1
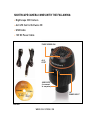
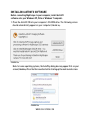
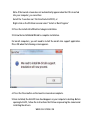
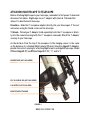
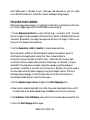
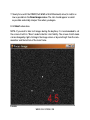
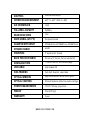
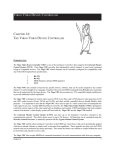
NIGHTSCAPE
CCD Camera
Model #95555
Congratulations on your purchase of Celestron’s Nightscape CCD imaging
camera. Nightscape combines the simplicity of a one-shot-color imaging
camera with the sophisticated features and software of more expensive astronomical imaging systems. This setup guide will help you install and use your
camera as well as the AstroFX control software.
Once AstroFX is installed, review the included Help file for complete
information for using all settings needed to control the camera and process
your images.
www.celestron.com
Nightscape camera comes with the following:
+ Nightscape CCD Camera
+ AstroFX Control Software CD
+ USB Cable
+ 12V DC Power Cable
three speed fan
aux
Port
usb ports
(to connect
to computer)
12 V
power input
Figure 1
www.celestron.com
Recommended Minimum System requirements:
+ Processor – Pentium™ or equivalent, or higher
+ Windows XP™, Windows Vista™, or Windows 7™ (or higher),
32-bit or 64-bit
+ 1 GB RAM
+ Disk Space – 20 MB for program installation
+ Video Display – minimum 1024x768, 16-bit color or higher
www.celestron.com
Installing AstroFX Software
Before connecting Nightscape to your computer, install AstroFX
software onto your Windows XP, Vista or Windows 7 computer.
1. Place the AstroFX CD into your computer’s CD-ROM drive. The following screen should automatically appear on your computer (Figure 2a).
Figure 2a
Note: for some operating systems, the AutoPlay dialog box may appear first on your
screen (Figure 2b). Press the Run Launcher button to bring up the main launch screen.
Figure 2b
www.celestron.com
Note: If the launch screen does not automatically appear when the CD is inserted
into your computer, you can either:
Select the “Launcher.exe” file from the AstroFX CD, or
Right-click on the CD-Rom icon and select “Install or Run Program”
2. Press the Install AstroFX button to begin installation.
3. Follow the InstallShield Wizard to complete installation.
For 64-bit computers, you will need to install the 64-bit skin support application.
Press OK when the following screen appears.
Figure 3
4. Press the Close button on the launch screen when complete.
5.Once installed, the AstroFX icon should appear on your computer’s desktop. Before
opening AstroFX, follow the instructions that follow on powering the camera and
installing the drivers.
www.celestron.com
Powering Nightscape
Before attaching Nightscape to your telescope, power the camera on to make sure it
is working properly.
1. Attach the smaller end of the USB cable to the camera port
labeled “PC”.
2. Attach the larger end of the USB cable to your computer’s USB port.
3. Plug the barrel connector end of the 12V DC power cable into the camera port
labeled “12V DC”.
4. Plug the cigarette lighter adapter end of the 12V DC power cable into the 12V
outlet in your car, PowerTank or other 12V power supply. Alternatively you can use
the optional 110V AC to 12V DC adapter (model #18778).
5. Nightscape should automatically power on. You should hear
(and feel) the fan operating.
installing the Drivers
Once Nightscape is connected, the computer should automatically connect to the Internet and install necessary drivers. If you do not have an Internet connection, follow
the installation wizard and allow the computer to browse you computer’s CD-ROM
drive for the “Nightscape Drivers” folder located on the CD-ROM.
Installing ASCOM Drivers
If you wish to install ASCOM drivers from the CD, you must first install AstroFX as
described above and also the ASCOM Platform 6 from the following web site: http://
ascom-standards.org/. Once installed press the “ASCOM Driver” button to install
driver. See Fig 2a.
www.celestron.com
Attaching Nightscape to Telescope
Before attaching Nightscape to your telescope, remember to first power it down and
disconnect all cables. Nightscape has a 2” adapter with internal T-threads that
allows it to be attached in two ways:
Drawtube – Slide the 2” nosepiece adapter directly into your telescope’s 2” focuser
and secure using the thumb screws on the telescope.
T-thread – Thread your T-Adapter (sold separately) onto the 2” nosepiece or directly into the camera housing (with the 2” nosepiece removed). Attach the T-Adapter
securely to your telescope.
As the distance from the top of the nosepiece to the imaging sensor is the same
as the distance of a standard DSLR camera (55 mm), Celestron EdgeHD T-Adapters
provide the correct spacing for attaching Nightscape to an EdgeHD telescope. Model
#93644 (EdgeHD 8”) and #93646 (EdgeHD 9.25”, 11” and 14”).
Guidescope (not Included)
CPC DLX Edge HD (not Included)
T-adapter (not Included)
nightscape attached
Figure 4
www.celestron.com
Once Nightscape is attached to your telescope and powered on, you are ready
to use AstroFX software to control the camera and begin taking images.
Focusing your camera
Before you begin taking images, it is important to take time to carefully focus the camera. To focus Nightscape from AstroFX’s SNAP screen (see Fig 6):
1. Set the Exposure duration to a short interval (e.g., 1 second to start). You want
the star to appear bright enough to effectively focus, but not so bright that pixels are
saturated. Remember, the longer the exposure duration, the longer it takes to see
the result of a change in focal position.
2. Set the Resolution to Half or Quarter to reduce download time.
Note: Resolution of Half (or 2x2 binning) will combine two adjacent pixels to
effectively increasing the pixel size by four times. Likewise Quarter
resolution increases the pixel size by 16 times. While this will increase light
sensitivity it will also reduce the resolution of the image. So “binning” is a good
method for focusing, because image acquisition speeds up greatly and gives
you greater sensitivity to see faint out-of-focus stars. Binning can also be used to
increase light sensitivity when imaging at long focal lengths such as f/10. Go to
the Nightscape web page on the Celestron web site for more information on
focal length and binning for Celestron telescopes.
3. Set the Exposure type to Focus and press the Start Imaging button.
4. Now center a moderately bright star in the frame and slowly adjust focus until it
is visibly sharp in the downloaded image. Hit Abort once the star is centered.
5. Set Subframe to Set with Mouse and use the cursor to draw a box around the star.
6. Press the Start Imaging button again.
www.celestron.com
7. Slowly focus until the FWHM (Full-Width at Half-Maximum) value (in red) is as
low as possible in the Focus Image window. The star should appear as small
as possible and visibly sharper than when you began.
8. Hit Abort when done.
NOTE: If you wish to take test images during the daytime, it is recommended to set
the screen stretch to “Moon” mode for better color fidelity. The screen stretch mode
can be changed by right-clicking in the image screen or by selecting it from the command bar and the bottom of the main frame.
Figure 5
www.celestron.com
12
2
1
7
8
9
10
11
3
4
5
6
Figure 6
13
Snap Screen
1. Exposure Type – Allows you to choose the type of image to be taken. Choose from Focus, Calibration Frames (Bias, Dark, and Flat) or Astro Image.
2. Exposure duration (sec) - set the desired length of the exposure(s) from .001 seconds to 24hr (86400 sec).
3. Number of exposures – Set the desired amount of exposure(s)from 1-9999.
Combining multiple exposures will greatly increase the image detail needed to
create pleasing images.
4. Object name – Assigns the target’s name (e.g., M42) to the image file.
www.celestron.com
5. Root Image Folder – Displays where the downloaded files are automatically saved. The location can be changed by clicking the navigation button at right.
6. Start Imaging – Begins the imaging sequence and can be halted at any time
using the blue Abort button at the bottom right of the control window.
7. Resolution – Sets the resolution for images being taken.
Resolution can be set to Full (1x1), Half (2x2) or Quarter (4x4).
8. Subframe – Allows you to select the portion of the imaging sensor that will be downloaded and displayed. Choose from Full Frame, Central Half, Central Quarter or Select with Mouse.
9. Camera Settings – Allows you to set the fan speed to high, medium or low for quick cooling of the sensor and to maintain temperature setpoint while imaging.
10. Cooler – Turns the thermoelectric cooler on and off.
11. Setpoint – Lets you choose a specific temperature you wish to cool the
imaging sensor.
12. Temp. – Displays the sensor’s actual current temperature in Celsius.
13. Status Window – Once the Start Imaging button is pressed, the status window will display the status of the current image.
www.celestron.com
Setting Temperature Setpoint
The Nightscape camera can be cooled to approximately 20°C below the ambient temperature. For best results set the temperature setpoint to 20°C below ambient. For
example, if the outside temperature is 15°C (60°F) then the ideal sensor temperature
setting should be approximately -5°C (a difference of 20°C).
If after a few minutes, the setpoint stabilizes at the desired temperature (as shown in
the Temp. field), you can continue to drop the setpoint down in 1°C increments until it
can no longer stabilize. Then go back and increase the setpoint by 0.5°C. This should
represent the lowest temperature that the sensor can reach for the given outside air
temperature. Note: If after several (5-10) minutes, the setpoint can not be reached, it
will automatically reset to the lowest temp that can reached. A pop-up box will
appear indicating the temperature.
Technical Specifications
Imaging Sensor
Kodak KAI-10100 Color Sensor
Number of Active Pixels
10.7 MP (3760 (H) x 2840 (V))
Imaging Sensor Size
17.9 mm x 13.5 mm (22.5 mm diagonal)
Pixel Size
4.75µm square
Exposure Range
.001 sec to 24 hrs (2x2, 4x4 binning)
.01 sec to 24 hrs (1x1 binning)
Thermoelectric Cooling
Yes (regulated TEC with fans)
Software Compatibility
AstroFX, MaxImDL (with ASCOM drivers
included on AstroFX CD)
Cooling Range
20C° below ambient
www.celestron.com
Shutter :
Internal Mechanical
Operating Environment
40C° to -40C° (104F to -40F)
A/D Conversion
16 bit
Full Well Capacity
25,000 e-
Read Noise (RMS)
16 e-
Dark Signal (at 0° C)
2e-/pixel/second
Quantum Efficiency
32%@630 nm; 42%@550 nm; 40%@470 nm
Dynamic Range
64 dB
Mounting
2" barrel and t-thread
Back Focus Distance
55 mm w/ 2" barrel; 26 mm w/o barrel
Download Time
11 sec or less for full-frame image
USB Cable
High-Speed 2.0
Sub-Framing
Full, Half, Quarter, selectable
Optical Window
High transmission Schott B270 glass
Optical Coatings
IR cutoff and anti-reflection multi-coatings
Power Requirements
12V DC 1.5Amp, tip positive
Weight
2 lbs (0.91 kg)
Warranty
2 year
www.celestron.com
Aux port
Nightscape is provided with a 6-pin AUX port – available to support expandability for
future development. Pin assignments for the port are as follows, (left-to-right):
1 - N/C 2 - GND
3 - IN1 4 - IN2
5 - OUT1
6 - OUT2
www.celestron.com
www.celestron.com
Model #95555
2835 Columbia Street • Torrance, CA 90503 U.S.A.
Telephone: 310.328.9560 • Fax: 310.212.5835
©2012Celestron | All rights reserved.
(Products or instructions may change without notice or obligation.)
This equipment has been tested and found to comply with the limits for a Class B digital device, pursuant to part
15 of the FCC Rules. These limits are designed to provide reasonable protection against harmful interference in a
residential installation. This equipment generates, uses and can radiate radio frequency energy and, if not installed
and used in accordance with the instructions, may cause harmful interference to radio communications. However,
there is no guarantee that interference will not occur in a particular installation. If this equipment does cause
harmful interference to radio or television reception, which can be determined by turning the equipment off and on,
the user is encouraged to try to correct the interference by one or more of the following measures:
—Reorient or relocate the receiving antenna.
—Increase the separation between the equipment and receiver.
—Connect the equipment into an outlet on a circuit different from that to which the receiver is connected.
—Consult the dealer or an experienced radio/TV technician for help.
95555-INST