1
Dialogic® Diva® System Release 8.5WIN
Reference Guide
February 2008
206-339-23
www.dialogic.com
COPYRIGHT NOTICE AND LEGAL DISCLAIMER
COPYRIGHT NOTICE AND LEGAL DISCLAIMER
Copyright © 2000-2008 Dialogic Corporation. All Rights Reserved. You may not reproduce this document in whole or in part
without permission in writing from Dialogic Corporation at the address provided below.
All contents of this document are furnished for informational use only and are subject to change without notice and do not
represent a commitment on the part of Dialogic Corporation or its subsidiaries ("Dialogic"). Reasonable effort is made to ensure
the accuracy of the information contained in the document. However, Dialogic does not warrant the accuracy of this information
and cannot accept responsibility for errors, inaccuracies or omissions that may be contained in this document.
INFORMATION IN THIS DOCUMENT IS PROVIDED IN CONNECTION WITH DIALOGIC® PRODUCTS. NO LICENSE, EXPRESS OR
IMPLIED, BY ESTOPPEL OR OTHERWISE, TO ANY INTELLECTUAL PROPERTY RIGHTS IS GRANTED BY THIS DOCUMENT. EXCEPT
AS PROVIDED IN A SIGNED AGREEMENT BETWEEN YOU AND DIALOGIC, DIALOGIC ASSUMES NO LIABILITY WHATSOEVER,
AND DIALOGIC DISCLAIMS ANY EXPRESS OR IMPLIED WARRANTY, RELATING TO SALE AND/OR USE OF DIALOGIC PRODUCTS
INCLUDING LIABILITY OR WARRANTIES RELATING TO FITNESS FOR A PARTICULAR PURPOSE, MERCHANTABILITY, OR
INFRINGEMENT OF ANY INTELLECTUAL PROPERTY RIGHT OF A THIRD PARTY.
Dialogic products are not intended for use in medical, life saving, life sustaining, critical control or safety systems, or in nuclear
facility applications.
It is possible that the use or implementation of any one of the concepts, applications, or ideas described in this document, in
marketing collateral produced by or on web pages maintained by Dialogic may infringe one or more patents or other intellectual
property rights owned by third parties. Dialogic does not provide any intellectual property licenses with the sale of Dialogic
products other than a license to use such product in accordance with intellectual property owned or validly licensed by Dialogic
and no such licenses are provided except pursuant to a signed agreement with Dialogic. More detailed information about such
intellectual property is available from Dialogic's legal department at 9800 Cavendish Blvd., 5th Floor, Montreal, Quebec, Canada
H4M 2V9. Dialogic encourages all users of its products to procure all necessary intellectual property licenses
required to implement any concepts or applications and does not condone or encourage any intellectual property
infringement and disclaims any responsibility related thereto. These intellectual property licenses may differ
from country to country and it is the responsibility of those who develop the concepts or applications to be aware
of and comply with different national license requirements.
Dialogic, Dialogic Pro, Brooktrout, Cantata, SnowShore, Eicon, Eicon Networks, Eiconcard, Diva, SIPcontrol, Diva ISDN, TruFax,
Realblocs, Realcomm 100, NetAccess, Instant ISDN, TRXStream, Exnet Exnet Connect, EXS, ExchangePlus VSE, Switchkit,
N20, Powering The Service-Ready Network, Vantage, Connecting People to Information, Connecting to Growth, Making
Innovation Thrive, and Shiva, among others as well as related logos, are either registered trademarks or trademarks of Dialogic.
Dialogic's trademarks may be used publicly only with permission from Dialogic. Such permission may only be granted by
Dialogic's legal department at 9800 Cavendish Blvd., 5th Floor, Montreal, Quebec, Canada H4M 2V9. Any authorized use of
Dialogic's trademarks will be subject to full respect of the trademark guidelines published by Dialogic from time to time and
any use of Dialogic's trademarks requires proper acknowledgement.
Microsoft, Windows, Windows Server, and Windows Vista are registered trademarks of Microsoft Corporation in the United
States and/or other countries. Other names of actual companies and products mentioned herein are the trademarks of their
respective owners.
This Agreement does not grant you the right to practice the AMR-NB Standard. To seek a patent license agreement to practice
the standard, please contact VoiceAge Corporation at [email protected].
page 2
Dialogic Corporation License Agreement For Use of Software
Dialogic Corporation License Agreement For Use of Software
This is an Agreement between you, the Company, and your Affiliates (referred to in some instances as "You" and in other
instances as "Company") and all Your Authorized Users and Dialogic Corporation ("Dialogic").
YOU SHOULD CAREFULLY READ THE SOFTWARE LICENSE AGREEMENT ("AGREEMENT") ON THIS SEALED PACKAGE BEFORE
OPENING THE PACKAGE. BY OPENING THE PACKAGE, YOU ACCEPT THE TERMS AND CONDITIONS OF THIS AGREEMENT. IF
YOU DO NOT AGREE WITH OR ARE UNWILLING TO ACCEPT THESE
TERMS AND CONDITIONS, YOU MAY RETURN THE PACKAGE IN UNOPENED "AS NEW" CONDITION (INCLUDING ALL
DOCUMENTATION AND BINDERS OR OTHER CONTAINERS) FOR A FULL REFUND. BY DOWNLOADING, INSTALLING, COPYING
OR OTHERWISE USING THE ENCLOSED SOFTWARE ("PROGRAM"), YOU FURTHER AGREE AND ACKNOWLEDGE THAT YOU
HAVE READ THIS AGREEMENT AND UNDERSTAND IT, AND THAT BY TAKING ANY ONE OR MORE OF SUCH STEPS/ACTIONS
YOU AGREE TO BE BOUND BY SUCH TERMS AND CONDITIONS. DIALOGIC IS UNWILLING TO LICENSE THE SOFTWARE TO
YOU IF YOU DO NOT ACCEPT AND AGREE TO BE BOUND BY THE TERMS AND CONDITIONS OF THIS AGREEMENT.
Intellectual Property
The enclosed Software ("Program") and all accompanying documentation are individually and collectively owned by Dialogic
Corporation ("Dialogic"), its subsidiaries and/or its suppliers and are protected by all applicable intellectual property laws and
international treaty provisions. Therefore, You and Your Authorized Users must treat the Program and documentation like any
other material so protected, except as expressly permitted in this Agreement. In particular, but without limitation, You
acknowledge that the Program and its accompanying documentation constitute valuable intellectual property rights, including
without limitation trade secrets and copyrights, and confidential information of Dialogic. The Program and all programs
developed thereunder and all copies thereof (including without limitation translations, compilations, partial copies with
modifications and updated works) are proprietary to Dialogic and title to all applicable copyrights, trade secrets, patents and
other intellectual property rights therein remains in Dialogic, its subsidiaries, and/or its suppliers. Except as expressly permitted
in this Agreement, You shall not sell, transfer, publish, disclose, display or otherwise make available the Program or copies
thereof to others. You agree to secure and protect the Program, its accompanying documentation and copies thereof in a
manner consistent with the maintenance of Dialogic's rights therein and to take appropriate action by instruction or agreement
with Your employees and/or consultants who are permitted access to the Program to satisfy Your obligations hereunder.
Violation of any provision of this paragraph shall be the basis for immediate termination of this Agreement. Because
unauthorized use or transfer of the Software or documentation may diminish substantially the value of such materials and
irrevocably harm Dialogic, if You breach the provisions of this Section of this Agreement, Dialogic shall be entitled to injunctive
and/or other equitable relief, in addition to other remedies afforded by law, to prevent a breach of this Section of this Agreement.
Grant of License
Subject to the terms and conditions of this Agreement Dialogic grants to You a non-exclusive, personal, non-transferable
license to use the Program in object code form only and solely in accordance with the following terms and conditions:
•
You may make, install and use only one (1) copy of the Program on a single-user computer, file server, or on a workstation
of a local area network, and only in conjunction with a legally acquired Dialogic® hardware or software product You may
also make one copy solely for backup or archive purposes;
•
The primary Authorized User on the computer on which the Program is installed may make a second copy for his/her
exclusive use on either a home or portable computer;
•
You may copy the Program into any machine readable or printed form for backup or modification purposes in support of
Your use of one copy of the Program;
•
You may distribute the Program in object code only and only as part of, or integrated by You into, a computer system that
(i) contains a Dialogic hardware product, (ii) includes a substantial amount of other software and/or hardware manufactured
or marketed by You and (iii) is marketed and sublicensed to an end user for the end user's own internal use in the regular
course of business (a "Licensed System");
•
Each end user to whom a Licensed System is distributed must agree to license terms with respect to the Program that are
at least as protective of Dialogic's rights in the Program as those set forth in this Agreement;
•
You shall receive one (1) Program master disk, and shall be solely responsible for copying the Program into the Licensed
Systems and for warranting the physical media on which it is copied
•
You may make one (1) copy of the documentation accompanying the Program, provided that all copyright notices contained
within the documentation are retained;
•
You may modify the Program and/or merge it into another Program for Your use in one computer; (any portion of this
Program will continue to be subject to the terms and conditions of this Agreement);
•
You may transfer the Program, documentation and the license to another eligible party within Your Company if the other
party agrees to accept the terms and conditions of this Agreement. If You transfer the Program and documentation, You
must at the same time either transfer all copies whether in printed or machine readable form to the same party or destroy
any copies not transferred; this includes all modifications and portions of the Program contained in or merged into other
Programs;
page 3
Dialogic Corporation License Agreement For Use of Software
•
You shall not remove, and each copy of the Program shall contain, the same copyright, proprietary, patent and/or other
applicable intellectual property or other ownership notices, plus any restricted rights legends that appear in the Program
and/or this Agreement and, if You copy the Program onto media to which a label may be attached, You shall attach a label
to the media that includes all such notices and legends that appear on the Program master disk and envelope;
•
You may not rent or lease the Program. You may not reverse engineer, decompile or disassemble the Program. Except as
is strictly necessary for You to integrate the Program with other software and/or hardware to produce the Licensed Systems,
You shall not copy, modify or reproduce the Program or documentation in any way. You shall use Your best efforts to ensure
that any user of the Program does not reverse engineer, decompile or disassemble the Program to derive a source code
equivalent of the Program;
•
If You transfer possession of any copy, modification or merged portion of the Program or documentation to another party
in any way other than as expressly permitted in this Agreement, this license is immediately and automatically terminated;
•
The Program may be used only in conjunction with Dialogic hardware;
•
The Program shall not be exported or re-exported in violation of any export provisions of the United States or any other
applicable jurisdiction.
Upgrades
If the Program is provided as an upgrade and the upgrade is an upgrade from another product licensed to You and Your
Authorized Users by Dialogic, the upgrade is governed by the license agreement earlier provided with that software product
package and the present Agreement does not grant You additional license(s). If You and Your Authorized Users choose to
upgrade this Program or the product used together with the Program and such upgrade requires the license of additional
software (whether a charge is associated with such software or not), the license agreement associated with such additional
software shall govern the license of such additional software to the exclusion of this Agreement.
Term
The Agreement is effective until terminated. You may terminate it at any time by notifying Dialogic and/or by destroying the
Program and all accompanying documentation together with all copies, modifications and merged portions in any form. The
Agreement will also terminate automatically upon the occurrence or lack of occurrence of certain terms and/or conditions set
forth in this Agreement, or if You fail to comply with any term or condition of this Agreement. You agree that upon any such
termination You shall destroy or return to Dialogic the Program and all accompanying documentation supplied by Dialogic,
together with any and all copies, modifications and merged portions in any form. All provisions of this Agreement relating to
disclaimers of warranties, limitation of liability, remedies, or damages, and licensor's proprietary rights shall survive
termination.
Limited Warranty
Dialogic solely warrants the media on which the Program is furnished to You to be free from defects in materials and
workmanship under normal use for a period of ninety (90) days from the date of purchase by You as evidenced by a copy of
Your receipt. If such a defect appears within the warranty period, You may return the defective media to Dialogic for replacement
without charge provided Dialogic, in good faith, determines that it was defective in materials or workmanship. Replacement
is Your sole remedy with respect to such a defect. Dialogic offers no warranty for Your reproduction of the Program. This
Limited Warranty is void if failure of the Program has resulted from accident, misuse, abuse or misapplication.
Disclaimers, Limitations of Liability and Customer Remedies
Except as set forth in the "Limited Warranty" Section of this Agreement, the Program and accompanying documentation are
provided to You "as is." Neither Dialogic, its subsidiaries, its suppliers, nor its licensor(s) (if any) warrants that the Program
will meet Your requirements or that its use will be uninterrupted or error-free. Except as set forth in the "Limited Warranty"
Section, EACH OF DIALOGIC, ITS SUBSIDIARIES, ITS SUPPLIERS AND ITS LICENSOR(S) (IF ANY) DISCLAIMS ANY AND ALL
REPRESENTATIONS AND WARRANTIES, EXPRESS OR IMPLIED, WITH RESPECT TO THE PROGRAM AND ACCOMPANYING
DOCUMENTATION, INCLUDING BUT NOT LIMITED TO THE IMPLIED WARRANTIES OF NON-INFRINGEMENT, MERCHANTABILITY,
FITNESS FOR A PARTICULAR PURPOSE, OR AGAINST LATENT DEFECTS. Except as set forth in the "Limited Warranty" Section,
neither Dialogic, its subsidiaries, its suppliers, nor its licensor(s) (if any) shall have any liability to You or any third party for
any claim, loss or damage of any kind, including but not limited to lost business profits, business interruption, loss of
information, or other pecuniary loss and indirect, punitive, incidental, economic, consequential or special damages, arising
out of or in connection with this Agreement and/or the use, inability to use the Program and/or the Program's performance
or inability to perform nor from or in connection with the Program's accompanying documentation, or any data or equipment
related thereto or used in connection therewith. In no event shall Dialogic's, its subsidiaries', its suppliers' or its licensor(s)'s
liability for damages, whether arising out of contract, negligence, warranty, or patent or copyright infringement, exceed the
fees You paid for the Program. No representation or warranty regarding the Program may be made without Dialogic's, its
subsidiaries', its suppliers', or its licensor(s)'s (if any) prior written consent, and any warranty or representation made by You
or Your customers regarding the Program shall not constitute an obligation of Dialogic, its subsidiaries, its suppliers, or other
licensor(s) (if any). This limited warranty gives You specific legal rights. You may have other rights, which may vary from
jurisdiction to jurisdiction. Also, as some jurisdictions do not allow the exclusion or limitation for certain damages, some of
the above limitations may not apply to You.
page 4
Dialogic Corporation License Agreement For Use of Software
Right to Audit
If this Program is licensed for use in a Company, Your Company and You individually and collectively agree to keep all usual
and proper records and books of accounts and all usual proper entries relating to each installation of the Program during the
term of this Agreement and for a period of three (3) years thereafter. During this period, Dialogic may cause an audit to be
made of the applicable records in order to verify Your compliance with this Agreement and prompt adjustment shall be made
to compensate for any errors or omissions disclosed by such audit. Any such audit shall be conducted by an independent
certified public accountant selected by Dialogic and shall be conducted during the regular business hours at Your offices and
in such a manner as not to interfere with Your normal business activities. Any such audit shall be paid for by Dialogic unless
material discrepancies are disclosed. For such purposes, "material discrepancies" shall mean three percent (3%) or more of
the Authorized Users within the Company. If material discrepancies are disclosed,
Your Company agrees to pay Dialogic for the costs associated with the audit as well as the license fees for the additional
licensed channels or additional authorized users. In no event shall audits be made more frequently than semi-annually unless
the immediately preceding audit disclosed a material discrepancy.
Supplementary Software
Any Supplementary Software provided with the Program and/or referred to in this Agreement is provided "as is" with no
warranty of any kind.
Miscellaneous
You acknowledge that You have read this Agreement, that You understand it, and that You agree to be bound by its terms
and conditions, and You further agree that this is the complete and exclusive statement of the Agreement between the Dialogic
and You ("the Parties"), which supersedes and merges all prior proposals, understandings and all other agreements, oral and
written, between the Parties relating to the Program. You agree to indemnify and hold harmless Dialogic and its subsidiaries,
affiliates, suppliers, officers, directors and employees from and against any claim, injury, loss or expense, including reasonable
attorneys' fees, arising out of (i) Your failure to comply with the provisions of this Agreement, or (ii) any other wrongful conduct
by or on behalf of You. This Agreement applies to all updates, future releases, modifications and portions of the Program
contained in or merged into other programs. This Agreement may not be modified or altered except by written instrument
duly executed by Dialogic. No action, regardless of form, arising out of this Agreement or the use of the Program may be
brought by You more than two (2) years after the cause of action has first arisen. Except as provided herein, neither this
Agreement nor any rights granted are assignable or transferable, and any assignment or transfer will be null and void. If You
authorize any other person to copy the Program, You shall obligate that person in writing to comply with all conditions of this
Agreement. Dialogic shall have the right to collect from You its reasonable expenses incurred in enforcing this agreement,
including attorney's fees. The waiver or failure of Dialogic to exercise in any respect any right provided for herein shall not be
deemed a waiver of any further right hereunder. All rights and remedies, whether conferred hereunder or by any other
instrument or law, will be cumulative and may be exercised singularly or concurrently. Failure by either Dialogic or You to
enforce any term or condition of the Agreement will not be deemed a waiver of future enforcement of that or any other term
or conditions. The terms and conditions stated herein are declared to be severable. Should any term(s) or condition(s) of this
Agreement be held to be invalid or unenforceable the validity, construction and enforceability of the remaining terms and
conditions of this Agreement shall not be affected. It is expressly agreed that Dialogic and You are acting as independent
contractors under this Agreement. These terms and conditions will prevail notwithstanding any different, conflicting or
additional terms and conditions that may appear on any other agreement between Dialogic and You. Deviations from these
terms and conditions are not valid unless agreed to in writing in advance by an authorized representative of Dialogic. Any
notices sent to Dialogic under this Agreement must be sent by registered mail or courier to the attention of Dialogic's legal
department at the address below or such other address as may be listed on www.dialogic.com from time to time as being
Dialogic's Montreal headquarters.
U.S. Government Restricted Rights
The Program and all accompanying documentation are provided with RESTRICTED RIGHTS. Use, duplication or disclosure by
the U.S. Government is subject to restrictions as set forth in subparagraph (c)(1)(iii) of The Rights in Technical Data and
Computer Software clause at DFARS 252.227-7013 or subparagraph (c) (1) and (2) of the Commercial Computer
Software-Restricted Rights at 48 CFR52.227-19, both as applicable.
Governing Law
Any and all claims arising under this Agreement shall be construed and controlled by the laws in force in the Province of
Quebec, Canada, excluding its principles of conflict of laws and the United Nations Convention on Contracts for the Sale of
Goods. Dialogic is not obligated under any other agreements unless they are in writing and signed by an authorized
representative of Dialogic.
page 5
Dialogic Corporation License Agreement For Use of Software
Contractor/ manufacturer is:
Dialogic CORPORATION.
9800 Cavendish Blvd., Montreal, Quebec, Canada H4M 2V9
This Agreement has been drafted in English at the express wish of the parties. Ce contrat a été rédigé en anglais à la demande
expresse des parties.
page 6
Contents
COPYRIGHT NOTICE AND LEGAL DISCLAIMER ........................................... 2
Dialogic Corporation License Agreement For Use of Software .................... 3
About This Publication ............................................................................... 9
How to use this online guide ............................................................................................... 9
Structure of this guide ....................................................................................................... 9
About the Dialogic® Diva® System Release 8.5WIN ................................ 10
Features .........................................................................................................................10
Supported Dialogic® Diva® Media Boards ...........................................................................15
Requirements for Dialogic® Diva® System Release Software installation .................................16
Information on installing downloaded software .....................................................................16
Software Installation ............................................................................... 17
License Activation .................................................................................... 23
Device Unique ID (DUID) ..................................................................................................23
Proof of Purchase Code (PPC) ............................................................................................23
To register your PPC and DUID ...........................................................................................24
To activate the license file .................................................................................................25
Software Configuration ............................................................................ 26
Configuration with installed hardware .................................................................................26
Creating configuration files ................................................................................................27
Dial-Up Networking and RAS Administration............................................ 29
RAS client setup ...............................................................................................................29
RAS server setup .............................................................................................................35
RAS status ......................................................................................................................37
SNMP Support For A Dialogic® Diva® Media Board .................................. 39
To activate SNMP support for a Dialogic® Diva® Media Board ................................................39
Supported MIBs, OIDs, and traps .......................................................................................43
Uninstalling.............................................................................................. 46
Dialogic® Diva® Media Board uninstallation with Uninstall ....................................................46
Dialogic® Diva® Media Boards uninstallation with Device Manager .........................................47
Maintenance Tools ................................................................................... 48
Dialogic® Diva® Line Test .................................................................................................48
Dialogic® Diva® Diagnostics .............................................................................................48
Management Tools ................................................................................... 49
Dialogic® Diva® Management ...........................................................................................49
page 7
Features................................................................................................... 50
Features of Dialogic® Diva® ISDN Media Boards ..................................................................51
Features of Dialogic® Diva® Analog Media Boards ...............................................................56
Customer Service ..................................................................................... 58
page 8
About This Publication
About This Publication
How to use this online guide
• To view a section, click the corresponding blue underlined phrase in the table below.
• To view a topic that contains further information, click the corresponding blue underlined phrases in this guide.
• You may wish to print out the pages required for installing the drivers.
Structure of this guide
This guide provides a detailed description of how to install and configure the Dialogic® Diva® System Release
Software, and how to troubleshoot your ISDN or channelized T1 connection should that become necessary.
This guide is structured as follows:
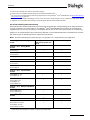
Section
Contents
About the Dialogic® Diva® System
Release 8.5WIN
Diva System Release features, supported hardware, and requirements for software
installation
Software Installation
Installation of the basic drivers, updating drivers or changing configuration using Diva®
Setup
License Activation
Registration of the PPC and DUID on the Dialogic® web site and activation of the license
in the Dialogic® Diva® Configuration Manager
Software Configuration
Start a configuration with installed hardware or performing a manual configuration
Dial-Up Networking and RAS
Administration
RAS client and RAS setup
SNMP Support For A Dialogic® Diva® Installation of the SNMP service and description of supported OIDs
Media Board
Uninstalling
Uninstallation of the Dialogic® Diva® Media Boards in the Device Manager or with
Dialogic® Diva® Uninstall
Management Tools
Tools available for monitoring active connections and getting statistic information on
all connections
Maintenance Tools
Debugging tools available for locating installation errors or connection problems
Features
Overview of the functions provided by the various interfaces
Customer Service
Information on how to get technical support for Dialogic® Diva® products
page 9
About the Dialogic® Diva® System Release 8.5WIN
CHAPTER 1
About the Dialogic® Diva® System Release 8.5WIN
The Dialogic® Diva® System Release Software enables you to use your Dialogic® Diva® Media Boards with
Windows® XP, Windows Server® 2003, Windows Vista®, or Windows Server® 2008. The Diva System Release
Software provides modem emulation, connectivity over ISDN or channelized T1 lines via the Remote Access
Service (RAS) of Windows®, a CAPI, and the Dialogic® Diva® API interface for ISDN-based applications, and a
TAPI interface for telephony-based applications. The Diva System Release Software also provides an SNMP agent
to support the Windows® implementation of the Simple Network Management Protocol (SNMP).
Features
The list below provides an overview of the features supported by the Dialogic® Diva® System Release Software.
For information on further supported features of Diva Media Boards, refer to Features at the end of this reference
guide.
Licensable features for all Dialogic® Diva® Media Boards, except the Dialogic® Diva® BRI-2FX Media
Board
Support for G.729 incl. Annex A and Annex B voice codec
Licensable features for Dialogic® Diva® V-2PRI and Dialogic® Diva® V-4PRI Media Boards
• Support for RTAudio voice codec with default bit rates: 24 kbps for 16 kHz and 8.8 kbps for 8 kHz
• Support for AMR-NB voice codec
• Support for G.729 incl. Annex A and Annex B voice codec
• Support for the following fax and modem features. These licensable features are divided into three groups:
1. TDM fax support, up to V.34 (33.600 bps and lower bit rates)
• Support for Fax G3, T.30, V.34 HDX, V.17, V.29, V.27ter, V.21, V.34
• Fax Compression MH, MR, MMR
• Error Correction Mode ECM
• Fax Polling
• Reversal Fax Direction
• Fax Password, Sub Addressing, 'new header line'
• Page Formats A4, B4, A3
• Resolutions fine, super fine, ultra fine
• Color Fax JPEG format
• T.38 FoIP (PSTN - IP Gateway mode)
2. TDM fax support, up to V.17 (14.400 bps and lower bit rates)
Note: At the most, half of the available channels can be licensed for these fax features.
• Support for Fax G3, T.30, V.17, V.29, V.27ter, V.21
• Fax Compression MH, MR, MMR
• Error Correction Mode ECM
• Fax Polling
• Reversal Fax Direction
• Fax Password, Sub Addressing, 'new header line'
• Page Formats A4, B4, A3
page 10
About the Dialogic® Diva® System Release 8.5WIN
• Resolutions fine, super fine, ultra fine
• Color Fax JPEG format
• T.38 FoIP (PSTN - IP Gateway mode)
3. Data modem support, up to V.90
• All modem modulations POS up to V.90 (client and server side)
• V.21, V.23, V.22, V.22bis, Bell 103, Bell 212A, V.32, V.32bis, V.34, V.90, including error correction MNP,
V.42, SDLC and compressions V.42bis, MNP 5
• POS modulations V.22 FC, V.22bis FC, V.29 FC
• Text telephone modem: V.18, V.21, Bell 103, V.23, EDT, Baudot 45, Baudot 47, Baudot 50, DTMF
• Extended modulations V.23 half duplex, V.23 on hook (SMSC mode), V.23 off hook, Bell 202 (POS), Telenot
Non-licensable features
General features
• Support for 64-bit version of all supported operating systems
Notes:
• The 64-bit version of the Diva System Release Software supports RAS, CAPI, TAPI (without Dialogic®
Wave driver), and SNMP service.
• The Dialogic® Diva® softIP software is only supported on 32-bit operating systems.
• Support for the ISDN basic rate interface (BRI), the ISDN primary rate interface (PRI), the channelized E1
interface, and the channelized T1 interface
• Support for fractional PRI, E1, and T1 lines
• Support for multiple PRI, E1, and T1 lines
• Support for analog lines
• Support for multiple CPU operating systems
• Automatic Diva Media Board detection
• Support for ISDN lines with a transfer rate of 64 kbps or 56 kbps (for example some regions in the USA)
• Support for channelized T1 lines with a transfer rate of 56 kbps (see Channelized T1 (robbed bit signaling)
on page 14)
• Support for unchannelized lines with a transfer rate of 64 kbps or 56 kbps
• Support for R2 signaling E1 lines with a transfer rate of 64 kbps
• Support for up to 240 B-channels for Dialogic® Diva® BRI, 4BRI, T1/PRI, and 2PRI Media Boards
• Support for up to 480 B-channels for Dialogic® Diva® 4PRI Media Boards (the total amount of channels that
can be used depends on the application)
• Modem connections up to 56 kbps (V.90)
• COM port (modem emulation)
• Support for CAPI-based applications through CAPI 2032.DLL and CAPI 20.DLL (32-bit and 16-bit versions)
for Windows®
• Support for ISDN-based applications through the Dialogic® Diva® API
• Support for TAPI-based applications through the Dialogic® Diva® Telephony Service Provider (TSP)
• Support for all known switch types (ISDN protocols)
• Support for Q.SIG protocol (see Q.SIG features on page 14)
• Additional security through support of RSA
• Interfaces: RAS WMP, modem emulation, CAPI, Dialogic® Diva® TSP
page 11
About the Dialogic® Diva® System Release 8.5WIN
• Compatible to V.22 Fast Connect terminals with V.22 Dialogic® Diva® Fast Setup via Port driver (not available
on Windows® 64-bit operating systems)
• M-Board:
• Middleware between Dialogic® Diva® Media Boards and interfaces (CAPI, COM port)
• Can group several Diva Media Boards and specific lines of any Dialogic® Diva® 4BRI Media Board and
abstract them as on board to the application (see "Combined Board" in the Dialogic® Diva® Configuration
Manager Online Help file (DSMain.chm)). Separate configuration of each individual line of any Dialogic®
Diva® 4BRI, V-2PRI, V-4PRI, and Analog Media Board
• Selectable call direction for each port of a Diva Analog or V-Analog Media Board.
• Dialogic® Diva® V-2PRI/E1/T1 and V-4PRI/E1/T1 Media Board: Creation of a trace message in the trace file
if maximum operation temperature is exceeded.
• Support for IP and TDM hybrid installations by using the Dialogic® Diva® softIP software (v2.1 or higher
enables fast data transfer using DMA (Direct Memory Access) procedures).
• Support for collecting phone number ranges or a specific number on incoming calls by the software.
• Support for a wide range of Windows® event logs. Driver and connection errors and informative messages
are listed in the MOM (Microsoft® Operation Manager). For a detailed description of the errors and messages
see the Dialogic® Diva® Configuration Manager Online Help file (DSMain.chm).
• Support for call deflection or call rerouting
• Support for redirecting number emulation (for incoming calls). In this case, the called party number is
delivered as redirecting number to the application.
• ECT Link Balance: To avoid confusion with call transfer and multiple incoming calls, each incoming call is
delivered to a separate TEI. This feature is only valid for Dialogic® Diva® BRI Media Boards and
Point-to-Multipoint interfaces.
• Call Rate Limiter: Limitation of the amount of outgoing calls per second. Some switches may require limitation
of calls in order to grant stability of the PSTN network.
RAS (Remote Access Service) features
• Connection to ISDN routers, enabling access to a remote LAN or the Internet
• Network access for PPP-compatible clients
• Connection to a Windows® server from digital, analog, and mobile networks with only one telephone number
• Automatic detection of ISDN service, synchronous/asynchronous framing, and B-channel protocol of incoming
calls
• Synchronous/asynchronous conversion
• Support for LAN protocols: TCP/IP, IPX/SPX, NetBIOS, NetBEUI, LAN Manager API
• Support for ISDN B-channel protocols: HDLC, X.75, V.120, V.110, PIAFS 1.0 and 2.1, modem V.34+ and V.90,
fax connections, V.42/LAPM (error correction), and V.42bis compression
• Encryption, data compression, number checking, shorthold mode, callback function
Modem emulation
• COM port for 16-bit Windows® applications
• TAPI-compliant pre-initialized Dialogic® Diva® modems:
• Diva Analog Modem
• Diva Fax Modem (Fax Class 1/ Fax Class 2)
• Diva V.120 Modem (64K)
• Diva V.120 Modem (56K)
• Diva V.110 Modem
• Diva X.75 Modem (64K)
page 12
About the Dialogic® Diva® System Release 8.5WIN
• Diva X.75 Modem (56K)
• Diva PPP-Modem (64K)
• Diva PPP-Modem (56K)
• Diva X.25 Modem
• Diva Generic Modem:
• Network access for PPP-compatible clients
• Automatic detection of ISDN service, synchronous/asynchronous framing and B-channel protocol
• Synchronous/asynchronous conversion
• Encryption, data compression, number checking, shorthold mode, callback function
CAPI features
Supplementary services
• Number identification services: MSN, DDI, SUB, CLIP, CLIR, COLP, COLR, KEY
• Call offering services: TP, CFU, CFB, CFNR
• Call completion services: CW, HOLD, ECT, CCBS, CCNR
• Charging services: AoC
• Three-party conference
• Others: User-to-user signaling
Fax and voice features
• Fax compression (MH, MR 2D coding, MMR T.6 coding) and error-correction mode (ECM)
• Fax connections up to 33,6 kbps
• Class 1 and class 2 fax interface
• Fax polling
• Extended fax
• Fax tone detection
• Reversal of fax direction
• Dynamic switching of B-channel protocols
• DTMF transmission, DTMF detection
• DTMF clamping
• Cross-board switching via interline connect (DSP-based monitor, bridge, and mixer for voice connections;
supports multiline conference calls)
• Page formats: ISO A4, ISO B4, ISO A3
• Standard, fine, super-fine, and ultra-fine resolution
• Echo cancellation - 128 ms
• Echo cancellation - 256 ms on Dialogic® Diva® V-2PRI and V-4PRI Media Boards
• Real time protocol (RTP)
• DSP-based secure RTP (sRTP)
• Dynamic anti-jitter buffering
• Comfort noise generation (CNG)
• Voice activity detection (VAD)
• Support for color fax via CAPI
• Support for JPEG format
page 13
About the Dialogic® Diva® System Release 8.5WIN
• Support for sending and receiving single or multi-page documents
• Support for fallback to gray scale if remote side does not support color fax
• Support for GSM-FR for Dialogic® Diva V-2PRI and V-4PRI Media Boards
• Support for DSP-based iLBC voice codec for Diva V-2PRI and V-4PRI Media Boards
Note: For the GIPS iLBC public license, refer to the gips_iLBClicense.pdf stored in the Diva program directory.
Diva TSP features
• Supplementary services based on CAPI: CLIP, CLIR, COLP, COLR, HOLD, CFU, CFB, CFNR, ECT, AoC, CCBS,
CCNR
• Media mode (unknown, interactive voice, automated voice)
• Wave audio format (8-bit 8 kHZ a-law, 8-bit 8 kHz μ-law, 8-bit 8 kHz PCM)
• DTMF tone generation and detection based on CAPI
Q.SIG features
• Support for generic Q.SIG according to ECMA and ISO (for more information see Supplementary services)
• Tests have been conducted for the various switch types (for a complete list of all supported types see
Supplementary services)
Channelized T1 (robbed bit signaling)
• Trunk modes (loop, ground, and wink start)
• Tone dialing (DTMF and MF)
• Pulse dialing
• Ringer and busy tone detection
• 56 kbps transfer rate
• Call transfer
page 14
About the Dialogic® Diva® System Release 8.5WIN
Supported Dialogic® Diva® Media Boards
The Dialogic® Diva® System Release Software supports the following Dialogic® Diva® Media Boards (max. eight
Diva Analog, BRI, 4BRI, PRI, V-2PRI or four Diva V-4PRI Media Boards in one computer):
Dialogic® Diva® BRI Media Boards
• Diva BRI-2FX
• Diva V-BRI-2
• Diva BRI-CTI
• Diva V-4BRI-8
• Diva BRI-2
• Diva 4BRI-8
Dialogic® Diva® PRI Media Boards
Diva PRI 3.0:
Diva V-PRI:
• Diva PRI/E1/T1-CTI
• Diva V-PRI/T1-24
• Diva PRI/E1/T1-8
• Diva V-PRI/E1-30
• Diva PRI/T1-24
• Diva PRI/E1-30
Diva PRI PCIe
Diva V-PRI PCIe
• Diva PRI/E1/T1-CTI PCIe
• Diva V-PRI/T1-24 PCIe
• Diva PRI/T1-24 PCIe
• Diva V-PRI/E1-30 PCIe
• Diva PRI/E1-30 PCIe
Dialogic® Diva® multiport PRI Media Boards
• Diva V-2PRI/E1/T1
• Diva V-4PRI/E1/T1
Dialogic® Diva® Analog Media Boards
• Diva Analog-2
• Diva V-Analog-4
• Diva Analog-4
• Diva V-Analog-8
• Diva Analog-8
Dialogic® Diva® softIP board
• Diva softIP v2.2 board
page 15
About the Dialogic® Diva® System Release 8.5WIN
Requirements for Dialogic® Diva® System Release Software installation
For the installation of the Dialogic® Diva® System Release software, the following requirements have to be met:
• PC/AT-compatible computer (at least 500 MHz or higher processor with at least 500 MB RAM)
• Windows® XP, Windows Server® 2003, Windows Vista®, or Windows Server® 2008 operating system
• At least 15 MB free space on the drive on which the operating system is installed
• An installed Dialogic® Diva® Media Board
Dialogic® Diva® multiport PRI Media Boards
• At least 1.5 GHz or higher processor
• At least 512 MB RAM (if more than one board is installed the capacity needs to be at least 1 GB)
• Power supply with 450 W (6 A with 3.3 V per Diva multiport PRI Media Board)
Note: Depending on the computer, a stronger power supply may need to be used.
To install your Dialogic® Diva® Media Board in your computer, refer to the printed installation guide that came
with your Diva Media Board or that you downloaded from the Dialogic web site.
Information on installing downloaded software
If you downloaded the Dialogic® Diva® System Release Software from the Dialogic web site, please note the
following:
• Extract the files to your hard disk drive. Do not change the directory structure of the extracted files.
• This manual assumes that the installation files have been copied into the directory "C:\Temp\DIVA". If
necessary, change the drive letter or path according to your system configuration.
page 16
Software Installation
CHAPTER 2
Software Installation
You should not attempt to install the software for your Dialogic® Diva® Media Board at the same time as the
operating system.
Basic driver support for most Dialogic® Diva® Media Boards is provided by the Windows® operating systems.
These Diva boards are fully detected and a basic set of drivers is installed automatically. Diva boards without
basic driver support are detected as new hardware.
The installation procedure is the same for all Diva Media Boards. If the Diva Media Board is fully detected, you
can directly install the Dialogic® Diva® drivers as decribed in To install the Dialogic® Diva® System Release
Software: on page 18.
If the Diva board is detected as "New Hardware", first abort the Windows® installation and then install the Diva
drivers as described in To install the Dialogic® Diva® System Release Software: on page 18.
Note for the Dialogic® Diva® softIP software: The drivers of the Diva softIP software are installed together
with the drivers of the Dialogic® Diva® Media Boards. To use the Diva softIP software, you need to purchase a
license and activate it in the Dialogic® Diva® Configuration Manager. Only after having activated the license and
having activated the configuration, you can add the Dialogic® Diva® softIP software as virtual board to the boards
pane in the Diva Configuration Manager and configure it.
Windows® XP
• The following Dialogic® Diva® Media Boards are fully detected:
Diva
Diva
Diva
Diva
BRI-2FX
BRI-CTI
BRI-2
4BRI-8
• The following Diva Media Boards are detected as "New Hardware":
Diva PRI 3.0
Diva PRI PCIe
Diva Analog
Diva
Diva
Diva
Diva
Diva
Diva
V-BRI-2
V-4BRI-8
V-2PRI
V-4PRI
V-PRI PCIe
V-Analog
Windows Server® 2003
• The following Dialogic® Diva® Media Boards are fully detected:
Diva
Diva
Diva
Diva
BRI-2FX
BRI-CTI
BRI-2
4BRI-8
• The following Diva Media Boards are detected as "New Hardware":
Diva PRI 3.0
Diva PRI PCIe
Diva Analog
Diva
Diva
Diva
Diva
Diva
Diva
V-BRI-2
V-4BRI-8
V-2PRI
V-4PRI
V-PRI PCIe
V-Analog
page 17
Software Installation
Windows Vista®
• The following Dialogic® Diva® Media Boards are fully detected:
Diva
Diva
Diva
Diva
Diva
Diva
Diva
Diva
BRI-2FX
BRI-CTI
BRI-2
4BRI-8
PRI 3.0
PRI PCIe
Analog-4
Analog-8
Diva
Diva
Diva
Diva
V-BRI-2
V-4BRI-8
V-PRI PCIe
V-Analog
• The following Diva Media Boards are detected as "New Hardware":
Diva Analog-2
Diva V-2PRI
Diva V-4PRI
Windows Server® 2008
• The following Dialogic® Diva® Media Boards are fully detected:
Diva
Diva
Diva
Diva
Diva
Diva
Diva
BRI-2FX
BRI-CTI
BRI-2
4BRI-8
PRI 3.0
PRI PCIe
Analog
Diva
Diva
Diva
Diva
Diva
Diva
V-BRI-2
V-4BRI-8
V-PRI PCIe
V-Analog
V-2PRI
V-4PRI
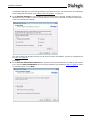
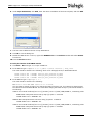
To install the Dialogic® Diva® System Release Software:
Note: If multiple Diva Media Boards are installed, the wizard will be visible only once for each update or
configuration of the software. The configured parameters correspond to all Diva Media Boards.
1. From the Windows® task bar, click Start > Run.
2. Type the path to the update file:
• Insert your Dialogic® Diva® System Release CD-ROM into the CD-ROM drive and enter the following path:
D:\DRIVER\i386\ENGLISH\SETUP.EXE
(where D: is your CD-ROM drive letter)
• Or enter the path to the update file on the hard disk, e.g.
C:\Temp\DIVA
(where C: is the hard disk drive letter)
3. In the welcome dialog box, click Next to start updating the drivers for all installed Diva boards.
4. If you installed a Dialogic® Diva® Media Board that is not supported with this software version, the
Unsupported Board box appears. Download the drivers for the unsupported boards and continue with the
installation of the supported boards. For supported Diva boards see Supported Dialogic® Diva® Media Boards
on page 15. This software version only supports the boards listed there.
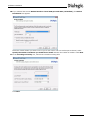
5. If you are updating the drivers from the Diva System Release CD-ROM, the License Agreement box appears.
Read the license agreement carefully. If you understand it and accept its terms, select I accept the above
license agreement and click Next. If you do not understand and/or accept its terms, click Cancel to exit
the process. You need to accept the license agreement to be able to update the drivers.
page 18
Software Installation
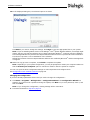
6. Select the switch type for your configuration in the Default Switch Type box, if you have a Dialogic® Diva®
ISDN Media Board installed or in the Default Analog Switch Type box, if you have a Dialogic® Diva®
Analog Media Board installed.
Note: If you are changing the configuration and you want to use the same switch type as you selected
during the update, select Use existing switch type configuration.
Click Next.
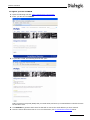
7. In the Installation Mode box, select if you want to install the board in default mode, customized mode, or
secure mode.
• If you select Default installation, the Remote Access Service and Dialogic® Diva® API/CAPI are installed.
Click Next and go to step 12 on page 22 to continue with the installation.
• If you select Customized installation, you can specify the services that are to be supported. Click Next
and go to step 9 on page 20 to continue with the installation.
• If you select Secure installation, you can set security settings for the various services and interfaces.
Additionally, you can set a password to prevent that unauthorized users change the settings. Click Next
and proceed with the following step.
Note: The services that you deactivate during the installation are not available in the Dialogic® Diva®
page 19
Software Installation
Configuration Manager. You have the opportunity to use these services if you activate them in the Dialogic®
Diva® Configuration Assistant. See Changing the configuration: on page 22.
8. In the Security Settings box, all possible services and interfaces are selected. Disable the services or
interfaces you do not want to use for security reasons. You can set a password to prevent unauthorized
users from changing the settings.
You need to deactivate at least one service. If all services need to be available, you have to configure them,
see step 9 on page 20.
Click Next.
9. In the Services and Interface Selection box, select the services and interfaces you need for your system.
If you selected Secure Installation, the services and interfaces you disabled in step 8 on page 20 cannot
be selected anymore. Click Next.
page 20
Software Installation
10. If you selected the service Modem based on virtual COM port and TAPI (Unimodem), the Modem
Installation box appears.
Select the virtual modem you want to use. If you do not want to use one modem per B-channel, select
Specify the number of modems you would like to install and enter the number of modems. Click Next.
11. In the Incoming Call Policy box, select how to handle incoming calls.
Click Next.
page 21
Software Installation
12. In the displayed dialog box, the selected options are listed.
Click Back if you need to change the settings. Click Next to copy the appropriate files to your system.
Note: If you are installing a Beta version of the Dialogic® Diva® System Release Software, a message might
appear, warning you that the software has not been tested with Windows®. Continue with the installation.
This message indicates only that the Diva System Release Software does not yet have Microsoft certification.
This does not prevent a correct installation of the software.
Official final releases of the Diva System Release Software are certified by Microsoft® and this message does
not appear.
13. When the copy process is complete, click Finish to complete the update.
Note: Depending on your system configuration, you may be prompted to restart your computer. Make sure
that the Restart your computer option is selected to restart it after the update is complete.
You can now open the Diva Configuration Manager to add components and configure them.
See Configuration with installed hardware on page 26.
Changing the configuration:
If you have already updated the drivers and you need to change the configuration:
1. Click Start > Programs > Dialogic Diva > Configuration Wizard. The Configuration Wizard box
appears. If you did not set a password during the update, click Next. If you set a password, enter it, and
then click Next.
Note: If you change the configuration, existing settings will be overwritten.
2. Proceed as described in step 6 on page 19.
page 22
License Activation
CHAPTER 3
License Activation
You need to generate a license if you have installed one of the following products and purchased a license for
one of the following functionalities. Free 30-day test licenses are available for the Dialogic® Diva® softIP software,
the Dialogic® Diva® SIPcontrol software, and the Dialogic® Diva® softSS7 software:
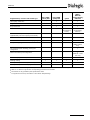
Product
®
Functionality
®
Dialogic Diva System
Release WIN
• Dialogic® Diva® softIP software
• Dialogic® Diva® SIPcontrol v2.2 software (See the Dialogic® Diva® SIPcontrol software
Reference Guide for information about activating the license.)
• Dialogic® Diva® softSS7 v1.5.2 software (See the Dialogic® Diva® softSS7 software Reference
Guide for information about activating the license.
All Dialogic® Diva®
Media Boards, except
the Dialogic® Diva®
BRI-2FX Media Board
G.729 speech compression
Dialogic® Diva® V-2PRI
or V-4PRI Media Board
• Data modem support up to V.90
• Microsoft® audio voice codec
• AMR-NB voice codec
• TDM fax support up to V.17
Note: If you have purchased a V.17 fax license, the number of simultaneous fax calls is limited
to half the number of channels the Dialogic® Diva® Media Board offers. The Diva V-4PRI/E1/T1
Media Board offers 120/96 channels but enables only 60/48 simultaneous fax calls. The Diva
V-2PRI/E1/T1 Media Board offers 60/48 channels but only 30/24 simultaneous fax calls.
Furthermore, the simultaneous fax calls per port are reduced to half the number of channels
the line offers, thus to 15 or 12 V.17 fax calls on one port.
• TDM fax support up to V.34
Note: V.34 fax is only available if you have purchased 60/48 fax channels for a Diva
V-2PRI/E1/T1 Media Board or 120/96 fax channels for a Diva V-4PRI/E1/T1 Media Board and
bound the licenses to the Diva Media Board.
To activate your license, you need the following information:
• Device Unique ID (DUID)
• Proof of Purchase Code (PPC)
As soon as you have both, the DUID and the PPC, visit the Dialogic® Diva® Activation site to register your PPC
together with the DUID and you will receive your license file. Activate this license file in the License Manager of
the Dialogic® Diva® Configuration Manager. For more information, see To activate the license file.
Device Unique ID (DUID)
The DUID binds the license to the installed Dialogic® Diva® Media Board.
To get the DUID:
1. Click Start > Programs > Dialogic Diva > Configuration Manager.
2. In the menu bar, click Tools > License Manager and click Available DUIDs on this system.
3. In the right pane of the dialog, select the Diva Media Board for which you want to activate a feature license
and click Copy DUID to the clipboard.
4. If you need to do web activation using another computer, open an editor, paste the DUID, and save the file.
Proof of Purchase Code (PPC)
When you purchase the license, you will receive a PPC either in printed form or via email. By registering this
PPC, you represent and warrant that you lawfully purchased the license.
page 23
License Activation
To register your PPC and DUID
1. Open the following web site: http://www.dialogic.com/activate.
2. Enter your PPC and click Check.
3. If your PPC is valid, the following web site will open:
Paste your Device Unique ID (DUID) that you saved earlier, and enter your email address to which the license
file should be sent.
4. Click Activate to generate the license file that will be sent to the email address you have entered.
5. Save the license file and activate it. For more information, see To activate the license file below.
page 24
License Activation
To activate the license file
Note: The date set in the system settings of your computer must be correct. Otherwise, you cannot add your
license file.
1. Click Tools > License Manager in the menu bar of the Dialogic® Diva® Configuration Manager.
2. Click Add License and go to the directory where you saved the license key file.
3. Select the license file and click Open.
4. Your license file is now added to the License Manager.
5. Click Close to close the License Manager.
6. In the Configuration Manager, click File > Activate to activate the configuration.
7. Now, the functionality is unlocked for the feature set you acquired with your license.
page 25
Software Configuration
CHAPTER 4
Software Configuration
Configuration with installed hardware
After you have installed your Dialogic® Diva® Media Board and the board drivers as described in Software
Installation on page 17, you can start the Dialogic® Diva® Configuration Manager:
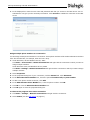
1. Click Start > Programs > Dialogic Diva > Configuration Manager.
2. The Diva Configuration Manager displays the configuration you chose during the software installation:
• The detected Dialogic® Diva® Media Board is installed.
• The Diva board is assumed to be connected to a corresponding ISDN BRI, PRI, or analog line.
• Line properties are either set by default or to the parameters you set in the Dialogic® Diva® Installation
Wizard.
Notes:
•
If you plan to use Channelized T1 Robbed Bit Signaling, then change the switch type in the line
properties to "T1 Robbed Bit Signaling (RBS)" and your PRI line will change automatically into a T1
line (see "Line Properties" in the Diva Configuration Manager Online Help file (DSMain.chm)).
• If you plan to use "Direct Access Mode" or "R2 Signaling E1", then change the switch type in the line
properties accordingly and your PRI line will change automatically into an E1 line (see "Line Properties"
in the Dialogic® Diva® Configuration Manager Online Help file (DSMain.chm)).
• If you installed a fully detected Diva board and chose Default installation during the driver update, then
RAS and Dialogic® Diva® API/CAPI are installed and connected to the Diva board.
• If you installed a fully detected Diva board and chose Customized installation or Secure installation
during the driver update, then the services you selected are installed and connected to the Diva board.
RAS and Diva API/CAPI are configured to accept all incoming calls. This can cause conflicts between the two
services, since both services are then listening to the same phone numbers. To avoid these conflicts, you
should assign different MSNs, phone numbers, or extensions to the services in the binding properties for
each service (see "Binding Properties" in the Diva Configuration Manager Online Help file (DSMain.chm)).
When you are using a North-American D-channel protocol with a Dialogic® Diva® BRI Media Board, you must
always assign ISDN numbers because otherwise incoming calls cannot be accepted (see "Binding Properties"
in the Diva Configuration Manager Online Help file (DSMain.chm)).
page 26
Software Configuration
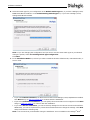
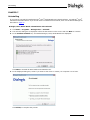
See below an example of a default installation for a Dialogic® Diva® PRI/E1/T1-CTI Media Board:
3. You can now add components to your Dialogic® Diva® System Release Software and configure them as
described in "Configuring" in the Diva Configuration Manager Online Help file (DSMain.chm).
Creating configuration files
You can create configuration files manually, without having a Dialogic® Diva® Media Board physically installed
in your computer. With the manual configuration the system administrator can create a complete configuration
and save it as a configuration file. This configuration file can be made available to the users who then only need
to install the board drivers and to activate the configuration created by the system administrator. As such, users
do not need to configure the software.
To start an empty configuration:
1. Click Start > Run.
2. To enter the path to the Dialogic® Diva® Configuration Manager:
• Insert your Dialogic® Diva® System Release CD-ROM into your CD-ROM drive and enter the following path:
D:\DRIVER\i386\ENGLISH\Disrvcfg.EXE
(where D: is your CD-ROM drive letter).
• Or enter the path to the configuration file on the hard disk, for example:
C:\Temp\DIVA\Disrvcfg.EXE
(where C: is the hard disk drive letter).
Click OK.
page 27
Software Configuration
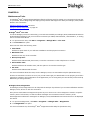
3. The Diva Configuration Manager is displayed with no components:
4. You can now do a complete manual configuration as described in "Configuring" in the Diva Configuration
Manager Online Help file (DSMain.chm).
Note: If configuration files have been created before, you can start the Diva Configuration Manager and
load a configuration file. The configuration file is displayed and you can modify it according to your
requirements.
To activate an existing configuration
To activate a configuration file for your system, open the configuration file and click File > Activate; or click
the activate button
in the toolbar.
Note: You can only activate a configuration file for your system if the Dialogic® Diva® Media Boards that are
available in the Diva Configuration Manager correspond to the Diva boards that are physically installed in your
computer.
page 28
Dial-Up Networking and RAS Administration
CHAPTER 5
Dial-Up Networking and RAS Administration
In the terminology used by the Remote Access Service, the calling station is referred to as the Client and the
called station as the Server. The RAS client/server architecture allows a station to be defined simultaneously
as a server and as a client, and therefore enables simultaneous initiation of outgoing and incoming ISDN or
channelized T1 connections. For example, this enables the peer-to-peer connection of two Windows® XP or
Windows Vista® workstations.
RAS client setup
The RAS client can be used to establish connections to the following remote stations:
• all Windows® operating systems with RAS in server mode
• Internet Service Provider
• TCP/IP router
Setting up a RAS client:
• Under Windows® XP and Windows Server® 2003 on page 29
• Under Windows Vista® and Windows Server® 2008: on page 33.
Under Windows® XP and Windows Server® 2003
1. Under Windows® XP:
Click Start > Settings > Control Panel > Network Connections.
In the Network Connections window, under Network Tasks on the left window side, double-click Create
a new connection.
Under Windows Server® 2003:
Click Start > Control Panel > Network Connections > New Connection Wizard.
2. If the Location Information box appears, enter the country/region you are in. Enter your area code and,
if required, your prefix number to access an outside line.
Click OK.
3. If the Phone and Modem Options box appears, select your location.
Click OK.
4. In the New Connection Wizard, click Next.
page 29
Dial-Up Networking and RAS Administration
5. In the Network Connection Type box, select Connect to the network at my workplace.
Note: The screen might appear slightly different under Windows Server® 2003.
Click Next.
6. In the Network Connection box, select Dial-up connection and click Next.
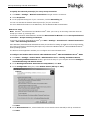
7. If you have configured more than one port for outgoing calls, you must specify a port:
Select a port, for example ISDN channel - Dialogic Diva BRI-2 to dedicate a line to this outgoing
connection.
The effect of the setting All available ISDN lines multi-linked is that RAS will automatically establish a
connection over all lines.
Note: A larger number of active lines may increase telephone charges. With a normal basic rate interface,
a connection with the setting All available ISDN lines multi-linked would be established over both
B-channels.
Click Next.
8. In the Connection Name box, enter a name for your RAS connection. Click Next.
page 30
Dial-Up Networking and RAS Administration
9. In the Phone Number to Dial box, enter the phone number of the server.
If the server is configured to use subaddresses, you must specify the appropriate subaddresses under Phone
Number:, separated by the vertical stroke "|", (the pipe symbol, or press [Alt] and the digits [0], [1], [2]
and [4] on the numeric keypad).
For example, if the phone number is 071594066 SUB 41, you must enter 071594066|41.
If your connection protocol is something other than synchronous HDLC, you must specify which protocol is
used. This information can be attached to the server phone number, separated by the caret character "^".
For example, for an analog call, add "^MODEM" to the phone number of the server. For a call to GSM, add
"^GSM1", "^GSM2" or "^GSM3".
If your connection uses something other than a transfer rate of 64 kbps, you must specify which transfer
rate is used. This information can also be attached to the server phone number separated by the caret
character "^".
For example, for a call to some regions in the United States where a line, a switch, or a device only supports
a transfer rate of 56 kbps, add "^56K" to the server phone number. The "T1 RBS" switch type always uses
a transfer rate of 56 kbps. Therefore, you must add "^56K" for all outgoing calls if you use this switch type.
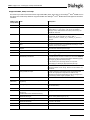
The required information can be found in the following table. The various parameters can also be entered
in combination.
page 31
Dial-Up Networking and RAS Administration
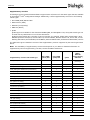
Designation
Description
Framing
^HDLC
synchronous HDLC
^X.75
synchronous X.75
^ASYNC
additional information asynchronous
^SYNC
additional information synchronous
Services
^XP
synchronous HDLC transparent (standard)
^V.120
asynchronous, default transfer rate is 64K, transfer rates given below can also be entered
^V.110
asynchronous, default transfer rate is 9600, transfer rates given below can also be entered
^GSM1
asynchronous without flow control, V.110/9600
^GSM2
asynchronous with flow control, V.110/9600
^GSM3
asynchronous with flow control, without LLC, V.110/9600
^PIAFS
PIAFS 2.1/64K (Dialogic® Diva® BRI, V-BRI, 4BRI, V-4BRI, any PRI, and V-PRI Media Boards)
^PIAFS^32K
PIAFS 1.0/32K (Dialogic® Diva® BRI, V-BRI, 4BRI, V-4BRI, any PRI, and V-PRI Media Boards)
^MODEM
asynchronous, entry of transfer speed is ignored, since this is handled by the modem
Speeds
^600
asynchronous with ^V.110
^1200
asynchronous with ^V.110
^2400
asynchronous with ^V.110
^4800
asynchronous with ^V.110
^9600
asynchronous with ^V.110
^14400
asynchronous with ^V.110
^19200
asynchronous with ^V.110
^28800
asynchronous with ^V.110
^33600
asynchronous
^38400
asynchronous with ^V.110
^56K
HDLC, X.75, V.120
^64K
HDLC, X.75, V.120
Click Next.
10. In the Connection Availability box, select whether the connection should be made available to all users
or only to yourself.
Click Next.
11. If you are connected to a network and you selected to make the connection available to all users, the Internet
Connection Sharing box will be displayed.
12. Specify if your Internet connection can be shared by all users or if it should be available only to yourself.
Click Next.
13. Click Finish to save the newly set up RAS client. If you need to make changes, click Back until you reach
the box where the changes are to be made.
14. In the displayed dialog box, click the Dial button to connect.
page 32
Dial-Up Networking and RAS Administration
Under Windows Vista® and Windows Server® 2008:
Before you can set up the RAS client, you need to enable the RAS service.
To do so:
1. Click Start > Settings > Control Panel > Administrative Tools > Services.
2. Double-click Remote Access Connection Manager.
3. On the General tab under Startup type select Automatic.
4. Click OK.
To set up the RAS client:
1. Click Start > Settings > Control Panel > Network and Sharing Center.
2. Click Set up a connection or network on the left.
3. In the displayed box, double-click Connect to a workplace.
4. In the How do you want to connect? box, select Dial directly.
5. If you have installed more than one Dialogic® Diva® Media Board, you need to select one Diva Media Board.
6. In the displayed box, type the phone number of the RAS server you want to connect to. Enter a name for
the RAS connection next to Destination name.
If the server is configured to use subaddresses, you must specify the appropriate subaddresses in the
telephone number of the RAS server. For more information go to page 31.
If the connection should be made avaiable to all users, select Allow other people to use this connection.
Click Next.
page 33
Dial-Up Networking and RAS Administration
7. In the displayed box enter the user name and password with that you connect to the RAS server. Your IT
administrator can give you the necessary information. Click Connect to establish a connection to the RAS
server.
Assign multiple phone numbers to a connection
You can assign several phone numbers to a connection. These phone numbers will be used as alternative numbers
if the first number fails, for example, when the line is busy.
1. Under Windows® XP and Windows Server® 2003:
Click Start > Control Panel > Network Connections and right-click the connection to which you want to
assign multiple numbers.
Under Windows Vista® and Windows Server® 2008:
Click Start > Settings > Network Connections and right-click the connection to which you want to assign
multiple numbers.
2. Select Properties.
3. In the properties dialog box of your connection, click the General tab. Click Alternates.
4. In the Alternate Phone Numbers box, check the option If number fails, try next number.
5. To add a new phone number to the list, click Add.
6. In the Add Alternate Phone Number box, enter the phone number. Click OK.
7. Click OK to close the Alternate Phone Numbers box.
8. Click OK again to close the properties dialog box.
To observe the progress of an active connection
1. Click Start > Settings > Network Connections and right-click the connection.
2. Select Status (see also RAS status on page 37).
page 34
Dial-Up Networking and RAS Administration
To specify the network protocol(s) for every set-up connection
1. Click Start > Settings > Network Connections and right-click the connection.
2. Select Properties.
3. In the properties dialog box of your connection, click the Networking tab.
You can now activate the desired network protocol(s) for your connection.
For more detailed information on the RAS client, see the Windows RAS documentation.
RAS server setup
Note: Windows® XP Professional and Windows Vista® allow you to set up an incoming connection that can
accept up to three (3) incoming calls.
To set up an connection under Windows® XP start the New Connection Wizard and select Set up an advanced
connection > Accept incoming connections.
To set up an connection under Windows Vista® go to Start > Settings > Control Panel > Network Connection
> File > New Incoming Connection.
Since Windows® XP Professional and Windows Vista® do not allow for setting up a RAS server for a large number
of incoming connections, the following description only refers to the Windows Server® 2003 and Windows Server®
2008 operating systems.
The Remote Access application enables you to configure and control the RAS server.
To configure and enable remote access under Windows Server® 2003 and Windows Server® 2008:
1. Click Start > Settings > Control Panel > Administrative Tools > Routing and Remote Access.
2. In the Routing and Remote Access window, right-click the entry for your computer and select Configure
and Enable Routing and Remote Access.
3. In the Routing and Remote Access Server Setup Wizard, click Next.
4. In the Configuration dialog box, select Remote access (dial-up or VPN).
Click Next.
5. In the Remote Access box, select whether the server should receive VPN and/or dial-up connections.
Click Next.
page 35
Dial-Up Networking and RAS Administration
6. In the IP Address Assignment box, specify whether IP addresses will be assigned to remote clients
automatically or from a specified range.
Click Next.
Note: If you select to assign the IP addresses from a specified range, enter the address ranges in the
following dialog boxes.
7. If your computer is part of a network, the Managing Multiple Remote Access Servers box is displayed.
Specify if you want to set up your RAS server to use an existing RADIUS server. By default, the RADIUS
server is not used.
The RADIUS (Remote Authentication Dial-In User Service) protocol is used for managing remote user
authentication and authorization in dial-up networks or virtual private networks. If a RADIUS server is
available in your LAN, you can have your RAS connections authenticated and monitored by this server. You
do not need to create your own remote access policies.
Click Next.
8. Click Finish to finish the Routing and Remote Access Server Setup Wizard.
To configure access authorizations for the RAS server:
1. Under Windows Server® 2003:
Click Start > Administrative Tools > Computer Management.
2. In the Computer Management window, select System Tools > Local Users and Groups > Users.
3. In the details pane, right-click the user for whom you want to configure the access authorizations.
Select Properties.
4. In the properties dialog box, select the Dial-in tab and activate the desired access rights:
• Allow access
The user has the direct permission to dial into the RAS server. This permission overrules all remote access
policies.
• Deny access
The user has no permission to dial into the RAS server. This denial also overrules all remote access policies.
page 36
Dial-Up Networking and RAS Administration
• Control access through Remote Access Policy
Depending on the Remote Access Policy, dial-in permission is granted or denied to the user. For further
information on Remote Access Policies, see your Windows® documentation.
The following callback options can be configured:
• No Callback
The client establishes the connection to the server and maintains the connection. The user of the RAS
client assumes all charges.
• Set by Caller (Routing and Remote Access Service only)
The client establishes the connection to the server, sends its current call number and then breaks the
connection. The server calls the client back at the number given and therefore assumes the charges for
the call. The client’s call can therefore be made from any site.
• Always Callback to
The client establishes the connection to the server, thereby indicating that a connection is required, and
then breaks the connection. The server calls the client back at the preassigned call number. This provides
that the client can call from one telephone terminal only. This provides that no other partner can call from
another terminal, because this call number cannot be manipulated.
To close the dialog box, click OK.
Note: Only the users that are set up on the server are shown in the "Users" list. For information on how to
configure authorizations for remote access for Windows Server® 2003 and Windows Server® 2008 domains, see
your Windows® documentation.
RAS status
To monitor a currently active connection:
1. To monitor the status of a currently active outgoing connection, right-click the connection. Select Status.
2. The RAS Status monitor is displayed:
To monitor a connection each time it is active:
1. Click Start > Control Panel > Network Connections and select the desired connection.
2. In the displayed dialog box, click Properties.
3. In the properties dialog box, click the General tab:
Check the option Show icon in taskbar when connected. Click OK.
4. Each time, when the connection is active, an icon is displayed in the Windows® taskbar.
page 37
Dial-Up Networking and RAS Administration
To monitor the status of RAS server ports:
1. To monitor the status of a RAS server port, click Start > Programs > Administrative Tools > Routing
and Remote Access.
2. In the Routing and Remote Access window, click the + next to your RAS server to expand the tree.
3. Click Ports to display the available ports in the right window pane.
4. Double-click the port for which you want to display the Port Status.
page 38
SNMP Support For A Dialogic® Diva® Media Board
CHAPTER 6
SNMP Support For A Dialogic® Diva® Media Board
The Windows® implementation of the Simple Network Management Protocol (SNMP) is used to configure remote
devices or to monitor network performance, to audit network usage, and to detect network faults or inappropriate
access. The SNMP support is only available if the service is installed for your operating system. The output
formats are defined in the MIB specification. Messages of the SNMP cannot be seen in the Dialogic® Diva®
Diagnostics tool, you need specific SNMP tools herefore, which are not part of the Dialogic® Diva® System
Release Software. To activate the SNMP service, use the Dialogic® Diva® Configuration Manager. See the
Dialogic® Diva® Configuration Manager Online Help file (DSMain.chm) for more information.
To activate SNMP support for a Dialogic® Diva® Media Board
1. Install the Windows® SNMP service as described below.
2. Add the SNMP service in the Diva Configuration Manager as described on page 40.
3. Install an SNMP tool ,e.g., Net.SNMP (optional, for testing only).
4. Restart your computer.
5. Verify the service status as described on page 41.
6. Verify the function of the SNMP service as described on page 42.
To install the Windows® SNMP service:
The installation of the SNMP service depends on the operating system.
For Windows® XP and Windows Server® 2003, see below.
For Windows Vista® and Windows Server® 2008, see page 40.
Under Windows® XP and Windows Server® 2003:
1. Click Start > Control Panel > Add or Remove Programs.
2. In the Add or Remove Programs box, click Add/Remove Windows Components on the left hand side.
3. The Windows Components Wizard box appears.
Select Management and Monitoring Tools and click Next.
4. During the installation of the components you might be asked to insert the CD-ROM of the operating system
or to enter the path to a server on which the files of your operating system are stored.
5. In the Completing Windows Components Wizard dialog box, click Finish to terminate the installation
and close all open dialog boxes.
page 39
SNMP Support For A Dialogic® Diva® Media Board
You can now add the SNMP service to the Dialogic® Diva® Configuration Manager as described below.
Under Windows Vista® and Windows Server® 2008
1. Click Start > Control Panel > Programs > Programs and Features.
2. Click Turn Windows features on or off in the left window pane. If your are ask for permission to continue,
click Continue.
3. In the Windows Features dialog box, click the + sign next to SNMP feature, select this feature, and WMI
SNMP Provider.
Click OK.
4. During the installation of the components you might be asked to insert the CD-ROM of the operating system
or to enter the path to a server on which the files of your operating system are stored.
5. Close all windows after the installation is finished.
6. You can now add the SNMP service to the Dialogic® Diva® Configuration Manager as described below.
To add the SNMP service in the Dialogic® Diva® Configuration Manager
1. Click Start > All Programs > Dialogic Diva > Configuration Manager to open the Diva Configuration
Manager.
2. In the menu bar, click Insert > SNMP Service. The SNMP Service is added to the Boards layer.
3. Activat the configuration. As soon as the configuration is activated, the Dialogic® Diva® System Release
Software validates if Windows® SNMP support is available. If it is not available, an error message is displayed
and the SNMP icon is removed from the configuration.
Note: You do not need to connect the SNMP service to any Dialogic® Diva® Media Board. The SNMP is always
available for all installed Diva Media Boards.
You can now install the SNMP tool and restart the PC. To install the SNMP tool correctly, consult the documentation
of the tool.
page 40
SNMP Support For A Dialogic® Diva® Media Board
To verify the service status
1. Click Start > Control Panel > Administrative Tools to open the Administrative Tools window.
2. In the Administrative Tools window, double-click Services.
3. In the Services window, right-click SNMP Service and select Properties from the list.
4. In the Properties dialog box, click the Security tab and under Accepted community names, click Add.
Enter a community name, for instance public, and as Community rights, select READ ONLY.
5. Click the Traps tab, enter the community name you added in the Security tab, and click Add to list.
page 41
SNMP Support For A Dialogic® Diva® Media Board
6. Under Traps destinations, click Add, enter the name or IP address of the host computer, and click Add.
7. The host name is added to the list of Trap destinations.
8. Click OK to close the dialog box.
9. Restart the SNMP service. To do so, right-click SNMP Service in the Services window and select Restart
from the list.
10. Close the Services window.
To verify the function of the SNMP service
1. Click Start > Run and type cmd to open a DOS box.
2. In the DOS box type: snmpwalk -v 2c -c public localhost interface | find_"Diva"
The result should be similar to the following, which is for a Dialogic® Diva® V-4PRI Media Board:
IF-MIB::ifDescr.101
IF-MIB::ifDescr.133
IF-MIB::ifDescr.164
IF-MIB::ifDescr.195
=
=
=
=
STRING:
STRING:
STRING:
STRING:
Dialogic_Diva_V-4PRI/E1/T1_1030
Dialogic_Diva_V-4PRI/E1/T1_1030
Dialogic_Diva_V-4PRI/E1/T1_1030
Dialogic_Diva_V-4PRI/E1/T1_1030
3. In the DOS box type: snmptrapd -f -L o
The result should be similar to the following:
2006-01-28 11:14:35 NET-SNMP version 5.2.1.2 Started.
You can create an output of traps if you change the status of the layer 1/2, for instance by disconnecting
the cable from the Diva Media Board. The result after changing the status of layer 1/2 should be similar to
the following:
2006-01-28 11:16:25 localhost [127.0.0.1] (via UDP: [127.0.0.1]:1053) TRAP, SNMP v1, community public
SNMPv2-SMI::enterprises.434.2 Link Up Trap (0) Uptime: 1:16:47.06
IF-MIB::ifIndex.101 = INTEGER: 101
SNMPv2-SMI::enterprises.434.2 Link Down Trap (0) Uptime: 1:16:48.57
IF-MIB::ifIndex.101 = INTEGER: 101
2006-01-28 11:16:26 localhost [127.0.0.1] (via UDP: [127.0.0.1]:1053) TRAP, SNMP v1, community public
SNMPv2-SMI::enterprises.434.2 Link Up Trap (0) Uptime: 1:16:48.81
IF-MIB::ifIndex.101 = INTEGER: 101
page 42
SNMP Support For A Dialogic® Diva® Media Board
Supported MIBs, OIDs, and traps
This section provides information about supported MIBs, OIDs, and traps by the Dialogic® Diva® SNMP service
and about the relationship between supported OIDs and Dialogic® Diva® Media Board management interface
variables.
MIB-II (RFC Path
1213/2233)
MIB-II
Description
interfaces.ifTable.ifEntry.
ifIndex
Unique index of Dialogic® Diva® interfaces starting with
ifIndex-offset + 1 (see option -oN). First, all installed
Dialogic® Diva® Media Boards are listed, followed by the
available B-channels.
ifDescr
For Diva Media Boards, the board name and it's serial number
are returned. For B-channels, the string "BRI +
ifIndex_of_board + number_of_b- channel_on_board" is
returned.
ifType
The type of the interface according to IANA: PRI, BRI, ISDN.
ifMTU
Since the concept of MTU is not applicable on Dialogic® Diva®
interfaces, they return always 0.
ifSpeed
The maximum interface speed in bps
ifAdminStatus
Always up
ifOperStatus
The current operating status of the interface
ifInBytes, ifInPackets, ifInErrors, ifOutBytes,
ifOutPackets, ifOutErrors
For Dialogic® Diva® Media Boards, the added values of the
D- and B-channel interface counters are returned. mantool
reports these values in the following paths "Statistics\\[D|B]Layer2\\[R|X]-[Bytes|Frames|Errors]".
For B-channels, the following values are reported:
"State\\B[n]\\L2 Stats\\R- [Bytes|Frames|Errors]".
ISDN-MIB
(RFC2127)
ifPhysAddr
Returns vendor-id, PnP-id, serial number of Diva Media
Boards formatted as hex string. Returns no information for
B-channels.
LinkUp/LinkDown Traps
For status changes of interfaces a trap is generated that
includes the appropriate ifOperStatus varbind. Trap
destinations and access parameters must be configured in
the underlying master agent (trapsink, etc.).
transmission.isdnMib.isdnMibObjects.isdnSign
alingGroup
isdnSignalingGetIndex
ISDN-MIB
Number of possible D-channels (equals number of installed
Diva Media Boards)
transmission.isdnMib.isdnMibObjects.isdnBasic Dialogic® Diva® BRI Media Boards
RateGroup
.isdnBasicRateTable.isdnBasicRateEntry
isdnBasicRateIfType
isdns or isdnu (IANA-ifType 75, 76)
isdnBasicRateLineTopology
pointToPoint or pointToMultipoint
isdnBasicRateIfMode
TE mode or NT mode
isdnBasicRateSignalMode
D-channel active or inactive
page 43
SNMP Support For A Dialogic® Diva® Media Board
ISDN-MIB
transmission.isdnMib.isdnMibObjects.isdnBear B-channels
erGroup.isdnBearerTable.isdnBearerEntry
isdnBearerChannelType
dialup or leased
isdnBearerOperStatus
idle, active, unknown
isdnBearerChannelIndex
Index of B-channel per Diva Media Board
isdnBearerPeerAddress
Remote address
isdnBearerPeerSubAddress
Remote sub address
isdnBearerCallOrigin
Answer or originate
isdnBearerInfoType
Info type as per Q.931 (unrestrictedDigital)
isdnBearerCallConnectTime
Time measured from start of divasnmpx
DIAL-CONTRO transmission.dialControlMib.dialControlMibObj
L-MIB
ects.callActive.callActiveTable.callActiveEntry
callActiveSetupTime
Timeticks at start of call, measured from start of divasnmpx.
callActiveIndex
Unique index
callActivePeerAddress
Address of remote partner
callActivePeerSubAddress
Subaddress of remote partner
callActivePeerId
Always 0 (unknown)
callActivePeerIfIndex
Always 0 (unknown)
callActiveLogicalIfIndex
Index of entry in ifTable for the interface used by this call.
callActiveConnectTime
0 if the call was not connected, otherwise timeticks measured
from start of divasnmpx.
callActiveCallState
State of call
callActiveCallOrigin
Direction of call: Answer or originate
DIAL-CONTRO transmission.dialControlMib.dialControlMibObj
L-MIB
ects.callHistory
(RFC2128)
callHistoryTableMaxLength
The maximum number of entries in the callHistoryTable
(read/write).
callHistoryRetainTimer
The minimum amount of time in minutes that a
callHistoryEntry will be maintained before being deleted.
DIAL-CONTRO transmission.dialControlMib.dialControlMibObj
L-MIB
ects.callHistory.callHistoryTable.callHistoryEntr
y
callHistoryPeerAddress
Address of remote partner
callHistoryPeerSubAddress
Subaddress of remote partner
callHistoryPeerId
Always 0
callHistoryPeerIfIndex
Always 0
callHistoryLogicalIfIndex
Index of entry in ifTable for the interface used by this call.
callHistoryDisconnectCause
Reason for disconnecting this call
callHistoryDisconnectText
empty
callHistoryConnectTime
Timeticks measured from start of divasnmpx.
page 44
SNMP Support For A Dialogic® Diva® Media Board
callHistoryDisconnectTime
Timeticks measured from start of divasnmpx.
callHistoryCallOrigin
Direction of call: Answer or originate.
The definition for the ISDN-, DIAL-CONTROL-, and DS1-MIB can be imported in any management application to
decode the OIDs reported by divasnmpx. For net-snmp simply copy these files to the standard MIB path (usually
<%program files%>\netsnmp\share\snmp\mibs) and tell the snmp command line tools to use them by
exporting/setting the environment variable 'MIBS' with the names of the appropriate MIBs (or simply the keyword
ALL), e.g., Set MIBS=ALL.
page 45
Uninstalling
CHAPTER 7
Uninstalling
If you want to uninstall all installed Dialogic® Diva® Media Boards and related software, use Dialogic® Diva®
Uninstall as described below. If you do not want to uninstall all Diva boards, then use the Device Manager as
described on page 47.
Dialogic® Diva® Media Board uninstallation with Uninstall
1. Click Start > Programs > Dialogic Diva > Uninstall.
2. The welcome dialog box is displayed. Follow the instructions on the screen and click Next to continue.
3. In the Confirm Uninstall box, all installed Dialogic® Diva® Media Boards are displayed:
Click Next to uninstall all Diva boards and related drivers.
4. In the displayed dialog box, select if you want to shut down or restart your computer now or later.
Click Finish, to complete the process.
page 46
Uninstalling
Dialogic® Diva® Media Boards uninstallation with Device Manager
Note: The uninstallation with the Device Manager is not recommended for Windows Vista®.
1. Click Start > Control Panel, and select System in the Control Panel window.
2. In the System Properties box, click the Hardware tab and then Device Manager.
3. In the Device Manager box, click the + sign next to Network adapters.
4. Right-click the entry of the Diva Media Board that you want to uninstall and select Uninstall from the list.
5. In the Confirm Device Removal box, click OK to start the uninstallation.
6. Shut down your computer and physically remove the Diva Media Board from your system. Otherwise, your
Windows® operating system will detect and install the board again as soon as you restart your computer.
page 47
Maintenance Tools
CHAPTER 8
Maintenance Tools
The Dialogic® Diva® System Release Software offers the following tools for testing your connection and controller
on your board, and for diagnosing and helping solve problems that might occur with your Dialogic® Diva® Media
Board or the connection:
Dialogic® Diva® Line Test see below
Dialogic® Diva® Diagnostics on page 48
Dialogic® Diva® Line Test
To use the Dialogic® Diva® Line Test utility, you must have installed your Dialogic® Diva® Media Boards and Diva
System Release Software, and you must have connected your ISDN, channelized E1, channelized T1, or analog
line to the Diva Media Board.
1. To open Diva Line Test, click Start > Programs > Dialogic Diva > Line Test.
2. The Line Test box opens.
Diva Line Test offers the following tests:
• Line Check:
Performs a quick check of your software installation and the physical connection.
• Hardware Test:
Performs a test only of the controller.
• Phone/Loop Test:
Performs basic bidirectional phone tests, to test the connection to other telephones or to itself.
• Call Transfer Test:
Performs different call transfer tests, with the option to choose the transfer type.
• Fax Test:
Performs basic bidirectional fax tests.
For more information about the tests, see the Dialogic® Diva® Line Test Online Help file (DSLineTest.chm).
If Diva Line Test does not return an error, but you still cannot get your Diva board to work properly, then there
might be a problem in the configuration of the application you are using with your Diva board (such as Dial-Up
Networking or faxing software).
Dialogic® Diva® Diagnostics
The Dialogic® Diva® Diagnostics tool can help with the analysis of problems if you encounter difficulties with the
Dialogic® Diva® drivers or with the connection.
Every driver sends status messages and reports any error that occurs. The messages are saved in a specific
memory area of a fixed size, so that the oldest messages are overwritten when the memory is full.
Diva Diagnostics enables the messages from Dialogic® Diva® Media Boards and various drivers to be displayed
and saved.
1. To open Diva Diagnostics, click Start > Programs > Dialogic Diva > Diagnostics.
2. The Diagnostics box opens.
For more information see, the Dialogic® Diva® Diagnostics Online Help file (DivaTrace.chm).
page 48
Management Tools
CHAPTER 9
Management Tools
Dialogic® Diva® Management
Dialogic® Diva® Management software is integrated into the Microsoft® Management Console (MMC) via a
snap-in. You may create your own set of management, for instance the Device Manager combined with the Diva
Management software.
Diva Management is a tool that displays the current status of the connected lines, the active connections, and
the history of connections. Simply testing lines and connectivity is also part of Diva Management software.
To open Diva Management as standalone program, click Start > Programs > Dialogic Diva > Management.
Diva Management offers the following statistics:
• Status:
Displays an overview of all installed Dialogic® Diva® Media Boards in the system and the events taking place
on these boards.
• Active Connections:
Displays the Diva boards with active incoming or outgoing calls.
• Call History:
Displays the history for all conducted ingoing or outgoing calls.
For more information, see the Dialogic® Diva® Management Online Help file (DivaServerManagement.chm).
page 49
Features
CHAPTER 10
Features
Dialogic® Diva® Media Boards provide different features and capabilities with the Dialogic® Diva® System Release
Software.
The interfaces supported by Dialogic® Diva® Media Boards are as follows; however, not all features may be
available on all the supported interfaces.
IDI
ISDN Direct Interface. Supports all features and capabilities of Dialogic® Diva®
ISDN Media Boards.
WAN
Miniport
Provides support for WAN protocols running over ISDN, channelized E1,
channelized T1, or analog. Useful for connecting to Windows® Remote Access
Services (RAS).
COM Port
For applications that require communications via a standard PC communications
port.
CAPI 2.0(
Dialogic®
Diva® API)
Common ISDN Application Programming Interface. A standard interface for
applications to interact with Diva Media Boards.
TAPI
Telephony Application Programming Interface. An interface for communication
programs to work with telephony and network services.
For features of Dialogic® Diva® ISDN Media Boards, see the tables from page 51 on. For features of Dialogic®
Diva® Analog Media Boards, see the tables from page 56 onward.
page 50
Features
Features of Dialogic® Diva® ISDN Media Boards
Features via interface:
IDI
WAN
MiniPort
COM Port
CAPI 2.0
TAPI
Transparent HDLC, 64/567) kbps
•
•
•
•
•6)
Transparent (Voice)
•
•
•
X.75 64/567) kbps
•
•
•
•6)
T.70/T.90 (T-Online)9)
•
•
•
•6)
V.110 (GSM)1)9)
•
•
•
•
•6)
V.120 64/56 kbps (CompuServe)
•
•
•
•
•6)
V.34+, V.90 analog modem1)7)9)
•
•
•
•
•6)
V.42, V.42bis1)7)9)
•
•
•
•
•6)
X.75/V.42bis
•
•
Change of B-channel protocol during a call
•
•
X.252), X.31, ISO 8208 in the B-channel
•
PIAFS 1.0 and 2.17)
•
SDLC
•
•
Fax Group 4 (incl. T.90/ISO 8208 and module mode
detection)9)
•
•
T.30 Fax Group 3 (analog),
Class 1 and 21)9)
•
•
•
•6)
Fax with Error Correction Mode (ECM)1)9)
Fax with MR (D2 coding)1)9)
Fax with MMR (T.6 coding)1)9)
•
•
•
•6)
Fax 14.4 kbps1)9)
•
•
•
•6)
Fax 33.6 kbps (V.34)1)9)
•
•
Fax T.38 (up to 33.6 kbps)
•
•
Fax tone detection1)
•
•
Reversal of fax direction1)9)
•
•
Fax polling / fax on demand1)9)
•
Speed and feature indication (polling and ECM)1)9)
•
•
New fax header line1)9)
•
•
Page formats: ISO A4, ISO B4, ISO A31)9)
•
•
Resolution: standard, fine, super-fine, ultra-fine1)9)
•
•
DTMF tone detection and transmission3)
•
•
DTMF clamping10)
•
•
On-board switching and conferencing (via line
interconnect)8)
•
•
Media mode (unknown, interactive voice, automated
voice)1)
•
•
Wave audio format (8-bit 8 kHz A-Law, 8-bit 8 kHz μ-Law,
8-bit 8 kHz PCM, 16-bit 8 kHz PCM)1)
•
•
B-channel related:
Silence detection
Volume control
•
•
•
•6)
•
•5)
•
•
•
•
page 51
Features
Features via interface:
IDI
Echo cancellation
WAN
MiniPort
COM Port
1)7)
Real time protocol (RTP)
TAPI
•
1)7)
•
(CNG)1)7)
Comfort noise generation
•
1)7)
Voice activity detection (VAD)
•
1)7)
•
Dynamic anti-jitter buffer
Audio
CAPI 2.0
tap1)7)
•
GSM and G.726 voice codecs
1)7)
•
Recording AGC
•
4)
Supplementary Services:
MSN (multiple subscriber number)
•
•
•
•
•
DDI (direct dialing-in)
•
•
•
•
•
SUB (sub-addressing)
•
CLIP (calling line identification presentation)
•
CLIR (calling line identification restriction)
•
•
•
•
•
•
•
COLP (connected line identification presentation)
•
•
•
COLR (connected line identification restriction)
•
•
•
CCBS (call completion to busy subscriber)
•
•
•
CCNR (call completion on no reply)
•
•
•
TP (terminal portability)
•
•
Call forwarding unconditional
•
•
•
Call forwarding busy
•
•
•
Call forwarding no reply
•
•
•
Call deflection/ Call rerouting
•
•
CW (call waiting)
•
•
•
HOLD (hold and retrieve a call)
•
•
•
ECT (explicit call transfer)
•
•
•
Blind transfer
•
AoC (advice of charge)
•
•
Three-party conference
•
•
Large conference
•
•
User-to-user signaling
•
•
Transparent D-channel
•
•
X.25/D-channel including AO/DI support
•
•
•
•
Others:
1)
Features are not available with the Dialogic® Diva® PRI/E1/T1 Media Boards.
2)
CAPI 2.0 (Dialogic® Diva® API) supports X.25 in the B- and D-channel, permanent virtual connections (PVC) and switched
virtual connections (SVC), and multiple logical connections per B-channel.
The COM port supports X.25 with one PVC in the B-channel.
3)
4)
5)
DTMF tone detection and transmission is done via soft DTMF for the Dialogic® Diva® PRI/E1/T1 Media Board.
For an overview on supplementary services support by the various switch types, see On-board switching and conferencing
on page 53.
The COM Port supports fax polling for Fax Class 1 only.
page 52
Features
6)
Features are available with TAPI via Unimodem support.
7)
Features are not available with the Dialogic® Diva® BRI-2FX Media Board.
8)
For an overview on switching and conferencing support by the various Dialogic® Diva® Media Boards, see On-board switching
and conferencing on page 53.
9)
Features are not available with Dialogic® Diva® V-Series boards, except Dialogic® Diva® V-2PRI and V-4PRI Media Board
10)
Features are not available with Dialogic® Diva® PRI Media Boards without additional DSPs.
On-board switching and conferencing
Some switches do not offer supplementary services such as call transfer, overlap sending, three-party conference,
or large conference. For these switches, the Dialogic® Diva® Media Boards and software can provide these
supplementary services by connecting or forwarding calls directly on the board (also known as "tromboning").
Support for on-board switching and conferencing depends on the installed Diva Board. The table below outlines
the various types of switching and their support by Diva Boards.
Note: On-board switching and conferencing is only possible if it is supported by your application.
Switching and conferencing via
board:
Switching and
conferencing (within one
board)
Cross-board switching
Dialogic® Diva® Analog Media
Boards
Diva Analog-2
•
•
Diva Analog-4
•
•
•
•
•
•
•1)
•
•
•
•
•
•1)
•
•
•
Diva Analog-8
Dialogic® Diva® BRI Media Boards
Diva BRI-2FX
Diva BRI-2
Diva V-BRI-2
Diva 4BRI-8
Diva V-4BRI-8
Dialogic® Diva® PRI 3.0 Media
Boards
Diva PRI/E1/T1-CTI
Diva PRI/E1/T1-8
Diva PRI/T1-24
Diva V-PRI/T1-24
Diva PRI/E1-30
Diva V-PRI/E1-30
Dialogic® Diva® Multiport PRI Media
Boards
Diva V-2PRI/E1/T1
Diva V-4PRI/E1/T1
Dialogic® Diva® PRI PCIe Media
Boards
Diva PRI/E1/T1-CTI PCIe
Diva PRI/T1-24 PCIe
Diva V-PRI/T1-24 PCIe
Diva PRI/E1-30 PCIe
Diva V-PRI/E1-30 PCIe
1)
Conference functionality is limited to eight (8) participants.
page 53
Features
Supplementary services
The Dialogic® Diva® System Release Software supports basic call services for the switch types that are available
in the Dialogic® Diva® Configuration Manager. Additionally, it offers supplementary services for the following
switch types:
• Euro-ISDN (ETSI) BRI and PRI
• 5ESS Custom (AT&T)
• 5ESS NI (Lucent/Avaya)
• DMS 100 (Nortel)
• Q.SIG
Q.SIG support is available for the derivatives ECMA-QSIG, and ISO-QSIG. Thus, the Q.SIG switch type can
be used with any PBX based on one of these derivatives.
Q.SIG has been tested with a number of various switches, for example, Alcatel 4200, Alcatel 4400, 4410,
DeTeWe OpenCom 1000/1010, Ericsson MD 110, Ericsson BP250, Siemens Hicom 150, Hicom 300, Lucent
Definity, Matra 65xx, Nortel Meridian, Nortel M65xx, Siemens HiPath 3000, and Siemens HiPath 4000, Tenovis.
The table below gives a detailed overview of the supplementary services supported by the switch types listed
above.
Note: The availability of supplementary services also depends on your PBX. For detailed information on
supplementary services supported by your PBX, contact the PBX manufacturer.
5ESS Custom
(AT&T),
5ESS NI
(Lucent/Avaya),
DMS 100
Euro-ISDN
(ETSI) PRI
Euro-ISDN
(ETSI) BRI
Q.SIG
MSN (multiple subscriber number)
•
•
•
DDI (direct dialing-in)
•
•
•
SUB (sub-addressing)
•
•
•
•
CLIP (calling line identification presentation)
•
•
•
•
CLIR (calling line identification restriction)
•
•
•
•
COLP (connected line identification presentation)
•
•
•
•
COLR (connected line identification restriction)
•
•
•
•
4)
•
Supplementary services with switch type
KEY (keypad protocol)
•
•
AoC (advice of charge)
•
•
•
User-to-user signaling
•
•
•
TP (terminal portability)
•
Call forwarding unconditional
•
Call forwarding busy
•
Call forwarding no reply
•
Call deflection
•
CW (call waiting)
HOLD (hold and retrieve a call)
ECT (explicit call transfer)
ECT by rerouting
ECT by join
Single-step call transfer (over CAPI deflection)
•
•
•
•
•
1)
•
(incoming)
•
•
•
2)
•
•
•3)
•
•
•3)
•
page 54
Features
Supplementary services with switch type
Euro-ISDN
(ETSI) PRI
Euro-ISDN
(ETSI) BRI
Q.SIG
5ESS Custom
(AT&T),
5ESS NI
(Lucent/Avaya),
DMS 100
Three-party conference
•
•
Large conference
•
•
Drop conference
•
•
Name identification services
•
(presented by
switch)
Generic functional procedures (basis for
supplementary services in Q-Sig environment)
•
Common information
•
Redirected number translation from Q-Sig to Q.931
•
Escape message types
•
(5ESS Custom
only)
Call Appearance/Call Handling (CACH) plus
configuration
•
Feature activators plus configuration
•
(5ESS NI + DMS
100 only)
Network display conversion/treatment
Message waiting
•
•
•
CCBS (call completion to busy subscriber)
•
•
CCNR (call completion on no reply)
•
•
1)
•
(presented by
network)
•
•
HOLD is not a standard supplementary service for Euro-ISDN PRI, nevertheless some PBXs support call hold and retrieve.
2)
HOLD is not defined in Q.SIG but corresponding procedures are available.
3)
Call transfer is only possible if path replacement works.
4)
In a Q.SIG environment, the feature is also called "Simple Dialog".
page 55
Features
Features of Dialogic® Diva® Analog Media Boards
Call control features
• Dial tone detection
• Dial pulse detection
• Pulse dialing
• Tone (DTMF/MF) dialing
• Busy tone detection
• Ring back tone detection
• Special Information Tone (SIT) detection
• Fax/modem detection
• Hold/Retrieve (via Hook Flash) and keypad protocol
• Analog caller identification (via FSK and DTMF signaling)
• Collection of DTMF post-dial digits
• DTMF parsing
• Call transfer
• Specify call direction
• Configurable PBX parameters
• Disconnect active call
• Disconnect hold call
• Hold
• Swap hold
• Complete transfer
• Hook-flash length
• Retrieve mode
Voice and speech features
• G.711 coding (a-law, µ-law selectable)
• DTMF detection and generation
• DTMF clamping and filtering
• Generic tone detection and generation
• Pulse tone detection
• Full-duplex voice, "barge-in"
• Voice activity detection
• Silence detection
• Human talker detection
• Fax signal detection
• G.168 echo cancellation, up to 128 ms tail length
• Recording automatic gain control (AGC)
• Pitch control
• Audio tap
page 56
Features
Voice over IP support
• G.711 voice codec (64 kbps, µ-law, A-law)
• G.726 voice codec (32 kbps)
• GSM voice codec (13 kbps)
• G.168 echo cancellation, up to 128 ms tail length, up to 256ms tail lenght configurable by application
• Adaptive jitter buffer
• Voice activity detection (VAD)
• Comfort noise generation (CNG)
• Real time protocol (RTP framing)
• Impedance calibration
Switching and Conferencing features
• On-board switching and conferencing
• Automatic gain control (AGC)
Fax features
• Support for fax class 1 and 2
• Support for fax group 3, T.30
• V.17, V.29, V.27ter, V.21, V.34 modulation
• Up to 33.600 bps with each channel (send and receive)
• Fax compression MH, MR, MMR
• Error Correction Mode (ECM)
• Fax polling/ Fax on demand
• Reversal of fax direction
• Fax password
• Fax sub addressing
• New fax header line
• Page formats: ISO A4, B4, A3
• Standard, fine, super-fine and ultra-fine resolution
• Color fax (JPEG-format)
Data modem features
• V.21, V.22, V.22bis, Bell 103, Bell 212A, V.32, V.32bis, V.34, V.42, V.42bis, V.90, MNP4, MNP5,
• Modem with extension: V.18, V.21, Bell 103, V.23, EDT, Baudot 45, Baudot 47, Baudot 50 incl. DTMF, V.42,
V.42bis
page 57
Customer Service
CHAPTER 11
Customer Service
Dialogic provides various options and arrangements for obtaining technical support for your Dialogic® product.
We recommend that you use the Dialogic® Diva® Support Tools first before contacting your Dialogic supplier.
Also we suggest that you visit the Dialogic help web, which includes detailed information about a variety of
topics. In the unusual case that neither your supplier nor the information on the help web adequately address
your support issue, you can contact Dialogic Customer Support.
For more information see:
• Dialogic® Diva® Support Tools
• Dialogic Help Web
• Dialogic Customer Support
Dialogic® Diva® Support Tools
If an issue occurs during the operation of your Dialogic® Diva® product, use the following Dialogic® Diva®
Support Tools:
• Dialogic® Diva® Line Test: With the Diva Line Test tool, you can test your hardware and perform simple phone
test calls, call transfers, or basic inbound and outbound calls.
• Dialogic® Diva® Diagnostics: With the Diva Diagnostics tool, you can write traces for each adapter or driver
into a file.
• Dialogic® Diva® Management tool: With the Diva Management tool, you can view the current status of the
connected lines, the active connections, and the history of the connections.
For more information about the tools see the respective online help file.
If you cannot solve an issue through use of these tools, contact your Dialogic supplier.
Dialogic Help Web
If your supplier is unable to help you to address your issue, visit the Dialogic Help Web. It contains detailed
information on such subjects as:
• Installation and upgrade of Dialogic® Diva® drivers, configuration scenarios, and applications.
• Diagnostic and testing utilities.
• Basic issues, error messages and how to resolve them.
• "How to" guides and wizards.
• Online training for ISDN, Dialogic® Diva® API, and X.25 is offered by Dialogic. The training is aimed toward
technical support people, but much of the courses are also suitable for a non-technical audience.
For more information, visit the Dialogic Help Web at www.dialogic.com/support/helpweb.
Dialogic Customer Support
If the information on the Dialogic Help Web was not sufficient to help you solve your problem, contact Dialogic
Customer Support. Please note that when you contact the Customer Support, they may need you to provide or
have handy one or more of the following:
To provide help, Dialogic Customer Support will likely need from you:
• A debug trace (see Dialogic® Diva® Diagnostics Online Help file - DivaTrace.chm), and
• A copy of your active configuration (see Dialogic® Diva® Configuration Manager Online Help file DSMain.chm).
See www.dialogic.com/support/contact for details on how to contact Dialogic.
page 58