1
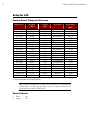
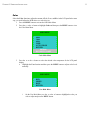
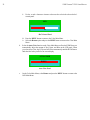
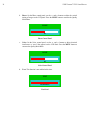
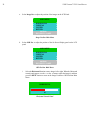
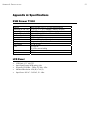
User Manual
T1500
This page intentionally left blank.
User Manual
T1500
Copyright ©2003 Raritan Computer, Inc.
KVM_T1500-0A-E
March 2003
255-37-0040
C
UL
US
1F61
I.T.E.
LISTED
Raritan Computer Inc.
400 Cottontail Lane
S
t NJ 08873
Raritan Computer Europe, B.V.
Eglantierbaan 16
2908 LV C
ll
d IJ
l
Raritan Computer Japan, Inc.
Kuga Building 7F
11 6 K
4 h
Raritan Computer Taiwan, Inc.
5F, 121, Lane 235,
P Chi Rd H i Ti
This page intentionally left blank.
FCC Information
This equipment has been tested and found to comply with the limits for a Class A digital device,
pursuant to Part 15 of the FCC Rules. These limits are designed to provide reasonable protection
against harmful interference in a commercial installation. This equipment generates, uses, and can
radiate radio frequency energy and if not installed and used in accordance with the instructions, may
cause harmful interference to radio communications. Operation of this equipment in a residential
environment may cause harmful interference.
Trademark Information
Product names mentioned in this document are trademarks or registered trademarks of their
respective companies. KVM Drawer, Paragon, and their respective logos are trademarks or
registered trademarks of Raritan Computer, Inc. All other marks are the property of their respective
owners.
Japanese Approvals
This page intentionally left blank.
Table of Contents
CHAPTER 1: INTRODUCTION ............................................... 1
KVM Drawer Overview ....................................................................................1
Product Photos ................................................................................................1
Product Features .............................................................................................2
Package Contents............................................................................................2
CHAPTER 2: INSTALLATION ................................................ 3
Rack Mounting the KVM Drawer .....................................................................3
Power Connections..........................................................................................5
Power Indicator..................................................................................................... 6
Setup for LCD ..................................................................................................6
Factory Preset Timing for Reference.................................................................... 6
Panel and OSD Controls ...................................................................................... 7
CHAPTER 3: OPERATING INSTRUCTIONS ............................... 7
OSD Main Menu Functions..............................................................................9
Auto Tune ............................................................................................................. 9
Brightness .......................................................................................................... 10
Contrast .............................................................................................................. 10
Color ................................................................................................................... 11
Quality ................................................................................................................ 13
Position............................................................................................................... 15
Language ........................................................................................................... 18
Recall ................................................................................................................. 18
Exit ..................................................................................................................... 19
APPENDIX A: SPECIFICATIONS .......................................... 21
KVM Drawer T1500 .......................................................................................21
LCD Panel......................................................................................................21
Model Differentiation ......................................................................................22
APPENDIX B: TROUBLESHOOTING ...................................... 23
Safety Instructions
1.
2.
3.
4.
5.
6.
7.
8.
9.
10.
11.
12.
13.
14.
Please read these safety instructions carefully.
Keep this User Manual for later reference.
Disconnect this equipment from the electrical outlet before cleaning. Do not use liquid or
spray detergent for cleaning. Use moisture sheet or cloth for cleaning.
For plug-in equipment, the outlet should be located near the equipment and should be
easily accessible.
Keep this equipment from humidity.
Rest this equipment on a reliable surface when installing. A drop or a fall could cause
injury.
Do not leave this equipment in an unconditioned environment where storage temperatures
rise above 40º C; it may damage the equipment.
The ventilation openings on the equipment are for air convection to keep it from
overheating. DO NOT COVER THE OPENINGS.
Make sure the voltage of the power source connecting to the equipment is appropriate.
Place the power cord in such a way that people cannot step on it. Do not place anything
over the power cord. The power cord must be rated for the voltage and current marked on
the product’s electrical ratings label. The voltage and current rating of the cord should be
greater than the voltage and the current rating marked on the product.
Please note all cautions and warnings on the equipment.
If the equipment is not in use for an extended time period, disconnect the equipment to
avoid being damaged by transient over-voltage.
Never pour any liquid into ventilation openings. This could cause fire or electrical shock.
If one of the following situations arises, get the equipment checked by service personnel.
−
−
−
−
−
−
The power cord or plug is damaged.
Liquid has gotten into the equipment.
The equipment has been exposed to moisture.
The equipment is not working well, or you cannot get it to work according to this User
Manual.
The equipment has dropped and is damaged.
The equipment has obvious signs of breakage.
15. Never open the equipment. Only qualified service personnel should open the equipment.
CHAPTER 1: INTRODUCTION
Chapter 1: Introduction
KVM Drawer Overview
Raritan’s KVM Drawer Model T1500 is the first in the industry to offer the convenience of using
standard UTP cabling to connect servers up to 1,000 feet away. The KVM Drawer T1500 is a 1U 19”
rack mount KVM console that can control a computer by an integration of a keyboard, a touchpad,
and an LCD monitor, and can save up to 10 U of height space in your mounting rack.
The KVM Drawer T1500 enables quick and efficient access to servers and other network devices, as
well as allowing you to manage the setup, administration, and maintenance of rackmount servers in
data centers, server rooms, and other space-critical industrial environments.
Product Photos
1
2
KVM DRAWER T1500 USER MANUAL
Product Features
•
•
•
•
•
1U 19” rack mount KVM drawer that meets EIA RS-310C standard
15” Active-Matrix LCD Flat Panel Display Color Monitor
Tempered glass protecting the LCD panel
Compact design enabling the unit to be mounted in most cabinets
Industrial grade ultra-low-profile compact keyboard with integrated touchpad
Package Contents
The complete KVM Drawer T1500 package consists of:
•
(1) 1U 19” Rack Mount KVM Drawer console
•
(1) Mounting Kit (includes short and long brackets for customized fit)
•
(1) CSW18 Cable
•
(1) User Manual
•
(1) Warranty Card
Check to make sure that the unit was not damaged in shipping. If you encounter a problem, contact
your dealer.
Please read this manual thoroughly and follow the installation and operation procedures carefully to
prevent any damage to the KVM Drawer, and/or any of the devices that connect to it.
CHAPTER 3: OPERATING INSTRUCTIONS
Chapter 2: Installation
Before you begin, make sure that power to all devices you will be connecting has been turned off. To
prevent damage to your KVM Drawer due to ground potential difference, make sure that all devices
on the installation are properly grounded. Please consult your vendor for any technical issues if
necessary or contact Raritan Technical Support at (732) 764-8886 or via email at
[email protected], Monday through Friday, 8:00am to 8:00pm, EST.
KVM Drawer Rack Mount Instructions
Before attaching pieces to your KVM Drawer, determine whether you will be using the short
brackets with the two-grid sliders or the longer brackets with the four-grid sliders. Select the pieces
according to the depth of the rack in which the unit will be mounted.
1.
With the rear of the KVM Drawer facing you, secure each small bracket to the left and right
corners of the unit, as illustrated below.
2.
Select the appropriate bracket arms and attach them to the sides of the KVM Drawer as
shown below. . This bracket will fit over the small bracket piece attached in Step 1, and
must be secured with two screws from above and two screws from below.
Note: Notice that there are five openings (in the form of an “X”) at one end of
the bracket arm and there are two screws already in the KVM Drawer at two
points of the “X”; you can remove the two screws in the KVM drawer and
attach the bracket arm using five screws to fill all five holes.
3
4
KVM DRAWER T1500 USER MANUAL
3.
With the rear of the KVM Drawer facing you, insert the slider into the bracket arm so that
the rack mount openings are aimed away from the unit. Attach the slider to the bracket arm
using the larger-head screws included in the kit.
Note: Leave the screws loose so that you can adjust the slider to the depth of
the rack when mounting the unit.
4.
Secure the entire assembly to a rack using eight large rack screws (not included).
Remember to support the KVM Drawer until the assembly is securely fastened to the rack.
CHAPTER 3: OPERATING INSTRUCTIONS
5
Power Connections
Important: All components and the KVM Drawer unit must be powered OFF prior to
installation
1.
2.
3.
4.
Connect the CSW18 Cable to the KVM Drawer’s mouse, keyboard, and VGA ports.
Connect the other end of the CSW18 Cable to the mouse, keyboard, and VGA ports on the
component to which you are connecting the KVM Drawer. The component must have
female PS2 keyboard and mouse ports and a female HD15 video port.
Plug a power cord into the KVM Drawer’s power jack and plug the other end into an AC
power source.
Power ON the KVM Drawer.
1
Rear view of KVM Drawer T1500
4
3
2
CSW18 Cable
6
KVM DRAWER T1500 USER MANUAL
Setup for LCD
Factory Preset Timing for Reference
RESOLUTION
H. FREQ.
(KHZ)
V. FREQ.
(HZ)
640 x 350
31.469
70
640 x 350
37.861
85
640 x 400
37.861
85
720 x 400
31.469
70
720 x 400
37.927
85
640 x 400
24.83
56
640 x 480
31.469
60
640 x 480
35.000
66.67
640 x 480
37.861
72
640 x 480
37.500
75
640 x 480
43.269
85
800 x 600
37.879
60
800 x 600
48.077
72
800 x 600
46.875
75
800 x 600
53.674
85
836 x 624
49.715
74.536
960 x 720
44.80
60
*1024 x 768
48.363
60
1024 x 768
56.476
70
1024 x 768
60.023
75
**1024 x 768
35.522
86.959
1024 x 768
68.677
85
* Panel factory recommended operation timing.
** Not recommended for normal operation.
SCAN TYPE
Non-interlaced
Non-interlaced
Non-interlaced
Non-interlaced
Non-interlaced
Non-interlaced
Non-interlaced
Non-interlaced
Non-interlaced
Non-interlaced
Non-interlaced
Non-interlaced
Non-interlaced
Non-interlaced
Non-interlaced
Non-interlaced
Non-interlaced
Non-interlaced
Non-interlaced
Non-interlaced
Interlaced
Non-interlaced
PIXEL FREQ.
(MHZ)
25.175
31.50
31.50
28.322
35.50
21.053
25.175
30.24
31.50
31.50
36.00
40.00
50.00
49.50
56.25
57.272
56.00
65.00
75.00
78.75
44.90
94.50
Note: When your KVM Drawer is shipped, the LCD Panel is covered with sheet
of clear plastic. You may leave this plastic in place or remove it when you set
up and start to operate the KVM Drawer.
Power Indicator
•
•
Green
Orange
=
=
On
Off
CHAPTER 3: OPERATING INSTRUCTIONS
7
Chapter 3: Operating Instructions
LCD Panel and OSD Controls
Buttons on the T1500 front LCD panel:
CONTROLS
Power On/Off button
Menu button
Up Arrow button
Down Arrow button
Auto button
DESCRIPTION
Soft power on/off button on front of the KVM Drawer (there is also
an on/off switch on the rear panel of the KVM Drawer).
Adjacent LED is lit green when unit is turned on and orange when
unit is turned off via the on/off button.
Press to access to On-Screen Main Menu and to save settings (if
any).
Press to move upward in an On-Screen Display menu list.
Press to move downward in an On-Screen Display menu list.
Press to Auto-synchronize and scale down display to any valid
factory preset timings.
8
KVM DRAWER T1500 USER MANUAL
Use the buttons located below the LCD panel to view the On Screen Display (OSD). The menu
functions on the OSD allow you to optimize working with and viewing screen images on the KVM
Drawer.
AUTO
MENU
MENU
UP ARROW
DOWN ARROW
AUTO
•
Press the MENU button to display the OSD Main Menu. Options on the OSD Main Menu
allow you to adjust visual functions of the LCD panel including Brightness, Contrast, Color,
Quality, and Position.
•
Press the UP ARROW () or DOWN ARROW () buttons to highlight an OSD Menu
option, and then press the MENU button to execute the highlighted option.
•
Press the AUTO button to allow the KVM Drawer to automatically configure all aspects of
visual display. The message AUTO CONFIGURE! appears and the LCD panel will flicker
momentarily until the KVM Drawer finds the ideal profile.
•
To close the OSD Main Menu, highlight the EXIT function on the Main Menu using the or
buttons, and then press the MENU button.
•
To manually close the OSD Main Menu, press the MENU button twice.
Note: The OSD Menu disappears after 20 seconds if no activity is registered on
the keyboard or touchpad.
Note: When using the KVM Drawer keyboard, be aware that the numeric
keypad is integrated into the alphabet keys; if the <Num Lock> key is
activated, you will type numbers instead of letters. If you have trouble typing
letters, check that the Num Lock key is not activated. The LEDs for <Num
Lock>, <Scroll Lock>, and <Caps Lock> are located above and to the right
of the keyboard.
CHAPTER 3: OPERATING INSTRUCTIONS
9
OSD Main Menu Functions
•
Press the MENU button to display the OSD Main Menu.
•
Press the UP ARROW () or DOWN ARROW () button to highlight an OSD Menu
option, and then press the MENU button to execute the highlighted option.
MAIN MENU
AUTO TUNE
BRIGHTNESS
CONTRAST
COLOR
QUALITY
POSITION
LANGUAGE
RECALL
EXIT
800X600
H37.8KHZ V:59.8HZ
OSD Main Menu
Auto Tune
Select the Auto Tune function to allow the KVM Drawer to automatically adjust all aspects of LCD
panel display. When you select Auto Tune, the LCD panel will flicker momentarily until the KVM
Drawer finds the ideal profile for on-screen display.
AUTO TUNE
DOING
Auto Tune Display
10
KVM DRAWER T1500 USER MANUAL
Brightness
Select the Brightness function to dim or brighten the backlighting of the LCD panel.
1. Press the MENU button to activate the OSD Main Menu.
2. Press the or the button to highlight Brightness and then press the MENU button to
view the Brightness control panel.
BRIGHTNESS
32
Brightness Control Panel
3.
4.
Press the or the button again to increase or decrease the video raster luminance.
Press the MENU button to return to the OSD Main Menu.
Contrast
Select the Contrast function to change the difference in brightness between the light and dark areas
of the LCD panel.
1. Press the MENU button to activate the OSD Main Menu.
2. Press the or the button to highlight Contrast and then press the MENU button to
view the Contrast control panel.
CONTRAST
32
Contrast Control Panel
3.
4.
Press the or the button again to increase or decrease the back light luminance.
Press the MENU button to return to the OSD Main Menu.
CHAPTER 3: OPERATING INSTRUCTIONS
11
Color
Select the Color function to adjust the amount of Red, Green, and Blue in the LCD panel in the same
way you would adjust the RGB values on a television set.
1. Press the MENU button to activate the OSD Main Menu.
2. Press the or the button to highlight Color and then press the MENU button to view
the Color Main Menu.
MAIN MENU
9300
7500
6550
USER
AUTO COLOR
RETURN
800X600
H37.8KHZ V:59.8HZ
Color Main Menu
3.
Press the or the button to select the desired color temperature for the LCD panel
display.
a. Highlight the User function and then press the MENU button to adjust color levels
manually.
MAIN MENU
RED
GREEN
BLUE
RETURN
User Main Menu
i.
On the User Main Menu, use the or the button to highlight the color you
wish to adjust and press the MENU button.
12
KVM DRAWER T1500 USER MANUAL
ii.
Use the and buttons to increase or decrease the color in the selected color’s
control panel.
RED
34
‘Red’ Control Panel
b.
iii. Press the MENU button to return to the Color Main Menu.
iv. Select the Return option and press the MENU button to return to the Color Main
Menu.
Select the Auto Color function on the Color Main Menu to allow the KVM Drawer to
automatically adjust the amount of Red, Green, and Blue on the LCD panel. When
you select Auto Color, the LCD panel will flicker momentarily until the KVM Drawer
finds the ideal color profile for on-screen display.
AUTO COLOR
DOING
Auto Color Panel
c.
On the Color Main Menu, select Return and press the MENU button to return to the
OSD Main Menu.
CHAPTER 3: OPERATING INSTRUCTIONS
13
Quality
Select the Quality function on the OSD Main Menu to adjust the size and clarity of the appearance of
text and graphics displayed on the LCD panel. Quality options include Size, Phase, Noise,
Text/Graphics, and Sharpness.
1. Press the MENU button to activate the OSD Main Menu.
2. Press the or the button to highlight Quality and then press the MENU button to view
the Quality Main Menu.
MAIN MENU
SIZE
PHASE
NOISE
TEXT/GFX
SHARPNESS
RETURN
800X600
H37.8KHZ V:59.8HZ
Quality Main Menu
3.
Press the or the button to highlight the option you wish to change and then press the
MENU button to view the sub-menu for that option.
a. Size: On the Size control panel, use the and buttons to adjust the size of images
or text on the LCD panel. Press the MENU button to return to the Quality Main Menu.
SIZE
1056
Size Control Panel
14
KVM DRAWER T1500 USER MANUAL
b.
Phase: On the Phase control panel, use the and buttons to adjust the vertical
timing of images on the LCD panel. Press the MENU button to return to the Quality
Main Menu.
PHASE
42
Phase Control Panel
c.
Noise: On the Noise control panel, use the and buttons to adjust electrical
interference or “snow” that appears on the LCD Panel. Press the MENU button to
return to the Quality Main Menu.
NOISE
40
Noise Control Panel
d.
Text: This function is not enabled at this time.
TEXT
NO EFFECT!
Text Panel
CHAPTER 3: OPERATING INSTRUCTIONS
e.
15
Sharpness: On the Sharpness control panel, use the and buttons to increase or
decrease the crispness of the image edges on the LCD panel. Press the MENU button
to return to the Quality Main Menu.
SHARPNESS
8
Sharpness Control Panel
4.
On the Quality Main Menu, select Return and press the MENU button to return to the
OSD Main Menu.
Position
Select the Position function to change the location of graphics displayed on the LCD panel.
1. Press the MENU button to activate the OSD Main Menu.
2. Press the or the button to highlight Position and then press the MENU button to view
the Position Main Menu.
MAIN MENU
IMAGE POS.
OSD POS.
RETURN
800X600
H37.8KHZ V:59.8HZ
Position Main Menu
3.
Press the or the button to highlight the option you wish to change and then press the
MENU button to view the sub-menu for that option.
16
KVM DRAWER T1500 USER MANUAL
a.
Select Image Pos. to adjust the position of the images on the LCD Panel.
MAIN MENU
HORIZONTAL
VERTICAL
CENTER
RETURN
800X600
H37.8KHZ V:59.8HZ
Image Position Main Menu
b.
Select OSD Pos. to adjust the position of the On Screen Display panel on the LCD
panel.
MAIN MENU
HORIZONTAL
VERTICAL
CENTER
RETURN
800X600
H37.8KHZ V:59.8HZ
OSD Position Main Menu
i.
Select the Horizontal function to move images left or right. When the Horizontal
control panel appears, use the or the buttons adjust the image(s) and then
press the MENU button to return to the Image Position or OSD Position Main
Menu.
HORIZONTAL
45
Horizontal Control Panel
CHAPTER 3: OPERATING INSTRUCTIONS
ii.
17
Select Vertical to move the entire contents of the LCD panel up or down. When
the Vertical control panel appears, use the or the button adjust the image(s)
and then press the MENU button to return to the Image Position or OSD Position
Main Menu.
VERTICAL
45
Vertical Control Panel
iii. Select the Center function if you want the KVM Drawer to center the image(s)
on the LCD panel automatically.
CENTER
DOING!
Centering Panel
4.
iv. On the Image Position or OSD Position Main Menu, select the Return option
and press the MENU button to return to the Position Main Menu.
On the Position Main Menu, select Return and press the MENU button to return to the
OSD Main Menu.
18
KVM DRAWER T1500 USER MANUAL
Language
Select the Language function to display all OSD menus in your preferred language. Options on the
KVM Drawer include English, German, French, Italian, and Spanish.
1. Press the MENU button to activate the OSD Main Menu.
2. Press the or the button to highlight Language and then press the MENU button to
view the Language Main Menu.
3. Press the or the button to highlight your language of choice and then press the
MENU button. The chosen language will be reflected immediately.
MAIN MENU
ENGLISH
GERMAN
FRENCH
ITALIAN
SPANISH
800X600
H37.8KHZ V:59.8HZ
Language Main Menu
Recall
Select the Recall function to revert any changed LCD panel settings to the original factory settings
set by Raritan before shipment.
1. Press the MENU button to activate the OSD Main Menu.
2. Press the or the button to highlight Recall and press the MENU button to view the
Recall Control Panel.
RECALL
YES
NO
Recall Control Panel
3.
Press the or the button to highlight YES or NO and press the MENU button to
execute the recall.
CHAPTER 3: OPERATING INSTRUCTIONS
Exit
Select the Exit function to close the OSD Main Menu.
1. Press the MENU button to activate the OSD Main Menu.
2. Press the or the button to highlight Exit and press the MENU button to close the
OSD Main Menu.
Note: The OSD Menu disappears after 20 seconds if no activity is registered on
the keyboard or touchpad.
19
20
KVM DRAWER T1500 USER MANUAL
APPENDIX A: SPECIFICATIONS
21
Appendix A: Specifications
KVM Drawer T1500
Standard
Dimension (W x H x D)
Display Type
Tempered Glass for LCD
Maximum Resolution
Input signal format
Keyboard
Touchpad
Gross Weight
Power
Warranty
Certification
Meets EIA RS-310C 1U 19” rack mount standard
17.34” x 1.73” x 19.5” (440mm x 44mm x 495 mm)
LCD, TFT panel display, 15” (381mm) diagonal
.08” x 9.8” x 13.1” (2mm x 249mm x 333 mm)
XGA (1024 x 768)
RGB Analog Video
PS/2 notebook style with touchpad
Integrated touchpad with two-button control
37.5 lb. (17 kg)
90~264VAC
47~63Hz, auto-switching
2 Years
CE, UL
LCD Panel
•
•
•
•
•
LCD Panel: 15.1” AM TFT
Input Signal Format: RGB analog video
Frequency: FH 30Khz – 70Khz, FV 50hz – 85hz
Maximum Resolution: 1024 (H) x 768 (V)
Input Power: 88VAC – 264VAC, 50 – 60hz
22
KVM DRAWER T1500 USER MANUAL
Model Differentiation
Raritan offers three KVM Drawer models: the T1500, the TZ1500, and the TP1500.
•
The T1500 allows management of data center and server room servers directly from the racks in
which they are installed while maximizing rack space for the servers.
•
The TZ1500 integrates Raritan’s Z-Series switchless KVM switch and enables selection and
control of up to 42 servers. It is ideal for server management where space is at a premium or
where access distance is up to 1,000 feet in areas such as corporate data centers, ISPs,
co-location, web hosting facilities, computer test labs, call centers, help desks and training
room.
•
The TP1500 offers another way to access the power of Paragon, Raritan’s all Category 5 UTP
cable-based KVM switch, which is built for small to mid-sized data centers, server rooms, call
centers and hardware/software test labs.
APPENDIX B: TROUBLESHOOTING
23
Appendix B: Troubleshooting
PROBLEM /DESCRIPTION
Blank Screen
SUGGESTION
• Press soft power button. Check if power LED is lit.
• If LED turns green, check if PC has been powered on.
Confirm that all cables are connected.
• If LED turns orange, check if PC is in the power saving
mode by pressing any key on the keyboard.
Rolling Screen
• Change PC display resolution to 1024x768 at 60hz. (Refer
to video card manual.)
• Unplug power adapter to monitor and plug it back in.
• Press monitor power button.
• Recall factory setting (see Chapter 3: Operating
Instructions; Recall for more information).
• Press the AUTO button.
Unstable Screen
• Check if PC display resolution is no greater than 1024 x 768
at 85hz.
• Check if PC display resolution matches the factory preset
timings.
• Change PC display resolution to 1024x768 at 60hz. (Refer
to video card manual.)
• Recall factory setting (see Chapter 3: Operating
Instructions; Recall for more information).
• Press the AUTO button.
• Check if PC display resolution matches the factory preset
timings.
• Recall factory setting (see Chapter 3: Operating
Instructions; Recall for more information).
• Fine-tune the screen by first adjusting Pitch, then Phase, and
finally, Position.
• Refer to Chapter 3: Operating Instructions and review all
OSD functions to see which adjustment will help LCD panel
appearance.
Screen is not perfect
255-37-0040