1
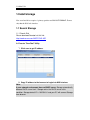
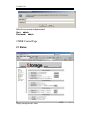
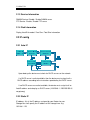
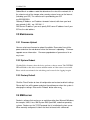
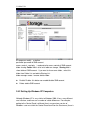
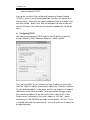
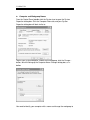
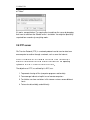
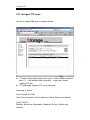
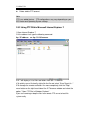
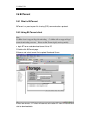
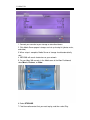
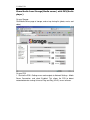
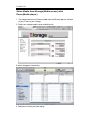
CoolMax USA
CoolMax CN-390
NAS User Guide
CoolMax USA
Instructions for First Time users:
1. Place the new hard drive into the NAS unit
2. Hard drives,
a. For new hard drives, use USB connection and partition the drive to 1
primary partition; DO NOT FORMAT
b. For old hard drives, you will need to erase your drive; delete partition
and partition the drive to 1 primary partition; DO NOT FORMAT
Note: If your hard drive is from a proprietary company like Dell, Compaq,
IBM… etc; Your drive may not work due to security feature on the drive.
3.
4.
5.
6.
7.
8.
9.
You will need to contact their support respectively. Then follow step 2
Download ScanTool to search for the NAS IP address provided by DHCP on
your router
Remove USB and plug the RJ45 to your router’s Ethernet port
Copy the IP address from ScanTool to your browser
Login information:
a. User: admin
b. Pass: admin
Once logged in, click on Disk Utility
Click on Format
- This formats and prepares the hard drive for NAS use.
For other features and usage; please read further instructions below.
Note: every change of settings, we suggest restarting the NAS to confirm changes.
CoolMax USA
1.Install storage
Note: new hard drives requires 1 primary partition and DO NOT FORMAT; Format
only thru the NAS web interface.
1.1 Search Storage
1.1.1 Search Disk
Please download Scantool vis this link:
http://coolmaxusa.com/NASTOOLS.ASP
A. Execute "ScanTool" Utility
1. Click scan to get IP address
2. Copy IP address to the browser to Login into NAS interface
Note:
If your network environment have no DHCP server: Storage automatically
become DHCP server itself . Storage role in the DHCP server in this
condition .Storage default IP is 169.254.0.1 and your PC will connect Storage
from browser
CoolMax USA
Default user name and password
User: admin
Password: admin
2.WEB Control Page
2.1 Status
Display storage current status
CoolMax USA
2.1.1 System Information
2.1.1.1 Host Name / Group Name
Click status -> host and group name field -> “Change” button to get into
Identification page
Host Name: default value is STORAGE-XXXX. The last 4 digital xxxx
depend on storage MAC address
。
Storage
on a network need unique names so they can identify and
communicate with each other. It's best to keep host names short (fifteen
characters or less) and easily recognizable.
We recommend that you use only Internet-standard characters in the
computer name. The standard characters are the numbers 0 through 9,
uppercase and lowercase letters from A through Z, and the hyphen (-)
character. Computer names cannot consist entirely of numbers, nor can they
contain spaces. The name also cannot contain special characters, such as the
following:
<>;:"*+=\|?,
Group Name: default value is WORKGROUP
2.1.1.2 Administration
Click status -> administrator field -> “Change” button to get into administration
page
Administrator field : default is “admin” , and this field can’t change by user
Password field
: default is “admin” , this field will change logon WEB
password by user
Verify password
: confirm password
After input password and click “ok” button , browser will re-login ,and pop login
dialog
CoolMax USA
2.1.1.3 Date/Time
Double click status -> Date/Time field -> “Change” button to get into Date and
Time page
Date: set manual Date (yyyy/mm/dd)
Time: set manual Time (hh:mm:ss)
SNTP: enable/disable SNTP client
Time server: locate time server
Time Zone: click your current time zone in the list, and then click OK.
Daylight saving time : If your time zone observes daylight saving time and you
want your storage clock to be adjusted automatically when daylight saving time
changes, make sure the Automatically adjust clock for Daylight Saving Time
check box is selected
2.1.1.4 Firmware version
Display firmware and loader current version
2.1.2 Network Information
2.1.2.1 IP Address
Display storage IP address
2.1.2.2 MAC Address
Display storage MAC address
2.1.2.3 DHCP Server
Enable / Disable DHCP server .
Enable DHCP server , Storage default IP is 169.254.0.1
Disable DHCP server with no DHCP server environment ,the storage IP is
169.254.X.X
Disable DHCP server with DHCP server environment ,the storage get the IP
from DHCP server
CoolMax USA
2.1.3 Service Information
SAMBA Service :Disable / Enable SAMBA server
FTP Service :Disable / Enable FTP server
2.1.4 Disk Information
Display Hard Disk model / Free Size / Total Size information
2.2 IP config
2.2.1 Auto IP
Upon boot-up the device must check for DHCP servers on the network
If a DHCP server is active/available, then the device must assign itself a
DHCP address according to the instructions provided by the DHCP server
If no DHCP servers are active/available, the device must assign itself an
AutoIP address and role play as DHCP server (169.254.0.1 / 255.255.255.0 /
no gateway)
2.2.2 Static IP
IP address: this is the IP address assigned by your Router for your
Storage.You shall specify the IP address of the storage here. e.g.
192.168.1.123
CoolMax USA
Subnet Mask: an address code that determines the size of the network; this is
the subnet mask of the storage, when seen by external users on the Internet
(including your ISP). The subnet mask is provided by your ISP.
e.g.255.255.255.0
Gateway IP Address: an IP address forwards Internet traffic from your local
area network (LAN) . e.g. 192.168.1.1
DNS Server IP address: you must specify DNS server IP address here if your
ISP has the said address.
2.3 Maintenance
2.3.1 Firmware Upload
You can select new firmware to upload if available. Please don't turn off the
power and close the web browser when the firmware is uploading. Firmware
upgrade erases information. Firmware upgrade doesn’t guarantee a fix on
any issues.
2.3.2 System Reboot
Click the Reboot button to have the device perform a software restart. The SYSTEM
LED will blinks as the device restarts and then remain on if the restarts is successful.
Please wait about a minute before refreshing your browser before logging in again
2.3.3 Factory Default
Click the "Reset" button to clear all configuration and restore to default settings.
Please don't turn off the power and close the web browser when the system is
changing the settings. Please click "Reboot" button after reset
.
2.4 SMB server
Samba is software that can be run on a platform other than Microsoft Windows,
for example, UNIX, Linux, IBM System 390, OpenVMS, and other operating
systems. Samba uses the TCP/IP protocol that is installed on the host server.
When correctly configured, it allows that host to interact with a Microsoft
CoolMax USA
Windows client or server as if it is a Windows file and print server.
Share one or more directory trees
Share one or more Distributed filesystem (Dfs) trees
Assist clients with network browsing
Provide or assist with Windows Internet Name Service (WINS)
name-server resolution
Share printers installed on the server among Windows clients on the network (not
support)
Authenticate clients logging onto a Windows domain (not support)
2.4.1 Configure SMB Server
Connect to storage SMB page ,the page as bellow:
NEW: create SMB share account (folder) and password ,
account :guest password:
Modify:
default
CoolMax USA
this page can modify as bellow
password: password of SMB account
access control : read only / read and write access control of SMB account
folder sharing: Folder List is all of exist folder on storage , Sharing List is
share folder of SMB account . If you want to share some folder , select this
folder from Folder List and add to Sharing List .
folder manage :create / rename /delete folder
Enable/ Disable :this button can enable/disable SMB account
Delete: delete SMB account
2.4.2 Setting Up Windows XP Computers
Although Windows XP is very similar to Windows 2000, it has a very different
user interface, and there are a number of subtle differences. For example,
getting to the Control Panel is different than in any previous version of
Windows—one must click the Control Panel item from the Start menu (there is
CoolMax USA
no Settings item in the Start menu in XP). By default, XP will display the
Control Panel in Category View mode. If you see this, click the Switch to
Classic View item in the upper-left corner of the window. All of our directions
are for using the Control Panel in Classic View mode.
You should perform the following steps as the Administrator or another user in
the Administrators group.
Networking Components
Go to the Control Panel and double-click the Network and Dial-up Connections
icon. You should see at least one Local Area Connection icon. If there is more
than one, identify the one that corresponds to the network adapter that is
connected to your Samba network. Right-click the Local Area Connection icon
and click the Properties button. (Or double-click the Local Area Connection
icon and then click the Properties button in the dialog box that comes up.) You
should now be looking at the Local Area Connection Properties dialog box, as
shown in bellow
You should see at least the following two components:
•
Client for Microsoft Networks
CoolMax USA
•
Internet Protocol (TCP/IP)
If you do not see either Client for Microsoft Networks or Internet Protocol
(TCP/IP) in your list, you will need to add them. For either, the method is to
click the Install... button, click the type of component (Client or Protocol), and
then click the Add... button. Next, click the component you want to add, and
click the OK button. You should see the component added to the list with the
others.
Configuring TCP/IP
Now click Internet Protocol (TCP/IP) and then click Properties to open the
Internet Protocol (TCP/IP) Properties dialog box, shown in bellow
If you are using DHCP on your network to assign IP addresses dynamically,
select the "Obtain IP address automatically" radio button. Otherwise, select the
"Use the following address:" radio button, and fill in the computer's IP address
and netmask in the spaces provided. You or your network manager should
have selected an address for the client on the same subnet (LAN) as the
Samba server. For example, if the server's address is 192.168.1.1 and its
network mask is 255.255.255.0, you might use the address 192.168.1.12 (if it
is available) along with the same netmask. You can also fill in the IP address of
the default gateway.
CoolMax USA
Computer and Workgroup Names
From the Control Panel, double-click the System icon to open the System
Properties dialog box. Click the Computer Name tab, and your System
Properties dialog box will look similar to:
To give your system computer a name and a workgroup, click the Change...
button, which will bring up the Computer Name Changes dialog box, as in
bellow
You need to identify your computer with a name and change the workgroup to
CoolMax USA
the one you specified in the web page of your Samba server. Don't worry that
Windows forces the workgroup to be all capital letters; it's smart enough to
figure out what you mean when it connects to the network.
Connecting to the Samba Server
Now for the big moment. Your Samba server is running, and you have set up
your Windows XP client to communicate with it. In the Start menu, select My
Computer to open the My Computer window. Click My Network Places, in the
Other Places box in the left part of the window. You should see a folder icon for
the test directory, as shown in bellow
Now click View workgroup computers in the Network Tasks box at the left of
the window. You should see your Samba server listed as a member of the
workgroup. Double-click its icon, and you will see a window that looks like
If you don't see the server listed in the workgroup, don't panic. Select Run...
from the Start menu. A dialog box appears that allows you to type the name of
your server and its share directory in Windows format. For example, you would
enter \\toltec\test, as shown in bellow, and use your server's hostname instead
CoolMax USA
of "Toltec".
If it works, congratulations! Try copying files to and from the server by dragging
their icons to and from the Samba server's test folder. You might be pleasantly
surprised how seamlessly everything works.
2.5 FTP server
File Transfer Protocol (FTP) is a network protocol used to transfer data from
one computer to another through a network, such as over the Internet.
FTP is a file transfer protocol for exchanging files over any TCP/IP based network to
manipulate files on another computer on that network regardless of which operating
systems are involved (if the computers permit FTP access).
The objectives of FTP, as outlined by its RFC, are:
1. To promote sharing of files (computer programs and/or data).
2. To encourage indirect or implicit use of remote computers.
3. To shield a user from variations in file storage systems among different
hosts.
4. To transfer data reliably, and efficiently
CoolMax USA
2.5.1 Configure FTP server
Connect to storage SMB page ,the page as bellow:
FTP port: configure port number, port range is 1025 to 65500 and default
port is 21 . If you behind firewall ,remember to open port number
mapping FTP port
FTP code page: configure FTP server code page
Code page as bellow:
Central Europe (CP1250)
Croat, Czech, Hungarian, Polish, Romanian, Slovak, Slovene and Sorbian.
Cyrillic (CP1251)
Bulgarian, Belorussian, Macedonian, Moldavian, Russian, Serbian and
Ukrainian.
CoolMax USA
Latin I (CP1252)
Albanian, Danish, Dutch, Faroese, Finnish, French, German,
Icelandic, Irish, Italian, Norwegian, Portuguese, Spanish and Swedish.
Baltic (CP1257)
Estonian, Latvian, Lithuanian.
NEW: create FTP share account and password ,default account is "guest"
Modify:
this page can modify as bellow
password: password of FTP account
access control : read only / read and write access control of FTP account
folder sharing: Folder List is all of exist folder on storage , Sharing List is
share folder of FTP account . If you want to share some folder , select this
folder from Folder List and add to Sharing List .
folder manage :create / rename /delete folder
Enable/ Disable :this button can enable/disable FTP account
CoolMax USA
Delete: delete FTP account
Note:
FTP is an added feature. FTP configurations may vary depending on your
ISP, Router and Operating System settings.
2.5.2 Using FTP Within Microsoft Internet Explorer 7
1.Open Internet Explorer 7
2.In the address bar, type the following command:
ftp:// IP address ex: ftp://10.130.xxx.xxx
3.IE 7 will display a list of files and folders from the FTP domain
4.To quickly save a file locally, right-click the file and select "Save Target As..."
5.To manage the remote and locals files more completely, click the 'Page'
menu button on the right-hand side of the IE 7 browser window and select the
option, "Open FTP Site in Windows Explorer"
5.you can now drag-n-drop the files from remote FTP server to local file
system easily
CoolMax USA
2.6 BitTorrent
2.6.1 What is BitTorrent
BitTorrent is a peer-to-peer file sharing (P2P) communications protocol.
2.6.3 Using Bit Torrent client
Note:
CoolMax doesn’t support illegal downloading. CoolMax will not support illegal
torrent downloading concerns. Please use Bit Torrent legally and responsibly.
1. login BT forum and download torrent file to PC
2 Double click BitTorrent page
3.Browse and select torrent file to upload Download Queue
4.After few minutes , BT client will connect to the other BT client in internet and
start to download data
CoolMax USA
5.When torrent download percentage show 100% ,the data will store in
download path
6.You can access file from SMB client or FTP client on the PC
7. Information and configuration :
System ID: torrent ID
Number of the Downloads: number of torrent active
Server Port: BT server upload port
Upload Limit: BT server upload throughput control
8. Mail Notification : when user stop or remove torrent ,storage will send the
mail alarm to administrator email box
Enable: enable or disable mail alarm
SMTP Server: SMTP server address or IP (ex: ms48.url.com.tw)
Sender: email of sender (ex: sender@ ms48.url.com.tw)
Recipient: email of recipient (ex: recipient@ ms44.url.com.tw)
Mail Authentication: enable or disable Mail Authentication ,if you need.
User Name: user name of Email account (SMTP/POP3 user name)
Password: password of Email account (SMTP/POP3 password)
CoolMax USA
9. Button of torrent queue
Path: open file manager by Samba (Network Neighborhood)
FTP: open file by default FTP client of PC (default path is public)
Restart: you can select a torrent to restart from download queue
Pause: pause you can select a torrent to pause from download queue
Show: show all BT information
Remove: you can select a torrent to pause from download queue
2.6.4 Mail Notification
Enable: enable /disable mail notification check box
SMTP server: SMTP server address
Sender: the address which send from.
Recipient: the address which send to.
Mail Authentication: enable /disable mail authentication check box
User name :mail authentication user name
Password: mail authentication password
2.7 Disk Utility
Format Disk: the format utility ,it will erase all data on Hard Drive
Sleep Time: configure the time Hard Drive get into sleep mode
Scan Disk :the scan disk utility , it will check error data in Hard Drive
2.8 Print server
1. Plug printer to USB host first
2. Ensure that Add Print Services is installed from WEB page
Note: The network printer or device will need a static IP address to be seen
on your network by the computer
CoolMax USA
3. Click Start and select Printers and Faxes.
4. Under Printer Tasks, click Add a Printer. Click Next.
CoolMax USA
5. Select the Local Printer attached to this computer radio button.
6. Uncheck the automatically detect and install my Plug and Play
printer check box.
7. Click Next.
8. Select the Create New Port radio button.
9. From the Type of port: drop down list choose Standard TCP/IP Port.
Click Next.
Note: You will now be prompted for 2 items: the Name or address of
server providing lpd and the Name of printer or print queue on that
server. The 1st item is the Static IP address that has been assigned to the
device. The 2nd item is the Queue Name that you found in the device's
documentation.
10. In the Name or address of server providing lpd box, enter the IP
Address of the device.
CoolMax USA
11.
Select configuration
CoolMax USA
12. setup protocol LPR and queue name
Note: If you receive an error message saying that the "LPD server did not
respond as expected ...", click Cancel. Attempt to reenter the IP Address or
Print Queue name. Click OK again. If this process fails, the device may not
support LPR printing. You should stop now and contact the manufacturer
for further assistance.
13. If Step 10 completed successfully, you are now ready to install the
driver. Click Have Disk. Click Browse.
14. Locate and select the .INF file for the device. You may need to browse
to the CD or to the folder on your computer where you have the device
driver downloaded.
15. When ready, click Next.
Note: If you are prompted to replace or keep existing driver, click on Keep
Existing Driver. Click Next.
16. When asked to print a test page, click No. Click Next. Click Finish.
CoolMax USA
Note: At this point, you should have the device listed in the Printers and
Faxes folder. You can attempt to use it as a printer.
2.9 Media Server
o
o
o
o
1.Select Media Server sharing folder
2.Double click set button
3.Make sure media server (storage) is same subnet with media
player (X box 360 PS3 and iTunes)
4.Browse content from iTunes (music only) , Xbox 360 and PS3
(music ,photo video )
Share Media from Storage(Media server) with Xbox
360(Media player)
To access media files—including audio, video and pictures—from storage, you
need to connect an Ethernet cable from the Ethernet port on the back of your
Xbox 360 console to your Storage.
CoolMax USA
1. Connect your console to your storage as described above.
2. Click Media Server page of storage, and set up sharing list (photo, music,
and video)
3. When setup is complete, Media Server of storage should automatically
start.
4. XBOX360 will search for devices on your network.
5. On your Xbox 360 console, in the Media area of the Xbox Dashboard,
select Music, Pictures, or Video.
6. Select STORAGE.
7. Find the media content that you want to play, and then select Play.
CoolMax USA
Share Media from Storage(Media server) with PS3(Media
player)
On your Storage:
Click Media Server page of storage, and set up sharing list (photo, music, and
video)
On your PS3:
1. Go into the PS3's Settings menu and navigate to Network Settings - Media
Server Connection, and select Enabled. This allows the PS3 to detect
networked device running Universal Plug and Play (UPnP) server software.
CoolMax USA
2. When you turn on the PS3™ system,
Media Servers on the same
network are automatically detected and icons for the detected servers are
displayed under
(Photo),
(Music), and
(Video).
3. Select the icon of the DLNA Media Server that you want to connect to under
(Photo), (Music), or
(Video) in the home menu. All available folders
and files that can be played by the PS3™ system will be displayed.
4.Select the file that you want to play.
CoolMax USA
Hints for PS3
•
The PS3™ system must be connected to a network. For details on
network settings, see
(Settings) >
(Network Settings) > [Internet
Connection Settings] in this guide.
•
When the method of allocating IP addresses has been changed from
AutoIP to DHCP under the settings for the network environment,
perform another search for servers under
(Search for Media
Servers).
•
The DLNA Media Server icon is only displayed when [Media Server
Connection] is enabled under
•
(Settings) >
(Network Settings).
The folder names that are displayed vary depending on the DLNA
Media Server.
•
Depending on the DLNA Media Server, some files may not be playable
or operations that can be performed during playback may be restricted.
•
You cannot play copyright-protected content.
•
File names for data that is stored on servers that are not compliant with
DLNA may have an asterisk appended to the file name. In some cases,
these files cannot be played on the PS3™ system. Also, even if the files
can be played on the PS3™ system, it might not be possible to play the
files on other devices.
CoolMax USA
Share Media from Storage(Media server) with
iTuner(Media player)
1. You need to connect an Ethernet cable from the Ethernet port on the back
of your iTunes to your storage
2. Make sure storage media server enable (music)
3.select storage on shared class
4. Find the music that you want to play.