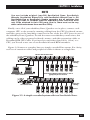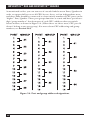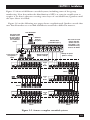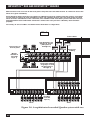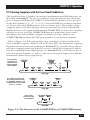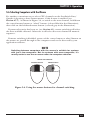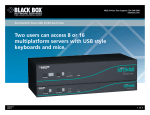
1
MAY 2002
KV6104SA-R2
KV6108SA-R2
KV6112FA-R2
KV6116FA-R2
KV6416FA-R2
Customer Support Information:
FREE tech support 24 hours a day, 7 days a week: Call 724-746-5500 or fax 724-746-0746.
Mailing address: Black Box Corporation, 1000 Park Dr., Lawrence, PA 15055-1018
World-Wide Web: www.blackbox.com • E-mail: [email protected]
© Copyright 2002. Black Box Corporation. All rights reserved.
THE SERVSWITCH™ FAMILY
Welcome to the ServSwitchTM Family!
Thank you for purchasing a BLACK BOX® ServSwitch™ Brand KVM switch! We
appreciate your business, and we think you’ll appreciate the many ways that your
new ServSwitch keyboard/video/mouse switch will save you money, time, and
effort.
That’s because our ServSwitch family is all about breaking away from the
traditional, expensive model of computer management. You know, the one-sizefits-all-even-if-it-doesn’t model that says, “One computer gets one user station, no
more, no less.” Why not a single user station (monitor, keyboard, and mouse) for
multiple computers—even computers of different platforms? Why not a pair of
user stations, each of which can control multiple computers? Why not multiple
user stations for the same computer?
With our ServSwitch products, there’s no reason why not. We carry a broad line
of robust solutions for all these applications. Do you have just two PCs, and need
an economical alternative to keeping two monitors, keyboards, and mice on your
desk? Or do you need to share dozens of computers, including a mix of IBM® PC,
RS/6000®, Apple® Macintosh®, Sun Microsystems®, and SGI® compatibles among
multiple users with different access levels? Does your switch have to sit solidly on a
worktable and use regular everyday cables? Or does it have to be mounted in an
equipment rack and use convenient many-to-one cables? No matter how large or
small your setup is, no matter how simple or how complex, we’re confident we
have a ServSwitch system that’s just right for you.
The ServSwitch™ family from Black Box—the one-stop answer for all your KVMswitching needs!
*
This manual will tell you all about your new ServSwitch™ Duo or ServSwitch
Quadro, including how to install, operate, and troubleshoot it. For an introduction
to the Duo and Quadro, see Chapter 2. The Duo and Quadro product codes
covered in this manual are:
KV6104SA-R2 KV6108SA-R2 KV6112FA-R2 KV6116FA-R2 KV6416FA-R2
This manual also includes information about the ServSwitch Duo Extender,
which comes with its own manual. Its product codes are:
KV6EXT-R2 KV6EXTB-R2
1
SERVSWITCH™ DUO AND SERVSWITCH™ QUADRO
TRADEMARKS USED IN THIS MANUAL
BLACK BOX and the
logo are registered trademarks, and ServSwitch,
ServSwitch Duo, ServSwitch Quadro, ServSwitch Wizard, ServSwitch Wizard LP,
and ServSwitch Wizard Pro are trademarks, of Black Box Corporation.
Apple and Macintosh are registered trademarks of Apple Computer, Inc.
Compaq and Alpha are registered trademarks of Compaq Computer Corporation.
Hewlett-Packard, HP, and Vectra are registered trademarks of Hewlett-Packard.
IBM, PC/AT, PS/2, RS/6000, and ThinkPad are registered trademarks, and
PC/XT is a trademark, of International Business Machines Corporation.
Microsoft, IntelliMouse, MS-DOS, Windows, Windows Me, and Windows NT are
registered trademarks or trademarks of Microsoft Corporation in the United
States and/or other countries.
Sun Microsystems is a registered trademark of Sun Microsystems, Inc. in the
United States and other countries.
Any other trademarks mentioned in this manual are acknowledged to be the property of the
trademark owners.
2
FCC/IC STATEMENTS
FEDERAL COMMUNICATIONS COMMISSION AND INDUSTRY CANADA
RADIO-FREQUENCY INTERFERENCE STATEMENTS
This equipment generates, uses, and can radiate radio-frequency energy, and if not
installed and used properly, that is, in strict accordance with the manufacturer’s
instructions, may cause interference to radio communication. It has been tested
and found to comply with the limits for a Class A computing device in accordance
with the specifications in Subpart B of Part 15 of FCC rules, which are designed to
provide reasonable protection against such interference when the equipment is
operated in a commercial environment. Operation of this equipment in a
residential area is likely to cause interference, in which case the user at his own
expense will be required to take whatever measures may be necessary to correct the
interference.
Changes or modifications not expressly approved by the party responsible for
compliance could void the user’s authority to operate the equipment.
Shielded cables must be used with this equipment to maintain compliance with
radio-frequency energy-emission regulations and ensure a suitably high level of
immunity to electromagnetic disturbances.
This digital apparatus does not exceed the Class A limits for radio noise emission from digital
apparatus set out in the Radio Interference Regulation of Industry Canada.
Le présent appareil numérique n’émet pas de bruits radioélectriques dépassant les limites
applicables aux appareils numériques de la classe A prescrites dans le Règlement sur le
brouillage radioélectrique publié par Industrie Canada.
3
SERVSWITCH™ DUO AND SERVSWITCH™ QUADRO
EUROPEAN UNION DECLARATION OF CONFORMITY
This equipment has been tested and found to comply with the limits for a class A
computing device in accordance with the specifications in the European standard
EN55022. These limits are designed to provide reasonable protection against
harmful interference. This equipment generates, uses and can radiate radio
frequency energy and if not installed and used in accordance with the instructions
may cause harmful interference to radio or television reception. However, there is
no guarantee that harmful interference will not occur in a particular installation. If
this equipment does cause interference to radio or television reception, which can
be determined by turning the equipment on and off, the user is encouraged to
correct the interference with one or more of the following measures:
(a) Reorient or relocate the receiving antenna.
(b) Increase the separation between the equipment and the receiver.
(c) Connect the equipment to an outlet on a circuit different from that to which
the receiver is connected.
(d) Consult the supplier or an experienced radio/TV technician for help.
Shielded cables must be used with this equipment to maintain compliance with
radio-frequency energy-emission regulations and ensure a suitably high level of
immunity to electromagnetic disturbances.
4
NOM STATEMENT
NORMAS OFICIALES MEXICANAS (NOM)
ELECTRICAL SAFETY STATEMENT
INSTRUCCIONES DE SEGURIDAD
1. Todas las instrucciones de seguridad y operación deberán ser leídas antes de
que el aparato eléctrico sea operado.
2. Las instrucciones de seguridad y operación deberán ser guardadas para
referencia futura.
3. Todas las advertencias en el aparato eléctrico y en sus instrucciones de
operación deben ser respetadas.
4. Todas las instrucciones de operación y uso deben ser seguidas.
5. El aparato eléctrico no deberá ser usado cerca del agua—por ejemplo, cerca
de la tina de baño, lavabo, sótano mojado o cerca de una alberca, etc.
6. El aparato eléctrico debe ser usado únicamente con carritos o pedestales que
sean recomendados por el fabricante.
7. El aparato eléctrico debe ser montado a la pared o al techo sólo como sea
recomendado por el fabricante.
8. Servicio—El usuario no debe intentar dar servicio al equipo eléctrico más allá
a lo descrito en las instrucciones de operación. Todo otro servicio deberá ser
referido a personal de servicio calificado.
9. El aparato eléctrico debe ser situado de tal manera que su posición no
interfiera su uso. La colocación del aparato eléctrico sobre una cama, sofá,
alfombra o superficie similar puede bloquea la ventilación, no se debe colocar
en libreros o gabinetes que impidan el flujo de aire por los orificios de
ventilación.
10. El equipo eléctrico deber ser situado fuera del alcance de fuentes de calor
como radiadores, registros de calor, estufas u otros aparatos (incluyendo
amplificadores) que producen calor.
11. El aparato eléctrico deberá ser connectado a una fuente de poder sólo del
tipo descrito en el instructivo de operación, o como se indique en el aparato.
5
SERVSWITCH™ DUO AND SERVSWITCH™ QUADRO
12. Precaución debe ser tomada de tal manera que la tierra fisica y la polarización
del equipo no sea eliminada.
13. Los cables de la fuente de poder deben ser guiados de tal manera que no
sean pisados ni pellizcados por objetos colocados sobre o contra ellos,
poniendo particular atención a los contactos y receptáculos donde salen del
aparato.
14. El equipo eléctrico debe ser limpiado únicamente de acuerdo a las
recomendaciones del fabricante.
15. En caso de existir, una antena externa deberá ser localizada lejos de las lineas
de energia.
16. El cable de corriente deberá ser desconectado del cuando el equipo no sea
usado por un largo periodo de tiempo.
17. Cuidado debe ser tomado de tal manera que objectos liquidos no sean
derramados sobre la cubierta u orificios de ventilación.
18. Servicio por personal calificado deberá ser provisto cuando:
A: El cable de poder o el contacto ha sido dañado; u
B: Objectos han caído o líquido ha sido derramado dentro del aparato; o
C: El aparato ha sido expuesto a la lluvia; o
D: El aparato parece no operar normalmente o muestra un cambio en su
desempeño; o
E: El aparato ha sido tirado o su cubierta ha sido dañada.
6
TABLE OF CONTENTS
Contents
Chapter
Page
1.
Specifications ........................................................................................................... 9
2.
Introduction ...........................................................................................................
2.1 Features and Benefits ....................................................................................
2.2 The Complete Package ..................................................................................
2.3 The ServSwitch Duo and Quadro Illustrated ...............................................
2.4 Safety Concerns ..............................................................................................
12
13
15
16
18
3.
Installation .............................................................................................................
3.1 What You Will Need .......................................................................................
3.2 Placement .......................................................................................................
3.3 Maintaining Video Quality ............................................................................
3.4 Connecting Your Equipment ........................................................................
3.4.1 Systems with a Single Duo/Quadro and Directly Attached
User Stations ...................................................................................
3.4.2 Systems with a Single Duo/Quadro and a Duo Extender ................
3.4.3 Cascaded Duo/Quadro Systems ........................................................
3.4.4 Premium KVM Cables, ServSwitch Extenders, and
PC/AT Adapters ............................................................................
3.5 Powering the Duo/Quadro ...........................................................................
19
19
20
20
21
4.
Configuration ........................................................................................................
4.1 Configuring Your PCs ....................................................................................
4.2 Configuring the Duo/Quadro System .........................................................
4.3 Enabling Password Security ...........................................................................
4.4 Setting an ADMIN Password .........................................................................
4.5 Creating and Editing User Accounts ............................................................
4.6 Creating and Editing Computer Names .......................................................
4.6.1 The Basic Procedures .......................................................................
4.6.2 Creating Entries for Computers Attached to a
Cascaded Duo/Quadro System ..................................................
4.7 Setting the SETUP OPTIONS and GLOBAL PREFERENCES ...................
4.7.1 Security ..............................................................................................
4.7.2 Language ..........................................................................................
4.7.3 Hotkeys ..............................................................................................
4.7.4 Keypad Controls ...............................................................................
4.7.5 Exclusive Use ....................................................................................
4.7.6 Automatic Logout ............................................................................
4.7.7 Mouse Switching ...............................................................................
4.7.8 Screen Saver ......................................................................................
4.7.9 Autoscan Mode .................................................................................
4.7.10 Autoscan Period ...............................................................................
4.7.11 OSD Dwell Time ...............................................................................
4.7.12 User Timeout ....................................................................................
4.7.13 RS-232 Mouse Type ..........................................................................
4.8 Setting Up the Autoscan List ........................................................................
22
23
24
32
34
35
35
35
37
38
39
40
41
42
44
44
44
45
45
46
46
47
47
48
48
49
49
50
50
7
SERVSWITCH™ DUO AND SERVSWITCH™ QUADRO
Contents (continued)
Chapter
5.
6.
Page
Operation ...............................................................................................................
5.1 Controls and Indicators ...............................................................................
5.2 Selecting Computers with the Front-Panel Pushbutttons ..........................
5.3 Logging Onto the Duo/Quadro System ....................................................
5.4 Things to Keep in Mind About the Keyboards and Mice ..........................
5.5 Keyboard Hotkey Commands .....................................................................
5.6 Selecting Computers with the Mouse .........................................................
5.7 Re-Enabling a Disconnected PS/2 Mouse ..................................................
5.8 Hot-Plugging Devices Into the ServSwitch Duo/Quadro and
Re-Enabling Disconnected CPU PS/2 Mouse Ports .............................
5.9 Resetting the Keyboard and Mouse ............................................................
5.10 Switching Channels by Sending RS-232 Data .............................................
5.11 Selecting Computers Using the On-Screen Menu .....................................
5.12 The Reminder Banner .................................................................................
5.13 Setting the USER PREFERENCES ..............................................................
5.13.1 OSD Colour ....................................................................................
5.13.2 Reminder Banner ...........................................................................
5.13.3 Reminder Colour ...........................................................................
5.13.4 Screen Saver Type ..........................................................................
5.14 Using the FUNCTIONS Menu ....................................................................
5.15 Querying the Routing Status .......................................................................
5.16 Local/Remote Access Sharing in an Extended Duo/Quadro System .....
5.17 Testing Link Cables in a Cascaded Duo/Quadro System with
Grouped Links .........................................................................................
5.18 Restoring to Factory Defaults (If ADMIN Password Lost, Etc.) ................
5.19 Saving and Restoring the Computer/User Configuration to and
from an Excel Compatible File ..............................................................
5.19.1 Saving the Configuration .................................................................
5.19.2 Editing the Configuration ...............................................................
5.19.3 Restoring the Configuration ............................................................
5.20 Upgrading the Duo’s/Quadro’s Firmware ................................................
Troubleshooting ....................................................................................................
6.1 Things to Try ..................................................................................................
6.2 Calling Black Box ...........................................................................................
6.3 Shipping and Packaging ................................................................................
51
51
53
54
54
55
59
60
61
63
64
65
70
71
71
71
71
72
72
73
74
75
76
77
77
78
79
80
84
84
86
86
Appendix A: Cable Guidelines ..................................................................................... 87
A.1 Cabling from the Keyboards, Monitors, and Mice to the
ServSwitch Duo/Quadro or Duo Extender ............................................. 87
A.2 Cabling from the ServSwitch Duo/Quadro to the CPUs ............................ 87
A.3 Cabling from the Duo’s/Quadro’s COMM Port to a PC ............................ 88
A.4 Cabling from the Duo/Quadro to a Duo Extender (Optional) ................. 88
Appendix B: Rackmounting the Duo/Quadro ........................................................... 90
8
CHAPTER 1: Specifications
1. Specifications
Compliance:
CE (EN55022 Class A); FCC Part 15 Subpart B Class A,
IC Class/classe A
Standards:
VGA, SVGA, XGA, XGA-2, SXGA, or UXGA video;
supports VESA DDC, DDC1, and DDC2 signaling
Interfaces:
Video: VGA;
Keyboard and mouse: IBM PS/2 compatible; with
appropriate adapters, also supports IBM PC/AT type
keyboards, CPUs with PC/AT keyboard ports, and
CPUs with EIA/TIA RS-232 mouse ports;
Serial: EIA/TIA RS-232 pinned according to a subset of
TIA-574 (IBM PC serial-port compatible)
Resolution:
Up to 1600 x 1280 noninterlaced at up to 100 Hz
Protocol:
RS-232: Asynchronous
Data Format:
RS-232: 8 data bits, no parity, 1 stop bit
Data Rate:
RS-232: 19,200 bps
Flow Control:
RS-232: None (but DTR, DSR, and CTS are all held high)
Maximum
Distance:
User Controls:
10 m (32 ft.) from the user ports of the Duo/Quadro to
any directly attached keyboard, monitor, and mouse or
cascaded KVM switch;
200 m (655 ft.) from user port #1 of the Duo or user
port #1 or #3 of the Quadro to a Duo Extender
(KV6EXT-R2 or KV6EXTB-R2);
30 m (100 ft.) from the CPU ports of the Duo/Quadro to
any directly attached CPU or cascaded KVM switch
On-screen menus;
Keyboard commands;
Mouse-click functions;
(1) Front-mounted pushbutton for CPU selection;
(1) Front-mounted pushbutton for user selection;
(1) Rear-mounted 2-position DIP switch for firmware
upgrade
9
SERVSWITCH™ DUO AND SERVSWITCH™ QUADRO
Indicators:
All front-mounted;
(2) Power LEDs, (1) for each power supply;
(1) Activity LED for each user port ([2] for the Duo,
[4] for the Quadro);
(1) Single-character 7-segment display to show the
selected user;
(1) 7-segment display to show selected computer and
other messages:
KV6104SA-R2 and KV6108SA-R2: Single-character;
KV6112FA-R2, KV6116FA-R2, and KV6416FA-R2: Dualcharacter
Connectors:
All rear-mounted;
(2) Barrel jacks for power input;
(1) DB9 female serial port (see Section A.3 of
Appendix A);
Local-user ports, each consisting of (1) HD15 female for
monitor attachment and (2) 6-pin mini-DIN female for
keyboard and mouse attachment:
Duo: (2);
Quadro: (4);
Remote-user ports, each consisting of (1) RJ-45 female
for Duo Extender attachment:
Duo: (1);
Quadro: (2);
CPU ports, each consisting of (1) HD15 female for videoport attachment and (2) 6-pin mini-DIN female for
keyboard- and mouse-port attachment:
KV6104SA-R2: (4);
KV6108SA-R2: (8);
KV6112FA-R2: (12);
KV6116FA-R2, KV6416FA-R2: (16)
MTBF:
500,000 hours (based on the historical reliability of
similarly designed and manufactured products)
Maximum
Altitude:
10,000 ft. (3048 m)
Temperature
Tolerance:
32 to 104˚F (0 to 40˚C)
10
CHAPTER 1: Specifications
Humidity
Tolerance:
5 to 60% noncondensing
Enclosure:
Steel, aluminum, and plastic
Power:
From utility-power outlet, through detachable power
cord and IEC 320 male inlet, to external transformer:
Input: 100 to 240 VAC at 50 to 60 Hz;
Output: 5 VDC at up to 2 A;
Consumption: 10 watts maximum
Size:
KV6104SA-R2, KV6108SA-R2:
1.75"H (1U) x 17.3"W x 8.7"D (4.4 x 43.9 x 22.1 cm);
KV6112FA-R2, KV6116FA-R2, KV6416FA-R2:
3.5"H (2U) x 17.3"W x 8.7"D (8.9 x 43.9 x 22.1 cm)
Weight:
KV6104SA-R2: 5.1 lb. (2.3 kg);
KV6108SA-R2: 5.3 lb. (2.4 kg);
KV6112FA-R2: 7.8 lb. (3.5 kg);
KV6116FA-R2, KV6416FA-R2: 8 lb. (3.6 kg)
11
SERVSWITCH™ DUO AND SERVSWITCH™ QUADRO
2. Introduction
The ServSwitch™ Duo and ServSwitch™ Quadro are high-performance keyboard-,
video-monitor-, and mouse-sharing (KVM-sharing) devices that support a wide
range of IBM® PC compatible hardware and software platforms, including some
high-end IBM PS/2® compatible computers (IBM RS/6000®, Compaq® Alpha®, and
SGI™). The Duo makes it possible for two users to independently access a set of
attached computers:
• The 4-Port (KV6104SA-R2) and 8-Port (KV6108SA-R2) ServSwitch Duos are
housed in a slimline 1U-high chassis. You can attach four and eight computers
to them respectively.
• The 12-Port (KV6112FA-R2) and 16-Port (KV6116FA-R2) ServSwitch Duos are
housed in a full-size 2U-high chassis. You can attach twelve and sixteen
computers to them respectively.
The Quadro (KV6416FA-R2) makes it possible for as many as four users to access
as many as sixteen computers. It’s housed in a full-size 2U-high chassis.
NOTE
Aside from the fact that the Duo supports two users and the Quadro
supports up to four, the Duo and Quadro function almost identically. For
this reason, whenever we refer to anything in this manual that applies
equally to both model types (which is true for most of the text), we
usually use combined forms such as “Duo/Quadro."
You can control most of the functions of the ServSwitch Duo/Quadro through
an on-screen display (OSD) that appears on the users’ monitors. This display
includes a menu system for easy computer selection and control—users can select
computers by name or description instead of having to remember which port the
computer is attached to. There are also menus through which the system
administrator can allocate access rights to each user on a login basis.
One of the Duo’s user ports and two of the Quadro’s user ports are “dual-access”
ports: Not only do they have one set of connectors that you can plug a local
keyboard, mouse, and monitor into, but they also have an RJ-45 connector from
which you can run Category 5 twisted-pair cable as far as 200 m (655 ft.) to a
remote keyboard, mouse, and monitor attached to a ServSwitch Duo Extender
(KV6EXTB-R2 for the basic model or KV6EXT-R2 for the model that supports a
remote CPU). Do not attach this port to a LAN; you could damage the Duo/
Quadro and possibly the network as well.
12
CHAPTER 2: Introduction
NOTE
The “-R2” versions of the ServSwitch Duo and Duo Extender are very
different from the original (non-R2) versions. You can connect original
and -R2 Duos in the same cascade, but the original Duos must be used
only on the “lowest level” (that is, they mustn’t have any other switches
between them and the CPUs). It’s possible to use an original Extender
with an -R2 Duo, although we don’t recommend this because the
original Extender can’t make use of the -R2 Duo’s RJ-45 remote user
port. The -R2 Extender can’t be used with the original Duo.
2.1 Features and Benefits
Here are some of the useful features of the ServSwitch Duo/Quadro and some of
the ways those features benefit you:
• Control multiple computer CPUs from two (Duo) or up to four (Quadro)
keyboard/mouse/monitor user stations.
• CPUs can be selected by name or description through an on-screen menu.
• CPUs can be selected for either exclusive, shared, or video-only access.
• Security is configurable; administrators can assign access rights to login-based
user profiles.
• Supports up to 16 user profiles and 512 named CPUs.
• Can be set to autoscan all CPUs, active CPUs, or a list of chosen CPUs.
• One (Duo) or two (Quadro) user ports support both a local and a remote user
that share access to the CPUs on a timeout basis.
• Remote users are connected through a Duo Extender that can be as far as
200 m (655 ft.) of Category 5 cable away.
• Dual redundant power supplies for reliability and peace of mind.
• Continuous keyboard and mouse emulation on all ports ensures reliable
computer bootup. And because all ports are simultaneously active, all attached
CPUs can be booted at the same time.
• Flashable for easy on-site firmware upgrades.
• Serial port for upgrading firmware and uploading and downloading
configuration information.
• Supports high-bandwidth monitors, at resolutions up to 1600 x 1280 pixels and
refresh rates up to 100 Hz, with low distortion.
13
SERVSWITCH™ DUO AND SERVSWITCH™ QUADRO
• Video channels support Display Data Channel (DDC/DDC1/DDC2) signaling.
• The OSD’s position and colors can be independently configured by each user.
• The OSD can be set to appear in either English, French, or German.
• Optional OSD reminder banner permanently displays which computer is
selected.
• Routing-status screen shows which computers are selected by which users.
• Can be cascaded to control a large number of CPUs.
• Supports full acknowledgment signaling across cascades for positive
confirmation of selected ports.
• Local channel switching using its on-screen display, front-panel pushbutton,
a keyboard hotkey sequence, or a 3-button mouse.
• Includes screen-blank, variable-hotkey, and name-search options.
• Automatically restores keyboard and mouse states when channel is changed.
• CPUs can have either PS/2 or PC/AT® keyboard ports and either PS/2 or
RS-232 mouse ports.
• Supports keyboard modes 1, 2, and 3, as well as both “prompt” and “stream”
mouse modes, for maximum compatibility.
• Supports keyboards with extra audio- and Internet-related function keys.
• Support for Microsoft® IntelliMouse™ and many other “wheel mice.”
• Mouse-restoration functions and individual power-down reset of user ports for
hot-plugging/hot-swapping user equipment.
• Supports IBM ThinkPad® notebooks and their “Y” cables.
• Also supports IBM RS/6000®, Compaq® Alpha®, and SGI™ computers.
• Compatible with all popular operating systems for the IBM PC.
• Metal enclosure for good shielding and video quality.
• Low-profile 1U- and 2U-high enclosures can be placed under a monitor on a
desktop or mounted in a 19" rack (rackmount equipment is included).
• Standard PC98-compliant color-coded connectors for easy installation.
14
CHAPTER 2: Introduction
2.2 The Complete Package
Here’s what comes with the ServSwitch Duo/Quadro:
• (1) Power supply. (If you’d like to use a second, redundant power supply,
they’re available separately as product code PS649.)
• (6) Stick-on adhesive rubber feet for placing the Duo/Quadro on a flat
surface.
• (2) Brackets for mounting the Duo/Quadro in a 19" rack.
• Screws for attaching the brackets to the Duo/Quadro: (4) for the 4- and 8-port
Duos, (6) for the 12- and 16-port Duos and the Quadro.
• (1) DB9 female to DB9 male serial cable for configuration uploading/
downloading and flash upgrades.
• (2) 5-pin DIN male to 6-pin mini-DIN female keyboard-port adapters.
• (2) DB9 female to 6-pin mini-DIN female mouse-port adapters.
• This manual.
For information about the complete ServSwitch Duo Extender package, refer to
the Extender’s manual.
15
SERVSWITCH™ DUO AND SERVSWITCH™ QUADRO
2.3 The ServSwitch Duo and Quadro Illustrated
ACTIVITY LEDs show
USER button for
user-port keyboard and
COMPUTER switching between
mouse activity
users
for
COMPUTER
button for
display/control
Green USER
changing
POWER LEDs show
7-segment
selected
whether input power is
LED shows
Red COMPUTER
user’s
being received on the two
which user is
7-segment LED
computer
power jacks
selected for
shows computer
channel
COMPUTER
being accessed
display/control
by selected user
and other
information
Rackmount
holes
Figure 2-1. The front and side panels of the 4- and 8-Port ServSwitch Duos.
COMPUTER
ACTIVITY LEDs show user-port keyboard
USER button for
button for
and mouse activity; LEDs 3 and 4 will be
switching between
changing users for COMPUTER
present only on Quadro
selected
display/control
Green USER
POWER LEDs show
user’s
7-segment
whether input power is
computer
Red COMPUTER
LED shows
being received on the two
channel
7-segment LED
which user is
power jacks
shows computer
selected for
being accessed
COMPUTER
by selected user
display/control
and other
information
Rackmount
holes
Figure 2-2. The front and side panels of the 12- and 16-Port ServSwitch
Duos and the Quadro (Quadro shown).
16
CHAPTER 2: Introduction
COMM
serial port
for various
I/O
functions
Power
jacks
User port #1’s
remote jack
for cable to
Duo Extender
(NOT an
Ethernet
port!)
CPU ports 1 through 8 (ports 5 through 8
are present on 8-port model only)
User
port #2
DIP switch for
upgrade mode
M3 screw thread
for strain relief or
grounding to rack
User-port video
connectors (blue)
User
port #1
CPU-port video connectors (blue)
User-port keyboard
connectors (purple)
User-port mouse
connectors (green)
CPU-port mouse
connectors (green)
CPU-port keyboard
connectors (purple)
Figure 2-3. The rear panel of the 4- and 8-Port ServSwitch Duos.
User-port video
connectors
CPU ports 1 through 16 (ports 13 through 16
(blue)
are present on 16-port model only)
Remote jacks on user User ports #3
and
#4
ports #1 and #3 for
cable to Duo Extender (Quadro only)
CPU-port video connectors (blue)
(NOT Ethernet ports!)
COMM serial port
for various I/O functions
Power
jacks
User
port #1
M3 screw
DIP
thread for switch
strain
for
relief or upgrade
grounding mode
to rack
User-port
mouse
connectors
(green)
User port #2
User-port
keyboard
connectors
(purple)
CPU-port mouse
connectors (green)
CPU-port keyboard
connectors (purple)
Figure 2-4. The rear panel of the 12- and 16-Port ServSwitch Duos and the
Quadro (Quadro shown).
17
SERVSWITCH™ DUO AND SERVSWITCH™ QUADRO
2.4 Safety Concerns
As you prepare to install the ServSwitch Duo/Quadro, please keep these things in
mind:
• The Duo/Quadro is for use in dry, oil-free indoor environments only.
• Do not attempt to fix the Duo/Quadro yourself.
• Follow all warnings and instructions marked on the Duo/Quadro, its power
supply, and any other accessories.
• Regarding the power supply of the Duo/Quadro (or both supplies if you’re
using two of them):
– Warning: The power-supply transformer contains no user-serviceable parts,
but it does contain “live” parts capable of delivering hazardous electric
shocks—do not attempt to dismantle it!
– Make sure that the total current rating of the devices plugged into any AC
outlet that’s supplying the Duo/Quadro is not greater than the outlet’s
rated current capacity.
– If you use an extension cord with the power supply, make sure that the total
current rating of the devices plugged into the extension cord is not greater
than the cord’s rated current capacity.
– Do not continue to use the power supply if its transformer’s case becomes
damaged, cracked, or broken, or if you suspect that the power supply isn’t
operating properly.
– If the power supply stops working, replace it with a manufacturer-approved
power supply of the same type only.
18
CHAPTER 3: Installation
3. Installation
3.1 What You Will Need
You’ll need these things to be in place before you can install your ServSwitch Duo/
Quadro:
• Cables to connect the ServSwitch Duo/Quadro to the keyboard, video, and
mouse ports of each of your computers. (You don’t need to connect mouse
cabling to a CPU if you’re not using a mouse with that CPU.) If you’ll be
installing cascaded Duos/Quadros, you’ll also need cables to interconnect the
Duos/Quadros. You’ll need adapters to connect the Duo/Quadro to the
keyboard and mouse ports of PC/AT style computers. For cable and adapter
specifications, see Appendix A.
• Monitors that will work when connected directly to each of your computers;
these should have a standard VGA (HD15) connector. The ServSwitch
Duo/Quadro supports low- and high-resolution monitors.
• Standard PC/AT or PS/2 style keyboards. (If you’re using an AT keyboard
with a 5-pin DIN connector, you’ll need a standard AT to PS/2 keyboard
adapter—product code FA211—to connect it to the ServSwitch Duo/Quadro.)
• PS/2 style two- or three-button Microsoft® or Logitech™ compatible mice or
Microsoft IntelliMouse® or IntelliMouse Explorer compatible mice. If you want to
use a mouse to switch channels on the ServSwitch Duo/Quadro, you’ll need a
three-button mouse or an IntelliMouse. (The Duo/Quadro supports other
IntelliMouse compatible “Internet mice”—fitted with a wheel or other
scrolling control, and sometimes additional buttons—including several models
by Logitech and Genius™.)
All of the mouse connections from the ServSwitch Duo/Quadro to the
attached computers support either PS/2 mouse ports or RS-232 serial mouse
ports. The Duo/Quadro automatically converts PS/2 mouse data and
commands to serial-mouse data and commands, but you’ll still need the
appropriate adapter—product code FA314—to connect the Duo/Quadro to a
PC with a serial mouse port. See Section A.2 in Appendix A.
The Duo/Quadro will operate without a mouse connected if you don’t want to
use one.
19
SERVSWITCH™ DUO AND SERVSWITCH™ QUADRO
• A suitable mouse driver for your PCs. Supported types are:
– PS/2 or RS-232 two-button mouse driver by any manufacturer.
– Microsoft mouse drivers, including those for the IntelliMouse. (You might
be able to user other drivers with IntelliMouse compatible data formats, but
these might not work—trial-and-error testing might be necessary.)
– Logitech mouse drivers, including those for two-button, three-button, and
wheel mice.
3.2 Placement
If you want to put the ServSwitch Duo/Quadro on a flat surface such as a desktop
or shelf, peel off the backing on its adhesive feet and stick them on the bottom of
the Duo/Quadro. If you want to mount the Duo/Quadro in a 19" rack, use the
included brackets and screws and follow the procedure described in Appendix B.
3.3 Maintaining Video Quality
Before you start attaching cables to the ServSwitch Duo/Quadro, consider what
effect your cabling will have on your Duo/Quadro system’s video quality. The
Duo/Quadro supports very-high-bandwidth video signals and resolutions up to
1600 x 1280 pixels. It regenerates the video signals using wideband amplifiers in
order to minimize any loss of video quality. However, all video cables introduce
distortion onto the video signal. For short cables this distortion is minimal, but for
longer cables the loss of quality can start to become noticeable, particularly at
higher video resolutions. To get the best video quality for your Duo/Quadro
installation, we recommend that you follow these guidelines:
• Use the shortest possible video cables between your devices. High-quality cables,
such as our Premium KVM CPU Cables (EHN408), will give excellent results.
• Avoid using cables with HD15 connectors that are not specifically designed to
carry video signals; you will see a picture, but it will probably have smudging,
ghosting, and loss of focus. Cables that are designed to carry video signals are
constructed using three separate coaxial cores to carry the red, green, and
blue signals. These coaxial cores make the cable thick like the cable that you
see coming out of the back of a monitor. Typically this cable will be about 3⁄8"
(8.5 to 9 mm) in diameter. If your cable is thin—say 1⁄4" (6 mm) or less in
diameter—or doesn’t look like the cable you’d expect to see coming out of a
monitor, then it’s probably a data cable rather than a video cable. Such cables
are only suitable for very-low-resolution graphics and monochrome text.
20
CHAPTER 3: Installation
• Where possible, use a single cable of the correct length rather than multiple
extension cables. If you must use an extension cable, make sure it’s a cable
specifically designed to carry video signals.
• If you’ll be cascading Duos/Quadros, use the shortest possible cabling between
them. Lay out your installation so that the maximum end-to-end coaxial-only
cable run (that is, not including twisted-pair runs through Duo Extenders,
which boost the video signals) from any CPU to any user station is not more
than 100 feet (30 m).
3.4 Connecting Your Equipment
NOTES
When you connect devices to Duos’/Quadros’ “user ports” and “CPU
ports,” refer to Figures 2-3 and 2-4 in Section 2.3 to see where these
ports are. (Make sure not to get your keyboard and mouse connections
backwards. To help you avoid this problem, the Duo’s/Quadro’s
connectors are color-coded like those on modern PCs; just remember
that the keyboard connectors are purple and the mouse connectors are
green.)
So long as they are all compatible with the ServSwitch Duo/Quadro,
your CPUs and user devices don’t all have to be the same type; the Duo/
Quadro will intelligently adapt for different equipment types.
Any unused CPU-port or user-port connectors on a Duo, Quadro, or
Duo Extender can be left vacant.
Most ServSwitch Duo/Quadro applications will involve two to four sets of local
keyboards, monitors, mice, and two to sixteen computer CPUs directly attached to a
single Duo/Quadro. If that describes what you want to do, follow the procedure in
Section 3.4.1.
If you’re indirectly attaching a remote keyboard, monitor, and mouse to the
Duo’s user port #1 or the Quadro’s user port #1 or #3 through a ServSwitch Duo
Extender, follow the additional directions in Section 3.4.2.
If you want to switch between more than sixteen CPUs, or if not all of your CPUs
are in the same location, you’ll need multiple cascaded Duos/Quadros to connect
them together. Follow the procedure in Section 3.4.3.
As described in Sections 3.4.1 through 3.4.3, you might want to use Premium
KVM User or CPU Cables to connect your equipment, or even ServSwitch Brand
KVM extenders if the distances involved are long enough. And to connect PC/AT
style equipment, you’ll need adapters. These cables, extenders, and adapters are
described in Section 3.4.4.
21
SERVSWITCH™ DUO AND SERVSWITCH™ QUADRO
3.4.1 SYSTEMS WITH A SINGLE DUO/QUADRO AND DIRECTLY ATTACHED USER STATIONS
Make sure that the ServSwitch Duo/Quadro is unplugged and powered down. If
possible, turn off and unplug all of the devices that you want to attach to it. (If you
have to “hot-plug” any powered computers into the Duo/Quadro, see Section 5.8.)
Connect your local user equipment (keyboards, PS/2 mice, and monitors) to the
appropriate user-port (“control-port”) connectors on the Duo’s/Quadro’s rear
panel. If you have had to place the Duo/Quadro farther from the user equipment
than the equipment’s native cables will reach—up to an additional distance of
30 ft. (9 m)—you can plug the native cables into Premium KVM User Cable. If you
need to place one set (Duo) or two sets (Quadro) of user equipment farther away
than that, make them remote user stations and connect them to user port #1 on
the Duo or user ports #1 and #3 of the Quadro through a ServSwitch Duo
Extender as described in Section 3.4.2. If you need to place more sets of user
equipment than that farther away than their native cables can reach, you’ll also
need to use our other ServSwitch brand KVM extenders to connect the additional
sets to user ports #2 and/or #4.
Next, connect each computer CPU to the Duo/Quadro by running cabling from
the CPU’s keyboard, mouse, and video ports to the matching connectors in one of
the Duo’s/Quadro’s “CPU ports.” This cabling can be either separate male-to-male
keyboard-, mouse-, and video-extension cables, or our three-in-one Premium KVM
CPU Cable. Video quality will be at its highest if you can keep this cabling short
(no longer than 10 ft. [3 m] if possible), but Premium KVM CPU Cable will work
at distances up to 100 ft. (30 m). If you need to run farther than 100 ft. (30 m) to a
CPU, you’ll need to use one of our ServSwitch brand KVM extenders.
A complete system using a single Duo is shown in Figure 3-1.
ServSwitch Duo
Extension
cabling
User station #1
User station #2
CPUs
Figure 3-1. System directly attached to a single ServSwitch Duo.
22
CHAPTER 3: Installation
3.4.2 SYSTEMS WITH A SINGLE DUO/QUADRO AND A DUO EXTENDER
NOTE
It’s possible to attach an original (non-R2 model) ServSwitch Duo
Extender to the local user-port connectors of an -R2 model Duo or a
Quadro. But we don’t recommend this because the original Extender
can’t make use of the -R2 Duo’s or Quadro’s RJ-45 remote user port.
The -R2 Extender can’t be used with the original Duo.
Attach all of your local equipment to the ServSwitch Duo/Quadro as described in
Section 3.4.1. Leave everything powered off, and make sure the ServSwitch Duo
Extender and your remote monitor are powered off as well.
Run twisted-pair cabling from the RJ-45 jack in the Duo’s user port #1 or the
Quadro’s user port #1 or #3 to the matching jack on a ServSwitch Duo Extender.
(Do not attach these jacks to a LAN; you could damage the Duo/Quadro or
Extender and possibly the network as well.) Category 5 twisted pair will give the
best results, but you should be able to use Category 3, 4, or 5e if you keep the
distance short (not more than 100 m [325 ft.]). Avoid using cabling rated as
“Level 6,” “Level 7,” etc., for data rates above 155 Mbps; the large differences
between the twist ratios of the wire pairs in these cables cause the video signals
from the Duo’s/Quadro’s CPUs to get out of sync with each other.
The twisted pair can be a single continuous length of cable if that’s the best
option. But this kind of cable is often already installed in buildings and terminated
at data-wiring sockets in various locations. If twisted-pair cable is preinstalled at
your site, you can run patch cables from the Duo/Quadro and Duo Extender to
these sockets and set up a direct one-to-one connection between them using the
patch panels in your wiring closets, which will probably be much more convenient.
CAUTION!
Even though the cabling and connectors might be the same, do not
connect a ServSwitch Duo, Quadro, or Duo Extender to your LAN or to
the telephone network. Doing so will damage the device and might
damage the network as well.
Connect your remote user equipment (keyboard, PS/2 mouse, and monitor) to
the appropriate user-port (“control-port”) connectors on the Duo Extender. If you
have had to place the Extender farther from the user equipment than the
equipment’s native cables will reach—up to an additional distance of 30 ft. (9 m)—
you can plug the native cables into Premium KVM User Cable. We don’t
recommend keeping your user equipment any farther than that from the
Extender. If you’re attaching a CPU to the Extender model that supports a CPU
(KV6EXT-R2), follow the directions in your Extender manual.
23
SERVSWITCH™ DUO AND SERVSWITCH™ QUADRO
A sample system using a single Duo and Duo Extender is shown in Figure 3-2.
Refer to Section 5.16 for how local/remote shared access works.
ServSwitch Duo
Extender
Remote user
station #1
Twisted-pair
cabling up to
200 m (655 ft.)
long
ServSwitch Duo
Extension
cabling
Local user station #1
(optional)
User station #2
(local only)
CPUs
Figure 3-2. System attached to a single ServSwitch Duo and Duo Extender.
3.4.3 CASCADED DUO/QUADRO SYSTEMS
Multiple ServSwitch Duos and/or ServSwitch Quadros can be cascaded (connected
together in a one-to-many scheme) in order to increase the maximum number of
available CPU and user ports in your KVM-switching system. This can be
particularly useful where clusters of computers are located some distance from
each other, because each Duo/Quadro acts as a kind of signal booster or repeater
and can be long distances away from the other Duos/Quadros in the system. (You
can mix 4-, 8-, 12-, and 16-Port Duos and Quadros in the same cascade.)
Because it has an intelligent communication system, the ServSwitch Duo/
Quadro can detect and communicate with other Duos/Quadros through the
keyboard cabling that runs between them. The master Duo/Quadro in a cascade
can positively verify that the other attached Duos/Quadros have correctly responded
to a switching request from the user. Duos/Quadros also intelligently manage the
cascade links, allocating them on a “first come, first served” basis, similar to the way
a telephone system would manage connections to individual phones.
24
CHAPTER 3: Installation
The typical cascade configuration is a logical “inverted tree” with one, two, or
three “layers” of subsidiary Duos/Quadros attached to a single master Duo/
Quadro. In this configuration, the users on the master Duo/Quadro can
independently access every CPU in the system by using a single switching pathway.
(If you want to mix Duos and Quadros in your system, and you want four users to
be able to reach all of the CPUs in your system that are attached to Quadros, you
need to arrange your cascade so that the master switch is a Quadro and that there
aren’t any Duos between the master Quadro and any subsidiary Quadros.) This
type of configuration is assumed in the rest of this section, but there are other
alternatives:
• You can use two master Duos/Quadros (to support more users than one
master unit could provide), but not all of the users on each master will be able
to reach all CPUs on all subsidiary Duos/Quadros at the same time.
• You can attach a user station to a subsidiary Duo/Quadro; if you do, not all of
the users on the master will be able to reach CPUs on that subsidiary Duo/
Quadro (or any “lower” Duos/Quadros connected to its CPU ports) at the
same time.
• You can create branches that merge at lower levels. This can provide useful
redundant pathways that can get around a Duo/Quadro chassis that might fail,
but configuring and maintaining your CPU-selection menu might be trickier
than normal.
• While it is theoretically possible to create loops, there is no good reason to do
this and we strongly recommend that you avoid it.
Here’s how to set up a standard “single master, single path” configuration. Make
sure that your master Duo/Quadro is powered down. If possible, turn off and
unplug all of the devices that you want to attach to the master. (If you have to “hotplug” any powered computers into the system, see Section 5.8.) Connect your local
user equipment to the master as described in Section 3.4.1; if you want to connect
a remote user station to the master, follow the instructions in Section 3.4.2.
Next, connect each subsidiary Duo/Quadro to the master by running extension
cabling from the subsidiary Duo’s/Quadro’s user port(s) to the master’s CPU
ports:
• If you want all users on the master Duo/Quadro to have access to all CPUs in
the system, run cabling from all of the user ports on each subsidiary Duo/
Quadro to different, consecutively numbered CPU ports on the master. For
example, you could run four cables from a master Quadro to each of four
subsidiary Quadros: to one Quadro each from CPU ports 1 through 4,
25
SERVSWITCH™ DUO AND SERVSWITCH™ QUADRO
5 through 8, 9 through 12, and 13 through 16. You could run two cables from
an eight-port master Duo to each of four subsidiary Duos: to one Duo each
from CPU ports 1 and 2, 3 and 4, 5 and 6, and 7 and 8. The Duo/Quadro will
treat these sets of ports as a unit when one of the users selects a CPU, routing
the KVM link through whichever of the two or four ports is free at the
moment.
• If it’s OK that not all users on the master have access to all CPUs in the system
at the same time, you can run extension cabling from one user port on a
subsidiary Duo to one CPU port on a master Duo or Quadro. Similarly, you
can run one, two, or three sets of extension cabling from the user ports of a
subsidiary Quadro to consecutively numbered CPU ports on a master Quadro.
(The Quadro will treat the sets of two or three ports as a unit for CPU selection.)
The extension cabling can be either separate male-to-male keyboard-, mouse-,
and video-extension cables, or our three-in-one Premium KVM CPU Cable. Video
quality will be at its highest if you can keep this cabling as short as you can (no
longer than 10 ft. [3 m] if possible), but Premium KVM CPU Cable will work at
longer distances. Whenever you make a set of cascade links between two Duos/
Quadros, make sure that the extension cables are approximately the same length.
Keep in mind, though, that if you are only running coaxial cable, the total cable
length from any user station to any CPU should not exceed 100 ft. [30 m] from end
to end between any CPU and any user station. So if any of the layer of subsidiary
Duos/Quadros that you’ll be directly attaching to the master Duo/Quadro are
more than about 30 ft. (9 m) away from it, you might want to use twisted-pair cable
and a ServSwitch Duo Extender to interconnect the two Duos/Quadros. To do this,
attach the twisted-pair cable to the RJ-45 jack in the subsidiary Duo’s user port #1
or the subsidiary Quadro’s user port #1 or #3. Run it to the master Duo’s/Quadro’s
site and plug it into the Duo Extender. Then run extension cabling (as short as
possible) from the Extender’s user-port keyboard, mouse, and monitor connectors
to the matching connectors in the master Duo’s/Quadro’s CPU ports. (In this
situation, if it’s vital that all users be able to access that subsidiary Duo/Quadro at
the same time, you can use one of our other ServSwitch brand KVM extenders to
connect the subsidiary Duo’s user port #2 or the subsidiary Quadro’s user ports #2
and #4 to other CPU ports on the master.)
The master forms the first layer of your cascade, and the subsidiary Duos/Quadros
directly attached to it form the second layer. You can extend your cascade to a third
and then a fourth layer by repeating the process and attaching additional subsidiary
Duos/Quadros to those you’ve already installed. Four layers is the maximum
cascaded configuration, but even if you maintain access and control for all users on
the master throughout such a cascade, it could still support up to 8192 computers.
26
CHAPTER 3: Installation
NOTE
You can include original (non-R2) ServSwitch Duos, ServSwitch
Wizards, ServSwitch Wizard LPs, and ServSwitch Wizard Pros in -R2
ServSwitch Duo or ServSwitch Quadro cascades, but all switches that
aren’t -R2 Duos or Quadros must be subsidiary units and must have
only CPUs attached to their CPU ports (that is, there must not be any
other switches between them and the CPUs).
Finally, once all of your subsidiary Duos/Quadros are in place, connect each
computer CPU to the system by running cabling from the CPU’s keyboard, mouse,
and video ports to the matching connectors in one of the free CPU ports on one of
the subsidiary Duos/Quadros. As with the master-to-subsidiary connections, this
cabling can be either separate keyboard-, mouse-, and video-extension cables or
Premium KVM CPU Cable. If you need to run farther than 100 ft. (30 m) to a
CPU, you’ll need to use one of our ServSwitch brand KVM extenders.
Figure 3-3 features a complete but very simple cascaded Duo system. For clarity,
each set of extension cables and peripheral cables is shown as a single line.
Master ServSwitch Duo
Extension
cabling
CPUs
User stations
Subsidiary
ServSwitch Duo
Extension cabling to CPU ports 7 and 8
(group 24) on the master
Extension
cabling
CPUs
Figure 3-3. A simple cascaded system with two ServSwitch Duos.
27
SERVSWITCH™ DUO AND SERVSWITCH™ QUADRO
As mentioned earlier, you can run sets of cascade links between Duos/Quadros in
order to support full access to all CPUs by two, three, or four independent users,
and these links should be connected to consecutively numbered CPU ports on the
“higher” Duo/Quadro. These port groups function as a unit and have special twodigit “group numbers” that form part of each CPU’s address when you switch
between them, as shown in Figure 3-4. (When there are three users, CPU port 16
doesn’t belong to any port group.) For more about CPU addressing and group
numbers, see Section 4.6.2.
Figure 3-4. Port and group address designations.
28
CHAPTER 3: Installation
Figure 3-5 shows a full-blown cascaded system, including some of the group
numbering. Note that unless the distribution of CPUs at your site would seem to
require it, we don’t advocate creating a new layer of cascaded Duos/Quadros until
the layer above it is filled.
Figure 3-6 on the following two pages shows a sophisticated Quadro cascade that
uses Duo Extenders to cross-link subsidiaries attached to different masters.
Duo Extender
The local and
remote users
on user port 1
share access
on a timeout
basis
Remote
user on
user port 1
Local users on
user ports 1
and 2
The user on user
port 2 and the
active user on
user port 1 can
simultaneously
access all CPUs
Master Duo
(cascade layer 1)
Group 22 (CPU
ports 3 and 4)
Group 21 (CPU
ports 1 and 2)
Layer
2
Duos
CPUs
Layer
3
Duos
CPUs
Layer
4
Duos
CPUs
CPUs
Figure 3-5. A more complex cascaded system.
29
SERVSWITCH™ DUO AND SERVSWITCH™ QUADRO
Both masters have users on all four user ports. Only two users on either master at a time can access the
CPUs on a given subsidiary.
Even though it might seem that you could run additional extension cabling from the masters’ CPU ports
to user ports #1 and #3 on each subsidiary at their site, allowing all four users on each master to reach
CPUs on those subsidiaries at the same time, this wouldn’t work. Cascaded systems with links that run
through both the local and remote connectors of the same user port on a subsidiary don’t function
properly.
For clarity, all sets of cables are shown in this illustration as single lines.
Site 1
CAT5 cables
Duo Extenders on
groups 25 and 26
(CPU ports 9
through 12)
Local users on
all user ports
Extension
cabling
Master
Quadro #1
(cascade
layer 1)
Extension cabling
on groups 21 and
22 (CPU ports 1
through 4)
Subsidiary
Quadros
(cascade
layer 2)
CPUs
CPUs
Figure 3-6. A sophisticated cascaded Quadro system with two
30
CHAPTER 3: Installation
Site 2
CAT5 cables
Duo Extenders on
groups 25 and 26
(CPU ports 9
through 12)
Extension
cabling
Master
Quadro #2
(cascade
layer 1)
Extension
cabling on
groups 21 and 22
(CPU ports 1
through 4)
Subsidiary
Quadros
(cascade
layer 2)
CPUs
CPUs
masters at two different sites crosslinked with Duo Extenders.
31
SERVSWITCH™ DUO AND SERVSWITCH™ QUADRO
3.4.4 PREMIUM KVM CABLES, SERVSWITCH EXTENDERS, AND PC/AT ADAPTERS
The Premium KVM Cables come in two types: User Cables, designed to extend the
distance between a switch and a set of user equipment (keyboard, monitor, and
mouse); and CPU Cables, designed to extend the distance between a switch and a
CPU or another switch. Premium KVM User Cables (product code EHN409) come
in 10-ft. (3-m), 20-ft. (6.1-m), and 30-ft. (9.1-m) lengths. Premium KVM CPU
Cables (EHN408) come in 5-ft.(1.5-m), 10-ft. (3-m), 20-ft. (6.1-m), 30-ft. (9.1-m),
and 50-ft. (15.2-m) lengths.
Both types of cable are built to the special three-in-one design shown in
Figure 3-7 on the next page. The central coaxial video strand of each cable is
molded to the keyboard and mouse strands on either side, and the ends of its
video strand are one inch (2.5 cm) longer than the ends of the other strands, so
that the weight of the composite cable can be borne by the video connector’s
screwlocks. To help you tell the otherwise identical keyboard and mouse strands
apart, they’re labeled “K” and “M” respectively. Also, at the time of this writing, the
keyboard strand is colored orange while the mouse strand is colored green, but the
colors of the strands or connectors might be changed at some point to conform to
PC-interface color specifications such as PC99.
We offer several types of ServSwitch Brand KVM Extenders. At the time of this
writing, there are three models that you might want to use to extend switch-to-user,
switch-to-CPU, or switch-to-switch distances in a ServSwitch Duo/Quadro system:
• The ServSwitch Brand CAT5 KVM Micro Extender (product code ACU3001A)
is suitable for runs up to 50 m (160 ft.).
• Depending on your video resolution, the regular ServSwitch Brand CAT5 KVM
Extender (ACU1001A) can be suitable for runs up to 300 m (1000 ft.).
• The ServSwitch Brand Fiber KVM Extender II-SM (ACS251A) is suitable for
runs up to 10 km (6.2 mi.).
With the regular Extender and Micro Extender, you’ll need CAT5 cable to run
between the Extender’s Local and Remote Units, plus special cable to connect the
Extender to the CPU or Duo/Quadro. For Duo/Quadro-to-CPU runs, you might
want the Dual-Access regular Extender (ACU1009A) or Micro Extender
(ACU3009A), which supports a local user station at the CPU that contends with
the Duo’s/Quadro’s user station for access. With the Fiber Extender II-SM, you’ll
need a duplex single-mode fiberoptic cable to run between the Extender’s Local
and Remote Units. Call Black Box Technical Support for help planning an
Extender-assisted ServSwitch Duo/Quadro system.
32
CHAPTER 3: Installation
6-Pin
mini-DIN
6-Pin
mini-DIN
HD15
10"
(25.4
cm)
9"
(22.9
cm)
Cross-section:
Central
video
strand
Keyboard and mouse
strands molded to sides
Figure 3-7. The Premium KVM cables.
To connect computers with serial mouse ports and/or PC/AT style keyboard
ports, you’ll need adapters like those shown in Figure 3-8. Refer to Appendix A.
To Duo’s/Quadro’s
CPU-port mouse
connector (6-pin
mini-DIN)
To Duo’s/Quadro’s
CPU-port keyboard
connector (6-pin
mini-DIN)
PS/2 style kbd/mouse cable
PS/2 style kbd/mouse cable
PS/2 to Serial Mouse
Adapter; to computer’s
DB9 serial mouse port
(product code FA314, two
incl. with Duo/Quadro)
PS/2 to PC/AT Keyboard
Adapter; to computer’s
AT compatible 5-pin DIN
keyboard port (product
code FA212, two incl.
with Duo/Quadro)
Figure 3-8. Using PC/AT keyboard-port and serial-mouse-port adapters.
33
SERVSWITCH™ DUO AND SERVSWITCH™ QUADRO
3.5 Powering the Duo/Quadro
NOTE
Before powering on the Duo/Quadro, make sure that the two positions
of the DIP switch on the Duo’s/Quadro’s rear panel are both set to OFF.
Once you’ve installed your ServSwitch Duo/Quadro system and attached your
equipment to it, you need to apply power to each Duo/Quadro in the system. You
can use just the single power supply that came with the Duo/Quadro, or you can
purchase a second one separately (product code PS649) and plug them both in to
create a redundant power system.
Plug each power supply’s output cord into one of the power jacks labeled “A”
and “B” on the back of the ServSwitch Duo/Quadro. (These power inlets are both
the same; you can use either one to power the Duo/Quadro.) Attach the input
cord to the power-supply transformer’s IEC 320 inlet, then plug the input cord
into utility (mains) power. If you’re using two power supplies, plug them into
separate outlets but don’t plug them into separate circuits unless the circuits use the
same electrical phase and the same ground; differences in phase or grounding
between electrical circuits could damage the Duo/Quadro.
As you plug in each Duo/Quadro, it should start operating immediately; the
Duo/Quadro has no ON/OFF switch. Depending on which power jack(s) you’ve
attached a power supply to, either the “POWER A” LED, the “POWER B” LED, or
both will light. The on-screen display should also pop up on the monitors at your
user stations (see Section 4.2).
The power LEDs on the front panel of the Duo/Quadro indicate the voltage
that’s being supplied to each power inlet. If POWER A or POWER B is lit, a
working power supply is connected to the corresponding inlet. If you have two
working power supplies connected, you can disconnect and reconnect either one
of them without disturbing the Duo’s/Quadro’s operation.
Always apply power to any ServSwitch Duos/Quadros first, then power on each of
your monitors and computers; if you power up the computers before the Duos/
Quadros, the computers might not recognize the presence of the mouse or
keyboard.
34
CHAPTER 4: Configuration
4. Configuration
To configure your ServSwitch Duo/Quadro system, you’ll need to configure first
the attached PCs, as directed in Section 4.1, then the Duo/Quadro itself, as
directed in the rest of this chapter.
4.1 Configuring Your PCs
Configure your PCs in the same way that you would if your keyboard, mouse, and
monitor were all connected directly to your PCs. Keep in mind that the ServSwitch
Duo/Quadro emulates Microsoft compatible serial, IntelliMouse, and PS/2 mice;
so you’ll need to make sure that your PC software is configured for a Microsoft
mouse of the correct type. Refer to the list of supported drivers in Section 3.1.
4.2 Configuring the Duo/Quadro System
You’ll configure the ServSwitch Duo/Quadro using its on-screen display (OSD)
menu system, which is activated by default when you first power on the system. It
can also be accessed by using the keyboard “hotkeys” (see Section 5.5) or by using
the Duo’s/Quadro’s front-panel pushbuttons (see Section 5.2). The steps in this
section summarize a typical configuration process. For more advanced information
on each of the configuration steps, refer to the corresponding sections of this
manual.
NOTE
The Duo/Quadro is configured through the ADMIN user account. The
Duo/Quadro will allow multiple users to be logged in under the ADMIN
account but will only allow one of these users to be adding or editing
computer names or user profiles or setting global and setup options at
any one time.
Step 1: Decide if you’re going to use password security
The ServSwitch Duo/Quadro can be run with security enabled or disabled. With
security disabled (which is how the Duo/Quadro is shipped to you), all user ports
have full access to all of the computers and full administration rights. This mode is
suitable for simple installations with a small number of users. Larger or sensitive
installations or systems with more users will usually require password security to be
enabled. In this mode, each user logs onto the system and is allocated access rights
to selected computers by the system administrator. This mode is recommended for
most systems; see Section 4.3 for details on how to enable security. If you are not
using security, skip to Step 4.
35
SERVSWITCH™ DUO AND SERVSWITCH™ QUADRO
Step 2: Create an ADMIN (administration) account password
The ServSwitch Duo/Quadro has a fixed user account that cannot be deleted
named “ADMIN.” This user account is the only one that is able to make important
system changes. If you’re going to be using security, you should assign a password
to this account (see Section 4.4).
Step 3: Create user accounts
Login to the ServSwitch Duo/Quadro using the ADMIN account and add user
profiles and passwords for each of your users (see Section 4.5). The Duo/Quadro
supports up to 16 user profiles.
Step 4: Add/edit names to identify your computers
While you’re logged into the ServSwitch Duo/Quadro using the ADMIN account,
create names for each of the computers that you’ve attached to the system (see
Section 4.6). The Duo/Quadro creates default names for each of its ports:
“Computer 1” through “Computer n,” where n = the Duo’s/Quadro’s highestnumbered port (4, 8, 12, or 16). These default names may be edited as required.
While adding the computer names, you can define which users will have access to
each computer. Each computer has an associated port number up to eight digits
long that defines its location. If you’re using a single ServSwitch Duo/Quadro, all
of the computers will have two-digit port numbers (“01” through “04” on a 4-Port
Duo up to “01” through “16” on a 16-Port Duo or Quadro). If you’re cascading
ServSwitch Duos/Quadros, each computer will have four-, six-, or eight-digit port
numbers depending on the number of layers in your cascade (see Sections 3.4.3
and 4.6.2 for details). The ServSwitch Duo/Quadro supports up to 512 computer
names; if your system will include more computers than that, please call Black Box
Technical Support for a possible quote on a version of the Duo/Quadro that can
store more names.
Step 5: Set the required SETUP OPTIONS and GLOBAL PREFERENCES
Use the ADMIN account to select the required SETUP OPTIONS and GLOBAL
PREFERENCES. The SETUP OPTIONS menu is used to configure important
system operating parameters such as security mode, language, hotkeys, and control
options. The GLOBAL PREFERENCES menu is used to select various timing
characteristics and other options. See Section 4.7.
Step 6: Set up the autoscan list (optional)
If you would like the Duo/Quadro to scan a selected subset of the computers
attached to your system when you turn on autoscanning, use the ADMIN account
to select which computers will be scanned, as described in Section 4.8. (Autoscan
mode must be set to “SCAN LIST” for this to have any effect—see Section 4.7.9.)
36
CHAPTER 4: Configuration
4.3 Enabling Password Security
The ServSwitch Duo/Quadro can be operated with or without security enabled.
With no security, all users will have full administration rights and full access to all
the connected computers. This might not be desirable for systems with more than
two or three users.
System security is enabled using the Duo’s/Quadro’s on-screen menu system.
The on-screen menus are activated automatically when you first plug in the
ServSwitch Duo/Quadro, but can also be triggered using the keyboard hotkeys
(see Section 5.5) or the front-panel controls (see Section 5.2)
To switch on the password-based security system, take these steps:
1. At the main on-screen menu, press the [F1] key for MORE MENUS.
2. Select SETUP OPTIONS from that menu.
3. Move the highlight bar onto the SECURITY option.
4. Press the space bar to enable security.
5. Press [Esc] (the escape key) repeatedly to exit the menu system.
37
SERVSWITCH™ DUO AND SERVSWITCH™ QUADRO
4.4 Setting an ADMIN Password
The ServSwitch Duo/Quadro supports up to 16 user profiles. The Duo’s/Quadro’s
system administrator can grant or deny users access to any of the connected
computers and has complete control over the setup of the system. The
administrator accesses the system through a special user profile named “ADMIN.”
This profile may not be altered or deleted from the system; it has full access rights
to all computers and system parameters. Consequently, we strongly recommend that
you set a password for this user.
To set a password for the ADMIN user profile, take these steps:
1. At the main on-screen menu, press the [F1] key for MORE MENUS.
2. Select EDIT USER LIST from the menu.
3. Move the highlight bar onto the ADMIN user.
4. Press [Return] or [Enter] to edit the ADMIN user.
5. Press [Return] or [Enter] again to edit the ADMIN user’s password.
6. Type in the password you want.
7. Press [Return] or [Enter] to save the password.
8. You will now see the “Edit Access Rights” menu. The ADMIN user always has
access to all of the computers. Press [Return] or [Enter] again to save the new
user profile.
9. Press [Esc] (the escape key) repeatedly to exit the menu system.
38
CHAPTER 4: Configuration
4.5 Creating and Editing User Accounts
To create user accounts:
1. Make sure that you are logged on as the ADMIN user.
2. At the main on-screen menu, press the [F1] key for MORE MENUS.
3. Select EDIT USER LIST from the menu.
4. Press [Insert] to add a new user.
5. Type in the name of the new user and press [Return] or [Enter].
6. Type in the password for the new user and press [Return] or [Enter]. (You
may leave the password field blank if you don’t want to define a password.)
7. As directed in the menu, use the space bar and function keys to choose which
computers you want this user to have access to. The user will have access to all
the starred (selected) computers. Don’t worry if not all of the computers have
been entered into the system yet; you can allocate users’ access to computers
when you add the computer names later.
8. Press [Return] or [Enter] to create the user.
9. Press [Esc] (the escape key) repeatedly to exit the menu system.
Follow a similar process to edit users:
1. In the EDIT USER LIST, move the highlight bar to the user that you want to
edit.
2. Press [Return] or [Enter] to edit the user’s name, password, and/or access
rights.
3. Make your changes and press [Return] or [Enter] to save them, or just press
[Return] or [Enter] without making changes if you want to keep the existing
settings.
4. Press [Esc] (the escape key) repeatedly to exit the menu system.
39
SERVSWITCH™ DUO AND SERVSWITCH™ QUADRO
4.6 Creating and Editing Computer Names
Computer names provide a very convenient way of selecting and identifying
computers that are attached to the ServSwitch Duo/Quadro. You can select
computers by their Duo/Quadro CPU-port number (see Sections 5.5), but when
you have a large number of computers, it becomes hard to remember which
computer is attached to which port. By assigning descriptive computer names, you
can select the required computer from an on-screen menu without having to
remember which of the Duo’s/Quadro’s physical ports the computer is connected
to. For each computer name that you assign, you can grant or deny access to any of
the defined user profiles.
Each computer name that you assign will have an associated port number—the
ServSwitch Duo/Quadro port that the computer is attached to. If all of your
computers are connected to a single Duo/Quadro, all of the port numbers will be
two characters long (for example, “01,” “02,” “10,” “16,” etc.). If you’re cascading,
the port numbers will be four, six or eight characters long, depending on whether
you have a two-, three-, or four-layer cascade (see Figure 4-1 at the end of this
section). See Sections 4.6.2 and 5.10 for an explanation of how the port numbers
are constructed.
The ServSwitch Duo/Quadro supports up to 512 computer names.
40
CHAPTER 4: Configuration
4.6.1 THE BASIC PROCEDURES
To create computer names, take these steps:
1. Make sure that you are logged on as the ADMIN user.
2. At the main on-screen menu, press the [F1] key for MORE MENUS.
3. Select EDIT COMPUTER LIST from the menu.
4. Press [Insert] to add a new computer name.
5. Type in the name of the computer and press [Return] or [Enter].
6. Type in the port number for this computer and press [Return] or [Enter].
7. As directed in the menu, use the space bar and function keys to choose which
users you want to be able to access this computer. The starred users will have
access to the computer. Don’t worry if not all of the user profiles have been
defined yet; you can allocate computers to users when you add the users to
the system later.
8. Press [Return] or [Enter] to create the new computer name.
9. Press [Esc] (the escape key) repeatedly to exit the menu system.
NOTE
To avoid confusing users, we recommend that when you’re adding
computers, you assign one name only to any given port unless you’ll be
creating an autoscan list with customized scan order (see Section 4.8).
Also, if you’re using CPU ports to cascade to other ServSwitch
Duos/Quadros, avoid giving names to those ports. Assign names only
to ports with CPUs attached to them.
Follow a similar process to edit users:
1. In the EDIT COMPUTER LIST, move the highlight bar to the computer that
you want to edit.
2. Press [Return] or [Enter] to edit the user’s name or to change the list of users
that have access rights to it.
3. Make your changes and press [Return] or [Enter] to save them, or just press
[Return] or [Enter] without making changes if you want to keep the existing
settings.
4. Press [Esc] (the escape key) repeatedly to exit the menu system.
41
SERVSWITCH™ DUO AND SERVSWITCH™ QUADRO
4.6.2 CREATING ENTRIES FOR COMPUTERS ATTACHED TO A CASCADED DUO/QUADRO SYSTEM
As described in Section 3.4.3, you can cascade ServSwitch Duos/Quadros using
one, two, three, or four KVM-cable links. Ideally, you should run two cable links
from each higher-level Duo or Quadro to each of the Duos cascaded from its CPU
ports, or four cable links from each higher-level Quadro to each of the Quadros
cascaded from its CPU ports, so that as many of the system’s users as possible can
simultaneously reach any of the system’s CPU ports.
Each computer name that you add to the Duo’s/Quadro’s on-screen menu has
an associated port number that tells the ServSwitch Duo/Quadro system where to
find the computer. Port numbers for computers attached to a single Duo/Quadro
are simply the number of the CPU port that the computer is attached to. Port
numbers for computers connected to cascaded Duos/Quadros are derived by
stringing together the “port routing” (that is, the numbers of the CPU ports that
the Duo/Quadro system has to switch through to get from the user station to the
computer).
Figure 4-1 on the next page shows how port numbers are constructed and how
the physical layout of a cascaded system relates to entries in the on-screen menu.
The illustrated configuration is not one we’d recommend for an actual installation,
but it’s useful for showing how the numbering system works. If you make two,
three, or four cascade links between a pair of Duos/Quadros, they must be
connected to the groups of consecutive CPU ports on the higher-level Duo/
Quadro that are listed in Figure 3-4 in Section 3.4.3. As that figure shows, these
ports have associated group numbers. The ServSwitch Duo/Quadro uses this
group number to connect users to the first available port in that group. For
example, group number 21 consists of CPU ports 1 and 2. If these ports are linked
to a subsidiary ServSwitch Duo, and two users both try to connect to computers
that are attached to that Duo, the system will allocate the cascade links to those
users on a first come, first served basis.
If you make only a single cable link between a CPU port on a higher-level
Duo/Quadro and a user port on a subsidiary Duo/Quadro, one user will be able to
freely switch to the CPUs directly or indirectly attached to that subsidiary Duo/
Quadro. But if another user tries to connect to those CPUs, they’ll get a message
saying that no cascade links are available. They won’t be able to connect to the
subsidiary Duo’s/Quadro’s CPUs until the other user switches elsewhere and
relinquishes that cascade link.
42
CHAPTER 4: Configuration
Group 41 (Ports 1
through 4)
Master
Quadro
Port 9
09
Group 42 (Ports 5
through 8)
Port 16
Layer 2
Quadro
16
Group 31 (Ports 1
through 3)
Layer 2
Quadro
Group 21
(Ports 1 and 2)
Port 9
Layer 3
Quadro
4109
424104
Port 7
42413107
Layer 3
Quadro
Layer 3
Quadro
Port 5
Port 3
Port 4
Layer 4
Quadro
Group 41 (Ports 1
through 4)
Port 1
41420301
First pair is number of
CPU port or port group
on master Duo/Quadro
(cascade layer 1)
Second pair (if any) is number of
CPU port or port group on subsidiary
Duo/Quadro in cascade layer 2
414105
Layer 4
Duo
Layer 4
Duo
Port 1
41422101
Fourth pair (if any) is number
of CPU port or port group on
subsidiary Duo/Quadro in
cascade layer 4
Third pair (if any) is number of CPU
port or port group on subsidiary
Duo/Quadro in cascade layer 3
Figure 4-1. A sample cascaded Duo/Quadro system
and its CPU numbering.
43
SERVSWITCH™ DUO AND SERVSWITCH™ QUADRO
4.7 Setting the SETUP OPTIONS and GLOBAL PREFERENCES
The SETUP OPTIONS and GLOBAL PREFERENCES are operating parameters
that apply to the whole ServSwitch Duo/Quadro system rather than to individual
users. These may only be set or changed by the system administrator logged in
using the ADMIN account. Once you’re logged in as ADMIN, take these steps:
1. From the main menu, press [F1] for MORE MENUS.
2. Use the arrow keys (the ones on the main part of the keyboard, not the
numeric keypad) to position the highlight bar over SETUP OPTIONS or
GLOBAL PREFERENCES.
3. Press [Enter] or [Return] to view the individual menus.
4. Use the arrow keys to place the highlight bar over the required option, then
use the space bar to change the setting of the option as required.
5. Press [Esc] (the escape key) to quit the menu system and save your changes.
The following subsections describe each of the options in these menus.
4.7.1 SECURITY
Accessed through: SETUP OPTIONS
Possible settings: DISABLED (factory default), ENABLED
With security disabled, users don’t have to log into the Duo/Quadro system. All
users have full access to all of the connected computers and full administration
rights. With security enabled, users have to log into the system. Each user is
allocated access rights to computers by the system administrator (see Section 4.5),
and the computers to which they have access are the only ones that appear in their
on-screen menus.
4.7.2 LANGUAGE
Accessed through: SETUP OPTIONS
Possible setting: ENGLISH (factory default), FRENCH, GERMAN
This option specifies both (a) the language that is used for the on-screen menus
and (b) the keyboard layout assumed for the keyboard. If you select French, an
“AZERTY” keyboard layout is assumed; if you select English or German,
“QWERTY” is assumed. New settings of this option will take effect when you exit
the SETUP OPTIONS menu. This option affects only how the Duo/Quadro
interprets the keyboard keys; it has no effect on the way that any attached computers
interpret those keys. Please avoid setting this option to a language you don’t
44
CHAPTER 4: Configuration
understand, because all of the menus will be in that language and you might find it
difficult to reselect your desired language.
4.7.3 HOTKEYS
Accessed through: SETUP OPTIONS
Possible settings:
CTRL+ALT (factory default)
CTRL+SHIFT
ALT+SHIFT
ALT GR ([Alt Graph], the right [Alt] key)
LEFT ALT+RIGHT ALT
LEFT CTRL+LEFT ALT
RIGHT CTRL+RIGHT ALT
DISABLED
The keyboard “hotkeys” are special combinations of keys that, when used together
with certain keyboard “command keys,” perform special Duo/Quadro functions.
For example, pressing the hotkeys together with the “M” key will cause the onscreen menu to be displayed on your monitor. Other hotkey combinations allow
you to query which computer you are connected to, to move the on-screen menu
around the screen, and more. You can also use the hotkeys together with the port
number to quickly select a chosen computer without activating the on-screen
menu. See Section 5.8 for full details on using keyboard hotkeys to control the
Duo/Quadro.
You can select “DISABLED” to disable the hotkeys and all associated keyboard
commands. We don’t normally recommend that you do this, but if you have to,
bear in mind that users will only be able to access the on-screen menu by using the
Duo’s/Quadro’s front-panel controls.
4.7.4 KEYPAD CONTROLS
Accessed through: SETUP OPTIONS
Possible settings: ENABLED (factory default), DISABLED
If you want to, you can disable the keypad controls (pushbuttons) on the front of
the Duo/Quadro so that they can only be used to select the special channels “o”
and “0” (the on-screen menu and the nonexistent channel zero).
45
SERVSWITCH™ DUO AND SERVSWITCH™ QUADRO
4.7.5 EXCLUSIVE USE
Accessed through: SETUP OPTIONS
Possible settings: ALLOWED (factory default), DISABLED
In normal operation, the Duo/Quadro will allow all users to share access to a
computer. In this mode, the computer’s video picture will be displayed on the
monitors of all users who select that port, but only one user may have active
control of the computer’s keyboard and mouse inputs at any one time. The
Duo/Quadro detects active users by looking for incoming keyboard and mouse
data from the user stations. A user becomes inactive if no keyboard or mouse data
has been received by the Duo/Quadro for a specified timeout period. If one user is
active and other users have selected same computer, the non-controlling users will
see a “video only” message displayed on their monitor screens.
There might be situations in which a user might want to take “exclusive use” of
computers: to control and view them privately, so that the other user is unable to
view that activity. The Duo/Quadro supports exclusive use, but this facility should
be used carefully. When exclusive use is requested, the video from the selected
computer is only available to the user with exclusive access. Users that have
selected exclusive access are never timed out by the Duo/Quadro, so the other
users are effectively “locked out” of the exclusive user’s computer until the
exclusive user switches to another computer or logs out. This could potentially be a
problem if, for example, a user turns on exclusive use, selects a critical shared
computer, and then leaves work for the day without logging out. This would
prevent other users from working on that computer until the following day.
If you don’t want this sort of thing to ever happen, you can disable exclusive use,
so that all activity by any user can be viewed by the other users.
4.7.6 AUTOMATIC LOGOUT
Accessed through: SETUP OPTIONS
Possible settings: DISABLED (factory default), ENABLED
The ServSwitch Duo/Quadro allows you to take an extra precaution against
unauthorized computer access. If an authorized user forgets to logout when they
finish working with the computers attached to the Duo/Quadro system, their user
station might still have full access to the system, which could allow other people to
get at the computers. If you enable both the screen saver (see Section 4.7.8) and
this option, the Duo/Quadro will automatically logout any user when there has
been no keyboard or mouse activity at their station for the duration of the screensaver timeout. The screen saver must not be disabled, or automatic logouts will not
occur even if this option is enabled.
46
CHAPTER 4: Configuration
4.7.7 MOUSE SWITCHING
Accessed through: GLOBAL PREFERENCES
Possible settings: ENABLED (factory default), DISABLED
As with the various switches in the ServSwitch Wizard family, you can use a threebutton mouse or IntelliMouse to switch between the ServSwitch Duo’s/Quadro’s
CPU channels (see Section 5.6): Pressing the central or “wheel” button together
with the left-hand mouse button will cause the Duo/Quadro to switch to the next
available computer for normal shared access. (Pressing those mouse buttons plus
[Shift] on the keyboard switches to that CPU for exclusive access; pressing those
mouse buttons plus [Ctrl] on the keyboard switches to that CPU for video-only
access.) Also, clicking the right-hand button together with the central or wheel
button can launch the on-screen menus (see Section 5.11), and if you’re using a
wheel mouse, you can use the wheel to move the menus’ highlight bar up and
down.
When mouse switching is enabled, presses of the central button on a mouse can
only be used to control the Duo/Quadro; center-button presses aren’t passed
through to your computer applications. If you need to press the central mouse
button to control your applications, you’ll need to disable mouse switching.
(Except when Duo/Quadro menus are on screen, the rotation action of an
IntelliMouse wheel is not affected by this setting and is always available to the
computer application.)
4.7.8 SCREEN SAVER
Accessed through: GLOBAL PREFERENCES
Possible settings: DISABLED (factory default); 2, 5, 7, 10, 15, 20, and 30 MINUTES
To avoid burning out the phosphor on your CRT monitor screens, the Duo/
Quadro can be set to blank the screen after no keyboard or mouse activity has
been detected for a selected timeout period. You can choose whether the screen
goes completely dark or displays a moving dot when the screen saver is activated;
see Section 5.13.4.
If users want to, they can blank the screen manually by selecting channel “0”
(zero) using the keyboard hotkeys or by pressing [Esc] from the login screen.
If this option is not disabled, you can enable the automatic-logout option to have
the system log users once the timeout expires, rather than merely activating a
screen saver. See Section 4.7.6.
47
SERVSWITCH™ DUO AND SERVSWITCH™ QUADRO
4.7.9 AUTOSCAN MODE
Accessed through: GLOBAL PREFERENCES
Possible settings: SCAN LIST (factory default), ACTIVE PCs, ALL
The Duo/Quadro is capable of “autoscanning,” automatically scanning between
the connected computers in sequence, briefly displaying each computer’s video in
turn. You can set your Duo/Quadro to any of three scanning patterns:
• SCAN LIST scans each of the system computers that you’ve added to the
“autoscan list” (see Section 4.8), in the order in which they appear on the list
(whether they’re currently powered on or off). This type of scanning is the
only one that can reach cascaded computers attached to subsidiary
Duo/Quadro chassis.
• ACTIVE PCs scans all of the active (currently powered-on) computers that are
attached to the Duo/Quadro chassis where the scan was initiated. Scanning
just the active computers keeps blank screens from being displayed and stops
the monitor from going into a power-down state on every scan cycle.
• ALL scans all of the available computers (whether they’re currently powered
on or off) that are attached to the Duo/Quadro chassis where the scan was
initiated.
CAUTION!
Many modern monitors are fitted with automatic relays that operate
whenever the video resolution changes, including when the Duo or
Quadro switches or scans from one CPU channel to another one
that uses a different resolution. If you need to do a lot of
autoscanning and your monitor constantly switches its relay on
and off during while it scans, this might eventually damage the
monitor; you might want to consider using a flat-panel display
instead.
4.7.10 AUTOSCAN PERIOD
Accessed through: GLOBAL PREFERENCES
Possible settings: DISABLED; 2 SECONDS; 5 SECONDS (factory default); 7, 10, 15,
20, and 30 SECONDS
While autoscanning, the Duo/Quadro will pause at each channel to display that
channel’s video signal before switching to the next computer. It will pause for the
duration of the currently selected autoscan time. If you choose the DISABLED
setting, the autoscanning function itself will be completely disabled.
48
CHAPTER 4: Configuration
4.7.11 OSD DWELL TIME
Accessed through: GLOBAL PREFERENCES
Possible settings: 1 SECOND; 2 SECONDS (factory default); 3, 5, and 10 SECONDS
After successfully switching to a different computer channel, the Duo/Quadro will
display a confirmation message for a few seconds. Set the length of time that this
message dwells (persists) on the screen to any of the possible settings listed above.
4.7.12 USER TIMEOUT
Accessed through: GLOBAL PREFERENCES
Possible settings: 2 SECONDS (factory default); 5, 10, and 30 SECONDS; 1, 5, and
10 MINUTES
When two or more users select the same computer, only one can have keyboard
and mouse control of that computer at any one time, although in normal
circumstances all of them will see its video output (see Section 4.7.5). When no
keyboard or mouse data has been received from the active user port for the
duration of the user-timeout period, the Duo/Quadro will allow the first of the
other users who types at their keyboard or moves their mouse to take keyboard and
mouse control of that computer. That user then becomes the active user—until he
or she, too, times out.
You can set this user timeout to any of the possible settings listed above; try to
choose a timeout just long enough that your users can usually manage to avoid
interrupting each other’s work (but no longer than that).
If you have both a local and remote user station attached to user port #1 of a
Duo or Quadro or user port #3 of a Quadro, the local and remote users will
contend for access to the Duo’s/Quadro’s computers in the same way that user #1
and user #2 will contend for access if they select the same CPU. Accordingly, this
user timeout value also controls the timeout between the local and remote users on
user ports #1 and #3.
49
SERVSWITCH™ DUO AND SERVSWITCH™ QUADRO
4.7.13 RS-232 MOUSE TYPE
Accessed through: GLOBAL PREFERENCES
Possible settings: INTELLIMOUSE (factory default), 2 BUTTON, 3 BUTTON
You might want to set this option if you have any computers attached to the Duo/
Quadro that use an RS-232 serial mouse rather than a PS/2 mouse. (You’ll need an
adapter to attach the serial mouse ports of such computers to the Duo/Quadro—
see Section 3.4.4.)
The Duo/Quadro automatically translates PS/2 mouse data into RS-232 serial
mouse data, but the serial mouse data needs to be formatted differently depending
on whether the computer’s serial-mouse driver is designed for a 2-button, 3-button,
or IntelliMouse (wheel mouse) type. Set this option for the format that’s
appropriate for your serial-mouse computers. Keep in mind that mouse functions
will be slightly more sluggish with the four-byte IntelliMouse format than they will
be with the other formats (both three-byte). In general, RS-232 mice are almost
always more sluggish than PS/2 mice, because their data rate is much slower.
4.8 Setting Up the Autoscan List
The ServSwitch Duo/Quadro can autoscan the computers attached to it, briefly
switching to each one in sequence and displaying its video before moving on to the
next. When you set the autoscan mode to SCAN LIST (see Section 4.7.9), the
Duo/Quadro will scan through a list of all of the system computers that you’ve
selected (even computers that are attached to subsidiary Duo/Quadro chassis in a
cascade). To set up this list once you’ve created all your computer names (see
Section 4.6), take these steps:
1. Make sure that you are logged on as the ADMIN user.
2. At the main on-screen menu, press the [F1] key for MORE MENUS.
3. Select EDIT AUTOSCAN LIST from the menu. The list of computers for
which you’ve created names will appear.
4. As directed in the menu, use the space bar and function keys to choose which
computers you want to add to or remove from the list. The starred computers
will be scanned during autoscanning.
5. Press [Esc] (the escape key) repeatedly to exit the menu system.
NOTE
Although we don’t normally recommend creating duplicate computer
names, you might want to create a special set of duplicate names—
perhaps all starting with “Z” or something—for the CPUs in your
autoscan list. This will allow you to customize the order of the scanning
in any way you want.
50
CHAPTER 5: Operation
5. Operation
This chapter explains how to operate the ServSwitch Duo/Quadro. Please read this
chapter carefully before starting to use a Duo/Quadro.
5.1 Controls and Indicators
The ServSwitch Duo/Quadro has several external user controls and indicators that
might be useful when you operate it. On the left end of its rear panel, you’ll see a
two-position DIP switch. Position 1 of this switch is reserved for future use, while
Position 2 is used for firmware upgrades (see Section 5.20).
On the front panel, there are two pushbuttons paired with 7-segment LEDs. One
of these button/LED pairs is labeled USER, and the other is labeled COMPUTER:
• The green USER 7-segment LED shows which user’s current computer selection
or connection status is shown in the red COMPUTER 7-segment LED(s). (The
4- and 8-Port Duo models have a single COMPUTER LED; the 12- and 16-port
Duo models and the Quadro have dual COMPUTER LEDs.) The functions of
the COMPUTER LED(s) are shown in Figure 5-1 on the next page.
• Press the USER button to switch to the next user in numeric sequence and
display their computer selection.
• Press the COMPUTER button to switch the currently selected user to the next
available computer port in numeric sequence. Which port qualifies as the
“next available computer port” will depend on whether the Duo/Quadro is
cascaded, which computers you have access to (if security is enabled), etc.
There are two special channels that you can select with the COMPUTER
button. These are the on-screen menu channel “o” and the nonexistent
channel “0” (zero). Selecting the on-screen menu channel will cause the onscreen menu or the login window to be displayed on your monitor. Selecting
channel zero will disable the video, keyboard, and mouse at your user station.
These channels are provided as convenient “parking places” for user ports that
are not currently in operation.
The Duo/Quadro also has several regular (single-dot) LEDs on its front panels.
Two are labeled “POWER A” and “POWER B”; they light steadily when the Duo/
Quadro is receiving proper power through the corresponding power inlet (see
Section 3.5 for more information). The others are labeled “ACTIVITY”; the Duo
has two labeled “ACTIVITY 1” and “ACTIVITY 2,” while the Quadro has four
labeled “ACTIVITY 1” through “ACTIVITY 4.” They flash when the Duo/Quadro
receives keyboard or mouse data from the corresponding user port—thus
confirming that the user-station keyboards and mice are working.
51
SERVSWITCH™ DUO AND SERVSWITCH™ QUADRO
Left-hand LED is not present
on 4- and 8-Port Duos
DISPLAYED ON
“COMPUTER” LED:
MEANING:
Computer channel
number, steadily lit
That channel is currently
selected by the active user
station indicated by the
USER LED
Computer channel
number, flashing
That channel is currently
selected by the user
station indicated by the
USER LED, but that station
is in screen-saver mode;
the Duo/Quadro is waiting
for keyboard or mouse
activity to restore video
Zero
Nonexistent channel zero
is currently selected by the
user station indicated by
the USER LED
Lowercase “o”
The user station indicated
by the USER LED is
currently displaying the
on-screen menu
Figure 5-1. The meaning of the COMPUTER 7-segment LED.
52
CHAPTER 5: Operation
5.2 Selecting Computers with the Front-Panel Pushbuttons
The ServSwitch Duo’s/Quadro’s front-panel pushbuttons and LED indicators are
described in Section 5.1. To select a computer using the buttons, first check the
green 7-segment LED labeled “USER.” Is it showing the number of the user port
on the Duo/Quadro (“1,” “2,” “3,” or “4”) that your KVM user station is attached
to? (If not, press the USER button to select your user port.) The number of the
computer port on the Duo/Quadro that you currently have selected should be
displayed in the red 7-segment LED marked COMPUTER. To select the computer
you want to access, press the COMPUTER button as many times as necessary,
switching to the next available computer channel each time, until the red
COMPUTER display shows the CPU-port number of your desired computer.
Refer to Figure 5-2: If the password security system has not been enabled, the
“next available computer channel” will be the next CPU port in numeric sequence.
If password security has been enabled (see Section 4.7.1), you will only be able to
select the computer ports that you have access to. And if the front-panel controls
have been disabled by the administrator (see Section 4.7.4), you’ll only be able to
select the special channels “o” and “0” (the on-screen menu/login screen and the
nonexistent channel zero respectively).
If no security
has been set
and the frontpanel controls
are enabled:
If security has been set,
the front-panel controls
are enabled, and the user
is allowed to access CPU
ports 1, 3, and 7:
If the frontpanel controls
are disabled:
Figure 5-2. The function of the COMPUTER key (COMPUTER button).
53
SERVSWITCH™ DUO AND SERVSWITCH™ QUADRO
5.3 Logging Onto the Duo/Quadro System
If password security has been turned on the ServSwitch Duo/Quadro system (see
Section 4.3), the login window shown in Figure 5-3 will appear when the Duo/
Quadro is switched on or when no user is currently logged in. (The previous user
may have blanked the screen with the screen-saver function. If so, you may need to
press a key before the login window appears.) Type in your user name and
password to access the Duo/Quadro.
User port
your
station is
attached to
User Name:
Password:
Port 1 login
Esc=Scr Save
Figure 5-3. The login window.
5.4 Things to Keep in Mind About the Keyboards and Mice
CPU bootup sequence: When your computer CPUs are powered on, they
communicate with any attached keyboards and mice and load the setup
parameters required by their particular operating systems. It’s necessary for the
ServSwitch Duo/Quadro to be attached and powered on during this sequence so
that it can give the CPUs the required responses and keep track of all of the modes
and settings requested by each of the connected CPUs.
Mouse characteristics: Do not unplug a PS/2 mouse connection from a computer
CPU while the CPU is on. Because of the way PS/2 mice communicate, the CPU
will lose mouse function and you will have to reboot the CPU to regain normal
operation. Unplugging a shared PS/2 mouse from the ServSwitch Duo/Quadro
will have no immediate effect, but the selected CPU will lose mouse function as
soon as you plug the mouse back in. (RS-232 mouse-port connections can usually
be freely unplugged and replugged, provided that a mouse was connected when
the operating system initially booted.) The ServSwitch Duo/Quadro has a PS/2
mouse-recovery system which allows you to disconnect and reconnect the shared
mice without powering down the system, but we recommend using this only when
absolutely necessary. See Section 5.7 for details.
Keyboard- and mouse-mode handling during channel switching: The ServSwitch
Duo/Quadro keeps a log of the keyboard and mouse modes and resolution
settings requested by each of the connected computer CPUs, including the
keyboard Num Lock, Caps Lock, and Scroll Lock states. These settings are
automatically restored to the user-station keyboards and mice when channels are
switched, ensuring maximum software compatibility.
54
CHAPTER 5: Operation
5.5 Keyboard Hotkey Commands
You can control many of the functions of the ServSwitch Duo/Quadro—including
selecting and autoscanning computers—from the keyboard, using commands
triggered with the Duo’s/Quadro’s currently selected hotkey combination. All of
the hotkey-control commands are invoked by holding down the one or two hotkeys
and then pressing a command key. By default, the two hotkeys are [Ctrl] and [Alt],
although you can choose any of several other keystroke combinations (see
Section 4.7.3).
Normally, when you send a hotkey command, you have to release the hotkeys
and the command key before you can send another one. There are two exceptions
to this rule:
• You can use {Hotkeys} + [Tab] to switch to the next available computer
channel in numeric sequence. You can hold down the hotkeys and repeatedly
press [Tab] to “tab through” the channels one at a time.
• You can use {Hotkeys} + {[↑], [↓], [←], or [→] arrow key} to shift the position
of the on-screen menu. (Use the arrow keys on the main part of the keyboard,
not those on the numeric keypad.) Each individual keypress of an arrow key
moves the menu through about 1⁄88 of the available screen area, but you can
hold down the hotkeys and repeatedly press or hold down the arrow keys to
maneuver the menu window to wherever you want it.
The rest of the hotkey commands are summarized in the remainder of this
section. When commands contain numbers, press the number keys on the top row
of the main section of the keyboard, not the number keys on the keypad; the Duo/
Quadro does not recognize keypad numbers.
The only computer channels that users can select with hotkey commands are
those for which they have access rights (see Section 4.5).
NOTE
Selecting computers with hotkey commands is suitable for systems with
just a few computers. But for systems with more computers, it’s usually
easier to use the on-screen menu for computer selection.
55
SERVSWITCH™ DUO AND SERVSWITCH™ QUADRO
• You can use {hotkeys} + {port number} to select a computer channel on a
single (non-cascaded) Duo/Quadro:
If the computer’s port number is a single digit (1 to 9), press and hold the
hotkeys, then press and release that number key—for example, {hotkeys} + [7]
to select CPU #7—then release the hotkeys.
If the computer is on a two-digit port number (10 to 16), press and hold the
hotkeys, then press and release[1], then press and release the number key of
the second digit—for example, {hotkeys} + [1] + [2] to select CPU #12—then
release the hotkeys.
If you try to select a channel with a higher number than the Duo/Quadro
has ports, the Duo/Quadro will ignore the command and pass it through to
the currently selected computer.
• Although we don’t recommend doing so, you can use {hotkeys} + {address} to
select a computer channel in a cascaded Duo/Quadro system (see
Sections 3.4.3, 4.6.2, and 5.15). The address is a series of port numbers that
specify the “path” to follow to get from the master ServSwitch Duo/Quadro to
the desired computer channel on a subsidiary switch. If the path goes only
through 4- and 8-Port Duos, you can enter single-digit port numbers without
leading zeros; otherwise, include the leading zeros. For example, if a routing
path consists of user → CPU port 6 on a master 8-Port Duo → CPU port 9 on a
second-layer 12-Port Duo → CPU port 15 on a third-layer 16-Port Duo → CPU,
then, to switch to that CPU, you would need to press and hold the hotkeys,
type in [0][6][0][9][1][5], and release the hotkeys. (To make sure that the
Duo/Quadro doesn’t prematurely switch to the wrong channel, hold down the
hotkeys until you enter the last digit.)
Although group numbers can take the place of single port numbers in the
on-screen menu’s cascade addresses (see Sections 3.4.3 and 4.6.2), the Duo/
Quadro doesn’t support using group numbers in hotkey switching commands.
If you make a mistake and type in a nonexistent address, the Duo/Quadro
will ignore the command and pass it through to the currently selected
computer.
• {Hotkeys} + [M] (when you have English or German selected as the keyboard
language) or {Hotkeys} + [?] (question mark) (when you have French selected
as the keyboard language—see Section 4.7.2) causes the on-screen menu to
appear, so that you can select computers by name. This is usually the best way
of selecting computers in systems with more than four attached CPUs.
56
CHAPTER 5: Operation
• {Hotkeys} + [A] causes the Duo/Quadro to begin autoscanning its computer
channels (that is, briefly displaying each channel’s video in turn). By default,
the Duo/Quadro only scans those channels that have been assigned to its scan
list (the “SCAN LIST” autoscan mode—see Sections 4.7.9 and 4.8). But if you
need the Duo/Quadro to scan all of its channels that have a powered-up
computer or cascaded switch connected to them (the “ACTIVE PCs” autoscan
mode), or all of its channels regardless if there’s a powered device connected
to them or not (the “ALL” autoscan mode), you can set it to do so (see
Section 4.7.9, including the Caution notice). (In the ALL setting, when the
Duo/Quadro scans a channel that has no computer or cascaded switch
attached, or a channel whose attached computer or switch is off or just not
outputting video, the shared monitor will display a blank screen.)
While it autoscans, the Duo/Quadro will pause (dwell) at each channel for
a period of time that you can set; see Section 4.7.11.
To end a scan, simply select any fixed channel using any enabled user
control (menu, keyboard, mouse, or Duo/Quadro pushbuttons).
Please keep in mind that in cascaded systems, it isn’t possible to perform a
single autoscan of the whole cascade unless you have autoscan mode set to
SCAN LIST. If you have the autoscan mode set to ACTIVE PCs or ALL; you
must separately scan each Duo/Quadro that has CPUs attached to it. During a
scan, when a Duo/Quadro switches to a port with a cascaded switch attached
to it, the system will display the video from whatever channel is currently
selected at the cascaded switch.
• You can use {Hotkeys} + [0] (zero) to select nonexistent “channel zero” in
order to shut off the video output from the Duo/Quadro to the user-station
monitors. (This will cause some monitors to go into standby mode or switch off.)
It will also deactivate the keyboard and mouse, except for hotkey commands.
The Duo’s/Quadro’s front-panel COMPUTER LED will show “0”. You can reenable video, keyboard, and mouse by selecting an active channel using any
enabled user control (menu, keyboard, mouse, or Duo/Quadro pushbuttons).
• You can use {hotkeys} + [L] to log out of the Duo/Quadro system if password
security has been enabled (see Section 4.3). (If security is disabled, this
command is equivalent to {hotkeys} + [0].) This disables the keyboard and
mouse (except for login purposes) at that user station, causes the login
window to appear on that station’s monitor screen, and switches that station to
channel zero. To use the Duo/Quadro system from that user station, a user
must log in. (Keep in mind that if anyone has typed anything at that station’s
keyboard while no one is logged in—especially if the screen saver has kicked
in—users might have to press [Enter] to clear those characters so that they
won’t invalidate their password when they proceed to type it in.)
57
SERVSWITCH™ DUO AND SERVSWITCH™ QUADRO
Examples of common hotkey commands (assuming the hotkeys are [Ctrl] and [Alt]):
• To select channel 2:
Press and hold [Ctrl] and [Alt], press and release [2], release [Ctrl] and [Alt].
• To “tab through” channels:
Press and hold [Ctrl] and [Alt], press and release [Tab] as many times as
necessary, release [Ctrl] and [Alt].
• To move the on-screen menu to the upper right corner of the screen:
Press and hold [Ctrl] and [Alt], press and release [↑] as many times as
necessary, press and release [→] as many times as necessary, release [Ctrl] and
[Alt].
• To select channel 13 on a subsidiary Duo/Quadro connected to port 3 on a master
Duo/Quadro: Press and hold [Ctrl] and [Alt], press and release [0], press and
release [3], press and release [1], press and release [3], release [Ctrl] and [Alt].
58
CHAPTER 5: Operation
5.6 Selecting Computers with the Mouse
Yet another convenient way to select CPU channels on the ServSwitch Duo/
Quadro is by using a three-button mouse, if this feature is enabled (see
Section 4.7.7). As shown in Figure 5-4, to switch to the next channel, hold down
the central mouse button or “wheel” button (colored black in the illustration),
then click on the left-hand mouse button (colored gray in the illustration).
If password security has been set (see Section 4.3), mouse switching will select
the next available channel. Otherwise it will select the next channel in numeric
sequence.
If mouse switching is disabled, presses of the center button or wheel button on
the mouse are passed through to the computers and can be detected by your
application software.
NOTE
Switching between computers with the mouse is suitable for systems
with just a few computers. But for systems with more computers, it’s
usually easier to use the on-screen menu for computer selection.
Select next channel:
3-button mouse
Wheel mouse
Figure 5-4. Using the mouse buttons for channel switching.
59
SERVSWITCH™ DUO AND SERVSWITCH™ QUADRO
5.7 Re-Enabling a Disconnected PS/2 Mouse
If you accidentally disconnect a user station’s PS/2 mouse from the ServSwitch
Duo/Quadro while the Duo/Quadro is operating, the mouse will not work
correctly when you plug it back in. To avoid having to reboot the entire system in
this situation, the Duo/Quadro has an automatic mouse-recovery system.
With the PS/2 mouse disconnected, change the channel using the Duo’s/
Quadro’s front-panel pushbuttons or the keyboard hotkeys. The Duo/Quadro
detects that the mouse has been disconnected and triggers the automatic recovery
system. Plug in the PS/2 mouse and the Duo/Quadro will re-initialize it. This
function only affects that station; it doesn’t affect the other user station or any of
the computers.
Alternatively, you can fully reset that station’s keyboard and mouse; see
Section 5.9.
60
CHAPTER 5: Operation
5.8 Hot-Plugging Devices Into the ServSwitch Duo/Quadro and Re-Enabling
Disconnected CPU PS/2 Mouse Ports
We suggest that you turn off the computers that will be connected to the
ServSwitch Duo/Quadro before you install a Duo/Quadro system. However, even
if this is not possible, most systems can be “hot-plugged” (connected to the Duo/
Quadro while they are powered and operating); the PS/2 mouse-port malfunctions
this usually causes can often be overcome by using the Duo’s/Quadro’s mouserestoration functions. (The keyboard connection will normally restore itself
automatically.)
Let’s take this from the top: On many computer CPUs, mouse movement will be
lost if the PS/2 mouse is unplugged and plugged back in while the CPU is
running. Mouse movement can then only be restored by rebooting the CPU. This
is because the mouse drivers only set up and enable the mouse when the CPU is
initially booted.
If you have powered down your Duo/Quadro, or if you are attempting to hotplug a system into it, you might be able to restore lost mouse movement using the
Duo’s/Quadro’s mouse-restoration functions.
Important: Mouse-restoration functions should be used with caution, because
unpredictable results might occur if the wrong mouse type is selected. If in doubt,
restore the mouse by rebooting the CPU normally.
Standard PS/2 mouse data uses a different data format than IntelliMouse data,
so two reset functions are provided on the Duo/Quadro. The type of data format
expected by the CPU depends upon the driver and the type of mouse that was
connected when the driver was booted. (If the CPU was attached to the Duo/
Quadro when it was booted, the Duo/Quadro would have behaved as if it were an
IntelliMouse.) The following table may be used as a guide; note that the mousereset functions predict the likely mouse resolution settings but may not restore the
speed or sensitivity of the mouse exactly as they were when the CPU originally
booted:
Type of device
connected
at bootup:
Driver type:
Probable
expected
data format:
Suggested
restoration:
PS/2 mouse
PS/2 only
PS/2
Standard
PS/2 mouse
IntelliMouse
PS/2
Standard
IntelliMouse or switch
PS/2 only
PS/2
Standard
IntelliMouse or switch
IntelliMouse
IntelliMouse
IntelliMouse
61
SERVSWITCH™ DUO AND SERVSWITCH™ QUADRO
To restore lost mouse movement on a CPU connected to the Duo/Quadro:
1. Select the CPU that has lost its mouse movement.
2. Activate the on-screen menu using the keyboard hotkeys or the Duo’s/
Quadro’s front-panel buttons.
3. Press [F1] for MORE MENUS.
4. Select the FUNCTIONS menu.
5. Select RESTORE STANDARD MOUSE or RESTORE INTELLIMOUSE.
6. Press [Esc] (the escape key) repeatedly to exit the menu system.
62
CHAPTER 5: Operation
5.9 Resetting the Keyboard and Mouse
You can have the ServSwitch Duo/Quadro perform a complete power-off reset of
any user station’s keyboard and mouse. This can be useful if you want to
disconnect and replace the keyboard or mouse at a station.
Keyboards will re-enable themselves automatically if they’re disconnected and
then reconnected to the Duo/Quadro. Mice won’t normally re-enable themselves
after they’ve been disconnected and reconnected, although they’ll do so
automatically if the Duo’s/Quadro’s channel has been changed while the mouse is
disconnected (see Section 5.7).
Consequently, you’ll normally need to perform a power-off reset of the user
station if you’ve disconnected and reconnected a mouse. The power-off reset only
affects the selected station; it doesn’t affect any of the other user stations or any of
the computers. Also, the power-off reset affects only local equipment; it has no
effect on the keyboard and mouse at any remote user station attached to the Duo’s
user port #1 or the Quadro’s user port #1 or #3 through a ServSwitch Duo
Extender.
To perform a power-off reset of a user station:
1. If it’s not already selected, press the USER button on the Duo’s/Quadro’s
front panel to select the user port whose keyboard and mouse you want to
reset. The number of that user port should appear in the green USER
7-segment LED.
2. Press and hold down the USER button for 5 seconds until the USER LED
goes dark. The keyboard and mouse at that port’s station will then be
powered off.
3. As soon as the USER LED goes dark, release the USER button. The LED will
then come back on, and a few seconds later the keyboard and mouse will be
powered on and ready for use.
63
SERVSWITCH™ DUO AND SERVSWITCH™ QUADRO
5.10 Switching Channels by Sending RS-232 Data
NOTE
This type of switching is intended for use in fully automated systems
only. Avoid using this type of switching when you also have human
users switching from their user stations—the results could be
unpredictable.
You can switch the ServSwitch Duo/Quadro remotely by sending RS-232 data to the
COMM port on the Duo’s/Quadro’s rear panel (next to the power connectors).
The Duo/Quadro can use this port for serial communications. To send the Duo/
Quadro switching commands that can affect any user:
• Run the included DB9-male-to-DB9-female serial cable from the COMM port
to a DB9 male serial (COM) port on your PC or other RS-232 device.
• Set your PC or RS-232 device to transmit at 19,200 bps using 8 data bits, 1 stop
bit, and no parity. (No handshaking is implemented or supported, but valid
command characters will be echoed back to the sender, and the DTR, DSR,
and CTS lines will always be held high.)
Each switching command is one byte long. The top nibble (first 4 bits) identifies
the user to be switched: from hex 1 (binary 0001) for the user on user port #1 to
hex 4 (binary 0100) for the user on user port #4. The bottom nibble (second
4 bits) identifies the computer port to which you want the Duo/Quadro to switch
that user: from hex 0 (binary 0000) for the CPU on CPU port #1 to hex F (binary
1111) for the CPU on CPU port #16. Here are some complete commands:
• Send hex 14 (binary 00010100) to switch user port #1 to CPU port #5.
• Send hex 38 (binary 00111000) to switch user port #3 to CPU port #9.
• Send hex 4D (binary 01001101) to switch user port #4 to CPU port #14.
In addition, you can use four special commands to switch the user ports to the
nonexistent CPU port #0: from hex 71 (binary 01110001) to switch user port #1 to
CPU port #0 to hex 74 (binary 01110100) to switch user port #4 to CPU port #0.
This type of switching is always done in “shared use” mode rather than “exclusive
use” or “video only” (see Section 5.11). If you attempt to switch a user to a CPU
port that’s already being exclusively used by another user—which shouldn’t
happen in an automated system—the attempt will fail, although the Duo/Quadro
won’t indicate that fact on the serial port. Obviously the commands that affect user
ports #3 and #4 will have no effect on a ServSwitch Duo. These serial commands
affect only the CPU ports on the directly attached Duo/Quadro; they can’t be used
to switch to CPU ports on other chassis in a cascaded system.
For a brief discussion of the COMM port and an illustration of its pinout, see
Section A.3 in Appendix A.
64
CHAPTER 5: Operation
5.11 Selecting Computers Using the On-Screen Menu
You can conveniently select computers by name using the ServSwitch Duo’s/
Quadro’s on-screen menu. For systems with large numbers of computers, this is the
recommended method of computer selection. You can bring up the on-screen
menu by pressing your keyboard’s hotkeys (see Section 4.7.3) and [M] key
together. For example, with the default hotkeys ([Ctrl] and [Alt]), you can launch
the menu by pressing and holding [Ctrl] and [Alt], pressing and releasing [M],
then releasing [Ctrl] and [Alt]. Once the menu is displayed, you can move it
around the screen by using the hotkeys and the arrow keys (see Section 5.5).
You can also launch the menu with a 3-button or wheel mouse if mouse
switching is enabled (see Section 4.7.7). To do this, as shown in Figure 5-5, hold
down the central mouse button or “wheel” button (colored black in the
illustration), then click on the left-hand mouse button (colored gray in the
illustration).
Launch menu:
3-button mouse
Wheel mouse
Figure 5-5. Using the mouse buttons to launch the menu.
65
SERVSWITCH™ DUO AND SERVSWITCH™ QUADRO
When the menu first appears, a set of default names will be listed. You will
probably want to change these names to ones of your choosing (see Section 4.6).
Once you’ve customized your names, the menu might look something like the one
shown in Figure 5-6.
List of
available
computers
(names
defined by
administrator)
CPU-port number or address
Marker
shows
currently
selected
computer
(triangle for
normal
shared
access,
asterisk for
exclusive
use, circle
for videoonly
access)
User port
your station
is attached to
Highlight bar
User
(login)
name
Connection status can be
NOT CONNECTED (channel zero), SHARED
USE, EXCLUSIVE USE, or VIDEO ONLY
Figure 5-6. The main on-screen menu.
66
CHAPTER 5: Operation
To access a computer, first place the highlight bar over its name using the upand down-arrow keys ([↑] and [↓] on the main part of keyboard, not the numeric
keypad) and/or the page-up and page-down keys ([PgUp] and [PgDn]). If mouse
switching is enabled, you can also move the highlight bar with the wheel of a wheel
mouse, as shown in Figure 5-7.
Scroll the menu’s
highlight bar DOWN
Scroll the menu’s
highlight bar UP
Figure 5-7. Using the mouse wheel to move the highlight bar.
Once you’ve highlighted a computer CPU, you can select it for one of three
types of access:
• To select normal “shared use” access, press [Enter] or [Return]. When you
select a CPU for shared use, its video output will be displayed on your monitor
(and on the monitors of every other user who selects that CPU). If no one else
currently has this CPU selected, you’ll also be given keyboard and mouse
control. If someone else has already selected this CPU and has keyboard and
mouse control, you’ll have to wait until they stop using their keyboard and
mouse long enough for the user timeout to expire (see Section 4.7.12) before
you can take keyboard and mouse control yourself.
• To select “exclusive use” access if this is enabled (see Section 4.7.5), press
[Shift] + [Enter] or [Shift] + [Return] (you can use either left- or right[Shift]). When you select a CPU for exclusive use, its video output will be
displayed on your monitor only, and you will be given keyboard and mouse
control. You will not be timed out—you will have exclusive, private use of that
CPU (no one else will be able to select it or view its video) until you select a
different one or you log out. For this reason, you should be very careful about
using this type of access; if you forget to log out, you can unintentionally lock
out other users from accessing a CPU for long stretches of time. (The Duo/
Quadro will not grant exclusive access to a CPU that any other user has already
selected; you have to wait for all other users to relinquish it.)
67
SERVSWITCH™ DUO AND SERVSWITCH™ QUADRO
• To select “video only” access, press [Ctrl] + [Enter] or [Ctrl] + [Return] (you
can use either left- or right-[Ctrl]). When you select a CPU for video-only
access, its video output will be displayed on your monitor but you will not be
granted keyboard and mouse control at any point. “Video Only” will be
displayed on the reminder banner (see Section 5.12) if the banner is enabled
(see Section 5.13.2).
If mouse switching is enabled (see Section 4.7.7), you can also use a 3-button or
wheel mouse to select CPUs for any of these three types of access. As shown in
Figure 5-8, to select a CPU for shared use when the menu’s highlight bar is on it,
click on the left-hand mouse button (colored gray in the illustration). To select a
highlighted CPU for exclusive use, press and hold either [Shift] key on your
keyboard, click on the left-hand mouse button, and release [Shift]. To select a
highlighted CPU for video-only access, press and hold either [Ctrl] key on your
keyboard, click on the left-hand mouse button, and release [Ctrl].
Select CPUs from menu:
3-button mouse
Wheel mouse
Figure 5-8. Using the left mouse button to select CPUs from the menu.
68
CHAPTER 5: Operation
If you have many connected computers, you can do an alphabetic search of the
list of computer names by pressing [F3] and then entering the name that you want
to find.
When you select a computer, the Duo/Quadro will briefly confirm the computer
that has been selected by displaying a message like the one shown in Figure 5-9.
Name of
selected
computer
(blank if
channel zero
is selected)
CPU-port number of
selected computer
User port
your station
is attached to
User
(login)
name
Connection status:
NOT CONNECTED = No computer (channel zero) selected;
SHARED USE = Computer selected for shared use (normal access);
EXCLUSIVE USE = Computer selected for exclusive use;
VIDEO ONLY = Computer selected for video display only
Figure 5-9. The Duo/Quadro confirms a successful connection.
Sometimes the selected computer might not be able to be accessed. In that case,
the Duo/Quadro will display an error message like the one shown in Figure 5-10
and wait for the user to press [Esc] before continuing. Reasons why the Duo/
Quadro might not be able to connect include:
• The requested port is being accessed exclusively by another user.
• There are no free cascade links available.
• The requested port does not exist.
Flashing
failure
message
Computer not available
Insufficient user rights
Reason
for failure
Press ESC to continue
Figure 5-10. The Duo/Quadro indicates an unsuccessful connection.
69
SERVSWITCH™ DUO AND SERVSWITCH™ QUADRO
5.12 The Reminder Banner
Normally the ServSwitch Duo/Quadro will display a discreet computer-name
reminder banner that reminds you which computer you are connected to. (It can
be very easy to forget—especially if many of your computers are devoted to the
same application software, so that their video output is very similar.) You can
customize the color and transparency of the banner, or even disable it if you want
to (see Section 5.13).
This banner will normally appear at the top of the screen in a central location,
but you can move it around the screen in any direction by using the hotkeys
together with the arrow keys in the main part of your keyboard (not those on the
numeric keypad). For example, with the default hotkeys ([Ctrl] and [Alt]), you
can move the banner up the screen by pressing and holding [Ctrl] and [Alt],
pressing and releasing [↑], then releasing [Ctrl] and [Alt].
In normal non-exclusive access, the reminder banner is also used to tell you that
another user is using the computer that you are currently connected to. While the
other user has keyboard and mouse control of the computer, you’ll see the
message “Video Only” below the computer name in the banner, as shown in
Figure 5-11. (You’ll also see the “Video Only” message if you’ve selected the
computer for video-only access; see Section 5.11.)
Screen background
pattern (shown here in
black and white); when
you select a transparent
color scheme, you can
see the screen behind
the banner
Banner text (shown
here as gray)
Figure 5-11. The reminder banner.
70
CHAPTER 5: Operation
5.13 Setting the USER PREFERENCES
The USER PREFERENCES are system operating parameters that are
independently selectable for each user. To adjust them, take these steps:
1. From the main on-screen menu, press [F1] for MORE MENUS.
2. Use the arrow keys to position the highlight bar over USER PREFERENCES.
3. Press [Enter] or [Return] to view the preferences.
4. Use the arrow keys to place the highlight bar over the required option and
then use the space bar to change the option as required.
5. Press [Esc] to quit and save the changes.
5.13.1 OSD COLOUR
Accessed through: USER PREFERENCES
Possible settings: SCHEME 1, SCHEME 2, SCHEME 3 (factory default)
As you toggle between these options you will see the color of the menu change to
show the selected scheme. These color schemes have been specially chosen to
provide a high contrast with the colors that you would normally see on a computer
screen. Scheme 1 is mainly blue and pink; Scheme 2 is mainly red, green, and blue;
and Scheme 3 is mainly blue and black.
5.13.2 REMINDER BANNER
Accessed through: USER PREFERENCES
Possible settings: ENABLED (factory default), DISABLED
When the reminder banner is enabled, the name of the currently selected
computer will appear in a small reminder banner (see Section 5.12). If you don’t
want the banner to be displayed, disable it.
5.13.3 REMINDER COLOUR
Accessed through: USER PREFERENCES
Possible settings: BLUE/TRANS, PINK/TRANS, BLUE/WHITE (factory default),
WHITE/RED
The reminder banner can have have any of four color schemes:
• BLUE/TRANS, PINK/TRANS — blue or pink text on a transparent
background.
• BLUE/WHITE — blue text on a solid white background.
• WHITE/RED — white text on solid red background.
71
SERVSWITCH™ DUO AND SERVSWITCH™ QUADRO
5.13.4 SCREEN SAVER TYPE
Accessed through: USER PREFERENCES
Possible settings: BLANK, MOVING DOT (factory default)
When the screen saver is enabled (see Section 4.7.8), the ServSwitch Duo/Quadro
will display a screen saver instead of the CPU video after the selected time elapses
without keyboard or mouse activity. If you set the screen-saver type to BLANK, a
completely blank black screen will be displayed. If you set the screen-saver type to
MOVING DOT, a moving dot will be displayed on an otherwise blank black screen.
The dot regularly changes color and "bounces off” the sides of the screen in a
zigzag pattern.
5.14 Using the FUNCTIONS Menu
The FUNCTIONS menu contains several useful functions that will help you to
make the most of your ServSwitch Duo/Quadro. You can access the FUNCTIONS
menu from the main on-screen menu by pressing [F1] for MORE MENUS and
then selecting FUNCTIONS.
Standard users will be offered just two functions: RESTORE STANDARD
MOUSE and RESTORE INTELLIMOUSE. If you’ve disconnected a mouse cable or
switched the Duo/Quadro off, the mouse connection will normally be lost. You
can use these functions to restore the mouse connection as described in
Section 5.8.
The ADMIN user is also given three additional options: RESET TO FACTORY
DEFAULTS, SEND DATA TO RS-232 PORT, and READ DATA FROM RS-232
PORT. The RESET option will clear all the computer and user names and set all
parameters back to their factory-default values. To avoid activating this function by
accident, the administrator must confirm the reset instruction by pressing [F8].
The RS-232 PORT options are used for backing up and restoring the Duo’s/
Quadro’s computer/user configuration; see Section 5.19 for details.
72
CHAPTER 5: Operation
5.15 Querying the Routing Status
It’s sometimes useful to know which KVM consoles are connected to which
computers with which types of access (shared use, exclusive use, or video only). For
example, if the ServSwitch Duo/Quadro denies you access to a certain computer,
you might want to check on whether another user has selected that computer for
exclusive use.
To query the routing status (that is, the status of users’ computer selection and
access), press [F1] at the main on-screen menu for MORE MENUS, then select
ROUTING STATUS. A routing-status window such as that shown in Figure 5-12 will
be displayed for ten seconds. (If you want the window to disappear before ten
seconds are up, press [Esc].) In the window:
• “User 1” is the user at either station (local or remote) attached to user port #1
on the standalone or master Duo/Quadro,
• “User 2” is the one on user port #2,
• “User 3” is the one at either station on user port #3, and
• “User 4” is the one on user port #4.
The window for a ServSwitch Duo will always say “NO USER” for User 3 and User 4.
User name
Computer name
Access type
Figure 5-12. The routing-status window.
73
SERVSWITCH™ DUO AND SERVSWITCH™ QUADRO
5.16 Local/Remote Access Sharing in an Extended Duo/Quadro System
User port #1 on ServSwitch Duos and user ports #1 and #3 on ServSwitch Quadros
are “dual-access ports”: They have both connectors for a local user station’s
monitor, keyboard, and mouse and a connector for cable that can run to a remote
user station attached to a ServSwitch Duo Extender. You can install either the local
user station, the remote user station, or both; you can access the Duo/Quadro
from any installed station.
If you have both a local and remote station installed on a port, both stations on
that port can be used to access the Duo/Quadro. The Duo’s/Quadro’s video
output for that port will always appear on both the local and remote monitors, but
the Duo/Quadro will only accept keyboard and mouse input from one station at a
time. While either of the stations is active (sending keyboard or mouse data), the
Num Lock, Caps Lock, and Scroll Lock LEDs on the other station’s keyboard will
flash as shown in Figure 5-13, indicating that the inactive station doesn’t have
control. Once there has been no keyboard or mouse data from the active KVM for
the duration of the user-timeout period (see Section 4.7.12), the other station can
take control by sending keyboard or mouse data, and the previously active station
will become disabled.
NUM
LOCK
CAPS
LOCK
SCROLL
LOCK
NUM
LOCK
CAPS
LOCK
SCROLL
LOCK
Figure 5-13. Keyboard LED-flash pattern indicating local/remote sharing.
CAUTION!
If password security is enabled, though there can be different people
manning the local and remote stations, these people will share the user
profile (user name, login, and access rights) of whichever of them is
logged in at any given time. If someone with access to a certain CPU is
logged in at one station while someone who wouldn’t normally have
access to that CPU is at the other station, the person who wouldn’t
normally have access will see the video from that CPU. Unless
automatic logout is enabled, they could even take keyboard and mouse
control of that CPU (with all of the abilities of the original user’s profile)
if the original user times out!
Also, do not try to run cascade links through both the local and
remote connectors of the same user port on a subsidiary Duo/Quadro.
Such installations don’t work.
74
CHAPTER 5: Operation
5.17 Testing Link Cables in a Cascaded Duo/Quadro System with Grouped
Links
As described in Section 3.4.3, multiple ServSwitch Duos/Quadros can be cascaded
together. Up to four layers of Duos and Quadros can be hooked together in a
cascade, using up to two or four cable links between Duos or Quadros as desired.
Normally we recommend using the on-screen menu to switch between
computers in such a system, as described in Section 5.11. But if you’ve run two or
more link cables between each of your Duos/Quadros and one of them gets
broken or goes bad somewhere, hotkey-command switching will be a better tool for
finding the problem than menu-based switching will. This is because group
numbers are normally used in the menu system’s CPU addresses (see
Section 4.6.2), and when you switch to a CPU with a group number in its address,
it’s impossible to tell which of the cables in a group the link is being routed
through.
To do trial-and-error testing of a grouped pair of link cables, send a hotkey
command that switches to a CPU (see Section 5.5) through one of them, then send
another command that switches to that CPU through the other. For example, if
you have a subsidiary Duo attached by a pair of cables to CPU ports 5 and 6 of a
master Duo, and you have a CPU attached to CPU port 14 of the subsidiary Duo,
check the cable pair this way (assuming that the hotkeys are the default [Ctrl] and
[Alt], and using leading zeros for the single-digit port numbers):
First press and hold [Ctrl] and [Alt], press and release [0] (zero), press and
release [5], press and release [1], press and release [4], and release [Ctrl] and
[Alt]. If that command goes through, video looks OK, and keyboard and mouse
control works, port 5’s cable is probably OK, so check port 6’s cable by repeating
the command sequence with [6] instead of [5].
75
SERVSWITCH™ DUO AND SERVSWITCH™ QUADRO
5.18 Resetting to Factory Defaults (If ADMIN Password Lost, Etc.)
In some cases it might be necessary to completely erase any configuration settings
you might have set or changed in a ServSwitch Duo/Quadro and return it to its
factory-default configuration. The most common situation that would call for such
a radical action is if you lose the ADMIN password you set for the Duo/Quadro. If
the ADMIN password is lost, you won’t be able to administer the Duo/Quadro at
the system level, which includes adding or editing user profiles or computer
names.
To perform a complete reset to factory defaults, take these steps (you will need
to be able to access both the front and rear of the Duo/Quadro):
1. Make sure the Duo/Quadro is powered on normally.
2. While the Duo/Quadro is powered on, move position 2 (the right-hand one)
of the DIP switch labeled “R U” on the Duo’s/Quadro’s rear panel to ON
(down).
3. Press the USER and COMPUTER buttons on the Duo’s/Quadro’s front panel
at the same time.
4. The green USER 7-segment LED will show the lowercase letter “r” for a few
seconds to confirm that a reset is in progress.
5. Move position 2 back to OFF (up), its normal state.
The Duo/Quadro should now be back in its factory-default state, in which you can
login as ADMIN without requiring a password. See Chapter 4 for instructions on
how to build a new configuration (or rebuild the old one) for the Duo/Quadro.
76
CHAPTER 5: Operation
5.19 Saving and Restoring the Computer/User Configuration to and from an
Excel Compatible File
The ServSwitch Duo/Quadro can store up to 512 computer names and 16 user
profiles that include names, passwords, and access rights to the computers. If you
have a cascaded system, it might take some time to enter all of the computer names
and port numbers and decide on the access rights that you’re going to grant to
each user profile. You don’t want to repeat that work any more than you have to.
Therefore, we’ve made it possible to attach an IBM PC compatible computer to the
ServSwitch Duo’s/Quadro’s RS-232 serial COMM port so that you can upload and
download configuration files between the Duo/Quadro and the computer.
Important: Only users logged into the Duo/Quadro as ADMIN can do this.
The file used to store the configuration settings can be loaded into a Microsoft
Excel® spreadsheet and edited to make changes to computer names and access
rights. The edited information can then be loaded back into the Duo/Quadro.
5.19.1 SAVING THE CONFIGURATION
To save the menu names and configuration settings from the Duo/Quadro to the
PC, first prepare your system:
• Call Black Box Tech Support and follow their instructions to download the
DOS compatible programs SSREAD.EXE and SSWRITE.EXE. Move or copy
these programs to the PC that will be attached to the Duo/Quadro.
• Connect one of the PC’s serial COM ports to the Duo/Quadro’s COMM port
using a standard straight-through-pinned DB9 female to DB9 male RS-232
serial extension cable. One of these cables is included with the Duo/Quadro;
if it’s been misplaced or broken, replacements are available separately as
product code EDN12H-MF (specify length). If your PC’s COM port is a DB25
male connector rather than a DB9, you might also need a serial adapter such
as our product code FA521A.
Once this is done, take these steps:
1. Run the program SSREAD.EXE on the PC attached to the Duo/Quadro.
2. Log into the Duo/Quadro as ADMIN if you haven’t already done so.
3. From the Duo’s/Quadro’s main on-screen menu, press [F1] for MORE
MENUS.
4. Use the arrow keys to position the highlight bar over FUNCTIONS.
77
SERVSWITCH™ DUO AND SERVSWITCH™ QUADRO
5. Press [Enter] or [Return] to view the FUNCTIONS menu.
6. Use the arrow keys to place the highlight bar over SEND DATA TO RS-232
PORT.
7. Press [Enter] or [Return] to trigger this function.
The Duo/Quadro should send the configuration data to the PC. The SSREAD
program will store the data in a file named SSDATA.CSV that will be created in the
same directory from which the SSREAD program was run. Make sure that you have
sufficient access rights to this PC to write data to this directory.
5.19.2 EDITING THE CONFIGURATION
You can open the SSDATA.CSV file using a spreadsheet program such as Microsoft
Excel. The format of a typical file is shown in Figure 5-14. You’ll see that the
computer names (rows) are tabulated against the user profiles (columns). To grant
a user access to a computer, enter the value “1” (one) in the cell where the
computer’s row and the user’s column meet. To deny a user access to a computer,
leave that cell empty (blank). (The ADMIN user will always be granted access to all
computers regardless of the values you enter in this file.) To add more users, insert
additional columns (up to a maximum of 16 users). To add more computers,
insert additional rows (up to a maximum of 512 computers). (The new entries
don’t have to be inserted in alphabetical order—the Duo/Quadro will sort them
automatically.) If you’re moving CPUs around, you can even change PORT values.
USERS
PASSWORDS
ADMIN
Alan
password exh4156
COMPUTERS PORT
Admin PC
2103
Alan’s System
2102
Comm Server
3
Comm PC
4
Gateway1
8
Gateway2
5
Test System
15
Web Browser
9
1
1
1
1
1
1
1
1
1
1
1
Jim
hello92
Sue
dynob5
1
1
1
1
1
1
1
1
Figure 5-14. Sample SSDATA.CSV file format.
78
Test
test
1
CHAPTER 5: Operation
5.19.3 RESTORING THE CONFIGURATION
To restore the saved/edited menu names and configuration settings from the PC to
the Duo/Quadro, first prepare your system:
• Make sure that copies of the SSWRITE.EXE program and the SSDATA.CSV
file are together in the same directory on the PC that will be attached to the
Duo/Quadro.
• Connect one of the PC’s serial COM ports to the Duo/Quadro’s COMM port
using the same serial cable you used to save the configuration (see Section
5.19.1) or an identical replacement cable.
Once this is done, take these steps:
1. Run the program SSWRITE.EXE on the PC attached to the Duo/Quadro and
follow the instructions the program gives you.
2. Log into the Duo/Quadro as ADMIN if you haven’t already done so.
3. From the Duo’s/Quadro’s main on-screen menu, press [F1] for MORE
MENUS.
4. Use the arrow keys to position the highlight bar over FUNCTIONS.
5. Press [Enter] or [Return] to view the FUNCTIONS menu.
6. Use the arrow keys to place the highlight bar over READ DATA FROM RS-232
PORT.
7. Press [Enter] or [Return] to trigger this function.
The Duo/Quadro should receive the configuration data from the PC and load the
new menu names and access rights into its on-screen menus.
79
SERVSWITCH™ DUO AND SERVSWITCH™ QUADRO
5.20 Upgrading the Duo’s/Quadro’s Firmware
Because the ServSwitch Duo/Quadro stores most of its firmware (its “operating
system,” if you will) in flash memory, the firmware is upgradable. To fix bugs in
existing firmware, or to add new features to your Duo/Quadro, Black Box
Technical Support might sometimes recommend that you upgrade the Duo’s/
Quadro’s firmware if a newer revision is available.
You can check which version of firmware a Duo/Quadro is currently running by
looking at its onscreen menu. Activate the menu by pressing {hotkeys} + [M] (see
Section 5.11), then press [F1]. The version number of the Duo’s/Quadro’s current
firmware will be displayed at the bottom of the Configuration Menu.
To upgrade the Duo’s/Quadro’s firmware, you’ll need a “host PC,” which must
be an IBM PC compatible computer with an RS-232 serial port. This computer
must be running an operating system that can execute DOS programs, such as MSDOS® or Windows® 3.x, 95, 98, or 2000. You’ll also need a standard straightthrough-pinned DB9 female to DB9 male RS-232 serial extension cable to transfer
the firmware files to the Duo/Quadro. One of these cables is included with the
Duo/Quadro; if it’s been misplaced or broken, replacements are available
separately as product code EDN12H-MF (specify length).
NOTE
The programs used to upgrade the firmware of the Duo/Quadro are
DOS-based for the maximum range of OS compatibility. They run quite
efficiently under DOS, Windows 3.x, Windows for Workgroups,
Windows 95 or 98, Windows Me®, and even Windows NT®, taking roughly
10 minutes to complete the upgrade. But when these programs are run
under Windows 2000 or Windows XP ® , which don’t handle DOS
programs well, they can take substantially longer. Upgrades will be
reliable but might require three or more hours to complete. For this
reason we recommend that you run the upgrade programs on a
computer using an older version of Windows.
80
CHAPTER 5: Operation
Take these steps:
1. C all Black Box Tech Support and follow their instructions to download the
necessary files for the upgrade onto the host PC. The model and version
numbers in the names of some of the files should all match each other, and
all of these files should be downloaded into the same directory:
– A universal upgrade installation/verification program, probably named
“SSDUO.EXE.”
– A data file that tells the program which firmware files to use for the
upgrade and where in the Duo’s/Quadro’s memory to put them.
Theoretically, this file can be modified so that only certain processors
inside the Duo/Quadro are upgraded, but don’t try to do this unless
specifically instructed to do so by Black Box Tech Support. There are five
varieties of this file—one for each model of the Duo and one for the
Quadro—which should be named “uXcVxyz.DAT”; u is the number of user
ports your switch has (2 for the Duo, 4 for the Quadro), c is the number of
CPU ports your switch has (4, 8, 12, or 16), and xyz is the x.yz firmwarerevision level. For example, “2X16V129.DAT” will be the data file for a
16-Port Duo for firmware version 1.29.
– The firmware files themselves. There are three of these, one for each of the
Duo’s/Quadro’s processors. Like the data file, each of these firmware files
comes in five varieties, one for each model of the Duo and one for the
Quadro. They should be named “uXcAxyz.HEX”, “uXcBxyz.HEX”, and
“uXcKxyz.HEX”; again, u is the number of user ports your switch has (2 for
the Duo, 4 for the Quadro), c is the number of CPU ports your switch has
(4, 8, 12, or 16), and xyz is the x.yz firmware-revision level. For example, to
upgrade an 8-Port Duo to hypothetical firmware version 1.32, you would
need the three files “2X8A132.HEX”, “2X8B132.HEX”, and
“2X8K132.HEX”.
2. Make sure that you’ve saved any important work on any computer CPUs
attached to the Duo/Quadro. The Duo/Quadro can be upgraded while
attached to live systems, although the mouse connections will probably need
to be restored after the upgrade is finished (see Section 5.8). Where possible,
however, mission-critical servers should be powered down or disconnected
before you continue with the upgrade.
81
SERVSWITCH™ DUO AND SERVSWITCH™ QUADRO
3. Run the serial cable from the host PC’s serial port to the DB9 female
COMM port on the rear panel of the Duo/Quadro. If your PC’s serial port is
a DB25 male connector rather than a DB9, you might need a serial adapter
such as our product code FA521A.
4. There is also a 2-position DIP switch labeled “R U” on the rear panel. Move
position 2 of this switch (the right-hand one labeled “U”) to the ON (down)
position to set the Duo/Quadro to “upgrade mode.”
OFF = Operate normally at power-up
ON = Go into upgrade mode at power-up
Reserved for future use; do not change setting
Figure 5-15. The Duo’s/Quadro’s DIP switch.
5. Power off the Duo/Quadro by unplugging its power supply (or both supplies,
if you’re using two).
6. While position 2 of the DIP switch is still ON, plug one or both power supplies
back in. The Duo/Quadro will power up in “upgrade mode.” The USER
7-segment LED should now show a lowercase “u” to indicate that the
Duo/Quadro is ready to be upgraded:
USER
LED
82
CHAPTER 5: Operation
7. Run the SSDUO.EXE firmware-upgrade program that you downloaded in
step 1, using the .DAT file that you downloaded in that step as its argument.
For example, to upgrade a Quadro to hypothetical firmware version 1.37, you
would type in the command line, “SSDUO 4X16V137.DAT”.
8. Follow the directions that appear on the host PC’s screen to transfer the new
firmware to the Duo/Quadro. When the upgrade’s complete, the program
will confirm whether the upgrade has been successful, and then it will stop
running.
9. Move position 2 of the Duo’s/Quadro’s DIP switch back to OFF (up), then
cycle power to the Duo/Quadro to return it to normal operation.
CAUTION—if the upgrade goes wrong:
The upgrade program rewrites the Duo’s/Quadro’s existing firmware
code with the code in the uXcVxyz.HEX files. If the upgrade process is
interrupted, the Duo/Quadro will contain invalid code and will not
operate properly. A partial, interrupted, or failed upgrade can be fixed,
but only if you immediately repeat the upgrade process without turning
OFF position 2 of the Duo’s/Quadro’s DIP switch. (The code that the
Duo/Quadro uses to download new firmware is not itself affected by the
upgrade process.) If you move position 2 back to OFF after a failed
upgrade attempt, the Duo/Quadro will begin running the incomplete
code. This could have unpredictable results and might damage your
Duo/Quadro or the attached equipment!
10. Verify one more time that the upgrade has been successful by bringing up the
on-screen menu (see Section 5.11) and seeing which firmware version is
reported at the bottom of the menu when you press [F1].
83
SERVSWITCH™ DUO AND SERVSWITCH™ QUADRO
6. Troubleshooting
6.1 Things to Try
This section suggests possible answers for a number of problems that people
sometimes encounter when trying to operate the ServSwitch Duo/Quadro. If the
suggested actions don’t solve your problem, or if you don’t see a listing for the type
of trouble you’re having, contact Black Box Technical Support as described in
Section 6.2.
Problem:
Poor video quality with smearing, fuzziness, or rippling.
Possible Solution:
Use shielded or screened coaxial video cables to connect your devices to the
ServSwitch Duo/Quadro.
Problem:
Your mouse does not move the cursor/pointer.
Possible Solutions:
If you move the mouse and your user station’s ACTIVITY LED doesn’t flash, then
the ServSwitch Duo/Quadro is not receiving data from the mouse. Check the
mouse’s connection to the Duo/Quadro; if it’s OK, try resetting the mouse using
the reset function (see Section 5.7), resetting the keyboard and mouse (see
Section 5.9) or powering the Duo/Quadro OFF and then ON again. If you are
attempting to connect the Duo/Quadro to a CPU with a PS/2 mouse connection
that has not been powered down, you will need to use the mouse-restoration
function (see Section 5.8).
Make sure that the selected computer’s software is configured to accept a
Microsoft compatible PS/2 mouse of the type that you have connected.
Make sure that (a) the mouse and computer were both connected to the
ServSwitch Duo/Quadro before any part of the system was powered up, and
(b) the Duo/Quadro was powered ON before the attached computer. If you’re not
sure whether this was the case, then (if it’s possible to do so) power everything
down, make sure all cable connections are correct and secure, power up the
Duo/Quadro, then power up all attached computers.
84
CHAPTER 6: Troubleshooting
Problem:
Your keyboard does not function or functions only intermittently. The Num Lock
LED does not always light when the Num Lock key is pressed.
Possible Solution:
Some older keyboards were designed for use with specific computers and are not
truly PC/AT or PS/2 compatible. These are not common, but if you’re having
problems like this and you’re using an old keyboard, try a newer keyboard.
Problem:
Just using your mouse normally causes the CPU channel to change unexpectedly.
Possible Solutions:
Some cheaper mice are not fully compatible with the ServSwitch Duo/Quadro and
can lose data, which—if mouse switching is enabled (see Section 4.7.7)—
sometimes causes the Duo/Quadro to interpret a data stream as a channel-change
request. Try using a Microsoft, Logitech, IBM, Compaq®, or Hewlett-Packard®
mouse instead.
Make sure that you are using a Microsoft compatible mouse driver on your PC.
Some drivers by other manufacturers can cause the mouse to use proprietary
mouse-data formats that the Duo/Quadro doesn’t support. If you have unplugged
and reconnected a mouse to the Duo/Quadro, make sure that you reset it (see
Section 5.7) or—especially if the mouse is an IntelliMouse—use the mouserestoration function (see Section 5.8).
Problem:
The mouse moves very slowly but otherwise functions correctly.
Possible Solutions:
Change to a Microsoft mouse driver.
Problem:
The cursor/pointer jumps around the screen after you disconnect the mouse cable
or power down the ServSwitch Duo/Quadro.
Possible Solution:
If you have disconnected and reconnected a CPU mouse cable or you have
powered down the ServSwitch Duo/Quadro, and you’re using a PS/2 mouse or
IntelliMouse, the mouse might have gotten out of sync with the CPU. Try the
mouse-reset function (see Section 5.7) or the mouse-restoration function (see
Section 5.8), or reboot the CPU.
85
SERVSWITCH™ DUO AND SERVSWITCH™ QUADRO
Problem:
Compaq MX11800 model integrated keyboard and mouse only: The mouse consistently
fails to boot when the Duo/Quadro is connected to PCs running Windows NT 4.0
through their PS/2 style mouse ports.
Possible Solutions:
There are three possible solutions to this problem:
1. Use a different type of mouse.
2. Connect the Duo/Quadro to your NT 4.0 PCs through adapters and their
serial ports rather than through their PS/2 ports.
3. Select channel 0, or another channel that is not connected to an NT 4.0 PC,
while NT is booting. You should be able to use the system normally once the logon
screen appears.
6.2 Calling Black Box
If you determine that your ServSwitch Duo/Quadro is malfunctioning, do not
attempt to alter or repair it. It contains no user-serviceable parts. Contact Black Box
Technical Support at 724-746-5500.
Before you do, make a record of the history of the problem. We will be able to
provide more efficient and accurate assistance if you have a complete description,
including:
• the nature and duration of the problem;
• when the problem occurs;
• the components involved in the problem—that is, what types of computers,
what type of keyboard, brand of mouse, make and model of monitor, etc.;
• any particular application that, when used, appears to create the problem or
make it worse; and
• the results of any testing you’ve already done.
6.3 Shipping and Packaging
If you need to transport or ship your ServSwitch Duo/Quadro:
• Package it carefully. We recommend that you use the original container.
• Before you ship the Duo/Quadro back to Black Box for repair or return,
contact us to get a Return Authorization (RA) number.
86
APPENDIX A: Cable Guidelines
Appendix A: Cable Guidelines
IMPORTANT NOTE
The maximum supported cable lengths vary widely between devices and
cables. It might be possible to use cables that are longer than those
specified in this Appendix with certain computers and peripherals, but
this can’t be guaranteed. If you have problems, try using shorter cables.
A.1 Cabling from the Keyboards, Monitors, and Mice to the ServSwitch Duo/
Quadro or Duo Extender
All of the shared devices plug directly into the relevant ports at the rear of the
ServSwitch Duo/Quadro or on the ServSwitch Duo Extender. If you use a PC/AT
style keyboard you’ll need a PC/AT (5-pin DIN female) to PS/2 (6-pin mini-DIN
male) adapter. (These are available from Black Box as product code FA211.)
You can use Premium KVM User Cables (product code EHN409) to increase the
distance from the Duo/Quadro to your peripherals to as much as 32 ft. (10 m); see
Section 3.4.4. Many keyboards and mice will operate at distances up to 65 ft.
(20 m), but don’t count on this.
A.2 Cabling from the ServSwitch Duo/Quadro to the CPUs
Video cabling: HD15 male to HD15 male, wired as a standard VGA CPU-tomonitor cable. There are two types commonly available. The better type, which will
carry video very well, is constructed with a coaxial cable core. The not-so-good
type—cheaper cable more suited for data communication—is often used, but can
degrade video quality, especially over longer distances. Avoid using “data cables”
longer than 6 ft. (2 m) unless video quality is not important in your application.
You might be able to run good coaxial video cables as far as 165 ft. (50 m) with
little loss of video quality, but the longest we recommend going—unless you use a
ServSwitch brand KVM Extender—is 100 ft. (30 m) over the video strand of our
Premium KVM CPU Cables (product code EHN408, see Section 3.4.4). In a
cascaded application, avoid running video cabling end-to-end (from user to CPU)
farther than 100 ft. (30 m).
If you want to make use of the ServSwitch Duo’s/Quadro’s ability to pass Display
Data Channel (DDC) information between your CPUs and the monitor, you’ll
need a cable that carries the DDC signaling lines (HD15 pins 12 and 15), which
not all video cables do.
87
SERVSWITCH™ DUO AND SERVSWITCH™ QUADRO
Keyboard- and PS/2 mouse-extension cabling: 6-pin mini-DIN male to 6-pin miniDIN male with all lines pinned straight through (1 to 1, 2 to 2, etc.). If the PC has a
5-pin DIN PC/AT style keyboard connector, you will need a PS/2 to PC/AT
keyboard adapter, 6-pin mini-DIN female to 5-pin DIN male (product code FA212).
You might be able to run keyboard- and mouse-extension cable, such as the
keyboard and mouse strands of our Premium KVM CPU Cables (product code
EHN408, see Section 3.4.4), as far as 100 ft. (30 m).
Cabling to CPUs’ RS-232 serial mouse ports: You’ll need PS/2 extension cabling as
described above, plus an adapter with the pinning shown in Figure A-1 on the next
page (product code FA314), to connect the ServSwitch Duo’s/Quadro’s PS/2
mouse port to the RS-232 port on a PC.
As noted above, PS/2 extension cabling, such as the mouse strand of our
Premium KVM CPU Cables (see Section 3.4.4), should be no longer than 100 ft.
(30 m). If you’re using an adapter at the Duo/Quadro end instead of the PC end and
are running regular RS-232 cable, this cable should not be longer than 50 ft. (15 m).
A.3 Cabling from the Duo’s/Quadro’s COMM Port to a PC
The DB9 connector labeled “COMM” on the back of the ServSwitch Duo/Quadro is
an RS-232 port pinned according to a subset of TIA-574; see Figure A-2 on the next
page. It’s very similar to the DB9 serial ports on most PCs, except that it’s female.
You can connect a PC to it in order to do serial switching (see Section 5.10), back
up and restore the Duo’s/Quadro’s computer/user configuration (see
Section 5.19), or upgrade the Duo’s/Quadro’s firmware (see Section 5.20). To do
this, use the DB9 male-to-female extension cable included with the Duo/Quadro.
If this cable is broken or misplaced, replacements are available separately as
product code EDN12H-MF. Specify the length you want when you order; the Duo/
Quadro can support DB9 extension cables as long as 50 ft. (15 m).
A.4 Cabling from the Duo/Quadro to a Duo Extender (Optional)
The remote user-station connector of the ServSwitch Duo’s user port #1 and the
ServSwitch Quadro’s user ports #1 and #3 is an RJ-45 jack. Run standard 4-pair
twisted-pair cabling from this connector to the matching connector on a
ServSwitch Duo Extender. (Do not attach these connectors to a LAN or a phone
network; you could damage the Duo/Quadro or Extender and possibly the
network as well.) This cabling can be anything from Category 3 to Category 5e, but
we recommend that you use straight Category 5 cable; it can be run farthest and
will produce the best results. Both shielded and unshielded Category 5 twisted pair
can be run as far as 200 m (655 ft.).
88
APPENDIX A: Cable Guidelines
6-pin mini-DIN attaches to Duo/Quadro
or cable from Duo/Quadro
DB9 attaches to PC’s serial port or
cable to PC’s serial port
KDAT
RLSD (DCD)
N/C
TD
RD
SGND
TD (-12V)
+5V
DTR
KCLK
SGND
-12V
DSR
RTS
Male
5
N/C
CTS
N/C
RI
1
6
5
Male
4
3
1
6
2
Female
6
5 Female 1
5
4
9
3
2
1
9
6
Figure A-1. The RS-232 mouse adapter’s pinout.
N/C
TD (out)
RD (in)
DTR (in)*
SGND
1
2
3
4
5
6
7
8
9
DSR (out)*
N/C
CTS (out)*
N/C
*Pins 6 and 8 (DSR and CTS) are internally tied together.
Pins 4, 6, and 8 (DTR, DSR, and CTS) are all held high.
Figure A-2. The pinout of the COMM port.
89
SERVSWITCH™ DUO AND SERVSWITCH™ QUADRO
Appendix B:
Rackmounting the Duo/Quadro
If you want to mount the ServSwitch Duo/Quadro, use the included rackmount
brackets and screws. (If you’ve lost these, call Black Box Technical Support.) If
you’d like to rackmount a Duo Extender, the Extender’s manual will tell you how
to do it.
The 4- and 8-Port Duos mount in 1U of vertical rack space and have two
mounting holes on each side. Their mounting brackets each have two matching
holes, and they come with four screws.
The 12- and 16-Port Duos and the Quadro mount in 2U of vertical rack space
and have three mounting holes on each side. Their mounting brackets have three
matching holes, and they come with six screws.
Screw the included screws through the holes in the brackets and into the sides of
the Duo/Quadro, as shown in Figure B-1 or B-2 on the next page. Then attach the
bracketed Duo/Quadro to your rack with your own screws, bolts, cage nuts, etc.
90
APPENDIX B: Rackmounting the Duo/Quadro
Figure B-1. Rackmounting a 4- or 8-Port Duo.
Figure B-2. Rackmounting a 12- or 16-Port Duo or a Quadro.
91
SERVSWITCH™ DUO AND SERVSWITCH™ QUADRO
DISCLAIMERS
While every precaution has been taken in the preparation of this manual, neither
the manufacturer nor its authorized agents assume any responsibility for errors or
omissions. Nor do they assume any liability for damages resulting from the use of
the information contained herein. They reserve the right to change the
specifications, functions, or circuitry of the product without notice.
Neither the manufacturer nor its authorized agents accept liability for damage
due to misuse of the product or due to other circumstances outside their control.
And they will not be responsible for any loss, damage, or injury arising directly or
indirectly from the use of this product.
92
NOTES
NOTES
NOTES
NOTES
JANUARY 2001
Remote
Unit
M
FIBER KV R
EXTENDE
Power
R
G
B
1
2
ACS235A
ACS236A
Customer Support Information:
FREE tech support 24 hours a day, 7 days a week: Call 724-746-5500 or fax 724-746-0746.
Mailing address: Black Box Corporation, 1000 Park Dr., Lawrence, PA 15055-1018
World-Wide Web: www.blackbox.com • E-mail: [email protected]
© Copyright 2001. Black Box Corporation. All rights reserved.