1
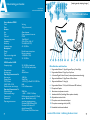
USB500
VoIP Headset with Skype
Interactive Controller
www.accutone.com
Disclaimer - Portions copyright © 2004-2006 Skype Limited. All rights reserved.
This product contains certain non-functional components that are property of Skype Limited (Skype).
Skype has licensed these components to the creator of this product “as is” and disclaims any express
or implied warranties, including but not limited to the implied warranties of merchantability and
fitness for a particular purpose. In no event shall Skype or its contributors be liable for any direct,
indirect, incidental, special, exemplary, or consequential damages (including, but not limited to,
procurement of substitute goods or services; loss of use, data or profits; or business interruption)
however caused and on any theory of liability whether in contract, strict liability, or tort (including
negligence or otherwise) arising in any way out of the use of this product, even if advised of the
possibility of such damage. This product uses the Skype API but is not endorsed or certified by Skype.
© 2007 Accutone Technologies Limited. All rights reserved.
Accutone and the logo device are trademarks of Accutone Technologies Ltd.
Installation Guide & User Manual
[ inspiring people, inspiring change ]
Introduction.
Table of Contents
USB 500 VoIP COMMUNICATION HEADSET
direct control of your Skype software from your headset!
Thank you for purchasing the Accutone® USB500 VoIP Communication Headset.
This high-performance headset is designed for professional Voice over IP
communication, whether it is Skype® chat or any proprietary softwares. Although
the USB500 is tailor-made for human voice applications, its 40mm customdesigned stereo speakers are more than capable of handling top notch hi-fi gaming
as well as listening to music with your PC. Aside from perfect sound reception, it is
also equipped with Accutone®'s noise cancelling microphone. On top of all that, we
have reduced the size of the USB module, added the control interface while still
fitting it into a compact and stylish casing, giving you digital audio control without
compromising convenience.
Now please spend a few moments to read through this user manual before
connecting the USB headset to your computer. After familiarizing with the features
and functions, you will surely appreciate the top audio performance this unique
device has to offer you.
Any PC or
Macintosh**
CM500
stereo headset
This installation guide and user manual contains the following contents:
Part A. Understanding your Headset
Specifications
Main Switches & Interface
p.3
p.4
Part B. Installing your Headset
Connecting to the Computer
Adjusting your Headset
Multi-status LED Indications
Installing USB Driver & Software
p.5
p.5
p.6
p.6
Part C. Operating your Headset
Operating the Xear 3D Software
Verifying Successful Installation of the USB Driver
Configuring the Audio Devices in Windows®
p.9
p.10
p.10
Part D. Troubleshooting
AU500
Interactive
controller
** USB500 VoIP headset is compatible to both desktop and notebook computers with an USB jack. Only the
operating systems listed under "Operating Environment" in the section of Specifications of AU500 USB
Converter on page 2 are applicable.
*** Outside the operating environments mentioned on page 2, the adaptor is not guaranteed to operate with
all computers. The adaptor is not guaranteed to operate with home built computers, operating systems
that are personally up-graded or multiple operating systems. The adaptor is also not guaranteed to operate
with functions under system suspend, sleep and hibernation modes.
1
No sound coming from the headset
Cannot record sound from the microphone
Other problems
p.13
p.13
p.13
Part E. Useful information
Precautions on Safety
Safety Standards - CE Mark & FCC Statement
Trademarks and Ownership
USB400 - Installation Guide & User Manual
p.14
p.14
p.14
A
[ inspiring people, inspiring change ]
Understanding your headset.
specifications
main switches and interface
Specifications.
Stereo Headset CM500
Cord
Mass
Receiver
Size
Type
Voice coil
Maximum input power
Impedance
Sensitivity
Frequency range
Microphone
Design
Type
Open circuit voltage level
Frequency range
USB Controller AU400
Frequency range
Data resolution
Sampling rate
Operating Characteristics Rx
Receiver gain
Output power
THD +Noise
S/N @ THD <0.4%
Master volume control range
Operating Characteristics Tx
Microphone gain
Volume control range
Power supply
Dimensions
Operating environment
Main Switches & Interfaces
2m long
100 g (without cord)
AU500
40mm diameter
Open air dynamic driver unit
CCAW
10mW/20mW
32W
±15% at 1kHz, 1V
93±3dB(3mW/1CM)
40 - 20,000 Hz
CM500
Flexible boom microphone
Electret condenser
-47dB (0dB=1V/Pa)
20 - 20,000 Hz
20 - 20,000 Hz (headphone)
100 - 10,000 Hz (microphone)
16 bit
48 kHz Stereo
14dB Max.
35mW Max.
<0.4% @ P0=30mW 20~20,000 Hz
86dB
0~46.5dB attenuation
20dB Max.
+12dB ~ -34.5dB, 1.5dB step
USB bus power compliant (5V, 100mA)
approx. 28x65x18mm (w/d/h)
compliant operating systems:
Windows 98 SE/Windows 2000/
Windows Me/Windows XP
Apple Macintosh OSX
CPU: Pentium II 266 MHz or better
Main Switches and Interface
1.
2.
3.
4.
5.
6.
7.
8.
9.
10.
11.
12.
13.
Skype-related Button 5 - Skype Program Pop-up / Switch Page
Skype-related Button 4 - Page Up or Up Arrow
4-direction Digital Volume Control (volume adjustments and muting)
Skype-related Button 3 - Page Down or Down Arrow
Skype-related Button 2 - Hang Up
Skype-related Button 1 - Dial (with Multi-status LED-indicator)
Microphone Capsule
Aluminium microphone voice tube
Leatherette Ear Pad (including 40mm speaker chamber)
Adjustable voice tube holder
Microphone voice tube rotational pivot
Microphone connecting cable (with SR)
Extendable double-arm headband
accutone USB controller - installation guide & user manual
B
Installing your headset.
[ inspiring people, inspiring change ]
connecting the computer
adjusting the headset
multi-status LED indications
under different operating system
Installation
Installation
B1. connecting the computer
Connect the USB plug extended from the AU500 USB controller to the USB port of
your notebook or desktop computer. The LED indicator will light up indicating correct
connection to the computer.
B3. multi-status LED indications
to USB port
The LED-indicator on the AU500 USB controller is able to display various status of the
device, and the definitions are listed as below:
B2. adjusting the headset
There are multiple points of adjustment with the CM500 headset, designed for comfort
as well as accomodating different preferences. The double-arm headband (A) is
extendable on both sides to fit different head sizes; and the aluminum microphone voice
tube (B) is rotatable so users can place the microphone closer to their mouth if they
wish. The suggested distance between a user's mouth and the microphone is 1/2 inch.
The voice tube rubber holder (C) also allows
adjustments, so users can shorten the
extension of the microphone capsule when
needed.
A
B
CM500 Headset
C
USB500 - Installation Guide & User Manual
steady GREEN light
STANDBY MODE
flashing GREEN light
OPERATING MODE
steady AMBER light
MUTED STANDBY
flashing AMBER light
MUTED OPERATING
the device is in
standby mode, ready
to receive or
transmit voice data.
the device is
operating, meaning
voice data is being
received or
transmitted.
the device is in
standby mode but
microphone is
muted and no data
is coming in or going
out.
the device is
operating, but
microphone has
been muted, the
device can receive
data but not
transmit.
B4. under different operating system
The USB500’s interactive control function is designed to pair with Microsoft® Windows
OS* only. The software CD that accompanies this manual includes a direct installer that
runs automatically under Windows. Aside from the USB device drivers, the CD will also
install a Skype-controlling application called a “Middleware”. The middleware program
is only designed to work under Windows OS.
Under other OS like Apple** or Linux, the headset as well as the in-line control will still
be operative, without the need to install a USB device driver. Users should still be able
to control volume, speaker mute and microphone mute from the in-line control.
However, because the Middleware cannot operate properly under Mac or Linux OS,
the extra Skype-controlling feature will not function at all.
* Microsoft Windows OS refers to Windows 98 SE, Windows ME and all derivative versions of Windows 2000 &
Windows XP.
** USB device driver not required for Mac OS 9 and above. For Linux driver requirements, please visit their
respective websites.
USB500 - Installation Guide & User Manual
C
Software installation.
[ inspiring people, inspiring change ]
operating digital audio controller
operating the sound configuration software
TM
operating the Accusound software
Installation
Installation
C1. installing the Skype software
The installation of the Skype-controlling middleware requires the pre-installation of the
Skype program. So if you have not already installed the Skype program, please download
it at: http://www.skype.com/download/skype/windows/downloading.html
Select your language for installation at the following screen, and subsequent license
agreement and the installation should proceed as shown.
Click “DOWNLOAD” and follow the instructions as shown below.
Your Skype™ program should launch by itself, create an account if you do not already
have one, simply follow the instructions. For more details about the features and
operations of the Skype software, please refer back to the Help menu with the
program.
*The word “Skype” and the Skype logo are trademark of Skype Technologies S.A. The Skype website screen-crop,
installation interfaces and application interfaces shown throughout this manual are all property of Skype Technologies S.A.
They are shown merely as visual assistance for proper user setup of the Accutone USB500 headset.
7
accutone USB converter - installation guide & user manual
8
C
Software installation.
[ inspiring people, inspiring change ]
operating digital audio controller
operating the sound configuration software
TM
operating the Accusound software
Installation
Installation
C1. installing the driver and middleware
Start off by restarting your Windows OS. Upon restart, insert the Software CD, and the
following screen will pop up. If it doesn’t open up My Computer, click the CD or DVDROM drive. If the screen still doesn’t show up, open up the drive and in the root
directory double-click accutone.exe file to start the installer.
The following screen will pop-up.
Please note that this installer is
designed to work with more than
one version of the USB headsets
from Accutone.
The next screen indicates the beginning of the USB500 driver installation as well as the
Skype-controlling middleware application.
Press Next to continue.
Select where and which folder you
want to install the files to.
Select the correct headset model,
in this case - USB500, by clicking
on the USB500 button, you
should be able to see the content
window showing the correct
headset.
9
Press Next to make a change, or
ignore this if you are okay with the
default choice.
Press Next to continue.
accutone USB converter - installation guide & user manual
10
C
Software installation.
[ inspiring people, inspiring change ]
operating digital audio controller
operating the sound configuration software
TM
operating the Accusound software
Installation
Installation
C2. installing the AccusoundTM software
Click Next to continue installation.
All Accutone USB headset comes with a proprietary-designed software for Digital Audio
Status Indication (DASI), called AccusoundTM. This program will show the current muting
status of the selected USB Audio device, as well as the volume output level.
Immediately after the complete
installation of the USB500 driver and
middleware program, the Accusound
installation will commence.
This screen indicates the completion
of the installation. With the box
checked,
If your PC don’t have Microsoft .NET
installed, the program will
automatically install it for you.
Click install to install Microsoft .NET
Click Finish to launch the
middleware.
Immediately after you finish the
previous installation to launch the
middleware, this screen pops up.
After that, if your PC already have
Microsoft .NET installed, this screen
will pop up.
Click next to install Accusound
Select Allow this program to use
Skype to make sure the middleware
can automatically launch Skype in the
future.
11
accutone USB converter - installation guide & user manual
12
C
Software installation.
[ inspiring people, inspiring change ]
operating digital audio controller
operating the sound configuration software
TM
operating the Accusound software
Installation
Installation
Please read carefully the End-User
Licence Agreement for Accusound.
Select “I accept the terms in the
license agreement”
Click next to continue installation.
The next screen will show you
installation details, like destination
folder and user information.
C3. setup sound devices in the Skype program
By default, the Skype program will use Windows Default Device as it’s audio input and
output channel. This can either mean it is using your default Sound Card, or whichever
audio device you’ve setup in Sound Devices inside the Control Panel.
We will need to change the device to the Accutone USB
headset. First, make sure you have the USB500 headset
plugged in, and the driver properly installed as shown in
the previous sections.
Open the Skype program, under Tools menu, select
Options, and the following screen will open up.
Click Install to continue installation.
After a few minutes of copying files,
this screen will pop up indication the
successful completion of Accusound.
Click Finish to exit installer.
Select Sound Devices in the left panels. On the right panel, open up the Audio In dropdown menu and you should see Accutone USB Sound Device, select it. Do the same for
the Audio Out selection.
Note: In some cases, the driver may read USB Audio Device, select it anyways. However you should uncheck
the Let Skype Adjust My Sound Device Settings, as the Windows default driver may cause microphone cut-off
during Skype talk. (Do not worry about this if you are using the Accutone USB driver.)
13
accutone USB converter - installation guide & user manual
14
D
Operating your headset.
[ inspiring people, inspiring change ]
operating digital audio controller
operating the sound configuration software
TM
operating the Accusound software
Operation
Troubleshooting
10 TROUBLESHOOTING
D1. understanding the controller interface
As shown in page 4 and 6 of this manual, the interactive controller has two sets of
buttons, and a main LED indicator. Each different color or flashing mode indicates
different status the headset is in. The two set of buttons are divided by their colors, the
black control-stick controls basic volume and USB acoustics, the blue buttons control
Skype-related functions.
Skype-Related Button 5
Skype Pop-up / Switch
Page
Skype-Related Button 4
Page Up / Up Arrow
Skype-Related Button 3
PageDown / Down Arrow
4-direction Digital Volume Control
(UP) - Increase Speaker Volume
(DOWN) - Decrease Speaker Volume
(LEFT) - Microphone Mute
(RIGHT) - Speaker Mute
AU500 Skype-related feature buttons not responding
This includes any one of the blue buttons - for features like Pop-up, Dial, Hangup, Page
Up, Page Down, Switch Page...etc.
>
User does not have the Skype software installed, or the program has not been turned on:
install the skype program as shown in p.14 of this manual, and double click on its icon
to launch program.
>
USB500 headset not plugged in, or Accutone USB driver not installed: check to make
sure the USB500 headset is plugged into a working USB port. Accutone strongly
suggests users to install the Accutone USB driver as oppose to the default Microsoft
Windows USB driver. For details to install the Accutone driver, see p.9 of this manual.
>
Middleware program not installed, or install improperly: install the middleware program
as shown in section p.9 of this manual.
** If the above doesn’t work, it is possible that the Skype software’s external application
pairing has been jammed with an non-functioning middleware application. To clean this
up and re-paired the middleware program with the Skype software, do the following:
Skype-Related Button 2
Hang Up
Skype-Related Button 1
Dial
Press the Skype Pop-Up button 5 to turn on Skype, if the program is minimized in
standby mode. By default, the Contact page turns up, use buttons 3 and 4 to select the
contacts you wish to make the Skype-call to. When highlighted the correct contact,
press button 5 to dial the call.
During your call, you can make adjustments to the volume by using the Volume Control
in the middle.
After you’ve completed your call, press button 2 to hang up. If you wish to switch to
different Skype pages like Dial or History, simply press button 1 to switch between them.
15
>
open up Skype, go to Tools, and Options, select Privacy tab on the left and the
above screen appears. On the bottom label Related Tasks, click on manage other
program’s access to skype. The above right screen pops up, if you see an entry
with the name CMSKYPE.EXE, select it, and click Remove on the right. This will
erase any broken link the middleware has with Skype
>
now reinstall the middleware program as in section 10
accutone USB converter - installation guide & user manual
16
troubleshooting
precautions, standards & trademarks
Troubleshooting problems with the device.
Precautions and other legal information.
10 TROUBLESHOOTING
11 PRECAUTIONS ON SAFETY
No sound coming from the headset
>
the USB plug is not properly plugged into the jack: check if the LED is on or replug
>
the 3.5mm headphone plug and microphone plug are not plugged in their corresponding
jack: check if the logos match
>
the headset was connected during music software being played: close all software and
restart installation
>
the audio device selected in your operating system is not correct: go to control panel,
select Sounds and Multimedia Properties or Sounds and Audio Device
Propeties (XP), open Sound Playback tab and select USB Audio Device or
Accutone Audio Adaptor in the Preferred Device scroll-down selection.
>
the volume control for your operating system or music software is set to mute: uncheck
mute from your system or music software.
>
the computer does not recognize the USB headset: restart your system or re-install the
USB headset driver by unplugging and re-plugging the USB plug.
>
Listening with the headset at high volume may damage your hearing.
>
Adjusting the volume for microphone or headphone too high may cause squealing (feedback sound)
and can damage your hearing.
>
Do not use while driving and cycling.
>
Place product far away from water, fire, extended exposure of direct sunlight or magnetic field, and
places of excessive dust, moist, rain, shock or electromagnetic radiation.
>
Do not drop your headset or subject it to external shock which may cause malfunction.
>
Do not disassemble or attempt to open up the casing of either adaptor or headset.
>
Whenever unplugging the headset or the adaptor, apply force to the plug part only. Jerking the cord
instead of the plug may cause damage to the product.
>
Do not use any liquid substance to clean the casing of the product.
Cannot record sound from the microphone
>
the microphone plug is not properly plugged in: check connection of the headset plugs.
>
the mic muting function is on: go to Sound and Multimedia (Audio Device)
Properties and select Volume control for Sound Recording to check Selected in
the Microphone column.
>
the audio device selected in your operating system is not correct: refer to the above
section on the same problem but open the Sound Recording tab instead.
Other problems
>
I'm using Windows 98 or 98SE, and the unit just doesn't work properly no matter how
many times I re-install the drivers: pc running Windows 98SE with AMD processor at
350MHz or faster, and pc that uses VIA Technologies USB Controller will require a
Microsoft USB Update Patch file, go to www.accutone.com.hk website, under "more
information" in the AU500 adaptor section, click "Microsoft Windows 98 Driver
Update" and follow the instructions.
>
headset seize to function after unplug and then re-plug to USB port: in some PC, the
audio driver doesn’t reset automatically; go to Control Panel and reselect the proper
Sound Playback and Sound Recording driver under Audio devices.
12 SAFETY STANDARDS - CE MARK
This product had been subject to testing requirement for the CE mark, and has been approved to
claim the CE mark for EMC standards (EN55022:09.98+A1:10.00+A2:01.03,
EN55024:09.98+A1:10.01+A2:01.03). The validity of the CE marking is restricted to only those
countries when it is legally enforced, mainly in the countries of the European Economic Area.
You are cautioned that any change or modification not expressly approved in this manual could void
your authority to operate this equipment.
13 TRADEMARKS AND OWNERSHIP
D
Accutone and the logo design combined are trademarks or registered trademarks of Accutone
Technologies Limited.
D
Microsoft and Windows are registered trademarks or trademarks of Microsoft Corporation in the
United States and/or other countries.
D
IBM and PC/AT are registered trademarks of International Business Machines Corporation.
D
Pentium is a trademark or registered trademark of Intel Corporation.
D
Skype is a trademark or registered trademark of Skype Technologies S.A.
D
Apple Computer Inc. has intellectual property rights over "Apple", "Macintosh" and "OSX".
D
In this manual, Microsoft® Windows® XP Home Edition and Microsoft® Windows® XP Professional
®
Edition are referred to as Windows XP, whereas Microsoft 2000 Professional Edition is referred to
®
®
as Windows 2000, Microsoft Millennium Edition is referred to as Windows Me, and Microsoft
®
Windows 98 Second Edition is referred to as Windows 98 SE.
D
All other names of systems and products mentioned are trademarks or registered trademarks of
®
their respective owners. ™ marks and marks are omitted for convenience purposes.
* For problems not listed in the above section, or more detailed instructions to various troubleshooting, please refer back
to FAQ:troubleshooting section in our website at http://www.accutone.com
17
accutone USB controller - installation guide & user manual
18