1
Introduction
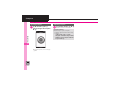
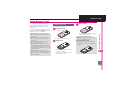
Thank you for purchasing Disney Mobile DM005SH.
. For proper handset use, read "Quick Tips" (in the box) and this guide beforehand.
. Accessible Disney Mobile services may vary by service area, subscription, etc.
Disney Mobile DM005SH is compatible with both 3G and GSM network technologies.
Notes
. Copying this guide in whole or part without authorization is prohibited.
. Guide content is subject to change without prior notice.
. Efforts have been made to ensure the accuracy and clarity of this guide. Please
contact General Information (P.17-41) about unclear or missing information.
Chapter Contents
At A Glance
Getting Started
1
Basic Operations
2
Universal Operations, Etc.
3
Calling
4
Messaging
5
Internet
6
Digital TV
7
Camera & Imaging
8
Media Player
9
S! Applications & Widgets
10
Handy Extras
11
Entertainment
12
Handset Security
13
Data Folder & Memory Card
14
Connectivity & File Backup
15
Handset Customization
16
Appendix
17
i
Guide Usage Notes
Notes
.Most operation descriptions are based on default settings with
handset open (P.1-2) in Standby (P.1-6).
.Operations and results may differ by handset status.
.Sample screenshots, etc. are provided for reference only.
.Actual handset windows, menus, etc. may differ in appearance.
."(Japanese)" appears next to functions or applications which
require Japanese ability to use as intended.
.In this guide and on handset, "abroad" means "outside Japan"
with regard to handset/service usage.
ii
Table of Contents
Guide Usage Notes .......................... ii
Table of Contents ............................ iii
Accessory .........................................v
Safety Precautions........................... vi
1
Getting Started
Handset Parts ................................ 1-2
Charging Battery .......................... 1-4
Power On/Off ................................ 1-6
Display & Indicators ..................... 1-7
2
Basic Operations
Accessing Functions .................... 2-2
Motion Control .............................. 2-8
Illumi Display............................... 2-10
Mobile Manners.......................... 2-12
Security Codes ........................... 2-13
Basic Tools................................... 2-14
Additional Functions .................. 2-15
3
Universal Operations, Etc.
Fonts............................................... 3-2
Wallpaper...................................... 3-3
Customized Screen ...................... 3-4
Sounds & Alerts ............................. 3-5
Text Entry ....................................... 3-6
User Dictionary ........................... 3-11
Dictionary.................................... 3-12
Search ......................................... 3-15
Scratch Pad ................................ 3-16
Phone Book................................. 3-17
Additional Functions .................. 3-20
Troubleshooting .......................... 3-25
4
Calling
Emergency Calls...........................4-2
Voice Calling.................................4-3
Video Calling ................................4-5
Decoration Call .............................4-6
Speed Dial .....................................4-7
Call Log ..........................................4-8
Call Time ........................................4-9
Call Barring ..................................4-10
Optional Services........................4-12
Additional Functions ...................4-14
Troubleshooting...........................4-22
5
Messaging
Messaging .....................................5-2
Sending Messages........................5-4
Incoming Messages ...................5-12
Handling Messages ....................5-15
Chat Folders ................................5-18
Mail Groups .................................5-19
PC Mail .........................................5-20
Additional Functions ...................5-23
Troubleshooting...........................5-40
6
Internet
Internet Services............................6-2
Disney Web....................................6-3
PC Sites...........................................6-5
Browsing.........................................6-6
Bookmarks & Saved Pages ..........6-8
RSS Feeds .......................................6-9
Additional Functions ...................6-10
Troubleshooting...........................6-18
7
Digital TV
Digital TV........................................ 7-2
Recording/Playing ....................... 7-8
TV Timer ....................................... 7-10
Time Shift...................................... 7-11
Additional Functions................... 7-12
Troubleshooting .......................... 7-19
8
Camera & Imaging
Camera ......................................... 8-2
Photo Camera .............................. 8-5
Video Camera ............................ 8-16
Opening Files .............................. 8-18
Editing Images ............................ 8-19
Printing ......................................... 8-23
Additional Functions................... 8-24
Troubleshooting .......................... 8-29
9
Media Player
Media Player................................. 9-2
Music ............................................. 9-4
Video ............................................. 9-5
Playlists .......................................... 9-6
Additional Functions..................... 9-7
Troubleshooting .......................... 9-10
10 S! Applications & Widgets
S! Appli......................................... 10-2
Mobile Widget............................. 10-3
Additional Functions................... 10-6
Troubleshooting ........................ 10-10
11 Handy Extras
Calendar & Tasks........................ 11-2
iii
Table of Contents
Alarms ..........................................11-8
Wakeup TV.................................11-10
Luxury Animation ......................11-12
Household Accounts ................11-13
Calculator ..................................11-17
Expenses Memo........................11-18
Osaifu-Keitai® ............................11-19
Simulated Call ...........................11-23
Stopwatch..................................11-24
Countdown Timer......................11-25
World Clock ...............................11-26
Hour Minder ...............................11-27
Pedometer .................................11-28
Compass....................................11-30
S! GPS Navi ................................11-31
Document Viewer .....................11-34
Notepad.....................................11-35
Voice Recorder .........................11-36
Scan Barcode............................11-37
Create QR Code .......................11-38
Scan Card..................................11-39
Scan Text....................................11-40
Kanji Grabber ............................11-41
Additional Functions .................11-42
Troubleshooting.........................11-59
12 Entertainment
Disney Characters ......................12-2
S! Quick News .............................12-3
S! Information Channel...............12-4
Content Downloads ....................12-5
e-Books ........................................12-6
iv
S! Friend's Status .......................... 12-7
S! Circle Talk..............................12-10
Blog Tool ....................................12-12
Additional Functions.................12-14
Troubleshooting ........................12-18
13 Handset Security
Handset Security......................... 13-2
Face Recognition ....................... 13-4
Function Control ......................... 13-6
Additional Functions................... 13-7
14 Data Folder & Memory Card
Data Folder.................................. 14-2
Memory Card.............................. 14-5
Additional Functions................... 14-7
Troubleshooting ........................14-10
15 Connectivity & File Backup
Infrared ........................................ 15-2
IC Transmission............................ 15-6
Bluetooth® .................................... 15-8
External Device Connection ... 15-12
Backup ...................................... 15-13
S! Addressbook Back-up (SAB) ...15-15
Additional Functions.................15-18
Troubleshooting ........................15-21
16 Handset Customization
Date & Time ................................. 16-2
Display & Illumination................. 16-3
Incoming Transmissions ............. 16-5
Sounds ......................................... 16-6
Connectivity................................ 16-7
Reset ............................................ 16-8
17 Appendix
USIM Card ................................... 17-2
Battery ......................................... 17-4
Software Update......................... 17-5
Troubleshooting .......................... 17-6
Key Assignments ........................ 17-8
Pager Codes ............................. 17-10
Character Codes ..................... 17-11
Weather Indicators................... 17-17
Specifications ........................... 17-18
Menu List ................................... 17-24
Index.......................................... 17-32
Warranty & Service................... 17-40
Customer Service ..................... 17-41
Accessory
Accessory
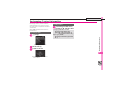
[ Battery (SHBCR1)
. For accessory-related information, please contact General Information (P.17-41).
. Use specified Charger or Headphones (each sold separately) only.
v
Safety Precautions
Safety Precautions
Read safety precautions before using handset.
. Observe precautions to avoid injury to self or others, or
damage to property.
. Disney Mobile is not liable for any damages resulting from use
of this product.
These labels indicate the degree of risk from improper
use. Make sure you thoroughly understand their
meanings before reading on.
vi
DANGER
Great risk of death or
serious injury from
improper use
WARNING
Risk of death or serious
injury from improper use
CAUTION
Risk of serious injury or
damage to property
from improper use
These symbols indicate prohibited or compulsory
actions. Make sure you thoroughly understand their
meanings before reading on.
$
%
&
'
(
)
Prohibited actions
Disassembly prohibited
Exposure to liquids prohibited
Use with wet hands prohibited
Compulsory actions
Unplug Charger from outlet
Safety Precautions
Handset, Battery, USIM Card,
Charger (Sold Separately) &
Memory Card (Sold Separately)
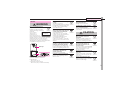
DANGER
Use specified battery, Charger
(sold separately) and Desktop
Holder (sold separately) only.
Non-specified equipment use may
cause battery to leak, overheat,
burst or ignite, and may cause
Charger to overheat, ignite,
malfunction, etc.
Do not disassemble, modify or
solder handset or related hardware.
May cause fire, injury, electric
shock or malfunction. Battery may
leak, overheat, burst or ignite.
Modifying handsets is prohibited by
the Radio Law and subject to a
penalty.
Do not expose handset or related
hardware to liquids.
Do not let liquid-exposed handset/
related hardware remain wet after
exposure to water, pet urine, etc.;
do not charge wet battery. May
cause overheating, electric shock,
fire, injury or malfunction. Use
handset and related hardware in
an appropriate place properly.
(
%
&
Do not charge battery in or expose
handset or related hardware to
extreme heat (e.g., near fire or
sources of heat, in direct sunlight,
inside vehicles, etc.).
May cause warping/malfunction;
battery may leak, overheat, ignite
or burst. Handset or related
hardware may become hot to the
touch, leading to burn injuries, etc.
Do not force battery/Charger into
handset. Check the direction and
retry.
Battery may leak, overheat, burst,
ignite, etc.
$
$
WARNING
Do not place handset, battery or
Charger in/on ovens, microwave
ovens, pressure cookers, induction
stoves or other cooking
appliances.
Battery may leak, overheat, burst or
ignite. Handset/Charger may
overheat, emit smoke, ignite,
malfunction, etc.
Keep handset off and Charger
disconnected near gas stations or
places with fire/explosion risk.
Handset use near petrochemicals
or other flammables may cause
fire/explosion; power handset off
before using Osaifu-Keitai® at gas
stations (cancel IC Card Lock
beforehand).
$
Do not apply strong shocks or
impacts.
Do not drop/throw handset or
related hardware. Battery may
leak, overheat, burst or ignite,
resulting in fire, electric shock,
malfunction, etc.
If there is unusual sound/odor,
smoke or any other abnormality:
Continued use may cause fire,
electric shock, etc.; grasp plug to
disconnect Charger, power
handset off, then remove battery,
being careful not to burn or injure
yourself.
Keep liquids (water, pet urine, etc.)
or conductive material (pencil
lead, metallic strip, metal jewelry,
etc.) away from charging terminals
or External Device Port.
May cause short circuit, resulting in
fire, malfunction, etc.
$
(
$
(
vii
Safety Precautions
CAUTION
Do not place handset or related
hardware on unstable surfaces.
Handset or related hardware may
fall, resulting in injury, malfunction,
etc.; be especially careful when
Vibration is set or while charging.
Keep handset and related
hardware out of infants' reach.
Infants may choke from swallowing
handset or related hardware or be
injured, etc.
If your child is using handset/
related hardware, explain all
instructions and supervise usage.
Misuse may cause injury, etc.
$
(
(
Battery
DANGER
Read battery label to confirm battery type;
use/dispose of battery accordingly.
Symbol on Label
Battery Type
Li-ion00
Lithium-ion
Do not dispose of battery in fire.
Battery may leak, burst, ignite, etc.
Do not damage battery (with a nail,
hammer, foot, etc.) or subject it to
strong impacts or shocks.
Battery may leak, overheat, burst,
ignite, etc.
Keep wire or other metal objects
away from battery terminals. Do
not carry/store battery with
conductive material (pencil lead,
metallic strip, metal jewelry, etc.).
Battery may leak, overheat, burst,
ignite, etc.
If battery fluid gets in eyes, do not
rub; rinse with water and consult a
doctor immediately.
Eyes may be severely damaged.
viii
$
$
$
(
WARNING
If battery fluid contacts skin or
clothes, discontinue handset use and
rinse with clean water immediately.
May cause skin damage.
If battery does not charge properly,
stop trying.
Battery may leak, overheat, burst,
ignite, etc.
If there is abnormal odor, excessive
heat, discoloration or distortion,
remove battery, being careful not
to burn or injure yourself. Avoid fire
sources.
Continued use may cause battery
to leak, overheat, burst, ignite, etc.
Keep battery away from pets.
Pet bites may cause battery to
leak, burst, overheat, ignite, etc.
(
(
(
(
CAUTION
Do not dispose of an exhausted
battery with ordinary refuse.
Tape over battery terminals before
disposal. Take battery to a SoftBank
Shop, or follow the local disposal
regulations.
$
Safety Precautions
Handset
WARNING
$
Do not use Mobile Light near
people's faces.
Eyesight may be temporarily
affected leading to accidents.
EN60825-1:1994 A1:2002 & A2:2001
CAUTION:
Use of controls,
CLASS 1
adjustments or
LED Product
performance of
procedure other than
those specified herein may result in hazardous
radiation exposure. As the emission level from
Mobile Light LED used in this product is
harmful to the eyes, do not attempt to
disassemble the cabinet. Servicing is limited
to qualified servicing station only.
Mobile Light
Do not use handset while driving or
cycling.
Accidents may result.
Phone use while driving or cycling is
prohibited by law and subject to a
penalty; park in a legal parking
space beforehand.
Power handset off near electronic
devices that employ high precision
control systems or weak signals.
May cause electronic
malfunctions, etc. Be especially
careful near the following devices:
Hearing aids, implanted
pacemakers/defibrillators and
other electronic medical
equipment; fire alarms, automatic
doors and other automatic control
devices.
Power handset off before boarding
aircraft to avoid radio waves from
interfering with aircraft operation.
If mobile phone use is allowed on
board, follow airline or cabin crew
instructions regarding handset use.
Users with a heart condition should
adjust ringtone Vibration and
Volume as needed.
May cause heart damage.
[ Mobile Light LED Properties
a) Emission Duration: Continuous
b) Wavelength
White: 400 - 700 nm
c) Maximum Emission Output
White: 490 μW (1.2 mW inside handset)
If thunder is heard while outdoors,
power handset off; find cover.
There is a risk of lightning strike or
electric shock.
$
(
(
(
(
Do not look into Infrared Port during
infrared transmissions.
Eyesight may be affected.
Confirm there is ample space for
Motion Control use; hold handset
firmly and shake it gently.
Handset may slip, resulting in injury
or breakage.
$
$
CAUTION
Do not use handset when it may
affect a vehicle's electronic
equipment.
Handset use inside vehicles may
cause electronic equipment to
malfunction, resulting in accidents.
If you experience any skin irritation
associated with handset use,
discontinue handset use and
consult a doctor.
Metal and other materials (P.17-18)
may cause skin irritation, rashes, or
itchiness depending on your
physical condition.
Keep handset away from magnetic
cards, etc.
Data on bank cards, credit cards,
telephone cards, floppy disks, etc.
may be lost.
Do not swing handset by strap.
May harm self or others; strap may
break, resulting in injury or handset
malfunction/breakage.
$
(
$
$
ix
Safety Precautions
Handset may become hot while in
use, especially at high temperature.
Prolonged contact with skin may
cause burn injuries.
Always maintain some distance
from Speaker while ringtones, music
or other handset sounds play.
Excessive volume may damage
ears or hearing.
Keep fingers, straps, etc. outside
when opening/closing handset.
May cause injury, breakage, etc.
Watch TV from a distance in good
light.
Watching in poor light or too close
may affect eyesight.
Moderate handset volume when
using Headphones.
Excessive volume may damage
ears or hearing.
(
$
(
(
(
Charger (Sold Separately)
WARNING
Do not cover/wrap Charger while
charging.
Charger may overheat, resulting in
fire, malfunction, etc.
Use only the specified voltage.
Non-specified voltages may cause
fire, malfunction, etc.
. AC Charger (sold separately):
AC 100V-240V Input
. In-Car Charger (sold separately;
use in negative earth vehicles
only): DC 12V/24V Input
Do not use power adapters. Using
Charger with step-up/step-down
transformer may cause fire, electric
shock or malfunction.
Leave Charger unplugged during
periods of disuse; grasp plug to
disconnect it.
May cause electric shock, fire or
malfunction.
Use only the specified fuse for
In-Car Charger (sold separately).
Non-specified fuse may cause fire
or malfunction. See In-Car Charger
manual for details.
If liquids (water, pet urine, etc.)
seep inside Charger, grasp plug
and disconnect it immediately.
May cause electric shock, smoke
or fire.
x
$
$
)
(
)
If plug is dusty, grasp it and
disconnect Charger, then clean
with dry cloth.
Fire may result.
Do not use In-Car Charger (sold
separately) in positive earth
vehicles.
May cause fire, etc. Use in negative
earth vehicles only.
Plug Charger firmly into the outlet,
keeping the plug and Charger/
Desktop Holder charging terminals
away from conductive material
(pencil lead, metallic strip, metal
jewelry, etc.).
May cause electric shock, short
circuit, fire, etc.
Do not touch Charger plug with wet
hands.
May cause electric shock,
malfunction, etc.
Do not touch Charger if thunder is
heard.
May cause electric shock, etc.
(
$
(
'
$
Safety Precautions
CAUTION
Grasp plug and disconnect
Charger before cleaning.
May cause electric shock, etc.
Always grasp plug (not cord) to
disconnect Charger.
Pulling the plug by cord may
damage cord, causing electric
shock, fire, etc.
Do not subject AC Charger (sold
separately) to strong shocks or
impacts while it is plugged into the
outlet.
May cause malfunction or injury.
Do not touch charging terminals of
Desktop Holder (sold separately)
while it is connected to the outlet.
May cause burn injuries.
)
(
$
$
Handset Use & Electronic
Medical Equipment
This section is based on "Guidelines on the Use
of Radio Communications Equipment such as
Cellular Telephones and Safeguards for
Electronic Medical Equipment"
(Electromagnetic Compatibility Conference,
April 1997) and "Report of Investigation of the
Effects of Radio Waves on Medical
Equipment, etc." (Association of Radio
Industries and Businesses, March 2001).
WARNING
Persons with implanted
pacemaker/defibrillator should
keep handset more than 22 cm
away.
Radio waves may interfere with
implanted pacemakers or
defibrillators.
If you intend to use electronic
medical equipment other than
implanted pacemaker/defibrillator
outside medical facilities, consult
the vendor on radio wave effects.
Radio waves may interfere with
electronic medical equipment.
(
Observe these rules inside medical
facilities to avoid effects of radio
waves on electronic medical
equipment:
. Do not enter an operating room
or an Intensive or Coronary Care
Unit while carrying a handset.
. Keep handset off in hospitals.
. Even in lobbies or other places
where handset use is permitted,
keep handset off near electronic
medical equipment.
. Obey medical facility rules on
mobile phone use.
Power handset off in crowds or
trains where persons with
implanted pacemaker/defibrillator
may be near.
Radio waves may interfere with
implanted pacemakers or
defibrillators causing such devices
to malfunction.
(
(
(
xi
Safety Precautions
General Notes
General Use
. Disney Mobile is not liable for any damages
resulting from accidental loss/alteration of
handset/Memory Card files or settings.
Keep separate copies of Phone Book
entries, etc.
. Handset transmissions/TV signal reception
may be disrupted inside buildings, tunnels or
underground, or when moving into/out of
such places.
. Use handset without disturbing others.
. Handsets are radios as stipulated by the
Radio Law. Under the Radio Law, handsets
must be submitted for inspection upon
request.
. Handset use near landlines, TVs or radios
may cause interference.
. For proper use of Memory Card (sold
separately), read the manual beforehand.
. Beware of eavesdropping.
Because this service is completely digital, the
possibility of signal interception is greatly
reduced. However, some transmissions may
be overheard.
Eavesdropping
Deliberate/accidental interception of
communications constitutes eavesdropping.
. An export license may be required to carry
the handset into other countries if it is to be
used by or transferred to another person.
However, no such license is required when
you take the handset abroad for personal
use on a vacation or business trip and then
bring it back.
xii
Export control regulations in the United
States provide that an export license
granted by the US government is required
to carry the handset into Cuba, Iran, North
Korea, Sudan or Syria.
Handset & Hardware Care
. Handset is not waterproofed. Avoid
exposure to liquids and high humidity.
, Keep handset away from precipitation.
, Cold air from air conditioning, etc. may
condense causing corrosion.
, Avoid dropping handset in damp places
(restroom, bath/shower room, etc.).
, On the beach, keep handset away from
water and direct sunlight.
, Perspiration may seep inside handset
causing malfunction.
. If handset is left with no battery or an
exhausted one, data may be altered/lost.
Disney Mobile is not liable for any resulting
damages.
. Use handset within 5oC - 35oC (35% - 85%
humidity).
. Avoid extreme temperatures or direct
sunlight.
. Malfunction resulting from misuse is not
covered by the warranty.
. Exposing lens to direct sunlight may
damage color filter and affect image color.
. Battery may not charge properly if ports/
terminals are obstructed by dust, etc. Clean
with dry cloth, cotton swab, etc.
. Clean handset with soft dry cloth. Using
alcohol, thinner, etc. may damage it.
. Avoid scratching Display.
. Avoid heavy objects or excessive pressure.
May cause malfunction or injury.
, Do not sit on handset in back pants pocket.
, Do not place heavy objects on handset
inside handbags, packs, etc.
. Connect only specified products to External
Device Port. Other devices may
malfunction or cause damage.
. Always power handset off before removing
battery. If battery is removed while saving
data or sending mail, data may be lost,
changed or destroyed.
. Do not remove Memory Card or power
handset off while using the card; may result
in data loss or malfunction.
. When walking outside, moderate handset
volume to avoid accidents.
. Do not use Desktop Holder (sold separately)
inside vehicles. Vibration may damage
handset, etc.
Safety Precautions
Bluetooth® Function
Disney Mobile is not liable for any damages
resulting from data/information leakage due
to use of handset Bluetooth® function.
[ Precautions
The frequency band utilized by handset
Bluetooth® function is shared with industrial,
scientific or medical equipment, including
household microwave ovens, etc., and used
by radio stations, amateur radio stations, etc.
(hereafter "other radio stations").
1 Before using Bluetooth®, visually confirm
that no other radio stations sharing the
same frequency band are in use nearby.
2 Should interference occur between
handset and other radio stations, move or
cancel Bluetooth® function immediately.
3 For additional information and support,
contact customer service:
Disney Mobile Customer Center
From a Disney Mobile handset, call toll free
at 157.
To call toll free from landlines, see P.17-41
"Customer Service."
Function Usage Limits
These functions are disabled after handset
upgrade/replacement or service
cancellation: Camera; Media Player;
S! Applications; TV.
After a period of disuse, these functions may
be unusable; retrieve Network Information
(P.16-7) to restore usability.
Mobile Camera
. Mind your manners when using handset
camera.
. Test the camera before capturing/
recording special moments.
. Do not use handset camera in places
where photography or videography is
prohibited.
In-Call/Transmission Caution
During calls/transmissions, calling/transmission
charges/fees apply even if other functions or
operations are simultaneously in use.
Frequency Band
This radio station utilizes 2.4 GHz band with
FHSS modulation. Maximum transmission
radius is 10 meters (32 feet). It is not possible
for the radio station to avoid using the
frequency band of the mobile unit
identification apparatus.
xiii
Safety Precautions
European RF Exposure Information
Electromagnetic Waves
For body-worn operation, this phone has
been tested and meets RF exposure
guidelines when used with accessories
containing no metal, that position handset a
minimum of 15 mm from the body. Use of
other accessories may not ensure
compliance with RF exposure guidelines.
CE Declaration of Conformity
Hereby, Sharp Telecommunications of Europe Ltd, declares
that DM005SH is in compliance with the essential requirements
and other relevant provisions of Directive 1999/5/EC.
A copy of the original declaration of conformity for each
model can be found at the following Internet address:
http://disneymobile.jp/
Battery - CAUTION
Use specified battery or Charger only.
Non-specified equipment use may cause
malfunctions, electric shock or fire due to
battery leakage, overheating or bursting.
Do not dispose of an exhausted battery with
ordinary refuse; always tape over battery
terminals before disposal. Take battery to a
SoftBank Shop, or follow the local disposal
regulations.
Charge battery in ambient temperatures
between 5oC and 35oC; outside this range,
battery may leak/overheat and performance
may deteriorate.
xiv
Your mobile device is a radio transmitter and
receiver. It is designed not to exceed the
limits for exposure to radio waves
recommended by international guidelines.
These guidelines were developed by the
independent scientific organization ICNIRP
and include safety margins designed to
assure the protection of all persons,
regardless of age and health.
The guidelines use a unit of measurement
known as the Specific Absorption Rate, or
SAR. The SAR limit for mobile devices is 2 W/kg.
As mobile devices offer a range of functions,
they can be used in other positions, such as
on the body as described in this user guide*.
Highest SAR value:
**
Model
At the Ear
On the Body
DM005SH
0.611 W/kg
0.771 W/kg
As SAR is measured utilizing the device's
highest transmitting power the actual SAR of
this device while operating is typically below
that indicated above. This is due to
automatic changes to the power level of the
device to ensure it only uses the minimum
level required to reach the Network.
The World Health Organization has stated
that present scientific information does not
indicate the need for any special precautions
for the use of mobile devices. They note that if
you want to reduce your exposure then you
can do so by limiting the length of calls or
using a handsfree device to keep the mobile
phone away from the head and body.
*
Please see Electromagnetic Waves on the
left for important notes regarding body-worn
operation.
**
Measured in accordance with international
guidelines for testing.
FCC Notice
. This device complies with part 15 of the FCC
Rules. Operation is subject to the following
two conditions:
(1) This device may not cause harmful
interference, and (2) this device must
accept any interference received,
including interference that may cause
undesired operation.
. Changes or modifications not expressly
approved by the manufacturer responsible
for compliance could void the user's
authority to operate the equipment.
FCC Information to User
This equipment has been tested and found to
comply with the limits of a Class B digital
device, pursuant to Part 15 of the FCC Rules.
These limits are designed to provide
reasonable protection against harmful
interference in a residential installation. This
equipment generates, uses and can radiate
radio frequency energy and, if not installed
and used in accordance with the instructions,
may cause harmful interference to radio
communications.
However, there is no guarantee that
interference will not occur in a particular
installation; if this equipment does cause
harmful interference to radio or television
reception, which can be determined by
turning the equipment off and on, the user is
encouraged to try to correct the interference
by one or more of the following measures:
1. Reorient/relocate the receiving antenna.
2. Increase the separation between the
equipment and receiver.
Safety Precautions
3. Connect the equipment into an outlet on a
circuit different from that to which the
receiver is connected.
4. Consult the dealer or an experienced
radio/TV technician for help.
FCC RF Exposure Information
Your handset is a radio transmitter and
receiver.
It is designed and manufactured not to
exceed the emission limits for exposure to
radio frequency (RF) energy set by the
Federal Communications Commission of the
U.S. Government.
The guidelines are based on standards that
were developed by independent scientific
organizations through periodic and thorough
evaluation of scientific studies. The standards
include a substantial safety margin designed
to assure the safety of all persons, regardless
of age and health.
The exposure standard for wireless handsets
employs a unit of measurement known as the
Specific Absorption Rate, or SAR. The SAR limit
set by the FCC is 1.6 W/kg.
Highest SAR value:
Model
FCC ID
DM005SH APYHRO00114
At the Ear
On the Body
0.392 W/kg
0.509 W/kg
The use of accessories that do not satisfy
these requirements may not comply with FCC
RF exposure requirements, and should be
avoided.
The FCC has granted an Equipment
Authorization for this model handset with all
reported SAR levels evaluated as in
compliance with the FCC RF emission
guidelines. SAR information on this model
handset is on file with the FCC and can be
found at http://www.fcc.gov/oet/fccid
under the Display Grant section after
searching on the corresponding FCC ID (see
table on the left).
Additional information on Specific Absorption
Rates (SAR) can be found on the Cellular
Telecommunications & Internet Association
(CTIA) Website at http://www.phonefacts.net.
This device was tested for typical body-worn
operations with the back of the handset kept
1.5 cm from the body. To maintain
compliance with FCC RF exposure
requirements, use accessories that maintain a
1.5 cm separation distance between the
user's body and the back of the handset. The
use of beltclips, holsters and similar
accessories should not contain metallic
components in its assembly.
xv
Safety Precautions
Rights, Trademarks & Patents
Portrait Rights
Portrait rights protect individuals' right to
refuse to be photographed or to refuse
unauthorized publication/use of their
photographs. Portrait rights consist of the right
to privacy, which is applicable to all persons,
and the right to publicity, which protects the
interests of celebrities. Therefore,
photographing others including celebrities
and publicizing/distributing their photographs
without permission is illegal; use handset
camera responsively.
Copyrights
Copyright laws protect sounds, images,
computer programs, databases, other
materials and copyright holders. Duplicated
material is limited to private use only. Use of
materials beyond this limit or without
permission of copyright holders may
constitute copyright infringement, and be
subject to criminal punishment. Comply with
copyright laws when using images captured
with handset camera.
The software contained in handset is
copyrighted material; copyright, moral right
and other related rights are protected by
copyright laws. Do not copy, modify, alter,
disassemble, decompile or reverse-engineer
the software; do not separate it from
hardware in whole or part.
xvi
Video recording and playback are based on
MPEG-4.
This product is licensed under the MPEG-4
Visual Patent Portfolio License for the personal
and non-commercial use of a consumer to (i)
encode video in compliance with the
MPEG-4 Video Standard ("MPEG-4 Video")
and/or (ii) decode MPEG-4 Video that was
encoded by a consumer engaged in a
personal and noncommercial activity and/or
was obtained from a licensed video provider.
No license is granted or implied for any other
use. Additional information may be obtained
from MPEG LA.
See http://www.mpegla.com.
This product is licensed under the MPEG-4
Systems Patent Portfolio License for encoding
in compliance with the MPEG-4 Systems
Standard, except that an additional license
and payment of royalties are necessary for
encoding in connection with (i) data stored
or replicated in physical media which is paid
for on a title by title basis and/or (ii) data
which is paid for on a title by title basis and is
transmitted to an end user for permanent
storage and/or use. Such additional license
may be obtained from MPEG LA, LLC.
See http://www.mpegla.com for additional
details.
Handset employs RSA® BSAFE=
software developed by RSA
Security Inc.
RSA is a registered trademark of
RSA Security Inc.
BSAFE is a registered trademark
of RSA Security Inc. in the United
States and/or other countries.
This product is
equipped with
JBlend= designed to
accelerate the
performance of Java=
Application.
Powered by JBlend=.
Copyright 1997-2010 Aplix Corporation.
All rights reserved.
JBlend and JBlend-related brands are
trademarks or registered trademarks of Aplix
Corporation in Japan and other countries.
Java and Java-related brands are
trademarks or registered trademarks of Sun
Microsystems, Inc. in the United States and
other countries.
The microSD and microSDHC logos are
trademarks of SD-3C, LLC.
This product employs NetFront Browser
(Internet browser) and NetFront SMIL Player
developed by ACCESS Co., Ltd.
Copyrightc 2010 ACCESS Co., Ltd.
ACCESS and NetFront are trademarks or
registered trademarks of ACCESS Co., Ltd. in
Japan or other countries.
This product includes a module developed by
Independent JPEG Group.
IrSimple=, IrSS= and IrSimpleShot= are
trademarks of the Infrared Data Association®.
Safety Precautions
Bluetooth is a registered trademark of the
Bluetooth SIG, Inc.
The Bluetooth word mark and logos are
owned by the Bluetooth SIG, Inc. and any use
of such marks by SHARP is under license.
Microsoft, PowerPoint and Excel are
registered trademarks of Microsoft
Corporation in the United States and/or other
countries.
Powered by MascotCapsule®.
Powered by MascotCapsule®/3DView
package=.
MascotCapsule is a registered trademark of
HI Corporation.
c2002-2010 HI Corporation. All rights reserved.
FeliCa is a contactless IC card technology
developed by Sony Corporation.
FeliCa is a registered trademark of Sony
Corporation.
m is a registered trademark of FeliCa
Networks, Inc.
Osaifu-Keitai is a registered trademark of NTT
DOCOMO, INC.
QR Code is a registered trademark of DENSO
WAVE INCORPORATED.
This product contains Adobe® Flash® Lite=
player software under license from Adobe
Systems Incorporated.
Adobe Flash Lite Copyright c 2003-2007 Adobe
Systems Incorporated. All rights reserved.
Adobe, Flash and Flash Lite are either
registered trademarks or trademarks of
Adobe Systems Incorporated in the United
States and other countries.
Wakeup TV, VeilView, Smartlink, Simulated
Call, AQUOS, Chase focus, Pretty Arrange
Camera and Animation View are trademarks
or registered trademarks of SHARP
Corporation.
Document Viewer is enabled by Picsel
Technologies.
Picsel, Picsel Powered, Picsel Viewer, Picsel
File Viewer, Picsel Document Viewer, Picsel
PDF Viewer and the Picsel cube logo are
trademarks or registered trademarks of Picsel
Technologies Ltd.
Chaku-Uta and Chaku-Uta Full are registered
trademarks of Sony Music Entertainment
(Japan) Inc.
BookSurfing® is a registered trademark of
CELSYS Inc., Voyager Japan, Inc. and
INFOCITY Inc.
Genius English-Japanese Dictionary
c2005-2008 Taishukan
Genius Japanese-English Dictionary
c2005-2008 Taishukan
Meikyo Japanese Dictionary c2005-2008 Taishukan
. Genius English-Japanese Dictionary MX.net
cKONISHI Tomoshichi, MINAMIDE Kosei &
Taishukan, 2009
. Genius Japanese-English Dictionary MX.net
cKONISHI Tomoshichi, MINAMIDE Kosei &
Taishukan, 2009
. Meikyo Japanese Dictionary MX.net
cKITAHARA Yasuo & Taishukan, 2009
. Imidas Encyclopedia cSHUEISHA Inc.
. Complete Japanese Encyclopedia
(Encyclopedia Nipponica 2001) including
"Nipponica Plus," Digital Dai-ji-sen Japanese
Dictionary, Shogakukan Progressive
English-Japanese Dictionary, Shogakukan
Progressive Japanese-English Dictionary
cShogakukan Inc.
. Amazon.co.jp is a trademark of
Amazon.com, Inc. or its affiliates.
. Hot Pepper FooMoo cRECRUIT
. Family Medical Encyclopedia cHouken 2004
. Guide to Prescription Drugs cShigeru
Kimura/Iyakuseidokenkyukai 2008
. Yahoo! Answers cYahoo Japan
EUPHONY= (a comprehensive sound
enhancement system utilizing a virtual
sound source processing technology)
is a trademark of DiMAGIC Co., Ltd.
Dynamic Range Adjustment is based
on iridix technology by Apical Limited.
. Household Accounts= is a trademark of
Information System Products Co., Ltd.
. Kanji Grabber® is a registered trademark of
Information System Products Co., Ltd.
xvii
Safety Precautions
PhotoSolid®, FaceSolid®, MovieSolid®,
FrameSolid®, PhotoScouter®, TrackSolid® and
Morpho Effect Library= are registered
trademarks or trademarks of Morpho, Inc.
Handset employs Face
Sensing Engine (FSE)
developed by Oki Electric
Industry Co., Ltd.
FSE and the FSE logo are trademarks of Oki
Electric Industry Co., Ltd.
Chara Time is a registered trademark of
Primeworks.
Machi-Uta® is a registered trademark of KDDI
CORPORATION.
SOFTBANK, SoftBank and the SoftBank logo are
trademarks or registered trademarks of
SOFTBANK CORP. in Japan and other countries.
Yahoo! and the Yahoo! and Y! logos are
trademarks or registered trademarks of Yahoo! Inc.
CP8 PATENT
S! Application, S! GPS Navi, Mobile Widget,
S! Quick News, S! Information Channel,
S! Friend's Status, S! Circle Talk, S! Addressbook
Back-up, Weather Indicator, Customized Screen,
Video Call, Lifestyle-Appli, Input Memory,
Decoration Call, PC Mail, PC Site Browser, Multi
Job, Graphic Mail, Feeling Mail, Ichi Navi,
Sha-mail, Movie Sha-mail, Secure Remote Lock
and Auto Art are trademarks or registered
trademarks of SOFTBANK MOBILE Corp.
Other company and product names
mentioned herein are trademarks or registered
trademarks of their respective owners.
T-1010001
The Walt Disney Company (Japan) Ltd.
xviii
Safety Precautions
Specific Absorption Rate (SAR)
DM005SH meets the government's
requirements for exposure to radio waves.
These requirements are based on scientific
basis to assure that radio waves emitted from
mobile phones and other handheld wireless
devices do not affect human health. They
require that the Specific Absorption Rate
(SAR), which is the unit of measurement for
the amount of radiofrequency absorbed by
the body, shall not exceed 2 W/kg*. This limit
includes a substantial safety margin designed
to assure the safety of all persons, regardless
of age or health, and meets the international
standard set by International Commission on
Non-Ionizing Radiation Protection (ICNIRP) in
cooperation with World Health Organization
(WHO).
All mobile phones, prior to product launch,
must be certified as compliant with
government requirements as stipulated by
the Radio Law. DM005SH has been granted
Technical Regulations Conformity
Certification by TELECOM ENGINEERING
CENTER. Its highest SAR value is 0.558 W/kg.
This value was obtained by TELECOM
ENGINEERING CENTER as part of the
certification process. SAR tests were
conducted with handset transmitting at its
highest certified power level in accordance
with testing methods set by the government.
While there may be differences between the
SAR levels for various handsets, they all meet
the governmental requirements for safe
exposure. The actual SAR level of the handset
while operating can be well below the
highest value. This is because the handset is
designed to operate at multiple power levels
so as to use only the power required to reach
the Network.
Additional information on SAR can be
obtained on the following Websites.
Ministry of Internal Affairs and
Communications
http://www.tele.soumu.go.jp/e/sys/ele/index.htm
Association of Radio Industries and Businesses
(ARIB)
http://www.arib-emf.org/ (Japanese)
*
Requirements are stipulated in Radio Law
(Ordinance Regulating Radio Equipment,
Article 14-2).
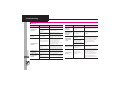
xix
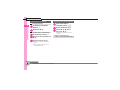
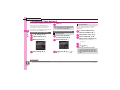
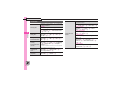
Handset Parts................................. 1-2
Display & Indicators ...................... 1-7
Parts & Functions ............................1-2
Display............................................. 1-7
Indicators........................................ 1-9
Charging Battery ........................... 1-4
Power On/Off................................. 1-6
Handset Power On/Off..................1-6
1
Getting Started
1-1
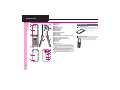
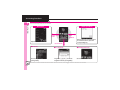
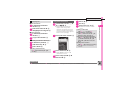
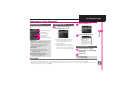
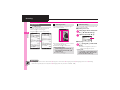
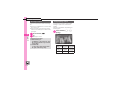
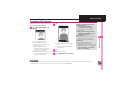
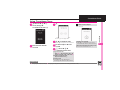
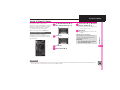
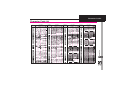
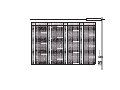
Handset Parts
1
Parts & Functions
Getting Started
1
9
2
a
3
4
8
b
5
c
d
e
6
f
g
h
7
1-2
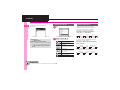
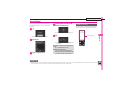
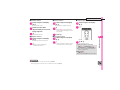
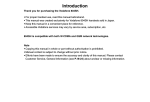
1 Light Sensor
2 Earpiece
3 Display
4 Internal Camera
5 Microphone
6 Illumi Display
7 Small Light
8 Charging Terminals
9 Strap Eyelet
a Infrared Port
b External Device Port (with Port Cover)
c Internal Antenna Location
d External Camera (lens cover)
e Mobile Light
f Speaker
g m Logo
h Battery Cover
. Do not cover or place stickers, etc.
over Light Sensor or Internal Antenna
area.
. Replace Port Cover after Port use.
. Avoid metallic straps; Antenna
sensitivity may be affected.
Handset Positions
Handset Closed
Keep handset closed
when not in use.
Handset Open
Open handset to place or
answer calls, enter text, etc.
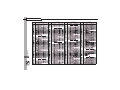
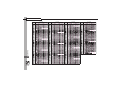
Handset Parts
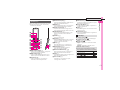
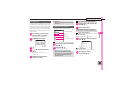
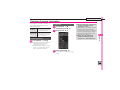
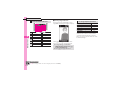
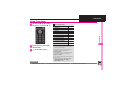
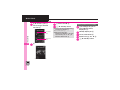
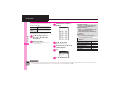
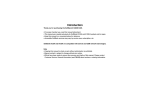
Handset Keys
1
2
3
4
5
6
7
8
9
a
b
c
d
e
f
g
h
i
j
k
l
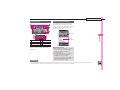
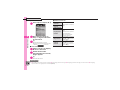
1 Multi Selector (right) d
Open Call Log (Received). Long Press
to activate/cancel Infrared*.
2 Multi Selector (up) a
Open Mobile Widget window. Long
Press to open PC Site Browser menu*.
3 Center Key %
Open Main Menu. Long Press to
activate/cancel Keypad Lock.
f Multi Selector (down) b
Open Phone Book. Long Press to open
Exchange Profile menu*.
g Power On/Off Key "
Toggle Standby display. Long Press to
power handset off.
h # Key #
Enter #. Long Press to activate/cancel
Manner mode.
i Camera Key |
Activate mobile camera. Long Press to
activate Review.
1
Getting Started
. Keys are indicated in this guide as shown.
. Change functions with * via Set Key
Shortcut as needed.
4 Multi Selector (left) c
Open Call Log (Dialed). Long Press to
activate/cancel Bluetooth®*.
5 Mail Key B
Open Messaging menu. Long Press to
open E Mail Composition window*.
6 Shortcuts & A/a Key '
Open Shortcuts menu. Long Press to
show active indicators (Status Icon List).
7 Clear/Back Key $
Play Answer Phone messages. Long
Press to activate/cancel Answer
Phone.
8 Start Key !
Open Call Log (All).
9 Keypad 0 - 9
Enter numbers to place calls or access
functions (Quick Operations). Long
Press to open Phone Book.
a n Key (
Enter n, +, P, ? and -. Long Press to
open S! Friend's Status member list.
b Dictionary Key ~
Open Dictionary. Long Press to
activate/cancel VeilView.
c Multi Job & Manner Key )
Select handset mode. Long Press to
activate/cancel Manner mode.
d D Key A
Open Disney Web portal. Long Press to
activate Familink Remote*.
e TV & Text Key &
Activate TV. Long Press to open
Change Menu window.
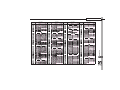
Side Keys
j Volume Up Key E
Long Press to illuminate Mobile Light.
k Volume Down Key F
Open: Show/hide Softkeys.
l Shutter Key I
Open: Long Press to activate mobile
camera.
Closed: Toggle Illumi Display view.
Multi Selector & Side Keys
. In this guide, Multi Selector and Side
Key operations are indicated as follows:
Press a or b
Press c or d
Press a, b, c or d
Press E or F
e
f
g
L
1-3
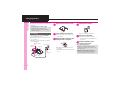
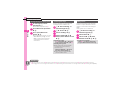
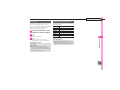
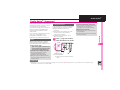
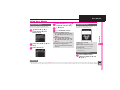
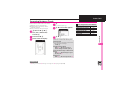
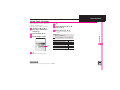
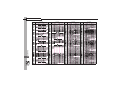
Charging Battery
1
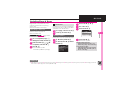
Charging Battery
Getting Started
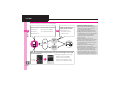
Battery must be inserted in handset to
charge it.
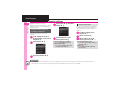
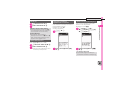
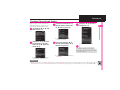
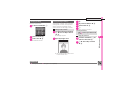
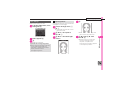
4 Unplug AC Charger
Charging Battery Outside Japan
. Disney Mobile is not liable for
problems resulting from charging
battery abroad.
AC Charger
Use specified AC Charger ZTDAA1
(sold separately) only.
. In this guide, ZTDAA1 is referred to as
"AC Charger."
. Handset and AC Charger may warm
while charging.
External Device
Port
Charger
Connector
Small Light
Arrows
AC Charger
Port
Cover
Release Tabs
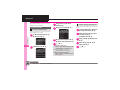
2 Insert Charger Connector
. With arrows up, insert connector
until it clicks.
3 Extend blades and plug AC
Charger into AC outlet
. Pull AC Charger straight out.
5 Disconnect handset
. Squeeze Charger Connector
release tabs and pull straight out
to remove.
6 Fold back blades and
replace Port Cover
AC 100V Outlet
Blades
1-4
1 Open Port Cover as shown
. Small Light illuminates red while
charging.
. Small Light goes out when battery
is full.
When Small Light Flashes
. Battery is unchargeable; may be
defective or simply at the end of its
life; replace it.
Important AC Charger Usage Note
. Fold back blades after charging. Do
not pull, bend or twist the cord.
Charging Battery
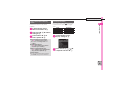
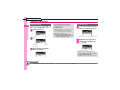
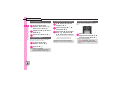
USB Charge
. Download and install USB Cable driver
beforehand.
. Handset must be on to charge battery.
. Battery may not charge if handset is
connected through a USB hub.
Disabling USB Charge
% S Tools S % S f Connectivity
S USB Charge S % S Disable S %
In-Car Charger may be purchased
separately.
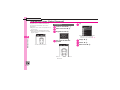
4 Start car engine
. Small Light illuminates red while
charging.
. Small Light goes out when battery
is full.
Cigarette Lighter Socket
Plug
In-Car Charger
lighter socket
External
Device Port
Charger
Small Light
Connector
Arrows
Port Cover
Release Tabs
1 Open Port Cover
2 Insert Charger Connector
. With arrows up, insert connector
until it clicks.
1
Getting Started
Connect handset (with power on) to
PC via USB Cable to charge battery.
3 Plug Charger into cigarette
In-Car Charger
5 Unplug Charger
6 Disconnect handset
. Squeeze Charger Connector
release tabs and pull straight out
to remove.
7 Replace Port Cover
Important In-Car Charger Usage Notes
. Disconnect Charger before leaving
vehicle to prevent charging with
engine off.
. Do not use In-Car Charger with
Desktop Holder.
. Avoid charging battery inside
extremely hot vehicles.
1-5
Power On/Off
1
Handset Power On/Off
Getting Started
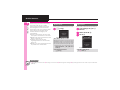
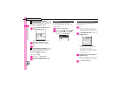
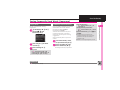
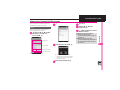
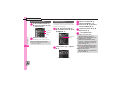
Power On
4 Yes or No S %
1 " (Long)
. After Power On Graphic, follow
the steps below.
" S " S % S b S % S 設定
S % S Language S % S English
S % S " (Long) S " (Long)
S Change Menu window opens
2 Select option S %
Guide descriptions are based on
Standard Menu.
Standby
. Choose No to enter Standby
immediately after powering on.
. My Details setup starts.
3 Enter last name S % S
Enter first name S %
. Change Menu display option
confirmation appears.
1-6
Retrieving Network Information
Handset initiates Network Information
retrieval when %, a, B or A is
pressed for the first time.
Follow these steps when powering on
DM005SH for the first time:
When USIM Card is Not Installed
. Insert USIM Card appears; insert the
card to use handset.
Follow these steps to retrieve Network
Information to use Network-related
services and TV; retrieval
automatically sets Clock:
1 Yes S % S Retrieval starts
2%
Power Off
1 " (Long)
. After Power Off Graphic, handset
shuts down.
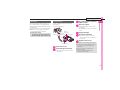
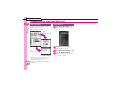
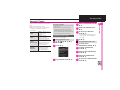
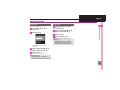
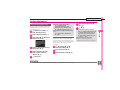
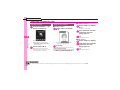
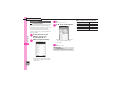
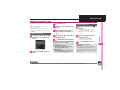
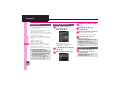
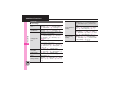
Display & Indicators
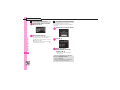
Display
1
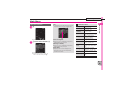
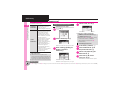
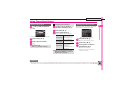
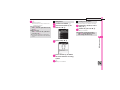
Indicator Area
Check active indicators and their
descriptions. (Status Icon List)
1 ' (Long)
Information
Information window opens at the
bottom for Missed Calls, new mail, etc.
Getting Started
Indicator Descriptions
Standby
Mobile Widgets/
Standby Shortcuts
Information Window
Hereafter, most screenshots omit
Mobile Widgets and other icons.
. Active indicators are enlarged;
description for selected indicator
appears.
. Use g to select indicators to view
their descriptions.
. Press % to open menu/window
(e.g., Battery Meter window from
battery strength indicator). May
be unavailable for some
indicators.
Information label (e.g., Message, etc.)
and count appear in Information
window. Select an item and press %
to open it.
Opening Information List Manually
% S Phone S % S Information S %
Clearing Information List
% S Phone S % S Information S
% S B S Yes S %
1-7
Display & Indicators
1
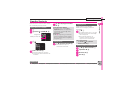
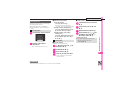
Softkeys
Display Saving
Getting Started
Functions/operations assigned to B,
% and A appear at the bottom of
Display.
Backlight
. Backlight turns off after Time Out time
elapses. Press 0 - 9 to illuminate it
(key press may affect active function).
. Display goes dark during a call.
(Backlight does not turn off first.)
B
1-8
Display goes dark after Display Saving
time elapses. Press any key (except
" during a call) to activate it.
%
A
Illumi Display
View date, time, signal strength, etc.
with handset closed.
Activating
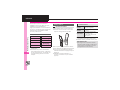
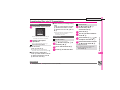
1 With handset closed, I
. Press I to toggle view.
Display & Indicators
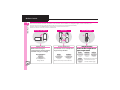
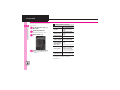
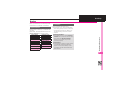
Indicators
1
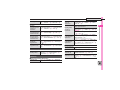
1
2
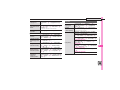
[ Basic Status
1
2
3
2
Within GSM range
International roaming in
progress
Signal strength1
3
Battery strength2
1
2
1
2
3
Active S! Application*
Within 3G range
1
[ Notifications
3
4
5
1
Paused S! Application*
1
Music playback in progress
TV recording in progress
(handset)
TV recording in progress
(Memory Card)
2
Memory Card inserted
The more bars the better.
Battery strength % (appears when
Display activates, etc.) is an
approximation.
Accessing Memory Card
2
Reading Memory Card
Formatting Memory Card
TV Timer/TV Recording Timer set
*
3
Compass Indicator
4
Music playback in progress
(via Bluetooth®)
5
Multiple functions (Multi Job)
active
4
5
6
7
Getting Started
[ Function Status
Display Indicators
Unread mail
Unread Delivery Report
Answer Phone active &
message recorded
Answer Phone canceled &
message recorded
3
New Voicemail
4
S! Appli/Mobile Widget Notification
Contents Key received
5
Unread S! Information Channel info
Software Update result
6
Unread S! Quick News info
Unread S! Friend's Status
notification or unanswered
registration request
7
[ Warnings
Appears gold for some S! Applications
(Real 3D Games, etc.).
1
2
3
1
Mail memory low
2
Message delivery failure
3
Memory Card unusable/
misinserted
1-9
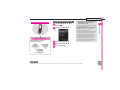
Display & Indicators
1
[ Transmissions
Getting Started
1
2
3
4
1
2
3
5
6
7
8
7
Positioning in progress2
RSS-compatible site
6
Weather Indicator
Manner mode active
7
8
1
2
a
Infrared transmission ready
Hidden while Mobile Widget is in use.
Flashes while positioning.
b
[ Settings
1
2
3
4
5
6
1
Offline Mode active
2
Answer Phone active
3
Call Forwarding or Voicemail
active (forwarding condition:
Always)*
4
1-10
c
7
8
9
a
b
c
Schedule/Task (Alarm set)
Schedule/Task (Alarm unset)
Original mode active
Keypad Lock active
IC Card Lock active
Ringtone (Silent)
9
PC Site Browser in use
8
Drive mode active
VeilView active
IC Transmission in progress
S! Addressbook Back-up
transmission in progress
S! Friend's Status online
Software Update in progress
Hour Minder active
Bluetooth® transmission ready
Bluetooth® transmission in
progress ( appears for
multiple connections)
Bluetooth® talk in progress
Sending mail
5
Alarm set
6
Infrared file transfer in progress
Receiving mail
4
5
USB transmission in progress
Infrared transmission in progress
SSL browsing in progress1
Packet transmission available
USB Cable connected
*
Ringtone (Increasing Volume)
Vibration for incoming Voice/
Video Calls active
Auto Answer or Remote
Monitor active
Show Secret Data active
Function Lock (Once) active
Wakeup TV set
Indicator does not appear when Call
Forwarding is set to Video Calls only, with
Voicemail unset.
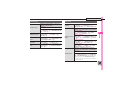
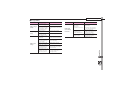
Accessing Functions ..................... 2-2
Main Menu......................................2-3
Using Simplified Menus (Simple Menu)
.............................................................2-4
Shortcuts Menu & Key Shortcut ....2-5
Toggling Active Functions (Multi Job)
...........................................................2-6
Standby Shortcuts ..........................2-7
Motion Control............................... 2-8
Illumi Display................................2-10
Customizing Illumi Display Settings .... 2-10
Mobile Manners...........................2-12
Security Codes ............................2-13
Basic Tools....................................2-14
My Details & Basic Tools .............. 2-14
Additional Functions ...................2-15
2
Basic Operations
2-1
Accessing Functions
Accessing Functions
2
Use the following methods as needed.
Basic Operations
Main Menu
Quick Operations
Select menu
items
Enter
numbers
Enter numbers to access functions.
To activate functions, press the
corresponding key.
Repeat menu item selection.
Use shortcuts
■Shortcuts
■Key Shortcut
■Standby Shortcuts
Access assigned functions
(changeable).
Long Press B, g or A to access
assigned functions (changeable).
Save functions to Standby.
Access a function in Shortcuts menu while another is active, then toggle function windows as needed.
2-2
Accessing Functions
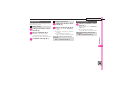
Main Menu
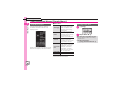
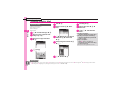
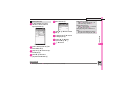
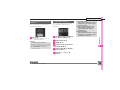
1%
Tabs
. Menus/lists in a single window appear on
separate tabs; use f to toggle tabs.
Main Menu Items
Disney Web
Browse the Internet
Open/create
messages, etc.
Capture images or
Camera
record video
Open files saved on
Data Folder
handset/Memory Card
Use S! Applications
S! Appli
including games
Watch/record TV
TV
programs
Read e-Books, receive
Entertainment
news updates, etc.
Manage schedules, set
Tools
Alarm, scan QR Codes,
etc.
Messaging
. Main Menu opens.
2 e Select menu item S %
. Menu/window opens.
. If Sub Menu opens, use e to
select an item and press %.
Tab
Reverse Navigation
. Press $. If a confirmation appears,
follow onscreen prompts.
Returning to Standby
. Press ". If a confirmation appears,
follow onscreen prompts.
Simple Menu
. Simplify menus and enlarge fonts;
ideal for users who use only basic
handset functions.
Settings
2
Basic Operations
Menu Item Selection
Customize handset
interface, sounds, etc.
Search contacts, add
entries, etc.
Play/download media
Media Player
files
Mobile Widget Use Mobile Widgets
Phone
2-3
Accessing Functions
Using Simplified Menus (Simple Menu)
2
Basic Operations
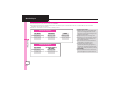
Simple Menu Features
Activate Simple Menu to reduce
available handset functions and
simplify menus.
. Fonts are enlarged and appear in bold.
. Clock is enlarged (Calendar is hidden).
[ Menu Items
Received Msg., Create
Msg., Disney Mail Maker,
Messaging Drafts, Templates, Sent
Messages, Unsent Msg.,
Create SMS
Phone Book, Add New
Entry, Call Log, Play
Messages, Answer Phone,
Phone
Call Voicemail, My
Details, Speed Dial/Mail
Photo Camera, Video
Camera, Hand Mirror,
Camera
Scan Barcode, Scan Card,
Kanji Grabber, Review
Calendar, Exchange
Profile, Alarms, Calculator,
Assignment, Dictionary,
Convenient
Notepad, S! GPS Navi,
Tool
Pedometer, Compass,
S! Friend's Status, S! Circle
Talk, Change Menu
Data Folder TV
-
Key assignments are largely the same
as those in Standard Menu.
2-4
Activating Simple Menu
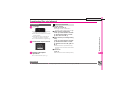
1 & (Long)
2 Simple Menu S %
While Using an Incompatible Function
. End the function before activating
Simple Menu.
Canceling Simple Menu
& (Long) S Standard Menu S %
Accessing Functions
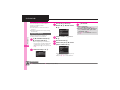
Shortcuts Menu & Key Shortcut
Access assigned functions via
Shortcuts menu.
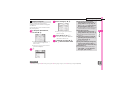
1'
2 Select function S %
. Menu/window opens.
Changing Default Shortcuts
In 2, select numbered function S
B S Assign Function S % S
Select menu item S % S Select
new item S %
, To assign menu items, select one
and press B.
Assigning Files & Folders
In 2, select numbered function S
B S Assign Data S % S Select
file/folder S %
, For folders, select Set this folder and
press %.
Key Shortcut
In Standby, Long Press B, g or A to
access assigned functions.
B
a
b
c
d
A
Open E Mail Composition window
Open PC Site Browser menu
Open Exchange Profile menu
Activate/cancel Bluetooth®
Activate/cancel Infrared
Activate Familink Remote
5 Tools S % S In PIM/Life
menu, Calculator S %
Bookmark
In 4, From Bookmark S % S
Select title S % S Yes S %
Infrared, Show Secret Data, Etc. On/Off
In 4, From Other S % S Select
item S %
Canceling Assigned Function
In 4, Off S %
2
Basic Operations
Shortcuts Menu
Changing Assigned Functions
Follow these steps to assign Calculator
to a (Long Press):
1 % S Settings S % S f
Phone/G
2 Set Key Shortcut S %
3 Long press S %
4 From Appli S %
Advanced
0 (Changing item order (Restoring default shortcuts (P.2-15)
2-5
Accessing Functions
Toggling Active Functions (Multi Job)
2
Basic Operations
Multi Job Feature
Using Multi Job
Access a function in Shortcuts menu
while another is active.
While browsing the Internet
1 In a function window, '
In text entry/dial windows, Long
Press '.
②
Toggle windows
2 Select function S %
. Menu/window opens.
3 To toggle active windows, )
4 " S Multi Job ends
①
Open Scratch Pad
Jot down information
. Multi Job may not activate from some
menus/windows (e.g., ringtone/
ringvideo selection, etc.).
. Multi Job is disabled while
(gold)
appears.
2-6
. If a confirmation appears, follow
onscreen prompts.
Accessing Functions
Standby Shortcuts
Saving Shortcuts to Standby
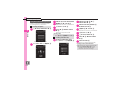
1a
2 g Select
(OPEN) S %
Widget Tab
Standby Shortcut Tab
3f
5 g Specify target location
S%
Saving from Menu/Window
. In Options menu, select Set as
StbyShortcut (may not appear for
some items) and press %; select
sheet as needed.
Using Pointer
. After 1, Long Press A to activate
pointer navigation; select widgets,
etc. (To cancel pointer navigation,
Long Press A.)
Using Shortcuts
1 a S g Select icon S %
. Menu/window opens or
command is executed.
4 Select item S %
. Corresponding icon appears.
. >> appears when more items are
available.
Toggling Sheets
Toggle sheets to use Standby
Shortcuts and widgets pasted on
each sheet.
1aSA
. To toggle further, press A or ).
. Sheet name appears at the top,
then disappears.
. Save Standby Shortcuts as
needed; corresponding icons
appear on the current sheet.
2
Basic Operations
Paste shortcuts to functions, files, folders,
etc. to Standby for easy access.
Using Locked Sheets
a S Select
S % S Enter
Handset Code S %
Removing Shortcuts from Standby
1 a S g Select icon S B
2 Operation S %
3 Remove S %
4 Yes S %
Advanced
0 (Sorting icons (Moving icons (Moving icons to front/back (Removing multiple icons at once (Editing sheet names (Locking sheets (P.2-15)
2-7
Motion Control
Motion Control
2
Basic Operations
2-8
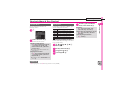
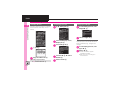
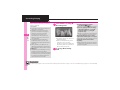
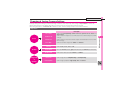
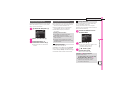
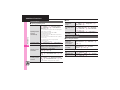
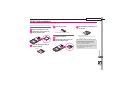
Motion Sensor tracks handset orientation or movement. Move handset to navigate pages, access functions, etc.
. Cancel Keypad Lock and activate Display first. (Not necessary for activating Quick Silent.)
. Adjust Motion Sensor (P.2-15) before using Motion Control for the first time.
. Activate Motion Control by function beforehand.
Change Orientation
Turn Over
Shake Left/Right
Display Change
Activate Quick Silent
Navigate Functions
Rotate handset 90 degrees
counterclockwise and return. Display
orientation changes accordingly.
Turn handset over to instantly mute
ringer and stop vibration.
Shake to the left to navigate back, or
right to navigate forward.
Display Rotation
Ringer
Vibration
Digital TV
PC Site Browser
Document Viewer
Image Viewer
Incoming Calls,
Alarms, etc.
Incoming Calls,
Alarms, etc.
. Some tones may not be silenced.
Music
Channels
Images
Music Player
Digital TV
Data Folder
(Pictures)
Pages
Document
Viewer
. While Multi Job is active and
both windows are open,
activate windows toggle.
Motion Control
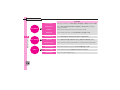
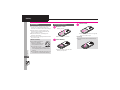
Shake Forward or Backward
Toggling Motion Control On/Off
Phone/G
2 Motion Control S %
Zoom In/Zoom Out
Shake forward to enlarge, or
backward to reduce.
Fonts
Zoom Image
Disney Web
Message Window
Data Folder
(Pictures)
3 Action Settings S %
4 Select function S %
5 On or Off S %
2
Basic Operations
1 % S Settings S % S f
Activating Show Secret Data Temporarily
Enter Handset Code S Shake
handset left or right
, Close handset in Standby to cancel
Show Secret Data.
Important Motion Control Usage Notes
. Hold/shake handset correctly to
avoid unintended results.
. Motion Control may be unavailable
while handset is ringing/vibrating.
. Confirm there is ample space for
Motion Control use; hold handset
firmly and shake it gently to avoid
injury/breakage. Do not shake
handset roughly; handset may slip,
resulting in injury or damage.
Zoom Page
PC Site Browser
Document Viewer
Advanced
0 (Disabling automatic Display rotation (Practicing Motion Control actions (Adjusting Motion Sensor (P.2-15)
2-9
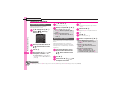
Illumi Display
Customizing Illumi Display Settings
2
Basic Operations
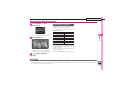
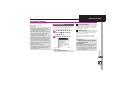
DM005SH features a unique
"illuminated text" Sub Display, or "Illumi
Display" (see below for settings and
usage details).
4 Select item S % S Pattern
Setting S %
Setting Illumination Pattern for
Incoming Transmissions
Follow these steps to use preset
patterns:
1 % S Settings S % S In
Sound/Display menu, Illumi
& Light S %
2 Illumi Display S %
Using Custom Patterns
Create custom illumination patterns
by selecting shape (LED arrangement)
and movement; set text to appear
instead.
1 In Pattern Setting menu,
Original S B
Pattern Setting Menu
5 Preset Pattern S % S
Select pattern S %
Using Customized Screen Pattern
In 5, Customized Screen S %
Disabling Illumi Display
In 4, select item S % S Switch
On/Off S % S Off S %
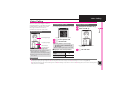
2 Select Anime S %
3 Select pattern S % S
Select option S % S A
Changing Illumination Speed
In 2, Anime Speed S % S Select
speed S % S A
Showing Text
In 3, Original Text S % S Enter
text S % S A
Illumi Display Menu
3 Event Illumination S %
Advanced
0 (Changing Clock pattern (Hiding Clock while charging (Showing caller info (Changing scroll speed (Changing illumination time
(Changing information display time (Adjusting brightness (Disabling display transition effects (P.2-16)
2-10
Illumi Display
Setting Illumination Pattern by
Action
1 In Illumi Display menu,
Effect Illumination S %
2 Select item S % S Pattern
Setting S %
3 Preset Pattern S % S
Select pattern S %
Using Customized Screen Pattern
In 3, Customized Screen S %
, Available for Charge Start and
Calling.
Disabling Illumi Display
In 2, select item S % S Switch
On/Off S % S Off S %
Setting In-Call Illumination Time
In 2, Calling S % S Lighting Time
S % S Select option S %
Custom Patterns
. To use custom illumination patterns,
see P.2-10 "Using Custom Patterns."
*
Clock*
Pedometer
Date
Weather Indicator
Battery
Signal & Battery
Cannot be unchecked.
2
Basic Operations
Follow these steps to use preset
patterns:
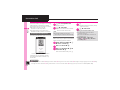
Showing Information
Show these items on Illumi Display with
handset closed; press I to toggle
view.
1 In Illumi Display menu,
Display Setting S %
2 Select item S % (
/ )S
Complete selection S A
2-11
Mobile Manners
Mobile Manners
2
Basic Operations
Please use your handset responsibly.
Use these basic tips as a guide.
Inappropriate handset use can be
both dangerous and bothersome.
Please take care not to disturb others
when using your handset. Adjust
handset use according to your
surroundings.
. Power it off in theaters, museums and
other places where silence is the norm.
. Refrain from using it in restaurants, hotel
lobbies, elevators, etc.
. Observe signs and instructions
regarding handset use aboard trains,
buses, etc.
. Refrain from use that interrupts the flow
of pedestrian or vehicle traffic.
Manner Mode
Mutes most handset function sounds.
1 ) (Long)
Offline Mode
Temporarily suspends all transmissions.
1 % S Settings S % S f
Network
2 Offline Mode S %
3 On S %
. Manner mode is set.
When Manner Mode is Active
. Ringtones and other sounds are muted.
. DM005SH vibrates for transmissions/alerts.
. Shutter click still sounds at fixed volume.
. To unmute Speaker temporarily while
playing music, etc., follow these steps:
During playback, a S % S Yes or
No S %
Canceling Manner Mode
) (Long)
. Offline Mode is set.
Canceling Offline Mode
In 3, Off S %
Advanced
0 (Changing handset modes (Creating a custom mode (Resetting Mode Settings (Suppressing Manner mode audio output confirmation
(P.2-16)
2-12
Security Codes
Security Codes
. Write down Security Codes.
. Do not reveal Security Codes. Disney
Mobile is not liable for misuse or
damages.
Handset
Code*
Administrator
Code*
Center
Access Code
Network
Password*
*
9999 by default; use or
change some
functions
9999 by default;
required for Reset
Settings and Reset All
4-digit code selected
at contract; access
Optional Services via
landlines or change
contract details
4-digit code selected
at contract; restrict
incoming/outgoing
calls (Call Barring)
Incorrect Code Entry
. Message appears for incorrect code
entries; retry.
. If Network Password is incorrectly
entered three times consecutively,
Call Barring settings are locked. To
resolve, Network Password and Center
Access Code must be changed.
Changing Security Codes
Enter four to eight digits.
Changing Handset Code
1 % S Settings S % S f
Phone/G
2 Locks S %
4 Enter current Handset Code
S%
5 Enter new Handset Code
S%
6 Re-enter new Handset
Code S %
2
Basic Operations
These codes are required for handset
use.
. To change Administrator Code
subsequently, choose Yes and
press %.
7 No S %
Changing Administrator Code
1 In Locks menu,
Administrator Setting S %
2 Change Administrator
Code S %
3 Enter current Administrator
Changeable on handset.
Code S %
Locks Menu
3 Chg. Handset Code S %
4 Enter new Administrator
Code S %
5 Re-enter new Administrator
Code S %
2-13
Basic Tools
My Details & Basic Tools
2
Basic Operations
My Number
1%S0
. Handset phone number and the
name entered at initial setup
appear.
VeilView
Activate VeilView to prevent peeking.
1 ~ (Long)
Canceling VeilView
~ (Long)
Hand Mirror
1 % S Camera S % S
Hand Mirror S %
. Internal Camera image appears.
Keypad Lock
Lock handset keys and prevent
accidental operation/function
activation.
1 % (Long)
. Keypad Lock activates.
. " does not power handset off.
Incoming Calls while Keypad Lock is
Active
. Keypad Lock is temporarily canceled;
press ! to answer calls. Keypad
Lock reactivates after the call.
Canceling Keypad Lock
% (Long)
Pen Light
1 E (Long)
. Mobile Light illuminates.
2 Side Key S Mobile Light
goes out
Battery Meter
1 % S Tools S % S f
Clock/Gauge
2 Battery Meter S %
. Approximate battery strength
appears.
Battery Strength %
. 100% may not appear even when
battery is full. This is by design; not a
malfunction.
Phone Help
1 % S Tools S % S f
Doc./Rec.
2 Phone Help S %
3 Select item S %
. For Indicators, select a category
and press %.
Important Pen Light Usage Note
. Do not point Pen Light at people or
look at it directly.
Advanced
0 (Editing My Details (Clearing My Details (Selecting My Details items to send (Changing battery strength indicator pattern (Changing
VeilView pattern/density (P.2-16 - 2-17)
2-14
Additional Functions
[ Sheets
Shortcuts
7a S B S Settings S % S Sheet
' S Select numbered function S B S
Move S % S Select target location S %
Restoring default
shortcuts
' S Select numbered function S B S Set
to Default S % S Yes S %
Editing sheet
names
7a S B S Settings S % S Sheet
[ Operations in Standby
Settings S % S Set Sheet Lock S % S Enter
Handset Code S % S See below
a S B S Sort Icon S % S Select option S %
. Widgets may also be sorted depending on the
size.
Moving icons
a S g Select icon S B S Operation S %
S Change Layout S % S Specify target
location S %
Moving icons to
front/back
a S g Select icon S B S Operation S %
S To Front or To Back S %
7a S B S Operate from List S % S
Remove S % S See below
Removing multiple
icons at once
Renaming
Select sheet S % S Enter name S %
Resetting All Sheet Names
B S Yes S %
Standby Shortcut
Sorting icons
Settings S % S Change Sheet Name S % S
See below
Locking sheets
2
Basic Operations
Changing item
order
Activating Lock
Select sheet S % S On S %
Changing Method for Temporary Access
Unlock Method S % S No Password S %
. Press a, then select
sheet temporarily.
and press % to unlock
Motion Control
All Icons
Remove All S % S f Shortcut S Select
sheet S A S Yes S %
Disabling
automatic Display
rotation
% S Settings S % S f Phone/G S Motion
Control S % S Display Change S % S
Select function S % S Off S %
Selected Icons
Select & Remove S % S f Shortcut S
Select icon S % ( ) S Complete selection
S A S Yes S %
Practicing Motion
Control actions
% S Settings S % S f Phone/G S Motion
Control S % S Action Test S % S Select
item S %
. Follow onscreen instructions.
Adjusting Motion
Sensor
% S Settings S % S f Phone/G S Motion
Control S % S Adjust Sensor S %
. Follow onscreen instructions.
. Avoid adjusting Motion Sensor near metal/
magnetic objects or aboard trains or in vehicles.
2-15
Additional Functions
Illumi Display
2
Basic Operations
Changing Clock
pattern
Hiding Clock while
charging
% S Settings S % S In Sound/Display
menu, Illumi & Light S % S Illumi Display S
% S Display Date&Time S % S Select
pattern S %
% S Settings S % S In Sound/Display
menu, Illumi & Light S % S Illumi Display S
% S Charging Time S % S Off S %
. Even if Off, Clock appears for the first few
seconds.
Disabling display
transition effects
Mode Settings
7% S Settings S % S In Sound/Display
menu, Mode Settings S % S See below
Changing handset
modes
% S Settings S % S In Sound/Display
Showing caller info menu, Illumi & Light S % S Illumi Display S
% S Caller Display S % S On S %
Changing scroll
speed
% S Settings S % S In Sound/Display
menu, Illumi & Light S % S Illumi Display S
% S Scroll Speed S % S Select speed S %
Changing
illumination time
% S Settings S % S In Sound/Display
menu, Illumi & Light S % S Illumi Display S
% S Illumi Lighting Time S % S Select time
S%
Changing
information
display time
% S Settings S % S In Sound/Display menu,
Illumi & Light S % S Illumi Display S % S
Info Display Time S % S Select time S %
Adjusting
brightness
% S Settings S % S In Sound/Display
menu, Illumi & Light S % S Illumi Display S
% S Brightness S % S Select option S %
Selecting a Handset Mode
Select mode S %
Customizing Handset Modes
Select mode S B S Select item S % S
Adjust settings
. Not available for Normal mode.
Creating a custom
mode
% S Settings S % S In Sound/Display
menu, Mode Settings S % S Original S B
S Select item S % S Adjust settings
Resetting Mode
Settings
% S Settings S % S In Sound/Display
menu, Mode Settings S % S Select mode S
A S Enter Handset Code S % S Yes S %
Suppressing
Manner mode
audio output
confirmation
% S Settings S % S In Sound/Display
menu, Mode Settings S % S Manner S B
S Audio Confirmation S % S Do not Show
S%
My Details
Editing My Details
2-16
% S Settings S % S In Sound/Display
menu, Illumi & Light S % S Illumi Display S
% S Display Effect S % S Off S %
% S 0 S f Select tab S Select item S A
S Select item S % S Edit S A
Additional Functions
% S 0 S B S Reset My Details S % S
Yes S %
Selecting My
Details items to
send
% S 0 S B S Set Send Items S % S
Select item S % ( / ) S Complete
selection S A
Battery Meter
Changing battery
strength indicator
pattern
% S Settings S % S In Sound/Display
menu, Display S % S Mini Battery S % S
Select pattern S %
2
Basic Operations
Clearing My Details
. Battery strength (appears as a percentage) is
for reference only.
VeilView
7
% S Settings S % S In Sound/
Display menu, Display S % S VeilView S %
S See below
Pattern
Pattern Setting S % S Select pattern S %
Changing
VeilView pattern/
density
Scale
Scale Setting S % S Select scale S %
. Scale is unselectable for some patterns.
Density
Density Setting S % S Adjust density S %
. For Density:2 or Density:3, use f before
pressing % to adjust the pattern appearance
for straight view.
2-17
Fonts ............................................... 3-2
Dictionary.....................................3-12
Customizing Fonts ..........................3-2
Using Dictionaries (Japanese) ... 3-12
Wallpaper ...................................... 3-3
Customized Screen....................... 3-4
Search ..........................................3-15
Customized Screen (Japanese)...3-4
Sounds & Alerts.............................. 3-5
Customizing Handset Responses ...3-5
Text Entry ........................................ 3-6
Entering Characters.......................3-7
Editing Characters .......................3-10
User Dictionary ............................ 3-11
Saving Frequently Used Words
(Japanese) ...................................3-11
Searching Text.............................. 3-15
Scratch Pad .................................3-16
Phone Book..................................3-17
Creating Phone Book Entries...... 3-17
Using Phone Book Entries ............ 3-19
Additional Functions ...................3-20
Troubleshooting ...........................3-25
3
Universal Operations, Etc.
3-1
Fonts
Customizing Fonts
3
Enlarging All Fonts
Universal Operations, Etc.
Activate Large Font Menu to enlarge
fonts for menus, text entry, etc. as
follows:
Customizing Font Sizes
1 % S Settings S %
1 In Font Settings menu, Font
Weight S %
2 Select weight S %
2 In Sound/Display menu,
Display S %
3 Font Settings S %
1 & (Long)
2 Large Font Menu S %
Canceling Large Font Menu
In 2, Standard Menu S %
Using Disney Font
Apply Disney font to handset interface.
Some characters (e.g., kanji) do not
change.
1 In Font Settings menu, Font
Type S %
2 Disney S %
Font Settings Menu
3-2
Changing Font Weight
4 Font Size S % S Select
item S %
5 Select size S %
. Lower case letters appear
capitalized in black.
. Font Type may not change in
some windows.
Wallpaper
Wallpaper
1 % S Settings S % S In
2 Wallpaper S %
Wallpaper Menu
3 Select folder S %
4 Select file S %
. Some files may not be usable.
. Omit the next step when Preset
Pictures is selected in 3.
5%
Selecting Images Smaller or Larger
than Display
After 4, select option S % S %
, For Centered, use e to zoom in/out
or press B to rotate.
Downloading Images via Disney Web
In 3, Search by Disney Web S %
, Read terms of service and then
follow onscreen instructions.
Selecting Images with Limited Usage
Period
. A confirmation appears. Follow these
steps:
Yes S % S %
Selecting Chara Time Files
In 3, Chara Time S % S Select file
S%S%S%
Slide Show Wallpaper
Set Slide Show to appear in Standby.
Some images may not appear.
1 In Wallpaper menu, Slide W
paper S %
2 Folder Setting S %
3 Pictures or DCIM S %
4 Select sub folder S % S
Set this folder S %
3
Universal Operations, Etc.
Sound/Display menu,
Display S %
. Omit steps for sub folder if none.
If There is No Image in Set Folder
. Preset images appear.
Using Preset Images
In 3, Preset Pictures S %
Changing Pattern
In 2, Pattern Setting S % S Select
pattern S %
, To check patterns, select one and
press B.
3-3
Customized Screen
Customized Screen (Japanese)
3
Preset Customized Screens
Universal Operations, Etc.
1%SB
2 Preset Screens S %
3 Select pattern S %
4%S%
When Selected Customized Screen is
Active
. Cancellation confirmation appears
after 3. To cancel, choose Yes and
press %.
Downloading Customized Screens
Read information (price, etc.) on
Customized Screen download page.
1 % S Data Folder S % S
Customized Screen S %
Customized Screen Menu
2 Download Customized
Customized Screen Setup
1 In Customized Screen
menu, select Customized
Screen S %
2%S%
Applying Fee-based Customized Screen
. If Contents Key is required, follow
these steps:
After 1, % S Yes S %
, Read terms of service and then
follow onscreen instructions.
Screen S %
. Follow onscreen instructions.
Advanced
0 (Canceling Customized Screen (Canceling Customized Screen unconditionally (Deleting Customized Screens (Accessing Customized
Screen source sites (P.3-20)
3-4
Sounds & Alerts
Customizing Handset Responses
Ringtones
Sound/Display menu,
Sounds & Alerts S %
Sounds & Alerts Menu
2 Ringtone/videos S %
3 Select item S %
For For New Message, etc., select
Assign Tone and press %.
Setting Ring Time for Incoming Mail, etc.
After 3, Duration S % S Enter time
S%
Playing Video for Incoming Transmissions
In 4, Videos S % S Select file S %
If Portion of File Content is Specifiable
. After 5, start point selection window
opens. Follow these steps:
Select start point S %
Selecting Files with Limited Usage Period
. A confirmation appears. Choose Yes
and press % to proceed.
Machi-Uta® Service Registration
(Japanese)
Use Machi-Uta® to play music instead
of the standard ringback tone for the
other party.
Machi-Uta® requires a separate
contract and basic monthly fee.
2 Register/Cancel S %
. Follow onscreen instructions.
Vibration
1 In Sounds & Alerts menu,
Vibration S %
2 Select item S % S Switch
On/Off S %
3 On S %
4 Vibration Pattern S %
3
Universal Operations, Etc.
1 % S Settings S % S In
4 Select folder S %
5 Select tone/file S %
. To check vibration patterns,
select one and press B.
5 Select pattern S %
Setting Ringtones to Control Vibration
In 3, Link to Sound S %
Important Vibration Usage Note
. Cancel Vibration when charging
battery to help avoid accidents.
1 In Sounds & Alerts menu,
Machi-Uta S %
Advanced
0 (Using Machi-Uta
®
(Japanese) (P.3-20)
3-5
Text Entry
Text Entry
3
Universal Operations, Etc.
Unless noted otherwise, text entry
descriptions are for text entry
windows.
Switching Entry Modes
1&
Example: In Double-byte Katakana
mode, press 1 three times.
Text Entry Window (Message Text)
Opening Help
B S Help S %
When Font Type is Set to Disney
. Lower case letters appear capitalized
in black. To cancel, follow these steps:
B S Font Type S % S Standard
S%
. Available entry modes appear.
2 Select mode S %
. Entry Mode Indicators:
*
/
/
/
*
Kanji (Hiragana)
Double/Single-byte
Katakana
Double-byte
Alphanumerics (upper/
lower case)
Single-byte
Alphanumerics (upper/
lower case)
Single-byte Number
Character Code
予 appears when Predictive is active.
Advanced
0 (Using Character Codes (Using Pager Code (P.3-20)
3-6
Character Entry Basics
Use Keypad to enter characters.
Multiple characters are assigned to
each key. Press a key to toggle
character options for that key.
■
1
Y ■
ア
1
Y ■
イ
1
Y ■
ウ
. Press ! to toggle options in reverse.
To type characters assigned to the
same key, press d first.
Example: In Single-byte Alphanumerics
mode, enter no.
■
66
n
Y ■
d
666
Y n
Y no
. Long Press a key to enter the current
character and advance cursor.
■
66
n
Y ■
6 (Long) 666
Y n
Y no
Text Entry
Entering Characters
Hiragana
1 333 (す) S d S
4%
Convert すずき to 鈴木.
1 Type すずき
333 (す) S ( (ず)
S 22 (き)
2 % (Confirm)
. In Kanji (Hiragana) mode, word
suggestions change as hiragana
are typed. (Predictive)
. Long Press & to toggle
suggestion mode between
Standard, Business, Male, Female
and Automatic. (Personal Mode)
2b
3 鈴木
. Words likely to follow the entry
appear based on previous
entries. (Previous Usage)
3
Universal Operations, Etc.
Follow these steps to enter すずき in
Kanji (Hiragana) mode:
Kanji
When Target Word is Not Listed
. Press B or A to segment hiragana to
convert separately.
, Press A to toggle Predictive and
Non-Predictive suggestions.
Single Kanji Conversion
Type reading in hiragana S A (Long)
. To exit suggestion list, press $.
Advanced
0 (Inserting line breaks (Inserting spaces (Clearing entry log (Using Disney font (Changing Font Size (Disabling suggestions based on
entered characters (Disabling suggestions based on entered words (Disabling emoticon/Disney Pictogram suggestions based on entered
words (Lowering type priorities in suggestion list (Selecting a suggestion mode (P.3-20 - 3-21)
3-7
Text Entry
Entering from Dictionaries
(Search Word)
3
Enter text by referring to word
definitions, translations, etc.
Universal Operations, Etc.
1 Type hiragana S Before
completing entry, &
Katakana
Follow these steps to switch to
Double-byte Katakana mode and
enter ジュン:
1 & S アイウ S %
2 33 (シ) S ( (ジ) S
88 (ユ) S ' (ュ ) S
000 (ン) S %
Disney Pictograms & Symbols
May be unavailable depending on
the entry mode.
1(
. Disney Pictogram or Symbol List
appears. (Log appears if Disney
Pictogram/Symbol has been used.)
2 & (toggle tabs) S B or A
(toggle Lists)
. Press & to toggle dictionaries.
2 Select word, etc. S %
. Definition/translation appears.
3%
One-Hiragana Conversion
Type the first hiragana to access
previously selected words.
Example: すずき was previously
converted to 鈴木.
1 333 (す) S b
2 Select word/phrase S %
3-8
. While entering message text,
press ' in Disney Pictogram List
to toggle Cross-Carrier
Pictograms and all Pictograms.
Alternatively, press & to switch to
My Pictogram List.
3 Select Disney Pictogram or
Symbol S %
. Disney Pictograms are double-byte
even in single-byte entry modes.
4 $ S List closes
Text Entry
Emoticons
Alternative Emoticon Entry Method
. In Kanji (Hiragana) mode, type かお
or a descriptive word such as わーい
or うーん, then convert the entry.
EmoticonWordLink
. Immediately after inserting a
descriptive word such as 嬉しい or 悲
しい, corresponding emoticons may
appear in the suggestion list.
Enter katakana and alphanumerics in
Kanji (Hiragana) mode.
Example: To enter PM
Use key inscriptions.
1 76 S A
Quick Conversion (for Hiragana)
A list of word suggestions appears
based on the key pressed.
Example: To enter 終電
1 3 (さ) S 8 (や)
S 1 (あ) S 4( (だ)
S 0 (わ) S a
Mail & Web Extensions
3
Universal Operations, Etc.
1 B S Emoticons S %
2 Select emoticon S %
Hiragana to Katakana/
Alphanumeric Conversion
Enter .co.jp, http://, etc., easily.
1 B S Quick Addr. List S %
2 Select extension S %
2 Select word/phrase (PM)
. Extensions are single-byte even in
double-byte entry modes.
S%
2 Select word/phrase (終電)
S%
One Hiragana Word Call
. Type the first hiragana of entries you
used Quick Conversion for and press a.
3-9
Text Entry
Editing Characters
3
Deleting & Editing
Universal Operations, Etc.
Follow these steps to correct また、お
願いします to また明日お願いします:
1 Select character
2$
Recovering Deleted Characters
. Press ! to recover characters
deleted with $.
Deleting All Text
. Long Press $ at the end of text. To
delete characters on and after
cursor, select the first character of
text and Long Press $.
Jumping to the End or Top of Text
B S Cursor Position S % S Jump
to End or Jump to Top S %
Copy/Cut & Paste
1 B S Cut or Copy S % S
Select first character S %
Cut
. To cancel and start over, press A.
2 Highlight text range S %
3 Select target location S
( (Long)
. The highlighted character is
deleted.
3 Select target location S
Enter characters
. Text is entered.
Pasting Previously Cut/Copied Text
Select target location S B S Paste
S % S Select text S %
, Available when Paste List appears.
Advanced
3-10
0 (Undo conversion or recover deleted characters (Inserting Phone Book entry items (P.3-20)
User Dictionary
Saving Frequently Used Words (Japanese)
Saving Words
1 % S Settings S % S f
Phone/G S User
Dictionary S %
User Dictionary Menu
2 New Entry S % S Enter
word S %
3 Enter reading S %
DM005SH Download Dictionary
Get specialized DM005SH Download
Dictionaries via SH-web Mobile
Internet site (シャープメーカーサイト in
Bookmarks; see P.6-8).
Activate dictionaries to improve
handset character conversion.
Dictionary words appear among
suggestions.
Some dictionary files may not be
usable.
1 In User Dictionary menu,
Canceling Dictionary
In 2, select dictionary S B S
Cancel S %
Viewing Dictionary Information
In 2, select dictionary S B S Info
S%
Reply Assist Dictionary (メール返信アシ
スト辞書)
. When replying, this dictionary
prioritizes original message words
(katakana or alphanumerics) in
suggestion list.
. Effective in Kanji (Hiragana) mode.
3
Universal Operations, Etc.
Saved words appear among
suggestions.
Acquire Dictionary S %
2 Select number S % S
Select dictionary S %
. Existing dictionary is replaced.
Editing Entries
In 2, Saved Word List S % S
Select word S % S Edit S % S
Edit reading S % S Yes S %
Advanced
0 (Deleting entries (P.3-21)
3-11
Dictionary
Using Dictionaries (Japanese)
Available Dictionaries:
3
Universal Operations, Etc.
Preloaded
Dictionaries*
Meikyo Japanese Dictionary,
Genius English-Japanese
Dictionary, Genius
Japanese-English Dictionary
Yahoo! Answers, Meikyo
Japanese Dictionary MX.net,
Genius English-Japanese
Dictionary MX.net, Genius
Japanese-English Dictionary
MX.net, Imidas Encyclopedia,
Complete Japanese
Encyclopedia (Encyclopedia
Nipponica 2001) including
Online
"Nipponica Plus," Digital
Dictionaries
Dai-ji-sen Japanese Dictionary,
Shogakukan Progressive
English-Japanese Dictionary,
Shogakukan Progressive
Japanese-English Dictionary,
Hot Pepper FooMoo,
Amazon.co.jp, Family Medical
Encyclopedia, Guide to
Prescription Drugs
*
Download and add dictionaries as needed.
Online Dictionaries
. Online dictionary use requires Internet
connection incurring packet transmission fees.
Information fees may also apply. Read terms of
service and then follow onscreen instructions.
. Update dictionary list for most recent versions.
Advanced
Using Preloaded Dictionaries
4 Select word, etc. S %
Searching As-You-Type
1~SA
Definition/Translation Window
2 Select dictionary S %
Dictionary Window
. Last used dictionary appears first.
3 Enter reading (spelling for
English-Japanese
dictionary)
Looking Up in Online Dictionaries
[Definition/Translation Window] B
S WebDict.Search S %
, Perform from 2 (except 4) in "Using
Online Dictionaries" on P.3-13.
(Read bulleted sentence in 1
beforehand.)
Searching by Keyword
1 In Dictionary window, B
2 Search Method S % S
Keyword Search S %
3 Select entry field S % S
Enter text S %
4 Search S % S Select
word, etc. S %
. Definition/translation window opens.
. Enter reading in katakana.
. Search results appear as you type.
0 (Changing Font Size (Looking up copied words in dictionaries (Viewing dictionary information (Updating dictionary list (And more on P.3-21)
3-12
Dictionary
Copying Text
[ Selected Portions
1 In definition/translation
2 Select first character S %
S Highlight text range S %
[ Index Word Only
1 In definition/translation
window, B
2 Copy Index Word S %
1 In Dictionary window, A S
ネット辞書 S %
. Terms of service (Japanese)
appear when using online
dictionary for the first time; read
and then press %. Subsequently,
image download options appear;
select one and press %.
2 Select pull-down menu S %
Adding Downloaded Dictionary
1 In Dictionary window, B
2 Add Dictionary S %
3 Select file S %
Canceling Added Dictionary
In 2, Cancel Dictionary S % S
Yes S %
5 Search S %
6 Yes S %
7 Select word, etc. S %
. Definition/translation window
opens.
Disabling Confirmation
After 5, B ( ) S From 6
Viewing Dictionary Information
After 6, select word, etc. S B S
Reference S % S Yes S %
Looking Up in Preloaded Dictionaries
After 6, B S Find by Other Dict. S
% S Select dictionary S % S
Search S % S Select word, etc.
S%
Opening Terms of Service
After 1, B S Terms of service S %
, Press % to return to Dictionary
window.
3
Universal Operations, Etc.
window, %
Using Online Dictionaries
3 Select dictionary S %
. Select すべて to look up in all
dictionaries at once.
4 Select entry field S % S
Enter text S %
Advanced
0 (Selecting dictionaries for use (Selecting search method (Selecting search area (And more on P.3-21 - 3-22)
3-13
Dictionary
Using History & Bookmarks
Saving Bookmarks
3
Universal Operations, Etc.
1 In definition/translation
window, B
2 Bookmark S %
Using Dictionaries during Text Entry
1 Type text S Before
completing entry, ~
2 Select dictionary S %
3 Search S % S Select
word, etc. S %
Opening History or Bookmarks
1 In Dictionary window, B
2 History List or Bookmark List
S%
. Definition/translation window
opens.
Inserting Index Word into Text
After 3, B S Paste Index Word S %
3 Select word, etc. S %
. Definition/translation window
opens.
. Not available in History List of
online dictionaries.
Advanced
3-14
0 (Deleting history records or bookmarks (P.3-21)
Search
Searching Text
Web Search
Packet transmission fees apply.
Doc./Rec.
2 Search S %
Search Window
1 In Search window, Mail
Search S %
2 Select entry field S % S
Enter search text S %
3 Search S %
4 Select option S %
Searching within Received or Sent
Messages
[Search Window] B S Change
Mail Folder S % S Received
Messages or Sent Messages S %
3
Universal Operations, Etc.
1 % S Tools S % S f
Mail Search
. Web Search is selected by
default.
3 Select entry field S % S
Enter search text S %
4 Search S %
. Search results appear.
Switching Browsers
[Search Window] B S Change
Browser S % S Select browser S %
3-15
Scratch Pad
Scratch Pad
3
Open Scratch Pad to jot down text,
and more.
Universal Operations, Etc.
1 % S Tools S % S f
Other Scratch Pad Usage
Usage
Doc./Rec.
Paste to
Standby
. Text entry window opens.
Enter Mail
Message Text
2 Scratch Pad S %
3 Enter text S %
4 Save to Notepad S %
. Open saved entries from
Notepad.
Enter Schedule
Subject/Details
Enter Task
Subject/Details
Add Last Name/
Phone Number/
Mail Address to
Phone Book
Save Text File
Operation in 4
Set as StbyShortcut S
% S Select sheet
S%
Create Message S
% S Select mail type
S%
Save to Calendar S %
Save to Tasks S %
Save to Phone Book
S%
, Reading is not entered.
Save as Text File S %
S Enter name S %
S Save here S %
, Saved to Data Folder
(Other Documents).
Search Internet
Web Search S % S
Select browser S %
For more, see corresponding function
description or follow onscreen
instructions.
3-16
Phone Book
Creating Phone Book Entries
Enter a name, phone number and
mail address (enter at least one of
these items) and classify the entry.
S Enter phone number S
% S Select type S %
5 Category: S % S Select
Category S %
New Entry S %
2 Last Name: S % S Enter
last name S % S First
Name: S % S Enter first
name S %
. To save additional phone
numbers, repeat 3.
4 Add Email Address: S %
S Enter mail address S %
S Select type S %
3
Universal Operations, Etc.
1 % S Phone S % S Add
3 Add Phone Number: S %
Phone Book Entry Window
6A
. Entry is saved to Phone Book.
Incoming Calls while Creating Entry
. Contents are temporarily saved. End
the call to return.
. Characters entered for names
(reading for kanji) appear.
. To save additional mail addresses,
repeat 4.
Advanced
0 (Saving other information (Changing Illumi Display settings (Setting Small Light status (Changing vibration pattern (Editing Phone Book
entries (Setting incoming mail ring time (Renaming Categories (Changing Category icons (Changing Category order (P.3-22 - 3-23)
3-17
Phone Book
Personal Ringtone
Set tone for calls from saved numbers.
3
1 In Phone Book entry
1 % S Phone S % S Set
Category S %
Universal Operations, Etc.
window, select item, e.g.,
Tone-Voice Call: S %
2 Select Category S B S
folder S %
3 Select item S % S Select
2 Assign Tone S % S Select
3 Select tone/file S % S A
Saving Secret Entries
Hide Phone Book entries to require
Handset Code for access.
1 In Phone Book entry
window, Secret: S %
2 On S % S A
Accessing Secret Entries
b S B S Unlock Temporarily S
% S Enter Handset Code S %
3-18
Customizing Response by Category
Saving Numbers After Calls
After a call, save number to Phone
Book.
Select item S %
item, e.g., Assign Tone S
% S Customize responses
. Customize responses in the same
way as Phone Book entries.
. Not available for USIM Card.
Responses Set by Phone Book Entry
. Settings for each entry take priority.
1 When confirmation
appears, New Entry S % S
Complete other fields S A
Saving to an Existing Entry
In 1, New Detail S % S Select
entry S % S Complete other fields
SA
Phone Book
Using Phone Book Entries
Dialing via Phone Book
row
S Ph.Book Settings S %
Opening from Other Functions
Example: Enter a recipient via Phone
Book when sending a message.
2 Sort Entries S %
3 Select method S %
. Phone Book Search Methods:
Entry Search Window (By あかさたな)
2 Select entry S %
3 Select phone number
4!
Placing Video Calls
After 3, % S Video Call S %
Shows entries with
Readings that start
By あかさたな
with katakana in
the specified row
Opens entries in the
By Category
specified Category
Shows all entries in
Reading order
By Reading (katakana,
alphabetical then
numerical)
Changing Search Method Temporarily
[Entry Search Window] A (press to
toggle search methods)
Select Recipient Window
1 Phone Book S %
. Entry search window opens.
3
Universal Operations, Etc.
1 b S f Select katakana
Changing Search Method
1 In entry search window, B
2 Select entry S %
3 Select phone number or
mail address S %
. Recipient is entered.
. Omit 3 if only one number or
address is saved.
Advanced
0 (Changing view for entry search window (Assigning images to Phone Book entries for incoming transmissions (Messaging via Phone Book (Placing
Decoration Calls via Phone Book (Deleting Phone Book entries (Checking memory status (Copying Phone Book entries (And more on P.3-22 - 3-24)
3-19
Additional Functions
Customized Screen
3
Canceling
% S B S Off S % S Yes S %
Customized Screen
Universal Operations, Etc.
Canceling
Customized Screen
unconditionally
Deleting
Customized Screens
Accessing
Customized Screen
source sites
' S Menu List S % S Settings S % S In
Sound/Display menu, Customized Screen S
% S Off S % S Yes S %
% S Data Folder S % S Customized Screen
S % S Select Customized Screen S B S
Delete S % S Yes S %
. When the corresponding Contents Key has been
downloaded, choose Yes or No and press %.
% S Data Folder S % S Customized Screen
S % S Select Customized Screen S B S
Web Access S %
. Follow onscreen instructions.
Machi-Uta®
7% S Settings S % S In Sound/
Display menu, Sounds & Alerts S % S
Machi-Uta S % S See below
Using Machi-Uta®
(Japanese)
Searching Music
Music Search S %
Using Character
Codes
Using Pager Code
Changing Settings
Settings S %
Viewing Machi-Uta® Information
What's Machi-Uta S %
In a text entry window, & S Character Code
S % S Enter four digits
In a text entry window, B S Input/Conversion
S % S Input Method S % S Pager Code
S%
. Return to text entry window and enter two digits.
At the End of Text
In a text entry window, b
Inserting line breaks Mid-Entry
In a text entry window, ( S & (select
Symbols) S (B or A S) 0 S %
Inserting spaces
In a text entry window, d
Clearing entry log
In a text entry window, B S Input/Conversion
S % S Reset Log S % S Yes S %
Undo conversion
or recover deleted
characters
In a text entry window, B S Undo/Recover S %
Inserting Phone
Book entry items
In a text entry window, B S Insert/Font Size
S % S Phone Book S % S Select entry S
% S Select item S %
. Follow onscreen instructions.
. Follow onscreen instructions.
3-20
Text Entry
[ Entry & Edit
Using Disney font
In a text entry window, B S Font Type S %
S Disney S %
. Disney font applies to other windows/menus as well.
Additional Functions
Changing Font Size
In a text entry window, B S Insert/Font Size
S % S Font Size S % S Select size S %
[ Conversion
Looking up copied
words in
dictionaries
7
In a text entry window, B S Input/Conversion
S % S Predictive S % S Off S %
Disabling
suggestions based
on entered words
In a text entry window, B S Input/Conversion
S % S Previous Usage S % S Off S %
~ S B S History List or Bookmark
List S % S See below
Deleting history
records or
bookmarks
Disabling emoticon/
In a text entry window, B S Input/Conversion
Disney Pictogram
S % S EmoticonWordLink S % S Off S %
suggestions based
on entered words
Looking up
scanned kanji in
dictionaries
Lowering type
priorities in
suggestion list
In a text entry window, B S Input/Conversion
S % S Set Low Priority S % S Select type S
%( )SA
Looking up
scanned text in
dictionaries
Selecting a
suggestion mode
In a text entry window, B S Input/Conversion
S % S Personal Mode S % S Select mode
S%
User Dictionary
One Word
Select word S B S Delete S % S Yes S %
All Words
B S Delete All S % S Enter Handset Code
S % S Yes S %
~ S B S Kanji Grabber S % S Frame
kanji in Loupe S % S % S Search S % S
Select word, etc. S %
. Definition/translation window opens.
~ S B S Scan Text S % S Frame text in
center of Display S % S Select line S % S
% S Search S % S Select word, etc. S %
3
Universal Operations, Etc.
Disabling
suggestions based
on entered
characters
Deleting entries
After copying text, ~ S B S Search by
Copied Text S % S Search S % S Select
word, etc. S %
. Definition/translation window opens.
[ Preloaded Dictionaries
Viewing dictionary
information
~ S B S Information S %
[ Online Dictionaries
% S Settings S % S f Phone/G S User
Dictionary S % S Saved Word List S % S
Select word S B S Yes S %
Dictionary
Updating
dictionary list
~ S A S ネット辞書 S % S B S
Update Dictionaries S % S Yes S %
~ S A S ネット辞書 S % S B S Edit
Selecting
Dict. List S % S Select dictionary S % ( /
dictionaries for use
)SA
[ Preloaded & Online Dictionaries
Changing Font
Size
~ S B S Font Size S % S Select size
S%
3-21
Additional Functions
Selecting image
download option
3
Universal Operations, Etc.
Selecting search
method
~ S A S ネット辞書 S % S B S Show
Image S % S Select option S %
. For Auto, choose Yes or No and press %.
~ S A S ネット辞書 S % S Select
pull-down menu S % S Select dictionary S
% S B S Set Search Method S % S Select
option S %
. Not available when すべて or unsupported
Selecting search
area
7% S Phone S % S Add New Entry S
% S See below
~ S A S ネット辞書 S % S Select
pull-down menu S % S Select dictionary S
% S B S Set Search Area S % S Select
area S %
. Not available when すべて or unsupported
Address
Address: S % S Select item S % S
Complete field S % S A
Office
Office: S % S Select item S % S Enter text
S%SA
dictionary is selected.
~ S A S ネット辞書 S % S Select
pull-down menu S % S Select dictionary S
% S B S Help S % S Yes S %
Phone Book
% S Phone S % S Ph.Book Settings S % S
View Settings S % S List Only S %
7% S Phone S % S Add New Entry S
Assigning images
to Phone Book
entries for incoming
transmissions
Saving other
information
Homepage
Homepage: S % S Enter URL S % S Select
type S %
Note
Note: S % S Enter text S %
[ View Settings
Changing view for
entry search
window
% S Phone S % S Ph.Book Settings S % S
New Number Prompt S % S Incoming Call
or Outgoing Call S % S Off S %
[ Phone Book Entry
Press A at the end to save entry. (At least a name, phone
number or mail address must be entered.)
dictionary is selected.
Opening Help
3-22
Hiding
confirmation after
calls to/from
unsaved numbers
% S Picture: S % S See below
Assigning Images
Assign Picture S % S Select image S %
Capturing Images
Take Picture S % S Frame image on Display
S%S%
Birthday
Birthday: S % S Enter date S %
Location Information
Location Info.: S % S Enter Location
Information S %
Additional Functions
7% S Phone S % S Add New Entry S
% S Select item, e.g., Illumi & Light(VoiceCall):
S % S Illumi Display S % S See below
Activating Illumi Display
Switch On/Off S % S On S % S $ S $
Changing Pattern
Pattern Setting S % S Select pattern S % S
$S$
7% S Phone S % S Add New Entry S
% S Select item, e.g., Illumi & Light(VoiceCall):
S % S Light Settings S % S See below
Setting Small Light
status
Activating Small Light
Switch On/Off S % S On or Link to Sound S
%S$S$
Changing Light Color
Light Color S % S Select color S % S $
S$
Changing
vibration pattern
Setting incoming
mail ring time
Changing
Category icons
% S Phone S % S Set Category S % S
Select Category S % S Change Icon S %
S Select Pictogram S %
Changing
Category order
b S Select entry S B S Edit S % S Select
item S % S Edit S % S A
. Available for compatible ringtones.
. View for By Category Phone Book search
changes accordingly.
7b S Select entry S % S See below
Messaging via
Phone Book
Phone Numbers
Select phone number S % S Create
Message S % S E Mail or SMS S % S
Complete message S A
3
Mail Addresses
Select mail address S % S Complete
message S A
Placing
Decoration Calls
via Phone Book
b S Select entry S % S Select phone
number S % S Deco. Call S % S Deco.
Call File S % S Deco. Call Folder S % S
Select file S % S Call Type S % S Voice
Call or Video Call S % S B
. When placing a Decoration Call for the first
time, follow onscreen prompt.
. Edit Reading after editing names.
b S Select entry S B S Edit S % S
Tone-New Message: S % S Duration S %
S Enter time S % S A
% S Phone S % S Set Category S % S
Select Category S A S Select target
location S %
[ Using Entries
% S Phone S % S Add New Entry S % S
Select item, e.g., Vibration-Message: S % S
Switch On/Off S % S Select option S % S
Vibration Pattern S % S Select pattern S %
S$
[ Editing Entries & Categories
Editing Phone
Book entries
% S Phone S % S Set Category S % S
Select Category S % S Edit Name S % S
Enter name S %
Universal Operations, Etc.
Changing Illumi
Display settings
Renaming
Categories
Initiating S! Circle
Talk via Phone
Book
b S Select entry S % S Select phone
number S % S Call S! Circle Talk S % S %
Placing
international calls
via Phone Book
b S Select entry S % S Select phone
number S % S Int'l Call S % S Select
country S % S !
. Set Connection status to Online first.
3-23
Additional Functions
Using Location
Information via
Phone Book
3
b S Select entry S % S f Settings S
B S Set to Destination S %
% S B S Change to USIM S % S See below
. Follow onscreen instructions.
[ Managing Entries
Universal Operations, Etc.
Deleting Phone
Book entries
Checking memory
status
One Entry
b S Select entry S B S Delete S % S Yes
S%
Editing Categories
on USIM Card
All Entries
% S Phone S % S Manage Entries S % S
Delete All S % S Select entry type S % S
Yes S % S Enter Handset Code S %
% S Phone S % S Manage Entries S % S
Memory Status S %
One Entry (Handset > USIM Card)
b S Select entry S B S Manage Entries S
% S Copy Entry to USIM S % S Yes S %
Copying Phone
Book entries
One Entry (USIM Card > Handset)
b S B S Ph.Book Settings S % S Select
Phone Book S % S USIM Memory S % S
Select entry S B S Manage Entries S % S
Copy Entry to Phone S %
All Entries
b S B S Manage Entries S % S Copy All
S % S Select method S % S Yes S %
. If handset/USIM Card memory is low, some
entries may not be copied.
3-24
7% S Phone S % S Set Category S
S
Renaming Categories
Select Category S % S Edit Name S % S
Enter name S %
Changing Order
Select Category S A S Select target
location S %
Changing Icons
Select Category S % S Change Icon S %
S Select Pictogram S %
Changing default
storage media for
new entries
% S Phone S % S Ph.Book Settings S % S
Save New Entry S % S USIM Memory or Ask
Each Time S %
Switching
reference Phone
Book
% S Phone S % S Ph.Book Settings S % S
Select Phone Book S % S USIM Memory or
Both S %
Troubleshooting
Customized Screen
. Some Customized Screens may not
contain files for Wallpaper, System
Graphics, ringtones or ringvideos;
default settings apply for these
functions.
Phone Book
3 for incoming transmissions
Assigned images do not appear
. Source files may be deleted or
moved to Memory Card; reassign
files.
. When using copy protected files,
etc., confirm that source file license/
usage period has not expired.
. Images do not appear if
corresponding Phone Book entry is
set to Secret.
. Images do not appear for
incoming Decoration Calls with
image/video.
. Images may not appear when
another function is active, etc.
Handset does not ring for
. Source files may be deleted;
reassign files.
. When using copy protected files,
etc., confirm that source file license/
usage period has not expired.
. Ringtone/ringvideo settings are
disabled if corresponding Phone
Book entry is set to Secret.
. Ringtones do not sound for incoming
Decoration Calls with sound.
. Memory Card with source files may
be removed; reinsert the card to
restore settings.
3
Universal Operations, Etc.
3 Customized Screen is not applied
3 incoming transmissions as set
3 Category names
Cannot enter 16 characters for
. Character entry limit for Category
names may be lower depending
on the USIM Card in use.
3-25
Emergency Calls ........................... 4-2
Voice Calling................................. 4-3
Video Calling................................. 4-5
Decoration Call ............................. 4-6
Speed Dial ..................................... 4-7
Call Log .......................................... 4-8
Call Time ........................................ 4-9
Call Barring ..................................4-10
Restrict Destinations .................... 4-10
Reject Numbers ........................... 4-11
Optional Services ........................4-12
Additional Functions ...................4-14
Troubleshooting ...........................4-22
4
Calling
4-1
Emergency Calls
Emergency Calls
4
Calling
Your location is automatically
reported to the corresponding
agency (police, etc.) when you place
emergency calls (110, 119 or 118) with
Disney Mobile handsets. (Emergency
Location Report)
DM005SH reports Location Information
based on positioning signals from
radio stations.
. Registration/transmission fees do not
apply.
. Positioning accuracy is affected by
location/signal conditions. Always
provide your location and purpose on
the phone.
. Location Information is not reported
when emergency calls are placed
without Caller ID (such as when the
number is prefixed with 184). However,
the corresponding agency may obtain
your Location Information in a life
threatening situation.
. Location Information is not reported
during international roaming.
4-2
Handset Restrictions &
Emergency Calls
Emergency calls are possible even
while some handset restrictions are
active.
Active Restriction
Function Lock
Bar Outgoing Calls
Offline Mode
Keypad Lock
PIN Entry
Emergency Calls
Possible
Restricted
Voice Calling
Voice Calling
Answering a Voice Call
Incoming Call window opens for a
call.
Placing a Voice Call
1 Enter phone number with
area code
Placing an International Call
1 Enter phone number with
area code S B
2 Int'l Call S %
3 Select country S % S !
. Wait for receiver to accept the call.
4 " S Call ends
2!
4
Calling
. To correct entry, use f to place
cursor under the digit and press
$. To delete the digits above and
after the cursor, Long Press $.
. Handset dials the number.
Calling Unlisted Countries
In 3, Enter Code S % S Enter
country code S % S !
Incoming Voice Call Window
1 ! to accept the call
. Call connects.
2 " S Call ends
Muting Ringer Temporarily
When a call arrives, )
Earpiece Volume
During a call, e or L
After Calls to/from Unsaved Numbers
. Save to Phone Book confirmation appears.
Select New Entry or New Detail and press %
to save number; Phone Book entry window
or entry search window opens, respectively.
3 " S Call ends
Advanced
0 (Rejecting calls (Placing calls on hold (Answering with Headphones (Adjusting Earpiece Volume (Sending/blocking Caller ID (Muting
Microphone (Recording caller voice (And more on P.4-14 - 4-16)
(Answering calls automatically when using Headphones (Saving frequently used touch tones (And more on P.4-20 - 4-21)
4-3
Voice Calling
Placing Calls from Outside Japan
4
Calling
See below to place a call to Japan
from abroad.
Apply for Global Roaming beforehand.
See SoftBank Mobile Website for details:
http://mb.softbank.jp/en/global_services/
Access roaming area/rate information or print
it out to carry with you while traveling abroad.
1 Enter phone number with area
code S B S Int'l Call S %
2 日本(JPN) S % S !
. Handset dials the number.
. To call other countries, select the
target country instead of 日本(JPN).
3 " S Call ends
Calling Disney Mobile & SoftBank Handsets
. In 2, always select 日本(JPN).
Calling Landlines & Mobiles within the
Same Country
Enter phone number with area code
S ! S Dial to Your Stay S %
Calls Overseas
. Calling may not be possible outside
Japan. Connections depend on
available network, signal strength,
and handset settings.
Answer Phone
Caller messages are recorded on handset.
. Answer Phone cannot be used while
handset is off or out-of-range. Use
Voicemail to record caller messages
when Answer Phone is not available.
. To answer a call mid-recording, press !.
, No message will be recorded.
Playing Messages
1$
2 Select record S %
. Playback stops automatically at
the end of message.
[ Playback Operations
Volume Control
Replay/Skip Backward
Stop
Skip Forward
Delete
Loudspeaker On/Off
e or L
c
%
d
B S Yes S %
A
Canceling Answer Phone
1 $ (Long)
Reactivating Answer Phone
$ (Long)
Deleting All Records
After 1, B S Delete All S % S
Enter Handset Code S % S Yes
S%
Advanced
0 (Recording caller messages (Changing ring time (And more on P.4-14)
(Placing calls by entering country code directly (Using Roaming Dial Assistant to place international calls while outside Japan (And more on P.4-15)
4-4
Video Calling
Video Calling
Answering a Video Call
Placing a Video Call
Incoming Call window opens for a call.
1 Enter phone number S %
2 Video Call S %
Window Description
Incoming Image
Outgoing Image
Other Party's
Number/Name
Important Video Call Usage Notes
. If both parties are not using the same
Video Call system, call may be
interrupted. (Video Call charges apply.)
. Video Calls cannot be placed while
TV is active.
4
Calling
View the other party's image or send an
Outgoing Image to compatible handsets.
Handle Video Calls like Voice Calls.
This page describes functions/
operations unique to Video Call.
Incoming Video Call Window
1 ! to accept the call
2 " S Call ends
Answering without Camera Image
[Incoming Video Call Window] %
S Yes S %
, Video Call charges apply to the caller.
[ Engaged Video Call Operations
Toggle View
Toggle Outgoing
Image
Open Help
. Image appears when call is
accepted.
3 " S Call ends
&
%
B S Help S %
Advanced
0 (Answering Video Calls automatically (And more on P.4-14)
(Adjusting Outgoing Image brightness (Canceling Internal Camera image reversal (Disabling touch tone sending (P.4-16)
(Sending Alternative Image when initiating Video Calls (Disabling Loudspeaker for Video Calls (Muting Microphone when initiating Video
Calls (And more on P.4-21)
4-5
Decoration Call
Decoration Call
Show decorative message in incoming
call windows on recipient's handset.
4
Calling
. Available without a separate contract.
. Recipient's handset must be
Decoration Call-compatible.
. Charges apply to the caller when
Decoration Call is placed successfully.
Answering a Decoration Call
Incoming Call window opens for a call.
1 ! to accept the call
. Call connects.
2 " S Call ends
. Open/save Decoration Call files
from received call records.
Note
. Decoration Call file may not play
depending on recipient handset settings.
Placing a Decoration Call
Follow these steps to place a Decoration
Call by entering a phone number:
1 Enter phone number S B
4B
. Handset dials the number. (It may
take some time.)
5 " S Call ends
Placing Your First Decoration Call
. A confirmation appears. Follow
onscreen prompt.
, To show confirmation next time as
well, press B ( ).
Placing Decoration Video Calls
After 3, Call Type S % S Video
Call S % S 4
S Deco. Call S %
2 Deco. Call File S %
3 Deco. Call Folder S % S
Select file S %
. To check selected file, press A.
Incoming Decoration Call Window
If Softkeys do not appear, handle
incoming Decoration Call like any
other call.
Advanced
0 (Creating Decoration Call files (Editing Decoration Call files (Saving received Decoration Call files (Restricting incoming/outgoing Decoration Calls (Hiding
incoming Decoration Call window (Using mobile camera to create Decoration Call files (Showing options upon Decoration Call failure (P.4-16 - 4-17)
4-6
Speed Dial
Speed Dial
Saving Phone Numbers
Save phone numbers to Speed Dial/
Mail list for easy dialing.
entry S %
4 Select phone number S %
. Select mail address prompt
appears. To save mail address for
easy messaging, select one and
press %. (Omit 5.)
. To save additional phone
numbers, repeat 3 - 6.
Using Headphones for Speed Dial
. Save a phone number to
.
Canceling Speed Dial Entries
In 3, select entry S B S Remove
Selected or Remove All S % S Yes
S%
, Omit entry selection step when
canceling all entries.
Using Speed Dial
1 0 - 99 (entry number)
2!
Placing Video Calls
In 2, % S Speed Video S %
Placing Decoration Calls
In 2, % S Speed Deco. Call S %
S Deco. Call File S % S Deco.
Call Folder (or From Call Log) S %
S Select file (or record) S % S B
, To create a new file, select Create
New File in Deco. Call File menu.
Using Headphones
. In Standby, Long Press Call Button
until a double beep sounds; handset
dials the number saved in
. To end
the call, Long Press Call Button until a
beep sounds.
4
Calling
1 % S Phone S %
2 Speed Dial/Mail S %
3 <Empty> S % S Select
6 A S Saved
5 Do not Assign S %
4-7
Call Log
Call Log
Open recent dialed/received call
records.
4
1!
Calling
. All records appear; press d to
open Dialed, Dialed Ranking and
then Received records.
When the Same Number is Dialed More
than Once Using the Same Call Option
. Only the last record appears. (All
records appear for S! Circle Talk and
Decoration Call.)
Hiding Dialed Ranking
In 2, f Dialed or Dialed (Ranking)
S B S Hide Dialed Ranking S %
, To show Dialed Ranking again,
follow these steps:
In 2, f Dialed S B S Show
Dialed Ranking S % S Enter
Handset Code S %
2 Select record S %
. Open Decoration Call record and
press A for the corresponding file.
Advanced
0 (Dialing from records (And more on P.4-17 - 4-18)
4-8
Call Time
Call Time
Check estimated time of the most
recent call and all calls.
1 % S Settings S % S f
2 Call Time/Data Counter S %
4
Calling
Call
3 Call Timers S %
4 Dialed Calls or Received
Calls S %
Resetting Dialed or Received Call Timer
After 4, B S Enter Handset Code
S % S Yes S %
Advanced
0 (Setting handset to beep during Voice Calls (Checking accumulated data transmission volume (Resetting Data Counter (And more on P.4-18)
4-9
Call Barring
Restrict Destinations
Allow calls to numbers saved in Phone
Book or Call Permitted List only.
4
Limiting to Phone Book
Calling
1 % S Settings S % S f
Call S Call Barring S %
2 Restrict Destinations S % S
Limiting to Call Permitted List
Specifying Numbers
1 In Restrict Destinations
menu, Specified Numbers
S%
Enter Handset Code S %
Specified Numbers Menu
Restrict Destinations Menu
3 Restrict Phonebook S % S
Do S %
When Restrict Phonebook is Do
. Handset Code is required to add/edit
Phone Book entries.
2 Call Permitted List S %
3 <Empty> S %
4 Enter phone number S %
. Repeat 3 - 4 to add phone
numbers.
Activating Call Permitted List
1 In Specified Numbers
menu, Switch On/Off S %
2 On S %
Advanced
0 (Designating Call Permitted List numbers from saved information (Editing Call Permitted List (P.4-18)
4-10
Call Barring
Reject Numbers
Reject calls from specified/unsaved
numbers or calls without Caller ID.
3 Specified Numbers S %
Rejecting Specified Numbers
2 Reject Numbers S % S
Enter Handset Code S %
Specified Numbers Menu
4 Reject Numbers List S %
5 <Empty> S %
6 Enter phone number S %
. Repeat 5 - 6 to add phone
numbers.
Saved Numbers Containing P (Pause)
. Calls from the number before P are
rejected.
Rejecting Withheld Caller ID
Calls from public phones or with
undisplayable Caller ID are also rejected.
Activating Rejection
1 In Reject Numbers menu,
menu, Switch On/Off S %
2 Reject S %
1 In Specified Numbers
Reject Numbers Menu
2 Reject S %
2 On S %
4
Calling
Call S Call Barring S %
1 In Reject Numbers menu, Not
registered Numbers S %
Specifying Numbers
1 % S Settings S % S f
Rejecting Unsaved Numbers
Withheld Call S %
Advanced
0 (Designating numbers to reject from saved information (Editing Reject Numbers List (Excluding rejected calls from Call Log (P.4-19)
4-11
Optional Services
Optional Services
4
Call Forwarding and Voicemail can
only be set simultaneously when Call
Forwarding is set to Video Calls.
Calling
Call
Forwarding
Voicemail
Call
Waiting*
Group
Calling*
Caller ID
Call Barring
*
Automatically divert all or
all unanswered incoming
calls to another preset
phone number
Redirect all or
unanswered calls to
Voicemail Center; access
messages from handset/
touch tone phones
Answer incoming calls or
open another line during
a call
Switch between open
lines or connect multiple
lines at once for
teleconferencing
Show or hide your own
number when placing
calls
Restrict incoming/
outgoing calls
depending on conditions
A separate contract is required.
Advanced
0 (Checking service status (P.4-19)
4-12
Initiating Call Forwarding
Follow these steps to divert calls to a
phone number saved in Phone Book
after selected ring time (No Answer set):
1 % S Settings S % S f
Call
2 Voicemail/Divert S %
Voicemail/Divert Menu
3 Diverts S %
4 Select call type S %
5 No Answer S %
6 Phone Book S % S Select
entry S %
7 Select phone number S %
. Omit 7 if only one number is
saved.
8%
9 Select ring time S %
Diverting Calls without Handset Response
In 5, Always S % S 6 - 8
Entering Forwarding Number Directly
In 6, Enter Number S % S Enter
phone number S % S Select ring
time S %
Optional Services
Initiating Voicemail
Follow these steps to divert calls to
Voicemail Center after selected ring
time (No Answer set):
Voicemail S % S Activate
S%
2 No Answer S % S Select
1 % S Settings S % S f
Call
2 ) Missed Calls S % S %
ring time S %
Diverting Calls without Handset
Response
In 2, Always S %
. Follow the voice guidance for
further operations.
Playing Messages
1 In Voicemail/Divert menu,
Voicemail S %
2 Call Voicemail S %
. Follow the voice guidance for
further operations.
Deleting New Voicemail Message
Indicator
In 2, Delete Icon S % S Yes S %
4
Calling
1 In Voicemail/Divert menu,
Missed Call Notification
Activate this function for records of
calls missed while handset is off/
out-of-range and Voicemail is active.
Canceling Call Forwarding/
Voicemail
1 In Voicemail/Divert menu,
Cancel All S %
2 Yes S %
Advanced
0 (Activating Call Waiting (Talking on multiple lines simultaneously (Setting/canceling outgoing call restriction (Setting/canceling
incoming call restriction (And more on P.4-19 - 4-20)
4-13
Additional Functions
Receiving a Call
[ Remote Monitor (Video Call)
7% S Settings S % S f Call S
[ Handling Incoming Calls
4
Rejecting calls
Calling
Placing calls on
hold
Answering with
Headphones
Saving Numbers from Phone Book
Auto Answer List S % S <Empty> S B S
Change S % S From Phone Book S % S
Select entry S % S Select phone number S %
Video Call
When a call arrives, A
When a call arrives, "
. To enter a phone number directly, select
<Empty> and press %.
. Press ! to answer the call on hold.
When a call arrives, Long Press Call Button
. To end the call, Long Press Call Button.
[ Answer Phone
Recording caller
messages
Video Call S % S Remote Monitor S % S
Enter Handset Code S % S See below
Voice Call
When a call arrives, B S Reject S %
When a Voice Call arrives, B S Record
Message S %
Answering Video
Calls automatically Saving Numbers from Call Log
Auto Answer List S % S <Empty> S B S
Change S % S From Call Log S % S Select
record S %
Activating Remote Monitor
Switch On/Off S % S On S % S %
% S Settings S % S f Call S Answer
Changing ring time Phone S % S Answer Time S % S Enter
time S %
Sampling outgoing
message
Muting Earpiece
. When Remote Monitor is active, auto answer tone
sounds even in Manner mode; cancel afterward.
. Calls cannot be answered automatically with
handset closed.
% S Settings S % S f Call S Answer
Phone S % S Outgoing Message S %
7% S Settings S % S f Call S
. Press $ to stop playback.
% S Settings S % S f Call S Answer
Phone S % S Volume S % S Silent S %
Editing Auto
Answer List
Video Call S % S Remote Monitor S % S
Enter Handset Code S % S Auto Answer List
S % S See below
Editing Numbers
Select entry S % S Edit S %
Deleting Entries
Select entry S B S Delete S % S Yes S %
Changing ring
time
4-14
% S Settings S % S f Call S Video Call S
% S Remote Monitor S % S Enter Handset
Code S % S Answer Time S % S Enter time
S%
Additional Functions
Placing a Call
[ Basic Operations
Saving frequently
used international
prefix
% S Settings S % S f Call S Int'l Calling
S % S Int'l Prefix S % S Enter Handset
Code S % S Enter prefix S %
% S Settings S % S In Sound/Display
menu, Earpiece Volume S % S Adjust level
S%
7% S Settings S % S f Call S Int'l
Sending/blocking
Caller ID
After phone number entry, B S Hide My ID or
Show My ID S %
Adding
<Empty> S % S Enter name S % S Enter
country code S %
[ International Calls
Placing calls by
entering country
code directly
(( (+ appears) S Enter country code S
Enter phone number with area code S !
S ! S See below
. Prompts do not appear for numbers with
country codes.
. To disable Roaming Dial Assistant automatically
after a call, press B to check box next to Don't
use this tool again..
% S Settings S % S f Call S Int'l Calling
S % S Roaming Dial Assistant S % S Off
S%
. When Off, handset dials the entered phone
number as-is even while outside Japan.
Changing
Select country S % S Change S % S Enter
name S % S Enter country code S %
4
Deleting
Select country S % S Delete S % S Yes S %
During a Call
[ Voice Call & Video Call
Voice Call
During a call, A (press again to cancel)
Muting Microphone
Calling Japan (Landlines & Mobiles)
Dial to Japan S % S !
Calling Other Counties (Landlines & Mobiles)
Dial to Other Country S % S Select country
S%S!
Disabling Roaming
Dial Assistant
Adding/changing/
deleting country
codes
. Omit the first 0 of the area code except when
calling Italy or some other countries.
. Pressing (( during a call does not enter +.
7Enter phone number with area code
Using Roaming Dial
Assistant to place
international calls
while outside
Japan
Calling S % S Country Codes S % S See
below
Calling
Adjusting Earpiece
Volume
Video Call
During a call, B S Mute S %
. To cancel, select Unmute.
Activating/
canceling
Loudspeaker
Switching sound
output
Activating Loudspeaker for Voice Call
During a call, % S While message appears, %
. To cancel, press %.
Canceling Loudspeaker for Video Call
During a call, A (press again to activate)
During a call, B S Transfer Audio S % S To
Phone or To Bluetooth S %
. For To Bluetooth, select a device and press %.
4-15
Additional Functions
Opening Phone
Book
4
Saving Phone
Book entries
During a call, B S Phone Book S % S
Select entry S %
. Press $ twice to return to call window.
During a call, B S Phone Book S % S B S
Add New Entry S % S Complete fields S A
. Press $ to return to call window.
Calling
During a call, B S Hold S %
Placing calls on
hold
. Subscription to Call Waiting or Group Calling is
required to place Voice Calls on hold.
. To resume Voice Calls, press B, select Retrieve
and press %.
. To resume Video Calls, press A.
[ Video Call Only
Adjusting
Outgoing Image
brightness
Opening messages
During a call, B S Settings S % S Mirror
Image S % S Off S %
Disabling touch
tone sending
During a call, B S Disable DTMF S %
Decoration Call
7% S Data Folder S % S Decoration
Call S B S Create New File S % S Text
Input S % S Enter text S % S Images S %
S See below
During a call, B S Record Caller Voice S %
S Recording starts S % S Recording ends
. To play recorded messages, see P.4-4 "Playing
Messages."
During a call, B S Messaging S % S Select
Messaging folder S % S Select folder S %
S Select message S %
. Press $ three times to return to call window.
4-16
. Alternative Image brightness is fixed.
Canceling Internal
Camera image
reversal
[ Voice Call Only
Recording caller
voice
During a call, B S Exposure S % S Adjust
level S %
Creating
Decoration Call
files
Using Still Images
Picture S % S Pictures S % S Select file S
% S Sounds S % S Select folder S % S
Select file S % S Yes or No S % S A S
Save here S %
During a call, B S Messaging S % S
Creating messages Create Message or Create New SMS S % S
Complete message S A
Using Video
Video S % S Videos S % S Select file S
% S Yes or No S % S A S Save here S %
Sending saved
touch tones
During a call, B S Touch-Tone Signal List S
% S Select entry S B
Sending touch
tones via Phone
Book
During a call, B S Phone Book S % S
Select entry S B S Send Push Tone S % S
Select phone number S %
Using Flash® Animation
Flash® S % S Select file S % S Yes or No
S % S A S Save here S %
Additional Functions
Editing Decoration
Call files
% S Data Folder S % S Decoration Call S
% S Select file S B S Edit S % S Edit S
A S Save as New or Overwrite S %
Call Log
Calling Dialed Numbers (Redial)
c S Select record S !
. For Save as New, select Save here and press %.
! S Select record S B S Save File S %
S Save here S %
Restricting
incoming/outgoing
Decoration Calls
% S Settings S % S f Call S Decoration
Call S % S Switch On/Off S % S Off S %
S Enter Handset Code S %
Hiding incoming
Decoration Call
window
% S Settings S % S f Call S Decoration
Call S % S Play in Receiving S % S Off S %
7
Using mobile
camera to create
Decoration Call
files
Showing options
upon Decoration
Call failure
% S Data Folder S % S Decoration
Call S B S Create New File S % S Text
Input S % S Enter text S % S Images S %
S See below
Capturing Still Images
Picture S % S Take Picture S % S % to
shoot S % S A S Save here S %
Recording Video
Video S % S Record Video S % S % to
start recording S % to stop S Save S % S
Yes or No S % S A S Save here S %
% S Settings S % S f Call S Decoration
Call S % S Notice S % S On S %
Dialing from
records
. To place Video Calls, press B instead of !,
then select Video Call and press %.
Calling from Received Call Records
d S Select record S !
. To place Video Calls, press B instead of !,
then select Video Call and press %.
Sending messages
from records
Saving Phone
Book entries from
records
Opening Phone
Book entries from
records
Placing
Decoration Calls
from records
4
Calling
Saving received
Decoration Call
files
! S Select record S B S Create Message
S % S E Mail or SMS S % S Complete
message S A
! S Select record S B S Save to Phone
Book S % S As New Entry S % S Complete
other fields S A
. To add to an existing entry, select As New
Detail.
! S Select record S B S Display Phone
Book S %
. Available when selected record (phone
number) is saved in Phone Book.
! S Select record S B S Deco. Call S % S
Deco. Call File S % S Select/create file S B
. For dialed Decoration Call records,
alternatively, select Redial Deco. Call instead of
Deco. Call and press %.
4-17
Additional Functions
Initiating S! Circle
Talk from records
4
! S Select record S B S Call S! Circle
Talk S % S %
. Set Connection status to Online first.
One Record
! S Select record S B S Delete (Delete
Item in Dialed Ranking) S % S Yes S %
Calling
Deleting records
Hiding Dialed
Ranking
All Records
! S B S Delete All (Reset in Dialed
Ranking) S % S Enter Handset Code S %
S Yes S %
[ Data Communication
Checking
% S Settings S % S f Call S Call Time/
accumulated data
Data Counter S % S Data Counter S % S
transmission volume All Data S %
Resetting Data
Counter
Restrict Destinations
7% S Settings S % S f Call S Call
% S Phone S % S Call Log Setting S % S
Hide Dialed Ranking S %
. Handset Code is required to re-select Show
Dialed Ranking.
Call Time & Data Communication
[ Call Time
Setting handset to
beep during Voice
Calls
% S Settings S % S f Call S Call Time/
Data Counter S % S Minute Minder S % S
On S %
Hiding Call Time
during calls
% S Settings S % S f Call S Call Time/
Data Counter S % S Call Time Counter S %
S Off S %
Resetting Call
Timers
% S Settings S % S f Call S Call Time/
Data Counter S % S Call Timers S % S
Clear Timers S % S Enter Handset Code S
% S Yes S %
% S Settings S % S f Call S Call Time/
Data Counter S % S Data Counter S % S
Clear Counter S % S Yes S %
Designating Call
Permitted List
numbers from
saved information
Barring S % S Restrict Destinations S % S
Enter Handset Code S % S Specified
Numbers S % S Call Permitted List S % S
<Empty> S B S See below
From Phone Book
Ph.Book List S % S Select entry S % S
Select phone number S %
From Call Log Records
From Call Log S % S Select record S %
From S! Friend's Status Member List
From Friend's Status S % S Select member
S%
7% S Settings S % S f Call S Call
Editing Call
Permitted List
Barring S % S Restrict Destinations S % S
Enter Handset Code S % S Specified
Numbers S % S Call Permitted List S % S
See below
Editing Numbers
Select number/name S % S Edit S %
Deleting Numbers
Select number/name S B S Delete S % S
Yes S %
4-18
Additional Functions
Reject Numbers
Optional Services
7% S Settings S % S f Call S Call
From Phone Book
Ph.Book List S % S Select entry S % S
Select phone number S %
From Call Log Records
From Call Log S % S Select record S %
From S! Friend's Status Member List
From Friend's Status S % S Select member
S%
7% S Settings S % S f Call S Call
Editing Reject
Numbers List
Barring S % S Reject Numbers S % S Enter
Handset Code S % S Specified Numbers S
% S Reject Numbers List S % S See below
Editing Numbers
Select number/name S % S Edit S %
Deleting Numbers
Select number/name S B S Delete S % S
Yes S %
Excluding rejected
calls from Call Log
% S Settings S % S f Call S Call Barring
S % S Reject Numbers S % S Enter
Handset Code S % S Record on Call Log S
% S Do not Record S %
Checking service
status
% S Settings S % S f Call S Select
service S % S Status S %
. Available for Voicemail/Divert, Show My
Number, Call Barring and Call Waiting.
. For Call Barring, select restriction and press %.
[ Call Waiting (Contract Required)
Activating Call
Waiting
Placing Line 1 on
hold to answer
Line 2
% S Settings S % S f Call S Call Waiting
S % S On S %
4
Calling
Designating
numbers to reject
from saved
information
Barring S % S Reject Numbers S % S Enter
Handset Code S % S Specified Numbers S
% S Reject Numbers List S % S <Empty> S
B S See below
[ All Services
A tone sounds during a Voice Call S !
. Press ! to switch between lines.
. Press " to end active line and re-engage the
party on hold.
[ Group Calling (Contract Required)
Opening another
line during a call
Switching
between open
lines (Swap Calls)
During a Voice Call, enter phone number S !
. Long Press ! to select a number from Call Log
records.
During a Voice Call, !
. Press ! to switch between lines.
Talking on multiple While switching between lines, B S Group
lines simultaneously Calling S % S Conference All S %
Switching to
private
conversation
During Group Calling, select number/name S
% S Private S %
4-19
Additional Functions
[ Call Barring
Changing Network
Password
4
7% S Settings S % S f Call S Call
% S Settings S % S f Call S Call Barring
S % S Change NW Password S % S Enter
current Network Password S % S Enter new
Network Password S % S Re-enter new
Network Password S %
Calling
7% S Settings S % S f Call S Call
Barring S % S Bar Outgoing Calls S % S
See below
Barring S % S Bar Incoming Calls S % S
See below
Setting/canceling
incoming call
restriction
Setting Restriction
Select restriction S % S On S % S Enter
Network Password S %
Setting/canceling
outgoing call
restriction
. Outgoing SMS messages are also restricted.
. Outgoing S! Circle Talk requests are not affected.
. Following restrictions are available:
, All Outgoing Calls: Restrict all non-emergency
calls
, Bar Int'l Call: Restrict all international calls
, Local & Home Only: Restrict all international
calls except to Japan
Canceling All Restrictions
Cancel All S % S Enter Network Password S %
Setting Restriction
Select restriction S % S On S % S Enter
Network Password S %
. Incoming SMS messages are also restricted.
. Incoming S! Circle Talk requests are not affected.
. Following restrictions are available:
, All Incoming Calls: Reject all calls
, Bar if Abroad: Reject calls when outside Japan
Canceling All Restrictions
Cancel All S % S Enter Network Password S %
[ Caller ID
Showing/hiding
Caller ID
% S Settings S % S f Call S Show My
Number S % S On or Off S %
Settings
[ Voice Call
7% S Settings S % S f Call S Auto
Answer S % S Enter Handset Code S % S
See below
Answering calls
automatically
when using
Headphones
Activating Auto Answer
Switch On/Off S % S On S %
. When Auto Answer is active, Auto Answer tone
sounds after ringtone even in Manner mode;
cancel afterward.
Changing Ring Time
Answer Time S % S Enter time S %
4-20
Additional Functions
Saving frequently
used touch tones
. Send saved touch tones from Voice Call
window via Options menu.
% S Phone S % S Touch-Tone Signal List S
% S B S Change to White Office Tone S %
. Touch tones for White Office are saved to
. When touch tones are already saved in
choose Yes and press %.
-
.
,
[ Video Call
7% S Settings S % S f Call S
Video Call S % S Camera Picture S % S
See below
Sending
Alternative Image
when initiating
Video Calls
Signal List S % S See below
Changing Alternative Image
Alternative Image S % S Select folder S %
S Select file S % S %
. Omit file selection step when using Customized
Screen image.
7% S Phone S % S Touch-Tone
Deleting touch
tones
Setting Alternative Image
Default Image S % S Alternative Image S %
One Entry
Select entry S B S Delete S % S Yes S %
Disabling
Loudspeaker for
Video Calls
% S Settings S % S f Call S Video Call S
% S Loudspeaker S % S Off S %
All Entries
B S Reset S % S Enter Handset Code S %
S Yes S %
Muting Microphone
when initiating
Video Calls
% S Settings S % S f Call S Video Call S
% S Mute Microphone S % S On S %
4
Calling
Saving touch
tones for White
Office
% S Phone S % S Touch-Tone Signal List S
% S Select number S % S Enter name S
% S Enter digits S %
Changing
% S Settings S % S f Call S Video Call S
Incoming/Outgoing % S Incoming Picture or Outgoing Picture S
Image quality
% S Select option S %
Setting image that
is sent while call is
on hold
Setting Backlight
status
% S Settings S % S f Call S Video Call S
% S Hold Guidance Pict S % S Select
folder S % S Select file S % S %
. Omit file selection step when using Customized
Screen image.
% S Settings S % S f Call S Video Call S
% S Backlight S % S Select option S %
. Selecting Normal Setting applies Display
Backlight settings.
4-21
Troubleshooting
Receiving a Call
3 Record Caller Voice
Cannot use Answer Phone or
4
Calling
. Answer Phone and Record Caller
Voice are disabled when less than
12 seconds of recording capacity
remain or 20 messages are
recorded. Delete messages.
. Answer Phone and Record Caller
Voice are not available for Video
Calls.
Placing a Call
3 Cannot place call via Speed Dial
. Speed Dial is not available when
Phone Book access is restricted by
Application Lock.
3 Cannot place call
. Cancel Keypad Lock, Function
Lock and Offline Mode, if active.
4-22
3 Call won't connect
. Did you include the area code or
the first 0? Dial the number
including the area code or 0.
. Handset may be out-of-range (out
appears). Move to a place where
signal is strong and retry.
During a Call
3 during Video Calls
Outgoing Image is distorted
. Rapid motion can make images
appear choppy or distorted.
3 Call is choppy or cut off
. Network signal may be weak.
Move to a place where signal is
strong and retry.
. Battery may need to be charged
or replaced. Charge battery or
install a charged battery.
3 Clicking noise is heard during call
. Handset may be moving into
another service area. Noise is
heard when Network signal
switches. This is normal.
Cannot hear other party's voice
Camera image switches to
3 Alternative Image during Video Calls 3 . Earpiece Volume may be low.
. Prolonged camera use may cause
camera area to heat up, resulting
in automatic shutdown; wait a
while and retry.
3 Conversation is hampered
. Conversations may be hampered
by ambient noise.
. Check Earpiece Volume when
using Loudspeaker. Increasing
Earpiece Volume may cause
feedback/interference.
Increase Earpiece Volume (P.4-3).
. Sound output may be set to use
handsfree device. Set Transfer
Audio (P.4-15) to To Phone.
Troubleshooting
Other
3 Received Calls) seems incorrect
Call Time (in Dialed Calls or
3 Call Forwarding
Cannot save phone number for
4
Calling
. Ring time for incoming or outgoing
calls is not counted. (On hold time
is counted.)
. Does the number start with 1, 00,
0120 or 0990? Public service
numbers, international call
numbers starting with 00, toll-free
numbers and fee-based service
numbers cannot be saved.
4-23
Messaging ..................................... 5-2
Chat Folders.................................5-18
Basics ...............................................5-2
Customizing Handset Address ......5-3
Mail Groups..................................5-19
Sending Messages ........................ 5-4
Sending E Mail ................................5-4
Sending Graphic Mail....................5-6
Sending SMS .................................5-10
Restricting Outgoing Messages ...5-11
Incoming Messages ................... 5-12
Opening & Replying ....................5-12
Customizing E Mail Retrieval .......5-14
Handling Messages .................... 5-15
Managing & Using Messages .....5-15
Sorting Messages..........................5-17
Using Chat Folders....................... 5-18
Creating Groups for Broadcast Mail
....................................................... 5-19
PC Mail .........................................5-20
Additional Functions ...................5-23
Troubleshooting ...........................5-40
5
Messaging
5-1
Messaging
Basics
Use the following messaging services.
SMS
5
Recipient Subject Message Attachment
Exchange up to 160 alphanumerics
with Disney Mobile and SoftBank
handsets.
Messaging
E Mail
Exchange up to 30,000 characters
with e-mail compatible handsets,
PCs, etc.; attach media files, etc.
PC Mail
Receive or reply to PC mail account
messages. Use DM005SH to handle
PC Mail messages like SMS or E Mail.
SMS
Available*
E Mail
Available Available Available Available
N/A
Available
N/A
PC Mail Available Available Available Available
*
Large Size Messages
Transmit messages of up to 2 MB
including large images or multiple
files; may incur high charges
depending on subscribed price plan.
5-2
[ Available Entry Items
Disney Mobile/SoftBank handset numbers only.
. A separate contract is required to use
E Mail and receive e-mail from PCs, etc.
. For more information, see Disney
Mobile Website (P.17-22).
Auto Retry Function
If recipient's handset is off/out-of-range,
a sent message is saved in Server Mail
Box and delivery attempted at regular
intervals. (Undeliverable messages are
deleted.)
Auto Resend
When Auto Resend is active, handset
makes up to two attempts to send
unsent messages automatically.
Cancel to disable (P.5-34).
Messaging
Customizing Handset Address
Change alphanumerics before @ of
the default handset mail address.
For more information, see Disney
Mobile Website (P.17-22).
Changing Address
Saving Address
3 Yes S %
When handset address is changed,
Disney Mobile sends new address
confirmation via E Mail.
5
. Handset connects to the Internet.
Select English and press %, then
follow onscreen instructions.
Messaging
1 B S Settings S %
2 Address Settings S %
To save new address to My Details,
follow these steps. (New address is
effective even if not saved.)
1 Message S %
4A
2 Information S %
5-3
Sending Messages
Sending E Mail
Follow these steps to send E Mail to a
number/address saved in Phone Book:
6 Select subject field S % S
Enter subject S %
1 B S Create Message S % 7 Select message text field
When a PC Mail Account exists,
5
select E Mail and press %.
S%
Messaging
Text Entry Window
E Mail Composition Window
2 Select recipient field S %
3 Phone Book S %
4 Select entry S %
5 Select number or mail
address S %
. Omit 5 if only one number or
address is saved.
. When a mail address is entered,
do not use single-byte katakana
in message text or subject.
8 Enter message S %
E Mail Composition Window
9 A S Transmission starts
Incoming Calls while Creating Message
. Content is saved temporarily. End the
call to return.
Personal Mode
. When recipient is entered via Phone
Book, text entry window word
suggestions change according to
recipient type.
Previewing Outgoing Message
After 8, B S Preview Message S %
Disney Pictogram Entry
. In Disney Pictogram List, press ' to
toggle Cross-Carrier Pictograms and
all Pictograms.
. Pictogram appearance may differ by
carrier.
Converting to Graphic Mail
After 8, Auto Art S % S Select
decoration type S % S % S 9
, To cancel conversion, follow these
steps before 9:
B S Cancel Arrangement S % S
Yes S %
. To cancel, press A during
transmission.
Advanced
0 (Using other recipient entry methods (Adding recipients (Inserting signature automatically (Converting mail type (SMS/E Mail) (And more on P.5-23)
5-4
(Saving without sending (Requesting delivery confirmation (Designating/editing reply-to address (And more on P.5-24 - 5-25)
(Requesting Delivery Report for all messages (Disabling automatic resend of unsent messages (Hiding progress bar while sending messages (And
more on P.5-34)
Sending Messages
Attaching Files
Send attachments to compatible
handsets.
Follow these steps to attach images to
E Mail:
1 In E Mail Composition
2 Picture S % S Select
folder S %
3 Select file S %
Auto Image Resize
Large images may be automatically
reduced to approximately 400 - 500 KB
by default.
Change resize setting via Picture Auto
Resize (P.5-37).
Sending Feeling Mail
1 In E Mail Composition
window after composing
message, B S Feeling
Settings S %
2 Select category, e.g.,
Happy/Glad S %
3 Select item, e.g., I Love You
S%
5
Messaging
window after composing
message, select
attachment field S %
Attaching Non-Image Files
. In 2, select a folder other than Picture
and press %, then select a file.
Attaching Multiple Files
After 3, Attach (1) S % S Attach
File S % S From 2
, X in Attach (X) indicates the
number of attached files.
If Recipient Cannot Receive Large
Messages (Up to 2 MB)
. Message may be truncated or
attachments may be lost.
4 A S Transmission starts
File Attached
4 A S Transmission starts
Canceling Feeling Mail
[E Mail Composition Window] Select
subject field S % S f Select
Pictogram, e.g., S $ S %
Advanced
0 (Changing attached image size (Set Auto Play File (And more on P.5-25)
(Disabling image auto-resize (Limiting outgoing E Mail message size (And more on P.5-37)
5-5
Sending Messages
Sending Graphic Mail
Basic Procedure
Follow these steps to:
5
. Change font size
. Insert images
. Scroll text
Messaging
1 B S Create Message S %
2 Select/enter recipient and
subject (P.5-4)
3 Select message text field
S%
5 SIZE S %
6 Select size S % S Enter
text
a Scrolling S %
b Select direction S % S
Enter text
c % S A S Transmission
starts
7 A S IMAGE S % S Select
folder S % S Select file
S%
8 Select target location S %
S$
Canceling Last Action
[Graphic Mail Window] UNDO S %
Canceling All Graphic Mail Settings
[Graphic Mail Window] CANCEL S
% S Yes S %
Saving as Templates
After b, % S B S Save as
Template S % S Enter name S %
S Save here S %
, Only the message text is saved.
Text Entry Window
4 ! (Long)
9 A S EFFECT S %
Graphic Mail Window
Advanced
0 (Changing text color, size & effect (Changing text color (Inserting background sound (Inserting Flash
®
(Flashing text (Aligning text (left/right/center) (And more on P.5-25 - 5-26)
5-6
file (Inserting horizontal line
Sending Messages
Using My Pictograms
3 Select Category S %
My Pictograms are grouped by
category; add or rename categories
as needed.
Source files are saved in Data Folder
(My Pictograms).
MY PICT S %
My Pictogram List
. Press A or B to open next or
previous page.
4 Select file S % S $
. List closes; enter text, add other
decorative effects, etc.
. My Pictogram List appears. (Log
appears if My Pictogram has
been used.)
. Press # or ( to open next or
previous Category.
2'
5 Complete message S %
S A S Transmission starts
5
Messaging
1 In Graphic Mail window,
Moving/Copying My Pictograms
[My Pictogram List] Select file S A
(Long) S Move or Copy S % S
Press # or ( to select Category
S Select target location S %
, My Pictograms can also be moved/
copied within the same Category.
Deleting My Pictograms
[My Pictogram List] Select file S A
(Long) S Delete S % S Yes S %
, Source files in Data Folder will be
deleted.
Checking My Pictograms Individually
[My Pictogram List] Select file S A
(Long) S Preview S %
, To return, press $.
Opening Data Folder (My Pictograms)
[My Pictogram List] Select file S A
(Long) S Access to Data Folder S %
Clearing Entry Log
. Open Log then follow these steps:
Select file S A (Long) S Delete
This Log S % S Yes S %
Advanced
0 (Adding Categories (Renaming Categories (Changing Category order (Deleting Categories (P.5-26)
5-7
Sending Messages
Using Disney Mail Maker (Japanese)
Create templates or animation files
containing Disney characters.
Creating Templates
5
1 B S Disney Mail Maker S %
3 Follow onscreen instructions 2 Select type S % S f
Select item S %
4 保存 S % S Yes S %
. Handset connects to the Internet.
3 Select text entry field S %
S Enter text S %
5 ダウンロード S %
6 Save S % S Enter name 4 作る S % S Yes S %
S%
Messaging
Creating Animation Files
5 ダウンロード S %
6 B S Save Items S %
7 Save S % S Enter name
メールアニメーション作成 S %
8 Save here S %
. Saved to Templates folder.
Opening Help
In 2, 使い方とご注意事項について S %
1 In Disney Mail Maker menu,
Disney Mail Maker Menu
2 メールテンプレート作成 S %
5-8
. Handset connects to the Internet.
S%
. Saved to Data Folder (Flash®).
Sending Created Animation Files
. Attach file from Data Folder (Flash®).
, Enable Set Auto Play File to play
animation automatically when
recipient opens the message.
Sending Messages
Converting from E Mail
Convert E Mail to Graphic Mail easily.
1 In text entry window, enter
message S & (Long)
2 Select decoration type S
3%
4 % S A S Transmission
starts
Canceling Conversion
After 3, B S Cancel Arrangement
S % S Yes S % S 4
1 B S Templates S %
2 Select template S %
3 Complete message S A
S Transmission starts
Template Size
. Template size may change when
used for creating messages.
Opening Templates from Text Entry
Window (E Mail)
[Text Entry Window] B S Launch
Template S % S Select template
S % S Complete message S A
, If message text has already been
entered, follow onscreen prompt to
insert it.
5
Messaging
% S A (Next) or B (Prev.)
Using Templates
Create Graphic Mail from templates.
Advanced
0 (Using custom decoration type (P.5-26)
5-9
Sending Messages
Sending SMS
Follow these steps to send SMS to a
number saved in Phone Book:
1 B S Create New SMS S %
6 Select message text field
S%
5
Messaging
Text Entry Window
SMS Composition Window
2 Select recipient field S %
3 Phone Book S %
4 Select entry S %
5 Select number S %
. Omit 5 if only one number is
saved.
7 Enter message S %
Incoming Calls while Creating Message
. Content is saved temporarily. End the
call to return.
Personal Mode
. When recipient is entered via Phone
Book, text entry window word
suggestions change according to
recipient type.
When Message Text Exceeds Limit
. A confirmation appears. To convert
SMS to E Mail, follow these steps:
Yes S %
Entering Disney Pictograms Automatically
After 7, Auto Art S % S % S 8
SMS Composition Window
8 A S Transmission starts
Advanced
0 (Using other recipient entry methods (Adding recipients (Using Speed Dial/Mail list (Converting mail type (SMS/E Mail) (And more on P.5-23)
(Saving without sending (Requesting delivery confirmation (Changing Server sent message storage limit (And more on P.5-24 - 5-25)
(Changing Server sent message storage limit (Changing SMS Server number (Changing character encoding for composing messages (P.5-39)
5-10
Sending Messages
Restricting Outgoing Messages
Allow messaging to handset numbers/
addresses saved in Phone Book or
Permitted List only.
Limiting to Phone Book
Specifying Mail Addresses
1 In Set Restrict Mail menu,
Individual Address S %
Send/Compose S %
3 Restrictions Setting S % S
Enter Handset Code S %
Set Restrict Mail Menu
4 Phonebook Entries S % S
On S %
When Phonebook Entries is On
. Handset Code is required to add/edit
Phone Book entries.
5
Messaging
1 B S Settings S %
2 General Settings S % S
Limiting to Permitted List
Individual Address Menu
2 Permitted List S %
3 <Empty> S %
4 Select method S % S
Select/enter address S %
. Repeat 3 - 4 to add mail addresses.
Activating Permitted List
1 In Individual Address menu,
Switch On/Off S %
2 On S %
Advanced
0 (Deleting Permitted List entries (P.5-35)
5-11
Incoming Messages
Opening & Replying
Opening New Messages
1 Message S %
Information window opens for new mail.
See P.5-22 to receive PC Mail.
5
Messaging
Important Message Retrieval Notes
. By default, if message size is around
1 MB or less, the complete message
including attachments is retrieved in
and outside Japan; transmission fees
apply depending on subscribed price
plan.
. Automatic message retrieval outside
Japan may incur high charges since
flat-rate packet transmission plans do
not apply during international roaming.
. To retrieve only the initial portion of
message text automatically, set Auto
Settings to Off; retrieve complete
message manually as needed.
Delivery Report
. Information window opens for Delivery
Report. Follow these steps to open it:
Delivery Report S % S Select
message with report S % S A
Advanced
Message List
2 Select message S %
. Message window opens.
Receiving Feeling Mail
. Illumi Display, Small Light, Key
Illumination, Vibration and ringtone
respond according to settings.
Attached Images
. Attached images open automatically.
Messages with Quiz
Enter or select answer S %
, Message opens when the correct
answer is entered or selected.
Animation View
. When a specific Disney Pictogram is entered
as the first character of subject or included
in message text, corresponding animation
appears in message window background.
Mail Notice
. Depending on the setting (e.g., Auto
Settings is Off), Server sends initial
portion of message text in each of
the following cases:
, The message was sent to multiple
recipients
, Files are attached to the message
. If message size exceeds 1 MB, Server
sends only initial portion of message
text regardless of Auto Settings status.
(Approximate size appears in
message text.)
0 (Accessing new mail out of Standby (Retrieving new E Mail manually (Retrieving remaining portions (And more on P.5-27)
(Muting ringer, etc. for messages sorted into Secret folders (Changing ringtone settings (And more on P.5-35 - 5-36)
(Limiting incoming E Mail message size (P.5-37)
5-12
Incoming Messages
Message Window
Window Description
1 In message window, A
Message List
Sender or Recipient
Message Text
[ Message Type/Status
Read
Mail Notice
(remaining
portion exists)
Unread
Delivery Report
Sent
Attachments
Failed
Protected
Replied
Priority (High)
Forwarded
Priority (Low)
Send
Reservation set
USIM Card
SMS
"SMS" or "PC" appears accordingly on indicators.
Advanced
Sender or Recipient
Subject (except for SMS)
Received or
Sent Date & Time
5
Message Text
Press ( to open next (newer)
message, or # to open previous
(older) one.
Changing Font Size
[Message Window] 3 (Long) to
enlarge or 1 (Long) to reduce
. Original message text is quoted
(except for SMS and Graphic Mail).
2 Complete message S A
Messaging
Message Type/Status
(see below)
Unread
Replying to Messages
S Transmission starts
Replying to Messages Addressed to
Multiple Recipients
After 1, To Sender or Reply All S %
S2
Reply Assist Dictionary (メール返信アシ
スト辞書)
. When replying in Kanji (Hiragana)
mode, this dictionary prioritizes
original message words (katakana or
alphanumerics) in suggestion list.
Auto Reply
. Handset sends a reply automatically
when receiving messages from saved
numbers or addresses in specified
mode (Manner mode, etc.).
0 (Saving attachments to Data Folder (Saving to Phone Book (Using linked info (Looking up message text words in dictionaries (Jumping
to message top/bottom (Reporting unsolicited message sources as spammers (Selecting mail type/quote option (Opening received
message for reference (Replying quickly using fixed text (Replying to messages automatically (And more on P.5-27 - 5-29)
(Selecting quote option (P.5-34)
5-13
Incoming Messages
Customizing E Mail Retrieval
5
Set complete E Mail retrieval to manual
(Server sends only initial portion of
message text without attachments) or
set handset to retrieve complete
messages automatically by specifying
sender type, mail address, etc.
Messaging
Retrieving Messages Manually
1 B S Settings S %
2 E Mail Settings S %
3 Message DL S %
5 Off S %
By Mail Address
Retrieving Complete E Mail Automatically
when Approximate Size is 300 KB or Less
In 5, On(Up to 300KB) S %
Restricting Automatic Retrieval
By Sender Type
Specify mail addresses or domains
(alphanumerics after @ of mail
addresses).
1 In Selected Mail menu,
Individual Address S B
2 Select blank entry S %
3 Select method S % S
1 In Message DL menu,
Condition(Auto) S %
Select/enter address S %
2 Selected Mail S B
. Repeat 2 - 3 to add mail
addresses.
4A
5%(
Message DL Menu
4 Auto Settings S %
Selected Mail Menu
3 Select item S % (
SA
/
)
)SA
Restricting by Domain (Direct Entry)
In 1, Receive by the Domain S B
S Select blank entry S % S Direct
Entry S % S Enter domain S % S
AS5
Advanced
0 (Retrieving remaining portions (P.5-27)
(Retrieving all messages (including spam) automatically (Deleting addresses/domains specified for complete message retrieval (P.5-36)
5-14
Handling Messages
Managing & Using Messages
Messaging Folders
Messages are organized in folders by
type.
Checking Messages
1 B S Received Msg. or
2 Select folder S %
Sent Messages S %
5
Received Messages
Auto Delete
. Oldest received/sent messages are
deleted automatically to save new
ones when memory is full. Protect
important messages to avoid
unintentional deletion.
Opening Help
. Follow these steps in folder list,
message list or message window:
B S Help S %
When Failed Message is Saved
. A reminder message appears upon
opening Messaging menu.
Advanced
Message List
3 Select message S %
Messaging
Incomplete/
Unsent Messages
Sent Messages
Failed or Send
Reservation Messages
Folder List
. When a PC Mail Account exists,
PC Mail folder (folder with the
name specified in Account
Name) appears.
. Select Mail folder or PC Mail
folder and press A to hide/show
sub folders. To open full message
list, hide sub folders and press %.
Message Window
Protecting Messages
1 In message list, select
message S B S Manage
Msg. S %
2 Lock S %
Canceling Protection
In 2, Unlock S %
0 (Selecting multiple messages (Deleting messages (Deleting Server Mail via Server Mail list (And more on P.5-30 - 5-31)
(Forwarding messages (Sending from Drafts (Checking Server Mail message count and volume (And more on P.5-33)
(Changing message window scroll unit (Selecting automatic deletion option for received messages (Canceling automatic deletion of
oldest sent messages (And more on P.5-34)
5-15
Handling Messages
Moving Messages to Spam Folder
1 In message list, select
message S B
. For PC Mail, skip ahead to 3.
5
2 Spam Measures Operation
S%
Messaging
3 Go to Spam Measures
Folder. S %
. If a confirmation appears, choose
Yes or No and press %. Choose
Yes to proceed with Sort Spam
Mail settings; follow onscreen
instructions.
Searching Messages
Search messages by message text,
sender/recipient address, etc.
1 B S Received Msg. or
Sent Messages S %
2 B S Search S %
3 Search All Msg. S %
4 Select method S % S
Select/enter address or text
S%
Searching by Folder
In 2, select folder S B S Search
S % S Search Folder S % S 4
Searching Message Text
. Follow these steps to find specific
words/phrases; limit search by
character type.
[Message Window] B S Search
Text S % S Enter text S %
, Press A or B to jump to next/
previous search result.
Hiding Folders
Hide Received Msg./Sent Message
folder to require Handset Code for
access to the folder and messages
within.
Chat Folders are not affected.
1 B S Received Msg. or
Sent Messages S %
2 Select folder S B
3 Set Secret S % S Enter
Handset Code S % S %
Accessing Secret Folders
After 1, B S Unlock Temporarily
S % S Enter Handset Code S %
Advanced
0 (Moving messages manually (Renaming folders (Deleting folders (Deleting Spam Folder messages (Adding folders (Moving folders
(Changing status of all messages within folders to read (Canceling automatic deletion of messages within folders (Canceling Secret (P.5-31)
5-16
Handling Messages
Sorting Messages
Sorting into Designated Folders
Sort messages by sender/recipient or
partially matching text in subject or
SMS message text.
Sent Messages S %
2 Select target folder S B
3 My Folders S % S Select
blank entry S %
4 Sender (Recipient for Sent
Messages) S %
5 Select method S % S
Select/enter number/
address S %
Filtering Spam
Follow these steps to filter messages
from handset numbers/addresses not
saved in Phone Book into Spam Folder:
(Alternatively, set sort keys to filter
messages.)
4 Unregistered(Mobile) S
%(
)
5AS%
Exempting Messages from Filtering
After 4, Permitted List(Common) S
B S Select blank entry S % S
Select key S % S Select/enter
number/address/subject S % S
AS%( )S5
When a PC Mail Account Exists
. Filter PC Mail messages from
addresses not saved in Phone Book.
5
Messaging
1 B S Received Msg. or
Sorting by Domain (Direct Entry)
In 4, Sender(Domain)
(Recipient(Domain) for Sent
Messages) S % S Direct Entry
S % S Enter domain S % S 6
Sorting by Part of Subject/SMS Message
Text
In 4, Subject S % S Enter text
S%S6
1 B S Settings S % S
General Settings S %
2 Sort Spam Mail S %
3 Enter Handset Code S %
6 A S Saved
Advanced
0 (Re-sorting messages (Sorting spam by setting keys (Editing/deleting sort keys (P.5-32)
5-17
Chat Folders
Using Chat Folders
5
Organize messages exchanged
between handset and Chat
members' handsets.
To hide messages, set Chat Folder to
Secret.
Messaging
Saving Members
1 B S Chat Folder S %
6 A S Saved
Changing Members
In 4, select member S B S
Change Member S % S From 5
Deleting Members
In 4, select member S B S
Delete S % S Yes S % S 6
Opening Chat Folders
1 In Chat Folder list, select
folder S %
Chat Folder List
2 Select folder S B
3 Add New Member S %
4 Select blank entry S %
2 Select message S %
. Select saved member to edit
number/address.
5 Select method S % S
Select/enter number/
address S %
. Repeat 4 - 5 to add members.
Advanced
0 (Deleting folders (Deleting all messages (Resetting Chat Folders (P.5-32)
5-18
Mail Groups
Creating Groups for Broadcast Mail
Create Mail Groups to send messages
to multiple recipients at one time.
First, save target recipients to Phone
Book.
6 Select number or mail
address S %
1 B S Settings S %
2 Set Mail Group S %
5
Mail Group Entry Window
3 <Add New Group> S % S
Messaging
. Omit 6 if only one number or
address is saved.
. Repeat 5 - 6 to add members.
7 A S Saved
Enter name S %
4 Select Group S %
5 <Assign New Entry> S % S
Select entry S %
Advanced
0 (Renaming Mail Groups (Deleting Mail Groups/Group members (Changing Mail Group members (P.5-32)
5-19
PC Mail
PC Mail
Receive or reply to PC mail account messages.
Retrieve mail delivered to
ISP or Yahoo! accounts.
Save PC mail account information to handset:
5
. User Name
. Incoming Mail Server
Messaging
. Password
. Outgoing Mail Server
. Alternatively, use
automatic message
retrieval option.
. Mail Address
Local
ISP
SBM
Server
Yahoo!
Japan
Messages are saved in unique folders; reply to/send messages via PC mail
account addresses.
PC Mail
Folder
5-20
%
. Handle messages (sort, etc.) like
E Mail or SMS. (Unavailable
functions do not appear in
Options menu and some may
appear under different names.)
Important PC Mail Usage Notes
. Receiving PC Mail for the first time
after PC Mail Account setup may
incur high charges due to
large-volume packet transmissions.
. Setting handset to retrieve PC Mail
automatically may incur high packet
transmission fees; remember this,
especially when using handset
outside Japan.
. Other functions may slow while
handset is checking for new messages.
. Checking for new messages may
incur packet transmission fees even
when none exists.
. Single-byte katakana and Disney
Pictograms are not supported.
. When messages sent from handset to
PC mail account are retrieved by
handset (then opened, replied with
quotes, forwarded, etc.), included
Disney Pictograms may not appear or
may appear as different characters.
PC Mail
PC Mail Account Setup
[ Mandatory Items for Retrieval
User Name
Password
ReceivingServer
Required to connect
to incoming mail server
Required to connect
to incoming mail server
Incoming mail server
address
[ Mandatory Items for Transmission
Mail Address
Sender Server
Address to use PC Mail
Outgoing mail server
address
Setting Other Items
. Edit information as needed; for
description, select an item and press B.
Mail Settings S %
2 PC Mail Account S %
3 <Empty> S %
4 Account Name S % S
Enter name S %
5 Set Receiving S % S
Select item S % S Select/
enter item S % S A
. User Name, Password and
ReceivingServer are mandatory.
6 Set Sending S % S Select
item S % S Select/enter
item S %
Using Yahoo! Mail Addresses
In 3, Set Quick Yahoo! Mail S % S
Yes or No S %
, Follow onscreen instructions.
, Choose No to create a new account.
Editing Accounts
In 3, select account S % S From 4
Deleting Accounts
In 3, select account S B S Yes
S%
Saving User ID & Password for
Transmission
. If User Name and Password are unset
Set Receiving items are automatically
used for SMTP authentication. Follow
these steps if ISP requires User Name
and Password:
In 6, Set Sending S % S Sender
Auth. S % S SMTP Auth. S B S
User Name S % S Enter name S
% S Password S % S Enter
password S % S A S $ S 7
5
Messaging
. Proceed with setup according to
information supplied by ISP.
. PC Mail services may be unavailable
depending on the services, settings or
contract details for your PC mail
account. Confirm compatibility with
POP/SMTP message retrieval/
transmission via e-mail software
beforehand.
1 B S Settings S % S PC
. Mail Address and Sender Server
are mandatory.
7ASAS%
. If a confirmation appears, follow
onscreen prompts.
5-21
PC Mail
Retrieving New PC Mail
Retrieve new messages from created
accounts. If message count is high,
some may not be received on the first
attempt.
5
Messaging
1BSB
2B
3 Select PC Mail folder S %
S Select message S %
Message Window
. Press A to retrieve full message.
. Message window is similar to that
of E Mail.
Deleting Messages
[Message List] Select message S
B S Delete S % S Select option
S % S Yes S %
Retrieving Messages by Account
After 1, select account S % S 3
Checking Received PC Mail
1 B S Received Msg. S %
S Select folder S %
. Message list appears. Message list
is similar to that of E Mail.
2 Select message S %
. Message window opens.
Replying to PC Mail
1 In message window, A
. PC Mail Composition window opens.
. Original message text is quoted
(except for HTML messages).
2 Complete message S A
Sending PC Mail
Follow these steps to create and send
PC Mail:
1 B S Create Message S %
2 Select PC Mail Account S %
3 Complete message S A
S Transmission starts
Converting to E Mail
After 2, B S Convert to E Mail S
% S Yes S %
Note
. Single-byte katakana and Disney
Pictograms are not supported.
S Transmission starts
Replying without Quoting Original
Message Text
[Message Window] B S Reply-To
Addr. S % S PC Mail S % S
Complete message S A
Changing Account for Outgoing Messages
[PC Mail Composition Window]
Select recipient field S % S From:
S % S Select account S %
Advanced
0 (Retrieving complete PC Mail messages (Retrieving new messages automatically (Retrieving PC Mail for specified folder (Disabling
automatic word wrap (Retrieving complete messages from specified addresses (Deleting addresses/domains specified for complete
message retrieval (Restricting complete message retrieval by size (P.5-37 - 5-38)
5-22
Additional Functions
7
Creating/Sending Messages
B S Settings S % S Speed Dial/Mail
S % S See below
[ Recipient
In Mail Composition window, select recipient
field S % S Select method S % S Select/
enter number/address S %
Adding recipients
In Mail Composition window, select recipient
field S % S Add Recipient S % S Select
method S % S Select/enter number/
address S % S A
Switching
recipient status
(To, Cc and Bcc)
Using Speed Dial/
Mail list
In Mail Composition window, select recipient
field S % S Select recipient S B S Select
status S % S A
Editing Speed
Dial/Mail list
Creating Messages
In Standby, 0 - 99 (Speed Dial/Mail
entry number) S B
. When messaging to Disney Mobile/SoftBank
handset numbers, select E Mail or SMS and press %.
Canceling Entries
Select entry S B S Remove Selected S %
S Yes S %
Canceling All Entries
B S Remove All S % S Yes S %
[ Message Text
. Other recipients cannot see numbers/addresses
set to Bcc.
Saving Recipients
B S Settings S % S Speed Dial/Mail S %
S <Empty> S % S Select entry S % S
Select number or mail address S % S Do not
Assign S % S A
Editing Entries
Select entry S B S Change S % S Select
number/address S % S Select new number/
address S % S A
Inserting signature
automatically
5
Messaging
Using other
recipient entry
methods
B S Settings S % S E Mail Settings S % S
Signature S % S Edit S % S Enter signature
S % S Auto Insert S % S On S %
. Signature is inserted above message text when
forwarding messages or quoting original
message text in replies.
. Not available for SMS.
Inserting signature
manually
In text entry window, B S Insert/Font Size S
% S Signature S %
Converting mail
type (SMS/E Mail)
In Mail Composition window, B S Change to
SMS or Convert to E Mail S % S Yes S %
7In Mail Composition window, select
recipient field S % S See below
Editing/deleting
recipients
Editing Recipients
Select recipient S % S Edit S % S A
Deleting a Recipient
Select recipient S B S Delete S % S A
Deleting All Recipients
Select recipient S B S Delete All S % S
Yes S % S A
5-23
Additional Functions
[ Save, Send Reservation & Sent Cancel
Saving without
sending
After completing message, B S Save to
Drafts S %
Adding a reply
request
7After completing message, B S Send
Reservation S % S See below
5
Messaging
Auto Send when Signal Returns
Sending
Within the Network S % S Yes S %
automatically later
Designating Send Date/Time (within 30 days)
Date & Time S % S Enter date/time S % S
Yes S %
Canceling sent
E Mail
Restricting
forward/delete
Setting priority
Setting message to
be deleted from
recipient handset
once read
5-24
. Delivery Report arrives when message is delivered.
. Open sent message to check delivery status
indicator:
,
: Delivered,
: Unknown,
: Failed
. Effective for messages addressed to Disney
Mobile/SoftBank handsets.
In Mail Composition window, B S Messaging
Settings S % S Priority S % S Select priority
S%
In Mail Composition window, B S Messaging
Settings S % S Set Auto Delete S % S On
S%
. Effective for messages addressed to Disney
Mobile/SoftBank handsets.
. Effective for messages addressed to Disney
Mobile/SoftBank handsets.
. Effective for messages addressed to Disney
Mobile/SoftBank handsets.
Using Preset Questions (Multiple Choice)
Select question S % S Selection S % S
Select number S % S Enter/edit option S %
S Enter/edit all options S Select answer S A
SBSB
[ Messaging Settings
Requesting
delivery
confirmation
In Mail Composition window, B S Messaging
Settings S % S Forward NG or Delete NG S
% S On S %
Messaging Settings S % S Quiz S % S
Switch On/Off S % S On S % S See below
. Effective for messages addressed to Disney
Mobile/SoftBank handsets.
In Mail Composition window, B S Messaging
Settings S % S Delivery Report S % S On
S%
. Effective for messages addressed to Disney
Mobile/SoftBank handsets.
7In Mail Composition window, B S
B S Sent Messages S % S Select folder S
% S Select message S B S Set Sent
Cancel S % S Yes S %
. For SMS, only Delivery Report and Expiry Time are available.
. For PC Mail, only Reply to Settings and Priority are available.
In Mail Composition window, B S Messaging
Settings S % S Reply Request S % S On S %
Locking message
with Quiz
. May be unavailable for some questions.
Using Preset Questions (Exact Answer Entry)
Select question S % S Match Characters S
% S Enter answer S % S B
. May be unavailable for some questions.
Creating Custom Quiz (Multiple Choice)
<Create Original> S % S Enter question S
% S Selection S % S Select number S %
S Enter option S % S Complete entry S
Select answer S A S B S B
Creating Custom Quiz (Exact Answer Entry)
<Create Original> S % S Enter question S
% S Match Characters S % S Enter answer
S%SB
Additional Functions
Editing assigned
Quiz
In Mail Composition window, B S Messaging
Settings S % S Quiz S % S Edit Question S
% S Edit question/options/answer S B (B
again after editing options)
Lowering size limit
for outgoing E Mail
messages
In Mail Composition window, B S Messaging
Settings S % S Create Msg. Size S % S
300KB S %
Changing Server
sent message
storage limit
7
In Mail Composition window, select
attachment field S % S See below
Still Images
Picture S % S Take Picture S % S % to
shoot S %
. Effective for messages addressed to Disney
Mobile/SoftBank handsets.
7In Mail Composition window, B S
Messaging Settings S % S Reply to Settings
S % S See below
Designating
Switch On/Off S % S On S % S Select
method S % S Select/enter address S %
Editing Recipients
Edit Address S % S Edit S %
In Mail Composition window, B S Messaging
Settings S % S Expiry Time S % S Select
option S %
. Available for SMS only.
Capturing/
recording and
attaching
Video
Video S % S Record Video S % S % to
start recording S % to stop S Accept S %
S Select storage media S %
Sounds
Sound S % S Record Voice S % S % to
start recording S % to stop S Accept S %
S Select storage media S %
Changing
attached image
size
Set Auto Play File
5
Messaging
Designating/
editing reply-to
address
[ Attachments
Select attached file S B S Resize Picture S
% S Select size S %
. May be unavailable for some images.
Select attached file S B S Set Auto Play File
S % S Switch On/Off S % S On S % S
Enter Message S % S Enter comment S %
S$SA
. Not available for PC Mail.
[ Graphic Mail (General)
Changing text
color, size & effect
In text entry window, ! (Long) S B S
Select start point S % S Highlight text range
S % S COLOR, SIZE or EFFECT S % S Set
S%
Changing text
color
In text entry window, ! (Long) S COLOR S
% S Select color S % S Enter text
Changing
background color
In text entry window, ! (Long) S BG S %
S Select color S %
5-25
Additional Functions
7In text entry window, ! (Long) S
Inserting
background
sound
5
Messaging
Inserting Flash® file
Previewing Flash®
file
Deleting Flash® file
7
INSERT S % S See below
In text entry window, enter message
S & (Long) S Original S B S See below
Inserting
BGM Sound S % S Select folder S % S
Select file S %
Disabling My Pictograms
Pictograms Type S % S Pictograms S % S
A S A (Next) or B (Prev.) S %
Deleting
Delete BGM S % S Yes S %
Inserting Disney Pictograms/My Pictograms at
the End of Text Only
Insert Pictograms Position S % S Page Bottom
S % S A S A (Next) or B (Prev.) S %
In text entry window, ! (Long) S INSERT S
% S Flash S % S Select file S %
®
In text entry window after inserting Flash file,
B S Preview S %
Using custom
decoration type
. When Graphic Mail window is open, press A first.
In text entry window after inserting Flash® file,
move cursor before Flash® icon S $
Enabling/Disabling Text Color/Size &
Background Color Auto Change
Change Font Color, Change Font Size or
Change Background Color S % S Do or Do
not S % S A S A (Next) or B (Prev.) S %
. When Graphic Mail window is open, press A first.
Inserting horizontal
line
In text entry window, ! (Long) S INSERT S
% S Line S %
7In text entry window, ! (Long) S
See below
Flashing text
Flashing
EFFECT S % S Blink S % S Blink On S % S
Enter text
Canceling
B S Select start point S % S Highlight text
range S % S EFFECT S % S Blink S % S
Blink Off S %
Aligning text (left/
right/center)
5-26
In text entry window, ! (Long) S EFFECT S
% S Alignment S % S Select option S %
S Enter text
Changing Disney Pictogram/My Pictogram
Quantity
Insert Pictograms Volume S % S Select option
S % S A S A (Next) or B (Prev.) S %
[ Graphic Mail (My Pictograms)
Adding
Categories
In text entry window, ! (Long) S MY PICT S
% S ' S B S Add New Folder S % S
Enter name S %
Renaming
Categories
In text entry window, ! (Long) S MY PICT S
% S ' S Select Category S B S Edit
Category Name S % S Enter name S %
Changing
Category order
In text entry window, ! (Long) S MY PICT S
% S ' S Select Category S B S Relocate
Category S % S Select target location S %
Deleting
Categories
In text entry window, ! (Long) S MY PICT S
% S ' S Select Category S B S Delete
Category S % S Yes S %
Additional Functions
Receiving/Opening Messages
[ Receiving
Accessing new
B (Long)
mail out of Standby
BSB
Retrieving new
E Mail manually
Saving
attachments to
Data Folder
Installing attached
widgets
S See below
Using attachments
Via Server Mail List
B S Server Mail Box S % S Mail List S %
S Select message S %
Retrieving all
Server Mail
. For images smaller or larger than Display,
Wallpaper Display options appear; follow
onscreen prompts.
. For For New Message or For New PC Mail, enter
ring time and press %.
7B S Server Mail Box S % S See
below
5
As Ringtone/Ringvideo
Set as Ringtone or Set as Ring Video S % S
Enter name S % S Save here S % S Select
item S %
. If retrieve list confirmation appears, choose Yes
and press %.
Directly from Server
Retrieve All S %
In message window, select file S B S Install
Attach S % S Enter name S %
As Wallpaper
Set as Wallpaper S % S Enter name S % S
Save here S % S %
Via Mail Notice
In message list, select Mail Notice S % S A
Retrieving
remaining portions
. For templates, Save as Template appears.
(Omit file name entry step.)
7In message window, select file S B
B S Server Mail Box S % S Mail List S %
S Yes S %
. If retrieve size options appear, select one and
press %.
In message window, select file S B S Save
to Data Folder S % S Enter name S % S
Save here S %
Messaging
Retrieving Server
Mail list
. When a PC Mail Account exists, select E Mail
and press %.
. Retrieve messages missed while handset is
out-of-range.
[ Message Window
In message window, B S Slide Play S %
Playing slides
. A slide consists of message text with
attachments.
Via Server Mail List
Mail List S % S B S Retrieve All S %
. If retrieve list confirmation appears, choose Yes
and press %.
5-27
Additional Functions
Saving Sender Address
In message window, B S Save Address S %
S Select number or mail address S % S As
New Entry S % S Complete other fields S A
Saving to Phone
Book
5
. To add to an existing entry, select As New
Detail.
Messaging
Saving Linked Info
In message window, select number or mail
address S % S Save to Phone Book or Save
Address S % S As New Entry S % S
Complete other fields S A
Sender/Recipient Number/Address
Address S % S Select number/address S %
Subject or Message Text
Subject or Message Text S % S Select first
character S % S Highlight text range S %
In message window, B S Copy & Search
Dict. S % S Select first character S % S
Highlight text range S % S Select dictionary
S % S Search S % S Select word S %
Dialing Numbers
In message window, select number S % S
Call or Video Call S %
Jumping to
message top/
bottom
In message window, B S View Settings S %
S Scroll Jump S % S Jump to Top or Jump
to Bottom S %
Sending Messages
In message window, select number or mail
address S % S Create Message S % S
E Mail or SMS S % S Complete message S A
Deleting
attachments
In message window, select file S B S
Remove File S % S Yes S %
Reporting
unsolicited
message sources
as spammers
In message window, B S Report Spam S %
SA
Saving
attachments within
Graphic Mail
In Graphic Mail message window, B S Save
Items S % S Select file S % S Enter name
S % S Save here S %
. For mail addresses, omit mail type selection step.
Accessing Internet Sites
In message window, select URL S % S Yes S %
. Choose Select Br. to select browser.
Saving Location Information URLs
In message window, select URL S % S
RegisterMyLocation S % S Name S % S
Enter name S % S B
Setting Location Information as Destination
In message window, select URL S % S Set to
Destination S % S Yes S %
5-28
Copying text
Looking up
message text words
in dictionaries
. To add to an existing entry, select As New Detail.
Using linked info
7
In message window, B S Copy S %
S See below
. Signature is not inserted automatically.
. Not available for PC Mail.
Additional Functions
7
Saving My
Pictograms within
Graphic Mail
In Graphic Mail message window, B
S Save Items S % S Save My Pictograms S
% S See below
7B S Settings S % S General
All Files
Save All S % S Select folder S % S Save
here S %
Saving Recipients
Address Setting S % S Select blank entry S
% S Select method S % S Select/enter
number/address S % S Select mode S %
( / )SASA
Selected Files
A S Select file S % ( / ) S Complete
selection S A S Select folder S % S Save
here S %
Saving Graphic
Mail as templates
In Graphic Mail message window, B S Save
as Template S % S Enter name S % S
Save here S %
[ Replying
Selecting mail
type/quote option
In message window, B S Reply-To Addr. S
% S Select type/option S % S Complete
message S A
Opening received
message for
reference
In message window, B S Rep. with View S
% S Select option S % S Complete
message S A
Replying quickly
using fixed text
Replying to
messages
automatically
. Select saved recipient and press % to edit
number/address.
Editing Reply Text
Reply Message S % S Select mode S % S
Enter text S %
5
Messaging
One File
Select file S % S Enter name S % S Select
folder S % S Save here S %
Settings S % S Send/Compose S % S
Auto Reply S % S See below
. Edit text for each mode.
Activating Auto Reply
Switch On/Off S % S On S %
. Replies are sent via E Mail.
. Replies are sent to the same sender only once
after each time Auto Reply is activated.
. Auto Reply is not available for PC Mail or
outside Japan.
Editing Quick Reply Text
B S Settings S % S General Settings S %
S Send/Compose S % S Set Quick Reply S
% S Select text S % S Edit S %
Using Quick Reply
In message window, A (Long) S Select text
S%
5-29
Additional Functions
Managing Messages
[ Message List
Selecting
In message list, A S Select message S % (
)
. To uncheck, press % again.
5
Selecting multiple
messages
In message list, select SMS message S B S
Manage Msg. S % S Move to USIMS %
Changing received
message status
(read/unread)
In message list, select message S B S
Manage Msg. S % S Switch to Unread or
Switch to Read S %
. Not available for some SMS messages.
[ Deleting Messages
Messaging
One Message
In message list, select message S B S
Delete S % S Yes S %
Unchecking All
In message list, B S Uncheck All S %
. Alternatively, delete an open message.
Color-tagging
messages
In message list, B S Manage Msg. S % S
Color Label S % S Select color S %
Sorting messages
In message list, B S View Settings S % S
Sort S % S Select option S %
Opening sender/
recipient details
In message list, select message S B S View
Mail Address S % S Select sender or
recipient S %
. For Spam Folder messages, delete Server Mail
confirmation appears. Choose Yes or No and
press %.
B S Memory Status S % S Select item S %
All Messages in Drafts or Unsent Messages
In message list (Drafts or Unsent Messages),
B S Delete All S % S Enter Handset Code
S%
Checking memory
status
5-30
Selecting Up to 50 Messages at Once
In message list, B S Manage Msg. S % S
Check in Block S %
Saving SMS
messages to USIM
Card
. Press A to check memory status by service
(SMS & E Mail or PC Mail).
. USIM Card SMS message count and volume do
not appear.
Opening properties
In message list, select message S B S
Message Details S %
Changing template
name display
B S Templates S % S B S Item Displayed
S % S Select item S %
Deleting messages
All Messages
In message list, B S Delete All S % S
Delete All or Except Locked Msg. S % S
Enter Handset Code S %
Deleting Server
In message list, select Mail Notice S B S
Mail via Mail Notice Delete S % S Select option S % S Yes S %
Additional Functions
7B S Server Mail Box S % S Mail List
S % S See below
Deleting Server
Mail via Server
Mail list
. If retrieve list confirmation appears, choose Yes
and press %.
One Message
Select message S B S Delete S % S Yes
S%
7B S Server Mail Box S % S Delete
Deleting all Server
Mail directly from
Server
All S % S Enter Handset Code S % S See
below
All Retrieved Messages
Except New Msg. S %
All Messages
Delete All S %
[ Folders
Moving messages
manually
Renaming folders
In message list, select message S B S
Manage Msg. S % S Move to Folder S % S
Select folder S %
. If sort messages confirmation appears, choose
Yes and press %; messages sent to/received
from the number/address will be sorted into
selected folder automatically.
Deleting Spam
Folder messages
Adding folders
In folder list, select folder S B S Delete S %
S Enter Handset Code S %
. If delete message confirmation appears,
choose Yes and press %.
In folder list, Spam Folder S B S Delete S %
S Delete Spam Measures. S % S Enter
Handset Code S %
. Corresponding Server Mail messages are also
deleted.
In folder list, B S Create New Folder S % S
Enter name S %
. Available in Chat Folder list as well.
Moving folders
In folder list, select folder S B S Relocate
Folder S % S Select target location S %
Changing status of
all messages within
folders to read
In folder list, select folder S B S To All Read
S % S Yes S %
Canceling
automatic deletion
of messages within
folders
Canceling Secret
5
Messaging
All Messages
B S Delete All S % S Enter Handset Code
S % S Yes S %
Deleting folders
In folder list, select folder S B S Protect S %
. To cancel protection, select Not Protect and
press % in the steps above.
Unlock Secret folders temporarily and select
Secret folder S B S Unset Secret S % S
Enter Handset Code S %
In folder list, select folder S B S Rename S
% S Enter name S %
. Available in Chat Folder list as well.
5-31
Additional Functions
[ Sorting into Folders
Re-sorting
messages
5
Sorting spam by
setting keys
In folder list, select folder S B S Classify S %
. Available in Chat Folder list as well.
Messaging
B S Settings S % S General Settings S %
S Sort Spam Mail S % S Enter Handset
Code S % S Individual(Common) S % ( )
S B S Select blank entry S % S Select key
S % S Select/enter number/address/
subject S % S A S A S %
7In folder list, select folder S B S My
Deleting all
messages
B S Chat Folder S % S Select folder S %
S B S Manage Msg. S % S Delete All S
% S Yes S %
Resetting Chat
Folders
B S Chat Folder S % S B S Reset S % S
Enter Handset Code S % S Yes S %
[ Mail Groups
Renaming Mail
Groups
7B S Settings S % S Set Mail Group
Folders S % S Select entry S See below
Editing/deleting
sort keys
Editing Sender/Recipient Key
B S Replace S % S Select method S %
S Select/enter number/address S % S A
Editing Subject Key
% S Edit S % S A
S % S Select Group S See below
Deleting Mail
Groups/Group
members
Deleting an Entry
B S Delete S % S Yes S % S A
Deleting folders
B S Chat Folder S % S Select folder S B
S Delete Folder S % S Enter Handset Code
S%
. If delete message confirmation appears,
choose Yes and press %.
5-32
Mail Groups
B S Delete S % S Yes S % S Enter
Handset Code S %
Group Members
% S Select member S B S Remove Entry
S % S Yes S % S A
. Source Phone Book entries remain even after
deleting members.
Deleting All Entries
B S Clear All S % S Yes S % S A
[ Chat Folders
B S Settings S % S Set Mail Group S % S
Select Group S B S Edit Name S % S
Enter name S % S Yes S %
Changing Mail
Group members
B S Settings S % S Set Mail Group S % S
Select Group S % S Select member S B S
Re-assign Entry S % S Select entry S % S
Select number or mail address S % S Yes S
%SA
Additional Functions
Using Messages
Forwarding
messages
. Attached files are forwarded.
. To forward SMS messages, select E Mail or SMS
and press %.
Forwarding Server
Mail
B S Drafts S % S Select message S % S
Complete message S A
7B S Unsent Messages S % S Select
message S B S See below
Sending unsent
messages
B S Sent Messages S % S Select folder S
Using sent messages % S Select message S B S Edit & Send S
% S Complete message S A
Saving schedules
from message list
. If retrieve list confirmation appears, choose Yes
and press %.
Sending without Editing
Resend S %
Edit & Send
Edit S % S Complete message S A
In message list, select message S B S
Manage Msg. S % S Save to Calendar S %
S Enter subject S % S Select Category S
% S Enter start/end date/time S % S
Complete other fields S A
Via Server Mail List
B S Server Mail Box S % S Mail List S %
S Select message S B S Remote Forward
S % S Select recipient field S % S Select
method S % S Select/enter number/
address S % S A
Opening Server
Mail properties
Checking Server
Mail message
count and volume
5
Messaging
Sending from Drafts
In message window, B S Forward S % S
Select recipient field S % S Select method
S % S Select/enter number/address S %
SA
Via Mail Notice
In message list, select Mail Notice S B S
Forward S % S Notifi. Forward (forward Mail
Notice text only) or Remote Forward S % S
Select recipient field S % S Select method
S % S Select/enter number/address S %
SA
B S Server Mail Box S % S Mail List S %
S Select message S B S Message Details
S%
. If retrieve list confirmation appears, choose Yes
and press %.
B S Server Mail Box S % S Mailbox
Volume S %
. Source message is accessible from schedule
window (via Related Mail in Options menu).
5-33
Additional Functions
General Settings
5
Messaging
Changing
message window
scroll unit
B S Settings S % S General Settings S %
S Scroll Unit S % S Select unit S %
Changing
message list view
B S Settings S % S General Settings S %
S Message List View S % S Select option
S%
Showing complete
sent/received
message
addresses
B S Settings S % S General Settings S %
S Address View S % S Show All S %
Changing view for
Received Msg.
folder
Changing view for
Sent Messages
folder
5-34
B S Settings S % S General Settings S %
S Received Msg. View S % S Select option
S%
. Folder View by Account is selectable when a
PC Mail Account exists.
General Settings (Send/Compose)
Requesting
Delivery Report for
all messages
Disabling
automatic resend
of unsent
messages
Selecting
automatic deletion
option for received
messages
B S Settings S % S General Settings S %
S Auto Delete S % S Received Msg. S %
S Select option S %
Canceling
automatic
deletion of oldest
sent messages
B S Settings S % S General Settings S %
S Auto Delete S % S Sent Messages S %
S Not Auto Del S %
Changing spam
report recipient
B S Settings S % S General Settings S %
S Report Spam S % S Edit address S % S
Yes S %
. Effective for messages addressed to Disney
Mobile/SoftBank handsets.
B S Settings S % S General Settings S %
S Send/Compose S % S Auto Resend S %
S Off S %
7B S Settings S % S General
Designating/
editing reply-to
address
B S Settings S % S General Settings S %
S Sent Msg. View S % S Select option S %
. Folder View by Account is selectable when a
PC Mail Account exists.
B S Settings S % S General Settings S %
S Send/Compose S % S Delivery Report S
% S On S %
Settings S % S Send/Compose S % S
Reply to Settings S % S See below
Designating
Switch On/Off S % S On S % S Select
method S % S Select/enter address S %
Editing
Edit Address S % S Edit S %
Selecting quote
option
B S Settings S % S General Settings S %
S Send/Compose S % S Reply With Text S
% S Select option S %
Hiding progress
bar while sending
messages
B S Settings S % S General Settings S %
S Send/Compose S % S Sending Status S
% S Off(Background) S %
Additional Functions
7B S Settings S % S General
Deleting Permitted
List entries
Settings S % S Send/Compose S % S
Restrictions Setting S % S Enter Handset
Code S % S Individual Address S % S
Permitted List S % S Select entry S B S
See below
[ Feeling Mail
Hiding graphics
above Information
window
7B S Settings S % S General Settings
S % S Receive S % S Link to Feeling S %
S Illumi Display S % S See below
One Entry
Delete S % S Yes S %
General Settings (Receive)
[ Message Notice & Animation View
Muting ringer, etc.
for messages
sorted into Secret
folders
B S Settings S % S General Settings S %
S Receive S % S Message Notice S % S
Secret Folder S % S No Response S %
Changing Illumi
Display settings
Using Preset Pattern
Pattern Setting S % S Select category S %
S Preset Pattern S % S Select pattern S %
Using Custom Pattern
Pattern Setting S % S Select category S %
S Original S %
5
Messaging
All Entries
Clear All S % S Yes S %
B S Settings S % S General Settings S %
S Receive S % S Link to Feeling S % S
Idle Screen Info. S % S Off S %
Disabling Illumi Display
Switch On/Off S % S Off S %
7B S Settings S % S General
Changing alerts
for messages
received during
handset use
Settings S % S Receive S % S Message
Notice S % S See below
Showing New Message Window
On Active Screen S % S On S %
Selecting Scrolling Notice Option
View Setting S % S Select option S %
Muting Alert Sound
Alert Sound S % S Off S %
Disabling
Animation View
B S Settings S % S General Settings S %
S Receive S % S Animation View S % S
Off S %
5-35
Additional Functions
7B S Settings S % S General Settings
S % S Receive S % S Link to Feeling S %
S Light & Key Illumi S % S See below
Setting Ringtones to Control Illumination
Switch On/Off S % S Link to Sound S %
5
Messaging
Changing Small
Light & Key
Illumination
settings
Changing Light Color
Light Color S % S Select category S % S
Select color S %
Disabling Small Light & Key Illumination
Switch On/Off S % S Off S %
B S Settings S % S General Settings S %
S Receive S % S Link to Feeling S % S
Vibration Pattern S % S Select option S %
7B S Settings S % S General
Settings S % S Receive S % S Link to
Feeling S % S Ringtone S % S See below
Changing ringtone
settings
Muting Ringer
Switch On/Off S % S Off S %
Changing Ringtones
Assign Tone S % S Select category S % S
Select folder S % S Select tone/file S %
Changing Duration
Duration S % S Enter time S %
5-36
Retrieving all
messages
(including spam)
automatically
B S Settings S % S E Mail Settings S % S
Message DL S % S Condition(Auto) S % S
All Message S %
. Available when Sort Spam Mail is active.
7B S Settings S % S E Mail Settings
S % S Message DL S % S Condition(Auto)
S % S Selected Mail S B S See below
Changing Key Illumination Pattern
Key Pattern S % S Select category S % S
Select pattern S %
. Not effective when Switch On/Off is set to Link
to Sound.
Selecting Vibration
option
E Mail Settings
[ Automatic Retrieval
Deleting addresses/
domains specified
for complete
message retrieval
One Entry (Mail Address)
Individual Address S B S Select entry S B
S Delete S % S Yes S % S A
All Entries (Mail Address)
Individual Address S B S Select entry S B
S Clear All S % S Yes S % S A
One Entry (Domain)
Receive by the Domain S B S Select entry
S B S Delete S % S Yes S % S A
All Custom Entries (Domain)
Receive by the Domain S B S Select entry
S B S Clear All S % S Yes S % S A
Additional Functions
[ Attachments
Disabling image
auto-resize
Enabling/disabling
image auto-open
or sound auto-play
B S Settings S % S E Mail Settings S % S
Picture Appearance S % S Normal S %
. Setting applies to PC Mail as well.
B S Settings S % S E Mail Settings S % S
Auto Play File S % S Pictures or Sounds S %
S On or Off S %
PC Mail Settings
Retrieving
complete PC Mail
messages
7B S Settings S % S PC Mail Settings
S % S Check New Mail S % S See below
. Setting applies to PC Mail as well.
. Setting applies to PC Mail as well.
. Depending on camera settings (Auto Save and
Background Save), files are saved when
opening Mail Composition window via newly
captured image or newly recorded video
regardless of the setting above.
[ Message Size
Limiting outgoing
E Mail message
size
Limiting incoming
E Mail message
size
Selecting size to
which images are
reduced when
attaching
B S Settings S % S E Mail Settings S % S
Create Msg. Size S % S 300KB or
Confirm(When exceed 300KB) S %
. Images are resized automatically when message
size exceeds the limit upon attaching them.
B S Settings S % S E Mail Settings S % S
Message DL S % S DL Size Limit S % S
Restricted(300KB) S %
. Exceeding attachments are reduced (images)
or deleted (other files) at Server.
B S Settings S % S E Mail Settings S % S
Picture Auto Resize S % S Select option S %
. Set to Ask Each Time to select size every time an
image is attached.
Retrieving new
messages
automatically
. Setting Check New Mail to On may incur high
charges; checking for new messages may incur
packet transmission fees even when none
exists. Remember this, especially when using
handset outside Japan.
. Handset does not check for new messages
between 10:00 PM and 6:00 AM; change/
cancel Inactive Time as needed.
5
Messaging
Enabling Automatic Retrieval
Check New Mail S % S On S % S Select
account S % ( ) S A S %
B S Settings S % S E Mail Settings S % S
Send File Settings S % S Attach Only S %
Attaching
captured/recorded
files unsaved
B S Settings S % S PC Mail Settings S %
S PC Mail DL S % S PC Mail DL S % S All
Contents S %
Enabling Automatic Retrieval Outside Japan
Abroad S % S Enable S % S %
. Automatically retrieving messages abroad may
incur high charges.
Changing Automatic Retrieval Interval
Interval S % S Select interval S %
Changing Inactive Time
Inactive Time S % S Start Time: S % S
Enter start time S % S End Time: S % S
Enter end time S %
Canceling Inactive Time
Inactive Time S % S Switch On/Off S % S
Off S %
5-37
Additional Functions
Retrieving PC Mail
for specified folder
In folder list, select PC Mail folder S B S
Retrieve New S %
Disabling
automatic word
wrap
B S Settings S % S PC Mail Settings S %
S Word wrap S % S Off S %
7B S Settings S % S PC Mail Settings
S % S PC Mail DL S % S PC Mail DL S %
S DL All From List S B S See below
5
Messaging
Selecting Sender Types
Select item S % ( / ) S A
Retrieving complete
messages from
specified addresses
S % S PC Mail DL S % S PC Mail DL S %
S DL All From List S B S See below
Deleting addresses/
domains specified
for complete
message retrieval
Specifying Addresses
Individual Address S B S Select blank entry
S % S Select method S % S Select/enter
address S % S A
Specifying Domains (Direct Entry)
Receive by the Domain S B S Select blank
entry S % S Direct Entry S % S Enter
domain S % S A
5-38
7B S Settings S % S PC Mail Settings
One Entry (Mail Address)
Individual Address S B S Select entry S B
S Delete S % S Yes S % S A
All Entries (Mail Address)
Individual Address S B S Select entry S B
S Clear All S % S Yes S % S A
One Entry (Domain)
Receive by the Domain S B S Select entry
S B S Delete S % S Yes S % S A
All Entries (Domain)
Receive by the Domain S B S Select entry
S B S Clear All S % S Yes S % S A
Restricting
complete message
retrieval by size
B S Settings S % S PC Mail Settings S %
S PC Mail DL S % S Max DL Size S % S
Select account S % S Select size S %
. Effective when PC Mail DL is set to All Contents
or DL All From List.
Additional Functions
SMS Settings
Changing Server
sent message
storage limit
B S Settings S % S SMS Settings S % S
Expiry Time S % S Select option S %
7B S Settings S % S SMS Settings S
% S Message Center S % S See below
Changing SMS
Server number
. Do not change Server number unless instructed
to do so.
Deleting
Setting2 or Setting3 S B S Delete S % S
Yes S %
5
Messaging
Editing
Setting1(Default) to Setting3 S % S Edit
number S %
Activating
Setting2 or Setting3 S B S Set Default S %
. Activated number moves to Setting1(Default)
and shifts the others down.
Changing
character encoding
for composing
messages
B S Settings S % S SMS Settings S % S
Char-code S % S Select encoding S %
5-39
Troubleshooting
Sending Messages
3 attach files
Cannot enter message text or
5
. Attachment size affects text size
limit. In turn, text size affects
attachment size limit.
Messaging
3 Information window
Sending failure appears in
. To resend, follow these steps:
Sending failure S % S Select
message S % S % S % S A
3 automatically
Unsent message is not resent
. Auto Resend makes up to two
attempts to send unsent messages
automatically. Resend unsent
message(s) manually.
3 Set Auto Play File cannot be set
. Apply to one file per message.
. Not available for Graphic Mail.
. May be unavailable for some files.
5-40
3 Messaging Settings are not applied 3 Cannot send PC Mail
. Settings are valid for one message,
and effective when viewed on
compatible handsets/applications.
. Delivery Report/Priority setting may
not be effective when sent to mail
addresses.
. Priority setting does not affect
delivery speed.
3 Cannot set Messaging Settings
. These settings cannot be applied to a
message simultaneously (select one):
Set Auto Delete, Reply Request,
Forward NG, Delete NG, Quiz, Set
Auto Play File.
3 automatically
Signature is not inserted
. Auto Insert is available for E Mail
only.
3 Cannot cancel sent messages
. Short messages may not be
canceled.
. Set Sent Cancel is available for
E Mail only.
. Follow these steps to check User
Name and Password for SMTP
authentication:
B S Settings S % S PC Mail
Settings S % S PC Mail Account
S % S Select account S % S
Set Sending S % S Sender Auth.
S % S SMTP Auth. S B S User
Name or Password S %
. Some ISPs require SMTP authentication
setup in addition to Set Receiving setup.
Troubleshooting
Incoming Messages
3 some incoming messages
Handset won't ring or vibrate for
3 appears
A confirmation requesting a reply
. To reply, choose Yes and press %.
Confirmation does not appear for
replied messages.
3 to Feeling Mail settings
Handset won't respond according
. Responses set in Phone Book take
priority.
. Feeling Mail settings are disabled when:
, Sender is saved in Phone Book as
Secret entry
, The message was filtered as spam
, The message was sorted to a
Secret folder
3 Message text appears distorted
. Follow these steps to change
encoding:
[Message Window] B S View
Settings S % S Char-code S %
S Select option S %
3 some folders
Cannot move messages into
. To move to Secret folders, unlock
temporarily or cancel Secret
beforehand.
3 Cannot receive messages
. If
appears, memory is full;
delete messages (P.5-30).
. If out appears, move to a place
where signal is strong.
3 sent
Video files are not delivered as
. Send video files to video-compatible
handsets; recipient must be
subscribed to compatible
Messaging service (E Mail, etc.).
5
Messaging
. Handset does not ring or vibrate for
messages with Low Priority.
. Handset does not ring, vibrate or
open Information window for
messages filtered as spam.
Handling Messages
3 E Mail is not delivered as sent
. Recipient must be subscribed to
compatible Messaging service
(E Mail, etc.). The maximum size of
messages/attachments handsets
can receive varies by make and
model. Confirm compatibility with
recipient handsets.
3 sent
Still images are not delivered as
. Recipient handset may not be
JPEG-compatible. Convert JPEG
files to PNG.
5-41
Internet Services............................ 6-2
Bookmarks & Saved Pages ..........6-8
Service Basics .................................6-2
Using Bookmarks & Saved Pages ... 6-8
Disney Web.................................... 6-3
RSS Feeds .......................................6-9
Using Disney Web...........................6-3
Updating Blogs & News ................ 6-9
PC Sites........................................... 6-5
Additional Functions ...................6-10
Troubleshooting ...........................6-18
Browsing PC Sites............................6-5
Browsing......................................... 6-6
Basic Operations ............................6-6
6
Internet
6-1
Internet Services
Service Basics
Access the Mobile Internet via Disney Web, or view PC Internet sites via PC Site Browser.
. Service requires a separate contract; retrieve Network Information to use these services.
. For more about Disney Web, see Disney Mobile Website (P.17-22).
6
Internet
Transmission/Information Fees
Some page content may
automatically activate Internet
connection incurring transmission fees.
Information fees may also apply.
Security
Electronic certificates are saved on
handset to support SSL (encryption
protocol for Internet transmissions of
important/sensitive information).
Opening Secure Pages
. A confirmation appears. Choose Yes
and press % to proceed.
. When a security notice appears,
subscribers must decide for
themselves whether or not to open
the page. Opening secure pages
constitutes agreement to the terms of
usage. Disney Mobile, VeriSign Japan,
Cybertrust, Entrust Japan, GMO
GlobalSign, RSA Security, SECOM Trust
Systems and Comodo Japan cannot
be held liable for any damages
associated with the use of SSL.
Advanced
0 (Clearing cache (temporarily saved information) (Clearing authentication information (And more on P.6-10)
(Resetting browser settings and stored information (Bookmarks, Saved Pages, etc.) (And more on P.6-17)
6-2
Disney Web
Using Disney Web
Using Disney Web Main Menu
Browse Mobile Internet sites from
Disney Web Main Menu.
Internet pages may not open
depending on connection/Server
status, etc.
Cursor
Internet Page
. Disney Web Main Menu appears.
. To disconnect, press A.
2 Highlight menu item S %
. Corresponding page opens.
. Repeat 2 to open additional links.
Using History
1 % S Disney Web S % S
History S %
2 Select record S % S
Connection starts
. Corresponding page opens.
3 " S Yes S % S Page
closes
6
Internet
1 A S Connection starts
Returning to Previous Pages
[Internet Page] A S Previous page
opens
, Follow these steps to return to the
initial page:
[Internet Page] B S Forward S %
Returning to Disney Web Main Menu
[Internet Page] B S Disney Web
S%
User Authentication
Enter user ID or password S % S A
Accessing Official Disney Sites
% S Disney Web S % S Disney
Official Sites S % S Highlight menu
item S %
Entering URLs Directly
1 % S Disney Web S % S
Enter URL S %
2 Enter URL S % S
Connection starts
. Corresponding page opens.
3 " S Yes S % S Page
closes
3 " S Yes S % S Page
closes
Advanced
0 (Switching browsers (Using previously entered URLs (Deleting History records (Sorting History records (And more on P.6-10)
6-3
Disney Web
Playing Media during Download
Play files while they transfer from the
server (progressive download) or
stream media files.
6
Internet
. Save progressive download files, as
needed, after playback. (Copy
protected files cannot be saved.)
. Streaming media files cannot be saved
even after playback.
. Packet transmission fees apply even
while playback is paused.
1 On a page, select file S %
. Playback starts.
Pausing Playback
%
, To resume playback, press %.
, Progressive download continues
even while playback is paused.
Stopping Playback
$
, Progressive download continues on the
page even while playback is stopped.
(Press % to resume playback.)
Stopping Progressive Download
During playback, $ S Previous
page returns S $
Playback Sound
. Sound is heard from Speaker/
Headphones regardless of gSound
Output setting.
Advanced
6-4
0 (Customizing media playback settings (And more on P.6-13)
PC Sites
Browsing PC Sites
View PC Internet sites via PC Site
Browser.
. Internet pages may not open
depending on connection/Server
status, etc.
. Browsing PC sites may incur high
charges depending on subscribed
price plan.
1 % S Disney Web S %
2 PC Site Browser S %
3 Homepage S % S
Connection starts
Internet Page
. "Disney.jp" Home opens.
. If a message appears, follow
onscreen prompts.
. To disconnect, press A.
4 Highlight menu item S %
. Corresponding page opens.
. Repeat 4 to open additional links.
5 " S Yes S % S Page
closes
6
Internet
Pointer
Returning to Previous Pages
[Internet Page] A S Previous page
opens
, Follow these steps to return to the
initial page:
[Internet Page] B S Forward S %
Returning to "Disney.jp" Home
[Internet Page] B S Homepage S %
User Authentication
Enter user ID or password S % S A
Using History
In 3, History S % S Select record
S%
Entering URLs Directly
In 3, Enter URL S % S Enter URL
S%
Hiding Softkeys
[Internet Page] B S Convenient
Functions S % S Softkey Area S
% S Off S %
, To show Softkeys temporarily, press F.
Browsing in Wideview
[Internet Page] Rotate handset
90 degrees counterclockwise
, Use Multi Selector according to
page orientation.
Advanced
0 (Switching browsers (Using previously entered URLs (Deleting History records (Opening History properties (P.6-10)
(Showing navigation map for continuous scroll (Changing scroll unit (Hiding PC Site Browser messages (P.6-13)
6-5
Browsing
Basic Operations
Switching Frames
Page Browsing
Scrolling Pages
6
If page content continues beyond
view, use g to scroll pages.
Long Press g to scroll continuously.
On framed pages, Long Press & to
switch active frame.
Tabbed Browsing
Open another page in a new tab and
switch between tabs.
[ Opening a New Tab
1 On a page, select menu item
S B S Tab Menu S %
Internet
2 Open in New Tab S %
Tab
g
Y
Frames
. In pointer navigation, point to a frame
and press % to select it.
. Otherwise, use g to select one.
Viewing Single Frame
[Internet Page] Select frame S B
S Convenient Functions S % S
Frame In S %
, To return, press $.
[ Switching Tabs
1 ( (Long) S f Select tab
S%
. In pointer navigation, point to a
tab and press % to open it.
Closing Tabs
( (Long) S f Select tab S % S
B S Tab Menu S % S Close Tab
or Close All Other Tabs S %
Advanced
0 (Looking up copied words in dictionaries (Saving files to Data Folder (Changing Font Size (Enlarging specific areas (Disabling
automatic image display/sound playback (Changing scroll unit (And more on P.6-11 - 6-13)
6-6
Browsing
Selecting Text
Activate pointer navigation to enable
text selection (Drag Mode). Select text
to copy or look up words in dictionaries.
Follow these steps to use a dictionary:
(Text may not be selectable or linked
page may open depending on the
site or page.)
Starting Over
After 3, point to first character S %
S From 2
Additional Page Operations
Enter text or select/execute items.
Text Entry Field
Buttons
character S % (Long)
. Drag Mode is activated.
Menu List
2 Highlight text range
Command Button
field S %
2 Select item S %
When Multiple Selection is Supported
. Select items as needed and press $.
6
Page Item Indicators
[ Selection Items
Buttons
or boxes
appear.
1 On a page, select button or
Internet
1 On a page, point to first
Pull-down Menu Item Selection
1 On a page, select menu list
box S %
Text Entry
1 On a page, select text entry
field S %
3%
4 ~ S Select dictionary
S%
. Dictionary opens with text
inserted.
5 Search S % S Select
2 Enter text S %
. Internet page returns.
Using Entered Text (Input Memory)
[Internet page] Select text entry
field S % S B S Insert/Font Size
S % S Input Memory S % S
Select text S %
.
/
changes to
/
.
[ Execution Items
Execute the assigned command.
1 On a page, select
command S %
word, etc. S %
6-7
Bookmarks & Saved Pages
Using Bookmarks & Saved Pages
Bookmarks
Bookmark sites for quick access.
Saving Bookmarks
1 On a page, B S
6
Internet
Bookmarks S % S <Add
New Entry> S %
. <Add New Entry> appears in gray
for unsavable pages.
2 Check/edit URL S %
3 Check/edit title S %
4 Save S %
Opening Bookmarks
1 % S Disney Web S % S
Bookmarks S %
2 Select title S %
. Corresponding page opens.
Switching Bookmarks Lists
After 1, B S Change List S % S
Select type S %
Opening Bookmarks Online
[Internet Page] B S Bookmarks S
% S Select title S %
Saved Pages
Save page content; handset opens
saved pages without connecting to
the Internet.
Saving Pages
1 On a page, B S Saved
Pages S % S Save S %
. Save appears only for savable
pages.
2 Check/edit title S %
Opening Saved Pages
1 % S Disney Web S % S
Saved Pages S %
2 Select page S %
. Corresponding page opens.
Switching Saved Pages Lists
After 1, B S Change List S % S
Select type S %
Opening Saved Pages Online
[Internet Page] B S Saved Pages
S % S Open List S % S Select
page S %
Advanced
0 (Deleting titles (Editing titles (Changing title order (Sorting titles into folders (Deleting pages (Editing page titles (Changing page
order (And more on P.6-14 - 6-15)
6-8
RSS Feeds
Updating Blogs & News
Register RSS-compatible sites; view
content updates without opening
source sites.
Packet transmission fees apply.
Subscribing to RSS Feeds
RSS Indicator
Available for PC Site Browser.
1 On a compatible page, B
S Register In RSS Feed S %
2 Select feed S % (
/ )S
Complete selection S A
Use RSS icons to subscribe to RSS feeds
from sites that are not RSS-compatible.
Available for PC Site Browser.
1 On a page, select icon S %
2 Yes S % S Save S %
3 Reload All S % S %
4 Yes or No S %
5 Select feed S %
6
Checking Updates
Follow these steps to update all feeds:
1 % S Disney Web S %
2 PC Site Browser S % S RSS
Feed S %
3 Save S %
. Choose Yes to update
immediately or No and press %.
Title List
6 Select title S %
Internet
Indicator below appears for
RSS-compatible sites.
Via RSS Icons
. Information appears.
Updating Single RSS Feeds
[RSS Feed List] Select feed S B S
Reload S % S % S Yes or No S %
Accessing Source Sites
[Title List] Select title S % S Select
linked title S % S Yes S % S %
S Yes or No S %
RSS Feed List
Advanced
0 (Disabling feed updates (Sorting feeds into folders (Deleting feeds (Sorting feeds (Opening feed properties (Exchanging feeds with
other devices (Sending feeds via mail (P.6-15 - 6-16)
6-9
Additional Functions
Connecting & Browsing
[ General
On a page, B S Switch Browser S % S This
Page or Linked Page S % S Select browser
Switching browsers S %
. A confirmation may appear when switching to
PC Site Browser.
% S Disney Web S % S History S % S
Select record S B S Details S %
Sorting History
records
% S Disney Web S % S History S % S B
S Sort S % S By Domain or By Date S %
Sending History
records via mail
7% S Disney Web S % S See below
6
Internet
Using previously
entered URLs
Disney Web
Enter URL S % S B S URL Entry Log S % S
Select URL S % S %
PC Site Browser
PC Site Browser S % S Enter URL S % S B
S URL Entry Log S % S Select URL S % S %
[ History
Follow these steps to switch History lists:
B S Change List S % S Select browser S %
7% S Disney Web S % S History S
% S See below
Deleting History
records
6-10
Opening History
properties
One Record
Select record S B S Delete S % S Yes S %
All Records
B S Delete All S % S Enter Handset Code
S % S Yes S %
% S Disney Web S % S History S % S
Select record S B S Send URL S % S E Mail
or SMS S % S Complete message S A
. E Mail Composition window opens
automatically depending on character count.
[ Memory Operation
For PC Site Browser, perform the following sequence instead
of Browser Settings S %.
PC Site Browser S % S PC Site Browser Settings S %
Clearing cache
% S Disney Web S % S Browser Settings S
(temporarily
% S Memory Operation S % S Delete
saved information) Cache S % S Yes S %
Clearing cookies
% S Disney Web S % S Browser Settings S
% S Memory Operation S % S Delete
Cookies S % S Yes S %
Clearing
authentication
information
% S Disney Web S % S Browser Settings S
% S Memory Operation S % S Delete Auth
Info S % S Yes S %
Additional Functions
7On a page, B S Convenient
Page Operations
[ Disney Web & PC Site Browser
Dialing Numbers
On a page, highlight number S % S Call or
Video Call S %
Using linked info
Looking up copied
words in
dictionaries
On a page, B S Convenient Functions S %
S Copy & Search Dict. S % S Select first
character S % S Highlight text range S %
S Select dictionary S % S Search S % S
Select word, etc. S %
Using Web Search
On a page, B S Convenient Functions S %
S Web Search S % S Enter search text S %
See below
Files on Page
Select file S % S Save S % S Enter name
S % S Save here S %
Saving files to Data
Folder
Opening page
properties
On a page, B S Convenient Functions S %
S Details S % S Select item S %
On a page, B S Convenient Functions S %
S Send URL S % S E Mail or SMS S % S
Complete message S A
. E Mail Composition window opens
automatically depending on character count.
. On a page with background image, select
Save Items and press % first.
. Some files are saved automatically.
. End memory-consuming operations (TV
recording, etc.) beforehand.
. Confirm signal is strong, battery is adequately
charged and that there is enough free memory
beforehand.
6
Background Images
Save Background Image S % S Save S %
S Enter name S % S Save here S %
. Press % to jump to next search result, if any.
On a page, B S Convenient Functions S %
S Jump In Page S % S Page Top or Page
Bottom S %
Sending URLs via
mail
7On a page, B S Save Items S % S
On a page, B S Convenient Functions S %
S Search S % S Enter search text S %
Jumping to page
top/bottom
Pausing/Playing
Pause, Resume or Replay S %
Internet
Copying text
Functions S % S Flash®Menu S % S See
below
Selecting Image Quality
Quality S % S Select quality S %
Sending Messages
On a page, highlight number or mail address S
% S Create Message or Create S % S E Mail
or SMS S % S Complete message S A
On a page, B S Copy Text S % S Select first
character S % S Highlight text range S %
Searching current
page
Handling Flash®
files
Updating page
content
On a page, B S Reload S %
. To update content in Saved Pages, open a
page and follow the steps above.
Changing
encoding to read
garbled text
On a page, B S Settings S % S Char-code
S % S Select option S %
Opening function
shortcuts
On a page, B S Help S %
6-11
Additional Functions
[ Disney Web
Changing Font
Size
On a page, 3 (Long) to enlarge or 1 (Long)
to reduce
[ PC Site Browser
Switching view
6
On a page, B S PC Screen or Small Screen
S%
. In Small Screen view, PC sites are redesigned to
fit Display.
Internet
Zooming on pages
(Zoom Factor)
On a page, 3 (Long) to enlarge or 1 (Long)
to reduce
Jumping to
specific locations
On a page, 5 (Long) S Quick Movement
map appears S Select target location S %
Enlarging specific
areas
Internet Page Settings
[ Disney Web & PC Site Browser
For PC Site Browser, perform the following sequence instead
of Browser Settings S %.
PC Site Browser S % S PC Site Browser Settings S %
7% S Disney Web S % S Browser
Disabling
automatic image
display/sound
playback
On a page, point to area S 7 (Long)
. Use g to move pointer in enlarged view;
highlight item and press % to execute it.
. To close enlarged view, press a key other than g.
Changing Font
Size
Settings S % S Downloads S % S See
below
Image Display
Images S % S Do not Show S %
Sound Playback
Sounds S % S Do not Play S %
% S Disney Web S % S Browser Settings S
% S Font Size S % S Select size S %
7% S Disney Web S % S Browser
Settings S % S Cursor Settings S % S See
below
Using pointer
navigation
Activating
Cursor Mode Settings S % S Normal Mode
S%
Changing Pointer Speed
Speed Settings S % S Select speed S %
Using Memory
Card as primary
download storage
6-12
% S Disney Web S % S Browser Settings S
% S Download to S % S Prefer Card S %
. Some files may be saved to handset regardless
of this setting.
Additional Functions
[ Disney Web
Changing scroll
unit
% S Disney Web S % S Browser Settings S
% S Scroll Unit S % S Select unit S %
Streaming & Progressive Download
[ General
7During playback, B S Settings S %
[ PC Site Browser
Changing scroll
unit
% S Disney Web S % S PC Site Browser S
% S PC Site Browser Settings S % S Scroll
Settings S % S Scroll Unit S % S Select unit
S%
Hiding PC Site
Browser messages
% S Disney Web S % S PC Site Browser S
% S PC Site Browser Settings S % S
Warning Message S % S Off S %
S See below
Changing Playback Size
Display Size S % S Select size S %
Customizing
media playback
settings
. Playback size may not change depending on file.
Setting Backlight Status
Backlight S % S Select option S %
. Selecting Normal Settings applies Display
Backlight settings.
Adjusting Sound Effects
Sound Effects S % S Select effect S %
6
Internet
Showing
navigation map for
continuous scroll
% S Disney Web S % S PC Site Browser S
% S PC Site Browser Settings S % S Scroll
Settings S % S Page Navigation S % S On
S%
[ Streaming
7% S Media Player S % S Streaming
S % S See below
Streaming from
Media Player
Resuming from Stopped Point
Last Played S %
Using Bookmarks
Bookmarks S % S Select title S %
Using History
History S % S Select record S %
6-13
Additional Functions
7% S Disney Web S % S Bookmarks
Bookmarks
S % S See below
7% S Disney Web S % S Bookmarks
Creating Folders
B S Create Folder S % S Enter name S %
S % S See below
Deleting titles
Moving to Folders
Select title S B S Move S % S Select
folder S % S Move S %
All Titles
B S Delete All S % S Enter Handset Code
S % S Yes S %
6
Internet
Editing titles
% S Disney Web S % S Bookmarks S % S
Select title S B S Edit S % S Title: S % S
Enter title S % S A
Editing
bookmarked URLs
% S Disney Web S % S Bookmarks S % S
Select title S B S Edit S % S URL: S % S
Edit S % S A
Sending
bookmarked URLs
via mail
6-14
One Title
Select title S B S Delete S % S Yes S %
% S Disney Web S % S Bookmarks S % S
Select title S B S Send S % S As Message
S % S E Mail or SMS S % S Complete
message S A
. E Mail Composition window opens automatically
depending on character count.
Changing title
order
% S Disney Web S % S Bookmarks S % S
Select title S B S Change Order S % S
Select target location S %
Opening title
properties
% S Disney Web S % S Bookmarks S % S
Select title S B S Details S %
Sorting titles into
folders
Moving from Folders
Select folder S % S Select title S B S
Move S % S Move S %
Renaming Folders
Select folder S B S Rename S % S Enter
name S %
Deleting All Titles within a Folder
Select folder S % S Select title S B S
Delete All S % S Enter Handset Code S %
S Yes S %
Deleting Folders
Select folder S B S Delete S % S Enter
Handset Code S % S Yes S %
Additional Functions
Saved Pages
RSS Feeds
7
% S Disney Web S % S Saved
Pages S % S See below
Deleting pages
One Page
Select page S B S Delete S % S Yes S %
Disabling feed
updates
7
% S Disney Web S % S PC Site
Browser S % S RSS Feed S % S See below
All Pages
B S Delete All S % S Enter Handset Code
S % S Yes S %
Creating Folders
B S Manage RSS Feed S % S Create
Folder S % S Enter name S %
Sorting feeds into
folders
Moving to Folders
Select feed S B S Manage RSS Feed S %
S Move S % S Select folder S % S Move
S%
Changing page
order
% S Disney Web S % S Saved Pages S %
S Select page S B S Change Order S %
S Select target location S %
Opening page
properties
% S Disney Web S % S Saved Pages S %
S Select page S B S Details S %
Renaming Folders
Select folder S B S Manage RSS Feed S %
S Rename S % S Enter name S %
Switching page list
view
% S Disney Web S % S Saved Pages S %
S Select page S B S List View or Preview
View S %
Deleting Folders
Select folder S B S Delete S % S Enter
Handset Code S % S Yes S %
6
Internet
Editing page titles
% S Disney Web S % S Saved Pages S %
S Select page S B S Rename S % S
Enter title S %
% S Disney Web S % S PC Site Browser S %
S RSS Feed S % S Select feed S B S
Manage RSS Feed S % S Restrict Update S %
7
% S Disney Web S % S PC Site
Browser S % S RSS Feed S % S See below
One Entry
Select feed S B S Delete S % S Yes S %
Deleting feeds
All Entries
B S Manage RSS Feed S % S Delete All S
% S Enter Handset Code S % S Yes S %
. Alternatively, perform Delete RSS Feed List in
Memory Operation (PC Site Browser Settings) to
delete all feeds.
6-15
Additional Functions
Sorting feeds
% S Disney Web S % S PC Site Browser S
% S RSS Feed S % S B S Manage RSS
Feed S % S Sort S % S Select option S %
Opening feed
properties
% S Disney Web S % S PC Site Browser S
% S RSS Feed S % S Select feed S B S
Manage RSS Feed S % S Details S %
7% S Disney Web S % S PC Site
Browser S % S RSS Feed S % S B S
Manage RSS Feed S % S See below
6
Internet
Exporting All Feeds
Export All S % S Select storage media S %
Exchanging feeds
with other devices
Importing (Adding Feeds)
Import S % S Select file S % S As New Items
S % S Yes or No S % S Yes or No S %
Importing (Overwriting Existing Feeds)
Import S % S Select file S % S Delete All
S % S Enter Handset Code S % S Yes S
% S Yes or No S % S Yes or No S %
Sending feeds via
mail
6-16
% S Disney Web S % S PC Site Browser S
% S RSS Feed S % S Select feed S B S
Manage RSS Feed S % S As Message S %
S Complete message S A
Security Settings
For PC Site Browser, perform the following sequence instead
of Browser Settings S %.
PC Site Browser S % S PC Site Browser Settings S %
Disabling
manufacture
number auto send
for authentication
% S Disney Web S % S Browser Settings S
% S Security Settings S % S Manufacture
Number S % S Off S %
Disabling referer
information delivery
to the Server
% S Disney Web S % S Browser Settings S
% S Security Settings S % S Send Referer
S % S Not Send S %
Enabling/disabling
cookies
% S Disney Web S % S Browser Settings S
% S Security Settings S % S Cookies S %
S Select option S %
Selecting script
execution option
% S Disney Web S % S Browser Settings S
% S Security Settings S % S Script Settings
S % S Select option S %
Hiding confirmations % S Disney Web S % S Browser Settings S
before entering/
% S Security Settings S % S Secure Prompt
exiting secure pages S % S Do not Show S %
Opening electronic
certificates saved
on handset
% S Disney Web S % S Browser Settings S
% S Security Settings S % S Root
Certificates S % S Select certificate S %
Additional Functions
Changing validity
of entered user ID/
password
. Per Browsing retains entered user ID/password
during browsing sessions. On retains such
authentication information even after powering
handset off.
. Authentication information may not be
retained depending on the site.
% S Disney Web S % S Browser Settings S
% S Security Settings S % S Restrict Ajax S
% S Select option S %
Resetting
6
Internet
Enabling/disabling
Ajax (for
asynchronous
communication)
% S Disney Web S % S Browser Settings S
% S Security Settings S % S Keep Auth Info
S % S Select option S %
For PC Site Browser, perform the following sequence instead
of Browser Settings S %.
PC Site Browser S % S PC Site Browser Settings S %
Resetting browser
settings and stored % S Disney Web S % S Browser Settings S
% S Initialized Browser S % S Enter
information
Handset Code S % S Yes S %
(Bookmarks,
Saved Pages, etc.)
Restoring default
handset settings
% S Disney Web S % S Browser Settings S
% S Reset Settings S % S Enter Handset
Code S % S Yes S %
6-17
Troubleshooting
Connecting & Browsing
Page Operations
3 What is the bar at Display bottom? 3 completely
Internet page does not open
6
. This is a data progress bar; the
number beside it indicates
transmitted (green) or received
(red) data.
. Portions of page content may not
appear in tabbed browsing; close
other tabs.
Internet
3 Text overlaps
. The site may be designed for
browsing on PCs; try Tiny font size.
. Text may overlap when Zoom
Factor is used; adjust scale.
3 while browsing the Internet
Cannot access other functions
. Multi Job may be active. When
switching between browsers,
additional function activation is
disabled; close either browser and
retry.
6-18
Digital TV ........................................ 7-2
TV Timer ........................................7-10
Basics ...............................................7-2
Area Setup ......................................7-3
Watching TV ...................................7-4
Obtaining Program Information ...7-7
Time Shift ......................................7-11
Recording/Playing ........................ 7-8
Recording Programs ......................7-8
Playing Recorded Programs .........7-9
TV Timer & TV Recording Timer... 7-10
Time Shift Recording & Playback....7-11
Additional Functions ...................7-12
Troubleshooting ...........................7-19
7
Digital TV
7-1
Digital TV
Basics
DM005SH supports One Seg terrestrial digital television broadcast services developed for mobile devices in Japan.
Watch Live Television
Set up a channel list for your service area
to access available programming.
Capture screenshots while watching TV.
7
Multi Job
Digital TV
Watch TV in one half of Display using the
other to access messaging functions, browse
the Internet or open Phone Book, etc.
TV Listing (EPG) & Program Info
Find program channels and times, or
open program details via current
channel's schedule.
7-2
View Data Broadcasts
In addition to audio and visuals, enjoy
text, program-related information and
interactive services.
Record Shows/Time Shift
Record current program for later
viewing; if interrupted by incoming calls
while watching TV, record it temporarily
for delayed playback.
Reserve TV Programs
Record a show or activate TV at a
specified time; enter dates & times
manually or reference TV Listing
electronic program guide.
Important Digital TV Usage Notes
. DM005SH TV is exclusively for use in Japan.
. Do not use TV while driving or cycling.
Accidents may result. Phone use while
driving is prohibited by the Road Traffic
Law (revised November 1, 2004). When
walking, always pay attention to your
surroundings, especially near road/rail
crossings, etc.
. When using TV while charging
battery, separate AC Charger and
Antenna to avoid interference.
. Call transmissions, incoming
messages or mobile phone use in the
immediate vicinity may affect
audiovisual quality.
. Programs may not be viewable or
record properly when:
, Too far from or too close to
broadcasting stations
, In mountainous areas or near tall
buildings
, Aboard trains or in moving vehicles
, Near high-voltage lines, neon lights
or wireless base stations
, Near railroad tracks or highways
, Anywhere a jamming signal is
broadcast/reception is unstable
Digital TV
Area Setup
When activating TV for the first time,
follow these steps to set up channels
by area:
4 Select prefecture S % S
Select locality S %
1&
Digital TV Antenna
TV Antenna is located behind Display.
Move handset to find best reception.
. After setup, channel list appears.
Antenna Area
2 Yes S %
7
Digital TV
. Setup confirmation appears.
5%
. To watch TV, select Digital TV and
press %.
3 Select region S %
Watching TV without Completing Area
Setup
In 3, No Preference S %
Adding Reception Areas
& S B S Set Channels S % S
Change Area S % S Select Area S
B S Set Area Info S % S From 3
Advanced
0 (Switching reception Areas (Renaming Areas (Changing/disabling ] function (f in portrait) (Editing channels (Deleting all channels
in Area (Adding new channels to Area (Updating all channels in the Area (P.7-12)
7-3
Digital TV
Watching TV
First, complete Area setup (P.7-3).
1&
7
Digital TV
TV Window
2 Use Keypad to select a
channel
. Use ] to switch channels one by
one; Long Press to find channel
with stable signal automatically.
3 " S Yes S % S TV ends
Watching TV in Portrait Position
. Data Broadcast appears below TV
image.
Incoming Calls
. Press ! to answer calls.
When Answering Voice Calls with
Memory Card Inserted
. Current program is temporarily
recorded; start playback after the
call. (Time Shift)
Incoming Messages
. Double beep sounds and New
Message notice appears. Long Press
B to access messages.
Key Assignments
Open Options Menu
Toggle Panel On/Off
Activate TV/Change Area
Volume Control
Toggle Display Size (portrait)
Multi Selector
Multi Selector response changes with
TV orientation.
Operation descriptions are based on
landscape position. (Landscape Multi
Selector operations are indicated as
], ,, etc.)
] (left/right)
B
A
&
L
)
f (left/right) , (up/down)
e (up/down)
Advanced
0 (Opening Help (Searching for current program on the Internet (Selecting an audiovisual mode (Changing panel pattern in portrait
7-4
position (Changing handset responses to incoming transmissions (And more on P.7-12 - 7-14)
(Changing subtitle settings (Changing sound settings (P.7-15)
Digital TV
Panel Description
Data Broadcast (Japanese)
5
1
2
3
4
6
7
In portrait position, Data Broadcast
appears below TV image. Use e to
select an item and press % to access
program-related information and
interactive services.
8
TV Image
1
2
3
4
*
Area name
Channel key
Channel
Program name
5
6
7
8
Station name
Signal strength*
Sound Channel
Volume
The more bars the better.
Indicator position varies with display
content, etc.
Advanced
Data
Broadcast
7
Digital TV
7
6
3
8
4
2
1
5
Data Broadcast Window
Data Broadcast Fees
. Data Broadcast information viewing
is free, however, using data links/
related services incurs Internet
connection fees.
. A confirmation appears the first time a
fee-based Network connection is
established from a channel; if
accepted, further Network connections
are established without confirmation
until the channel is changed.
0 (Changing view (Returning to initial window (Deleting information saved from Data Broadcasts (Hiding Network connection
confirmation (Saving links to Data Broadcasts or related information (And more on P.7-14)
7-5
Digital TV
Still Image Capture
Capture screenshots while watching
TV.
. May be unavailable if TV was activated
by TV Timer, etc.
. Saved images cannot be forwarded,
edited, set as Wallpaper or attached to
messages.
7
Digital TV
7-6
1 In TV window, I
2%
Enlarging Image Portion
In landscape position, temporarily
enlarge a portion of widescreen
image.
May be unavailable depending on
viewing style.
1 In TV window, 1 - 9
(Long)
. Image is saved.
Opening Saved Images
. While Watching TV
[TV Window] B S Useful Func. S %
S TV-Image Folder S % S Select
image S %
. From Standby
% S TV S % S TV-Image Folder
S % S Select image S %
. Key Assignments:
3
6
9
Upper Left Upper Center Upper Right
2
5
8
Center Left
Center
Center Right
1
4
7
Lower Left Lower Center Lower Right
Digital TV
Obtaining Program Information
Find program channels and times, or
open program details via current
channel's schedule.
Program Info
Open program details via
current channel's schedule;
set Reservations to record
shows or activate TV
1 In TV window, B S
OperateProgram S %
2 Program Info. S %
TV Listing (Japanese)
1 In TV window, A (Long)
. EPG application starts; refer to the
application's help menu for
operational instructions.
. When using EPG application for the
first time, a confirmation appears.
Follow onscreen instructions.
Setting Recording Timer via Program Info
[Program Info Window] Select
program S A S %
. Timer entries set via Program Info are
updated with program changes
automatically. Program cancellations
cancel corresponding Timer entries.
(Poor signal conditions may inhibit
updates or cancellations.)
Setting TV Timer via Program Info
[Program Info Window] Select
program S B S Watching S %
7
Digital TV
TV Listing
Start EPG S! Application to
find program channels and
times for specified area
Program Info
Program Info Window
3 Select program S %
. To return to TV window, press $
twice.
7-7
Recording/Playing
Recording Programs
Clip is saved to handset (or Memory
Card, if inserted).
7
Digital TV
Precautions
. Saved files cannot be forwarded or
attached to messages.
. DM005SH encryption technology
prevents unauthorized copying or
playback of Memory Card files
through data encryption and
authentication. Files copied from
Memory Card to other cards on PC
are unplayable.
. Copyright laws limit duplicated
material to private use only, and
prohibit unauthorized reproduction/
other use.
. Disney Mobile is not liable for any
damages resulting from accidental
loss or alteration of recorded content.
Dubbing 10
. DM005SH supports Dubbing 10 copy
protection scheme that allows
recordings to be copied from handset
to Memory Card. Open file properties
to check the remaining number of
copies allowed to be made.
1 In TV window, % (Long) S
Recording starts
Recording Window
. Changing volume, etc. does not
affect recordings.
. When Small Light flashes yellow,
reception is poor; change
location to improve it: Small Light
illuminates green for moderate, or
blue for strong reception.
Recording Programs in Portrait
[TV Window] I (Long)
, To stop, Long Press I while recording.
Chase Play (Playing while Recording)
[Recording Window] & (Long) S
Playback starts S A (Long) S
Playback stops
, Watch a program from the beginning
while recording it on Memory Card.
Memory/Battery Runs Low or Video
Call/S! Circle Talk Request is Accepted
. Recording stops. (Recorded clip is saved.)
Saving Files via the Internet while
Recording
. While recording programs to handset,
confirm there is enough free memory
before saving files.
2 % (Long) S Recording
ends
Advanced
0 (Recording programs without Data Broadcasts (Saving Data Broadcast images to Memory Card (Recording programs to handset (P.7-15)
7-8
Recording/Playing
Playing Recorded Programs
1 In TV window, B S TV
Player S %
Major Playback Operations
Adjust volume or temporarily enlarge
a portion of widescreen image
following the same operations used
while watching TV.
.
indicates the file is unplayable.
2 Select file S %
Toggle Panel On/Off
[ (d in portrait)1
@ (c in portrait)1, 2
#
(
% (A in portrait)
I (Long)4
I4
7
Digital TV
Fast Forward
Rewind
Skip Forward
Skip Backward
Pause3
Split File
Set Marker
Video List
&
1
Playback Window
. Playback starts. (The last played
file plays from where it stopped.)
Each press increases speed. To resume
normal playback, press % (A in portrait).
2
Long Press to replay. (Available when no
Marker is saved.)
3
In pause, use ] (f in portrait) to reverse/
advance frame.
4
Not available during Time Shift playback.
3 A (Long) S Playback
stops
Advanced
0 (Splitting files by specifying a time point (Playing files repeatedly (Playing split files (Playing video files transferred from Blu-ray Disc
recorders (Checking memory status (Renaming files (Deleting files (Copying files to Memory Card (Opening file properties (Playing
files with Markers (And more on P.7-16 - 7-17)
7-9
TV Timer
TV Timer & TV Recording Timer
1 In TV window, B S Rec./
TimeShift S %
2 Reservation List S % S B
3 New Entry S %
4 Manual S % S Watching
7
or Recording S %
Digital TV
5 Enter start date/time S % S
Enter end date/time S %
6 Channel: S % S Select
channel S % S A
. If a message appears, read and
then press %.
Setting Timer via EPG
In 4, From TV Listing S %
, Refer to the application's help
menu for operational instructions.
At Timer Time (TV Alarm Time)
TV and Alarm activate. Alarm ends
after the set duration.
Timer Recording Precautions
Confirm target channel reception;
keep handset open.
, End the current operations.
, Confirm battery is adequately
charged and there is enough free
memory.
Recording starts slightly before the
Timer start time and ends a few
seconds after the Timer end time.
While Using Another Function
. TV activates via Multi Job and target
program/recording starts. However, if
Multi Job cannot activate in the current
state, TV may remain off, or the current
function may end automatically
(unsaved images, messages, Phone
Book entries, etc. may be deleted). End
all active functions/applications before
Timer time.
Advanced
0 (Opening/editing/deleting Timer details (Opening/playing/deleting Timer log records (Changing TV Alarm tone/vibration settings
(Changing TV Alarm Illumi Display settings (Changing TV Alarm Small Light & Key Illumination settings (Prioritizing current operation over
TV Timer/TV Recording Timer (P.7-17 - 7-18)
7-10
Time Shift
Time Shift Recording & Playback
Record current program temporarily
for delayed playback.
Major Playback Operations
. Recorded content is deleted after
playback.
. First, insert Memory Card.
Fast Forward
Skip Forward
Skip Backward
1 While watching TV, &
(Long) S Recording starts
*
[ (d in portrait)*
#
(
Press & to resume normal Time Shift
playback.
Recording in progress
When a Voice Call is answered while
watching TV with Memory Card
inserted, Time Shift recording starts
automatically; Long Press & after the
call for playback.
7
Digital TV
Time Shift Recording Automatic
Activation
2 While recording, & (Long)
S Playback starts
. Playback starts from where
recording was started.
. Recording and playback stop when
Time Shift playback has caught up
to the real-time program.
Advanced
0 (Disabling Time Shift recording automatic activation (P.7-15)
7-11
Additional Functions
Area & Channel
Watching
Switching
reception Areas
While watching TV, & S Select Area S %
Renaming Areas
While watching TV, B S Set Channels S % S
Change Area S % S Select Area S B S
Change Area Name S % S Enter name S %
7While watching TV, B S Set Channels
7
Digital TV
S % S Channel Key Setting S % S See
Changing/disabling below
] function (f in
Toggling All Receivable Channels
portrait)
By Manual S %
Disabling
Disable S %
7While watching TV, B S Set Channels
S % S CH Switch S % S Select channel S
B S See below
Editing channels
Switching Channel Positions
Flip S % S Select target key S %
Deleting Channels
Delete S % S Yes S %
7-12
Deleting all
channels in Area
While watching TV, B S Set Channels S %
S Change Area S % S Select Area S B S
Reset Settings S % S Yes S %
Adding new
channels to Area
While watching TV, B S Set Channels S %
S Change Area S % S Select Area S B S
Channel Update S % S Update Further S %
Updating all
channels in the
Area
While watching TV, B S Set Channels S %
S Change Area S % S Select Area S B S
Channel Update S % S Update All S % S
Yes S %
While watching TV, B S Help S %
Opening Help
. Also available while recording or playing
programs.
Searching for
current program
on the Internet
While watching TV, B S OperateProgram S %
S Program Info. Search S % S Search S %
. Follow onscreen instructions.
Enlarging display
size for portrait
position
While watching TV, B S AV Settings S % S
Screen Size S % S Enlarge(Portrait) S %
Canceling image
smoothing
While watching TV, B S AV Settings S % S
Smooth Mode S % S Off S %
Saving current
channel
Selecting an
audiovisual mode
While watching TV, B S Set Channels S %
S Save Channel S % S Select key S %
. To overwrite a saved channel, choose Yes and
press %.
While watching TV, B S AV Settings S % S
AV Mode S % S Select mode S %
. TV reception time may shorten depending on
the mode.
Additional Functions
7
7With TV in landscape, B S Advanced
While watching TV, B S AV Settings
S % S See below
. Change AV Mode (select mode other than Link
to Genre) first.
Brightness
Image S % S Brightness S % S Adjust level
S%
Adjusting Brightness Automatically by Scene
Image S % S Control by Scene S % S
On(Light) or On S %
Other Image-Related Parameters
Image S % S Select item S % S Adjust
level S %
. Adjust Contrast, Blackness (black level), Color
(color density), Tint (skin color tone) and Sharpness.
Restoring Default Image Settings
Image S % S Reset S % S Yes S %
Selecting Sound Option
Tone S % S Select option S %
Changing panel
pattern in portrait
position
With TV in portrait, B S Advanced S % S
Panel Type S % S Select pattern S %
Showing Indicators Always
Display Icon S % S On S %
Disabling Partial Image Enlargement
Magnify Area S % S Off S %
Using Portrait Position Key Assignments
Key Direction S % S Off S %
Switching One Seg
services
While watching TV, B S Set Channels S %
S Select Serv. Station S % S Select service
S%
. Available for programs with multiple services.
Listening to audio
from Speaker
While watching TV, B S Advanced S % S
Sound Output S % S Loudspeaker S %
Switching audio
output to wireless
device
% S TV S % S Settings S % S gSound
Output S % S Bluetooth Device S %
Using wireless
Headphones
7
Digital TV
Adjusting current
AV Mode
parameters
Disabling/Enabling Brightness Adjustment via
Light Sensor
Image S % S Brightness S % S B ( / )
S%
S % S Set Landscape S % S See below
Customizing
viewing options for
landscape
position
While watching TV, ' (Long)
. Pair SCMS-T DRM scheme compliant Bluetooth®
headphones beforehand.
Setting TV to end
automatically
after a period of
time
While watching TV, B S Advanced S % S
Auto Exit S % S Auto Exit Time S % S
Select time S %
Disabling auto
shut-off when
handset is closed
While watching TV, B S Advanced S % S
Auto Exit S % S Close Action S % S Watch
TV S %
7-13
Additional Functions
7% S TV S % S Settings S % S
7While watching TV, B S
Calls & Alarms S % S See below
Changing handset
responses to
incoming
transmissions
Showing Alarm Notice
Alarm S % S Alarm Notice S %
Showing Voice Calls, Etc.
Select item S % S Notice a Call S %
Showing New Message Window
Incoming Message S % S Calls & Alarms S %
7
Data Broadcast
Digital TV
Changing view
With Data Broadcast in portrait, B S
SetBroadcastData S % S Change View (Data)
S%
. To return to TV window, press A.
Returning to initial
window
With Data Broadcast in portrait, B S
SetBroadcastData S % S Back to Top S %
Sending/hiding
Location
Information
Hiding manufacture
number and other
information
Hiding Network
connection
confirmation
While watching TV, B S SetBroadcastData S
% S Notify Connection S % S Off S %
While watching TV, B S SetBroadcastData S
% S Manufacture Number S % S Off S %
TV Link (Japanese)
Saving links to
Data Broadcasts or
related
information
While viewing Data Broadcast, select link
source S %
. Link navigation varies by program. Follow
onscreen instructions to save links.
7% S TV S % S TV Link S % S See
below
SetBroadcastData S % S Delete StationData
S % S See below
Deleting by Station
Select station S B S Delete S % S Yes S %
Sending Always
On S %
Hiding Always
Off S %
7While watching TV, B S
Deleting
information saved
from Data
Broadcasts
SetBroadcastData S % S Location S % S
See below
Using TV links
Opening TV Links
Select link S %
. Connection fees may apply.
Opening Properties
Select link S B S Details S %
Deleting All
B S Delete All S % S Enter Handset Code
S % S Yes S %
7% S TV S % S TV Link S % S See
below
Deleting TV links
One Entry
Select link S B S Delete S % S Yes S %
All Entries
B S Delete All S % S Enter Handset Code
S % S Yes S %
7-14
Additional Functions
Subtitle & Sound
Recording
7
While watching TV, B S Subtitle/
Sound S % S See below
. May be unavailable depending on program
content or viewing style (TV orientation, etc.).
Showing Subtitles Always
Display Subtitle S % S On S %
Changing subtitle
settings
Hiding Subtitles Always
Display Subtitle S % S Off S %
Showing Subtitle Area Always
Auto Subtitle Off S % S Off S %
Showing Subtitles at the Top
Subtitle Position S % S Upper S %
While watching TV, B S SetBroadcastData S
% S Set Recording S % S Image Only S %
Saving Data
Broadcast images
to Memory Card
While watching TV, B S SetBroadcastData
S % S Image Location S % S Memory
Card S %
Disabling Time Shift
recording automatic
activation
% S TV S % S Settings S % S Set Call
Time Shift S % S Off S %
Recording programs
to handset
% S TV S % S Settings S % S Save
Recording to S % S Phone Memory S %
7
Digital TV
Changing Subtitle Language
Subtitle Language S % S Language 2 S %
Recording
programs without
Data Broadcasts
Increasing Subtitle Lines
Subtitle ScrollMode S % S On S %
7
While watching TV, B S Subtitle/
Sound S % S See below
Changing sound
settings
Selecting Sound Option
Sound Type S % S Sound2 S %
. Available when multiple sounds are supported.
Listening to Sub Language
Sound Channel S % S Sub S %
Listening to Main & Sub Languages
Sound Channel S % S Main + Sub S %
7-15
Additional Functions
Recorded Programs
[ Playback
Splitting files by
specifying a time
point
During playback, B S Split File S % S
Select Point S % S ] Specify point (f in
portrait) S % S Confirm S %
Playing files
repeatedly
% S TV S % S TV Player S % S B S
Playback Pattern S % S Repeat S %
Playing split files
% S TV S % S TV Player S % S Select split
file S A S Select file S %
7
[ Managing
Checking memory
status
% S TV S % S TV Player S % S B S
Memory Remaining S %
Renaming files
% S TV S % S TV Player S % S Select file
S B S Rename S % S Enter name S %
7% S TV S % S TV Player S % S
See below
Deleting files
Digital TV
All Files
B S Delete All S % S Enter Handset Code
S % S Yes S %
% S TV S % S Recorder Contents S % S
Select file S %
Playing video files
transferred from
Blu-ray Disc
recorders
. During playback, press 8 to switch sound
channels [L (Main), R (Sub) or L + R (Main +
Sub)]. (Available for programs supporting sub
language.) For more operations, see P.9-5
"Video Playback Operations."
. In Recorder Contents file list, press B to rename
files, change playback mode (repeat, random,
etc.), check memory status, open properties or
delete files.
Copying files to
Memory Card
Moving files to
Memory Card
Opening file
properties
7-16
Single Files
Select file S B S Delete S % S Yes S %
% S TV S % S TV Player S % S B S
Change to Phone S % S Select file S B S
Copy to Card S % S Yes S %
. File is moved from handset to Memory Card
when the number of copies made exceeds the
limit.
% S TV S % S TV Player S % S B S
Change to Phone S % S Select file S B S
Move to Card S % S Yes S %
. Files moved to Memory Card cannot be moved
back to handset.
% S TV S % S TV Player S % S Select file
S B S Details S %
Additional Functions
Markers
Playing files with
Markers
TV Timer & TV Recording Timer
7During playback S See below
7While watching TV, B S Rec./TimeShift
Skipping between Markers
Landscape: @ (Long) or [ (Long)
Portrait: c (Long) or d (Long)
S % S Reservation List S % S See below
Moving to Specific Markers
0-9
7During playback, B S Set Marker S
Opening/editing/
deleting Timer
details
% S Marker List S % S See below
. Some entries may not be edited depending on
the content.
Deleting Entries
Select entry S B S Delete S % S Yes S %
Starting Playback
Select number S %
7While watching TV, B S Rec./TimeShift
Deleting a Marker
Select number S B S Delete S %
Deleting All Markers
B S Delete All S % S Yes S %
Editing Entries
Select entry S B S Edit S % S Edit S A
S % S Reservation List S % S A S See
below
Opening/playing/
deleting Timer log
records
Opening Timer Log
Select record S %
7
Digital TV
Using Marker List
Opening Entries
Select entry S %
Playing Recorded Programs
Select record S B
Deleting Records
Select record S A S Yes S %
7-17
Additional Functions
7While watching TV, B S Rec./TimeShift
S % S Reservation List S % S B S TV Alarm
S % S See below
Changing TV
Alarm tone/
vibration settings
Changing TV Alarm Time
Alarm Time S % S Select time S %
Disabling Tone/Vibration
Alarm or Vibration S % S Off S %
Changing Duration
Duration S % S Select time S %
7While watching TV, B S Rec./TimeShift
7
Digital TV
S % S Reservation List S % S B S TV Alarm
S % S Illumi Display S % S See below
Changing TV
Alarm Illumi
Display settings
Using Preset Pattern
Pattern Setting S % S Preset Pattern S % S
Select pattern S % S A
Using Custom Pattern
Pattern Setting S % S Original S % S A
Disabling Illumi Display
Switch On/Off S % S Off S % S A
7While watching TV, B S Rec./TimeShift
Changing TV
Alarm Small Light
& Key Illumination
settings
S % S Reservation List S % S B S TV Alarm
S % S Light & Key Illumi S % S See below
Changing Light Color
Light Color S % S Select color S % S A
Changing Key Illumination Pattern
Key Pattern S % S Select pattern S % S A
Disabling Small Light & Key Illumination
Switch On/Off S % S Off S % S A
7-18
Prioritizing current
operation over TV
Timer/TV
Recording Timer
% S TV S % S Settings S % S TV Reserve
Prior S % S Off S %
Troubleshooting
Watching
3 TV won't activate
. Battery may be low. Charge
battery or install a charged
battery.
3 Cannot watch TV
3 while recording
Ringtone does not sound as set
. When a Chaku-Uta® file, etc. is set
as ringtone, default ringtone may
sound for incoming transmissions
while recording.
TV Recording Timer
3 appeared as recording result
Could not start recording.
. Recording failed due to low
battery/memory, active function,
etc.
3 recording result
Recording aborted. appeared as
. Recording was interrupted due to
low memory, Memory Card
removal, etc.
7
Digital TV
. Reception may be poor; change
location to improve it. (TV signal
strength is independent of handset
signal strength.)
. Handset may not have been used
for a period of time; retrieve
Network Information.
. TV is disabled upon subscription
termination.
Recording
3 correctly
Area setup does not complete
. Perform Update All in Channel
Update. Area setup may not
complete correctly depending on
the area or service availability.
7-19
Camera.......................................... 8-2
Video Camera.............................8-16
Getting Started...............................8-2
Photo Camera & Video Camera
Overview.........................................8-3
Opening Files ...............................8-18
Photo Camera ............................... 8-5
Editing Images .............................8-19
Capturing Still Images....................8-5
Selecting Camera by Use .............8-8
Changing & Saving Camera Settings
.........................................................8-11
Registering Faces (Detect Personal)
........................................................8-14
Recording Video ......................... 8-16
Opening Saved Files via Review ... 8-18
Picture Editor ................................ 8-19
Composite.................................... 8-22
Printing..........................................8-23
Printing Images ............................ 8-23
Additional Functions ...................8-24
Troubleshooting ...........................8-29
8
Camera & Imaging
8-1
Camera
Getting Started
Capture still images or record video.
Detect Personal
Register faces; related information
appears in Viewfinder upon face
detection.
Continuous AF
8
Camera & Imaging
Focus continuously adjusts as the
framed subject's position changes.
Select Camera
DM005SH is loaded with preset camera
modes tailored for various purposes/
occasions; select a camera mode to
suit subject/shooting conditions.
Review
Open/play last saved mobile
camera file quickly with a single key;
access older files as needed.
Advanced
0 (Changing function assigned to Camera Key (|) (Opening Help (P.8-24)
8-2
Important Mobile Camera Usage Notes
. Clean dust/smudges from lens cover
with soft dry cloth before use.
. Mobile camera is a precision
instrument, however, some pixels may
appear brighter or darker.
. Shooting/saving images while
handset is hot may affect the image
quality.
. Exposing lens to direct sunlight may
damage color filter and affect image
color.
Auto Shut-off
. Before image capture/recording,
mobile camera shuts down after a
period of inactivity and handset
returns to Standby.
Shutter Click
. Shutter click and Self-timer tone
sound at fixed volume regardless of
handset settings.
Internal & External Cameras
. Use Internal Camera or External
Camera; unless noted otherwise,
operations in this chapter are
described for External Camera.
, May be unavailable depending on
camera mode, etc.
Camera
Photo Camera & Video Camera Overview
Focus modes and sizes shown below are defaults; those with * are fixed.
Focus Mode
Size
Easy Auto Camera
Capture nearby subjects easily (settings
partially changeable)
Normal(Portrait)*
8M
Pro Auto Camera
Capture nearby subjects easily (settings
mostly changeable)
Normal(Portrait)
8M
Manual Focus*
3M
Description
Standard
Shooting
Capture distant scenery quickly
Scene Cameras
Select one according to subject/shooting
conditions
Normal(Portrait)*
8M
Capture black and white images
Normal(Portrait)*
8M
Capture sepia images
Normal(Portrait)*
8M
Capture images in low light (fireworks, night
scenes, etc.)
Normal(Portrait)*
8M
Show mock Clock/Calendar in Viewfinder
to capture image and set it as Wallpaper
Normal(Portrait)
Wallpaper*
Center Auto Focus
VGA
Monochrome Camera
Sepia Camera
Long Exposure Camera
Wallpaper Camera
Specific
Objectives
Auction Camera
Use guide to capture multiple images for
posting on auction sites
8
Messaging Camera
Capture and send images via mail easily
Normal(Portrait)*
VGA
Blog Camera
Capture and post images to blogs easily
Normal(Portrait)
VGA
Camera & Imaging
Subject
&
Conditions
Quick Camera
8-3
Camera
Auto Shutter
Release
8
Camera & Imaging
Special
Shooting
Description
Focus Mode
Size
Look Back Camera
Play whistle sound and release shutter
automatically when subject turns face to camera
Normal(Portrait)*
8M
Smile Camera
Release shutter automatically when subject
smiles
Normal(Portrait)*
8M
Self Timer Camera
Release shutter automatically after
selected time elapses
Normal(Portrait)*
8M
Shooting Camera
Capture up to nine images consecutively
Normal(Portrait)
Wallpaper
Panorama Camera
Capture panoramic images of scenery, etc.
Center Auto Focus
─
Scanner Camera
Move handset to scan the area to capture
Center Auto Focus
Free
─
Wallpaper
Touch up faces in captured images
Normal(Portrait)*
3M
Self Portrait Camera
Use guide to capture self portraits
Normal(Portrait)*
3M
Face Register Camera
Register name and note for faces
Normal(Portrait)*
VGA*
Record long high quality video
Auto Focus
Wide
Record short video easily to send it via mail
Auto Focus
QCIF
In Camera
Additional
Cameras
Pretty Arrange Camera
Fine Video Camera
Capture with Internal Camera
Video Camera
Video Camera for Mail
8-4
Photo Camera
Capturing Still Images
Follow these steps to capture someone's
image using Easy Auto Camera:
2%
1 | S Frame subject on
Display
Captured Image Window
. Shutter clicks; captured image is
saved.
. Open saved images via Review
or Data Folder.
3%
8
Camera & Imaging
Photo Viewfinder
. Focus is locked on faces
automatically for Easy Auto
Camera, Pro Auto Camera, etc.
(Portrait auto focus)
, When multiple faces are
detected, frame appears on
each face; use f to select one
on which to lock focus.
, Detection may fail depending
on face angle, distance from
subject or environment.
Sending Captured Images at High
Speed via Infrared
[Captured Image Window]
A (Long) S Yes or No S %
, Set recipient device to ready
beforehand.
Sending Captured Images via Mail
[Captured Image Window] A S
Complete message S A
Detect Personal
. Register name, note, etc. for faces;
entered information appears in
Viewfinder upon face detection.
Mobile Light
. Mobile Light may illuminate
automatically depending on
ambient light level or camera mode.
Follow these steps to turn setting off:
[Photo Viewfinder] B S Mobile
Light S % S Off S %
. Viewfinder returns.
4 " S Camera shuts down
Advanced
0 (Selecting Self-timer time/repeat interval (Changing image size (Changing focus frame design (Changing shutter click sound
(Changing save location (Changing Mobile Light mode (And more on P.8-24 - 8-25)
8-5
Photo Camera
Photo Viewfinder Indicators
1
2
3
4
5
6
7
8
8
Camera & Imaging
Mobile Light
Memory
Picture Quality
Picture Size
Continuous Type
5
Long Exposure
6 Scene
1
2
3
4
7
ISO Sensitivity
Self-timer
9
a
b
c
d
e
f
8 White Balance
9 Remote Shutter
Background Save
a
Save to
b Auto Save
c Exposure
d Focus
e Shake Reducing
f Shutter Mode
[ Showing Large Indicators
Press ) in Photo Viewfinder to show
large indicators along the edges of Display.
Zoom In/Out
Toggle Mode
Adjust Brightness
Change Image Size
Toggle Mobile Light Mode
Open Help
*
a/b
A (Long)*
c/d
4
#
0
Toggle between External Video Camera,
Internal Photo Camera, Internal Video
Camera and External Photo Camera.
Press B to open Options menu for more
functions/settings.
Press ) to toggle indicator view
(Icon On, Icon Off and Guidance).
Accessing Settings via Indicators
While indicators appear, use |
to select function S %
, Press | to toggle functions.
Advanced
0 (Correcting portrait auto focus images (And more on P.8-26)
8-6
Pre-Image Capture Operations
Photo Camera
Focus Lock
Lock focus on subject; camera continuously
focuses on the subject even if it moves.
Chase Focus tracks the subject's movement,
and Continuous AF adjusts focus as the
distance to the subject changes.
Image Size & Print/Display Size
DM005SH Picture Size & Corresponding
Print/Display Size:
8M
5M
3M
Full HD
Wallpaper
VGA
QVGA
1 In Photo Viewfinder, frame
subject in center of Display
2!
. Focus Lock is set.
. Captured image appears.
. Press % to return to Viewfinder.
Canceling Focus Lock
. Press !.
Chase Focus
. Camera distinguishes the subject by
color; light-colored subjects or subjects
having the same color as the background
may not be tracked correctly.
*
For image specifications, see P.17-20
"Photo Camera."
Auto Resize Zoom
. At 8M, Picture Size changes with zoom
scale (print quality may be affected); check
the size on indicator before image capture.
8
Camera & Imaging
3%
A4 prints
B5 prints
L to 2L prints
Full HD display wallpaper*
DM005SH Wallpaper
VGA display wallpaper*
QVGA display wallpaper*
8-7
Photo Camera
Selecting Camera by Use
Switching Cameras
1 In Photo Viewfinder, B S
Switch Camera S %
Using Selected Camera
[ Shooting Camera
1 Frame subject on Display
S%
[ Look Back Camera
1 Frame subject on Display
S&
. Whistle sound plays.
2 Face detection activates
and shutter releases;
image appears
3%
8
Camera & Imaging
. Viewfinder returns.
[ Smile Camera
. Press A to toggle lists.
. Alternatively, in Main Menu,
Camera S Various Cameras to
select camera.
2 Select camera S %
. Selected camera activates.
. For subsequent operations, see
"Using Selected Camera."
. After image capture, the first
preview image appears.
2 % (Long)
. All captured images are saved.
Saving Selected Images
After 1, f (select image) S %
1 Frame subject on Display
2 Smile detection activates
and shutter releases;
image appears
3%
. Viewfinder returns.
Advanced
0 (Adjusting smile detection level (Changing continuous shooting mode (Changing Look Back Camera sound (P.8-25)
8-8
Photo Camera
[ Self Timer Camera
1 Frame subject on Display
S%
. Countdown starts.
[ Auction Camera
1 Frame subject on Display
S%
. First preview image appears.
2 Shutter releases after
2%
3%
3 Yes S %
approximately ten seconds;
image appears
. Viewfinder returns.
[ Wallpaper Camera
S%
. Wallpaper preview appears.
2A
1 Frame subject on Display
S%
22
. Repeat 1 - 2 to capture two
more images following onscreen
instructions.
[ Messaging Camera
1 Frame subject on Display
S%
2A
. Image is set as Wallpaper.
(Viewfinder returns.)
. Mail Composition window opens.
Complete and send message.
8
. Face is touched up.
3%S%
. Viewfinder returns.
Adjusting Each Effect Separately
After 2, 1 (Small Face), 2
(Cute Eyes) or 3 (Fair Skin) S 3
, Press the same key repeatedly for
further adjustment.
Editing Images
After 1, 1
, For more, see P.8-19 "Picture Editor."
Camera & Imaging
1 Frame subject on Display
[ Pretty Arrange Camera
Advanced
0 (Selecting Self-timer time/repeat interval (P.8-24)
(Changing Clock/Calendar type for Wallpaper Camera (P.8-25)
8-9
Photo Camera
[ Panorama Camera
1 Frame subject on Display S %
[ Additional Cameras
Scene
Cameras
Monochrome
Camera
Frame subject on Display
S%
Sepia Camera
8
2 Move handset slowly to
Camera & Imaging
3
keep + aligned with either
of yellow lines
%
. Captured image is saved.
. Image is captured automatically when
the bar (
) turns blue.
Frame subject on Display
S%
Long Exposure . Shutter is left open for
approximately
Camera
30 seconds before
image capture.
Blog Camera
Scanner
Camera
Frame subject on Display
S % S A S Proceed
with blogging
Frame subject on Display
S % S Move handset
slowly to scan the area to
capture S %
[ Self Portrait Camera
1 Frame your face on Display
S Face is detected
2 Shutter releases after
approximately two seconds;
image appears
3%
. Viewfinder returns.
Advanced
0 (Changing panorama/scanner settings (Previewing panorama image (Changing panorama image preview method (Changing
exposure time for Long Exposure Camera (P.8-26)
8-10
Photo Camera
Changing & Saving Camera Settings
Change settings according to purpose/shooting conditions; save frequently used settings as My Camera for future use.
. Some settings may be unavailable depending on camera mode (no corresponding indicators appear).
. For setting procedures, see P.8-24 - 8-25. In addition to these, there are settings unique to each tailored camera.
Major Items
Description
Continuous AF
Select whether to adjust focus continuously as focus-locked subject's position
changes
Chase Focus
Select whether to track focus-locked subject automatically as it moves within
framed image
Focus
Focus Mark
Self-timer
Shutter
Image Size
Select focus frame design from Pattern 1 to Pattern 6
Select 10 sec., 5 sec., 2 sec. or Off
Shutter Mode
Select from Normal (manual), Egao (smile detection) and Furimuki (face detection)
Shutter Sound
Select shutter click sound from Pattern 1 to Pattern 3
Picture Size
Select image size from 8M(2448x3264) to QVGA(240x320)
Picture Quality
Select image quality from High Quality, Fine and Normal
8
Camera & Imaging
Focus Mode
Select from Normal(Portrait), Center Auto Focus, Spot Auto Focus, Macro and
Manual Focus
&
Quality
8-11
Photo Camera
Description
ISO Sensitivity
Select light sensitivity from Auto(∼800) to Auto(High:∼12800) and 100 to 12800
White Balance
Select Auto, Daylight, Cloud/Shade, Tungsten or Fluorescent according to
lighting conditions
Conditions
Exposure
Mobile Light
8
Save Pictures to
Camera & Imaging
Save Settings
Auto Save
Background Save
Shake Reducing
Other
Display Setting
Set Send Key
8-12
Select amount of light received by camera from -2 to +2
Select Mobile Light mode from On, Automatic, Low Light and Off
Select Phone Memory, Memory Card, DCIM or Ask Each Time
Select ON(Preview Off), On(Preview 2 sec.), On(Preview Manual) or Off
Select whether to enable quick transition to Viewfinder after saving images
Select shake reduction option from Auto, Auto(Strong) and Off
Select indicator view from Guidance, Icon On and Icon Off
Select send option assigned to A
Photo Camera
Changing Settings
Example: Picture Size
1 In Photo Viewfinder, B
Saving Changed Settings
After image capture, save changed
settings with a name and captured
image; load saved settings in the
same manner as switching cameras.
Saving as My Camera
1 In captured image window,
. Messages appear.
2 Specify image area
. Viewfinder returns.
. My Camera is created.
Entering Information
After 5, Note: S % S Enter text S
%S6
Using My Cameras
1 In Photo Viewfinder, B S
Switch Camera S %
2 A S Select My Camera
S%
8
Camera & Imaging
2 Picture Size S %
3 Select size S %
B S Save as My Camera
S%
3%
4 My Camera Name: S %
5 Enter name S %
6A
. The specified portion will be used
as the camera's icon.
Advanced
0 (Deleting My Cameras (Editing My Cameras (P.8-26)
8-13
Photo Camera
Registering Faces (Detect Personal)
Register faces; related information
appears in Viewfinder upon face
detection.
. Register name, note and priority for up
to ten faces.
. When multiple registered faces are
detected, focus is locked to one with
highest priority.
Saving Entries
1 In Photo Viewfinder, B
2 Detect Personal S %
3 Register Face S %
. Window shown above opens
when face is recognized
correctly; if not, repeat 4 - 5.
8
Camera & Imaging
4 Use guide to find best
position
Viewfinder Information
. Guide turns red when face is
detected.
8-14
5%
6 Empty S %
7 Name: S %
8 Enter name S %
Photo Camera
9A
. Entry is saved.
. The lower the entry number the
higher the priority.
Entering Information
After 8, Note: S % S Enter text S
%S9
Setting Text Color
After 8, Font Color: S % S Select
color S % S 9
, Upon face detection, Viewfinder
information appears in the selected
color.
Editing Entries
1 In Photo Viewfinder, B
2 Detect Personal S % S
Edit Face S %
Deleting/Moving Entries
Follow these steps to delete an entry:
1 In Edit Face window, select
entry S B
2 Delete S % S Yes S %
. Entry is deleted.
Moving Entries (Changing Priorities)
After 1, Change Priority S % S
Select target location S %
8
3 Select entry S %
Camera & Imaging
Edit Face Window
4 Select item S % S Edit in
the same manner as saving
entries
5A
. Entry is overwritten.
8-15
Video Camera
Recording Video
Follow these steps to record short
video using Video Camera for Mail:
4%
1 % S Camera S %
2 Video Camera for Mail S %
5 Save S %
. Video is saved. (Viewfinder returns.)
. Play saved video via Review,
Data Folder or Media Player.
8
Camera & Imaging
Video Viewfinder
(Video Camera for Mail)
6 " S Camera shuts down
3 Frame subject on Display
Playing Unsaved Video
In 5, Preview S %
Incoming Calls
. If a call arrives before video is saved,
recorded clip is temporarily saved.
End the call to return.
If Battery Runs Low
. Recording stops. (Recorded clip is
saved.)
Switching Video Cameras
[Video Viewfinder] B S Simple
Setting S % S Select video
camera S %
Using Fine Video Camera without
Memory Card
. Storage media options appear when
% is pressed to start recording; select
To Phone Memory and press %.
S%
. Recording starts after a tone.
Advanced
0 (Adjusting focus quickly for close-up shots (Changing image quality (Activating Mobile Light (Capturing images while recording video
(still image capture) (Changing recording size (And more on P.8-27)
8-16
Video Camera
Video Viewfinder Indicators
Operations in Video Viewfinder
7
8
9
a
b
c
2
3
4
5
6
1 Mobile Light
2 Video Quality
7 Save to
8 Exposure
3 Record Size
Memory for still
4
image capture
5 Record Time
6 Self-timer
9 Focus
a Shake Reducing
b Audio Encode
c Video Encode
a/b
A (Long)1
c/d
|
#
(
While Recording, A2
While Recording, B
$
0
1
Toggle between Internal Photo Camera,
Internal Video Camera, External Photo
Camera and External Video Camera.
2
Fine Video Camera only. (May be
unavailable depending on recording size.)
8
Camera & Imaging
Zoom In/Out
Toggle Mode
Adjust Brightness
Toggle External
Camera and
Internal Camera
Toggle Mobile
Light Mode
Change Quality
Pause/Resume
Recording
Capture Still
Images
Cancel Recording
(Start Over)
Open Help
1
Press B to open Options menu for more
functions/settings.
8-17
Opening Files
Opening Saved Files via Review
Opening Last Saved File
Open/play last saved mobile camera
file; access older files as needed.
1 | (Long)
Enlarging Images
After 1, %
Pausing/Resuming Video
After 1, % (press to pause/resume)
Opening Help
[Review Window] 0
Opening from Viewfinder
[Photo Viewfinder]/[Video Viewfinder]
| (Long)
Accessing Older Files
1 In Review window, A
8
Camera & Imaging
Review File List
Review Window
. To end Review, press ".
. File list appears.
. Press A to toggle lists.
2 Select file S %
. File opens/plays.
8-18
Editing Images
Picture Editor
Picture Editor Options
The following options are available.
Some images may not be editable
depending on file type and size.
Resize
Frame
Paste
Retouch
Face Arrange
Correction
Rotate
File Format
1 % S Data Folder S %
2 Pictures S % S Select
image S %
3 B S Edit S %
4 Picture Editor S %
5 Select effect S % S Edit
. To start over, press $.
6 When finished, A
7 Save as New S %
. To overwrite, select Overwrite and
press %. (Omit 8.)
8 Enter name S % S Save
here S %
Canceling Effects
After 5, Undo S %
, To restore effect immediately after
canceling, select Redo and press %.
Add stamps to images
Make smiley, angry or
sad faces
Correct images
Rotate images
Convert file format
and change file size
8
Camera & Imaging
Stamp
Select from preset sizes
or crop image
Add Frame to images
Add text/dates to images
Dress up images with
preloaded visual effects
Basic Operation
Picture Editor Menu
8-19
Editing Images
Changing Image Size
Select from preset sizes or crop image.
Resize to Preset Size
1 In Picture Editor menu,
Resize S %
4%
. Editing is complete.
Zooming In/Out
After 3, B S e S 4
Cropping Images
Resize Window
Retouch S %
Adding Frames
Camera & Imaging
1 In Picture Editor menu,
Frame S %
2 Select size S %
3 g Specify image area
2 Select frame S %
3%
. Editing is complete.
3 g Move + to the lower right
corner of the portion to
crop S %
. If crop frame does not appear,
omit 3.
4%
. Editing is complete.
Specifying Image Area
After 3, g S 4
Zooming In/Out
After 3, B S e S 4
Advanced
0 (Using additional editing options (P.8-28)
8-20
1 In Picture Editor menu,
1 In Resize window, Cut S % 2 Select effect S %
2 g Move + to the upper left 3 %
. Editing is complete.
corner of the portion to
crop S B
8
Applying Visual Effects
Render in sepia tones or add blur, etc.
Editing Images
Face Arrange
Make faces smiley, sad, etc.
1 In Picture Editor menu, Face
Arrange S %
Adjusting Positions
4%
Change the default positions and sizes
of targets to fit the image.
1 In Face Arrange menu, B
SB
. A rectangle appears with + in the
upper left corner.
2 g Move + to top left of
face S B
Face Arrange Menu
. Editing is complete.
Important Face Arrange Usage Note
. When using Face Arrange, take care
not to create images that may
embarrass or offend others. Always
obtain permission before
photographing others.
of face
5 % S Yes S % S Save
here S %
. Image is saved as a new entry
with Face Arrange positions
adjusted. Complete Face
Arrange. Face Arrange is applied
to the adjusted positions.
8
Camera & Imaging
2 Select type S %
3%
3 g Move + to bottom right
. Face line is set. Set the eyes and
then mouth in the same way.
8-21
Editing Images
Composite
Composite Options
5 Merge Panorama S %
The following options are available.
Some images may not be editable
depending on file type and size.
Merge
Panorama
8
Camera & Imaging
Panorama Images
Panorama Image Effects:
Near View
Best suited for close-up
shots
Document
Standard
Use for images with text
Apply to other images
1 % S Data Folder S %
2 Pictures S % S Select
image S %
3 B S Edit S %
4 Composite S %
Advanced
0 (Combining reduced images (P.8-28)
8-22
here S %
Changing Images
After 7, select image S % S B S
Select image S %
Switching Image Positions
After 6, B
Combine up to four
reduced images into one
Combine two still
images into one
Split Picture
9%
a Enter name S % S Save
. File selected in 2 is set as left
image.
6 <Empty> S % S Select
image S %
7 EFFECT S % S Select
effect S %
. Editing is complete.
8 When finished, A
. Merged image appears.
Printing
Printing Images
Digital Print Order Format (DPOF)
5 Select image S B
. Activate Bluetooth® on the printer.
. Some images may not be sent depending
on file type and size.
1 % S Data Folder S % S
Pictures S %
1 % S Settings S % S f
2 Memory Card S % S
DPOF S %
3 Number of Copies S %
4 For Each Picture S % S
Select folder S %
6 Enter a number of copies to
print S %
. For more settings, repeat 5 - 6.
7A
Applying a Number to All Images
In 4, For All Pictures S % S Enter a
number of copies to print S %
Canceling Specified Number
In 6, enter 00 S % S A
Viewing Current Print Settings
In 3, Check Settings S %
2 Select image S B S Print
S%
3 Via Bluetooth S % S
Select printer S %
4 Yes S %
. To cancel, press A.
When Authorization Code is Required
Enter Authorization Code S %
8
Camera & Imaging
Phone/G
Using Printers
Connect handset to a Bluetooth®-compatible
printer and print images in Pictures folder.
Select images from Memory Card and
specify the number of copies to print
on DPOF-compatible printers, or at
digital printing services.
DPOF settings made on other devices
are unusable; delete existing settings
to create new ones on handset.
Advanced
0 (Changing print settings (P.8-28)
8-23
Additional Functions
[ Photo Camera Settings (General)
General
Changing function
% S Camera S % S Set Camera Key S %
assigned to
S Select function S %
Camera Key (|)
Photo Camera
Some functions may be unavailable or accessible via a
different menu path depending on camera mode.
Opening Help
8
Camera & Imaging
8-24
Releasing shutter
remotely with a
Bluetooth® watch
Disabling remote
shutter control via
Bluetooth® watches
In Photo Viewfinder, B S Help S %
In Photo Viewfinder, press the corresponding
button on Bluetooth® watch
. Connect handset to a Bluetooth® watch and
set Set Remote Shutter to On beforehand. For
details, see the Bluetooth® watch guide.
In Photo Viewfinder, B S Shutter Setting S %
S Set Remote Shutter S % S Off S %
. Available when a Bluetooth® watch is
registered.
Selecting
Self-timer time/
repeat interval
In Photo Viewfinder, B S Self-timer S % S
Select time S %
. For Self Timer Camera, select time or repeat
interval.
Changing image
size
In Photo Viewfinder, B S Picture Size S % S
Select size S %
Setting Center
Auto Focus
In Photo Viewfinder, B S Focus Setting S %
S Center Auto Focus S %
Specifying point of
focus manually
Adjusting focus
quickly for
close-up shots
Adjusting focus
manually
In Photo Viewfinder, B S Focus Setting S %
S Spot Auto Focus S %
. A frame appears on Display; use g to move
frame over target point of focus.
In Photo Viewfinder, B S Focus Setting S %
S Macro S %
In Photo Viewfinder, B S Focus Setting S %
S Manual Focus S % S Adjust focus S %
. To readjust focus, press !.
Canceling
Continuous AF
In Photo Viewfinder, B S Focus Setting S %
S Continuous AF S % S Off S %
Canceling Chase
Focus
In Photo Viewfinder, B S Focus Setting S %
S Chase Focus S % S Off S %
Changing focus
frame design
In Photo Viewfinder, B S Focus Setting S %
S Focus Mark S % S Select pattern S %
Additional Functions
Releasing shutter
when subject
smiles
Adjusting smile
detection level
Releasing shutter
when subject turns
face to camera
Changing shutter
click sound
In Photo Viewfinder, B S Shutter Setting S %
S Shutter Mode S % S Egao S %
In Photo Viewfinder, B S Shutter Setting S %
S Egao level S % S Select level S %
. Lower the level when detection is slow.
In Photo Viewfinder, B S Shutter Setting S %
S Shutter Mode S % S Furimuki S %
In Photo Viewfinder, B S Shutter Setting S %
S Shutter Sound S % S Select pattern S %
. Shutter click sounds for continuous shooting and
panorama/scanner image capture are fixed.
In Photo Viewfinder, B S Settings S % S
Picture Quality S % S Select quality S %
Adjusting light
sensitivity
In Photo Viewfinder, B S Settings S % S
ISO Sensitivity S % S Select level S %
Adjusting image
color to lighting
conditions
In Photo Viewfinder, B S Settings S % S
White Balance S % S Select mode S %
Adjusting
brightness
In Photo Viewfinder, B S Settings S % S
Exposure S % S Adjust level
Selecting shake
reduction option
In Photo Viewfinder, B S Settings S % S
Shake Reducing S % S Select option S %
Capturing images
in low light
In Photo Viewfinder, B S Settings S % S
Long Exposure S % S Select time S %
Switching
indicator view
In Photo Viewfinder, B S Settings S % S
Display Setting S % S Select option S %
In Photo Viewfinder, B S Settings S % S Set
Send Key S % S Short press or Long press S
% S Select option S %
. Select send option separately for each key
press method.
Changing save
location
In Photo Viewfinder, B S Save Setting S % S
Save Pictures to S % S Select option S %
Selecting
automatic save
option
In Photo Viewfinder, B S Save Setting S %
S Auto Save S % S Select option S %
Disabling quick
transition to
Viewfinder after
saving images
. When Off, press % after image capture to save.
In Photo Viewfinder, B S Save Setting S %
S Background Save S % S Off S %
In Photo Viewfinder, B S Mobile Light S %
S Select mode S %
Changing Mobile
Light mode
. Mobile Light goes out automatically after three
minutes. Reactivate mobile camera to
re-illuminate it.
. Do not use Mobile Light near people's faces or
look into the light yourself.
[ Photo Camera Settings (Selected Camera)
Changing
continuous
shooting mode
In Shooting Camera Viewfinder, B S
Continuous Type S % S Select mode S %
Changing Look
Back Camera
sound
In Look Back Camera Viewfinder, B S Turn
Sound S % S Select sound S %
Changing Clock/
Calendar type for
Wallpaper Camera
In Wallpaper Camera Viewfinder, B S
Clock/Calendar S % S Select type S %
8
Camera & Imaging
Changing image
quality
Selecting send
option assigned
to A
8-25
Additional Functions
7In Panorama Camera or Scanner
Camera Viewfinder, B S See below
8
Changing
panorama/
scanner settings
Hiding Guides
Assisting Lines S % S Off S %
Previewing
panorama image
After panorama image capture, Preview S %
Changing
panorama image
preview method
After panorama image capture, Preview S %
S B S Select method S %
Camera & Imaging
Changing exposure
time for Long
Exposure Camera
Locking Display Brightness during Image
Capture
AE-Lock S % S Enable S %
. Available when Auto Save is Off.
. Available when Auto Save is Off.
In Long Exposure Camera Viewfinder, B S
Exposure Time S % S Select time S %
[ Correction & Preview
7After image capture, B S Correlate
to Face S % S See below
Correcting portrait
auto focus images
. Available when Auto Save is Off.
Adjusting Face/Background Brightness
Against sun S % S %
Blurring Out-of-Focus Portions
Portrait S % S %
After image capture, B
Brightening backlit
. May be unavailable or require access via
subjects (Dynamic
D-Range in Options menu depending on Auto
Range Adjustment)
Save setting.
8-26
Seeking guidance
for better shots
After image capture, &
. Follow onscreen instructions.
. May be unavailable depending on Auto Save
setting.
After image capture, 1 - 9 (Long)
. Available when Auto Save is Off or On(Preview
Manual).
. Use g to see other portions enlarged. Press %
to enlarge further. Press $ to cancel.
. Key Assignments:
, Portrait
Checking image
1 (Upper Left) 2 (Upper Center) 3 (Upper Right)
4 (Center Left) 5 (Center)
6 (Center Right)
details before saving
7 (Lower Left) 8 (Lower Center) 9 (Lower Right)
, Landscape (rotated 90 degrees counterclockwise)
3 (Upper Left) 6 (Upper Center) 9 (Upper Right)
2 (Center Left) 5 (Center)
8 (Center Right)
1 (Lower Left) 4 (Lower Center) 7 (Lower Right)
. May be unavailable depending on image size,
etc.
[ My Camera
Deleting My
Cameras
In Photo Viewfinder, B S Switch Camera S
% S Select My Camera S B S Delete My
Camera S % S Yes S %
Editing My
Cameras
In Photo Viewfinder, B S Switch Camera S
% S Select My Camera S B S Edit My
Camera S % S My Camera Name: or Note:
S % S Edit S % S A
Additional Functions
Video Camera
In Video Viewfinder, B S Mobile Light S %
S On S %
In Video Viewfinder, B S Help S %
Opening Help
. Press A to toggle Help window for indicator
descriptions and key assignments.
Selecting
Self-timer time
In Video Viewfinder, B S Self-timer S % S
Select time S %
Adjusting
brightness
In Video Viewfinder, B S Settings S % S
Exposure S % S Adjust level
Adjusting focus
quickly for
close-up shots
In Video Viewfinder, B S Focus Setting S %
S Macro S %
In Video Viewfinder, B S Focus Setting S %
S Manual Focus S % S Adjust focus S %
. To readjust focus, press !.
In Video Viewfinder, !
Locking focus
. Frame subject in center of Viewfinder first.
. To start over, press ! again.
Changing image
quality
In Video Viewfinder, B S Settings S % S
Video Quality S % S Select quality S %
Activating
automatic saving
In Video Viewfinder, B S Save Setting S %
S Auto Save S % S On S %
Changing save
location
In Video Viewfinder, B S Save Setting S %
S Save Videos to S % S Select option S %
. Mobile Light goes out automatically after three
minutes. Reactivate mobile camera to
re-illuminate it.
. Do not use Mobile Light near people's faces or
look into the light yourself.
Capturing images
while recording
video (still image
capture)
While recording, B
Changing
recording size
. Captured images are saved when saving
recorded clip; open them via Review or Data
Folder.
In Video Viewfinder, B S Record Time/Size
S % S For Message or Extended Video S %
S Select size S %
. Selectable item depends on camera mode.
Enlarging
Viewfinder size
In Video Viewfinder, B S Display Size S %
S Enlarge S %
Recording video
without sound
In Video Viewfinder, B S Settings S % S
Microphone S % S Off S %
Changing video
encoding
In Video Viewfinder, B S Save Setting S %
S Video Encode or Audio Encode S % S
Select option S %
8
Camera & Imaging
Adjusting focus
manually
Activating Mobile
Light
. Selectable item depends on camera mode.
Disabling shake
reduction
In Video Viewfinder, B S Shake Reducing S
% S Off S %
Prioritizing video
frame rate
In Video Viewfinder, B S Save Setting S %
S Picture Setting S % S Prio Motion S %
8-27
Additional Functions
[ Composite
Editing Images
7% S Data Folder S % S Pictures S
[ Picture Editor
% S Select file S % S B S Edit S % S
Composite S % S See below
7% S Data Folder S % S Pictures S
% S Select file S % S B S Edit S % S
Picture Editor S % S See below
Creating Split Picture
SplitPicture 480x854 or SplitPicture 240x320 S
% S <Empty> S % S Select file S % S
When finished, A S Enter name S % S Save
here S %
Changing Text/Outline Color
Paste S % S B S Select text color S % S
b S Select outline color S % S A
Adding Text
Paste S % S Free Text S % S Enter text S
% S g Move text S %
8
Combining
reduced images
Camera & Imaging
Adding Dates
Paste S % S Date S % S g Move date S %
Using additional
editing options
Deleting Images
While creating Split Picture, select image S
B S Remove S % S Yes S %
Correcting Image Parameters
Correction S % S Select type S % S %
DPOF
7% S Settings S % S f Phone/G
Converting File Format
File Format S % S File Format S % S Select
format S %
. Changing file format may affect file size/image
quality.
. To return to Picture Editor menu, press $.
Changing File Size
File Format S % S File Size S % S Select
size S %
. Changing file size may affect image quality.
. To return to Picture Editor menu, press $.
8-28
Previewing Split Picture
While creating Split Picture, B S View
Composite S %
Changing Images
While creating Split Picture, select image S
% S B S Select another S %
Adding Stamps
Stamp S % S Select stamp S % S g Move
stamp S %
Rotating Images
Rotate S % S Select type S % S %
. Repeat from selecting <Empty> as needed.
S Memory Card S % S DPOF S % S See
below
Changing print
settings
Adding Dates to Prints
Settings S % S Add Date S % S On S %
Creating an Index Print
Settings S % S Index Print S % S On S %
Resetting
Reset Settings S % S Yes S %
Troubleshooting
Mobile Camera
3 shuts down automatically
Mobile camera won't activate/
3 Auto Save
Cannot use Background Save or
. Background Save/Auto Save is not
available when Save Pictures to is
set to Ask Each Time.
Display went dark during image
. DM005SH camera has built-in
mechanical shutter and ND filter.
Strong shocks to handset during
image capture may close
mechanical shutter for camera
protection, resulting in blank
Viewfinder. Reactivate mobile
camera to reopen the shutter.
3 Image is dark or distorted
. Avoid capturing strong light
sources (sun, lamps, etc.) in the
background.
3 Captured image appears all white
. When Long Exposure is active,
images captured in daylight or
good light appear all white.
Editing Images
3 Cannot save/send edited images
. Edited images may be too large to
save or send via mail.
DPOF
3 properly
Cannot specify print settings
. If Memory Card image files have
been deleted or renamed on PCs
or other devices, reset print settings
and start over with settings.
8
Camera & Imaging
. Battery may be low. Charge
battery or install a charged battery.
. Leaving handset at high
temperature may cause camera
area to heat up, disabling mobile
camera activation; wait a while
and retry.
. Prolonged camera use may cause
camera area to heat up, resulting
in automatic shutdown; wait a
while and retry.
3 capture
8-29
Troubleshooting
Photo Camera Terms
3 Center Auto Focus
. Camera automatically selects
center of the framed image as
point of focus (P.8-24).
3
8
Continuous AF
. Focus continuously adjusts as
focus-locked subject's position
changes (P.8-7, P.8-24).
Camera & Imaging
3 Chase Focus
. Focus tracks focus-locked subject
as it moves within framed image
(P.8-7, P.8-24).
3 Self-timer
. Releases shutter automatically after
selected time elapses (P.8-24).
3 Long Exposure
. Capture images in low light
(fireworks, night scenes, etc.)
(P.8-10). Stabilize handset to
reduce camera shake.
8-30
3 ISO Sensitivity
. Adjust light sensitivity (P.8-25).
Higher ISO brightens low light
images, but increases noise,
making images grainy.
3 White Balance
. Select a mode (Daylight, Tungsten,
Fluorescent, etc.) to adjust image
color to lighting conditions (P.8-25).
Media Player ................................. 9-2
Playlists ........................................... 9-6
Media Player Basics .......................9-2
Using Playlists .................................. 9-6
Music .............................................. 9-4
Additional Functions ..................... 9-7
Troubleshooting ...........................9-10
Playing Music ..................................9-4
Video .............................................. 9-5
Playing Video .................................9-5
9
Media Player
9-1
Media Player
Media Player Basics
Use Media Player to play music/video on DM005SH.
. Download media files from Mobile Internet sites via Media Player or transfer files from PCs or AQUOS Blu-ray Disc recorders
(hereafter "Blu-ray Disc recorders").
. Transfer PC music files and save them on Memory Card.
Music File Support
My Music
SD AUDIO
(Handset/Memory Card)
(Memory Card)
Downloads/Transferred Files Transferred SD-Audio Files
9
Media Player
Video File Support
My Videos
Recorder Contents/
SD VIDEO
(Memory Card)
(Handset/Memory Card)
Downloads/Recorded Files Transferred SD-Video Files
9-2
WMA
(Memory Card)
Transferred WMA Files
Playback Precautions
. Media Player is not compatible with
some recording/playback formats.
Files may not play depending on the
Memory Card status.
. Playback stops for incoming calls.
. If battery is low, Media Player will not
play. Playback stops if battery runs
low during playback.
. Turn down the volume if distortion is
noticeable in Speaker sound.
. Handset plays media while it
downloads (streaming/progressive
download). Packet transmission fees
apply even while playback is paused.
Compatibility
. Files transferred from PCs cannot be
used as ringtones or System Sounds.
Media Player
Downloading Media Files
Download media files from the Internet.
Read information (price, expiry date,
etc.) on the source site.
1 % S Media Player S %
Download Videos S %
. Follow the links to download
media.
Handling Transferred Files
. Copyright laws limit duplicated
material to private use only.
. Files created with PC software, etc.
may not play.
. Comply with copyright and other
intellectual property laws when using
obtained files.
Saving AAC Files
Convert PC music files to
DM005SH-compatible format (P.17-20),
then save to corresponding Memory
Card folder (P.17-23) via Mass Storage.
Install USB Cable driver beforehand.
Saving WMA Files
Follow these steps to save WMA files
via compatible software:
(Copy protected files can only be
played on the handset with which the
files were transferred.)
1 Connect handset to a PC
via USB Cable
9
2 MTP Mode S %
. Copy music from PC. Refer to the
software's help menu for
operational instructions.
Media Player
2 Music or Videos S %
3 Download Music or
Saving Music Files from PCs
. Use software to convert music file format.
. For software usage and specifications,
see the provider's website, etc.
. Disney Mobile does not guarantee
compatibility with any software.
. USB Cable may be purchased
separately.
3 A S Yes S % S
Connection ends
. Disconnect USB Cable.
If Menu in 1 Does Not Appear
. Follow these steps:
% S Tools S % S f Connectivity
S USB Mode S % S From 2
, Operations on the PC may be
required; if prompted, follow
onscreen instructions.
9-3
Music
Playing Music
1 % S Media Player S % S
Using Other Functions while Playing Music
After 4, $ or "
, To stop playback, follow these steps
in Standby:
" S Yes S %
Playing SD AUDIO or WMA Files
In 2, SD AUDIO or WMA S % S
From 3
Searching Music Files
After 3, B S Search S % S Enter
search text S %
Lyric Display-Compatible Files
. Press A to display lyrics.
Music S %
2 My Music S % S f Select
tab (folder)
9
Music Playlists Window
Media Player
3 All Music S %
4 Select file S %
Music Playback Operations
Replay
Skip Forward
Volume Down
Pause
Stop
Switch
Sound Output
Open Help
. Album art appears for compatible
Chaku-Uta Full® files. (WMA album
art is not supported.)
Advanced
9-4
*
1
2
3
4
5
1 Title
2 Artist name
6
7
8
9
6 Elapsed time
7 Volume
3 Track number
8 Information link
4 Status
9 Sound Effects
5 Playback Mode
c
(Long Press: Rewind*)
d
(Long Press: Fast Forward*)
b
(Long Press: Mute)
Volume Up or
Cancel Mute
Music Playback Window
Music Playback Window
Description
a
%
In Pause, $
' (Long)
0
Release for playback.
0 (Resuming from stopped point (Specifying start point (Playing repeatedly or randomly (Changing Sound Effects (And more on P.9-7)
Video
Playing Video
1 % S Media Player S % S
Videos S %
2 My Videos S % S Phone
Memory or Memory Card
S%
Video Playlists Window
Playing Video Files Transferred from
Blu-ray Disc Recorders
In 2, Recorder Contents S % S 4
Playing SD VIDEO Files
In 2, SD VIDEO S % S 4
Searching Video Files
After 3, B S Search S % S Enter
search text S %
At Alarm Time
. Playback pauses.
Video Recorded on Other Devices
. Video image may appear rotated.
Video Playback Operations
For pause, volume up/down, sound
output or help, see P.9-4 "Music
Playback Operations."
Replay
Skip
Forward
c
(Long Press: Rewind*)
d
(Long Press in Pause:
Advance Frame,
Long Press: Fast Forward*)
Toggle
Display Size
*
Release for playback.
Video Playback Window
Description
1
2
3
4
5
Video Playback Window
Advanced
9
2
Media Player
3 All Videos S %
4 Select file S %
5 $ S Playback stops
1
2
3
4
5
Title
Author name
Clip number
Status
Playback Mode
6
7
8
9
6
7
8
9
Elapsed time
Volume
Information link
Sound Effects
0 (Resuming from stopped point (Specifying start point (Accessing linked information (Switching audio output to wireless device (Playing
repeatedly or randomly (Changing Sound Effects (Changing playback size (Setting Backlight status (Hiding linked information (P.9-7)
9-5
Playlists
Using Playlists
Playlists store playback orders. Add
favorite media files to Playlists, or
organize files by artist/genre.
Playlists store only file locations. Source
files remain in All Music or All Videos.
Adding to Playlist
Follow these steps to add a music file
to プレイリスト1:
1 % S Media Player S % S
Music S %
Renaming Playlists
1 In Playlists window, select
Playlist S B
2 Edit List Title S % S Enter
name S %
9
Media Player
2 My Music S %
3 All Music S % S Select file
SB
4 Add to Playlist S % S プレ
イリスト1 S %
Advanced
0 (Organizing Playlists (Sorting files (Opening properties (Deleting/editing SD AUDIO files (Deleting All WMA files (Downloading Contents Keys (P.9-8)
(Organizing Playlists (Sorting files (Downloading Contents Keys (Opening properties (Deleting SD VIDEO files (Renaming files transferred from Blu-ray
Disc recorders (And more on P.9-9)
9-6
Additional Functions
Media Playback
[ Music & Video
Resuming from
stopped point
% S Media Player S % S Music or Videos
S % S Last Played Music or Last Played
Video S %
Specifying start
point
During playback, B S Time Search S % S
Enter time S %
Accessing linked
information
During playback, B S Access Web Link S
% S Yes S %
Switching audio
output to wireless
device
% S Media Player S % S Music or Videos
S % S Settings S % S gSound Output S
% S Bluetooth Device S %
[ Music
Mode S % S See below
Repeat One File
Repeat S %
Playing repeatedly
or randomly
Repeat All Files
Repeat All S %
7During playback, B S Settings S %
S Playback Mode S % S See below
Playing
repeatedly or
randomly
Repeat One File
Repeat S %
Repeat All Files
Repeat All S %
Play Randomly
Random S %
Changing Sound
Effects
During playback, B S Settings S % S
Sound Effects S % S Select effect S %
Changing
playback size
During playback, B S Settings S % S
Display Size S % S Select size S %
Setting Backlight
status
Hiding linked
information
During playback, B S Settings S % S
Backlight S % S Select option S %
. Selecting Normal Settings applies Display
Backlight settings.
During playback, B S Settings S % S Web
Link Setting S % S Off S %
9
Media Player
7During playback, B S Playback
[ Video
Some functions may be unavailable depending on file.
Play Randomly
Random S %
Repeat Randomly
Random Repeat S %
Changing Sound
Effects
During playback, B S Sound Effects S % S
Select effect S %
9-7
Additional Functions
7% S Media Player S % S Music S
Managing Music Files
% S SD AUDIO S % S See below
7% S Media Player S % S Music S
Deleting Single Files
All Music S % S Select file S B S Delete
Track S % S Yes S %
% S My Music S % S f Select tab (folder)
S See below
Adding New Playlists
B S Add New Playlist S % S Enter name
S%
Organizing
Playlists
Deleting Playlists
Select Playlist S B S Delete Playlist S % S
Yes S %
Media Player
Sorting files
Deleting All WMA
files
% S Media Player S % S Music S % S My
Music S % S f Select tab (folder) S All
Music S % S B S Sort S % S Select
option S %
Downloading
Contents Keys
% S See below
Opening
properties
SD AUDIO Files
SD AUDIO S % S All Music S % S Select
file S B S Details S %
Other Files
My Music S % S f Select tab (folder) S
Select Playlist S % S Select file S B S
Details S %
Deleting All Files
All Music S B S Delete All Tracks S % S
Yes S % S Yes S %
Editing Title/Artist
All Music S % S Select file S B S Edit S %
S Select item S % S Enter title or name S %
Changing File Order
Select Playlist S % S Select file S B S
Change Order S % S Select target location
S%
7% S Media Player S % S Music S
. Source files will be deleted.
. Source files will be deleted.
Deleting Playlist Files
Select Playlist S % S Select file S B S
Delete S % S Yes S %
9
9-8
Deleting/editing
SD AUDIO files
% S Media Player S % S Music S % S
Settings S % S Delete All WMA S % S Enter
Handset Code S % S Yes S %
. Source files will be deleted.
% S Media Player S % S Music S % S My
Music S % S f Select tab (folder) S Select
Playlist S % S Select file (with
)S%S
Yes S %
. Follow onscreen instructions.
Additional Functions
7% S Media Player S % S Videos S
Managing Video Files
% S See below
7% S Media Player S % S Videos S
SD VIDEO Files
SD VIDEO S % S Select file S B S Details
S%
% S My Videos S % S Phone Memory or
Memory Card S % S See below
Adding New Playlists
B S Add New Playlist S % S Enter name
S%
Organizing
Playlists
Deleting Playlists
Select Playlist S B S Delete Playlist S % S
Yes S %
Deleting Playlist Files
Select Playlist S % S Select file S B S
Delete S % S Yes S %
Downloading
Contents Keys
% S Media Player S % S Videos S % S
My Videos S % S Phone Memory or Memory
Card S % S All Videos S % S B S Sort S
% S Select option S %
% S Media Player S % S Videos S % S
My Videos S % S Phone Memory or Memory
Card S % S All Videos S % S Select file
(with
) S % S Yes S %
. Follow onscreen instructions.
Files Transferred from Blu-ray Disc Recorders
Recorder Contents S % S Select file S B S
Details S %
Other Files
My Videos S % S Phone Memory or Memory
Card S % S Select Playlist S % S Select file
S B S Details S %
Deleting SD VIDEO
files
% S Media Player S % S Videos S % S
SD VIDEO S % S Select file S B S Delete
S % S Yes S %
. Source files will be deleted.
Renaming files
transferred from
Blu-ray Disc
recorders
% S Media Player S % S Videos S % S
Recorder Contents S % S Select file S B S
Rename S % S Enter name S %
Checking Memory
Card memory
status
% S Media Player S % S Videos S % S
Recorder Contents S % S B S Memory
Remaining S %
9
Media Player
Changing File Order
Select Playlist S % S Select file S B S
Change Order S % S Select target location
S%
Sorting files
Opening
properties
7% S Media Player S % S Videos S
Deleting files
transferred from
Blu-ray Disc
recorders
% S Recorder Contents S % S See below
Single Files
Select file S B S Delete S % S Yes S %
All Files
B S Delete All S % S Enter Handset Code
S % S Yes S %
9-9
Troubleshooting
Music
3 How do I delete files in All Music?
. Delete All Music files in My Music
via Data Folder (Music or Ring
Songs·Tones).
3 (WMA files are not transferable)
WMA files do not appear
9
Media Player
9-10
. Did you use DM005SH to transfer the
files? Copy protected files can only
be played on the handset with
which the files were transferred.
. Copy protection information may
be corrupted; perform Delete All
WMA and re-transfer the files.
. Files transferred via Mass Storage
appear when moved to
corresponding Memory Card
folder. (Transfer copy protected
files via MTP Mode.)
. WMA files may be corrupted;
perform Delete All WMA and retry.
3 Cannot play WMA files
. Playback rights may have expired
(license not found message
appears); re-transfer the files. If files
still cannot be played, they may
be corrupted; perform Delete All
WMA and retry.
Video
3 How do I delete files in All Videos?
. Delete All Videos files via Data
Folder (Videos).
3 Cannot play video files
. Files created with PC software, etc.
may not play.
S! Appli ......................................... 10-2
Using S! Applications....................10-2
Mobile Widget ............................. 10-3
Customizing Standby Display
(Japanese) ...................................10-3
Additional Functions ...................10-6
Troubleshooting .........................10-10
10
S! Applications &
Widgets
10-1
S! Appli
Using S! Applications
S! Applications & Widgets
Try out the preloaded S! Applications or
download and use DM005SH-compatible
S! Applications offered by Disney
Mobile or SoftBank.
Refer to the S! Application's help
menu or the source Internet site, etc.
for operational instructions.
Remote Control (Familink Remote)
. Use ファミリンクリモコン for AQUOS
S! Application (Japanese) to control
a TV, VCR, etc. via infrared.
1 % S S! Appli S %
2 S! Appli Library S %
S! Appli Library
3 Select application S %
Network S! Applications
. A message appears indicating that
Internet connection is required.
Follow onscreen instructions.
Incoming Calls
. Incoming calls automatically pause
S! Application.
Opening S! Appli Notification History
In 2, Notification History S %
10
Exiting S! Applications
1"
2 End S %
Pausing S! Applications
In 2, Suspend S %
Resuming S! Applications
% S Resume S %
, Select Cancel to open Main Menu
and keep the S! Application
paused. (Additional function
activation may be disabled
depending on the S! Application.)
, Select End to exit the S! Application.
Advanced
0 (Downloading S! Applications (Adjusting S! Application sound volume (Canceling surround effect (Setting handset responses to
incoming transmissions (Setting S! Application to activate in Standby (Setting Permissions (Opening properties (Moving S! Applications
to Memory Card (Changing S! Application settings (Deleting S! Applications (Restoring default S! Application settings (Restoring default
S! Appli Library (Synchronizing Memory Card S! Applications with DM005SH (Opening Java= license information (P.10-6 - 10-7)
10-2
Mobile Widget
Customizing Standby Display (Japanese)
Obtaining Widgets
1 % S Mobile Widget S %
Deleting Widgets
1 In Mobile Widget menu,
Widget Contents S %
2 Select widget S B
. S!速報ニュース/S!ともだち状況 cannot
be deleted.
Widgets
Mobile Widget Menu
2 Widget Store S %
. Follow onscreen instructions.
Installing Widgets
. Some widgets may need to be
installed manually; follow these steps:
[Mobile Widget Menu] Widget
Contents S % S Select widget S
B S Install S % S Yes S %
Activating Widgets Not Saved in Standby
[Mobile Widget Menu] Widget
Contents S % S Select widget S
%S%
3 Delete S % S Yes S %
Deleting All Widgets
In 2, S!速報ニュース/S!ともだち状況 S
B S Delete All S % S Enter
Handset Code S % S Yes S %
, If there is a widget saved in
Standby, a confirmation appears;
follow onscreen prompt.
S! Applications & Widgets
Paste various widgets (applications) to
Standby to access/activate
information/functions immediately
from Standby.
10
Advanced
0 (Opening properties (Opening widget notification history (Canceling automatic updates (Receiving updates automatically while
outside Japan (Hiding confirmation outside Japan (Disabling widget notifications (Disabling cookies (Deleting cookies (P.10-8)
10-3
Mobile Widget
Saving Widgets to Standby
S! Applications & Widgets
10
1a
2 g Select
(OPEN) S %
Using Widgets
1 a S g Select widget
S%
Using Sheets
Paste widgets and Standby Shortcuts on
each sheet; toggle sheets to use them.
Toggling Sheets
1aSA
Widget Tab
Standby Shortcut Tab
↓A
3 Select widget S %
. Corresponding icon appears.
4 g Specify target location
S%
Using Pointer
. After 1, Long Press A to activate
pointer navigation; select widgets, etc.
. To cancel pointer navigation, Long
Press A.
2%
. Widget activates; follow onscreen
instructions.
. To toggle further, press A or ).
. Sheet name appears at the top,
then disappears.
. Save widgets as needed;
corresponding icons appear on
the current sheet.
Using Locked Sheets
a S Select
S % S Enter
Handset Code S %
Advanced
0 (Logging in to Yahoo! JAPAN (Moving widgets (Slowing pointer speed (Editing sheet names (Locking sheets (And more on P.10-8 - 10-9)
10-4
Mobile Widget
Saving Widgets on Other Sheets
Removing Widgets from Standby
1 a S g Select widget
2 Select widget S B
3 Set as StbyShortcut S %
2 Operation S %
Widget Contents S %
SB
Using S! Quick News & S! Friend's
Status Widget
DM005SH is preloaded with S!速報ニュース/
S!ともだち状況 (S! Quick News &
S! Friend's Status widget) that shows
S! Quick News and S! Friend's Status
information in Standby.
S! Quick News &
S! Friend's Status Widget
View Settings
4 Select sheet S %
3 Remove S %
4 Yes S %
[ Setting View Pattern
1 a S g Select S! Quick
2
3
News & S! Friend's Status
widget S B
Settings S % S Pattern
Setting S %
Select item S % ( / )
SA
S! Applications & Widgets
1 In Mobile Widget menu,
10
[ Switching View
1 a S g Select S! Quick
5 Specify target location
S%
Advanced
2
News & S! Friend's Status
widget S B
Operation S % S Switch
Pattern S %
. Repeat the steps above to switch
the view.
0 (Removing multiple widgets at once (Adding news items (Changing news scroll speed (Showing unread news only (Assigning
members (Managing members (P.10-9)
10-5
Additional Functions
7% S S! Appli S % S See below
S! Applications
Downloading
S! Applications
S! Applications & Widgets
10
Activating Screensaver
Settings S % S Screensaver S % S Switch
On/Off S % S On S %
% S S! Appli S % S S! Appli Library S % S
Download S! Appli S %
. Follow onscreen instructions.
Adjusting
S! Application
sound volume
% S S! Appli S % S Settings S % S
Application Volume S % S Adjust level S %
Canceling
surround effect
% S S! Appli S % S Settings S % S
Surround S % S Off S %
7% S S! Appli S % S Settings S % S
Setting Screensaver
S! Appli Library S % S Select application S
B S As Screensaver S %
. As Screensaver appears for compatible
Setting
S! Applications.
S! Application to
. Screensaver may not start or operate correctly
activate in Standby
when an external device (Headphones, etc.) is
connected to handset.
Calls & Alarms S % S See below
Setting handset
responses to
incoming
transmissions
Changing Screensaver Activation Time
Settings S % S Screensaver S % S
Activation Time S % S Enter time S %
Showing Calls
Select item S % S Show Call Notice S %
Pausing S! Application for Incoming Mail
Incoming Message S % S Message Priority
S%
Disabling Automatic Screensaver Restart
Settings S % S Screensaver S % S Stop
Auto Start S % S On S %
Showing Alarm Notice
Alarm S % S Alarm Notice S %
Showing Incoming S! Appli Request Notice
Notification S % S Start Notice S %
7% S S! Appli S % S S! Appli Library
S % S Select application S B S
Permission S % S See below
Setting Permissions
Customizing Permissions for S! Appli Operations
Select item S % S Select option S %
Resetting Permission Settings
Reset Settings S % S Yes S %
Opening properties
10-6
% S S! Appli S % S S! Appli Library S % S
Select application S B S Details S %
Additional Functions
. When an older version of the S! Application is
saved, choose Yes or No and press %.
. Repeat application selection step, as needed,
before pressing B.
. Some S! Applications may not be moved to
Memory Card.
Restoring default
S! Application
settings
Restoring default
S! Appli Library
7% S S! Appli S % S Settings S % S
See below
Activating Notification Setting
Notification Setting S % S On S %
Changing
S! Application
settings
Setting Backlight Status
Backlight S % S Switch On/Off S % S
Select option S %
. Selecting Normal Settings applies Display
Backlight settings.
% S S! Appli S % S Settings S % S Set to
Default S % S Enter Handset Code S % S
Yes S %
% S S! Appli S % S Settings S % S
Memory All Clear S % S Enter Handset
Code S % S Yes S %
. Delete IC Card data beforehand. (Procedures to
delete IC Card data vary by Lifestyle-Appli;
contact Osaifu-Keitai® service providers for details.)
. Memory All Clear deletes all downloaded
S! Applications and Lifestyle-Applications.
Synchronizing
Memory Card
S! Applications
with DM005SH
% S S! Appli S % S Settings S % S
Synchronization S % S Yes S %
Opening Java=
license information
% S S! Appli S % S Information S %
S! Applications & Widgets
Moving
S! Applications to
Memory Card
% S S! Appli S % S S! Appli Library S % S
A S Select application S % ( / ) S
Complete selection S B S Move to Card S %
10
Disabling Backlight Flashing
Backlight S % S Blink S % S Off S %
Disabling Vibration
Vibration S % S Off S %
Deleting
S! Applications
% S S! Appli S % S S! Appli Library S % S
Select application S B S Delete S % S
Yes S %
. Handset Code may be required.
. Cancel Screensaver to delete Screensaver
S! Application.
10-7
Additional Functions
Mobile Widget
[ Managing
S! Applications & Widgets
Opening
properties
% S Mobile Widget S % S Widget Contents
S % S Select widget S B S Details S %
. Select widget other than S!速報ニュース/S!ともだち
状況.
[ Widget History
7% S Mobile Widget S % S Widget
History S % S See below
Opening widget
notification history
Showing All Text
Select record S B S View full text S %
Deleting a Record
Select record S B S Delete S % S Yes S %
Deleting All Records
Select record S B S Delete All S % S Enter
Handset Code S % S Yes S %
10
[ Settings
10-8
Disabling widget
notifications
% S Mobile Widget S % S Settings S % S
Notification Setting S % S Off S %
Disabling cookies
% S Mobile Widget S % S Settings S % S
Cookies S % S Disabled S %
Deleting cookies
% S Mobile Widget S % S Settings S % S
Delete Cookies S % S Yes S %
[ Operations in Standby
Selecting widget
display option
Logging in to
Yahoo! JAPAN
a S B S Settings S % S Show Widget S
% S Select option S %
. Choose Off to disable widget display even
when a is pressed; re-enable via Show Widget
in Standby Display menu.
a S B S Yahoo!JAPAN log in S %
. Follow onscreen instructions.
. To log out, select Yahoo!JAPAN log out in the
steps above.
Moving widgets
a S g Select widget S B S Operation S
% S Change Layout S % S Specify target
location S %
Canceling
automatic updates
% S Mobile Widget S % S Settings S % S
Auto Refresh S % S Off S %
Moving widgets to
front/back
a S g Select widget S B S Operation S
% S To Front or To Back S %
Receiving updates
automatically while
outside Japan
% S Mobile Widget S % S Settings S % S
AutoConnect Abroad S % S On S %
Updating view
a S g Select widget S B S Operation S
% S Update View S %
Hiding confirmation
outside Japan
% S Mobile Widget S % S Settings S % S
Set Use Abroad S % S Off S %
Additional Functions
7a S B S Operate from List S % S
Remove S % S See below
Selected Widgets
Select & Remove S % S Select widget S %
( ) S Complete selection S A S Yes S %
Slowing pointer
speed
a S B S Settings S % S Cursor Speed S
% S Slow S %
a S Select S! Quick News & S! Friend's Status
widget S B S Operation S % S Content
Menu S % S Add News S % S S! Quick
Adding news items
News List S % S 登録はこちら S % S Yes S
% S Select genre S % S Select item S %
. Follow onscreen instructions.
Changing news
scroll speed
a S Select S! Quick News & S! Friend's Status
widget S B S Operation S % S Content
Menu S % S News Display S % S News
Speed S % S Select speed S %
Showing unread
news only
a S Select S! Quick News & S! Friend's Status
widget S B S Operation S % S Content
Menu S % S News Display S % S Target
News S % S Unread Only S %
[ Sheets
7a S B S Settings S % S Sheet
Editing sheet
names
Settings S % S Change Sheet Name S % S
See below
Renaming
Select sheet S % S Enter name S %
Resetting All Sheet Names
B S Yes S %
7a S B S Settings S % S Sheet
Settings S % S Set Sheet Lock S % S Enter
Handset Code S % S See below
Locking sheets
[ S! Quick News & S! Friend's Status Widget (S! Friend's
Status)
7
a S Select S! Quick News &
S! Friend's Status widget S % S g Select
member S B S Operation S % S Content
Menu S % S See below
Changing Method for Temporary Access
Unlock Method S % S No Password S %
and press % to unlock
10
a S Select S! Quick News & S! Friend's Status
widget S B S Operation S % S Content
Assigning members Menu S % S Assign Member S % S Select
category S % S Select entry/member S %
S (Empty) S %
Activating Lock
Select sheet S % S On S %
. Press a, then select
sheet temporarily.
S! Applications & Widgets
Removing multiple
widgets at once
All Widgets
Remove All S % S Select sheet S A S Yes
S%
[ S! Quick News & S! Friend's Status Widget (S! Quick News)
Managing members
Deleting Members
Delete S % S Yes S %
Changing Member Order
Move S % S B (Up) or A (Down) S %
Changing Member Icons
Change Icon S % S Select Pictogram S %
10-9
Troubleshooting
S! Applications
3 Memory Card
Cannot move S! Applications to
S! Applications & Widgets
10
10-10
. Memory Card memory may be low.
S! Applications do not pause for
transmissions despite
3 incoming
Calls & Alarms settings
. Regardless of setting, a notice
appears for Screensaver
S! Applications.
Calendar & Tasks ........................ 11-2
Hour Minder ............................... 11-27
Calendar.......................................11-2
Tasks ...............................................11-6
Pedometer ................................. 11-28
Alarms .......................................... 11-8
Using Alarms..................................11-8
Wakeup TV................................. 11-10
Using Wakeup TV........................11-10
Luxury Animation ...................... 11-12
Using Hour Minder...................... 11-27
Using Pedometer ....................... 11-28
Compass .................................... 11-30
Using Compass .......................... 11-30
S! GPS Navi................................. 11-31
Using S! GPS Navi ....................... 11-31
Playing Animation with Music &
Illumination..................................11-12
Document Viewer ..................... 11-34
Household Accounts ................ 11-13
Notepad ..................................... 11-35
Managing Household Expenses ...11-13
Calculator .................................. 11-17
Using Calculator.........................11-17
Expenses Memo ........................ 11-18
Adding Expenses........................11-18
Osaifu-Keitai® ............................ 11-19
Osaifu-Keitai® (Japanese).........11-19
Locking IC Card .........................11-20
Simulated Call ........................... 11-23
Faking Incoming Calls ...............11-23
Stopwatch.................................. 11-24
Using Stopwatch ........................11-24
Countdown Timer ...................... 11-25
Using Countdown Timer ............11-25
World Clock ............................... 11-26
Opening World Clock................11-26
Opening PC Documents .......... 11-34
Saving Text.................................. 11-35
Voice Recorder .........................11-36
Recording/Playing Voice ......... 11-36
Scan Barcode ............................ 11-37
Scanning Barcodes ................... 11-37
Create QR Code........................ 11-38
Creating QR Codes................... 11-38
Scan Card .................................. 11-39
Scanning Business Cards........... 11-39
11
Handy Extras
Scan Text.................................... 11-40
Scanning Text............................. 11-40
Kanji Grabber ............................ 11-41
Using Kanji Grabber................... 11-41
Additional Functions ................. 11-42
Troubleshooting .........................11-59
11-1
Calendar & Tasks
Calendar
Opening Calendar
1 % S Tools S % S In PIM/
Toggling View
Key Assignments
Press A to toggle Calendar window:
Life menu, Calendar S %
[ All Views
Open Previous Page
Open Next Page
Open Help
(
#
0
[ 1Month/3Month View
Handy Extras
Select Date
Go to Current Date
g
5
[ 6Month View
Go to Current Month
Select Month
1Month View
11
3Month View
Advanced
[ Week View
Select Date
Select Time Block
Calendar Window
6Month View
5
g
f
e
Week View
0 (Changing default view (Jumping to specified date (Changing date color (Selecting task view option (Adding stamps (1Month/
11-2
3Month View) (Hiding schedules (Saving additional holidays (Hiding/showing holidays (P.11-42)
Calendar & Tasks
Saving Schedules
3 Enter subject S %
Follow these steps to save subject,
Category, start/end date/time, Alarm
and schedule details:
(Enter Subject or Description to save
entry.)
time S % S A
9 Description: S % S Enter
schedule details S %
1 In Calendar window, select
a A S Saved
date S %
4 f Preset S Select
Category S %
5 Enter start date/time S %
Selecting Category from History
In 4, f History S Select Category
S % S From 5
Selecting Custom Category
In 4, f Definable S Select
Category S % S From 5
All-Day Schedule
In 5, B S % S From 9
Custom Alarm Time
In 8, Alarm Time: S % S Other S
% S Enter date/time S % S A S
From 9
Handy Extras
2 <Add New Entry> S %
7 Alarm: S %
8 Alarm Time: S % S Select
11
6 End: S % S Enter end
date/time S %
Advanced
0 (Setting Location (Creating Categories (Saving repetitive schedules (Editing entries (Changing Alarm tone/video & duration
(Changing Alarm volume (Selecting Vibration option (Changing Small Light & Key Illumination settings (And more on P.11-43 - 11-44)
11-3
Calendar & Tasks
At Alarm Time
Alarm activates; sounds/vibrates by
related settings.
Opening Schedules/Tasks
1 In Calendar window, select
date S %
[ First Film Appearance (Japanese)
The following Disney characters' first
appearances are commemorated in
Calendar:
Daisy Duck
Goofy
Donald Duck
Mickey & Minnie
Handy Extras
11
Schedule List
Stopping Alarm to Return to Standby
. While Alarm sounds/vibrates, press
%, " or $.
Stopping Alarm to Open Schedule
. While Alarm sounds/vibrates, press a
key other than %, " or $.
When Another Function is Active
. Alarm may not activate until handset
returns to Standby.
Incoming Calls
. Active Alarm stops for incoming calls.
Information window opens after
handset returns to Standby.
2 Select schedule or task
S%
3 " S Standby returns
Opening Task List
In 2, select task S B S Go to
Tasks S %
Accessing Secret Entries
[Calendar Window] B S Unlock
Temporarily S % S Enter Handset
Code S %
January 9th
May 25th
June 9th
November 18th
Above data cannot be deleted, or
transferred via mail, Infrared, etc.
Opening Related Message
Open schedule-related messages
saved from Messaging message list.
1 In schedule list, select
schedule S %
2 B S Related Mail S %
. Related message opens.
. To return to schedule window,
press $.
Deleting Message from Schedule
After 1, % S Related Mail: S % S
Yes S % S A
Advanced
0 (Searching entries (Checking memory status (Deleting all entries (Deleting entries by specifying week (Week View) (Deleting entries by
11-4
specifying month (1Month/3Month View) (Deleting entries in six months (6Month View) (P.11-44 - 11-45)
Calendar & Tasks
Information Link
Set to show or hide the following
information in Calendar.
Reservation
List
Birthday
TV Timer and TV
Recording Timer entries
Birthdays entered in
Phone Book
1 In schedule list, select entry
SB
2 Edit S %
3 Edit S A
Deleting Entries
In 2, Delete S % S Yes S %
, Timer is canceled.
Making Birthday Calls
1 In schedule list, select entry
SB
2 Call S % S Select phone
Deleting Schedules
[ One Entry
1 In schedule list, select
schedule S B
2 Delete S % S This
Appointment S % S Yes
S%
[ All Entries of the Day
1 In Calendar window, select
date S B
2 Delete S % S All This Day
S % S Yes S %
Handy Extras
1 In Calendar window, B
2 Calendar Settings S %
3 Data to Show S %
4 Select item S % ( / )
5A
Editing TV Timer/TV Recording
Timer
11
number S %
. Omit number selection step if only
one number is saved.
Sending Birthday Messages
In 2, Mail S % S Select number/
address S % S Complete
message S A
, Omit number/address selection
step if only one number or address is
saved.
, For phone numbers, select E Mail or
SMS and press %.
11-5
Calendar & Tasks
Tasks
Saving Tasks
3 Enter subject S %
Follow these steps to save subject, due
date/time, Alarm and task details:
(Enter Subject or Description to save entry.)
time S % S A
7 Description: S % S Enter
1 % S Tools S % S In PIM/
task details S %
Life menu, Tasks S %
Handy Extras
11
2 <Add New Entry> S %
5 Alarm: S %
6 Alarm Time: S % S Select
8 A S Saved
4 Enter due date/time S %
Task with No Due Date/Time
In 4, B S % S From 7
Custom Alarm Time
In 6, Alarm Time: S % S Other S
% S Enter date/time S % S A S
From 7
Advanced
0 (Hiding tasks (Editing tasks (Setting priority (Changing Alarm tone/video & duration (Changing Alarm volume (Selecting Vibration option
11-6
(Sounding Alarm tone even in Manner mode (Changing Illumi Display settings (Changing Small Light & Key Illumination settings (P.11-45 - 11-46)
Calendar & Tasks
At Alarm Time
Alarm activates; sounds/vibrates by
related settings.
Opening Tasks
1 % S Tools S % S In PIM/
Life menu, Tasks S %
Deleting Tasks
[ One Entry
1 In task list, select task S B
2 Delete S %
3 This Task S % S Yes S %
[ All Completed Tasks
Task List
Stopping Alarm to Return to Standby
. While Alarm sounds/vibrates, press
%, " or $.
Stopping Alarm to Open Task
. While Alarm sounds/vibrates, press a
key other than %, " or $.
When Another Function is Active
. Alarm may not activate until handset
returns to Standby.
Incoming Calls
. Active Alarm stops for incoming calls.
Information window opens after
handset returns to Standby.
2 Select task S %
1 In task list, B
2 Delete S %
3 All Comp. Tasks S % S
Yes S %
Handy Extras
. Use f to open Completed or
Incomplete task list.
11
3 " S Standby returns
Accessing Secret Entries
After 1, B S Unlock Temporarily
S % S Enter Handset Code S %
Marking Tasks as Completed
After 1, select task S A
Advanced
0 (Searching tasks (Sorting tasks by priority (Checking memory status (Deleting all tasks (P.11-46)
11-7
Alarms
Using Alarms
Setting Alarm
Follow these steps to set Alarm to
sound at a specific time on a specific
day of the week:
(Set Snooze--Alarm repeats at set
interval--Alarm Volume and Duration.)
1 % S Tools S % S In PIM/
Handy Extras
Life menu, Alarms S %
3 Repeat: S %
. For more settings, repeat 2 - c.
4 Selected Days S %
5 Select day S % ( /
)S
Complete selection S A
. For custom intervals, select Other.
Alarm List
2 --:-- S % S Enter hour
(24-hour format) S Enter
minutes S %
. For custom Duration, select Other.
c A S Saved
6 Snooze: S %
7 Select interval S %
11
b Select time S %
8 Alarm Volume: S %
9 Adjust level S %
a Duration: S %
d " S Standby returns
Activating Alarm Once or Daily
In 4, Once or Every Day (All) S %
S From 6
Selecting/Canceling All Days
In 5, B S Check All or Uncheck
All S %
Excluding Holidays
In 5, select day S %( / ) S
Complete selection S Except
Holidays S % ( ) S A S From 6
Advanced
0 (Editing entries (Saving entry name (Changing Alarm tone/video (Setting handset to vibrate at Alarm Time (Changing Small Light &
11-8
Key Illumination settings (Activating Alarm based on World Clock time (And more on P.11-46 - 11-47)
Alarms
At Alarm Time
Alarm activates; sounds/vibrates by
related settings.
When Snooze is Set
Alarm repeats at the set interval.
Other Alarms do not activate while
handset is Snoozing.
Canceling Snooze
While Snoozing, % S Yes S %
, Snooze is automatically canceled
after a period of time.
Canceling Alarm
1 In Alarm list, select entry
SB
2 Reset Alarm S %
3 Yes S %
[ All Entries
1 In Alarm list, select entry
2 Switch Off S %
2 Clear All S %
3 Enter Handset Code S %
. Reactivate entry to use the same
settings.
Reactivating Entry
In 2, Switch On S %
SB
S Yes S %
Handy Extras
1 In Alarm list, select entry
SB
Stopping Alarm
. Press a key.
When Another Function is Active
. Alarm may not activate until handset
returns to Standby.
Incoming Calls
. Active Alarm stops for incoming calls.
Information window opens after
handset returns to Standby.
Deleting Alarm
[ One Entry
11
11-9
Wakeup TV
Using Wakeup TV
Setting Wakeup TV
Follow these steps to activate TV at a
specific time on a specific day of the
week:
. Complete TV Area Setup beforehand.
. TV may not activate in poor signal
conditions.
Handy Extras
11
1 % S Tools S % S In PIM/
Life menu, Wakeup TV S %
3 Repeat: S %
4 Selected Days S %
5 Select day S % ( /
)S
Complete selection S A
6 Channel: S %
7 Select channel S %
8 A S Saved
. For more settings, repeat 2 - 8.
9 " S Standby returns
Wakeup TV List
2 --:-- S % S Enter hour
Activating TV Once or Daily
In 4, Once or Every Day (All) S %
S From 6
Selecting/Canceling All Days
In 5, B S Check All or Uncheck
All S %
Excluding Holidays
In 5, select day S % ( / ) S
Complete selection S Except
Holidays S % ( ) S A S From 6
Canceling Alarm
. Alarm activates at Wakeup TV time.
To cancel Alarm, follow these steps:
[Wakeup TV Menu] Alarm On/Off: S
% S Off S % S From 8
Adjusting Alarm Volume
[Wakeup TV Menu] Alarm Volume:
S % S Adjust level S % S From 8
(24-hour format) S Enter
minutes S %
Wakeup TV Menu
Advanced
0 (Editing entries (Changing Alarm tone/video (Changing Illumi Display settings (Changing Small Light & Key Illumination settings
11-10
(Sounding Alarm tone even in Manner mode (P.11-47 - 11-48)
Wakeup TV
At Wakeup TV Time
TV activates after Alarm.
Canceling Wakeup TV
1 In Wakeup TV list, select
entry S B
2 Wakeup TV Off S %
. Reactivate entry to use the same
settings.
Reactivating Entry
In 2, Wakeup TV On S %
Stopping Alarm Instantly
. While Alarm sounds/vibrates, press a
key.
When Another Function is Active
. TV may not activate depending on
the function.
After TV is On for a Period of Time
. A confirmation appears. Choose Yes
and press % to exit TV.
1 In Wakeup TV list, select
entry S B
2 Reset Alarm S %
3 Yes S %
Handy Extras
Deleting Wakeup TV
[ One Entry
11
[ All Entries
1 In Wakeup TV list, select
entry S B
2 Clear All S %
3 Enter Handset Code S %
S Yes S %
11-11
Luxury Animation
Playing Animation with Music & Illumination
Play preset animations or downloaded
Flash® files with music and illumination.
Set playback time, volume and
illumination pattern as needed.
1 % S Tools S % S In PIM/
Life menu, Luxury Animation
S%
Handy Extras
11
2 Select type S %
. Animation appears.
. For Flash®, select a file and press %.
, Key LEDs do not illuminate for
soundless Flash® files.
. Message appears when Playback
Time is set to Continuous Play
(except when charging battery);
press % to proceed.
Setting Luxury Animation
Follow these steps to set playback
time, volume and Key Illumination
pattern:
1 % S Tools S % S In PIM/
Life menu, Luxury Animation
S%
2 Settings S %
Settings Menu
3 Playback Time S %
4 Select time S %
. For custom playback time, select
Other.
5 Volume S %
6 Adjust level S %
11-12
7 Set Key Illumi S %
8 Key Pattern S %
9 Select pattern S % S A
a " S Standby returns
Changing Illumi Display Pattern
[Settings Menu] Illumi Display S %
S Pattern Setting S % S Preset
Pattern S % S Select pattern S %
SA
, To use custom pattern, select
Original instead of Preset Pattern.
Disabling Illumi Display
[Settings Menu] Illumi Display S %
S Switch On/Off S % S Off S %
SA
Disabling Key Illumination
In 8, Switch On/Off S % S Off S
%SA
Household Accounts
Managing Household Expenses
Scan receipts with mobile camera to
manage expenses on handset.
2B
Setup
amount S %
Specify closing day, closing month
and budget for the month.
7 $ S Household Accounts
1 % S Tools S % S In PIM/
window returns
Totals Panel
Account Setup Menu
3 Date/Month Closed S %
Restricting Access to Household
Accounts by Handset Code
[Account Setup Menu] Locks S %
S On S %
Resetting Household Accounts
[Account Setup Menu] Master Reset
S % S Enter Handset Code S %
S Yes S %
Handy Extras
Life menu, Household
Accounts S %
Charts Panel
5 Yes S %
6 Budget S % S Enter
11
Manual Input Panel
Scan Receipt Panel
Household Accounts Window
. Press B to change default
closing date (end of the month);
use f to move between date
and month fields.
4 Enter date/month S %
11-13
Household Accounts
Saving Entries
Scanning Receipts
Scan receipts with mobile camera to
enter date, expense items, fees/prices
and total amount automatically.
Scan may fail if receipt is too long,
folded, faded, etc.; some formats are
not supported.
3%
. To cancel, press A.
4 % S Scan results appear
Handy Extras
1 In Household Accounts
window, select scan
receipt panel S %
2 Frame receipt on Display
11
. To add, delete or edit expense
items, see P.11-15 "Entering
Manually."
5A
. Entry is saved.
Opening Help
[Scan Window] A
, Press % to return to scan window.
Scan Window
. Frame date, expense items and
total amount. Align text parallel to
guide lines.
11-14
[ Key Assignments in Scan Window
Toggle Focus Mode
Focus Lock
Mobile Light On/Off
Adjust Brightness
Open Help
3
!
#
f
0
Household Accounts
Entering Manually
1 In Household Accounts
5 New Item S %
window, select manual
input panel S %
6 Item S % S Enter name
S%
Category S %
8 Value S % S Enter
amount S % S A
Expense Input Window
9 A S Saved
Handy Extras
7 Category S % S Select
Adding Expense Items
After 8, select item field S B S
Add Items S % S From 6
Deleting Expense Items
After 8, select item S B S Delete
S % S Yes S % S 9
Changing Categories of All Items at
Once
[Expense Input Window] Category
S % S Select Category S % S 9
11
2 Select date panel S % S
Enter date S %
3 Shop S % S Select shop/
facility S %
4 Paid S % S Select
payment method S %
Advanced
0 (Renaming icon labels (Exporting Household Accounts data (P.11-48)
11-15
Household Accounts
Opening Expense Records
Opening Entries
1 In Household Accounts
window, select totals panel
S%
2 Select date S %
Handy Extras
11
Daily Expense Log
3 Select entry S %
. Details appear.
Deleting an Entry
[Daily Expense Log] Select entry S B
S Delete Receipt S % S Yes S %
Deleting All Entries
[Daily Expense Log] B S Delete
Day Receipt Data or Delete Month
Receipt Data S % S Yes S %
11-16
Viewing Expense Trends
Follow these steps to view monthly
expenses, budgets and balances:
1 In Household Accounts
window, select charts
panel S %
2 Results by Month S %
. Press % to toggle budget and
balance.
. Use f to open previous or next
year.
Viewing Other Expense Trends
In 2, select item S %
Calculator
Using Calculator
1 % S Tools S % S In PIM/
Life menu, Calculator S %
2 Use Keypad to enter digits
S Calculate
3 " S Standby returns
Advanced
+ (Add)
− (Subtract)
× (Multiply)
÷ (Divide)
= (Sum)
C.CE (Clear)
CM (Clear Memory)
RM (Recall Memory)
M+ (Add to Memory)
. (Decimal)
+/- (Positive/Negative
Value)
% (Percentage)
c
d
a
b
%
$
&
!
A
(
#
Handy Extras
Calculator Window
Key Assignments
'
11
Memory Calculation
. Clear Memory before starting new
Memory calculations.
. Numbers saved in Memory remain
until handset is powered off.
Incoming Calls
. Calculations are not affected. End
the call to return to Calculator.
Using % Function
Use ' to find definite percentage of a
known value.
Example: Calculate 30% of 800,000
Enter 800,000 S x S 30 S %
, 240,000 appears.
0 (Copying calculation results (Changing exchange rate for currency conversion (Converting currencies (P.11-49)
11-17
Expenses Memo
Adding Expenses
Entering Expenses
1 % S Tools S % S In PIM/
Life menu, Expenses Memo
S%
Handy Extras
11
Checking Entries
1 In Expenses Memo menu,
select list S %
2 Totals S %
Expenses Memo List
3 " S Standby returns
Saving Entries to Notepad
[Expenses Memo List] B S Save to
Notepad S %
5 Select Category S % S
Saved
Saving under Custom Category
In 5, Other S % S Enter name S %
Advanced
0 (Changing Category of saved entry (Changing amount (Renaming Categories (P.11-49)
11-18
1 In Expenses Memo list,
select entry S B
2 Delete Item S %
3 Yes S %
[ All Entries
Expenses Memo Menu
2 Select list S %
3 Add New Expense S %
4 Enter amount S %
Deleting Entries
[ One Entry
1 In Expenses Memo list, B
2 Delete All S %
3 Enter Handset Code S %
S Yes S %
. All entries on the list are deleted.
Osaifu-Keitai®
Osaifu-Keitai® (Japanese)
Basics
Before using Osaifu-Keitai®, activate
Lifestyle-Appli, complete registration,
customize settings and charge accounts.
Starting Lifestyle-Appli
% S Tools S % S In PIM/Life menu,
Osaifu-Keitai S % S Lifestyle-Appli
S % S Select application S %
Important Lifestyle-Appli Usage Notes
. Contact Osaifu-Keitai® service
providers for Lifestyle-Appli
registration and usage details.
. Keep service passwords/customer
service contact information, etc. in a
separate place.
Using Osaifu-Keitai®
Follow these steps to conduct a transaction:
Example: Making an electronic payment
. Lifestyle-Appli activation is not
necessary.
. Transactions are possible even while
handset power is off (if battery is
adequately charged).
. Calls/Internet transmissions do not
affect transactions.
Important Osaifu-Keitai® Usage Note
. Disney Mobile is not liable for damages
resulting from accidental loss/
alteration of IC Card data/settings.
When Placed Over Sensor
. If recognition is slow, move handset
around slightly.
. Handset may respond automatically
for some services.
1 Place m logo over reader/
writer S Confirm scan results
Handy Extras
Osaifu-Keitai® describes IC Card-equipped
handsets that support e-money or credit
functions/services. Osaifu-Keitai®
encompasses a range of IC Card-based
services on FeliCa-compatible Disney
Mobile handsets. DM005SH supports
Osaifu-Keitai®.
To use e-money, e-ticketing and reward
points, etc., hold handset over a
compatible reader/writer at shops,
restaurants, and other retail outlets, etc.
11
Place this part
over reader/writer
. Align handset parallel to reader/
writer.
Advanced
0 (Enabling to view e-money balances (Checking e-money balance (Moving applications up/down Balance Info list (Removing
applications from Balance Info list (P.11-49)
11-19
Osaifu-Keitai®
Locking IC Card
IC Card Lock
Restrict access to/prevent
unauthorized use of Osaifu-Keitai® on
handset.
1 % S Tools S % S In PIM/
Life menu, Osaifu-Keitai S %
3 IC Card Lock S % S On
S%
4 Enter Handset Code S %
S Yes S %
Canceling IC Card Lock
In 3, IC Card Lock S % S Off S
% S Enter Handset Code S %
Handy Extras
2 IC Card Settings S %
11
IC Card Settings Menu
Advanced
0 (Customizing handset response to reader/writer commands (Opening IC Card properties (Changing IC Card Lock notice recipient
(Changing required Missed Call count for Call Remote Lock (Restoring default Osaifu-Keitai® settings (P.11-49 - 11-50)
11-20
Osaifu-Keitai®
Remote Lock
4 Mail Remote Lock S %
Disable Osaifu-Keitai® remotely by
mail or phone.
Mail Remote
Lock
Call Remote
Lock
Send mail to activate
Remote Lock
Call from a specified
phone to activate
Remote Lock
Mail Remote Lock
1 % S Tools S % S In PIM/
Life menu, Osaifu-Keitai S %
2 IC Card Settings S %
3 Remote Lock S % S Enter
Handset Code S %
1 Send E Mail or e-mail to
handset with password as
subject
Mail Remote Lock Menu
5 Remote Lock PW S %
6 Enter password S %
7 Switch On/Off S %
8 On S % S A
Canceling Mail Remote Lock
In 5, Switch On/Off S % S Off S
%SA
. After handset receives message,
IC Card Lock is set and notice is
sent as a reply.
Handy Extras
[ Preparation on Handset
[ Activating Remote Lock via Mail
If handset cannot receive mail IC
Card Lock is not set.
11
11-21
Osaifu-Keitai®
Call Remote Lock
[ Preparation on Handset
5 Phone No. to Lck 1 or Phone
No. to Lck 2 S %
1 % S Tools S % S In PIM/
1 Using one of the specified
Life menu, Osaifu-Keitai S %
2 IC Card Settings S %
3 Remote Lock S % S Enter
Handset Code S %
Handy Extras
4 Call Remote Lock S %
phones, call handset
. Send Caller ID.
6 Phone Book S % S Select
entry S % S Select phone
number S %
. Select Phone Number to enter
directly.
7 Switch On/Off S %
8 On S % S A
11
Call Remote Lock Menu
[ Activating Remote Lock via Phone
If handset cannot receive calls IC
Card Lock is not set.
2 Handset receives call S
End the call
. The call is recorded as a Missed
Call.
3 Within three minutes, repeat
1 - 2 twice
Enabling Activation via Public Phone
In 5, Set Public Phone S % S On
S % S From 7
Canceling Call Remote Lock
In 5, Switch On/Off S % S Off S
%SA
. After the third Missed Call, IC
Card Lock is set; a message
announces Remote Lock
activation. Confirm the message
and end the call.
If Series is Interrupted by Another Call
. Missed Call count is reset. Start over
from the beginning.
11-22
Simulated Call
Faking Incoming Calls
Handset rings to emulate an incoming
call.
. Save name and phone number to
show as Caller ID.
. Ringer may be muted by handset
settings. To override Silent setting, see
P.11-50.
Setting Simulated Call
Life menu, Simulated Call
S%
Simulated Call Menu
2 Switch On/Off S % S On
S%
S%
5 Phone Number: S % S
Enter phone number S %
SA
6 Assign Tone S % S Select
tone/file S %
7 A S PIM/Life menu returns
When Name and Phone Number are Unset
. Handset rings with Caller ID
"Withheld."
Canceling Simulated Call
[Simulated Call Menu] Switch On/
Off S % S Off S % S A
Setting Wait Time
[Simulated Call Menu] Receive Timing
S % S Select time S % S A
Using Simulated Call
1 With handset closed, F
(Long)
. Handset rings and incoming
Voice Call window opens.
. Ringtone stops after a period of
time.
2 In incoming Voice Call
window, press !
. Voice Call window opens.
(Softkeys are dummies.)
3 " S Standby returns
When Receive Timing is Not
Immediately
. Press " or $ during wait time to
cancel Simulated Call activation.
. Simulated Call activation is canceled
by incoming calls, Alarms, etc. during
wait time.
Handy Extras
1 % S Tools S % S In PIM/
3 Set Caller S %
4 Name: S % S Enter name
11
Advanced
0 (Starting via Simulated Call menu (Clearing caller information (Overriding Silent volume setting (P.11-50)
11-23
Stopwatch
Using Stopwatch
Stopwatch stops if battery runs low.
1 % S Tools S % S f
Clock/Gauge S
Stopwatch S %
Handy Extras
11
Stopwatch Window
2 % S Stopwatch starts
3 % S Stopwatch stops
. Press % to resume.
4 " S Yes S % S
Stopwatch ends
. Records are deleted when
Stopwatch ends.
11-24
Recording Lap Times
While Stopwatch is running, B
Saving Records to Notepad
After 3, B S Save to Notepad S %
Resetting Records
After 3, A S From 2
Incoming Calls
. Stopwatch is not affected by
incoming calls. End the call to return.
Countdown Timer
Using Countdown Timer
1 % S Tools S % S f
Clock/Gauge S
Countdown Timer S %
3%
When Set Time Elapses
Tone sounds.
4 % S Countdown starts
Timer Entry Window
2 Enter minutes S Enter
seconds
. Press % to stop/resume countdown.
5 Set time elapses S Tone
sounds
6 " S Yes S % S
Stopping Tone Instantly
. Press % or a Side Key. (Tone stops
automatically after a period of time.)
When Timer Time Elapsed during a Call
. Tone sounds after the call.
Handy Extras
Countdown Timer Window
. Press B to change time.
11
Countdown Timer ends
Advanced
Using Timer Records
After 1, B S Input History S % S
Select record S % S % S From 4
Resetting Countdown Timer
Stop countdown and B
Incoming Calls
. Countdown is not affected by
incoming calls. End the call to return.
0 (Changing Illumi Display settings (Changing Small Light & Key Illumination settings (P.11-50 - 11-51)
11-25
World Clock
Opening World Clock
1 % S Tools S % S f
Clock/Gauge S World
Clock S %
Local Time
Zone
Handy Extras
11
World Time
Zone
2%
Set Time Zone Window
11-26
3 f Select area S %
4 " S Standby returns
Advancing One Hour (Daylight Saving)
[Set Time Zone Window] A
, To cancel, press A.
Adding Custom Time Zone
[Set Time Zone Window] B S Enter
city name S % S + or - S d S
Enter time difference S %
Opening World Clock in Standby
1 % S Settings S % S In
Sound/Display menu,
Display S %
2 Standby Display S %
3 Clock/Calendar S %
4 World Clock (L), etc. S %
5 " S Standby returns
Hour Minder
Using Hour Minder
Setting Hour Minder
Follow these steps to activate the
hourly time signal at selected hours:
1 % S Tools S % S f
Clock/Gauge S Hour
Minder S %
2 Switch On/Off S % S On
S%
3 Select Time S %
/ )S
Complete selection S A
5 A S Saved
6 " S Standby returns
Adjusting Hour Minder Volume
In 2, Advanced S % S Volume:
S % S Adjust level S % S A S
From 5
Changing Hour Minder Duration
In 2, Advanced S % S Duration:
S % S Select time S % S A S
From 5
, For custom Duration, select Other.
Selecting/Canceling All Hours
In 4, B S Check All or Uncheck
All S %
At Hour Minder Time
Hour Minder activates; sounds/
vibrates by related settings.
Stopping Tone Instantly
. Press a key.
When Another Function is Active
. Hour Minder does not activate.
Incoming Calls
. Active Hour Minder stops for
incoming calls.
Handy Extras
Hour Minder Menu
4 Select hour S % (
11
Canceling Hour Minder
1 In Hour Minder menu,
Switch On/Off S % S Off
S%SA
Advanced
0 (Changing Hour Minder tone/video (Setting handset to vibrate at Hour Minder Time (Changing Illumi Display settings (Changing Small Light &
Key Illumination settings (Sounding Hour Minder tone even in Manner mode (Activating Hour Minder based on World Clock time (P.11-51 - 11-52)
11-27
Pedometer
Using Pedometer
Getting Started
Handy Extras
11
. Count based on a pace of
approximately 100 steps per minute
over even terrain.
. Accuracy may be affected by course,
terrain, walking style, etc.
. Avoid holding the handset; use a body
worn case or a strap, or place handset
inside a pocket or bag.
, Avoid sudden/erratic movements.
. Steps are not counted in the following
cases:
, While handset is off
, For the first few steps
, While handset vibrates
. Handset use may affect accuracy.
. Weight and pace entry required to
view full Pedometer data.
. Use Pedometer only as a rough guide.
Adjusting Counter Sensitivity
% S Tools S % S f Clock/
Gauge S Pedometer S % S B S
Settings S % S Step Sensitivity S
% S Select option S %
, Select Low when steps seem
overcounted; select High when
they seem undercounted.
Saving Body Information
1 % S Tools S % S f
Clock/Gauge S
Pedometer S %
S%
5 Weight S % S Enter
weight S %
6 Pace S % S Yes or No S %
. Choose Yes to enter pace
automatically based on height.
7 Enter pace S % S A
Pedometer Window
. If Pedometer is inactive, a
confirmation appears. Choose
Yes or No and press %.
2 B S Settings S % S Body
Info. S %
3 Enter Handset Code S %
Body Info Menu
11-28
4 Height S % S Enter height
Editing Body Information
[Body Info Menu] Select item S %
S Enter value S % S A
, For Pace, automatic calculation
confirmation appears (when height
is entered).
Activating Pedometer
1 In Pedometer window, B
S Pedometer On S %
Canceling Pedometer
[Pedometer Window] B S
Pedometer Off S %
Pedometer
Pedometer Indicator
When Pedometer is active, today's
step count appears in Standby.
2 Select time/date S %
. Hourly/daily step counts appear.
3 $ S Pedometer window
returns
Viewing Step Count Records
Setting Targets
Information window opens, etc. when
target is achieved for these items:
Steps Window
. Press A to toggle Daily/Hourly
view.
. Press # or ( to scroll down or
up by one page.
Steps
Walking Time
Exercise
Calories
Distance
Fat burned
Advanced
S Settings S % S Target
S%
2 Target Settings S %
3 Select item S % S Enter
value/time S %
. Other target settings may
consequently change.
Editing Targets
[Pedometer Window] B S Settings
S % S Target S % S Target
Settings S % S Select item S B
S Enter value/time S %
When Target is Achieved
. A tone sounds and Information
window opens. (Select Goal
Achievement and press % to open
Pedometer Calendar.) Follow these
steps to mute achievement tone:
[Pedometer Window] B S Settings
S % S Target S % S Goal
Announce S % S Off S %
About Exercise (Ex)
. Ex and MET indicate amount and
intensity of physical activity,
respectively. Ex for walking is
calculated by multiplying 3 METs by
walking duration (hour).
Handy Extras
1 In Pedometer window, %
Pedometer Window Tabs
. Press d to open Exercise and then
Calories.
Resetting Today's Step Count
[Pedometer Window] B S Reset
Day's Data S % S Yes S %
Resetting Log
[Steps Window] B S Walk Data
Reset S % S Enter Handset Code
S % S Yes S %
, Today's data is also reset.
1 In Pedometer window, B
11
0 (Changing Pedometer indicator (Using Pedometer Calendar (Checking accumulated data (Resetting accumulated data (Setting
daily step count reset time (Customizing achievement notice (P.11-52)
11-29
Compass
Using Compass
Opening Compass
1 % S Tools S % S f
Clock/Gauge S Compass
S%
Handy Extras
11
Compass Window
. Compass opens; use as a rough
guide.
11-30
Adjusting Compass
1 In Compass window, % S %
. Follow onscreen instructions.
Compass Indicator
. When map is open, compass
indicator appears; follow these steps
to hide it:
% S Tools S % S f Clock/
Gauge S S! GPS Navi S % S NAVI
Settings S % S Compass Indicator
S % S Off S %
S! GPS Navi
Using S! GPS Navi
Use this GPS navigation service to
pinpoint current location, find routes
to destinations, and more.
Provide current location to
administrator upon request.
Precautions
. Location Information accuracy may be
affected when GPS satellite/radio
station signal reception is poor. Use
S! GPS Navi under the open sky.
. Disney Mobile is not liable for any
damages resulting from the provided
Location Information.
1 % S Tools S % S f
Clock/Gauge S S! GPS
Navi S %
S! GPS Navi Menu
2 Navi Appli S %
. To disable confirmation, press B
before 3.
Handy Extras
Positioning
. Pinpoints current location using
signals transmitted from GPS satellites.
Location Information Accuracy
. Probable distance from the actual
position is classified into three accuracy
levels, from level 1 (low) to 3 (high),
indicated by the number of
s.
. A confirmation appears when
accuracy level is 1 or 2; follow these
steps:
Yes or No S %
Starting Navi-Appli
11
3 Yes S %
Opening Navi Appli List
[S! GPS Navi Menu] Navi Appli List S %
, To activate Navi Appli, select one
and press %.
Selecting a Navi-Appli for S! GPS Navi
[S! GPS Navi Menu] NAVI Settings S
% S Select Navi Appli S % S
Select application S %
11-31
S! GPS Navi
Opening Location Log
1 In S! GPS Navi menu,
Location Logs S %
2 Select record S %
. Details appear.
3 $ S List returns
Using My Location
Saving Location Information
Follow these steps to save current
location as a new entry:
1 In S! GPS Navi menu, My
Location List S %
Handy Extras
2 Location Info S %
1 In S! GPS Navi menu,
. Details window appears.
My LocationList Menu
2 New Entry S %
3 Name S % S Enter name
S%
11
. To disable confirmation, press B
before 2.
4 Location Info S %
5 From Current Loc. S % S
starts
6%
2 Yes S % S Positioning
. Map of your current location
appears.
Opening Entries
1 In My LocationList menu,
select entry S %
Pinpointing Current Location
Locate Me S %
Saving as Home
In 2, 自宅 S % S From 4
Saving from Location Log
In 5, From Location Logs S % S
Select record S % S B
3 $ S Details window closes
Deleting Entries
1 In My LocationList menu,
select entry
2 B S Delete S % S Yes
S%
Positioning complete
. When accuracy level is 1 or 2,
choose No and press % to
proceed to 7.
7B
Advanced
0 (Sending current location via mail (Changing map source URL (Disabling positioning (Selecting Location Information transmission option
(Using My Location & Location Log (Saving Location Log records to My Location (Deleting Location Log records (P.11-52 - 11-53)
11-32
S! GPS Navi
Using Ichi Navi (Japanese)
Providing Location Information
Locate other S! GPS Navi-compatible
handset users or lost handset.
Provide current location to
administrator upon request.
. Ichi Navi requires a separate contract
and initial settings.
. For more about Ichi Navi, see Disney
Mobile Website (P.17-22).
. Location may be provided
automatically upon administrator's
request without confirmation.
. May be unavailable depending on
subscription. For details, contact the
nearest SoftBank Shop or General
Information (P.17-41).
1 In S! GPS Navi menu,
Location Navi S %
1 Location Information
request arrives
Handy Extras
. Handset connects to the Internet.
Follow onscreen instructions.
Information
Information window opens after your
location is provided manually (by
pressing B) upon Location
Information request or automatically
upon administrator's request.
Select the item and press % to open
log.
11
. A confirmation appears.
(Message shown above is for
reference only.)
2 B (provide) or A (reject)
Advanced
0 (Suppressing Information window after sending Location Information automatically (P.11-53)
11-33
Document Viewer
Opening PC Documents
Supported File Formats:
PDF (.pdf)
Microsoft® Excel® (.xls)
Microsoft® Word (.doc)
Microsoft® PowerPoint® (.ppt)
Handy Extras
11
. Some files may not appear correctly.
. Downloaded files are also supported.
. When transferring files from PCs, save to
corresponding Memory Card folder
(P.17-23).
1 % S Tools S % S f
Doc./Rec. S Document
Viewer S %
2 Select file S %
Zooming In/Out with Loupe (Magnifier)
In open file, & (Long) S Specify
portion S B S Zoom Out or Zoom
In S %
11-34
Key Assignments
View Whole Page
Scroll
View Upper Left
Toggle Full Screen
View On/Off
View Upper Right
Zoom Out
Continuous Zoom Out
View Center
Zoom In
Continuous Zoom In
View Lower Left
Jump to Page
View Lower Right
Open Help
Next Page
Previous Page
Fit Width
Rotate 90 Degrees
%
g
1
2/)
3
4/F
4 (Long)
F (Long)
5
6/E
6 (Long)
E (Long)
7
8
9
0
#
(
!
A
Notepad
Saving Text
New Notepad Entry
1 % S Tools S % S f
Doc./Rec. S Notepad
S%
2 <Add New Entry> S %
3 Enter text S %
4 Select Category S % S
Saved
Opening Notepad
1 In Notepad list, select entry
S%
. Text appears.
2 $ S List returns
Deleting Entries
[ One Entry
1 In Notepad list, select entry
SB
2 Delete Item S % S Yes
S%
[ Selected Entries
1 In Notepad list, select entry S
B S Setting/Manage S %
2 Multiple Selection S % S
Select entry S % ( / ) S
Complete selection S B
Handy Extras
Notepad List
Sorting Entries Temporarily
[Notepad List] A
, Press to toggle sort options
(Modified, Created, Category and
Accessed).
Inserting Notepad Text during Text Entry
[Text Entry Window] B S Notepad
S % S Call Notepad S % S
Select entry S %
11
3 Delete S % S Yes S %
Unchecking All
In 3, Uncheck All S %
[ All Entries
1 In Notepad list, select entry S
B S Setting/Manage S %
2 Delete All S % S Enter
Advanced
Handset Code S % S Yes
S%
0 (Editing Notepad (Searching text within all entries (Inserting Notepad text into message text (Sending entries via E Mail (Creating text
files (Importing text files (Checking memory status (Opening properties (P.11-53 - 11-54)
11-35
Voice Recorder
Recording/Playing Voice
Recording
. Recording stops if battery runs low
while recording.
. Record conversations during calls via
Record Caller Voice.
2 % S Recording starts
3 % S Recording ends
Handy Extras
. For Extended Voice, recording is
saved automatically.
4 Save S %
Play Before Saving
In 4, Playback S % S Playback
starts S $ S Playback stops
Starting Over
In 4, $ S From 2
11
Recording Window
Advanced
0 (Saving longer recordings (Sending Voice files via E Mail (Switching storage media (P.11-54)
11-36
1 In recording window, B S
Ring Songs·Tones S %
2 Select file S %
1 % S Tools S % S f
Doc./Rec. S Voice
Recorder S %
Playback
Playing Files via Data Folder
% S Data Folder S % S Ring
Songs·Tones S % S Select file S %
Playback Operations
Volume Control
Pause/Resume
Stop
e
%
$
Scan Barcode
Scanning Barcodes
Scan UPC/JAN (1D barcodes) or QR
Codes (2D barcodes).
. Membership file or password may be
required when scanning barcodes.
. Some barcodes may not be scanned.
3 Frame barcode in center of
Display
5 Tone sounds S Scan results
appear
1 % S Tools S % S f
Doc./Rec. S Barcode/
Scan S %
Scan Window
. Use Focus Adjustment Bar as a
guide (better focus in darker blue).
2 Scan Barcode S %
4 % S Scan starts
. If recognition takes time, slowly
adjust the distance between
handset and barcode.
. To cancel, press A.
Split Data
. After scanning, a confirmation
appears. Follow onscreen prompt(s).
. Scan results do not appear until all
split data is scanned.
Starting Over
After 5, A S Yes S % S From 3
Handy Extras
Focus
Adjustment
Bar
11
Key Assignments in Scan Window
Toggle Focus Mode
Switch to Photo Camera
Focus Lock
Mobile Light On/Off
Adjust Brightness
Open Help
3
7
!
#
f
0
Advanced
0 (Scanning during text entry (Scanning continuously (Reading saved barcode images (Saving scan results (Saving to Notepad
(Saving linked info to Phone Book (Opening saved scan results (Using linked info (Using images as Wallpaper (Saving images &
melodies (Copying text (And more on P.11-54 - 11-56)
11-37
Create QR Code
Creating QR Codes
Create QR Codes from these items on
handset:
Phone Book
My Details
Text Input
Ring Songs·Tones
Pictures
Notepad
Large items are divided into multiple
QR Codes.
Handy Extras
11
Procedure
Follow these steps to create QR Codes
from Data Folder files:
1 % S Tools S % S f
Doc./Rec. S Barcode/
Scan S %
2 Create QR Code S %
3 Data Folder S %
4 Select folder S % S Select
file or entry S %
. QR Code is created.
5%
. QR Code is saved to Data Folder
(Pictures).
11-38
From Phone Book Entries
In 3, Phone Book S % S Select
entry S % S 5
From My Details
In 3, My Details S % S B S 5
From Entered Text
In 3, Text Input S % S Enter text S
%S5
Switching Storage Media
In 5, B S Save to S % S Phone
or Memory Card S % S %
Attaching to E Mail
In 5, B S Send As Message S %
S Complete message S A
Incoming Calls
. QR Code creation is not affected by
incoming calls. End the call to return.
Scan Card
Scanning Business Cards
Scan business cards and save names,
addresses, etc. to Phone Book.
. English business cards may not be
scanned correctly.
. Some cards may not be scanned.
4%
. To cancel, press A.
5 % S Scan results appear
1 % S Tools S % S f
Doc./Rec. S Barcode/
Scan S %
Scan Window
6%SA
. New Phone Book entry is saved.
If Text Exceeds Phone Book Entry Item
Character Limit
. A confirmation appears. Follow these
steps to delete overage:
Yes S %
Switching Storage Media
After 5, B S Save to S % S
Select storage media S % S %
Saving Scanned Image as Phone Book
Picture
After 5, B S Add Image S % S
On S % S 6
Starting Over
After 5, A S Yes S % S From 3
Toggle Focus Mode
Switch to Photo Camera
Focus Lock
Mobile Light On/Off
Adjust Brightness
Open Help
3
7
!
#
f
0
Handy Extras
2 Scan Card S %
3 Frame card on Display
Key Assignments in Scan Window
11
Advanced
0 (Saving to Notepad (Pasting to message text (Copying text (P.11-56)
11-39
Scan Text
Scanning Text
Scan text and save it to Notepad, etc.
Available Modes:
Full
Capture text in full screen
and scan a selected line
Line
Capture a few lines of text
and scan a selected line
3 Frame text in center of
Display
. To toggle mode, press A in scan window.
. Some text may not be scanned.
Handy Extras
11
1 % S Tools S % S f
Doc./Rec. S Barcode/
Scan S %
2 Scan Text S %
. To change mode, press A in
scan window.
Scan Window
4 % S Scan starts
. To cancel, press A.
5 Select line S % S Scan
results appear
6%
Correcting Text Type
After 5, B S Change Mode S %
S Select type S % S From 6
Editing Scanned Text
After 5, B S Select/Edit S % S
Select character S Select
alternative from list or edit directly
S From 6
Starting Over
In 6, A S Yes S % S From 3
Key Assignments in Scan
Window
Toggle Focus Mode
Switch to Photo Camera
Focus Lock
Mobile Light On/Off
Adjust Brightness
Open Help
3
7
!
#
f
0
7 B S Notepad S %
Advanced
0 (Scanning and pasting during text entry (Scanning more text (Saving scan results (Saving linked info to Phone Book (Opening saved
scan results (Using linked info (Pasting to message text (Copying text (P.11-57 - 11-58)
11-40
Kanji Grabber
Using Kanji Grabber
Scan a word of up to ten kanji and
look it up in dictionaries.
Some kanji may not be scanned.
1 % S Tools S % S f
Doc./Rec. S Barcode/
Scan S %
7 Select word, etc. S %
. Definition/translation window
opens.
Starting Over
In 5, A S From 3
Key Assignments in Scan Window
Loupe
4%
Search S %
Toggle Focus Mode
3
Switch to Photo Camera
Focus Lock
Mobile Light On/Off
7
!
#
Adjust Brightness
Open Help
f
0
Handy Extras
2 Kanji Grabber S %
3 Frame kanji in Loupe
5%
6 Select dictionary S % S
11
Scan Window
. Scan results (kanji) appear.
Advanced
0 (Scanning and pasting during text entry (P.11-58)
11-41
Additional Functions
7% S Tools S % S In PIM/Life menu,
Calendar
Calendar S % S B S Calendar Settings S
% S Set Holiday S % S f Private S See
below
[ View Settings
Changing default
view
% S Tools S % S In PIM/Life menu,
Calendar S % S B S Calendar Settings S
% S Default View S % S Select type S %
Jumping to
specified date
% S Tools S % S In PIM/Life menu,
Calendar S % S 8 S Enter date S %
Saving additional
holidays
Editing Added Holidays
Select holiday S B S Edit S % S Name: S
% S Enter name S % S Date: S % S Enter
date S % S Select frequency S % S A
7% S Tools S % S In PIM/Life menu,
Calendar S % S See below
Handy Extras
Changing date
color
By Date
Select date S 4 S Select color S %
. Not available in 6Month View.
11
11-42
By Days of the Week
B S Calendar Settings S % S Set Color S
% S By Week S % S Select day S % S
Select color S %
Resetting "By Date" Colors
B S Calendar Settings S % S Set Color S
% S Reset Color S % S Select option S %
S Yes S %
Selecting task
view option
% S Tools S % S In PIM/Life menu,
Calendar S % S B S Calendar Settings S
% S Tasks View S % S Select option S %
Adding stamps
(1Month/3Month
View)
% S Tools S % S In PIM/Life menu,
Calendar S % S Select date S 2 S
Select stamp S %
Hiding schedules
% S Tools S % S In PIM/Life menu,
Calendar S % S Select date S % S Select
entry S % S % S Secret: S % S On S %
SA
Adding Holidays
<Empty> S % S Enter name S % S Enter
date S % S Select frequency S % S A
Hiding/showing
holidays
% S Tools S % S In PIM/Life menu,
Calendar S % S B S Calendar Settings S
% S Set Holiday S % S f Private or Public
S Select holiday S % ( / )
Additional Functions
[ Saving/Editing Schedules
Setting Location
% S Tools S % S In PIM/Life menu,
Calendar S % S Select date S % S Select
entry S % S % S Location: S % S Enter
location S % S A
7% S Tools S % S In PIM/Life menu,
Calendar S % S B S Calendar Settings S
% S Set Category S % S See below
Saving S! Friend's
Status information
Availability
Answer Status: S % S Edit S A S A S A
. Set Category first.
Renaming Categories
Select Category S % S Edit Category Name
S % S Enter name S %
Comment
Comment: S % S Enter text S % S A S A
Changing Icons
Select Category S % S Change Icon S %
S Select Pictogram S %
% S Tools S % S In PIM/Life menu,
Calendar S % S Select date S % S Select
entry S % S % S Select item S % S Edit in
the same manner as saving schedules S A
. Set Category first.
Editing entries
Resetting
B S Reset Settings S % S Enter Handset
Code S % S Yes S %
Saving repetitive
schedules
Calendar S % S Select date S % S Select
entry S % S % S S! Friend'sStatus: S % S
Link Setting: S % S Linked S % S See
below
% S Tools S % S In PIM/Life menu, Calendar
S % S Select date S % S Select entry S %
S % S Repeat: S % S Select frequency S
% S Enter repeat time S % S A
7% S Tools S % S In PIM/Life menu,
Calendar S % S Select date S % S Select
entry S % S % S Alarm: S % S See below
Changing Alarm
tone/video &
duration
Alarm Tone/Video
Assign Tone/Video: S % S Select folder S
% S Select tone/file S % S A S A
Handy Extras
Creating
Categories
7% S Tools S % S In PIM/Life menu,
11
. Select start point if required.
. Repeat time is not available for Every Year.
Duration
Duration: S % S Select time S % S A S A
Changing Alarm
volume
% S Tools S % S In PIM/Life menu,
Calendar S % S B S Alarm Settings S %
S Alarm Volume: S % S Adjust level S %
Selecting Vibration
option
% S Tools S % S In PIM/Life menu,
Calendar S % S B S Alarm Settings S %
S Vibration: S % S Select option S %
11-43
Additional Functions
Sounding Alarm
tone even in
Manner mode
% S Tools S % S In PIM/Life menu,
Calendar S % S B S Alarm Settings S %
S For Manner Mode: S % S Ring S % S
Yes S %
7% S Tools S % S In PIM/Life menu,
[ Managing Schedules
7% S Tools S % S In PIM/Life menu,
Calendar S % S See below
Searching entries
Calendar S % S B S Alarm Settings S %
S Illumi Display: S % S See below
Changing Illumi
Display settings
Using Preset Pattern
Pattern Setting S % S Preset Pattern S % S
Select pattern S % S A
Handy Extras
Using Custom Pattern
Pattern Setting S % S Original S % S A
Disabling Illumi Display
Switch On/Off S % S Off S % S A
11
Changing Small
Light & Key
Illumination
settings
Setting Ringtones to Control Illumination
Switch On/Off S % S Link to Sound S % S A
Changing Light Color
Light Color S % S Select color S % S A
Changing Key Illumination Pattern
Key Pattern S % S Select pattern S % S A
. Not effective when Switch On/Off is set to Link
to Sound.
Disabling Small Light & Key Illumination
Switch On/Off S % S Off S % S A
11-44
By Category
9 S Select Category S %
Checking memory
status
% S Tools S % S In PIM/Life menu,
Calendar S % S Select date S B S
Memory Status S %
Deleting all entries
% S Tools S % S In PIM/Life menu,
Calendar S % S B S Delete S % S All
Appointments S % S Enter Handset Code S
% S Yes S %
7% S Tools S % S In PIM/Life menu,
Calendar S % S B S Alarm Settings S %
S Light & Key Illumi: S % S See below
By Part of Subject
6 S Enter text S %
7% S Tools S % S In PIM/Life menu,
Calendar S % S See below
Deleting entries by
specifying week
(Week View)
Within One Week
Select date S B S Delete S % S All This
Week S % S Yes S %
Up to the End of Previous Week
Select date S B S Delete S % S Up to Last
Week S % S Yes S %
Additional Functions
Deleting entries by
specifying month
(1Month/3Month
View)
Deleting entries in
six months
(6Month View)
7% S Tools S % S In PIM/Life menu,
7% S Tools S % S In PIM/Life menu,
Calendar S % S See below
Tasks S % S Select task S B S Edit S % S
Alarm: S % S See below
Within One Month
Select date S B S Delete S % S All This
Month S % S Yes S %
Up to the End of Previous Month
Select date S B S Delete S % S Up to Last
Month S % S Yes S %
% S Tools S % S In PIM/Life menu,
Calendar S % S B S Delete S % S All
This 6Months S % S Yes S %
Hiding tasks
% S Tools S % S In PIM/Life menu, Tasks S
% S Select task S B S Edit S % S Secret:
S % S On S % S A
. Select start point if required.
Duration
Duration: S % S Select time S % S A S A
Changing Alarm
volume
% S Tools S % S In PIM/Life menu, Tasks S
% S B S Alarm Settings S % S Alarm
Volume: S % S Adjust level S %
Selecting Vibration
option
% S Tools S % S In PIM/Life menu, Tasks S
% S B S Alarm Settings S % S Vibration:
S % S Select option S %
Sounding Alarm
tone even in
Manner mode
% S Tools S % S In PIM/Life menu, Tasks S
% S B S Alarm Settings S % S For Manner
Mode: S % S Ring S % S Yes S %
[ Saving/Editing Tasks
Editing tasks
Setting priority
% S Tools S % S In PIM/Life menu, Tasks S
% S Select task S B S Edit S % S Select
item S % S Edit in the same manner as
saving tasks S A
% S Tools S % S In PIM/Life menu, Tasks S
% S Select task S B S Edit S % S Priority:
S % S Select priority S % S A
Alarm Tone/Video
Assign Tone/Video: S % S Select folder S
% S Select tone/file S % S A S A
7% S Tools S % S In PIM/Life menu,
Handy Extras
Tasks
[ Task List
Changing Alarm
tone/video &
duration
11
Tasks S % S B S Alarm Settings S % S
Illumi Display: S % S See below
Changing Illumi
Display settings
Using Preset Pattern
Pattern Setting S % S Preset Pattern S % S
Select pattern S % S A
Using Custom Pattern
Pattern Setting S % S Original S % S A
Disabling Illumi Display
Switch On/Off S % S Off S % S A
11-45
Additional Functions
7% S Tools S % S In PIM/Life menu,
Tasks S % S B S Alarm Settings S % S
Light & Key Illumi: S % S See below
Changing Small
Light & Key
Illumination
settings
Setting Ringtones to Control Illumination
Switch On/Off S % S Link to Sound S % S A
Changing Light Color
Light Color S % S Select color S % S A
Changing Key Illumination Pattern
Key Pattern S % S Select pattern S % S A
Alarms
Editing entries
% S Tools S % S In PIM/Life menu, Alarms
Saving entry name S % S Select entry S % S Subject: S % S
Enter name S % S A
7% S Tools S % S In PIM/Life menu,
. Not effective when Switch On/Off is set to Link
to Sound.
Handy Extras
11
Disabling Small Light & Key Illumination
Switch On/Off S % S Off S % S A
[ Managing Tasks
Changing Alarm
tone/video
By Part of Subject
By Subject S % S Enter text S %
Sorting tasks by
priority
% S Tools S % S In PIM/Life menu, Tasks S
% S B S Sort S % S Priority S %
Checking memory
status
% S Tools S % S In PIM/Life menu, Tasks S
% S B S Memory Status S %
Deleting all tasks
% S Tools S % S In PIM/Life menu, Tasks S
% S B S Delete S % S All Tasks S % S
Enter Handset Code S % S Yes S %
Using Preset Tone or Data Folder File
Select folder S % S Select tone/file S % S A
. Select start point if required.
Using Customized Screen Tone/Video
Customized Screen S % S A
Tasks S % S B S Find S % S See below
By Due Date
By Due Date S % S Enter date S %
11-46
Alarms S % S Select entry S % S Assign
Tone/Video: S % S See below
7% S Tools S % S In PIM/Life menu,
Searching tasks
% S Tools S % S In PIM/Life menu, Alarms
S % S Select entry S % S Select item S %
S Edit in the same manner as saving entries
SA
Setting handset to
vibrate at Alarm
Time
% S Tools S % S In PIM/Life menu, Alarms
S % S Select entry S % S Vibration: S %
S On or Link to Sound S % S A
. Select Link to Sound to allow compatible SMAF
files to control vibration.
Additional Functions
7% S Tools S % S In PIM/Life menu,
Changing Illumi
Display settings
Alarm S % S Select entry S % S Illumi
Display: S % S See below
Sounding Alarm
tone even in
Manner mode
% S Tools S % S In PIM/Life menu, Alarms
S % S Settings S % S For Manner Mode S
% S Ring S % S Yes S %
Using Preset Pattern
Pattern Setting S % S Preset Pattern S % S
Select pattern S % S A S A
Activating Alarm
based on World
Clock time
% S Tools S % S In PIM/Life menu, Alarms
S % S Settings S % S Link to World Clk S
% S On S %
Using Custom Pattern
Pattern Setting S % S Original S % S A S A
Using Customized Screen Pattern
Pattern Setting S % S Customized Screen S
%SASA
Wakeup TV
Editing entries
7% S Tools S % S In PIM/Life menu,
7% S Tools S % S In PIM/Life menu,
Alarm S % S Select entry S % S Light &
Key Illumi: S % S See below
Setting Ringtones to Control Illumination
Switch On/Off S % S Link to Sound S % S
ASA
Changing Small
Light & Key
Illumination
settings
Wakeup TV S % S Select entry S % S
Assign Tone/Video: S % S See below
Changing Alarm
tone/video
. Select start point if required.
. Not effective when Switch On/Off is set to Link
to Sound.
Disabling Small Light & Key Illumination
Switch On/Off S % S Off S % S A S A
11
Using Customized Screen Tone/Video
Customized Screen S % S A
Changing Light Color
Light Color S % S Select color S % S A S
A
Changing Key Illumination Pattern
Key Pattern S % S Select pattern S % S A
SA
Using Preset Tone or Data Folder File
Select folder S % S Select tone/file S % S A
Handy Extras
Disabling Illumi Display
Switch On/Off S % S Off S % S A S A
% S Tools S % S In PIM/Life menu, Wakeup
TV S % S Select entry S % S Select item S
% S Edit in the same manner as saving
entries S A
7% S Tools S % S In PIM/Life menu,
Wakeup TV S % S Select entry S % S
Illumi Display: S % S See below
Changing Illumi
Display settings
Using Preset Pattern
Pattern Setting S % S Preset Pattern S % S
Select pattern S % S A S A
Using Custom Pattern
Pattern Setting S % S Original S % S A S A
Disabling Illumi Display
Switch On/Off S % S Off S % S A S A
11-47
Additional Functions
7% S Tools S % S In PIM/Life menu,
Wakeup TV S % S Select entry S % S Light
& Key Illumi: S % S See below
Changing Small
Light & Key
Illumination
settings
Handy Extras
11
11-48
Household Accounts
7% S Tools S % S In PIM/Life menu,
Household Accounts S % S Select manual
input panel S % S See below
Setting Ringtones to Control Illumination
Switch On/Off S % S Link to Sound S % S
ASA
Changing Light Color
Light Color S % S Select color S % S A S A
Changing Key Illumination Pattern
Key Pattern S % S Select pattern S % S A
SA
Renaming icon
labels
. Not effective when Switch On/Off is set to Link
to Sound.
% S Tools S % S In PIM/Life menu, Wakeup
TV S % S For Manner Mode S % S Ring S
% S Yes S %
Payment Methods
Paid S % S Select icon S B S Enter name
S%
Categories
Category S % S Select icon S B S Enter
name S %
Disabling Small Light & Key Illumination
Switch On/Off S % S Off S % S A S A
Sounding Alarm
tone even in
Manner mode
Shops
Shop S % S Select icon S B S Enter name
S%
Exporting
Household
Accounts data
% S Tools S % S In PIM/Life menu,
Household Accounts S % S B S Export All
S % S Yes S %
. Data is exported as a CSV file and saved to
handset Data Folder (Other Documents).
. Files are saved to Memory Card, if inserted.
Additional Functions
Osaifu-Keitai®
Calculator
Copying
calculation results
While result appears, B S Copy S %
Changing
exchange rate for
currency
conversion
% S Tools S % S In PIM/Life menu,
Calculator S % S B S Money Converter S
% S Exchange Rate S % S Domestic or
Foreign S % S Enter rate S %
Converting
currencies
. Set Exchange Rate first.
Expenses Memo
Changing
Category of saved
entry
% S Tools S % S In PIM/Life menu,
Expenses Memo S % S Select list S % S
Totals S % S Select entry S % S Select
Category S %
Changing amount
% S Tools S % S In PIM/Life menu,
Expenses Memo S % S Select list S % S
Totals S % S Select entry S B S Change
Amount S % S Edit S %
Renaming
Categories
% S Tools S % S In PIM/Life menu,
Expenses Memo S % S Edit Category S %
S Select Category S % S Enter name S %
Checking
e-money balance
. For use with compatible Lifestyle-Applications.
. Start Lifestyle-Appli once before adding it to
Balance Info list.
In Standby, F (Long) S Service name/
balance appears S I S Standby returns
. Save Lifestyle-Appli to Balance Info list beforehand.
. Not available when IC Card Lock is active.
Moving applications
up/down Balance
Info list
% S Tools S % S In PIM/Life menu,
Osaifu-Keitai S % S IC Card Settings S %
S Balance Info S % S Enter Handset Code
S % S Select application S B S Move S
% S Select target location S %
Removing
applications from
Balance Info list
% S Tools S % S In PIM/Life menu,
Osaifu-Keitai S % S IC Card Settings S % S
Balance Info S % S Enter Handset Code S
% S Select application S B S Delete S %
Customizing
handset response
to reader/writer
commands
% S Tools S % S In PIM/Life menu,
Osaifu-Keitai S % S IC Card Settings S %
S Interface Settings S % S Enter Handset
Code S % S Select item S % S Off S %
Opening IC Card
properties
% S Tools S % S In PIM/Life menu,
Osaifu-Keitai S % S IC Card Settings S %
S IC Card Status S %
Handy Extras
% S Tools S % S In PIM/Life menu,
Calculator S % S Enter amount of money S
B S Money Converter S % S To Domestic
or To Foreign S %
Enabling to view
e-money
balances
% S Tools S % S In PIM/Life menu,
Osaifu-Keitai S % S IC Card Settings S %
S Balance Info S % S Enter Handset Code
S % S <Empty> S % S Lifestyle-Appli or
S! Appli S % S Select application S %
11
11-49
Additional Functions
7% S Tools S % S In PIM/Life menu,
Osaifu-Keitai S % S IC Card Settings S %
S Remote Lock S % S Enter Handset Code
S % S Mail Remote Lock S % S Notice
Settings S % S Send Notice S % S See
below
Changing IC Card
Lock notice
recipient
Handy Extras
11
11-50
Changing Recipient
To Set Recipient S % S Set Recipient S % S
Select method S % S Select/enter number/
address S % S $ S A
. Omit step of pressing $ when selecting Phone
Book as setting method.
. After selecting Set Recipient and pressing %,
phone number or mail address appears if a
specific recipient has already been set; edit or
delete as needed.
Disabling Notice
Off S % S $ S A
Changing
required Missed
Call count for Call
Remote Lock
% S Tools S % S In PIM/Life menu,
Osaifu-Keitai S % S IC Card Settings S % S
Remote Lock S % S Enter Handset Code S
% S Call Remote Lock S % S Count for Lock
S % S Enter Missed Call count S % S A
Restoring default
Osaifu-Keitai®
settings
% S Tools S % S In PIM/Life menu,
Osaifu-Keitai S % S IC Card Settings S %
S Set to Default S % S Enter Handset Code
S % S Yes S %
Simulated Call
Starting via
Simulated Call
menu
% S Tools S % S In PIM/Life menu,
Simulated Call S % S Receive Simulated
Call S % S Yes S %
. Simulated Call starts immediately regardless of
Receive Timing setting.
. Settings remain even after starting Simulated
Call during setup.
Clearing caller
information
% S Tools S % S In PIM/Life menu,
Simulated Call S % S Set Caller S % S B
S Yes S % S A S A
Overriding Silent
volume setting
% S Tools S % S In PIM/Life menu,
Simulated Call S % S For Silent Mode S %
S Ring S % S Yes S % S A
Countdown Timer
7% S Tools S % S f Clock/Gauge
S Countdown Timer S % S B S Illumi
Display S % S See below
Changing Illumi
Display settings
Using Preset Pattern
Pattern Setting S % S Preset Pattern S % S
Select pattern S % S A
Using Custom Pattern
Pattern Setting S % S Original S % S A
Disabling Illumi Display
Switch On/Off S % S Off S % S A
Additional Functions
Changing Small
Light & Key
Illumination
settings
7% S Tools S % S f Clock/Gauge
7% S Tools S % S f Clock/Gauge
S Countdown Timer S % S B S Light & Key
Illumi S % S See below
S Hour Minder S % S Advanced S % S
Illumi Display: S % S See below
Changing Light Color
Light Color S % S Select color S % S A
Changing Key Illumination Pattern
Key Pattern S % S Select pattern S % S A
Changing Illumi
Display settings
Using Custom Pattern
Pattern Setting S % S Original S % S A S A
Disabling Small Light & Key Illumination
Switch On/Off S % S Off S % S A
Disabling Illumi Display
Switch On/Off S % S Off S % S A S A
Hour Minder
7% S Tools S % S f Clock/Gauge
S Hour Minder S % S Advanced S % S
Light & Key Illumi: S % S See below
% S Tools S % S f Clock/Gauge S Hour
Minder S % S Advanced S % S Assign
Tone/Video: S % S Select folder S % S
Select tone/file S % S A S A
Setting Ringtones to Control Illumination
Switch On/Off S % S Link to Sound S % S
ASASA
. Select start point if required.
Setting handset to
vibrate at Hour
Minder Time
% S Tools S % S f Clock/Gauge S Hour
Minder S % S Advanced S % S Vibration:
S % S On or Link to Sound S % S A S A
. Select Link to Sound to allow compatible SMAF
files to control vibration.
Changing Small
Light & Key
Illumination settings
Changing Light Color
Light Color S % S Select color S % S A S
ASA
Handy Extras
Changing Hour
Minder tone/video
Using Preset Pattern
Pattern Setting S % S Preset Pattern S % S
Select pattern S % S A S A
11
Changing Key Illumination Pattern
Key Pattern S % S Select pattern S % S A
SASA
. Not effective when Switch On/Off is set to Link
to Sound.
Disabling Small Light & Key Illumination
Switch On/Off S % S Off S % S A S A
SA
11-51
Additional Functions
Sounding Hour
Minder tone even
in Manner mode
% S Tools S % S f Clock/Gauge S Hour
Minder S % S Advanced S % S For
Manner Mode: S % S Ring S % S Yes S
%SASA
Activating Hour
Minder based on
World Clock time
% S Tools S % S f Clock/Gauge S Hour
Minder S % S Advanced S % S Link to
World Clk: S % S On S % S A S A
Pedometer
Handy Extras
11
Changing
Pedometer
indicator
Using Pedometer
Calendar
Checking
accumulated data
7% S Tools S % S f Clock/Gauge
S Pedometer S % S B S Settings S % S
Target S % S Goal Announce S % S On S
% S See below
Customizing
achievement
notice
. Degree of achievement appears.
. Press ( or # to view previous or next month.
% S Tools S % S f Clock/Gauge S
Pedometer S % S B S Accumulated Data
S%
. Change in body information is reflected in the
data.
Changing Duration
Duration S % S Select time S %
. For custom Duration, select Other and press %.
S! GPS Navi
Sending current
location via mail
Setting daily step
count reset time
% S Tools S % S f Clock/Gauge S
Pedometer S % S B S Settings S % S
Count Reset Time S % S Enter time S % S
Yes S %
% S Tools S % S f Clock/Gauge S
S! GPS Navi S % S Location Mail S % S
Positioning complete S % S Complete
message S A
. When accuracy level is 1 or 2, choose No and
press % after positioning, then complete message.
% S Tools S % S f Clock/Gauge S
Pedometer S % S B S Accumulated Data
Resetting
S % S B S Reset Walk Data S % S Enter
accumulated data
Handset Code S % S Yes S %
. Averages are also reset.
Changing Tone Volume
Goal Volume S % S Adjust level S %
Selecting Vibration Option
Vibration S % S Select option S %
% S Settings S % S In Sound/Display
menu, Display S % S Standby Display S %
S Pedometer S % S Select item S %
% S Tools S % S f Clock/Gauge S
Pedometer S % S A S Select date S %
Changing Tone
Goal Sound S % S Select pattern S %
7% S Tools S % S f Clock/Gauge
S S! GPS Navi S % S NAVI Settings S % S
Map URL Settings S % S See below
Changing map
source URL
Adding URLs
<Not set> S % S Enter URL S %
Setting Destination URL
Select URL S %
Viewing/Editing/Deleting URLs
Select URL S B S Display, Edit or Delete S %
. Follow onscreen prompt.
11-52
Additional Functions
Disabling
positioning
% S Tools S % S f Clock/Gauge S
S! GPS Navi S % S NAVI Settings S % S
Positioning Lock S % S On S % S Enter
Handset Code S %
Selecting Location
Information
transmission
option
% S Tools S % S f Clock/Gauge S S! GPS
Navi S % S NAVI Settings S % S Send
Location Info S % S Select option S %
Suppressing
Information window
after sending
Location Information
automatically
Notepad
7% S Tools S % S f Doc./Rec. S
7% S Tools S % S f Clock/Gauge
Notepad S % S Select entry S B S See below
Editing Notepad
Changing Category
Change Category S % S Select Category S %
Opening Map
A S Yes S %
Using My Location
& Location Log
Showing Routes via Navi Appli
B S Go to S % S Yes S %
. Follow onscreen instructions.
Inserting into Message Text
B S As Msg. Text S % S Complete
message S A
Saving to Phone Book
B S Save to Ph.Book S % S As New Entry
S % S Complete other fields S A
. To add to an existing entry, select As New Detail.
Saving Location
Log records to My
Location
Deleting Location
Log records
% S Tools S % S f Clock/Gauge S
S! GPS Navi S % S Location Logs S % S
Select record S B S Set as My Location S
% S Name S % S Enter name S % S B
% S Tools S % S f Clock/Gauge S
S! GPS Navi S % S Location Logs S % S
Select record S B S Delete or Delete All S
% S Yes S %
Editing Text
Edit Text S % S Edit S %
Searching text
within all entries
Inserting Notepad
text into message
text
% S Tools S % S f Doc./Rec. S Notepad
S % S Select entry S B S Search S % S
Enter text S %
% S Tools S % S f Doc./Rec. S Notepad
S % S Select entry S B S Send S % S As
Message Text S % S E Mail or SMS S % S
Complete message S A
Handy Extras
S S! GPS Navi S % S My Location List or
Location Logs S % S Select entry or record
S See below
% S Tools S % S f Clock/Gauge S
S! GPS Navi S % S NAVI Settings S % S
Inform Location S % S Do not Show S % S
Enter Handset Code S %
11
. E Mail Composition window opens
automatically depending on character count.
Sending entries via
E Mail
% S Tools S % S f Doc./Rec. S Notepad
S % S Select entry S B S Send S % S Via
Message S % S Complete message S A
Creating text files
% S Tools S % S f Doc./Rec. S Notepad
S % S Select entry S B S Setting/Manage
S % S Create Text File S % S Enter name
S % S Save here S %
. Omit record selection step when deleting all
records.
11-53
Additional Functions
Importing text files
% S Tools S % S f Doc./Rec. S Notepad S
% S Select entry S B S Setting/Manage S
% S Import Text File S % S Select file S %
Checking memory
status
% S Tools S % S f Doc./Rec. S Notepad
S % S Select entry S B S Setting/Manage
S % S Memory Status S %
Opening
properties
% S Tools S % S f Doc./Rec. S Notepad
S % S Select entry S B S Details S %
Scan Barcode
7In a text entry window, B S Scan S
% S Scan Code S % S Frame barcode in
center of Display S % S See below
Scanning during
text entry
Pasting a Part of Scan Results
B S Select first character S % S Highlight
text range S %
Voice Recorder
Handy Extras
11
Saving longer
recordings
Scanning
continuously
Sending Voice files
via E Mail
% S Tools S % S f Doc./Rec. S Barcode/
Scan S % S Scan Barcode S % S B S
Continuous Scan S % S On S % S Frame
barcode in center of Display S %
. Choose Yes to continue scanning or No and
press % to view scan results.
. Insert Memory Card to record in Extended Voice
mode. (Recording is saved automatically.)
Switching storage
media
11-54
% S Tools S % S f Doc./Rec. S Voice
Recorder S % S B S Record Time S % S
Extended Voice S % S % S Recording
starts S % S Recording ends
Pasting All Scan Results
%
% S Tools S % S f Doc./Rec. S Voice
Recorder S % S % S Recording starts S %
S Recording ends S Save and Send S % S
Complete message S A
Reading saved
barcode images
% S Tools S % S f Doc./Rec. S Barcode/
Scan S % S Open Barcode S % S Select
file S %
. Available in For Message mode.
Saving scan results
% S Tools S % S f Doc./Rec. S Barcode/
Scan S % S Scan Barcode S % S Frame
barcode in center of Display S % S B S
Save S %
Saving to Notepad
% S Tools S % S f Doc./Rec. S Barcode/
Scan S % S Scan Barcode S % S Frame
barcode in center of Display S % S B S
Notepad S %
% S Tools S % S f Doc./Rec. S Voice
Recorder S % S B S Save Recording to S
% S Select option S %
. Available in For Message mode.
. Set to Ask Each Time to select media after
every recording.
Additional Functions
Saving linked info
to Phone Book
. To add to an existing entry, select As New
Detail.
. When MEMORY: appears in scan results, press
% to enter the items underlined with a dotted
line automatically in Phone Book entry window.
% S Tools S % S f Doc./Rec. S Barcode/
Scan S % S Scanned Results S % S Select
file S %
. Select a file and press B to rename files, open
properties or delete files.
. Some files may not open.
7% S Tools S % S f Doc./Rec. S
Barcode/Scan S % S Scan Barcode S % S
Frame barcode in center of Display S % S
See below
Dialing Numbers
Select phone number S % S !
Using linked info
Using images as
Wallpaper
% S Tools S % S f Doc./Rec. S Barcode/
Scan S % S Scan Barcode S % S Frame
barcode in center of Display S % S Select
image S B S Set as Wallpaper S % S %
. For images smaller or larger than Display,
Wallpaper Display options appear; follow
onscreen prompts.
Saving images &
melodies
% S Tools S % S f Doc./Rec. S Barcode/
Scan S % S Scan Barcode S % S Frame
barcode in center of Display S % S Select
file S B S To Data Folder S %
Opening or
playing files
% S Tools S % S f Doc./Rec. S Barcode/
Scan S % S Scan Barcode S % S Frame
barcode in center of Display S % S Select
file S %
Using images for
System Graphics
% S Tools S % S f Doc./Rec. S Barcode/
Scan S % S Scan Barcode S % S Frame
barcode in center of Display S % S Select
image S B S As System S % S Select item
S % S Specify image area S %
Handy Extras
Opening saved
scan results
% S Tools S % S f Doc./Rec. S Barcode/
Scan S % S Scan Barcode S % S Frame
barcode in center of Display S % S Select
number or mail address S B S Save to
Ph.Book S % S As New Entry S % S
Complete other fields S A
11
. Some images may be usable without specifying
image area.
Sending Messages
Select mail address S % S Complete
message S A
. When MAILTO: appears in scan results along
with SUBJECT: or BODY:, press % to enter the
items underlined with a dotted line
automatically in Mail Composition window.
Accessing Internet Sites
Select URL S %
11-55
Additional Functions
7% S Tools S % S f Doc./Rec. S
Barcode/Scan S % S Scan Barcode S % S
Frame barcode in center of Display S % S
B S Send Message S % S See below
Pasting to
message text
All Text
% S E Mail or SMS S % S Complete
message S A
Saving to Notepad
Handy Extras
. E Mail Composition window opens
automatically depending on character count.
Barcode/Scan S % S Scan Card S % S
Frame card in center of Display S % S % S
B S Send Message S % S See below
Pasting to
message text
7% S Tools S % S f Doc./Rec. S
. E Mail Composition window opens
automatically depending on character count.
. E Mail Composition window opens
automatically depending on character count.
Text
B S Copy S % S Select first character S
% S Highlight text range S %
Number, Address or URL
Select number, mail address or URL S B S
Copy Telephone, Copy Address or Copy URL
S%
All Text
% S E Mail or SMS S % S Complete
message S A
Selected Text
B S Select first character S % S Highlight
text range S % S E Mail or SMS S % S
Complete message S A
Barcode/Scan S % S Scan Barcode S % S
Frame barcode in center of Display S % S
See below
Copying text
% S Tools S % S f Doc./Rec. S Barcode/
Scan S % S Scan Card S % S Frame card
in center of Display S % S % S B S
Notepad S %
7% S Tools S % S f Doc./Rec. S
. E Mail Composition window opens
automatically depending on character count.
Selected Text
B S Select first character S % S Highlight
text range S % S E Mail or SMS S % S
Complete message S A
11
11-56
Scan Card
Copying text
% S Tools S % S f Doc./Rec. S Barcode/
Scan S % S Scan Card S % S Frame card
in center of Display S % S % S B S Copy
S % S Select first character S % S
Highlight text range S %
Additional Functions
7% S Tools S % S f Doc./Rec. S
Scan Text
Scanning and
pasting during text
entry
In a text entry window, B S Scan S % S
Scan Text S % S Frame text in center of
Display S % S Select line S % S %
Scanning more
text
% S Tools S % S f Doc./Rec. S Barcode/
Scan S % S Scan Text S % S Frame text in
center of Display S % S Select line S % S
% S B S Continue Part or Scan More S %
Barcode/Scan S % S Scan Text S % S
Frame text in center of Display S % S Select
line S % S % S See below
Using linked info
Sending Messages
Select mail address S % S Complete
message S A
. Select Continue Part to enter additional text or
Scan More to enter text after a line break.
Saving linked info
to Phone Book
% S Tools S % S f Doc./Rec. S Barcode/
Scan S % S Scan Text S % S Frame text in
center of Display S % S Select line S % S
% S B S Save S %
% S Tools S % S f Doc./Rec. S Barcode/
Scan S % S Scan Text S % S Frame text in
center of Display S % S Select line S % S
% S Select number or mail address S B S
Save to Ph.Book S % S As New Entry S %
S Complete other fields S A
. To add to an existing entry, select As New Detail.
Opening saved
scan results
Accessing Internet Sites
Select URL S %
% S Tools S % S f Doc./Rec. S Barcode/
Scan S % S Scanned Results S % S Select
file S %
. Select a file and press B to rename files, open
properties or delete files.
. Some files may not open.
7% S Tools S % S f Doc./Rec. S
Barcode/Scan S % S Scan Text S % S
Frame text in center of Display S % S Select
line S % S % S B S Send Message S %
S See below
Pasting to
message text
All Text
% S E Mail or SMS S % S Complete
message S A
Handy Extras
Saving scan results
Dialing Numbers
Select phone number S % S !
11
. E Mail Composition window opens
automatically depending on character count.
Selected Text
B S Select first character S % S Highlight
text range S % S E Mail or SMS S % S
Complete message S A
. E Mail Composition window opens
automatically depending on character count.
11-57
Additional Functions
7% S Tools S % S f Doc./Rec. S
Barcode/Scan S % S Scan Text S % S
Frame text in center of Display S % S Select
line S % S % S See below
Copying text
Text
B S Copy S % S Select first character S
% S Highlight text range S %
Number, Address or URL
Select number, mail address or URL S B S
Copy Telephone, Copy Address or Copy URL
S%
Handy Extras
11
11-58
Kanji Grabber
Scanning and
pasting during text
entry
In a text entry window, B S Scan S % S
Kanji Grabber S % S Frame kanji in Loupe
S % S Scan results appear S %
Troubleshooting
Osaifu-Keitai®
Voice Recorder
3 Cannot record properly
3
3
Noise/skipping occurs
3
Recording takes time to start
Cannot use Osaifu-Keitai®
. Battery may be low. Charge
battery or install a charged battery.
Recognition via reader/writer
takes time
. Check m logo area. Foreign articles
can block/hamper recognition.
Call Remote Lock does not
even after specified
3 activate
number of Missed Calls
. Missed Call count is reset by calls
from other numbers. If series is
interrupted, start over from the
beginning.
. When Call Forwarding is active,
Missed Calls may not be recorded.
Wakeup TV
3 specified channel
TV does not activate with
. If Wakeup TV Time arrives while TV is
active, channel does not switch to
the specified one.
. If incompatible microphone is
connected, recording may fail.
. Avoid shocks to handset while
recording; may cause noise or
skipping.
. Recording window may take
longer to open as more Voice files
are saved on Memory Card.
Scanning Barcode/Card/Text
3 Cannot read barcodes properly
. Scan may fail if barcode is dirty or
unclear.
. Scan may fail if barcode is
scanned under inadequate light.
. Scan may fail if multiple barcodes
are captured at one time.
Cannot read barcodes during text
. Scanning is not available during
calls or when mobile camera is
active.
3 Data Folder automatically
Cannot read split QR Codes in
. When scan fails, follow onscreen
instructions and select next
barcode image manually.
3 properly
Cannot scan business cards
. Scan fails if business card is printed
in light-colored text on a dark
background, handwritten or
printed in casual/decorative fonts,
decorated with a background
pattern, or designed with both
vertical and horizontal text.
. Scan may fail if business card is
printed in light-colored text on a
light background, printed in italics
or extremely small fonts, decorated
with a logo or logo-like text, printed
on a glossy paper or other
material, or dirty/folded.
Handy Extras
3 (S! FeliCa)
3 entry
11
3 Cannot scan text properly
. Scanning over 35 characters at
one time may yield poor results.
. Adjust to frame text in [ ]. Letters at
the ends may be distorted.
11-59
Disney Characters....................... 12-2
e-Books ........................................12-6
Using Disney Character Tools
(Japanese) ...................................12-2
S! Friend's Status...........................12-7
S! Quick News.............................. 12-3
Reading e-Books (Japanese) .... 12-6
Using S! Friend's Status ................. 12-7
Receiving Content Updates
(Japanese) ...................................12-3
S! Circle Talk .............................. 12-10
S! Information Channel ............... 12-4
Blog Tool..................................... 12-12
S! Information Channel & Weather
Indicator (Japanese)...................12-4
Content Downloads .................... 12-5
Downloading Content (Japanese) ... 12-5
Using S! Circle Talk ..................... 12-10
Blogging...................................... 12-12
Additional Functions ................. 12-14
Troubleshooting .........................12-18
12
Entertainment
12-1
Disney Characters
Using Disney Character Tools (Japanese)
Disney Character Photo Maker
Transform persons in photos into
Disney characters.
Packet transmission fees apply.
1 % S Entertainment S %
S Disney Character Photo
Maker S %
Disney Player
Watch online Disney character movies.
Packet transmission fees apply.
1 % S Entertainment S %
S Disney Player S %
Entertainment
12
. Disney Character Photo Maker
S! Application starts.
. Follow onscreen instructions. Refer
to the S! Application's help menu
for operational instructions.
12-2
. Disney Player S! Application starts.
. Follow onscreen instructions. Refer
to the S! Application's help menu
for operational instructions.
S! Quick News
Receiving Content Updates (Japanese)
View content updates or breaking news.
Packet transmission fees apply.
Registering S! Quick News Items
1 % S Entertainment S %
S S! Quick News S %
2 S! Quick News List S %
Opening Information
1 In S! Quick News List, select
item S %
. Title list appears.
2 Select title S %
. Information appears.
. Press B to return to title list, or A
to open next title.
Indicators
Unread
Special news
Unread
General news
Read Special
news
Read General
news
Unread News
Flash
Auto update
disabled
Read News
Flash
S! Quick News List
3 登録はこちら S % S Yes
S%
. Handset connects to the Internet.
Entertainment
Updating Items Manually
[S! Quick News List] Select item S
A S 更新 S % S 一件 or 全件 S %
12
4 Select item S %
. Follow onscreen instructions.
Advanced
0 (Updating S! Quick News List automatically (Checking update schedule (Deleting S! Quick News items (Resetting S! Quick News List
(Changing background image (Accessing source sites (Disabling image download (P.12-14)
12-3
S! Information Channel
S! Information Channel & Weather Indicator (Japanese)
Subscribe to Japanese mobile
periodicals that download to handset
automatically; use Weather Indicator
as needed.
Packet transmission fees apply.
Service Registration & Content
Subscription
1 % S Entertainment S %
Entertainment
S S! Information Channel/
Weather S %
New Received Information
Information window opens for new
S! Information Channel info delivery.
1 While Information window
appears, S! Info. Channel
S%
. S! Information Channel page
opens. Follow onscreen
instructions.
. S! Information Channel page
handling is similar to that of Disney
Web.
Using Weather Indicator
After S! Information Channel
registration, local area weather
indicator appears in Standby.
Manual Update
[S! Information Channel Menu]
Weather Indicator S % S Manual
Update S % S Yes S %
2 " S Standby returns
12
S! Information Channel Menu
2 Registration/Cancel S %
. Handset connects to the Internet.
Follow onscreen instructions.
Opening Unread Latest Issue
[S! Information Channel Menu]
What's New S %
Opening Back Issues
[S! Information Channel Menu] Back
Issue S % S Select date S %
Advanced
0 (Suppressing Information window for new received info (Changing Display Size (Changing scroll unit (Copying text (Hiding Weather Indicator in
Standby (Canceling Weather Indicator automatic updates (Suppressing Information window for weather updates (And more on P.12-14 - 12-15)
12-4
Content Downloads
Downloading Content (Japanese)
Download media content via Disney
Web.
Via Music Store
1 % S Entertainment S %
Via Free Content Providers
Download music files and Graphic
Mail templates.
Content downloads are free, however,
they require Internet connection
incurring packet transmission fees.
1 In Entertainment menu,
Free Contents S %
. Handset connects to the Internet.
Follow onscreen instructions.
Entertainment
2 Select content type S %
12
Entertainment Menu
2 Music Store S %
. Handset connects to the Internet.
Follow onscreen instructions.
12-5
e-Books
Reading e-Books (Japanese)
Downloading e-Books
1 A S メニューリスト S %
2 書籍・コミック・写真集 S %
. Follow onscreen instructions.
. Downloaded e-Books are saved
to Data Folder (Books).
Entertainment
Note
. Alternatively, go to SH-web Mobile
Internet site (シャープメーカーサイト in Bookmarks;
see P.6-8) for e-Books.
e-Book Viewer
Read XMDF books and dictionary files.
Some files may not be supported.
1 % S Entertainment S %
1 In Entertainment menu,
. BookSurfing® S! Application starts.
Refer to the BookSurfing® help
menu for operational instructions.
Entertainment Menu
. e-Book Viewer starts. Refer to the
e-Book Viewer help menu for
operational instructions.
Advanced
0 (Copying text (Opening non-DM005SH e-Books (Library) (Using Library (P.12-15)
12-6
Download Contents Keys and read
CCF files.
Some files may not be supported.
BookSurfing S %
2 e-Book Viewer S %
12
BookSurfing®
Moving CCF Files via Memory Card
. When purchasing a new handset,
move CCF files and retrieve Contents
Keys to open the files. Some files may
need to be re-downloaded.
S! Friend's Status
Using S! Friend's Status
Exchange current usage status,
mood, etc. with compatible handsets.
. Save and organize members in Groups.
. S! Friend's Status requires a separate
contract and basic monthly fee.
. Set Connection status to Online first.
1 % S Entertainment S %
S S! Friend's Status S %
phone number S %
. Omit number selection step if only
one number is saved.
6 Yes S %
. Registration request is sent to the
number.
First S! Friend's Status Use
2 Yes S %
When Request is Accepted
. An acceptance notice arrives; My
Status is sent and member's status
appears on handset.
Direct Entry
In 4, Add New Entry S % S Enter
phone number S % S 6
3 Yes S %
4 Phone Book S %
Entertainment
Follow these steps to register a
number saved in Phone Book; Status,
Availability and Comment are sent to
the members.
5 Select entry S % S Select
12
Advanced
0 (Adding members (Deleting members (Moving members (Renaming Groups (Rejecting requests (Updating manually (Opening
notices (Sending My Details image (And more on P.12-16 - 12-17)
12-7
S! Friend's Status
Opening Member Status
1 % S Entertainment S %
S S! Friend's Status S % S
f Select Group
My Status
Changing My Status
Follow these steps to change Status,
Availability and Comment; new status
is sent to the members.
1 % S Entertainment S %
S S! Friend's Status S % S
私の状況 S %
Member
Status
Entertainment
12
Connection
Status
2 Select member S %
. Member status details appear.
When Cancellation Notice Arrives
. Member is deleted from S! Friend's
Status member list.
My Status Window
2 Select Status, e.g., ごきげん
S%
Status Template Window
12-8
3 Select new Status S %
4 Select Availability, e.g.,
Answer OK S % S Select
new Availability S %
5 <Add Comment> S % S
Enter text S %
6 A S Update starts
Changing Connection Status
[My Status Window] Online (or
Offline) S % S Select status S %
Changing Status Icon/Label
[Status Template Window] Select
Status S A S Status Icon or Status
Label S % S Select Pictogram or
enter text S % S A
Changing Availability Settings at Once
In 4, Answer Status S % S Select
new Answer Status S % S From 5
Editing My Status Name
[My Status Window] B S Edit Name
S % S Edit S %
S! Friend's Status
Receiving Request from Unsaved
Numbers
When a registration request arrives, a
confirmation appears.
. Acceptance notice is sent; the
number is registered.
Rejecting
In 1, No S % S Yes S %
, Rejection notice is sent; the number
cannot be registered for 24 hours.
, For ConfirmLater, Information
window opens.
1 In Status Template window,
Saving to Data Folder
[Status Template Window] f Select
template S B S Save to DF S %
S Save here S %
Loading Templates via Data Folder
[Status Template Window] B S
Add Template S % S Select
template S %
Renaming Templates
[Status Template Window] f Select
template S B S Edit Temp. Name
S % S Enter name S %
B S New Entry S %
Entertainment
1 Yes S %
Creating Status Templates
Save custom combinations of Status
Icon and Status Label to each
template.
Pictogram S %
12
2 Enter name S %
3 <未定> S %
4 Status Icon S % S Select
5 Status Label S % S Enter
text S % S A
6 Repeat 3 - 5 S A S
Saved
Advanced
0 (Resetting templates (P.12-16)
12-9
S! Circle Talk
Using S! Circle Talk
Use handset like a walkie-talkie to
speak to multiple parties
simultaneously.
. A subscription to S! Friend's Status is
required.
. Packet transmission fees apply during
S! Circle Talk.
3 Group S % S Group
Name: S % S Enter name
S%
Registering Members
Entertainment
12
Follow these steps to register a
number saved in Phone Book:
1 % S Entertainment S %
S S! Circle Talk S %
. When registering a member for
the first time, member registration
confirmation appears. Choose
Yes and press %, then skip ahead
to 3.
4 Select number, e.g., No.1:
S%
5 Phone Book S %
6 Select entry S % S Select
phone number S %
2 <Add New Entry> S %
. Omit number selection step if only
one number is saved.
. Repeat 4 - 6 to add members.
Advanced
0 (Editing individual members (Editing Groups (P.12-17)
12-10
7 A S Saved
Saving as Individuals
In 3, Individual S % S 5 - 6
Saving from S! Friend's Status Member List
In 5, Members List S % S Select
member S % S 7
, Omit 7 when Individual is selected
in 3.
S! Circle Talk
Initiating S! Circle Talk
Follow these steps to send S! Circle
Talk requests to members:
(First, set Connection status to Online
(P.12-8).)
1 % S Entertainment S %
S! Circle Talk Operations
[ Speaking
1 Press and hold ! when
Press and Hold
appears
S You have the floor
S S! Circle Talk S %
S%
3 % S Transmission starts
. S! Circle Talk starts when request is
accepted by a receiver.
. Loudspeaker activates
automatically.
Direct Entry
Enter phone number S % S Call
S! Circle Talk S % S %
.
:My Turn appears when you
have the floor.
2 Keep holding ! to speak
S Release ! S Floor is
released
. Warning tone sounds before time
limit.
1 " S Connection ends
. S! Circle Talk ends automatically
when there is only one participant
left, including yourself.
Rejoining S! Circle Talk
c/d S Select most recent
S! Circle Talk record S B S Rejoin
Circle Talk S %
, Not available when S! Circle Talk
has ended or maximum number of
participants are already engaged.
Accepting S! Circle Talk Request
1 While handset is ringing/
vibrating, % S S! Circle
Talk starts
. Alternatively, press !.
. S! Circle Talk Operations: left
Entertainment
2 Select member or Group
[ Exiting S! Circle Talk
12
Incoming Calls during S! Circle Talk
. Incoming calls are rejected. Set
handset to exit S! Circle Talk to
answer incoming calls as needed.
Canceling Loudspeaker
During S! Circle Talk, %
, To reactivate, follow these steps:
% S While message appears, %
Advanced
0 (Disabling Loudspeaker (Exiting S! Circle Talk for incoming calls (P.12-17)
12-11
Blog Tool
Blogging
Save blog details to view or update
blogs easily on handset.
Saving Blog Details
Setup for Posting via Mail
3 Blog Title S % S Enter
name S %
4 Blog by send Mail S %
2 Refer/Send by Disney Web
1 % S Entertainment S %
or Refer/Send by
PCSiteBrowser S %
S Blog Tool S %
Entertainment
12
5 Blog's Email Address S %
S Enter mail address S %
2 Add New Entry S %
Blog Setting Menu
Advanced
12-12
0 (Editing entries (Deleting entries (P.12-17)
1 In Blog Setting menu, Blog Title
S % S Enter name S %
Follow these steps to save blog name
and address for posting:
Blog Tool Window
Setup for Posting via the Internet
Save URL for Disney Web or PC sites, or
both.
6$SA
Saving Title/Text for Posts
After 5, Blog's Title or Blog's Text S
% S Enter title or text S % S 6
, Saved title/text is entered
automatically when posting.
Setting Image Size for Posting
After 5, Picture Size S % S Select
size S % S 6
3 Blog's URL S % S Enter URL
S%
4 Refer Blog's URL S % S
Enter URL S %
5$SA
Blog Tool
Posting to Blogs
Complete setup for posting via mail/
Internet beforehand.
Posting via Mail
1 In Blog Tool window, select
entry S %
2 Blog by send Mail S %
. E Mail Composition window
opens with address entered.
. Omit 2 if no URL is saved for posting.
entry S %
2 Blog by send Browser S %
. Page of URL saved in Blog's URL
opens.
. Omit 2 if no address is saved for
posting.
. If PC Site Browser message
appears, follow onscreen prompts.
When URLs for Disney Web & PC Sites
are Saved
After 2, select browser S %
Opening Blog Page
1 In Blog Tool window, select
entry S A
. Page of URL saved in Refer Blog's
URL opens.
. If PC Site Browser message
appears, follow onscreen prompts.
When URLs for Disney Web & PC Sites
are Saved
After 1, select browser S %
Entertainment
3 Complete message S A
Posting via the Internet
1 In Blog Tool window, select
12
12-13
Additional Functions
[ Other
S! Quick News
[ Opening/Updating Items
% S Entertainment S % S S! Quick News S
% S Settings S % S Automatic Update S
% S Select item S % S Select interval or
choose On S %
Updating S! Quick
News List
automatically
Entertainment
Checking update
schedule
. If a confirmation appears after completing the
steps above, press %.
. When selecting an item set to Off, a
confirmation appears.
. When Special is set to On, items are updated
every four hours.
. When General is set to On, items are updated
once a day.
. Updating items may incur high packet
transmission fees.
. Only available in Japan.
% S Entertainment S % S S! Quick News S
% S Settings S % S Check Schedule S %
7% S Entertainment S % S S! Quick
12
News S % S S! Quick News List S % S
Select item S B S See below
Deleting S! Quick
News items
One Entry
一件 S % S Yes S %
All Entries
全件 S % S Enter Handset Code S % S Yes
S%
Resetting S! Quick
News List
% S Entertainment S % S S! Quick News S
% S Settings S % S Delete S! Quick News
Lists S % S Enter Handset Code S % S Yes
S%
. Not available during automatic updates.
12-14
Changing
background
image
% S Entertainment S % S S! Quick News S
% S Settings S % S Change Skin S % S
Select pattern S %
Accessing source
sites
% S Entertainment S % S S! Quick News S
% S S! Quick News List S % S Select item
S % S Select title S % S Select linked title
S % S Yes S %
Disabling image
download
% S Entertainment S % S S! Quick News S
% S Settings S % S Show Image S % S
Off S %
S! Information Channel
[ Receiving Information
Suppressing
Information
window for new
received info
% S Entertainment S % S S! Information
Channel/Weather S % S Notification S %
S Off S %
Requesting
re-delivery
% S Entertainment S % S S! Information
Channel/Weather S % S Get Latest
Contents S % S Yes S %
[ Information Pages
Changing Display
Size
On a page, B S Settings S % S Display Size
S % S Select size S %
Changing scroll
unit
On a page, B S Settings S % S Scroll Unit
S % S Select unit S %
Additional Functions
Copying text
Saving files to Data
Folder
On a page, B S Copy Text S % S Select
first character S % S Highlight text range
S%
On a page, B S Save Items S % S Select
file S % S Save S % S Enter name S % S
Save here S %
. Some files are saved automatically.
Opening page
properties
On a page, B S Details S %
e-Books
Copying text
Opening
non-DM005SH
e-Books (Library)
Changing weather
forecast page font
size
On a page, B S Settings S % S Font Size S
% S Select size S %
Hiding Weather
Indicator in Standby
% S Entertainment S % S S! Information
Channel/Weather S % S Weather Indicator
S % S Settings S % S Standby Setting S
% S Off S %
Canceling
Weather Indicator
automatic updates
% S Entertainment S % S S! Information
Channel/Weather S % S Weather Indicator
S % S Settings S % S Icon Update S % S
Off S %
Suppressing
Information
window for
weather updates
% S Entertainment S % S S! Information
Channel/Weather S % S Weather Indicator
S % S Settings S % S Weather Notif. S %
S Off S %
. Some files may not open.
7
Adding Folders
B S New Folder S % S Enter name S %
Switching Folders
B S Switch Folders S % S Select folder S %
Using Library
Renaming Folders/Files
Select folder/file S B S Rename S % S
Enter name S %
Moving Files
Select file S B S Move S % S Select folder
S % S Move here S %
Entertainment
% S Entertainment S % S S! Information
Channel/Weather S % S Weather Indicator
S % S Weather S %
% S Entertainment S % S e-Book Viewer S
B S Select file S %
% S Entertainment S % S e-Book
Viewer S B S See below
[ Weather Indicators
Checking weather
forecast
In open page, A S 文字列をコピー S % S
Select first character S % S Highlight text
range S %
12
Deleting Folders/Files
Select folder/file S B S Delete S % S Yes
S%
Opening File Properties
Select file S B S Details S %
12-15
Additional Functions
[ Status & Availability
S! Friend's Status
[ Members & Groups
Adding members
Deleting members
% S Entertainment S % S S! Friend's Status
S % S f Select Group S B S Add
Member S % S Select method S % S
Select entry or enter phone number S % S
Yes S %
% S Entertainment S % S S! Friend's Status
S % S f Select Group S Select member S
B S Registration Release S % S Yes S %
S Yes S %
% S Entertainment S % S S! Friend's Status
S % S B S Settings S % S Answer Status
S % S User Setting S % S Select type S %
S Select Availability S % S A
Changing Status
Icon Pictogram or
Status Label
description
% S Entertainment S % S S! Friend's Status S
% S B S Settings S % S Status Setting S %
S f Select template S Select Status S % S
Status Icon S % S Select Pictogram S % S
Status Label S % S Enter text S % S A
[ Status Templates
7% S Entertainment S % S S! Friend's
Entertainment
. Cancellation notice is sent; deleted members
cannot be re-registered for 24 hours.
Moving members
% S Entertainment S % S S! Friend's Status
S % S f Select Group S Select member S
B S Change Group S % S Select target
Group S %
12
Renaming Groups
% S Entertainment S % S S! Friend's Status
S % S f Select Group S B S Edit Group
Name S % S Enter name S %
7% S Entertainment S % S S! Friend's
Status S % S B S Settings S % S Request
Reply S % S See below
Rejecting requests
Rejecting Requests from Unsaved Numbers
Confirm if Registered S %
. Rejection notice is sent to rejected numbers
automatically.
Rejecting All Requests
Always Ignore S %
. Rejection notice is sent to all requesters
automatically.
12-16
Saving custom
Availability
combinations
Status S % S 私の状況 S % S Select Status
S % S See below
Resetting templates
One Template
f Select template S B S Reset S % S Yes
S%
All Templates
B S Reset All S % S Yes S %
[ Member Status & Notices
Updating manually
% S Entertainment S % S S! Friend's Status
S % S B S Settings S % S Status Update
S%
Opening notices
% S Entertainment S % S S! Friend's Status
S % S B S Status Notif. List S % S Select
notice S %
Additional Functions
[ My Details
Sending My Details
image
[ Settings
% S Entertainment S % S S! Friend's Status
S % S f Select Group S Select member S
B S Send Image S % S Yes S %
. Available when your handset number is saved
in Phone Book on member's handset.
S! Circle Talk
Disabling
Loudspeaker
% S Entertainment S % S S! Circle Talk S
% S B S Loudspeaker S % S Off S %
Exiting S! Circle
Talk for incoming
calls
% S Entertainment S % S S! Circle Talk S %
S B S Incoming Calls S % S Voice Calls or
Video Calls S % S Accept Calls S %
Blog Tool
[ Member List
7% S Entertainment S % S S! Circle
Talk S % S Select member S B S See below
Deleting Members
Delete S % S Yes S %
7
% S Entertainment S % S S! Circle
Talk S % S Select Group S B S See below
Editing Groups
Editing Group Name/Members
Edit S % S Select target S % S Edit/enter
S%SA
Editing entries
. For Blog Title, omit step of pressing $ after
editing.
Deleting entries
% S Entertainment S % S Blog Tool S % S
Select entry S B S Delete S % S Yes S %
Entertainment
Editing individual
members
Replacing Members
Edit S % S % S Select method S % S
Select entry S %
% S Entertainment S % S Blog Tool S % S
Select entry S B S Edit S % S Select item
S % S Edit S $ S A
12
Deleting Group Members
Edit S % S Select member S B S Delete S
% S Yes S % S A
Deleting Groups
Delete S % S Yes S %
12-17
Troubleshooting
S! Friend's Status
3 Cannot use S! Friend's Status
. Set IP Service Setting to On.
3
Entertainment
12
3
Handset rejected a registration
request automatically
. Rejection notice is sent
automatically when 30 members
are already registered or handset
fails to respond within two hours.
Registration request arrived from a
deleted member
. Registration request arrives when a
member fails to receive
cancellation notice within 24 hours.
3 member automatically
Registration request was sent to a
. Registration request is sent
automatically when handset fails
to receive rejection/cancellation
notice within 24 hours.
12-18
3 Cannot create Status Templates
. Three templates may already be
added; reset one and retry.
S! Circle Talk
3 Cannot use S! Circle Talk
. Set IP Service Setting to On.
3 S! Circle Talk starts automatically
. Check My Status; handset accepts
S! Circle Talk requests
automatically if S! Circle Talk
Availability is set to Auto Join.
3 requests
Cannot accept S! Circle Talk
. Check My Status; handset rejects
S! Circle Talk requests
automatically if S! Circle Talk
Availability is set to Join NG.
S! Quick News
3 Cannot receive content updates
. Update may fail out-of-range or in
poor signal conditions.
. Automatic Update does not affect
S! Quick News List News Flash
update items overnight.
. USIM Card replacement cancels
Automatic Update.
Handset Security ......................... 13-2
Function Control ..........................13-6
Operations Security .....................13-2
Information Security.....................13-3
Additional Functions ...................13-7
Face Recognition........................ 13-4
Using Face Recognition ..............13-4
Using Function Control ................ 13-6
13
Handset Security
13-1
Handset Security
Operations Security
Function Lock
Restrict access to handset functions.
Lock when Display turns
off or handset is closed
Lock immediately; setting
Once
is canceled once
handset is unlocked
Lock when handset is
At Power On powered on; Handset
Code entry window opens
1 % S Settings S % S f
Phone/G S Locks S %
1 In Locks menu, PIN Entry S
Auto
% S Switch On/Off S %
2 On S % S Enter PIN S %
Secure Remote Lock
Locks Menu
Handset Security
2 Function Lock S %
3 Select option S % S Enter
Handset Code S %
Unlocking Temporarily
While handset is locked, enter
Handset Code S %
Available Operations while Function
Lock is Active
. Power handset on/off, answer calls,
place callers on hold, end calls, etc.
13
Advanced
0 (Changing PIN (Setting Secure Remote Lock activation message (P.13-7)
13-2
PIN Entry
Activate PIN Entry to require PIN entry
each time handset is powered on.
Lock a lost handset remotely via PC or
another handset. Secure Remote
Lock disables all operations except
powering handset on, and activates
IC Card Lock.
For more about Secure Remote Lock,
see Disney Mobile Website (P.17-22) or
contact General Information (P.17-41).
Handset Security
Information Security
Application Lock
Restrict access to these functions:
Phone Book
Mail
Calendar/Tasks
Notepad
Disney Web
1 % S Settings S % S f
Phone/G S Locks S %
4 A S Enter Handset Code
S%
Temporary Access to Functions
. When accessing functions, enter
Handset Code and press %.
History Lock
Restrict access to Call Log and sent/
received mail records.
S%
2 Select item S % ( )
3 A S Enter Handset Code
S%
Locks Menu
2 Application Lock S %
3 Select item S % ( )
Temporary Access to Records
. When accessing records, enter
Handset Code and press %.
1 In Locks menu, Show Secret
Data S %
2 On S % S Enter Handset
Code S %
Activating Temporarily with
Motion Control
1 Enter Handset Code S
Shake handset left or right
S%
. Show Secret Data is canceled
when handset is closed or Display
goes dark in Standby.
Handset Security
1 In Locks menu, History Lock
Show Secret Data
Activate Show Secret Data to access
Secret entries.
13
For Phone Book, select No Refer (to
hide entry names in message lists,
Call Log, etc.) or Refer and press %.
13-3
Face Recognition
Using Face Recognition
Capture portraits with mobile camera
then match live image to saved ones
to unlock handset or access
functions/files.
If Face Recognition fails, Function
Lock activates.
Handset Security
13
Important Face Recognition Usage Notes
. Identification accuracy is not
guaranteed. Disney Mobile cannot
be held liable for misuse or any
damages associated with the use of
Face Recognition.
. Handset Code is required to cancel
Face Recognition. Changing the
code helps enhance security.
. Osaifu-Keitai® is available even when
Face Recognition is active.
. When capturing/scanning face,
remember these points:
, Make sure your face is clearly visible.
, Face should be lit evenly and brightly.
Precautions for Portrait Capture
. Look straight into lens and frame
whole face with no expression.
. Do not wear a mask when capturing
portraits, even for use with Low(Mask).
Saving User Information
1 % S Settings S % S f
Phone/G S Locks S %
2 Face Recognition S %
5 User Name: S % S Enter
name S %
6 Register Riddle: S % S
Enter question S %
7 Register Answer: S % S
Enter answer S %
8 Face Image: S %
Face Recognition Menu
3 User Registration S % S
Enter Handset Code S %
4 Select from User 1 to User 5
S%
9 Select from Image 1 to
Image 5 S B
. Mobile camera activates.
a Frame your face on Display
S%SB
b Yes S %
. To save more, repeat 9 - a.
c $ S A S Saved
Advanced
0 (Editing/deleting user information (Changing/deleting portraits (Changing accuracy level (P.13-7)
13-4
Face Recognition
Scanning Face
Face Recognition window opens
when handset is powered on or
opened, or whenever Display is
refreshed after Display Saving time.
1 Face the Display S
Recognition starts
If You Cannot Remember the Answer
In 1, " S Enter Handset Code S %
When No Question or Answer is Saved
In 1, enter Handset Code S A
When Recognition Fails
Function Lock activates.
Activating & Canceling
1 In Face Recognition menu,
2 On or Off S % S Enter
portrait, handset unlocks
Saved question appears.
[ Retrying Face Recognition
1B
[ Unlocking with Handset Code
1 Enter Handset Code S %
Handset Code S %
Handset Security
2 If face matches a saved
When Matching Portrait is Found
Switch On/Off S %
13
1 % S Enter answer S %
Advanced
0 (Selecting recognition guide option (Opening contact information when recognition fails (P.13-7)
13-5
Function Control
Using Function Control
Restrict access to the following
functions remotely. (Available for
administrators.)
Handset Security
13
Camera
Attach File
Infrared
Disney Web
Bluetooth
PC Site Browser
Memory Card
IP Service
USB
S! Appli
Digital TV
Osaifu-Keitai
Messaging
PC Mail
Voice Call (placing)
Streaming
Video Call (placing)
Flash®
USIM (writing)
Mobile Widget
E Mail
. A message appears while Function
Control is in progress.
. May be unavailable depending on
subscription. For details, contact the
nearest SoftBank Shop or General
Information (P.17-41).
13-6
[ When Accessing Restricted Functions
A message (example shown below)
appears; the function is inaccessible.
Checking Restriction Status
1 % S Settings S % S f
Phone/G S Locks S %
2 Function Control S %
Message may not appear for some
functions.
. Restriction status appears for
each function.
Additional Functions
PIN Entry
Changing PIN
Face Recognition
7
% S Settings S % S f Phone/G S Locks
S % S PIN Entry S % S Change PIN S %
S Enter current PIN S % S Enter new PIN S
% S Re-enter new PIN S %
. Activate PIN Entry first.
Secure Remote Lock
% S Settings S % S f Phone/G S
Locks S % S Face Recognition S % S User
Registration S % S Enter Handset Code S %
S Select from User 1 to User 5 S See below
Editing/deleting
user information
. Edit items in the same way as saving entries.
7% S Settings S % S f Phone/G
Deleting
B S Yes S %
S Locks S % S Set Lock Message S % S
See below
7
Changing/
deleting portraits
Suppressing Message
Display Setting S % S Don't Show S % S
Enter Handset Code S %
% S Settings S % S f Phone/G
S Locks S % S Face Recognition S % S
User Registration S % S Enter Handset Code
S % S Select from User 1 to User 5 S % S
Face Image: S % S Select from Image 1 to
Image 5 S See below
Changing
% S B S Yes S % S % S B S $ S A
Deleting
A S Yes S % S $ S A
Changing
accuracy level
Handset Security
Saving Message
Message S % S Enter Handset Code S %
Setting Secure
S Enter message S % S Yes S %
Remote Lock
activation message Checking Message
Check Message S %
Editing
% S Select item S % S Enter information S
%SA
13
% S Settings S % S f Phone/G S Locks
S % S Face Recognition S % S Security
Level S % S Select level S %
. When set to Low(Mask), handset recognizes
faces with masks.
Selecting
recognition guide
option
% S Settings S % S f Phone/G S Locks
S % S Face Recognition S % S Conductor
Setting S % S Select option S %
Opening contact
information when
recognition fails
% S Settings S % S f Phone/G S Locks
S % S Face Recognition S % S Report S
% S Enter Handset Code S % S Enter
contact information S %
13-7
Data Folder .................................. 14-2
Opening Files ................................14-3
Managing Files & Folders ............14-4
Memory Card ..............................14-5
Using Memory Card .................... 14-5
Additional Functions ...................14-7
Troubleshooting .........................14-10
14
Data Folder &
Memory Card
14-1
Data Folder
Data Folder
Handset files are organized in folders by file format.
[ Preset Folders
Contents
Pictures*
Still images
DCIM
Still images on Memory Card (images
captured with save location set to DCIM)
Data Folder & Memory Card
Ring Songs·Tones*
S! Appli*
Widget*
Music*
Videos*
Lifestyle-Appli*
Books*
Customized Screen*
Status Templates
Decoration Call*
14
Flash®
Other Documents
*
Downloaded melodies and other sound files
S! Applications
Widgets
Downloaded Chaku-Uta Full® files
Video images
Lifestyle-Appli required to use Osaifu-Keitai®
Downloaded e-Books, etc.
Downloaded Customized Screen files
Combinations of Status Icon and Status
Label for S! Friend's Status
Decoration Call files created on handset
or obtained via mail
Downloaded Flash® (animation) files
Other files (Dictionary files, etc.)
Contains corresponding Disney Web menu shortcut.
Checking Memory Status
% S Data Folder S % S Memory Status S % S Phone
Memory or Memory Card S %
, The category Others: includes Data Folder management
files, Saved Pages, etc.
. Delete messages/files when memory is low. Handset
performance may be affected when memory is full.
14-2
Data Folder
Opening Files
1 % S Data Folder S %
3 Select file S %
Slide Show
Available for Pictures or DCIM folder.
1 In file list, select file S B
2 Slide Show S %
. Slide Show starts.
2 Select folder S %
To open a sub folder, select it and
press %.
File List
3 % S Slide Show stops
. The content plays or appears.
. To return to file list, press $.
Handling Open Images
. Press % to enlarge, or press #/d or
(/c to open next or previous
image. Press A to rotate 90 degrees
clockwise.
Attaching to Mail
After 2, select file S B S Send/
Blog S % S As Message S %
, If a confirmation appears, follow
onscreen instructions.
Copy Protected Files (
or
)
. Some functions may be unavailable.
Changing Interval
After 2, B S Speed S % S Select
speed S %
, When Speed is set to Manual, press
%/# or ( to advance or
reverse frame.
Note
. Backlight stays on during Slide Show;
exit to save battery power.
Data Folder & Memory Card
. Unselectable files/folders appear
in gray.
. To show/hide sub folders, select a
folder and press A.
14
Advanced
0 (Switching file list view (Changing image quality (Changing Slide Show settings (Using files as Wallpaper (Using files as ringtones (Using
files as ringvideos (And more on P.14-7 - 14-8)
14-3
Data Folder
Managing Files & Folders
Adding Folders
May be unavailable for some folders.
1 % S Data Folder S % S
Select folder S %
Moving/Copying Files
Hiding Folders
Some files may not be moved/copied.
1 In file list, select file S B
2 Move or Copy S % S
Phone or Memory Card S %
Data Folder & Memory Card
14
. For still images, select Pictures or
Mail Art and press %.
2B
File List
If Download is selected or folder is
empty, skip ahead to 4.
3 Manage Items S %
4 Create Folder S % S Enter
name S %
3 Select folder S %
4 Move here or Copy here
S%
Selecting Multiple Files
1 In file list, A
2 Select file S %
. Repeat 2 as needed. (To
uncheck, select a file with
press %.)
Restrict access to created folders.
Only handset folders can be hidden.
1 In file list, select folder S B
2 Set Secret S % S Enter
Handset Code S %
Accessing Secret Folders (Unlock
Temporarily)
[File List] B S Unlock Temporarily
S % S Enter Handset Code S %
Canceling Secret
Unlock Secret folders temporarily
and select Secret folder S B S
Unset Secret S % S Enter Handset
Code S %
and
Advanced
0 (Renaming folders (Opening file properties (Renaming files (Sorting files (Deleting files & created folders (Handling SVG files (P.14-8 - 14-9)
14-4
Memory Card
Using Memory Card
Use microSD/microSDHC Memory
Card (hereafter "Memory Card") to
save and organize files for use on
DM005SH.
Use recommended Memory Cards
only. For details, see P.17-22 "microSD
Memory Card Compatibility."
3 Close cover
First, power handset off.
1 Remove cover
Battery Cover
. Position and slide the cover gently
as shown until it stops.
. Press and slide as shown.
2 Insert card
. With terminal side down, insert
card until it clicks.
. Do not insert other objects into
Memory Card Slot.
If
Appears after Power On
. Memory Card may not be inserted
properly; reinsert the card.
Removing Memory Card
. Gently push in card and release it;
card pops out. Pull card straight out
gently.
Data Folder & Memory Card
Important Memory Card Usage Notes
. Do not force Memory Card into or out
of handset.
. Keep Memory Cards out of infant's
reach; may cause suffocation if
swallowed.
. Do not touch terminals or expose
them to metal objects.
. Disney Mobile is not liable for any
damages resulting from accidental
loss/alteration of information. Keep a
copy of Phone Book entries, etc. in a
separate place.
. Never remove Memory Card or
battery while files are being accessed.
. Be careful not to erase or overwrite
files accidentally.
Inserting & Removing
14
14-5
Memory Card
Format Card
When using a new Memory Card for
the first time, format it on the handset
before trying to save files, etc. Format
Card deletes all Memory Card files,
even those created on other devices.
1 % S Settings S % S f
Data Folder & Memory Card
Phone/G S Memory Card
S%
2 Format Card S % S Yes
S%
. Offline Mode is set. Handset
transmissions are suspended until
format is complete.
3 Enter Handset Code S %
4 Yes S %
. To cancel, choose No and press %.
14
Advanced
0 (Using HTML files on Memory Card (P.14-9)
14-6
Precaution
. Never remove Memory Card or
battery while formatting; may cause
damage.
Opening Memory Card Files
1 % S Data Folder S %
2 B S Change to
MemoryCard S %
. Memory Card Data Folder opens.
3 Select folder S %
To open a sub folder, select it and
press %.
4 Select file S %
Additional Functions
7% S Data Folder S % S Select
File/Folder View Settings
% S Data Folder S % S Select folder S %
S B S Manage Items S % S Change List
View S % S Select option S %
Changing image
quality
% S Data Folder S % S Select folder S %
S Select file S % S B S Switch Display
(Picture Quality for Flash® files) S % S Select
quality S %
Changing
transition effect
when using f
% S Data Folder S % S Select folder S %
S Select file S % S B S Switch Effect S %
S Select effect S %
folder S % S Select file S B S Slide Show
S % S B S See below
Changing Key Illumination Pattern
Set Key Illumi S % S Key Pattern S % S
Select pattern S % S A
Changing Slide
Show settings
folder S % S Select file S B S Slide Show
S % S B S See below
. Choosing Off applies Display Backlight settings.
(Display remains on during Slide Show
regardless of Display Saving setting.)
Playing Once
Repeat S % S Off S %
Playing Music
BGM Settings S % S Switch On/Off S % S
On S %
Changing Music
BGM Settings S % S Play Ring Tones S % S
Select folder S % S Select file S %
Hiding Softkeys
SW Guide Display S % S Off S %
Setting Backlight to Turn Off after a Period of Time
Always Backlight S % S Off S %
7% S Data Folder S % S Select
Changing Slide
Show settings
Disabling Key Illumination
Set Key Illumi S % S Switch On/Off S % S
Off S % S A
Changing Image Transition Effect
Switch S % S Select effect S %
Showing Softkeys
in image view
% S Data Folder S % S Select folder S %
S Select file S % S B S SW Guide Display
S % S On S %
Data Folder & Memory Card
Switching file list
view
14
14-7
Additional Functions
Using Files/Folders
Using files as
Wallpaper
Data Folder & Memory Card
14
14-8
Using files as
ringtones
Using files as
ringvideos
% S Data Folder S % S Select folder S %
S Select file S B S Set as Wallpaper S %
S%
. For images smaller or larger than Display,
Wallpaper Display options appear; follow
onscreen prompts.
% S Data Folder S % S Select folder S %
S Select file S B S Set as Ringtone S % S
Select item S %
. If prompted, enter ring time and press %.
. If a confirmation appears, follow onscreen
instructions.
% S Data Folder S % S Select folder S %
S Select file S B S Save to Phone Book S
% S As New Entry S % S Complete other
fields S A
. To add to an existing entry, select As New Detail.
Activating mobile
camera, etc. in
corresponding
folders
Renaming folders
% S Data Folder S % S Select folder S %
S B S Take Picture, Record Video or Record
Voice S %
% S Data Folder S % S Select folder S %
S Select folder S B S Manage Items S %
S Rename S % S Enter name S %
. Assign different names to folders within a layer.
Opening file
properties
% S Data Folder S % S Select folder S %
S Select file S B S Details S %
Renaming files
% S Data Folder S % S Select folder S %
S Select file S B S Manage Items S % S
Rename S % S Enter name S %
Sorting files
% S Data Folder S % S Select folder S %
S B S Manage Items S % S Sort S % S
Select method S %
% S Data Folder S % S Videos S % S
Select file S B S Set as Ring Video S % S
Select item S %
. If prompted, enter ring time and press %.
Saving Phone
Book entries
Managing Files/Folders
7% S Data Folder S % S Select
folder S % S See below
Deleting files &
created folders
Single Files
Select file S B S Delete S % S Yes S %
Folder & Files Within
Select folder S B S Delete S % S Enter
Handset Code S % S Yes S %
Additional Functions
7
% S Data Folder S % S Other
Documents S % S Select file S % S See
below
Line Scroll
g
Page Scroll
2 (Up), 8 (Down), 6 (Right), 4 (Left)
Handling SVG files
Zoom
1 (Zoom out), 3 (Zoom in)
Key Action Mode
0
Default View
5
Memory Card
Using HTML files on
Memory Card
% S Settings S % S f Phone/G S
Memory Card S % S SD Local Contents S
% S Select title S %
Data Folder & Memory Card
Rotate
7 (Counterclockwise), 9 (Clockwise)
14
14-9
Troubleshooting
Managing Files/Folders
3 Cannot copy files
. Files may be copy/forward
protected. (If a copy/forward
protected file is included in
selected files, only the remaining
files are copied.)
Data Folder & Memory Card
14
3 used on PCs, etc.
Copied/moved files cannot be
. Some files may not be usable on
other Disney Mobile handsets or
PCs, etc.
3 Cannot sort files properly
. Check the number of files/folders
in the folder. Files/folders in folders
containing 961 or more files/folders
are sorted per 240 files/folders in
the order they were saved. The
order may change when a file/
folder is deleted, etc.
3 file/folder names
Cannot use some characters in
. Single-byte Symbols m, /, :, ;, ., <, >,
|, ?, n and " are not supported.
14-10
Infrared......................................... 15-2
Backup ....................................... 15-13
Transferring Files via Infrared .......15-3
Exchanging Contact Information.... 15-5
Basics........................................... 15-13
Backup & Restore ...................... 15-14
IC Transmission ............................ 15-6
S! Addressbook Back-up (SAB) ....15-15
Transferring Files via IC Transmission
........................................................15-7
About SAB................................... 15-15
Using Sync Commands ............. 15-17
Bluetooth® .................................... 15-8
Additional Functions ................. 15-18
Troubleshooting .........................15-21
Transferring Files via Bluetooth® ....15-9
External Device Connection .... 15-12
Connecting PC or Blu-ray Disc
Recorder .....................................15-12
15
Connectivity &
File Backup
15-1
Infrared
Infrared
Wirelessly transfer files between
DM005SH and compatible devices.
DM005SH supports IrSimple=
high-speed wireless communications
protocol; exchange large image files
instantly with compatible mobile
phones, printers, etc.
Getting Started
Infrared Precautions
Align Infrared Ports of both devices.
. Handset cannot receive connection
requests during Software Update.
Transferable Files
Connectivity & File Backup
15
15-2
Phone Book
Received Msg.
Calendar
Sent Messages
Tasks
Drafts
Notepad
Templates
(Messaging)
Bookmarks
Data Folder
. Copy/forward protected files are not
transferable.
. Some files may not be transferable;
some settings may be lost, or files may
not be saved properly. For details, see
"Troubleshooting" at the end of this
chapter.
Transfer Options
One File
Transfer
Transfer single files
All File
Transfer
Transfer all files by
function
IrSS Transfer
Exchange single JPEG
image files with
compatible devices at
high speed
. Some transfer options may be
unavailable depending on file type.
. Transfer Memory Card files one by one.
. Do not place objects between devices.
. Keep Infrared Ports aligned during transfer.
. Do not look into Infrared Port during
infrared transmissions. Eyesight may be
affected.
. DM005SH complies with IrMC 1.1,
however, some files may not transfer
properly.
Authorization Code
. Four-digit code required for Infrared
transfers. All File Transfers possible when
codes match. (Authorization Code is
changeable for each transfer.)
Infrared
Transferring Files via Infrared
Receiving Files
1 d (Long)
2 Connection request arrives
. If storage media confirmation
appears, select media and press %.
[ All File Transfer (Adding Files)
Yes S % S Enter Handset Code S
% S Enter Authorization Code S
% S As New Items S %
[ All File Transfer (Overwriting Existing
Files)
Yes S % S Enter Handset Code S
% S Enter Authorization Code S
% S Delete All & Save S % S Yes
S%
. For Phone Book, My Details except
handset phone number is overwritten
as well.
Request Window
3 Perform subsequent
operations
[ IrSS Transfer
Yes S %
. Files are saved to Data Folder (Pictures).
Connectivity & File Backup
. Infrared is activated. (Alternatively,
activate it via Main Menu.)
. Handset receives files if sent within
three minutes.
. Handset must be in Standby to
accept connection requests.
. To cancel Infrared, Long Press d.
Subsequent Operations
[ One File Transfer
Yes S % S Yes S %
15
. To cancel transfer, press A.
Advanced
0 (Activating Infrared via Main Menu (Sending images via IrSS Transfer without reducing size (P.15-18)
15-3
Infrared
Sending Files
One File Transfer
Example: Phone Book entry
1 b S Select entry S B S
Send Entry S %
2 Via Infrared S %
3 Yes S % S Transfer starts
. When complete, entry search
window returns.
All File Transfer
1 % S Tools S % S f
Connectivity S Infrared S %
2 Send All S %
3 Yes S % S Enter Handset
Code S %
4 Select item S % (
/ )S
Complete selection S A
Connectivity & File Backup
5 Enter Authorization Code S
% S Transfer starts S %
Sending Phone Book
. In 5, Picture transfer confirmation
appears; follow these steps:
Yes or No S %
15
Advanced
0 (Sending My Details (Sending non-Phone Book files (P.15-18)
15-4
Sending JPEG Images at High
Speed
1 % S Data Folder S %
2 Pictures or DCIM S %
For DCIM, select a folder and press %.
3 Select image S A (Long)
4 Yes or No S % S Transfer
starts
. Images may be reduced
automatically before transfer
depending on the size.
. When complete, file list returns.
. Transfers are one-way; end even
if files are not received.
Infrared
Exchanging Contact Information
Exchange name, phone numbers,
mail addresses, and other contact
info with other compatible handsets
via infrared.
Read P.15-2 "Infrared Precautions"
beforehand.
Receiving Profiles
1 b (Long)
2 Receive S %
3 Profile received
1 In Exchange Profile menu,
Send S % S Transfer starts
Changing Profile Items to Send
[Exchange Profile Menu] Send
Settings S % S Select item S %
( / ) S Complete selection S A
Opening My Details
[Exchange Profile Menu] My Details
S%
Connectivity & File Backup
Exchange Profile Menu
Sending Profiles
15
. Received profile is saved to
Phone Book.
15-5
IC Transmission
IC Transmission
Wirelessly transfer files between
DM005SH and compatible devices.
. For transferable files, see P.15-2.
. Cancel IC Card Lock beforehand.
. Disconnect Headphones, USB Cable
and AC Charger beforehand.
Getting Started
IC Transmission Precautions
Align m logos of both devices.
Transfer Options
One File
Transfer
Transfer single files
All File
Transfer
Transfer all files by function
. Some transfer options may be
unavailable depending on file type.
. Transfer Memory Card files one by one.
Connectivity & File Backup
Authorization Code
. Four-digit code required for IC
transfers. All File Transfers possible when
codes match. (Authorization Code is
changeable for each transfer.)
Align m logos
Keep m logos aligned during transfer.
15
Advanced
0 (Disabling one file reception (P.15-18)
15-6
IC Transmission
Transferring Files via IC Transmission
Receiving Files
1 Connection request arrives
Request Window
2 Perform subsequent
operations
. To cancel transfer, press A.
Subsequent Operations
[ One File Transfer
Yes S % S Yes S %
. If storage media confirmation
appears, select media and press %.
. For Phone Book, My Details except
handset phone number is
overwritten as well.
Sending Files
One File Transfer
Example: Phone Book entry
1 b S Select entry S B S
Send Entry S %
2 Via IC Transmission S %
3 Yes S % S Transfer starts
[ All File Transfer (Adding Files)
Yes S % S Enter Handset Code S
% S Enter Authorization Code S
% S As New Items S %
All File Transfer
1 % S Tools S % S f
Connectivity S IC
Transmission S %
2 Send All S %
3 Yes S % S Enter Handset
Code S %
4 Select item S % (
/ )S
Complete selection S A
5 Enter Authorization Code S
% S Transfer starts S %
Sending Phone Book
. In 5, Picture transfer confirmation
appears; follow these steps:
Yes or No S %
Connectivity & File Backup
. Handset must be in Standby to
accept connection requests.
[ All File Transfer (Overwriting Existing
Files)
Yes S % S Enter Handset Code S
% S Enter Authorization Code S
% S Delete All & Save S % S Yes
S%
15
Advanced
0 (Sending My Details (Sending non-Phone Book files (P.15-18)
15-7
Bluetooth®
Bluetooth®
Wirelessly transfer files/data between
DM005SH and compatible devices
(watches, handsfree devices, etc.).
Connectivity & File Backup
. For transferable files, see P.15-2.
. DM005SH supports simultaneous
connection with two devices. (May be
unavailable depending on the device
type.)
. Bluetooth® connection may not be
possible with some Bluetooth® devices.
, Handset shall be connected to
certified Bluetooth® devices that
meet the specification standards
developed by the Bluetooth SIG.
, Data transfers may fail depending on
characteristics or specifications of the
certified Bluetooth® devices.
, Noise may interfere with wireless or
handsfree conversations.
. TV audio is supported only on SCMS-T
DRM scheme compliant Bluetooth®
devices.
15
Getting Started
Bluetooth® Precautions
Check transmission range of your
Bluetooth® device to use with handset
properly.
Maximum transmission range for
transfers between DM005SH handsets
is ten meters. (Bluetooth® connection/
transfer rate may vary depending on
conditions.)
Important Handsfree Device Usage Note
. Handle call operations on the device
in use.
Bluetooth® Watches
. Compatible Bluetooth® watches
support these functions:
, Clock sync
, Alarm notice
, News notice , Mail notice
, Remote Shutter , Mode Settings
, Quick Silent , Caller ID notice
, Hold calls
, Show Operator Name
. For details about functions/operations,
see the Bluetooth® watch guide.
Bluetooth® Connection
Sender
Recipient
Search for devices
Select device
Activate
Bluetooth®
Request connection
(Enter
Authorization Code)
Accept
Enter
Authorization Code
Connection complete
Authorization Code
. 4 to 16-digit code required for
Bluetooth® connections. Pairing
possible when codes match.
. For handsfree devices, enter
specified Authorization Code.
. Authorization Code entry may not be
required depending on the other device.
Advanced
0 (Cloaking handset to avoid connection requests (Setting idle time after which Bluetooth
®
is canceled (Switching audio output to wireless
device (Changing Bluetooth® name for handset (Opening Bluetooth®-related handset properties (Synchronizing Bluetooth® watch with
handset Clock (Enabling/disabling Bluetooth® watch responses (And more on P.15-18 - 15-19)
15-8
Bluetooth®
Transferring Files via Bluetooth®
Activating Bluetooth®
1 c (Long)
Connecting Bluetooth® Devices
Device Search & Pairing
Activate Bluetooth® on devices to be
paired with.
. Bluetooth® is activated.
. Handset must be in Standby to
accept connection requests from
unpaired handsfree devices, etc.
. To cancel Bluetooth®, Long Press c.
1 % S Tools S % S f
Connectivity S Bluetooth
S%
2 Add Device S %
Advanced
. Found devices are listed after
search.
. To cancel search, press A.
4 Select device S %
If a confirmation appears, choose
Yes and press %.
5 Enter the same
Authorization Code for
handset and the other
device S % S Pairing
complete
. On the other device, complete
code entry within 30 seconds.
. Authorization Codes are not
necessary for paired devices.
Connecting Bluetooth® Specification
Ver. 2.1 Compliant Devices
In 5, Yes S % S Pairing complete
, If the other device is a keyboard,
follow onscreen instructions.
Connectivity & File Backup
Bluetooth Menu
3%
15
. To disable confirmation, press B
before 3.
0 (Activating Bluetooth
®
via Main Menu (Editing Paired Device list (Disconnecting devices (Connecting devices supporting handsfree
telephony and audio output by service (Specifying a preferred device for wireless connection (P.15-19)
15-9
Bluetooth®
Connecting Paired Devices
1 In Bluetooth menu, Paired
Devices S %
Accepting Connection Requests
Follow these steps to accept
connection requests from unpaired
devices:
1 Connection request arrives
Paired Device List
2 Select device S %
Connectivity & File Backup
15
If handset is already connected to
another device, disconnection
confirmation may appear; choose
Yes and press %.
. The device is connected and
(preferred) appears.
Request Window
2 Yes S %
3 Enter the same
Authorization Code as
sender's S %
. Complete code entry within
30 seconds.
Connecting Bluetooth® Specification
Ver. 2.1 Compliant Devices
In 3, Yes S %
, If the other device is a keyboard,
follow onscreen instructions.
15-10
Bluetooth®
Transferring Files
Follow the steps below to exchange
files with paired devices.
. For transferable files, see P.15-2.
. When requested, enter Authorization
Code.
Receiving Files
1 Connection request arrives
2 Perform subsequent
operations
. To cancel transfer, press A.
. If storage media confirmation
appears, select media and press %.
●All File Transfer (Adding Files)
Yes S % S Enter Handset Code
S % S As New Items S %
●All File Transfer (Overwriting
Existing Files)
Yes S % S Enter Handset Code
S % S Delete All & Save S %
S Yes S %
Sending Files
[ One File Transfer
Example: Phone Book entry
1 b S Select entry S B S
Send Entry S %
2 Via Bluetooth S %
3 Select device S %
4 Yes S % S Transfer starts
[ All File Transfer
1 In Bluetooth menu, Send All
S%
2 Select device S % S Yes
S%
3 Enter Handset Code S %
4 Select item S % ( / ) S
Complete selection S A
S Transfer starts S %
Sending Phone Book
. In 4, Picture transfer confirmation
appears; follow these steps:
Yes or No S %
Connectivity & File Backup
Request Window
[ Subsequent Operations
●One File Transfer
Yes S % S Yes S %
15
. When complete, entry search
window returns.
Advanced
0 (Sending My Details (Sending non-Phone Book files (P.15-19)
15-11
External Device Connection
Connecting PC or Blu-ray Disc Recorder
Connecting PC
Accessing Memory Card
Connect handset to a PC via USB Cable
to access Memory Card from the PC
without removing card from handset.
USB Cable may be purchased separately.
1 Connect handset to a PC
via USB Cable
Connectivity & File Backup
15
2 Mass Storage S %
. Use PC to access Memory Card.
3 A S Yes S % S
Connection ends
. Disconnect USB Cable.
If Menu in 1 Does Not Appear
. Follow these steps:
% S Tools S % S f Connectivity
S USB Mode S % S From 2
, Operations on the PC may be
required; if prompted, follow
onscreen instructions.
15-12
Utility Software (Japanese)
For more PC-related operations,
download Utility Software (including
USB Cable driver) from the following
URL.
Utility Software
http://k-tai.sharp.co.jp/download/tools/dm_utility/download_1.html
Mobile Data Communication Fees
. Using the Internet by connecting
handset to PC/PDA via USB Cable or
Bluetooth® may incur high charges as
large-volume packet transmissions
tend to occur in a short period of
time.
Connecting Blu-ray Disc
Recorder
Connect handset to a Blu-ray Disc
recorder via USB Cable to transfer
recorded programs to Memory Card
without removing card from handset.
. Compatible only with SHARP Blu-ray
Disc recorders. For details, see P.17-22
"Compatible Blu-ray Disc Recorders."
. USB Cable may be purchased separately.
1 Connect handset to a
Blu-ray Disc recorder via
USB Cable
2 Recorder Link S %
. Transfer files from Blu-ray Disc
recorder to Memory Card.
3 A S Yes S % S
Connection ends
. Open transferred files via
Recorder Contents in TV menu or
Media Player menu (Videos).
If Menu in 1 Does Not Appear
. Follow these steps:
% S Tools S % S f Connectivity
S USB Mode S % S From 2
Backup
Basics
Back up information to Memory Card,
and restore to handset as needed.
Supported Items
Select items to back up, or transfer all
at once.
Items with * are selectable at once via
Check Selection in Options menu.
Phone Book*
Drafts
*
Templates
(Messaging)
Tasks*
Bookmarks*
Notepad
Sent Messages*
*
Mail Groups*
Received Msg.*
Contents Keys
Data Folder
User Dictionary
Transferring All Items
. Use blank Memory Card for Backup
All Items. Do not use the card to save
other files after Backup All Items;
backed up content may not be
restored properly.
Contents Keys
. Moving Keys to Memory Card creates
a special file. Performing Backup
again on the same Memory Card
overwrites that file. Perform Restore
beforehand.
Connectivity & File Backup
Calendar
*
Precautions
. Not available if battery is low.
. Some items may not be transferable;
some settings may be lost, or files may
not transfer properly. For details, see
"Troubleshooting" at the end of this
chapter.
15
15-13
Backup
Backup & Restore
5 A S Yes S %
Handset to Memory Card
Follow these steps to back up
selected items at once:
1 % S Settings S % S f
Phone/G S Backup/
Restore S %
Connectivity & File Backup
15
4A
. To cancel, press A.
6 Backup complete S % S %
Selecting Multiple Items at Once
In 4, B S Select option S % S
From 5
Selecting/Canceling All Items
In 4, B S Check All or Uncheck
All S %
Memory Card to Handset
Backup/Restore Menu
2 Backup Selected Items S
% S Enter Handset Code
S%
3 Yes S %
4 Select item S % (
/
)S
Complete selection
. For Phone Book, a confirmation
appears. Choose Yes or No and
press %.
Advanced
Follow these steps to restore selected
items:
(Restoring backed up content to
handset overwrites current--with the
exception of Contents Keys--handset
content.)
1 In Backup/Restore menu,
Restore Selected Items S
% S Enter Handset Code
S%
2 Yes S %
3 Select item S % (
Complete selection
/
. If no file list appears, skip ahead
to 7.
5 Select file S %
. Repeat 5 to complete selection.
6A
7 Yes S %
. To cancel, press A.
8 Restore complete S % S %
Selecting Multiple Items at Once
In 3, B S Select option S % S
From 4
Selecting/Canceling All Items
In 3, B S Check All or Uncheck
All S %
Changing Restoration Method
After 3, select item S B S
Change to Add Mode or Chg. to
Overwrite Mode S % S From 4
)S
0 (Backing up all items (Encoding data for backup (Restoring all items (Deleting backup files (P.15-20)
15-14
S! Addressbook Back-up (SAB)
About SAB
Back up Phone Book content in SAB; add Phone Book
changes to SAB anytime. Edit SAB online via PC; add SAB
changes to Phone Book anytime. Restore lost or altered
Phone Book content from SAB.
SAB Sync Commands & Features
Synchronization
Sync from
Client
Add Phone Book changes to SAB2
Backup
Export Phone Book content to SAB3
Server
Edit on PC
Import from/Export to PC
. SAB requires a separate contract and basic monthly fee.
. Use SAB to add Phone Book content to a new compatible
Disney Mobile handset; some conditions apply (P.15-16).
. Use a PC to edit SAB online.
. For more about SAB, see P.17-22 "S! Addressbook Back-up."
. Synchronization incurs packet transmission fees.
Auto Synchronization
. When subscribed to SAB, Network Information retrieval
activates auto synchronization (Auto Sync Settings: On, Set
Frequency: After Editing Ph.Book(10 min.), Sync Mode
Setting: Normal); Phone Book changes are added to SAB
automatically.
. Cancel auto synchronization as needed. However, it
reactivates after Network Information retrieval.
Send
Notice6
Spam Filter
1
Restore
Import SAB content to Phone Book5
Import from PC
Upload PC address book info to SAB
Export to PC
Export SAB content to PC address book
Sync Lock
Prevent synchronization from handset
Birthday
Notification
SAB sends reminders via SMS to
handset
Email Address
Notification7
Send new handset mail address
to specified addresses
"Disaster Message Send emergency message
Board" Message
board update to specified
Notification8
addresses
Tomodachi
Email Filter9
Always accept messages from
mail addresses saved in SAB
If the same entry item is edited in Phone Book and SAB, SAB
content is referenced.
Unrelated SAB changes remain.
3
Any existing SAB content is deleted.
4
Unrelated Phone Book changes remain.
5
Any existing Phone Book content is deleted.
6
Access this function via handset or a PC.
7
Backup resets notification setting; handset address is sent to all
addresses.
8
Backup resets notification setting; updates are not sent to any address.
9
Export Phone Book content to SAB beforehand.
Connectivity & File Backup
Edit on PC
Synchronize Phone Book and SAB1
Sync from Server Add SAB changes to Phone Book4
Synchronize
Phone
Book
Normal
15
2
15-15
S! Addressbook Back-up (SAB)
Precautions
Service Usage Outline
Complete Contract
Contact General Information (P.17-41) for application.
[ Unsynchronizable Items
These Phone Book settings are lost:
, Picture, Tone, Vibration, Illumi & Light
[ Unintentional Phone Book or SAB Content Deletion
Receive User ID & Password
After subscription, user ID and password arrive via SMS.
. User ID and password are required to use SAB via a PC.
Use SAB
Connectivity & File Backup
Export Phone Book content to SAB.
[ Phone Book ⇔ SAB Content Capacity Disparities
When the number of savable items varies between Phone
Book and SAB entries, synchronization reflects lower limit.
[ Contract Termination
SAB content is deleted upon contract termination.
[ SAB Transfers to New Handsets
. SAB-Compatible 3G Handsets
SAB remains as last saved and is fully accessible.
15
Advanced
15-16
. When no Phone Book content exists, performing
synchronization via Normal, Sync from Client or Backup
deletes all SAB content.
. When no SAB content exists, performing synchronization via
Normal, Sync from Server or Restore deletes all Phone Book
content.
0 (Canceling auto synchronization (P.15-20)
S! Addressbook Back-up (SAB)
Using Sync Commands
Normal (Start Sync)
Synchronize Phone Book and SAB via
Normal.
1 % S Phone S % S
S! Addressbook Back-up
S%
Other Sync Commands
Available Commands:
Sync from
Client
Backup
Sync from
Server
2 Start Sync S %
. Synchronization starts; when
complete, details appear.
3 % S Synchronization
complete
Canceling Synchronization
A S Yes S %
. Synchronization starts; when
complete, details appear.
4 % S Synchronization
complete
Canceling Synchronization
A S Yes S %
If this is your first use of SAB (new
handset), synchronization is performed
via Normal regardless of selection.
1 In S! Addressbook menu,
Details S %
2 Backup/Restore S %
Connectivity & File Backup
Restore
S! Addressbook Menu
Add Phone Book changes
to SAB
Export Phone Book content
to SAB; any existing SAB
content is deleted
Add SAB changes to
Phone Book
Import SAB content to
Phone Book; any existing
Phone Book content is
deleted
3 Select command S %
15
Advanced
0 (Changing auto synchronization settings (Confirming password (Japanese) (Opening log (Deleting log records (P.15-20)
15-17
Additional Functions
Bluetooth®
Infrared
Activating Infrared
via Main Menu
Connectivity & File Backup
15
15-18
% S Tools S % S f Connectivity S Infrared
S % S Switch On/Off S % S On(3 min.) S %
[ General
% S 0 S B S Send My Card S % S Via
Sending My Details
Infrared S % S Yes S % S Transfer starts
Cloaking handset to
avoid connection
requests
% S Tools S % S f Connectivity S
Bluetooth S % S My Device Settings S % S
Visibility S % S Hide My Phone S %
Sending
non-Phone Book
files
In file list, select file S B S Send (or Send/
Blog) S % S Via Infrared S % S Yes S %
S Transfer starts
Setting idle time after
which Bluetooth® is
canceled
% S Tools S % S f Connectivity S
Bluetooth S % S My Device Settings S % S
Bluetooth Timeout S % S Select time S %
Sending images
via IrSS Transfer
without reducing
size
% S Tools S % S f Connectivity S
Infrared S % S IrSS Key Setting S % S Send
via IrSS S %
Switching audio
output to wireless
device
IC Transmission
Disabling one file
reception
% S Tools S % S f Connectivity S IC
Transmission S % S 1 File Reception S % S
Off(Disabled) S %
% S 0 S B S Send My Card S % S Via
Sending My Details IC Transmission S % S Yes S % S Transfer
starts
Sending
non-Phone Book
files
In file list, select file S B S Send (or Send/
Blog) S % S Via IC Transmission S % S Yes
S % S Transfer starts
% S Tools S % S f Connectivity S
Bluetooth S % S My Device Settings S % S
gSound Output S % S Bluetooth Device S %
. Bluetooth Device is set automatically when
connection is made from wireless Headphones.
Changing
Bluetooth® name
for handset
% S Tools S % S f Connectivity S
Bluetooth S % S My Device Settings S % S
Device Name S % S Enter name S %
Talking on
handsfree device
% S Tools S % S f Connectivity S
Bluetooth S % S My Device Settings S % S
Handsfree Setting S % S Handsfree Mode
S%
Avoiding connection
requests from
Bluetooth®-compatible
S! Applications in
Standby, etc.
% S Tools S % S f Connectivity S
Bluetooth S % S My Device Settings S % S
S! Appli Request S % S Off S %
Receiving
connection requests
while connected to
a device
% S Tools S % S f Connectivity S
Bluetooth S % S My Device Settings S % S
Plural Connect Standby S % S On S %
Additional Functions
Opening
Bluetooth®-related
handset properties
% S Tools S % S f Connectivity S
Bluetooth S % S My Device Details S %
Activating
Bluetooth® via
Main Menu
% S Tools S % S f Connectivity S
Bluetooth S % S Switch On/Off S % S On
S%
. Press A to view service details.
[ Bluetooth® Watches
% S Tools S % S f Connectivity S
Synchronizing
Bluetooth S % S Setting Watch S % S Set
®
Bluetooth watch
BT-Watch Time S % S Yes S %
with handset Clock . Connect handset to a Bluetooth® watch
Disconnecting
devices
% S Tools S % S f Connectivity S
Bluetooth S % S Paired Devices S % S
Select connected device S %
Connecting devices
supporting
handsfree telephony
and audio output by
service
% S Tools S % S f Connectivity S
Bluetooth S % S Paired Devices S % S
Select device S B S Select Service S % S
Handsfree function or Audio function S %
7% S Tools S % S f Connectivity S
Bluetooth S % S Paired Devices S % S
Select device S B S Set to Prior Connect S
% S See below
beforehand.
Specifying a
preferred device
for wireless
connection
. For Handsfree On, specified device reconnects
to handset when placing/receiving calls.
. Register a Bluetooth® watch beforehand.
For Audio Output
Audio On S %
7% S Tools S % S f Connectivity S
. For Audio On, Media Player/TV audio output is
redirected to specified device automatically
when gSound Output is set to Bluetooth Device.
[ Paired Devices
Bluetooth S % S Paired Devices S % S
Select device S B S See below
Editing Paired
Device list
For Handsfree Telephony
Handsfree On S %
Renaming Paired Devices
Change Name S % S Enter name S %
Deleting Paired Devices
Delete S % S Yes S %
. To delete a device connected to handset,
choose Yes and press %.
[ Sending Files
% S 0 S B S Send My Card S % S Via
Sending My Details Bluetooth S % S Select device S % S Yes
S % S Transfer starts
Sending
non-Phone Book
files
Connectivity & File Backup
Enabling/disabling
Bluetooth® watch
responses
% S Tools S % S f Connectivity S
Bluetooth S % S Setting Watch S % S
Notification S % S Select item S % S
Permit or Prohibit S %
15
In file list, select file S B S Send (or Send/
Blog) S % S Via Bluetooth S % S Select
device S % S Yes S % S Transfer starts
15-19
Additional Functions
Backup
S! Addressbook Back-up
[ Backup & Restore
Backing up all
items
Encoding data for
backup
% S Settings S % S f Phone/G S
Backup/Restore S % S Backup All Items S
% S Enter Handset Code S % S Yes S %
S Yes S % S Backup complete S % S %
% S Settings S % S f Phone/G S
Backup/Restore S % S Settings/Manage S
% S Encode Settings S % S Select item S
% S On S %
. Available for Phone Book, Messaging folders,
Calendar and Tasks.
Connectivity & File Backup
Restoring all items
% S Settings S % S f Phone/G S
Backup/Restore S % S Settings/Manage S
% S File Management S % S Select item S
% S Select file S % ( / ) S Complete
selection S A S Yes S %
% S Phone S % S S! Addressbook Back-up
S % S Details S % S Auto Sync Settings S
% S Set On/Off S % S Off S %
7% S Phone S % S S! Addressbook
Back-up S % S Details S % S Auto Sync
Settings S % S See below
. Set Set On/Off to On beforehand.
Changing auto
synchronization
settings
% S Settings S % S f Phone/G S
Backup/Restore S % S Restore All Items S
% S Enter Handset Code S % S Yes S %
S Yes S % S Restore complete S % S %
[ Backup Files
Deleting backup
files
Canceling auto
synchronization
Changing Auto Sync Frequency
Set Frequency S % S Select frequency S %
S Enter/select date/time/day of the week S %
. For After Editing Ph.Book(10 min.), omit steps for
date, time, etc.
Changing Auto Sync Command
Sync Mode Setting S % S Select command
S%
Confirming
password
(Japanese)
Opening log
A S 設定・申込 S % S S!電話帳バックアップ
編集用パスワード確認 S %
. Follow onscreen instructions.
% S Phone S % S S! Addressbook Back-up
S % S Details S % S Sync Log S % S
Select record S %
7% S Phone S % S S! Addressbook
15
Deleting log
records
Back-up S % S Details S % S Sync Log S
% S See below
One Record
Select record S B S Delete S % S Yes S %
All Records
B S Delete All S % S Yes S %
15-20
Troubleshooting
File Transfer
3 Some files are not received
. If storage limit is reached during
transfers, remaining files will not be
received.
3
Cannot receive/accept
connection requests even when
Infrared/Bluetooth® is On
3 Phone Book settings are lost
. One file transfer resets these settings:
, Category, Tone, Illumi & Light,
Vibration, Secret
. Picture setting may be lost
depending on image; send the
image separately and reassign it.
3 Calendar/Tasks settings are lost
. One file transfer resets these settings:
, Alarm tone/video, Secret,
S! Friend's Status
Messages are not saved properly
. Large Bookmarks may not be
received correctly.
. Streaming Bookmarks are saved as
Disney Web Bookmarks.
3 on handset
Messages are not saved properly
. Messages may not be received
depending on the size.
. Messages received via One File
Transfer are saved to Data Folder
(Other Documents) and cannot be
used as messages.
. Sky Mail may be received as E Mail
when transferred from other handset
models via All File Transfer.
. In All File Transfers, overwriting
messaging folders deletes sort keys.
. Mail Notices are saved as
messages, invalidating complete
message retrieval.
. When sending messages to other
handset models via All File Transfer,
Spam Folder messages may be
saved to the incoming message
folder.
. When sending messages in Drafts
to other handset models via All File
Transfer, only the first entered
recipient may remain or SMS
addressed to multiple recipients
may not be saved.
3 Cannot find files in DCIM folder
. Received files in DCIM folder are
saved to Pictures folder.
Infrared
3 Infrared transfer fails
Connectivity & File Backup
. Handset may not be in Standby.
. Keypad Lock/Function Lock may
be active.
. Software Update may be in progress.
3 Bookmarks are not saved properly 3 on recipient devices
15
. Infrared Port may be obstructed by
dust, etc.; clean with soft cloth.
. Transfers may fail in direct sunlight,
under fluorescent lighting or near
infrared equipment.
15-21
Troubleshooting
Backup & Restore
3 Backup fails
. Check handset/Memory Card
memory; backup may fail if the
memory is low.
3
Connectivity & File Backup
15
Some files are not restored
. If storage limit is reached during
Restore, remaining files will not be
restored.
3 Disney Mobile handsets or PCs
Cannot use backup files on other
. Some backup files may not be
usable on other Disney Mobile
handsets or PCs.
3
Cannot open backup files
. Some backup files may open only
after being restored to handset.
3 Phone Book settings are lost
. Picture setting may be lost
depending on image; send the
image separately and reassign it.
15-22
3 Messages are not saved properly
. Transfer may delete sort keys.
. Mail Notices are restored as
messages, invalidating complete
message retrieval.
3 Bookmarks are not saved properly
. Disney Web, Streaming and PC Site
Browser Bookmarks are all backed
up as a single file.
. Streaming Bookmarks are saved as
Disney Web Bookmarks.
[ Exporting Backed Up Data to Other
Disney Mobile Handsets
3 Messages are not saved properly
. If spam filter is available on
recipient handset, Spam Folder
messages are saved in spam folder
regardless of the setting. (If
unavailable, they are saved as
normal received messages.)
. When restoring draft messages, only
the first entered recipient may
remain or SMS addressed to multiple
recipients may not be saved.
[ Importing Data Backed Up on Other
Handset Models
3 Messages are not saved properly
. Messages may not be restored
depending on the size.
. Sky Mail may be restored as E Mail.
Date & Time ................................. 16-2
Display & Illumination ................. 16-3
Language .....................................16-3
Image & Text ................................16-3
Display & Backlight ......................16-3
Standby Display............................16-4
Key Backlight ................................16-4
Key Illumination ............................16-4
Incoming Transmissions.............. 16-5
Handset Response .......................16-5
Handset Response (Lights) ..........16-5
Sounds ..........................................16-6
System Sounds ............................. 16-6
Additional Sound Settings........... 16-6
Connectivity ................................16-7
Network ........................................ 16-7
IP Service ...................................... 16-7
Reset .............................................16-8
Restoring Default Settings ........... 16-8
16
Handset
Customization
16-1
Date & Time
1 Date & Time Settings
Date & Time
Setting the date and time
Correcting Clock manually
Disabling auto Clock correction
Setting auto Clock correction timing
Activating Daylight Saving
Changing Time Zone
Adding custom time zone
Changing time format to 12 hour
Handset Customization
16
16-2
Changing date format
Starting the Calendar week on Monday
7% S Settings S % S In Sound/Display menu, Date & Time S %
Set Date/Time S % S Enter the year S Enter the month S Enter the day S
Enter the time S %
Time Correction S % S Manual S % S Yes S % S Yes S %
Time Correction S % S Auto Corr. Setting S % S Off S %
Time Correction S % S Auto Corr. Setting S % S On S B S Select item
S%( / )SAS$
Daylight Saving S % S On S %
Set Time Zone S % S f Select area S %
Set Time Zone S % S B S Enter city name S % S e + or - S d S Enter
time difference S %
Time Format S % S 12 Hour S %
Date Format S % S Select option S %
Calendar Format S % S Monday-Sunday S %
Display & Illumination
1 Display & Illumination Settings 1
Language
7% S Settings S % S Sound/Display menu
Switching interface between Japanese and English
Image & Text
7% S Settings S % S In Sound/Display menu, Display S %
Showing preloaded images for incoming calls, etc.
Showing Data Folder images for incoming calls, etc.
Showing Customized Screen for incoming calls, etc.
Changing font of numbers entered in Standby
Showing a message each time handset is powered
on
System Graphics S % S Select item S % S Preset Animation (or Pattern 1
to Pattern 3) S %
System Graphics S % S Select item S % S Select folder S % S Select
image S % S Specify image area S %
. Some images may be usable without specifying image area.
System Graphics S % S Select item S % S Customized Screen S % S %
. Not available for Power On or Power Off.
Vivid Mode S % S Select option S %
Dial Number S % S Select pattern S %
Greeting Message S % S Edit Message S % S Enter message S % S
Switch On/Off S % S On S %
7% S Settings S % S In Sound/Display menu, Display S %
Display Effects S % S Off S %
Backlight S % S Time Out S % S Select time S %
Changing Display/key Backlight illumination time
. For custom illumination time, select Other.
Changing Display Brightness
Backlight S % S Brightness S % S Adjust level S %
Canceling/activating Light Sensor
Backlight S % S Brightness S % S B ( / ) S %
Changing inactivity time after which Display turns off Display Saving S % S Select time S %
Disabling display transition effects
Handset Customization
Selecting image enhancement option for Standby
and video playback
Display & Backlight
Language or 言語選択 S % S English or 日本語 S %
16
16-3
Display & Illumination
1 Display & Illumination Settings 2
Standby Display
7% S Settings S % S In Sound/Display menu, Display S % S Standby Display S %
Changing Clock/Calendar
Selecting Mobile Widget display option
Showing Network service provider name in Standby
Hiding Pedometer in Standby
Key Backlight
Disabling key Backlight illumination
Key Illumination
Handset Customization
16
16-4
Setting Key Illumination pattern by action
Disabling Key Illumination by action
Clock/Calendar S % S Select type S %
Show Widget S % S Select option S %
Show Operator Name S % S On S %
Pedometer S % S Off S %
7% S Settings S % S f Phone/G
Set Key Light S % S Off S %
7% S Settings S % S In Sound/Display menu, Illumi & Light S %
Light S % S Set Key Illumi S % S Select action S % S Key Pattern S %
S Select pattern S %
Light S % S Set Key Illumi S % S Select action S % S Switch On/Off S
% S Off S %
Incoming Transmissions
1 Incoming Transmission Settings
Handset Response
7% S Settings S % S In Sound/Display menu, Sounds & Alerts S %
Volume S % S Select item S % S Adjust level S %
Any Key Answer S % S On S %
. Use 0 - 9, (, #, ~, g, ', & or | in addition to !.
Changing ringtone volume
Answering calls with other keys
Any Key Answer S % S Only Mute S %
. Use 0 - 9, (, #, ~, g, ', &, | or L in addition to ).
Muting ringer with other keys
Handset Response (Lights)
7% S Settings S % S In Sound/Display menu, Illumi & Light S %
Setting Small Light color
Selecting Small Light illumination option
Setting Small Light color for missed transmissions
Light S % S Status Light S % S Select item S % S Light Color S % S
Select color S %
Enabling/disabling Small Light illumination for missed
transmissions
Light S % S Status Light S % S Select item S % S Switch On/Off S % S
On or Off S %
Handset Customization
Changing Key Illumination patterns
Light S % S Event Light S % S Select item S % S Light Color S % S
Select color S %
Light S % S Event Light S % S Select item S % S Switch On/Off S % S
On, Link to Sound or Off S %
Light S % S Event Light S % S Select item S % S Key Pattern S % S
Select pattern S %
. Regardless of Key Pattern setting, ringtones control illumination when
Switch On/Off is set to Link to Sound.
16
16-5
Sounds
1 Sound Settings
System Sounds
7% S Settings S % S In Sound/Display menu, Sounds & Alerts S %
System Sounds S % S Keypad Tones S % S Select tone S %
System Sounds S % S S! Circle Talk S % S Select tone S %
System Sounds S % S Select item S % S Tone or Sound S % S Select
folder S % S Select tone/file S %
. For files with limited usage period, choose Yes and press %.
Enabling Keypad Tones
Changing S! Circle Talk tone
Changing other System Sounds
System Sounds S % S Select item S % S Tone or Sound S % S Off S %
. Not available for S! Circle Talk.
. For Keypad Tone, omit Tone or Sound selection step.
System Sounds S % S Select item S % S Duration S % S Select/enter
time S %
. Not available for Keypad Tones or S! Circle Talk.
Volume S % S General Volume S % S Adjust level S %
Disabling System Sounds
Changing System Sound duration
Handset Customization
16
16-6
Changing System Sound volume
Additional Sound Settings
7% S Settings S % S Sound/Display menu
Disabling Speaker when using Headphones
Activating Speaker surround
Ringer Output S % S Earphone S %
Sounds & Alerts S % S Surround S % S On S %
Connectivity
1 Connectivity Settings
Network
7% S Settings S % S f Network
Select Network S % S Manual S % S Select Network S %
Select Network S % S Set Preferred S % S Select target location S % S
Insert S % S Select Network S %
Selecting a Network manually
Adding preferred Networks
Select Network S % S Set Preferred S % S % S Add to End S % S
Select Network S %
Adding preferred Networks to the end
Deleting preferred Networks
Adding Networks
Deleting Networks
Switching Network service between 3G and GSM manually
Refreshing Network connection
Retrieving Network Information
Checking Network status
Editing connection names for mobile data communication
Clearing connection names for mobile data communication
IP Service
Disabling IP Service
Handset Customization
Editing Networks
Select Network S % S Set Preferred S % S Select Network S % S Delete S %
Select Network S % S Add New Network S % S Add S % S Enter
country code S % S Enter Network code S % S Enter name S % S
Select NW Type S % S Select type S %
. After selecting Add New Network and pressing %, Network list appears if
Network has already been added. To add more, press % again and proceed.
Select Network S % S Add New Network S % S Select Network S % S
Change S % S Edit in the same manner as adding Networks S %
Select Network S % S Add New Network S % S Select Network S % S
Delete S %
Select Service S % S Manual S % S Select service S %
Re-search Signal S %
Retrieve NW Info S % S Yes S % S %
Network Info S %
External Device S % S Select name S % S Edit S %
External Device S % S B S Reset S % S Enter Handset Code S % S
Yes S %
16
7% S Settings S % S f Phone/G S Locks S %
IP Service Setting S % S Off S % S Enter Handset Code S %
. When Off, S! Friend's Status, S! Circle Talk, Decoration Call, S! Appli
Notification Setting and Mobile Widget Notification Setting are disabled.
16-7
Reset
1 Reset Settings
Restoring Default Settings
7% S Settings S % S f Phone/G S Master Reset S %
Reset Settings S % S Enter Administrator Code S % S Yes S % S Yes
S%
. Some default settings may not be restored.
Reset All S % S Enter Administrator Code S % S Yes S % S Yes S %
. Delete IC Card data beforehand. (Procedures to delete IC Card data vary
by Lifestyle-Appli; contact Osaifu-Keitai® service providers for details.)
Clearing all Phone Book entries, Data Folder files, etc.
. Files and records deleted by Reset All cannot be restored. Reset All deletes
all downloaded S! Applications and Lifestyle-Applications.
. Handset Code and Administrator Code return to the default settings.
Restoring default handset settings
. A confirmation may appear before entering Administrator Code; end the current function to proceed.
Handset Customization
16
16-8
USIM Card .................................... 17-2
Character Codes ......................17-11
About USIM Card .........................17-2
USIM Card Installation..................17-3
Weather Indicators.................... 17-17
Battery .......................................... 17-4
Battery Installation........................17-4
Software Update.......................... 17-5
Troubleshooting........................... 17-6
Key Assignments ......................... 17-8
Pager Codes.............................. 17-10
Pager Code List ..........................17-10
Character Code List.................. 17-11
Weather Indicator List ............... 17-17
Specifications ............................ 17-18
Memory Card Structure & Contents
..................................................... 17-23
Menu List .................................... 17-24
Index........................................... 17-32
Warranty & Service.................... 17-40
Customer Service ......................17-41
17
Appendix
17-1
USIM Card
About USIM Card
USIM Card is an IC card containing
customer and authentication
information, including the handset
number. USIM Card must be inserted
to use this handset.
Save Phone Book entries on USIM
Card Phone Book to use them on
other Disney Mobile handsets.
Depending on the USIM Card in use,
some entry items may not be
supported, and some limits (character
entry, etc.) may be lower.
Precautions
IC Chip
Appendix
17
17-2
. Do not insert USIM Card into any other
IC card device. Disney Mobile is not
liable for resulting damages.
. Keep the USIM Card IC chip clean;
malfunction may result. Clean with soft
dry cloth.
. Do not attach labels to USIM Card.
Malfunction may result.
Important
. USIM Card is the property of Disney
Mobile.
. USIM Card will be reissued for a fee if
lost or damaged.
. Return USIM Card to Disney Mobile
upon subscription termination.
. Returned USIM Cards are recycled.
. USIM Card specifications may
change without prior notice.
. Back up USIM Card files. Disney
Mobile is not liable for lost files.
. If your USIM Card or handset (with
USIM Card inserted) is lost or stolen,
suspend your service immediately.
For details, contact General
Information (P.17-41).
USIM PIN
4-digit code (9999 by default);
activate PIN Entry to restrict usage.
PIN Lock
. Entering incorrect PIN three
consecutive times activates PIN Lock,
limiting handset use.
Canceling PIN Lock
. Contact General Information (P.17-41)
for your Personal Unblocking Key (PUK
Code) and follow these steps:
Enter PUK Code S % S Enter new
PIN S % S Re-enter new PIN S %
, Write down PUK code.
PUK Lock
. Entering incorrect PUK Code ten
consecutive times activates PUK Lock,
disabling handset. Contact General
Information (P.17-41) for recovery.
USIM Card
USIM Card Installation
. Do not apply excessive force to insert/remove USIM Card.
. USIM Card must be inserted to use this handset.
Inserting
1 Remove battery (P.17-4)
2 Using Tab, pull out Tray as
shown until it clicks
4 Push in Tray fully
as shown
. Reinstall battery (P.17-4).
Removing
Tray
3 Lift and slide out USIM Card
1 Remove battery
2 Using Tab, pull out Tray as
shown until it clicks
Tab
3 Slide in USIM Card with IC
chip facing up
Notch
After Repairs, USIM Card Replacement
or Handset Upgrade/Replacement
. Some downloaded files may be
inaccessible. In addition,
S! Applications and BookSurfing® may
be disabled after USIM Card
replacement.
Appendix
Tab
. Reinstall battery.
. Take care not to lose removed
USIM Card.
17
17-3
Battery
Battery Installation
About Battery
. Charge battery at least once every six
months; an uncharged battery may
become unusable or affect files/settings.
. Depending on usage, bulges may
appear near end of battery life; this
does not affect safety.
. Replace battery if operating time
shortens noticeably.
. Clean device charging terminals with a
dry cotton swab.
Lithium-ion Battery
Appendix
17
17-4
. This product requires a
lithium-ion battery.
Lithium-ion batteries are
a recyclable resource.
, To recycle a used
lithium-ion battery, take it to any
shop displaying the symbol shown
above.
, To avoid fire or electric shock, do not
short-circuit or disassemble battery.
Inserting & Removing
1 Remove cover
3 Close cover
Battery Cover
. Position and slide the cover gently
as shown until it stops.
. Press and slide as shown.
2 Insert battery
. With logo side up, fit tabs into
battery cavity slots.
Removing
. Power handset off and lift battery as
shown.
Software Update
Software Update
Check for firmware updates and
download as required.
Precautions
. Handset is disabled until update is
complete. Update may take up to
approximately 30 minutes.
. Update failure may disable handset.
To reduce failure risk, make sure
signal is strong and stable, and
charge battery beforehand.
. Update will not start if other functions
are in use. Before updating software
(or before scheduled update time),
end all active functions/applications.
. Disconnect USB Cable beforehand to
reduce failure risk.
. Always back up important
information. Disney Mobile cannot be
held liable for damages from lost
information, etc.
Updating Software
Scheduled Update
Packet transmission fees do not apply
to updates (including checking,
downloading and rewriting).
A confirmation appears at scheduled
update time. Press % or wait a while
for update to start.
Phone/G S Software
Update S %
Update success notification appears
and handset reboots.
After reboot, completion message
appears and Information window
opens.
1 % S Settings S % S f
2 Software Update S %
. Follow onscreen instructions.
Update Result
While Information window appears,
Update Result S %
Reboot Failure
. If handset does not return to Standby
after update, power handset off,
reinsert battery, then restart it. If it still
does not restart, contact Customer
Assistance (P.17-41).
Appendix
Update Result
In 2, Update Result S %
When Updated
17
17-5
Troubleshooting
Troubleshooting
[ General
Problem
Handset won't
power on
Handset won't
respond
Insert USIM Card
appears
Appendix
17
17-6
REFRESH appears
and handset
returns to Standby
Keypad won't
respond
Possible Cause
Solution
Was " pressed long
enough?
Press " longer.
Battery may need to
be charged or
replaced.
Charge battery or install a
charged battery.
Battery may not be
properly installed.
Install battery properly
(P.17-4).
Is Switch On/Off in
PIN Entry On?
If On, PIN is required. Enter
PIN according to onscreen
prompt.
USIM Card may not
be properly inserted.
Power handset off and
check that USIM Card is
properly inserted, then
restart handset. If the
message still appears, USIM
may be damaged.
The correct USIM
Card may not be
inserted.
Make sure the correct USIM
Card is inserted. The inserted
USIM Card may not be valid.
There may be debris
on IC chip/terminals.
Clean relevant parts with dry
cloth and re-insert.
Handset may have
been dropped or
subjected to shocks.
Handset failed to recognize
USIM Card temporarily. This is
not a malfunction.
Keypad Lock may be
active.
Cancel Keypad Lock (P.2-14).
Function Lock may
be active.
Cancel Function Lock (P.13-2).
Problem
Possible Cause
Battery strength
indicator flashes
when not
charging
Ambient temperature
may be outside 5oC
to 35oC.
Use within an ambient
temperature of 5oC - 35oC.
Saved entry/
folder does not
appear on
handset
Entry/folder may be
set to Secret.
Activate Show Secret Data
(P.13-3).
Handset/AC
Charger feels
warm
Handset/AC Charger
may warm while
charging.
Handset may warm
during extended
periods of use.
Handset may warm
during Video Calls.
Cannot access
Memory Card files
Clock settings
are lost
Solution
Unless handset/AC Charger
is too hot to touch, warmth is
considered normal. Always
avoid prolonged skin
contact to prevent burn
injuries.
Memory Card may
not be properly
formatted.
Use DM005SH-formatted
Memory Cards.
Did you leave
handset without
battery?
Clock settings remain even
when removing battery for
replacement, etc. However,
if handset is left with no
battery or an exhausted one
for an extended period of
time (approximately one
hour), Clock will need to be
reset.
Troubleshooting
[ Charger/Battery
Problem
Battery charges
quickly
Battery charges
slowly
Battery won't
charge
Possible Cause
Solution
Remaining charge
shortens charging time.
This is normal.
Battery may be
terminally exhausted
or defective. (Small
Light flashes red.)
Replace battery with a new
one.
Charging slows
during Video Calls.
End the call to charge
faster.
Battery may be
charging via USB.
Use AC Charger.
AC Charger may not
be properly connected
to handset.
Make sure connector is
securely inserted and retry.
AC Charger may not
be firmly plugged in
to AC outlet.
Remove plug from outlet,
re-insert and retry.
Battery may not be
properly installed.
Install battery properly
(P.17-4).
Problem
Battery Time
seems shorter
than usual
Possible Cause
Solution
High power
consuming
operations are in use.
Keep handset closed in
Standby; reduce TV,
S! Application,
Media Player and camera
use, and limit transmissions/
external connections.
Using handset in poor
conditions may
shorten Battery Time.
Avoid prolonged use of
handset out-of-range or in
poor signal conditions.
Power hungry settings
may be active.
Lower Brightness, select
shorter Display Saving/
Backlight time, etc.
Battery, AC Charger, or
Clean terminals, connector
Charging Terminals, or
and Port with a dry cotton
Device Port may be
swab and retry.
obstructed by dust, etc.
Use specified AC Charger,
etc. only; others may
damage battery.
Appendix
Charger, etc. may
not be supported.
17
17-7
Key Assignments
Key Assignments
Key
Kanji (Hiragana)
[Double-byte]
Katakana
[Double & Single-byte]
Alphanumerics
[Double & Single-byte]
1
あいうえお
ぁぃぅぇぉ
アイウエオ
ァィゥェォ
@./_-1
J (space)
1
1
2
2
Appendix
17
17-8
2
3
Character Codes
2
かきくけこ
カキクケコ
ABCabc2
3
さしすせそ
サシスセソ
DEFdef3
3
3
4
たちつてとっ
タチツテトッ
GHIghi4
4
4
5
5
なにぬねの
ナニヌネノ
JKLjkl5
5
6
はひふへほ
ハヒフヘホ
MNOmno6
6
6
7
まみむめも
マミムメモ
PQRSpqrs7
7
7
8
やゆよゃゅょ
ヤユヨャュョ
TUVtuv8
8
8
9
らりるれろ
ラリルレロ
WXYZwxyz9
9
9
0
わをんー
0
(
ワヲンー
゛゜-1
0
゛゜
─────
#
1
Numbers
[Single-byte]
0
N + P (pause) ? -2
Log, Disney Pictogram List (double-byte), Symbol List3
、
。0 (line break) ?! K (space)
,.0 (line break)
?! J (space)
- is available only in Single-byte Katakana mode.
Available for phone number entry; some characters may not be enterable in some windows.
May not be enterable in some windows.
#
─────
─────
Key Assignments
Key
e
Kanji (Hiragana)
[Double-byte]
Conversion
Katakana
[Double & Single-byte]
&
(Long)
Numbers
[Single-byte]
Character Codes
Cursor up/down; 0 (line break) when b is pressed at the end of text
4
Cursor left/right
f
&
Alphanumerics
[Double & Single-byte]
Switch entry modes (except during conversion)
Search Word5
─────
Toggle Personal
Mode5
─────
Toggle Personal
Mode5,6
─────
Toggle case (for some characters)
'
Toggle mode (upper/
lower and lower case)
─────
$
Delete one character
Cancel conversion
─────
$
(Long)
!
Cancel conversion6
─────
Delete code
Delete before or after cursor
Recover characters deleted with $
Re-convert7
─────
Re-convert6, 7
─────
OK
%
B
Non-Predictive
suggestions5
A
Hiragana to Katakana/
Alphanumeric
Conversion5
A
(Long)
Single Kanji
Conversion5
Cursor moves up/down except during conversion.
Available during conversion.
6
Available only in Single-byte Alphanumerics mode.
7
Press ! immediately after inserting characters to re-convert them.
─────
─────
─────
Appendix
4
─────
17
5
17-9
Pager Codes
Pager Code List
2
い
き
し
ち
に
ひ
み
(
り
を
Second Digit (Press Next)
3
4
5
6
7
8
う え お A B C
く け こ F G H
す せ そ K L M
つ て と P Q R
ぬ ね の U V W
ふ へ ほ Z ? !
む め も m &
ゆ
) よ N # Space
る れ ろ 1 2 3
ん ゛ ゜ 6 7 8
9
D
I
N
S
X
−
0
E
J
O
T
Y
/
*1
*2
4
9
5
0
Appendix
First Digit (Press First)
[ Double-byte Lower Case
17
1
2
3
4
5
6
7
8
9
0
1
ぁ
2
ぃ
ゅ
9
d
i
n
s
x
0
e
j
o
t
y
ょ
*2
、 。
Press 70 to insert 0 (line break) in mail message text, Notepad, etc.
*2
Press 80 to toggle upper and lower case modes.
*1
17-10
1
2
3
4
5
6
7
8
9
0
1
ア
カ
サ
タ
ナ
ハ
マ
ヤ
ラ
ワ
2
イ
キ
シ
チ
ニ
ヒ
ミ
(
リ
ヲ
Second Digit (Press Next)
3
4
5
6
7
8
ウ
エ
オ
A
B
C
ク
ケ
コ
F
G
H
K
L
M
ス
セ
ソ
ツ
テ
ト
P
Q
R
ヌ
ネ
ノ
U
V
W
Z
?
!
フ
ヘ
ホ
ム
メ
モ
m
&
N
ユ
)
ヨ
# Space
ル
レ
ロ
1
2
3
ン
゛ ゜
6
7
8
9
D
I
N
S
X
-
0
E
J
O
T
Y
/
*1
*2
4
9
5
0
9
d
i
n
s
x
0
e
j
o
t
y
[ Single-byte Lower Case
Second Digit (Press Next)
3
4
5
6
7
8
ぅ ぇ ぉ a b c
g
f
h
k l m
っ
p q r
u v w
z
*1
ゃ
First Digit (Press First)
1
2
3
4
5
6
7
8
9
0
1
あ
か
さ
た
な
は
ま
や
ら
わ
First Digit (Press First)
First Digit (Press First)
Gray background indicates upper and lower case available. Press ' to switch immediately after character entry.
[ Double-byte Upper Case
[ Single-byte Upper Case
1
2
3
4
5
6
7
8
9
0
1
ァ
2
ィ
Second Digit (Press Next)
3
4
5
6
7
8
ゥ
ェ
ォ
a
b
c
g
f
h
k
l
m
ッ
p
q
r
u
v
w
z
*1
ャ
ュ
ョ
,
.
*2
Character Codes
Character Code List
Last Digit
First Three
Digits
First Three
Digits
Last Digit
First Three
Digits
Last Digit
First Three
Digits
Last Digit
Space
Appendix
17
17-11
Character Codes
First Three
Digits
Appendix
17
17-12
Last Digit
First Three
Digits
Last Digit
First Three
Digits
Last Digit
First Three
Digits
Last Digit
Character Codes
First Three
Digits
Last Digit
First Three
Digits
Last Digit
First Three
Digits
Last Digit
First Three
Digits
Last Digit
Appendix
17
17-13
Character Codes
First Three
Digits
Appendix
17
17-14
Last Digit
First Three
Digits
Last Digit
First Three
Digits
Last Digit
First Three
Digits
Last Digit
Character Codes
First Three
Digits
Last Digit
First Three
Digits
Last Digit
First Three
Digits
Last Digit
First Three
Digits
Last Digit
Appendix
17
17-15
Character Codes
First Three
Digits
Appendix
17
17-16
Last Digit
First Three
Digits
Last Digit
First Three
Digits
Last Digit
First Three
Digits
Last Digit
Weather Indicators
Weather Indicator List
■Basic Status
■Pollen Count
■Ultraviolet
Clear skies (day)
Low
Low
Clear skies (night)
Moderate
Moderate
Cloudy
High
High
Rain
Extreme
Extreme
Snow
■Cherry Blossom
■Typhoon
Thunder showers
Flowering
Forming
Chance of rain: 0%
Almost full bloom
Approaching
Chance of rain: 10%
Full bloom
Caution necessary
Chance of rain: 20%
Beginning of petal fall
Chance of rain: 30%
Chance of rain: 40%
Chance of rain: 50%
Chance of rain: 70%
Chance of rain: 80%
Chance of rain: 90%
Chance of rain: 100%
■Other
Heavy rain
No color change
Gale
Colors appearing
Notification
Peak
Defoliating
Appendix
Chance of rain: 60%
■Fall Foliage
17
Then
Partly/chance of
17-17
Specifications
Specifications
Disney Mobile DM005SH
Weight*
Continuous Talk
Time*
114 g
210 minutes (3G)
220 minutes (GSM)
360 hours (3G)
Continuous
320 hours (GSM)
Standby Time*
(handset closed)
Charging Time
AC Charger: 140 minutes
*
(power off)
In-Car Charger: 140 minutes
50 x 110 x 13.9-17.8 mm
Dimensions
(handset closed, without
(W x H x D)*
protruding parts)
0.25 W (3G)
Maximum Output
2.0 W (GSM)
*
Appendix
17
17-18
Approximate value.
. Above values calculated with battery
installed and Backlight Brightness set to
Level:2.
. Continuous Talk Time is an average
measured with a new, fully charged
battery, in strong signal conditions
without moving handset.
. Continuous Standby Time is an average
measured with a new, fully charged
battery, with handset closed without calls
or operations, in strong signal conditions
without moving handset. In Japan (3G
service area), the value is calculated with
IP Service Setting, Decoration Call,
S! Appli Notification Setting and Mobile
Widget Notification Setting set to Off.
. Talk Time/Standby Time may vary with
environment, status, settings, etc.
. Display employs precision technology,
however, some pixels may appear
brighter/darker.
Parts
[ Handset Materials
Parts
Materials & Finishing
Materials & Finishing
Infrared Port
PC resin/Multilayer
deposition
Housing stop pads
(Keypad side)
Polyurethane resin
PET
Battery
PC resin & ABS resin
Housing (Display side,
Keypad side)
Nylon resin
(stainless
insert-molded)/
Acrylic UV painting
Screw cover (Keypad side)
Charging Terminals
SUS/Gold plating
(sealer: nickel)
Housing (Display back,
battery side), Battery Cover
ABS resin/Acrylic
UV painting
Screw (all pieces)
SWCH16A/Ni plating
Display window
PC resin & acrylic
resin
Mobile Light cover
PC resin
Lens cover
Acrylic resin
Multi Selector (Cursor
Keys), Center Key, Mail
Key, Shortcuts & A/a Key,
Dictionary Key, Multi Job
& Manner Key, D Key, TV
& Text Key, Camera Key,
Clear/Back Key, Start
Key, Keypad, N Key,
Power On/Off Key, # Key,
key ornament sheets
(Keypad side), camera
ring
PC resin & UV
curing resin
Side Keys (Volume Up Key,
Volume Down Key, Shutter
Key), External Device Port
Cover
PC resin &
elastomeric resin/
Acrylic UV painting
Accessory
[ Battery
Voltage
Battery Type
Capacity
Dimensions
(W x H x D)*
*
3.7V
Lithium-ion
770 mAh
37.2 x 37 x 5.4 mm
(without protruding parts)
Approximate value.
Specifications
Basic Operations
Memory
[ Standby Shortcut
Savable Items
19 per sheet (shared with widgets)
Universal Operations, Etc.
[ Text Entry
User
Dictionary
250 entries (5 per reading)
Word: 30 characters
Reading: 8 hiragana
Acquire
5 dictionaries
Dictionary
Paste List
10 text strings
Recoverable
Deleted
30,720 single-byte characters
Characters
Meikyo Japanese Dictionary:
Approximately 47,100 words/phrases
Genius English-Japanese Dictionary:
Dictionary
Approximately 45,700 words/phrases
Genius Japanese-English Dictionary:
Approximately 55,800 words/phrases
Call Log Records
Office
Homepage
Note
Mail Groups
Dialed: 30
Dialed Ranking: 10
Received: 30
Messaging
*
Received
Msg.
Drafts
Sent
Messages
Memory
Unsent
Messages
Templates
PC Mail/E Mail
Subject
PC Mail/E Mail
Message
SMS Message
Auto Resend
Attachment
Send
Reservation
Signature
Recipient
Folder
10 MB or
3,000 messages
5 MB (or
1,000 messages
between Drafts,
Sent Messages
and Unsent
Messages)
50 MB (shared
with Data Folder
and S! Appli
Library)
512 single-byte characters
Approximately
30,000 single-byte characters
160 single-byte
alphanumerics
2 times
20 files or 2 MB*
10 messages
256 single-byte characters
20 numbers/addresses
20 folders (20 sort keys each)
Limit may be lower depending on message
text, etc.
[ PC Mail Settings
Account
Account
Name
User Name
Password
Set Receiving
ReceivingServer
Port Number
Sender Name
Set Sending
Mail Address
Individual
PC Mail DL
Address
PC Mail
Account
3 accounts
20 characters
128 characters
40 characters
128 characters
1 to 65535
20 characters
128 characters
20 addresses
Internet
300 KB per page
10 MB for
Disney Web
Download
progressive
(Disney Web &
downloads
PC Site Browser)
PC Site
1 MB per file
Browser
Appendix
Address
1,000 entries
Last/First: 32 characters each
5 numbers (32 digits each)
5 addresses (128 characters each)
16 Categories
Postal Code: 20 characters
Country: 32 characters
Others: 64 characters each
Office Name/Division/Post:
32 characters each
1,024 bytes
256 characters
20 Groups (20 members each)
Group name: 16 characters
Chat Folders
Answer Phone/
20 messages or 90 seconds
Record Caller Voice
Auto Answer List
10 numbers
100 KB including
Decoration Call
20 characters
Speed Dial/Mail
100 numbers/addresses
[ Phone Book
Entry
Name/Reading
Phone Number
Mail Address
Category
300 messages
per folder
10 folders
Folder
(20 members each)
1 sound or Flash® file, or
Graphic Mail
40 images/My Pictograms
(with 1 sound or Flash® file)
20 numbers/addresses
Auto Reply
Reply Message: 256 single-byte
characters per mode
Individual
20 entries
Sort Spam Mail
Permitted List 20 entries
Calling
17
17-19
Specifications
History
URL Entry Log
Bookmarks* &
Saved Pages
Tab
Input Memory
Streaming
History
RSS Feeds
*
300 pages for Disney Web
300 pages for PC Site Browser
10 URLs
100 pages for Disney Web
100 pages for PC Site Browser
3 tabs at one time
20 entries
20 URLs
30 entries (60 KB per entry)
Folders are counted as pages.
Digital TV
Recorded File
Recording Time
(example)
Marker
Split File
Time Shift
Recording
Appendix
17
17-20
Reservation List
ISDB-T mobile Video profile
(SD-Video standard)
Approximately
Handset
15 minutes
Approximately
Memory 80 minutes on
Card
256 MB Memory
Card
99 Markers (10 per file)
99 portions per file
[ Photo Camera
1x - 20.4x
8M
2448 x 3264
5M
1944 x 2592
3M
1536 x 2048
Picture Size
Full HD
1080 x 1920
(W x H dots)
Wallpaper 480 x 854
VGA
480 x 640
QVGA
240 x 320
Scanner Image
Free, 1200 x 640, 480 x 1488,
Size (W x H dots) 1280 x 960
File Format
JPEG
Approximately 18 files (at 8M,
Memory
High Quality) on handset
with no other files
File Name
yymmdd_hhmmss
Shooting Distance Macro: 10 cm
Background Save 3 files
Portrait Auto Focus VGA or larger
[ Video Camera
Zoom
30 minutes
5 entries (24 hours each on
1 GB or larger Memory Card)
Record Size
(W x H dots)
Camera & Imaging
[ Mobile Camera
Effective Pixels 8 Megapixels
Auto Shut-off
Approximately 3 minutes
Time
Approximately
Extended
Recording
30 minutes* on
Capacity per Video
Memory Card
Shot
For Message 2 MB or 295 KB
File Name
yymmdd_hhmmss
Recording
1.5 m in good light
Distance
Still Image
3 images
Capture
Recording
QVGA or larger
Pause
(Extended Video sizes only)
Supported
Zoom
File Format
1x - 5.1x
864 x 480 (Wide)
640 x 480 (VGA)
Extended
320 x 240 (QVGA)
Video
176 x 144 (QCIF)
128 x 96 (SubQCIF)
320 x 240 (QVGA)
For Message 176 x 144 (QCIF)
128 x 96 (SubQCIF)
3GP
*
Varies with handset usage, location or settings.
[ Editing Images
Wallpaper (480 x 854)
Power On/Off (480 x 854)
Incoming Call (320 x 320)
Resize
Alarm (480 x 208)
(W x H dots) Mail Art (96 x 96)
VGA (480 x 640)
Picture
QVGA (240 x 320)
Editor
Cut
52 x 52 dots or larger
Retouch
JPEG/PNG images
Paste
16 characters
52 x 52 dots or larger
Correction
JPEG/PNG images
JPEG images between
Merge
Composite
W 48 x H 64 dots and
Panorama
240 x 320 dots
Media Player
WMA (.wma), AAC (.mp4/.3gp/.m4a),
Secure AAC (SD-Audio standard)
Supported
(Some files may not play
Formats
depending on sampling frequency
and bit rate)
Specifications
All Music
List
Music
Chaku-Uta®
WMA
Shows up to
350 files each
SD AUDIO
Shows up to
999 files
S! Applications & Widgets
[ Clock/Gauge
Stopwatch
Countdown
Timer
World Clock
[ S! Applications
100 items or 50 MB (shared with
Memory
Messaging Templates folder and
other folders in Data Folder)
Remote Control Approximately 5 m
[ Mobile Widget
Savable Items
4 widgets (S! Quick News &
S! Friend's Status: 1, others: 3)
per sheet x 4 sheets
Handy Extras
[ PIM/Life
1
2
Preset holidays are based on Japanese
calendar as of January 2010.
Limit may be lower depending on the number
of items in each entry.
Pedometer
S! GPS Navi
[ Doc./Rec.
Document
Viewer
Notepad
Voice
Recorder
Scan Barcode
(Continuous
Mode)
Create QR
Code
Scan Text
PDF (.pdf)
Microsoft® Excel® (.xls)
Supported
Microsoft® Word (.doc)
Formats
Microsoft® PowerPoint®
(.ppt)
File Size
10 MB
500 entries (8,192 characters each)
Approximately
20 minutes (message
For
size limit: 2 MB) or
Message
3 minutes (message size
limit: 300 KB) per file
Extended 99 hours 59 minutes
Voice
59 seconds
UPC/JAN 50 codes
QR Code 16 codes
Equivalent of 513 digits,
311 alphanumerics or 131 kanji
256 characters
Entertainment
[ S! Quick News
Savable 1 item for Special
Items
5 items between News Flash and General
[ e-Books
Text Copy
20 characters
[ S! Friend's Status
Member
30 members
Name: 7 characters
My Status
Comment: 15 characters
Status Label: 4 characters
Status Templates Template name: 12 characters
Appendix
Schedule: 1,000 entries
Tasks: 300 entries
1
Calendar /
Subject: 32 characters
Tasks
Description: 128 characters
Location: 16 characters
Set Holiday: 10 holidays
Alarms
5 entries, Subject: 9 characters
Approximately
Wakeup TV
Auto Shut-off
30 minutes
2
Household
3,285 entries
Accounts
(9,999,999 yen each)
Calculator
999,999,999,999
50 entries (999,999.99 yen
Expenses Memo
each) per list x 3 lists
Remote Lock password:
Osaifu-Keitai®
5 - 16 single-byte alphanumerics
23 hours 59 minutes 59.9 seconds
in 0.1-second increments
Lap time: 4 records
99 minutes 59 seconds in
1-second increments
City name: 16 characters
Steps: 99,999
Walking Time: 23 hours
59 minutes 59 seconds
Today's
Exercise: 71.9 Ex
Data
Calories: 9,999.9 kcal
Distance: 179.9 km
Fat burned: 999.9 g
2 years
Hourly view:
Log
9,999 steps per hour
Daily view:
99,999 steps per day
All Days: 999 days
Steps: 99,999,999
Time: 99,999 hours
59 minutes 59 seconds
Accumulated Exercise: 99,999.9 Ex
Data
Calories:
9,999,999.9 kcal
Distance: 999,999.9 km
Fat burned:
999,999.9 g
Steps: 99,999
Time: 23 hours
59 minutes 59 seconds
Exercise: 71.9 Ex
Average
Calories: 9,999.9 kcal
Distance: 179.9 km
Fat burned: 999.9 g
My Location 50 entries
17
17-21
Specifications
[ S! Circle Talk
Participant
Speak Time
Member List
11 members
30 seconds each
30 entries (10 members per Group)
[ Blog Tool
Blog Details
Blog Title
Blog Settings
(Mail)
Blog Settings
(Disney Web
& PC Site
Browser)
5 entries
16 characters
Email Address 128 characters
Title
32 characters
Text
128 characters
S (320 x 320)
M (640 x 640)
Picture Size
L (1024 x 1024)
Send
URL for Posting 1,024 characters
URL for Viewing 1,024 characters
Data Folder
Memory
Appendix
17
17-22
50 MB (shared with Messaging
Templates folder and S! Appli
Library)
Memory Card
Backup File
Name
*
yymmddXX* (XX: 2 digits/letters)
Connectivity & File Backup
[ Infrared
Infrared
Transfer
IrSS Transfer
(JPEG images)
IrMC 1.1
Range
Within 20 cm
Receive 2,500 KB or less; send
5,000 KB or less (after resizing)
[ Bluetooth®
Communication
Bluetooth® specification Ver. 2.1
System
Headset Profile
Hands-Free Profile
Dial-Up Networking Profile
Supported
Object Push Profile
Profiles
File Transfer Profile
Basic Imaging Profile
Advanced Audio Distribution Profile
Audio/Video Remote Control Profile
Output
Bluetooth® Power Class 2
Range
Within 10 m
Device Search 16 devices
Pairing
32 devices
Device Name 16 characters
Printing
JPEG/PNG images
[ S! Addressbook Back-up
Log
10 synchronization records
Network
yymmdd for Contents Keys.
Add Network
5 Networks
Country/Network code: 3 digits
Name: 25 single-byte characters
Reference URLs
[ Disney Mobile
http://disneymobile.jp
[ SOFTBANK MOBILE Corp.
http://mb.softbank.jp/en/
[ microSD Memory Card Compatibility
From PC (Japanese)
http://k-tai.sharp.co.jp/peripherals/sd/dm005sh.html
From Handset (Japanese)
http://k-tai.sharp.co.jp/k-tai/j/peripherals/dm005sh/dm005sh.html
[ Compatible Blu-ray Disc Recorders
From PC (Japanese)
http://www.sharp.co.jp/bd/spec/index.html
[ S! Addressbook Back-up
From PC
http://disneymobile.jp
[ SVG-T
From Handset (Japanese)
http://shweb.sharp.co.jp/svgt/index_pdc.html
[ Association for Promotion of Digital
Broadcasting
From PC
http://www.dpa.or.jp/english/
From Handset (Japanese)
http://www.dpa.or.jp/1seg/k/
Specifications
Memory Card Structure & Contents
Memory Card Structure
DCIM
PRIVATE
MYFOLDER
Still images in DCIM
Local Contents
SD Local Contents
Mail
Messaging folder backups (Received Msg., Sent Messages and Drafts)
My Items
Book
e-Book files in Data Folder (Books)
Bookmarks
Disney Web Bookmarks
Character
PNG files in Data Folder (Character)
CSI
Decoration Call files in Data Folder (Decoration Call)
Custom Screens
Customized Screen files in Data Folder (Customized Screen)
Flash(R)
Flash® Wallpaper files in Data Folder (Flash®)
Flash(R) Ringtones
Flash® ringtones in Data Folder (Flash® Ringtones)
Games and More
S! Applications
Hot Status Template
Template files in Data Folder (Status Templates)
Mail Art
Files in Data Folder (Mail Art)
Message Templates
Graphic Mail templates in Templates folder
Music
Music files in Data Folder (Music)
Other Documents
Other files in Data Folder (Other Documents)
Pictograms
GIF files in Data Folder (My Pictograms)
Pictures
Still images in Data Folder (Pictures)
Sounds & Ringtones
Melodies and other sound files in Data Folder (Ring Songs·Tones)
Videos
Video files in Data Folder (Videos)
Widget
Widget files in Data Folder (Widget)
WMAudio
WMA files for Media Player (WMA)
SH_Folder
Application management files
Appendix
SHARP
SD_AUDIO
Contents (Location when Viewed on Handset)
XXXSHARP
Utility
Backup files (Phone Book), etc.
MOBILE
Backup files (User Dictionary), etc.
17
SD-Audio files for Media Player (SD AUDIO)
17-23
Menu List
Menu List
Disney Web
Function
Disney Web
Disney Official Sites
Bookmarks
Saved Pages
Web Search
Enter URL
History
PC Site Browser
Browser Settings
Refer to
P.6-3
P.6-3
P.6-8
P.6-8
P.6-11
P.6-3
P.6-3
P.6-5
P.6-12
[ PC Site Browser
Function
Appendix
17
17-24
Homepage
Bookmarks
Saved Pages
Web Search
Enter URL
History
RSS Feed
Disney Web
Refer to
P.6-5
P.6-8
P.6-8
P.6-11
P.6-5
P.6-5
P.6-9
P.6-3
PC Site
Browser
Settings
Function
Font Size
Scroll Settings
Cursor Settings
Downloads
Memory Operation
Security Settings
Download to
Initialized Browser
Reset Settings
Warning Message
Zoom Factor
Softkey Area
Refer to
P.6-12
P.6-13
P.6-12
P.6-12
P.6-10
P.6-16
P.6-12
P.6-17
P.6-17
P.6-13
P.6-12
P.6-5
[ Browser Settings
Function
Font Size
Scroll Unit
Cursor Settings
Downloads
Memory Operation
Security Settings
Download to
Initialized Browser
Reset Settings
Refer to
P.6-12
P.6-13
P.6-12
P.6-12
P.6-10
P.6-16
P.6-12
P.6-17
P.6-17
Messaging
Function
Received Msg.
Create Message
Disney Mail Maker
Retrieve New Msg.
Drafts
Templates
Sent Messages
Unsent Messages
Chat Folder
Mail List
Retrieve All
Server Mail
Box
Delete All
Mailbox Volume
Create New SMS
Address Settings
General Settings
E Mail Settings
Settings
PC Mail Settings
SMS Settings
Speed Dial/Mail
Set Mail Group
Memory Status
Refer to
P.5-15
P.5-4
P.5-8
P.5-27
P.5-33
P.5-9
P.5-15
P.5-33
P.5-18
P.5-27
P.5-27
P.5-31
P.5-33
P.5-10
P.5-3
P.5-34
P.5-36
P.5-21
P.5-39
P.5-23
P.5-19
P.5-30
Menu List
[ Settings: General Settings
Function
Delivery Report
Reply to Settings
Reply With Text
Auto Reply
Send/
Compose
Set Quick Reply
Auto Resend
Sending Status
Restrictions Setting
Message Notice
Receive
Link to Feeling
Animation View
Sort Spam Mail
Report Spam
Scroll Unit
Message List View
Address View
Received Msg. View
Sent Msg. View
Received Msg.
Auto Delete
Sent Messages
[ Settings: E Mail Settings
Refer to
P.5-34
P.5-34
P.5-34
P.5-29
P.5-29
P.5-34
P.5-34
P.5-11
P.5-35
P.5-35
P.5-35
P.5-17
P.5-34
P.5-34
P.5-34
P.5-34
P.5-34
P.5-34
P.5-34
P.5-34
Function
Message DL
Signature
Picture Appearance
Pictures
Auto Play File
Sounds
Create Msg. Size
Send File Settings
Picture Auto Resize
Refer to
P.5-14
P.5-23
P.5-37
P.5-37
P.5-37
P.5-37
P.5-37
P.5-37
[ Settings: PC Mail Settings
Function
PC Mail Account
PC Mail DL
Check New Mail
Word wrap
Refer to
P.5-21
P.5-37
P.5-37
P.5-38
[ Settings: SMS Settings
Function
Expiry Time
Message Center
Char-code
Camera
Function
Easy Auto Camera
Pro Auto Camera
Quick Camera
Pretty Arrange Camera
Fine Video Camera
Video Camera for Mail
Various Cameras
Hand Mirror
Scan Barcode
Scan Card
Scan Receipt
Kanji Grabber
Review
Set Camera Key
Refer to
P.8-5
P.8-3
P.8-3
P.8-9
P.8-4
P.8-16
P.8-8
P.2-14
P.11-37
P.11-39
P.11-14
P.11-41
P.8-18
P.8-24
Refer to
P.5-39
P.5-39
P.5-39
Appendix
17
17-25
Menu List
[ Photo Camera (Example: Pro Auto
Camera)
Appendix
17
17-26
Function
Switch Camera
Detect Personal
Self-timer
Picture Size
Focus Setting
Egao level
Shutter Mode
Shutter
Setting
Shutter Sound
Set Remote Shutter
Picture Quality
ISO Sensitivity
White Balance
Exposure
Settings
Shake Reducing
Long Exposure
Display Setting
Set Send Key
Review
Save Pictures to
Save Setting Auto Save
Background Save
Scene
Help
Mobile Light
Refer to
P.8-8
P.8-14
P.8-24
P.8-24
P.8-24
P.8-25
P.8-25
P.8-25
P.8-24
P.8-25
P.8-25
P.8-25
P.8-25
P.8-25
P.8-25
P.8-25
P.8-25
P.8-18
P.8-25
P.8-25
P.8-25
P.8-10
P.8-24
P.8-25
[ Video Camera
Function
Switch Camera
Simple Setting
Self-timer
Record Time/Size
Focus Setting
Shake Reducing
Video Quality
Settings
Exposure
Microphone
Review
Save Videos to
Auto Save
Save Setting Video Encode
Audio Encode
Picture Setting
Display Size
Help
Mobile Light
Refer to
P.8-8
P.8-16
P.8-27
P.8-27
P.8-27
P.8-27
P.8-27
P.8-27
P.8-27
P.8-18
P.8-27
P.8-27
P.8-27
P.8-27
P.8-27
P.8-27
P.8-27
P.8-27
Data Folder
Function
Pictures
DCIM
Ring Songs·Tones
S! Appli
Widget
Music
Videos
Lifestyle-Appli
Books
Customized Screen
Status Templates
Decoration Call
Flash®
Other Documents
Memory Status
Refer to
P.8-19
P.14-2
P.11-36
P.10-2
P.10-3
P.14-2
P.14-2
P.11-19
P.14-2
P.3-4
P.14-2
P.4-16
P.14-2
P.14-2
P.14-2
Menu List
S! Appli
Function
S! Appli Library
Osaifu-Keitai
Notification History
Settings
Information
TV
Refer to
P.10-2
P.11-19
P.10-2
P.10-7
P.10-7
[ Settings
Function
Application Volume
Backlight
Vibration
Synchronization
Notification Setting
Calls & Alarms
Switch On/Off
Screensaver Activation Time
Stop Auto Start
Surround
Set to Default
Memory All Clear
Refer to
P.10-6
P.10-7
P.10-7
P.10-7
P.10-7
P.10-6
P.10-6
P.10-6
P.10-6
P.10-6
P.10-7
P.10-7
Entertainment
Function
Digital TV
TV Player
TV-Image Folder
TV Link
TV Listing
Familink Remote
Reservation List
Settings
Recorder Contents
Refer to
P.7-4
P.7-9
P.7-6
P.7-14
P.7-7
P.1-3
P.7-10
P.7-14
P.7-16
[ Settings
Function
TV Alarm
Broadcast
Data
Set Recording
Image Location
Notify Connection
Location
Manufacture Number
Delete StationData
Refer to
P.12-2
P.12-2
P.12-4
P.12-4
P.12-4
P.12-14
P.12-14
P.12-4
P.12-3
P.12-5
P.12-5
P.12-5
P.12-7
P.12-10
P.12-12
P.12-6
P.12-6
[ S! Information Channel/Weather:
Weather Indicator
Function
Weather
Manual Update
Standby Setting
Settings
Weather Notif.
Icon Update
Refer to
P.12-15
P.12-4
P.12-15
P.12-15
P.12-15
Appendix
Screen Size
Set Landscape
Sound Output
gSound Output
Set Call Time Shift
Calls & Alarms
TV Reserve Prior
Save Recording to
Auto Exit Time
Auto Exit
Close Action
Smooth Mode
Refer to
P.7-18
P.7-15
P.7-15
P.7-14
P.7-14
P.7-14
P.7-14
P.7-12
P.7-13
P.7-13
P.7-13
P.7-15
P.7-14
P.7-18
P.7-15
P.7-13
P.7-13
P.7-12
Function
Disney Character Photo Maker
Disney Player
What's New
Back Issue
S! Information Registration/Cancel
Channel/
Get Latest Contents
Weather
Notification
Weather Indicator
S! Quick News
Music
Free Contents
Graphic Mail
Music Store
S! Friend's Status
S! Circle Talk
Blog Tool
BookSurfing
e-Book Viewer
17
17-27
Menu List
[ S! Quick News
Function
S! Quick News List
Automatic Update
Show Image
Check Schedule
Settings
Change Skin
Delete S! Quick
News Lists
[ PIM/Life: Osaifu-Keitai
Refer to
P.12-3
P.12-14
P.12-14
P.12-14
P.12-14
P.12-14
[ PIM/Life
Appendix
17
[ Doc./Rec.
Refer to
P.11-19
P.11-49
P.11-20
P.11-21
P.11-49
P.11-49
P.11-50
[ Clock/Gauge
Tools
Function
Calendar
Exchange Profile
Alarms
Wakeup TV
Luxury Animation
Tasks
Household Accounts
Calculator
Expenses Memo
Osaifu-Keitai
Receive Simulated Call
Switch On/Off
Simulated Set Caller
Call
Assign Tone
Receive Timing
For Silent Mode
Function
Lifestyle-Appli
IC Card Status
IC Card Lock
Remote Lock
IC Card
Settings
Interface Settings
Balance Info
Set to Default
Refer to
P.11-2
P.15-5
P.11-8
P.11-10
P.11-12
P.11-6
P.11-13
P.11-17
P.11-18
P.11-19
P.11-50
P.11-23
P.11-23
P.11-23
P.11-23
P.11-50
Function
Stopwatch
Countdown Timer
World Clock
Hour Minder
Pedometer
Compass
S! GPS Navi
Battery Meter
Refer to
P.11-24
P.11-25
P.11-26
P.11-27
P.11-28
P.11-30
P.11-31
P.2-14
Function
Dictionary
Search
Document Viewer
Notepad
Scratch Pad
Record Time
Voice
Ring Songs·Tones
Recorder
Save Recording to
Scan Barcode
Open Barcode
Create QR Code
Scan Card
Barcode/
Scan
Scan Receipt
Kanji Grabber
Scan Text
Scanned Results
Phone Help
[ Connectivity
Function
Bluetooth
Infrared
IC
Transmission
USB Mode
Switch On/Off
Send All
IrSS Key Setting
1 File Reception
Send All
Mass Storage
Recorder Link
MTP Mode
USB Charge
Memory Card
Backup/Restore
17-28
Refer to
P.3-12
P.3-15
P.11-34
P.11-35
P.3-16
P.11-54
P.11-36
P.11-54
P.11-37
P.11-54
P.11-38
P.11-39
P.11-14
P.11-41
P.11-40
P.11-55
P.2-14
Refer to
P.15-8
P.15-18
P.15-4
P.15-18
P.15-18
P.15-7
P.15-12
P.15-12
P.9-3
P.1-5
P.14-6
P.15-20
Menu List
[ Connectivity: Bluetooth
Function
Switch On/Off
Add Device
Paired Devices
Send All
Setting Watch
My Device Settings
My Device Details
Refer to
P.15-19
P.15-9
P.15-10
P.15-11
P.15-19
P.15-18
P.15-19
Settings
[ Sound/Display
Vivid Mode
Mini Battery
Greeting Message
Backlight
Display Saving
Dial Number
P.16-4
P.11-52
P.16-3
P.2-17
P.16-3
P.16-3
P.16-3
P.16-3
[ Sound/Display: Illumi & Light
Refer to
P.2-16
P.16-3
P.2-10
P.3-4
P.3-5
P.16-2
P.16-3
P.16-6
P.4-15
P.2-4
Illumi
Display
[ Sound/Display: Display
Function
Wallpaper
System Graphics
VeilView
Display Effects
Font Settings
Show Operator Name
Pedometer
Refer to
P.16-4
P.16-4
Refer to
P.3-3
P.16-3
P.2-17
P.16-3
P.3-2
Light
Function
Event Illumination
Effect Illumination
Display Setting
Display Date&Time
Charging Time
Caller Display
Scroll Speed
Illumi Lighting Time
Info Display Time
Brightness
Display Effect
Event Light
Set Key Illumi
Status Light
Refer to
P.2-10
P.2-11
P.2-11
P.2-16
P.2-16
P.2-16
P.2-16
P.2-16
P.2-16
P.2-16
P.2-16
P.16-5
P.16-4
P.16-5
[ Sound/Display: Sounds & Alerts
Function
Volume
Ringtone/videos
Machi-Uta
System Sounds
Vibration
Any Key Answer
Surround
Refer to
P.16-5
P.3-5
P.3-20
P.16-6
P.3-5
P.16-5
P.16-6
[ Sound/Display: Date & Time
Function
Set Date/Time
Time Correction
Daylight Saving
Set Time Zone
Clock/Calendar
World Clock
Alarms
Set Holiday
Time Format
Date Format
Calendar Format
Refer to
P.16-2
P.16-2
P.16-2
P.16-2
P.16-4
P.11-26
P.11-8
P.11-42
P.16-2
P.16-2
P.16-2
Appendix
Function
Mode Settings
Display
Illumi & Light
Customized Screen
Sounds & Alerts
Date & Time
言語選択 (Language)
Ringer Output
Earpiece Volume
Change Menu
Standby
Display
Function
Clock/Calendar
Show Widget
17
17-29
Menu List
[ Phone/G
Function
User Dictionary
Set Key Shortcut
Motion Control
Set Key Light
Memory Card
Backup All Items
Backup Selected
Items
Backup/
Restore
Restore All Items
Restore Selected Items
Settings/Manage
Locks
Software Update
Reset Settings
Master
Reset
Reset All
[ Phone/G: Locks
Refer to
P.3-11
P.2-5
P.2-9
P.16-4
P.14-6
P.15-20
P.15-14
P.15-20
P.15-14
P.15-20
P.13-2
P.17-5
P.16-8
P.16-8
[ Phone/G: Memory Card
Appendix
17
17-30
Function
Number of Copies
Settings
DPOF
Check Settings
Reset Settings
SD Local Contents
Format Card
Memory Status
Refer to
P.8-23
P.8-28
P.8-23
P.8-28
P.14-9
P.14-6
P.14-2
Function
PIN Entry
Face Recognition
Function Lock
IP Service Setting
Function Control
Application Lock
History Lock
Show Secret Data
Set Lock Message
Chg. Handset Code
Administrator Setting
Refer to
P.13-2
P.13-4
P.13-2
P.16-7
P.13-6
P.13-3
P.13-3
P.13-3
P.13-7
P.2-13
P.2-13
[ Call
Call Time/
Data
Counter
Answer
Phone
Voicemail/
Divert
Function
Call Timers
Data Counter
Call Time Counter
Minute Minder
Switch On/Off
Answer Time
Outgoing Message
Volume
Voicemail
Diverts
Cancel All
Status
Refer to
P.4-9
P.4-18
P.4-18
P.4-18
P.4-4
P.4-14
P.4-14
P.4-14
P.4-13
P.4-12
P.4-13
P.4-19
Function
Camera Picture
Incoming Picture
Outgoing Picture
Hold Guidance Pict
Video Call
Backlight
Loudspeaker
Mute Microphone
Remote Monitor
Show My Number
) Missed Calls
Int'l Prefix
Int'l Calling
Country Codes
Roaming Dial Assistant
Bar Outgoing Calls
Restrict Destinations
Call Barring
Bar Incoming Calls
Reject Numbers
Change NW Password
Switch On/Off
Decoration
Play in Receiving
Call
Notice
Auto Answer
Call Waiting
Refer to
P.4-21
P.4-21
P.4-21
P.4-21
P.4-21
P.4-21
P.4-21
P.4-14
P.4-20
P.4-13
P.4-15
P.4-15
P.4-15
P.4-20
P.4-10
P.4-20
P.4-19
P.4-20
P.4-17
P.4-17
P.4-17
P.4-20
P.4-19
[ Network
Function
Select Network
Select Service
Re-search Signal
Offline Mode
Retrieve NW Info
Network Info
External Device
Refer to
P.16-7
P.16-7
P.16-7
P.2-12
P.16-7
P.16-7
P.16-7
Menu List
Phone
Refer to
P.3-17
P.3-17
P.1-7
P.4-8
P.4-4
P.4-13
P.15-15
P.2-14
P.3-18
P.5-19
P.4-7
P.4-21
P.3-19
P.3-24
P.3-24
P.3-22
P.3-22
P.4-18
P.3-24
P.3-24
P.3-24
Function
Music
Videos
Streaming
MTP Mode
Mobile Widget
Refer to
P.9-4
P.9-5
P.6-4
P.9-3
[ Music
Function
Last Played Music
My Music
SD AUDIO
WMA
Download Music
Sound Effects
Playback Mode
Settings
gSound Output
Delete All WMA
Refer to
P.9-7
P.9-4
P.9-4
P.9-4
P.9-3
P.9-7
P.9-7
P.9-7
P.9-8
Function
Widget Store
Widget Contents
Widget History
Remove Contents
Remove All Contents
Auto Refresh
AutoConnect
Abroad
Settings
Set Use Abroad
Notification Setting
Cookies
Delete Cookies
Refer to
P.10-3
P.10-3
P.10-8
P.10-5
P.10-9
P.10-8
P.10-8
P.10-8
P.10-8
P.10-8
P.10-8
[ Videos
Function
Last Played Video
My Videos
Recorder Contents
SD VIDEO
Download Videos
Playback Mode
Backlight
Display Size
Settings
Sound Effects
Web Link Setting
gSound Output
Refer to
P.9-7
P.9-5
P.9-5
P.9-5
P.9-3
P.9-7
P.9-7
P.9-7
P.9-7
P.9-7
P.9-7
Appendix
Function
Phone Book
Add New Entry
Information
Call Log
Play Messages
Call Voicemail
S! Addressbook Back-up
My Details
Set Category
Mail Groups
Speed Dial/Mail
Touch-Tone Signal List
Sort Entries
Select Phone Book
Ph.Book
Save New Entry
Settings
New Number Prompt
View Settings
Call Log Setting
Copy All
Manage
Memory Status
Entries
Delete All
Media Player
17
17-31
Index
Index
A
C
AC Charger................................................ 1-4
Accessing Functions ................................. 2-2
Accessory ......................................................v
Administrator Code................................. 2-13
After-Sales Services .............................. 17-40
Alarms ...................................................... 11-8
Canceling ..............................................11-9
Deleting..................................................11-9
Editing entries ......................................11-46
For Manner Mode ...............................11-47
Link to World Clk..................................11-47
Animation View ....................................... 5-12
Answer Phone...................................4-4, 4-14
Any Key Answer ...................................... 16-5
Application Lock ..................................... 13-3
Auto Art ...................................................... 5-4
Auto Reply ......................................5-13, 5-29
Auto Resend .....................................5-2, 5-34
Auto Retry Function................................... 5-2
Calculator................................... 11-17, 11-49
Calendar...................................................11-2
Calendar Settings ...............................11-42
Editing schedules ................................11-43
Call Barring ..................................... 4-12, 4-20
Call Forwarding........................................4-12
Call Log............................................. 4-8, 4-17
Call Time Counter ....................................4-18
Call Waiting .................................... 4-12, 4-19
Call Waiting (answering Line 2) ..............4-19
Caller ID .......................................... 4-12, 4-20
Camera.......................................................8-2
Capturing Still Images ............................8-5
Changing/saving camera settings.....8-11
Detect Personal ....................................8-14
Photo Camera settings ........................8-24
Recording Video...................................8-16
Review....................................................8-18
Center Access Code...............................2-13
Change NW Password.............................4-20
Change PIN ..............................................13-7
Character Code List...............................17-11
Charging.....................................................1-4
Charging Terminals....................................1-2
Chat Folder ..................................... 5-18, 5-32
Clock/Calendar.......................................16-4
Compass.................................................11-30
Composite ................................................8-22
Countdown Timer...................................11-25
Create QR Code ....................................11-38
Customer Service...................................17-41
Customized Screen (Japanese)...............3-4
B
Appendix
17
Backlight .................................................. 16-3
Backup ........................................15-13, 15-20
Bar Incoming Calls.................................. 4-20
Bar Outgoing Calls .................................. 4-20
Battery ...............................................1-4, 17-4
Battery Cover............................................. 1-2
Battery Meter ........................................... 2-14
Blog Tool......................................12-12, 12-17
Bluetooth® ................................................ 15-8
Blu-ray Disc recorders ...7-16, 9-5, 9-9, 15-12
Bookmarks ................................................. 6-8
BookSurfing® ............................................ 12-6
D
Data Broadcast (Japanese) .....................7-5
17-32
Change View (Data) ........................... 7-14
Returning to initial window .................. 7-14
Set Recording ....................................... 7-15
Data Counter ........................................... 4-18
Data Folder............................................... 14-2
Files (attaching) .............................5-5, 14-3
Files (moving/copying) ........................ 14-4
Files (opening)....................................... 14-3
Files (renaming) .................................... 14-8
Folders (adding) ................................... 14-4
Selecting Multiple Files ......................... 14-4
Set Secret (folders) ............................... 14-4
Slide Show.............................................. 14-3
Date & Time ..............................................16-2
Daylight Saving............................ 11-26, 16-2
Decoration Call................................ 4-6, 4-16
Delivery Report .....................5-12, 5-24, 5-34
Dialing from Call Log records................. 4-17
Dictionary ................................................. 3-12
Digital TV (> TV) ........................................7-2
Adding Reception Areas....................... 7-3
Area Setup .............................................. 7-3
Auto Exit................................................. 7-13
AV Settings ............................................ 7-12
Calls & Alarms ....................................... 7-14
Change Area........................................ 7-12
Program Info. Search ........................... 7-12
Screen Size ............................................ 7-12
Set Channels ..................................7-3, 7-12
Smooth Mode ....................................... 7-12
gSound Output .................................... 7-13
Sound Output ....................................... 7-13
Subtitle/Sound....................................... 7-15
Disney Character Photo Maker..............12-2
Disney Player ...........................................12-2
Disney Web ................................................6-3
Display ................................................ 1-2, 1-7
Display (settings) ..................................... 16-3
Index
Function Lock........................................... 13-2
E
Hand Mirror .............................................. 2-14
Handset Closed ......................................... 1-2
Handset Code.......................................... 2-13
Handset Keys ............................................. 1-3
Handset mail address ............................... 5-3
Handset Open ........................................... 1-2
Handset Parts ............................................. 1-2
Handset Positions....................................... 1-2
Handset Power On/Off .............................. 1-6
Handset responses .................................... 3-5
Headphones (answering calls) .............. 4-14
History Lock.............................................. 13-3
Hold........................................................... 4-14
Hour Minder ........................................... 11-27
Assign Tone/Video ............................. 11-51
For Manner Mode .............................. 11-52
Link to World Clk ................................. 11-52
Vibration .............................................. 11-51
Household Accounts............................. 11-13
E Mail...........................................................5-2
Attaching Files......................................... 5-5
Create Msg. Size ..........................5-25, 5-37
Disney Mail Maker .................................. 5-8
E Mail Settings ....................................... 5-36
Feeling Mail ............................................. 5-5
Graphic Mail ........................................... 5-6
E Mail (sending) .........................................5-4
Earpiece .....................................................1-2
Earpiece Volume .....................................4-15
e-Book Library........................................12-15
e-Book Viewer .........................................12-6
e-Books (Japanese) .................... 12-6, 12-15
Emergency Calls........................................4-2
English .......................................................16-3
Exchange Profile ......................................15-5
Expenses Memo.....................................11-18
External Device Connection.................15-12
External Device Port ..................................1-2
F
Face Arrange ...........................................8-21
Feeling Mail (receiving) ..........................5-12
Feeling Mail (sending)...............................5-5
Focus (locking) ................................ 8-7, 8-27
Font Size ......................................................3-2
Format Card .............................................14-6
Function Control.......................................13-6
G
General Notes..............................................xii
Graphic Mail .............................................. 5-6
Group Calling ................................ 4-12, 4-19
Group Calling (opening another line)... 4-19
Guide Usage Notes .......................................ii
H
I
IC Card Lock.......................................... 11-20
IC Card Settings..................................... 11-20
IC Transmission ........................................ 15-6
Ichi Navi ................................................. 11-33
Illumi & Light ................................... 2-10, 16-4
Illumi Display............................. 1-2, 1-8, 2-10
Indicators ................................................... 1-9
Camera (Viewfinder).................... 8-6, 8-17
Display ..................................................... 1-9
Messaging (message list) .................... 5-13
Music Playback Window ....................... 9-4
S! Quick News ....................................... 12-3
Video Playback Window....................... 9-5
Information window .................................. 1-7
Infrared..................................................... 15-2
Receiving files ....................................... 15-3
Sending files ............................... 15-4, 15-18
Infrared Port ............................................... 1-2
Internal Antenna ....................................... 1-2
Internal Camera........................................ 1-2
International calls.............................4-3, 4-15
Internet ....................................................... 6-2
Accessing......................................... 6-3, 6-5
Basic Operations .................................... 6-6
Browser Settings.................................... 6-12
Enter URL .......................................... 6-3, 6-5
History ............................................... 6-3, 6-5
Saving Bookmarks/pages ..................... 6-8
Int'l Call ...................................................... 4-4
IP Service Setting..................................... 16-7
IrSS Transfer .............................................. 15-2
K
Kanji Grabber ........................................ 11-41
Key Assignments ..................................... 17-8
Keypad Lock ........................................... 2-14
L
Language................................................. 16-3
Large Font Menu ....................................... 3-2
Light Sensor.......................................1-2, 16-3
Link to Feeling.......................................... 5-35
Link to World Clk.........................11-47, 11-52
Locks ...............................................2-13, 13-2
Loudspeaker....................... 4-15, 4-21, 12-17
Luxury Animation .................................. 11-12
Appendix
Display Effect............................................2-16
Display Effects ..........................................16-3
Display Saving..........................................16-3
Document Viewer..................................11-34
Download Dictionary...............................3-11
DPOF..........................................................8-23
Add Date............................................... 8-28
Check Settings ...................................... 8-23
For All Pictures ....................................... 8-23
Index Print .............................................. 8-28
17
M
Machi-Uta® ................................................ 3-5
17-33
Index
Appendix
17
17-34
Mail Groups ............................................. 5-19
Changing members .............................5-32
Deleting..................................................5-32
Edit Name ..............................................5-32
Main Menu ................................................. 2-3
Manner mode.......................................... 2-12
Mass Storage ......................................... 15-12
Master Reset ............................................ 16-8
Format Card ..........................................14-6
Reset All..................................................16-8
Reset Settings.........................................16-8
Media Player ............................................. 9-2
Delete All WMA .......................................9-8
Playlists....................................... 9-6, 9-8, 9-9
Memory All Clear (S! Applications) ....... 10-7
Memory Card .......................................... 14-5
Format Card ..........................................14-6
Opening files..........................................14-6
Memory Card Structure & Contents .... 17-23
Menu List ................................................ 17-24
Camera................................................17-25
Data Folder..........................................17-26
Disney Web..........................................17-24
Entertainment......................................17-27
Media Player .......................................17-31
Messaging............................................17-24
Mobile Widget.....................................17-31
Phone ...................................................17-31
S! Appli .................................................17-27
Settings .................................................17-29
Tools ......................................................17-28
TV ..........................................................17-27
Message List View ................................... 5-34
Message Notice ...................................... 5-35
Messages (creating/sending) ... 5-4, 5-10, 5-22
Attachments..........................................5-25
Graphic Mail............................................5-6
Inserting signature manually................5-23
Messaging Settings ...............................5-24
Preview Message ....................................5-4
Recipient status.....................................5-23
Recipients (editing) ..............................5-23
Save to Drafts ........................................5-24
Send Reservation ..................................5-24
Sending from Drafts ..............................5-33
Sending unsent messages ...................5-33
Set Auto Play File...................................5-25
Set Sent Cancel ....................................5-24
Signature................................................5-23
Speed Dial/Mail ....................................5-23
Templates ................................................5-9
Using sent messages.............................5-33
Messages (deleting)...................... 5-22, 5-30
Auto Delete ...........................................5-34
Messages (forwarding) ...........................5-33
Messages (protecting) ............................5-15
Messages (receiving/checking)............5-12
Accessing new mail out of Standby ....5-27
DL Size Limit............................................5-37
Mail List ...................................................5-27
Message List .................................5-13, 5-30
Message Window ........................5-13, 5-27
Retrieving complete E Mail messages
manually ................................................5-14
Retrieving PC Mail........................5-22, 5-37
Save to Data Folder .............................5-27
Messages (sorting)...................................5-17
Sort Spam Mail .............................5-17, 5-32
Messaging (> SMS, E Mail, PC Mail)........5-2
E Mail Settings........................................5-36
General Settings ...................................5-34
PC Mail Settings ....................................5-37
Receive (settings) .................................5-35
Send/Compose (settings) ....................5-34
SMS Settings ...........................................5-39
Microphone ................................................1-2
Minute Minder ..........................................4-18
Missed Call Notification ..........................4-13
Mobile Light ................................................1-2
Mobile Widget ..........................................10-3
Mode Settings ..........................................2-16
Motion Control ...........................................2-8
MTP Mode...................................................9-3
Multi Job .....................................................2-6
Music (deleting).........................................9-8
Music (downloading) ................................9-3
Music (playing).................................. 9-4, 9-7
Music Store ............................................... 12-5
My Details.................................................2-14
Sending via Bluetooth® ...................... 15-19
Sending via IC Transmission ............... 15-18
Sending via Infrared ........................... 15-18
N
Navi Appli...............................................11-31
Network Password ...................................2-13
Notepad .................................................11-35
Change Category.............................. 11-53
Edit Text................................................ 11-53
O
Offline Mode ............................................ 2-12
Optional Services .................................... 4-12
Optional Services (checking status) .....4-19
Osaifu-Keitai® (Japanese) ....................11-19
Balance Info........................................ 11-49
IC Card Settings .................................. 11-20
Locking ................................................ 11-20
Set to Default ...................................... 11-50
P
Pager Code List......................................17-10
PC (connecting handset) .....................15-12
PC Mail.............................................. 5-2, 5-20
PC Mail (sending) ....................................5-22
PC Site Browser ..........................................6-5
Pedometer..............................................11-28
Pen Light ................................................... 2-14
Personal Mode...........................................3-7
Phone Book (deleting) ............................3-24
Index
Phone Book (editing)...............................3-23
Phone Book (saving) ...............................3-17
Phone Book (using) .................................3-19
Phone Book search .................................3-19
Phone Help ...............................................2-14
Picture Editor ............................................8-19
PIN .............................................................17-2
PIN Entry....................................................13-2
PIN Lock ....................................................17-2
Playlists.........................................9-6, 9-8, 9-9
Printing ......................................................8-23
Printing (Bluetooth®).................................8-23
Q
Quick Operations ......................................2-2
Quick Silent ................................................2-8
R
S
S! Addressbook Back-up ...................... 15-15
Auto Sync Settings.............................. 15-20
Confirming password ......................... 15-20
Sync Log .............................................. 15-20
S! Applications ......................................... 10-2
S! Circle Talk............................... 12-10, 12-17
Accepting requests............................ 12-11
Initiating ............................................... 12-11
IP Service Setting .................................. 16-7
Registering Members ......................... 12-10
S! FeliCa (> Osaifu-Keitai®).................. 11-19
S! Friend's Status........................... 12-7, 12-16
IP Service Setting .................................. 16-7
Opening Member Status ..................... 12-8
S! GPS Navi ............................................. 11-31
S! Information Channel (Japanese)
...................................................... 12-4, 12-14
Weather Indicator ................................ 12-4
S! Quick News (Japanese) ..................... 12-3
Automatic Update............................. 12-14
Deleting items ..................................... 12-14
Safety Precautions........................................vi
SAR ...............................................................xix
Saved Pages .................................... 6-8, 6-15
Scan Barcode ........................................ 11-37
Open Barcode ................................... 11-54
Scanning during text entry ................ 11-54
Using scan results................................ 11-55
Scan Card .............................................. 11-39
Using scan results................................ 11-56
Scan Text ................................................ 11-40
Scanning and pasting during text entry
.............................................................. 11-57
Using scan results................................ 11-57
Scanning Receipts................................. 11-14
Schedules (> Calendar)........................ 11-2
Scratch Pad ............................................. 3-16
SD Local Contents ................................... 14-9
Search ...................................................... 3-15
Security Codes ........................................ 2-13
Sent Msg. View ........................................ 5-34
Set as Wallpaper ..................................... 14-8
Set Date/Time .......................................... 16-2
Set Key Light ............................................ 16-4
Set Key Shortcut ........................................ 2-5
Set Quick Reply ....................................... 5-29
Set Sent Cancel ....................................... 5-24
Set Time Zone ...............................11-26, 16-2
Set to Default (S! Applications) .............. 10-7
Shortcuts..................................................... 2-5
Show My Number.................................... 4-20
Show Secret Data.................................... 13-3
Side Keys.................................................... 1-3
Signature .................................................. 5-23
Simple Menu.............................................. 2-4
Simulated Call ....................................... 11-23
Slide W paper ............................................ 3-3
Small Light .................................................. 1-2
SMS ............................................................. 5-2
SMS Settings .......................................... 5-39
SMS (sending).......................................... 5-10
Snooze.............................................11-8, 11-9
Softkeys ...................................................... 1-8
Software Update...................................... 17-5
Sort Spam Mail................................5-17, 5-32
Sounds & Alerts.................................3-5, 16-5
Speaker...................................................... 1-2
Specifications ........................................ 17-18
Specifications (by function) ................. 17-19
Basic Operations ................................ 17-19
Calling ................................................. 17-19
Camera & Imaging............................ 17-20
Connectivity & File Backup............... 17-22
Data Folder ......................................... 17-22
Digital TV ............................................. 17-20
Appendix
Received Msg. View................................5-34
Record Caller Voice................................4-16
Recorder Contents.....................................9-5
Recorder Link .........................................15-12
Reference URLs ......................................17-22
Reject (calls) ............................................4-14
Remote Lock (Osaifu-Keitai®)...............11-21
Call Remote Lock ............................... 11-22
Count for Lock .................................... 11-50
Mail Remote Lock............................... 11-21
Notice Settings .................................... 11-50
Remote Monitor .......................................4-14
Reply ......................................5-13, 5-22, 5-29
Auto Reply............................................. 5-29
Opening received message for
reference............................................... 5-29
Set Quick Reply..................................... 5-29
Reply Assist Dictionary ............................3-11
Reset (> Master Reset) ...........................16-8
Reset All ....................................................16-8
Reset Settings ...........................................16-8
Retrieve NW Info ......................................16-7
Retrieving Network Information ............... 1-6
Review ...................................................... 8-18
RSS Feeds ................................................... 6-9
17
17-35
Index
Appendix
17
Entertainment......................................17-21
Handy Extras ........................................17-21
Internet .................................................17-19
Media Player .......................................17-20
Memory Card ......................................17-22
Messaging............................................17-19
Network ................................................17-22
S! Applications & Widgets ..................17-21
Universal Operations, Etc. ..................17-19
Speed Dial/Mail................................4-7, 5-23
Standby ...................................................... 1-6
Standby Shortcuts ..................................... 2-7
Status Icon List ........................................... 1-7
Status Templates ..................................... 14-2
Still images (capturing) ............................ 8-5
Easy Auto Camera .................................8-5
ISO Sensitivity .........................................8-25
Long Exposure .......................................8-25
Picture Size .............................................8-24
Pro Auto Camera....................................8-5
Quick Camera ........................................8-3
Shake Reducing....................................8-25
Shutter Sound ........................................8-25
Switch Camera menu ............................8-8
White Balance.......................................8-25
Still images (capturing & sending) ...8-5, 8-9
Still images (editing) ............................... 8-19
Additional editing options ...................8-28
Changing sizes ......................................8-20
Face Arrange ........................................8-21
Merge Panorama .................................8-22
Stopwatch .............................................. 11-24
Strap Eyelet ................................................ 1-2
Streaming................................................... 6-4
Swap Calls ............................................... 4-19
System Graphics ..................................... 16-3
System Sounds......................................... 16-6
T
Table of Contents ......................................... iii
17-36
Tasks..........................................................11-6
Deleting Tasks ........................................11-7
Editing tasks .........................................11-45
Opening Tasks .......................................11-7
Text (editing) ............................................3-10
Text Entry.....................................................3-6
Disney Pictograms & Symbols ...............3-8
Emoticons ................................................3-9
Hiragana ..................................................3-7
Hiragana to Katakana/Alphanumeric
Conversion...............................................3-9
Input/Conversion ..................................3-20
Inserting line breaks ..............................3-20
Inserting Phone Book entry items ........3-20
Inserting spaces ....................................3-20
Katakana .................................................3-8
Mail & Web Extensions ...........................3-9
One-Hiragana Conversion ....................3-8
Personal Mode ........................................3-7
Quick Conversion ...................................3-9
Reset Log ...............................................3-20
Search Word............................................3-8
Single Kanji Conversion ..........................3-7
Switching Entry Modes ...........................3-6
Undo conversion or recover deleted
characters .............................................3-20
Using Character Codes .......................3-20
Using Pager Code ................................3-20
When Target Word is Not Listed ............3-7
Time Correction........................................16-2
Time Shift ...................................................7-11
Touch-Tone Signal List .............................4-21
Troubleshooting........................................17-6
TV (watching) .............................................7-4
AV Mode ......................................7-12, 7-13
Channels (saving).................................7-12
Data Broadcast (Japanese) .................7-5
Help ........................................................7-12
Program Info............................................7-7
TV Listing (Japanese)..............................7-7
Using wireless Headphones ................. 7-13
TV Player .....................................................7-9
TV programs (recording/playing).... 7-8, 7-9
Details .................................................... 7-16
Marker List.............................................. 7-17
Markers .................................................. 7-17
Memory Remaining.............................. 7-16
Playback Pattern .................................. 7-16
Playing split files .................................... 7-16
Recorded programs (deleting)........... 7-16
Recorded programs (renaming) ........ 7-16
Set Call Time Shift.................................. 7-15
Split File .................................................. 7-16
TV Timers (watching/recording).............7-10
Setting Timer via Program Info .............. 7-7
Timer entries (opening/editing/deleting)
................................................................ 7-17
Timer log records (opening/playing/
deleting) ................................................ 7-17
TV Alarm................................................. 7-18
TV Reserve Prior..................................... 7-18
Wakeup TV .......................................... 11-10
U
USB Charge ................................................1-5
User Dictionary......................................... 3-11
Deleting entries ..................................... 3-21
USIM Card................................................. 17-2
USIM PIN (> PIN) ..................................... 17-2
Utility Software........................................15-12
V
VeilView.................................................... 2-14
Vibration .....................................................3-5
Video (deleting) ........................................9-9
Video (downloading)................................9-3
Video (playing).................................. 9-5, 9-7
Video (recording).................................... 8-16
Display Size ............................................ 8-27
Microphone........................................... 8-27
Index
Record Time/Size .................................. 8-27
Shake Reducing ................................... 8-27
Video Calling .............................................4-5
Remote Monitor.................................... 4-14
Video Calls (answering)............................4-5
Video Calls (placing) ................................4-5
Voice Calling .............................................4-3
Voice Calls (answering)............................4-3
Voice Calls (placing) ................................4-3
Voice Calls (placing while abroad) ........4-4
Voice Recorder......................................11-36
Record Time ........................................ 11-54
Save and Send ................................... 11-54
Save Recording to.............................. 11-54
Voicemail ....................................... 4-12, 4-13
Volume (ringtones)..................................16-5
W
Objectives
Accessing Secret Files/Entries
Data Folder ........................................... 14-4
Disney Web ............................................. 6-3
Messaging folders................................. 5-16
Phone Book ........................................... 3-18
Schedules/tasks .................................... 11-4
Accessing the Internet
From message text ............................... 5-28
From scan results......................11-55, 11-57
Font Weight............................................. 3-2
Handset Code...................................... 2-13
Handset mail address ............................ 5-3
Key Shortcut............................................ 2-5
Network Password................................ 4-20
PIN .......................................................... 13-7
Changing Ringtones
Phone Book........................................... 3-18
Ringtone/videos ..................................... 3-5
Via Data Folder .................................... 14-8
Composing/Sending Messages
Disney Mail Maker .................................. 5-8
E Mail ....................................................... 5-4
Feeling Mail............................................. 5-5
From Call Log records.......................... 4-17
From Internet pages ............................ 6-11
From message text............................... 5-28
From Phone Book ................................. 3-23
From received messages .................... 5-13
From scan results ..................... 11-55, 11-57
From Scratch Pad ................................ 3-16
From sent messages............................. 5-33
Graphic Mail .................................. 5-6, 5-25
PC Mail .................................................. 5-22
SMS......................................................... 5-10
Copying
Calculation results.............................. 11-49
Data Folder files.................................... 14-4
From text entry window....................... 3-10
Scan results .............................. 11-56, 11-58
Text (e-Books) ..................................... 12-15
Text (Internet pages) ........................... 6-11
Text (Messaging) .................................. 5-28
Text (S! Information Channel pages) ... 12-15
Downloading
Content ................................................. 12-5
Customized Screen................................ 3-4
e-Books .................................................. 12-6
Free content ......................................... 12-5
Music........................................................ 9-3
Appendix
Wakeup TV .............................................11-10
Wallpaper ...................................................3-3
Slide W paper.......................................... 3-3
Warranty .................................................17-40
Weather Indicator....................................12-4
Icon Update ........................................ 12-15
Manual Update .................................... 12-4
Weather............................................... 12-15
Weather Indicator List............................17-17
Widgets .....................................................10-3
World Clock............................................11-26
Media Player........................................... 9-3
PC Site Browser ....................................... 6-5
RSS Feeds................................................. 6-9
Browsing/Viewing
Blog Tool .............................................. 12-13
Disney Web ............................................. 6-3
Document Viewer .............................. 11-34
e-Books .................................................. 12-6
PC Site Browser ....................................... 6-5
S! Information Channel........................ 12-4
S! Quick News ....................................... 12-3
Calculating
Calculator ........................................... 11-17
Expenses Memo ................................. 11-18
Household Accounts ......................... 11-13
Canceling
Alarm ..................................................... 11-9
Answer Phone......................................... 4-4
Call Barring restrictions......................... 4-20
Call Forwarding .................................... 4-13
Customized Screen .............................. 3-20
Download Dictionary........................... 3-11
Function Lock........................................ 13-2
Hour Minder ........................................ 11-27
IC Card Lock....................................... 11-20
Keypad Lock......................................... 2-14
Large Font Menu .................................... 3-2
Manner mode....................................... 2-12
Offline Mode......................................... 2-12
PIN Lock ................................................. 17-2
S! Information Channel........................ 12-4
Secret folders ............................... 5-31, 14-4
Simple Menu ........................................... 2-4
Speed Dial entries .................................. 4-7
VeilView................................................. 2-14
Voicemail .............................................. 4-13
Wakeup TV .......................................... 11-11
Changing
Administrator Code.............................. 2-13
Font Size................................................... 3-2
17
17-37
Index
Appendix
17
17-38
S! Applications.......................................10-6
Video ........................................................9-3
Widgets ..................................................10-3
Exchanging Files
Bluetooth® ..............................................15-8
Exchange Profile ...................................15-5
IC Transmission.......................................15-6
Infrared...................................................15-2
Mass Storage .......................................15-12
MTP Mode ................................................9-3
Hiding Files/Entries
Data Folder............................................14-4
Messaging folders .................................5-16
Phone Book ...........................................3-18
Schedules/tasks....................... 11-42, 11-45
Inserting/Removing
Battery ....................................................17-4
Memory Card ........................................14-5
USIM Card ..............................................17-3
Locking/Restricting
Application Lock...................................13-3
Call Log ..................................................13-3
Function Control ...................................13-6
Function Lock ........................................13-2
Incoming/outgoing calls......................4-20
Keypad Lock .........................................2-14
Mail records ...........................................13-3
Osaifu-Keitai® .......................................11-20
PIN Entry .................................................13-2
Secure Remote Lock ............................13-2
Managing Schedules
Calendar................................................11-2
Tasks........................................................11-6
Measuring Time
Countdown Timer ...............................11-25
Stopwatch ...........................................11-24
Notifying Phone Number
Opening My Details ..............................2-14
Via Exchange Profile ............................15-5
Via IC Transmission ..............................15-18
Via Infrared..........................................15-18
Placing Calls
By entering phone numbers ..................4-3
From Call Log records ..........................4-17
From Internet pages .............................6-11
From message text ...............................5-28
From Phone Book..................................3-19
From scan results......................11-55, 11-57
International calls ...................................4-3
Speed Dial ...............................................4-7
Video Calls ..............................................4-5
While abroad ..........................................4-4
Playing
Answer Phone messages/caller voice....4-4
Files (Scan Barcode)...........................11-55
Music ........................................................9-4
Recorded TV programs..........................7-9
Recorded TV programs from Timer log....7-17
Split files (TV) ..........................................7-16
Streams ..................................................6-13
Video........................................................9-5
Video (transferred from Blu-ray Disc
recorders) ................................................9-5
Voice files.............................................11-36
Voicemail messages ............................4-13
Rejecting
Calls from public phones .....................4-11
Calls from specified numbers ..............4-11
Calls from unsaved numbers...............4-11
Undisplayable Caller ID........................4-11
Withheld Caller ID .................................4-11
Resetting/Formatting
All settings ..............................................16-8
Handset..................................................16-8
Memory Card........................................14-6
Saving
Attachments within Graphic Mail.......5-28
Backup.................................................15-14
Captured still images ..... 8-5, 8-8, 8-9, 8-10
Draft messages .....................................5-24
Edited still images ................................. 8-19
Files (Internet) ........................................ 6-11
Files (S! Information Channel pages).... 12-15
Graphic Mail templates......................... 5-6
Mail attachments ................................. 5-27
My Pictograms ...................................... 5-29
Notepad entries.................................. 11-35
Phone Book entries............................... 3-17
Recorded video ................................... 8-16
TV channels ........................................... 7-12
Saving Phone Book Entries
Add New Entry ...................................... 3-17
Data Folder files .................................... 14-8
During a call .......................................... 4-16
From Call Log records .......................... 4-17
From message window........................ 5-28
From scan results......................11-55, 11-57
Scanning
Business cards ..................................... 11-39
Kanji...................................................... 11-41
QR Codes ............................................ 11-37
Receipts ............................................... 11-14
Text ....................................................... 11-40
Searching
Bluetooth® devices............................... 15-9
Messages......................................3-15, 5-16
Music to download ................................ 9-3
Music to play........................................... 9-4
Notepad entries.................................. 11-53
Phone Book ........................................... 3-19
Text (Internet pages)............................ 6-11
TV program information....................... 7-12
Video to download................................ 9-3
Video to play .......................................... 9-5
Web Search .......................................... 3-15
Sending via Mail
Data Folder files .............................5-5, 14-3
Notepad entries.................................. 11-53
QR Codes ............................................ 11-38
Scan results...............................11-56, 11-57
Index
Appendix
Still images ........................................8-5, 8-9
URLs ...............................................6-11, 6-14
Voice files ............................................ 11-54
Setting Wallpaper
From attached files .............................. 5-27
From scan results................................. 11-55
From Sound/Display menu .................... 3-3
Via Data Folder..................................... 14-8
Showing in Standby
Clock/Calendar ................................... 16-4
Mobile Widgets ..................................... 10-4
S! Applications ...................................... 10-6
Standby Shortcuts................................... 2-7
Wallpaper................................................ 3-3
World Clock......................................... 11-26
Using as Alarm Clock
Alarm...................................................... 11-8
Hour Minder......................................... 11-27
Wakeup TV .......................................... 11-10
Using Away from Home
Alarm...................................................... 11-8
Camera ................................................... 8-2
Compass.............................................. 11-30
Digital TV .................................................. 7-2
Hour Minder......................................... 11-27
Osaifu-Keitai® ...................................... 11-19
Pedometer .......................................... 11-28
Pen Light ................................................ 2-14
Scratch Pad .......................................... 3-16
Search.................................................... 3-15
S! GPS Navi .......................................... 11-31
Voice Recorder .................................. 11-36
Using Disney-featured Functions
Customized Screen ................................ 3-4
Disney font......................................3-2, 3-20
Disney Mail Maker .................................. 5-8
Graphic Mail templates......................... 5-9
Ringtone/videos ..................................... 3-5
Wallpaper................................................ 3-3
17
17-39
Warranty & Service
Warranty & Service
[ Warranty
Warranty is provided when you purchase handset.
. Check the name of distributor and date of purchase.
. Read contents and keep in a safe place.
. The warranty term is described in the warranty.
[ After-Sales Services
See P.17-6 "Troubleshooting" before contacting Disney
Mobile for service or repairs.
If you cannot find solutions or solve problems, contact
Customer Assistance (P.17-41) and provide a detailed
description of the problem.
. Repairs within warranty are performed under terms and
conditions described.
. Out of warranty, possible repairs are performed upon request
at subscriber expense.
Appendix
17
17-40
For other services, contact the distributor, the nearest
SoftBank Shop or General Information (P.17-41).
Replacement parts are available for 6 years after
termination of production.
. Disney Mobile is not liable for any damages resulting from
use of this product.
. Disney Mobile is not liable for any damages resulting from
accidental loss/alteration of handset data. Keep a copy of
Phone Book entries, etc. in a separate place.
. Disassembling or modifying handset may violate the Radio
Law. Modified handset will not be repaired.
Customer Service
Customer Service
For Disney Mobile handset or service information, call General Information. For repairs, call Customer Assistance.
General Information
Customer Assistance
Disney Mobile Customer Center
SoftBank Mobile Customer Center
From a Disney Mobile handset, dial toll free at 157
From a Disney Mobile handset, dial toll free at 113
From landlines, dial toll free at 0800-2222-157
From landlines, dial toll free at 0088-250-113
SoftBank Mobile Global Call Center
From outside Japan, dial +81-3-5351-3491
(International charges apply.)
Appendix
17
17-41
Disney Mobile DM005SH User Guide
April 2010, First Edition
The Walt Disney Company (Japan) Ltd.
For additional information, please contact the distributor.
Model: Disney Mobile DM005SH
Manufacturer: SHARP CORPORATION
Please help the mobile industry maintain high environmental standards. Recycle your old
handsets, batteries and charger units (all manufacturers and brands). Before you recycle,
please remember these important points:
. Handsets, batteries and chargers submitted for recycling cannot be returned.
. Always erase all data recorded on old handsets (Phone Book entries, call records, mail, etc.)
before recycling.
Mind your mobile manners when carrying a handset.