1
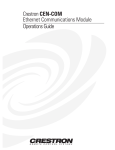
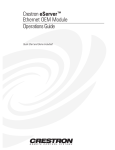
Crestron e-control™ Software Development Kit & CNX Gateway Contents Crestron e-control™: Software Development Kit & CNX Gateway 1 Introduction ............................................................................................................................... 1 What is Crestron e-control Software Development Kit? ............................................. 1 How do I Choose Whether to Use HTML/Java or ActiveX Components? ................. 2 What Other System Requirements are There?............................................................. 2 Installing the Software ............................................................................................................... 4 CNX Gateway Requirements ...................................................................................... 4 Installing From the CD-ROM...................................................................................... 4 Installing the SDK (Downloaded From the Website).................................................. 4 Installing SIMPL Windows......................................................................................... 4 Running the Demos ..................................................................................................... 5 Licensing the CNX Gateway ..................................................................................................... 5 Calculating the Number of Connections...................................................................... 5 Transferring an Existing License To Another Computer ............................................ 6 Setup .......................................................................................................................................... 7 Hardware Setup of CNMSX........................................................................................ 7 Hardware Setup of CEN Series Devices ..................................................................... 8 Leading Specifications ................................................................................................ 8 Configure the CNX Gateway ...................................................................................... 9 Configure the Web Server ........................................................................................... 9 Build the Application with ActiveCNX or Java .......................................................... 9 Write the SIMPL Windows Program .......................................................................... 9 Running ................................................................................................................................... 12 Start the CNX Gateway ............................................................................................. 12 Getting Status Information from the CNX Gateway ................................................. 12 Start the Visual Basic Program or Web Page ............................................................ 12 Shutting Down the CNX Gateway........................................................................................... 12 Troubleshooting....................................................................................................................... 13 Use of Ping or Telnet to Verify Communication....................................................... 14 Use of Viewport ........................................................................................................ 14 Appendix A: Contents of the Crestron e-control SDK CD...................................................... 15 Gateway Folder: ........................................................................................................ 15 SDK Folder: .............................................................................................................. 15 New_Dll Folder:........................................................................................................ 15 Appendix B: Recommended Reading...................................................................................... 15 Glossary of Terms.................................................................................................................... 16 Software License Agreement................................................................................................... 18 Operations Guide - DOC. 5778A Contents • i Crestron e-control™ Software Development Kit & CNX Gateway Crestron e-control™: Software Development Kit & CNX Gateway Introduction Crestron e-control consists of two separate products – the Software Development Kit (SDK) and the CNX Gateway. The SDK is a free download containing tools for developing demo webpages or Visual Basic programs that have the potential to communicate with Crestron CNX equipment. The CNX Gateway must be purchased and licensed from Crestron. It is a software package that performs the actual communication between the code developed by the SDK and the CNX equipment. Demos created with the SDK will not be fully functional without the CNX Gateway to “bridge” the communication gap. For convenience, the CNX Gateway software package includes all the SDK tools. What is Crestron e-control Software Development Kit? The Crestron e-control SDK is a complete software development kit, rather than a standalone product. It contains software components, examples, and directions for writing your own custom user interface to Crestron’s control systems and equipment. The examples ARE finished products that actually work, but are probably too simple for typical applications. The Crestron e-control SDK encompasses two different technologies. You can choose the one which best suits your application and your development capabilities. The Crestron e-control SDK has both Web pages that contain compiled Java classes that are usable from most browsers and an ActiveX control (dubbed “ActiveCNX™”) that is usable from Visual Basic, Internet Explorer, or any other ActiveX compatible development environment such as Visual C++. Operations Guide - DOC. 5778A Crestron e-control™: Software Development Kit & CNX Gateway • 1 Software Development Kit & CNX Gateway Crestron e-control™ How do I Choose Whether to Use HTML/Java or ActiveX Components? Use the HTML/Java/Web page method if you need platform independence (i.e., you must run from Macintoshes as well as PCs) and you have the ability to write HTML. At this time, Crestron does not provide any method for developing Web pages. We suggest using a third-party Web page development tool such as Microsoft FrontPage ’98 or Adobe Page Mill to produce great looking Web pages without having to code in HTML directly. The compiled Java classes that Crestron ships with the SDK are used within the Web page to communicate with Crestron equipment. The Web page method also means that no special software is needed to access the Crestron equipment; the act of viewing the Web page is all that is required. The latest version of VisionTools™ Pro (VT Pro-e) is able to produce HTMLencoded Web pages, just as previous versions of VisionTools produces touchpanel displays. Use the ActiveCNX method if you want to program in Visual Basic to provide a completely custom look to your interface, or you need a background non-visual interface to Crestron control systems. What Other System Requirements are There? Refer to the diagram on the next page for a graphical representation of the required system components. 1. The Crestron e-control SDK requires that there be a Windows 95/98 or NT PC accessible on your network to run the “CNX Gateway”. The Gateway is an application that routes packets from the SDK Java components or ActiveX controls to Crestron’s control systems or Ethernet-enabled (CEN series) devices. 2. If you are running the CNX Gateway and the browser on different PCs, OR if you are using Internet Explorer as your browser, you must also run a Web Server on the network, perhaps Microsoft’s own Personal Web Server that is distributed free with Windows 95/98 or downloaded from their Web site. The “CNX Gateway” and Web Server must be running on the same machine to remotely access and control the system from any LAN location. 3. The PC with CNX Gateway and all Crestron equipment must be connected to the TCP/IP network and given static IP addresses. 4. SIMPL Windows, Crestron’s graphical programming environment, must be used to program any control system that accepts commands from a virtual Touchpanel, just as it is used to program the control system to respond to wired or wireless touchpanels. A sample SIMPL Windows program has been included in this SDK. Crestron’s Ethernetenabled devices (CEN series) can be controlled directly without any special programming, if there is no control system, or if multiple points of control are required. Of course, they can also be controlled through a SIMPL Windows program running on the control system. 2 • Crestron e-control™: Software Development Kit & CNX Gateway Operations Guide - DOC. 5778A Crestron e-control™ Software Development Kit & CNX Gateway e-control™ System Architecture Web Browser VC++ VB IE Clients ActiveCNX Control CNX Gateway/ Web Server Server Crestron Network Any Crestron Controllable Device Operations Guide - DOC. 5778A Crestron e-control™: Software Development Kit & CNX Gateway • 3 Software Development Kit & CNX Gateway Crestron e-control™ Installing the Software Depending upon where you received your e-control software, installation procedures may vary. Currently, there are two ways to get a copy of the e-control SDK software. 1. Purchase the CNX Gateway from Crestron (you receive a CD-ROM). 2. Download the e-control Software Development Kit (SDK) from the Crestron website. If you have purchased the CNX Gateway from Crestron, then you should have received a CD-ROM which contains both the CNX Gateway and the SDK software necessary for doing custom programming. Using the SDK alone, you will be able to develop solutions, but you will not be able to test them by connecting to a Crestron control system. Contact Crestron for more information about licensing the CNX Gateway. CNX Gateway Requirements The minimum system requirements for the CNX Gateway are as follows. • Pentium 200 • 32Mb RAM (for Windows 95) 64 Mb Ram (for Windows 98/NT) Installing From the CD-ROM To prevent installation problems, you should exit all programs prior to running the install application. Insert the CD into your drive. From the Start menu, select Run, then click on Browse. Locate the CD-ROM drive, select “setup.exe" and hit OK. Hit OK again to run it. Follow the instructions on the screen to install the software. By default, this will install both the CNX Gateway and the e-control SDK on the computer. If you want to install only one of these packages, you can simply uncheck the check-box next to the component you do not want to install. Installing the SDK (Downloaded From the Website) If you download the e-control SDK from the Crestron website, you should have a single executable file. Simply run this file by double-click on its icon. Follow the onscreen instructions to complete the installation. Realize that this installation does not include the CNX Gateway. Installing SIMPL Windows If you will be programming Crestron control system processors (as opposed to controlling CEN series devices), you will need to install SIMPL Windows version 1.30.01 or later (with SIMPL Windows Library Update file, v62 or higher) and the Crestron database. They are available on the Crestron ControlCD (v6.1 or higher), that is available free for authorized Crestron dealers, or from our FTP site. The SIMPL Windows release notes detail how to enable Ethernet access to the CNMSX and how to program SIMPL Windows to respond to the SDK. 4 • Crestron e-control™: Software Development Kit & CNX Gateway Operations Guide - DOC. 5778A Crestron e-control™ Software Development Kit & CNX Gateway Running the Demos NOTE: Change the communication component in the HTML code of the demo. Make sure the IP address is the IP address of the control system. Also, the control system programming needs to have the IP address of the CNX Gateway. To run either of the CNMSX demo programs that are shipped with this SDK, use the Viewport to load “Net Demo.bin". This file has been written for a CNMSX-PRO. If you are using a unit without a front panel (eg., CNMSX-AV), then you should open the file “Net Demo.smw" in SIMPL Windows and change the control system type to the appropriate model. The program can then be recompiled and uploaded to the actual unit. Start the CNX Gateway running. The CNX Gateway IP Address of the computer is displayed in a dialog box. From the Viewport in SIMPL Windows, assign the same Gateway IP Address to IP ID 03. Click “Functions”, then “Setup IP Table…”. Click “Add”. Set the IP ID to 03 and type in the IP Address. Click “Send IP Table to control system”. In each demo verify that the IP address is set to the IP address of your particular control system and verify the IP ID is also set to 03. Now the Visual Basic CNMSX or HTML demo can be executed. Licensing the CNX Gateway Unlike most Crestron software, the CNX Gateway is a licensed product, which means that you may not freely distribute copies. Each individual copy must be paid for and licensed. All licenses for the CNX Gateway must be purchased from Crestron. Each Gateway license is designed to work only on a single machine. Because of this, you must provide Crestron with the “Site Code” for the computer you plan to run the Gateway on. Crestron can then issue the appropriate “Site Key” to enable your software. Install the Gateway if you have not already done so, and run it. If it has not yet been licensed, a licensing window will open automatically. Contact Crestron Customer Support with the “Site Code” given in the this dialog and the number of connections you wish to purchase (connections are discussed in more detail below). You may also cut and paste the site code into an email message if you prefer. Address the email to [email protected]. Crestron Customer Support will issue a “Site Key” which must be typed or pasted into the Site Key field. Once entered, click on the Update License button. If you do not want to wait for the site key to be issued, exit the program. It can be restarted at any time. The same site key will always be valid on the same PC. The site key will not work on a different PC. Calculating the Number of Connections The number of connections needed is determined by the overall system configuration. The number of connections equals the number of computer users (those using e-control SDK’s Java components or ActiveX components), the number of CNMSX control systems being accessed, and the number of CEN series components being accessed directly (not through a CNMSX). Connections over and above the licensed number will be refused. Licenses can be upgraded to support Operations Guide - DOC. 5778A Crestron e-control™: Software Development Kit & CNX Gateway • 5 Software Development Kit & CNX Gateway Crestron e-control™ additional connections by calling Crestron Customer Support and getting a new site key. Transferring an Existing License To Another Computer As mentioned above, a license is only valid on the computer for which it was obtained. However, a license can be transferred from one computer to another. There are several reasons to transfer a license. The application developer may set up the system off-site, then transfer the license to the actual computer on-site when ready. Alternatively, if the hardware or operating system on the computer where the CNX Gateway is licensed is upgraded, the license ceases to be valid. However, transferring the license to another computer before the upgrade and then back to the original machine after the upgrade avoids any possible problems. On both the source computer (where the license is currently valid) and the destination computer (where the license will be transferred), make sure the CNX Gateway is installed and running. If the Gateway “Update/Transfer License” window is not displayed, right-click the CNX Gateway icon in the system tray and choose Properties. Click on the About tab and select the Update License button to bring up the “Upgrade/Transfer License” window. Make sure this window is active on both computers. On the destination computer, create a preparation file on a diskette in the A: drive by inserting a blank diskette and selecting Prepare Diskette. This will create a file on this diskette which indicates who will be receiving the license. Alternately, this file can be created on another portable media (e.g. Zip disc) or a network drive by simply using the “Windows Open” dialog to browse for a new file location. When transferring via a network drive both computers need read/write access to the drive being used. After the last step has completed, remove the diskette from the drive and insert it into the source computer’s floppy drive, and click on the Transfer License. The source computer will read the preparation file to see which computer wants the license. It encodes the license with the destination and writes it back to the same file on the floppy diskette (or network drive). The source computer has now passed the license to the file. Only the designated computer can use the license, so the CNX Gateway is no longer licensed on the source computer. NOTE: At this point in the transfer procedure your CNX Gateway license resides on a file on the diskette or network drive, and not on the computer. If this file should become lost or damaged, your license will be lost as well. Because of this, please use the utmost care while performing this transfer. Bring the diskette back to the destination computer. Click on the Transfer License button. The computer reads the license information off the diskette and transfers the license to itself. The CNX Gateway should now be licensed on this machine. 6 • Crestron e-control™: Software Development Kit & CNX Gateway Operations Guide - DOC. 5778A Crestron e-control™ Software Development Kit & CNX Gateway Setup Hardware Setup of CNMSX Follow these steps to enable Ethernet communications in your CNX control system: Operations Guide - DOC. 5778A 1. Install the CNXENET Direct Processor Access (DPA) card into the CNMSX. Refer to the CNXENET manual (latest revision of Doc. 8129) for instructions. 2. Connect your PC to the CNMSX computer port via a serial cable, as usual. Refer to the CNMSX manual (latest revision of Doc. 8118) for instructions. 3. Ensure you have installed SIMPL Windows version 1.21.03 or later. 4. Run SIMPL Windows. Verify that the control system has been loaded with proper versions of firmware. To check the versions currently installed, run the Viewport by selecting it from the Tools menu. Once in the Viewport, select File Transfer|Update Control System to bring up a dialog box containing the current versions of monitor, operating system, and TCP/IP stack. Verify the versions per the “Leading Specifications” on page 8. If you need to upgrade any of these files, you can retrieve a copy of the latest upgrade package from the Crestron website (ECONTROL Library). These files have an extension of .upz which contains all three system components in one compacted file. Once you have downloaded the appropriate file, browse for it in the “Upgrade Control System” dialog box. Select Send to upload the files to the control system. When upgrading the system in this manner, always send all three components to avoid incompatibilities. It may be necessary to upgrade to an intermediate version of the monitor first and then to the required version of the monitor, but the Viewport will notify you if this is necessary. After you have completed this step, you may disable the TCP/IP stack if you do not intend to use it now; set the control system’s IP address to 0.0.0.0 using the Viewport. This will provide more memory for your program, but of course will disable Ethernet communications. 5. Assign an IP address to the control system using the Viewport by selecting Functions|Set Control System IP Information. This will allow you to assign an IP address, a gateway address, and a subnet mask (see these terms defined later in this document for more information). These addresses should be obtained from your MIS department. The IP address must be unique. IP addresses have four fields separated by periods (e.g. 192.168.2.3). 6. Connect your control system to the Ethernet network. Your PC may communicate to the control system either via Ethernet (if it is equipped with a network card and has been properly set up with a unique IP address itself), or continue to operate via the serial connection. 7. Test the IP address of the control system by “pinging” it: From a networked PC bring up an MS-DOS prompt (Windows 95/98) or “Command Prompt” (Windows NT) and type “ping <ip _address>”, as shown after this step. The control system responds with several lines Crestron e-control™: Software Development Kit & CNX Gateway • 7 Software Development Kit & CNX Gateway Crestron e-control™ “Reply from address <ip-address>…”. If you are running on an “isolated network” (i.e., a network that contains only your PC and the CNMSX equipment and is not connected to the larger intranet) and do not get a response from the “ping” to the IP address of the CNMSX, go back to the previous steps to see if you can find an error. C:\WINDOWS>ping 132.149.2.2 Pinging 132.149.2.2 with 32 bytes of data: Reply Reply Reply Reply from from from from 132.149.2.2: 132.149.2.2: 132.149.2.2: 132.149.2.2: bytes=32 bytes=32 bytes=32 bytes=32 time=8ms time=5ms time=5ms time=5ms TTL=60 TTL=60 TTL=60 TTL=60 Hardware Setup of CEN Series Devices If you are working with the CEN-IO network interface device, follow these steps to enable CIP communications in your CEN-IO. This will allow the CEN-IO to communicate directly to a CNX control system, or directly to a browser or VB app using the Crestron e-control SDK. 1. Check the firmware version in each CEN-IO by following the steps described in the CEN-IO manual. If the version is v1.2 or later, you can skip the next two steps; your CEN-IO is already TCP/IP enabled. 2. Update the firmware as described in the CEN-IO manual (latest revision of Doc. 5718). Consult Crestron Technical support (1.888.CRESTRON [1.888.273.7876]) to obtain the proper firmware version. 3. Assign an IP address, subnet mask and gateway as described in the CEN-IO manual. Leading Specifications Specifications Table SPECIFICATIONS CNX Gateway SDK Web Server CNMSX-AV/PRO Upgrade File (upz) CNRACKX/-DP Upgrade File (upz) CEN-IO Firmware SIMPL™ Windows® Visual Basic Netscape Navigator Internet Explorer * DETAILS Version 2.08 or later Version 1.3.6 or later Refer to "Configure the Web Server" Version 5.09.02x or later* Version 5.09.02 or later* Version 1.2 or later Version 1.21.03 or later Version 5.0 or later Version 4.5 or later Version 5.0 or later CNX upgrade files are required for either CNMSX-AV/PRO or CNRACKX/-DP. Filenames for upgrade files have a UPZ extension and can be obtained from the Downloads page (OPSYS Library) of the Crestron website (www.crestron.com). New users are required to register in order to obtain access to the FTP site. 8 • Crestron e-control™: Software Development Kit & CNX Gateway Operations Guide - DOC. 5778A Crestron e-control™ Software Development Kit & CNX Gateway Configure the CNX Gateway The CNX Gateway is self-configuring and requires no manual adjustments. Upon starting, it acquires the IP address and name of the host PC (the computer on which it is running). If you want the CNX Gateway to begin running automatically when your PC starts, place it in the Windows StartUp menu. Click on Start, then Settings, then Taskbar. Choose tab “Start Menu Programs”, and then click on “Add”. Browse for the CNX Gateway. Its name is cmcipsvr.exe. Click on “next”. Choose the “Startup” folder. Click “Next”. Choose a name, e.g. “CNX Gateway”, and click “Finish”. Configure the Web Server A terrific feature of e-control is that any standard Web Server works. Crestron has tested the following Web Servers (among others). Win 95/98: Personal Web Server 4.0 To allow web browser control through the web or a private network, you must use a Web Server. If you don’t have one, Microsoft distributes one for free. Install from your PC by clicking on the Start button, then Settings, then Control Panel. Double click on Network, then Add, Service, and Microsoft. Select Personal Web Server, then Add. You might be prompted to put your Win95/98 CD in the drive. The Web Server will then be active whenever your PC is up and running. An icon is displayed in the system tray. To configure the web server, double click on the icon and set the home directory to the folder where your Web pages reside. Win NT Server (SP 3 or higher): Internet Information Server v4.0 (IIS) Configuration varies due to security concerns (i.e., administrator versus user, licensing, and when running). Win NT Workstation: Peer Web Services Peer Web Services is located on the NT CD at \i386\INEISRV as inetstd.exe. Various Environments: Xitami Web Server Xitami is a free download available from imatix (www.imatix.com). Build the Application with ActiveCNX or Java There are separate help files that describe how to build the application with each of the two technologies. They are installed in the same folder as the components that they describe. Please refer to them, and then return to this document (latest revision of Doc. 5778). Write the SIMPL Windows Program 1. Add Ethernet Capability to the Control System To add Ethernet capability to a SIMPL Windows program using a CNMSX-AV or CNMSX-PRO, select a CNXENET card from the “Plug-In DPA Modules” category and drop it on the DPA card slot. Operations Guide - DOC. 5778A Crestron e-control™: Software Development Kit & CNX Gateway • 9 Software Development Kit & CNX Gateway Crestron e-control™ Ethernet devices that are addressed by the control system may have their IP addresses set either in the SIMPL Windows program or through the Viewport with a PC. Just as each Cresnet device is assigned a Cresnet ID, e.g. 03 through FE, to be used when programming, an Ethernet device is assigned an IP ID which also may range from 03 through FE. Ultimately, each IP ID is converted into an actual IP address through an IP Table that exists inside the CNX control system. This will be discussed in more detail below. 2. Add Ethernet-Connected Devices to a SIMPL Windows Program To add Ethernet devices to your program, in the SIMPL Windows’ Configuration Manager, drag an Ethernet-connected device, e.g. a CEN-IO or a Virtual Touchpanel symbol, into the program. Drop it on the CNXENET card or the “Ethernet Units” arrow underneath the “Cresnet Units” arrow. (Pull the window divider down further if you don’t see it in the System View window.) Double click on the icon and assign an IP ID and a corresponding IP address in the tabbed configuration dialog titled “IP Net Address”. For example, drop a CEN-IO and assign it IP ID: 03 at IP address 192.168.2.7. In the SIMPL Windows Program Manager, connect signals to the “Virtual Touchpanel” symbol, exactly as you would to a regular wired Touchpanel symbol. 3. Change the IP Address of Ethernet Devices without Changing the Program When your SIMPL Windows program is compiled, the compiler makes an “IP Table” consisting of the IP IDs and the IP addresses that were entered in for the various Ethernet devices added to the program. During upload, you can choose whether to load this IP table or whether to use the IP table that already exists in the control system. You can modify the corresponding IP address for any IP ID without changing or reloading the program by changing the IP table in the control system directly. From the Viewport select Setup IP Table… from the Function menu. Now click on the button labeled Retrieve Current IP Table from Control System. This will extract the IP Table from the CNX system and list it in the dialog box. You are now able to modify or delete existing entries as well as add new ones. When you have made all the changes necessary, you can save the new table to disk and/or load it back into the control system. Once you have made these changes, be careful not to overwrite the IP table in the control system the next time you upload the program, unless the addresses in your program supercede those in the current IP table. 4. IP ID Behavior in the Crestron e-control SDK It is extremely important that the IP ID in the SIMPL Windows program MATCH the IP ID (sometimes called the Cres ID) encoded in the Crestron e-control SDK object by the developer of the Web page or Visual Basic program. Refer to the diagram on the next page. If more than one computer uses the same IP ID for a connection (e.g. each loads the same Web page), the CNX Gateway will duplicate all packets that are received from the CNMSX to each of the identical IP IDs. This is known as Touchpanel tracking in standard Crestron terms. The IP Address that is typed into the “Virtual Touchpanel” devices in the SIMPL Windows program is the IP Address of the CNX Gateway, not of the individual PCs (running a web browser or Active CNX application), since these individual computers may change, but the CNX Gateway remains fixed. 10 • Crestron e-control™: Software Development Kit & CNX Gateway Operations Guide - DOC. 5778A Crestron e-control™ Software Development Kit & CNX Gateway Typical e-control Configuration Virtual Touchpanel IP ID : 03 CNX Gateway IP Address: 1.2.3.4 Virtual Touchpanel IP ID : 05 CNX Gateway IP Address: 1.2.3.4 NOTE: The default IP address should be the CNX Gateway and Web Server IP address. SIMPL Windows Program CNMSX IP Address: 1.1.1.1 Network CNX Gateway and Web Server IP Address: 1.2.3.4 Connected as IP ID : 03 PC running Web Browser or ActiveCNX app. 1.2.3.4 Server IP: 1.1.1.1 CNMSX IP: Operations Guide - DOC. 5778A Connected as IP ID : 05 PC running Web Browser or ActiveCNX app. 1.2.3.4 Server IP: 1.1.1.1 CNMSX IP: Clients Crestron e-control™: Software Development Kit & CNX Gateway • 11 Software Development Kit & CNX Gateway Crestron e-control™ Running Start the CNX Gateway The CNX Gateway must be running whenever any Web page or Visual Basic program attempts to communicate with Crestron equipment. Refer to the discussion above if you want to place the CNX Gateway in your Startup menu. Only one CNX Gateway needs to run on any network, although it is possible to run one or multiple copies on some or all PCs. After the CNX Gateway starts, it displays a small swirl in the system tray (right side of the Taskbar). If you installed a CNX Gateway on your computer in the Setup stage above, it should already be running with an icon displayed in the system tray. Getting Status Information from the CNX Gateway Once the CNX Gateway is running, double click on its small swirl icon in the system tray to bring up its dialogs. Click on the “General” tab to find its IP Address and its name. Click on the “Connection Information” tab to see the IP addresses that are currently in use. The top box (“PC Connections”) contains any WebControl connections. The bottom box (“CIP Connections”) contains any CNMSX or CEN Series connections that are or have been addressed by the Crestron e-control SDK connections. When a PC connection is broken, the CIP connections it established are also broken. Start the Visual Basic Program or Web Page Visual Basic programs are installed on the individual user’s computer and are started in the usual way, by double clicking on icons. Web pages are brought up by starting the default browser and typing in the address of the Web page to view. Shutting Down the CNX Gateway The CNX Gateway should run until all client programs (browsers or Visual Basic programs) have finished. To stop the CNX Gateway, double click on the Crestron swirl icon in the system tray (right side of the task bar) to bring up the dialog for the CNX Gateway. Click on the tab marked “General”, then on the button marked “Close”. There are three choices: 1. “Shut down after all users log off” is the recommended choice. It will stop as soon as the last user disconnects. If you click on the “General” tab, there is a status line saying “Awaiting users to Exit”. If you change your mind and do not wish to stop the CNX Gateway, click on the “Close” button again, and select the first option which has changed to “Do not shut down after all users log off”. 2. “Disconnect all users” will not shut down the CNX Gateway, but terminates all users. Programs will need to exit and re-start or execute a “Reconnect” command if one is available in order to restore connections. 3. “Shut down immediately” disconnects all users immediately and stops the CNX Gateway. 12 • Crestron e-control™: Software Development Kit & CNX Gateway Operations Guide - DOC. 5778A Crestron e-control™ Software Development Kit & CNX Gateway Troubleshooting If a Crestron e-control web page is not communicating to a control system, refer to the following troubleshooting tips prior to calling Crestron for assistance. 1. Verify the CNX Gateway is running on the same PC as the Web Server. 2. Verify the contents of the IP table match the IP address of the CNX Gateway and the IP ID of the e-control page. 3. Verify the IP address in the HTML is a valid Crestron device (with valid IP table). 4. Verify the IP ID in the SIMPL Windows e-control touchpanel symbol matches the IP table entry and the contents of the HTML file. 5. If using Internet Explorer, check the “Address” field in the browser. Verify the address is a network address and not a local path. For communications to work, the page must come from a Web Server even if the Web Server is on the same machine as the browser (Netscape works off of the local file system). For example, to view the pages on the same machine as the Web Server, type in the IP address of that PC, then the path to the e-control pages. 6. Verify the Web Server’s home directory is pointing at the directory that contains the e-control HTML files. If after confirming these troubleshooting tips, the e-control page is still not communicating to the control system, a call to Crestron technical support (1-888-CRESTRON) may be necessary. However, before calling, be sure to have the following information available. The support representative needs some or all of this information to troubleshoot specific problems. 1. CNX Gateway Version. 2. SDK Version (obtained from the “Java console” when an e-control page is loaded). 3. VT Pro-e Version. 4. Web Server Version. 5. Operating System Version and Service Pack (where CNX Gateway is loaded). 6. Operating System Version and Service Pack (which the client (browser) is using). This is not always the same as the CNX Gateway machine. 7. Browser Version on the client machine. This is not always the same as the CNX Gateway. A Java virtual machine must be installed. 8. Any error dialogs that appear when the page is loaded. If no error dialogs appear, view the “Java console” for errors. 9. Verification that the IP address and the IP ID are in the HTML file. 10. Network configuration, including: – IP address of CNX Gateway and Crestron devices. – Sub net Mask. – Contents of IP table. 11. OPS, Monitor, and TCP/IP Stack Versions. Operations Guide - DOC. 5778A Crestron e-control™: Software Development Kit & CNX Gateway • 13 Software Development Kit & CNX Gateway Crestron e-control™ 12. System Configuration Details – Basic System Diagram. Use of Ping or Telnet to Verify Communication Ping <ip_addr> Tests communication between PC and CNMSX’s IP Address Telnet <ip_addr> 41794 Telnets into CNX Gateway and establishes a connection. The connections can be seen in the CNX Gateway dialog. Leaving Telnet breaks the connection. Use of Viewport SIMPL Windows contains a tool called Viewport that can communicate with a CNMSX and set its IP Address, as well as perform other maintenance chores and status checks that could be used for diagnostic purposes. To obtain more information about Viewport, access the help file (HELP | HELP TOPICS while running SIMPL Windows) and use the index to search on “viewport”. 14 • Crestron e-control™: Software Development Kit & CNX Gateway Operations Guide - DOC. 5778A Crestron e-control™ Software Development Kit & CNX Gateway Appendix A: Contents of the Crestron e-control SDK CD The ActiveX control is installed in the \windows\system directory and is registered when installed. The folder structure of the installed components of the Crestron e-control SDK is as follows: Gateway Folder: Contains CNX Gateway (if CNX Gateway product was ordered). SDK Folder: Contains a readme file. ActivCNX Subfolder: • Contains ActiveX components and examples. It has a help file describing the use of the ActiveX control. It also has two subfolders. One is CENIOExp, which contains a sample Visual Basic program using this control with a CEN-IO unit. The other is CNMSXExp, which contains a sample Visual Basic program using this control with a CNMSX control system. HTML Subfolder: • Contains sample Web page and its popup page, as well as a help file describing how to use the compiled Java classes. It has two subfolders. One is Java, which contains the compiled Java classes and their archive. The other is Media, which contains the graphics used on the sample Web pages. Simplwin Subfolder: • Contains a SIMPL Windows program and its compiled binary that can be used with the enclosed sample Visual Basic and HTML interfaces. New_Dll Folder: Contains the Microsoft system DLLs that are shipped with this product. If your DLLs are newer version than these are, they are not installed. This folder is for reference and backup purposes only. Appendix B: Recommended Reading Networking for Dummies (3rd Ed) by Doug Lowe IDG Books Worldwide; ISBN: 0764503464 TCP/IP for Dummies by Candace Leiden, Marshall Wilensky IDG Books Worldwide; ISBN: 0764500635 TCP/IP Addressing: Designing and Optimizing You IP Addressing Scheme by Buck Graham, Norman B. Graham Ap Professional; ISBN: 0122946308 Operations Guide - DOC. 5778A Crestron e-control™: Software Development Kit & CNX Gateway • 15 Software Development Kit & CNX Gateway Crestron e-control™ Glossary of Terms CNX Control System Any Crestron control processor in the CNX product line. Currently, these include the CNMSX-PRO and CNMSX-AV. CNX Gateway A Crestron software package that routes control messages between the Crestron econtrol SDK and the Crestron Ethernet device. Cresnet ID A unique identity code, ranging from 03 to FE (in hex), given to all devices that communicate using the Cresnet network protocol. Ethernet Hub Inexpensive four to 16 port devices that provide local network to destinations outside of the local network, or receives them from outside and propagates them onto the local network. Gateway A router that sends packets within the local network to destinations outside of the local network, or receives them from outside and propagates them onto the local network. IP ID A unique identity code, ranging from 03 to FE (in hex), given to all devices that communicate using the Cresnet over IP (CIP) network protocol. Each IP ID is associated with an IP address, determined by an IP Table which resides inside the CNX control system. IP Table A table which lists IP IDs and their corresponding IP addresses. This table is maintained inside each CNX control system, though it may be generated by a SIMPL Windows program, or edited manually using the Viewport utility. Network Address A pattern of bits in IP address format that is shared by all network devices on a given local network. For example, network address 192.168.2.0 describes the local network where all devices have an IP address of 192.168.2.x, where x is any value from 1 to 254. 16 • Crestron e-control™: Software Development Kit & CNX Gateway Operations Guide - DOC. 5778A Crestron e-control™ Software Development Kit & CNX Gateway Subnet Mask A pattern of bits in IP address format (e.g., 255.255.255.0) which, when bitwise "and"ed with your address, produces a network address. If an outgoing packet's network address has the same network address as the source of the packet, it is sent on the local network wire, to be received by a device on that local network. Otherwise, it is sent to the gateway address instead, to be routed to a device existing on another network. Operations Guide - DOC. 5778A Crestron e-control™: Software Development Kit & CNX Gateway • 17 Software Development Kit & CNX Gateway Crestron e-control™ Software License Agreement This License Agreement (“Agreement”) is a legal contract between you (either an individual or a single business entity) and Crestron Electronics, Inc. (“Crestron”) for software referenced in this guide, which includes computer software and, as applicable, associated media, printed materials, and “online” or electronic documentation (the “Software”). BY INSTALLING, COPYING, OR OTHERWISE USING THE SOFTWARE, YOU REPRESENT THAT YOU ARE AN AUTHORIZED DEALER OF CRESTRON PRODUCTS OR A CRESTRON AUTHORIZED INDEPENDENT PROGRAMMER AND YOU AGREE TO BE BOUND BY THE TERMS OF THIS AGREEMENT. IF YOU DO NOT AGREE TO THE TERMS OF THIS AGREEMENT, DO NOT INSTALL OR USE THE SOFTWARE. IF YOU HAVE PAID A FEE FOR THIS LICENSE AND DO NOT ACCEPT THE TERMS OF THIS AGREEMENT, CRESTRON WILL REFUND THE FEE TO YOU PROVIDED YOU (1) CLICK THE DO NOT ACCEPT BUTTON, (2) DO NOT INSTALL THE SOFTWARE AND (3) RETURN ALL SOFTWARE, MEDIA AND OTHER DOCUMENTATION AND MATERIALS PROVIDED WITH THE SOFTWARE TO CRESTRON AT: CRESTRON ELECTRONICS, INC., 15 VOLVO DRIVE, ROCKLEIGH, NEW JERSEY 07647, WITHIN 30 DAYS OF PAYMENT. LICENSE TERMS Crestron hereby grants You and You accept a nonexclusive, nontransferable license to use the Software (a) in machine readable object code together with the related explanatory written materials provided by Creston (b) on a central processing unit (“CPU”) owned or leased or otherwise controlled exclusively by You, and (c) only as authorized in this Agreement and the related explanatory files and written materials provided by Crestron. If this software requires payment for a license, you may make one backup copy of the Software, provided Your backup copy is not installed or used on any CPU. You may not transfer the rights of this Agreement to a backup copy unless the installed copy of the Software is destroyed or otherwise inoperable and You transfer all rights in the Software. You may not transfer the license granted pursuant to this Agreement or assign this Agreement without the express written consent of Crestron. If this software requires payment for a license, the total number of CPU’s on which all versions of the Software are installed may not exceed one per license fee (1) and no concurrent, server or network use of the Software (including any permitted back-up copies) is permitted, including but not limited to using the Software (a) either directly or through commands, data or instructions from or to another computer (b) for local, campus or wide area network, internet or web hosting services; or (c) pursuant to any rental, sharing or “service bureau” arrangement. The Software is designed as a software development and customization tool. As such Crestron cannot and does not guarantee any results of use of the Software or that the Software will operate error free and You acknowledge that any development that You perform using the Software or Host Application is done entirely at Your own risk. The Software is licensed and not sold. Crestron retains ownership of the Software and all copies of the Software and reserves all rights not expressly granted in writing. OTHER LIMITATIONS You must be an Authorized Dealer of Crestron products or a Crestron Authorized Independent Programmer to install or use the Software. If Your status as a Crestron Authorized Dealer or Crestron Authorized Independent Programmer is terminated, Your license is also terminated. You may not rent, lease, lend, sublicense, distribute or otherwise transfer or assign any interest in or to the Software. You may not reverse engineer, decompile, or disassemble the Software. You agree that the Software will not be shipped, transferred or exported into any country or used in any manner prohibited by the United States Export Administration Act or any other export laws, restrictions or regulations (“Export Laws”). By downloading or installing the Software You (a) are certifying that You are not a national of Cuba, Iran, Iraq, Libya, North Korea, Sudan, or Syria or any country to which the United States embargoes goods (b) are certifying that You are not otherwise prohibited from receiving the Software and (c) You agree to comply with the Export Laws. If any part of this Agreement is found void and unenforceable, it will not affect the validity of the balance of the Agreement, which shall remain valid and enforceable according to its terms. This Agreement may only be modified by a writing signed by an authorized officer of Crestron. Updates may be licensed to You by Crestron with additional or different terms. This is the entire agreement between Crestron and You relating to the Software and it supersedes any prior representations, discussions, undertakings, communications or advertising relating to the Software. The failure of either party to enforce any right or take any action in the event of a breach hereunder shall constitute a waiver unless expressly acknowledged and set forth in writing by the party alleged to have provided such waiver. 18 • Crestron e-control™: Software Development Kit & CNX Gateway Operations Guide - DOC. 5778A Crestron e-control™ Software Development Kit & CNX Gateway If You are a business or organization, You agree that upon request from Crestron or its authorized agent, You will within thirty (30) days fully document and certify that use of any and all Software at the time of the request is in conformity with Your valid licenses from Crestron of its authorized agent. Without prejudice to any other rights, Crestron may terminate this Agreement immediately upon notice if you fail to comply with the terms and conditions of this Agreement. In such event, you must destroy all copies of the Software and all of its component parts. PROPRIETARY RIGHTS Copyright. All title and copyrights in and to the Software (including, without limitation, any images, photographs, animations, video, audio, music, text, and “applets” incorporated into the Software), the accompanying media and printed materials, and any copies of the Software are owned by Crestron or its suppliers. The Software is protected by copyright laws and international treaty provisions. Therefore, you must treat the Software like any other copyrighted material, subject to the provisions of this Agreement. Submissions. Should you decide to transmit to Crestron’s website by any means or by any media any materials or other information (including, without limitation, ideas, concepts or techniques for new or improved services and products), whether as information, feedback, data, questions, comments, suggestions or the like, you agree such submissions are unrestricted and shall be deemed non-confidential and you automatically grant Crestron and its assigns a non-exclusive, royalty-tree, worldwide, perpetual, irrevocable license, with the right to sublicense, to use, copy, transmit, distribute, create derivative works of, display and perform the same. Trademarks. CRESTRON and the Swirl Logo are registered trademarks of Crestron Electronics, Inc. You shall not remove or conceal any trademark or proprietary notice of Crestron from the Software including any back-up copy. GOVERNING LAW This Agreement shall be governed by the laws of the State of New Jersey, without regard to conflicts of laws principles. Any disputes between the parties to the Agreement shall be brought in the state courts in Bergen County, New Jersey or the federal courts located in the District of New Jersey. The United Nations Convention on Contracts for the International Sale of Goods, shall not apply to this Agreement. CRESTRON LIMITED WARRANTY CRESTRON warrants that: (a) the Software will perform substantially in accordance with the published specifications for a period of ninety (90) days from the date of receipt, and (b) that any hardware accompanying the Software will be subject to its own limited warranty as stated in its accompanying written material. Crestron shall, at its option, repair or replace or refund the license fee for any Software found defective by Crestron if notified by you within the warranty period. The foregoing remedy shall be your exclusive remedy for any claim or loss arising from the Software. CRESTRON shall not be liable to honor warranty terms if the product has been used in any application other than that for which it was intended, or if it as been subjected to misuse, accidental damage, modification, or improper installation procedures. Furthermore, this warranty does not cover any product that has had the serial number or license code altered, defaced, improperly obtained, or removed. Notwithstanding any agreement to maintain or correct errors or defects Crestron, shall have no obligation to service or correct any error or defect that is not reproducible by Crestron or is deemed in Crestron’s reasonable discretion to have resulted from (1) accident; unusual stress; neglect; misuse; failure of electric power, operation of the Software with other media not meeting or not maintained in accordance with the manufacturer’s specifications; or causes other than ordinary use; (2) improper installation by anyone other than Crestron or its authorized agents of the Software that deviates from any operating procedures established by Crestron in the material and files provided to You by Crestron or its authorized agent; (3) use of the Software on unauthorized hardware; or (4) modification of, alteration of, or additions to the Software undertaken by persons other than Crestron or Crestron’s authorized agents. ANY LIABILITY OF CRESTRON FOR A DEFECTIVE COPY OF THE SOFTWARE WILL BE LIMITED EXCLUSIVELY TO REPAIR OR REPLACEMENT OF YOUR COPY OF THE SOFTWARE WITH ANOTHER COPY OR REFUND OF THE INITIAL LICENSE FEE CRESTRON RECEIVED FROM YOU FOR THE DEFECTIVE COPY OF THE PRODUCT. THIS WARRANTY SHALL BE THE SOLE AND EXCLUSIVE REMEDY TO YOU. IN NO EVENT SHALL CRESTRON BE LIABLE FOR INCIDENTAL, CONSEQUENTIAL, SPECIAL OR PUNITIVE DAMAGES OF ANY KIND (PROPERTY OR ECONOMIC DAMAGES INCLUSIVE), EVEN IF A CRESTRON REPRESENTATIVE HAS BEEN ADVISED OF THE POSSIBILITY OF SUCH DAMAGES OR OF ANY CLAIM BY ANY THIRD PARTY. CRESTRON MAKES NO WARRANTIES, EXPRESS OR IMPLIED, AS TO TITLE OR INFRINGEMENT OF THIRD-PARTY RIGHTS, MERCHANTABILITY OR FITNESS FOR ANY PARTICULAR PURPOSE, OR ANY OTHER WARRANTIES, NOR AUTHORIZES ANY OTHER PARTY TO OFFER ANY WARRANTIES, INCLUDING WARRANTIES OF MERCHANTABILITY FOR THIS PRODUCT. THIS WARRANTY STATEMENT SUPERSEDES ALL PREVIOUS WARRANTIES. Operations Guide - DOC. 5778A Crestron e-control™: Software Development Kit & CNX Gateway • 19