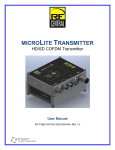
1
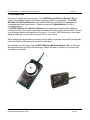
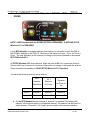
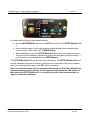
fSTOP Wireless V2-1 BarTech Receiver Manual 30-Dec-13 fSTOP Wireless V2-1 BarTech Receiver Manual READ ALL INSTRUCTIONS BEFORE OPERATING. Document Number: PLC850-0007 Document Version: 008 Copyright 2012 by PLC Electronic Solutions Ltd. 9-3871 North Fraser Way, Burnaby, BC V5J 5G6 www.plcelectronicsolutions.com 1-877-832-3476 PLC Electronic Solutions Ltd. www.plcelectronicsolutions.com Copyright © 2013 1 of 20 fSTOP Wireless V2-1 BarTech Receiver Manual 30-Dec-13 TABLE OF CONTENTS 1. Introduction ...................................................................................................................................................................... 3 2. Installation ........................................................................................................................................................................ 4 2.1. Necessary Hardware ....................................................................................................................................................... 4 2.2. Optional Hardware ......................................................................................................................................................... 4 2.3. fSTOP Wireless V2-1 BarTech Receiver ........................................................................................................................ 5 3. fSTOP Wireless V2-1 BarTech Receiver Setup ....................................................................................................... 6 3.1. Power ............................................................................................................................................................................... 6 3.2. Single fSTOP Wireless V2-1 Operation ......................................................................................................................... 6 3.3. Dual fSTOP Wireless V2-1 Operation (FOCUS + IRIS) or (FOCUS + ZOOM) ......................................................... 7 3.4. Setting Motor DIRECTION............................................................................................................................................ 8 3.5. Automatic Motor Calibration ......................................................................................................................................... 9 3.6. Manual Motor Calibration ........................................................................................................................................... 10 3.7. TORQUE Setup ............................................................................................................................................................. 11 3.8. Setting LIMITS ............................................................................................................................................................. 12 3.9. Resetting Calibration .................................................................................................................................................... 13 3.10. Resetting to Factory Defaults ................................................................................................................................... 13 3.11. Rx Light ..................................................................................................................................................................... 14 4. Connector Pinouts ........................................................................................................................................................ 15 4.1. Camera ON/OFF Connector ........................................................................................................................................ 15 4.2. Power (8V-30V) Connector .......................................................................................................................................... 15 4.3. Digital Motor Connector ............................................................................................................................................... 15 5. Specifications ................................................................................................................................................................ 16 6. Troubleshooting ............................................................................................................................................................ 17 6.1. Automatic Calibration .................................................................................................................................................. 17 6.2. Manual Calibration ...................................................................................................................................................... 17 6.3. Connectivity ................................................................................................................................................................... 17 6.4. Interference Issues ........................................................................................................................................................ 18 6.5. Iris Slider Calibration ................................................................................................................................................... 18 6.6. Iris Slider Maintenance ................................................................................................................................................ 19 7. Limited Warranty ........................................................................................................................................................... 20 8. Technical Support......................................................................................................................................................... 20 PLC Electronic Solutions Ltd. www.plcelectronicsolutions.com Copyright © 2013 2 of 20 fSTOP Wireless V2-1 BarTech Receiver Manual 30-Dec-13 1. Introduction Welcome to a giant leap in technology! The fSTOP Wireless BarTech Receiver V2-1 is currently the smallest, lightest and fastest response receiver on the market. The fSTOP Wireless V2-1 BarTech Receiver is compatible with the current BarTech Handsets and compatible with most digital motors. Please see section 5.Specifications for a list of compatible motors. The fSTOP Wireless V2-1 BarTech Receiver incorporates great features like voltage up conversion to the motor which means that no matter what input voltage from 8 volts to 30 volts you will always have a fast response on the motor. The unit is DSP controlled for even faster signal processing; it can be used to control Focus, Iris or Zoom. Other features are improved torque control and the ability to program limits which is especially useful for DSLR and Prosumer lenses with no end stops. We hope that you will enjoy using the fSTOP Wireless BarTech Receiver V2-1 as much as we enjoyed bringing you this new technology. Please feel free to contact us if you have any questions or comments. PLC Electronic Solutions Ltd. www.plcelectronicsolutions.com Copyright © 2013 3 of 20 fSTOP Wireless V2-1 BarTech Receiver Manual 30-Dec-13 2. Installation 2.1. Necessary Hardware fSTOP Wireless V2-1 BarTech Receiver fSTOP Power Cable Digital Motor Digital Motor Cable BarTech Focus Device (BFD) Handset Note: Camera output power or battery must be able to source up to 3.0 Amps. 2.2. Optional Hardware A PLC Electronic Solutions BarTech Iris Slider Upgrade for two channel control of focus and iris (PLC955-0028). The PLC Electronic Solutions BarTech Iris Slider Upgrade can be retrofitted to existing BFD Handsets with serial number T1.0450 and up. PLC Electronic Solutions Ltd. www.plcelectronicsolutions.com Copyright © 2013 4 of 20 fSTOP Wireless V2-1 BarTech Receiver Manual 30-Dec-13 2.3. fSTOP Wireless V2-1 BarTech Receiver a. Attach the Antenna (PLC477-0001) to the fSTOP Wireless V2-1 BarTech Receiver (PLC955-0029). b. Plug one end of the fSTOP Power Cable into the power output connector of a camera or battery and the other end into the 2pin Lemo connector on the fSTOP Wireless V2-1. c. Attach the motor to the gearing of the desired focus, iris or zoom gear on the lens. Plug one end of the 7pin motor cable into the digital motor and the other end into the 7 pin connector of the fSTOP Wireless V2-1. Do not power up the system at this time. **You must ensure that the Camera Power output connector is able to source 3.0 Amps if you wish to power the fSTOP Wireless V2-1 directly from the Camera otherwise motor performance will suffer.** PLC Electronic Solutions Ltd. www.plcelectronicsolutions.com Copyright © 2013 5 of 20 fSTOP Wireless V2-1 BarTech Receiver Manual 30-Dec-13 3. fSTOP Wireless V2-1 BarTech Receiver Setup 3.1. Power The fSTOP Wireless V2-1 can use anything between 8 – 30 volts and incorporates internal voltage up conversion, so no matter the input voltage you will always get a fast response on the motor. Your power source must be able to source up to 3.0 Amps otherwise motor performance will suffer. 3.2. Single fSTOP Wireless V2-1 Operation a. On the BFD Handset choose one channel from 0 to 7 by rotating the selector until the arrow points to the desired channel. The selector can be turned in either direction. b. Using the CHAN switch on the fSTOP Wireless V2-1 select the same channel you chose above by rotating center selector with a small tool until the arrow points to the desired channel. The selector can be turned in either direction. a. The focus wheel on the BFD Handset now controls the fSTOP Wireless V2-1. The Rx light on the fSTOP Wireless V2-1 will rapidly flash green to indicate received data. As a general rule, you can further reduce the potential for video transmitter interference by choosing the channel with the highest number. PLC Electronic Solutions Ltd. www.plcelectronicsolutions.com Copyright © 2013 6 of 20 fSTOP Wireless V2-1 BarTech Receiver Manual 30-Dec-13 3.3. Dual fSTOP Wireless V2-1 Operation (FOCUS + IRIS) or (FOCUS + ZOOM) NOTE: A BFD Handset with the SLIDER OPTION is REQUIRED. A SECOND fSTOP Wireless V2-1 is REQUIRED. If your BFD Handset is equipped with the slider option you can either control the IRIS or the ZOOM in addition to the FOCUS. The setup is the same for Focus + Iris or for Focus + Zoom. The only difference is the function you assign to the motor attached to the second fSTOP Wireless V2-1. All fSTOP Wireless V2-1’s are identical. When we refer as V2-1 for a particular function (Focus-Iris-Zoom) it refers to the function of the motor you assign to that particular receiver. Three channels are available for DUAL fSTOP Wireless V2-1 Operation. You have the following channel set-up options: BFD V2-1 Handset V2-1 Receiver Receiver Transmitter for Focus for Zoom or Iris option 1 channel 0 channel 0 channel A option 2 channel 3 channel 3 channel B option 3 channel 7 channel 7 channel C a. On the BFD Handset choose channel 0, channel 3 or channel 7 by rotating the selector until the arrow points to the desired channel. The selector can be turned in either direction. Channels 1,2,4,5 and 6 are not used in dual receiver operation. PLC Electronic Solutions Ltd. www.plcelectronicsolutions.com Copyright © 2013 7 of 20 fSTOP Wireless V2-1 BarTech Receiver Manual 30-Dec-13 b. Using the CHAN switch on the fSTOP Wireless V2-1 for FOCUS choose the same channel (0, 3 or 7) by rotating center selector with a small tool until the arrow points to the desired channel. The selector can be turned in either direction. c. Using the CHAN switch on the fSTOP Wireless V2-1 for IRIS or ZOOM choose the corresponding channel in accordance with the above table of channel options by rotating center selector with a small tool until the arrow points to the desired channel. Note: To AVOID INTERFERENCE when using two BFD Handsets simultaneously: USE the below channel combinations with a ✔ . BFD #1 Channel BFD #2 Channel 0 1 2 3 4 5 6 7 0 X X ✔ ✔ ✔ X ✔ ✔ 1 X X X ✔ ✔ ✔ ✔ ✔ 2 ✔ X X X ✔ ✔ X ✔ 3 ✔ ✔ X X X ✔ ✔ X 4 ✔ ✔ ✔ X X X ✔ ✔ 5 X ✔ ✔ ✔ X X X ✔ 6 ✔ ✔ X ✔ ✔ X X X 7 ✔ ✔ ✔ X ✔ ✔ X X 3.4. Setting Motor DIRECTION The DIRECTION Switch on the fSTOP Wireless V2-1 sets the direction of travel of the motor. Toggling the direction switch will recalculate the position and slowly move the motor to the new position. PLC Electronic Solutions Ltd. www.plcelectronicsolutions.com Copyright © 2013 8 of 20 fSTOP Wireless V2-1 BarTech Receiver Manual 30-Dec-13 3.5. Automatic Motor Calibration For lenses with end stops (most camera lenses). a. Set the AUTO/MANUAL switch up to AUTO on the front of the fSTOP Wireless V21. b. Insure that the torque is set to the minimum usable setting before connecting the motor to a lens. See section 3.7. TORQUE Setup. c. After installing the motor and fSTOP Wireless V2-1 power up the camera system. The motor will automatically calibrate by moving the lens gear to both end stops. It is now ready to communicate with your BFD Handset. *The fSTOP Wireless V2-1 has built-in positional memory. The fSTOP Wireless V2-1 will use the calibration stored in its memory until the motor is removed or the unit is powered down for more than 45 minutes, or the CAL button is pressed. Note: Do not let the motor spin for more than 60 seconds, as it will fail calibration as it assumes that no lens is present. If this happens simply press the CAL button on the front of the fSTOP Wireless V2-1 or unplug the motor cable and then plug it in again to restart the calibration. PLC Electronic Solutions Ltd. www.plcelectronicsolutions.com Copyright © 2013 9 of 20 fSTOP Wireless V2-1 BarTech Receiver Manual 30-Dec-13 3.6. Manual Motor Calibration For lenses with no or soft end stops (most SLR lenses). a. Set the AUTO/MANUAL switch down to MANUAL on the front of the fSTOP Wireless V2-1. b. After installing the motor and fSTOP Wireless V2-1 power up the camera system. The motor will allow a small movement to show that the unit is working. c. With the BFD Handset on and communicating with the fSTOP Wireless V2-1 (Rx light flashing green) center the knob. d. Press and release the CAL button, both the TORQUE and LIMITS lights will cycle at the same time through green, orange and red indicating that the fSTOP Wireless V2-1 is now ready to be manually calibrated. The first time the fSTOP Wireless V21 is put in manual calibration mode it will already indicate that it is ready to be manually calibrated. e. Press the CAL button until both the TORQUE and LIMITS lights alternate while changing colour. This indicates that the fSTOP Wireless V2-1 is looking for end stops and allows an increased range of motion. f. Move the BFD Handset knob so that the motor moves to first one then the other end stop. This will set the greatest range at which the motor will move. g. Press the CAL button again to save these settings into memory. The lights will stop flashing and the motor will move to the position indicated on the BFD Handset knob. You are now ready to go. Note: If you save settings into memory without moving the motor at all a span of 0 will be saved and the motor will not move. PLC Electronic Solutions Ltd. www.plcelectronicsolutions.com Copyright © 2013 10 of 20 fSTOP Wireless V2-1 BarTech Receiver Manual 30-Dec-13 3.7. TORQUE Setup The fSTOP Wireless V2-1 allows for the user to set the desired torque for the motor control. Generally the increased torque will allow for more accurate control on stiffer lenses, however there is a trade-off with increased noise generated by the motor. a. Make sure that the BFD Handset is communicating with the fSTOP Wireless V2-1. The Rx light on the fSTOP Wireless V2-1 will rapidly flash green to indicate received data. b. In order to adjust the Torque move the BFD Handset knob to the torque percentage you would like to set, i.e. fully clockwise is 100%, fully counter clockwise is 1%. This means that there are 100 potential settings for the user. (Assuming the direction switch on the BFD Handset is set to REV). c. Press and Hold in the TORQUE button on the fSTOP Wireless V2-1 and wait for the torque light to go OFF and then turn back ON after about 1 second. The torque is set and saved into memory. The torque light will change color to indicate the current torque setting: Green = 0-33% Orange = 34-66% Red = 67-100% The TORQUE light constantly on indicates that the motor is engaged. The TORQUE light pulsing indicates that the motor power has shut off to conserve power and can now be back driven with certain motors (Heden™). This will happen after being idle for about 5 seconds. The torque setting is retained in memory even if the power to the fSTOP Wireless V2-1 is removed. PLC Electronic Solutions Ltd. www.plcelectronicsolutions.com Copyright © 2013 11 of 20 fSTOP Wireless V2-1 BarTech Receiver Manual 30-Dec-13 3.8. Setting LIMITS The LIMITS button is used to limit the travel of the motor between 2 user defined positions. When the limits are set the position of the focus knob on the BFD Handset is recalculated to the corresponding position between the 2 limits set by the user, i.e. fully clockwise will move the motor to one limit and fully counterclockwise will move to the other limit. a. When the LIMITS light is off no limits are set. With the BFD Handset communicating with the fSTOP Wireless V2-1 and the motor calibrated, position the motor at the first limit you would like to set using the BFD Handset knob. b. Press in the LIMITS button until the LIMITS light starts blinking orange then release. This indicates that the fSTOP Wireless V2-1 has set the first limit and is waiting for the second limit to be set. c. Move the BFD Handset knob until the motor is at the second desired limit. d. Press in the LIMITS button until the LIMITS light is solid orange then release to save the limits into memory. Note: There is a minimum Limit setting. Clearing Limits Once the limits are set, indicated by a solid orange light, press the LIMITS button down until the light turns off. Note: The limits are stored in the fSTOP Wireless V2-1 memory and will remain in memory for up to 45 minutes after power is removed. PLC Electronic Solutions Ltd. www.plcelectronicsolutions.com Copyright © 2013 12 of 20 fSTOP Wireless V2-1 BarTech Receiver Manual 30-Dec-13 3.9. Resetting Calibration a. Press the CAL or calibrate button while the fSTOP Wireless V2-1 is powered will do a soft reset of the unit. b. When the button is depressed and released it will reset the unit. The motor will then start it’s calibrate function again immediately if in Automatic calibration mode or be ready for settings in Manual calibration mode. Limits will also be erased. 3.10. Resetting to Factory Defaults Resetting the fSTOP Wireless V2-1 to factory defaults will clear out all of the settings. a. Make sure that the fSTOP Wireless V2-1 is powered down and the AUTO/MANUAL switch is in the up/AUTO position. b. Power up the fSTOP Wireless V2-1 while holding in the CAL button until the lights cycle at the same time from red to orange to green then release the CAL button. The unit is now set to factory defaults. PLC Electronic Solutions Ltd. www.plcelectronicsolutions.com Copyright © 2013 13 of 20 fSTOP Wireless V2-1 BarTech Receiver Manual 30-Dec-13 3.11. Rx Light The Rx light is solid Red if the fSTOP Wireless V2-1 is not communicating with the BFD Handset. The Rx light is solid Green if there is data on that frequency but not for that device. I.e. the fSTOP Wireless V2-1 is controlling Iris but you have not moved the Iris slider in a while. The Rx light flashes Green if the fSTOP Wireless V2-1 is communicating with the BFD Handset. Please note that if the fSTOP Wireless V2-1 is setup for Focus, the light will flash all the time as it is communicating constantly with the BFD Handset. If the fSTOP Wireless V21 is setup for Iris or Zoom, the light will only flash when the Iris Slider or Zoom is moving. PLC Electronic Solutions Ltd. www.plcelectronicsolutions.com Copyright © 2013 14 of 20 fSTOP Wireless V2-1 BarTech Receiver Manual 30-Dec-13 4. Connector Pinouts 4.1. Camera ON/OFF Connector Lemo# ERD.0S.304.CLL 1 Transmit (Tx) – RS 232 Data In/Out and Factory re-programming 3 Receive (Rx) – RS 232 Data In/Out and Factory re-programming 2 Camera (ON/OFF) contact closure 4 Camera (ON/OFF) contact closure Plug for making cables Lemo# FFA.0S.304.CLAK52 4.2. Power (8V-30V) Connector Lemo# ECG.0B.302.CLL 1 Power (8V – 30V) 2 Ground Plug for making cables Lemo# FGG.0B.302.CLAD52 4.3. Digital Motor Connector Lemo# EGG.1B.307.CLL 1 Motor – 2 Motor + 3 Chan A Encoder 4 VCC +5V 5 Ground 6 Chan B Encoder 7 Motor Detect Plug for making cables Lemo# FGG.1B.307.CLAD52 PLC Electronic Solutions Ltd. www.plcelectronicsolutions.com Copyright © 2013 15 of 20 fSTOP Wireless V2-1 BarTech Receiver Manual 30-Dec-13 5. Specifications Dimensions (antenna removed): approx. 3.5"L x 2 1/8"W x 7/8"H (9.1cm L x 5.4cm W x 2.4cm H) Weight: 4 7/8 oz. (138 g) Input Voltage: 8 to 30 Volts Power Consumption: 0.075 A @ 12 volts, 0.055 A @ 24 volts Standby, not driving motor RF Reception: 8 channels 902-928 MHz Channel Frequency (MHz) 0 903.37 1 906.37 2 907.37 3 909.37 4 912.37 5 915.37 6 919.37 7 921.37 Resolution: 12-bits (4096 steps), all steps always used. Transmission Latency: 2.7 milliseconds Position Update Rate: 300 transmissions / second Antenna: ANT 916MHZ 1/4 WAVE WHIP Linx Technologies# ANT-916-CW-RH Digi-Key# ANT-916-CW-RH-ND (www.digikey.com) Motor Compatibility: Digital Motors: Preston: DM1, DM1X, DM2 Scorpio: All Digital motors with 7 pin Lemo connector Heden: All Digital motors with 7 pin Lemo connector Loon Video: M-One Digital motor PLC Electronic Solutions Ltd. www.plcelectronicsolutions.com Copyright © 2013 16 of 20 fSTOP Wireless V2-1 BarTech Receiver Manual 30-Dec-13 6. Troubleshooting 6.1. Automatic Calibration The motor will not calibrate to the full span of the lens. Try increasing the torque settings. See section 3.5 Torque Setup. The motor moves to the first stop and continues to turn. Try decreasing the torque settings. See section 3.5 Torque Setup. 6.2. Manual Calibration The motor does not move in manual calibration mode. If a manual calibration has be set into the fSTOP Wireless V2-1 memory without moving the motor the span will be set to 0 so the motor will not move. Simply press the CAL button and start the manual motor calibration again. See 3.6. Manual Motor Calibration for directions. 6.3. Connectivity I cannot get the fSTOP Wireless BarTech Receiver V2-1 to receive the signal from the transmitter. Check that the BFD Handset and fSTOP Wireless V2-1 are set to the same channel. Look for the Rx light flashing on the fSTOP Wireless V2-1. If the Rx light is flashing green the BFD Handset and fSTOP Wireless V2-1 are communicating. PLC Electronic Solutions Ltd. www.plcelectronicsolutions.com Copyright © 2013 17 of 20 fSTOP Wireless V2-1 BarTech Receiver Manual 30-Dec-13 6.4. Interference Issues I am having interference issues. To AVOID INTERFERENCE when using two BFD Handsets simultaneously: USE the below channel combinations with a ✔ . BFD #1 Channel BFD #2 Channel 0 1 2 3 4 5 6 7 0 X X ✔ ✔ ✔ X ✔ ✔ 1 X X X ✔ ✔ ✔ ✔ ✔ 2 ✔ X X X ✔ ✔ X ✔ 3 ✔ ✔ X X X ✔ ✔ X 4 ✔ ✔ ✔ X X X ✔ ✔ 5 X ✔ ✔ ✔ X X X ✔ 6 ✔ ✔ X ✔ ✔ X X X 7 ✔ ✔ ✔ X ✔ ✔ X X 6.5. Iris Slider Calibration If the Iris is not making it all the way to the end stops. a. To calibrate the BarTech Iris Slider make sure that all of the switches are in the down position on the BarTech Handset. I.e. Power is OFF, Motor Direction is in REV, Camera is in CON, and Camera Run/Stop is in STOP. b. Switch on the Power switch. c. Now switch up all of the other switches. When this is completed both the Power and Camera Run/Stop LED’s should start rapidly flashing. d. Slide the BarTech Iris Slider knob all the way from one end to the other a few times. e. Move all of the switches but the Power switch into the down position. The Power and Camera Run/Stop LED’s will stop rapidly flashing which indicates that the calibration is complete. PLC Electronic Solutions Ltd. www.plcelectronicsolutions.com Copyright © 2013 18 of 20 fSTOP Wireless V2-1 BarTech Receiver Manual 30-Dec-13 6.6. Iris Slider Maintenance My Iris Slider is sticky or has dirt in the slider guide. To clean the BarTech Iris Slider guide unscrew the 2 Phillips screws on the end of the slider in the plastic stopper. Slide out the stopper and slider knob. Clean the guide and knob with alcohol and replace the slider knob with the rounded end going in first. Slide in the stopper and screw it back into place. The slider works on a magnetic system. No wires are attached when you remove the slider. Note: Be careful not to over tighten the screws. PLC Electronic Solutions Ltd. www.plcelectronicsolutions.com Copyright © 2013 19 of 20 fSTOP Wireless V2-1 BarTech Receiver Manual 30-Dec-13 7. Limited Warranty PLC Electronic Solutions Ltd. warrants this equipment for 1 year from the date of original purchase against defects in materials or workmanship, provided it was purchased from an authorized dealer. This warranty does not cover equipment, which has been abused or damaged by careless handling or shipping, nor does it cover products subjected to customer alteration, modification, negligence or misuse. This warranty does not apply to used or demonstrator equipment. Should any defect develop within the warranted time period, PLC Electronic Solutions Ltd. will at its sole option, repair or replace the defective instrument without charge. To obtain warranty service, the defective instrument must be returned within 1 year from the original purchase date to PLC Electronic Solutions Ltd., along with a brief description of the defect claimed. PLC Electronic Solutions Ltd. will pay for ground shipping of any unit deemed to be covered under warranty. Under no circumstances will PLC Electronic Solutions Ltd. be liable for greater than the original purchase cost of the PLC Electronic Solutions Ltd. product. 8. Technical Support Address any technical question to: PLC Electronic Solutions Ltd. 9-3871 North Fraser Way Burnaby, BC V5J 5G6 Canada 1-877-832-3476 (M-F 8:00 am/4:00 pm) E-mail: info@ plcelectronicsolutions.com BarTech Engineering 5285 East Appian Way Long Beach, CA 90803 Tel: (562) 987-9159 (M-F 9:00 am/ 5:00 pm) Fax (815) 364 5240 E-mail: [email protected] PLC Electronic Solutions Ltd. www.plcelectronicsolutions.com Copyright © 2013 20 of 20