1
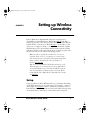
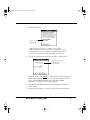
Dana Wireless Setup Guide
AlphaSmart, Inc.
973 University Avenue
Los Gatos, CA 95032
phone: 530.528.7200 (technical support)
www.alphasmart.com
[email protected]
The Palm Powered wireless laptop alternative.
© 2003 AlphaSmart is a registered trademark and Dana™ by AlphaSmart® is a trademark of AlphaSmart, Inc.
Palm and the Palm Powered logo are trademarks of Palm, Inc.
51-0001-030805a
wireless.book Page i Friday, August 1, 2003 12:33 PM
Dana Wireless
Setup Guide
AlphaSmart, Inc.
www.alphasmart.com
wireless.book Page ii Friday, August 1, 2003 12:33 PM
AlphaSmart Sales and Technical Support
US.:
For technical questions or problems, please contact:
Phone: (530) 528-7200
Email: [email protected]
For the latest support information please check
www.alphasmart.com/supportinfo
To purchase AlphaSmart products, see our online store at:
www.alphasmart.com or call (888) 274-0680.
For general information or sales questions, please call:
(888) 274-0680 or email [email protected].
UK and Europe:
For users in the UK and Europe please call +44 (0) 870 120 0718 for
Technical Support and product inquiries, or email
[email protected].
Nothing in this manual may be reproduced in any manner, either wholly or in part,
for any purpose whatsoever without written permission from AlphaSmart, Inc.
Be sure to make backup copies of all important data on other media to protect
against data loss. Important: Please read the End User Software License Agreement
with this product before using the accompanying software program(s). Using any
part of the software indicates that you accept the terms of the End User Software
License Agreement.
AlphaSmart is a registered trademark and Dana Wireless, Dana by AlphaSmart,
DanaWeb, and AlphaSmart 3000 are trademarks of AlphaSmart, Inc. Macintosh is
a registered trademark of Apple Computer, Inc. Palm OS, Palm Powered and the
Palm Powered logo are trademarks of PalmSource, Inc. VeriChat is a trademark of
PDAapps Inc. Third-party products and brand names may be trademarks or registered trademarks of their respective owners.
Copyright 2003, AlphaSmart, Inc. All rights reserved.
ii
wireless.book Page iii Friday, August 1, 2003 12:33 PM
Contents
Chapter 1 - Setting up Wireless Connectivity
Setup. . . . . . . . . . . . . . . . . . . . . . . . . . . . . . . . . . . . . . . . . . . . . . . . .1
Basic Wi-Fi setup on Dana Wireless . . . . . . . . . . . . . . . . . . . . . .2
Advanced Wi-Fi setup on Dana Wireless . . . . . . . . . . . . . . . . . .4
WiStat. . . . . . . . . . . . . . . . . . . . . . . . . . . . . . . . . . . . . . . . . . . . . . . .9
Launching WiStat. . . . . . . . . . . . . . . . . . . . . . . . . . . . . . . . . . .10
To Ping an address . . . . . . . . . . . . . . . . . . . . . . . . . . . . . . . . . .10
Wi-Fi HotSync Operations . . . . . . . . . . . . . . . . . . . . . . . . . . . . . . .11
Chapter 2 - Dana Internet Solutions Pack
Installing Dana Internet Solutions Pack . . . . . . . . . . . . . . . . . . . . .13
Installing Dana Internet Solutions Pack on a PC . . . . . . . . . . .13
Installing Dana Internet Solutions Pack on a Macintosh . . . . .14
DanaWeb . . . . . . . . . . . . . . . . . . . . . . . . . . . . . . . . . . . . . . . . . . . .15
Visiting a web page . . . . . . . . . . . . . . . . . . . . . . . . . . . . . . . . .16
Changing Browser Settings . . . . . . . . . . . . . . . . . . . . . . . . . . . .18
Transferring text from a web page to Memo Pad
and AlphaWord . . . . . . . . . . . . . . . . . . . . . . . . . . . . . . . . . . . .19
VeriChat . . . . . . . . . . . . . . . . . . . . . . . . . . . . . . . . . . . . . . . . . . . . .21
Setting up VeriChat . . . . . . . . . . . . . . . . . . . . . . . . . . . . . . . . .21
Adding a contact . . . . . . . . . . . . . . . . . . . . . . . . . . . . . . . . . . .25
Sending a chat message . . . . . . . . . . . . . . . . . . . . . . . . . . . . . .25
Mark/Space Mail . . . . . . . . . . . . . . . . . . . . . . . . . . . . . . . . . . . . . .26
Setting up Mark/Space Mail . . . . . . . . . . . . . . . . . . . . . . . . . . .27
Creating an email message . . . . . . . . . . . . . . . . . . . . . . . . . . . .30
Receiving mail . . . . . . . . . . . . . . . . . . . . . . . . . . . . . . . . . . . . .31
Appendix A - Wi-Fi Terms and Dana Interface
Dana Interface . . . . . . . . . . . . . . . . . . . . . . . . . . . . . . . . . . . . .35
Appendix B - Product Regulatory and Safety Information
FCC Statement . . . . . . . . . . . . . . . . . . . . . . . . . . . . . . . . . . . . . . . .37
iii
wireless.book Page iv Friday, August 1, 2003 12:33 PM
iv
wireless.book Page 1 Friday, August 1, 2003 12:33 PM
Setting up Wireless
Connectivity
CHAPTER 1
Dana™ Wireless by AlphaSmart® offers the convenience and
affordability of a handheld device. With built-in Wi-Fi (802.11b)
technology, wireless connectivity has never been easier. Dana Wireless
enables wireless connectivity to Wi-Fi HotSpots - at the office, in the
classroom, on campus, at home, or in any of the thousands of public
Wi-Fi HotSpots. The optional Dana Internet Solutions Pack includes
valuable tools like a wide screen web browser, an email program, and a
60-day trial version of an instant messaging program.
Note: In order to use Wi-Fi you must have access to a
network (home, school, or corporate) or a service plan
with a network service provider (sold separately by third
party vendors). You must also have proximity to a
wireless access point.
Tip: If you are unfamiliar with Wi-Fi terminology or the
Dana interface, we recommend you refer to Appendix A.
It contains definitions of commonly used Wi-Fi terms as
well as a description of Dana interface elements. Wi-Fi
terms defined in the Appendix are indicated in the text by
an underline.
Setup
Setup procedures for Dana Wireless will vary considerably depending
on the Wi-Fi network you are connecting to. For instance, a school or
office might use encryption, while a coffeehouse probably would not.
Dana Wireless will work in both cases, but some additional setup steps
are required when connecting to a network that uses encryption.
Dana Wireless Setup Guide
1
wireless.book Page 2 Friday, August 1, 2003 12:33 PM
Important: When setting up Dana Wireless to
connect to a school or corporate network, you will
probably need to ask your network administrator for
the correct network settings.
Basic Wi-Fi setup on Dana Wireless
Basic Wi-Fi setup will be sufficient for most public HotSpots,
homes or small offices. However, if you want to use a specific
access point (by default Dana Wireless tries to connect to the first
access point it can find), a static (fixed) IP address, or encryption,
please see “Advanced Wi-Fi setup on Dana Wireless” on page 4 for
detailed setup procedures.
1. Press the apps key repeatedly until you see All in the top right
corner of the Applications Launcher.
2. Tap the Prefs icon.
3. Tap the pick list in the upper-right corner and select
“Network”.
4. Tap the Details button.
2
Setting up Wireless Connectivity
wireless.book Page 3 Friday, August 1, 2003 12:33 PM
5. Tap the Edit button.
Tap here to select a
different profile
Tip: If you are going to be regularly connecting to
different Wi-Fi networks, you can set up a profile for each
network (up to 4). For example, you could setup profiles
for home, work, and your favorite public access point.
6. Type in an appropriate name for the profile (i.e. Wi-Fi home).
Drag your stylus to select the
text, and then type in an
appropriate name.
7. Generally when using DHCP you will not need to make changes to
DHCP Addressing. However, if your network administrator told
you to change DHCP Addressing, see “Changing DHCP
Addressing” on page 4 for more information.
8. Tap OK in the Profile Preferences dialog. Tap Done in the LAN
Details dialog.
9. Tap the Connect button to connect to the wireless network now.
Dana Wireless Setup Guide
3
wireless.book Page 4 Friday, August 1, 2003 12:33 PM
Advanced Wi-Fi setup on Dana
Wireless
Changing DHCP Addressing
After completing steps 1- 6 for “Basic Wi-Fi setup on Dana Wireless” on page 2, continue with the following steps to change DHCP
addressing.
1. If your network administrator told you to change DHCP
addressing, tap on the Addressing selector field.
Tap here to change settings for
Primary DNS, Secondary
DNS or Gateway.
2. Tap the Primary DNS, Secondary DNS or Gateway selector
field, then enter the information obtained from your network
administrator. Tap OK.
Enter values obtained from your
network administrator here
3. Tap OK in the Profile Preferences dialog. Tap Done in the LAN
Details dialog.
4
Setting up Wireless Connectivity
wireless.book Page 5 Friday, August 1, 2003 12:33 PM
4. Tap the Connect button to connect to the wireless network now.
Choosing a Specific Access Point
After completing steps 1- 6 for “Basic Wi-Fi setup on Dana Wireless”
on page 2, continue with the following steps to choose a specific access
point.
1. Tap the 802.11b button.
2. Choose “Use specific AP” from the Access Point pick list. (Dana
Wireless defaults to “Use first available” which allows it to connect
to the first access point it can find).
Tap here to select a specific
channel
Tap here to select a specific
access point
3. Enter the Network ID (SSID) for the access point you want to
connect to.
Important: The Network ID you type in is case-sensitive
and must exactly match the name assigned to the access
point for the connection to work.
Enter the Network ID
(SSID) here
Dana Wireless Setup Guide
5
wireless.book Page 6 Friday, August 1, 2003 12:33 PM
Tip: If your access point needs to know the MAC
(Media Access Control) address for each device that
connects to it, you can use WiStat to get the MAC
address for your Dana Wireless. See “WiStat” on
page 9 for more information.
4. Tap OK in the 802.11b Preferences dialog. Tap OK in the
Profile Preferences dialog. Tap Done in the LAN Details dialog.
5. Tap the Connect button to connect to the wireless network
now.
Using a Static IP Address
After completing steps 1- 6 for “Basic Wi-Fi setup on Dana Wireless” on page 2, continue with the following steps to use a static
(fixed) IP address.
1. If your network administrator told you to use a Static IP
address, tap on the Addressing selector field.
Tap here to select Static IP
6
Setting up Wireless Connectivity
wireless.book Page 7 Friday, August 1, 2003 12:33 PM
2. Tap the IP Address pick list, and select “Static IP”.
Tap here to select Static IP
Tip: When typing in DNS, IP and Gateway information,
typing a period will automatically move the cursor to the
next field.
3. Tap a selector field, and then enter the information obtained from
your network administrator. Tap OK.
Enter information in the
displayed fields
4. Tap OK in the Profile Preferences dialog. Tap Done in the LAN
Details dialog.
5. Tap the Connect button to connect to the wireless network now.
Setting up Encryption
After completing steps 1- 6 for “Basic Wi-Fi setup on Dana Wireless”
on page 2, continue with the following steps to setup Dana Wireless to
work with a network that uses encryption.
Dana Wireless Setup Guide
7
wireless.book Page 8 Friday, August 1, 2003 12:33 PM
Note: When working with a school or corporate
network, you will need to ask your network administrator for the correct WEP (Wired Equivalent
Privacy) key settings. WEP settings are associated
with network security.
1. Tap the 802.11b button.
2. Tap the Security selector field.
Tap here to change security
settings
3. Choose “Open Encryption” from the Security pick list.
Tap here to turn on
encryption
Tap here to select the
type of encryption
Select which key will be
active
Enter key values here
4. Choose “40-Bit/64-Bit” or “128-Bit” from the Encryption pick
list based on your network administrator’s instructions.
8
Setting up Wireless Connectivity
wireless.book Page 9 Friday, August 1, 2003 12:33 PM
5. Select the appropriate encryption key from the Key Index pick list.
Then tap the corresponding Key 1-Key 4 selector field, and enter the
key value you received from your network administrator. Tap OK.
6. Tap OK in the Security Preferences dialog. Tap OK in the 802.11b
Preferences dialog. Tap OK in the Profile Preferences dialog. Tap
Done in the LAN Details dialog.
7. Tap the Connect button to connect to the wireless network now.
Using Wi-Fi applications
When you completed the Wi-Fi setup procedure described earlier, you
created a Wi-Fi profile. Your Wi-Fi profile can now be utilized by other
programs. The optional Dana Internet Solutions Pack includes software to enhance your Internet experience. For more information see
Chapter 2 “Dana Internet Solutions Pack”.
WiStat
WiStat is a diagnostic tool that provides status information about your
Wi-Fi connection. For the current connection it will show signal
strength, Network ID (SSID), encryption status, and more. WiStat is
the only easy way to discover the MAC (Media Access Control)
address for your Dana Wireless. It can also help you troubleshoot
connection problems by allowing you to Ping an address. WiStat is
included as part of the Dana Internet Solutions Pack. Before you can
use WiStat, you must first install it. For more information see
“Installing Dana Internet Solutions Pack” on page 13.
Dana Wireless Setup Guide
9
wireless.book Page 10 Friday, August 1, 2003 12:33 PM
Security Tip: You can use MAC addresses to limit
unauthorized access to your Wi-Fi network. Every
Dana has a unique MAC address associated with it
that can be seen in WiStat. Your network
administrator can setup the Wi-Fi network to only
permit access for devices whose MAC addresses it
recognizes.
Launching WiStat
1. Press the apps key repeatedly until you see All in the top right
corner of the Applications Launcher.
2. Tap the WiStat icon. See below for illustration of WiStat.
Bar indicates signal strength
Tap here to change
network preferences
Tap here to enter an
address to ping
To Ping an address
If you are having trouble with your Wi-Fi connection, you can use
Ping to narrow down the source of the problem. If you can
successfully Ping your Gateway, but not the AlphaSmart web site
(included in the Ping target list), then your gateway is having
problems connecting to the internet. If you cannot successfully
Ping your Gateway, then you probably do not have a working
10
Setting up Wireless Connectivity
wireless.book Page 11 Friday, August 1, 2003 12:33 PM
Wi-Fi connection. Either your connection is incorrectly configured, or
you are out of range of the access point and not receiving a signal.
1. Tap the WiStat icon.
2. Tap the Ping Address selector field.
3. Tap the Target pick list, and select an address.
4. If the address you want is not in the Target pick list, select “Enter
Address” and then type in the appropriate address. Tap OK.
5. Tap the Ping button to Ping the address.
Wi-Fi HotSync Operations
You can also use your Wi-Fi profile (created when you completed the
Wi-Fi setup procedure described earlier) to perform HotSync
operations. The HotSync® process automatically synchronizes—that
is, exchanges and updates—data between Dana and the Palm Desktop
Dana Wireless Setup Guide
11
wireless.book Page 12 Friday, August 1, 2003 12:33 PM
software on your computer. For more information on installing
Palm Desktop Software or the HotSync operation, see the Getting
Started with Dana guide. For more information on setting up and
performing a Wi-Fi HotSync operation, refer to the online Dana
Internet Solutions Guide. To open that guide, double-click
DanaInternetSolutionsGuide.pdf located in the Dana Internet
Solutions Pack folder inside the Palm folder on your computer.
12
Setting up Wireless Connectivity
wireless.book Page 13 Friday, August 1, 2003 12:33 PM
CHAPTER 2
Dana Internet
Solutions Pack
The optional Dana Internet Solutions Pack includes:
• DanaWeb™ - a wide screen web browser
• Mark/Space Mail - an email program
• VeriChat™ - an instant messaging program (60-day free trial)
This chapter will cover the fundamentals of using these programs. For
more detailed information refer to the online Dana Internet Solutions
Guide. To open that guide, double-click
DanaInternetSolutionsGuide.pdf located in the Dana Internet Solutions
Pack folder inside the Palm folder on your computer.
Installing Dana Internet Solutions
Pack
Installing Dana Internet Solutions Pack on
a PC
Important: The version of Palm Desktop Software that
comes with Dana must be installed before installing the
Internet Solutions Pack. For more information on
installing Palm Desktop Software see the Getting Started
with Dana guide.
1. Insert the Internet Solutions Pack CD-ROM into the CD-ROM
drive.
Dana Wireless Setup Guide
13
wireless.book Page 14 Friday, August 1, 2003 12:33 PM
2. When the window showing the CD's contents opens, doubleclick on setup.exe.
Note: If a window showing the CD's contents does
not appear, click the Windows Start button, choose
Run, enter D:\setup.exe, and then click OK. If
necessary, replace D: with the drive letter assigned to
your CD-ROM drive.
3. Follow the onscreen instructions to complete the installation.
4. The Internet Solutions Pack program files have now been
transferred to your hard drive, but you must still perform a
HotSync operation to install them on Dana.
5. Connect Dana to your computer with the USB cable.
6. Press function-sync (hold down the function and sync keys
simultaneously on Dana).
7. If the Users dialog box appears, select the user name you
selected when you installed the Internet Solutions Pack.
8. Wait for a message on Dana indicating that the process is complete
before disconnecting Dana from the USB cable.
Installing Dana Internet Solutions Pack
on a Macintosh
Important: The version of Palm Desktop Software
that comes with Dana must be installed and a
HotSync operation must be performed before
installing the Internet Solutions Pack. For more
information on installing Palm Desktop Software or
performing a HotSync operation, see the Getting
Started with Dana guide.
1. Insert the Internet Solutions Pack CD-ROM into the CD-ROM
drive.
14
Dana Internet Solutions Pack
wireless.book Page 15 Friday, August 1, 2003 12:33 PM
2.
3.
4.
5.
6.
7.
8.
9.
Double-click the Internet Solutions Pack CD icon.
Double-click the Internet Solutions Installer icon.
Follow the onscreen instructions to complete the installation.
The Internet Solutions Pack program files have now been
transferred to your hard drive, but you must still perform a
HotSync operation to install them on Dana.
Connect Dana to your computer with the USB cable.
Press function-sync (hold down the function and sync keys
simultaneously on Dana).
If the Users dialog box appears, select the user name you selected
when you installed the Internet Solutions Pack.
Wait for a message on Dana indicating that the process is complete
before disconnecting Dana from the USB cable.
DanaWeb
DanaWeb provides full access to the internet from your Wireless Dana.
DanaWeb includes many of the features of a standard PC or Macintosh
browser including: support of images and tables, saving and offline
viewing of web pages, downloading and saving certain files and
program types (including Palm OS applications (.prc files), Palm OS
database files (.pdb), and Palm Web clipping applications (.pqa)),
downloading and uploading files to an FTP server, and creating and
editing bookmarks. DanaWeb also gives you the choice of viewing
streamlined PDA-ready versions of web pages (when provided by the
content providers), or the full versions complete with layout and
graphics. The default is for DanaWeb to load PDA-ready versions
when available, since they generally load faster.
Dana Wireless Setup Guide
15
wireless.book Page 16 Friday, August 1, 2003 12:33 PM
Visiting a web page
1. Press the apps key repeatedly until you see All in the top right
corner of the Applications Launcher.
2. Tap the DanaWeb icon.
3. Tap the address bar, type the web address you want to visit, and
tap the Go button or tap “Visit Web”.
Tap the address bar or tap Visit
Web to go to a web site
Tap here to change
browser settings
Tap here to view previously
visited web sites
Tap here to create or
edit Bookmarks
4. If you tapped “Visit Web” or the Visit Web icon, type in the
web address you want to visit, then tap OK.
Type in web address
here
Tap a button or select
from the pick list to add
to the web address
To keep web page
in memory for
offline browsing
leave box checked
Select ftp:// from the
pick list to upload or
download files to a
FTP server
5. DanaWeb connects and downloads the web page. DanaWeb
uses the connection you setup in Network Preferences. For
16
Dana Internet Solutions Pack
wireless.book Page 17 Friday, August 1, 2003 12:33 PM
information on setting up a connection see “Basic Wi-Fi setup on
Dana Wireless” on page 2.
Navigation Bar icons
The Navigation Bar on the top right of the screen has seven icons for
quickly accessing browser commands. Most of these commands can
also be accessed from the menus.
Signal Strength - bar
indicates power of
Wi-Fi signal
Browser Activity - shows
browser is downloading
web page
Visit Web
Refresh - reload Forward - go
forward one
current page
page
Stop - stop
page from
loading
Home - go to
homepage
Magnifying glass zoom views
Backward - go
back one page
Sometimes a warning icon (exclamation point) may appear to the left
of the Navigation Bar. Tapping on the icon will bring up a warning
message explaining the problem DanaWeb has encountered.
Warning - Tap to display
warning message
Dana Wireless Setup Guide
17
wireless.book Page 18 Friday, August 1, 2003 12:33 PM
Navigation Keys
The keyboard’s F1 to F8 keys also provide a shortcut to some
browser commands. These commands can also be accessed from
the menus.
Visit Web
Help
Zoom
Refresh
History
Bookmark
Forward
Backward
Changing Browser Settings
Browser settings let you set a custom home page, and turn
Wrapping View, JavaScript, images, and PDA content on and off.
The default setting are designed to optimize the browsing
experience, so for quicker downloads DanaWeb comes with “PDA
Content if Available” turned on and “Load Images with Page”
turned off.
Tip: When “Load Images with Page” is turned off
you can still download an image by tapping the
image placeholder (indicated by an outlined box). If
there is not enough memory available to decode the
image file, a small "x" will appear in the upper lefthand corner of the image placeholder.
1. Tap the DanaWeb icon.
2. Choose “Browser Settings” under the Options menu or tap
“Settings” on the default homepage.
18
Dana Internet Solutions Pack
wireless.book Page 19 Friday, August 1, 2003 12:33 PM
3. Check the setting you want to change.
Tap checkbox and
then type in URL for
new homepage
Tap checkbox to turn
on Wrapping view
Tap checkbox to
enable JavaScript
Tap checkbox to view
images on page
Tap checkbox to download regular content
4. Tap OK.
Transferring text from a web page to
Memo Pad and AlphaWord
1. Tap the DanaWeb icon.
2. Tap the address bar, type in the web address you want to visit, and
tap the Go button.
3. Choose “Save Current Page” under the Navigate menu.
4. Choose “MemoPad” from the File Type pick list. Tap the Save
button.
Tap here to save the web
page as a Memo Pad file
Note: Memo Pad will use the first line of the web page as
the Memo Pad file name.
Dana Wireless Setup Guide
19
wireless.book Page 20 Friday, August 1, 2003 12:33 PM
5. Press the apps key repeatedly until you see All in the top right
corner of the Applications Launcher.
6. Tap the Memo Pad icon.
7. Tap the Memo created from the web page.
Tap the memo containing the
web page content
8. Select the text you want to transfer to AlphaWord, then choose
“Copy” under the Edit menu.
Select the text to copy
to AlphaWord
Tip: The alert “Clipboard limit exceeded” might
come up if too much text is copied at one time.
Instead select smaller blocks of text, and repeat the
copy operation as many times as necessary.
9. Press the memo key on the keyboard to launch AlphaWord.
Choose the AlphaWord file where you want the text from the
web page to go.
20
Dana Internet Solutions Pack
wireless.book Page 21 Friday, August 1, 2003 12:33 PM
10.Choose “Paste” under the Edit menu.
Paste the text into the
chosen AlphaWord file
VeriChat
VeriChat is an instant messaging application that works with the
following chat networks: Yahoo!, ICQ, MSN or AOL. You don't even
have to be in the VeriChat application to chat with your buddies. They
will always see you as online, and can send you messages. You can be
logged onto Yahoo, ICQ, Microsoft Messenger and AOL IM at the
same time, and can be talking to your buddies on any of these
networks simultaneously.
The version of VeriChat included in the Dana Internet Solutions Pack is
a trial version. It entitles you to a 60-day free trial use of the product.
Setting up VeriChat
To use VeriChat you must first sign up for one or more (free) Instant
Messaging Accounts like Yahoo, Microsoft Messenger or AOL IM. For
more information about signing up for an Instant Messaging Account,
refer to the providers respective web sites.
1. Press the apps key repeatedly until you see All in the top right
corner of the Applications Launcher.
2. Tap the VeriChat icon. The VeriChat configuration wizard will start
to walk you through set up.
Dana Wireless Setup Guide
21
wireless.book Page 22 Friday, August 1, 2003 12:33 PM
3. Tap the Continue button.
4. If Dana is off, VeriChat can notify your cell phone or pager that
there is a message. This is called “paging” mode. To setup
paging mode tap Yes and proceed to step 5. Otherwise, tap No
and skip to step 7.
5. To set up paging mode you will need to know the text
messaging e-mail address of your cell phone, and must
subscribe to the text messaging service from your wireless
service provider. This e-mail address typically looks like "yourphone-num@wireless-phone-carrier-domain" e.g.,
[email protected]. If you are using a
22
Dana Internet Solutions Pack
wireless.book Page 23 Friday, August 1, 2003 12:33 PM
pager, you will need to use one that has an email address. Enter the
email address and tap Continue.
6. Now enter the 5 digit code that should have been emailed to the
address you entered in the previous step. Tap Continue. If you did
not receive the code, tap Start Again and reenter the email address.
7. VeriChat can automatically connect to Instant Messaging (IM)
services when Dana is turned on. This enables VeriChat to receive a
message and prompt you, even when you are in another application.
To enable this feature tap Yes; otherwise, tap No.
Dana Wireless Setup Guide
23
wireless.book Page 24 Friday, August 1, 2003 12:33 PM
8. Now you will configure your IM Account(s). There is a dialog
for each of the four supported IM services. When you get to the
service you want to configure tap Yes; otherwise, tap No.
9. Type in your user-id and password. Tap the checkbox to
automatically connect to this IM service when you launch
VeriChat. Tap OK.
Tap here connect to IM
service at launch
10.If you didn’t tap the checkbox to automatically connect in the
previous step, you can connect now. Tap the checkbox next to
the IM service you want to connect to, then tap Connect.
Tap here to connect
to IM service(s)
24
Dana Internet Solutions Pack
wireless.book Page 25 Friday, August 1, 2003 12:33 PM
Adding a contact
Before you can send a message, you must create a contact record for
the person you want to send the message to. If you already have an
existing buddy list it should be automatically displayed, so you can
skip this procedure.
1. Tap the VeriChat icon.
2. If not automatically connected tap the checkbox next to the IM
service you want to connect to, then tap Connect.
3. Choose “Add Contact” under the Messaging menu.
4. Choose the IM service the recipient is on from the Protocol pick list.
Type in the Contact ID and tap OK.
Tap to change the
IM service
5. If the contact is online then their Contact ID will appear in the
Online list on the left. Otherwise, it will be listed under Offline.
Contact is currently
online
Sending a chat message
1. Tap the VeriChat icon.
Dana Wireless Setup Guide
25
wireless.book Page 26 Friday, August 1, 2003 12:33 PM
2. If not automatically connected tap the checkbox next to the IM
service you want to connect to, then tap Connect.
3. Tap the contact you want to send a message to. Then tap the
Chat button or press the enter key.
Tap to select a contact
4. Type in a message. Tap the Send button.
Mark/Space Mail
Mark/Space Mail is a full-fledged POP3 email application that lets
you check or send mail via multiple accounts, use powerful
filtering capabilities to flag important messages or auto-delete
spam, mail securely with support for SMTP AUTH and APOP,
quickly address messages using Palm OS address book lookup, and
much more.
26
Dana Internet Solutions Pack
wireless.book Page 27 Friday, August 1, 2003 12:33 PM
Setting up Mark/Space Mail
In order to begin using Mark/Space Mail, you must first go through the
Account setup process. The following instructions will walk you
through setting up an account from the Welcome Screen. You can also
add or edit account information from within the program by choosing
“Accounts” under the Options menu.
1. Press the apps key repeatedly until you see All in the top right
corner of the Applications Launcher.
2. Tap the M/S Mail icon.
3. Tap Setup Accounts.
Tap here to setup
an email account
4. Tap the New button.
Tap here for a new
account
5. Enter the information for your email account.
Account Name - Naming the account profile is for your reference - this
information is not sent to your email server.
Dana Wireless Setup Guide
27
wireless.book Page 28 Friday, August 1, 2003 12:33 PM
Real Name - This is the name that will be listed on your outgoing
email messages.
Email Address - This is the email address that will be listed on your
outgoing email messages.
POP3 Username - This is the login ID that your email server knows
you by. In most cases, this is simply the part of your e-mail address
before the “@” symbol, not your full email address.
Tap here to go to
the next page
6. Tap on 2 to go to the second page.
7. Enter the information for your email account.
POP3 Host: - Enter your POP3 Host information. If you do not
have this information, you can either get it from the account
information on your computer’s email client or you can request
the information from your email service provider. Often the POP3
Host information will look similar to pop.yourserver.com or
mail.yourserver.com.
POP3 Password - For security reasons, the default password is
-Unassigned-. This means that you will have to enter your password
each time you want to check or send messages from Mark/Space
Mail. If you prefer to enter your password into Mark/Space Mail,
tap the POP3 Password selector field and enter your password,
then tap ok. Once your password is entered into your Account
profile, you will be able to check your email by simply tapping the
Send/Receive button.
Use APOP - Check this box if your email service requires APOP.
28
Dana Internet Solutions Pack
wireless.book Page 29 Friday, August 1, 2003 12:33 PM
SMTP Host - Enter your SMTP Host information. If you do not have
this information, you can either get it from the account information on
your computer’s email client or you can request the information from
your email service provider. Often the SMTP Host information will look
similar to smtp.yourserver.com.
Signature – Choose the signature file that you want to use for this
account.
Leave Mail On Server – By default, Mark/Space Mail downloads only a
copy of your email and leaves the original on your email server. If you
would like the default action to erase the email from your email server,
uncheck this checkbox.
Tap here to go to
the next page
8. Tap on 3 to go to the third page.
9. The port information on Page 3 defaults to the standard POP3 and
SMTP port information. If your email service provider requires
different settings, you would have been given this information with
your account.
POP3 Port - The default is 110. If your email server is setup to use a
different port, enter that number here.
SMTP Port - The default is 25. If your email server is setup to use a
different port, enter that number here.
Auto BCC Messages To - Check this checkbox if you would like a copy
of your outgoing email to be sent to your email address. Once you check
this checkbox, you will be able to enter an email address to send a copy
of outgoing messages to. This email address will not be listed in the
recipient list of your outgoing message.
Dana Wireless Setup Guide
29
wireless.book Page 30 Friday, August 1, 2003 12:33 PM
Allow SMTP Authorization - Check this checkbox if your email
server requires SMTP Authorization. Once you check this checkbox,
you will be able to enter your SMTP Username and SMTP
Password. Your SMTP Password, like your POP3 Password,
is -Unassigned- by default.
10.Tap OK.
11.Tap Done.
Creating an email message
1. Tap the M/S Mail icon.
Note: Mark/Space Mail uses the connection you setup
in Network Preferences. For information on setting
up a connection see “Basic Wi-Fi setup on Dana
Wireless” on page 2.
30
Dana Internet Solutions Pack
wireless.book Page 31 Friday, August 1, 2003 12:33 PM
2. Tap the Compose Message button.
3. Enter the recipient’s name in the To field. Tap Lookup to select an
email address from Address Book.
Tap here to lookup the email
address in Address Book
4. Tap the Subj field and enter the subject of your email.
5. Tap the Body field and type in your email message.
Tip: To insert a Memo, Address, or To Do List item, tap
the Insert pick list and choose the item you want to insert.
6. Tap the Send button.
Receiving mail
1. Tap the M/S Mail icon.
Note: Mark/Space Mail uses the connection you setup in
Network Preferences. For information on setting up a
connection see “Basic Wi-Fi setup on Dana Wireless” on
page 2.
2. Tap the Send/Receive Mail button.
Tip: Once you complete the Register Now form, you will
no longer be prompted to register.
Dana Wireless Setup Guide
31
wireless.book Page 32 Friday, August 1, 2003 12:33 PM
3. Mark/Space Mail will connect and retrieve any new mail.
Tap on an email
to read it
Tap New to create a
new email message
Tap to retrieve any
new mail
4. Tap on an email to read it.
32
Dana Internet Solutions Pack
Tap to change
show options
wireless.book Page 33 Friday, August 1, 2003 12:33 PM
APPENDIX A
Wi-Fi Terms and
Dana Interface
Refer to the table below for definitions of common Wi-Fi terms.
TABLE 1. Wi-Fi Terms
Access Point
A wireless LAN transceiver or “base station” that
provides a wireless connection to a Wi-Fi network
for one or many wireless devices.
DHCP
(Dynamic
Host
Configuration
Protocol)
A utility that enables a server to dynamically assign
IP addresses from a predefined list and limit their
time of use so that they can be reassigned. Without
DHCP, an IT Manager would have to manually
enter in all the IP addresses of all the computers on
the network. When DHCP is used, whenever a
computer logs onto the network, it automatically
gets an IP address assigned to it.
Encryption
(WEP Wired
Equivalency
Protocol)
Basic wireless security provided by Wi-Fi to protect
Wi-Fi networks from unauthorized access. WEP is
available in 40-bit (also called 64-bit), or in 108-bit
(also called 128-bit) encryption modes. Since 108-bit
encryption provides a longer algorithm that takes
longer to decode, it usually provides better security
than 40-bit encryption.
Encryption
Key
An alphanumeric series that enables data to be
encrypted and then decrypted so it can be safely
shared among members of a network. WEP uses an
encryption key that automatically encrypts outgoing
wireless data. On the receiving side, the same
encryption key enables the computer to automatically decrypt the information so it can be read.
Dana Wireless Setup Guide
33
wireless.book Page 34 Friday, August 1, 2003 12:33 PM
TABLE 1. Wi-Fi Terms
34
Gateway
The part of the network that serves as an entrance to
another network. In a school or office, the gateway
is the computer that routes the traffic from a
workstation (i.e. Dana) to the Internet. In homes, the
gateway is the ISP that connects the user to the
internet.
HotSpot
A place where you can access Wi-Fi service. This can
be free or for a fee. HotSpots can be inside an airport
lounge, hotel, or any other public area. Corporations
and campuses are also implementing HotSpots to
provide wireless Internet access to their visitors.
Ping
A command to determine whether a specific IP
address is accessible. It works by sending a packet to
the specified address and waiting for a reply. Ping is
used primarily to troubleshoot Internet connections.
SSID (Service
Set Identifier
A unique identification number (up to 32 characters)
associated with a wireless network. A SSID is
basically a network name that identifies a wireless
network.
Wi-Fi
Wi-Fi (short for Wireless Fidelity) is a radio technology that enables devices to connect to a network
(and to the Internet) without wires. A Wi-Fi network
operates like a wired network, but without the
restrictions imposed by wires. Wi-Fi allows users to
be mobile at home and at work, as well as provide
easy connections to the Internet and business
networks while on the road.
Wi-Fi Terms and Dana Interface
wireless.book Page 35 Friday, August 1, 2003 12:33 PM
Dana Interface
Pick list
Selector Field
Command buttons
Text field
• Command buttons initiate a command when tapped.
Command buttons appear in dialog boxes and at the bottom of
application screens.
• Pick lists display a list of choices. Tap the black triangle next to the
pick list name to display a list of choices, and then tap an item in the
list to select it.
• Text fields are areas in which you can enter information. Tap the
field, and then type in your information.
• Selector Fields open a dialog where additional selections can be
made or entered. They also display the selected value from the
dialog.
Dana Wireless Setup Guide
35
wireless.book Page 36 Friday, August 1, 2003 12:33 PM
36
Wi-Fi Terms and Dana Interface
wireless.book Page 37 Friday, August 1, 2003 12:33 PM
APPENDIX B
Product Regulatory
and Safety Information
FCC Statement
Note: This equipment has been tested and found to comply with the limits
for a Class B digital device, pursuant to part 15 of the FCC Rules. These limits are designed to provide reasonable protection against harmful interference in a residential installation. This equipment generates, uses and can
radiate radio frequency energy and, if not installed and used in accordance
with the instructions, may cause harmful interference to radio communications. However, there is no guarantee that interference will not occur in a
particular installation. If this equipment does cause harmful interference to
radio or television reception, which can be determined by turning the equipment off and on, the user is encouraged to try to correct the interference by
one or more of the following measures:
• Reorient or relocate the receiving antenna.
• Increase the separation between the equipment and receiver.
• Connect the equipment into an outlet on a circuit different from
that to which the receiver is connected.
• Consult the dealer or an experienced radio/TV technician for help.
FCC Caution:
Any changes or modifications not expressly approved by AlphaSmart could
void the user's authority to operate the equipment.
This device complies with part 15 of the FCC Rules. Operation is subject to
the following two conditions: (1) This device may not cause harmful interference, and (2) this device must accept any interference received, including
interference that may cause undesired operation.
Dana Wireless Setup Guide
37
wireless.book Page 38 Friday, August 1, 2003 12:33 PM
FCC RF Radiation Exposure Statement:
This equipment is classified as a portable device and has been tested for
Specific Absorption Rate (SAR). The SAR measurement for Dana Wireless (measured from contact with the bottom of the Dana Wireless unit)
is 0.0954mW/g. The measurement for Dana Wireless is far below the
maximum allowable rating for a unit of this type (maximum is
1.6mW/g).
Industry Canada
IC: 4656A -DANA002
The term "IC" before the equipment certification number only signifies that the Industry Canada technical specifications were met.
EC Declaration of Conformity
This product complies with the requirements of the EU directives
by meeting the following standards:
EN55024 (IEC61000-4-2) - Immunity
EN55022 (CISPR 22) - Emissions
EN 300 328 - Electromagnetic Compatibility
EN 60950 - Safety
Geographical Limitations of Use:
France: Limited to channels 10, 11, 12, and 13 (2457, 2462, 2462
and 2472MHz respectively) may be used. License required for
indoor and outdoor installations.
Netherlands: License required for outdoor installations.
Italy: If used outside of own premises, general authorization is
required.
Romania: On a secondary basis. Individual license required.
38
Product Regulatory and Safety Information
Dana Wireless Setup Guide
AlphaSmart, Inc.
973 University Avenue
Los Gatos, CA 95032
phone: 530.528.7200 (technical support)
www.alphasmart.com
[email protected]
The Palm Powered wireless laptop alternative.
© 2003 AlphaSmart is a registered trademark and Dana™ by AlphaSmart® is a trademark of AlphaSmart, Inc.
Palm and the Palm Powered logo are trademarks of Palm, Inc.
51-0001-030805a