1
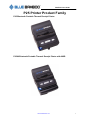
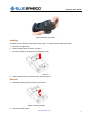
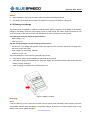
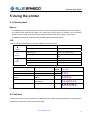
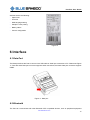
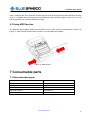
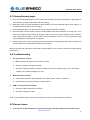
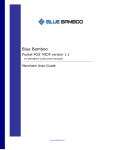
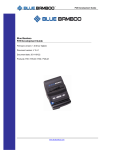
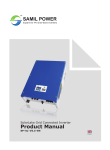
Blue Bamboo
P25 End User Guide
P25 Printer
P25 End User Guide
P25 Printer Product Family
P25 Bluetooth Portable Thermal Receipt Printer
P25-M Bluetooth Portable Thermal Receipt Printer with MSR
www.bluebamboo.com
1
P25 End User Guide
BLUE BAMBOO
Date: Dec 08, 2009
Version: 1.4
Headquarters
Blue Bamboo Transaction Systems (Shanghai) Co., Ltd.
6 Floor, Huishan Technology Park, No. 3333 Changning Road,
Shanghai, P.R. China 200336
Tel: +86 21 5219 0333
Fax:+86 21 5219 0603
www.bluebamboo.com
Copyright © 2010 BLUE BAMBOO
All rights reserved.
No part of this publication may be copied, distributed, stored in a retrieval system, translated
into any human or computer language, transmitted, in any form or by any means, without the
prior written consent of BLUE BAMBOO. All other brand names and trademarks in this guide
are the property of Blue Bamboo.
Information in this document is subject to change without notice.
www.bluebamboo.com
1
P25 End User Guide
Trademark
It is a registered trademark of BLUEBAMBOO LTD.
All other trademarks are the properties of their respective companies.
Certification
The product has been approved by FCC.
Li-ion Battery has been approved by UN.DOT and CE certification.
Power adapter has been approved by CCC, TUV GS, UL, CE and FCC certification.
FCC compliance statement:
“This device complies with part 15 of the FCC Rules. Operation is subject to the following two conditions: (1)
This device may not cause harmful interference, and (2) this device must accept any interference received,
including interference that may cause undesired operation.”
SAR statement:
The P25 Printer conforms with Article C95.1-1999 of essential requirements and other relevant requirements of ANSI. The antennas used for this transmitter must be installed to provide a separation distance of
at least 20 cm from all persons and must not be co-located or operating in conjunction with any other antenna or transmitter.
www.bluebamboo.com
1
P25 End User Guide
Table of Content
Precaution....................................................................................................................................................... 1
1 Introduction .................................................................................................................................................. 1
2 Summary ..................................................................................................................................................... 1
3 Unpacking the Unit Carton .......................................................................................................................... 2
4 P25 Printer Operation.................................................................................................................................. 3
4.1 Hardware features................................................................................................................................ 3
4.2 Inserting the paper roll ......................................................................................................................... 5
4.3 Battery supply....................................................................................................................................... 6
4.3.1 Installing/ Removing the battery pack........................................................................................... 6
4.3.2 Battery and charge........................................................................................................................ 8
5 Using the printer .......................................................................................................................................... 9
5.1 Control panel ........................................................................................................................................ 9
5.2 Self test ................................................................................................................................................ 9
6 Interface..................................................................................................................................................... 10
6.1 Data Port ............................................................................................................................................ 10
6.2 Bluetooth ............................................................................................................................................ 10
6.3 Using MSR function............................................................................................................................ 11
7 Consumable parts ..................................................................................................................................... 11
7.1 Recommended paper......................................................................................................................... 11
7.2 Printing position.................................................................................................................................. 12
8 Maintenance .............................................................................................................................................. 12
8.1 Printer Maintenance ........................................................................................................................... 12
8.2 Using thermal paper ........................................................................................................................... 12
8.3 Storing thermal paper......................................................................................................................... 13
8.4 Troubleshooting.................................................................................................................................. 13
8.5 Known issues ..................................................................................................................................... 13
9 Revision History......................................................................................................................................... 14
www.bluebamboo.com
2
P25 End User Guide
Precaution
Some semiconductor devices are easily damaged by static electricity. You should turn the printer “OFF”,
before you connect or remove the cable on the rear side.
Using the Printer
− Be careful not to drop or bump the printer on a hard surface.
− Do not install the printer in direct sunlight or in such areas.
− Do not install the printer near devices that generate strong electromagnetic fields such as a copy machines.
− Do not remove or install the communication cable during printing or transmission.
Suitable environment for the use of the printer is as follows:
− Operating temperature: -5 °C to 50 °C
− Relative humidity: 20% to 85% (no-condensing)
− Storage temperature: -20 °C to 60 °C
− Storage humidity: 5% to 90%RH
Notice
The contents of this manual are subject to change without notice.
1 Introduction
The P25 is a compact, affordable and portable thermal printer. It is designed to be used with desktop, laptop
computers, mobile phones, POS terminals, PDA’s and similar devices. This manual contains basic installation instructions. Take some time to familiarize yourself with this manual, the printer and its accessories.
2 Summary
Item
Specification
Print width
48mm
Print resolution(horizontal and vertical)
203dpi (8 dpmm) horizontal & vertical
Print speed
50mm/sec at 1/6 print ratio in 7.4V, 25℃
Feed speed
50mm/sec
Dimension(W×D×H)
75mm x 100mm x 45mm
Weight (g)
P25 210g without paper P25M 235g without paper
Paper specification
• Paper width 56~58mm
• Paper thickness
60 to 100 µm
• Paper roll diameter external diameter 40mm at max; inner diameter 11mm
www.bluebamboo.com
1
P25 End User Guide
Keypad
• Power button
• Feed button
• Mode button
Indicator
• Tricolor LED
Interface
USB2.0, full speed
Bluetooth: Ver2.0+EDR, class II, SPP
Magnetic Strip Reader
Supports ISO 7811 Track1,2,3 cards
Battery
•Rated Voltage: 7.4VDC
•Peak circuit: 5A
• Single Charge: 20m (at 12.5% printing ratio), 500 charge cycle
•Self-discharge ratio 10% per week
Battery charger with cable
•Input voltage 100–240V AC, 50/60 Hz
•Output: 9VDC 1A
Graphic support
Print image in bitmap format
Multi font support
Support ISO 8859-1/2, Chinese Simplified and Traditional fonts.
Auto power down
Support auto shut down feature (Programmable).
Application update
Update via USB or Serial port with PC tool
Font update
Font download and update via USB or Serial port with P25 utility
FCC
Part 15 Class B/C
TUV/GS
EN 60950-1 2001 (Only Power pack)
UL
UL60950 (Only Power pack)
Environment
Temperature:
Storage: -20 °C to 60 °C
Operating: -5 °C to 50 °C
Humidity:
Storage 5% to 90%RH, non-condensing
Operating: 20% to 85% RH, non-condensing
Warranty
12 months for the printer, 6 months for the battery
3 Unpacking the Unit Carton
When opening the original shipping carton, carefully inspect the contents. It should include the following
items listed in the P25 packing list. If any items are damaged or missing, please contact your dealer.
www.bluebamboo.com
2
P25 End User Guide
Figure 1: P25 Printer Unit Carton Components
Use of non-BLUE BAMBOO approved accessories may cause damage and thus void the Limited Warranty
of this equipment.
4 P25 Printer Operation
4.1 Hardware features
www.bluebamboo.com
3
P25 End User Guide
Note: For all printers produced
before 04/22/2009, the location
of the PIN code label is underneath
the
lid.
After
date
04/22/2009, it changes to the roll
paper bottom cover.
Front
SN label
Back
Figure 2: Hardware features
Note: For all printers produced before 04/22/2009, the location of the SN label is as shown as below picture:
www.bluebamboo.com
4
P25 End User Guide
4.2 Inserting the paper roll
The P25 uses a roll of single-ply, thermal-sensitive paper 58 mm wide and 40 mm or less in diameter. A
pink out-of-paper indicator line appears on the edge of the paper approximately 18 inches before the end of
the roll. When this line appears, there is enough paper remaining for at least one more transaction.
Warning:
− Only use paper rolls that meet the specifications.
− Do not use paper rolls that are glued to the spindle as the printer will not be able to detect the paper end.
To install the paper roll in the printer, follow these steps:
Open the paper cover by applying your pressure with your fingers to both sides of the cover release, and
squeeze to release the lock.
a. Open the lid.
Figure 3: Open the lid
b. Insert the shaft into the paper roll.
www.bluebamboo.com
5
P25 End User Guide
c.
Install paper roll.
Figure 4: Install paper roll
d. Pull out a small amount of paper, and close the lid. Tear the paper along the tear bar.
Figure 5: Pull out a small amount of paper
4.3 Battery supply
4.3.1 Installing/Removing the battery pack
Note:
Please do not dispose of the battery in fire or water.
Extreme temperatures will degrade the performance of your battery. Do not store the battery in an area with
a temperature below -20°C or above 60°C.
Remove the printer:
a.
Hold the printer and the case by the sides.
b.
Pop two fingers under the printer, then pull the printer out of the case
www.bluebamboo.com
6
P25 End User Guide
Figure 6 Remove the printer
Installing:
The battery pack is located at the bottom of the printer. To install it please follow these steps:
a. Remove the rugged case
b. Open the battery pack as shown in Figure 7.
c.
Remove the battery contact guard if the battery is new.
Figure 7
d. Insert the battery pack, and press until it clicks into place.
Removal:
a. Release the battery pack by pressing the lock tab.
Figure 8: Remove battery
b. Remove the battery pack.
www.bluebamboo.com
7
P25 End User Guide
Notes:
a. When installing or removing the battery pack, the printer should be turned off.
b. The battery pack should be removed if the printer is not going to be used for a long time.
4.3.2 Battery and charge
The printer power is supplied by a lithium ion battery with a 100VAC-240VAC power adapter for the battery
charging. The battery life time is 500 charging cycles. In a full charge, the printer can last no less than 100
hours in standby mode and print more than 200 pieces of 100 mm receipts in working mode.
The battery pack has the following specifications:
− Rate Voltage: 7.4V
− Peak circuit: 5A
The AC charging adapter has the following specifications:
− Construction: The adapter has a power cord to the outlet and has a country specific for the plug and a
DC power cord to the printer
− Input voltage: AC 100–240V, 50/60HZ
− Output: 9.0V DC 1.0A
The power adapter is connected to the left side of the printer.
a.
Insert the DC plug of power adapter into the power jack of printer;
b.
Insert the AC plug of power adapter into AC power supply; the red LED will flash continuously when the
battery is being recharged.
c.
When charging is complete, the red LED will turn off.
Figure 9: Battery recharge
Warning:
Notice:
If the red LED turns on for a short time and then turns off quickly when the battery starts charging, there are
two possible reasons: Either the battery is completely charged, and there is no need to charge again, or this
battery doesn’t work; please change it.
www.bluebamboo.com
8
P25 End User Guide
5 Using the printer
5.1 Control panel
Buttons
− The POWER button switches the power on/off. To power off, press the POWER button for more than 1s.
− The FEED button advances the paper roll continuously until the button is released. Also, the FEED
button enters into boot loader mode when holding the Feed button and powering on the printer.
− The MODE button prints a self-test when pressed together with FEED button.
LED
There is a tricolor LED indicator to provide feedback on the P25 status:
(Blue)
(Green)
(Red)
Constantly lit
Bluetooth module is available
Flashing
data transaction via Bluetooth
Constantly lit
Power on, normal status
Flashing
data transaction via USB or serial
port
Constantly lit
Charging
Flashing intermittently with Blue LED
An error has occurred
Off
Charging finished
Error description
Remedy
Check
Steps
There is no more paper
Add paper
1
The paper cover is open
Close the paper cover
2
An transmission error occurred
Check
status
transmission
3
An overheat error occurred
Wait until the print head
cools down
4
Charge the battery
5
Battery voltage is low
the
flashing type
(R, G, B)
(B R B R)
(B R R B R R)
(B R R R B R R R R )
(B R R R R B R R R R)
Note: If an error has occurred while charging, the LED will show the above error messages.
5.2 Self test
The self test checks for printer problems, no paper and other status. Hold the MODE button and press the
FEED button at the same time to enter start the test.
www.bluebamboo.com
9
P25 End User Guide
Self test checks the following:
− Paper feed
− Font size
− Multi-language setting
− Sample invoice printing
− Battery status
− Current configuration
Figure 10
6 Interface
6.1 Data Port
The Data port allows the P25 to connect via a USB cable or Serial port connection to PC. Please see Figure
11. P25 with white Data port connector supports serial connections, the black Data port connector supports
USBR.
Figure 11: Data port
6.2 Bluetooth
The P25 can communicate with other Bluetooth SPP compatible devices, such as peripheral equipment
www.bluebamboo.com
10
P25 End User Guide
PDAs, mobile phones, and computers. Confirm that your host device supports the SPP (Serial Port Profile)
CLDC 1.1 and MIDP 2.0 before using the P25-M. Bluetooth communication distance is up to 10m. You can
find the P25 device in the host’s Bluetooth manager.
6.3 Using MSR function
The Magnetic Stripe Reader (MSR) will read three tracks in both directions (bi-directional). Please see
Figure 11. After the P25-M reads card information, it is transmitted automatically.
Figure 12: MSR function
7 Consumable parts
7.1 Recommended paper
Item
Specification
Type
Thermal paper
Paper width
56~58mm
Paper thickness
60 to 100um
Paper roll diameter
50mm at max
Recording side
Outside of roll
www.bluebamboo.com
11
P25 End User Guide
7.2 Printing position
Figure 13: Printing position
8 Maintenance
8.1 Printer Maintenance
a. The thermal elements of the print head and driver ICs are easy to break so do not touch them with your
fingers or metal objects.
b. Since the print head becomes very hot during and just after printing, do not touch the print head.
c.
Do not touch the surface of the print head because dust and dirt can stick to its surface and damage it.
d. Thermal paper containing Na, K, and Cl ions can harm the print head thermal elements. Therefore, be
sure to use thermal paper that meets the right specifications.
8.2 Using thermal paper
a. Chemicals and oil in the thermal paper may cause discoloration and faded printing. Therefore, pay attention to the following;
b. When gluing thermal paper, use water paste, starch paste, polyvinyl paste, or CMC paste.
c.
Volatile organic solvents such as alcohol, ester, and ketone can cause discoloration.
d. Some adhesive tapes may cause discoloration or faded printing.
e. If thermal paper touches diazo copy paper immediately after copying, the printed surface may be discolored.
f.
If the surface of thermal paper is scratched with a hard metal object such as a nail, the paper may become discolored.
www.bluebamboo.com
12
P25 End User Guide
8.3 Storing thermal paper
a. Since color development begins at 70C (158F), thermal paper should be protected from high temperature, humidity, and light, both before and after printing.
b. Store paper away from high temperatures and humidity. Do not store thermal paper near a heater or in
enclosed places exposed to direct sunlight.
c.
Avoid extended exposure to direct light as it may cause discoloration or fading.
d. If thermal paper touches anything which includes phthalic acid ester plasticizer for a long time, it can
reduce the image formation ability of the paper and can cause the printed image to fade. Therefore,
when storing thermal paper in a card case or sample notebook, be sure to use only products made
from polyethylene, polypropylene, or polyester.
e. Thermal paper must not be stored with the printed surfaces touching against each other because the
printed material may be transferred between the surfaces.
Because this tear bar uses steel, the tear bar may be subject to rust. However, this does not affect printer
performance.
8.4 Troubleshooting
1.
The printer does not print
a. Make sure that the paper cover is properly closed.
b. Check if the paper is properly inserted.
c.
Check the voltage of battery, and confirm whether it stands in proper range or not, if the battery
voltage is low, please recharge it at once.
2.
Bluetooth does not work
a. Confirm Bluetooth host device supports SPP master profile, CLDC 1.1, MIDP 2.0
b. Check that the PIN code has been correctly entered.
3.
USB or serial port does not work
a. Check the USB or serial port connection.
b. Check the COM port number.
Note: If your problem still can not be resolved please contact your local dealer for assistance.
8.5 Known issues
1.
The first line of the characters on the printed receipt is too light. (before version 2007-10-10)
www.bluebamboo.com
13
P25 End User Guide
The motor of the printer is quite slow when printing the first line of a receipt, so that the time between two
heat strobes are very long and the characters printed seems to be light. However, if the first line is left blank
(only CR), then the receipt will be alright. This problem has been resolved in later release versions. (It only
occurs in the versions before 2007-10-10)
2.
Printing flushes the bootload if the P25 is in download mode (before version 2008-06-02)
Press Feed + power key, the P25enters into download mode, but if sending printing data instead of
download data, the printing flushed P25’s bootload, (This problem only occurs before bootload version
2008-06-02. after that version, this problem has solved.)
3.
After downloading a new font, printing data would cause the paper to burn.
After downloading a new font file, press Mode + Feed to do a self test caused the paper to burn severely.
This was caused by using an old version of the Device Manager (before Device Manager version 2007-12-26)
and font designed for the new version of the Device Manager.(2007-12-03
<= firmware version <
2008-06-20), After version 2008-06-20, font file name extension was changed from “ . “font to” .ap2”, and
the old version of the Device Manager did not support downloading of .ap2 files, so the operation failed.
9 Revision History
Revision 1.0 (June 29, 2007)
Initial Release.
Revision 1.1 (February 03, 2008)
Add Serial Port Support
Revision 1.2 (June 16, 2008)
Add section Known Issues
Revision 1.3 (April 23, 2009)
Add the note for the location change of PIN code label and SN label
Revision 1.4 (Dec 08, 2009)
Add the version number and section Revision History
www.bluebamboo.com
14