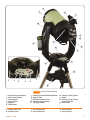
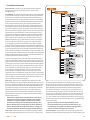
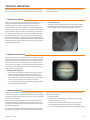
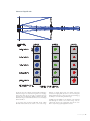
1
® ēĘęėĚĈęĎĔēĆēĚĆđ #11007 / #11008 / #11009 . . . . . . . . . . . . . . . . . . . . . . . . . . . . . . . . . . . . . 2 . . . . . . . . . . . . . . . . . . . . . . . . . . . . . . . . . . . . . . . . . 4-7 . . . . . . . . . . . . . . . . . . . . . . . . . . . . . 8-17 . . . . . . . . . . . . . . . . . . . . . . . . . . . . . . 18-19 . . . . . . . . . . . . . . . . . . . . . . . . . . . . 20-22 . . . . . . . . . . . . . . . . . . . . . . . . . . 23-24 . . . . . . . . . . . . . . . . . . . . . 25-29 . . . . . . . . . . . . . . . . . . . . . 30-31 . . . . . . . . . . . . . . . . . . . . . . . . 31-32 ǧ . . . . . 33-34 ǧ . . . . . . . . . . . . . 34-36 ȃǧ͚͚͛ . . . . . . . . . . . . . . . . 37 ȃ . . . . . . . . . . . . 38-39 ȃ . . . . . . . . . . . . . . . . . . . . . . . . 40-45 . . . . . . . . . . . . . . . . . . . . . 46 . . . . . . . . . . . . . . . . . . . . . . . . . . . . . . . . . . . . . . . . . 47 >> www.celestron.com 1 Congratulations on your purchase of the Celestron CPC DeluxeHD telescope! The CPC DeluxeHD combines Celestron’s newly designed CPC Computerized mount with its new EdgeHD optical system. The CPC series uses GPS (Global Positioning System) technology to take the ơƤ sky. Simple and easy to use, the CPC with its SkyAlign sky modeling ǡ Ǥǯ so advanced that once you turn it on, the integrated GPS automatically pinpoints your exact coordinates. No need to enter the date, time, longitude and latitude or even know the name of a single star in the sky. Take time to read through this manual before embarking on your Ǥ become familiar with your CPC, so you should keep this manual handy until you have fully mastered your telescope’s operation. The CPC hand control has built-in instructions to guide you through all the alignment procedures needed to have the telescope up and running in minutes. Use Ǧ the hand control. The manual gives detailed information regarding each step as well as needed reference material and helpful hints guaranteed to make your observing experience as simple and pleasurable as possible. ǡơǯ Ǧǡ Ƥ Ǥ if you are more experienced, you will appreciate the comprehensive ͘͜ǡ͘͘͘ ǡ Ǧ ǡǤ level you are starting out, the CPC will unfold for you and your friends all the wonders of the Universe. Your CPC telescope is designed to give you years of fun and rewarding observations. However, there are a few things to consider before using your telescope that will ensure your safety and protect your equipment. Some of the many standard features of the CPC DeluxeHD include: Ȉ Ȉ Ȉ Ȉ Ȃ fork arm Ȉ Ƥ Ȉ Ƥ Ǣ performance features! The CPC DeluxeHD’s features combined with Celestron’s legendary optical systems give amateur astronomers the most sophisticated and easy to use telescopes available on the market today. 2 ĆėēĎēČ Ȉ ȋ ƤȌǤ Ǥ Ȉ ǤǦ telescope and any accessories attached to it. Ȉ Ƥ Ǥ Ǧ ǡƤ sunlight to pass through to the eye. Ȉ ǡ children are present or adults who may not be familiar with the correct operating procedures of your telescope. >> www.celestron.com 9 8 6 7 10 5 15 2 4 11 12 3 1 11 13 F A B C D E 14 ͛ĊđĚĝĊ͙͙͘͘čĔĜē ͙ǤȋȌ ͚Ǥ ͛Ǥ ͜Ǥ ͝Ǥ ͞Ǥ Ǥ Ǥ >> www.celestron.com ͟Ǥ ͠Ǥ ͡Ǥ ͙͘Ǥ ͙͙Ǥ Ǥ Ǥ ͙͚Ǥ ͙͛Ǥ ͙͜Ǥ Ȁ ͙͝Ǥ ǤȀơ Ǥ͙͚ 3 The CPC DeluxeHD telescope comes completely pre-assembled and can be operational in a matter of minutes. The CPC and its accessories are Ǥ ǣ #11007 CPC Deluxe 800 HD Diameter 203 mm (8”) Edge HD Optics Focal Length 2032 mm f/10 Eyepiece 40 mm - 1.25” (51x) Finderscope 9x50 Diagonal 90° - 1.25” Mount CPC Altazimuth Tripod 2” Stainless Steel NexRemote Telescope Control Software Software with RS-232 cable Power Car Battery Adapter #11008 CPC Deluxe 925 HD #11009 CPC Deluxe 1100 HD 235 mm (9.25”) Edge HD Optics 280 mm (11”) Edge HD Optics 2350 mm f/10 2800 mm f/10 23 mm - 2” (102x) 23 mm - 2” (122x) 9x50 9x50 90° - 2” with 1.25” adapter 90° - 2” with 1.25” adapter CPC Altazimuth CPC Altazimuth 2” Stainless Steel 2” Stainless Steel NexRemote Telescope Control NexRemote Telescope Control Software with RS-232 cable Software with RS-232 cable Car Battery Adapter Car Battery Adapter >>ĘĘĊĒćđĎēČęčĊ Start by removing the telescope and tripod from their shipping cartons ǯƪ Ǥ carry the telescope by holding it from the lower portion of the fork arm on the hand control side and from the handle on the opposite side. Remove all of the accessories from their individual boxes. Remember to save all of the containers so that they can be used to transport the telescope. Before attaching the visual accessories, the telescope should be mounted on the tripod and the tube should be positioned horizontal to the ground. Setting up theTripod ǡ Ȁ Ǥ Ƥǡ ƪǤǡ tripod must be shipped with the leg support bracket detached so the tripod legs can collapse. To set up the tripod: 1. Hold the tripod with the head up and the legs pointed toward the ground. Ȁ 2. Pull the legs away from the central column until they will not separate any further. The top of each tripod leg presses against the tripod head to indicate maximum separation. ͛Ǥ ǡ ǤƤ͛Ǧ͙Ǥ 4. Place the leg support bracket over the central rod so that the cups on the end of each bracket are directly underneath each leg. 5. Rotate the tension knob until the bracket is secure against the tripod legs. Ǥ Ǥ ǡ Ǥ ǡǨ 4 ͛ǧ͙ >> www.celestron.com Adjusting theTripod Height Note: When transporting your telescope, make sure that both clutches are somewhat loose; this will diminish the load placed on the worm gear assemblies and protect them from damage. Ǥ the height at which the tripod stands: ͙Ǥ ȋƤ͛Ǧ͙ȌǤ 2. Extend the leg to the desired height. 3. Tighten the extension clamp to hold the leg in place. 4. Repeat this process for each of the remaining legs making sure that the tripod is level when complete. You can do this while the tripod legs are still folded together. Remember that the higher the tripod legs are extended, the less stable Ǥ ǡǤǡ you plan on doing photography, the tripod should be set low to ensure stability. A recommended height is to set the tripod in such a manner that you can look directly into the eyepiece on the telescope with a diagonal while seated. Attaching the CPC to theTripod ͛ǧ͛ čĊčĆĘĆēĆđęĎęĚĉĊđĔĈĐĎēČĐēĔćȋėĎČčęȌđĔĈĆęĊĉĔēęčĊ ċĔėĐĆėĒĆēĉĆēĆğĎĒĚęčđĔĈĐĎēČĐēĔćȋđĊċęȌđĔĈĆęĊĉĔēęčĊęĔĕ ĔċęčĊćĆĘĊǤ >>ēĘęĆđđĎēČęčĊęĆėĎĆČĔēĆđ The star diagonal is a prism or mirror that diverts the light at a right angle to the light path of the telescope. This allows you to observe in positions that are physically more comfortable than if you looked straight through. To attach the 1.25” star diagonal onto the 8” optical tube: ͙Ǥ͚͝dz ͛ǧ͚ ĔĚēęĎēČęčĊĊđĊĘĈĔĕĊ After the tripod is set up, you are now ready to attach the telescope. The bottom of the CPC base has three threaded holes that mount to the tripod head and one hole in the center that goes over the positioning pin on the tripod head. 1. Place the center hole in the bottom of the telescope base over the positioning pin in the center of the tripod head. ͙Ǥ͚͝dz ͛ǧ͜ ĎĘĚĆđĆĈĈĊĘĘĔėĎĊĘċĔėęčĊ͠dz 2. Rotate the telescope base on the tripod head until the three feet on the bottom of the base fall into the feet recesses on the top of the tripod head. 1. Turn the set screw on the visual back until its tip no longer extends into (i.e., obstructs) the inner diameter of the visual back. 3. Thread the three attached mounting bolts from underneath the tripod head into the bottom of the telescope base. Tighten all three bolts. 3. Tighten the set screw on the visual back to hold the star diagonal in place. You are now ready to attach the visual accessories onto the telescope optical tube. Adjusting the Clutches The CPC has a dual axis clutch system. This allows you to move the telescope manually even when the telescope is not powered on. However, both clutches need to be tightened down for the telescope to be aligned for “GoTo” use. Any manual movement of the telescope will invalidate your telescope’s alignment. ǡƤ knob while holding the telescope tube by the rear cell handle. Rotate the tube upwards until it is level with the ground and tighten the locking knob. >> www.celestron.com 2. Slide the chrome portion of the star diagonal into the visual back. ǡ screw on the visual back until the star diagonal rotates freely. Rotate the diagonal to the desired position and tighten the set screw. To attach the 2” star diagonal onto the 9.25/11” optical tubes: 1. Remove the visual back from the rear of the tube. 2. Attach the threaded ring of the 2” diagonal to the rear cell of the telescope. 3. Loosen the thumb screws on the side of the diagonal and remove the 1.25” adapter from the barrel of the diagonal. ͚dzǡ the retaining ring that attaches the diagonal to the rear cell. Rotate the diagonal to the desired position and tighten the retaining ring. 5 The Eyepiece Ƥ Ǥ Ƥ star diagonal. To install the eyepiece: 1. Loosen the thumbscrew on the star diagonal so it does not obstruct the inner diameter of the eyepiece end of the diagonal. 2. Slide the chrome portion of the eyepiece into the star diagonal. ͛ǧ͞ 3. Tighten the thumbscrew to hold the eyepiece in place. To remove the eyepiece, loosen the thumbscrew on the star diagonal and slide the eyepiece out. Eyepieces are commonly referred to by focal length and barrel diameter. The focal length of each eyepiece is printed on the eyepiece barrel. The longer the focal length (i.e., the larger the number) the lower the Ƥ Ǣ ȋǤǤǡȌƤ Ǥ ǡ ǦǦǤ ǡ Dz Ƥ Ǥdz WARNING: If you remove the mounting bracket, do not completely thread the screws back into the rear cell of the telescope. The screws may be long enough to obstruct the movement of, and possibly damage the primary mirror. Barrel diameter is the diameter of the barrel that slides into the star diagonal or visual back. The CPC uses eyepieces with a standard 1-1/4” barrel diameter. ͚dz ͛ǧ͟ ͚dz ͛ǧ͝ ĎĘĚĆđĆĈĈĊĘĘĔėĎĊĘċĔėęčĊ͡Ǥ͚͝Ȁ͙͙dz The Finderscope ͘͡͝Ƥ Ǥ Ƥ Ƥ Ƥ ǡ ǡ Ǥǡ͘͡͝ƤƤ ͘͝ Ǥ čĊċĎēĉĊėĘĈĔĕĊćėĆĈĐĊęĈĔĒĊĘĎēęĜĔ ĕĎĊĈĊĘǢęčĊĒĔĚēęĎēČćėĆĈĐĊęȋęĔĕȌĆēĉęčĊ ċĎēĉĊėćėĆĈĐĊęȋćĔęęĔĒȌ Ƥ ǡ Ƥ Ǥ ͙Ǥ Ǧ Ƥ Ƥ Ǥ ͚Ǥ Ƥ ȋ Ȍǡ Ǥ Ƥ ȋƤ͛Ǧ͞ȌǤ Finderscope Installation ͛Ǥ Ƥ Ǧ Ƥ Ǥ Ƥ Ƥ Ǧ bracket then attached to the rear cell of the telescope. To install Ƥ ǣ ͜Ǥ Ƥ Ǥ ͙Ǥ Ƥ Ƥ Ǥ Ƥ Ǥ ͚Ǥ ǡ when looking from the back of the tube. 3. Place the mounting bracket over the two holes of the rear cell as Ƥ͛Ǧ͟Ǥ ͜Ǥ Ǥ 6 ͛ǧ͠ >> www.celestron.com Aligning the Finderscope Ƥ ǡ ȋƤȌƤ bracket and a spring loaded pivot screw (located on the left side of the ȌǤ Ƥ ǡ Ƥ Ǥ Ƥ ƤǤ To make the alignment process a little easier, you should perform this ƤǤƤǣ ͙Ǥ Ǥ ơ ƤǤ Ȉ ȋƤ͛Ǧ͡ȌǤ Ȉ Ǥ The hand control can now rest in the holder on the fork arm of the telescope. Powering the CPC The CPC can be powered by the supplied 12v car battery adapter or ȋ of this manual). 1. To power the CPC with the car battery adapter, simply plug the round post into the designated 12v power outlet located on the drive base. ͚Ǥ ƪȀơ Ǥ ͚Ǥ main optics of the telescope. 3. Lock the azimuth and altitude clamps to hold the telescope in place. ͜Ǥ Ƥ ƤǤ Ȁơ ͙͚ ͝Ǥ Ƥ centered on the target. Ƥ (i.e., upside down and reversed from left-to-right). Because of this, it may take a few minutes to familiarize yourself with the directional change ƤǤ ͛ǧ͙͘ Attaching the Hand Control ǡ unit has been packaged along with the other telescope accessories and will need to be plugged in to the drive base of your telescope. The hand ȋƤ 3-10). Your telescope also comes with a hand control holder that must be attached to the fork arm. To connect the hand control to the fork arm: ͛ǧ͡ >> www.celestron.com 7 The CPC is controlled by Celestron’s NexStar hand controller designed ơǤ ͘͜ǡ͘͘͘ ǡ ǡ a few observing sessions. Below is a brief description of the individual components of the CPC’s NexStar hand controller: 1. ȋȌǣǦǡ͙͞ display screen that is backlit for comfortable viewing of telescope information and scrolling text. 2. ǣ alignment position. Double Stars Asterisms 4. ǣ The NexStar hand control has keys to allow direct access to each of the catalogs in its database. The hand control contains the following catalogs in its database: 1 Common name listing of the brightest stars in the sky. ͘͝ Ǥ Numeric-alphabetical listing of the most visually stunning double, triple and quadruple stars in the sky. Select list of the brightest variable stars with the shortest period of changing magnitude. A unique list of some of the most recognizable star patterns in the sky. pairs, trios and clusters that are well suited for CCD imaging with the CPC telescope. Ǧ Ǥ Ǧ Ǥ 5. ǣ selected from the NexStar database. 7 ͞Ǥ ǣ ǡ for the current date and time, and automatically slews the CPC to Ǥ 8 3 ͟Ǥ ǣ Pressing Enter allows you to select any of the CPC functions and accept entered parameters. 8. ǣ Undo will take you out of the current menu and display the previous level of the menu path. Press Undo repeatedly to get back to a main menu or use it to erase data entered by mistake. 9 4 10 5 9. ǣ Displays the many setup and utilities functions such as tracking Ƥ Ǥ 10. ǣ Used to scroll up and down within any of the menu lists. A double-arrow will appear on the right side of the LCD when there are sub-menus below the displayed menu. Using these keys will scroll through those sub-menus. 11 6 11. ǣ direction buttons are pressed. 12.Ǧ͚͚͛ ǣ Allows you to interface with a computer and control the CPC remotely. 12 >>ĆēĉĔēęėĔđĕĊėĆęĎĔē ͜ǧ͙ čĊĊĝęĆėĆēĉĔēęėĔđ Messier – Ǥ NGC – Ǧ New General Catalog. Caldwell – Ǥ Planets – All 8 planets in our Solar System plus the Moon and the Sun. Stars – Ǥ 8 Named Stars Variable Stars 3. ǣ Allows complete control of the CPC in any direction. Use the direction keys to move the telescope to the initial alignment Ǥ 2 List – ǡ lists based on their type and/or common name: This section describes the basic hand control procedures needed to operate the CPC. These procedures are grouped into three categories: Alignment, Setup and Utilities. The alignment section deals with the Ƥ Ǣ section discusses changing parameters such as tracking mode, tracking ƤǢƤǡ of the utilities functions such as PEC, polar alignment and hibernating the telescope. >>đĎČēĒĊēęėĔĈĊĉĚėĊĘ ǡƤ be aligned to known positions (stars) in the sky. With this information, >> www.celestron.com the telescope can create a model of the sky, which it uses to locate any Ǥ with the sky depending on what information the user is able to provide: uses the internal GPS receiver to acquire all the necessary time/ site information needed for the CPC to create an accurate model of the sky. Then the user can simply point the telescope to any three bright Ǥ Ǧ Ƥ star, then the CPC will automatically select and slew to a second star for alignment. Ǧ requires the user to identify and manually slew the telescope to the two alignment stars. Ǧ ǦǢǡ to one known star. Although not as accurate as the other alignment ǡǦ Ƥ Ǥ will display ȋȌ Ǥǡ alignments are designed to assist you in aligning the CPC when polar aligned using an equatorial wedge. Each alignment method is discussed in detail below. “Altazimuth” or “Alt-Az” refers to a type of mounting that allows a telescope to move in both altitude (up and down) and azimuth (left and right) with respect to the ground. This is the simplest form of mounting in which the telescope is attached directly to a tripod without the use of an equatorial wedge. SkyAlign SkyAlign must be used with the telescope mounted in altazimuth. With SkyAlign, the GPS receiver links with and acquires information from 3 of the orbiting GPS satellites. With this information, the built-in GPS system calculates the scope’s location on Earth with an accuracy of a few meters and calculates universal time down to the second. After quickly making all these calculations and automatically entering the information for you, the user simply needs to aim the telescope to any three bright celestial Ǥ ǡ it is not necessary to know the name of the stars that you are aiming at. You may even select a planet or the Moon. The CPC is then ready to start Ƥ ͘͜ǡ͘͘͘ή Ǥ Before the telescope is ready to be aligned, it should be set up in an ȋ ǡƤ Ȍ attached and lens cover removed as described in the Assembly section of the manual. To begin SkyAlign: ͙Ǥ ƪ DzdzǤ ǡ control display will say CPC Ready. Press ENTER to choose SkyAlign Ȁ ȋ͙͘Ȍ ơ Ǥ options and the scrolling text and automatically begins Sky Align. ͚Ǥ Sky Align has been selected, the hand control will display “Enter dzǡDzdzDz dzǤ will display either the current time or the time when you last used the telescope. The GPS will quickly link up and display the current date, Ǥǡ and manually updating the time/site information. Press ENTER to accept the time/site information downloaded from the GPS. 3. The hand control will display a message reminding you to level the tripod if you already haven’t done so. Press ENTER to continue. 4. Use the arrow buttons on the hand control to slew (move) the Ǥ Ƥ Ǥ >> www.celestron.com ͝Ǥ Ƥ ǡ Ƥ eyepiece. The CPC will ask that you center the bright alignment star Ǥ ƤǤȋ Ǥ Ƥ ȌǤ ͞Ǥ ǡ Ƥ Ǥ Ƥ Ǥ ǡ Ǥ ͟Ǥ Ǥ ƤǡMatch ƤǤ ǡ ǤƤƤ Ǥ A Few Words on GPS: Ǧ Ǥ ǡ Ǥǡ ǣ Ǧ ǤǦ ǡ ƤǤ Ƥǡ͛Ǧ͝ ǦǤ ǡ ͚͘Ǥ ȋ Ȍ Ǥ ǡ Ǥ ȋ Ȍǡ Ǥ Ǥ Tips for Using SkyAlign Remember the following alignment guidelines to make using SkyAlign as simple and accurate as possible. Ȉ ǤȀ site information along with a level tripod will help the telescope better predict the available bright stars and planets that are above the horizon. Ȉ pointed at the beginning of the alignment. So to make the alignment process even faster, it is acceptable to move the Ƥ clutches. However the following alignment stars still need to be found and centered using the hand control. Ȉ Ǥǡ ƤǤ may result in a failed alignment. 9 Ȉ ǯ Ǥ ȋǡǡȌǤ to the planets, the hand control has over 80 bright alignment stars to choose from (down to 2.5 magnitude). Ȉ Ǥ Ǥ ǡ Ǥ Ȉ ǡ Ƥ the GoTo Approach (by default this will be using the up arrow button and the right arrow button). Approaching the star from this direction when looking through the eyepiece will eliminate much of the backlash between the gears and assure the most accurate alignment possible. AutoTwo-Star Align As with SkyAlign, Auto Two-Star Align downloads all the necessary time/ Ǥ received, the CPC will prompt you to slew the telescope and point at one known star in the sky. The CPC now has all the information it needs to automatically choose a second star that will assure the best possible Ǥ ǡ second alignment star to complete the alignment. With the CPC set up outside with all accessories attached and the tripod leveled, follow the steps below to align the telescope: ͙Ǥ ǡǤ 2. Use the Up and Down scroll keys (10) to select Auto Two-Star Align and press ENTER. Two-Star Alignment With the two-star alignment method, the CPC requires the user to know the positions of two bright stars in order to accurately align the telescope Ƥ ǤǦ star alignment procedure: ͙Ǥ ǡ ȋ͙͘Ȍ select Two-Star Align, and press ENTER. 2. Press ENTER to accept the time/site information displayed on the display, or wait until the telescope has downloaded the information from the GPS satellites. 3. The SELECT STAR 1 message will appear in the top row of the display. ȋ͙͘Ȍ ƤǤǤ 4. CPC then asks you to center in the eyepiece the alignment star you selected. Use the direction arrow buttons to slew the telescope to the Ƥ Ǥ ENTER when centered. ͝Ǥ ǡ In order to accurately center the alignment star in the eyepiece, Ƥ centering. This is done by pressing the RATE key (11) on the hand controller then selecting the number that corresponds to the speed you desire. (9 = fastest, 1 = slowest). ͞Ǥ Ǥ a good distance away from one another. Stars that are at least 40º to ͕͘͞ than stars that are close to each other. 3. The hand control will display the last time and location information that was entered or downloaded from the GPS. Use the Up and Down buttons to scroll through the information. Press ENTER to edit the information. ǡ read Alignment Successful, and you should hear the tracking motors turn-on and begin to track. 4. The display will now prompt you to select a bright star from the Ǥȋ͞͡ on the keypad) to scroll to the desired star and then press ENTER. Ǧ would for the Two-Star Align procedure. However, instead of slewing to two alignment stars for centering and alignment, the CPC uses only one star to model the sky based on the information given. This will allow you altazimuth in any part of the sky. 5. Use the arrow buttons to slew the telescope to the star you selected. Ƥ Ǥ ǡ Ǥ ͞Ǥ ǡ suitable second alignment star that is above the horizon. Press ENTER Ǥ reason you do not wish to select this star (perhaps it is behind a tree or building), you can either: Ȉ for alignment. Ȉ you wish from the entire list of available stars. ǡ ǤƤǡ will ask you to use the arrow buttons to align the selected star with the Ƥ Ǥ Ƥǡ press ENTER. The display will then instruct you to center the star in the Ƥ Ǥ ǡ accept this star as your second alignment star. When the telescope has been aligned to both stars the display will read Alignment Success, and ƤƤ Ǥ 10 One-Star Align Ǧǣ ͙Ǥ ǦǤ 2. Press ENTER to accept the time/site information displayed on the display, or wait until the telescope has downloaded the information from the GPS satellites. 3. The SELECT STAR 1 message will appear in the top row of the display. Use the Up and Down scroll keys (10) to select the star you wish to use ƤǤǤ 4. The CPC then asks you to center in the eyepiece the alignment star you selected. Use the direction arrow buttons to slew the telescope Ƥ Ǥ Press ENTER when centered. ͝Ǥ ǡ ͞Ǥ ǡ and display Alignment Successful. >> www.celestron.com Note: Once a One-Star Alignment has been done, you can use the Re-alignment feature (later in this section ) to improve your telescope’s pointing accuracy. Solar System Align Solar System Align is available in alt-az mode (scope mounted directly on the tripod) and equatorial mode (scope mounted on a wedge). Solar System Align is designed to provide excellent tracking and GoTo ȋǡȌ align the telescope with the sky. Solar System Align is a great way to align your telescope for daytime viewing as well as a quick way to align the telescope for night time observing. Never look directly at the Sun with the naked eye or ȋƤȌǤ Permanent and irreversible eye damage may result. 1. Select Solar System Align from the alignment options. 2. Press ENTER to accept the time/site information displayed on the display, or wait until the telescope has downloaded the information from the GPS satellites. ͛Ǥ display. Use the Up and Down scroll keys (10) to select the daytime ȋǡȌǤǤ ͜Ǥ you selected. Use the direction arrow buttons to slew the telescope to Ƥ Ǥ ENTER when centered. ͝Ǥ ǡ Ǥ ǡ and display Alignment Successful. Tips for Using Solar System Align Ȉ ǡ ǯ Menu. To allow the Sun to be displayed on the hand control, do the following: ȋƤ͜Ǧ͚Ȍǡ ȋƤ 4-3). Based on this information the CPC will automatically slew to two selected alignment stars to be centered and aligned. To use EQ Auto-Align: 1. Select EQ North or South Align from the alignment options and press ENTER 2. Press ENTER to accept the time/site information displayed on the display, or wait until the telescope has downloaded the information from the GPS satellites. 3. Select EQ AutoAlign method and press ENTER 4. Use the up and down arrow buttons to move the telescope tube upwards until the altitude index markers are aligned. The altitude ǤƤ͜Ǧ͚Ǥ 5. Use the left and right arrow buttons to move the telescope base until the fork arms are horizontally parallel and the tube is pointing towards the Meridian. ͞Ǥ ǡ suitable alignment stars that are above the horizon. Press ENTER to Ǥ reason you do not wish to select one of these stars (perhaps it is behind a tree or building), you can either: Ȉ for alignment. Ȉ you wish from the entire list of available stars. ͟Ǥ selected. Use the direction arrow buttons to slew the telescope to Ƥ Ǥ ENTER when centered. ͠Ǥ ǡ Ǥ ͡Ǥ ǡ Ǥ͟͞ complete alignment. ͙Ǥ DzdzǤ 2. Press the MENU button and use the Up and Down keys to select the Utilities Menu. Press ENTER. 3. Use the UP and Down keys to select Sun Menu and press ENTER. 4. Press ENTER again to allow the Sun to appear on the hand control display. The Sun can be removed from the display by using the same procedure as above. ͜ǧ͚ Ȉ ǡ Re-Align feature as described below. EQ North / EQ South Alignment EQ North and EQ South Alignments assist the user in aligning the telescope when polar aligned on an optional equatorial wedge. Similar to the Altazimuth alignments described earlier, the EQ alignments gives ǡǦǡǦ Star alignment or Solar System alignment. EQ AutoAlign The EQ AutoAlign uses all the same time/site information as the Alt-Az alignments, however it also requires you to position the tube so that the >> www.celestron.com đęĎęĚĉĊēĉĊĝĆėĐĊėĘ EQTwo-Star Align The EQ Two-Star Align follows most of the same steps as the Alt-Az Two-Star Align. This alignment method does not require the user to align the altitude index markers or point towards the Meridian, but it does require the user to locate and align the telescope on two bright stars. When selecting alignment stars, it is best to choose stars that, a) have a large separation in azimuth and b) both are either positive or negative in Ǥ EQ Two-Star alignment. 11 EQ One-Star Align >>ĊđĊĈęĎēČĆēćďĊĈę Ǧ Ǧǡ however it only relies on the alignment of one star to align the telescope. Ǧ EQ Two-Star Align, but only using one star. ǡ from any of the catalogs in the CPC’s extensive database. The hand control has a key (4) designated for each of the catalogs in its database. ǣ Ǥ EQ Solar System Align equatorially align the telescope for daytime use. To align your telescope ǡ͙͟ EQ Two-Star Align section. CPC Re-Alignment The CPC has a re-alignment feature which allows you to replace either of Ǥ be useful in several situations: Ȉ ǡ that your original alignment stars have drifted towards the west considerably. (Remember that the stars are moving at a rate of 15º every hour). Aligning on a new star that is in the eastern part of the ǡ that part of the sky. Ȉ Ǧ System alignment method, you can use re-align to align to Ǥ accuracy of your telescope without having to re-enter addition information. To replace an existing alignment star with a new alignment star: ͙Ǥ ȋ ȌǤ ͚Ǥ Ǥ ͛Ǥ ǡǤ 4. With CPC Readyǡ Ǥ 5. The display will then ask you which alignment star you want to replace. Ǥ Ǥ Ǥ ǡ Dzdz Ǥ ͞Ǥ Ǥ database that have common names or types. Each list is broken down ǣǡ ǡ ǡǡ Ǥ Ǧ Ǥȋ͙͘Ȍ Ǥ When scrolling through a long list of objects, holding down either the UP or DOWN key will allow you to scroll through the catalog at a rapid speed. Pressing any of the other catalog keys (M, CALD, NGC or STAR) will display a blinking cursor below the name of the catalog chosen. Use ǤǡƤǡ “M” key and enter “042”. ǡ Ƥ Ǥ Ƥ four digits are entered, the hand control will automatically list all the Ǥ Ǥǡ ͙͘͜͠͞ȋȌǡƤ Dz͙͘͘͜dzǤ Ǥ Ǥ >>đĊĜĎēČęĔĆēćďĊĈę ǡ from the following options: Ȉ Ǥ ǤǤ ǡ Ǥ Ȉ Ǥ Ǥ Caution: Never slew the telescope when someone is looking into the eyepiece. The telescope can move at fast slew speeds and may hit an observer in the eye. If you manually enter an object that is below the horizon, CPC will notify you by displaying a message reminding you that you have selected an object outside of your slew limits (see Slew Limits in the Scope Setup section of the manual). Press UNDO to go back and select a new object. Press ENTER to ignore the message and continue the slew. ͜ǧ͛ alignment. After the telescope is powered on, pressing any of the Ǥ čĊĊėĎĉĎĆēĎĘĆēĎĒĆČĎēĆėĞđĎēĊĎēęčĊĘĐĞęčĆęĘęĆėęĘĆęęčĊ ĔėęčĈĊđĊĘęĎĆđĕĔđĊĆēĉĊēĉĘĆęęčĊĔĚęčĈĊđĊĘęĎĆđĕĔđĊĆēĉ ĕĆĘĘĊĘęčėĔĚČčęčĊğĊēĎęčǤċĞĔĚĆėĊċĆĈĎēČĔĚęčǡęčĊĒĊėĎĉĎĆē ĘęĆėęĘċėĔĒĞĔĚėĔĚęčĊėēčĔėĎğĔēĆēĉĕĆĘĘĊĘĉĎėĊĈęđĞ ĔěĊėčĊĆĉęĔęčĊĔėęčĈĊđĊĘęĎĆđĕĔđĊǤ 12 >> www.celestron.com >>ĎēĉĎēČđĆēĊęĘ The CPC can locate all 8 of our solar systems planets plus the Sun and Moon. However, the hand control will only display the solar system ȋƤȌǤ planets, press the PLANET key on the hand control. The hand control will ǣ Ȉ Up and Down keys to select the planet that you wish to observe. Ȉ Ǥ Ȉ Ǥ To allow the Sun to be displayed as an option in the database, see Sun Menu in the Utilities section of the manual (pg. 15). >>ĔĚėĔĉĊ The CPC includes a tour feature which automatically allows the user in which you are observing. The automatic tour will display only those ƤȋFilter Limits in the Scope ͙͝ȌǤ ǡȋ͞Ȍ Ǥ Ǥ Ȉ ǡ Ǥ Ȉ ǡǤ Ȉ ǡǤ >>ĔēĘęĊđđĆęĎĔēĔĚė ǡ Ǥ Ƥ ȋƤȌǤ ǡ Ǥ Ȉ ǡ Ǥ desired speed. The number will appear in the upper-right corner of the LCD display to indicate that the rate has been changed. The hand control has a “double button” feature that allows you to instantly speed up the motors without having to choose a speed rate. To use this feature, simply press the arrow button that corresponds to the direction that you want to move the telescope. While holding that button down, press the opposite directional button. This will increase the slew rate to the maximum slew rate. When pressing the Up and Down arrow buttons in the slower slew ȋ͞Ȍ ȋ͟͡ȌǤ eyepiece (i.e. pressing the Up arrow button will move the star up in the Ƥ ȌǤǡ ȋ͞Ȍ Ƥ ǡ may need to press the opposite directional button to make the telescope move in the correct direction. 1 = .5x* 4 = 8x 7 = .5º / sec 2 = 1x (sidereal)* 5 = 16x 8 = 2º / sec 3 = 4x 6 = 64x 9 = 4º / sec ĎēĊĆěĆĎđĆćđĊĘđĊĜĘĕĊĊĉĘ *Rate 1 and 2 are photographic guide rates and are meant to be used when the telescope is set up on a wedge in equatorial mode. These rates can be used while set up in altazimuth, however the actual ơǤ >>ĊęĚĕėĔĈĊĉĚėĊĘ Ƥ the user control over the telescope’s many advanced features. All of the setup and utility features can be accessed by pressing the MENU key and scrolling through the options: Tracking Mode – This allows you to change the way the telescope tracks depending on the type of mount being used to support the telescope. ơ ǣ Ȉ ǡǤ Ȉ ǡǤ >>ĎėĊĈęĎĔēĚęęĔēĘ The CPC has four direction buttons (3) in the center of the hand control which control the telescope’s motion in altitude (up and down) and ȋȌǤ ơ speed rates. Ǧ This is the default tracking rate and is used ƪ or tripod without the use of an equatorial wedge. The telescope must be aligned with two stars before it can track in altazimuth (Alt-Az). Used to track the sky when the telescope is polar aligned using an equatorial wedge in the Northern Hemisphere. Used to track the sky when the telescope is polar aligned using an equatorial wedge in the Southern Hemisphere. When using the telescope for terrestrial (land) observation, the tracking can be ơ Ǥ >>ĆęĊĚęęĔē Pressing the RATE key (11) allows you to instantly change the speed rate of the motors from high speed slew rate to precise guiding rate or anywhere in between. Each rate corresponds to a number on the hand controller key pad. The number 9 is the fastest rate (3º per second, Ȍ and locating alignment stars. The number 1 on the hand control is the slowest rate (.5x sidereal) and can be used for accurate centering of Ǥ rate of the motors: Ȉ Ǥ current speed rate. Ȉ >> www.celestron.com 13 Tracking Rate – ǡ moves across the night sky. The tracking rate can be changed depending ǣ This rate compensates for the rotation of the Earth by moving the telescope at the same rate as the rotation of the Earth, but in the opposite direction. When the telescope is polar aligned, this can be accomplished by moving the telescope in right ascension only. When mounted in Alt-Az mode, the telescope must make corrections in both R.A. and declination. Used for tracking the Moon when observing the lunar landscape. Used for tracking the Sun when solar observing. View Time-Site – Displays the current time and longitude/latitude Ǥ time-site information like time zone, daylight saving and local sidereal time. Local sidereal time (LST) is useful for knowing the right ascension Ǥ Time-Site will always display the last saved time and location entered Ǥ ǡǤ ơǡ the hand control will only display the last saved time and location. Ƥ Ȃ ͘͘͜ơ Ƥ Ǥ included in the regular database. There are several ways to save an ǣ Save Sky Object – by saving its right ascension and declination in the sky. This way the Ǥ ǡ “Save Sky Obj” command and press ENTER. The display will ask you to ͙Ǧ͚͘͘ Ǥ Ǥ Save Land Object – The CPC can also be used as a spotting scope on Ǥ altitude and azimuth relative to the location of the telescope at the Ǥ the telescope, they are only valid for that exact location. To save land ǡ Ǥ down to the “Save Land Obj” command and press ENTER. The display will ask you to enter a number between 1-200 to identify the Ǥ Ǥ Save Database (Db) Object – This feature allows you to create your Ǥ Ǥ Enter R.A. - Dec – Ƥ ǤǤ Ǥ Scroll to the “Enter RA-DEC” command and press ENTER. The display ƤǤǤ Ǥ database, scroll down to either GoTo Sky Obj or GoTo Land Obj and Ǥ The CPC will automatically retrieve and display the coordinates before Ǥ Ƥ ǡ Ƥ Ǥ Ƥ Ǥ Get RA/DEC – Displays the right ascension and declination for the current position of the telescope. GoTo R.A/ Dec – Ƥ ǤǤ slew to it. Identify Identify Mode will search any of the CPC database catalogs or lists and ơ Ǥ Ǥǡ Ƥ Ǥǡ Identify Mode Ƥ Ǥǡ pointed at the brightest star in the constellation Lyra, choosing Identify and then searching the Named Star catalog will no doubt return the star Vega as the star you are observing. However, by selecting Identify and searching by the Named Object or Messier catalogs, the hand control ȋ͟͝Ȍ͞λ your current position. Searching the Double Star catalog will reveal that ͙λǤ Identify feature: Ȉ Ǥ Ȉ Ȁ like to search. Ȉ Ǥ Note: Some of the databases contain thousands of objects, and can therefore take a minute or two to return the closest object. Precise GoTo Ƥ Ƥ view for astrophotography and CCD imaging. Precise GoTo automatically the user to carefully center it in the eyepiece. The hand control then ơ Ǥơǡ Ǥ ǣ 1. Press the MENU button and use the Ȁ keys to select Precise GoTo. 2. Choose Database any of the database catalogs listed 3. Choose RA/DEC to enter a set of celestial coordinates that you wish to slew to. ͜Ǥ ǡ Ǥ to slew to the bright alignment star. 5. Use the direction buttons to carefully center the alignment star in the eyepiece. Ǥ To store a set of coordinates (R.A./Dec) permanently into the CPC database, save it as a Ƥ as described above. GoTo Object –Ƥ 14 >> www.celestron.com >>ĈĔĕĊĊęĚĕĊĆęĚėĊĘ Setup Time-Site – Allows the user to customize the CPC display by changing time and location parameters (such as time zone and daylight savings). Anti-backlash – All mechanical gears have a certain amount of backlash or play between the gears. This play is evident by how long it takes for a star to move in the eyepiece when the hand control arrow buttons are pressed (especially when changing directions). The CPC’s anti-backlash feature allows the user to compensate for backlash by inputting a value between gears. The amount of compensation needed depends on the Ǣ for the star to appear to move in the eyepiece. There are two values for each axis, positive and negative. Positive is the amount of compensation applied when you press the button, in order to get the gears moving quickly without a long pause. Negative is the amount of compensation applied when you release the button, winding the motors back in the other direction to resume tracking. You will need to experiment with ơȋ͘Ǧ͡͡ȌǢ͚͘͘͝ for most visual observing, whereas a higher value may be necessary for photographic guiding. Positive backlash compensation is applied when the mount changes its direction of movement from backwards to forwards. Similarly, negative backlash compensation is applied when the mount changes its direction of movement from forwards to backwards. When tracking is enabled, the mount will be moving in one or both axes in either the positive or negative direction, so backlash compensation will always be applied when a direction button is released and the direction moved is opposite to the direction of travel. To set the anti-backlash value, scroll down to the anti-backlash option Ǥ ǡ responsiveness of each of the four arrow buttons. Note which directions you see a pause in the star movement after the button has been pressed. ǡ when pressing or releasing the button. Now, enter the same values Ǥ releasing the button, but setting the values lower results in a pause when pressing the button, go with the higher value for positive, but use a lower value for negative. CPC will remember these values and use them each time it is turned on until they are changed. Slew Limits – Sets the limits in altitude that the telescope can slew without displaying a warning message. By default the slew limits are set ͕͕͘͘͡ the horizon. However, the slew limits can be customized depending on Ǥǡ attached to your telescope preventing it from pointing straight-up, you can set the maximum altitude limit to read 80º, thus preventing ͕͘͠ altitude without warning. Slew limits are applied relative to the base of the mount not the actual horizon. So when setting the slew limits when using the telescope on an equatorial wedge, remember that a minimum slew limit of 0° would prevent the telescope from slewing down past the celestial equator not the horizon. To set the slew limit so that the telescope will slew to the horizon while on a wedge, you must set the minimum slew limit to equal your latitude minus 90°. Filter Limits – When an alignment is complete, the CPC automatically Ǥǡ >> www.celestron.com scrolling through the database lists (or selecting the Tour function), be above the horizon when you are observing. You can customize the Ǥǡ mountainous location where the horizon is partially obscured, you can ή͚͕͘Ǥ ͚͕͘Ǥ numeric keypad, the hand control will display a warning message before Ǥ If you want to explore the entire object database, set the maximum altitude limit to 90º and the minimum limit to –90º. This will display every object in the database lists regardless of whether it is visible in the sky from your location. Direction Buttons – The direction a star moves in the eyepiece varies depending on the accessories being used. This can create confusion when 15 ơǦ scope. To compensate for this, the direction of the drive control keys can be changed. To reverse the button logic of the hand control, press the MENU button and select Direction Buttons from the Utilities menu. Use Ȁȋ͙͘Ȍ ȋȌ or altitude (up and down) button direction and press ENTER. Pressing ENTER again will reverse the direction of the hand control buttons from their current state. Direction Buttons will only change the eyepiece rates ȋ͙Ǧ͞Ȍơ ȋ͟Ǧ͡ȌǤ GoTo Approach –Ƥ Ǥ ơ Ǥǡ heavy from using heavy optical or photographic accessories attached to the back, you would want to set your altitude approach to the negative direction. This would ensure that the telescope always approaches an Ǥ Similarly, if using the CPC polar aligned on a wedge, you would want to set the azimuth approach to the direction that allows the scope to ơ ơǤ To change the GoTo approach direction, simply choose GoTo Approach from the Scope Setup menu, select either Altitude or Azimuth approach, choose positive or negative and press ENTER. Autoguide Rate – Allows the user to set an autoguide rate as a percentage of sidereal rate. This is helpful when calibrating your telescope to a CCD autoguider for long exposure photography. Cordwrap – Cord wrap safeguards against the telescope slewing more ͕͛͘͞ the telescope. This is useful when autoguiding or any time that cables are plugged into the base of the telescope. By default, the cord wrap feature ơ when aligned on a wedge. Custom Rate 9 – Allows the user to set the maximum slew speed when ͡Ǥ provides more controlled slews when equipped with delicate imaging ǤƤ and Dec axes. Enabling and disabling this feature will allow you to toggle back and forth between the custom setting and the default setting. Ǥ ǡ ǢƤ numbers are for azimuth and the second set are for altitude. Get Axis Position – Displays the relative altitude and azimuth for the current position of the telescope. GoTo Axis Position – Ƥ position and slew to it. Hibernate – Hibernate allows the CPC to be completely powered down and still retain its alignment when turned back on. This not only saves power, but is ideal for those that have their telescopes permanently mounted or leave their telescope in one location for long periods of time. To place your telescope in Hibernate mode: 1. Select Hibernate from the Utility Menu. 2. Move the telescope to a desired position and press ENTER. ͛Ǥ ơ Ǥ telescope manually while in Hibernate mode. ǡǤ After pressing ENTER, you have the option of scrolling through the time/ Ƥ Ǥ the telescope. Pressing UNDO at the Wake Up screen allows you to explore many of the features of the hand control without waking the telescope up from Hibernate mode. To wake up the telescope after UNDO has been pressed, select Hibernate from the Utility menu and press ENTER. Do not use the direction buttons to move the telescope while in Hibernate mode. Sun Menu ƤǤǡSun Menu and press ENTER. The Sun will now be displayed in the Planets catalog and can method. To remove the Sun from displaying on the hand control, once again select the Sun Menu from the Utilities Menu and press ENTER. Scrolling Menu This menu allows you to change the rate of speed that the text scrolls across the hand control display. >>ęĎđĎęĞĊĆęĚėĊĘ Ȉ ȋ͞Ȍ Ǥ Scrolling through the MENU (9) options will also provide access to Ǣ Correction, Hibernate, as well as many others. Ȉ ȋ͡Ȍ of the text. ȀơȂơ Ǥ telescope, the CPC still receives information, such as current time, from ǤƤ ǡ ơǤ Lights Control –ơ light and LCD display for daytime use to conserve power and to help preserve your night vision. Factory Setting – Returns the CPC hand control to its original factory setting. Parameters such as backlash compensation values, initial date ǡȀƤǤ The hand control will ask you to press the “0” key before returning to the factory default setting. Version – Selecting this option will allow you to see the current version ǤƤ 16 Calibrate GoTo – GoTo Calibration is a useful tool when attaching heavy visual or photographic accessories to the telescope. GoTo Calibration calculates the amount of distance and time it takes for the mount to Ƥ Ǥ balance of the telescope can prolong the time it takes to complete the ƤǤ Ƥ Ǥ Set Mount Position The Set Mount Position menu can be used to maintain your alignment in cases where you wish to disengage the clutches or similar situations. ǡ mount after having completed an alignment. To set the mount position simply slew to a bright star in the named star list then select Set Mount Position. The hand control will sync on the star by asking you to center the star in the eyepiece and pressing the AlignǤ the star, you are free to manually move the mount in both axes in order >> www.celestron.com and improving the tracking accuracy of the drive. This feature is for advanced astrophotography and is used when your telescope is polar Ǥ using PEC, see the section on “Celestial Photography”. to rebalance. When you are ready to slew the telescope to your next ǡ star and carefully center it in the eyepiece. Using this tool will invalidate the PEC index Periodic Error Correction (PEC) – PEC is designed to improve photographic quality by reducing the amplitude of the worm gear errors ĊēĚėĊĊ čĎĘċĎČĚėĊĎĘĆĒĊēĚęėĊĊĘčĔĜĎēČęčĊĘĚćǦĒĊēĚĘ ĆĘĘĔĈĎĆęĊĉĜĎęčęčĊĕėĎĒĆėĞĈĔĒĒĆēĉċĚēĈęĎĔēĘ >> www.celestron.com 17 A telescope is an instrument that collects and focuses light. The nature of the optical design determines how the light is focused. Some telescopes, ǡǤ ǡƪ ǡ use mirrors. The EdgeHD optical system (Aplanatic Schmidt) uses a combination of mirrors and lenses and is referred to as a compound or ǤơǦ while maintaining very short tube lengths, making them extremely portable. The EdgeHD system consists of a zero power corrector plate, a ǡ Ƥ ƪƫǤ optical system, they travel the length of the optical tube three times. Ȃ enhanced multi-layer coatings on the primary and secondary mirrors ƪ Ƥ Ǧƪ Ǥ ͝ǧ͙ ĈĚęĆĜĆĞěĎĊĜĔċęčĊđĎČčęĕĆęčĔċęčĊĉČĊĔĕęĎĈĆđ ǡ Ǥƫǡ light from passing through to the eyepiece or camera. >>ĒĆČĊėĎĊēęĆęĎĔē The image orientation changes depending on how the eyepiece is inserted into the telescope. When using the star diagonal, the image is right-side-up, but reversed from left-to-right (i.e., mirror image). ĈęĚĆđĎĒĆČĊĔėĎĊēęĆęĎĔēĆĘĘĊĊē ĜĎęčęčĊĚēĆĎĉĊĉĊĞĊ ȋǤǤǡ star diagonal), the image is upside-down and reversed from left-to-right (i.e., inverted). This is normal for the Schmidt-Cassegrain design. ĊěĊėĘĊĉċėĔĒđĊċęęĔėĎČčęǡĆĘ ěĎĊĜĊĉĜĎęčĆęĆėĎĆČĔēĆđ ͝ǧ͚ ēěĊėęĊĉĎĒĆČĊǡĆĘěĎĊĜĊĉĜĎęč ęčĊĊĞĊĕĎĊĈĊĉĎėĊĈęđĞ ĎēęĊđĊĘĈĔĕĊ >>ĔĈĚĘĎēČ The CPC’s focusing mechanism controls the primary mirror which is ƫǤ The focusing knob, which moves the primary mirror, is on the rear cell Ǥ Ǥǡ reached the end of its travel on the focusing mechanism. Turn the knob in Ǥ ǡ Ǥ primary mirror only slightly. Therefore, it will take many turns (about 30) ȋ͘͞ȌƤǤ ǡ ơǡ ƥ Ǥ ǡ you can go right through focus without seeing the image. To avoid this ǡƤ ȋ Moon or a planet) so that the image is visible even when out of focus. Critical focusing is best accomplished when the focusing knob is turned 18 Ǥ ǡǤ ǡ visually and photographically, this is done by turning the focus knob counterclockwise. čĊĊĒćđĊĒĔēęčĊĊēĉ ĔċęčĊċĔĈĚĘĐēĔćĘčĔĜĘ ęčĊĈĔėėĊĈęėĔęĆęĎĔēĆđ ĉĎėĊĈęĎĔēċĔėċĔĈĚĘĎēČ ęčĊǤ ͝ǧ͛ >> www.celestron.com >>ĎėėĔėĚĕĕĔėęđĚęĈčĊĘ help support and minimize lateral movement of the primary mirror during astrophotography. To use the mirror clutches: ͙Ǥ Ǥ ͚Ǥ ǡ very tight and can be turned no further. Mirror Clutch Warning! Once the mirror is locked down, do not turn the focuser ƤǤ the focus knob should not damage the telescope, undue stress can be placed on the focus mechanisms causing excessive image shift while focusing. ͝ǧ͜ >>ĆđĈĚđĆęĎēČĆČēĎċĎĈĆęĎĔē ȋ ȌǤƤ ǡ simply divide the focal length of the telescope by the focal length of the Ǥǡǣ ĆČēĎċĎĈĆęĎĔēȂ ȋȌ ȋȌ Let’s say, for example, you are using the 40 mm Plössl eyepiece. To Ƥ telescope (the CPC 800, for example, has a focal length of 2032 mm) by the focal length of the eyepiece, 40 mm. Dividing 2032 by 40 yields a Ƥ ͙͝Ǥ Although the power is variable, each instrument under average skies Ƥ Ǥ ͘͞ Ǥǡ ͘͘͠͠ Ǥ͘͠͞ Ƥ ͘͜͠Ǥ Ƥ ǡ͚͛͘͝ ͙͚͘͘͘͘͞͠͠ Ǥ >>ĊęĊėĒĎēĎēČĎĊđĉĔċĎĊĜ Ƥ Ǥ ƤǡƤ ȋ ȌƤ Ǥǡ formula looks like this: ėĚĊĎĊđĉȂ Ƥ ǡƤǡ Ƥ Ǥ ǡ Ƥ͘͜ Ǥ͘͜ Ú Ƥ͜͞λǤ͜͞λ Ƥ ǡ ͙͝Ǥ ƤǤ͡λǡ almost a full degree. To convert degrees to feet at 1,000 yards, which is more useful for terrestrial observing, simply multiply by 52.5. Continuing with our ǡƤǤ͡λ͚͝Ǥ͝Ǥ Ƥ͜͟ Ǥ Ƥ ȋ͗͛͡͞͠͝ȌǤ >> ĊēĊėĆđćĘĊėěĎēČĎēęĘ When working with any optical instrument, there are a few things to remember to ensure you get the best possible image. Ȉ Ǥ is optically imperfect, and as a result, may vary in thickness from one Ǥ ơ Ǥ achieve a truly sharp image, while in some cases, you may actually see a double image. Ȉ Ǥ includes asphalt parking lots on hot summer days or building rooftops. >> www.celestron.com Ȉ ǡ ƥ viewing terrestrially. The amount of detail seen under these conditions is greatly reduced. Also, when photographing under these conditions, Ƥ lower contrast and underexposed. Ȉ ȋ Ƥ Ȍǡ to remove them when observing with an eyepiece attached to the telescope. When using a camera, however, you should always wear Ǥ stigmatism, corrective lenses must be worn at all times. 19 Up to this point, this manual covered the assembly and basic operation of your CPC telescope. However, to understand your telescope more thoroughly, you need to know a little about the night sky. This section deals with observational astronomy in general and includes information on the night sky and polar alignment. >>čĊĊđĊĘęĎĆđĔĔėĉĎēĆęĊĞĘęĊĒ ơǤ constellation of Pisces designated as 0 hours, 0 minutes, 0 seconds. All other points are designated by how far (i.e., how long) they lag behind this coordinate after it passes overhead moving toward the west. 60 ͛͘͞ the northern celestial hemisphere from the southern. Like the Earth’s ǡǤ latitude. However, in the sky this is referred to as declination, or DEC for short. Lines of declination are named for their angular distance above and below the celestial equator. The lines are broken down into degrees, minutes of arc and seconds of arc. Declination readings south of the equator carry a minus sign (-) in front of the coordinate and those north of the celestial equator are either blank (i.e., no designation) or preceded ȋήȌǤ 40 20 17 19 18 0 3 2 1 0 23 22 21 Ƥ ǡ system that is similar to our geographical coordinate system here on Earth. The celestial coordinate system has poles, lines of longitude and ǤǡƤ background stars. 20 0 -4 -60 The celestial equivalent of longitude is called Right Ascension, or R.A. for short. Like the Earth’s lines of longitude, they run from pole to pole and are evenly spaced 15 degrees apart. Although the longitude lines are separated by an angular distance, they are also a measure of time. Each line of longitude is one hour apart from the next. Since the Earth rotates once every 24 hours, there are 24 lines total. As a result, the R.A. coordinates ͞ǧ͙ čĊĈĊđĊĘęĎĆđĘĕčĊėĊĘĊĊēċėĔĒęčĊĔĚęĘĎĉĊ ĘčĔĜĎēČǤǤĆēĉ >>ĔęĎĔēĔċęčĊęĆėĘ The daily motion of the Sun across the sky is familiar to even the most casual observer. This daily trek is not the Sun moving as early astronomers thought, but the result of the Earth’s rotation. The Earth’s rotation also causes the stars to do the same, scribing out a large circle as the Earth completes one rotation. The size of the circular path a star follows depends on where it is in the sky. Stars near the celestial equator form the largest circles rising in the east and setting in the west. Moving toward the north celestial pole, the point around which the stars in the northern hemisphere appear to rotate, these circles become smaller. Stars in the mid-celestial latitudes rise in the northeast and set in the ęĆėĘĘĊĊēēĊĆėęčĊ ēĔėęčĈĊđĊĘęĎĆđĕĔđĊ northwest. Stars at high celestial latitudes are always above the horizon, and are said to be circumpolar because they never rise and never set. You will never see the stars complete one circle because the sunlight during the day washes out the starlight. However, part of this circular motion of stars in this region of the sky can be seen by setting up a camera on Ǥ Ƥ will reveal semicircles that revolve around the pole. (This description of stellar motions also applies to the southern hemisphere except all stars south of the celestial equator move around the south celestial pole.) ęĆėĘĘĊĊēēĊĆėęčĊ ĈĊđĊĘęĎĆđĊĖĚĆęĔė ęĆėĘĘĊĊēđĔĔĐĎēČĎēęčĊ ĔĕĕĔĘĎęĊĉĎėĊĈęĎĔēĔċęčĊ ēĔėęčĈĊđĊĘęĎĆđĕĔđĊ ͞ǧ͚ đđĘęĆėĘĆĕĕĊĆėęĔėĔęĆęĊĆėĔĚēĉęčĊĈĊđĊĘęĎĆđĕĔđĊĘǤĔĜĊěĊėǡęčĊĆĕĕĊĆėĆēĈĊĔċęčĎĘĒĔęĎĔē ěĆėĎĊĘĉĊĕĊēĉĎēČĔēĜčĊėĊĞĔĚĆėĊđĔĔĐĎēČĎēęčĊĘĐĞǤĊĆėęčĊēĔėęčĈĊđĊĘęĎĆđĕĔđĊǡęčĊĘęĆėĘ ĘĈėĎćĊĔĚęėĊĈĔČēĎğĆćđĊĈĎėĈđĊĘĈĊēęĊėĊĉĔēęčĊĕĔđĊȋ͙ȌǤęĆėĘēĊĆėęčĊĈĊđĊĘęĎĆđĊĖĚĆęĔėĆđĘĔ ċĔđđĔĜĈĎėĈĚđĆėĕĆęčĘĆėĔĚēĉęčĊĕĔđĊǤĚęǡęčĊĈĔĒĕđĊęĊĕĆęčĎĘĎēęĊėėĚĕęĊĉćĞęčĊčĔėĎğĔēǤ čĊĘĊĆĕĕĊĆėęĔėĎĘĊĎēęčĊĊĆĘęĆēĉĘĊęĎēęčĊĜĊĘęȋ͚ȌǤĔĔĐĎēČęĔĜĆėĉęčĊĔĕĕĔĘĎęĊĕĔđĊǡĘęĆėĘ ĈĚėěĊĔėĆėĈĎēęčĊĔĕĕĔĘĎęĊĉĎėĊĈęĎĔēĘĈėĎćĎēČĆĈĎėĈđĊĆėĔĚēĉęčĊĔĕĕĔĘĎęĊĕĔđĊȋ͛ȌǤ 20 >> www.celestron.com >>ĔđĆėđĎČēĒĊēęȋĜĎęčĔĕęĎĔēĆđĊĉČĊȌ Alt-Az position, it is still necessary to align the polar axis of the telescope (the fork arm) to the Earth’s axis of rotation in order to do long exposure astrophotography. To do an accurate polar alignment, the CPC requires an optional equatorial wedge between the telescope and the tripod. This allows the telescope’s tracking motors to rotate the telescope around the celestial pole, the same way as the stars. Without the equatorial wedge, you would notice the stars in the eyepiece would slowly rotate around ƤǤ unnoticed when viewing with an eyepiece, it would be very noticeable when imaging. Polar alignment is the process by which the telescope’s axis of rotation (called the polar axis) is aligned (made parallel) with the Earth’s axis of Ǥ ǡ Ǥ ȋǤǤǡƤ ȌǤ ǡ ȋȌ ƤǤ ǯǤ >>đđǦęĆėĔđĆėđĎČēĒĊēę The CPC hand control has a polar alignment function called “All-Star” polar alignment that will help you polar align your telescope for increased tracking precision and astrophotography. This feature allows you to choose any bright alignment stars to assist in accurately aligning your telescope and wedge with the North Celestial Pole. Before using the Polar Align feature, ƤǤ ͞ǧ͛ čĎĘĎĘčĔĜęčĊęĊđĊĘĈĔĕĊ ĎĘęĔćĊĘĊęĚĕċĔėĕĔđĆė ĆđĎČēĒĊēęǤčĊęĚćĊ ĘčĔĚđĉćĊĕĆėĆđđĊđęĔęčĊ ċĔėĐĆėĒĆēĉęčĊĒĔĚēę ĘčĔĚđĉĕĔĎēęęĔĔđĆėĎĘǤ Updating your Star Alignment After polar alignment, it’s a good idea to check the pointing accuracy ơ the mount. Since the polar alignment process requires you to “sync” the telescope on a bright star before you begin, it will be necessary to undo the sync before re-aligning. To undo the sync: 1. Press the AlignȀ controller to select Undo Sync from the list, and press Enter. The message Complete will display on the LCD. ǡ in its Named Star database list. This will be the star used for the All-Star Ǥǡ alignment star that is high in the sky and near the Meridian. Try to avoid stars that are close to the west/east horizon, directly overhead or too near the celestial pole. To re-align your telescope: Press the Align button and use the Up/Down buttons on the hand controller to select Polar Align from the list. 3. The hand control will ask you which of the original alignment stars ǤȀ desired star and press Enter. The Polar Align feature has two options: Align Wedge and Display Align. Align Wedge Ȃ slewing your telescope to any bright star in the telescope’s database, select the “Align Wedge” option. The telescope will then re-slew to the same star. ͙Ǥ Ƥ Ǥ 2. Then accurately center the star in your eyepiece and press Ǥ Dz dz the position that the star should be if it were accurately polar aligned. ȋ Optional Accessories) or a high power eyepiece to precisely center the ƤǤ 2. Slew the telescope to one of the original alignment stars, or another bright star if the original alignment stars are no longer in a convenient location. Press the AlignȀ buttons on the hand controller to select Alignment Stars from the list. ͜Ǥ ǡ Ƥ Enter. 5. Then center the star in the eyepiece and Press Align. ͞Ǥ Ǥ Display Align – the user can now display the polar alignment error in the RA and DEC axes. These values show how close the mount is pointed at the celestial pole based on how accurately the user centered the alignment star with the hand control and with the mount Ǥǣ 1. Press the AlignȀ controller to select Display Align from the list, and press Enter. ͛Ǥ star in the center of the eyepiece. Ǥ ǡǢ now be pointed towards the North Celestial Pole. >> www.celestron.com 21 >>ĎēĉĎēČęčĊĔėęčĊđĊĘęĎĆđĔđĊ ǡ other stars appear to rotate. These points are called the celestial poles Ǥǡ in the northern hemisphere all stars move around the north celestial pole. When the telescope’s polar axis is pointed at the celestial pole, it is parallel to the Earth’s rotational axis. Spring Polaris (North Star) the south celestial pole are not nearly as bright as those around the Ǥ Ǥ ȋ͝Ǥ͝Ȍ͝͡ minutes from the pole. The north celestial pole is the point in the northern hemisphere around which all stars appear to rotate. The counterpart in the southern hemisphere is referred to as the south celestial pole. Declination Drift Method of Polar Alignment This method of polar alignment allows you to get the most accurate alignment on the celestial pole and is required if you want to do long exposure deep-sky astrophotography through the telescope. The declination drift method requires that you monitor the drift of selected stars. The drift of each star tells you how far away the polar axis is pointing from the true celestial pole and in what direction. Although declination drift is simple and straight-forward, it requires a great deal ƤǤ drift method should be done after any one of the previously mentioned methods has been completed. Winter Summer ͞ǧ͝ čĊĕĔĘĎęĎĔēĔċęčĊĎČĎĕĕĊė ĈčĆēČĊĘęčėĔĚČčĔĚęęčĊĞĊĆė ĆēĉęčĊēĎČčęǤ Fall Ƥ Ǥ ǡƤ ƥ Ǥ ǡǤ star, Polaris, is the end star in the handle of the Little Dipper. Since the Little Dipper (technically called Ursa Minor) is not one of the brightest ǡƥ Ǥ ǡ (the pointer stars). Draw an imaginary line through them toward the Ǥȋ͞Ǧ͞ȌǤ Big Dipper changes during the year and throughout the course of the ȋ͞Ǧ͝ȌǤȋǤǤǡ Ȍǡƥ Ǥǡ ȋ͞Ǧ͞ȌǤ not as fortunate as those in the northern hemisphere. The stars around To perform the declination drift method you need to choose two Ǥ south near the meridian. Both stars should be near the celestial ȋǤǤǡ͘λ ȌǤ one at a time and in declination only. While monitoring a star on the meridian, any misalignment in the east-west direction is revealed. While monitoring a star near the east/west horizon, any misalignment Ǧ Ǥ Ǥ close alignment, a Barlow lens is also recommended since it increases Ƥ Ǥǡ Ǥ hair eyepiece and align the cross hairs so that one is parallel to the declination axis and the other is parallel to the right ascension axis. Move your telescope manually in R.A. and DEC to check parallelism. ǡ meet. The star should be approximately within 1/2 an hour of the Ƥ Ǥ Ƥ Ǥ Ȉ ǡǤ Ȉ ǡǤ Big Dipper Ǥ ǡ eastern horizon. The star should be 20 degrees above the horizon and Ƥ Ǥ Little Dipper Cassiopeia N.C.P. ter Poin s Star Polaris (North Star) ͞ǧ͞ čĊęĜĔĘęĆėĘĎēęčĊċėĔēęĔċęčĊćĔĜđĔċęčĊĎČĎĕĕĊėĕĔĎēę ęĔĔđĆėĎĘĜčĎĈčĎĘđĊĘĘęčĆēĔēĊĉĊČėĊĊċėĔĒęčĊęėĚĊȋēĔėęčȌ ĈĊđĊĘęĎĆđĕĔđĊǤĆĘĘĎĔĕĊĎĆǡęčĊDzdzĘčĆĕĊĉĈĔēĘęĊđđĆęĎĔēǡĎĘĔē ęčĊĔĕĕĔĘĎęĊĘĎĉĊĔċęčĊĕĔđĊċėĔĒęčĊĎČĎĕĕĊėǤčĊĔėęč ĊđĊĘęĎĆđĔđĊȋǤǤǤȌĎĘĒĆėĐĊĉćĞęčĊDzήdzĘĎČēǤ 22 Ȉ ǡǤ Ȉ ǡǤ ǡ Ǥǡ Ǥǡ Ǥ eliminated, the telescope is very accurately aligned. You can now do prime focus deep-sky astrophotography for long periods. NOTE: If the eastern horizon is blocked, you may choose a star near the western horizon, but you must reverse the polar high/low error directions. Also, if using this method in the southern hemisphere, the direction of drift is reversed for both R.A. and DEC. >> www.celestron.com With your telescope set up, you are ready to use it for observing. This section covers visual observing hints for both solar system and deep ơ your ability to observe. >>ćĘĊėěĎēČęčĊĔĔē ǡǤǡ face we see is fully illuminated and its light can be overpowering. ǡ Ǥ ȋƤȌǤ amount of detail on the lunar surface. At low power you will be able to see most of the lunar disk at one time. The optional Reducer/Corrector lens allows for breath-taking views of the entire lunar disk when used ǤȋƤ Ȍ focus in on a smaller area. Choose the lunar tracking rate from the CPC’s MENU tracking rate options to keep the Moon centered in the eyepiece Ƥ Ǥ Lunar Observing Hints ǡƤǤ Ƥ Ƥ Ǥ >>ćĘĊėěĎēČęčĊđĆēĊęĘ ƤǤ Venus go through its lunar-like phases. Mars can reveal a host of surface detail and one, if not both, of its polar caps. You will be able to see the cloud belts of Jupiter and the Great Red Spot (if it is visible at the time ȌǤǡ Jupiter as they orbit the giant planet. Saturn, with its beautiful rings, is easily visible at moderate power. Planetary Observing Hints Ȉ factor on how much planetary detail will be visible. So, avoid observing the planets when they are low on the horizon or when they are directly over a source of radiating heat, such as a rooftop or chimney. See “Seeing Conditions” later in this section. Ȉ ǡ ƤǤ >>ćĘĊėěĎēČęčĊĚē Although overlooked by many amateur astronomers, solar observation is both rewarding and fun. However, because the Sun is so bright, special precautions must be taken when observing our star so as not to damage your eyes or your telescope. Ǥ the folded optical design, tremendous heat build-up will result inside the optical tube. This can damage the telescope and/or any accessories attached to the telescope. they move across the solar disk and faculae, which are bright patches seen near the Sun’s edge. Solar Observing Hints Ȉ afternoon when the air is cooler. Ȉ ǡ shadow of the telescope tube until it forms a circular shadow. Ȉ ǡ Ǥ ǡƤ ǯǡǤƤ >> www.celestron.com 23 >>ćĘĊėěĎēČĊĊĕĐĞćďĊĈęĘ Ǧ Ǥ ǡǡơ nebulae, double stars and other galaxies outside our own Milky Way. Ǧ ǤǡǦǦ moderate power is all you need to see them. Visually, they are too faint Ǥǡ they appear black and white. And, because of their low surface brightness, they should be observed from a dark-sky location. Light pollution around ƥ ǡ ǡǤ Ƥ background sky brightness, thus increasing contrast. >>ĊĊĎēČĔēĉĎęĎĔēĘ ơ an observing session. Conditions include transparency, sky illumination Ǥ ơ observing will help you get the most out of your telescope. >>ėĆēĘĕĆėĊēĈĞ ơ clouds, moisture and other airborne particles. Thick cumulus clouds are completely opaque while cirrus can be thin, allowing the light from the brightest stars through. Hazy skies absorb more light than clear skies Ǥ ơ Ǥ is inky black. >>ĐĞđđĚĒĎēĆęĎĔē General sky brightening caused by the Moon, aurorae, natural airglow and ơ Ǥ brighter stars and planets, bright skies reduce the contrast of extended ƥ ǡǤ observing, limit deep sky viewing to moonless nights far from the light ǤƤ sky viewing from light polluted areas by blocking unwanted light while Ǥ ǡ hand, observe planets and stars from light polluted areas or when the Moon is out. >>ĊĊĎēČ Seeing conditions refers to the stability of the atmosphere and directly ơ Ƥ Ǥ atmosphere acts as a lens which bends and distorts incoming light rays. The amount of bending depends on air density. Varying temperature ơǡǡơǤ imperfect or smeared image. These atmospheric disturbances vary from time-to-time and place-to-place. The size of the air parcels compared to your aperture determines the “seeing” quality. Under good seeing ǡƤ Mars, and stars are pinpoint images. Under poor seeing conditions, images are blurred and stars appear as blobs. The conditions described here apply to both visual and photographic observations. ͟ǧ͙ ĊĊĎēČĈĔēĉĎęĎĔēĘĉĎėĊĈęđĞĆċċĊĈęĎĒĆČĊĖĚĆđĎęĞǤčĊĘĊĉėĆĜĎēČėĊĕėĊĘĊēęĆĕĔĎēęĘĔĚėĈĊ ȋĎǤĊǤǡĘęĆėȌĚēĉĊėćĆĉĘĊĊĎēČĈĔēĉĎęĎĔēĘȋđĊċęȌęĔĊĝĈĊđđĊēęĈĔēĉĎęĎĔēĘȋėĎČčęȌǤĔĘęĔċęĊēǡ ĘĊĊĎēČĈĔēĉĎęĎĔēĘĕėĔĉĚĈĊĎĒĆČĊĘęčĆęđĎĊĘĔĒĊĜčĊėĊćĊęĜĊĊēęčĊĘĊęĜĔĊĝęėĊĒĊĘǤ 24 >> www.celestron.com After looking at the night sky for a while, you may want to try photographing it. Several forms of celestial photography are possible with your telescope, including short exposure prime focus, eyepiece ǡǡǤ Each of these is discussed in moderate detail with enough information to get you started. Topics include the accessories required and some simple techniques. More information is available in some of the publications listed at the end of this manual. Ƥ ǡ Ȃ Ǥ ơ ǯǦǦǦǤǡǯ focus capability or mirror lock up. Here are the mandatory features a ǤǡDzdz which allows for time exposures. This excludes point and shoot cameras and limits the selection to SLR cameras, the most common type of 35 mm camera on the market today. >>čĔėęĝĕĔĘĚėĊėĎĒĊĔĈĚĘčĔęĔČėĆĕčĞ Short exposure prime focus photography is the best way to begin Ǥ telescope without an eyepiece or camera lens in place. To attach your Ǧȋ ȌǦ Ƥ ȋǤǤǡǡǡ ǤȌǤ The T-Ring replaces the 35 mm SLR camera’s normal lens. Prime focus Ǥ To attach your camera to your telescope: ͙Ǥ Ǥȋ͡Ǥ͚͝dz͙͙dz also remove the 3” adapter plate threaded onto the rear of the tube) ǡDzdzơǤ new electronic cameras use the battery to keep the shutter open during Ǥ ǡ ǡ ǡƤ or not. Look for a camera that has a manual shutter when operating in Ǥǡǡǡǡ others have made such camera bodies. The camera must have interchangeable lenses so you can attach it to the Ǥ ǯƤ ǡ not 100% functional. The light meter, for example, does not have to be operational since you will be determining the exposure length manually. You will also need a cable release with a locking function to hold the shutter open. Mechanical and air release models are available. Lunar Phase ISO 50 ISO 100 ISO 200 Crescent 1/2 1/4 1/8 ISO 400 1/15 Quarter 1/15 1/30 1/60 1/125 Full 1/30 1/60 1/125 1/250 ͠ǧ͙ ćĔěĊĎĘĆđĎĘęĎēČĔċėĊĈĔĒĒĊēĉĊĉĊĝĕĔĘĚėĊęĎĒĊĘĜčĊē ĕčĔęĔČėĆĕčĎēČęčĊĔĔēĆęęčĊĕėĎĒĊċĔĈĚĘĔċĞĔĚėęĊđĊĘĈĔĕĊǤ T-Adapter 2. Thread the T-Ring onto the T-Adapter. T-Ring (camera model Ƥ Ȍ 3. Mount your camera body onto the T-Ring the same as you would for a standard camera lens. 4. Thread the T-Adapter onto the back of the telescope while holding the camera in the desired orientation (either vertical or horizontal). With your camera attached to the telescope, you are ready for prime Ǥ Ǥǯ to do it: ͙Ǥ Ƥ Ǥ ͚Ǥ sharp. Make sure the mirror lock knobs are loosened. ͠ǧ͚ ǦĉĆĕęĊėċĔė͠dzĕęĎĈĆđĚćĊ ͛Ǥ ȋ͠Ǧ͙ȌǤ 4. Trip the shutter using a cable release or self timer. T-Adapter 5. Use your camera’s bracketing feature to automatically change ƤǤ T-Ring (camera model Ƥ Ȍ The exposure times listed in table 8-1 should be used as a starting point. Always make exposures that are longer and shorter than the recommended time. Also, take a few photos at each shutter speed. This will ensure that you will get a good photo. Ȉ ƤǤ ͠ǧ͚ ǦĉĆĕęĊėċĔė͙͙Ȁ͙͜dzĕęĎĈĆđĚćĊ >> www.celestron.com 25 >>ĞĊĕĎĊĈĊėĔďĊĈęĎĔē angular sizes, primarily the Moon and planets. Planets, although physically quite large, appear small in angular size because of their ǤƤ ǡǡ to make the image large enough to see any detail. Unfortunately, the camera/telescope combination alone does not provide enough Ƥ ƤǤ image large enough, you must attach your camera to the telescope with Ǥǡ Ǣ Ǧȋ͗͛͛͜͡͞Ȍǡ T-ring for your particular camera make (i.e., Minolta, Nikon, Pentax, etc.). Ƥ ǡƤ ƥ Ƥ Ǥ ǡƤ Ǥ ǯƤ ƤǯǤ ƤǤǯ to take photos of varying duration and keep accurate records of what you have done. Record the date, telescope, exposure duration, eyepiece, ȀǡƤ Ǥ ͙͘ eyepiece. All exposure times are listed in seconds or fractions of a second. Planet Moon Mercury Venus Mars Jupiter Saturn ISO 50 4 16 1/2 16 8 16 ISO 100 2 8 1/4 8 4 8 ISO 200 1 4 1/8 4 2 4 ISO 400 1/2 2 1/15 2 1 2 ͠ǧ͜ ĊĈĔĒĒĊēĉĊĉĊĝĕĔĘĚėĊęĎĒĊċĔėĕčĔęĔČėĆĕčĎēČĕđĆēĊęĘǤ 35 mm SLR T-Ring Tele-Extender Eyepiece Visual Back ͠ǧ͛ ĈĈĊĘĘĔėĎĊĘċĔėėĔďĊĈęĎĔē čĔęĔČėĆĕčĞ Ƥ Ǥ Ȃ Ȃ vibration to smear the image. To get around this, use the camera’s self Ȃ Ǥ ǡ “hat trick.” This technique incorporates a hand-held black card placed over the aperture of the telescope to act as a shutter. The card prevents Ǥ the shutter has been released and the vibration has diminished (a few Ȍǡ ƤǤ the exposure is complete, place the card over the front of the telescope Ǥ Ƥǯ Ǥ ǡ Ǥ Ǣ Ǥ Here’s the process for making the exposure. ͙Ǥ Ƥ Ǥ 2. Turn the focus knob until the image is as sharp as possible. 3. Place the black card over the front of the telescope. 4. Release the shutter using a cable release. 5. Wait for the vibration caused by releasing the shutter to diminish. Also, wait for a moment of good seeing. ͞Ǥ of the exposure (see accompanying table). ͟Ǥ Ǥ 8. Close the camera’s shutter. 26 The exposure times listed here should be used as a starting point. Always make exposures that are longer and shorter than the recommended time. Also, take a few photos at each shutter speed. This will ensure that Ǥ ͛͞Ǥ NOTE: Don’t expect to record more detail than you can see visually in the eyepiece at the time you are photographing. ǡơƤǡ ơ ơƤǤ >>ĔēČĝĕĔĘĚėĊėĎĒĊĔĈĚĘčĔęĔČėĆĕčĞ This is the last form of celestial photography to be attempted after Ǥ ǡ ǤƤ ǡǤ Ƥ Ƥ Ǥ ǡǡ ǡǡƥ Ǥ There are several techniques for this type of photography, and the one chosen will determine the standard accessories needed. The best ơǦ guider. This device allows you to photograph and guide through the Ǥơ ơǦǡ ȋ͙͗͜͟͡͞ȌǤǡ need a T-Ring to attach your camera to the Radial Guider. Ǥ forms of astrophotography which allows for fairly loose guiding, prime focus requires meticulous guiding for long periods. To accomplish this you need a guiding ocular with an illuminated reticle to monitor your Ǥǡơ ȋ͙͙͗͜͟͡ȌǤ Ǥ 1. Polar align the telescope using an optional equatorial wedge. To polar ȋȌ Ǥǡ see the Polar Alignment section earlier in the manual. 2. Remove all visual accessories. 3. Thread the Radial Guider onto your telescope. 4. Thread the T-Ring onto the Radial Guider. >> www.celestron.com 5. Mount your camera body onto the T-Ring the same as you would any other lens. ͞Ǥ DzdzǤ ͟Ǥ Ǥ ͠Ǥ Ƥ Ǥ ͡Ǥ ƤǤ time consuming process. ͙͘Ǥ Ǥ 11. Monitor your guide star for the duration of the exposure using the buttons on the hand controller to make the needed corrections. 12.Close the camera’s shutter. >>ĊėĎĔĉĎĈėėĔėĔėėĊĈęĎĔēȋȌ PEC for short, is a system that improves the tracking accuracy of the drive by reducing the number of user corrections needed to keep a guide star centered in the eyepiece. PEC is designed to improve photographic quality by reducing the amplitude of the worm errors. Using the PEC Ǧ Ǥǡ position of its worm gear so that it has a reference when playing back the recorded error. Next, you must guide for at least 8 minutes during Ǥȋ worm gear 8 minutes to make one complete revolution, hence the need to guide for 8 minutes). This “teaches” the PEC chip the characteristics of the worm. The periodic error of the worm gear drive will be stored in the PEC chip and used to correct periodic error. The last step is to play Ǥǡ this feature is for advanced astrophotography and still requires careful guiding since all telescope drives have some periodic error. Ƥ eyepiece, it will have to be re-centered before the recording begins. ǡ ǦơǤǡ prepare for guiding, it is best to restart PEC recording after the worm gear has found its index. ͞Ǥ ͠ǡ Ǥ ͟Ǥ the guide star on the illuminated cross hairs and you are ready to play back the periodic error correction. ͠Ǥ ǯ ǡ function to begin playing back the correction for future photographic ǤǦ ǡ and repeat the recording processes again. The previously recorded information will be replaced with the current information. Repeat ͟͠ Ǥ Does the PEC function make unguided astrophotography possible? Yes and ǤȋƤȌǡ ȋ͚͘͘Ȍǡ ǤǡǡơǦ exposure, deep sky astrophotography. The optional Reducer/Corrector lens reduces exposure times making the task of guiding a little easier. ǡƤ shortest possible time. Here are proven recommendations: Ȉ ͙͘͘͘ȋ Ȍ Ȉ ͚͛͘͘ȋ Ȍ Ȉ ͙͘͘͞ȋ Ȍ Ȉ ͙͛͘͘͘ȋ Ȍ Ȉ ͘͘͜ Using Periodic Error Correction Ȉ Ǧ͚͛͘͘ȋ Ȍ ȋ EQ South for southern hemisphere) method, select PEC from the Utilities menu and press ENTER to begin recording your periodic error. Here’s how to use the PEC function. Ȉ Ǧ͘͘͜ȋ Ȍ ͙Ǥ to photograph. Ȉ ͙͚͝ȋ Ȍ ͚Ǥ Ǥ parallel to the declination while the other is parallel to the R.A. axis. Ȉ ǡȋ Ȍ 3. Center the guide star on the illuminated cross hairs, focus the telescope and study the periodic movement. 4. Before actually recording the periodic error, take a few minutes to practice guiding. Set the hand control slew rate to an appropriate guide rate (rate 1 = .5x, rate 2 = 1x) and practice centering the guide star in the cross hairs for several minutes. This will help you familiarize yourself with the periodic error of the drive and the operation of the hand control. Remember to ignore declination drift when programming the PEC. Note: When recording PEC, only the photo guide rates (rates 1 and 2) will be operational. This eliminates the possibility of moving the telescope suddenly while recording. 5. To begin recording the drive’s periodic error, press the MENU button ǤȀ buttons to display the Record option and press ENTER. You will have ͝ ǤƤ observing session that PEC record or play is selected, the worm gear Ǥ >> www.celestron.com ǡ Ƥǡ Ƥ are designed or specially treated for celestial photography. Here are some popular choices: Ȉ ͙͘͘ȋ Ȍ Ȉ Ǧ͘͘͜ȋ Ȍ There is no exposure determination table to help you get started. The best ways to determine exposure length is to look at previously published ƤȀ unguided sample photos of various parts of the sky while the drive is running. Always take exposures of various lengths to determine the best exposure time. >>ĊėėĊĘęėĎĆđčĔęĔČėĆĕčĞ Your CPC makes an excellent telephoto lens for terrestrial (land) photography. Terrestrial photography is best done with the telescope in Ǧ Ƥ ơǤ ơǡȋ͡Ȍ Ǥ ȋ͙͘Ȍ ơǤ ơ ǯƤǤ Metering ƤǡǡƤȀǤ ǡ Ǥ͛͝ ơǦǦ 27 metering which lets you know if your picture is under or overexposed. Ǥ ǯ Ƥ metering and changing shutter speeds Reducing Vibration Releasing the shutter manually can cause vibrations, producing blurred photos. To reduce vibration when tripping the shutter, use a cable release. A cable release keeps your hands clear of the camera and lens, thus eliminating the possibility of introducing vibration. Mechanical shutter releases can be used, though air-type releases are best. Blurry pictures can also result from shutter speeds that are too slow. To prevent ǡƤ ͙Ȁ͚͘͝ ǦǤǡ exposure length is virtually unlimited. >>ĒĆČĎēČ Fastar Option – Using your EdgeHD telescope at f/2 with optional lens assembly. The EdgeHD telescopes are equipped with a removable secondary mirror that allows you to convert your f/10 telescope into an f/2 imaging system capable of exposure times 25 times shorter than those needed Ȁ͙͘Ǩ ǯ ơǦ Ƥǡ making it the most versatile imaging system available today. With an telescope to f/2 prime focus use in a matter of seconds. This makes the Ǧ Ǥ Ƥ Ǧ Ǥ Another way to reduce vibration is with the Vibration Suppression Pads (#93503). These pads rest between the ground and tripod feet. They reduce the vibration amplitude and vibration time. The following is a brief description of the advantages of imaging at each Ǧ Ƥ telescope in any of its many settings f/6.3 with Reducer/Corrector ȋ͟͝ǡ Ring Nebula) and small galaxies (M104, the Sombrero Galaxy), larger ƤǤ Ȁ͞Ǥ͛Ȁ͙͘Ǥ Medium size to small galaxies –Ȁ͞Ǥ͛Ƥ then at f/2, but the slower f-number will usually require you to guide the image while you are taking longer exposures. Guiding can be accomplished by using an optional Radial Guider or a piggyback guide scope. The exposure times are about 10 times longer, but the results can ơǤ Ȁ͞Ǥ͛Ǥ͙͘͜ȋ Galaxy) can be imaged under dark skies with a series of short exposures using Track and Accumulate. Ten exposures at 15 seconds each will yield a nice image and is short enough that you may not need to guide the ǤȀ͞Ǥ͛ǡ Ȁ Ǥȋ ȌǤ Lunar or small planetary nebulae – f/10 imaging is more challenging for long exposure, deep-sky imaging. Guiding needs to be very accurate and the exposure times need to be much longer, about 25 times longer than Ȁ͚Ǥ Ȁ͙͘Ǥ Ƥ ǡ should be shot at f/20. The Ring Nebula is a good candidate because it is Ǥȋ͟͝Ȍ ͛͘Ǧ͘͝ seconds at f/10. The longer the exposure, the better. Planetary or Lunar – f/20 is a great way to image the planets and features on the Moon. When imaging the planets, very short exposures are needed. The exposure lengths range from .03 to .1 seconds on Ǥ Ǥ Generally you will take one image after another until one looks good. Dzdz Ǥ͙͘ exposures you might save 1. To image at f/20, you need to purchase a 2x Barlow and a T-adapter or Radial Guider. 28 ͠ǧ͝ čĊĆĘęĆėĔĒĕĆęĎćđĊ ĕęĎĈĆđĞĘęĊĒ Ƥ using the optional CCD camera for f/2 imaging. Warning: The secondary mirror should never be removed unless Ȁ͚Ǥ can easily be made by turning the screws on the top of the secondary mirror mount without ever having to remove the secondary mirror (see Telescope Maintenance section of this manual). The f/# stands for the ratio between the focal length and the diameter Ǥǡ͙͙dz tube has a focal length of 110 inches and a diameter of 11 inches. This makes the system an f/10, (focal length divided by diameter). When position, the system becomes f/2. This is a unique feature to some ȋƤȌǤ Ȁ͚ ͠ǧ͞ ͠ǧ͟ >> www.celestron.com ǢǡƤǦǦ view, image size and pixel resolution. As the f-number goes down (or Ȍǡ ǡƤǦǦǦ ǡ Ǥ ơ Ȁ͚Ȁ͙͘ǫȀ͚͙Ȁ͝ Ȁ͙͘Ǥ That makes the exposure time needed about 25 times shorter than at Ȁ͙͘ǡƤ͝ ͙Ȁ͝ Ȁ͙͘ȋ͠Ǧ͠ȌǤ TELESCOPE MODEL 8” 9.25” 11” STANDARD F /10 CONFIGURATION 80” (2032 mm) 93” (2350 mm) 110” (2800 mm) F /2 CONFIGURATION 16” (406.4 mm) 18.5” (470 mm) 23.1” (587 mm) ͠ǧ͠ Auto Guiding The CPC has a designated auto guiding port for use with a CCD Ǥ͠Ǧ͡ cable to the CPC and calibrating the autoguider. Note that the four outputs are active-low with internal pull-ups and are capable of sinking 25 mA DC. 12 3456 1 = No Connect 2 = Ground 3 = +RA (Right) 4 = +DEC (Up) 5 = -DEC (Down) 6 = -RA (Left) ͠ǧ͡ ĎēĔĚęĉĎĆČėĆĒċĔėĚęĔČĚĎĉĊė >> www.celestron.com 29 While your CPC telescope requires little maintenance, there are a few things to remember that will ensure your telescope performs at its best. >>ĆėĊĆēĉđĊĆēĎēČĔċęčĊĕęĎĈĘ ǡȀ of your telescope. Special care should be taken when cleaning any instrument so as not to damage the optics. ǡȋ of camel’s hair) or a can of pressurized air. Spray at an angle to the lens for approximately two to four seconds. Then, use an optical cleaning solution and white tissue paper to remove any remaining debris. Apply the solution to the tissue and then apply the tissue paper to the lens. Low pressure strokes should go from the center of the corrector to the Ǥ Ǩ You can use a commercially made lens cleaner or mix your own. A good cleaning solution is isopropyl alcohol mixed with distilled water. The ͘͞ά ͘͜άǤ ǡȋ quart of water) can be used. ǡ Ǧ Ǥ observing, the dew must be removed, either with a hair dryer (on low setting) or by pointing the telescope at the ground until the dew has evaporated. ǡ accessories from the rear cell of the telescope. Place the telescope in a dust-free environment and point it down. This will remove the moisture from the telescope tube. To minimize the need to clean your telescope, replace all lens covers ƤǤ ǡ cover should be placed over the opening when not in use. This will prevent contaminants from entering the optical tube. Ǥ ǡ call the factory for a return authorization number and price quote. >>ĔđđĎĒĆęĎĔē The optical performance of your CPC telescope is directly related to its collimation, that is the alignment of its optical system. Your CPC was collimated at the factory after it was completely assembled. However, ǡ have to be collimated. The only optical element that may need to be ǡǡ Ǥ To verify collimation, view a star near the zenith. Use a medium to high Ȃ͙͞ Ǥ Ƥ Ǥ Ǥ skewing of the star to one side, then re-collimation is needed. To check the collimation of your telescope you will need a light source. A bright star near the zenith is ideal since there is a minimal amount of atmospheric distortion. Make sure that tracking is on so that you won’t Ǥǡ ǡ Ǥ means that it moves very little thus eliminating the need to manually track it. Before you begin the collimation process, be sure that your telescope is in thermal equilibrium with the surroundings. Allow 45 minutes for the telescope to reach equilibrium if you move it between large temperature extremes. ͡ǧ͙ ĔđđĎĒĆęĎĔēĉďĚĘęĒĊēęĈėĊĜĘ ͡ǧ͚ ěĊēęčĔĚČčęčĊĘęĆėĕĆęęĊėēĆĕĕĊĆėĘęčĊĘĆĒĊĔēćĔęčĘĎĉĊĘĔċċĔĈĚĘǡęčĊĞĆėĊĆĘĞĒĒĊęėĎĈǤčĊĉĆėĐ ĔćĘęėĚĈęĎĔēĎĘĘĐĊĜĊĉĔċċęĔęčĊđĊċęĘĎĉĊĔċęčĊĉĎċċėĆĈęĎĔēĕĆęęĊėēĎēĉĎĈĆęĎēČĕĔĔėĈĔđđĎĒĆęĎĔēǤ 30 >> www.celestron.com To accomplish this, you need to tighten the secondary collimation ȋȌ Ƥ skewed light. These screws are located on the secondary mirror holder ȋƤ͡Ǧ͙ȌǤ the collimation screw cover to expose the three collimation screws Ǥ ǡ ƪ ơǤ ͙Ȁ͙͞Ȁ͠ Ǧ moving the scope before making any improvements or before making Ǥ To make collimation a simple procedure, follow these easy steps: 1. While looking through a medium to high power eyepiece, de-focus a ȋƤ 9-2). Center the de-focused star and notice in which direction the central shadow is skewed. Ƥ skewed, than you are turning the collimation screw the wrong way. Turn the screw in the opposite direction, so that the star image is ƤǤ ͞Ǥ ǡ tighten the other two screws by the same amount. Conversely, if the collimation screw gets too tight, then loosen the other two screws by the same amount. ͟Ǥ Ƥǡ Ǥ the same direction, then continue turning the screw(s) in the same ǤƤơ ǡ͚͞ the new direction. ĈĔđđĎĒĆęĊĉęĊđĊĘĈĔĕĊ ĘčĔĚđĉĆĕĕĊĆėĘĞĒĒĊęėĎĈĆđ ĜĎęčęčĊĈĊēęėĆđĔćĘęėĚĈęĎĔē ĈĊēęĊėĊĉĎēęčĊĘęĆėǯĘ ĉĎċċėĆĈęĎĔēĕĆęęĊėēǤ ͚Ǥ Ƥ (be careful not to touch the corrector plate), pointing towards the ǤƤ ǤƤ until its shadow is seen closest to the narrowest portion of the rings (i.e., the same direction in which the central shadow is skewed). ͛Ǥ Ƥ positioned. This will be the collimation screw you will need to ƤǤȋƤ ǡ Ƥ ȌǤ 4. Use the hand control buttons to move the de-focused star image to Ƥ obstruction of the star image is skewed. 5. While looking through the eyepiece, use an Allen wrench to turn the collimation screw you located in step 2 and 3. Usually a tenth of a turn Ǥ ͡ǧ͛ Ǥǡ Ƥ Ǥ ȋǤǤǡȌǡ ƥ Ǥ Wait until a better night if it is turbulent or aim to a steadier part of the ǤǤ Ƥ Ǥ ǡ the accessories are listed in alphabetical order. ȋ͙͙͚͗͜͡ǦȌȂ This accessory is an Amici prism ͜͝λ with images that are oriented properly (upright and correct from ǦǦȌǤǡǤ Ȃ Like telescopes, eyepieces come in a variety of designs. Ǥ͙Ǥ͚͝dz ơ Ǥ ÚȂ Plössl eyepieces have a 4-element lens designed for low-to-high power observing. All are fully multi-coated for maximum ǤÚơ ƤǡǨ͙Ǥ͚͝dzǡ ǣ͛Ǥ͞ǡ͞ǡ͠ǡ͙͘ǡ͙͛ǡ ͙͟ǡ͚͝ǡ͚͛͘͜Ǥ ǦȂ The newly enhanced X-Cel LX eyepiece series is what you’ve been waiting for in a high quality eyepiece for planetary viewing. With a brand new sleek and robust design and a twist-up eye guard, these eyepieces are especially designed for comfort and ease of use. They also >> www.celestron.com Ƥ͘͞λ͞Ǧ Ǧ Ƥ Ƥ ǤǦ parfocal and require little to no focusing when changing from low to high power. The X-Cel LX ơǣ ͚Ǥ͛ǡ͝ǡ͟ǡ͡ǡ͙͚ǡ͙͠ 25 mm. ȂCelestron Ultima LX Series Ƥ Ƥ Ǥ͕͘͟Ƥ Ƥ twist-up eyecups - Good for eyeglass wearers. ǣ͝ǡ͠ǡ͙͛ǡ͙͟ǡ 22 mm and 32 mm. ǡ ȋ͙͙͗͜͟͡ȌȂ This multipurpose 12.5 mm illuminated reticle can be used for guiding deep-sky astrophotos, measuring position angles, angular separations and more. The laser etched reticle provides razor sharp lines, and the variable brightness illuminator is completely cordless. The Micro Guide Eyepiece produces 224 power when used with ͙͙͘͘Ȁ͙͙͛͘͘͘͞͠Ǥ 31 ǡ ȋ͙͙͜͡͡Ǧ͙͘ȌȂ Ƥ in lunar and planetary observing. They reduce glare and light scattering, increase contrast through selective Ƥǡ Ƥ resolution, reduce irradiation and lessen eye fatigue. Celestron’s Ƥǡ plane parallel glass with excellent ǤǯǦƪ Ǥ Ƥ Ƥǯǡ ǯǡ͙Ǥ͚͝dz ǡ ơ͚͞ Ǥ ǣ͚͙ǡ͘͠ǡ͙͗͝ǡǦ͚͝ Neutral Density. ǡȋ͗͛͡͝͠͠ȌȂ Celestron’s premium model for astronomy, using two red LEDs to preserve night vision better than red Ƥ ǤǤ 9 volt battery (included). ȋȌȂƤ Ǥ ǡ Ƥ Ƥ Ǥ This includes mercury and high and low pressure sodium vapor lights. ǡ ȋȌ Ǥơ 1.25” eyepieces (#94123) and 2” eyepieces (#94124). ȋ͙͗͟͟͜͠ȌȂ͙͚͟ rechargeable power supply. Comes with two 12v output cigarette outlets, built-in ƪǡ Ǥ 120v AC adapter and cigarette lighter Ǥơ͙͟ ȋ͙͗͟͟͟͠ȌǤ ȋ͙͗͜͟͡͞ȌȂ The Celestron Radial Guider® Ƥ for use in prime focus, deep sky astrophotography and takes the place of the T-Adapter. This device allows you to photograph and guide simultaneously through the optical tube assembly of your telescope. This type of guiding produces the best results since what you see through the ƤǤ Guider is a “T”-shaped assembly that attaches to the rear cell of the telescope. As light from the telescope enters the guider, most passes straight through to the camera. A small portion, however, is up to the guiding eyepiece. This guider has ơǦ ǢƤǡ housing rotate independently of the camera orientation making the acquisition of a guide star quite easy. Second, the 32 prism angle is tunable allowing you to look at guide stars on-axis. This accessory works especially well with the Reducer/Corrector. ǦȂ This T-Adapter allows you to attach your 35 mm DSLR camera to the prime focus of your EdgeHD telescope. This arrangement is used for terrestrial photography and short exposure lunar and Ǥ long exposure deep-sky photography when Ǥ͗͛͜͜͡͞ ͗͛͘͘͜͠͡͞͞ CPC Deluxe 925 and 1100 HD. ǦȂ The T-Ring couples your 35 mm SLR camera body to the T-Adapter, radial guider, or tele-extender. This accessory is mandatory if you want to do DSLR photography through the telescope. Celestron provides a T-ring for both Nikon (#93402) and Canon (#93419). Ǧǡȋ͗͛͛͜͡͞ȌȂ The tele-extender is a hollow tube that allows you to attach a camera to the telescope when the eyepiece Ǥ which allows you to capture very high power views of the Sun, Moon and ƤǤǦƤ back. This tele-extender works with eyepieces that have large housings, like the Celestron Ultima series. ȋ͗͛͜͡͞͞ȌȂ Celestron’s HD Pro Wedge allows you to tilt the telescope so that its polar axis is parallel to the earth’s Ǥ your CPC DeluxeHD for guided astrophotography. The Pro Wedge is designed to support our fork mounted telescopes up to 11”. The HD Pro Wedge provides a heavy duty, stable platform that is perfect for astroimaging and guarantees minimal vibration. A low latitude range of 0-90 degrees makes this wedge functional for use at the equator. A full description of all Celestron accessories can be found in the Celestron Accessory Catalog (#93685). >> www.celestron.com ȃ Optical Specification CPC Deluxe 800 HD – #11007 CPC Deluxe 925 HD – #11008 Design 203 mm (8”) EdgeHD Optics 235 mm (9.25”) EdgeHD Optics Focal Length 2032 mm 2350 mm F/ratio of the Optical System 10 10 Primary Mirror: Fine Annealed Pyrex Starbright XLT Coating Fine Annealed Pyrex Starbright XLT Coating 2.75” 3.35” Optical Quality Crown Glass A-R Coatings both sides Optical Quality Crown Glass A-R Coatings both sides Highest Useful Magnification 480x (~4 mm eyepiece) 555x (~4 mm eyepiece) 660x (~4 mm eyepiece) Lowest Useful Magnification (7 mm exit pupil) 29x (~70 mm eyepiece) 34x (~70 mm eyepiece) 40x (~70 mm eyepiece) Magnification: Standard Eyepiece 51x 102x Resolution: .68 arc seconds .57 arc seconds .59 arc seconds .49 arc seconds Light Gathering Power 843x 1127x Near Focus with Standard Eyepiece or Camera ~25 feet ~40 feet Material Coatings Central Obstruction Corrector Plate: Material Coatings Rayleigh Criterion Dawes Limit CPC Deluxe 1100 HD – #11009 280 mm (11”) EdgeHD Optics 2800 mm 10 Fine Annealed Pyrex Starbright XLT Coating 3.75” Optical Quality Crown Glass A-R Coatings both sides 122x .50 arc seconds .42 arc seconds 1593x ~100 feet Field of View: Standard Eyepiece .85º .8º Linear Field of View (at 1000 yds) 44 ft. 42 ft. 35 ft. .67º Optical Tube Length 17” 22” 24” Weight of Telescope 42 lbs 58 lbs 65 lbs Weight of Tripod 19 lbs 19 lbs 19 lbs đĊĈęėĔēĎĈĕĊĈĎċĎĈĆęĎĔēĘ nput Voltage Maximum Minimum 12 V DC Nominal 15 V DC Max 9 V DC Min Power Supply Requirements 12 VDC-2.5A (Tip positive) GPS Internal 48 channel ĊĈčĆēĎĈĆđĕĊĈĎċĎĈĆęĎĔēĘ Motor: Type Resolution Slew speeds DC Servo motors with encoders, both axes .1406 arc sec Nine slew speeds: 4º /sec, 2º /sec, .5º/sec, 64x, 16x, 8x, 4x, 1x, .5x Hand Control Double line, 16 character Liquid Crystal Display 19 fiber optic backlit LED keypad Fork Arm Dual Fork tine cast aluminum with detachable HC holder Gears 5.78”, precision brass gears on RA axes, 180 tooth. Stainless steel worm gear Bearings 9.8” Azimuth Bearing Surface Optical Tube Aluminum >> www.celestron.com 33 ĔċęĜĆėĊĕĊĈĎċĎĈĆęĎĔēĘ Ports Period Error Correction Tracking Rates Tracking Modes Alignment Procedures Database Complete Revised NGC Catalog Complete Messier Catalog Complete IC Catalog Complete Caldwell Abell Galaxies Solar System objects Famous Asterisms Selected CCD Imaging Objects Selected SAO Stars RS-232 communication port on hand control, Autoguider Port, 2 Auxiliary Port, PC Port Permanently programmable Sidereal, Solar, Lunar Alt-Az, EQ North and EQ South Sky Align, Auto Two-Star Align, Two-Star Align, Solar System Align, EQ North Align and EQ South Align 40,000+ objects, 99 user defined programmable objects. Enhanced information on over 200 objects 7,840 110 5,386 109 2,712 9 20 25 29,500 ǧ A– Absolute magnitude Airy disk The apparent magnitude that a star would have if it were observed from a ͙͘ ǡ͚͛Ǥ͞Ȃ years. The absolute magnitude of the Sun is ͜Ǥ͠Ǥ ͙͘ ǡ be visible on Earth on a clear moonless night away from surface light. The apparent size of a star’s disk produced even by a perfect optical system. Since the star can never be focused perfectly, 84 per cent of the light will ǡ͙͞ system of surrounding rings. Alt–Azimuth Mounting A telescope mounting using two independent rotation axes allowing movement of the instrument in Altitude and Azimuth. Altitude ǡ its Angular Distance above or below the celestial horizon. ƪ ơǢ astrology has nothing in common with astronomy. Astronomical unit (AU) The distance between the Earth and the Sun. ͙͜͡ǡ͟͝͡ǡ͘͘͡Ǥǡ ơ͙͘͝ǡ͘͘͘ǡ͘͘͘Ǥ Aurora The emission of light when charged particles from the solar wind slams into and excites atoms and molecules in a planet’s upper atmosphere. Azimuth the horizon, measured from due north, between the astronomical meridian (the vertical line passing through the center of the sky and the north and south points on the horizon) and the vertical line containing the celestial body whose position is to be measured. B– Binary Stars Aperture ǯǢ the larger the aperture, the greater the telescope’s ȂǤ Apparent Magnitude A measure of the relative brightness of a by an observer on Earth. Arc minute ͙Ȁ͘͞ a degree. Arc second ͙Ȁ͛ǡ͘͘͞ȋ ͙Ȁ͘͞ ȌǤ Asterism ƥ night sky. C– Asteroid A small, rocky body that orbits a star. Celestial Equator Astrology Ƥ 34 Binary (Double) stars are pairs of stars that, because of their mutual gravitational attraction, orbit around Ǥ more stars revolve around one another, it is called Ǥ 50 percent of all stars belong to binary or multiple systems. Systems with individual components that can be seen separately by a telescope are called visual binaries or visual multiples. The nearest “star” to our solar system, Alpha Centauri, is actually our Ǥ of three stars, two very similar to our Sun and one dim, small, red star orbiting around one another. ǯ Ǥ into two equal hemispheres. >> www.celestron.com Celestial pole ǯ north or south pole onto the celestial sphere. Celestial Sphere An imaginary sphere surrounding the Earth, concentric with the Earth’s center. Collimation The act of putting a telescope’s optics into perfect alignment. Meridian A reference line in the sky that starts at the North celestial pole and ends at the South celestial pole and Ǥ ǡ the meridian starts from your Southern horizon and passes directly overhead to the North celestial pole. Messier ͙͘͘͟ primarily looking for comets. Comets are hazy ơ that were not comets to help his search. This catalog became the Messier Catalog, M1 through M110. D– Declination (DEC) The angular distance of a celestial body Ǥ be said to correspond to latitude on the surface of the Earth. N– Nebula Ǥ cloudy appearance. North Celestial Pole The point in the Northern hemisphere around which all the stars appear to rotate. This is caused by the fact that the Earth is rotating on an axis that passes through the North and South celestial poles. The star Polaris lies less than a degree from this point and is therefore referred to as the “Pole Star”. Nova Although Latin for “new” it denotes a star that suddenly becomes explosively bright at the end of its life cycle. E– Ecliptic ǯ ǤƤDz yearly path of the Sun against the stars.” Equatorial mount A telescope mounting in which the instrument is set upon an axis which is parallel to the Ǣ equal to the observer’s latitude. F– Focal length The distance between a lens (or mirror) and the point Ƥ to focus. The focal length divided by the aperture of the mirror or lens is termed the focal ratio. G– GoTo Open Cluster Term used to refer to a computerized telescope or to the act of slewing (moving) a computerized telescope. J– Jovian Planets O– P– Any of the four gas giant planets that are at a greater distance form the Sun than the terrestrial planets. Parallax ơ ơ Ǥ a triangle from which the apex angle (the parallax) if the length of the baseline between the observing positions is known and the angular direction of the has been measured. The traditional method in astronomy of determining the distance to a celestial Ǥ Parfocal Refers to a group of eyepieces that all require the same distance from the focal plane of the telescope to be in focus. This means when you focus one parfocal eyepiece all the other parfocal eyepieces, in a particular line of eyepieces, will be in focus. Parsec The distance at which a star would show parallax Ǥ͛Ǥ͚͞Ȃǡ ͚͘͞ǡ͚͞͝ ǡ͛͘ǡ͘͘͠ǡ͘͘͘ǡ͘͘͘ǡ͘͘͘ km. (Apart from the Sun, no star lies within one parsec of us.) Point Source because it to too far away or too small is considered a point source. A planet is far away but it can be resolved as a disk. Most stars cannot be resolved as disks, they are too far away. 35 K– Kuiper Belt A region beyond the orbit of Neptune extending to about 1000 AU which is a source of many short period comets. L– Light–Year (ly) Ȃ ͙͠͞ǡ͘͘͘Ȁ Ǥ ȋ͚͡͡ǡ͚͟͡Ȁ ǤȌ͙͛ǡ͟͝͝ǡ͘͘͞ ǡ Ȃ ͝Ǥ͠͠ ȋ͡Ǥ͜͞ȌǤ M Ȃ Magnitude >> www.celestron.com along the plane of the Milky Way. Most have an asymmetrical appearance and are loosely assembled. They contain from a dozen to many hundreds of stars. Magnitude is a measure of the brightness of a celestial body. The brightest stars are assigned magnitude 1 and those increasingly fainter from 2 down to magnitude 5. The faintest star that can ͞Ǥ Each magnitude step corresponds to a ratio of 2.5 in brightness. Thus a star of magnitude 1 is 2.5 times brighter than a star of magnitude 2, and 100 times brighter than a magnitude 5 star. The brightest star, ǡȂ͙Ǥ͞ǡ Ȃ͙͚Ǥ͟ǡǯǡ ǡȂ͚͞Ǥ͟͠Ǥ apparent magnitude scale is arbitrary. R– V– ƪ A telescope in which the light is collected by means of a mirror. Resolution The minimum detectable angle an optical system Ǥ ơ ǡ to the minimum angle, resolution. The larger the aperture, the better the resolution. Right AscensionǣȋȌ The angular distance of a celestial ǡ seconds along the Celestial Equator eastward from the Vernal Equinox. S– Schmidt Telescope Sidereal Rate This is the angular speed at which the Earth is rotating. Telescope tracking motors drive the telescope at this rate. The rate is 15 arc seconds per second or 15 degrees per hour. The boundary line between the light and dark portion of the Moon or a planet. U– Universe 36 A star whose brightness varies over time due to either inherent properties of the star or something eclipsing or obscuring the brightness of the star. W– Waning Moon The period of the Moon’s cycle between full and new, when its illuminated portion is decreasing. Waxing Moon The period of the Moon’s cycle between new and full, when its illuminated portion is increasing. Z– Rated the most important advance in optics. in 200 years, the Schmidt telescope combines ƪ for photographic purposes. It was invented in 1930 by Bernhard Voldemar Schmidt (1879-1935). T– Terminator Variable Star Zenith The point on the Celestial Sphere directly above the observer. Zodiac The zodiac is the portion of the Celestial Sphere that lies within 8 degrees on either side of the Ecliptic. The apparent paths of the Sun, the Moon, and the planets, with the exception of some portions of the path of Pluto, lie within this band. Twelve divisions, or signs, each 30 degrees in width, comprise the zodiac. These signs coincided with the zodiacal constellations about 2,000 years ago. Because of the Precession of the Earth’s axis, the Vernal Equinox has moved westward by about 30 degrees since Ǣ longer coincide with the constellations. The totality of astronomical things, events, relations Ǥ >> www.celestron.com ǧǧ͚͚͛ȍȎ You can control your NexStar telescope with a computer via the RS-232 port on the computerized hand control and using an optional RS-232 ȋ͚͗͛͘͡͡ȌǤ ǡ popular astronomy software programs. Communication Protocol ͘͘͡͞Ȁ ǤǤ ͙͞ hexadecimal. Echo Kx GoTo Azm-Alt B12AB, 4000 GoTo Ra-Dec R34AB, 12CE Get Azm-Alt Z 12AB, 4000# Get RA-Dec E 34AB, 12CE# Cancel GoTo M Is GoTo in Progress L X# Useful to check communication 10 characters sent. B=Command, 12AB=Azm, comma, 4000=Alt. If command conflicts with slew limits, there will be no action. Scope must be aligned. If command conflicts with slew limits, there will be no action. 10 characters returned, 12AB=Azm, comma, 4000=Alt, # Scope must be aligned # or 1# 0=No, 1=Yes ͙Ǥ͞ HC version V 16# Stop/Start Tracking Tx x = 0 (Tracking off) x = 1 (Alt-Az on) x = 2 (EQ-N) x = 3 (EQ-S) 32-bit GoTo RA-Dec r34AB0500,12CE0500 32-bit get RA-Dec e 32-bit GoTo Azm-Alt b34AB0500,12CE0500 32-bit get Azm-Alt z Version 1.6 Alt-Az tracking requires alignment 34AB0500,12CE0500# The last two characters will always be zero. 34AB0500,12CE0500# The last two characters will always be zero. čĊĈĆćđĊėĊĖĚĎėĊĉęĔ ĎēęĊėċĆĈĊęĔęčĊęĊđĊĘĈĔĕĊ čĆĘĆēǦ͚͚͛ĒĆđĊĕđĚČ ĆęĔēĊĊēĉĆēĉĆ͜Ǧ͜ ęĊđĊĕčĔēĊďĆĈĐĆęęčĊ ĔęčĊėĊēĉǤčĊĜĎėĎēČĎĘ ĆĘċĔđđĔĜĘǣ 4-4 Modular Phone Jack DB9 Pin 3 PC Transmit DB9 Pin 5 Ground >> www.celestron.com DB9 Pin 2 PC Receive 37 ȃ 38 >> www.celestron.com >> www.celestron.com 39 ȃ 40 >> www.celestron.com >> www.celestron.com 41 42 >> www.celestron.com >> www.celestron.com 43 44 >> www.celestron.com >> www.celestron.com 45 ηηĊĆėđĞĊęĊĔėčĔĜĊėĘ čĔĜĊė ĆęĊ ĊĆĐ ĔĚėđĞ ĆęĊ Quadrantids Jan 01-Jan 05 4-Jan Lyrids Apr 16-Apr 25 21-Apr 15 pi-Puppids Apr 15-Apr 28 23-Apr Var. eta-Aquarids Apr 19-May 28 5-May 60 June Bootids Jun 26-Jul 02 27-Jun Var. July Phoenicids Jul 10-Jul 16 13-Jul Var. Southern delta-Aquarids Jul 12-Aug 19 27-Jul 20 60-200 Perseids Jul 17-Aug 24 12-Aug 120-160 Alpha-Aurigids Aug 25-Sep 05 31-Aug 10 Draconids Oct 06-Oct 10 8-Oct Orionids Oct 02-Nov 07 21-Oct 20 ĆĈčĆČēĎęĚĉĊĎĘĆćĔĚę͚Ǥ͝ęĎĒĊĘćėĎČčęĊėĔėċĆĎēęĊė ęčĆēęčĊēĊĝęĒĆČēĎęĚĉĊǤ Var*. Leonids Nov 14-Nov 21 17-Nov 100* alpha-Monocerotids Nov 15-Nov 25 21-Nov Var. Phoenicids Nov 28-Dec 09 6-Dec Var. Puppid-Velids Dec 01-Dec 15 7-Dec 10 Geminids Dec 07-Dec 17 13-Dec 120 Ursids Dec 17-Dec 26 22-Dec 10 * These meteor showers have the potential of becoming meteor storms with displays of thousands of meteors per hour. >>ĔđĆėĈđĎĕĘĊĘĎēĔėęčĒĊėĎĈĆĕđĚĘĔęĆđĈđĎĕĘĊĘėĔĚēĉęčĊĔėđĉ 46 ĆęĊ ĈđĎĕĘĊĞĕĊ ĚėĆęĎĔē 2001 Dec 14 2001 Jun 21 2002 Dec 04 2002 Jun 10 2003 May 31 2003 Nov 23 2005 Apr 08 2006 Mar 29 2008 Aug 01 2009 Jul 22 2010 Jul 11 2012 May 20 2012 Nov 13 2013 May 10 2014 Oct 23 2015 Mar 20 2016 Mar 09 2017 Aug 21 2019 Jul 02 2020 Dec 14 Annular Total Total Annular Annular Total Partial Total Total Total Total Annular Total Annular Partial Total Partial Total Total Total 03m53s 04m57s 02m04s 00m23s 03m37s 01m57s 00m42s 04m07s 02m27s 06m39s 05m20s 05m46s 04m02s 06m03s 02m47s 04m09s 02m40s 04m33s 02m10s ĔĈĆęĎĔē North America, Hawaii South Africa, Madagascar S. Africa, Indonesia, Australia West, Midwest, Hawaii, Alaska Alaska Australia, New Zealand, S. America Florida, Southwest Africa, Europe, Asia Europe, Asia Asia, Hawaii South America West, Hawaii, Alaska Australia, S. America Australia, N.Z. West, Midwest, Alaska Europe, N. Africa, Asia Hawaii, Alaska Across the U.S.! S. America S. America >> www.celestron.com A. Celestron warrants this telescope to be free from defects in materials and workmanship for two years. Celestron will repair or replace such product or part thereof which, upon inspection by Celestron, is found to be defective in materials or workmanship. As a condition to the obligation of Celestron to repair or replace such product, the product must be returned to Celestron together with proof-of-purchase satisfactory to Celestron. B. The Proper Return Authorization Number must be obtained from Ǥȋ͙͛͘Ȍ͚͛͠Ǧ͘͡͝͞ to receive the number to be displayed on the outside of your shipping container. All returns must be accompanied by a written statement setting forth the name, address and daytime telephone number of the owner, together with a brief description of any claimed defects. Parts or product for which replacement is made shall become the property of Celestron. ǡ ǡ Ǥ ơ Ǥ the event repair or replacement shall require more than thirty days, Celestron shall notify the customer accordingly. Celestron reserves the right to replace any product which has been discontinued from its product line with a new product of comparable value and function. ơ Ƥ ǡ ǡǡǤ ǡ Ǥ ǡǡ ǡǤ ǡǤ ǡ ǡǡ ǡ Ǥ Ǥ Some states do not allow the exclusion or limitation of incidental or consequential damages or limitation on how long an implied warranty lasts, so the above limitations and exclusions may not apply to you. Ƥ ǡ Ǥ Celestron reserves the right to modify or discontinue, without prior notice to you, any model or style telescope. ǡ ǣ Customer Service Department 2835 Columbia Street Torrance, CA 90503 Ǥȋ͙͛͘Ȍ͚͛͠Ǧ͘͡͝͞ Ǥȋ͙͛͘Ȍ͚͙͚Ǧ͛͝͠͝ Ǧ͠Ǧ͜ This warranty supersedes all other product warranties. ǣǤǤǤ ǤǤǤǤǤǤǤ Ƥ Ǥ >> www.celestron.com 47 Ǥ Ǥ #OLUMBIA3TREETs4ORRANCE#!53! 4ELEPHONEs&AX FCC Statement This device complies with Part 15 of FCC Rules. Operation is subject to the following two conditions: 1. This device may not cause harmful interference, and 2. This device must accept any interference received, including interference that may cause undesired operation. ©2011 Celestron !LLRIGHTSRESERVEDs0RINTEDIN#HINAs Product design and specifications are subject to change without prior notification. )TEM).34s Designed and intended for those 13 years of age and older. A FLEXIBLE IMAGING PLATFORM AT AN AFFORDABLE PRICE Superior flat-field, coma-free imaging by the Celestron Engineering Team Ver. 04-2013, For release in April 2013. The Celestron EdgeHD A Flexible Imaging Platform at an Affordable Price By the Celestron Engineering Team ABSTRACT: The Celestron EdgeHD is an advanced, flat-field, aplanatic series of telescopes designed for visual observation and imaging with astronomical CCD cameras and full-frame digital SLR cameras. This paper describes the development goals and design decisions behind EdgeHD technology and their practical realization in 8-, 9.25-, 11-, and 14-inch apertures. We include cross-sections of the EdgeHD series, a table with visual and imaging specifications, and comparative spot diagrams for the EdgeHD and competing “coma-free” Schmidt-Cassegrain designs. We also outline the construction and testing process for EdgeHD telescopes and provide instructions for placing sensors at the optimum back-focus distance for astroimaging. 1. INTRODUCTION The classic Schmidt-Cassegrain telescope (SCT) manufactured by Celestron served an entire generation of observers and astrophotographers. With the advent of wide-field and ultra-wide-field eyepieces, large format CCD cameras, and full frame digital SLR cameras, the inherent drawbacks of the classic SCT called for a new design. The EdgeHD is that new design. The EdgeHD offers clean, diffraction-limited images for high power observation of the planets and the Moon. As an aplanatic, flat-field astrograph, the EdgeHD’s optics provide tight, round, edge-to-edge star images over a wide, 42mm diameter flat field of view for stunning color, monochrome, and narrow-band imaging of deep sky objects. 2. SETTING GOALS FOR THE EDGEHD TELESCOPE The story of the EdgeHD began with our setting performance goals, quality goals, and price goals. Like the classic SCT, the new Celestron optic would need to be light and compact. Optically, we set twin goals. First, the new telescope had to be capable of extraordinary wide-field viewing with advanced eyepiece designs. Second, the optic had to produce sharp-tothe-edge astrophotography with both digital SLR cameras and astronomical CCD cameras. Finally, we wanted to leverage Celestron’s proven ability to manufacture high-performance telescopes at a consumer-friendly price point. In short, we sought to create a flexible imaging platform at a very affordable price. Given an unlimited budget, engineering high-performance optics is not difficult. The challenge Celestron accepted was to control the price, complexity, and cost of manufacture without compromising optical performance. We began with a comprehensive review of the classic SCT and possible alternatives. Our classic SCT has three optical components: a spherical primary mirror, a spherical secondary mirror, and a corrector plate with a polynomial curve. As every amateur telescope maker and professional optician knows, a sphere is the most desirable optical figure. In polishing a lens or mirror, the work piece moves over a lap made of optical pitch that slowly conforms to the glass surface. Geometrically, the only surfaces that can slide freely against one another are spheres. Any spot that is low relative to the common spherical surface receives no wear; any spot that is higher is worn off. Spherical surfaces result almost automatically. 2 I The Celestron EdgeHD A skilled optician in a well-equipped optical shop can reliably produce near-perfect spherical surfaces. Furthermore, by comparing an optical surface against a matchplate—a precision reference surface—departures in both the radius and sphericity can be quickly assessed. In forty years of manufacturing its classic Schmidt-Cassegrain telescope, Celestron had fully mastered the art of making large numbers of essentially perfect spherical primary and secondary mirrors. In addition, Celestron’s strengths included the production of Schmidt corrector plates. In the early 1970s, Tom Johnson, Celestron’s founder, perfected the necessary techniques. Before Johnson, corrector plates like that on the 48-inch Schmidt camera on Palomar Mountain required many long hours of skilled work by master opticians. Johnson’s innovative production methods made possible the volume production of a complex and formerly expensive optical component, triggering the SCT revolution of the 1970s. For more than forty years, the SCT satisfied the needs of visual observers and astrophotographers. Its performance resulted from a blend of smooth spherical surfaces and Johnson’s unique method of producing the complex curve on the corrector with the same ease as producing spherical surfaces. As the 21st century began, two emerging technologies —wide-field eyepieces and CCD cameras—demanded highquality images over a much wider field of view than the classic SCT could provide. Why? The classic SCT is well-corrected optically for aberrations on the optical axis, that is, in the exact center of the field of view. Away from the optical axis, however, its images suffer from two aberrations: coma and field curvature. Coma causes off-axis star images to flare outward; field curvature causes images to become progressively out of focus away from the optical axis. As wide-field eyepieces grew in popularity, and as observers equipped themselves with advanced CCD cameras, the classic SCT proved inadequate. To meet the requirements of observers, we wanted the new Celestron optic to be both free of coma and to have virtually zero field curvature. EdgeHD Series Edge HD 800 Edge HD 925 Edge HD 1100 Edge HD 1400 FIGURE 1. Celestron’s EdgeHD series consists of four aplanatic telescopes with 8-, 9.25-, 11-, 14-inch apertures. The optical design of each instrument has been individually optimized to provide a flat, coma-free focal plane. Each EdgeHD optic produces sharp images to the edge of the view with minimal vignetting. The Celestron EdgeHD 3 OPTICAL ABERRATIONS For those not familiar with the art of optical design, this brief primer explains what aberrations are and how they appear in a telescopic image. OFF-AXIS COMA Coma is an off-axis aberration that occurs when the rays from successive zones are displaced outward relative to the principal (central) ray. A star image with coma appears to have wispy “hair” or little “wings” extending from the image. In a coma-free optical system, rays from all zones are centered on the (central) ray, so stars appear round across the field FIELD CURVATURE Field curvature occurs when the best off-axis images in an optical system focus ahead or behind the focused on-axis image. The result is that star images in the center of the field of view are sharp, but off-axis images appear more and more out of focus. A telescope with no field curvature has a “flat field,” so images are sharp across the whole field of view. SPHEROCHROMATISM In the Schmidt-Cassegrain, spherochromatism is present, but not deleterious in designs with modest apertures and focal ratios. It occurs because the optical “power” of the Schmidt corrector plate varies slightly with wavelength. Only in very large apertures or fast SCTs does spherochromism become a problem. 3. ENGINEERING A NEW ASTROGRAPH We did not take lightly the task of improving the classic SCT. Its two spherical mirrors and our method of making corrector lenses allowed us to offer a high-quality telescope at a low cost. We investigated the pros and cons of producing a Ritchey-Chrétien (R-C) Cassegrain, but the cost and complexity of producing its hyperbolic mirrors, as well as the long-term disadvantages of an open-tube telescope, dissuaded us. We also designed and produced two prototype Corrected Dall-Kirkham (CDK) telescopes, but the design’s ellipsoidal primary mirror led inevitably to a more expensive instrument. While the R-C and CDK are fine optical systems, we wanted to produce equally fine imaging telescopes at a more consumer-friendly price. As we’ve already noted, our most important design goal for the new telescope was to eliminate coma and field curvature over a field of view large enough to accommodate a top-of-theline, full-frame digital SLR camera or larger astronomical CCD camera. This meant setting the field of view at 42 mm in diameter. Of course, any design that would satisfy the full-frame requirement would also work with the less expensive APS-C digital SLR cameras (under $800) and less expensive astronomical CCD cameras (under $2,000). There are several ways to modify the classic SCT to reduce or eliminate coma. 4 I The Celestron EdgeHD Unfortunately, these methods do not address the problem of field curvature. For example, we could replace either the spherical primary or secondary with an aspheric (i.e., non-spherical) mirror. Making the smaller secondary mirror into a hyperboloid was an obvious choice. Although this would have given us a coma-free design, its uncorrected field curvature would leave soft star images at the edges of the field. We were also concerned that by aspherizing the secondary, the resulting coma-free telescopes would potentially have zones that would scatter light and compromise the high-power definition that visual observers expect from an astronomical telescope. Furthermore, the aspheric secondary mirror places demands on alignment and centration that often result in difficulty maintaining collimation. The inspiration for the EdgeHD optics came from combining the best features of the CDK with the best features of the classic SCT. We placed two small lenses in the beam of light converging toward focus and re-optimized the entire telescope for center-to-edge performance. In the EdgeHD, the primary and secondary mirrors retain smooth spherical surfaces, and the corrector plate remains unchanged. The two small lenses do the big job of correcting aberrations for a small increment in cost to the telescope buyer. Furthermore, because it retains key elements of the classic SCT, the EdgeHD design is compatible with the popular Starizona Hyperstar accessory. THE OPTICAL PERFORMANCE OF THE EDGEHD COMPARED TO OTHER SCTS CLASSIC SCT “COMA-FREE” SCT EDGEHD 100 μm On-Axis 5.00 mm 10.00 mm 15.00 mm 20.00 mm Off-axis distance (millimeters) FIGURE 2. Matrix spot diagrams compare the center-to-edge optical performance of the classic SCT, “coma-free” SCT, and EdgeHD. The EdgeHD clearly outperforms the other optical systems. The classic SCT shows prominent coma. The “coma-free” SCT is indeed free of coma, but field curvature causes its off-axis images to become diffuse and out of focus. In comparison, the EdgeHD’s spot pattern is tight, concentrated, and remains small from on-axis to the edge of the field. The Celestron EdgeHD 5 4. OPTICAL PERFORMANCE OF THE EDGEHD Optical design involves complex trade-offs between optical performance, mechanical tolerances, cost, manufacturability, and customer needs. In designing the EdgeHD, we prioritized optical performance first: the instrument would be diffraction-limited on axis, it would be entirely coma-free, and the field would be flat to the very edge. (Indeed, the name EdgeHD derives from our edge-of-field requirements.) Figure 2 shows ray-traced spot diagrams for the 14-inch aperture classic SCT, coma-free SCT, and EdgeHD. All three are 14-inch aperture telescopes. We used ZEMAX® professional optical ray-trace software to design the EdgeHD and produce these ray-trace data for you. Each spot pattern combines spots at three wavelengths: red (0.656μm), green (0.546μm), and blue (0.486μm) for five field positions: on-axis, 5mm, 10mm, 15mm, and 20mm off-axis distance. The field of view portrayed has diameter of 40mm— just under the full 42mm image circle of the EdgeHD—and the wavelengths span the range seen by the dark-adapted human eye and the wavelengths most often used in deep-sky astronomical imaging. In the matrix of spots, examine the left hand column. These are the on-axis spots. The black circle in each one represents the diameter of the Airy disk. If the majority of the rays fall within the circle representing the Airy disk, a star image viewed at high power will be limited almost entirely by diffraction, and is therefore said to be diffraction-limited. By this standard, all three SCT designs are diffraction-limited on the optical axis. In each case, the Schmidt corrector removes spherical aberration for green light. Because the index of refraction of the glass used in the corrector plate varies with wavelength, the Schmidt corrector allows a small amount of spherical aberration to remain in red and blue light. This aberration is called spherochromatism, that is, spherical aberration resulting from the color of the light. While the green rays converge to a near-perfect point, the red and blue spot patterns fill or slightly overfill the Airy disk. Numerically, the radius of the Airy disk is 7.2μm, (14.4μm diameter) while the root-mean-square radius of the spots at all three wavelengths is 5.3μm (10.6μm diameter). Because the human eye is considerably more sensitive to green light than it is to red or blue, images in the eyepiece appear nearly perfect even to a skilled observer. Spherochromatism depends on the amount of correction, or the refractive strength, of the Schmidt lens. To minimize spherochromatism, high-performance SCTs have traditionally been ƒ/10 or slower. When pushed to focal ratios faster than ƒ/10 (that is, when pushed to ƒ/8, ƒ/6, etc.) spherochromatism increases undesirably. Next, comparing the EdgeHD with the classic SCT and the “coma-free” SCT, you can see that off-axis images in the classic SCT images are strongly affected by coma. As expected, the images in the coma-free design do not show the characteristic comatic flare, but off-axis they do become quite enlarged. This is the result of field curvature. Figure 3 illustrates how field curvature affects off-axis images. In an imaging telescope, we expect on-axis and off-axis rays to focus on the flat surface of a CCD or digital SLR image sensor. But unfortunately, with field curvature, off-axis rays come to sharp focus on a curved surface. In a “coma-free” SCT, your off-axis star images are in focus ahead of the CCD. At the edge of a 40mm field, the “coma-free” telescope’s stars have swelled to more than 100μm in diameter. Edge-of-field star images appear large, soft, and out of focus. 6 I The Celestron EdgeHD Meanwhile, at the edge of its 40mm field, the EdgeHD’s images have enlarged only slightly, to a root-mean-square radius of 10.5μm (21μm diameter). But because the green rays are concentrated strongly toward the center, and because every ray, including the faint “wings” of red light, lie inside a circle only 50μm in diameter, the images in the EdgeHD have proven to be quite acceptable in the very corners of the image captured by a full-frame digital SLR camera. Field curvature negatively impacts imaging when you want high-quality images across the entire field of view. Figures 4 and 5 clearly demonstrate the effects of field curvature in 8- and 14-inch telescopes. Note how the spot patterns change with off-axis distance and focus. A negative focus distance means closer to the telescope; a positive distance mean focusing outward. In the EdgeHD, the smallest spots all fall at the same focus position. If you focus on a star at the center of the field, stars across the entire field of view will be in focus. In comparison, the sharpest star images at the edge of the field in the “coma-free” telescope come to focus in front of the on-axis best focus. If you focus for the center of the image, star images become progressively enlarged at greater distances. The best you can do is focus at a compromise off-axis distance, and accept slightly out-of-focus stars both on-axis and at the edge of the field. Any optical designer with the requisite skills and optical ray-tracing software can, in theory, replicate and verify these results. The data show that eliminating coma alone is not enough to guarantee good images across the field of view. For high-performance imaging, an imaging telescope must be diffraction-limited on-axis and corrected for both coma and field curvature off-axis. That’s what you get with the EdgeHD, at a very affordable price. Field Curvature Telescope with Field Curvature Flat-Field Telescope FIGURE 3. In an optical system with field curvature, objects are not sharply focused on a flat surface. Instead, off-axis rays focus behind or ahead of the focus point of the on-axis rays at the center of the field. As a result, the off-axis star images are enlarged by being slightly out of focus. 5. MECHANICAL DESIGN IMPROVEMENTS Centering the primary mirror is even more demanding. In the classic SCT, the primary mirror is attached to a sliding “focus” tube. When you focus the telescope, the focus knob moves the primary mirror longitudinally. When you reverse the direction of focus travel, the focus tube that carries the primary can “rock” slightly on the baffle tube, causing the image to shift. In the classic SCT, the shift does not significantly affect on-axis image quality. However, in the EdgeHD, off-axis images could be affected. Because the baffle tube carries the sub-aperture corrector inside and the primary mirror on the outside, we manufacture it to an extremely tight diametric tolerance. The tube that supports the primary was redesigned with a centering alignment flange, which contacts the optical (front) surface of the primary mirror. When the primary mirror is assembled onto the focus tube and secured with RTV adhesive, this small mechanical change guarantees precise optical centration. Following assembly, the focus tube carrying the primary is placed in a test jig. We rotate the mirror and verify that the primary is precisely squared-on to ensure that the image quality expected from the optics is maintained. To ensure that the completed EdgeHD telescope delivers the full potential of the optical design, we also redesigned key mechanical components. With classic SCT designs, for example, an observer could bring the optical system to focus at different back focus distances behind the optical tube assembly, changing effective focal length of the telescope. This caused on-axis spherical aberration and increased the off-axis aberration. In the EdgeHD series, the back focus distance is optimized and set for one specific distance. Every EdgeHD comes equipped with a visual back that places the eyepiece at the correct back focus distance, and our Large T-Adapter accessory automatically places digital SLR cameras at the optimum back focus position. As part of the optical redesign, we placed the primary and secondary mirrors closer than they had been in the classic SCT, and designed new baffle tubes for both mirrors that allow a larger illuminated field of view. To ensure full compatibility with the remarkable Starizona Hyperstar accessory that enables imaging at ƒ/1.9 in the EdgeHD 800 and ƒ/2.0 in the EdgeHD 925, 1100, and 1400, all EdgeHDs have a removable secondary mirror. In any optical system with a moveable primary mirror, focus shift—movement of the image when the observer changes focusing direction—has been an annoyance. In Celestron’s SCT and EdgeHD telescopes, we tightened the tolerances. During assembly and testing, we measure the focus shift; any unit with more than 30 arcseconds focus shift is rejected and returned to an earlier stage of assembly for rework. Because it covers a wide field of view, the optical elements of the EdgeHD must meet centering and alignment tolerances considerably tighter than those of the classic SCT design. For example, because the corrector plate must remain precisely centered, we secure it with alignment screws tipped with soft Nylon plastic. The screws are set on the optical bench during assembly while we center the corrector plate. Once this adjustment is perfect, the screws are tightened and sealed with Loctite® to secure the corrector in position. This seemingly small mechanical change ensures that the corrector plate and the secondary mirror mounted on the corrector plate stay in permanent optical alignment. In the classic SCT, astrophotographers sometimes experience an image shift as the telescope tracks across the meridian. The focus mechanism serves as one support point for the mirror. In the EdgeHD, we added two stainless steel rods to the back of the cell that supports the primary mirror. When the two mirror clutches at the back of the optical tube assembly are engaged, aluminum pins press against the stainless steel rods, creating two additional stabilizing support points (see Figure 6). 8” ƒ/10 Coma-Free SCT -0.8 mm -0.4 mm 0.0 mm +0.4 mm 8” ƒ/10 Flat-Field EdgeHD +0.8 mm -0.8 mm -0.4 mm 0.0 mm +0.4 mm +0.8 mm On-axis 3.5 mm off-axis 7 mm off-axis 10.5 mm off-axis 14 mm off-axis Spot diagrams plotted for 0.0, 3.5, 7, 10.5, and 14 mm off-axis; showing λ = 0.486, 0.546, and 0.656 μm. FIGURE 4. Compare star images formed by a 8-inch coma-free SCT with those formed by an EdgeHD. The sharpest star images in the coma-free SCT follow the gray curve, coming to focus approximately 0.6mm in front of the focal plane. In the EdgeHD, small, tight star images are focused at the focal plane across the field of view, meaning that your images will be crisp and sharp to the very edge. The Celestron EdgeHD 7 14” ƒ/10 Coma-Free SCT -0.8 mm -0.4 mm 0.0 mm +0.4 mm 14” ƒ/11 Flat-Field EdgeHD +0.8 mm -0.8 mm -0.4 mm 0.0 mm +0.4 mm +0.8 mm On-axis 5 mm off-axis 10 mm off-axis 15 mm off-axis 20 mm off-axis Spot diagrams plotted for 0.0, 5, 10, 15, and 20mm off-axis; showing λ = 0.486, 0.546, and 0.656μm. FIGURE 5. In a 14-inch coma-free SCT, the smallest off-axis star images lie on the curved focal surface indicated by the gray line. Since CCD or digital SLR camera sensors are flat, so star images at the edge of the field will be enlarged. In the aplanatic EdgeHD design, the smallest off-axis images lie on a flat surface. Stars are small and sharp to the edge of the field. Telescope tubes must “breathe” not only to enable cooling, but also to prevent the build-up of moisture and possible condensation inside the tube. In the classic SCT, air can enter through the open baffle tube. In the EdgeHD, the sub-aperture lenses effectively close the tube. To promote air exchange, we added ventilation ports with 60μm stainless steel mesh that keeps out dust but allows the free passage of air. In a telescope designed for imaging, users expect to attach heavy filter wheels, digital SLRs, and astronomical CCD cameras. We designed the rear threads of the EdgeHD 925, 1100, and 1400 telescopes with a heavy-duty 3.290×16 tpi thread, and we set the back focus distance to a generous 5.75 inches from the flat rear surface of the baffle tube locking nut. The rear thread on the EdgeHD 800 remains the standard 2.00×24 tpi, and the back-focus distance is 5.25 inches. Many suppliers offer precision focusers, rotators, filter wheels, and camera packages that are fully compatible with the heavy-duty rear thread and back focus distance of the EdgeHD. FIGURE 6. The mirror clutch mechanism shown in this crosssection prevents the primary mirror from shifting during the long exposures used in imaging. 6. MANUFACTURING THE EDGEHD OPTICS Each EdgeHD has five optical elements: an aspheric Schmidt corrector plate, a spherical primary mirror, a spherical secondary mirror, and two sub-aperture corrector lenses. Each element is manufactured to meet tight tolerances demanded by a highperformance optical design. Celestron applies more than forty years of experience in shaping, polishing, and testing astronomical telescope optics to every one of the components in each EdgeHD telescope. Our tight specifications and repeated, careful testing guarantee that the telescope will not only perform well for highpower planetary viewing, but will also cover a wide-angle field for superb edge-to-edge imaging. Nevertheless, we don’t take this on faith; both before and after assembly, we test and tune each set of optics. 8 I The Celestron EdgeHD Celestron’s founder, Tom Johnson, invented the breakthrough process used to make Celestron’s corrector plates. Over the years, his original process has been developed and refined. At present, we manufacture corrector plates with the same level of ease, certainty, and repeatability that opticians expect when they are producing spherical surfaces. Each corrector plate begins life as a sheet of water-white, hightransmission, low-iron, soda-lime float glass. In manufacturing float glass, molten glass is extruded onto a tank of molten tin, where the glass floats on the dense molten metal. The molten tin surface is very nearly flat (its radius of curvature is the radius of planet Earth!), and float glass is equally flat. We cut corrector blanks from large sheets of the glass, then run them through a double-sided surfacing machine to grind and polish both surfaces to an optical finish. The blanks are inspected and any with defects are discarded. The Johnson/Celestron method for producing the polynomial aspheric curve is based on precision “master blocks” with the exact inverse of the desired curve. We clean the master block and corrector blank, and then, by applying a vacuum from the center of the block, pull them into intimate optical contact, excluding any lint, dust, or air between them, gently bending the flat corrector blank to match the reverse curve of the block. We then take the combined master block and corrector blank and process the top surface of the corrector to a polished concave spherical surface. With the corrector lens still on the master block, an optician tests the radius and figure of the new surface against a precision reference matchplate (also known as an optical test plate or test glass) using optical interference to read the Newton’s rings or interference fringes, as shown in Figure 7. If the surface radius lies within a tolerance of zero to three fringes (about 1.5 wavelengths of light, or 750nm concave), and the surface irregularity is less than half of one fringe (¼– wavelength of light), the corrector is separated from the master block. The thin glass springs back to its original shape, so that the side that was against the master block becomes flat and the polished surface assumes the profile of a Schmidt corrector lens. The corrector is tested again, this time in a double-pass auto collimator. Green laser light at 532nm wavelength (green) enters through an eyepiece, strikes an EdgeHD secondary and primary mirror, passes through the corrector lens under test, reflects from a precision optical flat, goes back through the corrector to reflect again from the mirrors, and finally back to focus. Because the light passes twice through the Schmidt corrector lens, any errors are seen doubled. The double-pass autocollimation test (see Figure 9) ensures that every Schmidt corrector meets the stringent requirements of an EdgeHD optical system. transfers them to an abrasive free room where they are polished to a precise spherical surface. Each mirror is checked for both radius and optical spherical figure against a convex precision reference matchplate. When the interference fringes indicate the radius is within ±1 fringe from the nominal radius and the surface irregularity is less than one fourth of one fringe, the mirror receives a final check using the classic mirror-maker’s null test familiar to every professional optican. Afterwards, every primary mirror is taken to the QA Interferometry Lab—shown in Figure 10—where the surface irregularity of each mirror is verified, via interferometer, to be within specification. The smaller secondary mirrors are also made of low-expansion borosilicate glass. Like the primaries, the secondaries are edged and centered, then ground and polished. The secondary is a convex mirror so during manufacture it is tested against a concave precision reference matchplate to check both its radius of curvature and figure. The secondary mirrors are also brought to the QA Interferometry Lab where the radius and irregularity of each mirror is verified through interferometric measurement to assure that each one lies within specification. When we designed the EdgeHD optical system, we strongly favored spherical surfaces because a sphere can be tested by optical interference to high accuracy in a matter of minutes. If we had specified a hyperboloidal surface for the secondary mirror, we would have been forced to use slower, less accurate testing methods that might miss zonal errors. Furthermore, coma-free SCT designs with hyperboloidal mirrors still suffer from field curvature—an aberration that we specifically wished to avoid in the EdgeHD design. Finally, the sub-aperture corrector lenses are made using the same manufacturing techniques used for high-performance refractor objectives. The EdgeHD design specifies optical glass from Schott AG. The 8-, 9.25-, and 11-inch use N-SK2 and K10 glasses, while the 14-inch uses N-SK2 and N-BALF2 glasses. To ensure homogeneity, optical glass is made in relatively small batches, extruded in boules. The raw glass is then diamondmilled to the correct diameter, thickness, and radius. Each lens blank is blocked, ground, and polished, then the radius and figure are compared to matchplates to ensure they meet EdgeHD’s tight tolerances. Our assembly workstations resemble the optical benches used to qualify corrector plates. The primary mirror and corrector plate slip into kinematic support jigs, and we place the secondary mirror in its holder. The sub-aperture corrector lenses meet specifications so reliably that a master set is used in the assembly workstation. Laser light from the focus position passes in reverse through the optics, reflects from a master autocollimation flat, then passes back through the optics. Tested in autocollimation, the optician can see and correct surface errors considerably smaller than a millionth of an inch. FIGURE 7. Matchplates use interference fringes to check the radius and smoothness of the correction. In this picture, a corrector blank is attached to a master block. The matchplate rests on top; interference fringes appear as green and blue circles. The circular pattern indicates a difference in radius. Primary mirrors begin as precision-annealed molded castings of low-expansion borosilicate glass with a weight-saving conical back surface and a concave front surface. The molded casting is edged round, its central hole is cored, and the radius of the front surface is roughed in. Celestron grinds the front surface of primary mirrors with a succession of progressively finer diamond abrasive pellet tools using high-speed spindle machines, then If the combined optics set shows any slight residual under-or over-correction, zones, astigmatism, upturned or downturned edges, holes, or bulges, the optician marks the Foucault test shadow transitions on the secondary mirror, then removes the secondary mirror from the test fixture and translates these markings into a paper pattern. The pattern is pressed against a pitch polishing tool, and the optician applies corrective polishing to the secondary mirror—as we show in Figure 11—until the optical system as a whole displays a perfectly uniform illumination (no unwanted zones or shadows) under the double-pass Foucault test and smooth and straight fringes under the doublepass Ronchi test. The in-focus Airy disk pattern is evaluated for roundness, a single uniform diffraction ring, and freedom from scattered light. In addition, the intra- and extra-focal diffraction pattern must display the same structure and central obscuration on both sides of focus, and it must appear round and uniform. The Celestron EdgeHD 9 EDGEHD’S CLOSE-UP ON THE PELICAN NEBULA FIGURE 8. After all the testing is done, the ultimate test is the night sky. This close-up image of the Pelican Nebula testifies to the EdgeHD’s ability to focus clean, neat, round star images from center to edge. The telescope was a 14-inch EdgeHD on a CGE Pro Mount; the CCD camera was an Apogee U16m. The mage above shows a 21.5×29.8mm section cropped from the original 36.8mm square image. 10 I The Celestron EdgeHD Autocollimation Testing Telescope being checked Precision optical flat Beamslitter Eyepiece and Ronchi grating Green Laser (532 nm) FIGURE 9. In autocollimation testing, light goes through an optical system, reflects from a plane mirror, and passes through again. This super-sensitive test method doubles the apparent size of all errors. After we remove each set of optics from the autocollimator, we send the components to our in-house coating chamber. Here, the primary and secondary mirrors receive their high-reflectance aluminum coatings, and the corrector lens is anti-reflectance coated. Each set of optics is then installed into an optical tube assembly (OTA). Completed OTAs undergo the Visual Acceptance Test. In a temperature-stabilized optical test tunnel, green laser light at 532nm wavelength is reflected from a precision paraboloidal mirror to act as an artificial star. With a high-power ocular, a QA Inspector views the artificial star critically. To pass the Visual Acceptance Test, an optical tube assembly must meetthe following requirements: • The in-focus Airy disk must be round, free of scattered light around the disk, and display only one bright ring. • Inside and outside focus, the diffraction patterns must be round, uniform, and appear similar on both sides of focus. • Observed with a 150 line-pairs-per-inch Ronchi grating, the bands must be straight, uniformly spaced, and high in contrast. Because its optics have been tested and tuned in error-revealing double-pass mode, and because each assembled OTA has been tested again and qualified visually, the telescope’s images should be flawless when observing and imaging the night sky. 7. FINAL ACCEPTANCE TESTING AND CERTIFICATION FIGURE 10. We test all of our primary mirrors on an optical bench by means of laser interferometry. In the picture, stacks of polished primary mirrors await testing. Before it can leave Celestron’s facilities, every EdgeHD must pass its Final Acceptance Test, or FAT. We conduct the FAT on an optical test bench in a specially-constructed temperaturecontrolled room (Figure 12). Rather than use laser light for this test, we use white light so that the FAT reproduces the same conditions an observer would experience while viewing or photographing the night sky. To avoid placing any heat sources in the optical path, the light for our artificial star is carried to the focus of a precision parabolic mirror through a fiber-optic cable. After striking the parabolic mirror, the parallel rays of light travel down the optical bench to the EdgeHD under test, through the telescope, to a full-frame format digital SLR camera placed at its focus. Using a set of kinematic test cradles, there is no need to change the test configuration between different EdgeHD telescopes. We simply place the telescope in its test cradle on the bench, and it’s ready for testing. The Final Acceptance Test verifies an EdgeHD’s ability to form sharp star images in the center and on the edges of a full-frame (24×36mm format, with a 42mm diagonal measurement) digital SLR camera. The QA Inspector attaches the camera to the telescope, focuses carefully, and takes an on-axis image. The telescope is then pointed so the artificial star image falls in the corner of the frame, and without refocusing, the inspector takes another image. The process is repeated for each corner of the camera frame, and another picture is taken at the center of the frame. FIGURE 11. To correct any remaining optical errors, the figure of the secondary mirror is fine-tuned against the entire optical system in double-pass autocollimation setup. This delicate match process ensures that every telescope performs to the diffraction limit. To pass the test, the telescope must form a sharp image at the center of the field, at each corner of the camera frame, and again at the center. The images are examined critically. To pass, every one of the test images must be tight, round, and in perfect focus. Any EdgeHD that does not pass the FAT is automatically returned to the assembly room to recheck the collimation and centering of its corrector plate. No EdgeHD can leave the factory until it has passed its FAT. The Celestron EdgeHD 11 Throughout the telescope-building process, we maintain a quality-assurance paper trail for each instrument. All test images are numbered and cross referenced. Should a telescope be returned to Celestron for service, we can consult our records to see how well it performed before it left our facility. Once a telescope has passed the FAT, we apply Loctite® to the set screws to permanently hold the alignment of the corrector plate. The instrument is then inspected carefully for cosmetic defects. It is cleaned and packaged for shipment to our dealers and customers. To your discerning eye—as an observer with experience—on a night with steady air and good seeing, a properly cooled EdgeHD performs exceptionally well on stars. You will see a round, clean Airy disk, a single well-defined diffraction ring, and symmetrical images inside and outside of focus. Every EdgeHD should resolve double stars to the Dawes limit, reveal subtle shadings in the belts of Jupiter, and reveal the Cassini Division in Saturn’s rings. On deep-sky objects viewed with a high-quality eyepiece, star images appear sharp and well defined to the edge of the field of view. The EdgeHD reveals faint nebular details as fine as the sky quality at the observing site will allow. EdgeHD Field of View KAF-3200 KAF-8300 42 mm ∅ KAF-16803 FIGURE 12. In the Final Acceptance Test, the EdgeHD optics must demonstrate the ability to form sharp images at the center and in the corners of a Canon 5D Mark II full-frame digital SLR camera, with a sensor that measures 42mm corner-to-corner. 8. VISUAL OBSERVING WITH THE EDGEHD Because both the Celestron EdgeHD and our classic SCTs are diffraction-limited on-axis, their performance is essentially the same for high-magnification planetary or lunar viewing, splitting close double stars, or any other visual observing task that requires first-rate on-axis image quality. However, the EdgeHD outshines the classic SCT when it comes to observing deep-sky objects with the new generation of high-performance wide-field eyepieces. The classic SCT exhibits off-axis coma and field curvature which are absent from the EdgeHD design. Modern wide-field eyepieces, such as the 23mm Luminos, have an apparent field of view of 82 degrees, so they show you a larger swatch of the sky. Gone are the light-robbing radial flares of coma and annoying, out-of-focus peripheral images so sadly familiar to observers. With the EdgeHD, stars are crisp and sharp to the edge. The back of the EdgeHD 800 features an industry standard 2.00×24 tpi threaded flange. A large retaining ring firmly attaches the 1¼-inch visual back, and this accepts a 1¼-inch Star Diagonal that will accept any standard 1¼-inch eyepiece. The EdgeHD 925, 1100, and 1400 feature a heavy-duty flange with a 3.290×16 tpi threaded flange. This oversize flange allows you to attach heavy CCD cameras and digital SLR cameras. For visual observing, use the adapter plate supplied with each telescope to attach the Visual Back. The 2-inch XLT Diagonal (also supplied with these telescopes) accepts eyepieces with 1¼-inch and 2-inch barrels. 12 I The Celestron EdgeHD APS-C DSLR Full-Frame DSLR KAI-10002 FIGURE 13. EdgeHD telescopes are designed to provide good images across a flat 42mm diameter field of view. Compare this with the size of a variety of image sensor formats. The popular APS-C digital SLR format fits easily. The full-frame DSLR format is fully covered. EdgeHD even covers the 36.8mm square KAF-16803 format remarkably well. Imaging with Celestron EdgeHD Telescopes 1. 2. EdgeHD Aperture Focal Ratio Focal Length Secondary Ø Obstruction1 Back Focus Distance Adapter Thread Size Image Circle Linear Ø Angular Ø Airy Disk Angular Ø Linear Ø Rayleigh2 Image Scale arcsec/pixel (6.4 μm pixel) EdgeHD 800 203.2mm ƒ/10.456 2125mm 68.6mm 34 % 133.35mm 2.00”-24 tpi 42mm Ø 68.0 arcmin 1.36” Ø 14.0μm Ø 0.68” 0.62”/pix EdgeHD 925 235mm ƒ/9.878 2321mm 85.1mm 36 % 146.05mm 3.29”-16 tpi 42mm Ø 62.2 arcmin 1.18” Ø 13.2μm Ø 0.59” 0.57”/pix EdgeHD 1100 279.4mm ƒ/9.978 2788mm 92.3mm 33 % 146.05mm 3.29”-16 tpi 42mm Ø 51.8 arcmin 0.99” Ø 13.3μm Ø 0.50” 0.47”/pix EdgeHD 1400 355.6mm ƒ/10.846 3857mm 114.3mm 32% 146.05mm 3.29”-16 tpi 42mm Ø 37.4 arcmin 0.78” Ø 14.4μm Ø 0.39” 0.34”/pix The Ø symbol means diameter. Central obscuration is given as a percentage of the aperture. The Rayleigh Limit for resolving doubles with equally bright components. The “ symbol means arcseconds. 9. IMAGING WITH THE EDGEHD The Celestron EdgeHD was designed and optimized for imaging with astronomical CCD cameras, digital SLR cameras, video astronomy sensors, electronic eyepieces, and webcams. We designed the EdgeHD 800 to deliver the best images 5.25 inches (133.35mm) behind the surface of the telescope’s rear cell 2.00×24 tpi threaded baffle tube lock nut. The EdgeHD 925, 1100, and 1400 form their best images 5.75 inches (146.05mm) behind the telescope’s rear cell 3.290×16 tpi threaded baffle tube lock nut. For best results, the image sensor should be located within ±0.5mm of this back-focus distance. It is easy to place a digital SLR (DSLR) camera at the proper distance using the Small T-Adapter (item #93644) for the EdgeHD 800, or the Large T-Adapter (item #93646) for the EdgeHD 925, 1100, and 1400. The small adapter is 78.35mm long while the large adapter adds 91.05mm, in both cases placing the best focus 55mm behind the T-Adapter. Because 55mm is the industry standard T-mount to sensor distance, add a T-Ring adapter (T-Ring for Canon EOS, item #93419; T-Ring for Nikon, item #93402) and attach your camera to it. That’s all there is to placing your digital SLR camera at the correct back-focus location. (By the way, if you’ve never heard of the T-mount system, you need to know about it. The T-mount is a set of industry standard sizes and distances for camera lenses. A standard T-mount thread (M42×0.75) is available for most astronomical CCD cameras. The standard T-mount flange-tosensor distance is 55mm.) The T-mount system also makes spacing an astronomical CCD camera easy. Consult your CCD camera’s documentation to find the flange-to-sensor distance for your CCD camera. Attaching the Celestron T-Adapter to your EdgeHD gives you the standard 55mm spacing. If your CCD’s front flange-to-sensor distance is 35mm, you need an additional 20mm distance. A 20mm T-mount Extension Tube, available from many astronomy retailers, will help you achieve the correct back focus distance. If you require a more complex optical train for your CCD camera, consult a trusted astronomy retailer. For imaging, we recommend using T-system components because threaded connections place your CCD camera or digital SLR at the correct back focus distance for optimum performance. Not only are they strong, but they also hold your camera perfectly square to the light path. To mount a high-performance video camera, add the T-Adapter plus a T-to-C adapter. (Like the T-mount system, the C-mount system is an industry standard. It uses 1×32 tpi threads with a back-focus distance of17.5mm.) For consumer video systems such as electronic eyepieces, planetary cameras, and webcams that attach to the telescope using a standard 1.25-inch eyepiece barrel, simply use the same components that you use for visual observing. Just remove the eyepiece from the telescope and replace it with the camera. Many imaging programs allow you to shoot short exposures through the telescope. On a solid, polar-aligned equatorial mounting, you may be able to expose for 30 seconds or more. With such exposure times, you can capture wonderful images of the Moon, planets, eclipses, bright star clusters, and objects like the Orion Nebula. However, for long exposures on deep-sky objects, you will need to guide the telescope. The days of guiding by eye are over; electronic auto-guiders are the new standard. A functional and relatively inexpensive autoguiding setup consists of a small refractor mounted piggyback on your EdgeHD telescope. You will need a dovetail bar attached to the EdgeHD tube. Celestron offers an 80mm guide telescope package (item #52309) to be used with the NexGuide Autoguider (item #93713). For sub-exposures exceeding 10 minutes or so, piggybacked guide telescopes potentially suffer from differential flexure; for such imaging, consider the Off-Axis Guider (item #93648). The Celestron EdgeHD 13 Celestron's EdgeHD: The Versatile Imaging Platform EdgeHD 800 5.25 inches 133.35±0.5 mm Small T-Adapter Camera Adapter Digital SLR Reducing Ring Small T-Adapter T-to-1.25” Adapter Webcam Large T-Adapter T-Ring Adapter Digital SLR EdgeHD 925, 1100, and 1400 5.75 inches 146.05±0.5 mm Large T-Adapter T-to-C Adapter Astro Video Camera Large T-Adapter T-system Spacer CCD Camera FIGURE 14. It is easy to position your digital SLR camera, an astronomical CCD camera, a high-performance video camera, or an inexpensive webcam at the focus plane of your EdgeHD telescope. For the sharpest wide-field imaging, your goal is to place the sensor 5.25 inches behind the rear flange of the EdgeHD 800, or 5.75 inches behind the rear flange of the EdgeHD 925, 1100, and1400. For those who wish to make images with a faster focal ratio than EdgeHD 1100’s ƒ/10 or the EdgeHD 1400’s ƒ/11, we designed a five-element 0.7× reducer lens for each of these EdgeHD telescopes. (For more information, see Appendix B.) The Reducer Lens 0.7× for the EdgeHD 1100 is item #94241; for the 14-inch, item #94240. (The newly-released EdgeHD 800 Focal Reducer is item #94242.) The reducer lens attaches directly to the 3.290×16 tpi threaded baffle tube lock nut on the back of the telescope. Since the back focus distance for the 1100 and 1400 reducer lens is 5.75 inches (146.05mm), you can use the same T-Adapter and camera T-Ring you would use for imaging at the ƒ/10 or ƒ/11 focus. The linear field of view is still 42mm diameter, but the angular field is 43% larger, and exposure times drop by a factor of two. For super-fast, super-wide imaging, the EdgeHD telescope series supports Starizona’s Hyperstar lens. Mounted on the corrector plate in place of the secondary mirror, the Hyperstar provides an ƒ/1.9 focal ratio on the EdgeHD 1400, and ƒ/2.0 or ƒ/2.1 on the 800, 925, and 1100. Covering a 27mm diameter field of view, the Hyperstar is a perfect match for APS-C format digital SLR cameras. Because of the short focal length and fast focal ratio, sub-exposures are just a minutes. With a solid, polar-aligned equatorial mount, guiding seldom necessary. 14 I The Celestron EdgeHD Of course, the focal length of any EdgeHD telescope can be extended using a Barlow lens such as the Celestron 2x X-Cel LX (item #93529) or 3x X-Cel LX (item #93428). Using a Barlow, imagers can reach the desirable f/22 to f/32 range for ultra-high-resolution lunar and planetary imaging. In summary, the Celestron EdgeHD telescopes provide a flexible platform for imaging. You can work at the normal ƒ/10 or ƒ/11 Cassegrain focus for seeing-limited deep-sky images or add the reducer lens for wider fields and shorter exposure times. With a Hyperstar, you can grab wide-field, deep-sky images in mere minutes. And finally, you can extend the focus to capture fine lunar and planetary images with a quality Barlow lens. When you buy an EdgeHD telescope, you’re getting an imaging platform that covers all the bases, from fast, wide-field imaging to high-resolution imaging of the moon and planets. 10. CONCLUSION The classic Schmidt-Cassegrain telescope introduced tens of thousands of observers and imagers to astronomy and nurtured their appreciation for the wonder of the night sky. Today, observers and imagers want a more capable telescope, a telescope that provides sharp close-ups as well as high-quality images all the way across a wide, flat field of view. But, consumers want this advanced optical technology at an affordable price. Celestron has designed the EdgeHD to meet customers’ needs. The EdgeHD is not only coma-free, but it also provides a flat field so that stars are sharp to the very edge of the field of view. In this brief technical white paper, we have shown you the inner workings of our new design. We also demonstrated the care we exert as we build and test each EdgeHD telescope. We trust that we have proven that an EdgeHD is the right telescope for you. You may find the following resources to be useful in learning about optical design, fabrication, and testing: 11. REFERENCES DeVany, Arthur S., Master Optical Techniques. John Wiley and Sons, New York, 1981. Fischer, Robert E.; Biljana Tadic-Galeb; and Paul R. Yoder, Optical System Design. McGraw Hill, New York, 2008. Geary, Joseph M., Introduction to Lens Design. Willmann-Bell, Richmond, 2002. Malacara, Daniel, ed., Optical Shop Testing. John Wiley and Sons, New York, 1978. Rutten, Harrie, and Martin van Venrooij, Telescope Optics: A Comprehensive Manual for Amateur Astronomers. Willmann-Bell, Richmond, 1999. Smith, Gregory Hallock, Practical Computer-Aided Lens Design. Willmann-Bell, Richmond, 1998. Smith, Gregory Hallock; Roger Ceragioli; Richard Berry, Telescopes, Eyepieces, and Astrographs: Design, Analysis, and Performance of Modern Astronomical Optics. Willmann-Bell, Richmond, 2012. Wikipedia. Search references to specific topics. See: http://en.wikipedia.org/wiki/Optical_lens_design and many associated links. Wikipedia. Search references to T-mount. See: http://en.wikipedia.org/wiki/T-mount and associated camera system links. Wilson, R. N., Reflecting Telescope Optics I and II. Springer-Verlag, Berlin, 1996. ZEMAX® Optical Design Program, User’s Guide. Radiant Zemax LLC, Tucson, 2012. The Celestron EdgeHD 15 Appendix A: Technical Profiles of EdgeHD Telescopes 8-inch When evaluating astronomical telescopes, astroimagers must bear in mind the many factors that influence image quality. The major factors at play are: Airy Disk and Seeing Blurs • The sampling by pixels of the image sensor • The diffraction pattern of the telescope 9.25-inch • The image formed by the telescope To aid astroimagers, this Appendix presents a spot matrix plot for each of the telescopes in the EdgeHD series. To determine the size of the images that you observe in your exposures, these must be compounded with the other factors that affect your images. In the spot matrix plots we have provided, each large gray box is 64μm on a side, and consists of a ten small boxes 6.4μm representing a pixel in a “typical” modern CCD camera. The black circle represents the diameter of the Airy disk to the first dark ring. It is immediately clear that for each of the EdgeHDs, two 6.4μm pixels roughly match the diameter of the Airy disk. This means that under ideal conditions, a CCD camera with pixels of this size will capture most of the detail present in the telescopic image. Referring to Figure A1, the left column shows the Airy disk for a telescope with a central obstruction of 34%. Because the light in the Airy disk is concentrated into a smaller area in the center, capturing all of the image detail in a planetary or lunar image requires using a 2x or 3x Barlow lens to further enlarge the Airy disk. Unfortunately, ideal conditions are fleeting. During a typical CCD exposure, atmospheric turbulence enlarges the image of all stars, and furthermore, it causes the images to wander. On the steadiest nights, the “seeing” effect may be as small as 1 arcsecond. In Figure A1, the “superb seeing” column shows blurs with a FWHM (full-width half-maximum) of 1 arcsecond. The next column shows excellent seeing (1.5”), and the right column shows 2” seeing blurs, typical of many nights at most observing sites. It is important to note that as the focal length of the telescope increases, the diameter of the seeing blur increases in proportion. With a small telescope, seeing plays a smaller role. With the large apertures and long focal lengths of the EdgeHD series, nights of good seeing become particularly valuable. 16 I The Celestron EdgeHD 14-inch • The guiding accuracy during exposure 11-inch • The “seeing” quality during exposure Airy Disk Superb Seeing Excellent Seeing Average Seeing FIGURE A1. Shown at the same scale as the matrix spot diagrams are the Airy disk and the point-spread-function of seeing disks for average (2.0”), excellent (1.5”), and superb (1.0”) seeing. Celestron EdgeHD 800 On-axis, the spots show that the 8-inch EdgeHD is diffractionlimited in both green (for visual observing) and red (for imaging). And because blue rays are strongly concentrated inside the Airy disk, the 8-inch EdgeHD is diffraction-limited in blue light. Off-axis, its images remain diffraction-limited over a field larger than the full Moon. For an imager using an APS-C digital SLR camera, relative illumination falls to 84% at the extreme corners of the image. Although for bright subjects this minor falloff would pass unnoticed, for imaging faint objects we recommend making and applying flat-field images for the best results. For CCD imaging, we always recommend making flat field images. Portability and affordability are the hallmarks of the EdgeHD 800. Although the 8-inch covers a 42mm image circle, we optimized its optics for the central 28mm area, the size of an APS-C chip in many popular digital SLR cameras. The Celestron EdgeHD 17 .Celestron EdgeHD 925 The spot matrix shows that on-axis images are diffraction limited at all three wavelengths, and remain diffraction-limited over the central 15mm. While blue and red are slightly enlarged, in green light images are fully diffraction-limited over a 38mm image circle. The size of the off-axis blue and red spots remain nicely balanced. On a night of average seeing, stars will display a FWHM of 23μm, comparable in size to the spot pattern at the very edge 18 I The Celestron EdgeHD of a 42mm field. Relative illumination in the EdgeHD 925 is excellent. The central 12mm is completely free of vignetting, while field edges receive 90% relative illumination. For most imaging applications, flat fielding would be optional. For full-field imaging on a tight budget, the EdgeHD 925 is an excellent choice. It offers nearperfect on-axis performance and outstanding images over a full 42mm image circle. Celestron EdgeHD 1100 The 11-inch EdgeHD is optimized to produce its sharpest images in green and red; at these wavelengths it is diffractionlimited over roughly two-thirds of the full 42mm image circle. The relative illumination remains 100% across the central 16mm, then falls slowly to 83% at the very edge of a 42mm image circle. For pictorial images with an APS-C digital SLR camera, flats are unnecessary. For monochrome imaging with an astronomical CCD camera, we always recommend making flat-field images. On nights when the seeing achieves 1.5 arcseconds FWHM, star images shrink to 18μm at the focal plane. On such nights, the EdgeHD 1100 delivers fine images over a 30mm image circle, and well-defined stars over the full 42mm field. The EdgeHD 1100 is a serious telescope. Its long focal length and large image scale give it the ability to capture stunning wide-field images of deep-sky objects with a large-format CCD camera. The Celestron EdgeHD 19 Celestron EdgeHD 1400 In the matrix spot diagrams, note the tight cluster of rays in green light, and the well balanced spherochromatism in the blue and red. These spots are far better than spots from a fine apochromatic refractor of the same aperture. In green light, the EdgeHD 1400 is diffraction-limited over a 28mm image circle, although atmospheric seeing enables it to display its full resolution only on the finest nights. Relative illumination is 100% across the central 16mm, and falls slowly to 83% in the extreme corners of a full-frame 35mm 20 I The Celestron EdgeHD image sensor. We have seen excellent results when the 14-inch EdgeHD is used with a KAF-16803 CCD camera over a 50mm circle. The EdgeHD 1400 is a massive telescope, well suited to a backyard observatory or well-planned away-from-home expeditions. Its long focal length and large image scale offer skilled imagers the opportunity to make images not possible with smaller, less capable telescopes. Appendix B: TECHNICAL PROFILE OF THE EDGEHD 0.7× FOCAL REDUCER LENS Perhaps the most useful accessory you can get for an EdgeHD telescope is a focal reducer. Although the long focal length is a great advantage in capturing detailed images of nebulae, galaxies, and especially of planetary nebulae, it also means the field of view is sometimes smaller than desirable. The relatively slow focal ratio also means rather long exposure times. We designed our 0.7× Focal Reducer to provide a field of view 1.4× larger in angular diameter, giving you twice the sky area coverage and halving the exposure time required to reach a given signal-to-noise ratio. If your passion is imaging large deep-sky objects, imaging in Hα, SII, and OIII narrowband, capturing the faint reflection nebulae often found around Barnard’s dark objects, or just cutting your exposure (and guiding) times down, the focal reducer is a “must-have” item. Back in the days of film astrophotography, focal reducers came to be poorly regarded. Although they would shorten the focal length, they also produced fuzzy star images, had bad field curvature, and suffered from severe vignetting. But the days of film and ersatz focal reducers are over. The modern EdgeHD focal reducer is the product of optical engineering and precision manufacturing on a par with the design and production of wide- and ultra-wide-field eyepieces. The EdgeHD 0.7× Focal Reducer FIGURE B1. The EdgeHD 0.7x Focal Reducer shortens the focal ratio of the of the EdgeHD 1400, 1100 and 800 while maintaining sharp images across the full field. This enables CCD imagers to reach the same signal-to-noise ratio on extended objects in half the exposure time, and brings even the faintest deep-sky objects within the range of your high-end digital SLR camera. We designed three EdgeHD 0.7x focal reducers, each specifically tailored to the EdgeHD 1400, 1100, and 800, respectively. The 1400 and 1100 reducers contain five precision optical elements, while the 800 contains four elements. To attain a level of performance worthy of the EdgeHD, the designs employ low-dispersion lanthanum rare-earth glass to control both chromatic and geometric aberrations. All optical surfaces are multi-layer anti-reflection coated to maximize light transmission, provide high-contrast images, and minimize image ghosting. The matrix spot diagram shows that star images on-axis are diffraction-limited in green light, while rays at all wavelengths concentrated near the Airy disk. Even at the outer edge of the 42mm image circle, green and blue rays are clustered tightly, while red shows only a weak flare. Both physically and mechanically, the 0.7× Reducer Lens is more than comparable to a top-of-the-line wide-field eyepiece. The CNC-machined housing easily supports the full weight of your CCD camera or digital SLR camera without sag or movement. And for safe storage, each unit is provided with threaded metal covers for both the front and the back. The Celestron EdgeHD 21 Celestron EdgeHD 0.7× Reducer Large T-Adapter T-Ring Adapter Digital SLR EdgeHD 1100 and 1400 5.75 inches 146.05±0.5 mm 0.7× Reducer Large T-Adapter T-system Spacer CCD Camera The matrix spot diagrams show that the bulk of rays cluster tightly in or near the Airy disk, with a diffuse scatter most strongly seen in the red light. Plotted at the same scale as those for the EdgeHD, the spots demonstrate that the focal reducer’s star images are even smaller than those of the telescopes. 22 I The Celestron EdgeHD For observers who wish to pursue faint nebulae in RGB or in narrowband, the 0.7× Focal Reducer is a valuable accessory that halves the necessary exposure time with no sacrifice in resolution or image quality. Image by André Paquette Imagine the thrill of seeing the first images from your Celestron EdgeHD! A quick glance at the whole image shows that you have captured your target’s faint outer extensions. Across the field, from one side to the other, star images are sharp, crisp, and round. As you process your image, fine details in the target object reveal themselves. Star clouds, delicate dust lanes, subtle HII regions—it’s all there, credit to your skill and the design of your EdgeHD telescope. The image shown here is a single monochrome 10-minute exposure taken with an Apogee U16 camera (KAF-16803 CCD chip) and a Celestron EdgeHD 1400 telescope on a CGE Pro mount. The Celestron EdgeHD 23 The Celestron EdgeHD • ©2013 by Celestron • All rights reserved. Torrance, CA 90503 U.S.A. • www.celestron.com Combining Celestron’s newly designed dual fork arm computerized mount with its award winning EdgeHD optical system, the NEW CPC Deluxe HD Series offers you a high definition experience! 80 mm Guidescope Package 52309 CPC Deluxe 1100 HD 11009 NexGuide Autoguider 93713 Nightscape CCD Camera 95555 HD Pro Wedge Mount 93664 Accessorize your CPC Deluxe HD to create the ultimate telescope for astro imaging + Nightscape One shot color imaging camera with 10.7MP CCD sensor, mechanical shutter, TEC cooling and processing software. + HD Pro Wedge Provides a stable platform essential for polar aligning your fork arm telescope for smooth tracking all the way across the meridian. + 80 mm Guidescope Package 600 mm focal length guidescope and ring package for piggyback guiding during astro imaging. All featured accessories sold separately + NexGuide Autoguider NexGuide stand-alone autoguider eliminates the need for a laptop computer for guiding during long-exposure imaging. CPC Deluxe 800 HD 11007 CPC Deluxe 925 HD 11008 CPC Deluxe 1100 HD 11009 The wait is over! Celestron’s award winning EdgeHD optical system is now available on a newly designed top-of-the-line dual fork arm computerized mount – The CPC Deluxe HD. Available in 8”, 9.25” and 11” models, the CPC Deluxe HD telescope line re-defines everything that amateur astronomers are looking for –ease of use, quick and simple GPS alignment, improved ergonomics, enhanced computerization, unsurpassed optical quality and most importantly, affordability. As a visual instrument, the EdgeHD optical system delivers pinpoint images across your widest field eyepiece, providing you stunning clarity and sharpness that will leave you wanting more. When used for astro imaging with our new Nightscape or your own favorite CCD or DSLR camera, the EdgeHD optical system produces a flat focal plane allowing pinpoint stars to the very edge of your image. Own this premier telescope line today, and it will surely keep you up all night. ALL CPC DELUXE HD MODELS OFFER: Starbright XLT Coatings Internal GPS Computerized Flash Upgradeable Hand Control with SkyAlign™ Alignment Technology 40,000+ Object Database Fastar Versatility NexRemote Telescope Control Software All-Star™ Polar Alignment Improved Gear System for Smoother Tracking Permanent Periodic Error Correction //SPECIFICATIONS MODEL FOCAL ITEM # LENGTH EYEPIECES FINDER OPTICAL SCOPE COATING OPTICAL DESIGN TELESCOPE WEIGHT CPC DELUXE 800 HD 11007 2032 mm (f/10) 40 mm Plössl - 1.25¨ (51x) 50 mm STARBRIGHT XLT EDGEHD OPTICS 43LB CPC DELUXE 925 HD 11008 2350 mm (f/10) 23 mm Luminos - 2¨ (102x) 50 mm STARBRIGHT XLT EDGEHD OPTICS 58LB CPC DELUXE 1100 HD 11009 2800 mm (f/10) 23 mm Luminos - 2¨ (122x) 50 mm STARBRIGHT XLT EDGEHD OPTICS 66LB For complete specifications and product information visit