1
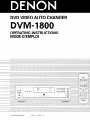
DVD VIDEO AUTO CHANGER
DVM-1800
OP IRATING INSTRUCTIONS
MC IDE D’EMPLOI
-
FOR ENGLISH READERS
POUR LES LECTEURS FRANCAIS
PAGE 6-PAGE
61
PAGE 62 - PAGE 117
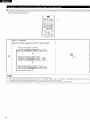
NOTE:
IMPORTANT TO SAFETY
Thus DVD vrdeo player uses the semiconductor
music at a stable operation, It is recommended
(41 “F) - 35°C (95°F).
WARNING:
TO PREVENT FIRE OR SHOCK HAZARD,
DO NOT
EXPOSE THIS APPLIANCE TO RAIN OR MOISTURE.
laser. To allow you to enjoy
to use this in a room of 5°C
CAUTION:
USE OF CONTROLS OR ADJUSTMENTS
OR REFORMANCE OF
PROCEDURES OTHER THAN THOSE SPECIFIED HEREIN MAY
RESULT IN HAZARDOUS RADIATION EXPOSURE.
CAUTION:
1. Handle the power supply cord carefully
Do not damage or deform
deformed,
When
the power supply cord. If it is damaged
it may cause electric
removing
plug attachment
from wall outlet,
shock or malfunction
be sure to remove
when
or
used.
by holding the
THE COMPACT DISC PLAYER SHOULD NOT BE ADJUSTED OR
REPAIRED BY ANYONE EXCEPT PROPERLY QUALIFIED SERVICE
PERSONNEL.
and not by pulling the cord.
2. Do not open the top cover
Thus devrce complies with Part 15 of the FCC Rules. Operation is
subject to the following two conditions: (1) This device may not
cause harmful interference,
and (2) this device must accept any
interference
received,
including
Interference
that may cause
undesired operation.
In order to prevent electrrc shock, do not open the top cover.
If problems occur, contact your DENON DEALER.
3. Do not place anything inside
Do not place metal objects or spill liquid inside the DVD video player.
Electrrc shock or malfunction
may result.
This Class B digital apparatus
meets all requirements
Canadian Interference-Causing
Equipment Regulations.
Please, record and retarn the Model name and serial number of your set
of the
shown on the rating label.
Model No. DVM-1800
Cet apparel1 numerique
de la classe B respecte
toutes
exigences du Reglement sur le materiel brourlleur du Canada.
Serial No.
l
AmA
CAUTION:
TO REDUCE THE RISK OF ELECTRIC SHOCK,
DO NOT REMOVE COVER (OR BACK). NO
USER SERVICEABLE PARTS INSIDE. REFER
SERVICING
TO QUALIFIED
SERVICE
PESONNEL.
A
The lightnrng flash wrth arrowhead symbol, within
an equrlateral triangle, IS intended to alert the user
to the presence
of uninsulated
“dangerous
voltage” within the product’s enclosure that may
be of sufficient magnitude to constitute
a risk of
electrrc shock to persons.
A
The exclamatron point within an equilateral triangle
IS intended
to alert the user to the presence of
important
operating and maintenance
(servicrng)
rnstructions
In the lrterature
accompanying
the
appliance.
les
FOR U.S.A. & CANADA MODEL ONLY
TO PREVENT ELECTRIC SHOCK DO NOT USE THIS (POLARIZED)
PLUG WITH AN EXTENSION CORD, RECEPTACLE OR OTHER
OUTLET UNLESS THE BLADES CAN BE FULLY INSERTED TO
. POUR LES MODELES AMERICAINS ET
CANADIENS UNIQUEMENT
ATTENTION
POUR PREVENIR LES CHOCS ELECTRIQUES NE PAS UTILISER
CETTE FICHE POLARISEE
AVEC UN PROLONGATEUR
UNE
PRISE DE COURANT OU UNE AUTRE SORTIE DE COURANT,
SAUF SI LES LAMES PEUVENT ETRE INSEREES A FOND SANS
EN LAISSER AUCUNE PARTIE A DECOUVERT.
2
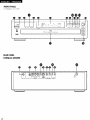
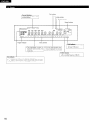
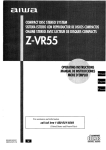
FRONT PANEL
PANNEAU AVANT
J
\
J
L
I
A
L
1
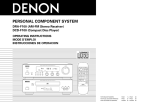
REAR PANEL
PANNEAU ARRIERE
L
3
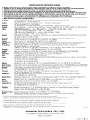
SAFETY INSTRUCTIONS
4
12.
Power-Cord Protection - Power-supply cords should be
routed so that they are not likely to be walked on or
pinched by items placed upon or against them, paying
particular attention to cords at plugs, convenience
receptacles, and the point where they exit from the
appliance.
Heed Warnings - All warnings on the appliance and in
the operating instructions should be adhered to.
14.
Cleaning - The appliance should be cleaned only as
recommended by the manufacturer.
4.
Follow Instructions - All operating and use instructions
should be followed.
15.
Power Lines - An outdoor antenna should be located
away from power lines.
5.
Water and Moisture -The appliance should not be used
near water - for example, near a bathtub, washbowl,
kitchen sink, laundry tub, in a wet basement, or near a
swimming pool, and the like.
16.
6.
Carts and Stands - The appliance should be used only
with a cart or stand that is recommended
by the
manufacturer.
6A.
An appliance and cart
combination should be
moved with care.
Quick stops, excessive
force, and uneven
surfaces may cause
the appliance and cart
combination to overturn.
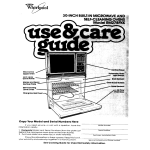
Outdoor Antenna Grounding - If an outside antenna is
connected to the receiver, be sure the antenna system
is grounded so as to provide some protection against
voltage surges and built-up static charges. Article 810
of the National Electrical Code, ANSUNFPA 70, provides
information with regard to proper grounding of the mast
and supporting structure, grounding of the lead-in wire
to an antenna-discharge
unit, size of grounding
conductors,
location of antenna-discharge
unit,
connection to grounding electrodes, and requirements
for the grounding electrode. See Figure A.
17.
Nonuse Periods - The power cord of the appliance
should be unplugged from the outlet when left unused
for a long period of time.
18.
Object and Liquid Entry - Care should be taken so that
objects do not fall and liquids are not spilled into the
enclosure through openings.
19.
Damage Requiring Service - The appliance should be
serviced by qualified service personnel when:
A.The power-supply
cord or the plug has been
damaged; or
B. Objects have fallen, or liquid has been spilled into
the appliance; or
C. The appliance has been exposed to rain; or
D. The appliance does not appear to operate normally or
exhibits a marked change in performance; or
E. The appliance has been dropped, or the enclosure
damaged.
20.
Servicing - The user should not attempt to service the
appliance beyond that described
in the operating
instructions. All other servicing should be referred to
qualified service personnel.
1.
Read Instructions
- All the safety and operating
instructions should be read before the appliance is
operated.
2.
Retain Instructions
- The safety and operating
instructions should be retained for future reference.
3.
@
l b
3
AC4
7.
Wall or Ceiling Mounting - The appliance should be
mounted to a wall or ceiling only as recommended by
the manufacturer.
8.
Ventilation - The appliance should be situated so that
its location or position does not interfere with its proper
ventilation. For example, the appliance should not be
situated on a bed, sofa, rug, or similar surface that may
block the ventilation openings; or, placed in a built-in
installation, such as a bookcase or cabinet that may
impede the flow of air through the ventilation openings.
9.
Heat - The appliance should be situated away from
heat sources such as radiators, heat registers, stoves,
or other appliances (including amplifiers) that produce
heat.
10.
Power Sources - The appliance should be connected to
a power supply only of the type described in the
operating instructions or as marked on the appliance.
11.
Grounding or Polarization - Precautions should be taken
so that the grounding or polarization
means of an
appliance is not defeated.
NOTE ON USE / OBSERVATIONS RELATIVES A L’UTILISATION
l
l
l
l
l
Keep the set free from moisture, water,
and dust.
Proteger I’apparerl contre I’humrdrte. I’eau
et iapoussrere.
l
l
l
l
dans
Avord high temperatures.
Allow for suffrcrent heat drspersion when
installed on a rack
Eviter des temperatures elevees
Tenor compte d’une dispersron de chaleur
suffisante
101s de I’installatron
sur une
etagere.
l
l
Do not let forergn objects in the set.
Ne pas laisser des objets &rangers
I’appareil.
Handle the power cord carefully.
Hold the plug when unpluggrng the cord.
Manrpuier le cordon d’airmentatron avec
precautron.
Tenor la pnse lors du debranchement
du
cordon
Unplug the power cord when not using the
set for long periods of time.
Debrancher
le cordon d’alimentation
lorsque I’appareil n’est pas uttlrse pendant
de longues perlodes.
* (For sets with ventilatron holes)
l
l
Do not obstruct the ventllatlon holes
Ne pas obstruer les trous d’a&atlon
l
l
l
Do not let rnsectrcrdes,
benzene, and
thrnner come in contact with the set.
Ne pas mettle en contact des insecticides,
du benzene et un diluant avec I’appareil.
Never disassemble or modify the set rn any
way.
Ne jamars demonter ou modrfier I’apparerl
d’une mankre ou d’une autre
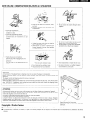
CAUTION:
At the bottom of the player there is shipping screw for use when the player is transported.
Before using the player, turn the shipprng screw (located under the player) counterclockwise
and
remove it.
The player cannot start playing unless thrs screw is removed.
Keep thus screw for future use.
When the player IS gorng to be transported, remove the discs and close the disc tray. Turn off the power
after “000 00 00” is displayed, then unplug the power cable from the outlet. Insert the shipping screw
and turn clockwise. Tighten unttl secure.
ATTENTION:
Au-dessous du lecteur se trouve une vis de transport qur doit etre utilisee pour transporter I’apparerl.
Avant d’utilrser le lecteur, devissez cette vis de transport (sit&e sous le lecteurj en tournant en sens
Inverse des aiguilles d’une montre et retirez-la.
Le lecteur ne peut pas fonctionner tant que cette vrs n’est pas enlevee.
Conservez cette vis pour une utilisation ulterieure.
Lorsque le lecteur va devour etre transport&
retrrez les disques et fermer le tiroir a disque. Eteignez
I’appareil apres que “000 00 00” sort affiche, puis debranchez le cable d’alimentation
de la prise.
lnserrez la vis de transport et vrssez-la dans le sens des arguilles d’une montre. Serrez a fond.
Copyrights
/ Droits d’auteur
n It IS prohibrted by law to reproduce,
w
Keep the screw for future use.
Conserves
cette VIS pour une utilisation
ulterreure.
La reproduction,
d’auteur.
la diffusion,
broadcast,
la location,
rent or play drscs In public without
le pret ou la lecture
publique
the consent of the copyright
de ces disques
sont interdits
holder.
sans le consentement
du detenteur
des droits
5
- TABLE OF CONTENTS -
q
q
q
q
q
q
q
q
q
q
q
q
q
q
q
q
.6, 7
Feat ures ....................................................................
Discs ..........................................................................
(8
Cautions on Handling Discs .............................................
9
onnections
............................................................
IO14
FW
(15, 16
El Part Names and Functions .........................................
Remote Control Unit ...............................................
.17, 18
...19. 20
Loading D’ISCS ......................................................
Playback ...............................................................
21-25
Using the GUI Screens ............................................
.26-30
Marking Scenes You Want to See Again .......................... .31
Playing Repeatedly ..................................................
.32, 33
Playing Tracks in the Desired Order .............................
.34, 35
Playing the Tracks in Random Order ................................
.35
Using the Multrple Audio, Subtitle
and Angle Functions ................................................
36-40
Using the Menus .....................................................
.41, 42
Changing the Default Settrngs ....................................
43-59
Troubleshooting ...........................................................
.60
...6 1
Main Specifications ...................................................
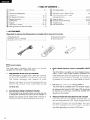
ACCESSORIES
l
Please check to make sure the following items are included with the main unit in the carton:
@ Video/Audio cord ........................................................
@ Remote control unit (RC-545) ..........................................
@I Batteries (“AA” (R6P)) ..................................................
01
2.
6
@I Operating instructions ..................................................
@ Service station list .........................................................
.I
.
FEATURES
The DVM-1800
is DENON’s
DVD video
equipped with the latest in digital technology.
1.
.I
1
.2
auto changer
High precision 96 kHz 24-bit D/A converter
The DVM-1800 is equipped with a 24-bit D/A converter
for faithful D/A conversion of the high quality 24-bit data.
This further
enhances
such aspects
of audio
performance
as the S/N ratio, dynamic range and
distortion and makes full use of the possibilities for high
quality sound provided by a high number of bits and high
sampling rates.
Carousel-type changer mechanism included
This mechanism can house five discs, and while one disc
is playing the remaining four discs can be changed. In
addition, the carousel can be rotated either clockwise or
counterclockwise, so searching between discs is fast.
Dolby Digital bitstream output compatibility
(NOTE
1)
The DVM-1800 is compatible with Dolby Digital bitstream
output. When a Dolby Digital decoder is connected, the
three-dimensional sense and positioning of the sound is
recreated extremely naturally, resulting in a strong sense
of presence, as if you were in a movie theater or concert
hall.
DTS bitstream output compatibility
(NOTE 2)
The DVM-1800 is compatible with DTS bitstream output,
an optional audio format for DVD video. DTS sound can
be enjoyed by connecting a commercially available DTS
decoder and AV amplifier.
Advanced Virtual Surround Sound W.S.S.) function
Even when just two front speakers are being used, the
user can simply press the V.S.S. (Virtual Surround Sound)
button during playback of a Dolby Digital DVD (2 channel
and above) to provide a rear surround effect. (This does
not work with DVD Karaoke discs. In addition, this effect
may differ depending on the kind of DVD used.)
6.
High picture quality thanks to a IO-bit video D/A
converter
(I) The 8-bit/l3.5 MHz brightness and color component
signals recorded on DVDs are expanded to IO-bit/27
MHz signals and requantized, leaving room to spare in
the processing of the recorded signals to provide the
beautiful pictures DVDs have to offer. Furthermore,
color component video output terminals are provided
for even more faithful reproduction of the colors.
(2) An array of picture quality modes yielded by digital
processing
Signal deterioration
is kept to the minimum
by
processing the data as digital data.
This feature can be used as the picture quality setting
individually tailored for DVD playback.
l
Digital Cinema Mode
Using the On-Screen
Menu Icons enables the
cinema mode, which is best for the playback of
movie programs, to be selected.
In addition, the picture quality best suited to the
type of software
programs concerned
can be
selected.
In all, four picture quality modes are
provided: normal, soft, fine and cinema.
l
User selection
Using the On-Screen Menu Icons, the contrast,
color hue, equalizer and brightness can be adjusted
to suit your own preference.
l
Monitor selector
Once the type of TV used [Standard (Direct View
TV), CRT Projector, LCD Projector, Projection TV]
has been selected
when the initial setting
operations are performed,
the optimum picture
quality for the type of TV concerned
will be
automatically selected.
7.
8. Many convenient functions
(I) Multiple audio function
Selection of up to 8 audio languages.
(The number of languages offered differs from DVD to
DVD.)
(2) Multiple subtitle function
Selection of up to 32 subtitle languages.
(The number of languages offered differs from DVD to
DVD.)
(3) Multiple angle function
The angle of view can be changed.
(For DVDs on which multiple angles are recorded.)
(4) GUI (Graphical User Interface) function
The on-screen display button on the remote control unit
can be used to display player and disc information on
the TV screen.
(5) Marker function
The positions of up to five scenes can be stored in the
memory,
so you can watch your favorite scenes
whenever you want.
(6) Playback disable function
This function can be used to disable playback of DVDs
you do not want children to watch.
.
NOTES:
1. Manufactured under license from Dolby Laboratories.
“Dolby” and the double-D symbol are trademarks of
Dolby Laboratories. Confidential unpublished works.
01992 - 1997 Dolby Laboratories. All rights reserved.
2. “DTS” is a trademark of Digital Theater Systems, Inc.
Subwoofer output
In addition to 2-channel stereo sound, you can enjoy
powerful bass sound by connecting a subwoofer with
built-in amplifier etc to this output jack.
7
q2
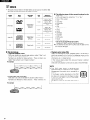
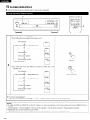
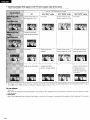
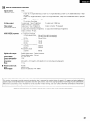
DISCS
The types of discs listed on the table below can be used on the DVM-1800
The marks are indicated on the disc labels or jackets.
l
Usable
discs
Mark
(logo)
Recorded
signals
Disc
size
Maximum
recording time
12cm
Approx. 240
minutes per side
Approx. 480
minutes for both
sides
8cm
Approx. 80
minutes per side
Approx. 160
minutes for both
sides
Digital audio +
digital video
(MPEG2)
DVD video
VIDEO
Video CD
74 minutes
Digital audio +
dp;jt$;o
flrf$fi
I2 cm
@EiiGG)
CD
20 minutes
12cm
74 minutes
8cm
20 minutes
DigItal audio
fl(gg
DIGITAL AUDIO
n
8cm
Disc terminology
l
l
Titles and chapters (DVDs)
DVDs are divided into several large sections called “titles” and
smaller sections called “chapters”.
Numbers are allotted to these sections.
These numbers are
called “title numbers” and “chapter numbers”.
For example:
.
Title 1
Chapter 1 Chapter 2
l
Playback control (video CDs)
Video CDs including the words “playback control” on the disc or
jacket are equipped with a function for displaying menus on the
TV screen for selectrng
the desired position,
displaying
information, etc., in dialog fashion.
In this manual, playing video CDs using such menus is referred
to “menu playback”.
Video CDs with playback control can be used on the DVM-1800.
Title 2
Chapter 1 Chapter 2
Tracks (video and music CDs)
Video and music CDs are divided into sections called “tracks”.
Numbers are allotted to these sections.
These numbers are
called “track numbers”.
For example:
8
I_
Chapter 3
W The following types of discs cannot be played on the
DVM-1800:
l
DVD with Region No. other than “1” or “ALL”
l
Disc of PAL system
. VSD
l
DVD+RW
l
DVD-ROM
l
CDV
. CVD
. DVD-R/DVD-RAM
. CD-G
. SVCD
. CD-ROM
. CD-R/RW
. DVD-RW
l
DVD-Audio
l
SACD
l
Divx Video Disc etc.
l
Do not try to play Photo CD or CD-R.
(Otherwise, data on the disc may be damaged.)
*If you attempt to play CD-R or photo CD, the data on the
disc may be damaged.
NOTE:
l
This DVD video player is designed
and
manufactured
to respond to the Region
Management lnformatron that is recorded on a
DVD disc.
If the Region number described on the DVD
disc does not correspond to the Region number
of this DVD video player, this DVD video player
cannot play this disc.
The Region number for this DVD video player is
1.
03
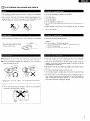
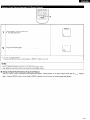
CAUTIONS ON HANDLING DISCS
Only the discs including the marks shown on page 8 can be played
on the DVM-1800.
Note, however, that discs with special shapes (heart-shaped discs,
hexagonal discs, etc.) cannot be played on the DVM-1800. Do not
attempt to play such discs, as they may damage the player.
l
l
l
l
l
l
l
Avoid touching
them.
the surface of discs when loading and unloading
l
l
l
Be careful not to get fingerprints on
the stgnal surface (the side which
shines in ralnbow colors).
n Fingerprints or dirt on the disc may lower sound and picture
quality or cause breaks in playback. Wipe off flngerprints or dirt.
1 Use a commercially available disc cleaning set or a soft cloth to
wipe off fingerprints or dirt.
l
l
l
l
l
l
Wipe gently
outwards.
from the middle
Do not wipe with a circular motion.
NOTE:
l
Do not use record spray or antistatic.
chemicals such as benzene or thinner.
Record
wav
Thinner
Do not get fingerprints, grease or dirt on discs.
Be especially careful not to scratch discs when removing them
from their cases.
Do not bend discs.
Do not heat discs.
Do not enlarge the center hole.
Do not write on the labeled (printed) side with a ball-point pen or a
pencil.
Water droplets may form on the surface if the disc is moved
suddenly from a cold place to a warm one. Do not use a hairdryer,
etc., to dry the disc.
Always eject discs after playrng them.
Keep discs in their cases to protect them from dust, scratches and
warping.
Do not put discs in the following places:
I. Places exposed to direct sunlight for long periods of time
2. Humid or dusty places
3. Places exposed to heat from heaters, etc.
Only load one disc at a time. Loading one disc on top of another
may result in damage or scratch the discs.
Load 8 cm discs securely in the disc guide, without using an
adapter. If the disc is not properly loaded, it may slip out of the
guide and block the disc tray.
Be careful not to let your fingers get caught when the disc tray is
closing.
Do not place anythrng but discs in the disc tray.
Do not load cracked or warped discs or discs that have been fixed
with adhesive, etc.
Do not use discs on which the adhesive part of cellophane tape or
glue used to attach the label is exposed, or discs with traces of
tape or labels that have been peeled off. Such discs may get
stuck inside the player, resulting in damage.
Also do not use volatile
Benzene
9
cl4
I
l
l
l
l
l
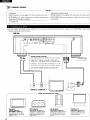
CONNECTIONS
NOTES:
Read the manuals
of all the components
when making
l
Plug the power cord securely into the power outlet. Incomplete
connections.
connection may result in noise.
l
Binding the power cord together with connection cords may result
Keep the power cord unplugged until all connections have been
in humming or noise.
completed.
If the power is on when connections are made, noise may be
l
Plug in the power cord in the direction in which the sound is most
to your liking.
generated and damage the speakers.
Be sure to connect the left and right channels properly, L (left) to
L, R (right) to R.
Use the included video/audio cord to connect the TV’s video input connectors
connectors and audio output connector
and audio input connector to the DVM-1800’s
video output
DVM-1800
S-Video output
connector
The video signals are divided
into color (0 and
brightness (Y) signals, achieving a clearer picture.
If the TV is equipped
connector,
DVM-1800’s
with
we recommend
S-Video output
an S-Video
connecting
connector
Video equipment
,
input
it to the
using a
you own
cl
Standard
(Direct View TV)
(See pages 10 and Il.)
Conventional TV set (4:3),
Wide-screen TV set (I 6:9),
Digital TV etc.
10
El
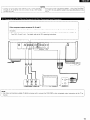
To power outlet
CRT projector
(See pages 10 and 11.)
Cinema-size images can be
enjoyed by projecting from
three light sources onto a
lame screen.
LCD projector
(See pages 10 and 11.)
Cinema-size images can be
enjoyed by projecting from
an LCD panel onto a large
screen.
Projection TV
(See pages 10 and 11 .I
Powerful images can be
enjoyed with a large rear
screen projector.
l
NOTES:
Connect the DVM-1800’s video outputs to the TV either directly or
l
Some discs contain copy prohibit signals. If such discs are played
through an AV amplifier. Do not connect it via a VCR (video
vra a VCR, the copy prohibit system may cause disturbance in the
cassette recorder).
picture.
Color component
output
connectors
(CR, Ce and Y)
The red (CR), blue KS) and brightness (Y) signals are output independently,
achieving more faithful reproduction of
the colors.
l
The color component
Input connectors may be marked differently on some TVs or monitors (PR, PB and Y/R-Y, B-
Y and Y/CR, CB and Y, etc.). For details, refer to the TV’s operating instructions.
I
A
cl
DVM-1800
To power outlet
TV
1 -NOTE:
l
Use three commercially
monitor.
available 75 Q/ohm pin-plug cord to connect the DVM-1800’s
3~~010
color component
INJ
output connectors to the TV or
11
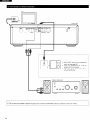
When DVDs recorded in Dolby Digital or DTS are played, Dolby Digital or DTS bitstream signals are output from the DVD player’s digital audio
output connectors. If a Dolby Digital or DTS decoder is connected, you can achieve sound with the power and sense of presence of a movie
theater or concert hall.
TV
DVM-1800
Digital audio input
connector (COAXIAL)
Center speaker
Front speaker (left)
I
1 ,
Surround
sneaker
Cleft\
, - .,
P - -. .-
II/
n Connecting
an optical fiber cable (commercially
Dolby Digital or DTS
decoder (digital
surround processor)
I
1
)
lHT=-Tl
1 11
1
I
AV amplifier
(AV control center)
-I
I
available) to the digital audio input connector
(OPTICAL)
NOTE:
l
Store the dust cap in a safe place, and be careful not to lose it:
When not usrng the terminal, attach the cap to protect the
terminal from dust.
Remove the dust cap, line up the cable in the proper directly, then
insert it securely as far as it goes.
12
W Sound output
from the DVM-1800’s
Disc played
digital audio output
connectors
Audro recording format
Dolby Digital
DVD vrdeo
DTS
Linear PCM
48 kHzi96 kHz
16/20/24 brt
Video CD
MPEGI
CD
Lrnear PCM
Sound output
f
I
l
Dolby Drgrtal bitstream (I to 312 1 channels) or PCM (48 kHz/lG bit) (2 channels). (NOTE 1, 2)
* Select with the “Drgrtal Audio Output” default setting. (See page 55.)
l
dts brtstream or no output
+ Select with the “Drgrtal Audro Output” default setting.
(See page 55.)
l
Linear PCM (48 kHz/lG brt only) (2 channels) or no output. (NOTE 2)
* Select with the “Digital Audio Output” default setting. (See page 55.)
. PCM (44.1 kHz) (NOTE 1)
l
Ltnear PCM 144 1 kHz)
NOTE 1 The type of audro output from the connector can be selected by “7 Drgrtal Audio Output” of the rnrtral setting. (See page 55.)
NOTE 2. Compressed audto IS converted to PCM before output.
NOTE:
l
Some dts decorders which do not support DVD- dts Interface may not work properly with the DVD video auto changer.
l
Linear PCM audio is the signal recording format used for music CDs.
Whrle the signals are recorded at 44.1 kHz/lG brt for music CDs, for DVDs they are recorded at 48 kHz/lG bit to 96 kHz/24 bit, providing higher
sound quality than music CDs.
TV
*Set the “Digital Audio Output” default setting as shown below.
(See page 55.)
l
“PCM Down Conversion” - “NO”
l
“Dolby Digital” -+ “PCM”
. “dts” + “OFF”
Playing DVDs with incorrect settings may result noise that could
damage your ears or the speakers.
DVM-1800
Digital audio input
connector (COAXIAL)
13
TV
DVM-1800
T
~
l
INPUT
l
l
Active subwoofer
Use the GUI icons to turn subwoofer
output on (see page 29.)
Place the subwoofer
as close as
possible to the front center.
Adjust the volume of the subwoofer to
suit your preference.
Stereo component
NOTE:
l
Use commercially
14
available 75 n/ohm pin-plug cord to connect the DVM-1800’s video out connector to the TV or monitor.
I
I
I
I
I
I
I
I
I
I
1
:
I
1
I
I
I
I
I
1
I
I
I
05
PART NAMES AND FUNCTIONS
Disc number button
@
l
@
POWER button
l
l
l
l
(I-5)
Press these button to specify which disc you want to play.
Disc tray (I-5)
Load discs here.
Press the OPEN/CLOSE button @to open and close the disc
tray.
The disc tray is also closed when the PLAY button @ is
pressed.
Press once to turn the power on.
Press again to set to the “OFF” position and turn the power
off.
Set the power to the standby mode by pressing the POWER
button on the remote control unit while the power is on.
Turn the power on from the standby mode by pressing the
POWER button on the remote control unit.
Power indicator
l
This indicator lights when the power is on and when the
power is In the standby mode.
RANDOM button
l
l
l
Video output
Press this button to begin random play.
Pressing this button during stop, and press play button play
3
to full automatic random play.
This button does not work when playing DVDs.
l
S-Video output
l
REPEATbutton
l
l
Each time this button is pressed, the carousel will rotate in a
clockwise direction to the next tray position. This allows for
loading or unloading of discs.
This button is also used to select the next disc, in the normal
play continuously.
Remote control
sensor (REMOTE SENSOR)
Display
l
l
SKIP button
l
l
l
l
l
l
button
cord (available
connectors
in
(COMPONENT)
connector
Connect these to the input connectors
to hear the sound of the DVM-1800
through the amplifier.
l
connector
of an amplifier, etc.,
over the speakers
(COAXIAL)
Connect using an audio cord. Connect
available 75 Q/ohms pin-plug cord.
Digital data is output from this connector.
connector
a commercially
(OPTICAL)
Connect using an optical fiber cable (available in stores).
Digital data IS output from this connector.
Remote control input connector
(REMOTE CONTROL IN)
This is the Input connector for wired remote control.
Consult your DENON dealer if you wish to use this
connector.
Remote control output connector
(REMOTE CONTROL OUT)
(44)
This is the output connector for wired remote control.
Consult your DENON dealer if you wish to use this
connector.
Power cord
l
Plug this into a wall power outlet.
(HI
Press thus to stop the disc. (See page 23.)
button
(h,
1
Press the button In the play mode to search in the forward
direction.
Press the button in the stall mode for slow play in the forward
directron.
OPEN/CLOSE
l
l
l
Press this button in the play mode to search in the reverse
direction.
Press the button in the still mode for slow play in the reverse
direction.
SLOW/SEARCH
l
l
Press this button to stop play temporarily.
STOP button
l
(II)
(S-VIDEO OUT)
Connect using an audio cord (available to stores) to the active
subwoofer.
Digital audio output
(ml)
Press this to move ahead to the beginning of the next track
(or chapter).
SLOW/SEARCH
l
l
l
button
video output
Digital audio output
(F)
STILL/PAUSE
connector
using an S-Video connection
ANALOG OUT connectors
Press this to play the disc.
SKIP button
l
(I441
Press thus to move back to the begrnning of the current track
(or chapter).
Press again to move back to the begrnnrng of the previous
track (or chapter).
PLAY button
l
(VIDEO OUT)
Connect using video cords (available in stores).
Subwoofer
l
Information on the disc that IS currently playrng IS shown on
the display. (See page 16.)
Connect
stores).
Component
Press this button for repeated playback. (Refer to page 32 for
details.)
DISC SKIP button
l
connector
Connect using the included video cord.
button
(4
Press this button to open and close the disc tray.
15
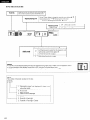
Play Indicator
r Source Indicators 1
These Indicate the type of drsc
currently playing.
r
IT\’
DVD VIDEO
CD’
DISC TITLE TRACKCHAP INDEX
Music calendar
Proqram’lndrcator
l
The title/chapter
number is
displayed here for DVDs, the
track number for video and
musrc CDs.
*The title and elapsed track
trme are displayed here durrnq
playback.
r 96 kHz
l Lights during playback of lrnear PCM sound
wrth a sampling frequency of 96 kHz.
r Disc Indicator l The number of the trays rn whrch discs are loaded light
. ”l
16
” lights for tray numbers rn whrch CDs and Video CDs are loaded
” I-1 ” lights for tray numbers in which DVDs are loaded.
Ll6
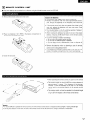
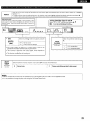
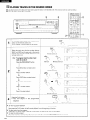
REMOTE CONTROL UNIT
W The DVM-1800 can be controlled from a distance using the included remote control unit CRC-545).
0 Remove the remote control unit’s rear cover.
@ Place two batteries (“AA” (R6P)) in the battery compartment
the direction indicated by the marks.
in
Cautions On Batteries
l
Use batteries (“AA” (R6P)) in this remote control unit.
l
Replace the batteries with new ones approximately once a
year, though this depends on the frequency with which the
remote control unit is used.
l
If the remote control unit does not operate from close to the
main unit, replace the batteries with new ones, even If less
than a year has passed.
l
The included battery is only for verifying operation. Replace it
with a new battery as soon as possible.
l
When inserting the batteries, be careful to do so in the proper
direction, following the 0 and 0 marks in the remote control
unit’s battery compartment.
l
To prevent damage or battery fluid leakage:
l
Do not use a new battery with an old one.
l
Do not use two different types of batteries.
l
Do not short-circuit,
disassemble,
heat or dispose of
batteries in flames.
l
Remove the batteries when not planning to use the remote
control unit for a long period of time.
l
If the batteries should leak, carefully wipe off the fluid from the
inside of the battery compartment, then insert new batteries.
@ Close the rear cover
l
l
Approx. 7 meters
l
When operating the remote control unit, point it at the remote
control sensor as shown on the diagram.
The remote control unit can be used from a direct distance of
approximately
7 meters.
This distance will be shorter,
however, if there are obstacles in the way or if the remote
control unit is not pointed directly at the remote control
sensor.
The remote control unit can be operated at a horizontal angle
of up to 30” with respect to the remote control sensor.
NOTES:
l
It may be difficult to operate the remote control unit if the remote control sensor IS exposed to direct sunlight or strong artificial light.
l
Do not press buttons on the main unit and on the remote control unit at the same time. Doing so will result in malfunction.
17
I
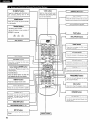
FL DISPLAY button
V.S.S. button
I
I
I
Sets the vrrtual surround sound.
(Functions when playing DVDs
recorded in Dolby Digital with
two or more channels.)
Press this to display audio information on
the currently
playing
disc on the
[ fluorescent display.
I
OPEN/CLOSE
r
Press this to clear numbers that you have
POWER button
I
Press this to switch the power between
on and standby.
I
SLOW/SEARCH
->umber
buttons
buttons
I
1
Use these to input numbers.
Use the 210 button to input numbers of
10 or over.
Example: To input 25
PLAY button
210
o-b&
I
button
-I
STILL/PAUSE
button
SKIP buttons
1
MENU button
I
Press this to drsplay
recorded on the disc.
the DVD menu
I
RETURN button
I
Press this to return to the prevrous menu
STOP button
-I
MARKER button
1
I
Press thus to mark places you want to see
agarn.
I
1
I
I vertical direction.
Use the 4 and b buttons to select in the
horizontal directton.
Press the ENTER button to select the
item selected with the cursor buttons.
I
SUBTITLE button
Press this to switch the DVD’s subtitle
language.
I
For vrdeo CDs, press thus to
18
I
DISC SKIP button
Disc Number button
I
PROGlDlRECT
I
4
button
Press thus to switch between the normal
play, programmed play.
I
Press this to display the GUI screen.
language.
I
1
I
DISPLAY button
I
-
ANGLE button
Press this to switch the angle.
(1 - 5)
1
CALL button
1
I
Press thus to check the program contents.
I
RANDOM button
I
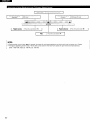
This set has the following
presettings:
“DISC Languages”, “Ratings”, “Menu Language”, “On-Screen Messages”,
“FL Display”, “TV
Aspect”, ” Digital Audio Output” and “Other Settings”.
These presettings have been preset upon shipment from the factory. If you wish to change them to suit your specific purposes, refer to pages
43 to 59.
cl7
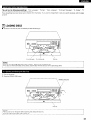
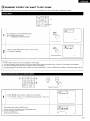
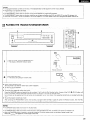
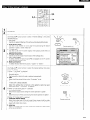
LOADING DISCS
W Set discs in the drsc tray with the labeled (printed) side facing up
8 cm disc guide
DISCtray
12 cm disc guide
NOTES:
l
Do not move the DVM-1800 while a disc is playing. Doing so may scratch the disc.
l
For discs on which both sides can be played, load the disc wrth the side you want to play facing down.
@ Turn on the power.
@ Press the OPEN/CLOSE button
\
DISCtray
NOTES:
l
Be sure to turn on the power before opening and closing the disc tray.
l
Do not strike on the button with a pencil, etc.
19
How to load a disc
l
Make sure the drawer is completely open.
l
Hold the disc by the edges and place it on the disc tray. (Do not
touch the signal surface, i.e., the glossy side.)
l
Set the disc properly in the tray according to its size.
Set 8 cm discs in the center hole.
Set 12 cm discs in the outer hole.
l
When the drawer is opened during the stop mode, discs can be
loaded in the 5 disc trays. If the DISC SKIP button is pressed, the
carousel turns and a disc can be loaded in the another disc tray.
When the drawer is opened during the play mode, it is possible to
load and unload discs in all of the disc trays other than the one
whose disc is currently playing. 5 discs can be replaced and press
the DISC SKIP button to switch the other disc tray that can be
replaced.
l
Press the OPEN/CLOSE button (b) to close the drawer
NOTES:
l
Remove all discs before moving the player.
l
The player will not operate properly and the disc may even be
damaged if it is not set correctly.
l
If your finger should get caught in the drawer when it closes,
press the OPEN/CLOSE button (+).
l
Do not place any foreign objects on the disc tray, and do not
place more than one disc on the tray at a time. Otherwise
malfunction may occur.
l
Do not push in the disc tray manually when the power is off as
this may cause malfunction and damage the DVD video auto
changer.
l
Do not touch the carousel while it is turning. Also, do not turn
the carousel by hand when it is stopped. Doing so could
damage it.
l
Do not insert disc where indicated by arrow.
This could damage the internal mechanism in the unit.
l
Do not hit the set strongly when a disc is loaded. Doing so may
scratch the disc or cause the DVD video auto changer to stop
operating.
20
/
\
/
\
LABEL SIDE
UP WARD
08
PLAYBACK
Turn on the power.
l
The power indicator lights and the power turns on.
Press the OPEN/CLOSE button to open the disc tray.
Main unit
Remote control unit
Main unit
Remote control unit
Set the disc to be played in the front srde tray.
Press the PLAY button.
The disc tray closes automatically and playback begrns.
l
If the disc tray is closed with the OPEN/CLOSE button,
press the PLAY button.
l
For many interactive DVDs and video CDs with playback
control, a menu screen appears. In this case use the
procedure in step 5 to select the desired item.
* Interactive DVDs are DVDs rncluding multiple angles,
l
Example: For DVDs with menu
xreenS
Example: For vrdeo CDs with
playback control
21
5
A
@b
o”o
a
G;
Use the cursor buttons (A, v, 4 and b) to select the desired
item.
l
For some discs there is a second menu screen. If so,
press the HI
button to display the next menu screen.
(See the disc’s jacket.)
* The cursor buttons (A, 7, 4 and )I do not work for video
CDs. Use the number buttons to select the desired item.
Remote control unit
Example: When “Apple”
is selected
TOP MENU
Apple
Press the ENTER button.
The desired item is selected and playback starts.
l
You can return to the menu screen by pressing the TOP
MENU/MENU/RETURN
button while the DVD is playing,
though this depends on the disc.
l
Press the RETURN button during playback of a video CD
to return to the menu screen.
l
6
ENTER
%
Remote control unit
NOTES:
l
l
22
If the OPEN/CLOSE (6) button is pressed while a drsc is playrng,
playback continues, but the disc tray opens and four discs can be
replaced. The disc that can be replaced switches when the DISC
SKIP button is pressed
Press the OPEN/CLOSE (A) button again to close the drawer.
If 8 appears on the TV screen while buttons are being operated,
that operation is not possible on the DVM-1800 or with that disc.
l
l
l
l
Set the disc in the disc guide.
Do not place more than one disc in the disc tray.
The disc keeps turning while the menu screen is displayed on the
TV screen.
Always press the STOP button if you do not want to keep playing
the disc.
SKIP buttons
I
PLAY button
STOP button
I
Number
buttons
L
L
1
1
I
SKIP buttons
-
SLOW/SEARCH buttons
STOP button
-
PLAY button
STILL/PAUSE button
_
Cursor buttons/ENTER
button
RETURN button
-
DISC number buttons
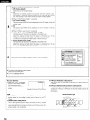
During
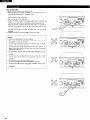
playback, press the STOP button.
RESUME function
The player records the point where STOP was pressed during play (RESUME
function). (“b” flashes on the player’s FL drsplay when this function is activated.)
l
Press PLAY again while “b” flashes, and play WIII resume from this point.
l
When the tray is opened or STOP is pressed again while “b” flashes, the
RESUME function will be cleared.
STOP
.
The RESUME function works only with titles for which the elapsed playing time
appears on the player’s FL display durrng playback.
This feature will not be cleared when the player is set to the standby mode and
then turned back ON.
%
Main unit
Chapter preview function (DVD only)
When PLAY is pressed while “b”
flashes, the message shown at right IS
displayed.
STOP
Press PLAY to Chapter Preview
.
i
When PLAY is pressed again whrle the above message is displayed, the first few
seconds of each chapter from the beginning of the title up to the point where
operation was stopped will be played. This makes it possible to review previously
vrewed chapters. Normal playback will commence from the point where operation
was stopped.
k
Remote control unit
*
The resume play memory function only works for discs
for which the elapsed time is shown on the display
during playback.
NOTES:
l
Cancelling the RESUME function will also clear the chapter preview functron.
l
The chapter preview function may not work wrth some DVDs.
l
l
After 30 mtnutes in the stop mode, the DVM-1800’s power automatically turns
off and the standby mode is set. (Auto Power Off)
If you do not want to continue playing the disc, to save electricity either press
the POWER button on the main to turn the power off or press the POWER
button on the remote control unit to set the power to the standby mode.
23
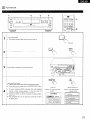
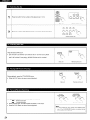
1
Press the button for the number of the desired disc (I to 5)
Remote control unit
2/
Press the number of the desired chapter or track (0 to 9 and 210 button).
Press the DISC SKIP button.
The carousel in the dreamer turns and the disc on the next tray is played.
l
For example, if disc number 3 was playing, the disc switch to disc number 4,
and if disc number 5 was playing, the disc switches to disc number 1.
l
Main unit
Remote control unit
STILUPAUSE
During playback, press the STILL/PAUSE button.
Press the PLAY button to resume normal playback.
l
I
Maln unit
Remote control unit
SLOW/SEARCH
During playback, press one of the SLOW/SEARCH buttons.
44
: Reverse direction
w
: Forward direction
l
When pressed again, the search speed increases (In five steps)
l
Press the PLAY button to resume normal playback.
24
\
Main unit
\
Remote control unit
NOTE:
l
In some cases the menu screen may reappear when
one of the SLOW/SEARCH buttons IS pressed during
menu playback on a video CD.
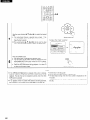
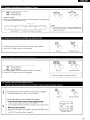
- SKIP -
During playback, press one of the skip buttons.
I44
: Reverse direction
w
: Forward directron
l
A number of chapters or tracks equal to the number of times the button IS
pressed is skipped.
l
When the skip back button is pressed once, the pickup returns to the beginning
of the currently playing chapter or track.
Marn unrt
Remote control unit
Playrngposrtron
J
\Ff--&-k/
\J
Chapternrack
Chapterrrack
l
Chapterflrack
In some cases the menu screen may reappear when
one of the SKIP buttons IS pressed durrng menu
Reverse drrection - - Forward drrection (dIrectronof playback)
STILLIPWSE
STILUPAUSE
During playback, press the STILL/PAUSE button.
l
The prcture moves forward one frame each time the button is pressed.
l
Press the PLAY button to resume normal playback.
%
Main unit
SLOW
In the stall mode, press one of the SLOW/SEARCH buttons.
44
: Reverse direction
w
: Forward direction
l
When pressed again, the slow play speed increases (in five steps).
l
Press the PLAY button to resume normal playback.
/ SEARW
j$;y$fJ
%
Remote control unit
SLOW/SEARCH
?$$I$
Marn unit
Remote control unit
NOTE:
l
1
Reverse slow play is not possrble on video CDs.
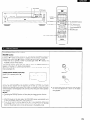
Press the STOP button while the video CD’s menu screen is displayed.
The display switches from “PBC” to the time display.
l
Main unit
Use the number buttons to input the desired track number.
To play the disc without using the menu playback function
l
Refer to the disc’s jacket, etc., for the track numbers.
l
To start playback from the beginning of the disc, press number button
l
2
”1”
l
l
Returning to menu playback
Press the STOP button to stop playback, then press the MENU button.
(“PBC” appears on the display window and the menu screen appears
on the TV.) Now perform step 6 on page 22.
Remote control unrt
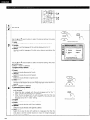
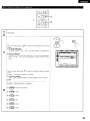
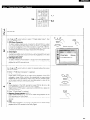
USING THE GUI SCREENS
n Use this function to display and change information on the disc (titles, chapters, time, audio, subtitles, angles, etc.) and on the player (repeat,
play mode, markers, etc.)
In the play or stop mode, press the DISPLAY button.
The GUI (Graphical User Interface) screen appears.
l
The picture on the TV screen switches each time the button is pressed.
l
The items displayed differ from disc to disc.
l
For DVDS
l
Disc information screen
For Video CD
l
Player rnformatron screen
For CD
l
L
l
26
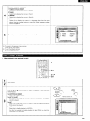
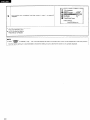
Disc infarmation screen
” l~~“ss‘ee
Shuttle screen
t
t
Use the + and ) cursor buttons
The selected item is displayed
2
. b
O %
to select the item you wish to change.
with a yellow frame.
l
Remote control unit
Use the A and 7 cursor buttons to change the item.
Some changes are effective
immediately.
while some changes are only
made after the ENTER button is pressed.
Also, some functions
may
not work from the stopped GUI screen.
l
Numbers
(for titles, etc.) can be changed using the number buttons.
When this is done, press the ENTER button
to make the change
effective.
A
l
3
IENTER)
T
a
Remote control unit
n For DVDs
Title No.
Change the title No. by using the cursor buttons (A. 7) or the numeric buttons and press the ENTER button.
I
I
Chapter No.
Change the chapter No. by using the cursor buttons (A, r) or the numeric buttons and press the ENTER button.
I
I /I
Elapsed playing time
(hour. minute: second)
Change the time by using the numeric buttons and press the ENTER button.
Example: To specify “1 hour 56 min. 37 sec.“. enter “15637”.
(This function does not work with some discs.)
Angie No.
I
Audio soundtrack
language No.
Change the No. by using the cursol r
buttons (A. 7) or the numeric buttons.
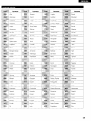
Audio soundtrack
language
ENG:
FRA:
DEU:
ITA:
ESP:
NLD:
SVE:
NOR:
DAN:
English
French
German
Italian
Spanish
Dutch
Swedish
Norwegian
Danish
POR:
RUS:
JPN:
CHI:
KOR:
MAL,
VIE:
THA:
x:
Portuguese
Russtan
Japanese
Chtnese
Korean
Malay
Vietnamese
Thai
Others
Subtitl;z.nguage
Change the No. by using the cursor
buttons (A, 7) or the numeric buttons.
Subtitle
ENG:
FRA,
DEU:
ITA:
ESP:
NLD:
SVE:
NOR:
DAN:
language
POR Portuguese
English
RUS: Russian
French
JPN: Japanese
German
CHI: Chinese
Italian
KOR: Korean
Spanish
MAL: Malay
Dutch
Swedish
VIE: Vtetnamese
Norwegian THA: Thai
*:
Others
Danish
Select “ON” or “OFF”
cursor buttons IA, 7).
(“k” stands for kHz
and “b” stands for
LPCM
I
Change the No. by using the cursor buttons (A. r) or the numeric
buttons.
Subtitle
by using the
on/off
II0
Audio
attribute
DTS
NOTE:
Vocal
l
“A V” around
the icon means
that the item can be changed
using the cursor buttons (A, ‘I).
Vocal
:
27
H For video and music CDs
I
Change the title No. by using the cursor buttons (A, v)
or the numerrc buttons and press the ENTERbutton.
Track No.
Change the mode by using the cursor buttons (A. VI
Left channel sound is output from the speaker CL).and
rrght channel sound from the speaker (R).
Audio mode
(VrdeoCD only)
Left channel sound only is output.
Rght channel sound only ISoutput.
l
l
l
Track No. and the elapsed playing time are not displayed during menu play of Video CDs with playback control.
It is not possible to turn playback control ON or OFF using the On-Screen Menu Icons.
“A 8” around the icon means that the item can be changed using the cursor buttons (A, 7).
NOTE:
The number of channels recorded on the disc.
Example:
12 .Ich
TT
.I:
I
Subwoofer
signal
subwoofer signal)
(not displayed
I
is no
I
0: No surround
1: Mono surround
2: Stereo surround (left/right)
1: Center
2: Front left + Front right
3: Front left + Front right + Center
28
if there
Markers
Press the ENTER button during play and press the ENTER button agarn at the preferred point to store a marker. (Marker no. is drsplayed
instead of “*“.)
l To recall a marker, select the preferred marker no. by usrng the cursor buttons (4, ,)
and enter the selection using the cursor button (A).
l To clear a marker, select the preferred marker no. usrng the cursor buttons (4. )I
and press the CLEAR button.
A-B repeat play
Press the ENTER button durrng play to store location A and
press again to store locatton 6 Repeat play between the two
locatrons starts. Press the ENTER button again to return to
normal play.
Turning
subwoofer
output
on and off
Select “ON” or “OFF” with the cursor buttons CA, 7)
ON:
OFF:
if you have connected a subwoofer
if you have not connected a subwoofer
Select the preferred mode durrng play by usrng the
Select the preferred mode during
plav bv usina the cursor buttons (A.
Virtual
l
l
l
This mode makes the dialogue in movies easier to hear if the
soundtrack has been recorded with surround sound.
This function is effective with Dolby Digital, three channels or
over, where the dialogue is recorded in the center channel.
This function is effective with analog out.
Digital
Cinema
Mode
(DVDA/ideo
CD only)
I
2
/ V.S.S. emphasized effect
Select the preferred mode by using the cursor buttons (A, v) and press the ENTER button.
I
c
I
N
I
Normal mode
I
c
I
Cinema mode (Enhances detail in dark scenes.)
I
NOTES:
l
Marker functions do not work with an Interactive DVD or during menu play of a Vrdeo CD with playback control.
l
It is not possible to change the play mode usrng the On-Screen Menu Icons.
29
the cursor button (4).
I
I
I
Rapid reverse
Press the cursor button (4)
I
Play
I
I
Rapid advance
Press the cursor button (v)
Press the cursor button (k).
I
r
I
NOTES:
l
Each time the cursor button (4, W is pressed, the speed of rapid reverse/advance and slow-motion play increases up to 5 steps.
l
The figures appearing at both ends of the shuttle screen stand for the maximum speeds of rapid reverse and rapid advance.
(DVD: +I 00/-l 00, Video CD: +40/-40, CD: +50/-50)
30
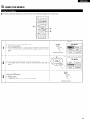
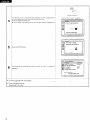
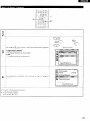
010
MARKING SCENES YOU WANT TO SEE AGAIN
n Set marks at scenes you want to see agarn so that you can start playback from the marked position whenever you want.
During playback, press the MARKER button.
l
The marker screen appears.
l
“x” is displayed if the mark is not set.
Press the ENTER button at the scene you want to mark.
A number is drsplayed.
l
Up to five marks can be set.
l
Remote control unit
’ NOTES:
l
In some cases, subtitles may not be drsplayed at marked spots.
l
The marking function cannot be used for DVDs and video CDs for which the elapsed time is not shown on the drsplay during playback.
l
The marks are retained until the power is turned off or the disc is ejected.
l
The mark settings will be cleared when changing from the specified disc to a disc of a different disc number, or when the power is set to
the standby mode.
l-
I
.
o
I
.
Q-;
Remote control unrt \
1
Use the 4 and F cursor buttons to select the mark number.
l
If the marker screen IS not drsplayed during playback,
MARKER button to display It.
press the
* To play from the selected mark number:
Press the A cursor button or ENTER button.
The disc returns to the selected mark and playback starts.
* Clearing the selected mark number:
Press the CLEAR button.
The selected mark is cleared.
31
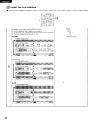
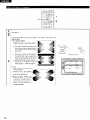
q11 PLAYING
REPEATEDLY
H Use this function to play your favorite audio or video sections repeatedly.
During playback, press the REPEAT button.
@ For DVDs (When the display’s DVD indicator is lit.)
Normal playback
----)
Chapter repeated
REPEAT
(During playback only)
i 1
CHAP
REPEAT
(During playback only)
TITLE
All disc repeated
L-l
REPEAT
ALL DISCS
DVD only disc repeated
Repeat playback canceled
L-J
REPEAT
DlSCS
D”0
I
1
Main unit
!-I
@I For video and music
indicator is lit)
CDs (When the display’s
VIDEO CD or CD
Normal playback
4
Track repeated
(During playback only)
1 disc repeated
(Durrng playback only)
1
I
Remote control unit
All disc reoeated
CD only all drsc repeated
Repeat playback canceled
* To return to normal playback:
Press the REPEAT button until the display’s “REPEAT” indicator turns off to return to the normal play mode.
NOTES:
l
If neither the DVD, the VIDEO CD nor the CD indicator is lit, the mode switches in the following order each time the REPEAT button is
pressed:
Normal play back - All disc repeated - DVD only all disc repeated - CD only all disc repeated - Repeat playback canceled
l
Repeat play may not work correctly with some DVDs.
l
Repeat play does not work with an interactive DVD or during menu play of a Video CD with playback control.
32
REPEAT
I
During playback, press the A-B button.
l
This sets start point A.
LJ
A-
REPEAT
2
Press the A-B button again
This sets end pornt B, and repeat playback of the A-B section starts.
l
A-B
L-J
* To return to normal playback:
Press the A-B REPEAT button untrl the display’s “REPEAT” indicator turns off.
NOTES:
l
A-B repeat play does not work with an interactive DVD.
l
Some subtrtles recorded around pornt A or B may fall to appear. [DVD]
l
A-B repeat play works only within a title [DVDI or a track [Video CD/CD].
W Setting
the Repeat Play Mode During Programmed
Playback
When the REPEAT button is pressed during programmed
playback, repeat playback of the entire program starts and the
D
indicator
lights. Press the REPEAT button until the display’s REPEAT indicator turns off to return to normal programmed playback.
33
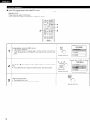
012
PLAYING TRACKS IN THE DESIRED ORDER
W Use this function with video and music CDs to play the tracks in the desired order. (This function will not work for DVDs.)
W Up to 32 tracks can be set in a program.
L
-c-----l
J
In the stop mode, press the PROG/DIRECT
button on the remote control unit.
l
The “PROG” indicator lights on the display.
1
Ex: To program track 3 on disc 2 and
track 12 on disc 5:
Press the PROG/DIRECT button.
Remote control unit
v
$i!gy-y
Remote control unit
Malt- unit
1
Press DISC2 (disc number button).
2
pyYyry
v
Select the track using the disc number buttons
(DISC1 to DISC51 on the main unit or the remote
control unit and the number buttons on the
remote control unit.
l
Remote control unit
v
$
(
Remote control unit
1
Press 3 (number button).
%
1
Press DISC5 (disc number button).
1
Press >I 0 (number button).
1
Press 1 (number button).
&v
Remote control unit
Maln unit
G$y%,Fgy-y
Remote control unit
$
1
Press 2 (number button).
pEyy-y
Remote control unit
3
Press the PLAY button.
Play now begins
sequence.
l
in the
programmed
%
Maln unit
b
Remote control unit
C To return to normal playback:
Press the STOP button to stop programmed playback, then press the PROG/DIRECT button.
Now press the PLAY button to start normal playback from the beginning of the disc.
C To clear tracks from the program:
Press the STOP button twice. Press the CLEAR button to clear the last track in the program.
k To clear the entire program:
The entire program is cleared when the power is turned off or when the PROG/DIRECT button is pressed.
34
NOTES:
l
The programmed track numbers
l
Programming is not possible for
l
The PROG/DIRECT button does
l
The PROG/DIRECT button does
l
The PROG/DIRECT button does
l
When the PROG/DIRECT button
013
on the drsc of the displayed disc number appear lit on the music calendar.
DVDs.
not function when DVDs are loaded in all five trays.
not function during normal playback or programmed playback.
not function when the tray IS open and neither the DVD, the VIDEO CD nor the CD indicator is lit.
is pressed In the all disc repeat or CD all disc repeat mode, the all programmed repeat mode is set.
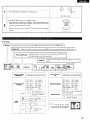
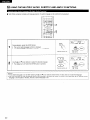
PLAYING THE TRACKS IN RANDOM ORDER
Use this function with video and music CDs to play the tracks in random order. (This function will not work for DVDs.)
1
2
-2
I
1
J
In the stop mode, press the RANDOM button.
The display’s RANDOM indicator lights.
l
I
-1
Main unit
RANDOM
%
Remote control unit
PLAY
2
Press the PLAY button.
The tracks start playing in random order.
l
%
8-
Main unit
Remote control unit
8 When random playback ends:
The stop mode is set and the random play screen reappears
C To return to normal playback:
Press the STOP button to stop random playback, then press the RANDOM button.
$ To set the disc sequential random play mode:
Press the RANDOM button and specify the disc numbers (1 to 5) with the Disc Number button. A press of the PLAY 0 PLAY) button will
result In the player randomly selecting and playing tracks on the disc in the order of specified discs.
Up to 5 discs can be selected, and the same disc can be selected, two or more times. Disc sequential random play IS cancelled when play
ends.
C To set the program random play mode:
After pressrng the PROG/DIRECT button and inputting a program (See item q on page 34), press the Random button, then the Play
button. The microcomputer will then select tracks from the program at random and play them.
NOTES:
l
The RANDOM button does not function in the play mode.
l
The RANDOM button does not functron when DVDs are loaded in all five trays.
l
The RANDOM button does not function when the tray is open and neither the DVD, the VIDEO CD nor the CD indicator is lit.
l
When the RANDOM button is pressed In the all disc repeat or CD all disc repeat mode, the random all repeat mode is set.
RANDOM cREPEAT-)
will appear lit on the drsplay at this time.
35
014
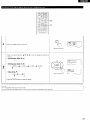
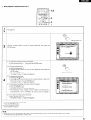
USING THE MULTIPLE AUDIO, SUBTITLE AND ANGLE FUNCTIONS
n With DVDs containing multiple audio language signals, the audio language can be switched during playback.
AUDIO
1
During playback, press the AUDIO button.
l
The current audio language number is displayed.
l
If no audio language is recorded on the disc, “- -” is displayed.
%
Remote control unit
2
Use the A and 7 cursor buttons to select the desired language.
The display turns off when the ENTER button is pressed.
l
Remote control unit
NOTES:
l
l
36
If the desired language is not set after pressing the A and v cursor buttons several times, the disc does not include that language.
The audio language set with the default settings (see page 43) is set when the power is turned on and when the disc is replaced. If that
language is not included on the disc, the disc’s default language is set.
AUDIO
1
Press the AUDIO button during play.
Remote control unit
Press the cursor
selected.
l
buttons
(A.7,
4,
,I
until the preferred
setting
IS
DVD Karaoke (Solo) (4, b)
---(OFF) -ON
l
DVD Karaoke (Duet) 14, F)
---(OFF)-
*
I+2 (ON)---+
VI (ON)---+
V2 (ON)
t
l
Video CD (A, ‘I)
---LPI--W
L&R
Remote control unit
t
Press the ENTER button to clear the display
NOTES:
l
This operation does not work with CDs.
l
The vocals from the digital audio output connector cannot be switched by this operation.
37
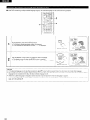
n With DVDs containing multiple subtitle language signals, the subtitle language can be switched during playback
During playback, press the SUBTITLE button.
The current subtitle language number is displayed.
l
If no subtitles are recorded on the disc, “- -” is displayed.
l
Remote control unit
Use the A and 7 cursor buttons to select the desired language.
The display turns off when the ENTER button is pressed.
l
Use the 4 and ) cursor buttons to turn the subtitles “ON” and “OFF”.
l
Remote control unit
I
NOTES:
l
If the desired language is not set after pressing the A and 7 cursor buttons several times, the disc does not include that language.
l
The subtitle language set with the default settings (see page 44) is set when the power is turned on and when the disc is replaced. If that
language is not included on the disc, the disc’s default language IS set.
l
When the subtitle language is changed, several seconds may be required for the new language to appear.
l
When a disc supporting the closed caption is played, the subtitle and the closed caption may overlap each other on the TV monitor. In this
case, turn the subtitle off.
38
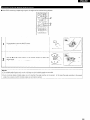
H With DVDs containrng multiple angle signals, the angle can be switched during playback.
ANGLE
1
During playback, press the ANGLE button
The current angle number is displayed.
l
T--l
\
Remote control unit
2
Use the A and 7 cursor buttons or the number buttons
desired angle.
l
The display turns off when the ENTER button is pressed.
to select the
Remote control unit
NOTES:
l
The multiple angle function only works wrth discs on which multiple angles are recorded.
l
At scenes where multiple angles are recorded, the angle can be switched.
l
Even at scenes where multrple angles are not recorded, the angle number can be preset.
angle once a scene at which multiple angles are recorded is reached.
In this case the angle switches to the preset
39
W This player can reproduce a virtual surround sound effect which provides sound as if heard from the front speakers located at the horizontally
further position or heard from nonexistent speakers even when only a 2-channel stereo system is connected [for playback of Dolby Digital
DVD software (2ch and above) only].
-1
T Press V.S.S. during
play.
Each time this button is pressed, the player’s FL display changes:
Virtual slurround sound is cancelled
+
1
v.s.s
Virtual surround sound 1 (Natural effect\
%
Remote control unit
t
Virtual surround sound 2 (Emphasized effect)
NOTES:
l
The virtual surround sound effect does not work with DVD Karaoke discs.
l
The virtual surround sound effect may not work with some Dolby Digital 2.lch or 3.lch DVDs. AddItionally,
properly with some Dolby Digital DVDs other than 2.1 ch or 3.lch. depending on the software.
l
Turn off the lV surround sound and other surround sound effects when using this virtual surround sound effect.
40
this effect may not work
w
USING THE MENUS
n For DVDs containrng multiple titles, the desired title can be selected and played from the top menu
l-
Example:
1
During playback, press the TOP MENU button.
l
The top menu appears.
l
If the TOP MENU button IS pressed again, the disc returns to the point
at which the title menu was called out and playback resumes from that
point.
Example: When “Orange” is selecteN
Use the cursor or number buttons to select the desired title.
If you select the title number using the number buttons, skip step 3
below.
2
l
3
Press the ENTER button.
l
Playback starts.
l
Playback also starts if the PLAY button is pressed.
ENTER
%
Remote control unit
41
n Some DVDs include special menus called DVD menus.
For example, DVDs with complex contents may contain guide menus, and DVDs with multiple languages may contain audio and subtitle
language menus.
These menus are called “DVD menus”.
Here we describe the general procedure for using DVD Imenus
Example:
1
During playback, press the MENU button.
l
The DVD menu appears.
l
If the MENU button is pressed again, the drsc returns to the point at
which the DVD menu was called out and playback resumes from that
point.
Example: When “AUDIO”
2
Use the A or 7 cursor buttons or the number buttons to select the desired
item.
If you select the item using the number buttons, skrp step 3 below.
l
Remote control unit
3
Press the ENTER button.
The selected item is set.
l
If more menus appear, repeat steps 2 and 3.
l
Remote control unit
42
is selected
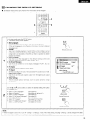
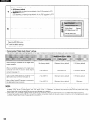
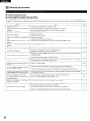
016 CHANGING
THE DEFAULT SETTINGS
H The default values preset upon shipment from the factory can be changed.
The default settings are retained until they are agaln changed, even if the power is turned off.
In the stop mode, press the SET UP button.
The default setting screen appears.
1. Disc Languages
Use this to set the language to be used when playing the disc.
If the set language is not offered on that disc, the disc’s default
language IS set.
2. Ratings
Use this to disable playback of adult DVDs so that children cannot
watch them. Note that playback of adult DVDs cannot be disabled If the
rating level is not recorded on the DVD, but that it is possible to disable
playback of all DVDs.
3. Menu Language
Use this to set the language for the default setting screen and
messages displayed on the TV screen (“PLAY”, etc.).
4. On-Screen Messages
Use this to set whether or not to display messages (“PLAY”, etc.) on
the TV screen.
5. FL Display
Use this to set the brightness of the display.
6. TV Aspect
Set thts according to the size of the connected TV’s screen (4:3 or 16:9).
7. Digital Audio Output
Use this to set the audio signals output from the digital audio output
connectors.
9. Other Settings
These include special settings
such as audio dynamic
range
compression.
l
1
SET UP
%
Remote control unit
9 Other Settings
Press RETURNto
A
Use the A and 7 cursor buttons to select the desired setting, then press
the ENTER button.
l
l
2
l
l
l
l
l
l
Select
Select
Select
Select
Select
Select
Select
Select
“1
“2
“3
“4
“5
“6
“7
“9
Disc Languages”.
Ratings”.
Menu Language”.
On-Screen Messages”.
FL Display”.
TV Aspect”.
Digital Audio Output”.
Other Settings”.
(See
(See
(See
(See
(See
(See
(See
(See
page 44.)
pages 45, 46 and 47.)
page 48.)
page 49.)
page 51.)
page 52, 53 and 54.)
pages 55 and 56.)
pages 57 and 58.)
IENTER)
%
a
Remote control unit
ENTER
p-.
Remote control unit
NOTE:
l
When the player is set to the “Lock All” setting in “2 Ratings”, none of the initial setting, including “2 Rating”, can be changed if the DVD
disc is left inside the player. In this case, remove the disc, and then operate the player.
43
-I-
See page 43.
2
44
3
Use the A and v cursor buttons to select the desired setting, then press
the ENTER button.
1. Audio
Use this to set the language of the sound output from the speakers.
2. Subtitle
Use this to set the language of the subtitles displayed on the TV.
3. Menus
Use this to set the language of the title menus (menus recorded on the
disc), etc.
4
Use the A and 7 cursor buttons to select the desired setting, then press
the ENTER button.
@When “1 Audio” is selected:
1. English (Factory default)
Select this to play the sound in English.
2. French
Select this to play the sound in French.
3. Spanish
Select this to play the sound in Spanish.
4. Original
Select this to play the disc’s original sound.
5. Other I + + +
Select this to play the disc with a language other than the ones above.
Use the number buttons to input the 4-digit language number shown on
page 59.
0 When “2 Subtitle” is selected:
1. Automatic (Factory default)
The subtitle language is automatically set to the same language as the
audio language.
l
When the disc is played with the audio language set for the “1
Audio” setting, the subtitles are not displayed.
l
When the disc is played with an audio language other than the one
set for the “1 Audio” setting, the subtitles are drsplayed in the
language set for the “1 Audio” setting.
2. English
Select this to play the disc with English subtitles.
3. French
Select this to play the disc with French subtitles.
4. Spanish
Select this to play the disc with Spanish subtitles.
5. Other + + + +
Select this to play the disc with subtitles in a language other than the
ones above. Use the number buttons to input the 4-digit language
number shown on page 59.
Remote control unrt
Remote control unit
ENTER
%
Remote control ;nrt
1. English (Factory default)
Select thus to display the menus in English.
Select this to display the menus in French.
Select
5. Other
Select
above.
shown
this to drsplay the menus in Spanish.
++++
this to display the menus in a language other than the ones
Use the number buttons to Input the 4-dtgit language number
on page 59.
The settings are completed, and the screen in step 3 reappears.
I To return to the previous menu screen:
Press the RETURN button.
* To exit the default settings:
Press the SET UP button.
When playback
1.
L
is not restricted
(Level 8)
See page 43.
2
3
Use the A and 7 cursor buttons to select “2 Ratings”, then press the
ENTER button.
Level 8 (Factory default)
Select thus to play all DVDs.
Level 7 to Level 2
Select this to play DVDs for general audrences and children. Adult DVDs
cannot be played.
Level 1
Select this to play only DVDs for children. (Adult and general audience
DVDs cannot be played.)
Level 0
Select this to disable playback of all DVDs.
Use this for example to drsable playback of adult DVDs on which the
rating level is not recorded.
Remote control unrt
If a rating of Level 7 or lower has been selected, use the number buttons
to input a 4-digit password, then press the ENTER button.
* Do not forget the password.
* Once locked, the setting cannot be changed without inputting the
correct password.
Press the ENTER button,
The settings
are completed,
and the screen
in step
1 on page 43
3 Menu Language
4 On-Screen Messages
7 Digital Audio Output
9 Other Settings
Press AETURNto oxit
F To return to the previous menu screen:
Press the RETURN button. (The RETURN button will not function after the ENTER button IS pressed in step 5.)
C To exit the default settings:
Press the SET UP button.
46
2. When playback
is restricted
(Level 0 to 7)
Remote control unrt
Use the number buttons to Input the correct password,
ENTER button.
then press the
Press number button “1 “, then press the ENTER button.
The screen in step 1 on page 43 reappears.
@To change the password:
l
Press number button “2”.
l
Use the number buttons to input the new password, then
ENTER button.
l
Press the ENTER button.
The screen in step 1 on page 43 reappears.
@To change the rating level:
l
Press number button “3”.
l
Use the A and 7 cursor buttons or the number buttons to
desired level, then press the ENTER button.
The screen in step 1 on page 43 reappears.
@To temporarily cancel the restriction (unlock the player):
l
Press number button “4”.
l
Press the ENTER button.
The screen in step 1 on page 43 reappears.
l
The temporary unlock setting WIII be in effect until the
switched OFF or set to STANDBY, as well as until the
l
press the
Remote control unrt
select the
4 Temporary
power IS
change is
Unlock
Press RETURN to e
F To return to the previous menu screen:
Press the RETURN button.
F To exit the default settings:
Press the SET UP button.
NOTE:
l
Some discs may not be encoded with specific rating level information though its disc jacket says that it is for “adults”.
For those discs, the age restriction will not work.
47
3
Use the A and v cursor buttons to select “3 Menu Language”, then press
the ENTER button.
1. English (Factory default)
Select this to set the language used for the default setting screen and
the “PLAY” and other messages displayed on the TV screen to English.
Remote control mt
the “PLAY” and other messages displayed on the TV screen to French.
the “PLAY”
The settings
and other
messages
are completed,
displayed
and the screen
on the TV screen
in step
to
1 on page 43
Digital Audio Output
9 Other Settings
Press RETURNto exit
* To return to the previous menu screen:
Press the RETURN button.
$ To exit the default settings:
Press the SET UP button.
48
Press the cursor buttons ( A, 7 ) to select the preferred item and press
1. On-Screen Messages
To select whether “Play”,
Remote control unit
“Still”
and other displays are displayed or
2. Color and Position
To select the color (Blue/Violet/Green)
and posltion (abovekllghtly
below) of “Play”, ” Still” and other displays as well as On-Screen Menu
Press the cursor buttons ( A, 7 ) to select the preferred setting and press
(j) When “1 On-Screen Messages” is selected
1. On (Factory default)
Still” and other displays will always appear on the TV screen.
Still” and other displays will not appear on the TV screen.
@When “2 Color and PosItion” IS selected
The colors and posltions are set as follows:
Blue (Factory default)
5
The settings
reappears.
are completed,
and the screen
in step
1 on page 43
$ To return to the previous menu screen:
Press the RETURN button.
* To exit the default settings:
Press the SET UP button.
NOTE:
l
When
is selected, “Play”, ” Still” and other displays as well as On-Screen Menu Icons will be displayed at a little lower positron
than the factory setting. It is recommended
50
to choose this setting in such a case that the screen is only partially displayed.
3
Use the A and V cursor buttons to select the desrred screen brightness,
then press the ENTER button.
1. Bright (Factory default)
The display rndrcations are always brrght.
The display indications are always dim.
1 Disc Languages
The settings
are completed,
and the screen
in step 1 on page 43
7 Digital Audio Output
Press RETURN to exit
t To return to the previous menu screen:
Press the RETURN button.
C To exit the default settrngs:
Press the SET UP button.
51
-3
I/
-3
-I-
See page 43.
2
Use the A and v cursor buttons to select “6 TV Aspect”,
ENTER button.
@ 4:3 (Factory default)
Select this when a conventional size TV
is connected. (Factory preset)
l
The video material formatted in the
Pan & Scan style is played back in
that style (the left and right edges
are cut off).
The video material not formatted in
the Pan & Scan style is played back
in the letterbox style (black bands
appear at top and bottom of screen).
* Set the Pan & Scan and letter box
setting at “3 TV Mode” under “9
Other Settings”. (Refer to page 57.)
l
3
@ 16:9
Select this when a wide-screen
TV is connected.
Played in “FULL” size. (Setting
the wide-screen TV to “FULL”
mode is also necessary.)
* Each
screen
shows
an
example
when
the video
material for a wide-screen
is
played. (This setting does not
affect the video material for
conventional size.)
52
then press the
A
IENTER)
ENTER
%
F
Remote control unit
4
The settings
reappears.
are completed,
and the screen
in step
1 on page 43
9 Other Settings
* To return to the previous menu screen:
Press the RETURN button.
* To exit the default settings:
Press the SET UP button.
53
l
Concerning
images which appear on the TV screen (aspect ratios of the screen)
Images which appear on the TV screen differ depending on the type of software and the TV set connected.
TV set connected
16:9 (“FULL”
l
mode)
(Screen mode)
16:9 (“ZOOM”
mode)
16:9 (“AUTO”
mode)
Full screen
Screen whose top and
bottom edges are cut off
Full screen
Screen horizontally
enlarged
Screen whose top and
bottom edges are cut off
Full screen (with black
bands at right and left)
Screen horizontally
enlarged (with black
bands at top and bottom)
Full screen
Screen in which the
picture at the far left and
far right ends only IS
extended horizontally
(wrth black bands at top
and bottom)
The images which appear on the TV screen, and what each screen mode is called, may doffer depgnding on the manufacturer
on the type of the TV set. Consult the instruction manual provided wrth your TV set.
of the TV set or
For your reference:
l
Letterbox
Black bands are inserted at the top and bottom of the screen to fill in the gaps at the top and bottom where the size of the picture is smaller
than the screen.
l
Pan&Scan
Part of the wide-screen picture (either at both sides or one side of the screen) is automatically elrminated so that the prcture fills the whole
screen.
54
3,4
1
See page 43.
2
3
Use the A and 7 cursor buttons to select “7 Drgrtal Audio Output”, then
press the ENTER button.
1. PCM Down Conversion
To select whether digital audro converted to 48 kHz/lG bit is output
from the optical/coaxial drgital audio output connector or no digital audio
is output during playback of the DVD recorded in Linear PCM of 96 kHz.
(In case of the DVD recorded in Linear PCM of 48 kHz, digital audio
converted to 48 kHz/lG brt is output irrespective of the setting.)
2. Dolby Digital
To select the signal format (Brtstream or PCM) to be output from the
optical/coaxial digital audio output connector during playback of the DVD
recorded in Dolby Digital.
3. DTS Digital Surround
To select whether DTS bitstream is output from the optical/coaxial
digital audio output connector or no digital audio is output during
playback of the DVD recorded In dts.
3
8\
7
Remote control unrt
3 DTSDigitalSurroundOff
Press RETURN to exit
Use the A and 7 cursor buttons to select the desrred settrng, then press
the ENTER button.
4
0 When “1 PCM Down Conversron” IS selected
1. No (Factory default)
Digital audio of 48 kHzil6 brt is output durrng playback of the DVD
recorded in Linear PCM of 48 kHz. No digital audio is output during
playback of the DVD recorded in Lrnear PCM of 96 kHz. However, audio
will be output using the orrgrnal audio recording system in case of the
DVD which has not been copyright-protected.
2. Yes
During playback of the DVD recorded in Linear PCM of 48 kHz or 96
kHz, digrtal audio converted to 48 kHz/lG bit is output.
(Digital output of PCM audio is restricted to 48 kHz/lG brt or below for
copyright protection.)
@When “2 Dolby Digital” IS selected
1. Bitstream (Factory default) (NOTE I)
Dolby Digital brtstream (Ich - 3/2.lch) is output during playback of the
DVD recorded in the Dolby Drgrtal.
Select this setting when the player is connected to the Dolby Digital
decoder.
2. PCM
Digital audio converted to PCM (2ch) of 48 kHz/lG bit is output during
playback of the DVD recorded in the Dolby Digital.
A
%[ENTER]
a
Remote control unrt
ENTER
%
Remote control unrt
55
4
@When “3 DTS Digital Surround” is selected
1. Off (Factory default)
No digital audio is output during playback of the DVD recorded in DTS.
2. Bitstream (NOTE 1)
DTS bitstream is output during playback of the DVD recorded in DTS.
Select this setting when the player is connected to the DTS decoder.
5
The settings are completed, and the screen in step 3 reappears.
* To return to the previous menu screen:
Press the RETURN button.
* To exit the default settings:
Press the SET UP button.
l
Recommended “Digital Audio Output” settings
The optimum digital output setting depends on the type of component connected to the digital audio output connector.
When nothing is connected to the digital audio
output connector
1 No (factory default)
1 Bitstream (factory default)
1 Off (factory default)
When an amplifier equipped with a digital input
connector and with no built-in Dolby Digital
decoder is connected to the digital audio output
connector (see page 1 I)
2 Yes (NOTE I)
2 PCM (NOTE 2)
1 Off (factory default)
When a Dolby Digital decoder is connected to the
digital audio output connector (see page 12)
2 Yes (NOTE 1)
1 Bitstream (factory default)
1 Off (factory default)
When a Dolby Digital DTS decoder is connected to
the digital audio output connector
2 Yes (NOTE 1)
1 Bitstream (factory default)
2 Bitstream
NOTES:
1. When connecting an amplifier (with an optrcal/coaxral digital input connector) which does not contain the Dolby Digital or dts decoder, be sure
to select “PCM” at the “2 Dolby Digital” and “Off” at the “3 dts”. If “Bitstream” is selected, any attempt to play DVD may cause such a hrgh
level of noise that it may be harmful to your ears and damage your speakers.
2. Audio output from the player’s audio output connectors is converted to 48 kHz as well as audro from the digital audio output connector.
To enjoy high quality sound at 96 kHz, connect the amplifier or decoder directly to the audio output connectors, not to the digital audio output
connector. (Select “No” at the “1 PCM Down Conversion”.)
56
3,4
1
See page 43.
2
3
Use the A and v cursor buttons‘ to select “9 Other Settings”, then press
the ENTER button.
1. Still Mode
Use this to reduce fluttering of the picture when playing still pictures.
2. Audio during search
Use this to set whether or not to play the sound during the search
operation in speed I. (DVD, Video CD)
3. TV mode (4:3)
Use this to set the TV screen display when playing wide DVDs on
conventlonal size TVs.
4. DRange Compression
Use this to set the range of sound output when playing discs.
5. Still Picture Display
To select whether the picture type (I/P/B) is displayed on the TV screen
in the still picture mode or not.
6. Black Level Control
To select the black level of the picture, “Lighter” or “Darker”.
A
ENTER
IENTER)
%
a
%
Remote control unit
2 Audio durig Search
On
4 D.Range Compression Off
5 Still picture Display Off
Lighter
6 Black Level Control
Use the A and v cursor buttons to select the desired setting, then press
the ENTER button.
0 When “1 Still Mode” is selected
1. Automatic (Factory default)
Normally set this.
The frame still or field still mode is selected automatically.
2. Field
Select this if the picture flutters when “Automatic” is set.
3. Frame
“Frame still” is always selected.
Select this setting when small text or fine patterns cannot be seen
clearly even when “1 Automatic” IS selected.
4
@When “2 Audio during search” is selected
1. On (Factory default)
Select this to output sound during the search operation in speed 1.
Remote control unit
ENTER
2. off
Select this to turn off the sound during the search operation in speed 1.
@When “3 TV Mode (4:3)” is selected
1. Pan&Scan (factory default)
Select this to play wide DVDs with a pan & scan screen (with the sides
cut off). If pan & scan is not specified for the disc, however, the disc is
played with a letter box screen.
2. Letter box
Select this to play wide DVDs with a letter box screen (with black bands
at the top and bottom).
%
Remote control unit
57
@I When “4 D.Range Compression” is selected
1. Off (Factory default)
Select this for the standard range.
2. On
Select this to achieve powerful sound even when the volume is low.
This setting is suited for watching DVDs late at night with the volume
low. (This setting is only valid for DVDs recorded in Dolby Digital.)
4
@When “5 Still Picture Display” IS selected
1. Off (Factory default)
The picture type (I/P/B) will not be displayed on the TV screen in the still
picture mode.
2. On
The picture type (I/P/B) will be displayed on the TV screen in the still
picture mode.
@When “6 Black Level Control” is selected
1. Lighter (Factory default) [BLACK LEVEL: 7.5 IRE]
The black level of the picture is selected to the lighter one.
Select this setting normally when the player is connected to a TV set
through the VIDEO OUT connector or S VIDEO OUT connector.
(7.5 IRE is the standard for NTSC format In North America)
2. Darker [BLACK LEVEL: 0 IRE]
The black level of the picture is selected to the darker one.
Select this setting normally when the player is connected to a TV set
through the COMPONENT VIDEO OUT (Y,Ca, CR) connector.
5
The settings are completed, and the screen in step 3 reappears.
C To return to the previous menu screen:
Press the RETURN button.
$ To exit the default settings:
Press the SET UP button.
For your reference:
@When the “2 On” is selected
at the “5 Still Picture Display”,
the following screen is
displayed in the still picture
mode;
(-““;““i
Example: m the case of the P-Picture
P: P-Picture (Predictive coded picture)
This picture type is computed on the basis of a past I-Picture or
P-Picture.
B: B-Picture (Bidirectionally-predictive
coded picture)
This picture type is computed by comparing the previous and
subsequent I-Prcture or P-Picture. It has the lowest volume of
informatton.
General Picture type
I/P/B:
l
The MPEG 2 standard adopted for DVD uses the following 3
picture types for the coding of each picture (frame) on the TV
screen.
I: l-Picture (Intra coded picture)
This is the standard picture type, and each picture is coded
separately.
Since it features the best picture quality, it is
recommended that the screen be frozen with l-Picture when the
picture quality is to be adjusted.
58
Predict
..
a
a
Predict
---j
/
Abkhazian
French
““----r
Frlsian
Scats Gaelic
Guarani
Bengali; Bangla
Tibetan
lndonestan
Icelandic
-4 I Czech
1 Danish
Yiddish
j German
Javanese
---j
-“-“““j
1 Bhutani
---A
Greek
Greenlandic
Cambodian
Kannada
Korean
Kashmir1
Kurdish
59
17 TROUBLESHOOTING
III
W Are all the connections correct?
W Are you following the instructions in the manual?
n Are the amplifier and speakers operating properly?
If the DVM-1800 does not seem to be functioning properly, check the table below. If this does not solve the problem, the DVM-1800 may be
damaged. Turn off the power, unplug the power cord from the power outlet, and contact your store of purchase or nearest DENON sales office.
Check
Symptom
Power does not turn on.
l
10
. Is there condensatron on the drsc or player? (Let stand for 1 or 2 hours.)
l Discs other than DVDs. video CDs and musrc CDs cannot be played.
l Disc is dirty Wipe off the dirt.
-
Picture does not appear.
. Check the connections.
l Set the TV’s Input to “vrdeo”.
10
Sound is not produced or sound quality is
poor.
l Check the connections.
. Properly set the input of the TV, stereo, etc
10
-
Menu playback
possible.
l
Menu playback is not possrble with anythrng but video CDs wrth playback control.
l
Some disturbance is normal.
Playback does not start when PLAY button
is pressed.
Playback stops immediately.
of video
Picture is disturbed
operation.
during
CD’s
is not
the search
Buttons do not operate.
l
l
No subtrtles are drsplayed.
l
l
Audio (or subtitle) language does not switch.
l
Playback does not start when the title is
selected.
8
9
21
Some operations are disabled for some drscs
22
Subtitles are not displayed for DVDs not containing subtitles.
Subtitles are turned off. Turn the subtitles settrng on.
38
The audro (or subtrtle) language does not switch for discs which do not Include multrple audro (or
subtitle) languages.
For some discs the audio for subtitle) language cannot be switched when the operation to switch It is
performed, but can be switched on the menu screens.
. The angle cannot be switched for DVDs which do not contarn multrple angles. In some cases
multrple angles are only recorded for specrfrc scenes
Angle does not swatch.
36,38
39
45-47
. Check the “Ratrngs” setting
. Use the procedure descrrbed below to reset all the settrngs to the factory defaults.
In the stop mode, press and hold in the STILL/PAUSE, SKIP 044) and OPEN/CLOSE buttons on the
DVD player for at least 3 seconds. (Check that “lnrtialrzed” has turned off from the TV screen.)
-
The disc IS not played wrth the audio or
subtitle language set as the default setting.
. The drsc does not play with the selected audro or subtrtle language If that audro or subtitle language
IS not included on that DVD.
44
Set the “TV Aspect” default settrng to the proper settrng for the connected TV.
52
Picture is not displayed in 4:3 (or 16:9).
l
No messages appear on the screen when
buttons are operated.
. Set the “On-Screen Messages”
Menu screen messages
language do not display.
. Check the default settrng for the disc language’s menu language.
44
l Check that the batteries are Inserted rn the proper “0”
and “0” directions
. The batteries are dead. Replace them wrth new batteries.
. Pornt the remote control unit at the remote control sensor when operating It.
l Operate the remote control unrt wrthin a drstance of 7 meters from the remote control sensor.
l Remove the obstacle between the remote control unrt and remote control sensor.
17
17
17
17
17
for the desired
-
-
You have forgotten the password you have
set for the “Ratings” setting.
Remote control unrt does not operate.
60
Plug the power cord securely Into the power outlet
Page
default settrng to “On”.
49
018
MAIN SPECIFICATIONS
Signal system:
Applicable discs:
S-Video output:
Video output:
Component output:
Audio output:
Audio output properties:
Digital audio output:
Power supply:
Power consumption:
Maximum external
dimensions:
Mass:
n Remote control unit:
Type:
Power supply:
NTSC
(I) DVD/video discs
l-layer 12 cm single-sided drscs, 2-layer 12 cm single-sided discs, 2-layer 12 cm double-sided discs (I layer
per side)
l-layer 8 cm single-sided drscs, 2-layer 8 cm single-sided discs, Z-layer 8 cm double-sided discs (I layer per
side)
(2) Compact drscs (CD-DA, Video CD)
12 cm discs, 8 cm discs
Y output level: 1 Vp-p (75 R/ohms)
C output level: 0.286 Vp-p
Output connectors: S connector
Output connector: Pin-plug jack
Output level: 1 Vp-p (75 Q/ohms)
Y output level: 1 Vp-p (75 Q/ohms)
CB output level: 0.648 Vp-p (75 R/ohms)
CR output level: 0.648 Vp-p (75 Q/ohms)
Output connector: Pin jack
Fixed output level: 2 Vrms
(1) Frequency response
0 DVDs (Irnear PCM) : 2 Hz to 22 kHz (48 kHz samplrng)
: 2 Hz to 44 kHz (96 kHz sampling)
@ CDs
: 2 Hz to 20 kHz
(2) S/N ratio
@ DVDs
: 115dB
: 115dB
@ CDs
(3) Total harmonic distortion
0 DVDs
: 0.0025%
@ CDs
: 0.0030%
(4) Dynamic range
@ DVDs
: 103dB
: IOOdB
@ CDs
Optrcal digital output : Optical connector
Coaxial digital output : Pin jack
AC 12OV, 60 Hz
18W
434 (width) x 131 (height) x 415 (depth) mm (not including protruding parts)
7.1 kg
RC-545
Infrared pulse
DC 3V, two batteries (“AA” (R6P))
This product incorporates copyright protection technology that is protected by method claims of certain U.S. patents and other intellectual
property rights owned by Macrovision Corporation and other rights owners. Use of this copyright protection technology must be authorized by
Macrovision Corporation, and IS intended for home and other limited viewing uses only unless otherwise authorized by Macrovision
Corporation. Reverse engineering or disassembly is prohibited.
* Design and specifications are subject to change without notice in the course of product improvement.
61
NIPPON
COLUMBIA
CO., LTD.
14-14, AKASAKA 4-CHOME, MINATO-KU, TOKYO 107-8011, JAPAN
Telephone: (03) 3584-8111
Prlnted m Chlna 511 3644 002 El 007
DENON
MODEL
DEALER
NAME
DEALER
ADDRESS
@
WARRANTY
SERIAL
NO.
REGISTRATION
DATE
NO.
PURCHASER’S
STREET
Who/What
was the greatest
to purchase this product?
1.
2.
3.
4.
6)
ADDRESS
ZIP
TELEPHONE
AREA
A)
NAME
STATE
CITY
DEALER
SOLD
0
q
q
0
Advertising
Denon brand name
Product
features
Friend/Relative
influence
5.
6.
7.
8.
0
0
0
0
in your final
Reel-to.Reel
Speakers
Headphones
Blank Tape
Brand
Accessories
Cleaners,
cables,
etc.
C)
decision
Price
Product
brochure/literature
Salesperson
Other (specify:
What other audio equipment
do you piesently
indicate
the make and model.
Turntable
Cartridge
Tonearm
Head Amp/Transf.
Amplifier
Integrated
Amp
Tuner
Receiver
Cassette
Deck
PHONE
CODE
NO.
What equipment
do you plan to
purchase in the next 6 months?
Category
)
Price
Level
own ? Please
D)
Length
Please list the periodicals
azines, newspapers,
etc.)
you read regularly.
(Magwhich
n Please remove the screw underneath before installation.
n Entfernen Sie vor der Installation die unteren Schrauben.
n Veuillez retirer les vis du dessous avant I’installation.
W Per favore, rimuovete le viti sottostanti prima dell’installazione.
n Antes de realizar la instalacion, retire 10s tornillos inferiores.
W Verwijder voor installatie de schroeven aan de onderzijde.
n Lossa och ta bort skruvarna pa undersidan innan installationen.
n Remova OS parafusos na parte de baixo antes da instalacao.
DENON SERVICE NETWORK/ fl6i%nM%
l
Please contact one of our overseas service centers, listed below, for follow-up
service consultation.
Wenden Sie sich fur anfallende Wartungs-bzw.
Reparaturarbeiten
bitte an eine der folgend aufgefiihrten
Kundendienststellen.
Adressez-vous
a nos centres de service d’outre-mer
indiques ci-dessous, pour le service apresvente.
Per il servizio dopo vendita rivolgete Vi al nostro centro di servizio ester0 appropriato
della lista seguente.
Para consultas de servicio porfavor dirigirse a cualquiera
de nuestros centros de servicio en el extranjero,
enlistados
abajo.
Neem kontakt op met een van onze reparatie-inrichtingen
in het buitenland,
waarvan hier een lijst volgt, voor na-service.
Ta kontakt med nedan angivna servicecentraler
for radfrlgning
om servicearbeten
efter forslljningen.
Favor contactar urn de nossos centros de services internacionais,
abaixo listados, para consulta de services de acompanhamento.
l
~~~l;W~~jTiSJ*B~~~~E86i~:/rb~~%~86i~:4~
l
l
l
l
l
l
l
Australia
Austria
Belgium
Canada
China
Czech0
Denmark
Finland
France
F.R. Germany
Greece
Hong Kong
Israel
Indonesia
Italy
Korea
Malaysia
Mexico
Netherlands
New Zealand
Norway
Poland
Portugal
Singapore
South
Africa
Spain
Sweden
Switzerland
Taiwan R.O.C.
PURWrE
Thailand
United
Kingdom
U.S.A.
*
*
*
*
*
*
*
*
*
& Eire
O
Audio Products Australia Pty Ltd. 67 O’Riordan Street, Alexandria NSW 2015, Australia
Tel: (02) 9669-3477 Fax: (02) 9578-0140
Digital-Professronal-Audio
Vertriebsges.m.b.H..
1170 Wien, Rupertusplatz 3
Tel: 0222-4501006-9,
Fax: 0222-457679
Transtel-Sabima P.V.B.A. Harmonrestraat 13, 2018 Antwerpen 1, Belgie Tel: 03-237-3607
Denon Canada Inc. 17 Denison Street, Markham Ontario, Canada L3R 1 B5 Tel: 905-475-4085
Fax: 905-475-4159
qq$ElB9tB%wf$7%R+~L~
( ;Its*%%wl$~~~~~L~
1 ;ll;g%BP’lhAf$j92!fi
z$i%i : 100007
@;6 : ( IO) 64015151/64023798
f$Z$ : ( 10 ) 64034229
ffW~~bl~~r~~~#~tiil~Qf~8~~~~,i~
&&&!,%%253%
fl;%i : 200062
Fi$$& : 86-21-6257-9958
{@g : 86-21-6260-5645
EUROSTAR OSTORAVA s.r.0. areal Vodni stavby Praha a.s., budova A2 Dobronrcka 635,148 00 Praha 4 Czech Rep.
Tel: 02-611 I-2901 Fax: 02-611 I-2904
Hrfi Klubben A/S Dal1 Alle 1, 9610 Noerager, Denmark Tel: 45-96 72 10 00 Fax: 45-96 72 10 14
Suomen Hi-Fi Klubi OY Nylandsgatan 4-6, Helsingfors
Tel: 0644401
Denon France S.A. 3 Boulevard Ney, 75018 Paris Tel: 44-89-68-69
Denon Electronic GmbH An der Landwehr 19, 41334 Nettetal Tel: +49 2157 12 08 78 Fax: +49 2157 12 08 13
KINOTECHNIKI LTD. 14, PYRGOU STR. 166 75, GLYFADA ATHENS Tel: (01)960-1071
Fax: (01)960-1072
DENON ASIA COMPANY LTD. 18/F No.79 Chatham Road South, Tsimshatsui Kowloon, Hong Kong
Tel: 852-2516-6862, Fax: 852-2516-5940
~%,Tt$%! ($#j )%‘lrRfiEl
~~~h~~~~~n~~~~~~~+h~~+n~~
%@$j: 852-2516-6862
f%B : 852-2516-5940
InfoVox Ltd. Terez krt. 31, 1067 Budapest Hungary Tel / Fax: 01-302-2515
Japis Ltd. Brautarholt 2, P.O.Box 396, 121 Reykjavrk, Iceland Tel: 354-58009-800
Fax: 354-5800-888
Newpan Ltd. 14 Rosansky st. Rishon Lezion 75706. Tel: 03-9535900
Fax: 03-9616193
PT Autoaccindo Jaya. Cideng Barat No. 7 Jakarta, lndonesra Tel: 633-2730
Audrodelta S.r.l.19 Vra Pietro Calvi 20129 Milan Italy
Tel: 39-02-541 I-6008 / 39-02-5412-8253
Fax: 39-02-5518-I 961
SAM WON KOREA Co., Ltd. 1 F, SANG-ROCK BLDG, #1629-3 SEOCHO-DONG, SEOCHO-KU, SEOUL 137-070, KOREA
Tel: 02-521-I 404 Fax: 02-3486-2135
HWEE SENG (ELECTRONICS) SDN BHD. 13-1, Jalan Raja Laut, 50350 Kuala Lumpur Malaysia
Tel: 60-3443-I 193 Fax: 60-3441-0563
Labrador, S.A. de C.V. Zamora No. 154 Col. Condesa 06140 Mexico, D.F. Tel: 286 55 09 Fax: 286 34 62
Penhold B.V. Poppenbouwing
58, NL-4191 NZ Geldermalsen, Netherland Tel: 31-345-588 080 Fax: 31-345-588 085
Avalon Audio Corpn. Limited 630B Great South Road Ellerslie Auckland, New Zealand Tel: 64-9-579-l 280 Fax: 64-9-579-3350
Hi-Fi Klubben AS Sandakerveien 64 0483 Oslo Tel: 47 22 79 66 66 Fax: 47 22 79 66 67
HORN DISTRIBUTION S.A. Ulica Kurantow 34, 02-873 Warszawa Poland
Tel: +48 22 649 30 71 Fax: +48 22 649 31 99
Videoacustrca
Qta. Do Parzinho-Armazem 5-Estrada De Circunvalacao-Apart.
3127 1303 Lisboa Codex
Tel: (01)417-00-04/00-96
Fax: (01)418-80-93
Hwee Seng (Electronics) Pte Ltd. 81 Gentrng Lane #02-02, Everich Industrial Building Singapore 349566
Tel: 65-746-3355
Fax: 65-743-l 704
Mandarin Distributors S.A. 10 Thora Crescent, Wynberg Ext.3 Sandton, P.O.Box 5137, Johannesburg Republic of
South Africa Tel: 27-11-444-8445
Fax: 27-1 l-444-8363
Gaplasa S.A.AV. Ing. Conde de Torroja, 25, 28022 Madrid Tel: 91-329-29-60
Fax: 91-329-16-75
Sveriges Hi-Fi Klubb Box 5116, S-402 23 Goteborg Tel: 031-200040
Diethelm & Co., AG. Grindelstrasse 5, 8303 Bassersdorf
Tel: 01-306-1611
Fax: 01-306-1690
KOLIN-DENON ENTERTAINEMENTY
INC. 5th FL.,N0.63, Po-Ai Road, Taiper, Taiwan, R.O.C.
Tel: (02)2381-5876
Fax: (0212381.5811
~;;i~~f?$~~@63?&0@
,%:& : (02)2381-5876
@g : (02)2381-5811
W$4*tE~%S%fl9tiGFEti~
Mahajak Development Co., Ltd. 46 Mahajak Burlding, Sukhumvit Soi 3 (Nana-Nua) Klongtoey, Bangkok
Thailand. 10110 Tel: 66-Z-256-0020
Fax: 66-2-253-l 696
Hayden Laboratories Ltd. Hayden House, Chiltern Hill, Chalfont St Peter,
Gerrards Cross, Bucks, SL9 9UG Tel: 01753-888447
Fax: 01753-880109
DENON ELECTRONICS, a Division of Denon Corporation (U.S.A.) 19 Chapin Road, Pine Brook,
NJ 07058-9777 Tel: 973-396-7499,
Fax: 888-544-8434
If there IS no servrce center II- your local area, consult the outlet where the equipment was purchased
Falls sich rn lhrer Ndhe kerne Kundendrenststelle befindet. wenden Sre such an das Geschaft, wo das Gerat gekauft wurde
S’II n’y a aucun centre de service dans votre regron, consultez votre revendeur
Se nella Vostra zona non c’e II centro dr servrzro. nvoigete VI al negozro dove avete acqurstato I’apparecchro
S no hay centros de servlcro en su area local, consulte en donde haya comprado su equrpo
Als er rn uw streek geen reparatre-inrrchtrng IS, neemt u kontakt op met de vestrglng waar u de apparatuur gekocht heeft
Saknas servicecentral I narheten dar du bor, bar kontakt tas medaterforsaltaren for apparaten
Se nao exrstrr urn centro de servrcos em sua area local, consulte o estabelecrmento onde o equrpamento for adqulndo.
E,gi&%BB%+,i~
’ mm~
Gi%%vm~~@
0
NIPPON
COLUMBIA
HO0605
CO., LTD.
14-14, AKASAKA 4-CHOME, MINATO-KU, TOKYO 107-8011, JAPAN
Telephone: (03) 3584-8111
515 0867 101 El 006
DENON’
LIMITEDWARRANTY
DENON R ELEC
a Division of DE
BENQN
DENON ELECTRONICS,
DENON ~~~~~~~NlCS,
222 New Road
Parsippany, N.J. 07054
(973) 396-7499
1888) 544-8434 FAX
13825 Cerritos Cot potato DI ., Sluite 6
Cerritos, CA 90703 2456
(562) 565-1730
(562) 565-1740 FAX
DENON
REGIONAL
SUPER
SERVICE
CENTERS
(Repair
only---
I’\io Iwt.t:; orders
please)
PYRAMID AUDIO
UNITED ~~1~~~
AUDIO SERVICES
8711 Burnett Rd.
Building F, Suite 65
Austin, TX. 78758
(512) 458-8292
(512) 453-4542 FAX
2949 Erie Boillevard East
Syracuse, N.Y. 13224
(315) 446-8.700
(315) 446-8505 FAX
544 Central Dr., Suite 101
Virginia Beach, VA 23454
1757) 498-8277
1757) 498-9554 FAX
ELECTRO SERVliiS
INNER SOUND
2144 Columbia Avenue
Lancaster, PA 17603
(717) 397-0509
(717) 397-9565 FAX
1818 S.1:.
Pot-t land,
(503) %X(5031 3:s
IIivision Si
OR 97?07
lY5!l
I is! I’AX