1
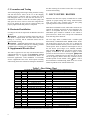
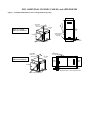
and then restoring the electrical control box to its original location and mounting. C. Evacuation and Testing After initial purging with nitrogen during and after brazing, and with the Service Valves on the CU in the shipping position (closed = clockwise, full in), evacuate the A-Coil and Refrigerant Line Set to less than 200 microns for a minimum of 20 minutes. Isolate the evacuation pump, and fully open the service valves to release the refrigerant into the A-Coil. Ensure all valve caps are restored securely and properly tightened after this process is completed. D. Horizontal Installation Use hangers and rods to suspend the Air Handler Unit off of a surface. CAUTION – A full-sized secondary drain plan with its own drain is required under the entire AHU when water leakage is a concern, and all condensate drains must be protected from freezing. CAUTION – Additional splash guards may be necessary to extend the condensate drain pan for returning potential condensate blow-off back to the condensate pan. E. Supplemental Electric Heat The AHU is approved for use only with ECONAR electric supplemental heat for use only on top discharge vertical installations. Use a separate duct-installed heater for horizontal applications. Field installation of ECONAR electric supplemental heat in the field requires loosening and lowering the electric control box during this installation V. DUCT SYSTEM / BLOWER Ductwork must have the capacity to handle the air volume required for proper heating and cooling. Undersized duct work will cause noisy operation and poor heat pump operating efficiencies due to lack of airflow. Metal ductwork should be used, and flexible connectors are required for discharge and return air duct connections. See Table 3 for acceptable duct sizes. A duct installed in an uninsulated space should be insulated on the outside to prevent heat loss, absorb noise, and prevent condensation from collecting on the ductwork. The Two Stage AHU is standard with a variable speed Electronically Commutated Motor (ECM) blower motor. The ECM motor converts 230 Volts AC to internal DC power and then modulates the DC power to run the motor at various speeds. There are different CFM outputs in each of the four blower speed ranges (Low, Medium, MediumHigh, or High). Important – The blower will not operate properly if ductwork is not attached to supply a static pressure for the blower motor to work against. Important – The blower compartment access door must be on for the unit to run properly. Blower motors may overheat if run for extended periods of time without a load. Note – refer to the ECM Motor Troubleshooting Guide at the rear of this manual if problems occur with the ECM motor. Table 3 - Duct Sizing Chart CFM 50 75 100 150 200 250 300 350 400 450 500 600 800 1000 1200 1400 1600 1800 2000 2200 2400 Acceptable Branch Duct Sizes Round Rectangular 4” 4x4 5” 4x5, 4x6 6” 4x8, 4x6 7” 4x10, 5x8, 6x6 8” 5x10, 6x8, 4x14, 7x7 9” 6x10, 8x8, 4x16 10” 6x14, 8x10, 7x12 10” 6x20, 6x16, 9x10 12” 6x18, 10x10, 9x12 12” 6x20, 8x14, 9x12, 10x11 Acceptable Main or Trunk Duct Sizes Round Rectangular 10” 10” 10” 12” 12” 14” 16” 16” 18” 20” 20” 22” 22” 4x20, 7x10, 6x12, 8x9 5x20, 6x16, 9x10, 8x12 10x10, 6x18, 8x12, 7x14 6x20, 7x18, 8x16, 10x12 8x18, 9x15, 10x14, 12x12 10x18, 12x14, 8x24 10x20, 12x18, 14x15 10x25, 12x20, 14x18, 15x16 10x30, 15x18, 14x20 10x35, 15x20, 16x19, 12x30, 14x25 10x40, 12x30, 15x25, 18x20 10x40, 15x25, 20x20 12x40, 16x25, 20x20 Tables calculated for 0.05 to 0.10 inches of water friction per 100’ of duct. At these duct design conditions, along with the pressure drop through the filter, the total design external static pressure is 0.20 inches of water. 6