1
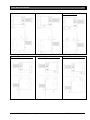
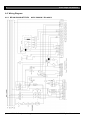
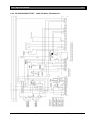
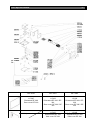
Error! Style not defined. 11 4 Installation and putting into operation In general all RoFry® units will be packed for safe transport after the final control in order to reach you properly. Nevertheless we ask you to have a look at the machine on arrival to detect any transport damages. Note! Visible damages have to be reported immediately! 4.1 Unwrapping • • • • Open the box and remove the wrapping carefully. Take out all movable parts and make sure that they are complete. Remove all cartons and folio around RoFry® Pull the basket out of the unit with the black handle and remove all parts inside like operating manual, legs, plugs etc. 4.2 Installation • • • • • Install the legs and put the machine on the chosen place. Take care of the following points: The RoFry® has to be placed on a horizontal level. Small unevenness can be corrected by the adjustable legs. Make sure that all ventilation holes have at least 5 cm clear space. There has to be enough free space to load, unload, clean and maintain the unit. The machine has to be placed in a way that the complete area around it can be cleaned easily. 4.3 Electrical connection Note! While working on the unit with opened side-panels take care that the unit is disconnected from the mains. Even if the unit is switched off, the cooling fan may start to run. Not paying attention may result in injury! Please learn the electrical data of your unit from the nameplate. It is located at all types behind the grease tray. • • • • • Check whether your local electrical power supply is in accordance with the data on the name plate. Make sure the supply cable is protected for units with a supply voltage as listed below: ≤ 240V (4/5-wire, min. cross-section 4) separately with 40 Amps, > 240V (4/5-wire, min. cross-section 2,5) separately with 25 Amps Protection has to be done by use of a 3 pole line circuit breaker! The power supply needs to be manufactured from heat resistant, flexible cable. It is to be routed to prevent any contact to hot parts. For further information please see the wiring diagram (below) Note! After the unit is connected to the mains, check correct rotation direction of the main fan: Remove the basket from the unit (pull the basket out of the unit with the black handle, push the release and remove the basket). Switch the unit on and look into the chamber. The fan wheel needs to rotate clockwise. If the rotation direction is wrong, change two phases on the main terminal block (X1). After finishing any installation work, maintenance or repair, check whether the ground wires are connected properly to the casing and the side covers. 4.4 Tap printed: 05/2013 Subject to change! RoFryUserManual.doc