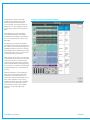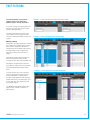
1
HYDRA2 ORGANIZER USER GUIDE
H2O
Gigabit Ethernet Networking
calrec.com
Putting Sound in the Picture
No part of this manual may be reproduced
or transmitted in any form or by any means,
electronic or mechanical, including photocopying
and scanning, for any purpose, without the prior
written consent of Calrec Audio Ltd.
Calrec Audio Ltd
Nutclough Mill
Hebden Bridge
West Yorkshire
England UK
HX7 8EZ
Tel: +44 (0)1422 842159
Fax: +44 (0)1422 845244
Email: [email protected]
calrec.com
Whilst the Company ensures that all details in this
document are correct at the time of publication,
we reserve the right to alter specifications and
equipment without notice. Any changes we make
will be reflected in subsequent issues of this
document. The latest version will be available
upon request. This publication is for International
usage.
Calrec Audio Ltd reserve the right to change
specifications without notice. E & O.E.
The established policy of Calrec Audio
Ltd. is to seek improvements to the design,
specifications and manufacture of all products.
It is not always possible to provide notice outside
the company of the alterations that take place
continually.
Despite considerable effort to produce up to
date information, no literature published by
the company nor any other material that may
be provided should be regarded as an infallible
guide to the specifications available nor does
it constitute an offer for sale of any particular
product.
Apollo, Artemis, Summa, Hydra, Bluefin and
High Density Signal Processing (HDSP) are
trade marks of Calrec Audio Ltd. Dolby®E is a
registered trade mark of Dolby Laboratories, Inc.
All other trade marks are acknowledged.
© 2014 Calrec Audio Ltd. All Rights Reserved.
H2O
CONTENTS
Information
Important Information
Health and Safety
Introduction - Hydra2 Networking
Overview
Single Console Networks
Multi-Console Networks
Router Cores
IP Address Management
Patching to a Protected Output 5
6
8
9
10
11
12
14
15
Confirming IPs
Changing IPs
15
15
Master Routers
16
Configuring Master & Slave Routers
Sync in Multi-Router Systems
I/O Box Identification
Fixed Format I/O boxes
Address 2
Modular I/O box ID setting
I/O Port Identification
Default / Native Labels
H2O edited custom labels
Console edited custom labels
Port Description
Using H20
Connection and Login
Connection
Accessing H2O
I/O Boxes and Port Labels
Add / Remove I/O boxes
Box and Port Labels
Access Rights
Manage Folders
Organizing Folders
Adding Ports to Folders
16
17
18
18
18
18
19
19
19
19
19
21
22
22
22
23
23
23
25
26
26
26
Port Grouping
27
Manage Clients
Port Patching
28
29
Making a Patch
29
Source Settings
30
Accessing from the Port Patching Screen
30
Accessing from the I/O Box & Setup Screen 30
Port Protection
31
Salvos
Viewing and Adding To Salvos
Executing a Salvo
Saving Salvos
Getting and Deleting Salvos
Sync Sources
Metadata and EMBER Control
Hydra Patchbays
Creating Hydra patchbays
Port Sharing
Un-patching
31
32
32
32
32
32
33
34
35
35
36
36
Label & SW-P-08 Data Import / Export 37
Editing CSV files
SW-P-08 Configuration
37
38
4HYDRA2 Operator Manuel

H2O
INFORMATION
calrec.com
Putting Sound in the Picture
IMPORTANT INFORMATION
Should you require any technical
assistance with your Calrec product
please contact your regional Calrec
distributor. Customers within the
UK or Ireland should contact Calrec
directly.
For a complete list of worldwide
distributors by region, go to www.
calrec.com or contact us for more
information.
For pre-delivery technical enquiries, UK
and Ireland customers should contact the
Calrec project manager assigned to their
order. Post delivery, the Calrec Customer
Support team will take care of your
technical enquiries.
Our UK customer support team works
closely with our global distributor network
to provide the highest level of after sales
support. Your distributor should be your
first point of contact and will often be
able to provide an instant solution, be it
technical advice, spares or a site visit by
an engineer.
Calrec UK customer support and our
global technical team provide free of
charge technical support and advice to all
customers by phone or e-mail.
Calrec after sales support includes:
• Free of charge comprehensive
technical advice and support by phone
and e-mail
• Repairs
• Quick supply of replacement or loan
hardware in the event of a failure
• Provision of export documentation for
the return of faulty parts
• Operational training
• Maintenance / technical training
• Supply of replacement components
• Supply of documentation
• Service contracts
We offer a range service contracts to our
UK and Ireland customers, from 24/7
telephone support, regular health checks
and extended warranty, amongst other
benefits. Please contact our customer
support team for more information on
service contracts.
Product Warranty
A full list of our conditions and warranties
relating to goods services is contained in
Calrec’s standard terms and conditions. A
copy of this is available on request.
Repairs
If you need to return goods to Calrec for
whatever reason, please contact your
regional distributor, or Calrec customer
support beforehand for guidance, as
well as to log the details of the problem
Telephone:
+44 (0) 1422 842159
(9:00am-5.30pm)
Email - Technical: [email protected]
Email - General:
[email protected]
Postal Address:
Calrec Audio Ltd.
Nutclough Mill,
Hebden Bridge,
West Yorkshire,
HX7 8EZ,
UK
Fax:
Website:
+44 (0) 1422 842159
www.calrec.com
6HYDRA2 Operator Manual
and receive a reference number. For
customers outside the UK and Ireland,
shipping via the distributor saves
customers from dealing with exportation
paperwork. If there is a need to send
direct to Calrec, contact us beforehand to
log the incoming repair and for assistance
with exportation documents.
Standard of Service
Ensuring the highest standards is a
priority, if you have any comments on
the level of service, product quality or
documentation offered to you by Calrec,
please contact the Calrec Customer
Support team in the UK who will endeavor
to address your issues. Calrec welcomes
all customer feedback.
For feedback specific to this document,
please contact [email protected].
Whenever you contact Calrec
Customer Support please have the
following information to hand:
•
•
•
•
•
Name
Company
Email Address
Full details of enquiry (e.g. fault report)
Serial number of faulty hardware (if
applicable)
Once this information has been provided,
a service ticket will be created to log
your enquiry. The service ticket reference
number will be given via email.
Serial Numbers
All units produced by Calrec are given
a serial number and are booked into
a central record system at the time
of manufacture. These records are
updated whenever a piece of hardware is
dispatched to or received from a customer.
When contacting Calrec Customer
Support with a hardware inquiry it
is important that the correct Calrec
serial number is provided to enable the
customer support team to provide a high
level of service.
After Sales Modifications
Please be aware that any modifications
other than those made or approved by
Calrec Audio Limited or their agents, may
invalidate the console’s warranty. This
includes changes to cabling provided by
Calrec and variations to the recommended
installation as detailed in Calrec
documentation.
Modifications to this equipment by any
party other than Calrec Audio Limited
may invalidate EMC and safety features
designed into the equipment. Calrec Audio
Limited can not be liable for any legal
proceedings or problems that may arise
relating to such modifications.
If in doubt, please contact Calrec Audio
Limited for guidance prior to commencing
any modification work.
Installation
In many installations the AC power
connectors will not be readily accessible,
effectively making the equipment
permanently connected. The installation
should be carried out in accordance
with all applicable installation rules and
regulations.
Service Personnel
The AC power disconnect devices are
the 2 x IEC (IEC60320-1 C13/C14)
couplers located at the rear of each unit.
WARNING: The apparatus has a dual
power system. It is essential that BOTH
AC power IEC couplers are disconnected
to prevent exposure to hazardous voltage
within the unit.
LEAD FREE
CALREC Putting Sound in the Picture
Third Party Equipment
Integrating third party equipment into
a Calrec system may compromise the
product’s ability to comply with the Class
B radiated emission limits set in the EMC
(Electro Magnetic Compatibility) standard
EN55022.
RoHS Legislation
In order to comply with European RoHS
(Reduction of Hazardous Substances)
legislation, Calrec PCB and cable
assemblies are produced with lead-free
(tin/copper/silver) solder instead of tin/
lead solder.
Calrec Audio Limited can not be
responsible for any non-conformities due
to use of third party equipment. If in doubt,
please contact Calrec Audio Limited for
guidance prior to integrating any third
party equipment.
In the unlikely event of a customer
having to carry out any re-soldering on
Apollo, Artemis or Hydra2 hardware,
it is imperative that lead-free solder is
used; contaminating lead-free solder with
leaded solder is likely to have an adverse
effect on the long-term reliability of the
product. Circuit boards assembled with
lead-free solder can be identified (in
accordance with IPC/JEDEC standards)
by a small oval logo (see below) on the
top-side of the circuit board near the PCB
reference number (8xx-xxx). The same
logo is used on the connector hoods of
soldered cable assemblies.
ESD (Static) Handling Procedures
In its completed form, this equipment has
been designed to have a high level of
immunity to static discharges. However,
when handling individual boards and
modules, many highly static sensitive
parts are exposed. In order to protect
these devices from damage and to protect
your warranty, please observe static
handling procedures, for example, use an
appropriately grounded anti-static wrist
band. Calrec will supply an electrostatic
cord and wrist strap with all of it’s digital
products.
All modules and cards should be returned
to Calrec Audio Limited in anti-static
wrapping. Calrec Audio Limited can supply
anti-static wrapping upon request.
This applies particularly to digital products
due to the types of devices and very
small geometries used in their fabrication,
analog parts can, however, still be
affected.
If in doubt, please check with a Calrec
customer support engineer before
carrying out any form of re-soldering
ISO 9001 and RAB Registered
Calrec Audio Ltd has been issued
the ISO9001: 2008 standard by the
Governing Board of ISOQAR.
The award, for both UKAS and RAB
registration (see below), is the most
comprehensive of the ISO9000
international standards. Granted in
recognition of excellence across design,
development, manufacture and aftersales support, the certification follows a
rigorous and thorough review of Calrec’s
internal and external communication and
business procedures.
LEAD FREE STICKER
7
HEALTH AND SAFETY
Important Safety Instructions:
• Read these instructions.
• Keep these instructions.
• Heed all warnings.
• Follow all instructions.
• Do not use this apparatus near water.
• Clean only with dry cloth.
• Do not block any ventilation openings.
Install in accordance with the
manufacturer’s instructions.
• Do not install near any heat sources
such as radiators, heat registers,
stoves, or other apparatus (including
amplifiers) that produce heat.
• Protect the power cord from being
walked on or pinched particularly at
the plugs, convenience receptacles,
and the point where they exit from the
apparatus.
• Use only with the cart, stand, tripod,
bracket, or table specified by the
manufacturer, or sold with the
apparatus. When a cart is used,
use caution when moving the cart/
apparatus combination to avoid injury
from tip-over.
• Refer all servicing to qualified service
personnel. Servicing is required when
the apparatus has been damaged in
any way, such as power-supply cord
or plug is damaged, liquid has been
spilled or objects have fallen into the
apparatus, the apparatus has been
exposed to rain or moisture, does not
operator normally, or has been dropped.
• Warning: To reduce the risk of fire
or electric shock, do not expose this
apparatus to rain or moisture.
• Not intended for outdoor use.
• This equipment must be EARTHED.
• Before starting any servicing operation,
equipment must be isolated from the
AC power supply. The disconnect
devices are the 2 x IEC connectors
(IEC 60320-1 C13/C14 couplers).
• Do not allow ventilation slots to be
blocked. Do not leave the equipment
powered up with the dust cover fitted.
Explanation of Warning Symbols
Triangular warning symbols contain a
black symbol on a yellow background,
surrounded by a black border.
DANGEROUS VOLTAGES
The lightning flash with arrow head
symbol within an equilateral triangle, as
shown on this page, is intended to alert
the user to the presence of dangerous
voltages and energy levels within the
product’s enclosure that may be of
sufficient magnitude to constitute a risk of
electric shock or injury.
The exclamation mark within an
equilateral triangle, as shown on this page,
is intended to prompt the user to refer
to important operating or maintenance
instructions in the documentation supplied
with the product.
Earthing
This is a Class I product. An Earth
connection MUST be provided in each AC
power cord.
IMPORTANT INSTRUCTIONS
The Earth Bolt connection at the rear of
the console should be connected to Earth
using Earth cable at least 6mm2 in cross
section (10 AWG).
Lithium Battery Replacement
Caution: Danger of explosion if battery is
incorrectly replaced. Replace only with the
same or equivalent type. Batteries must
not be exposed to excessive heat such as
sunshine, fire or the like
This device complies with part 15 of
the FCC Rules. Operation is subject to
the following two conditions:
1. This device may not cause harmful
interference
2. This device must accept any
interference received, including
interference that may cause undesired
operation.
Cleaning
For cleaning the front panels of the
equipment we recommend using a soft
anti-static cloth, lightly dampened with
water if required.
8HYDRA2 Operator Manuel
Information
H2O
INTRODUCTION - HYDRA2 NETWORKING
calrec.com
Putting Sound in the Picture
OVERVIEW
The Hydra2 system is designed to
provide seamless, scalable audio
networking of Calrec audio consoles
with Calrec audio I/O interfaces.
Hydra2 allows large numbers of
audio inputs and outputs to be easily
connected, shared and controlled,
irrespective of their location, as well
as providing comprehensive built in
redundancy.
Audio consoles and I/O can be physically
added to the network as and when
needed. Added hardware automatically
syncs with the rest of the system and
makes itself available for use.
The Hydra2 Organizer, H2O, is an
administrator-level user interface designed
to provide control over the network
without the use of an audio console.
Amongst other things, H2O can change
access rights for individual consoles
to selected I/O on a port by port, or by
port group basis, effectively splitting the
network to safeguard multi-production
environments. Input to output cross-point
routing can also be carried out to aid in
control room and resource management.
Hydra2 provides 1-to-N routing;
inputs may be routed to any number
of destinations. They can be used in
multiple places on a console, on multiple
consoles, as well as being sent directly to
multiple outputs by cross-point routing, all
simultaneously.
Hydra2’s interconnections are made
using SFPs to allow use of copper or fiber
connections. Distances are only limited by
the SFP type. The capacity of the network
is vast, both in terms of the number of
input and output ports and the switching
capability.
10HYDRA2 Operator Manual
Each connection between Hydra2 units
can carry up to 512 signals in both
directions, simultaneously, at 48kHz.
I/O interfaces are available in a range of
format types including balanced analog,
balanced and unbalanced AES digital,
MADI, Dolby-E decoders, SDI embedders
and de-embedders. New formats can
easily be supported as they arrive. Hydra2
also supports non-audio I/O interfaces in
the form of general purpose inputs and
outputs (GPIO) for remote control input
tallies and output switching. Please refer
to the Hydra2 installation manual for more
details on available I/O types.
As with all Calrec products, audio
quality and product reliability are our top
concerns. All Hydra2 hardware and audio
interfaces are designed to the highest
standards with no compromise to audio
performance. All analog pre-amps and
line level paths are designed around our
proven and highly respected circuitry,
providing very high headroom with a very
low noise floor. Our lossless proprietary
network transportation protocol does not
compromise the high audio quality within
the digital domain. Particular attention
is also paid to communications reliability
and system status monitoring, power
generation and distribution, thermal
management and physical robustness.
The system is designed with redundancy
and fault detection at the forefront,
providing backup paths for data and audio
in the event of hardware failure, to keep
any disruption of audio or control to the
absolute minimum. All critical components
are fed from dual power supplies.
Hydra2 supports the Ember and SW-P-08
protocols for integration with third party
routers and control systems to enable
remote control and data transfer.
Introduction - Hydra2 Networking
SINGLE CONSOLE NETWORKS
Apollo, Artemis and Summa consoles
rely on the Hydra2 system for all audio
routing. A single, standalone console
uses a simple Hydra2 network with all
I/O boxes having direct connections
to the router card in the console’s
processing core. This creates a star
formation, in that all elements connect
to a central point; the router card.
can then be patched directly to multiple
output ports if the raw signal is required
by other equipment. Console DSP audio
outputs can also be sent to multiple
output ports / I/O boxes and be made
available to other consoles via Hydra
Patchbays.
FIGURE 1 - STAR FORMATION
FIGURE 2 - EXAMPLE OF A SINGLE CONSOLE NETWORK
Audio I/O
Audio I/O
Input to output patching provides routing
capability without the use of DSP or the
need for a control surface.
Multiple port patching to mixed I/O
formats along with input to output
patching reduces the need for external
audio routers, distribution amplifiers, and
convertors such as ADCs / DACs.
Control Room
Router /
Processing
Rack
INPUTS
OUTPUTS
H YDR A 12- 4
AN A LOG
PSU
FAN
PORT1 PORT2
Con Act Con Act
RESET
Audio I/O
Audio I/O
The router card is responsible for directing
audio and data across the Hydra2
network and within the processing rack
itself. When an input port is patched to a
fader, the router card requests that the
relevant I/O box sends audio from the
selected input port and passes that audio
on to the DSP card within the processing
rack for use by the console. When an
output is patched, the router card takes
the output audio from the DSP card and
sends it to the relevant I/O box/port.
When an input to output patch is made,
the router requests the input and then
sends it directly to the I/O box output port
in question.
The comprehensive routing system and
the ability to perform point to point input
to output patching reduces the need for
I/O to be wired via physical patch points.
Any input can be used multiple times in
multiple places, simultaneously sending
audio to any/all input channels as well as
other locations on the console such as
external inputs or monitor inputs. All audio
CALREC Putting Sound in the Picture
STATUS
1
2
3
4
5
6
7
8
48V
1L
SIG
48V
1R
SIG
48V
2L
SIG
48V
2R
SIG
48V
3L
SIG
48V
3R
SIG
48V
4L
SIG
48V
4R
SIG
48V
5L
SIG
48V
5R
SIG
48V
6L
SIG
48V
6R
1L
SIG
SIG
1R
SIG
2L
SIG
2R
SIG
Audio Inputs / Outputs
e.g. for playout devices, external
effects units, loudspeaker monitoring
feeds etc.
Control Surface
Equipment Room
Studio Floor
INPUTS
OUTPUTS
H YDR A 12- 4
AN A LOG
PSU
FAN
PORT1 PORT2
Con Act Con Act
RESET
STATUS
1
2
3
4
5
6
7
8
48V
1L
SIG
48V
1R
SIG
48V
2L
SIG
48V
2R
SIG
48V
3L
SIG
48V
3R
SIG
48V
4L
SIG
48V
4R
SIG
48V
5L
SIG
48V
5R
SIG
48V
6L
SIG
48V
6R
SIG
1L
SIG
1R
SIG
2L
SIG
2R
SIG
Audio Inputs / Outputs
e.g. for microphones, foldback /
monitor feeds etc.
Processing Rack
INPUTS
OUTPUTS
H YDR A 12- 4
AN A LOG
PSU
FAN
PORT1 PORT2
Con Act Con Act
RESET
STATUS
1
2
3
4
5
6
7
8
48V
1L
SIG
48V
1R
SIG
48V
2L
SIG
48V
2R
SIG
48V
3L
SIG
48V
3R
SIG
48V
4L
SIG
48V
4R
SIG
48V
5L
SIG
48V
5R
SIG
48V
6L
SIG
48V
6R
SIG
1L
SIG
1R
SIG
2L
SIG
2R
SIG
Audio Inputs / Outputs
e.g. for external routers, servers,
transmission equipment etc.
Hydra2 Connection
Control Surface Connection
11
MULTI-CONSOLE NETWORKS
Routers from different processing
racks can be connected together.
Networking consoles in this way
gives access to all I/O from all control
surfaces and system PCs on the
same Hydra2 network.
Each console’s access to I/O can be
managed from the Hydra2 Organizer
(H2O). Individual consoles can be denied
access to I/O by groups of I/O boxes,
specific I/O boxes, specific ports, or
groups of ports.
Inputs can be used simultaneously by
multiple consoles on the same network.
Any console with access can patch audio
to any of its DSP inputs and to any output
ports.
Router to router connections, like I/O
boxes, can be made using any of the
16 front panel Hydra2 router ports.
Connecting racks together creates
multiple linked star formations, as shown
in Figure 1. All 3 routers shown have
access to all of the I/O shown. The path
from I/O box to console may pass through
multiple router cards before reaching the
console’s own router.
It is important that there is only one path
between any two points in the network
(not counting secondary paths designed
for redundancy, or configured trunks for
increased bandwidth). Having multiple
paths between two points will cause
data collisions and instability. Figure 2
shows an incorrect connection of three
processing racks. The addition of a third
router-to-router link creates a duplicate
path. The route between any two
processing racks can be direct or via the
other processing rack. Removing any one
of the three marked links will correct the
problem.
12HYDRA2 Operator Manual
FIGURE 1 - CORRECT CONNECTION OF A THREE STAR FORMATION NETWORK
Audio I/O
Audio I/O
Audio I/O
Audio I/O
Router /
Processing
Rack
Router /
Processing
Rack
Audio I/O
Audio I/O
Audio I/O
Audio I/O
Audio I/O
Router /
Processing
Rack
Audio I/O
Audio I/O
Audio I/O
Three router racks connected with no duplicate paths.
FIGURE 2 - INCORRECT CONNECTION OF A THREE STAR FORMATION NETWORK
Audio I/O
Audio I/O
Audio I/O
Audio I/O
Router /
Processing
Rack
Router /
Processing
Rack
Audio I/O
Audio I/O
Audio I/O
Audio I/O
Audio I/O
Router /
Processing
Rack
Audio I/O
Audio I/O
Audio I/O
Incorrect Connection The additional link creates duplicate paths.
When connecting two or more routers
together it is important that one of
them, and only one, is configured to
be the Master Router.
Please see the Master Router section of
this document for more details.
It is also important to the ensure IP
address compatibility of the systems
being connected together.
Please see the IP Address management
section of this document for more details.
Each Hydra2 link is capable of carrying up
to 512 channels of audio simultaneously
in each direction. This imposes no
limitations over I/O box to router
connections as no single I/O box contains
more than 512 input or output ports.
It is important however in multi-rack
systems to understand the network
topology; a single connection between
two routers is also limited to 512 channels
in each direction. This imposes a limit on
the amount of I/O that can be accessed
via other routers’ connections at any
given time. The bandwidth available is
Introduction - Hydra2 Networking
FIGURE 4 - EXAMPLE OF A THREE CONSOLE NETWORK
System A
System B
Control Surface
Control Surface
Router / Processing Rack
INPUTS
OUTPUTS
INPUTS
PSU
FAN
2
3
4
5
6
7
8
48V
1L
SIG
48V
1R
SIG
48V
2L
SIG
48V
2R
SIG
48V
3L
SIG
48V
3R
SIG
48V
4L
SIG
48V
4R
SIG
48V
5L
SIG
48V
5R
SIG
48V
6L
SIG
48V
6R
SIG
1L
SIG
1R
SIG
2L
SIG
2R
SIG
RESET
1
2
3
4
5
6
7
8
INPUTS
FAN
2
3
5
6
7
8
SIG
48V
1R
SIG
48V
2L
SIG
48V
2R
SIG
48V
3L
SIG
48V
3R
SIG
48V
4L
SIG
48V
4R
SIG
48V
5L
SIG
48V
5R
SIG
48V
6L
SIG
48V
6R
SIG
1L
SIG
1R
SIG
2L
SIG
2R
SIG
RESET
FAN
3
5
6
7
8
2L
SIG
48V
2R
SIG
48V
3L
SIG
48V
3R
SIG
48V
4L
SIG
48V
4R
SIG
48V
5L
SIG
48V
5R
SIG
48V
6L
SIG
48V
6R
SIG
1L
SIG
1R
SIG
2L
SIG
2R
SIG
RESET
1
2
3
4
2
3
4
5
6
7
8
48V
1R
SIG
48V
2L
SIG
48V
2R
SIG
48V
3L
SIG
48V
3R
SIG
48V
4L
SIG
48V
4R
SIG
48V
5L
SIG
48V
5R
SIG
48V
6L
SIG
48V
6R
SIG
1L
SIG
1R
SIG
2L
SIG
2R
SIG
Audio Inputs / Outputs
Hydra2 I/O Box Connection
determined by usage on either side of
the link. In the example shown in Figure
4, If console A is sending 100 channels
of audio to outputs connected to console
B’s rack, Console B and C can then
only access 412 channels from inputs
CALREC Putting Sound in the Picture
8
FAN
RESET
2
3
SIG
48V
1R
SIG
48V
2L
SIG
48V
2R
SIG
48V
3L
SIG
48V
3R
SIG
48V
4L
SIG
48V
4R
SIG
48V
5L
SIG
48V
5R
SIG
48V
6L
SIG
48V
6R
SIG
1L
SIG
1R
SIG
5
6
7
8
SIG
48V
1R
SIG
48V
2L
SIG
48V
2R
SIG
48V
3L
SIG
48V
3R
SIG
48V
4L
SIG
48V
4R
SIG
48V
5L
SIG
48V
5R
SIG
48V
6L
SIG
48V
6R
SIG
1L
SIG
INPUTS
2L
SIG
2R
SIG
RESET
FAN
1R
SIG
2L
SIG
2R
SIG
2L
SIG
2R
SIG
OUTPUTS
PORT1 PORT2
STATUS
1
2
3
4
5
6
7
8
48V
1L
SIG
48V
1R
SIG
48V
2L
SIG
48V
2R
SIG
48V
3L
SIG
48V
3R
SIG
48V
4L
SIG
48V
4R
SIG
48V
5L
SIG
48V
5R
SIG
48V
6L
SIG
48V
6R
SIG
1L
SIG
1R
SIG
Audio Inputs / Outputs
OUTPUTS
INPUTS
OUTPUTS
H YDR A 12- 4
AN A LOG
PORT1 PORT2
4
1L
Con Act Con Act
PSU
FAN
PORT1 PORT2
Con Act Con Act
STATUS
1
48V
AN A LOG
PSU
1L
Con Act Con Act
SIG
7
H YDR A 12- 4
48V
AN A LOG
PSU
1L
6
Audio Inputs / Outputs
H YDR A 12- 4
48V
5
OUTPUTS
INPUTS
PORT1 PORT2
4
48V
PORT1 PORT2
STATUS
1
Con Act Con Act
2
SIG
Audio Inputs / Outputs
AN A LOG
STATUS
1
1R
OUTPUTS
H YDR A 12- 4
RESET
48V
Con Act Con Act
1L
INPUTS
FAN
SIG
AN A LOG
PSU
48V
Audio Inputs / Outputs
PSU
1L
H YDR A 12- 4
PORT1 PORT2
4
48V
INPUTS
Con Act Con Act
STATUS
1
PORT1 PORT2
STATUS
Audio Inputs / Outputs
AN A LOG
PSU
FAN
Con Act Con Act
OUTPUTS
H YDR A 12- 4
OUTPUTS
AN A LOG
PSU
STATUS
Audio Inputs / Outputs
RESET
INPUTS
H YDR A 12- 4
PORT1 PORT2
Con Act Con Act
STATUS
1
OUTPUTS
AN A LOG
PORT1 PORT2
Con Act Con Act
RESET
Router / Processing Rack
H YDR A 12- 4
AN A LOG
FAN
Control Surface
Router / Processing Rack
H YDR A 12- 4
PSU
System C
48V
1L
SIG
48V
1R
SIG
48V
2L
SIG
48V
2R
SIG
48V
3L
SIG
48V
3R
SIG
48V
4L
SIG
48V
4R
SIG
48V
5L
SIG
48V
5R
SIG
48V
6L
SIG
48V
6R
SIG
1L
SIG
1R
SIG
2L
SIG
2R
STATUS
SIG
Audio Inputs / Outputs
Router to Router Connection
connected to the A rack. Clearly this only
becomes an issue for large systems. In
these circumstances standalone central
routers should be considered. Please see
“Router Cores” on page 14 for more
information.
RESET
1
2
3
4
5
6
7
8
48V
1L
SIG
48V
1R
SIG
48V
2L
SIG
48V
2R
SIG
48V
3L
SIG
48V
3R
SIG
48V
4L
SIG
48V
4R
SIG
48V
5L
SIG
48V
5R
SIG
48V
6L
SIG
48V
6R
SIG
1L
SIG
1R
SIG
2L
SIG
2R
SIG
Audio Inputs / Outputs
Control Surface Connection
If more bandwidth is required, router ports
can be configured as trunks, which can be
connected to ‘trunk’ ports on other routers
adding an additional 512 mono channels
of bandwidth in both directions. Please
contact Calrec customer support for more
information.
13
ROUTER CORES
Standalone router racks, called Router
Cores, that have no DSP and no control
surface attached, can be used to increase
the capacity of I/O connections by
providing an extra 16 or 32 router ports
with each additional rack.
Router Cores can be used as a central
point for shared I/O resources and
console router connections. Dedicating a
standalone router as the Master Router in
a network and locating it in an equipment
room, powered on 24/7, ensures that
the network is always active and that any
console that is powered on has access
to all their own I/O as well as all I/O
connected to the Router Core.
Having a central point for console
connections on a large network with a
lot of shared I/O makes router to router
bandwidth easier to manage.
The consoles / control rooms shown
below in Figure 1 have access to the
studio floor and equipment room I/O
without it being routed via other console
cores.
FIGURE1 - NETWORK WITH STANDALONE MASTER ROUTER
Control Room 1
Audio I/O
Audio I/O
Control Room 2
Audio I/O
Audio I/O
Control Room 3
Audio I/O
Audio I/O
Console
Core
Console
Core
Console
Core
Audio I/O
Router
Core
Audio I/O
Audio I/O
Audio I/O
Audio I/O
Equipment
Room
Audio I/O
Studio A
14HYDRA2 Operator Manual
Audio I/O
Audio I/O
Studio B
Studio C
Introduction - Hydra2 Networking
IP ADDRESS MANAGEMENT
In an Apollo/Artemis/Summa/Hydra2
system, each hardware element is
allocated a unique IP address, be it a
router card, Control Processor card,
or an I/O box.
IP addresses follow the format of:
AAA.BBB.XXX.Y YY.
FIGURE1 - MULTI-ROUTER IP’S
Broadcast Facility
Control Room 1
Control Room 2
IP Address 001.001.xxx.yyy
IP Address 001.002.xxx.yyy
AAA is given a value unique to the
customer / owner of the system.
BBB is given a value unique to each
router / processing rack owned by a
customer.
AAA.BBB is set by the configuration of
the active Control Processor card within
a rack. Physically changing a Control
Processor card could change the IP
address of all hardware associated
with that rack, including the I/O boxes
connected to it, if the replacement card is
not correctly configured.
XXX.Y YY is automatically set for each
element within and connected to the
rack, including rack cards, control surface
elements and I/O boxes, but not other
processing racks, or items connected
via other racks. XXX is set by the type
of hardware, YYY is set by the location /
port that the hardware is connected to.
Maintaining this format of IP allocation
ensures that systems can be connected
together without address conflicts, as
shown in Figure 1.
Confirming IPs
To confirm the IP addresses associated
with a processing rack, log in (with
administrator privileges) to the PC
associated with that rack and launch the
Calrec Program Updater application.
On startup, the Program Updater scans
all the hardware it can find and lists it. The
CALREC Putting Sound in the Picture
Rented OB / Mobile Unit
Hydra2 Router to Router connections.
IP Address 002.001.xxx.yyy
first hardware element detected by the
Program Updater is the configuration PC
itself, followed by the Control Processor
and then the remaining hardware
associated with that rack. All hardware
listed is part of the same system and will
have the same number for the first two
bytes, AAA.BBB.
Another system owned by the same
customer will have the same first byte,
AAA but a different second.
A system owned by a different customer
will have a different first byte AAA, but
may have the same second byte BBB.
Changing IPs
The first two bytes of the IP address
are set by the Control Processor.
Changing the IP requires logging in to
the card’s Linux environment and editing
a configuration file. This should only be
carried out by competent technicians.
Please contact our Customer Support
team for guidance on IP address changing
if required.
15
MASTER ROUTERS
In any Hydra2 network there needs to
be a Master Router.
In a single router / processing rack
system, there is only one active router
card. All router cards fitted within such
a rack will be factory pre-configured as
Master Routers so that whichever card is
active will be the master.
In a multi-rack system, one of the racks
needs to be dedicated as the Master
Router and the router cards in this rack
should be configured as such. All other
routers on the same network need to be
configured as Slaves.
Having more than one Master Router rack
in a single networked system will result
in instability. Not having an active Master
Router on a network will also cause
instability.
Configuring Master & Slave Routers
Only the active main router card in the
chosen rack needs to be configured as
the Master, however, it is good practise to
set the secondary main router and also
the primary and secondary expansion
routers (if used) as masters as well.
This allows for cards to be moved
around within the same rack to aid
troubleshooting (if hardware problems
are experienced) as well as ensuring the
backup is correct in the event of a hotswap.
Configuring the Master/Slave status
requires logging into the router card’s
Linux environment and editing a
configuration file. This should only be
carried out by competent technicians.
Please contact the Calrec Customer
Support team for guidance on Master
Router configuration if required.
The rack configured to be the Master
Router needs to remain powered and
active to maintain reliability of the network.
No individual system within the Hydra2
network should be used if the Master
Router is not active.
Similarly, it is important to understand
the network topology to know which I/O
boxes are available to which consoles if
individual racks (other than the Master)
are powered down.
When two or more networks are joined or
a network is split, for example if two OB /
mobile units are occasionally connected
together, it is essential that the Master
Routers are managed. If connecting two
networks, one of the masters will need
to be re-configured as a slave. When
separating two networks, one of the
slaves needs to be changed back to a
master.
16HYDRA2 Operator Manual
Introduction - Hydra2 Networking
SYNC IN MULTI-ROUTER SYSTEMS
In a multi-rack system each router /
processing rack requires its own sync
connection. The router in each rack
provides sync over the network in turn
to the I/O boxes connected to it.
Equipment Room
It is vitally important that all router /
processing racks on the same network
are locked to a sync derived and locked
from the same source. If any routers are
clocked by free running sync, or if they
are derived from different sources, both
network audio and communications will be
compromised.
Racks running on different syncs can
cause instability leading to the loss of I/O
and unreliable error messaging.
If sync is being distributed via equipment
such as regenerators / buffers, it is
important to ensure that they are all set to
lock to the correct input from the master
sync generator.
h y dr a
CONTROL
SYSTEM
RESETS
ROUTER / EXPANDER
SYNC INPUTS
DSP
ENABLE
FANS
VIDEO 1
AES 3
WORD
CLOCK
VIDEO 2
GOOD
FAIL
h y dr a
EXPANSION 1
ROUTER 1
DSP 1
10
9
10
11 12
11
13 14
13
16
15 16
15
10
12
14
16
9
11
LINKS
13
15
1
4
3
6
5
8
2
4
6
8
7
1
3
5 LINKS
7
10
12
14
16
MA
RST
NOK
ST2
1
4
3
6
2
4
6
8
MAC
4
MAC
4
MAC
3
MAC
3
MAC
5
MAC
5
2
7
1
3
5 LINKS
7
D2
D4
D6
D8
MA
RST
NOK
ST2
2
9
16
15 16
15
9
11
LINKS
13
15
1
4
3
6
5
8
D2
D4
D6
D8
D1
D3
D5
D7
2
4
6
8
7
1
3
5 LINKS
7
10
12
14
16
MA
RST
NOK
ST2
POK
PRI
MOK
ST1
MA
RST
NOK
ST2
POK
PRI
MOK
ST1
MA
RST
NOK
ST2
POK
PRI
MOK
ST1
MA
RST
NOK
ST2
POK
PRI
MOK
ST1
MA
RST
NOK
ST2
PSU
AC IN
AC IN
9
11
LINKS
13
15
2
1
4
3
6
5
8
2
4
6
8
PSU 2
PSU
9
11
13
10
12
14
16
1
10
11 12
13 14
ETHERNET
POK
PRI
MOK
ST1
PSU 1
12
ETHERNET
POK
PRI
MOK
ST1
EXPANSION 2
14
2
USB
1
D1
D3
D5
D7
ROUTER 2
ROUTER / EXPANDER ROUTER / EXPANDER
10
MAC
6
MAC
7
USB
5
8
DSP
SFP
MAC
6
h y dr a
DSP 2
CONTROL
PROCESSOR
SFP
MAC
7
9
11
LINKS
13
15
2
ETHERNET
POK
PRI
MOK
ST1
CONTROL
PROCESSOR
9
12
14
2
CONTROL
PROCESSOR 1
PROCESSOR 2
DSP
ROUTER / EXPANDER ROUTER / EXPANDER
7
1
3
5 LINKS
7
USB
USB
ETHERNET
POK
PRI
MOK
ST1
MA
RST
NOK
ST2
MOK
ST1
ST3
ST5
ST0
ST2
ST4
ST6
MOK
ST1
ST3
ST5
ST0
ST2
ST4
ST6
Master Router Rack
Sync Buffer
h y dr a
CONTROL
SYSTEM
Sync Buffer
RESETS
ROUTER / EXPANDER
SYNC INPUTS
DSP
ENABLE
FANS
VIDEO 1
AES 3
h y dr a
CONTROL
SYSTEM
WORD
CLOCK
VIDEO 2
RESETS
ROUTER / EXPANDER
SYNC INPUTS
DSP
ENABLE
FANS
GOOD
FAIL
h y dr a
EXPANSION 1
ROUTER 1
DSP 1
10
9
10
9
12
11 12
11
14
13 14
16
10
12
14
16
1
2
1
3
4
3
6
2
4
6
8
5
7
1
3
5 LINKS
7
6
2
4
6
8
SFP
MAC
6
MAC
3
MAC
3
MAC
5
USB
D2
D4
D6
D8
2
10
9
10
9
12
11 12
11
10
12
14
16
MA
RST
NOK
ST2
13 14
MA
RST
NOK
ST2
MA
RST
NOK
ST2
POK
PRI
MOK
ST1
MA
RST
NOK
ST2
POK
PRI
MOK
ST1
D1
D3
D5
D7
MA
RST
NOK
ST2
9
12
AC IN
15
10
12
14
16
11
13 14
10
12
14
16
1
2
1
2
1
3
4
3
4
3
5
7
1
3
5 LINKS
7
MA
RST
NOK
ST2
6
5
8
2
4
6
8
6
7
MA
RST
NOK
ST2
5
8
1
3
5 LINKS
7
USB
USB
2
4
6
8
ETHERNET
POK
PRI
MOK
ST1
7
1
3
5 LINKS
7
6
ST0
ST2
ST4
ST6
MOK
ST1
ST3
ST5
ST0
ST2
ST4
ST6
Console Router Rack
Control Room 1
Primary Sync Path
POK
PRI
MOK
ST1
MA
RST
NOK
ST2
2
4
6
8
MAC
6
WORD
CLOCK
VIDEO 2
MAC
3
MAC
3
MAC
5
MA
RST
NOK
ST2
12
10
12
14
16
USB
1
2
11 12
D1
D3
D5
D7
10
12
14
16
MA
RST
NOK
ST2
POK
PRI
MOK
ST1
MA
RST
NOK
ST2
POK
PRI
MOK
ST1
MA
RST
NOK
ST2
POK
PRI
MOK
ST1
MA
RST
NOK
ST2
1
2
1
3
4
3
2
4
6
8
5
7
1
3
5 LINKS
7
MA
RST
NOK
ST2
6
AC IN
AC IN
5
8
2
4
6
8
PSU
11
13
15
4
POK
PRI
MOK
ST1
PSU 2
PSU
9
11
LINKS
13
15
2
ETHERNET
POK
PRI
MOK
ST1
PSU 1
9
13 14
8
D2
D4
D6
D8
10
15 16
9
11
LINKS
13
15
6
1
D1
D3
D5
D7
9
16
ETHERNET
POK
PRI
MOK
ST1
EXPANSION 2
ROUTER / EXPANDER ROUTER / EXPANDER
14
MAC
4
USB
D2
D4
D6
D8
DSP
ROUTER 2
10
MAC
5
2
7
1
3
5 LINKS
7
h y dr a
DSP 2
MAC
6
MAC
7
MAC
4
5
8
ETHERNET
MOK
ST1
ST3
ST5
SFP
15
4
2
4
6
8
SFP
9
11
LINKS
13
15
2
POK
PRI
MOK
ST1
CONTROL
PROCESSOR
MAC
7
13
15 16
9
11
LINKS
13
15
CONTROL
PROCESSOR
9
11 12
14
16
9
11
LINKS
13
15
10
CONTROL
PROCESSOR 1
PROCESSOR 2
DSP
ROUTER / EXPANDER ROUTER / EXPANDER
10
AC IN
DSP 1
1
8
D2
D4
D6
D8
POK
PRI
MOK
ST1
PSU
ROUTER 1
3
ETHERNET
POK
PRI
MOK
ST1
PSU
h y dr a
EXPANSION 1
4
6
1
10
12
14
16
PSU 2
13
15 16
9
11
LINKS
13
15
PSU 1
2
ETHERNET
POK
PRI
MOK
ST1
EXPANSION 2
ROUTER / EXPANDER ROUTER / EXPANDER
16
USB
1
D1
D3
D5
D7
ROUTER 2
14
MAC
4
MAC
5
2
7
1
3
5 LINKS
7
DSP
VIDEO 1
AES 3
GOOD
FAIL
h y dr a
DSP 2
MAC
6
MAC
7
MAC
4
5
8
ETHERNET
MA
RST
NOK
ST2
SFP
15
4
8
CONTROL
PROCESSOR
9
11
LINKS
13
15
2
POK
PRI
MOK
ST1
CONTROL
PROCESSOR
MAC
7
13
15 16
9
11
LINKS
13
15
CONTROL
PROCESSOR 1
PROCESSOR 2
DSP
ROUTER / EXPANDER ROUTER / EXPANDER
10
12
14
16
CALREC Putting Sound in the Picture
Backup House Sync Generator
Master House Sync Generator
7
1
3
5 LINKS
7
USB
USB
ETHERNET
POK
PRI
MOK
ST1
MA
RST
NOK
ST2
MOK
ST1
ST3
ST5
ST0
ST2
ST4
ST6
MOK
ST1
ST3
ST5
ST0
ST2
ST4
ST6
Console Router Rack
Control Room 2
Secondary Sync Path
17
I/O BOX IDENTIFICATION
Each I/O box on the Hydra2 network
needs to be given a unique ID in the
form of a number between 0 and 255.
The Hydra ID, or “HID” for each box
is set using a DIP switch accessible
from the rear of fixed format I/O
boxes, or on the side of the controller
card within a modular I/O box.
Label pockets are fitted to the front panel
of I/O boxes to aid visual identification.
Fixed Format I/O boxes
The 8 way DIP switch is set as an 8 bit
binary representation of the HID value
with the left hand switch used for the
most significant bit, and the right hand
switch for the least significant bit. A switch
in the down / off position represents
a binary 0 and a switch set in the up /
on position represents a binary 1. Each
switch / binary bit equates to a decimal
value, starting at 1 for the least significant
bit. The remaining switches are double
the value of their less significant neighbor,
making the 8th / most significant bit
equate to a decimal value of 128.
All fixed format I/O box ID switches are
orientated the same way, though some
boxes, such as MADI units, use a different
style switch with more pronounced
labelling. Ignore any labels on the switch
itself and always refer to the Calrec
labelling on the surrounding panel which
will show the most significant bit switch on
the left and the binary 1 position as up.
Care should be taken when setting HIDs
to avoid accidentally duplicating the same
ID on more than one box. Duplicate box
IDs can cause network conflicts. I/O
boxes should be disconnected from the
network before changing their HID, and
reset or power cycled once the DIP switch
is set to ensure the new HID is active
before reconnecting to the network.
18HYDRA2 Operator Manual
STANDARD SWITCH FOR HID SETTING
32 + 4 + 2 + 1
128 64 32 16
0
1
0
0
1
0
= 39
8
4
2
1
0
1
1
1
76543210
1
0
ADDRESS
• The above diagram shows how
each switch relates to a decimal
value. The setting shown in the
example provides a decimal
HID value of 39
If replacing an I/O box for any reason,
choosing a box of the same type as the
original and setting it with the same ID
makes it a drop-in replacement which will
work with existing user memories and
settings, requiring no further configuration.
Modular I/O box ID setting
The ID for modular I/O boxes is set by
a DIP switch on the controller card and
is only accessible by removing the card.
Please refer to the Hydra2 installation
manual and ensure ESD precautions are
observed before removing any modular
I/O box cards.
ID switches on modular I/O controller
cards are orientated differently. Ignore any
labelling on the switch itself and refer to
the Calrec labelling printed on the circuit
board around the switch to clarify its
orientation. When viewing the card from
the side, the most significant bit is on the
left and the least significant bit on the
right. Pulling a switch towards you sets it
as a binary 1, away from you as a binary
0. The following illustrations show the
ID switch on the modular I/O controller
card from the side and top views. Again
the decimal value of 39 is used for the
example.
MODULAR I/O CONTROLLER - SIDE
128 64 32 16 8
When connecting additional I/O boxes to
a network it is important to be aware of
the existing I/O HIDs in order to select
a unique number and avoid creating a
conflict.
Address 2
Some I/O boxes, such as MADI units,
are fitted with 2 banks of DIP switches—
Address 1 and Address 2—to provide
a 16 bit ID, and therefore a greater
range of values. Please note that only ID
values between 0 and 255 are currently
supported. Any DIP switches labelled
Address 2 should all be set to the off
position.
7
6
5
4
3
4
2
1
2
1
0
ID BITS
Sw3
Front Panel
MODULAR I/O - VIEWED FROM TOP
1
2
4
8 16 32 64 128
Front Panel
Introduction - Hydra2 Networking
I/O PORT IDENTIFICATION
Default / Native Labels
Each Hydra2 input and output port has
a default label beginning with the HID
number of the I/O box the port is located
in, followed by the number of the port
within that box. For example, a port in a
source list labelled 12-08 would be the
8th input in the I/O box with the HID of
12. The same port label in a destination
list would be the 8th output of the same
I/O box 12.
AES ports are numbered in stereo pairs
and as such have a L or R suffix to denote
the left and right legs of each pair. For
example 16-09R in a source list would be
the right leg of the 9th AES input pair to
I/O box 16.
MADI I/O boxes have two inputs and two
outputs, each of which contains 56 or 64
channels of audio (quantity set by front
panel button on the I/O box). Labels for
ports within a MADI stream contain an
additional number to identify the MADI
stream the port is in. For example, 31-240 in a destination list would be channel
40 in I/O box 31’s second MADI output,
the middle number being used to identify
the MADI stream.
Modular I/O boxes can contain a mixture
of formats of I/O and their default port
labels contain a reference to the card
slot within the I/O box to further aid
identification. Modular I/O card slots are
labelled using letters rather than numbers.
Note that some card types take up more
than one slot space, such cards are
identified by their left most slot. Slot labels
are printed across the upper fixing rail and
each card has a small circular hole in the
upper left corner through which the slot
label can be seen. Slots are labelled in
alphabetic order however, the characters
F, I, O, Q, U and Y are omitted as these
could easily be miss-read and confused
with other letters or numbers. The central
CALREC Putting Sound in the Picture
slot in the card-frame is not included in
this labelling scheme as external I/O
cards are never fitted in this location. It
is instead labelled “H2 Interface” and is
always populated with a Hydra2 network
interface card. A source list port label of
12-K-04 would be the 4th input of the
card in slot K of the I/O box with the HID
12.
Modular SDI cards have two SDI inputs/
outputs per card. Each SDI stream can
have 16 channels of audio embedded into
it. An SDI port label of 12W1-8R would
be the 16th (and last) audio channel in
the first SDI stream of the card in slot W
of the I/O box with a HID of 12. 12W2-1L
would be the first audio channel of the
second SDI stream on the same card.
Ports that require the same label to be
visible from each console should be edited
using H2O to avoid having to name them
on each console.
Port Description
If required, a description can be entered
against each port label in both H2O and
from each console’s PC/Touch Display
interface. As with labels, H2O-entered
data is visible to H2O and all consoles,
whilst console entered data is only visible
to the console it was entered on. The
description field allows for more text to be
entered against a port than can fit into a
label field.
Each port’s format (Mic / Line / AES /
MADI / SDI etc) is also displayed and
color coded adjacent to its label to further
aid identification.
H2O edited custom labels
Default / native labels provide a unique
ID for each port and are very useful at an
engineering level, however, custom labels
may be more beneficial at an operational
level by referring to the device feeding or
being fed by the Hydra2 port, e.g. ‘Mic2’,
or ‘VT6’.
Port labels can be edited by H2O users.
H2O edited port labels are passed on
to all consoles on the same network,
replacing their defaults.
Console edited custom labels
Port labels can also be edited at a
console level using the console’s Main
PC Application for Apollo and Artemis
consoles, or from the Touch Display
interface for Summa consoles. Console
edited labels are only visible on the
console from which they were entered,
other consoles and H2O will not display
them.
19
20HYDRA2 Operator Manuel
H2O
USING H20
calrec.com
Putting Sound in the Picture
CONNECTION AND LOGIN
H2O is the ‘Hydra2 Organizer’—a
standalone user interface providing
administrator-level control over the
Hydra2 network.
FIGURE 1 - CONNECTION
Web Browser
Master Router Rack
h y dr a
CONTROL
SYSTEM
ROUTER 1
DSP 1
Connection
H2O runs in a web-server environment
on the Control Processor card, which is
fitted in the Master Router rack. If the
Master Router rack has its own console,
H2O can be accessed from that console’s
PC. Alternatively, if access is required
from a different PC, not connected to the
control surface, or if the master router is a
standalone rack with no console, H2O can
be accessed by connecting a PC to the
MAC5 RJ45 Ethernet port on the front
panel of the active Control Processor, as
shown in Figure 1.
The connection between PC and
Control Processor should be established
automatically if the network connection
settings on the PC are set to their default
to obtain IP and DNS automatically. The
Cat5e cable used can be a ‘straight
through’ or ‘crossover’ type.
SYNC INPUTS
DSP
ENABLE
FANS
10
9
10
9
12
11 12
11
14
13 14
13
16
15 16
15
10
12
14
16
9
11
LINKS
13
15
2
1
4
3
6
8
2
4
6
8
10
12
14
16
8
2
4
6
8
POK
PRI
MOK
ST1
Calrec factory configured PCs have
quick-launch and start menu shortcuts
that launch the Chrome browser and
automatically direct it to the H2O server.
MA
RST
NOK
ST2
CONTROL
PROCESSOR
SFP
SFP
MAC
6
MAC
7
1
4
6
7
ETHERNET
CONTROL
PROCESSOR
9
11
LINKS
13
15
2
5
1
3
5 LINKS
7
CONTROL
PROCESSOR 1
PROCESSOR 2
DSP
ROUTER / EXPANDER ROUTER / EXPANDER
Amongst other features, H2O is used to
manage which I/O ports each console
on the network can access, provides the
ability to perform input to output crosspoint patching without the use of a control
surface and allows the custom editing of
I/O port labels which are passed on to all
consoles on the network.
RESETS
ROUTER / EXPANDER
VIDEO 1
AES 3
WORD
CLOCK
VIDEO 2
GOOD
FAIL
h y dr a
EXPANSION 1
3
MAC
4
MAC
3
MAC
3
MAC
5
MAC
5
USB
5
2
7
1
3
5 LINKS
7
D2
D4
D6
D8
DSP
MAC
6
MAC
7
MAC
4
2
ROUTER 2
9
10
9
12
11 12
11
14
13 14
13
16
15 16
15
MA
RST
NOK
ST2
1
4
3
6
D1
D3
D5
D7
2
4
6
8
ETHERNET
POK
PRI
MOK
ST1
9
11
LINKS
13
15
8
D2
D4
D6
D8
10
12
14
16
6
7
8
2
4
6
8
MA
RST
NOK
ST2
POK
PRI
MOK
ST1
MA
RST
NOK
ST2
POK
PRI
MOK
ST1
MA
RST
NOK
ST2
POK
PRI
MOK
ST1
MA
RST
NOK
ST2
POK
PRI
MOK
ST1
MA
RST
NOK
ST2
PSU
AC IN
AC IN
1
4
5
1
3
5 LINKS
7
PSU 2
PSU
9
11
LINKS
13
15
2
ETHERNET
POK
PRI
MOK
ST1
PSU 1
10
10
12
14
16
1
EXPANSION 2
ROUTER / EXPANDER ROUTER / EXPANDER
2
USB
1
D1
D3
D5
D7
h y dr a
DSP 2
3
5
7
1
3
5 LINKS
7
USB
USB
ETHERNET
POK
PRI
MOK
ST1
MA
RST
NOK
ST2
MOK
ST1
ST3
ST5
ST0
ST2
ST4
ST6
MOK
ST1
ST3
ST5
ST0
ST2
ST4
ST6
this document for details on checking
actual hardware addresses.
Alternatively, H2O can be accessed by
entering hydra:8080 or the IP address of
the Control Processor, followed by :8080,
e.g. 192.100.1.0:8080 in the browser’s
URL address entry field. Please refer to
the IP Address Management section of
On opening, you are greeted with the
login screen. Selecting ‘Guest’ from the
username drop-down provides a password
and allows you to log in to view settings.
To obtain full access, you should login
with the admin username. Please contact
Calrec Support or your distributor for
admin password details.
H2O QUICK-LAUNCH SHORTCUT
Once logged in, different pages can be
accessed by clicking on the page tabs
across the top of the window.
H2O START MENU SHORTCUT
LOG IN
Accessing H2O
Calrec recommends the use of Google’s
Chrome browser to access H20. Google
Chrome is free of charge and can be
downloaded and ready to use in minutes
from www.google.com/chrome.
Other web-browsers, such as Safari and
Firefox can be used, however Calrec
cannot guarantee how the user interface
will be displayed on all available browsers.
Notably, Microsoft’s Internet Explorer does
not display H2O satisfactorily.
22HYDRA2 Operator Manual
Using H20
I/O BOXES AND PORT LABELS
H2O can be used to manage
box labels, port names and port
descriptions. Custom labels entered
in H2O are relayed to all control
surfaces on the network, replacing
their default labels.
FIGURE 1 - I/O BOX & PORT LABELS SCREEN
Custom labels entered on a console are
not overwritten by H2O labels, only default
console labels are replaced. Labels
provided by H2O can be edited locally
on each console if ports require different
labels depending on where they are being
accessed from. Consoles are not aware
of each others custom labels, only of
defaults and custom H2O labels.
On the ‘IO Boxes & Port Labels’ screen,
all I/O boxes currently in the system
database are displayed on the left hand
side of the screen.
If a new I/O box is connected anywhere
on the network, H2O will recognise it and
automatically add it to the database.
I/O boxes remain in the database, even
if they are removed from the network or
powered down.
Add / Remove I/O boxes
I/O boxes can be added or removed from
the database by clicking on the Boxes
+ / - buttons at the bottom of the list
window.
The Boxes + function can be used to add
I/O to the database when the physical I/O
box is not available. This allows for setup
and pre-configuration of future expansion
to the network.
The Boxes - function can be used to
remove boxes that are no longer required,
or that have been added in error.
Physical I/O boxes can be replaced with
units of the same I/O type and quantity
CALREC Putting Sound in the Picture
if the replacement’s HID is set the same
as the original without any configuration
changes being required to either H20, or
any of the consoles’ PC/Touch display
interfaces.
It is important however not to duplicate
HIDs on the network. Connecting a box
with the same ID as one already in the
database, whether it is online or not, will
cause confusion. If an ID value is to be
reused by a different I/O type or quantity,
the original ID should be removed from
the database first using the Boxes function.
To manually add an I/O box using the
Boxes + function, you are required
to choose the box type from the box
selection screen, shown in Figure 2, on
the following page, and select an ID value
from a drop-down list. H2O will only offer
IDs that are not currently in the database.
Box and Port Labels
I/O boxes in the database can be selected
by clicking on them to bring up the box
details in the main window, as shown in
Figure 1 above, where custom information
about the box can be entered.
23
A full port list is shown in the table
beneath the box details, where user
defined port labels and descriptions
can be entered. The order the ports are
displayed in can be changed by clicking
on the column headers at the top of the
table.
FIGURE2 - ADD BOX SELECTION SCREEN
After editing box or port information,
click APPLY CHANGES or CANCEL
CHANGES at the bottom of the table for
the new information to take affect or be
discarded.
On applying the changes, the updated
information is passed on to all consoles on
the network. Each console will display the
updated information unless it has already
been edited from the default values on the
console PC itself, in which case, the local
custom labels take precedence.
Note, up to 20 characters can be entered
as port labels. All 20 characters are visible
in H2O, and on each console interface,
however, console control surface displays
have limited text fields; fader displays only
show the first 10 characters of a port label
and Apollo/Artemis TFT meter labels will
show 14.
Individual input ports can be protected
within this screen using the right hand
“Protected” check box column. This is
useful if the network administrator wishes
extra care to be taken over accessing
individual ports’ Mic Gain, 48 V and SRC
controls. For more information see the
Port Protection sections of the Apollo,
Artemis or Summa Operator/User
manuals.
24HYDRA2 Operator Manual
Using H20
ACCESS RIGHTS
Consoles can be denies access to I/O
resources on a folder or port by port
basis.
FIGURE 1 - ACCESS MANAGEMENT
The ‘Access Management’ screen shows
the folder structure containing the I/O on
the left. “+” symbols indicate branches of
the folder tree that can be expanded, “-”
symbols allow branches to be collapsed.
Each console in the client database has a
column next to the folder tree.
Consoles have access to I/O folders or
ports marked with a tick in the checkbox.
Unchecking a folder or port denies access
from that console.
Changing access at folder level affects
all the sub-folders and ports within that
folder . Branches can be expanded to find
sub-folders and individual ports if required.
A blue background to a checkbox
indicates that the whole folder is
accessible, whilst a grey background
indicates the whole folder is restricted. A
half-blue background indicates that the
folder contains a mixture of ports that can
and cannot be accessed.
If a port appears in more than one folder,
removing access to it from one will also
change the display of the other folder to
reflect the change of access.
Denying access to an input or output port
from a console will instantly stop audio
passing between the console and the port
upon confirming the change.
Note, existing patches to restricted ports
are instantly made and pass audio upon
access being granted.
A yellow background indicates access
that has not yet been confirmed. Once
changes to access have been selected,
clicking OK at the bottom of the column
for the respective console will apply the
changes.
Consoles that do not have access to parts
of the network will display a ‘No-Entry’
sign next to the ports in their PC/Touch
Display interface. If patches are attempted
to ports which have been restricted, the
patch will display as “!! port x !!” to indicate
that the patch cannot be made at this
time.
CALREC Putting Sound in the Picture
25
MANAGE FOLDERS
Before access rights to I/O from
consoles can be restricted, and
before port patching can be carried
out using H2O, I/O ports need to be
added to folders. Folders are a means
of organizing ports into lists and sublists.
FIGURE 1 - MANAGE FOLDERS SCREEN
Organizing Folders
The right hand pane shows the folder
structure and the ports within those
folders. Figure 1 shows an example
viewing the contents of a folder labelled
“IO 1”.
Click FOLDERS ‘+’ at the bottom of the
screen to add a new folder. Note, folders
can be created within folders to help give
a logical structure relating to location and
usage.
When managing access rights to I/O
from consoles, whole folders can be
selected which in turn selects all the
ports within that folder, or its subfolders.
Therefore the folder structure created
should minimize the number of clicks
required to change access for common
situations. For example, if there is a folder
called “Studio1” which contains folders
called “Area1” & “Area2”, Access to
Studio1 can be completely restricted or
enabled by selecting the “Studio1” folder,
or to the individual areas by clicking on
the sub-folders. Flexibility is maintained
by allowing ports to be selected on an
individual basis if required.
The FOLDERS ‘-’ button can be used to
remove folders that are no longer needed,
and the FOLDERS EDIT button can be
used to re-label folders if required.
Adding Ports to Folders
A folder may contain other folders or I/O
ports, however it cannot contain both.
Ports may only be added to folders or
sub-folders which do not contain further
sub-folders.
26HYDRA2 Operator Manual
The Manage Folders page shows the
available I/O boxes in the left hand pane.
Clicking on a box brings up a list of all the
ports within that box. Clicking the BOXES
button at the top of the list reverts to the
list of I/O boxes. Column headers can
be clicked to view the lists in a different
order. The PORT DESCRIPTIONS button
displays the additional descriptive label for
the ports.
To add ports to a folder, select the relevant
I/O box on the left, then select the port
or ports required. Ports are selected by
clicking on them. To select multiple ports,
hold CTRL whilst clicking each required
port, or to select a consecutive group
of ports, hold SHIFT whilst clicking on
the second to highlight all the ports in
between. Highlight the folder chosen to
be the location of the ports and click the
‘Add to Folder’ button at the bottom of the
folder list, shown in Figure 2, to add the
selected ports to the selected folder. To
remove ports from a folder, highlight the
FIGURE 2 - ADD TO FOLDER
FIGURE 3 - REMOVE FROM FOLDER
Using H20
desired ports and click the “remove from
folder” button at the bottom of the folder’s
content list, as shown in Figure 3.
FIGURE 5 - MANAGE FOLDERS, SHOWING BOX CONTENT
“+” symbols within the folder tree indicate
branches that have been collapsed to
compact the displayed view. Clicking the
“+” expands the view. Clicking. “-” symbols
will collapse branches.
Ports can be added to multiple folders. If
access to a port is restricted, all folders
containing that port will show the port
being restricted.
Port Grouping
Port lists are sorted alphabetically
which will not always place related ports
together. For example it can be convenient
to have a 5.1 set of signals which are
designated L, R, C, LFE, Ls, Rs placed
adjacently and in that order.
Ports in a folder can be selected and
added to a group by clicking the ‘Add To
Group’ button shown below. Ports can
then be moved within the group using the
up / down arrows at the bottom of the
window.
Port groups that are no longer required
can be broken apart using the remove
from group button shown below.
ADD TO GROUP BUTTON
REMOVE FROM GROUP BUTTON
CALREC Putting Sound in the Picture
27
MANAGE CLIENTS
The Manage Clients screen shows all
the consoles and standalone racks on
the Hydra2 network that H2O is aware
of.
FIGURE 1 - MANAGE CLIENTS LIST
To manage console access rights to
I/O, or sync settings on consoles and
standalone racks, the consoles/racks
need to appear in the ‘Manage Clients’ list.
Consoles and standalone racks are not
auto-detected by H2O, they need to be
manually added to the database, and will
remain in the database whether they are
online or not, unless manually removed.
To add a console or rack to the H2O
database, click the DESKS ‘+’ button at
the bottom of the window. On creation,
a type and number needs to be entered.
The type should be set as Apollo/
Artemis/Summa for consoles, or Router
for a standalone rack. Each system has
to be given a unique label, e.g. “Studio1”.
The “Number” field is split in two (xxx.
xxx) and should be filled with the first two
bytes (AAA.BBB) of the IP address for
the particular system being added. See
“IP Address Management” on page 15
for details on Hydra2 IP addresses and
identifying the IP of each system.
Adding a console to the client list allows
H2O to control access for that console
to I/O. Both consoles and Router Cores
can have their sync status displayed and
changed by H2O once in the client list.
Clients can be edited by highlighting
them and then clicking DESKS EDIT from
the bottom of the screen. Clients can be
removed by clicking DESKS ‘-’.
28HYDRA2 Operator Manual
Using H20
PORT PATCHING
The Port Patching screen allows
Hydra2 inputs to be patched to
Hydra2 outputs directly from H2O.
FIGURE 1 - PORT PATCHING, FOLDER TOP LEVEL VIEW
As well as making cross-point patches of
physical I/O ports, H2O can also patch
to/from Hydra patchbays.
The left hand side of the screen shows
source folders and the right hand side
shows the destination folders, as shown in
Figure 1.
FIGURE 2 - PORT PATCHING, PORT LEVEL VIEW
Making a Patch
Double click on folders to find the required
ports. Note, the navigation bar at the top
of the window expands as folders are
selected to show the folder path. Clicking
the folder labels in the navigation bar
takes the screen back to view those
folders.
Alternatively, clicking the tree structure
button at the bottom of the window
changes the view to that of the folder tree.
Description and patched to / patched
from buttons change the view of port lists
to provide different information about
them.
FIGURE 2 - PORT PATCHING, FOLDER TREE VIEW
To make a patch, click on the required
source / input port on the left and the
required destination / output port on
the right to highlight them both. Clicking
PATCH makes the cross point patch and
routes audio from the selected input to
the selected output.
The REMOVE and MOVE buttons allow
patches to be cleared or moved to a
different port.
CALREC Putting Sound in the Picture
29
SOURCE SETTINGS
H2O can be used to manage source
settings—including mic gain and
phantom power (48V) when using
analogue I/O boxes and SRC when
using digital I/O boxes.
SOURCE SETTINGS — MIC/LINE BOX
Accessing from the Port Patching
Screen
When viewing I/O boxes within H2O’s
port patching screen, depending on which
box type you are viewing, you will see a
SOURCE SETTINGS button at the bottom
of the window. Pressing this repopulates
the screen with the relevant source
settings. The first picture on this page
shows accessible settings for Mic/Line
I/O boxes.
• To enable source settings for any port,
simply check the checkbox.
• Selecting the gain control displays a
level slider as shown.
• Phantom power can be toggled on and
off by pressing the 48 V button.
• Sample rate conversion can be toggled
on and off by pressing the SRC button.
SOURCE SETTINGS — AES I/O BOX
Accessing from the I/O Box & Setup
Screen
When viewing I/O boxes within the I/O
Box & Setup Screen, select the SOURCE
SETTINGS tab to view the controls as
described above. The second image on
this page shows available controls when
viewing an AES I/O box.
30HYDRA2 Operator Manual
Using H20
PORT PROTECTION
Output port protection is a system
that notifies users when they are
attempting to patch to outputs that
are already in use and provides
information to assist in deciding
whether to go ahead with each overpatch individually, or as a group.
PORT PROTECTION POP-UP - H2O
All output destinations are available to
all users across the Hydra2 network if
permitted within H2O, but only one audio
feed can be routed to each individual
output at any one time. When an output is
in use, it is “protected” from over-patching
by other users.
Patching to a Protected Output
When patching a source to a protected
destination, a pop-up appears on the PC
screen containing a table of information
to help decide whether to accept the
patching change. When executing a salvo
(see “Salvos” on page 32) it is possible
that there will be more than one patching
conflict. In such cases the table will have
several rows. From H2O it is also possible
to un-patch ports from desk connections.
Note that H2O un-patches are not held
in console hidden memory and so if the
console is rebooted, or the user memory is
reloaded, these patches will be re-made.
The pop-up functions in the same way
whether it results from a single patch, an
un-patch or a salvo-load.
Once you are happy with your selections,
ACCEPT CHANGES executes all
selected patching changes in the list.
CANCEL ALL cancels all patching to
protected output ports.
From left to right the pop-up displays
the source you are attempting to patch,
the source that is currently patched to
the protected output, the label of the
protected output and the name of the
console that is protecting the output.
The check boxes down the left hand side
allow you to select or deselect patching
changes individually. SELECT ALL selects
and deselects all patching changes in the
list together.
CALREC Putting Sound in the Picture
31
SALVOS
Salvos are predetermined collections
of source to destination patches that
can be executed as a whole, saving
time when multiple configurations are
needed quickly and frequently.
Viewing and Adding To Salvos
Salvos are accessed using two buttons at
the bottom of the Port Patching screen:
ADD TO SALVO, and VIEW SALVO
SALVO ACCESS BUTTONS
VIEW SALVO POP-UP
SAVE SALVO POP-UP
of patches ready for execution within the
View Patch List pop-up.
Within all salvo pop-ups, patches held
within salvos can be viewed by clicking the
small triangle to the left of the name label.
Patches can be added to the current salvo
from the patching screen by clicking on
the required source on the left and the
required destination on the right (or by
click-dragging to select multiple sources
and destinations) then clicking ADD TO
SALVO.
VIEW SALVO opens a pop-up showing
all patches that have been added to the
current salvo so far.
Executing a Salvo
The salvo displayed within the View Salvo
pop-up can be executed by clicking the
TAKE CURRENT SALVO button at the
top of the pop-up. This will ‘make’ all
patches held within the salvo and close
the pop-up
Saving Salvos
From the View Patch List pop-up, the
current salvo can be saved by clicking
SAVE SALVO. At this point, you can
either create a new salvo or overwrite a
previously created one by clicking on its
name in the list. When creating a new
salvo, a unique name and brief description
must be entered to help with future
identification.
Getting and Deleting Salvos
The OPEN SALVO LIST button displays
all available saved salvos. From here, the
user can choose a salvo by clicking on
its name and clicking GET, which closes
the pop-up and displays the salvo as a list
32HYDRA2 Operator Manual
Salvos can be deleted from the Open
Salvo List by clicking on the unwanted
salvo’s name and clicking DELETE, you
will then be prompted to either carry on
with the delete process or press CANCEL,
which retains the salvo and jumps back to
the Open Salvo List pop-up.
It is possible to add contradictory
patches to salvos, in such cases the
last conflicting patch will take priority.
Using H20
SYNC SOURCES
The Sync Sources page displays the
synchronization settings for each
console and standalone rack in the
H2O client database.
FIGURE 1 - SYNC SOURCES
Each client is shown on the left. Selecting
a client brings up the sync details for its
rack on the right. The currently active sync
within the priority list is shown as “Locked”
in the Current column.
H20 allows the selected sync sources
to be changed and reset if required.
Changes made to a console’s sync
settings in H2O are instantly reflected
on the console’s PC / Touch Display
interface. H2O does not have priority over
the console Main Application for sync
settings, changes can be made on either
system and are reflected on both.
It is important to ensure all of the
clients (Calrec router/DSP/processing
racks) on the network are locked to
the same derived sync source. Ensure
that any sync buffers or regenerators
feeding the racks are all referenced
from the same master source.
CALREC Putting Sound in the Picture
33
METADATA AND EMBER CONTROL
SMPTE2020 metadata can be
inserted into chosen Hydra2 SDI
output streams using a 3rd party
EMBER controller.
The EMBER controller can choose from
a list of metadata sets stored by H2O.
To make a metadata set available for
selection by the EMBER controller, the
metadata set needs to be imported into
H2O in the form of an XML file.
The Manage metadata page in H2O
displays a list of the metadata sets
available for selection. The Files “+” and
“-” buttons at the bottom of the screen
allow for files to be added and removed
from the list.
As well as inserting metadata into
SDI outputs, EMBER controllers can
selectively mute any of the audio channel
pairs within each SDI output.
EMBER controllers also have the ability to
change the active user memory on control
surfaces as well as changing audio I/O
patching on control surfaces by activating
and deactivating I/O port alias files. For
more information on user memories and
port aliasing, please refer to a console
operator manuals.
Please refer to the Hydra 2 installation
manual for more information on EMBER
controllers and connecting them to a
Hydra2 network.
34HYDRA2 Operator Manual
Using H20
HYDRA PATCHBAYS
Hydra patchbays (HPBs) allow
console operators to make selected
DSP audio outputs available on
the Hydra2 network, allowing other
Hydra2 users to access them as well
as allowing console input sources and
output feeds to be changed remotely.
HYDRA PATCHBAY - PATCHING OPTIONS
HPBs are virtual patchbays within the
Hydra2 domain. Like physical patchbays,
HPBs have a number of input ports which
are ‘hard wired’ to output ports. For port
patching purposes, Hydra Patchbay inputs
are destinations and Hydra Patchbay
outputs are sources.
When a source is patched to a Hydra
Patchbay input, it immediately becomes
available at the corresponding Hydra
Patchbay output. For example, if a console
operator patches a direct output to a
Hydra Patchbay input, the Direct Output
feed becomes available to all Hydra2
users (who have been granted access),
as the corresponding Hydra Patchbay’s
output.
There are two types of HPB: ‘console
specific’ and ‘shared’. Console specific
HPBs are available to the console that
they have been created for, plus H2O
and 3rd party controllers via SW-P-08.
Shared Hydra Patchbays are available
to all Hydra2 users who have been
granted access, plus H2O and 3rd party
controllers via SW-P-08. Consoles can
patch signals to their own or shared Hydra
Patchbay inputs in the same way they
patch to physical output ports.
Hydra Patchbays allow network
administrators (via H2O) to patch
console inputs and outputs (which have
been patched to Hydra Patchbay ports)
to physical I/O ports. H2O users can
choose physical input ports to connect
to console’s Hydra Patchbay inputs,
and physical output ports to connect
CALREC Putting Sound in the Picture
to console’s Hydra Patchbay outputs
allowing them to choose and change
console feeds and output destinations.
External routers, supporting the SW-P-08
protocol, can also have access to Hydra
patchbays enabling 3rd party control over
console patching.
Creating Hydra patchbays
Hydra patchbays are created from the
Hydra Patchbays tab within the H2O user
interface. The left hand side of the screen
shows a series of folders starting with
‘Shared Patchbays’ followed by a folder
for each console on the network. The
folders can be expanded to show existing
patchbays.
Default labels are given to the Hydra
Patchbay inputs and outputs which can
then be changed by entering text within
the User Label fields. This window has
two tabs, the second of which is used
for entering SW-P-08 mapping data if
required.
Once created, Hydra patchbays are
available for patching and can be
accessed from the H20 port patching
screen. The newly created Hydra
Patchbays also become available to
consoles. They appear ‘online’ within the
‘Edit Network’ screen of the console PC /
Touch Display interface from where they
can be added to the console’s Required
List to be used for port patching.
Select the folder within which you would
like to create a new Hydra Patchbay and
click the + button at the bottom of the list.
Enter a name for the patchbay along with
the quantity of ports required.
35
Port Sharing
Input and output port protection works
as normal when dealing with Hydra
Patchbays for both console and H2O
users. In situations when two or more
consoles are using the same feed from
a Hydra Patchbay it is possible for one
console to change the patching of the
other by changing the I/O box port which
is feeding the shared Hydra Patchbay
input, either through a Memory load, or
through changing the individual patch. In
these circumstances it is important that
the console operator understands the
contents of the Input/Output protection
dialogue before accepting any changes,
as these changes directly affect other
network users.
Console operators are given the
ability to change the source feeding a
HPB that is feeding other consoles to
add increased flexibility. However we
advise that all I/O box port to Hydra
Patchbay input patching is controlled
from H2O or a third party controller
to avoid unwanted changes to other
consoles’ source feeds.
HYDRA PATCHBAY - CONSOLE PATCHING CHANGE
HYDRA PATCHBAY - UN-PATCH
Un-patching
Under normal circumstances when I/O
box ports are un-patched, their input
settings (Mix Gain, SRC, 48 V) are reset
to their default values. However, when
using Hydra Patchbays it is possible to
un-patch a port at two points in the signal
chain, as shown in the figure on the right.
If the port is first un-patched at point 2,
the I/O box port’s input settings will be
retained, even when the port is also unpatched at point 1.
36HYDRA2 Operator Manual
Using H20
LABEL & SW-P-08 DATA IMPORT / EXPORT
Labels and SW-P-08 mapping data
for physical I/O ports and for Hydra
patchbays can be imported and
exported to / from H2O, reducing
the need for the same data to be
manually entered repeatedly on
different systems.
Clicking on the TOOLS button at the
bottom of the IO Box & Port Labels
screen, or the Hydra Patchbays screen
brings up import/export menus.
When exporting, you must select the I/O
boxes/Hydra patchbays to be included.
Data is then put into CSV format and
downloaded from the Control Processor
to the PC. Depending on the amount of
data being converted and downloaded,
this process may take some time.
The location of the downloaded CSV file
depends on the web-browser being used
to display H2O. If using Google Chrome,
as recommended by Calrec, the file
download progress is shown in the bottom
left hand corner and upon completion the
download button can be clicked to open
the file which can then be saved to the
desired location. The file is also saved to
the My Documents\Downloads folder.
Other browsers may ask for a location to
save the file to.
When importing a CSV file, select the file
location and then the data required from
the file. Depending on the file size, the
import process can take some time. Do
not interrupt this process by closing H2O
or resetting the Master Control processor.
A confirmation message is displayed upon
completion.
CALREC Putting Sound in the Picture
Editing CSV files
CSV files can be manually edited. Using
spreadsheet software to view the file
makes the data easier to read than using
a text editor. Many spreadsheet and CSV
specific applications are available, the
following describes how to import a CSV
file into Microsoft’s Excel -
MS EXCEL CSV FILE IMPORT STEPS
• From the menu across the top of the
Excel window, choose Data>Import
External Data>Import Data.
• Select the file to be imported, then in
the next step, ensure the “Delimited”
option is selected before clicking
NEXT.
• Select Comma as the delimiter
character and click NEXT.
• In the following step, all columns need
to be set to ‘text’ as the data format all columns can be selected together
by clicking on the left most column to
highlight, scrolling across to the right
then shift+click the right most column
to highlight all columns. Once all
columns are set to text, click Next.
The data should then be available,
displayed as a spreadsheet.
When you have finished editing, the file
should be saved as a .CSV file rather than
a .XLS file. Select Yes in the pop-up to
only save the active sheet. In the following
pop-up, click Yes again to keep the format
and omit incompatible features.
Only the data under the headers EDIT
Box Label, EDIT Port Label, Edit Port
Description, EDIT SW-P-08 Matrix,
EDIT SW-P-08 Level, and EDIT SW-P08 ID can be changed. DO NOT edit
any other data fields or the headers.
37
SW-P-08 CONFIGURATION
Input to output cross-point matrix
routing of Hydra2 ports and Hydra
Patchbays can be performed remotely
from 3rd party equipment supporting
the SW-P-08 protocol.
The SW-P-08 connection is made to
the router card in the processing rack
configured as the Master Router (the
same processing rack as the H2O
connection, but to the router card rather
than the Control Processor). Please refer
to the Hydra2 installation manual for
more detail on the SW-P-08 protocol and
connection.
The Hydra2 I/O ports that are to be used
with SW-P-08 need to be given matrix,
level and ID information. In the I/O Box
& Port Labels screen, select the SW-P08 Mapping tab at the top of the port
labelling area to bring up these fields
for each I/O port on a box by box basis.
To ensure any desired changes are not
lost, click on APPLY CHANGES before
changing the screen or viewing a different
I/O box port list.
SW-P-08 Matrix, Level and IDs can also
be given to Hydra patchbays, allowing the
remote control system to patch console
DSP outputs to physical output ports as
well as change which sources are feeding
console DSP inputs.
As well as setting values for the I/O
ports intended for remote control, SWP-08 values also need to be assigned
for ‘Digital Silence’ and ‘Source out
of Range’. Manufacturers refer to
these two instances differently and so
documentation for specific 3rd party
devices should be consulted. ‘Digital
Silence’ refers to unused patches, where
black or silent signals are patched to
unused destinations. ‘Source out of
Range’ refers to instances when a source
that is unknown to the 3rd party device
is patched to a destination. These values
are entered from the Control Protocols
38HYDRA2 Operator Manual
IO BOX & PORT LABELS, SW-P-08 MAPPING SCREEN
CONTROL PROTOCOLS SCREEN
screen. Again, ensure APPLY CHANGES
is clicked before navigating away from this
screen.
Within the IO Box & Port Labels screen,
and the Control Protocols screen, unsaved
changes are highlighted with a blue
background. If invalid or duplicated data
is entered against a source or destination,
the row will be highlighted red and
the APPLY CHANGES button will be
greyed out preventing the changes being
submitted.
The SW-P-08 data entered should
match that of the 3rd party controller’s
configuration* SW-P-08 and port label
data can be imported to and exported
from H2O as CSV files to reduce the
amount of manual data entry. Please see
the following section for guidance on CSV
file import / export.
*The exact format of SW-P-08 mapping data
may vary from system to system. Calrec uses a
“1 based” count - the first addresses in each field
being 1. Some systems start the count from 0,
and therefore an offset of 1 would be required
between the two sets of mapping data.
The Grass Valley Jupiter system counts
from 0 but also uses its physical level
numbers rather than SW-P-08 values in
its config. When entering data into H2O,
the SW-P-08 matrix value is the Grass
Valley physical layer value divided by 16
(rounded down to the nearest integer).
The SW-P-08 level is the remainder /
modulo of the Grass Valley physical layer
divided by 16. A 1 then needs to be
added to both values to cater for the count
offset:
For example:
A Grass Valley physical layer of 100 (decimal)
gives a Calrec SW-P-08 matrix value of 7
(100/16 = 6.25, rounded down = 6, +1=7), and
a Calrec SW-P-08 level value of 5 (100 mod 16 /
0.25 x 16 =4, +1=5)
Using H20
CALREC Putting Sound in the Picture
39
Calrec Audio Ltd
Nutclough Mill
Hebden Bridge
West Yorkshire
England UK
HX7 8EZ
Tel +44 (0)1422 842159
Fax +44 (0)1422 845244
Email [email protected]
calrec.com
(926-166 Iss.10)