1
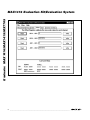
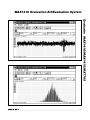
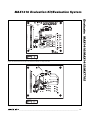
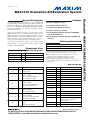
19-3084; Rev 1; 5/07
MAX1416 Evaluation Kit/Evaluation System
The MAX1416 evaluation kit (EV kit) is an assembled and
tested printed-circuit board (PCB) that demonstrates the
MAX1416 multichannel, 16-bit, sigma-delta data-acquisition system. Windows® 98/2000/XP-compatible software
provides a convenient user interface to exercise the features of the MAX1416.
Order the complete evaluation system (EV system)
(MAX1416EVC16) for a comprehensive evaluation of the
MAX1416 using a personal computer. Order the EV kit
(MAX1416EVKIT) if the 68HC16MODULE-DIP has been
purchased with a previous Maxim EV system, or for custom use in other microcontroller (µC)-based systems.
To evaluate the MAX1415, request a free sample of the
MAX1415EUE. To evaluate the MX7705, request a free
sample of the MX7705EUE.
Component Lists
MAX1416 EV System
PART
QTY
DESCRIPTION
MAX1416EVKIT
1
MAX1416 evaluation kit
68HC16MODULE-DIP
1
68HC16 µC module
USBTO232+
1
USB-to-COM port adapter board
+Denotes lead-free and RoHS-complaint.
Features
♦ Proven PCB Board Layout
♦ Complete Evaluation System
♦ Convenient On-Board Test Points
♦ Fully Assembled and Tested
♦ EV Kit Software Supports Windows 98/2000/XP
with RS-232/COM Port
♦ EV Kit Software Supports Windows 2000/XP with
USB Port
Ordering Information
TEMP RANGE
INTERFACE TYPE
MAX1416EVC16
PART
0°C to +70°C*
Windows software
MAX1416EVKIT
0°C to +70°C*
User supplied
*This limited temperature range applies to the EV kit PCB only.
The MAX1416 IC temperature range is -45°C to +85°C.
Note: The MAX1416 software is designed for use with the
complete EV system (MAX1416EVC16). It includes a
68HC16MODULE-DIP module, USBTO232, and a
MAX1416EVKIT. If the MAX1416 evaluation software is not
used, the MAX1416EVKIT board can be purchased by itself,
without the µC.
MAX1416 EV Kit
DESIGNATION
C1–C4, C10,
C11
C5
C6
C7, C8
C9, C12, C13
C14
QTY
DESCRIPTION
DESIGNATION
QTY
6
0.01µF, 10V X7R ceramic capacitors
(radial leaded)
H1
1
8-pin header
J1
1
2 x 20 right-angle socket
JU1
1
2-pin header
1
0.01µF ±10%, 50V X7R ceramic
capacitor (0603)
Taiyo Yuden UMK107B103KZ
TDK C1608X7R1H103KT
JU2
1
2-pin header
JU3
1
3-pin header
JU4
1
2-pin header
R1–R4
4
10Ω ±5% resistors (axial leaded)
R5, R6
2
TB1
1
10Ω ±5% resistors (1206)
0.200in 2-circuit screw terminal
TB2, TB3
2
U1
1
0.200in 3-circuit screw terminal
blocks
MAX1416EUE (16-pin TSSOP)
U2
1
MAX873ACSA
U3, U4
2
MAX1840EUB
Y1
1
4.9152MHz crystal (HC49/US),
parallel resonant, 20pF load
ECS 49-20-4
—
4
Shunts (JU1–JU4)
—
1
PCB: MAX1416 Evaluation Kit
1
2
3
1
4.7µF ±20%, 10V X5R ceramic
capacitor (1206)
Taiyo Yuden LMK316BJ475ML
TDK C3216X5R1A475MT
22pF ±5%, 50V C0G ceramic
capacitors (0603)
TDK C1608C0G1H220J
0.1µF ±10%, 50V X7R ceramic
capacitors (0805)
Taiyo Yuden UMK212BJ104KG
TDK C2012X7R1H104KT
1µF, 10V X7R ceramic capacitor
(0805)
TDK C2012X7R1A105K
DESCRIPTION
Windows is a registered trademark of Microsoft Corp.
________________________________________________________________ Maxim Integrated Products
For pricing, delivery, and ordering information, please contact Maxim/Dallas Direct! at
1-888-629-4642, or visit Maxim’s website at www.maxim-ic.com.
1
Evaluate: MAX1416/MAX1415/MX7705
General Description
Evaluate: MAX1416/MAX1415/MX7705
MAX1416 Evaluation Kit/Evaluation System
Component Suppliers
SUPPLIER
PHONE
FAX
WEBSITE
Taiyo Yuden
800-348-2496
847-925-0899
www.t-yuden.com
TDK Corp.
847-803-6100
847-390-4405
www.component.tdk.com
Note: Indicate that you are using the MAX1416 when contacting these component suppliers.
Quick Start
Recommended Equipment (USB Port/PC
Connection Option)
Before beginning, the following equipment is needed:
• MAX1416 EV system:
MAX1416 EV kit
68HC16MODULE-DIP
USBTO232 (USB cable included)
• DC power supply, +7VDC to +12VDC at 0.25A
• DC power supply, +5VDC
• A user-supplied Windows 2000/XP computer with an
available USB port to connect to the USBTO232
board
Note: In the following sections, software-related items
are identified by bolding. Text in bold refers to items
directly from the EV kit software. Text in bold and
underlined refers to items from the Windows 2000/XP
operating system.
Procedure
The MAX1416 EV kit is fully assembled and tested.
Follow the steps below to verify board operation.
Caution: Do not turn on the power until all connections are completed.
1) Visit the Maxim website (www.maxim-ic.com) to
download the latest version of the USBTO232 User
Guide. Follow the steps in the USBTO232 User Guide
Quick Start section and return to step 2 of this Quick
Start section when finished.
2) Ensure that jumpers JU1, JU2, and JU4 are closed
and that jumper JU3 is in the 1-2 position (see Table
1 for jumper settings).
3) Carefully connect the boards by aligning the 40-pin
header of the MAX1416 EV kit with the 40-pin connector of the 68HC16MODULE-DIP module. Gently
press them together. The two boards should be flush
against one another.
4) Connect the +5VDC power source to the MAX1416
EV kit at terminal block TB1. Observe the polarity
marked on the board.
2
5) Connect the +7VDC to +20VDC power source to the
µC module at the terminal block located next to the
ON/OFF switch, along the top-edge of the µC module. Observe the polarity marked on the board.
6) Connect the USBTO232 board to the
68HC16MODULE-DIP module if you have not done
so already.
7) The MAX1416 EV kit software should have already
been downloaded and installed in the USBTO232
Quick Start.
8) Start the MAX1416 program by opening its icon in the
Start | Programs menu.
9) Turn on the power supplies and slide SW1 to the ON
position on the 68HC16MODULE-DIP module. Press
the OK button to automatically connect and download the KIT1416.C16 file to the module.
10) When the main window appears (Figure 1), click
Initialize and then Calibrate.
11) Apply input signals between AIN1+ and AIN1-. Tie
the unused analog input (AIN2+ and AIN2-) to GND.
Click Read or check Auto Read. Observe the code
and voltage readout on the screen.
Recommended Equipment (RS-232-to-COM
Port/PC Connection Option)
Before beginning, the following equipment is needed:
• MAX1416 EV system:
MAX1416 EV kit
68HC16MODULE-DIP
• DC power supply, +7VDC to +12VDC at 0.25A
• DC power supply, +5VDC
• A user-supplied Windows 98/2000/XP computer with
an available serial (COM) port
• 9-pin I/O extension cable
Note: In the following sections, software-related items are
identified by bolding. Text in bold refers to items directly
from the EV kit software. Text in bold and underlined
refers to items from the Windows 98/2000/XP operating
system.
_______________________________________________________________________________________
MAX1416 Evaluation Kit/Evaluation System
5) Connect the +5VDC power source to the MAX1416
EV kit at terminal block TB1. Observe the polarity
marked on the board.
6) Connect the +7VDC to +20VDC power source to the
µC module at the terminal block located next to the
on/off switch, along the top-edge of the µC module.
Observe the polarity marked on the board.
7) Connect a cable from the computer’s serial port to
the µC module. If using a 9-pin serial port, use a
straight-through, 9-pin female-to-male cable. If the
only available serial port uses a 25-pin connector, a
standard 25-pin to 9-pin adapter is required. The
EV kit software checks the modem status lines
(CTS, DSR, and DCD) to confirm that the correct
port has been selected.
8) Start the MAX1416 program by opening its icon in the
Start | Programs menu.
9) Turn on the power supplies and slide SW1 to the ON
position. Select the correct serial port and press the
OK button. The program will automatically download
KIT1416.C16 to the module.
10) When the main window appears (Figure 1), click
Initialize and then Calibrate.
11) Apply input signals between AIN1+ and AIN1-. Tie
the unused analog input (AIN2+ and AIN2-) to GND.
Click Read or check Auto Read. Observe the code
and voltage readout on the screen.
Detailed Description
of Software
The main window of the evaluation software controls the
features of the MAX1416. The Measurement tab is used
to initialize, calibrate, and read data. Prior to reading the
MAX1416, select the appropriate MCLK master-clock
input source and click Initialize. The FS1 and FS0 bits in
the clock register determine the data rate.
The Initialize button writes the clock register INT,
CLKDIS, CLKDIV, CLK, and FS bits, and then writes to
the setup register with FSYNC = 1. The exact value
written to the clock register depends on the MCLK
input setting, and can be viewed by bringing up the
Clock tab after initialization.
The Calibrate button first writes the setup register with
FSYNC = 1, then writes setup with MD = 01 (self-calibration mode) and FSYNC = 0. After DRDY returns low,
the MAX1416 setup register automatically returns to
MD = 00 and FSYNC = 0.
The Setup, Clock, Offset, and Gain tabs provide
read/write access to each of the registers. See
Figures 2–5.
The Comms and Data (Figure 6) tab provides access
to the Standby bit. The comms registers RS2, RS1,
RS0, and R/W bits are automatically set by each register’s read and write buttons. The channel select bits
CH1 and CH0 are determined by which channel is
selected on the Measurement tab.
Sampling
To collect data, go to the Measurement tab and click
Sample. Select the sample size and click Begin
Sampling. After the samples have been collected, the
data is automatically uploaded to the host and is
graphed. Once displayed, the data can be saved to a
file (optional).
Saving Graphs to Disk
Data in the real-time graph and in the sampled data
graphs can be saved to a file (Figures 7–8). Only the
raw output codes are saved, but voltages can be
inferred based on the reference voltage and the maximum code value.
Evaluating Power-Down Mode
To enter standby mode, first make sure that Auto Read
is not checked in the Measurement tab sheet. Then go
to the Comms and Data tab and check Power Down,
then click Write.
_______________________________________________________________________________________
3
Evaluate: MAX1416/MAX1415/MX7705
Procedure
The MAX1416 EV kit is fully assembled and tested.
Follow the steps below to verify board operation.
Caution: Do not turn on the power until all connections are completed.
1) Visit the Maxim website (www.maxim-ic.com/evkitsoftware) to download the latest version of the EV kit software. Save the EV kit software to a temporary folder
and uncompress the file (if it is a .zip file).
2) Install the MAX1416 EV kit software on your computer
by running the INSTALL.EXE program. The program
files are copied and icons are created for them in the
Windows Start | Programs menu.
3) Ensure that jumpers JU1, JU2, and JU4 are closed
and that jumper JU3 is in the 1-2 position (see Table
1 for jumper settings).
4) Carefully connect the boards by aligning the 40-pin
header of the MAX1416 EV kit with the 40-pin connector of the 68HC16MODULE-DIP module. Gently
press them together. The two boards should be flush
against one another.
Evaluate: MAX1416/MAX1415/MX7705
MAX1416 Evaluation Kit/Evaluation System
Reference Voltage
The evaluation software assumes a 2.500V reference
voltage, unless otherwise specified. To override this
value, go to the Measurement tab and type the new
reference voltage next to REF voltage.
Software Listing
Table 1. Jumper Functions
JUMPER
JU1
The EV kit software disk contains the driver source and
header file. Refer to DRV1416.cpp and DRV1416.h.
Detailed Description
of Hardware
The MAX1416 (U1) is a multichannel, 16-bit, sigmadelta data-acquisition system. Resistors R1–R4 and
C1–C4 act as anti-aliasing filters. The MAX873 (U2) is a
2.5V reference. C14 ensures the MAX873’s stability for
arbitrary values of input capacitor C11. Level translators U3 and U4 allow the kit to support the 3V
MAX1415, as well as the 5V MAX1416. The input signal
can be applied directly to terminal blocks TB2 and TB3.
C5 and C6 bypass the analog-to-digital converter’s
power supply. See Figure 9, and refer to the MAX1416
data sheet.
Evaluating the MAX1415
To evaluate the MAX1415, request a free sample of the
MAX1415EUE and replace U1. Follow the Quick Start
procedure, with the following exceptions:
• In step 1, leave jumpers JU1 and JU2 open.
• In step 3, apply a +3VDC power supply (instead of
+5V) to TB1. Apply an external +1.225VDC differential reference between TB3 pins 3 and 2.
• After step 10, go to the software’s Measurement tab
and type the new reference voltage of 1.225 next to
REF voltage.
Evaluating the MX7705
To evaluate the MX7705, request a free sample of the
MX7705EUE and replace U1. The MX7705 is similar to
the MAX1415/1416 except it does not support internal
clock mode (INT must always be zero).
Using an External Reference
To use an external reference, remove the shunts from
JU1 and JU2, and connect a differential reference
between TB3 pins 3 and 2. The evaluation software
assumes a 2.500V reference voltage, unless otherwise
specified. To override this value, go to the
Measurement tab and type the new reference voltage
next to REF voltage.
SHUNT
POSITION
Closed*
Open
JU2
Closed*
Open
1-2*
Open
JU3
2-3
Closed*
JU4
Open
FUNCTION
U2 (MAX873) supplies REF+
reference voltage
REF+ must be externally connected
REF- connects to ground at U2
REF- must be externally connected
MCLKIN connects to crystal Y1
MCLKIN is not connected
MCLKIN connects to ground
(MAX1416/MAX1415 internaloscillator mode only)
MCLKOUT drives crystal Y1
MCLKOUT is not connected
(MAX1416/MAX1415 internaloscillator mode only)
*Default position.
Troubleshooting
Problem: No output measurement. System seems to
report zero voltage, or fails to make a measurement.
Check VDD supply voltage at TB1. The EV kit requires
a separate supply in addition to the supply on the
microcontroller module. Check the reference voltage
using a digital voltmeter. Use an oscilloscope to verify
that the CS, SCLK, and DIN waveforms are correct. If
the DRDY signal is pulsing, then the software has successfully initialized the MAX1416 and conversions have
been triggered.
Problem: Cannot see MCLK waveform on oscilloscope.
When using an external crystal, the MCLKIN and
MCLKOUT nodes are very sensitive to extra load
capacitance. Connecting a typical 10x scope probe
effectively doubles the load capacitance from 20pF to
40pF, which can slow down or even halt oscillation.
When using the internal oscillator (clock register INT =
1 and CLKDIS = 0), the oscillator signal is visible on the
MCLKOUT pin. In this mode, MCLKOUT can be measured using a typical 10x scope probe.
QSPI is a trademark of Motorola, Inc.
4
_______________________________________________________________________________________
MAX1416 Evaluation Kit/Evaluation System
Problem: Internal oscillator does not work.
The internal-oscillator mode is a feature of the
MAX1416/MAX1415 only, and is not supported on the
MX7705. The MX7705 requires an external clock, and
can only be used with INT = 0. To observe the internal
oscillator driving the MCLKOUT pin, U1 must be a
MAX1416 or MAX1415, and the clock register must
have INT = 1 and CLKDIS = 0.
Problem: Measurements are erratic or unstable or
there is poor accuracy.
Problem: Unacceptable errors when measuring a
transducer.
Although most signal sources can be connected directly to the MAX1416’s analog input, some high-impedance signal sources may require using the internal
input buffer (BUF = 1).
Problem: PDA hot-sync software or other device
software interferes with EV kit software.
COM ports can only be used by one device at a time.
Disable PDA hot-sync manager.
Check the reference voltage using a digital voltmeter.
Use an oscilloscope to check for noise. When probing
for noise, keep the oscilloscope ground-return lead as
short as possible, preferably less than 1/2 in (10mm).
_______________________________________________________________________________________
5
Evaluate: MAX1416/MAX1415/MX7705
Figure 1. MAX1416 EV Kit Software Main Window (Measurement Tab)
Evaluate: MAX1416/MAX1415/MX7705
MAX1416 Evaluation Kit/Evaluation System
Figure 2. MAX1416 EV Kit Software Main Window (Setup Tab)
6
_______________________________________________________________________________________
MAX1416 Evaluation Kit/Evaluation System
Evaluate: MAX1416/MAX1415/MX7705
Figure 3. MAX1416 EV Kit Software Main Window (Clock Tab)
_______________________________________________________________________________________
7
Evaluate: MAX1416/MAX1415/MX7705
MAX1416 Evaluation Kit/Evaluation System
Figure 4. MAX1416 EV Kit Main Window (Offset Tab)
8
_______________________________________________________________________________________
MAX1416 Evaluation Kit/Evaluation System
Evaluate: MAX1416/MAX1415/MX7705
Figure 5. MAX1416 EV Kit Main Window (Gain Tab)
_______________________________________________________________________________________
9
Evaluate: MAX1416/MAX1415/MX7705
MAX1416 Evaluation Kit/Evaluation System
Figure 6. MAX1416 EV Kit Main Window (Comms and Data Tab)
10
______________________________________________________________________________________
MAX1416 Evaluation Kit/Evaluation System
Evaluate: MAX1416/MAX1415/MX7705
Figure 7. MAX1416—Saving Graphs to Disk
Figure 8. MAX1416—Saving Graphs to Disk
______________________________________________________________________________________
11
12
Figure 9. MAX1416 EV Kit Schematic
______________________________________________________________________________________
J1-33
J1-32
J1-30
J1-28
J1-26
J1-25
J1-24
J1-23
J1-22
J1-21
J1-20
J1-19
J1-18
J1-17
J1-16
J1-15
J1-14
J1-13
J1-12
J1-11
J1-10
J1-9
J1-1
J1-2
J1-3
J1-4
N.C.
N.C.
N.C.
N.C.
N.C.
N.C.
N.C.
N.C.
N.C.
N.C.
N.C.
N.C.
N.C.
N.C.
N.C.
J1-31
J1-35
J1-27
J1-36
J1-37
J1-8
J1-7
J1-38
J1-40
N.C.
N.C.
J1-39
J1-34
J1-29
J1-6
J1-5
N.C.
N.C.
N.C.
N.C.
N.C.
CONNECTOR
J1
N.C.
N.C.
N.C.
N.C.
N.C.
N.C.
TB2
TB2-3
TB2-2
TB2-1
TERMINAL
BLOCK
C12
0.1μF
+5V
H1-6
RESET
H1-8
CS
H1-7
SCLK
+5V
+5V
Y1
4.9152MHz
10
9
8
7
6
5
4
3
2
1
I/O
VCC
CLK
RST
GND
SHDN
RIN
CIN
DVCC
DATA
R2
10Ω
R1
10Ω
R3
10Ω
C8
22pF
C7
22pF
JU3
MAX1840
U4
MAX1840
U3
C2
0.01μF
C1
0.01μF
C3
0.01μF
JU4
2
3
1
I/O
DATA
DVCC
CIN
RIN
SHDN
GND
RST
CLK
1
2
3
4
5
6
7
8
9
10
AIN1-
AIN1+
AIN2+
RESET
CS
U1
REF+
REF-
AIN2-
DRDY
DOUT
DIN
VDD
GND
RESET
DOUT
DRDY
DIN
SCLK
CS
MAX1416
MCLKOUT
MCLKIN
SCLK
VCC
8
7
6
5
4
3
2
1
9
10
11
12
13
14
15
16
C13
0.1μF
C11
0.01μF
C10
0.01μF
C4
0.01μF
C5
0.01μF
DRDY
H1-5
DOUT
H1-4
DIN
H1-3
H1-1
R5
10Ω
H1-2
R6
10Ω
JU1
JU2
R4
10Ω
C9
0.1μF
C14
1μF
TEST
MAX873
U2
TB3-3
TB3-2
TERMINAL
BLOCK
TB3-1
TB3
8
TEST
2
7
VIN
N.C.
6
3
TEMP VOUT
4
5
GND TRIM
1
C6
4.7μF
TB1-2
TB1-1
TERMINAL
BLOCK
TB1
Evaluate: MAX1416/MAX1415/MX7705
MAX1416 Evaluation Kit/Evaluation System
MAX1416 Evaluation Kit/Evaluation System
Evaluate: MAX1416/MAX1415/MX7705
Figure 10. MAX1416 EV Kit Component Placement Guide—Component Side
Figure 11. MAX1416 EV Kit PCB Layout—Component Side
______________________________________________________________________________________
13
Evaluate: MAX1416/MAX1415/MX7705
MAX1416 Evaluation Kit/Evaluation System
Figure 12. MAX1416 EV Kit PCB Layout —Solder Side
Revision History
Pages changed at Rev 1: 1–10, 13, 14
Maxim cannot assume responsibility for use of any circuitry other than circuitry entirely embodied in a Maxim product. No circuit patent licenses are
implied. Maxim reserves the right to change the circuitry and specifications without notice at any time.
14 ____________________Maxim Integrated Products, 120 San Gabriel Drive, Sunnyvale, CA 94086 408-737-7600
© 2007 Maxim Integrated Products
is a registered trademark of Maxim Integrated Products, Inc.