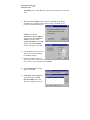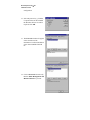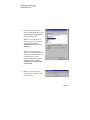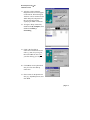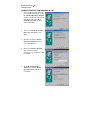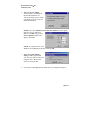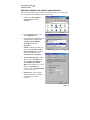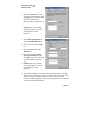
1
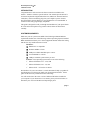
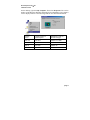
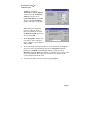
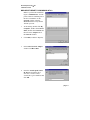
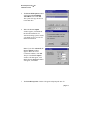
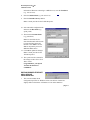
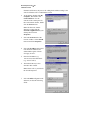
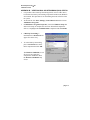
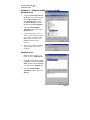
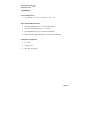
SPEED TOUCH PC
ADSL PC Network Interface Card
Installation Guide
Microsoft Windows 95A, 98 and NT4.0
VERSION 2.1.1 – for CD-ROM Installation
November 9, 1999
SPEED TOUCH PC
ADSL PC Network Interface Card
Installation Guide
Microsoft Windows 95A, 98 and NT4.0
VERSION 2.1.1– for CD-ROM Installation
November 9, 1999
TABLE OF CONTENTS
Introduction.......................................................................................................... 1
System Requirements........................................................................................... 1
Determining Your Service Type.......................................................................... 3
Technical Support................................................................................................ 3
Before Installation................................................................................................ 4
Hardware Installation........................................................................................... 4
Software Installation and Service configuration.................................................. 4
Point to Point Protocol over ATM (PPPoA) or (RFC 2364) .......................... 5
Windows 95A ........................................................................................... 5
Windows 95B............................................................................................ 7
Windows 98, 98A ..................................................................................... 9
Windows NT 4.0..................................................................................... 14
PPPoA ADSL Network Connection ....................................................... 21
Bridged Ethernet Service or (RFC 1483) ................................................... 23
Windows 95A ......................................................................................... 23
Windows 95B.......................................................................................... 25
Windows 98, 98A ................................................................................... 27
Bridged Ethernet ADSL Service Configuration...................................... 29
Windows NT 4.0..................................................................................... 31
Editing Bridged Ethernet ADSL Service Configuration......................... 34
Diagnostic Tools ................................................................................................ 36
Appendix A – Upgrade Microsoft DUN Version 1.3 ........................................ 37
Appendix B – Verifying Dial-Up Networking (DUN) Status ........................... 38
Appendix C – Removing Speed Touch PC NIC Drivers................................... 39
Windows 95, 98.......................................................................................... 39
Windows NT4.0 ......................................................................................... 39
Appendix D – System Requirements & Compliance Information..................... 41
Appendix E – Copyright & Regulatory Information ......................................... 42
Alcatel Speed Touch™ PC
Installation Guide
INTRODUCTION
Congratulations! You’ll soon have the fastest connection available to the
Internet – thanks to Alcatel’s Speed Touch PC. The Alcatel Speed Touch PC is
an internal Asymmetric Digital Subscriber Line (ADSL) PC Network Interface
Card (NIC), which conveniently plugs into your computer system. Alcatel’s
Speed Touch PC connects directly to your telephone line via a standard RJ-11
connector and is fully plug-and-play compatible.
This guide is designed to walk you through the installation of your Speed Touch
PC in the easiest and quickest way possible. Please follow the instructions
carefully.
SYSTEM REQUIRMENTS
Make sure your PC system meets ALL of the following minimum hardware
requirements and has one of the following software Operating Systems installed.
Note: Install this board only in UL Listed equipment that has instructions stating
that the user may install and remove boards.
Hardware:
IBM PC/AT or compatible
Pentium 100Mhz or faster
30Mbytes available hard disk space or more
2x CD-ROM drive or better
32Mbyte available system memory or more
Software: Your Operating System must be one of the following:
Microsoft Windows 95.x – 95A, 95B
Microsoft Windows 98.x – 98, 98A
Microsoft NT – NT 4.0 Service Pack 3
Provided here for your convenience is a work sheet that will help you gather all
the information you will need to install your Alcatel Speed Touch PC. Please
gather all the necessary information before continuing.
You will need to know the exact version of Microsoft Windows installed in
your computer. If you do not know or are unsure, please proceed as follows to
determine your version of the Microsoft Operating System.
page 1
Alcatel Speed Touch™ PC
Installation Guide
On the desktop, right click My Computer. Then select Properties. The version
number of the Microsoft Windows Operating System installed in your computer
will be displayed. Refer to the following table for more detailed information.
Windows
Version
System Description on
System Properties
Official Release Name (on
Microsoft Web page)
Win 95A
4.00.950A
Windows 95 OSR1
Win 95B
4.00.950B
Windows 95 OSR2
Win 98
4.10.1998
Window 98
Win 98A
4.10.2222A 2nd
Windows 98 2nd Edition
page 2
Alcatel Speed Touch™ PC
Installation Guide
DETERMINING YOUR SERVICE TYPE
Contact your Internet Service Provider (ISP) for your service type and
connection configuration. Your service type is one of the following:
1) Bridged Ethernet Service or (RFC 1483)
2) Point to Point Protocol over ATM (PPPoA) or (RFC 2364)
⇒ If your service is Bridged Ethernet you will need to know the following:
IP Address
Subnet Mask
Gateway
(Domain Name Service) DNS Host
DNS Domain
1DNS Server
2DNS Server
3DNS Server
The values of VPI and VCI
⇒
.
.
.
.
.
.
.
.
.
.
.
.
.
.
.
.
.
.
VPI = ____
VCI =______
Default VPI=0, VCI=35
If your service is PPPoA you will need to know the following:
User Name
Password
Logon Domain
The values of VPI and VCI
VPI = ____
VCI =______
Default VPI=0, VCI=35
TECHNICAL SUPPORT
•
If you have questions regarding your PC system and the Microsoft
Windows Operating System, please contact your original PC manufacturer
or Microsoft for assistance.
•
If you have questions regarding Speed Touch PC, please refer to the Speed
Touch PC User Manual contained on the Alcatel CD supplied, or visit the
Web site: www.alcateldsl.com
page 3
Alcatel Speed Touch™ PC
Installation Guide
BEFORE INSTALLATION
If you are installing PPPoA service for Win95A, 95B or Bridged Ethernet
service for Win95A, you need to upgrade your Dial-Up Networking (DUN)
application to version 1.3 or above. Please refer to Appendix A on how to
upgrade your system’s DUN.
HARDWARE INSTALLATION
To install the Alcatel Speed Touch PC in your PC, proceed through the
following steps:
WARNING! To avoid possible damage to your Speed Touch PC card you
need to use an anti-static grounding device or hold onto the metal chassis of the
PC to provide anti-static grounding.
1.
2.
3.
4.
5.
6.
7.
8.
9.
Shut down the system and switch the power off.
Unplug the AC power cable from the PC.
Remove the cover from the PC chassis.
Unscrew the “slot cover bracket” from an unused PCI slot.
Insert the card into an empty PCI slot.
Firmly press the Speed Touch PC card into the
slot and secure the card to the chassis with the
chassis bracket screw.
Connect one end of a phone cable to the RJ-11
port on the Speed Touch PC card and plug the
other end of the cable into the ADSL data service.
Plug the power cable back into the PC system.
Power-up the PC and proceed to software installation.
SOFTWARE INSTALLATION AND SERVICE CONFIGURATION
NOTE: You may need the Microsoft Windows Operating System installation
files (CAB files) to complete the installation. The CAB files are contained in
the Microsoft’s system CD. Some systems may have already installed the CAB
files to the hard drive, but you should have the Microsoft CD handy just in case.
page 4
Alcatel Speed Touch™ PC
Installation Guide
TO INSTALL POINT TO POINT PROTOCOL OVER ATM SERVICE
Win95A
go to page 5
Win95B
go to page 7
Win98, 98A
go to page 9
NT 4.0
go to page 14
TO INSTALL BRIDGED ETHERNET SERVICE
Win95A
go to page 23
Win95B
go to page 25
Win98, 98A
go to page 27
NT 4.0
go to page 31
POINT TO POINT SERVICE FOR WINDOWS 95A
1.
After installing the Alcatel Speed
Touch PC card, power on the PC
system. The Hardware Wizard
will detect the card as a PCI
Network Controller. Select the
Driver from disk provided by
hardware manufacturer option.
Click OK.
2.
Insert the Alcatel Speed Touch
PC Driver CD into the drive.
3.
The Install From Disk window
appears. Enter the <CD drive
letter> :\PPPoA9x (e.g.
D:\PPPoA9x), then click OK.
4.
When the Service Option window
appears, click Next for the default
installation. For Advanced
settings, please consult your
ADSL service provider for
detailed information.
page 5
Alcatel Speed Touch™ PC
Installation Guide
NOTE: If you clicked
Advanced, the Service Options
window shows the Connection
Address. Enter the service
Connection Address, click OK.
The previous Service Option
window will appear, click Next.
NOTE: During the installation
process you may be asked to
insert your Windows 95. Insert
the Windows 95 CD into the CD
drive and click OK.
NOTE: If during the file
copying process a file is reported
as “not found” enter the path
<CD Drive letter> :\Win95 (e.g.
D:\Win95)
5.
At the conclusion of the Speed Touch PC driver installation, the Diagnostic
Tools icon is active and monitoring connectivity. The Diagnostic Tools –
found on the task bar – with blinking (or solid) Black or Green lights
indicates a good connection. Diagnostic Tools with Red lights indicate a
connection error or driver load error. Verify that the cable is properly
connected to the data port of the service and the Speed Touch PC card.
6.
You must now make a network connection, go to page 21.
page 6
Alcatel Speed Touch™ PC
Installation Guide
POINT TO POINT SERVICE FOR WINDOWS 95B
1.
After installing the Alcatel Speed Touch PC card, power-up the PC
system. The Hardware wizard will detect the Alcatel Speed Touch PC as a
PCI Network Controller, click Next
2.
Insert the Alcatel Speed Touch
PC Device Driver CD into the
CD drive. Then click Other
Locations.
Note: If the driver is not detected,
click Back, insert the Speed
Touch PC disk, then click
NEXT.
3.
When Select Other Location
window appears, enter <CD drive
letter> :\PPPoA9x (e.g.
D:\PPPoA9x) and click OK.
4.
The Update Device Driver
Wizard window appears. Click
Finish. The Insert Disk window
appears. Click OK.
5.
The Copying Files window
appears. Enter <CD drive letter>
:\PPPoA9x (e.g. D:\PPPoA9x)
and click OK.
6.
When the Service Option window
appears, click Next for the default
installation. For Advanced
settings, please consult your
ADSL service provider for
detailed information.
page 7
Alcatel Speed Touch™ PC
Installation Guide
NOTE: If you clicked
Advanced, the Service Options
window shows the Connection
Address. Enter the service
Connection Address, click OK.
The previous Service Option
window will appear, click Next.
Note: During the installation
process you may be asked to
insert your Windows 95. Insert
the Windows 95 CD into the CD
drive and click OK.
7.
The Copying Files window will
now appear. Enter <CD driver
letter> :\WIN95 (e.g. D:\WIN95)
and click OK.
8.
At the conclusion of the Speed Touch PC driver installation, the Diagnostic
Tool icon is active and monitoring connectivity. Diagnostic Tool with
blinking or solid Black or Green lights indicates a good connection.
Diagnostic Tool with Red lights indicates a connection error or driver load
error. Verify that the cable is properly connected to the data port of the
service and Speed Touch PC card.
9.
You must now make a network connection, go to page 21.
page 8
Alcatel Speed Touch™ PC
Installation Guide
POINT TO POINT SERVICE FOR WINDOWS 98, 98A
1.
After installing the Speed Touch PC card and restarting the system, the
Add New Hardware Wizard window will automatically appear and
indicate that a new PCI Network Controller has been found. Click Next.
2.
Then select Search for the best
driver for your device.
(Recommended), click Next.
3.
Insert the CD labeled Alcatel
Speed Touch PC Driver into
your CD drive.
4.
Then select Specify a location
and enter <CD drive letter>
:\PPPoA9x (e.g. D:\PPPoA9x)
and click OK. Click Next.
5.
The Add New Hardware
Wizard will find the Alcatel
SPEED TOUCH PC driver.
Click Next.
page 9
Alcatel Speed Touch™ PC
Installation Guide
6.
When the Service Option
window appears, click Next for
the default installation. For
Advanced settings, please consult
your ADSL service provider for
detailed information.
NOTE: If you clicked Advanced,
the Service Options window
shows the Connection Address.
Enter the service Connection
Address, click OK. The previous
Service Option window will
appear, click Next.
7.
Additional files are copied from
the Speed Touch PC disk to the
hard drive. In addition, files are
now copied from the Windows
CD (system CAB files) to the
hard drive.
8.
If prompted to insert the CD do so
at this time then click OK. Enter
the <CD drive Letter>: \Win98
(e.g. D:\Win98) and click OK.
9.
At the conclusion of the Speed
Touch PC driver installation,
click Finish.
10. For the PC system to properly set
up the Speed Touch PC, a system
Restart is required. Click Yes.
page 10
Alcatel Speed Touch™ PC
Installation Guide
11. After restarting the system, the Diagnostic Tools icon is active and
monitoring connectivity. The Diagnostic Tools – found on the task bar –
with blinking (or solid) Black or Green lights indicate a good connection.
Diagnostic Tools with Red lights indicate a connection error or driver load
error. Verify that the cable is properly connected to the data port of the
service and Speed Touch PC card.
12. You must now make a dial-up
network connection. At the task
bar, click on the Start icon, and
then select Programs,
Accessories, Communications,
followed by Dial-Up
Networking. Double-click the
Make New Connection icon.
Note: Another dialog window
may prompt for the entry of the
Area Code if this is a first time
Dial-Up Network connection.
Enter the Area code and click
OK.
13. Enter the connection name (e.g.
My Connection) and set the
connection device to the Alcatel
SPEED TOUCH PC.
NOTE: use the scroll down menu
to locate Alcatel SPEED
TOUCH PC; then click Next.
14. Enter the Host Name or IP
Address if provided by your ISP,
otherwise enter (0) zero, and then
click Next.
page 11
Alcatel Speed Touch™ PC
Installation Guide
15. Make New Connection is
complete. Click Finish.
16. The new connection will appear
in the Dial-Up Networking
window.
17. Double-click the My Connection
icon to begin a Dial-Up session.
18. Enter the User Name and
Password supplied by the
Internet service provider. Click
Connect.
19. The message Logging on to
network confirms a valid user
name, password, and VPN IP
address. Please wait for the
Connection Established window
before proceeding.
Note: If logon domain is required,
enter username, password and
logon domain supplied by your
ISP.
page 12
Alcatel Speed Touch™ PC
Installation Guide
20. The PPPoA service connection is
now established. Click Close and
the PPPoA icon appears on the
task bar.
Congratulations, you are
done. Your Speed Touch to
the Internet is established!
page 13
Alcatel Speed Touch™ PC
Installation Guide
POINT TO POINT SERVICE FOR WINDOWS NT 4.0
Note: To perform the installation
logon as Administrator. Also the
TCP/IP protocol must be installed
prior to the driver installation.
1.
At the desktop, double click My
Computer, then double click
Control Panel.
2.
In the Control Panel window,
double click the Network icon
then select the Adapters tab.
3.
Click Add (to add new adapters).
4.
In the Select Network Adapter
window click Have Disk.
5.
Insert the Alcatel Speed Touch
PC Device Driver CD into the
CD-ROM drive, enter the < CD
drive letter> :\PPPoANT4 (e.g.
D:\PPPoANT4), then click OK.
6.
The Select OEM Option window
will find the Alcatel SPEED
page 14
Alcatel Speed Touch™ PC
Installation Guide
TOUCH PC driver, Click OK. The system will copy the drivers to the hard
drive.
7.
When the Service Option window appears, click Next for the default
installation. For Advanced settings, please consult your ADSL service
provider for detailed information.
NOTE: If you clicked
Advanced, the Service Options
window shows the Connection
Address. Enter the service
Connection Address. Click OK.
The previous Service Option
window will appear, click next.
8.
Next the Remote Access Services
(RAS) will need to be installed.
Click OK to continue.
9.
Insert the Windows NT4.0 CD
into the drive and in the space provided enter the path <CD drive
letter>:\i386 (e.g. D:\i386) then click Continue.
10. The Add RAS Device window
appears. Click OK
11. The Remote Access Setup will
appear showing the Alcatel
Speed Touch PC card. Click
Network to display the network
page 15
Alcatel Speed Touch™ PC
Installation Guide
configuration.
12. Select the protocol (e.g. TCP/IP),
if a protocol has not been loaded
the Windows NT 4.0 CD will be
required. Click OK.
13. The Network window will appear
at the conclusion of the
installation to confirm installation
of the Alcatel SPEED TOUCH
PC.
14. Click on Protocols tab and verify
that the ADSL Management and
Monitor Interface is present.
page 16
Alcatel Speed Touch™ PC
Installation Guide
15. Still in the Network window,
click on the Services tab to verify
that the Remote Access Service
is present. Click Close.
Note: To review the Network
window properties at any time,
right-click the Network
Neighborhood icon and select
Properties.
Note: If no previous network
devices have been installed, then
the Network Neighborhood icon
will not be present on the
desktop. To open the Network
window, double-click My
Computer then Control Panel
then Network.
16. The PC system needs to be
restarted for the changes to take
effect. Click Yes
page 17
Alcatel Speed Touch™ PC
Installation Guide
17. After the system restarts the
Diagnostic Tools icon will appear
on the task bar. When the Speed
Touch PC card is connected to the
ADSL data port, both panels of
the icon will appear black
signifying an ADSL connection.
18. To begin a dial-up connection,
double-click My Computer, then
double-click Dial-Up
Networking.
19. If this is the first dial-up
connection created enter an area
code (e.g. 408) for your region,
then click Close. If this is not
your first dial-up, go to step 23.
20. Click OK to create a phonebook
entry for a first time dial-up
connection.
21. Enter a name for the phonebook
entry (e.g. MyDialUpServer) and
click Next.
page 18
Alcatel Speed Touch™ PC
Installation Guide
22. When the Server window appears
click Next.
23. The Dial-Up Networking window prompts for the phone number of the
dial-up server. Unless instructed to enter a phone number by the ISP, enter
zero “0” Still at the Dial-Up Networking window, click More.
24. The Edit Phonebook Entry
window appears. Select the
Security tab and verify that
“Accept only Microsoft
encrypted authentication ” is
selected. Click OK. The previous
Dial-Up Networking window
appears, click Dial.
25. The Connect to
MyDialUpServer window
appears. Enter the User name,
Password and Domain, then
click OK.
Note: Refer to you ADSL
Worksheet for this information or
contact your ISP provider.
page 19
Alcatel Speed Touch™ PC
Installation Guide
Note: The text “Verifying
username and password…”
will be displayed while logon
authentication takes place.
Note: If this screen persists and a
connection logon error is
reported, confirm that the correct
Username and Password are
entered and try the connection
again. Also verify that the
connection address is correct.
26. This window is displayed at the
completion of a successful DialUp logon. Choose a display
behavior and click OK to close.
Congratulations, you are done.
Your Speed Touch to the
Internet is established!
page 20
Alcatel Speed Touch™ PC
Installation Guide
PPPoA ADSL NETWORK
CONNECTION
Note: This section is for Win95A, 95B and 98 users only.
1.
Double click the My Computer
icon on the desktop. Then double
click the Dial-Up Networking
icon. The Dial-Up Networking
window will appear.
Note: Another dialog window
may prompt for the entry of the
Area Code if this is a first time
Network connection. Enter the
Area code and click OK.
2.
Double-click on the Make New
Connection icon.
3.
Enter the connection name (e.g.
My Connection) and set the
connection device to Alcatel
SPEED TOUCH PC.
NOTE: use the scroll down menu
to locate the Alcatel Speed
Touch PC card; then click Next.
4.
Enter the Host Name or IP
Address, if provided by your ISP,
otherwise enter (0) zero, and then
click Finish.
page 21
Alcatel Speed Touch™ PC
Installation Guide
5.
The new connection will appear
in the Dial-Up Networking
window. Double-click the My
Connection icon to begin a DialUp session.
6.
Enter the User Name and
Password supplied by the
Internet service provider. Then
click Connect.
Note: The Virtual Private
Network server name (or IP
address) has been previously
entered.
7.
The Connection window reports
the status of a connection. The
message Logging on to network
confirms a valid connection.
Note: If logon domain is
required, enter username,
password and logon domain
supplied by your ISP.
8.
The PPPoA service connection is
now established. Click Close and
the PPPoA icon is transferred to
the task bar.
Congratulations, you are done.
Your Speed Touch to the
Internet is established!
page 22
Alcatel Speed Touch™ PC
Installation Guide
BRIDGED ETHERNET SERVICE FOR WINDOWS 95A
1.
After installing the Speed Touch
PC card, power on the PC system.
The Hardware Wizard will detect
the Speed Touch PC as a PCI
Network Controller. Select the
Driver from disk provided by
hardware manufacturer option.
2.
Insert the Alcatel Speed Touch
PC Device Driver CD into the
drive.
3.
The Install From Disk window
appears. Enter the <CD drive
letter> :\1483w9x (e.g.
D:\1483w9x), then click OK.
4.
D:\1483w9x
When the Service Option
window appears, click Next for
the default installation. For
Advanced settings, please consult
your ADSL service provider for
detailed information.
NOTE: If you clicked Advanced,
the Service Options window
shows the Connection Address.
Enter the service Connection
Address, click OK. The previous
Service Option window will
appear, click Next.
NOTE: If prompted, insert your
Windows 95 CD into the drive
and click OK.
page 23
Alcatel Speed Touch™ PC
Installation Guide
NOTE: If during the file copying process a file is reported as “not found”
enter the path <CD drive letter> :\Win95 (e.g. D:\Win95)
5.
At the conclusion of the Speed Touch PC driver installation, the Diagnostic
Tool icon will appear disabled on the task bar.
You must now Restart the PC system to
complete the installation; the Diagnostic Tool will then become active.
6.
Proceed to Bridged Ethernet ADSL Service Configuration; page 29.
page 24
Alcatel Speed Touch™ PC
Installation Guide
BRIDGED ETHERNET SERVICE FOR WINDOWS 95B
1.
After installing the Speed Touch PC card, power-up the PC System.
2.
The Hardware wizard will detect
the Alcatel Speed Touch PC as a
PCI Network Controller, click
Next. Insert the Alcatel Speed
Touch PC Driver CD into the
CD-ROM drive. Click Other
Locations.
3.
When Select Other Location
window appears, enter <CD drive
letter> :\1483w9x (e.g.
D:\1483w9x) and click OK.
4.
The Update Device Driver
Wizard window appears. Click
Finish. The Insert Disk window
appears. Click OK.
5.
The Copying Files window
appears, enter <CD drive letter>
:\ 1483w9x (e.g. D:\1483w9x)
and click OK.
page 25
Alcatel Speed Touch™ PC
Installation Guide
6.
When the Service Option window appears, click Next for the default
installation. For Advanced
settings, please consult your
ADSL service provider for
detailed information.
NOTE: If you clicked
Advanced, the Service Options
window shows the Connection
Address. Enter the service
Connection Address, click OK.
The previous Service Option
window will appear, click Next.
Note: If your Windows 95B CD
is not already in the drive, then
the Insert Disk window will
appear. Insert the Windows 95B
CD in the drive now. Then click
OK.
7.
The Copying Files window will
now appear. Enter <CD drive
letter> :\WIN95(e.g. D:\WIN95)
and Click OK.
8.
Proceed to Bridged Ethernet
ADSL Service Configuration;
page 29.
page 26
Alcatel Speed Touch™ PC
Installation Guide
BRIDGED ETHERNET FOR WINDOWS 98, 98A
1. After installing the Speed Touch
PC card and restarting the system,
the Add New Hardware Wizard
window will automatically appear
and indicate that a new PCI
Network Controller has been
found. Click Next.
2.
Then select Search for the best
driver for your device. Click
Next.
3.
Insert the CD labeled Alcatel
Speed Touch PC Driver into
your CD-ROM drive.
4.
Then select Specify a location,
enter <CD drive letter>
:\1483w9x (e.g. D:\1483w9x) and
Click Next.
5.
The Add New Hardware
Wizard will find the Alcatel
Speed Touch PC card driver.
Click Next.
page 27
Alcatel Speed Touch™ PC
Installation Guide
6.
When the Service Option
window appears, click Next for
the default installation. For
Advanced settings, please consult
your ADSL service provider for
detailed information.
NOTE: If you click Advanced, the Connection Address window appears.
Enter the Service connection
address, click OK. The previous
Service Options window will
appear, click Next.
NOTE: If prompted, insert your
Windows 98 CD-ROM into the drive and click OK.
7.
When the System Settings
Change window appears and
asks, “Do you want to restart your
computer now?” Remove the
driver CD and click Yes.
8.
Proceed now to Bridged Ethernet ADSL Service Configuration page 29.
page 28
Alcatel Speed Touch™ PC
Installation Guide
BRIDGED ETHERNET ADSL SERVICE CONFIGURATION
This section describes how to configure the ADSL network service when your
PC is running Microsoft Windows 95A, 95B, 98, 98A.
1.
Double click My Computer,
Control Panel, and then
Network.
2.
In the Network window, select
the Configuration tab.
Scroll through the loaded network
components list. Highlight the
TCP/IP->Alcatel SPEED
TOUCH PC and click
Properties.
NOTE: In Win95/95A/95B, you
may not find TCP/IP->Alcatel
Speed Touch PC card. If this is
the case, find and select the
TCP/IP and click Properties.
3.
4.
The TCP/IP Properties window
appears. Select IP Address tab.
Select Specify an IP address.
The IP address and Subnet
Mask will turn from gray to clear.
Enter your IP Address (i.e.
10.10.10.125). and Subnet Mask
(i.e. 255.255.255.0).
5.
NOTE: Please refer to ADSL
System Work Sheet, or consult
your ISP for the TCP/IP
Properties.
page 29
Alcatel Speed Touch™ PC
Installation Guide
6.
Select the SGateway tab. Enter
your gateway information into the
New gateway box and click Add.
If you have more than one
gateway numbers, repeat this step
NOTE: Please refer to ADSL
System Work Sheet, or consult
your ISP for the TCP/IP
Properties.
7.
Select DNS Configuration tab.
Select the Enable DNS option.
8.
Enter your host name into Host:
box.
9.
Enter your domain name into
Domain: box.
10. Enter DNS number into DNS
Server Search Order box and
click Add. If you have more than
one DNS numbers, repeat this
step.
11. NOTE: Please refer to ADSL
System Work Sheet, or consult
your ISP for the TCP/IP
Properties.
12. After completed filling all necessary data for TCP/IP properties, click Ok
and the system will ask you to restart. Click Ok to restart the system. After
the system restarts, configure the Internet browser. Once the Internet
browser is configured properly, you will enjoy high-speed access to Internet
with your Alcatel Speed Touch PC.
page 30
Alcatel Speed Touch™ PC
Installation Guide
BRIDGED ETHERNET FOR WINDOWS NT 4.0
Note: To perform the installation
logon as Administrator. TCP/IP
protocol must be installed prior to
the driver installation. At the
Network window select the
Protocols tab and verify that the
TCP/IP is present.
1.
At the desktop, double click My
Computer, double click Control
Panel, double click Network and
then select the Adapters tab of
the Network window.
2.
Click Add (to add new adapters).
3.
In the Select Network Adapter
window click Have Disk.
4.
Insert the Alcatel Speed Touch
PC driver CD into the drive,
enter the < CD drive letter>
:\1483NT4 (e.g.D:\1483NT4) and
click OK.
page 31
Alcatel Speed Touch™ PC
Installation Guide
5.
The Select OEM Option window
will find the Alcatel SPEED
TOUCH PC card. Click OK.
The system will copy the drivers
to the hard drive.
6.
When the Service Option
window appears, click Next for
the default installation. For
Advanced settings, please consult
your ADSL service provider for
detailed information.
Note: If you click Advanced, the
Service Options window
appears. Enter the service
Connection Address, click OK.
The previous Service Option
window will then appear, click
Next. Then the Network window
will appear, click Close.
7.
The TCP/IP Properties window will appear and prompt the user for
page 32
Alcatel Speed Touch™ PC
Installation Guide
information. When not connecting to a DHCP server, enter the IP address
(e.g. 192.168.4.39).
8.
Enter the Subnet Mask (e.g. 255.255.255.0).
9.
Enter the Default Gateway address.
Note: Consult your ISP for the TCP/IP Properties.
10. Select the DNS Configuration tab
and enter the Host Name (e.g.
speed_touch)
11. Then enter the Domain Name
(e.g. pacbell.net)
Note: Use the DNS Service
Search and Domain Sufix Search
to locate the Host Name and
Domain. Click Add to save the
address. Repeat the process for
additional DNS entries.
12. Click OK to update the changes.
Note: Consult your ISP for the
TCP/IP Properties.
13. The system must be restarted for
the changes to take effect. Click
Yes to restart.
Congratulations, your Speed
Touch to the Internet is
established!
EDITING BRIDGED ETHERNET
ADSL SERVICE
CONFIGURATION
1.
This section includes the IP
configuration specifics for Windows NT4.0. The NT 4.0 windows are
slightly different from those of Windows 95 /98. Other than these
page 33
Alcatel Speed Touch™ PC
Installation Guide
illustrative differences, the process for editing the IP address settings is the
same for Windows NT 4.0 and Windows 95/98.
2.
At the desktop, double click My
Computer, then double click
Control Panel to view the
contents of the control panel. In
the Control Panel window, double
click the Network icon.
Note: The Network window
shortcut is a right-click the
Network Neighborhood on your
desktop then left-click
Properties.
3.
Select the Protocols tab of the
network window. Select TCP/IP
Protocol and click Properties.
4.
Select the IP address option and
note that the IP Address and
Subnet Mask regions will turn
from gray to active.
5.
Enter the IP Address (e.g.
192.168.4.39) and subnet mask
(e.g. 255.255.255.0).
6.
The Default Gateway is also
entered in this window.
Note: Please refer to your ISP for
the TCP/IP Properties.
7.
Select the DNS configuration tab
and enter (or edit) the following
fields:
page 34
Alcatel Speed Touch™ PC
Installation Guide
8.
Enter the Host Name (e.g. speed_touch) and Domain (e.g. pacbell.net).
Note: To enter the Domain search (DNS) entries, click Add then enter the
address. Click Add to save the address. Repeat the process for additional
DNS entries.
9.
Click OK to update the changes.
page 35
Alcatel Speed Touch™ PC
Installation Guide
DIAGNOSTIC TOOLS
The diagnostic tools allow the user to monitor the ADSL connectivity,
setup the service connection address, and run diagnostic tests. The
Diagnostic Tools icon is displayed on the task bar as shown.
Maximum transfer rate
Maximum receiving rate
By positioning the mouse cursor over the icon, a summary of the ADSL
connection status is displayed e.g. upstream and downstream line rates.
The Diagnostic Tools icon consists of two lights side by side. The left light
indicates data is being transmitted whereas the right light indicates data is
being received. The state of the connection can be determined as follows:
Color Code
Description
Red, Red
No ADSL connection and No ADSL handshaking.
Check your cable connections.
Black/Yellow or Yellow/Black
flashing
ADSL handshaking – Connection not established.
Precursor to establishing an ADSL connecting.
Black, Black
ADSL connection established – no data traffic or idle
connection
Black, Green
ADSL connection established – NIC is receiving data
(TX/off, RX/on)
Green, Black
ADSL connection established – NIC is transmitting data
(TX/on, RX/off)
Green, Green
ADSL connection established – NIC is transmitting and
receiving data (TX/on, RX/on)
∅
NIC is disconnected or a driver problem exists. Try
using Connect command in Diagnostic Tools. If
persists, restart the PC system and last resort reload the
drivers.
page 36
Alcatel Speed Touch™ PC
Installation Guide
APPENDIX A - UPGRADE MICROSOFT DUN VERSION 1.3
This section explains how to upgrade Microsoft’s Dial-Up Networking (DUN)
application. You can download the DUN application from Microsoft’s Web
page and install it into your system. Please follow the instruction below.
1. Access the Microsoft Web site at http://www.microsoft.com.
2. In the Contents frame, select Free Downloads.
3. Scroll to Support Drivers, Patches and Service Packs and select Window
95 Updates. The Microsoft Widnows95 Downloads page appears.
4. Select Windows 95 in the select a product or feature box.
5. Select Networking & Communications in the Select a category box.
6. Click Go. The Windows Dial-Up Networking 1.3 Performance and
Security Upgrade for Windows 95 is listed.
7. Click this hyper-link to access the Windows Dial-Up Network 1.3
performance and Security Upgrade for Windows 95 page.
8. Click the Download Now hyper-link in the upper right corner of the page.
The MSDUN1.3 download page appears.
9. Click the link to the download site nearest you. The program prompts you
for a directory to download the MSDUN13.EXE file.
10. Specify a directory. The MSDUN13.EXE file is then downloaded to this
directory. The Dial-UP Networking 1.3 Performance & Security Upgrade
(MSDUN13.EXE) must be installed to setup a dial-up connection to your
corporate headquarters or your ISP.
Note:During the installation, you will be asked to restart your workstation.
Make sure you save your work and exit from all applications (except
Internet browser) before beginning the installation.
1.
2.
3.
4.
At your desktop, click Start, and select Run from the menu. The Run
window appears.
Specify the path for the MSDUN13.EXE file in the Open box and click
OK. This will install Microsoft Dial-Up Networking 1.3 for Windows
95/95A. Click Yes to continue.
Click Yes on the End-User License Agreement window.
Restart your system. After you restart your system, the Microsoft Dial-Up
Networking should be ready to support ADSL PPPoA service. Please verify
this before proceeding. Go to next section - Verifying Dial-Up Networking
(DUN) Status.
page 37
Alcatel Speed Touch™ PC
Installation Guide
APPENDIX B – VERIFYING DIAL-UP NETWORKING (DUN) STATUS
1.
It is possible to have Dial-Up Networking (DUN) version 1.2B or above,
but not have the Dial-Up Networking components loaded in the Windows
environment. This procedure is for determining the status of DUN on the
PC system.
2.
At the task bar click Start, Settings, Control Panel and double-click on
Add/Remove Programs.
3.
In Add/Remove Programs Properties, choose the Windows Setup Tab
and wait for Setup to complete the search for all installed components.
Select (i.e. highlight) the Communications component and click Details.
4.
If Dial-Up Networking is
installed, then a check mark will
appear next to the entry.
5.
To select Dial-Up Networking,
place a check mark next to the
DUN component and click OK.
The Windows CD-ROM (or Cab
file access) are required to
complete the installation. Have
the Windows CD-ROM ready
for use.
page 38
Alcatel Speed Touch™ PC
Installation Guide
APPENDIX C – REMOVING SPEED TOUCH PC DRIVERS
WINDOWS 95, 98
1.
To Delete Alcatel Speed Touch
PC drivers; on the desktop, rightclick on My Computer, then
click Properties, then click on
the Device Manager tab, then
double click Network adapters.
2.
Select the Alcatel SPEED
TOUCH PC, then click on the
Remove button.
3.
A warning message “You are
about to remove this device from
your system” will appear. Click
OK to remove drivers or click
Cancel to abort the driver
removal.
4.
The PC system must be restarted
for the changes to take effect.
Click Yes.
WINDOWS NT4.0
Note: For driver removal, you
need to logon as Administrator.
1.
On the desktop; double click My
Computer, double click Control
Panel, double click the Network
icon and select the Adapters tab.
2.
Select the Alcatel SPEED
TOUCH PC adapter, then click
Remove.
page 39
Alcatel Speed Touch™ PC
Installation Guide
3.
A warning message will inform you that a component is about to be
removed. Click Yes.
4.
Once the Alcatel SPEED
TOUCH PC is removed from the
adapter list, click Close.
5.
The PC system must be restarted
for the changes to take effect.
Click Yes.
page 40
Alcatel Speed Touch™ PC
Installation Guide
APPENDIX D:
Power Requirements
•
.75A Max @ +5V ± 5%, 0.1A max @ ± 12V, ± 5%
Environmental Requirements
•
Operating Temperature: 0 °C to 70°C with airflow
•
Non-operating Temperature: -10 °C to 85 °C
•
Operating Humidity: 10% to 90% non-condensing
•
Non-operating storage humidity: 5% to 95% non-condensing
Compliance Certification
•
UL 1950
•
CE approved
•
FCC Part 15 Class B
page 41
Alcatel Speed Touch™ PC
Installation Guide
APPENDIX E:
Copyright © 1999, Integrated Telecom Express, Inc. All rights reserved.
This manual and software described in it are copyrighted with all rights reserved. This
manual may not be copied, in whole or in part, without the written consent of Integrated
Telecom Express, Inc. Speed Touch PC is a trademark of Alcatel. All other product
names are trademarks and or registered trademarks of their respective companies.
Part Number 44-060014-000
FCC Statement
This equipment has been tested and found to comply with the limits for a Class B digital
device, pursuant to Part 15 of the FCC Rules. These limits are designed to provide
reasonable protection against harmful interference in a residential installation. This
equipment generates, uses and can radiate radio frequency energy and, if not installed
and used in accordance with the instructions, may cause harmful interference to radio
communications. However, there is no guarantee that interference will not occur in a
particular installation. If this equipment does cause harmful interference to radio or
television reception, which can be determined by turning the equipment off and on, the
user is encouraged to try to correct the interference by one or more of the following
measure:
Reorient or relocated the receiving antenna.
Increase the separation between the equipment and receiver.
Connect the equipment into an outlet on a circuit different from that to which the
receiver is connected.
Consult the dealer or an experienced radio/TV technician for help.
Shielded cables must be used to comply with FCC regulations.
Please direct any queries on this product or request for information on other
Alcatel products to www.alcateldsl.com
page 42