1
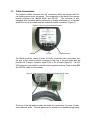
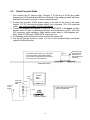
5. The tile support rails distribute the weight of the camera into the grid and
prevent tile warping. The camera module enclosure and the tile support rails
allow for exceptional positioning freedom when used with 2’x2’ and 2’x4’
ceiling tiles (Figure 5).
Figure 5: Enclosure and Tile Support Braces Positioned on 2’x2’ Ceiling Tile
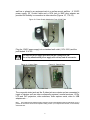
6. After the camera module enclosure is positioned above the ceiling, attach the
white trim ring to the camera module bezel from the front of the tile and
tighten gently. This will pull the bezel and camera module together and firmly
hold the camera in position against the ceiling tile. Rotate the camera
enclosure module with the positioning indicator pointing toward the monitor or
display device. This orientation is standard document camera orientation
(see Figures 6 & 7).
Figure 6: Enclosure and Trim Ring
Trim Ring
Positioning Indicator (hole)
IR Sensor
Lens
Figure 7: Enclosure and Trim Ring with Ceiling Tile (side view)
Camera
Module
Enclosure
Ceiling Tile
Bezel
Trim Ring
6