1
VIRTUAL CD V4
MANUAL
© 2001 by H+H Software GmbH. All rights reserved.
Virtual CD v4 Documentation
Foreword
Thank you for choosing Virtual CD. We have improved and expanded the VCD
program both to address the needs and preferences expressed by our users and to
reflect broader developments such as the latest CD technologies and the increasingly
widespread use of DVDs.
A couple of very basic changes have been made in the Virtual CD software for this
fourth version. For example, while all the previous versions used the same driver
kernel and file format, Virtual CD v4 has a whole new software kernel. The new driver
was developed specifically to support the new MS Windows XP operating system
while at the same time making Virtual CD forward-compatible with future software
developments. The new file format has been implemented to support DVDs, which
often contain considerably larger volumes of data than your average music or software
CD.
Another change involves our company itself, rather than the software. You may have
noticed that Virtual CD is now manufactured under the name H+H Software rather
than Microtest. H+H Software GmbH, headquartered in Goettingen, Germany, was
until recently a wholly-owned subsidiary of Microtest. In summer of 2001, the two
companies officially parted ways. H+H has been developing the Virtual CD software
ever since Version 2, and will continue to develop it in future.
This manual provides you with an introduction to Virtual CD, as well as basic
instructions on all the main functions. For further details, please refer to the Help
program integrated in Virtual CD.
Important Note:
If you use Virtual CD with CDs or DVDs that are under license, then creating
multiple virtual images from a given CD/DVD or running the Virtual CD
program with a given virtual CD on more than one computer at a time may
constitute a breach of the software licensing agreement you entered into with
the manufacturer of the CD/DVD in question. Make sure to check your
licensing agreements for detailed information.
Copyright 2001 by H+H Software GmbH. All rights reserved.
Copyrights on the software, the Virtual CD trademark and all corresponding
documentation are owned by H+H Software GmbH. In the US, Microsoft and Windows
are registered trademarks of Microsoft Corporation. The names of products mentioned
in this manual are used for identification purposes and may be trademarks or
registered trademarks of their manufacturers.
Page 2 of 2
Virtual CD v4 Documentation
Contents
Foreword.............................................................................................. 2
You don't read manuals?..................................................................... 4
What is Virtual CD? ............................................................................. 4
New Features in Version 4.................................................................. 5
System Requirements ......................................................................... 5
Document Conventions ....................................................................... 6
Installation........................................................................................... 7
First Steps ........................................................................................... 8
Creating a Virtual CD: Easy Copy Mode ........................................... 10
Creating a Virtual CD: Expert Copy Mode ........................................ 12
Selecting the Source CD.................................................................................... 12
Entering the CD Label and Description .............................................................. 13
Selecting Data/Audio tracks ............................................................................... 14
Settings for Audio Tracks ................................................................................... 15
Settings for Reading and Compressing Data ..................................................... 17
Entering a File Name and Path for the Container ............................................... 19
Additional Settings for the Virtual CD ................................................................. 20
Inserting a Virtual CD........................................................................ 22
Working with the Virtual CD Management Program ........................ 23
Starting the Virtual CD Management Program ................................................... 23
Adding Existing Virtual CDs to the Management Program.................................. 25
Deleting Virtual CDs........................................................................................... 26
Creating Customized Virtual CDs....................................................................... 26
Properties of a Virtual CD .................................................................................. 29
Properties of a Physical CD Drive ...................................................................... 31
Adding/Removing Virtual CD Drives................................................................... 31
Customizing the Virtual CD Program.................................................................. 32
Troubleshooting ................................................................................ 39
Technical Support ............................................................................. 40
Page 3 of 3
Virtual CD v4 Documentation
You don't read manuals?
Are you one of those people who never bothers to read instruction manuals?
No problem! Experienced PC users will find no surprises in the installation procedure
that sets up VCD v4. Not only that—the Help program starts automatically the first
time you run the new installation.
Especially for you impatient types, we have developed the following 4-point 'Instant
User's Guide':
1.
2.
3.
4.
If you have an earlier version of VCD, deinstall it and then (this is important:)
restart your computer
Install Virtual CD v4 and then (this is important:) restart your computer
Insert a CD from which you wish to create a virtual image.
Double-click on the Virtual CD icon on your Desktop. The VCD v4 Wizards
take over from there and guide you through the program functions.
That's it! You can now use your new virtual CD just like a real CD.
Version 4 uses a new file format, with the extension .VC4 rather than .FCD.
You can convert files of the old format to the new format—but not vice versa!
What is Virtual CD?
Virtual CD makes your CD/DVD applications faster, more portable, and easier to use.
This is because it stores CDs on your hard drive, using highly efficient data
compression techniques. Once you've made a virtual CD from a physical CD or DVD,
simply 'insert' it in a virtual drive to run it. Virtual drives behave just like physical drives,
and look the same in your Windows Explorer.
With the Virtual CD program...
•
•
•
•
•
•
•
your CD/DVD-based applications are much faster, because the CDs run
from your hard drive rather than from the CD-ROM drive
you don't have to bother with inserting and removing physical CDs—let
alone having to look for them in the first place!
you can run your CDs on computers that don't even have physical CD
drives
you can use multiple CDs simultaneously—no need for an expensive CD
changer!
your valuable original CDs won't get lost or damaged
your notebook conserves precious battery power, because you don't have to
run a CD drive
your workplace is quieter, because CD drive noise is eliminated
Page 4 of 4
Virtual CD v4 Documentation
New Features in Version 4
The new version is a completely reworked software suite, with a new user interface
and lots of new features:
•
•
•
•
•
•
•
•
•
•
•
Compatible with Windows 98/ME/NT4/2000 and XP
Supports DVDs (independent of FAT32 file size restrictions!)
Optional password protection for individual virtual CDs
New data readout techniques (RAW mode, including sub-channel data)
support the latest CD technologies
Simplified Easy Copy Mode for beginners
Virtual CDs can be sorted into categories and stored in different folders
You can import ISO-format image files (for data exchange with CD-R
software)
Improved data compression that works even with copy-protected CDs
Exclusive access to virtual CDs stored on a network
Supports up to 99 data tracks per virtual audio CD
Full support for all CD-player functions (such as visualization and play lists,
for example)
Because so many functions have been added and expanded, Virtual CD v4 uses a
new file format, with the extension .VC4 (rather than the old .FCD extension).
This version of Virtual CD is designed as a single-workstation application. A new
network version will be available separately in early 2002. Even your single-user
version, however, enables exclusive access to virtual CDs over the network. Exclusive
access here means that a virtual CD stored on a network can be accessed by only
one network user at a time. Once in use, the virtual CD is blocked for any other user
until it is released again (by ejecting it from the virtual drive).
System Requirements
Trouble-free operation of Virtual CD is generally assured on any system where
Windows also runs smoothly. To a great extent, Virtual CD is basically a Windows
device driver that uses very little of your system resources.
Some of the Microsoft applications that are available free of charge, such as the
Media Player and the Internet Explorer, optimize certain functions in the operating
Windows system and thus are highly recommended for use in conjunction with Virtual
CD.
To run Virtual CD, your system should meet the following minimum specifications:
•
•
Windows 98/98SE/ME with at least 64 MB RAM or
Windows NT4 Workstation with Service Pack 6a and at least 128 MB RAM
or
Windows XP/2000 Professional with Service Pack 2 and at least 128 MB
RAM
Pentium 200 MHz processor or faster
Page 5 of 5
Virtual CD v4 Documentation
•
•
•
•
•
MS Internet Explorer 5 (or later)
MS Media Player 7 (or later)
Approximately 10 MB hard disk space for installation of the Virtual CD v4
software
Optional: DirectSound-compatible sound card
Optional: Internet access, to retrieve audio CD data over the Internet
You will also need space on the hard drive for your virtual CDs. How much space is
required by a given virtual CD depends on both the CD content and the compression
method used in creating the virtual CD, and may be anywhere from 1 to over 700 MB.
Virtual DVD videos generally require 4 to 8 GB.
Document Conventions
Bold, italic type in the manual indicates either a procedure or a part of the program
(such as buttons and menu items).
Notes that are especially important are marked by the exclamation point
symbol you see here. These notes contain information that is essential for
trouble-free operation of your Virtual CD program.
Tips and tricks for simplifying procedures are marked with the light-bulb
symbol shown here.
Generally, whenever the term "CD" is used in this manual, it is meant to include DVDs
as well.
The following definitions of some Virtual CD-specific terms may be helpful:
•
•
•
Virtual CD drives: These look and "feel" just like normal CD drives in your
Windows Explorer. You can set up as many virtual CD drives as you have
drive letters available (for example, D: through Z:).
Virtual CD: This is synonymous with the depiction of CD contents. Virtual
CDs are displayed as symbols in the right-hand pane of the Virtual CD
Management program (the main Virtual CD program). The number of virtual
CDs you can create is limited only by the disk space you have available for
their containers.
Virtual CD container (file): Each virtual CD is made up of one "container
file" (with the extension .VC4) and one or more other files, depending on the
amount of data (or number of song tracks) on the source CDs in each case.
The term "container" is sometimes used to refer to the container file
together with the other files that make up the virtual CD. The container file
basically "tells" the Virtual CD driver how to present the remaining CD data
in virtual CD form.
Page 6 of 6
Virtual CD v4 Documentation
Structure of a Virtual CD Container
You don't really need to understand how these files are structured in order to work
with Virtual CD. But for those who are interested, the following provides a brief
description of virtual CD container files.
Each virtual CD consists of 2 or more files:
•
•
•
The container file, with the extension .VC4, which indicates the data
structure of the virtual CD
Virtual data CDs contain one or more files with extension(s) consisting of
sequential numbers, from .000 up to .999, which contain the actual user
data. These are especially important for DVDs, because when the FAT32
file system is used (which is most often the case), file size is limited to 2GB,
while most DVDs contain larger volumes of data. In such cases, user data is
divided into a number of separate files. The container file keeps track of the
structure so that the virtual CD driver "knows" how to put them together in
virtual CD form.
Virtual audio CDs contain a number of audio files, depending on the number
of tracks included from the source CD(s).
Installation
If you are updating an earlier VCD version, you need to deinstall the older
version and then restart your system before installing Virtual CD v4. When
you deinstall the old version, the program asks whether you wish to delete
existing virtual CDs. Make sure you don't inadvertently delete any virtual CDs
that you wish to convert for use with the new program!
Place the installation CD in a CD drive and wait a moment for Windows to detect it.
If the autostart function is active, the installation begins automatically, starting with the
"Welcome..." window.
If installation does not start automatically, double-click on "My
Computer" in your Explorer and then on the symbol for the drive where
you inserted the installation CD.
Now you should see the contents of the installation CD. Double-click on the
"SETUP" file to start installation.
Follow the instructions as the Wizard guides you through the installation procedure.
The program asks, for example, whether you wish to retrieve audio CD information
over the Internet. Please do not answer "yes" here unless your computer has Internet
access.
Page 7 of 7
Virtual CD v4 Documentation
When installing Virtual CD under MS Windows XP, you may get some rather
drastic-sounding warnings about installing a non-certified hardware driver.
You can ignore these warnings (simply confirm and continue), as they refer
to the virtual CD driver, which will not damage your system in any way.
Once the installation is finished, you need to restart your computer in order to have it
detect the virtual drives. Under Windows XP/2000, after you restart your system, you
might prompted to restart it once again. You can answer this with "no", as an
additional reboot is not necessary.
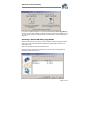
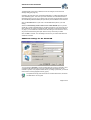
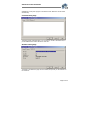
Once you've completed installation and restarted your computer, you can see your
new virtual drives in the Windows Explorer:
In this example, drive F: is the physical drive and G: is the virtual drive. (You can also
add more virtual drives at a later stage.)
The virtual drive is empty at this point, because no virtual CDs have been created yet
(let alone inserted!). At this point, the installation of the Virtual CD program is roughly
equivalent to the installation of a hardware CD-ROM drive in the PC housing.
First Steps
This chapter is for those of you who have never used Virtual CD before.
If you have already worked with an earlier version of Virtual CD, you can skip to page
25 for information on converting older virtual CDs for use with the new program.
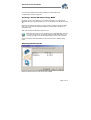
To work with the Virtual CD program, you need to begin of course by creating a virtual
CD. To do this, start by double-clicking on the Virtual CD program icon. This starts the
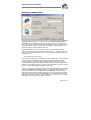
program. The "Welcome..." window opens only the first time you start Virtual CD:
Page 8 of 8
Virtual CD v4 Documentation
Select the first option here. You are then asked to enter your license code, which is
either included in the package that contained the installation CD or was sent to you
electronically:
If you don't have your license code handy at the moment, click on Cancel. You can
still use the program, for another 30 days. To enter your license code at a later stage
(within the 30-day period!), click on Help in the VCD Management program and select
the Licensing menu item.
The next window asks you to select a copy mode:
Page 9 of 9
Virtual CD v4 Documentation
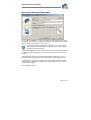
If you are a "Virtual CD Beginner", we recommend selecting the Easy Copy Mode at
this point. In this mode, creating a virtual CD is really about as easy as falling off a log.
You can always change to the Expert mode—and back again—at a later stage (see
page 36).
Creating a Virtual CD: Easy Copy Mode
Select the physical CD from which you want to create a virtual CD and place it labelside up in your physical CD-ROM drive. Make sure the data side of the CD is not
scratched or dirty.
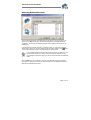
Wait a few seconds for Windows to detect the CD.
If there are CDs in more than one CD drive on your computer, a dialog opens for
selecting the desired source CD:
Page 10 of 10
Virtual CD v4 Documentation
Select the desired source and click on Next.
Make sure the source CD is not accessed by any other application while you
are making the virtual CD. In particular, make sure that Media Player is not
running, as it might be set to start automatically any time a CD is inserted.
If the source is an audio CD and you activated the "CDDB" function when you installed
VCD v4, Virtual CD now attempts to download the CD title and track titles from the
Internet. The CDDB service is free of charge and is supplied by www.cddb.com. (If
you do not have an Internet connection, an error message is shown. This does not
affect the creation of your virtual CD—simply confirm and continue.) If you are not
registered with CDDB, the registration process is completed the first time you log on to
the CDDB server.
In the next dialog, you can enter a Description of the CD. Make sure the description
is unique, and clearly identifies the CD it refers to, so you can use it to locate the
virtual CD later:
When you click on Next, Virtual CD analyzes the performance of the physical drive
and the structure of the source CD. This process runs in the background; you don't
have to do anything.
Now Virtual CD uses the data on the physical CD to create a 1 : 1 image of it on your
hard disk. Depending on the CD type and data volume, and on your computers
performance specifications, this can take anywhere from 15 to 45 minutes. (If the CD
is copy-protected, it may even take hours.) When data transfer is complete, the
physical CD is ejected from the drive.
Congratulations! You can now insert your new virtual CD in a virtual drive (see page
22.) and use it just like a real CD!
Page 11 of 11
Virtual CD v4 Documentation
If you have any problems while making a virtual CD, please refer to the
Troubleshooting. section on page 39..
Creating a Virtual CD: Expert Copy Mode
Depending on the current settings in your Virtual CD program, you might have to
deactivate the Easy Copy Mode before you can use the Expert Copy Mode (see page
36).
Select the physical CD from which you want to create a virtual CD and place it labelside up in your physical CD-ROM drive. Make sure the data side of the CD is not
scratched or dirty.
Wait a few seconds for Windows to detect the CD.
Make sure the source CD is not accessed by any other application while you
are making the virtual CD. In particular, make sure that Media Player is not
running, as it might be set to start automatically any time a CD is inserted.
If there is more than one CD available for use as a source CD, a selection dialog
opens:
Selecting the Source CD
Select the desired source from the list and click on Next.
Page 12 of 12
Virtual CD v4 Documentation
Entering a Label and a Description
You can edit the CD Label if you wish, if this option has been activated in the Virtual
CD Settings (see page 36). The CD label is limited to 16 characters and may contain
letters, numbers and the hyphen or minus sign ("-").
Some CD applications identify the CD by its label. In such cases, changing
the label might cause the application to malfunction. Thus it is not always
advisable to change the CD label.
The default Description of the virtual CD is the CD label. If the title and artist name for
an audio CD are downloaded from the Internet, the default Description is taken from
this data.
Changing the Description does not affect CD applications. Make sure you use a
unique description (not used for any other virtual CD) that clearly identifies the CD.
The Description is limited to 127 characters, and special characters are not allowed.
The Description is offered as the default for the container file name, which you can
overwrite in a later dialog.
Click on Next to continue.
Page 13 of 13
Virtual CD v4 Documentation
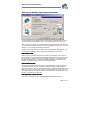
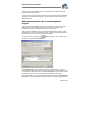
Selecting Data/Audio tracks
The next window shows all of the data and/or audio tracks on the source CD. If you
simply click on Next at this point, all tracks are included on the virtual CD without
modification. We strongly recommend doing this when making a virtual CD from a
software CD.
If you are making an audio virtual CD, on the other hand, you may wish to exclude
button.
certain tracks, which you can do by selecting them and then clicking on the
You can also change the order of the tracks using the arrow buttons.
You can select multiple tracks by holding down the CTRL key while you click
on the desired tracks. If you want to select a number of tracks shown in a
row, hold down the shift key while you click on the first and last of the desired
tracks.
Click on Next when you are ready to continue. The "Settings for Audio CD" dialog,
shown below, opens only if the source CD is an audio CD. The dialog that opens for
data CDs is explained further down.
Page 14 of 14
Virtual CD v4 Documentation
Settings for Audio Tracks
The default setting in this window is the option for creating audio tracks as individual
sound files. With this option, you can also select the Compression method for
sound files from the select list. At the time of printing of this manual, "ACM" is the
only method offered. Additional methods will be released shortly for integration in your
Virtual CD program. As soon as these become available, you will find them on the
Virtual CD Web site, at www.virtualcd-online.com.
The audio formats found on your PC are a subset of the selected compression
method. The standard setting uses a method that creates 1 : 1 images in audio CD
quality (PCM, 44.100Hz, 16-bit, stereo). If you want to change the audio format, keep
one thing in mind:
"Sound quality costs disk space"
In other words, the better the sound quality, the more space used up on your hard disk
by the virtual CD. The standard CODEC (compression-decompression module)
module integrated in Windows is the MS ADPCM CODEC, which offers a good
compromise between the sound quality achieved and the disk space required. Other
CODECs, such as MP3 and VQF, for example, offer even better compression and still
produce sound quality approaching that of the original CD.
When you create music tracks as sound files, you can define whether the source data
is read using a digital or an analog technique. Almost all CD-ROMs used today (8x
and up) support the function for reading audio tracks digitally. This option offers
better sound quality than the analog technique. Even so, there may be some audible
interference. If this is the case, select the analog option. With this setting, the audio
data is played from the original CD and recorded by your sound card. You can use the
Test option to check the recording quality and volume.
Page 15 of 15
Virtual CD v4 Documentation
If you select the data files option, the audio data is not treated as audio files by Virtual
CD, compressed using audio coding/compression methods, but rather the raw data is
read digitally and stored as data tracks. The compression method used, if selected, is
for data compression. This compression method does not have the error tolerance
that audio compression does, and is less efficient for audio tracks than the audio
compression methods, which are designed especially for use with music files.
See page 31 for details on how to determine whether your CD-ROM drive
supports the function for Creating audio files as data tracks. Under
Windows 98, the MS Media Player v7 (or later) must be installed, and the
"digital playback" option in its program settings must be selected. This
setting is deactivated automatically, by the way, every time you insert a
physical audio CD.
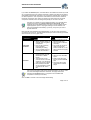
Both methods have advantages and disadvantages, so we can't really recommend
one method over the other. The table below lists the pros and cons to help you decide
which is best for you in any given case:
Write audio
tracks as...
Advantages
Disadvantages
...individual
sound files
• Saves hard disk space, for
example when using MP3
compression
• Files can be opened by
music programs
individually for editing
• Can be created using any
physical CD-ROM drive
• Audio compression might
take more CPU time
• Takes longer to make the
virtual CD
• The virtual CD cannot be
used as a source for
another virtual CD, nor for
CD-R or audio-CD 'ripping'
software
...data files
• Full support for music
player functions (such as
visualization in Media
Player)
• The virtual CD can be
used as source for another
virtual CD, or for CD-R and
audio-CD 'ripping' software
• More flexible, as the files
can be used later to create
a virtual CD with sound
files
• Takes up more hard disk
space
• Doesn't work with every
type of physical CD-ROM
drive
• Only works with certain
configurations in Media
Player
We recommend creating audio tracks as data files only if you plan to make
use of the advantages listed here. Otherwise, we highly recommend
selecting the sound files option in conjunction with a suitable data
compression method (such as MP3).
Click on Next to continue to the next Image Wizard dialog:
Page 16 of 16
Virtual CD v4 Documentation
Settings for Reading and Compressing Data
This dialog allows precise definition of the method used to read data from the source
CD. These are the most important options for successful creation of a virtual CD!
When you insert the source CD, Virtual CD analyzes the performance of its CD-ROM
drive and the structure of the source-CD data, and suggests a "conservative" choice of
settings. You can change these settings as desired.
The first select list lets you choose from a range of data readout configurations. You
can change the individual settings to adapt the configuration to your needs.
Fast sector read
With this option, sectors are read in blocks rather than individually. This is faster, on
the one hand, but on the other hand, if a defective sector is found in a given block then
the other sectors in that block must be read again individually. In most cases this is
the preferred configuration. If a virtual CD created using this method doesn't work,
however, try deselecting this option to improve the read quality.
Correct bad sectors
Some copy-protection methods are based on defective sectors, which can simply be
reproduced by Virtual CD when this option is selected. Detecting defective sectors
does take more time, however, which means creating a virtual CD with this setting can
take up to a number of hours. Still, this option is recommended for certain CDs, such
as "home-made" CDs, for example, because CD-writers often create bad sectors. This
option is not necessary for audio CDs.
Fast detection of
of bad sectors
This option is available only if the Correct bad sectors option is selected.
Page 17 of 17
Virtual CD v4 Documentation
Each sector is read individually and defects are reproduced only if a test routine
shows an error. Without this option, each sector is read repeatedly until the exact
same data is read several times. If a virtual CD created using this option doesn't work,
deactivate this option. Again, the creation process takes longer if this option is not
active.
Read RAW sectors
RAW sectors contain other information in addition to the desired user data. If the copyprotection technique used on the source CD involves evaluating these sectors, they
must be read in order to create the virtual CD. Furthermore, RAW sectors must always
be read to create video CDs, CD-Extra CDs or audio CDs. The disadvantage is that
the virtual CD takes up more disk space, as additional files are included in the
container. Please see page 31 for details on determining whether your physical CDROM drive supports this mode.
Read subsub-channel data
Sub-channels also contain additional information which is often required for the CD,
especially for newer audio CDs. Again, the disadvantage is that the virtual CD takes
up more disk space. See page 31 for details on determining whether your physical
CD-ROM drive supports this mode.
Number of repeat reads for each sector
Readout quality can be improved—especially for older CD-ROM drives—by reading
each sector repeatedly. If a lot of errors are detected, the number of repeat reads
should be set to 2 or 3. Unfortunately, this slows down the overall read speed.
Source drive read speed
With some CD-ROM drives, the readout quality can be improved by decreasing the
speed. This can also reduce noise, as the source CD rotates more slowly. If this
option is not available in this dialog, this indicates that your CD-ROM drive does not
support it.
Compression
You can switch off data compression, or choose one of three compression levels. The
higher the compression level you choose, the longer it takes to create the virtual CD
and the more CPU time is used when you run the CD. On the other hand, the lower
the compression, the more hard-disk space is taken up by the resulting virtual CD.
The table below lists the advantages and disadvantages of the different compression
options to help you decide which is best for you:
Compression
Advantages
Disadvantages
Page 18 of 18
Virtual CD v4 Documentation
None
• Quickest method for
creating a virtual CD
• No added load on the
CPU
Takes up the most space on
the hard disk, as the size of
the container corresponds
directly to the data volume
on the CD
Level 1
Good compromise
between CPU load and
storage space taken up
Low added CPU load
Level 2
Especially well suited for
use with sectors copied
using the RAW mode
Higher added CPU load
Level 3
Lowest disk space
requirement
• For use only with
processors of at least
700MHz
• Takes longest to create
the virtual CD
Once you have chosen the options that are best for you, click on Next to continue.
Entering a File Name and Path for the Container
This is where you define the path and file name for storing the VCD container on your
hard disk.
The path and file name together must not exceed 254 characters in length.
Page 19 of 19
Virtual CD v4 Documentation
The default path shown here is defined, and can be changed, in the Virtual CD
Settings dialog (see page 33).
Generally, the path shown here is selected (white letters on a dark blue background)
when this dialog opens. Thus when you enter characters, the entire default name is
replaced by what you type. All you need to enter is a name for the file itself, as Virtual
CD automatically adds the default path (see above) and the .VC4 file name extension.
Click on Hard disk info for a quick view of the available disk space on your hard
disk(s).
Select the Automatically create a folder for the virtual CD/DVD option if you want
Virtual CD to create a separate folder for the files that make up your virtual CD. Since
each virtual CD can consist of several files (see "Structure of a Virtual CD Container"
on page 7), it can be difficult to tell later which files belong to which virtual CD. This is
why we recommend leaving this option active for every virtual CD you create.
Click on Next to continue. The next dialog is the last one you need to edit before the
virtual CD is created.
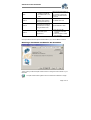
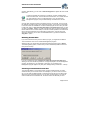
Additional Settings for the Virtual CD
You can assign a password to prevent unauthorized use of a given virtual CD. Once
a password has been assigned, it must be entered before the virtual CD can be
inserted or ejected, or its properties edited. When you assign a password, you have to
enter it twice to avoid typographical errors ('typos').
The password merely protects the CD from unauthorized access; the virtual
CD data itself is not encrypted.
Page 20 of 20
Virtual CD v4 Documentation
We recommend using a password that is not too easy to guess. The longer the
password, the more secure it is; combinations of numbers and letters are also more
secure than simple words.
The password is case sensitive (a distinction is made between upper and lower-case
letters), and can have up to 15 characters. You can change the password at a later
stage in the virtual CD Properties dialog.
You can define a start program if you want to have a program of your choice started
automatically when the virtual CD is inserted. For example, if the virtual CD contains
images, you can enter a graphic editing program here as the start program.
For some CD applications, you need to define a working directory for the application
to run in. Where this is the case, you can enter the directory here.
The hotkey is a combination of keys (such as "Ctrl+M", for example) that
inserts the virtual CD automatically. This option can be very handy,
especially for virtual CDs that are used frequently. Even if the Virtual CD
program is not running and you are working with some other program, this
hotkey inserts the virtual CD and runs any start program defined for it.
If you select a drive letter for the option 'Automatically insert the virtual CD into
drive...', the virtual CD is inserted in that drive as soon as it has been successfully
created.
Click on the Comment... button to enter additional information about the virtual CD.
The Comment text is limited to 2047 characters:
In the Virtual CD Settings, you can have the list of track titles from audio CDs added to
the comment field automatically. For details, see page 36).
This completes the configuration of your virtual CD. The 'write' process begins when
you click on Finish, and a window opens showing the progress.
Page 21 of 21
Virtual CD v4 Documentation
You can stop the procedure temporarily by clicking on Pause, or end it before it has
finished by clicking on Cancel.
Even if defective sectors are indicated in the Sector overview (opened by
clicking on More>>), this does not necessarily mean that the virtual CD
created will be defective. Some CDs are purposely made with defective
sectors; these are included on the virtual CD if the Correct bad sectors
option is selected.
Inserting a Virtual CD
There are a number of ways to insert a virtual CD:
• Through the Virtual CD Management program
• Through the quick-launch symbol in the taskbar
• By right-clicking on a virtual CD drive in the Windows Explorer
The latter option is described in the following:
Double-click on the "My Computer" icon in your Windows Explorer. Right-click on the
virtual drive in which you want to insert a virtual CD.
The Virtual CD program has expanded the shortcut menu that opens here, so that it
now includes the item Insert a virtual CD:
Page 22 of 22
Virtual CD v4 Documentation
When you move the mouse cursor to this option, a list of all your virtual CDs is
opened. Click on the desired CD to insert it. You can now work with this virtual CD in
the same manner as if it were a real CD.
Working with the Virtual CD Management Program
Virtual CD Management is the main program in Virtual CD, and should be quite
familiar to users of earlier Virtual CD versions. You can access all Virtual CD functions
and configure all of the available program options in this program window.
Starting the Virtual CD Management Program
You can open the Virtual CD Management program (actually the main program
window in Virtual CD) by double-clicking on the quick-launch symbol in your Windows
taskbar (if you have not deactivated the Quick Start Utility; see page 33), or on the
program icon on your desktop—or of course by using the classic method: Click on the
Start button in your Windows taskbar and select Programs Virtual CD v4 CD
Management.
Unless you have deactivated it in the Virtual CD Settings dialog (see page 33), the
Start Selection dialog starts rather than the Management program:
Page 23 of 23
Virtual CD v4 Documentation
This window offers direct access to the most frequently-used Virtual CD functions. To
open the Virtual CD Management program from here, click on either Manage your
virtual CDs or Disable the Start Selection Dialog. In the latter case, the Start
Selection dialog is not opened any more unless you re-activate it (see page 33).
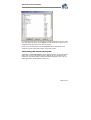
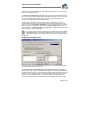
CD Management program window:
This main window is divided into 3 panes. All drives and all virtual CDs are shown on
the left in the usual tree structure. The virtual CDs are shown with their respective
folders, under Virtual CDs/DVDs, and again at the bottom of the tree in a simple list,
under CD Overview. You can change the display mode of this window pane so that it
Page 24 of 24
Virtual CD v4 Documentation
shows only your virtual CD-ROM drives, as was the case in the earlier Virtual CD
program versions (see page 34).
The upper half of the right-hand pane shows all of the virtual CDs that are registered
(see below) in the Management program. The lower half shows the contents of the
selected virtual CD.
Adding Existing Virtual CDs to the Management
Program
When Virtual CD is first installed, it doesn't "know" about any virtual CDs you may
already have on your hard disk. Existing virtual CDs have to be added to the
Management program, or "registered", before you can use them.
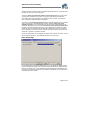
When you select the Find function in the Virtual CD Management program, Virtual
CD searches your system for existing virtual CDs. The CDs found are presented in a
selection dialog, so you can define which ones are added.
button to open the "Find..." dialog. Enter
To add CDs, start by clicking on the
the path to be searched under Search in:..
Under Virtual CD files you can restrict the search to certain file types. You can
choose between container files from earlier Virtual CD versions and .ISO files, which
are created by CD-R programs. Click on Start searching when you are ready to start
the search; all CDs found are shown in the box at the bottom of this dialog.
From the files listed, you can select the desired containers and click on Add selected
image files to register the corresponding virtual CDs in the Virtual CD Management
Page 25 of 25
Virtual CD v4 Documentation
program. Alternatively, you can click on Add all image files to register all of the virtual
CDs found.
In order to integrate new functions in Virtual CD, we have implemented a
whole new file format. The new files have the extension .VC4, rather than the
old .FCD extension. When you add older files to your new Virtual CD
Management program, they are automatically converted to the new file
format.
Once an older .FCD file has been converted to the new .VC4 format, it can no longer
be used with an earlier version of the Virtual CD program. If you think you might want
to have the virtual CD available for use with an older program version, then you need
to select the option to Copy the image files before converting them before you click
on either of the Add... buttons. If you do not select this option, a warning is displayed
before older files are converted. Keep in mind that it is NOT possible to convert the file
back to the old .FCD format once it has been converted to a .VC4 file. When this
warning is displayed, you can click on the Cancel button to go back and select the
Copy files... option.
Deleting Virtual CDs
If you have a virtual CD that you don't need any longer, you might want to delete it.
The command for this is in the Virtual CD Management program.
Select the CD in the upper half of the right-hand window pane and click on Delete.
The following dialog opens, to make sure you don't inadvertently delete a virtual CD
that you wish to keep:
If you do not select the option to Delete the virtual CD from the hard disk before
clicking on OK, then the CD in question is no longer displayed in the CD Management
program, but remains on your hard disk. In this case, you can add it to the
Management program again at any time (see "Adding Existing Virtual CDs..." above).
Creating Customized Virtual CDs
The Virtual CD Editor is a high-performance program module that lets you make
virtual CDs with your choice of content. For example, if you want to 'burn' a custom
CD, you can write the desired tracks to a virtual CD first so that you can test the CD
without using up a blank physical CD. You can also use this function if you want to
make a virtual CD from a software CD, but want to leave out data that you don't
Page 26 of 26
Virtual CD v4 Documentation
need—which would otherwise take up space unnecessarily—such as service pack
installers or demo files.
One way to start the Virtual CD Editor is by clicking on the
CD Management program:
symbol in the Virtual
The Editor program window is divided into 4 panes. The view on the upper left shows
a tree structure with all of your system's physical drives, including all their folders. The
contents of the folder selected here are shown in the upper right-hand pane.
The view on the lower left-hand side shows the structure of the virtual CD currently
being created, and the contents of the element selected here are shown in the lower
right-hand view.
Virtual CD sets the size of the CD to be created at 650 MB, as this is the usual
capacity of blank CDs. To change this setting, click on the "CD Size" button.
Then start selecting the data you wish to include on the virtual CD. To do this, you can
either use 'drag & drop'; that is, drag the desired data from the upper to the lower half
of the window, or click on the Add button, which opens a list where you can select the
type of element you wish to add (audio tracks, directory, or files).
Depending on the type of element you select from this list, a dialog opens where you
can specify the data you wish to add. The dialog shown here, for example, opens
when you select "Audio tracks":
Page 27 of 27
Virtual CD v4 Documentation
If the physical drive selected in the upper left-hand pane of the Editor window contains
an audio CD, the tracks are listed in the box shown here.
The option to Store audio tracks on the hard disk temporarily is especially useful if
your virtual CD will contain audio tracks from a number of different source CDs. When
you activate this function, the selected track(s) from the currently selected CD are
stored immediately on your hard disk, so that you do not need to insert the source CD
again later, when you have finished composing the CD and start the Image Writer.
The next dialog prompts you to enter a name by which the source CD can be
identified:
The name you enter here is the name used later, when the Image Writer is writing the
virtual CD and you are prompted to insert source CDs. It is important to enter a unique
name that clearly identifies the CD.
Once you have put together all of the data you wish to include on your virtual CD, click
on the Create button to write the virtual CD.
Page 28 of 28
Virtual CD v4 Documentation
Alternatively, you can just save the data in a 'definition file', which contains the
information (see below) for creating the virtual CD, without actually making a virtual
CD at this point. To do this, select Save from the File menu. The file is saved with the
extension .VCX, and can be opened in the Virtual CD Editor at a later stage and used
to create a virtual CD.
The .VCX file stores only the structure of the virtual CD you have defined
(references to files and folders), but not the actual data that the virtual CD will
contain. This means that, for example, if you save a definition file that
indicates the folder "C:/Pictures", and then modify the contents of that folder
before making the virtual CD, the virtual CD will contain the modified content, rather
than the content that existed at the time you saved the definition file.
You can edit the content of an existing virtual CD by loading its VC4 file in the
Editor. When the modified CD is written, the changes are stored in a new CD
session which is added by the Image Writer. The resulting virtual CD is thus a
multisession CD.
Properties of a Virtual CD
Some of the settings you configure when creating a virtual CD can be changed later in
the Properties dialog. The easiest way to open this dialog is to right-click on the virtual
CD in the Management window. The Properties dialog is divided into 3 pages:
General Dialog Page
Eject on exit ejects the virtual CD when the computer is shut down; if you do not
select this option, the virtual CD is inserted automatically when you start the computer
again. This setting is especially important for virtual CDs stored on a network. In this
case, this option ejects the CD when you log off the network. If you don't select this
option, the virtual CD is inserted again as soon as the network connection is re-
Page 29 of 29
Virtual CD v4 Documentation
established, and any start program or autostart function defined for the CD starts
automatically.
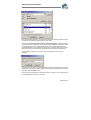
Comment Dialog Page
This dialog is fairly self-explanatory. You can enter up to 2047 characters here, to
provide additional information about the virtual CD.
Statistics Dialog Page
The fields on the Statistics page cannot be edited, but provide you with statistics on
the virtual CD.
Page 30 of 30
Virtual CD v4 Documentation
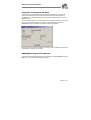
Properties of a Physical CD Drive
The properties of a physical CD-ROM drive provide information not only about its
performance features and drivers, but also indicate what methods it supports for
reading data. The newer the drive, the better the chances that it supports all of the
available options.
To check these properties, first load a data CD in a physical drive and then select that
drive in the Virtual CD Management program. Open the Edit menu and select
Properties and click on Test for an overview of the drive properties:
If the drive does not support the functions you require, select a different physical drive
(if possible) for creating your virtual CD.
Adding/Removing Virtual CD Drives
To open the dialog for adding and removing virtual drives, select Edit drives from the
Edit menu in the Virtual CD Management program:
Page 31 of 31
Virtual CD v4 Documentation
In the example shown above, the drive letter K: has been selected for use as a virtual
drive. After selecting a drive, click on Refresh and then restart the computer; the new
virtual CD drive is then shown in the Windows Explorer.
If there is only one virtual drive, then the Set drives button is deactivated, as the
Virtual CD program requires that at least one virtual drive exists.
Customizing the Virtual CD Program
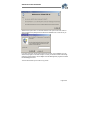
Select View Virtual CD settings in the Management program to open the Settings
dialog. Here you can configure the program in detail to suit your requirements and
preferences. The Settings dialog is divided into different categories, each on its own
dialog page (Global, CD Management, Editor, etc.) :
Page 32 of 32
Virtual CD v4 Documentation
Global Dialog Page
The Current language setting applies to all Virtual CD v4 programs. You need to
restart your computer after changing this setting.
The Current symbol style setting lets you choose between the Windows XP and
Windows 98/Me/NT4/2000 styles for the symbols displayed in the main program, the
menu bar, and in program windows. This setting does not affect the functioning of
Virtual CD.
The Default image folder is the default folder for storing container files on the hard
disk when a new virtual CD is created. This path is used automatically by the Image
Wizard when creating a virtual CD. If you enter a different path in the Image Wizard
dialog for a container file name, then that path is used instead of this default.
Make sure the directory you define here is on a hard disk that has sufficient
space available for your virtual CDs.
If you activate the Use the Virtual CD selection program option, then the Start
Selection dialog (see page 23) is opened rather than the Management program when
Virtual CD is started.
When you install the Virtual CD program, the Virtual CD Quick Start Utility is
automatically added to the quick-launch section of your Windows taskbar (on the far
right). If you don't want this icon on your taskbar, deselect the Start the Quick Start
Utility automatically on system start option here.
Activate the Retrieve audio CD information from CDDB² server option to have
Virtual CD download the album title, track titles and artist's name of audio CDs through
Page 33 of 33
Virtual CD v4 Documentation
the Internet, from the CDDB Service. Please deactivate this option if your computer
does not have Internet access.
The Show popup information texts option lets you activate and deactivate the tool
tips. A tool tip is the brief explanatory text that appears when the mouse cursor rests
on a given operating element. Once you know your way around the Virtual CD
program, you might want to deactivate these texts.
The last option concerns one of the new functions in Virtual CD: you can now
configure folders for sorting your virtual CDs, which can make them easier to keep
track of. The option Virtual CDs displayed are... lets you define whether your virtual
CDs are shown in the right-hand window pane sorted by category, if you want to
view the folders, or all listed together in an overview, if you just want to see a list of
all the virtual CDs, without their folders.
If you have a large number of virtual CDs, we recommend using the sorted
by categories option and assigning designations to the folders that clearly
identify the contents, such as "DVD Videos", "Music CDs" and "Applications",
for example.
CD Management Dialog Page
This page lets you configure more display options for your Virtual CD Management,
the main program window in Virtual CD.
The Current mode of the CD Management program view defines the left-hand
window pane, which shows the virtual CD drives. When you select the Hi-tech mode,
the left hand pane shows not only the virtual CD drives but also the physical drives, as
well as all of your virtual CDs, both a in a plain list and sorted by category in a tree
structure, in their separate folders. In this mode, the Drive View gives you direct
access to all CD-ROM drives and all virtual CDs. The classic view shows only the
Page 34 of 34
Virtual CD v4 Documentation
virtual CD drives, as was the case in the earlier Virtual CD versions. This mode might
be easier to work with for VCD beginners.
The option Show only Virtual CD symbols in the image view gives you the choice
of having only Virtual CD icons shown, or using the symbols that come with the
original CDs. Not all CD applications come with their own symbols. For those that
don't, a Virtual CD symbol is used in the display.
The option for the Double-click function determines what happens when you doubleclick on a virtual CD in the Management program. Select the Show the virtual
CD/DVD properties if you want a double-click to open the Properties dialog for the
virtual CD. Alternatively, you can select the Insert the virtual CD in the default drive
to insert a virtual CD by double-clicking on it. If no default drive is defined for a given
virtual CD, then it is inserted in the first available virtual drive found. If no virtual CD
drive is available, then the virtual CD in the first virtual drive found is ejected, and the
virtual CD in question is inserted in its place.
The boxes at the bottom of this page let you define which columns are shown, as well
as the order they appear in, when 'details' are shown in the CD View.
Editor Dialog Page
On the dialog page for Virtual CD Editor settings, you can define the default directory
for the temporary files stored when creating a customized virtual CD. Make sure the
directory you define here is on a hard disk that has sufficient space available for the
temporary files. All files in this directory are deleted automatically once the virtual CD
in question has been created.
Page 35 of 35
Virtual CD v4 Documentation
Creating Virtual CDs Dialog Page
One of the most important options is the selection of the copy mode. The new Easy
Copy Mode has been added especially for users who want to create virtual CDs as
quickly and easily as possible. Deactivating this option sets the Image Wizard to the
Expert Copy Mode.
In the Easy Copy Mode, almost all of the settings for creating a virtual CD are
configured automatically:
•
•
•
•
If there is only one drive that can be used as a source drive, then this drive
is selected automatically.
A 1:1 image of the source CD is created. When making a virtual audio CD,
for example, you cannot choose which tracks are included or excluded.
The container file for the virtual CD is given a name automatically.
The source CD-dependent settings are configured automatically based on
the results of Virtual CD's analysis of the source CD structure.
The Easy Copy Mode is definitely the fastest and least complicated method for
creating virtual CDs.
Some CDs actually require that certain configurations are set manually, to
ensure that the virtual CD functions properly. In such cases, you need to
deactivate the Easy Copy Mode here, so that you can edit all of the
configuration options (including password protection and hotkeys, for
example).
Activate the Use virtual drives as source drives option to make virtual CDs from
other virtual CDs. Even with this option selected, the only virtual CDs you can use as
sources for other virtual CDs are audio CDs and data CDs created using the normal
Page 36 of 36
Virtual CD v4 Documentation
copy method. To make a virtual CD from another virtual CD, select the source virtual
drive and then activate the Create function in the Virtual CD Management program.
The Enable CD/DVD label editing option lets you edit the field for CD labels.
If you select the Create a title list in the 'Comment' field of virtual audio CDs
option, then all track titles from a source music CD are automatically listed in the
"Comment" field of the virtual CD. The "Comment" field can be edited at any time,
regardless of whether this option is selected or not.
The option Eject source CD/DVD after image creation has finished can be useful
for providing a clear indication—by opening the physical CD-ROM drive—that the
virtual CD creation process is finished. Once the virtual CD has been created, the
physical CD is no longer required anyway, and ejecting it automatically can help
prevent confusion.
Once the creation of a virtual CD is completed, the Image Wizard usually opens a
window with a summary of the creation process; including, for example, the time it
took to make the virtual CD. If you select the Close Virtual CD Image Writer
automatically option, the Summary window and the Image Writer are closed
automatically.
The last option on this page lets you adjust the priority given by the operating system
when allotting system resources to the Image Writer for creating a virtual CD. If the
computer has nothing else to do than to create a virtual CD, then the high priority
setting shortens the time this process takes. In this case, the majority of system
resources are given to the Image Writer, and any other programs running are allotted
far less CPU time.
If you plan to do other work with your computer while the Image Writer is running, you
should set the priority to low or medium.
Page 37 of 37
Virtual CD v4 Documentation
Compression Defaults Dialog Page
The defaults you set here are applied automatically by the Image Writer when the
Easy Copy Mode is active, and are presented as defaults that can be overwritten in
the Image Writer when you use the Expert Copy Mode. For detailed information on the
use of data compression, please see "Compression" on page 18.
There are 2 options for data compression settings on this page:
The first option lets you choose one of three compression levels (or "none") as the
default.
If you activate the second option, Virtual CD estimates the results attainable with each
level of compression, and selects a level based on the value you enter under
Compression ratio. This value is the percentage of the total data volume on the
original CD. For example, if you enter 80% as the target compression ratio, then
Virtual CD selects the lowest compression level that can reduce the data volume to
80% of the original volume.
Please don't set the ratio too low, as this could result in Virtual CD selecting
the highest compression level every time—which might put a considerable
strain on system resources. The optimum setting is generally around 70% to
80%.
The setting under Use the compression defaults lets you define whether the
defaults set here are applied only to certain types of source CD. For example,
experience has shown that there is not much point in using compression on videoDVD/CDs, as the data they contain is already highly compressed and further
compression only takes up CPU time without noticeably reducing the data volume of
the virtual CD.
Page 38 of 38
Virtual CD v4 Documentation
The default compression level for the Virtual CD Editor is a separate setting,
configured at the bottom of this page.
Audio Defaults Dialog Page
The default settings for audio tracks that you configure here are applied automatically
when working in the Easy Copy Mode, and presented as defaults that you can
overwrite in the Image Wizard when working in the Expert Copy Mode.
Please see "Settings for Audio " on page 15 for details on audio track settings.
Troubleshooting
Some circumstances can lead to difficulties with your Virtual CD program. We've listed
these in the following, along with descriptions of how to solve or get around the
problems:
The source CD-ROM drive doesn't support the RAW mode for reading data
Virtual CD "asks" the source drive whether it supports the RAW mode or not, but
some drives give an incorrect answer. Solution: If possible, use a different CD drive for
your source CD.
The source CD or DVD has a special type of copy-protection
Virtual CD analyzes source CDs to determine both their data structure and the
optimum method for reading their data. Of course, Virtual CD doesn't have standard
settings for absolutely every single type of CD that is available on the market. If Virtual
CD doesn't recognize the structure of a given CD, it may help to set certain options
manually. First, deactivate the Easy Copy Mode (if it's active) in the Virtual CD
Page 39 of 39
Virtual CD v4 Documentation
Settings (see page 36) and then try configuring other settings in the Image Wizard
when defining your virtual CD. Refer to the instructions starting on page 12 in this
manual for detailed information on the options available. Unfortunately, if the source
CD is a video DVD with CSS copy protection, then no combination of settings will
work! There is no way to get around this copy protection technique, due to legal
technicalities.
The application on a software CD cannot be installed from a virtual CD
If the application has already been installed from the physical CD, it probably
"remembers" the drive letter it was installed from, and looks for its data there rather
than on the virtual CD. Solution: deinstall the application in question and then install it
from the virtual CD. NOTE: Before running the deinstallation, make sure you save any
user data that was generated with that application; otherwise, it might be deleted
during deinstallation.
Other applications interfere with Virtual CD functions
Before its release, Virtual CD v4 was thoroughly tested for compatibility with the most
widely used computer programs. However, there are innumerable possible
combinations of system configurations, and we couldn't test every single possibility.
Please check the Virtual VC Web site at www.virtualcd-online.com for up-to-date
information on specific compatibility problems that have been discovered in
combination with other software products.
Technical Support
If you have any problems with Virtual CD v4, we'd like to ask that you check the
manual, the on-line Help and the continuously updated Web pages at www.virtualcdonline.com for assistance.
Naturally we are constantly striving to improve the Virtual CD software. Software
upgrades are released in the form of Service Packs that you can download from the
Virtual CD Web site.
If you still have questions, please do not hesitate to contact us. For information on how
to reach us, see the Readme file installed with Virtual CD or check our Web pages.
You have now reached the end of the manual. Thank you once again for choosing
Virtual CD, and we hope you enjoy using it!
We are always interested in hearing from our customers, whether you have questions,
suggestions or complaints. After all, we make this software for you, so it's important for
us to know what you want! Please send any comments you have about Virtual CD to
[email protected]
Page 40 of 40