1
Installation Instructions
Single Package Air Conditioners
tactor ‘L’ terminals on the unit electrical control plate.
Check all screw terminals to ensure they are tight.
NOTE: If an Electric Heat Accessory is installed, refer to
the Electric Heat Accessory Installation Manual to determine line voltage connections. The Electric Heat Accessory mounts inside the unit. Field supplied line voltage wires
for the Electric Heat Accessory (separate from the field
supplied line voltage wires to the unit) connect to the circuit
breaker(s) in the Electric Heat Accessory.
Converting 230V Units to 208V
5. Replace the electrical access panel.
Field Installed Equipment
Wiring to be done in the field between the unit and other devices, or between separate devices which are field
installed and located, MUST NOT exceed the temperature
limitations for type T wire and MUST be installed according
to the manufacturer’s instructions for the devices.
Final Electrical Check
Make a final wiring check to be sure system is correctly
wired. Inspect field installed wiring and the routing to ensure that rubbing or chafing due to vibration will not occur.
To convert 230V units to 208V:
1. Turn electric power OFF.
2. Remove the electrical access panel.
NOTE: Wiring MUST be installed so it is protected from
possible mechanical damage.
3. Locate the 24V control transformer.
4. Remove wires from the terminal labeled “240V” on
the 24V control transformer and reconnect them to
the 208V terminal of the 24V control transformer.
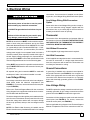
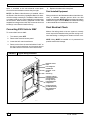
FIGURE 5
Typical Wiring Installation
Electrical Control
Plate
Low Voltage Terminal Board
Contactor ‘L’ Terminals
Ground lug
Carefully route low
voltage wires behind
unit cornerpost
through wire clip
Field supplied line
voltage wires
Knockout for Electric Heat Accessory
field supplied line
voltage wires
80-30-53
8
513 01 1702 00