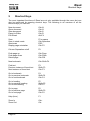
1
User Manual iRead and iRead Now Version 3.0 Horb, September 2014 © Handy Tech Elektronik GmbH All rights reserved Ha n d y T e ch E le kt ro n ik Gm b H; B ru nne n st ra ße 1 0; 72 16 0 Ho rb ; G e rm a n y Phone: +49 7 4 5 1 55 46 0; Fax: +49 7 4 5 1 55 46 67 Email: inf [email protected] Internet: www.handytech. de iRead Table of Content HandyTech ElektronikGmbH Table of Content 1 General ............................................................................................................... 3 1.1 Foreword ..................................................................................................... 3 1.2 iRead at a Glance ........................................................................................ 3 2 Installation.......................................................................................................... 4 2.1 Scope of Delivery ....................................................................................... 4 2.2 System Requirements for iRead ............................................................... 4 2.3 System Requirements for iRead Now cameras ....................................... 5 2.4 Installing iRead on a PC ............................................................................. 5 2.5 Installation of Sceye camera for iRead Now ............................................ 5 2.6 Installation of camera for iRead Now A3 .................................................. 6 2.7 Technical features of iRead Now Sceye camera ...................................... 6 2.8 Technical features of iRead Now A3 camera ........................................... 6 3 Using iRead ........................................................................................................ 7 3.1 First Steps ................................................................................................... 7 3.2 Tips for using iRead Now........................................................................... 8 4 The iRead Menu ................................................................................................. 9 4.1 Document .................................................................................................... 9 4.1.1 New (ctrl+n) ....................................................................................... 9 4.1.2 Open (ctrl+o) ...................................................................................... 9 4.1.3 Save (ctrl+s)....................................................................................... 9 4.1.4 Save as .............................................................................................. 9 4.1.5 Import............................................................................................... 10 4.1.6 Export .............................................................................................. 10 4.1.7 Export to Editor (ctrl+d) .................................................................... 10 4.1.8 Exit ................................................................................................... 10 4.2 Scan ........................................................................................................... 11 4.2.1 Scan................................................................................................. 11 4.2.2 Abort Scan ....................................................................................... 11 4.2.3 Page orientation ............................................................................... 11 4.2.4 Stack ................................................................................................ 11 4.3 Page ........................................................................................................... 12 4.3.1 Push Up ........................................................................................... 12 4.3.2 Push Down ...................................................................................... 12 4.3.3 Delete .............................................................................................. 12 4.3.4 Invert Page Order ............................................................................ 12 4.4 Bookmark .................................................................................................. 12 4.4.1 New.................................................................................................. 12 4.4.2 Delete .............................................................................................. 13 4.4.3 Delete All ......................................................................................... 13 4.5 Navigation ................................................................................................. 13 4.5.1 Find .................................................................................................. 13 4.5.2 Bookmarks ....................................................................................... 14 4.5.3 Heading ........................................................................................... 14 4.5.4 Page ................................................................................................ 15 4.6 Settings ..................................................................................................... 15 4.6.1 Column Separation .......................................................................... 15 Page 1 HandyTech ElektronikGmbH iRead Table of Content 4.6.2 Preferred Scanner ........................................................................... 16 4.6.3 Highlight when Navigating ............................................................... 16 4.6.4 Highlight New Text ........................................................................... 16 4.6.5 Beep when Recognition Complete ................................................... 16 4.6.6 Timing .............................................................................................. 16 4.6.7 Font and Color ................................................................................. 16 4.6.8 Editor ............................................................................................... 16 4.6.9 Save Images .................................................................................... 17 4.6.10 Image format.................................................................................... 17 4.6.11 Reset ............................................................................................... 17 4.7 Help ............................................................................................................ 17 4.7.1 Intro.................................................................................................. 17 4.7.2 Manual ............................................................................................. 17 4.7.3 Info ................................................................................................... 17 5 Shortcut Keys .................................................................................................. 18 6 Technical Support ........................................................................................... 19 7 Copyright .......................................................................................................... 20 Page 2 iRead General 1 HandyTech ElektronikGmbH General Thank you for choosing iRead. Please take the time to study this user manual. We have done our best to make using iRead as simple and intuitive as possible. Nevertheless, this user manual will help you to use iRead even better. 1.1 Foreword iRead is the result of careful development and testing. However, should you have suggestions for improvement, please contact your responsible Handy Tech consultants directly. Your feedback is important to us. We hope you will enjoy working with iRead. 1.2 iRead at a Glance iRead is a software-based text recognition system, i.e. it allows you to scan printed documents and read them using your screen reader. In addition to printed text, iRead can also recognize text in PDF and RTF files as well as most popular image formats. Instead of with a scanner, you can use iRead as a camera-based text recognition system. This feature, called iRead Now, has the following advantages: Higher speed: Whereas a scanner captures your document line by line, the camera instantly takes a complete picture. Greater mobility: The camera can be folded for easy transport and, combined with a laptop, makes for a comfortable mobile reading solution. After scanning or photographing a document with iRead, you can use its navigation functions to comfortably move within the text and quickly find the passages most relevant to you. For example, you can navigate to a particular page or heading or perform a full text search of the entire document. In addition, you can place as many bookmarks as you wish at interesting positions in the text to be able to return to them efficiently. Use iRead as your standard pdf reader Many pdf documents include text in image format, which cannot read out by screen readers. Also photographed text, which is only available in jpg format. With iRead 3.0.2.0 you can open these documents easily within Windows Explorer. Just choose the document you want to read and open the context menu by pressing the context menu key or the right mouse key. Choose the “open with” function. A Windows dialog appears where you can choose the application. If iRead is not listed, you can choose it using the “standard program” button. To edit your documents in a word processor of your choice, you can export them to text or rich text format. iRead can also generate HTML files so you can read your documents in a web browser or conveniently publish them on the web. Page 3 HandyTech ElektronikGmbH 2 iRead Installation Installation This chapter contains useful information about installing iRead. Please read it carefully to avoid problems in bringing iRead into service. 2.1 Scope of Delivery Please make sure the delivery contains all items listed here. If a component is missing or damaged, please contact us to obtain a replacement. The scope of delivery contains: iRead installation CD including this manual Short Reference in Braille If you have purchased "iRead Now", the shipped box includes the following additional items: Silver Creations sceyeX-document camera Carrying bag SceyeX-scanpad CD with driver for sceyeX USB-cable for sceyeX If you have purchased "iRead Now A3", the shipped box includes the following additional items: A3 document camera A3 scanpad USB-cable CD with driver for older Windows systems 2.2 System Requirements for iRead iRead runs on the following operating systems: Microsoft Windows Vista Microsoft Windows Server 2003 Microsoft Windows Server 2008 Microsoft Windows 7 Microsoft Windows 8 / 8.1 Both 32 and 64 bit versions of all of the above are supported. We recommend running iRead on a pc with at least 256 MB of main memory and a processor with at least 800 MHz. You can gain a significant speed increase by using iRead on a multicore system. Page 4 iRead Installation HandyTech ElektronikGmbH iRead can be used with all scanners that support at least one of the protocols TWAIN and WIA. This should include all commercially available scanners. When in doubt, contact your scanner manufacturer. 2.3 2.4 System Requirements for iRead Now cameras 1 GHz Pentium or higher Min. 500 MB RAM Min. 250 MB free memory on harddisk Min. 1024x768 screen resolution free USB 2.0 port CD-Drive for software and driver installation Installing iRead on a PC Insert the CD labelled “Installation” from your iRead package into your computer's CD ROM drive. The installation program usually starts automatically. If it does not, manually start the program setup.exe located on the CD. The first step is to select the desired language. Available languages are English and German. After deciding on English, press OK. Next, iRead will ask you into which folder the program files should be installed. By default, iRead is installed into the folder "C:\Program Files\Handy Tech\iRead“. If you would like to change the destination folder, you can do so now. Press the "Next" button. During the next step, iRead wants to know if you would like a link in the start menu and how it should be named. By default, a link with the name "iRead 1.0" is created. This makes it easier to launch iRead later. If you don't want a start menu link, check the "Don't create shortcuts" box. Press the "Install" button. The required files will be copied to your hard drive and the program will be installed. You will be informed of the successful installation whereupon you may dismiss the installer by pressing the "Close" button. 2.5 Installation of Sceye camera for iRead Now Please perform the following steps once in order to use iRead Now: 1. Insert the sceyeX driver CD into your computer's CD ROM drive. 2. Usually the installation program starts automatically. If this does not happen within 30 seconds, please manually start the file "sceye_setup.exe" on the CD. 3. Follow the prompts of the installer to install sceyeX software on your computer. 4. Open the camera. Using the included USB cable, connect the camera to your computer, and wait until Windows informs you that the device is ready for use. 5. Start iRead. Page 5 iRead HandyTech ElektronikGmbH Installation 6. Select the command "Preferred scanner" from the "Settings" menu. 7. Select "Silver Creations Sceye (iRead Now)" from the list. 8. Confirm your selection by pressing the enter key. 2.6 Installation of camera for iRead Now A3 Please perform the following steps once in order to use iRead Now A3: 1. Open the camera. Using the included USB cable, connect the camera to your computer, and wait until Windows informs you that the device is ready for use. 2. Start iRead. 3. Select the command "Preferred scanner" from the "Settings" menu. 4. Select "Other Manufacturer Other Camera Model" from the list. 5. Confirm your selection by pressing the enter key. 2.7 2.8 Technical features of iRead Now Sceye camera Sensor: 10 MPixel CMOS Sensor / RGB or Monochrom Configuration: Laser & LED-light powered by USB Capture size: A4 – 210 mm x 297 mm Color: silver metallic Interface: USB 2.0 / Twain Power supply: 5 V powered USB Dimensions: 10 cm (3.94”) width, 12 cm (4.72”) depth, 36 cm (14.17”) high Weight: 740 Gramm (1.63 lb) Technical features of iRead Now A3 camera Sensor: 5 MPixel Configuration: Laser & LED-light powered by 2 USB Capture size: A3– 297 mm x 420 mm Color: anthrazit Interface: 2 x USB 2.0 / Twain Power supply: 5 V powered USB Dimensions: 13 cm (5.12”) width, 10 cm (3.94”) depth, 33 cm (13”) high Weight: 700 Gramm (1.54 lb) Page 6 iRead Using iRead 3 HandyTech ElektronikGmbH Using iRead To start the program, choose "iRead 1.0\iRead" from the start menu. The iRead window opens with the title "Untitled.htr - iRead". If you have previously saved a document, the document last saved will be opened and the cursor will be placed at the position where you last saved. Please make sure your scanner is connected to the PC and turned on. When using iRead Now please make sure that the camera´s driver software is installed like described in chapter 2.5 and the camera is opened and connected via USB to your computer. 3.1 First Steps To read a document in iRead, follow these steps: If the focus is not in the text area, but for example on the "Text" tab, you can move there by pressing [Tab]. a) Using a scanner: place the document on the glass plate of your scanner, printed side downward, and then press [F2] or [space].There may be a delay of a few seconds depending on the scanner used, then the scanner will begin scanning the page. After iRead has received the image from the scanner, it will immediately begin converting it to text. As soon as the process completes, you will be informed of this fact by a sound. b) Using the camera with iRead Now: Place the camera base into the hole of the scanpad. Place your document in the middle of the scanpad. The distance from the document to the camera base and the lower edge of the scanpad should be the same. Press [F2] or [space]. You can hear a click sound when the picture was taken. In the document area of the iRead window you will now find the text of the scanned or photographed page. You can zoom in and zoom out using [Ctrl+] and [Ctrl-]. If you scan another page now, it will be appended to the page you just scanned. In this way you create a multipage document. You can also save these page(s) to your PC. For this you choose "Save" or "Save as" from the "Document" menu or press [Ctrl+S]. The standard Windows dialog for saving documents will open. Here you may choose the folder and a name for the document. After you have given your document a name, it will be shown in the title bar of the iRead window. Documents scanned and saved with iRead have the extension "htr". You can open an "htr" document only with iRead. If, for instance, you would like to open your document with Microsoft Word, you must export it first. See section "4.1.6 Export". If you would like to scan another page without appending it to the current document, you can remove the current document from the iRead window first. Any copies previously saved to disk will not be erased. Choose the "New" command from the "Document" menu. The iRead window will be emptied and the title bar reset to "Untitled.htr". Page 7 HandyTech ElektronikGmbH iRead Using iRead On the tab sheet “Image” you can see the photography of the paper. Use [Ctrl+Tab] to toggle between the tab sheets “Image” and “Text”. 3.2 Tips for using iRead Now For best results, always use the camera with the included scanpad. Place the camera base into the rectangular hole in the scanpad. To open the camera, softly press the movable part against the static base. In the same way the camera can be closed again after use. Note that the camera works only when it is completely open. If possible, place your document in the approximate center of the scanpad. It should be at equal distance from the base of the camera and the opposite end of the scanpad. A camera click sound indicates that the camera is taking a picture. iRead Now can be used without problems under most lighting conditions. Direct sunlight, however, can negatively impact the result. In these cases it is recommended that you place the camera outside of direct sunlight, or temporarily darken the room. Page 8 iRead The iRead Menu 4 HandyTech ElektronikGmbH The iRead Menu You may access the various functions of iRead using the iRead menu. You enter the iRead menu by pressing [Alt]. Most functions also have shortcut keys so you don't need to use the menu to activate them. Chapter "5 Shortcut Keys" gives an overview of all the shortcut keys. 4.1 Document The "Document" menu contains all functions you need to manage your scanned documents. You can also exit iRead from this menu. 4.1.1 New (ctrl+n) This menu item starts a new, empty document, i.e. all currently loaded text is deleted and the document name reset to "Untitled.htr" as if you had started iRead for the first time. You may be asked if you would like to save the changes to the current document first. The shortcut key is [Ctrl+N]. 4.1.2 Open (ctrl+o) If you have previously saved scanned documents with iRead, you may open them again. It is not necessary to scan your documents more than once. Please note that you can only open documents with the "htr" extension. When you choose this command, the standard Windows dialog for opening files will be displayed. You may be asked if you would like to save the changes to the current document first. The shortcut key for opening a document is [Ctrl+O]. 4.1.3 Save (ctrl+s) After scanning one or more pages, you may save them under a name of your choice. So you won't have to scan this document a second time to access it again. If the document has never been saved, the Windows standard "Save as" dialog will open, letting you choose the name and destination folder. However, if the document has been saved once before, it will be saved again in the background without opening a dialog box. Bookmarks will be saved along with the document. The shortcut for saving is [Ctrl+S]. 4.1.4 Save as After scanning one or more pages, you may save them under a name of your choice. You won't need to scan this document a second time to access it again. The standard Windows "Save as" dialog will open, letting you choose the name and destination folder. Bookmarks will be saved along with the document. This command can only be performed through the menu. Page 9 HandyTech ElektronikGmbH iRead The iRead Menu 4.1.5 Import iRead not only lets you scan printed documents but you can also import digital files. The advantage is that, for instance, you won't have to print and then scan a document you receive by email to open it in iRead. iRead can also recognize, and make accessible, textual content of image files. The following file formats can be imported into iRead: Text Format (txt) Portable Document Format (pdf) Rich Text Format (rtf) Image files (tif, pcx, bmp, jpg, png and gif) After choosing the Import command, the standard Windows dialog for opening files will display, letting you choose the name and folder of the desired file. This command always starts a new document. You may be asked if you would like to save changes to the current document first. You can interrupt a running import process at any time by pressing [space]. This will retain the document that was loaded before you chose "Import“. The "Import" command can only be performed through the menu. 4.1.6 Export You cannot edit the text of a document directly within iRead. To edit the text, you will have to export it first. Then you can open and edit the text with a word processing program like Microsoft Word or Notepad. iRead can export the following file formats: Text format (txt) Web page (htm, html, xhtml or xml) Rich Text Format (rtf) After choosing the Import command, the standard Windows dialog for saving files will display, letting you choose the type, name and folder of the desired file. The export function can only be performed through the menu. 4.1.7 Export to Editor (ctrl+d) If you want to edit the scanned document immediately, you can open it directly within an editor when choosing this function. The editor, which will be opened, can be chosen within the settings menu. Per default, it is Microsoft Word. The shortcut for opening the editor is [Ctrl+D]. 4.1.8 Exit This will exit iRead. If the current document has never been saved or has been modified since it was last saved, iRead will ask if you would like to save the document first. If you choose to save the document, the Windows standard "Save as" dialog may open. Otherwise iRead will exit without saving the document. The shortcut for exiting iRead is [Alt+F4]. Page 10 iRead The iRead Menu 4.2 HandyTech ElektronikGmbH Scan The commands in the "Scan" menu allow you to start or interrupt scanning and to find out the orientation of the page on the scanner. 4.2.1 Scan To read a printed document in iRead, place it on the glass plate of the scanner, printed side pointing downward, then choose the "Scan" command from the "Scan" menu. Alternatively, you can press [F2] or [space]. After scanning and recognizing the document, iRead plays a sound and displays the text in the text area of the iRead window. If no page was placed on the scanner, or the page was placed onto the glass plate the wrong way up (backside pointing down), iRead will show a message in the document area informing you that no text was recognized. 4.2.2 Abort Scan If you started the scanning process by accident and would like to abort it, choose "Abort Scan" from the "Scan" menu or press [Esc]. The scanning process will be aborted (which may take a moment), and the text in the document area of the iRead window remains unchanged. 4.2.3 Page orientation If you are unsure how the document was aligned with respect to the glass plate, choose the "Page orientation" command from the "Scan" menu or press [Ctrl+F2]. iRead will tell you the orientation of the page you last scanned. Important: iRead can determine the orientation only after scanning the page. Possible messages include: "The page last scanned had portrait orientation" "The page last scanned had portrait orientation and was upside down" "The page last scanned had landscape orientation and was upside down" 4.2.4 Stack The stack function allows you to scan multiple pages at once, then recognize them later in a second step. This is especially useful in combination with the camera and iRead Now. For example, you can quickly take pictures of all the pages of a book, then have iRead recognize them without requiring further user attention. The "Stack" menu has the following three entries: 1. Start: This starts stack recognition. You will hear three beeps before the first picture is taken. During this time you can move your hands from the keyboard to the document to position it properly with respect to the camera or scanner, and to hold it in place if necessary. The time between two subsequent scans can be set using the "Settings" menu (see section 4.6.6 Timing). To exit stack scanning, press the ESC key. A dialog box appears in which you can choose if you wish to recognize the scanned pages now or later, to scan additional pages, or to discard the entire stack. 2. Recognize: If you previously started the stack function and then chose to "recognize later," this menu item allows you to have iRead recognize the previously scanned pages. The image data will be automatically deleted from your hard drive as soon as Page 11 HandyTech ElektronikGmbH iRead The iRead Menu recognition completes. While iRead is recognizing and displaying the pages one by one, the status bar at the bottom of the window will display the message "Recognizing stack." As soon as iRead has recognized all pages, a notification sound will be played. 3. Discard: The page images scanned by the stack function will be deleted. This is only necessary if iRead has not yet recognized the images. 4.3 Page After scanning several pages, the commands in the "Page" menu let you change the order of certain pages, delete individual pages or invert the page order globally. 4.3.1 Push Up Normally, iRead appends new pages after the end of the page you last scanned. However, if you would like to move the current page before the page you last scanned, choose the "Push up" command from the "Page" menu or press [Ctrl+PgUp]. Please make sure the cursor is positioned within the page you would like to push up. This function is very helpful when you have scanned a double-sided page and you realize you scanned the back side first. 4.3.2 Push Down This function behaves analogous to the "Push up" command. If you would like to move the page containing the cursor down in the document, choose the "Push down" command from the "Page" menu or press [Ctrl+PgDn]. 4.3.3 Delete You can delete a single page from the document area of the iRead window without having to delete the entire document. For example, if you have scanned a multipage document and realize it has got mixed up with a completely different page, choose "Delete" from the "Page" menu or press [Ctrl+Del]. Please make sure the cursor is located within the page you would like to delete. iRead will ask for confirmation before deleting the page. 4.3.4 Invert Page Order If you have scanned multiple pages starting with the last one and finishing with the first, you can invert the page order in a single step. Just select the "Invert page order" from the "Page" menu. 4.4 Bookmark You can place as many bookmarks as you wish into an iRead document to make navigating the document easier. The "Bookmark" menu allows you to place and delete bookmarks. Bookmarks are saved along with the document. 4.4.1 New To place a bookmark into the document, place the cursor at the desired position and choose the "New" command from the "Bookmark" menu or press [Ctrl+Shift+F4]. The "New bookmark" dialog will open. At this point you can give your bookmark an arbitrary unique name. This can also include special characters and numbers. If you assign a name which is already taken, iRead will inform you of this fact. You can then decide to move this Page 12 iRead HandyTech The iRead Menu ElektronikGmbH bookmark to the new position or give another name to the new bookmark. The positions of bookmarks will be underlined in the iRead document area. 4.4.2 Delete If you have placed one or more bookmarks, you can delete them at any time. Just choose the "Delete" command from the "Bookmark" menu. The "Delete bookmark" dialog opens, listing the names of all existing bookmarks along with their page numbers. You can now select the bookmark to delete and confirm by pressing "OK“. To prevent you from accidentally deleting a bookmark, iRead will ask for confirmation before deleting the bookmark. 4.4.3 Delete All If you have placed one or more bookmarks, you can delete them at any time. To delete all existing bookmarks at once, choose the "Delete all" command from the "Bookmark" menu. The "Delete all bookmarks" dialog opens, informing you of the number of bookmarks. If you confirm by pressing "Yes," all bookmarks will be deleted from the document. 4.5 Navigation In order for you to easily find specific passages in your document, iRead offers the commands in the "Navigation" menu. They allow you to search for specific text or move through the document by heading, by page, or by bookmark. 4.5.1 Find Using the "Find" menu you can search for specific text inside your iRead document. This includes the three submenu commands "Find text," "Previous instance" and "Next instance“. 4.5.1.1 Find Text To search for specific text within the iRead document, choose the "Find text" command from the "Navigation\Find" menu or press [F3]. The "Find text" dialog opens, containing the entry field "Search for" and the two check boxes "Match whole word only" and "Match case". Type the text you would like to find into the text field. If you check "Match whole word only", iRead will find only those instances of the text which are enclosed by spaces or other separators. Example: You have typed "she" into the text field. If the box is not checked, iRead will also find text passages like "Usher" or "sheet“. The check box "Match case" makes iRead pay exact attention to the capitalization you type. If the box is checked, iRead will find the word "usher" but not "Sherwood Forest". 4.5.1.2 Previous Instance If the text you typed into the "Find Text" dialog occurs more than once inside the document, choosing the "Previous instance" command from the "Navigation\Find" menu, or pressing [Shift+F3], will jump to the previous instance, moving backwards through the text. If you are already on the first instance, iRead will jump to the last instance and play a sound. Page 13 HandyTech ElektronikGmbH 4.5.1.3 iRead The iRead Menu Next Instance If the text you typed into the "Find Text" dialog occurs more than once inside the document, choosing the "Next instance" command from the "Navigation\Find" menu, or pressing [Ctrl+F3], will jump to the next instance, moving forward through the text. If you are already on the last instance, iRead will jump to the first instance and play a sound. 4.5.2 Bookmarks If you have placed one or more bookmarks using the "Bookmark" menu, you can use the "Navigation\Bookmark" menu to navigate between those bookmarks. 4.5.2.1 Go to If you choose "Go to" from the "Navigation\Bookmark" menu or press [F4], the "Go to bookmark" dialog opens. This dialog lists all defined bookmarks by name and corresponding page number. You can now select the desired bookmark and confirm by pressing "OK". The cursor will then jump to the corresponding position in the document. 4.5.2.2 Previous If you have placed more than one bookmark, the command "Previous" in the "Navigation\Bookmark" menu or pressing [Shift+F4] lets you jump to the previous bookmark without having to choose the name. If you are already on the first bookmark, iRead will jump to the last bookmark and play a sound. 4.5.2.3 Next If you have placed more than one bookmark, the command "Next" in the "Navigation\Bookmark" menu or pressing [Ctrl+F4] lets you jump to the next bookmark without having to choose the name. If you are already on the last bookmark, iRead will jump to the first bookmark and play a sound. 4.5.3 Heading When scanning a document, iRead searches for boldface text or lines with increased spacing and treats them as headings. This makes navigation easier when you would like to jump by heading. If iRead has not detected any headings, this navigation option is not available. 4.5.3.1 Go to When you choose the command "Go to" from the "Navigation\Heading" menu or press [F5], the "Go to heading" dialog will open. This dialog lists all text passages detected as headings, along with their corresponding page numbers. You can now select the desired heading and confirm by pressing "OK“. The cursor will then jump to the corresponding position in the document. 4.5.3.2 Previous If iRead has detected more than one heading, the command "Previous" in the "Navigation\Heading" menu or pressing [Shift+F5] lets you jump to the previous heading without having to choose it from the list. If you are already on the first heading, iRead will jump to the last heading and play a sound. Page 14 iRead HandyTech The iRead Menu 4.5.3.3 ElektronikGmbH Next If iRead has detected more than one heading, the command "Next" in the "Navigation\Heading" menu or pressing [Ctrl+F5] lets you jump to the next heading without having to choose it from the list. If you are already on the last heading, iRead will jump to the first heading and play a sound. 4.5.4 Page If a scanned document consists of several pages, you can also navigate by page. 4.5.4.1 Go to If you choose the "Go to" command from the "Navigation\Page" menu or press [F6], the "Go to page" dialog will open. This dialog lists all the pages along with their respective first five words. You can now choose the desired page and confirm by pressing "OK". The cursor will then jump to the corresponding position in the document. This is useful only if the document consists of multiple pages. Even if the document contains just one page however, you can jump to the start of the page this way. 4.5.4.2 Previous If the document consists of more than one page, you can jump to the previous page without having to select it from the list by choosing the "Previous" command from the "Navigation\Page" menu or by pressing [Shift+F6]. If you are already on the first page, iRead will jump to the last page and play a sound. 4.5.4.3 Next If the document consists of more than one page, you can jump to the next page without having to select it from the list by choosing the "Next" command from the "Navigation\Page" menu or by pressing [Ctrl+F6]. If you are already on the last page, iRead will jump to the first page and play a sound. 4.6 Settings The commands in the "Settings" menu allow you to customize iRead to better suit your individual needs. 4.6.1 Column Separation iRead automatically detects if the scanned text is printed in multiple columns, e.g. as in a newspaper, or if it is a single block of text like a page in a book. When iRead detects multiple columns of text, it will read them in sequence, from top to bottom and from left to right. There are cases, however, where it is desirable to read past the column boundaries from left to right. Examples of such cases would be tables or account statements. In these situations you can turn off column separation simply by pressing F9 or choosing the command "Column Separation" from the "Settings" menu which will remove the tick next to the command, then scan your table, account statement, or other document. Column separation is turned on by default. Page 15 HandyTech ElektronikGmbH iRead The iRead Menu 4.6.2 Preferred Scanner If you have connected more than one scanner to your computer or you are using an all-inone device, it is possible for iRead to detect multiple scanners. In this case, every time you start a scanning process, iRead has to probe all scanners for availability until one responds. Therefore, it may be useful to set the scanner you intend to use so that scanning time is minimized. If you choose the command "Preferred Scanner" from the "Settings" menu, the "Select Preferred Scanner" dialog will open, listing all scanners that iRead has detected. By default, no scanner is preferred. 4.6.3 Highlight when Navigating When you navigate through your document, for example by searching for text, iRead can visually highlight the text you navigate to. This text will then be displayed in inverted colors so that a sighted person can find it quickly. In addition, most screen readers can be configured to automatically read highlighted text. To highlight text when navigating, choose this command from the "Settings" menu to activate it. By default, text you navigate to will not be highlighted. 4.6.4 Highlight New Text When you scan new text into an existing document, this text can be visually highlighted so that a sighted person can find it quickly. In addition, most screen readers can be configured to read highlighted text automatically. To highlight new text, activate the command "Highlight New Text" in the "Settings" menu. 4.6.5 Beep when Recognition Complete Scanning and recognizing text on a page usually takes a couple of seconds. To let you know when the scanning and recognition process is complete, iRead will play a sound. This may be turned off by choosing the command "Beep when Recognition Complete" from the "Settings" menu, removing the tick next to the command. 4.6.6 Timing In the "Timing" menu you choose the time span between two subsequent scans in stack mode. You can specify a value between 1 and 60 seconds as well as the settings "manually" or "automatically." The default is 2.5 seconds. If you choose "manually," iRead waits for the press of any key before taking the next picture. The setting "automatically" is only supported with the camera and iRead Now; it detects when you turn the page and takes the next picture when the document has stopped moving. 4.6.7 Font and Color With this option, you can change the font, text and background color to your individual needs. Sighted people can adjust text size and contrast, so that it is possible to read along in addition to speech output. 4.6.8 Editor Use this setting to specify the editor, which you want to use to edit the document, when calling the "Export to Editor" function. You can choose between Microsoft Word, Notepad, Page 16 iRead The iRead Menu HandyTech ElektronikGmbH WordPad, and Custom. Custom means you can select your own editor. A window appears where you can select the editor. 4.6.9 Save Images If this option is enabled, the image from which the text has been converted will also be saved. This setting is enabled by default. 4.6.10 Image format Use this option to specify the format in which the image will be saved. You can choose between jpg in low, medium and high quality, as well as tif, bmp, png and gif. By default, jpg low quality is selected. 4.6.11 Reset To reset all settings to their defaults, choose the "Reset" command from the "Settings" menu. iRead will ask to make sure you really wish to reset the settings. 4.7 Help In the "Help" menu you will find useful tips for using iRead, you can read this user manual, and you can find out the software version and obtain copyright information. 4.7.1 Intro This command opens a brief introduction, which will familiarize you with the most important features and concepts of iRead. You can also display the introduction by pressing [F1]. 4.7.2 Manual This user manual can be found in the "Help" menu by choosing the "Manual" command. 4.7.3 Info This will open the "About iRead" dialog containing copyright information and the number of the software version currently installed. The version number may be important when you request technical support. Page 17 iRead HandyTech Shortcut Keys ElektronikGmbH 5 Shortcut Keys The most important functions of iRead are not only available through the menu but can also be performed by pressing shortcut keys. The following is an overview of all the shortcut keys you can use: New document Open document Save document Export to Editor Exit iRead Ctrl+N Ctrl+O Ctrl+S Ctrl+D Alt+F4 Scan Scan in stack mode: Abort scan Display page orientation F2 or space Ctrl+Spacebar ESC Ctrl+F2 Column Separation on/off F9 Push page up Push page down Delete page Ctrl+Pgup Ctrl+Pgdn Ctrl+Del New bookmark Ctrl+Shift+F4 Find text Previous instance of found text Next instance of found text F3 Shift+F3 Ctrl+F3 Go to bookmark Go to previous bookmark Go to next bookmark F4 Shift+F4 Ctrl+F4 Go to heading Go to previous heading Go to next heading F5 Shift+F5 Ctrl+F5 Go to page Go to previous page Go to next page F6 Shift+F6 Ctrl+F6 Help (Intro) F1 Zoom In Zoom Out Ctrl+ Ctrl- Page 18 iRead Technical Support 6 HandyTech ElektronikGmbH Technical Support iRead is a very complex product. Although it has been optimized to be as simple and selfexplanatory as possible, misunderstandings or errors may occasionally interrupt successful work. As a first resort, please always consult this user manual. Should the problem persist, please contact your vendor or customer advisor. Of course, you can also contact Handy Tech directly. Handy Tech Elektronik GmbH, Brunnenstraße 10, 72 160 Horb, Germany Phone: +49 7 4 5 1 55 46 - 55 Fax: +49 7 4 5 1 55 46 - 67 Email: [email protected] Our service staff will be happy to assist you. Page 19 HandyTech ElektronikGmbH 7 iRead Copyright Copyright All rights to this user manual belong to Handy Tech Elektronik GmbH. Reproduction, in full or in part, is permitted only with written approval from Handy Tech Elektronik GmbH. Windows is a registered trademark of Microsoft Inc. Page 20