1
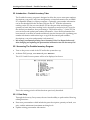
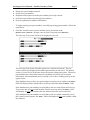
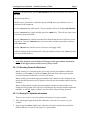
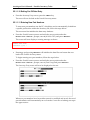
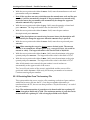
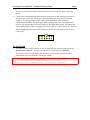
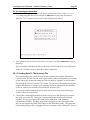
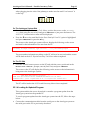
Autologue User’s Manual – Portable Inventory Taker Page i Table Of Contents 25. Introduction – Portable Inventory Taker ...................................................................... 1 25.1 Accessing The Portable Inventory Program ............................................................... 1 25.1.1 Data Entry................................................................................................................ 1 25.1.1.1 Displaying The Help Function Keys ........................................................ 3 25.1.1.2 Inserting A Part Number............................................................................. 3 25.1.1.3 Moving The Last Record Into The Current Record (Flip)..................... 3 25.1.1.4 Deleting A Part Number ............................................................................. 4 25.1.1.5 Searching A Part Number ........................................................................... 4 25.1.1.6 Duplicating A Description ......................................................................... 4 25.1.1.7 Duplicating A Part Number Record.......................................................... 5 25.1.1.8 Scrolling Forward & Backward.................................................................. 6 25.1.1.9 Saving The Updated Information ............................................................. 6 25.1.1.10 Exiting Out Of Data Entry ........................................................................ 7 25.1.1.11 Entering New Part Numbers .................................................................... 7 25.1.2 Receiving Data From The Inventory File .......................................................... 8 25.1.3 Sending Data To The Inventory File.................................................................. 10 25.1.4 Loading An Updated Program............................................................................. 11 25.1.5 Communications Setup......................................................................................... 12 25.1.6 Initializing The Data Entry Files......................................................................... 13 25.1.7 Exiting Back To DOS............................................................................................. 13 Revision 6/02 Version 7.1 Autologue User’s Manual – Portable Inventory Taker Page 1 25. Introduction – Portable Inventory Taker The Portable Inventory program is designed to allow the user to enter part numbers, descriptions, cost prices, min/max and quantity on hand information into an IBM PC compatible Palmtop or Laptop computer. Optionally, part number information can be downloaded from the Inventory file into the PC. With the information residing on the PC, the user can take the PC into the part aisles and change the quantity on hand, min/max stocking levels, descriptions and price level 0 (cost) for the selected part numbers, thus performing a “Physical Inventory.” On the PC, the user can insert and update part number information. Once all the information has been entered, it can then be transferred directly into the Inventory file (updating part number information without having to re-type all the entered part numbers, descriptions, cost prices and quantity's information)! We strongly recommend printing out an Inventory Price List Report before and after changing and updating the part number information into the Inventory file! 25.1 Accessing The Portable Inventory Program • Turn on the power switch of the PC and let the system boot up. • At the C> DOS prompt, enter acs and press <Enter>. The ACS Portable Inventory menu will now be displayed as shown: This is the starting point for all the functions previously described. 25.1.1 Data Entry Through the Inventory Entry screen, the user has the ability to perform the following editing functions: ♦ Enter new part numbers which include the parts description, quantity on hand, cost price, and the minimum & maximum stocking levels ♦ Update existing part number information Autologue User’s Manual – Portable Inventory Taker ♦ ♦ ♦ ♦ ♦ Page 2 Delete new part numbers entered Search for a part number Duplicate a description from the part number previously entered Scroll forward & backward through part numbers Save the updated part number information To begin entering new part numbers or modifying existing part numbers, follow the steps below: • From the Portable Inventory menu and the cursor positioned at the Enter Your Choice: prompt, enter 1 (Data Entry) and press <Enter>. The Inventory Entry screen will now be displayed as shown: The Inventory Entry screen is broken up into two windowed sections. The top section will always display the last edited part number record saved. The bottom section (Current Record) is the area where the current editing takes place. Whenever part numbers have been either entered or modified and saved, the saved part information will automatically move from the Current Record editing area up to the upper section. If the database does not have any part numbers currently saved within it, the Part: field will display blanks and the cursor will be positioned within the Part: field. If the database has part numbers saved within it and was exited from the Inventory Entry screen but was not exited from the Portable Inventory menu, the Part: field will display the last part number that was edited (where the user last left off). If the database has part numbers saved within it and was exited completely out of the Portable Inventory menu, the Part: field will display the first part number within the database. Autologue User’s Manual – Portable Inventory Taker Page 3 25.1.1.1 Displaying The Help Function Keys • From the Inventory Entry screen, pressing the <F1> (Help) key will display the function keys and their functions on the bottom of the screen as shown: • Pressing the <Enter> key will remove the function keys displayed and allow the user to continue entering or editing part number information. 25.1.1.2 Inserting A Part Number The insert function currently does not do anything as of this release. This option will be used in a future release. 25.1.1.3 Moving The Last Record Into The Current Record (Flip) When a part number has just been modified and saved, but the user forgot to enter information into one of the fields, the <F3> (Flip) key can be used to quickly flip the part number from the upper section of the Inventory Entry screen back into the Current Record editing section. To flip the last edited part number record back into the Current Record editing section follow the steps below: • After a part number has been modified and saved, press the <F3> (Flip) key and the part number information from the upper section of the Inventory Entry screen will flip down into the Current Record editing section. • The Current Record section will now contain the last part number records information and the cursor will be positioned at the Qty: field. • Edit any of the information fields for the part number and press the <F10> (Update) key to save the part number information. Autologue User’s Manual – Portable Inventory Taker Page 4 25.1.1.4 Deleting A Part Number When a part number has been entered and saved, but the user decides to delete the part number so it will not update the Inventory file, the <F4> (Delete) key can be used to mark the part number as deleted and prevent the part number from either being added or modifying the Inventory file. To delete a part number record, follow the steps below: • From the Inventory Entry screen, view the existing part number within the Current Record section of the screen by scrolling forward (<F8>) or backward (<F9>) through the existing part numbers. • Press the <F4> (Delete) key and the message MARKED FOR DELETION will now be displayed on the bottom of the screen and then go away. The part number can still be scrolled to but will display the message MARKED FOR DELETION when displayed. It is considered flagged to not update the Inventory file. 25.1.1.5 Searching A Part Number When wanting to search for a part number, the <F5> (Search) key can be used. To search for a part number record, follow the steps below: • From the Inventory Entry screen, position the cursor in the Part: field using the arrow key. • Enter the part number to search for and press the <Enter> key. • With the cursor now positioned in the Qty: field, press the <F5> (Search) key. If the part number was found, the record information will now be displayed within all the fields. Any of the fields can then be edited. If the part number was not found, all the fields within the Current Record section will be blank. 25.1.1.6 Duplicating A Description When inserting new part numbers with identical descriptions, the <F6> (Dup-Desc) key can be used in place of repetitive typing of the same description. Using the duplicate description function key will speed up the process when entering new part numbers with identical descriptions. To duplicate a description from an existing part number, follow the steps below: • From the Inventory Entry screen, view the existing part number, with the identical description to be used for the new part number, within the Current Record section of the screen by scrolling forward (<F8>) or backward (<F9>) through the existing part numbers. • Press the <F3> (Flip) key and the part will flip up to the upper section of the Inventory Entry screen. Autologue User’s Manual – Portable Inventory Taker Page 5 • The Current Record section will now be blanked out and the cursor will be positioned at the Part: field. • Enter the new part number and press <Enter>. • Press the <F6> (Dup-Desc) key and the description of the part number in the upper section of the Inventory Entry screen will automatically be entered into the Desc: field for the current part number. • Continue adding all other information into their respective fields and press the <F10> (Update) key to save the part number information. Note: The duplicate description feature will always use the description of the part number information that is in the upper section of the Inventory Entry screen! 25.1.1.7 Duplicating A Part Number Record When inserting new part numbers with near identical part numbers, the <F7> (DupRec) key can be used in place of repetitive typing of the part number information. Using the duplicate record function key will speed up the process when entering new part numbers with near identical part numbers. To duplicate a part number record, follow the steps below: • From the Inventory Entry screen, view the existing part number, with the near identical part number to be used for the new part number, within the Current Record section of the screen by scrolling forward (<F8>) or backward (<F9>) through the existing part numbers. • Press the <F3> (Flip) key and the part will flip up to the upper section of the Inventory Entry screen. • The Current Record section will now be blanked out and the cursor will be positioned at the Qty: field. • Press the <F7> (Dup-Rec) key and the part number information in the upper section of the Inventory Entry screen will automatically be copied into the Current Record section of the screen. • Press the arrow key and the cursor will be positioned on the first character of the part number within the Part: field. • Using either the <End>, arrow, <Insert> or <Delete> keys, modify the part number field to enter the new part number and press <Enter>. Autologue User’s Manual – Portable Inventory Taker Page 6 Example: If the part number field has ACD-R45TS and the new part number to be entered is ACD-R46. Follow the steps below: With the cursor positioned on the letter A, press the positioned on the number 5. arrow key until the cursor is Press the <Insert> key and enter 6. The part number will now display ACD-R465TS. Press the <Insert> key again and then press the <End> key. This will move the cursor one character past the letter S. Press the <Delete> key and the letter S will be deleted and the cursor will move back one position. Press the <Delete> key two more times and the part number will now display ACD-R46. Press the <Enter> key and the cursor will move to the Qty: field. Continue entering all the information for the part number and press the <F10> (Update) key to save the information. Note: The duplicate record feature will always use the part number information that is in the upper section of the Inventory Entry screen! 25.1.1.8 Scrolling Forward & Backward When wanting to scroll through the previously entered part numbers within the database, use the <F8> (Forward) and <F9> (Backward) keys when a part number record is displayed within the Current Record section. When scrolling forward through part numbers and a blank record is displayed, this means that the part that was just displayed was the last part number entered into the database. When scrolling backward through part numbers and the first part number was displayed, the program will wrap around and display the last part number within the database. It will not display a blank record as it does when scrolling forward! 25.1.1.9 Saving The Updated Information There are two ways to save the updated information for a part number: 1. After entering through all the fields within the Current Record section of a part number 2. By pressing the <F10> (Update) key when the user hasn’t entered through all the fields within the Current Record section of a part number Autologue User’s Manual – Portable Inventory Taker Page 7 25.1.1.10 Exiting Out Of Data Entry • From the Inventory Entry screen, press the <Esc> key. The user will now be back at the Portable Inventory menu. 25.1.1.11 Entering New Part Numbers To enter new part numbers into the PC, which then can be automatically loaded into a specific product line within the Inventory file, follow the steps below: The user must first initialize the data entry database: • From the Portable Inventory menu and with the cursor positioned at the Enter Your Choice: prompt, enter 6 (Initialize Files) and press <Enter>. The screen will now display a warning message as shown: WARNING...this will DELETE DATA FILES Continue? (y/n) : • Entering y and pressing <Enter> will initialize the data files and return the user back to the Portable Inventory menu. To begin entering new part numbers, follow the steps below: • From the Portable Inventory menu and with the cursor positioned at the Enter Your Choice: prompt, enter 1 (Data Entry) and press <Enter>. The Inventory Entry screen will now be displayed as shown: Whenever part numbers have been either entered or modified and saved, the saved part information will automatically move from the Current Record editing area up to the upper section. Autologue User’s Manual – Portable Inventory Taker • Page 8 With the cursor positioned within the Part: field, enter the manufacturer code and part number and press <Enter>. Note: If the user does not enter a dash between the manufacturer code and the part number, it will be automatically inserted! If the part number was entered using lowercase letters, the part number will automatically be changed to uppercase when the <Enter> key is pressed! • With the cursor positioned within the Qty: field, enter the quantity on hand and press <Enter>. The largest allowable value for this field is 32,767. • With the cursor positioned within the Desc: field, enter the part numbers description and press <Enter>. Note: If the description was entered using lowercase letters, the description will automatically be changed to uppercase when the <Enter> key is pressed! • With the cursor positioned within the Cost: field, enter the cost price and press <Enter>. Note: When entering the cost price, do not enter a decimal point! The amount entered is an assumed two decimal places (e.g., a cost price of $15.25 would be entered as 1525). The largest allowable value for this field is 999,999.99. • With the cursor positioned within the Min: field, enter the minimum order point quantity and press <Enter>. The largest allowable value for this field is 32,767. • With the cursor positioned within the Max: field, enter the maximum order point quantity and press <Enter>. The largest allowable value for this field is 32,767. After all information was entered, the part number is saved and moves automatically to the upper section of the screen. The Current Record section of the screen is again blank and the cursor will be positioned within the Part: field ready for the next part number to be entered. Continue entering all part numbers. 25.1.2 Receiving Data From The Inventory File This option enables the user to receive a file containing a selection of part numbers within the Inventory file into the PC. Once the part number information is transferred into the PC, the user can then perform a “Physical Inventory” on each of the part numbers. Note: The maximum number of parts that can be downloaded into a palmtop PC with a 1-megabyte RAM card is 5,000. The maximum number of parts that can be downloaded into a palmtop PC with a 2-megabyte RAM card is 20,000. Autologue User’s Manual – Portable Inventory Taker Page 9 To receive part number data from the Inventory file into the PC, follow the steps below: • Connect the communication cable from the serial port on the Autologue system to the serial port on the PC. There are 2 separate cables that need to be connected together. A large gray cable (CRT cable) and a small black cable (Palmtop communication cable). The large gray cable is plugged into the Autologue serial port on one end and the other end connects to the small black cable. The other end of the small palmtop cable is plugged into the serial port on the Palmtop PC. Be sure when plugging into the side of the palmtop to make sure the small "oval cutout" is on the top! Palm Top Serial Connection On The PC Side • From the Portable Inventory menu on the PC and with the cursor positioned at the Enter Your Choice: prompt, enter 2 (Receive Data) and press <Enter>. The screen on the PC will display the following on the screen and wait for the information to be sent from the Autologue system: DSZ .COM Copyright 05-28-93 by Omen Technology INC "The High Reliability Software" COM1 9600 bps Carrier Detect DISABLED Handshake sw S/N 43851 Command line = 'port 1 speed 9600 d rz -rr acspart.dat acsdesc.dat ' Autologue User’s Manual – Portable Inventory Taker Page 10 On The Autologue System Side • From the ACS Physical Inventory Tools Menu, position the cursor on the Transmit Data field using the arrow keys and press <Return> or just press the letter T. The ACS To PC Communications menu will be displayed as shown: • Arrow down to the Send Parts Data Info To PC option and press <Return> or press the S key. The part number information will now be sent to the PC and the screen will be back at the ACS Portable Inventory Main Menu when completed. 25.1.3 Sending Data To The Inventory File This option enables the user to transfer all the updated part number information residing on the PC back into the Autologue system. Once the information is residing on the Autologue system, the temporary file can then be “applied” to the Inventory file through the Physical Inventory Tools menu. This process will update existing part number information or add new part numbers, that were entered into the database on the PC and do not currently exist within the Inventory file. To send part number data from the PC back into Inventory file on the Autologue system, follow the steps below: • Connect the communication cable from the serial port on the Autologue system to the serial port on the PC. There are 2 separate cables that need to be connected together. A large gray cable (CRT cable) and a small black cable (Palmtop communication cable). The large gray cable is plugged into the Autologue serial port on one end and the other end connects to the small black cable. The other end of the small palmtop cable is plugged into the serial port on the Palmtop PC. Be sure Autologue User’s Manual – Portable Inventory Taker Page 11 when plugging into the side of the palmtop to make sure the small “oval cutout” is on the top! Palm Top Serial Connection On The Autologue System Side • From the ACS Physical Inventory Tools Menu, position the cursor on the Transmit Data field using the arrow keys and press <Return> or just press the letter T. The ACS To PC Communications menu will be displayed. • Press the arrow key until the Receive Parts Data Info From PC option is highlighted and press <Return> or press the R key. The screen on the Autologue system will now display the following on the screen and wait for the information to be sent from the PC: rz ready. To begin transfer, type "sz file ..." to your modem program The part number information residing on the PC will now be received and the screen will be back at the ACS Physical Inventory Tools Menu when completed. On The PC Side • From the Portable Inventory menu on the PC and with the cursor positioned at the Enter Your Choice: prompt, enter 3 (Send Data) and press <Enter>. The screen on the PC will display the following on the screen as the information is being sent to the Autologue system: DSZ .COM Copyright 05-28-93 by Omen Technology INC "The High Reliability Software" COM1 9600 bps Carrier Detect DISABLED Handshake sw S/N 43851 Command line = 'port 1 speed 9600 d sz -rr acspart.dat acsdesc.dat ' The PC will be back at the ACS Portable Inventory Menu when completed. 25.1.4 Loading An Updated Program This option enables the user to download or transfer a program update from the Autologue system into the portable PC. To send a program update from the Autologue system into the PC, follow the steps below: • Connect the communication cable from the serial port on the Autologue system to the serial port on the PC as previously described. Autologue User’s Manual – Portable Inventory Taker Page 12 On The Autologue System Side • From the ACS Physical Inventory Tools Menu, position the cursor on the Transmit Data field using the arrow keys and press <Return> or just press the letter T. The ACS To PC Communications menu will be displayed. • Press the arrow key until the Updated DOS Program Sent To PC option is highlighted and press <Return> or press the U key. The screen on the Autologue system will now display the following on the screen and wait for the information to be sent to the PC: Retry 0: Awaiting pathname nak for /usr/triton/acs.exe On The PC Side • From the Portable Inventory menu on the PC and the cursor positioned at the Enter Your Choice: prompt, enter 4 (Load Program) and press <Enter>. The screen on the PC will display the following on the screen as the program is being downloaded into the PC: DSZ .COM Copyright 05-28-93 by Omen Technology INC "The High Reliability Software" COM1 9600 bps Carrier Detect DISABLED Handshake sw S/N 43851 Command line = 'port 1 speed 9600 d rz -rr acs.exe (null) ' The PC screen will be back at the ACS Portable Inventory Menu when completed. Note: Be sure to exit completely out of the menu and then call up the program again to start running the updated PC program! 25.1.5 Communications Setup This option is used to setup the communication commands that talk to the Autologue system when sending or receiving data information to and from the PC. To modify the communication commands, follow the steps below: • From the Portable Inventory menu and with the cursor positioned at the Enter Your Choice: prompt, enter 5 (Communications SetUp) and press <Enter>. The screen will now display the communication commands as shown: ACS Communications Commands Rcv: dsz port 1 speed 9600 d rz –rr Send:dsz port 1 speed 9600 d sz -rr Autologue User’s Manual – Portable Inventory Taker Page 13 • With the cursor positioned at the Rcv: prompt, enter the new receive command and press <Enter> or just press <Enter> to not modify the receive command. • With the cursor positioned at the Send: prompt, enter the new send command and press <Enter> or just press <Enter> to not modify the send command. Note: User’s should ONLY modify this file with the help of an Autologue Customer Service Representative! Under no other circumstances should these commands ever be modified! The user will now be back at the Portable Inventory menu. 25.1.6 Initializing The Data Entry Files The user is given the ability to initialize (or clear out) the data entry files to begin entering new part number data information. This process becomes necessary for the following reasons: • After entering many new part numbers and the information was then transferred into the Autologue system, the data entry database must then be initialized when wanting to start entering more part number information. • The PC can only hold a certain amount of information (20,000 part numbers & 6,000 unique descriptions)! To initialize the data entry database, follow the steps below: • From the Portable Inventory menu and with the cursor positioned at the Enter Your Choice: prompt, enter 6 (Initialize Files) and press <Enter>. The screen will now display a warning message as shown: WARNING...this will DELETE DATA FILES Continue? (y/n) : • Entering y and pressing <Enter> will initialize the data files. • Entering n and pressing <Enter> will not initialize the data files. The user will now be back at the Portable Inventory menu. 25.1.7 Exiting Back To DOS • From the Portable Inventory menu and with the cursor positioned at the Enter Your Choice: prompt, enter 7 (Quit) and press <Enter>. The user will now be back at the C> DOS prompt and the PC can now be powered off if desired.