1
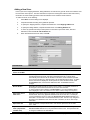
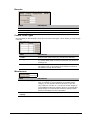
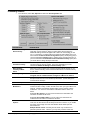
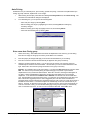
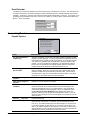
Company Setting USER MANUAL Version 4 Information in this document is subject to change without notice. Companies, names and data used in examples herein are fictitious unless otherwise noted. No part of this document may be reproduced or transmitted in any form or by any means, electronic or mechanical, for any purpose, without the express written permission of Run.IT Systems and Goldman Marcus, Inc.. © Goldman Marcus, Inc. All rights reserved, 2001 Run...It! is a trademark of Goldman Marcus, Inc. Run.It! Retail Software Copyright 2001 Company Information & Settings • 1 Company Setting ________________________________________________________________ 1 Company Information & Settings ___________________________________________________ 3 About Company Information and Settings________________________________________________ 3 Accessing the Options _______________________________________________________________________ 3 Printing the Currently Defined Options __________________________________________________________ 3 Store Information ____________________________________________________________________ 4 Add Current Store Information ________________________________________________________________ 4 Adding a New Store _________________________________________________________________________ 5 Creating Groups ____________________________________________________________________________ 8 Receipts_____________________________________________________________________________ 9 General Receipt Settings______________________________________________________________________ 9 Line Item Settings___________________________________________________________________________ 9 Pole Display Greetings ______________________________________________________________________ 10 Receipt Messages __________________________________________________________________________ 10 You Saved…______________________________________________________________________________ 10 Point of Sale ________________________________________________________________________ 11 Receipt Categories _________________________________________________________________________ Customers ________________________________________________________________________________ Discounts ________________________________________________________________________________ Returns __________________________________________________________________________________ Salesprsn_________________________________________________________________________________ Inventory_________________________________________________________________________________ Warnings/Security _________________________________________________________________________ Barcodes _________________________________________________________________________________ Custom Tender Types_______________________________________________________________________ Miscellaneous _____________________________________________________________________________ 11 12 12 13 13 14 14 15 15 15 Inventory/Orders____________________________________________________________________ 16 Price Points_______________________________________________________________________________ 18 Auto Pricing ______________________________________________________________________________ 20 Confirm Quick Find Items ___________________________________________________________________ 21 Misc. Categories_____________________________________________________________________ 22 General ____________________________________________________________________________ 23 Multi Store _______________________________________________________________________________ Tax Rates ________________________________________________________________________________ Custom Names ____________________________________________________________________________ Buying Club ______________________________________________________________________________ Shipping _________________________________________________________________________________ Retail Calendar ____________________________________________________________________________ 24 24 25 25 26 28 Accounting/Tenders _________________________________________________________________ 28 Payable Options ___________________________________________________________________________ Payroll___________________________________________________________________________________ Receivables_______________________________________________________________________________ G/L _____________________________________________________________________________________ 28 29 29 30 Employees/Security __________________________________________________________________ 31 Employees _______________________________________________________________________________ Setting up a New Employee __________________________________________________________________ Setting Up an Employee’s Schedule____________________________________________________________ Security__________________________________________________________________________________ 31 32 33 34 Analysis____________________________________________________________________________ 36 Internet Sales _______________________________________________________________________ 37 2 • Company Information & Settings Copyright 2001 Run.It! Retail Software Company Information & Settings About Company Information and Settings Before you begin using Run.It!, you must set various options in the File Options menu. The File Options Menu menu allows you to set and control different parts of the system. There are many ways that you can customize the Run.It! system to suit your hardware and business. Accessing the Options The Options menu allows you to customize your system and to set certain personal preferences. It enables you to set the guidelines for the operation of your Run.It! system. This menu can be accessed from any of the Run.It! modules by doing the following: 1. Move to the desktop, and double-click the Run.It! icon. The main Run.It! menu is displayed. 2. Click the any Run.It! module. The Login screen is displayed. 3. Enter your user name and password and select OK. The main module window is displayed. 4. If you have not set any options for this computer, an information message is displayed. Select OK. 5. Move to the menu bar, and select File. 6. From the drop-down list of options, select Options. The Company Information and Settings window is displayed. Printing the Currently Defined Options This function prints all the current options you have setup in the system. 1. While viewing any window in any Run.It! module, move to the menu bar and select File. 2. From the drop-down list of options, select Options Printout. 3. In the Print Set Up Options dialog box, select one of the following: Print to Report Printer or Print to Receipt Printer. 4. When printing is complete, select Exit to close this dialog box. Run.It! Retail Software Copyright 2001 Company Information & Settings • 3 Store Information It is important to enter ALL of your stores that use Run.It! in the Store Information section. This is necessary for operations such as transferring merchandise, entering inventory and making purchase orders. You MUST complete this section. There are several special rates and taxes that may be applicable for certain stores. The only mandatory item is the Standard tax. By default when you open this window, the current store information is displayed (if entered). Plus, a list of all other stores defined in your system is shown. 1. From the menu, select File, Options and select the Store Information tab. 2. From this window, you can perform the following tasks: − Add a new store. Refer to the instructions in this section entitled, “Adding a New Store.” − Edit existing store information by selecting Edit, making the necessary changes, and selecting OK. − Create groups by selecting the Groups button. Refer to the instructions in this section entitled, “Adding a Store Group.” − Delete an existing store by highlighting the store in the list, and selecting Delete. In the confirmation window, select OK. − Indicate that these settings are for this computer system only by selecting the Options for this computer only option. Refer to the instructions in this section entitled, “Setting Options for a Specific System.” − Close and exit the window without saving the currently entered information by selecting Cancel. − Save the information and exit the window, select OK. Add Current Store Information Enter store # and address in which this store is located. This information will be printed on your receipt and will be the default location for your transfer, purchase orders etc. 4 • Company Information & Settings Copyright 2001 Run.It! Retail Software Adding a New Store Each of your store’s shipping addresses, billing addresses, tax rates and any specific terms and conditions must be entered into store options. The store information is required for viewing that location’s sales and inventory information as well as allowing purchase orders and transfers to be created for those locations. To add a new store, do the following: 1. Select New. The Store dialog box is displayed. 2. Complete the fields according to the guidelines provided. 3. To specify the Shipping Address, complete the fields shown on the Shipping Address tab. 4. To specify the billing address, complete the fields shown on the Billing Address tab. 5. To enter any special terms that you want printed on the bottom of purchase orders, RA’s and statements, select the Terms and Conditions tab. 6. When all selections/entries are made, select OK. FIELD/BUTTON DESCRIPTION Store # Each store must have a unique store # assigned Sell items from this stores on the Web Future enhancement Standard Tax Enter the applicable tax for this store. To view the list of currently defined tax rates, click the drop-down list arrow, and click on the desired tax rate. This tax rate is automatically set as the tax rate for all items in this store, unless otherwise specified. If you use two tax rates (e.g. GST and PST), set the Standard rate for both. To define the tax rates that are displayed in the drop-down list, select the General tab, select the Tax Rates button, and enter the desired tax rates. Select OK to save the changes. No Tax Under… Designates the dollar amount for which no tax is charge. For example, if there is no tax charged on items that are less than $110, enter 110 in the field. To enter exceptions to this setting, select Exceptions. The Tax Exceptions dialog box is displayed. Refer to the instructions in this section entitled, “Setting Tax Exceptions.” Special tax rate on items over… Designates a special tax rate that is charged only for the amount that the price of an item exceeds. This is only applied if these items are set for zero tax. For example, you set a special tax rate of 5% and in the Special tax rate on items over field, you enter $200. You then sell a non-taxed item that is $1,200. The tax is only charged on the amount over $200 that in this case is $1,000. Therefore, the tax on this receipt will be $50. Special tax rate Enter the amount of the special tax rate to use with the Special tax rate on items over… field. Special tax on all items (not just NonTaxable ones) When enabled, the special tax rate is charged on all items that exceed the Special tax rate on items over amount, not just those that have no tax. The special tax rate is charged, in addition to the standard tax. Run.It! Retail Software Copyright 2001 Company Information & Settings • 5 Setting Tax Exceptions Designates any special exceptions for the No tax under… field found in the Store dialog box. All currently designated exceptions are displayed in the list. • Add a new exception by selecting Add Exception. • Clear the data already in the fields by selecting Clear Criteria. • Remove an existing exception by highlighting it in the list, and selecting Remove Exceptions. FIELD DESCRIPTION Department Designates what department this exception applies to. Click the drop-down list arrow to view a list of currently designated departments. Type Specifies the type of exception. Click the drop-down list arrow to view a list of currently defined types. SubType Specifies the subtype for this type of exception. Click the dropdown list arrow to view a list of currently defined subtypes. Tax Rate Sets the tax rate for this exception. Click the drop-down list arrow to view a list of currently defined tax rates. 6 • Company Information & Settings Copyright 2001 Run.It! Retail Software Shipping Address Information Enter the Shipping Address to be assigned for purchase orders for each store location. Billing Address Information Enter the Billing Address to be assigned for purchase orders for each store location. • Select the Copy from Shipping button to copy the field information from the Shipping Address tab. Terms and Conditions Information • Enter any special terms that you want printed on the bottom of purchase orders, RA’s (Return Authorizations) and statements. Run.It! Retail Software Copyright 2001 Company Information & Settings • 7 Creating Groups This is used to create groupings of your stores. It is helpful for making Transfer Orders and Purchase Orders. Instead of having to select each store on the order individually, you are able to select a group. 1. While viewing the Company Information and Settings: Store Tab, select Groups. The Store Groupings dialog box is displayed. A listing of existing store groupings (if defined) are displayed. 2. Select Add. The Add Store Group dialog box is displayed. 3. In the Group Name field, type the group name, and select OK. 4. When you return to the Store Grouping dialog box, the newly added stores are shown. 5. To specify which stores to include in a group, select Modify Group. The Modify Store Group dialog box is displayed. 6. From the list of Stores on the left, highlight the stores to add to this group, and select the red right arrow. To remove a store, highlight it under the Group – [Group Name] listing, and select the left red arrow. 7. When all selections are made, select Exit. You return to the Store Groupings dialog box. 8. To remove a group, highlight it in the list, and select Remove. 9. When all additions/removals/modifications are made, select OK. 8 • Company Information & Settings Copyright 2001 Run.It! Retail Software Receipts • From the menu, select File Options and select the Receipts tab. General Receipt Settings FIELD/BUTTON DESCRIPTION Show “Reprint” on Reprinted Receipts Normally when you reprint a receipt, it will print exactly the same as the original receipt. However, if you enable this option, whenever you reprint a receipt, it will specify on top that it is a reprint. Use Gift Receipts Enables the Print Gift Receipt field to be used on the Pay screen when tendering a receipt Print Totals on Closeout Receipts When this option is enabled, closeout receipts will show the Total Sales and the Total Cash for the register. Hide Customer Info on Receipts. When set customer information does not print on receipt. Line Item Settings FIELD DESCRIPTION Show % Off on Printed Receipt Prints the discount percentage for each line item on the receipt. This percentage is based upon the price you chose for discount based on in the General tab. It applies to both register discounts and back office markdowns. Show $ Off on Printed Receipt Prints the dollar amount of the markdown for each line item on the receipt. This percentage is based upon the price you chose for Markdown based on. It applies to both register and back office markdowns. Show Off for Markdown Items Only This prints the discount percentage or dollar amount (depending on which of the below options is selected) only when items are specifically discounted down at the register. Show Kit Details on Receipt When this option is selected the merchandise making up the kit is printed on the receipt. Print FINAL SALE on discounts This prints Final Sale on all receipts that have register discounts outside of a discount threshold. Run.It! Retail Software Copyright 2001 Company Information & Settings • 9 Pole Display Greetings Enter the Pole display message Receipt Messages Enter message to print for each receipt type. You Saved… FIELD DESCRIPTION You saved $#.## This prints the amount discounted on the bottom of the receipt. This option is active only if you enter something in the field (for example, “by shopping here!”). You saved based on Sets the price that you want to base the You saved amount on— Current Price, Original Price, Sale Price, Suggest Retail. 10 • Company Information & Settings Copyright 2001 Run.It! Retail Software Point of Sale • From the menu, select File, Options and select the Point of Sale tab. Receipt Categories Categories are used to create labels for capturing receipts information. For example: you might want to track advertising sources or customer demographics (male or Female) These categories are useful for running POS reports. There are 3 category labels that can be optionally assigned • Maintenance. Specifies choices for the Receipt Categories, discount reasons and Return Reasons. Each of the receipt and categories entered appear in the Types menu along with Discount and Returns. To add a new category, do the following: − − − Under Type, click the radio button for either Discount or Returns. Select Add. In the New [Discount or Returns] Reason field, enter the reason, and select OK. To remove a category, do the following: − − Move to the Category listing, and highlight the category you want to remove. Select Delete. Run.It! Retail Software Copyright 2001 Company Information & Settings • 11 Customers FIELD DESCRIPTION Customer Categories User defined labels that can be used to record customer characteristics (shoe size, hat size, etc) The information is entered into the personal tab of the customer record. Must Enter Customer When this option is enabled, a customer must be entered for a sale before it can be completed. Show Customer Photo at Register When this option is enabled, every time you retrieve a customer at the register, his or her photo will be displayed. The photo will only be displayed if you have previously associated the image with this customer. This option is very helpful for verifying customer identity. Enter Zip Code on Receipts Enters customers' zip codes on the Sale screen without entering more detailed customer information, allowing tracking of purchases and returns by zip code. Enter Email Addr on Receipts Enters customers' Email on the Sale screen without entering more detailed customer information, allowing tracking of purchases and returns by Email address. Discounts FIELD DESCRIPTION Ask for Discount Reason at Register If this option is enabled, whenever merchandise is discounted a window will appear from which the cashier must select a discount reason for the discount. The choices for Discount Reasons are entered in the Category Maintenance. Show Discount at Register Sets the system to display the markdown percentage for each line item on the Receipt screen. It displays both register discounts and back office markdowns. 12 • Company Information & Settings Copyright 2001 Run.It! Retail Software Returns FIELD DESCRIPTION Ask for a Return# Lets you retrieve the items that are being returned directly from the receipt on which they were originally purchased. Ask for Return Reason at Register If this option is enabled, whenever merchandise is returned, a window will appear from which the cashier must select a reason for the return. The choices for Return Reason are entered in the Category Maintenance. Buy Backs at Register This option allows you to purchase items from customers. When this is enabled, if an item is returned, you are given the option of creating a new style. This item is then added to your inventory. Return items for lowest price in ___ days This option is for when a customer returns an item and does not have the original receipt for the item. The amount returned to the customer will be the lowest price for which the item has been sold during the specified number of days. For example, a customer is returning a pair of shoes but does not have the receipt. You have set 20 days in this option. During the last 20 days, you have sold this pair of shoes for $85.99, $74.99, $79.99 and $88.99. When you scan the pair of shoes that the customer is returning, the lowest price, $74.99, will automatically appear as the amount being returned to the customer. Salesprsn FIELD DESCRIPTION Salesman Must Punch In to Sell If this option is enabled, a salesperson cannot be attached to a sale (i.e. receive commissions for a sale) unless he or she has already punched in using the Time Clock. If this option is enabled, a sale cannot be completed until the salesperson has punched in. To streamline this process, there is a Time Clock option on the top of the sale screen that allows an employee to punch in right from the sale screen. Salesman same as clerk at first If your salespeople often ring up their own sales at the register, you may want to have this option enabled. It sets the person currently logged in as the salesman on every receipt. You will be able to override this and change the salesman on the Sales screen. Salesperson gets assigned to New Customers When this option is selected, if you enter a customer at the point-ofsale, the salesperson on that receipt will automatically become the default salesperson for that customer. This means that this salesperson will automatically be assigned to each of this customer’s subsequent receipts. Run.It! Retail Software Copyright 2001 Company Information & Settings • 13 Inventory FIELD DESCRIPTION Layaway/SO Deduct Inventory on Pickup (All stores must match) The default in Run.It! is that units sold on a layaway or special order are deducted from inventory when the first installment is paid. However, if you enable this option, the units will not be deducted from inventory until the customer picks up the items. Suggestion Items at Register You may want to suggest certain additional items when a customer purchases a certain item. If this option is enabled and you sell an item that has suggested items attached, a list of these suggested items will appear. You can then sell these items without having to scan them. Suggestion items are set in the Administration in Move.It! or Order.It! Linked Items at Register This allows you to link certain items that are automatically sold with other items. Whenever you sell an item that has linked items, those linked items will automatically appear on the sale. Linked Items are set in the Administration in Move.It! or Order.It! Makeup Kits at Register if Needed Enables both bulk item breakup and kits to be created from inventory when the sale is completed Ask when making up a kit When selected a window appears prompting the cashier to decide on whether a kit should be made. Warnings/Security FIELD DESCRIPTION Re-login for every sale Sets the system so the cashier must re-login before every new receipt. Warn Negative Inventory at Register When the on-hand is below zero a warning will automatically appear indicating a item has been sold that has no on-hand inventory in your store Can Close Layaways on Full Payment Allows special order and Layaways to be closed when a full payment is made on the receipt but without the customer having to pick up the merchandise. Allow sale to complete if charge failed Normally, you will not be able to complete a sale unless you receive an authorization code for all credit card payments on the sale. If you select this option, however, you will be able to complete the sale without authorization. This option is only applicable if you are using credit card processing software with Run.It!. Warn cashier for pickup when case reaches _____ If the drawer reaches or exceeds the specified amount of cash, a warning will automatically appear telling the cashier to call the manager for a pickup. 14 • Company Information & Settings Copyright 2001 Run.It! Retail Software Barcodes FIELD DESCRIPTION Prefix Future enhancement Price Starting Position Future enhancement Price Length Future enhancement Custom Tender Types Run.It! provides you with the ability to enter up to five custom tender types. This is useful if you accept foreign currencies. FIELD DESCRIPTION Tender Enter the name of this currency (e.g. Pound, Franc, Drachma). Exchg Rate Enter the number of dollars that equal one unit of this currency— e.g., if three dollars equal a Pound, you would enter 3 for the Pound exchange rate. Acts like cash When selected, allows a customer to overpay with this tender and get change in cash. If this checkbox is not selected, a customer is not allowed to overpay with this tender. Miscellaneous FIELD DESCRIPTION Sales Activity Category This is a category that you can use to describe an entire day at a store. For instance, if you have Weather as your Sales Activity Category, you can say that it was sunny at store1 on June 3rd, rainy at store4 on June 6th, etc. You can then use this category to group the Business Summary reports in Know.It! You set the sales activity category for a particular day and store by editing its Sales Activity from the Daily menu in the Back Office. Custom Name for Layaway Allows you to rename the layaway receipt on the Run Sale window Run.It! Retail Software Copyright 2001 Company Information & Settings • 15 Inventory/Orders • From the menu, select File, Options and select the Inventory/Orders tab. FIELD/BUTTON DESCRIPTION Additional Settings on New Inventory When this option is selected, you can enter additional information for each style when you first create it. When you select OK to save the style, the Additional Settings window will appear with a button for each setting you can use. For each style, you will be able to set customer pricing tables (only if you have selected the Use Customer Pricing Tables option), rental pricing (only if you have selected the Rentals option), quantity pricing, reorder points (only if you have selected the Enter Reorder Points with New Inventory option) and you will be able to change the style’s barcodes. Enter Reorder Points with New Inventory When this option is selected, you will be able to enter Reorder Points for each new style when the style is created. This is only applicable if you have selected the Additional Settings on New Inventory option. Warn Negative Inventory at Back Office When the on-hand is below zero a warning will automatically appear on non Sell.It modules indicating a item has been sold that has no on-hand inventory in your store Inventory Categories User defined label to attached to styles in inventory. The labels are assigned choices in Administration, Categories in Move.It or Order.It. Markdown based on… The price upon which Show Markdown at Register, Show % Off on Printed Receipt and Show $ Off on Printed Receipt are based. (These settings are found under the Receipts. Wholesale Options Future enhancement Auto-Commit Markdowns Allows you to quickly commit markdowns. If you have markdowns that have a Commit On Date of today or within the last week, when you login to Move.It! or Order.It!, a window automatically appears telling you the number of these markdowns. You can then commit those markdowns with the select of a button. Select For ALL Stores if you want to be informed of the markdowns that should be committed for all stores. Select For Current Store ONLY if you only want to be informed of the markdowns that should be committed for this store. Purchase Order Options Reflect PO Discounts in Avg Cost. If you received a discount on a purchase order, the non-discounted cost will always be shown on the PO. If you enable this option, the average cost of the merchandise will be based upon the discounted cost. Multiple Brands on POs. Normally, Run.It! allows only one brand on a particular purchase order. However, you may have purchase orders that 16 • Company Information & Settings Copyright 2001 Run.It! Retail Software contain merchandise of more than one brand. If you enable this option, you will not have to enter a brand on your purchase orders, thereby allowing you to have purchase orders with multiple brands. Create POs from Special Orders. When this is enabled, you can automatically generate a purchase order from a special order receipt. The PO can only be generated if the item on the special order is of a brand that has an attached vendor. You can attach a vendor to a brand through Move.It!, Inventory, Brands. Each special order gets a single PO. Normally, multiple special orders can be combined onto the same PO if they are for the same vendor. However, if you enable this option, each special order will always be on its own PO. The PO will then show the receipt number and the customer of the special order. Alert New Special Orders Created. This option is helpful for keeping up-tothe-minute track of purchase orders that are created from special orders. If you select this option, any computer on the network that is in the Order.It! module automatically gives updates of special orders. If you are in Order.It! and a special order PO has just been generated from the POS, you are automatically notified within 30 seconds. This option is applicable only if you have also selected the Create PO’s from Special Orders option. Must Approve PO’s/RA’s. When this option is enabled, receiving on a PO (or shipping on an RA) cannot be performed until the order has been approved. To approve it, you simply need to enter the SKUs screen of the order and enable the Approved checkbox. Show only this store’s PO’s. When this is enabled in a store, this store will only be able to view and work with purchase orders written in this store. In addition, when they write a new PO, they cannot add additional stores to it. For PO’s written elsewhere that include this store, you will only be able to view the totals for this store. You may find this option useful for maintaining security and preventing duplicate receiving. Confirm Receiving but no tickets made. You may want to be warned when you have performed receiving on a purchase order and have not yet printed tickets for the received items. If you have this option enabled and you select OK on the PO Styles screen to save the receiving, but you have not yet printed tickets, a window will appear alerting you. You will then be given the option of printing the tickets from that screen. Allow On-Order amounts to be negative inventory. ??? Reflect current inventory when calculating pre-distros. This option means that the distribution on a pre-distro PO will be based upon both the quantity sold and the current inventory quantities instead of just the quantity sold. Taxes on POs. Option enables tax to be attributed to purchase order merchandise. Standard Distro Method. This is used to select the default distribution method for pre-distro PO’s. Select from the drop-down list the method you want to be the default pre-distro method for PO’s. When you actually create a PO, you will have the option to change the distro method. Transfer Options No Prices/Cost on Printout. When you print a copy of a transfer order, it will normally show the prices and costs of the items on the order. By enabling this option, the prices and costs will not be on the printout. Inventory adjusted upon transfer confirmations. If this option is enabled, when a transfer is performed between stores, the inventory for the stores involved (except the store where the transfer is entered) will not be adjusted until they have confirmed the transfer using Transfer Confirmations. This may help you to keep tighter control of your inventory. Run.It! Retail Software Copyright 2001 Company Information & Settings • 17 Price Points Price Points are a powerful inventory feature used in Run.It! A price point is a price range that describes a style. For example, if you price a style at $35.99, you would want to put it in the 30-40 price point. While they are not necessary in most circumstances, price points can be very useful. Price points are mandatory if you are going to be using the Buy.It! module. This functions sets up price points so they automatically are applied to any new inventory entered, added to the pick list of Price Points in Inventory. Based upon what you enter here, Run.It! automatically assigns the Price Point for a new style when you enter its retail price. The price point is automatically set only if you enable the Use Automatic Price Points option. 1. While viewing the Company Information and Settings Inventory/Orders tab, select Price Points. The Auto Price Points dialog box is displayed. 2. From this dialog box, you can perform the following tasks: − Add a new price point by selecting New. − Edit an existing price point by highlighting it in the list, selecting Edit, and making any necessary changes. − Delete an existing price point by highlight it in the list, and selecting Delete. − Close and exit this dialog box by selecting Exit. 18 • Company Information & Settings Copyright 2001 Run.It! Retail Software Adding a New Price Point 1. In the Auto Price Points dialog box, select New. 2. In the resulting dialog box, do the following: − In the Price Point field, enter the price point (for example, 20-30). − In the Range of Pricing fields, enter the lowest and highest price that are to be associated with this price point. (For example, $20 in the low field and $29.99 in the high field). − Select OK to save this price point. 3. When you return to the Auto Price Points dialog box, the new price point appears on the list. Run.It! Retail Software Copyright 2001 Company Information & Settings • 19 Auto Pricing Enables Run.It to pre-calculate prices, price rounding, special size pricing, commission and spiffs based upon setting up groups of brands, departments or cost ranges. 1. While viewing the Company Information and Settings Inventory/Orders tab, select Auto Pricing. The Automatic Price Calculations dialog box is displayed. 2. From this dialog box, you can perform the following tasks: − Add a new price range by selecting New. − Edit an existing price range by highlighting it in the list, selecting Edit, and making any necessary changes. − Delete an existing price range by highlight it in the list, and selecting Delete. − Close and exit this dialog box by selecting Exit. Enter a new Auto Pricing group 1. Select Auto Pricing. Select New. Select the Brand and Department of the inventory you are setting. Enter the cost range for this group of inventory under When cost is between. 2. Enter the proper percentages that apply to the Sources and Destinations you are setting. 3. Enter the commission rate that will automatically be applied to this group of inventory. 4. Select the rounding method for prices. You can also enter an amount over which the prices will automatically be rounded to the nearest dollar. All information you have set will be described on the right. Select OK to save the auto pricing information for this group of inventory. Example: This example refers to the picture below. You select the Auto Prices button and then select New. You want to set up automatic pricing for styles belonging to any brand of your footwear department that cost you between $50 and $100. Select ALL for Brand, meaning that this applies to any brand. Select FOOTWEAR for Department, meaning that this applies only to the Footwear department. In the first field beneath When cost is between enter 50 and in the second field enter 100. That describes the cost range for this group. You want the current selling price of the item to be 80% of the store’s suggested price, the store’s suggested price to be 90% of the manufacturer’s suggested retail, and the manufacturer’s suggested retail to be 150% of the cost. Enter the numbers in the fields as shown below. You want these prices to automatically round to the nearest $.99 so you select it. However, for items that cost over $90, you want the prices to round to the nearest dollar, so enter 90 in the field. Finally, you want all items belonging to this group of inventory to automatically have a commission rate of 3%, so enter 3 in the Commission Rate field. Select OK to save. 20 • Company Information & Settings Copyright 2001 Run.It! Retail Software Confirm Quick Find Items Quick Find is a convenient register function that can be used in place of scanning merchandise. Instead of scanning items, you just select buttons to select items and quantities. Quick Find is ideal for kiosks, restaurants, and any other type of business where you will not scan merchandise. For more details about Quick Find, refer to the chapter entitled, “Sell.It!”. 1. While viewing the Company Information and Settings Inventory/Orders tab, select Quick Find. The Automatic Price Calculations dialog box is displayed. 2. If you want to automatically start with the Quick Find screen instead of the Sale Screen when you select Run Sales, you should enable the Start with Quick Find - Not Scanning checkbox. NOTE If you don’t enable this option, you can still use Quick Find at any time by selecting the Quick Find button on the Sale Screen. You can also return to the Sale Screen from the Quick Find screen at any time. 3. If you want the quantity of any item sold using Quick Find to automatically be one, enable the Skip Quantity on Quick Find checkbox. NOTE If this option is not enabled, when you select an item from Quick Find, a screen displays allowing you to select the quantity being purchased. 4. Select the Confirm Quick Find List button to build your Quick Find system. It takes a few seconds. You should wait until you have entered a large group of inventory into your Run.It! system before selecting this button. When you have selected this button once, you will not have to select it again unless you modify your inventory. 5. Select OK when you are finished setting the Quick Find options. Run.It! Retail Software Copyright 2001 Company Information & Settings • 21 Misc. Categories FIELD/BUTTON DESCRIPTION Payable Categories Enter in payable category choices to be assigned to the vendor in the phone book Checking Account - Enter in checking Account choices to be assigned when writing checks to the vendors. Customer Preferences Enter in customer preference choice assigned in a customer record to indicate a brand or any other buying preference Contact Types Enter in contact choice assigned to vendors in phone book. PO Seasons Enter in Purchase Orders season to be assigned to purchase order season. For example Fall 2000, Summer 2001. PO Types Enter in Purchase Orders types to be assigned to purchase order to indicate the type of order. For example: Refill, Seasonal buy, Special Order, etc. Shipping Terms Enter in shipping method to be assigned to Purchase Orders ( UPS, Fed Ex, etc). Payable Exceptions Enter in payable exception reasons to assigned to specific payables for non payment 22 • Company Information & Settings Copyright 2001 Run.It! Retail Software General • From the menu, select File, Options and select the General tab. FIELD DESCRIPTION Use No-Size and Size Together This allows you to have both size-based and non-size-based merchandise. If you have this option enabled, when you are in Move.It! and Order.It! you are given the option of working in NoSize Mode or Size Mode. The differences encountered when working in these modes are discussed in the beginning of the section on Move.It!. Use Serial Numbers This should be enabled if you are using serial numbers with your inventory. Serial Numbers can only be used for non-size-based inventory. Show printer dialog before printing This allows you to change the printer when you print a report. If you have this option enabled, whenever you print a report or a list in Run.It!, a window will appear showing which printer this report is going to print to. If you click the Setup button on this window, you can change the printer that will be used. You may find it helpful to enable this option if you have several printers attached to your computers. Use Family Member Name When this is enabled, you can enter the name of a family member for whom each line item is being purchased. This information can be used when printing mailing labels for your customers. Refer to the chapter entitled, “Know.It!” When you enable Use Member Name, two things change on the register screen. The Sls Code field becomes the Member field and the Salesman button becomes the Member button. Consequently, you cannot enter a salesperson for each line item when Use Member Name is enabled. Rentals If you rent merchandise (such as video tapes, ski equipment, musical instruments, etc.) you will want to enable this option. When Rentals is enabled, a button labeled Rental becomes available on the sale screen, which if depressed sets the transaction as a rental. You can also set rental terms by clicking View/Edit on an item in Stock Information in Inventory. Use Automatic Price Points When this is enabled, the price point of each new style you create will be automatically set based upon the price. This uses the price ranges that you set in Price Points through File, Options, Inventory/Orders. Use Customer Pricing Tables This allows you to set special prices for certain groups of customers. You may have one group of customers that you charge certain special prices, and another group of customers that you charge different prices. If you select this option, you can set the customer pricing tables for each item in inventory. Use Unabbreviated State Names Allows for entry of foreign county designations Run.It! Retail Software Copyright 2001 Company Information & Settings • 23 Multi Store FIELD DESCRIPTION Sell/Ship from multistore This allows you to automatically sell an item from another store if it is not in stock in this store. This is very helpful for shipping receipts, and can also be used with ordinary receipts. You must specify a customer on the receipt for this feature to work. When you try to sell an item that is out of stock in this store, a window will appear asking you to select the store you want to sell from. If you have specified a Warehousing Store, you will first be asked if you want to ship from that store. If you answer No, you will be presented with a list of stores, from which you can select the store that the item will ship from. If you want a certain quantity of an item to remain in stock at a store, you can enter this quantity in the Leave Floor Sample(s) field. Warehousing Store If a store location is assigned as the warehouse indicate the store # Tax Rates Your business may require that you use various tax rates. Sell.It! allows you to enter multiple sales tax rates. For example, you may have a store in a state where clothing is not taxable but sporting goods are taxed at a rate of 5%. Enter 0 and 5 in the tax rates boxes provided. 1. Click on Tax Rates. 2. Enter all the tax rates that you will need. 3. Click OK. 24 • Company Information & Settings Copyright 2001 Run.It! Retail Software Custom Names This allows you to enter your own custom names for the Store Suggested Price, Layaways, and the two tax rates. You should only enter a name for Tax 2 if you use a second tax rate. This Tax 2 can be used if you charge a luxury tax on certain items. It is useful in most Canadian provinces where you would enter GST for Tax 1 and PST for Tax 2. You also have the option of having Tax 2 applied to the amount that already includes Tax 1. If you do not enable this option, Tax 1 and Tax 2 are each applied separately to the Sub-total of the receipt. Buying Club This is used if you have a buying club. There are two types of buying clubs: one is Free Item, where customers get a free item after they have purchased a certain number of items; the other type is Free Dollars, where the customer receives a certain amount of money to be taken off of a future purchase. • Example 1 You want to use a Free Item Buying Club. You want a buying club customer to be eligible for a free item after he or she has purchased 12 items at a minimum price of $30 each. Enter “12” in the Buy ___ items and get 1 item free field. Enter “30” in the Min Price for eligible item field. • Example 2 You want to use a Free Dollars Buying Club. You want a buying club customer to receive a $5 credit after each purchase of at least $100. You want the free dollar credit to be limited to $25. In other words, even if the customer makes a purchase of more than $500, he or she only receives a $25 Free Dollar credit good for future purchases. Enter “100” in the Spend ____ $ field, and enter “5” in to earn ___ $ field. Enter “25” in the Maximum Free Dollars field. FIELD DESCRIPTION Use Buying Club A check in this checkbox means that you are going to use a buying club. Buy ___ items and get 1 item free Enter the number of club items the customer must buy before being eligible for a free item Spend ____ $ to earn ____ $ Indicates the amount the customer has to spend (the first field) in order to earn a certain amount (the second field) of free dollars. Min Price for eligible item Enter the minimum price of an item for it to be counted towards the buying club Maximum Free Dollars Enter the amount spent in order to receive free dollars, the amount of free dollars and the maximum possible free dollars Useable with parent cust. authorization Permits the buyers club to recognize the parent in parent/child relationship in the customer record. Run.It! Retail Software Copyright 2001 Company Information & Settings • 25 Shipping Enables you to pre-calculate the shipping rates to be charged when shipping at the point of sale FIELD/BUTTON Shipping Rate Calculation DESCRIPTION Assign the method of shipping rate will method on which the shipping rate will be determined. • None – No method will be used and the shipping rate will be determined when the sale is created • Weight – The amount of weight of the total merchandise determines the rate of shipping. Weight’s of individual items are assigned when new styles are created and can be modified in view style of either Move.It or Order.It. • Units – The amount of units sold determines the rate of shipping. • Sale Amt- The amount of the sale determines the rate of shipping • Select the available shipping term (S) Standard (Ground) , Priority Overnight , Standard Overnight, 2 Day, or 3 Day. 26 • Company Information & Settings Copyright 2001 Run.It! Retail Software Shipping Rate Tables Enter the Up To amount for the shipping method chosen. For example: If Units are the chosen method used then enter the upper limit range for units. For example: If you enter in the Up To field “2” to indicate that any shipping of 1 or 2 units will be charged this shipping rates depending on the shipping terms used. Next, Enter the amount to be charged for any of the shipping terms standard (ground) Priority Overnight , Standard Overnight, 2 Day, or 3 Day. Countries Displays the list of currently defined countries and their applicable shipping surcharges. You can add, edit, or delete countries shown on this list. 1. 2. 3. 4. Run.It! Retail Software Copyright 2001 To add a new country to the list, select New. The Country dialog box displays. In the Country field, enter the country name. In the Shipping Surcharge field, enter the amount of the surcharge. Click OK. Company Information & Settings • 27 Retail Calendar This allows you to set the First Month of the Year and First Day of the Week for your store. This information can be used in several Know.It! reports including the History, Markdown/Sell Thru, Fast/Slow Sellers and Inventory Flexibility. The Sales vs. Inventory report always uses the Retail Calendar that you set here. For example, if you set March as the First Month of the Year, when you run a Sales vs. Inventory report, it reflects information from st March 1 to the current date. Accounting/Tenders Payable Options FIELD DESCRIPTION Use Approval/Disputes on Receiving When this is enabled, a check cannot be written towards a payable until that payable has been approved. In order for a payable to be approved, all of the merchandise on the payable must be marked as OK. If you receive only part of an order for a particular style, that style will be marked as Invalid on the payable. You can mark this item as Disputed. The disputed item will then be put on its own payable and the original payable will become approved. Payable Approval and Disputes are discussed further in Pay.It. Prefer to Pay by Discount Date Normally in Run.It!, the second Net date is automatically considered the due date of a payable. However, if you select this option, the due date of each payable is considered to be its first Net (or discount) date. This is useful if you always plan to pay your invoices before the discount date. If you select this option, the second Net date becomes meaningless. Sales Tax(1) charged on payables Enables tax 1 to be collected on payables. Sales Tax(2) charged on payables Enables tax 2 to be collected on payables Print check on customer reimburse This allows you to print a check to reimburse a customer. If you select Check as the tender for the reimbursement, when the receipt prints, the check will automatically print (on your Check Printer). This check will be automatically added to your check register. When you enable this option, the Checking Account for Reimburse menu appears from which you select the account you are using for the reimbursement checks. You must first enter your checking accounts in the Categories in Pay.It! before you can select one here. Pay bills ___ days early Future Enhancement EOM Cut off Day This is the date of every month that will be the cut off for discounts that reflect the end of the month. For example, you set the EOM Cut Off Day here as 15. The EOM net date (set in the Phone Book) for a company is 20. If you make a payable for this company on June 12th, it will be due on July 20th. If you make a payable for this company on June 16th, it will be due on August 20th since it was made after the cutoff date. For more information on EOM discounts, refer to the sections on Pay.It! and Call.It!. 28 • Company Information & Settings Copyright 2001 Run.It! Retail Software Payroll Enter information in this tab only if you are using the ADP payroll system. This allows you to export the employee payroll information for use with ADP. FIELD DESCRIPTION ADP Company Code Enter your ADP Company Code ADP Export File Enter the full path of the ADP file to which you will be exporting the payroll information. Export Gross Sales Amount Select this option if you also want to export the gross sales. When you enter your employees (refer to the section entitled, “Employees”), you see a feature in which you can enter the payroll information. When you actually want to export the ADP information, go the Employee section of Know.It!. Receivables FIELD/BUTTON DESCRIPTION Net Terms # of days statement is Due Interest % The rate charged for late payments Late Fee Fee charged for late payments Days late for fee Fee charged after # of days late Min Payment (%) Minimum payment due based on % rate Interest Compound Daily – Interest compound on a daily basis Per Period – Interest compound per period Receivable Type Balance Forward – Payment are made against total balance similar to credit cards. Open Item – Payments are made a against specific open invoices. Statement Printout Standard - Prints minimum detail: Such as due date, previous balance, current charges and payments and balance due Revolving – Includes all of standard info plus finance charges, late charges, and minimum payment amount. The customer can tear off the top stub of the statement to mail with payment remittance. Run.It! Retail Software Copyright 2001 Company Information & Settings • 29 G/L Adding a New G/L Account 1. Click the New button. 2. In the Pick Account dialog box, in the first field, enter the Acct#. In the second field, enter the Account Name. 3. Click OK. 30 • Company Information & Settings Copyright 2001 Run.It! Retail Software Employees/Security Employees It is important that you enter information for all of your employees in Run.It! Employee information must be entered before any security can be set. DO NOT delete the employee USER until you have entered another user and given the full security access. Enter employee information for everyone (from cashier to owner) who will be using the system. NOTE You must enter a store number for the employee. The employee will have access privileges only in that store. If an employee is going to be using Run.It! in more than one store, he or she must be entered separately for each store. 1. From the menu, select File, Options and select the Employee/Security tab. 2. Select what type of employee list you want to display—by Store, by Status, etc. Then select Search. 3. With the desired results shown, you can perform the following tasks: − Add a new employee to the list by selecting New. Refer to the section entitled, “Setting up a New Employee.” − Modify the details for a current employee by highlighting the employee’s name on the list, and selecting Edit. − Delete an employee by highlighting the employee’s name on the list, and selecting Delete. − Print the list currently displayed on screen by selecting Print List. − Enter a schedule for any employee by selecting Schedule. Refer to the section entitled, “Setting Up an Employee’s Schedule.” − Specify a bar code the employee can scan when logging in by selecting Codes and entering the applicable information in the fields of the Employee Barcodes box. Run.It! Retail Software Copyright 2001 Company Information & Settings • 31 Setting up a New Employee 1. From the menu bar, select File, Options. 2. In the Company Information and Settings window, click the Employees/Security tab. 3. Enter the employee’s last and first names and the number of the store in which he or she will be working. 4. Enter all applicable information on each tab. 5. When you are finished entering the information on all tabs, select OK to save this employee’s information. TAB DESCRIPTION Personal This is where you enter the employee’s basic information. Enter this person’s address, phone numbers, and social security number. Enter or select a type for this employee; e.g., Manager, Cashier, or Salesperson. Enter the date this person was hired. Payroll This is used to set the payroll information for this employee. Enter the employee’s hourly or weekly rate of pay and his or her overtime rate. Enter and select all other necessary information for this employee. The information on the Payroll tab is used for your payroll system. Commissions This is where you enter the employee’s special commission rates. These are the commission rates that will be applied to each item this person sells. You can enter a standard commission rate, which is what this person normally receives when he or she sells an item. You can also set special markdown commission rates that a salesman will receive in place of the standard rate when he sells an item with a register markdown. 1. Enter this person’s standard commission rate in the Commission % field. This is the commission rate this employee will normally earn when selling an item. 2. Select New to enter this employee’s first Special Commission Rate at Markdown Levels. 3. Enter the range of markdown percentages for this special commission level. For example, if you want this special commission to apply to items sold at a register markdown of between 10% and 20%, enter 10 in the at least field and 20 in the less than field. 4. Enter the commission rate this employee will receive for selling an item within this markdown range. 5. Select OK. 6. To enter additional special markdown levels for commissions, repeat steps 2 – 5. RELATED TASKS To edit existing information, highlight the range you want to modify, make your changes, and select Edit. To delete existing information, highlight the range you want to delete, and select Delete. Security This is where you enter the security access for the employee. Security levels for employees can also be set in the Security setup. For information on setting security, refer to the section entitled, “Security.” Each employee must have a unique login name. You must enter a different login name for each employee. Each employee must also have a password. 1. In the Login Name field, enter the employee’s login name. The login name can consist of letters and/or numbers, but cannot be more than 5 characters long. 2. In the Password field, enter the employee’s password. The password is limited to 5 characters and can only be numbers. 3. Select Set Security to set this person’s security access. For information on setting security, refer to the section entitled, “Security.” 32 • Company Information & Settings Copyright 2001 Run.It! Retail Software Setting Up an Employee’s Schedule This is used to enter the employee’s weekly work schedule. To enter a new week’s schedule for this employee: 1. From the Company Information and Settings window, select Employees/Security. 2. Select Schedule. The Schedules dialog box appears. 3. Select New. The Schedule dialog box appears. 4. Select the week that you are setting. 5. Enter the time In and time Out for each day. If you select a red arrow, it copies the previous day’s schedule to the next day. NOTE When entering a time in the schedule, it must be entered in one of two formats. Either you can use 24-hour time, in which you would type 17:00 for 5PM. Or you can enter it as 5:00PM. 6. A graph of the hours appears on the bottom and the total hours for the week will appear in the upper right. Select OK to save this week’s schedule. RELATED TASKS To copy the highlighted schedule to the upcoming week, select Copy. To edit the highlighted schedule, select Edit. To delete the highlighted schedule, select Delete. Run.It! Retail Software Copyright 2001 Company Information & Settings • 33 Security Security is an important feature of the Run…it! system. Security levels allow you to control which functions of the program the users (employees) can access. You may want certain employees to have access to only some parts of the system. You must have at least one user who has full access to all parts of Run.It! If you are going to set each user’s access individually, it is easiest to set it when you create the user in the Employee setup. However, if you want to duplicate the security access of one employee for another employee, you would do this from the Security setup screen. This is helpful if you want certain groups of employees to have the same clearance (e.g. managers, cashiers). NOTES Before working on system security, you must enter your employees in the Employees screen in the Setup menu. Without a list of employees, there is nobody to give security access to. When Run.It! is installed, it automatically creates a user whose login name is USER and whose password is 12345. This user has complete access to all parts of the system. From the menu, select File, Options and select the Employees/Security tab. 7. Search for the employee for whom you want to specify security settings. 8. When the desired employees name is shown in the list, highlight the name, and select the Security button. The Security dialog box appears. 9. Select the tab (General, Point of Sale, Transfers, Purchase Orders, Inventory, Payables, Know.It!, Maintenance) of the section you wish to set access on for this user. Use the following buttons, as applicable: − Check All. Automatically enables all of the checkboxes for this user’s security access. This means that this user now has access to all parts of Run.It!. − Uncheck All. Automatically clears all of the checkboxes for this user’s security access. This means that this user has no access to any part of Run.It!. − Print. Prints a list showing the complete security profile for this employee. 10. Select all the appropriate options this employee should have access to. A check will appear in the box next to a function if the employee has access to it. If you wish to deny access to this option, select it again and the box will become blank. NOTE Refer to Appendix D for description of each security setting. 11. When you have finished setting this person’s access, select OK. 34 • Company Information & Settings Copyright 2001 Run.It! Retail Software Copying Security Access from Another User To set an employee’s access by copying another employee’s access, do the following: 1. From the menu, select File, Options and select the Employees/Security tab. 2. Select the name of the employee whose access you wish to modify. 3. Select Copy Security. 4. Double-select the user whose security access you wish to copy. 5. Select OK. Removing a User’s Access To completely remove a user’s access to Run.It! do the following: 1. From the menu, select File, Options and select the Employees/Security tab. 2. Highlight the employee whose access you wish to delete, and select Delete. Run.It! Retail Software Copyright 2001 Company Information & Settings • 35 Analysis ??? 36 • Company Information & Settings Copyright 2001 Run.It! Retail Software Internet Sales Future enhancement Run.It! Retail Software Copyright 2001 Company Information & Settings • 37