1
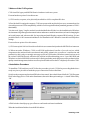
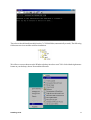
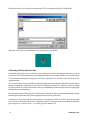
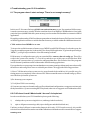
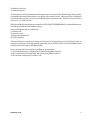
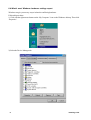
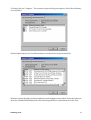
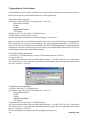
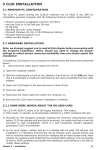
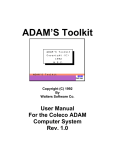
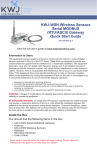
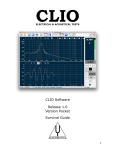
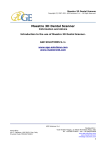
Installing, upgrading and troubleshooting your CLIO
system under the Windows environment.
Audiomatica Srl
Rev. 1.1. June 2001.
Contents
1 What does this document cover? .............................................................................. 1
2 Windows compatibility ................................................................................................ 1
3 Nature of the CLIO system .......................................................................................... 2
4 Installation Procedure ................................................................................................. 2
5 Running CLIO for the first time ................................................................................... 4
6 Troubleshooting your CLIO installation .................................................................... 5
6.1 The program doesn't start and says 'There is not enough memory!'.................. 5
6.2 CLIO doesn't work! What should I do now? A simple test. ................................... 5
6.3 Hardware requirements and possible conflicts ..................................................... 6
6.4 What's next: Windows hardware settings report .................................................. 8
7 Upgrading the CLIO software ................................................................................... 10
1 What does this document cover?
This document covers the installation of the CLIO HR-2000 PC board and of the CLIO Software release
4.5 (and above) under the various Windows environments. It covers also troubleshooting when the system
is run under Windows or in MS-DOS mode. As last topic, it covers the software upgrade from one version
to a newer one.
From here on, the CLIO PC board and Software are also referred as ‘the CLIO system’ or simply CLIO.
All references are given with respect to CLIO User’s Manual; as an example ‘refer to 1.3’ means ‘refer to
chapter 1, paragraph 1.3 of CLIO User's Manual’.
2 Windows compatibility
The CLIO system is compatible with all Windows versions except Windows 3.1, Window NT and its
successor Windows 2000. So you will be able to install CLIO under the following Operating Systems (OS):
1) Windows 95
2) Windows 95 OSR2 (OEM Service Release 2)
3) Windows 98
4) Windows 98 SE (Second Edition)
5) Windows ME (Millennium Edition)
The procedures described in this document refer directly (and are described with examples and figures) to
the Windows 98 SE operating system, English version; they can be applied with only minor modifications
and appropriate translations to all the other OS and languages.
Installing CLIO
1
3 Nature of the CLIO system
CLIO is an ISA legacy and MS-DOS native hardware/software system.
From an hardware point of view this means:
1) CLIO needs, to operate, to be phisically installed in a 100% compliant ISA slot.
2) Provided an ISA equipped computer, CLIO can operate with any kind of processor, no matter how fast
or new this processor is. ISA compatibility, which is a well recognized industry standard, guarantees CLIO’s
functionality.
3) As the word ‘legacy’ implies, and as it is needed with all other ISA devices, the installation in a Windows
environment will go through some manual actions and man-to-machine interactions, at least for changing the
on-board jumper and, when needed, for inspecting and modifing the computer BIOS settings. It is not
possible to have a 100% automatic and hassle-free installation since Windows is not able to modify these
settings.
From a software point of view this means:
1) CLIO can exploit 100% of what is described in its users manual only under the MS-DOS environment.
2) When run under Windows, CLIO (as all DOS applications) benefits of several services which
compensates the minimal lacks encountered and greatly enhance the overall user’s satisfaction and
productivity; this is why we strongly encourage you to run CLIO under a Windows normal session, not in
the exclusive MS-DOS mode, when the OS exploits its full multitasking power. Leave MS-DOS and
Windows exclusive MS-DOS sessions only for testing and other particular purposes like production line
quality control management; in these cases it may be advisable to have the PC completely devoted to CLIO.
4 Installation Procedure
To install the CLIO card into your PC follow the procedure given in 3.2. Before proceeding further have
ready one pin-to-pin cable to make the proper connections as described later.
Switch on the computer and wait until Windows has started. Insert the diskette labelled ‘CLIO Program
Disk’ in the floppy drive. Click on the Start button, choose the Run option and type: ‘a: install’ followed by
‘Ok’.
A DOS window should pop up, press Enter to confirm the software installation.
When the installation finishes close the DOS window.
2
Installing CLIO
The software should install smoothly into the C:\CLIO40 folder (automatically created). The following
folders structure is created after software installation:
We will now create a shortcut on the Windows desktop in order to run CLIO: click with the right mouse
button on your desktop, choose New and then Shortcut
Installing CLIO
3
Follow the wizard: click on Browse and open the CLIO executable inside the CLIO40 folder.
When the wizard exits you should have on your desktop an icon like this
5 Running CLIO for the first time
Just double click on the newly created icon! A new full screen window should open and you are ready to
work with CLIO. Remember that you are running a DOS application under Windows; to switch between
CLIO and other running tasks simply press Alt-Tab: to get back to CLIO click on the CLIO icon on the
Application Bar.
You are now ready to test your installation with some simple measurements and calibrations; please connect
Output A with Input A with the pin-to-pin cable; now follow the procedure in 3.4; please, execute any single
step as described, if you fail to obtain the result expected do not go further but pass to the next paragraph
to troubleshoot your installation.
If you complete the procedure OK your CLIO system is running fine and you can start immediately working
and taking measurements with it, thus skipping the next sections; good work!
As last advice: if you are using one of Audiomatica’s microphones (MIC-01 or MIC-02) remember that
you can connect them directly to CLIO’s input but you also need to power them switching the phantom
power supply on; to do this see 8.1.5 or simply press F4 and then ‘H’.
4
Installing CLIO
6 Troubleshooting your CLIO installation
6.1 The program doesn't start and says 'There is not enough memory!'
In this case CLIO cannot find enough DOS conventional memory to run. Pay attention, DOS memory
is not the system memory (usually Windows machines have from 8MB to 128MB and more) but is that
particular space (640kB within the system memory) used to emulate DOS and that is common to all DOS
applications.
Depending on the number of DOS resident programs that are launched when any DOS session is invoked
each DOS application will have a variable amount of memory available within the 640kB maximum size.
CLIO needs at least 585kB free to run.
To inspect the available amount of memory type 'MEM' from MS-DOS Prompt. Look at the report: the
'Largest executable program size' is the memory free for any DOS application. To go into deeper detail type
'MEM/C', you'll get a report with also a list of the running residents.
DOS memory is configured at start-up by two standard files: autoexec.bat and config.sys. These files
reside in the system root (usually C:\). It is far beyond the scope of this paper to describe how DOS
configures the system at start-up; you need to understand that these files contain a list of the programs
invoked at start-up and that remain resident under all DOS running applications.
If you get the above error message it means that there are too many running residents and you need to modify
the autoexec and config files to remove or disable part of them. We suggest the following procedure:
1) Since CLIO doesn't need any system service (apart from the keyboard driver) it is possible to try, for
testing purposes, to completely remove the two files. Either rename the autoexec.bat and config.sys files or
move them away from the system root.
2) Re-bootstrap your computer.
3) Verify that CLIO is now running.
4) Create two new autoexec.bat and config.sys files with minimal configuration; we suggest to activate only
the keyboard driver, if you are not using the US keyboard; otherwise we suggest to work without those files.
6.2 CLIO doesn't work! What should I do now? A simple test.
In order to troubleshoot your CLIO installation please get the following:
1)
a loudspeaker system or a single driver (a midrange is the best choice)
2)
a pin-to-alligators connecting cable (tip to red alligator and shield to black one)
Until now we have left Input A connected to Output A; this is why, if CLIO works correctly, it is possible
to let it self-test all its functions and execute all the calibrations without the need for external devices support;
Installing CLIO
5
during the procedure described in 3.4 you are actually testing two things: the capability of generating a signal
(through CLIO’s output) and the capability of acquiring and analyzing it (through CLIO’s input). If something
goes wrong we have to open the loop and separately test the two hardware sections. The first thing to test
is CLIO’s generator.
To do this disconnect the pin-to-pin cable and connect the loudspeaker to Output A with the pin-to-alligators
cable (no external amplifier is required).
Now let’s repeat the first part of the procedure in 3.4; press F4 to recall the Generator&Level Meter and
then ‘S’, type ‘1000’ in the Freq field leaving the other fields at zero, press Enter.
You should hear a 1kHz sinusoid; listen carefully, CLIO is a high precision signal generator; the sinusoid has
to be continuous, without clicks, pops or any other disturbing effect; it has to be clean and crisp without
any audible distortion; it has to be stable without any frequency shift effect.
The ability of generating is vital for CLIO and let it also test and calibrate its input; so, if you are encountering
problems here it is crucial that you solve the hardware/software conflicts that are causing them; read the
following sections and get back to the sinusoid test until it runs fine. Only then you can repeat the procedure
in 3.4 to finalize CLIO's installation.
6.3 Hardware requirements and possible conflicts
The CLIO systems needs the following PC system resources:
1) The exclusive usage of DMA channels number 1 and 3.
2) A free I/O Address range selectable between the two possible: 300 HEX (using 300-304 range) or 310
HEX (using 310-314 range)
No IRQ is needed.
No other hardware requirement (memory, hard disk, processor speed) is stringent if Windows is used;
different limitations apply if an MS-DOS based system is used: refer to CLIO User’s Manual for details.
DMA Channel 3 is needed to operate CLIO's generator. If the generator doen's work it is very likely that
there is a hardware conflict with this resource.
The I/O address range is needed to operate CLIO's analyzer and to control all the hardware settings.
NOTE: The exclusive usage of DMA channels may create unresolvable conflicts with other hardware; CLIO
may be operated, with limited functionality, without the need for DMA channel number 1: in this situation
you are not able to use the Leq Measurement Menu (see 14.4), all other functions should operate normally.
Fulfil these hardware requirements may not be an easy task especially if other espansion cards are present
in your computer.
The causes of conflict may be divided in two main categories: peripherals integrated on your main PC board
or add-on cards inserted in your mainboard's ISA expansion slots. It is very unlikely that a PCI expansion
card is conflicting with CLIO. To troubleshoot your installation you need to locate the conflicting hardware
and either reconfigure, disable or remove it.
The on-board conflicting integrated peripherals may be:
1) Parallel ports configured in ECP mode
6
Installing CLIO
2) Infrared serial ports
3) Audio subsystems
To check if any on-board peripheral is conflicting you have to access your PC's BIOS settings. This is usually
accomplished pressing a particular key or sequence of keys while your PC is booting; any PC is telling the
user which is the correct key to press to enter BIOS: the most common is the ‘Del’ key but you may need
to press ‘F2’ or a different one.
When inside BIOS you should locate a menu like ‘INTEGRATED PERIPHERALS’ inside which there are
listed the peripherals present and their settings.
The conflicting ISA add-on cards may be:
1) Sound cards
2) Network cards
3) Expansion parallel ports
4) SCSI controllers
The main difference with the preceeding case when an on-board peripheral was conflicting is that an
expansion card may be, for testing purposes, physically removed. This is a quick way for isolating the cause
of problems and assessing CLIO's functionality.
In our experience the vast majority of conflicts are generated by:
1) On-board parallel ports configured in ECP mode using DMA channel 3.
2) ISA sound cards or on-board audio subsystems using DMA channel 3.
3) ISA network cards using I/O address 300.
Installing CLIO
7
6.4 What's next: Windows hardware settings report
Windows can give you an easy way to isolate the conflicting hardware.
Follow this procedure:
1) Click with the right mouse button on the ‘My Computer’ icon on the Windows desktop. Then click
‘Properties’.
2) Select the Device Manager tab.
8
Installing CLIO
3) Double click on ‘Computer’. The computer properties dialog box appears. Select Direct Memory
Access (DMA).
4) Select Input/Output (I/O). Scroll down until you visualize the I/O region around 0300.
Windows is gently showing you which peripheral or card is using the resources that CLIO needs. In the case
showed we found a MS Sound System card conflicting with DMA 3 and no hardware at I/O 0300.
Installing CLIO
9
7 Upgrading the CLIO software
You should have received, either via snail mail or e-mail, the sofware upgrade to the latest software release.
In the first case you received a diskette labelled ‘CLIO Program Disk’
To install the software upgrade:
1) Take note of the following CLIO settings (see 7.3 and 7.4):
- Microphone sensitivity
- Printer
- Palette
- Amplifier&SwitchBox
- TTL control
2) Delete the file ‘clio.stp’ in the C:\CLIO40 directory.
3) Follow the procedure given in section 4.
4) After running the new software reenter the settings previously saved.
In the second case you received a file from Audiomatica. If you received Lite software version upgrade the
file is named ‘lite.exe’; if you received a standard or QC version upgrade then the file is ‘12345678.exe’
where 12345678 is your CLIO system serial number.This file is useful for upgrading an existing installation
without loss of the user's data directories or for creating a clean install from sctratch, in the case you are
reinstalling the software after an hard disk formatting.
To install the software from scratch:
1) Create the C:\CLIO40 directory; you may use also another name if you prefer.
2) Copy the file in it.
3) Click on the Start button, choose the Run option and type: ‘c:\clio40\12345678.exe -d’ followed by
‘Ok’. Don't forget ‘-d’, it is essential to create the directories structure! If you are upgrading a Lite version
type ‘lite’ instead of ‘12345678’.
To upgrade an existing installation:
1) Copy the file in the C:\CLIO40 directory.
2) Take note of the following CLIO settings (see 7.3 and 7.4):
- Microphone sensitivity
- Printer
- Palette
- Amplifier&SwitchBox
- TTL control
3) Delete the file ‘clio.stp’ in the C:\CLIO40 directory.
4) Click on the Start button, choose the Run option and type: ‘c:\clio40\12345678.exe -d’ followed by
‘Ok’. Don't forget ‘-d’, it is essential to create the directories structure! If you are upgrading a Lite version
type ‘lite’ instead of ‘12345678’.
5) After running the new software reenter the settings previously saved.
10
Installing CLIO