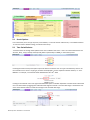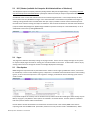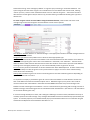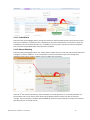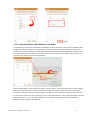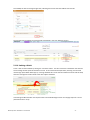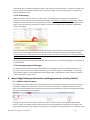
1
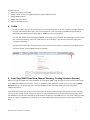
User Guide MultiMatch Version 4.2 © Copyright 2014, RAE Internet Inc. (doing business as Match My Email). This document is the copyrighted intellectual property of RAE Internet Inc., a corporation domiciled in the State of New York, with its principal offices at P. O. Box 143, Ardsley on Hudson, New York 10503. The document may be copied in whole or in part, provided that each copy contains this copyright notice. The information contained in this manual was compiled with care. Nevertheless, erroneous statements cannot be excluded altogether. RAE Internet Inc., the authors and the translators are not liable for possible errors and their consequences. The names of software and hardware used in this manual may be registered trademarks; they are used without guarantee of free usability. RAE Internet Inc. generally follows the spelling conventions of the manufacturers. The reproduction of brand names, trade names, logos etc. in this manual (even without special marking) does not justify the assumption that such names can be considered free (for the purposes of trademark and brand name regulations). Please direct any recommendations or comments to [email protected] Table of Contents 1 Introduction ................................................................................................................... 4 2 Match My Email Web Tabs in Salesforce ......................................................................... 4 3 Menu Navigation - Where to go for Specific Actions ....................................................... 5 4 Profile ............................................................................................................................ 6 5 Email Page (MME Cloud View, Manual Matching, Creating Salesforce Records) ............. 6 6 7 5.1 Search Options ................................................................................................................................... 7 5.2 Time Period Selector .......................................................................................................................... 7 5.3 RSS / Chatter (available for Enterprise & Unlimited editions of Salesforce) ........................................ 8 5.4 Pages.................................................................................................................................................. 8 5.5 Filter Options ..................................................................................................................................... 8 5.6 Settings .............................................................................................................................................. 9 5.7 Commands-Ignore, Delete, Reprocess, Save ....................................................................................... 9 5.7.1 Ignore Command .................................................................................................................... 9 5.7.2 Delete Command .................................................................................................................. 11 5.7.3 Reprocess Command ............................................................................................................. 11 5.7.4 Save Command (Troubleshooting) ........................................................................................ 12 5.8 Email Check Boxes ............................................................................................................................ 12 5.9 Sorting ............................................................................................................................................. 12 5.10 Email List and Drilldown ................................................................................................................... 12 5.11 Type Matches & Match Detail pop-up commands ............................................................................ 13 5.11.1 Linked Match ........................................................................................................................ 14 5.11.2 Manual Matching .................................................................................................................. 14 5.11.3 Create (and Match) a New Salesforce.com Object ................................................................. 15 5.11.4 Undoing a Match ................................................................................................................... 17 5.11.5 Reprocessing ......................................................................................................................... 18 5.11.6 Reassigning Ignored Messages .............................................................................................. 18 Import Page (Adding email accounts, updating passwords, selecting folders) ............... 18 6.1 Email Accounts for Import ................................................................................................................ 18 6.2 Start Import Manually ...................................................................................................................... 19 6.3 Adding New Email Imports ............................................................................................................... 20 6.4 Folder Selection Details .................................................................................................................... 20 6.4.1 Fully Automatic Mode Using INBOX and Sent (No mail filters or rules in place.) .................... 21 6.4.2 Fully Automatic Mode Using INBOX, Sent and Mail Filter Subfolders (Mail filters and rules are in place). 22 6.4.3 Fully Automatic Mode using ‘All Except Selected’ option....................................................... 22 6.4.4 Total Control mode using a designated “Sync to Salesforce” folder ....................................... 23 Ignore Page (Adding & Modifying Ignore rules, Internal Domain Ignore) ...................... 25 7.1 External Ignore Rules........................................................................................................................ 25 7.2 Internal Domain Ignore Rule............................................................................................................. 26 Match My Email MultiMatch – User Manual -2- 8 9 10 Settings Page (Salesforce Integration, Adding Domains, Adding Users) ......................... 27 8.1 Salesforce Integration web tab ......................................................................................................... 27 8.1.1 Matching Rules ..................................................................................................................... 28 8.1.2 Upload Rules ......................................................................................................................... 28 8.2 Google Drive Integration (User with Gmail account or Google Apps) ................................................ 29 8.3 Google Mail Integration (Gmail Users)(optional) .............................................................................. 30 8.4 Domains & Users .............................................................................................................................. 30 8.5 Company tab .................................................................................................................................... 31 MME Special Features .................................................................................................. 31 9.1 Matching to Contacts using Secondary Email Addresses................................................................... 31 9.2 Importing Legacy Email .................................................................................................................... 31 MME Results within Salesforce Records ....................................................................... 32 10.1 Web Tabs ......................................................................................................................................... 32 10.2 Visualforce view ............................................................................................................................... 32 10.3 Related Lists ..................................................................................................................................... 33 10.4 Secondary Email Address ................................................................................................................. 34 10.5 Permissions ...................................................................................................................................... 35 11 Troubleshooting and Support ....................................................................................... 36 12 Limitations ................................................................................................................... 36 13 12.1 In MME ............................................................................................................................................ 36 12.2 Salesforce Limits & MME Operations ............................................................................................... 36 Master Services Agreement .......................................................................................... 37 13.1 Contact Match My Email support for a PDF of the Master Services Agreement or click on http://www.matchmyemail.com/legal/............................................................................................ 37 Match My Email MultiMatch – User Manual -3- 1 Introduction The purpose of Match My Email (“MME”) is to integrate your email account or accounts with Salesforce.com (SFDC). MME is designed to be fully automatic, 24/7/365, always on and operate with little or no end-user intervention. MME is a cloud service that is accessible via a browser using a username and password. MME is platform-independent and leverages open standards such as IMAP for email and OAuth for authentication. The service syncs and logs email and its attachments to standard Salesforce.com objects like Leads, Contacts, Accounts, Person Accounts, Opportunities and Cases. Through custom programming projects it is also possible for MME to match automatically to custom objects or do precision matching using custom tags. MME also offers many options for privacy controls. The service is designed to be “set up and forget” and operate completely in the background. Once an end-user has set up his or her credentials, the service works with no user intervention. 2 Match My Email Web Tabs in Salesforce The web tabs Email Messages and Match My Email are typically added after the MME package has been installed in Salesforce and during MME set up. The web tabs appear in the light blue command ribbon within Salesforce and enable easy access in the SFDC environment to MME information. [in Salesforce light blue menu ribbon, Click “+” > Customize My Tabs & move these two to available tabs] Clicking the Match My Email web tab will open the MME screen for login. After login, the default view is the Email Cloud, containing a table of emails, matching status, and options for searching, filtering, and acting on those emails. The Email Messages web tab will provide a list of emails uploaded into Salesforce. The view resembles that when a User logs into MME cloud. On this web tab it is possible to select specific messages via check boxes and perform bulk actions of Match, Unmatch, and Delete using buttons at top. If you click the box to the left of From column header, all messages will be selected. Date range filtering options can be entered at top right. Match My Email MultiMatch – User Manual -4- 3 Menu Navigation - Where to go for Specific Actions The MME Menu Ribbon is visible when a user logs in to MME (https://matchmyemail.com), either within the Salesforce environment via web tab or in an independent browser window. From the Menu Ribbon, Users have access to the Match My Email Email Cloud, a User’s Import settings, a User’s Ignore rules, Settings for MME Account, a User’s Profile, and Logout. On Email Cloud one can: View the MME Cloud as a table of emails See status of email messages as matched and to which records See Emails that have not been matched and have status “No Match” Create new Leads, Contacts and other Salesforce records from emails Manually Match and Reprocess emails Add email addresses to Ignore list Search through emails in cloud Delete emails from cloud and permanently delete them from Salesforce On Import one can: View email account(s) currently set up for MME User Add more email accounts for importing into MME cloud Update password for email accounts Change email folders selected for import into MME cloud Start an import manually instead of waiting for 20 minute cycle On Ignores one can: View list of personal ignore rules View list of ignore rules that apply to all Users in the email domain. (End Users can only see personal rules.) Add/remove email addresses or modify rules on Ignore Lists Create rules to discard confidential emails from MME cloud On Settings one can: Manage Salesforce Integration credentials Have access to integration for Google Drive (for Google Users only) Set up of Google Mail Integration (for Google Users only) List of Domains, domain settings, and Users for each email domain Match My Email MultiMatch – User Manual -5- In Profile one can: Change time zone for Email table Change number of email messages displayed per page in MME cloud view Change MME password Change Alert notifications Add or modify RSS Channels 4 Profile By clicking Profile, Users can set the correct time zone within which they reside, the number of messages displayed per page, make choices about alerts, and, if the Cloud Admin, a User can change their MME complex password. (Remember that additional users always login to MME with their email password. In Profile, the number of email messages displayed on each page may be changed. When wanting to perform a bulk task, such as reprocessing, in the main cloud view on a lot of messages, it may be more efficient to display more messages on each page. The check boxes allow a User to choose if they are to receive email alerts when a connection to their IMAP server or Salesforce account are interrupted and require attention. If changes are made to any of the options on this Profile screen, a User must click the Save button. 5 Email Page (MME Cloud View, Manual Matching, Creating Salesforce Records) When a user logs in to MME, the screen will default to a view of the MME cloud. At any time a user can click “Email Cloud” in the MME Menu Ribbon to return here. If a user is elsewhere in their Salesforce account, they can also click the Match My Email web tab. The Email Cloud view is the heart of MME and the screenshot below maps areas explained in subsequent sections. In the Email Cloud, Users may see their email stream (from last 45 days) and how emails have been processed. End Users can only see their emails. Domain Admins are able to see and manipulate the email stream of their entire domain, while the Cloud Admin can see and manipulate the email stream of all domains in the MME account. As a privacy setting, a Cloud Admin can request that MME turn off (done on server side by MME Support Staff) the ability to see the content of email body. Match My Email MultiMatch – User Manual -6- 5.1 Search Options In the Search box, User can type in phrase, email address, or name of interest and hit Enter, or click Refresh button. To reset the cloud to default settings, click Email Cloud at top. 5.2 Time Period Selector Time Periods are set through the dropdown menu in the middle of the screen. Users can choose between the last 24 hours, Daily, 7 Days, 14 Days and All period [which equals 45 days in MME], or the Custom period. Choosing the Custom time period option opens two boxes in which the user can type in the date they want or use the calendar icons to select. If typing in, the dates are displayed in reverse Japanese calendar notation, i.e. YYYYMM-DD. For example, in screenshot below 2014-04-29 is April 29th, 2014. Clicking on the Calendar icon to the right of the date fields opens a calendar dropdown as shown below in which the user can select a date by toggling back and forward through the calendar. Once the data range is selected the user clicks on the Browse button to show the messages in the selected date range. Match My Email MultiMatch – User Manual -7- 5.3 RSS / Chatter (available for Enterprise & Unlimited editions of Salesforce) The RSS feature requires a company install the package Chatter RSS from the AppExchange. This package will work only with Enterprise and Unlimited editions of Salesforce and will not work for Group or Professional editions. An RSS feed of the current view of Email Cloud can be created using this button. In the example below, the filter tool is used to view only No Match messages. Once the Cloud View is refreshed and only No Match messages are showing, clicking the RSS of Current View button will open a pop-up window in which a Name and Description for the feed can be entered. Clicking the “Export to Salesforce” box will allow the feed to be accessed within Salesforce (requires Chatter RSS package from AppExchange available only with the Enterprise or Unlimited Edition). A list of all RSS feeds can be seen by viewing MME Profile . 5.4 Pages The page to be viewed is selected by clicking on the page number. If there are not enough messages in the system to require multiple pages of emails for viewing, this area will be blank on the screen. As described in section 4.0, by clicking Profile a User can change the number of messages displayed on each page. 5.5 Filter Options MME categorizes imported emails by their Match State. Shown in the far right Type:Matches column, an email will be a No Match, or have a status of Match, Ignore, or Reprocess. The default view of the Email Cloud is “All Excluding Ignore”, as we’ve assumed if you have a rule to ignore a message, you would not want it cluttering up the view of emails in cloud. It is possible to adjust the ‘View by’ filter to show All email (in which the list will include Ignore status email), only No Match, only Ignore, only Match or other options as indicated in screenshot below. This filter option is available to End Users, Domain Admins and the Cloud Admin. Domain Admins and the Cloud Admin can further filter the view of email in the cloud by MME Users that are importing email into the MME cloud. (Remember, End Users can only see their email in the MME cloud.) While Match My Email MultiMatch – User Manual -8- default in the ‘for’ field is All, clicking the cursor in that box will show a list of all Users importing into MME. Once new filter options are set, click Refresh button. (This overrides any limits on date in the Time Period Selector.) 5.6 Settings Hover over the ‘Settings’ option at far right to display a pop up window in which MME Cloud View settings can be set depending on user preference. The user can Show or Hide the From or To column and select the number of Messages per page from 20 up to 100 in preset increments. 5.7 Commands-Ignore, Delete, Reprocess, Save The Manual Command buttons of ‘Ignore’, ‘Delete, ‘Reprocess’, and ‘Save’ allow those actions to be taken on messages that are selected using the check box in the far left column. By clicking the box for one message, these commands “mine” information within the message and then use that as a starting point for the user to refine their desired use of that command. Find details about how to employ these commands in their own subsequent section below. 5.7.1 Ignore Command When MME processes emails, the first step executed by the MME algorithm is to check Ignore rules. A User can have a personal list of ignore rules. Admin-level MME Users can establish domain-level ignore rules that apply to all MME Users. By creating an ignore rule for an email address or email domain, a User will direct MME to not attempt matching of an email message to a Salesforce record with the same email address. There are two types of ignore rules (“just address” or “entire message by address”) available with this command button: “Just Address”: means that attempted matching of the email message will be ignored for just this email address or email domain. This is useful if there is more than one email address in the email header. The message will be processed for the other email addresses in the email header. If all email addresses in the header are ‘covered’ by an ignore rule, then the message status becomes ‘Ignore’ and the email is not shown in the default cloud view of ‘All Excluding Ignore’. However, if not all email addresses in the header are ‘covered’ by an ignore rule, then our system will either show a status of No Match or Match information, depending on if matches can be made to records in Salesforce. “Entire Message By Address”: means that when the email address for the rule is in the email header, this entire message will not be processed. It is important to apply this type of ignore carefully because even if other email addresses desired for processing are in the email header the email will not be processed at all and result in “Ignore” in Type:Matches column for Match State. Match My Email MultiMatch – User Manual -9- One benefit of using "entire message by address" is to ignore spam, marketing, or email blast addresses. Our system will give them the status of ‘Ignore’ and exclude them from the default view of email cloud, reducing “clutter” (see 5.5). There are two methods that allow a user to make use of “Ignore” – the manual command discussed here and the Ignore Tab (see Section 7.0), the latter offering a confidential discard ignore type at the domain level. To create an Ignore rule for an email address using the Command button, check the box next to the email message to ignore and click the Ignore command button to show a box of options. The “Apply To” field will default to “1 selected message” or the appropriate number of selected messages based on how many boxes are checked. The Ignore Type field has a drop down menu in which to choose appropriate type. Addresses will automatically show the email address in the From field and have the box checked. If User wants to create the same type of ignore rule for other email addresses in the header, click “add other”. The other email addresses will be visible and those desired can be checked. Be careful to uncheck User's personal email address if choosing 'entire message by address' type, or User could accidentally create an ignore for all email. For Users will only show for Cloud Admin or Domain Administrator within Match My Email. In either of these roles, User has the ability to create this ignore rule for just themselves or apply it to all users of the email domain(s) within which User has authority. Clicking apply will add this ignore rule to User's Personal Ignore List and also to Domain Ignore List depending on options checked under "For Users". It is important to employ a ‘just address’ ignore for a User’s own email address or email domain if the User has their email address entered into a Salesforce object record. Without the ignore, every email a User sends or receives contains their email address in the header and thus MME would match every email message to the Salesforce record containing this email address. This can create unnecessary processing, API call usage, and use of Salesforce storage, and could bring personal or confidential emails into Salesforce. (See Section 7.2 for information on an internal domain ignore rule.) If an email message already has a status, and a new Ignore affecting it has been created, it would be necessary to manually reprocess the email message. Only messages with No Match status are automatically reprocessed by our system. To manually reprocess, use the Match Detail pop up commands described in 5.11 or in batches using the check boxes and Reprocess Command button described in 5.7.3. Match My Email MultiMatch – User Manual - 10 - 5.7.2 Delete Command The Delete command allows users to delete an email from the MME cloud, and ultimately Salesforce if that is desired. Delete is a powerful command and should be used carefully. Typically, a user will click the Check Box next to the messages desired for removal. Clicking the ‘Delete’ command button opens a drop window in which the user is asked to apply Delete to the selected number of messages or all messages. All messages means all, not just all the emails that might match the one selected, so rarely would ‘All’ be used. The Delete command window contains the option of checking a box for uploaded data. No check in the box means the emails are deleted from the Email List in the MME cloud, but uploaded data will remain in Salesforce. However, if the box is checked as in the screenshot below, then the email will be deleted from the Email List AND the email and all related links will be deleted from Salesforce. 5.7.3 Reprocess Command To reprocess an email is to ask MME to again analyze the email address or addresses in the email header. This may be because changes have been made that could include adding an email address to the Ignore list, adding a new Lead in Salesforce, or updating email information in Salesforce. While automatic reprocessing occurs on emails with a ‘No Match’ status every 20 minutes, messages that already have a match status, such as status of Ignore or Match information, require manual reprocessing. The user can choose to individually reprocess emails as shown in screenshot below. Click the Check Box to the left of an email (or emails) desired and click the Reprocess command button. In the drop window, the choice will be to apply the reprocess to the selected message(s) or all messages. Select choice and click Apply to execute the process. A pop up window will appear and will show the progress of manual reprocessing. When complete, the word “Done” will appear in green at the top. You can then click Close, and then click Refresh button to refresh the MME cloud view. When reprocessing many email messages, one may need to wait for system to complete the task. It is important to wait until the ‘Done’ appears at the top, as shown in the below screenshot, before clicking Close. Match My Email MultiMatch – User Manual - 11 - Users can choose to select and manually reprocess several emails all at once. This is often helpful if a change has been made that can affect several emails. A User can filter the view of email in the cloud per Section 5.5 and then check the boxes next to multiple emails, or check the box to the left of the From column to select all emails on the page being viewed (which could be 20, 50 or up to 100, see Section 4.0 for adjusting in Profile). While a User has the option to manually reprocess as many emails as desired in the MME Cloud, it should be limited to less than 400 per day. It is important to understand that reprocessing uses API calls in addition to those used for normal processing. Due to a Salesforce limit of 5,000 API calls in a 24-hour period for most editions, reprocessing of extensive numbers of emails could reach this limit. Thus it may be advisable if significant reprocessing is desired, to check API call usage in Salesforce and/or do smaller groups of emails such as 50 to 100 at a time, and no more than 400 messages per 24-hour period. The Reprocess command can also be enabled through the Match Detail pop-up boxes as described in Section 5.11.5 below. 5.7.4 Save Command (Troubleshooting) The Save command currently exists as a mechanism for troubleshooting assistance. A user can save a particular email, or emails, by clicking the Check Box next to the emails in question. Choose the Save Command and apply to selected messages. The emails will be saved in the location on the local computer where downloaded files normally reside. These email files can be attached to an email being sent to [email protected] for viewing by support staff. 5.8 Email Check Boxes Check Boxes next to individual emails are used to specify which email should be affected by a Command. Note that to the left of the From column header there is a Check Box which will check all the emails on a page. By default, pages show 20 emails. This can be changed in either Settings (See Section 8.0) or in Profile (See Section 4.0). 5.9 Sorting The headings for columns in the Email List exist also as a Sorting Ribbon. Much as one can sort a column in a spreadsheet by clicking the column header, in the Email List a user can change the order of viewed emails by alphabetical, date, or by size. Clicking on the column header once will sort the column alphabetically or in date order. Clicking on a column header a second time will sort it in the opposite order. An arrow will appear to help indicate the direction of the sort. Sorting of the From column is based on email address first, when firstname/lastname are not present, and then by firstname/lastname. 5.10 Email List and Drilldown Details regarding an email message are shown in the Email List: From, To, Subject, Date, Size, and match status. Match My Email MultiMatch – User Manual - 12 - Hovering over the subject will open a small window in which the email can be read, including a scroll bar to scan lower in message thread. By clicking on the line or subject of an email message, the user can open and view the email in the MME database. This opens a window containing the email and its attachments. Inside the window, the user can read the email and view all emails in the header (From/To/CC/ and BCC fields) and enact the following: Show Headers - enables the user to view the Header details Show Source - enables the user to view the Source code details Hide Message - hides the body of the email or restores it to view Show Attachment - open the attachment for viewing Print Message – enables the user to print the email 5.11 Type Matches & Match Detail pop-up commands The Type:Matches column shows the state of the email. Hover the cursor over the match status to open a Match Details pop-up box with details about the match, such as the email used for matching and when, or see why an email was ignored. Inside the Match Details pop up box are command options explained below which allow the user to change jump to the matched record, unmatch the message, manually match to a record, create a new record, or manually reprocess the email. Match My Email MultiMatch – User Manual - 13 - 5.11.1 Linked Match Indicated in the purple highlights above, clicking the linked name within the Match Details pop up box will jump to that record in Salesforce. If Salesforce.com is already open, the jump to the Salesforce.com account is direct and immediately to the record (Lead, Contact, etc.). If Salesforce.com is not open, then the user will be prompted to enter username and password before the jump can be completed. 5.11.2 Manual Matching Indicated in the green highlights above, the ‘+Match’ button enables the user to manually match the selected email message to a record in Salesforce. This is true whether the email has No Match status or has already been matched to other objects. Clicking ‘+Match’ brings up a Match pop up window. Select the 2nd bar from the top that says “Select and Match to an Existing Record”, if not already expanded. Use the drop down menu under Type to select which type of Salesforce object to which you want to match the message. Type a few letters in the Name field and MME will perform a forward look up to provide a list of options. Choose the correct record and click OK. Match My Email MultiMatch – User Manual - 14 - 5.11.3 Create (and Match) a New Salesforce.com Object A new Salesforce record can be created from the MME Email Cloud, most often in the case of a ‘No Match’ status, though the functionality works for messages already matched. In the same manner to make a manual match, hover over the phrase ‘No Match’ (or match status information) to bring up the Match Details pop up box. Click the ‘+Match’ button to reveal the Match window. To create a new record, click the top bar option “Create and match to a new record” to reveal a simple web form. Use the Type dropdown menu to choose the type of record to create. In the screenshot below, a Lead is created. Clicking the Envelope button in the lower left corner will open another pop up with the contents of the email, providing a convenient reference for populating the record fields. As an alternative to typing in information, you can select text in the email, then copy/paste or click on it and drag and drop it to the appropriate field to save time. Fields marked with a ‘*’ are required by Salesforce, and we always recommend adding an email address if prompted. When complete, click OK button. Match My Email MultiMatch – User Manual - 15 - When creating a Contact, Salesforce requires a Contact belong to an Account. In the screenshot below, a Contact is created when there is already an existing Account. After entering the Contact info (firstname, lastname, email address, etc.), type in a few letters for the Account name. Match My Email will do a forward lookup and provide Account options. Select the correct Account for this new Contact and click OK. If the Account does not already exist, it can be created at the same time as an Account. As before, hover over the No Match or match status, click +Match button, and click the top option “Create and match to a new record”. Clicking the gold envelope button will open the email message to the side. For Type, choose Contact and fill in web form as described above. Type in new Account name. MME will attempt to do a lookup but will report ‘not found’ and you’ll see the box shaded pink. Click the “+” button to add the Account. Match My Email MultiMatch – User Manual - 16 - Once added, the box will change to light blue, indicating the Account has been added. Then click OK. The message will immediately be matched and show details in the Type: Matches column. 5.11.4 Undoing a Match A user is able to undo a Match by clicking the ‘-Unmatch’ button. This will remove the link between the selected email message and the particular Salesforce record. In the screenshot example below, hovering over the Lead name brings up the Match Detail pop up. Clicking UnMatch will remove the link between the email and this Lead, while the message will remain linked to the other objects indicated. Unmatching and Bulk Unmatch can be performed in the Email Messages section on the page layout of a record (See Section 10.2 or 10.3). Match My Email MultiMatch – User Manual - 17 - Unmatching can be reversed by finding the emails in the cloud and reprocessing them. To do this one would hover over the match status and click Reprocess button in pop-up window. The emails would again be matched to all relevant Salesforce records. 5.11.5 Reprocessing MME reprocesses ‘No Match’ emails every 20 minutes. It is also possible to manually force the system to reprocess a specific message or group of selected messages. To reprocess an individual message, hover over the No Match or match information in the Type Matches column, and click the Reprocess button in the Match Details pop up. After reprocessing is complete, the change in status of the message will be indicated in Type:Matches column immediately.. Please remember that any message with a No Match status will automatically be reprocessed by the system at the next cycle, and thus changes made will be handled at that time. While Users can do so for No Match messages, manual reprocessing is only required when a message already has a status, such as Ignore or matching information, and would not be automatically reprocessed. To reprocess a group of messages, follow the steps described in section 5.7.3 above regarding use of the Reprocess command button. 5.11.6 Reassigning Ignored Messages It is possible that an email may be relevant to Salesforce even though the system is directed to ignore it via an Ignore rule. One can use the Filter Options (Section 5.5) to view either ‘Ignore’ or ‘All Messages’. Any message with a status of ‘Ignore’ in the Type:Matches column will be visible. One would then perform steps for a manual match as described in section 5.11.2. 6 Import Page (Adding email accounts, updating passwords, selecting folders) 6.1 Email Accounts for Import In the MME menu ribbon, clicking ‘Import’ will allow the user to view the email accounts that have been set up for importing into MME cloud. Each import represents a separate email account. In addition to the Source column, which will indicate the IMAP server hostname, the Status column will show which imports are enabled and working, and which may be disabled or not working. Clicking the check box next to an import selects it for action. The User can then click Enable, Disable or Delete buttons. Clicking on the Name for the import will open the Import Settings for that particular email account and show details of the import such as IMAP server hostname, email password, and folder selection. To update an email Match My Email MultiMatch – User Manual - 18 - password, enter new password in that field. Click Refresh Folders button to ensure password was typed correctly and MME can retrieve folder structure (seen in Available folders window). Unless a change in folders is desired, click Save to save new password. To change folders for import, remove the folders in the Selected Folders window. Click the button “Refresh Folders”. The system will connect with user’s email account and populate the Available Folders window with the folder structure. The user then selects the folders and clicks the < button to add them to Selected folders. Folder selection can be used in varying ways based on a User’s workflow and email management habits. In its most basic form, a User chooses the Import Folder strategy of “Selected” and puts Inbox and Sent folders into the Selected folders window. If a rule or filter immediately moves a Salesforce-relevant email into a subfolder, the User would want to also select that subfolder. Please note that a User can select up to 18 subfolders for email account at the base subscription rate. If a User moves their own email into subfolders without the use of rules or filters, then a User should select their Inbox OR their subfolder, but not both so emails are not duplicated in MME and into Salesforce. If a User creates new subfolders often, one can choose the reverse logic for Import From of “All, Except Selected”. In this situation, the User should move folders into the Selected Folders window that are not desired for import. Whichever logic is used, it is vital that folders such as Draft, Trash, Junk etc. are NOT selected for importing and that emails are left in folders for at least 20 minutes and ideally 1 hour for MME to capture them via automatic processing cycle. For more information on folder selection, see Section 6.4 or contact [email protected] for assistance. 6.2 Start Import Manually If a user would like to force an import to check operations or to immediately have email processed, use the button “Start Import Manually” found with Import settings. This button directs the system to perform the steps that normally happen every 20 minutes automatically in the background. After clicking the button, the user can observe progress in the window in lower portion of screen. Once an import is complete, the button that reads “Running” will change back to “Start Import Manually”. We recommend that if a User clicks the button, a User should wait until ‘Done’ is noted at end of code (scrolling down may be required) before proceeding. Match My Email MultiMatch – User Manual - 19 - 6.3 Adding New Email Imports *To add new users, See Section 8.4 Domains & Users By clicking on “+New”, users can add email addresses from which to import. On the next screen, the user will be prompted for an “Import Name”. This name is at user discretion. If nothing is entered, once settings for new import are saved, the Name field will be the email address. It becomes more important to give it a descriptive name if several email addresses are used for importing so that they can be differentiated in the Name column. Importing is often set up during an online session when MME is initially installed and configured. Assistance for this step can be found in Set-up Guides at http://www.matchmyemail.com/support/ or by contacting MME staff at [email protected]. 6.4 Folder Selection Details Folder Selection is a core Match My Email technology aqnd gives end-users the ability to which email messages are imported into the Match My Email cloud (MME) for processing and matched to records in Salesforce.com. Since email syncing in Match My Email occurs on a twenty minute cycle and depends on when an email drops into a selected folder, the timing aspects of the way you work with email folders needs to be borne in mind: Does your email remain in the Inbox until you move them to a subfolder manually? Have you set up rules that immediately move emails into subfolders [Mail Filter in Gmail; Rules & Alerts in Outlook]? Do you create a lot of new subfolders and setup up rules that immediately move emails into them? **Remember that MME brings copies of email from designated folders into the MME cloud, holds them there for 45 days (matched or not), and then purges them. MME is not a substitute for an email client, nor does it make changes to email accounts on User’s email server. Folder Selection is configured within IMPORT settings for a particular email account. In the MME menu ribbon, click IMPORT to see a list of all imports for a User. In the screenshot example below, there are 3 imports that have been Match My Email MultiMatch – User Manual - 20 - set up. Clicking the name of a specific import will reveal the import settings where tools are available for folder selection. By clicking Refresh Folders, a User jumps across the Internet to his or her email service provider and can download the folder structure of his or her email account. In the Available Folders box, they will see all the email folders related to their email account. 6.4.1 Fully Automatic Mode Using INBOX and Sent (No mail filters or rules in place.) The simplest configuration for MME to work in fully automatic mode is to: 1) Choose “Selected” in the Import Folders dropdown menu. 2) Click the Inbox and Sent folder options in Available Folders window, use the top arrow button to move them into the Selected folders window. Please note there can be multiple Sent folders also called “Sent Items”, “Sent Messages”, “Inbox.Sent”, or “[Gmail]/Sent Mail”. Choose all folders that contain outgoing email so that MME may process them. 3) Click Save. Match My Email MultiMatch – User Manual - 21 - 6.4.2 Fully Automatic Mode Using INBOX, Sent and Mail Filter Subfolders (Mail filters and rules are in place). This configuration means that you would want to have MME import from subfolders into which email is immediately moved upon receipt via a rule or filter as well as INBOX and Sent. 1) Note in Available Folders which subfolders contain emails you want MME to process. In our example, there is Mail Filter Subfolder, Mail Filter Subfolder 2 and Mail Filter Subfolder 3. 2) For ‘Import from’ choose “Selected” 3) In Available Folders window, choose Inbox and Sent folder(s), and Mail Filter Subfolder(s) you desire. Use the top arrow button to move them into the Selected folders window. Please note there can be multiple Sent folders also called “Sent Items”, “Sent Messages”, “Inbox.Sent”, or “[Gmail]/Sent Mail”. Choose all folders that contain outgoing email so that MME may process them. 4) Click Save 6.4.3 Fully Automatic Mode using ‘All Except Selected’ option. This configuration is for Users who frequently create new Subfolders with Mail Filters and don’t want to constantly be updating Folder Selection in Match My Email. With this option, the system will update your Available Folders every twenty minutes and mark them to be synced to Salesforce.com. Match My Email MultiMatch – User Manual - 22 - **Importing from more than 18 folders/subfolders per email account may result in increased costs. 1) For ‘Import from’ choose “All, Except Selected” 2) In Available Folders window, choose subfolders that will be excluded from MME processing. For efficiency, this MUST INCLUDE All Mail, Draft, Trash, Spam, etc. so that unnecessary and potentially harmful email is not brought into the MME cloud. If you only want MME to look in subfolders, you would also select INBOX to exclude MME from pulling copies when they drop into the INBOX. 3) Use the top arrow button to move them into the Selected folders window. Therefore, in the example below, MME will be importing from all folders in pink shaded window (such as Salesforce and [Gmail]/Important) and will not be importing from those folders in green shaded window. 4) Click Save 6.4.4 Total Control mode using a designated “Sync to Salesforce” folder This configuration gives the User total control over which emails are synced and logged to Salesforce.com because the User only avails MME to one specific folder. While the processing of emails from this folder is automatic by MME, there is a manual component of requiring the User to move or copy email into this designated folder in their email client. Total Control mode is often favored by executives who have emails that are highly confidential and they don’t want them to end up in Salesforce inadvertently. 1) Create a special folder in your email client. We recommend naming it “Sync to Salesforce”. 2) For ‘Import from’ choose “Selected” 3) In Available Folders window, choose the “Sync to Salesforce” folder. Use the top arrow button to move it into the Selected folders window. 4) Click Save Match My Email MultiMatch – User Manual - 23 - Match My Email MultiMatch – User Manual - 24 - 7 Ignore Page (Adding & Modifying Ignore rules, Internal Domain Ignore) 7.1 External Ignore Rules Ignore rules can be created for email addresses as described in Section 5.7.1 using the Ignore Command button while on the MME Cloud View. A User can view the Ignore rules applied to their email by clicking Ignore in the MME menu ribbon. Every User will have a personal list of ignore rules shown on the Personal tab. If a User has a role in MME that is as a Domain Administrator or Cloud Admin, they may also see a Domain tab, which contains Ignore rules applied to all Users within an email domain. Initially it is empty, but as emails are added to the list, it can grow and be quite long, which is fine. When MME processes email, our system first checks ignore rules and address those before proceeding with matching and uploading. Another way to create ignore rules is to directly type them into the list using the Add button found on the Ignore page. When clicking the Add button, depending on which tab you are on – Personal or Domain – the rule will be created for that scope. In the image below, the window shown on left is when you add a Personal rule. Below on right is the window when a Domain rule is added, with the additional field choice of which email domain. Fields are filled out as follows: Address to Ignore: User should type in the full email address or email domain that is desired for ignore. For example, if email is received from a friend, you may want to ensure it never have the chance of being uploaded into Salesforce and so would type in the friends full email address. If emails are received from, for example, Google related to adwords or other issues, a User could type in simply “google.com”, and anything that might have an email ‘[email protected]’ or ‘[email protected]’, etc, would all be ignored because the email domain has an ignore rule. Always click Save before closing the window to save the ignore rule. The “Ignore type” field has three options on Domain tab: “Just Address”: means that attempted matching of the email message will be ignored for just this email address or email domain. This is useful if there is more than one email address in the email Match My Email MultiMatch – User Manual - 25 - header. The message will be processed for the other email addresses in the email header. If all email addresses in the header are ‘covered’ by an ignore rule, then the message status becomes ‘Ignore’ and the email is not shown in the default cloud view of ‘All Excluding Ignore’. However, if not all email addresses in the header are ‘covered’ by an ignore rule, then our system will either show a status of No Match or Match information, depending on if matches can be made to records in Salesforce. “Entire Message By Address”: means that when the email address for the rule is in the email header, this entire message will not be processed. It is important to apply this type of ignore carefully because even if other email addresses desired for processing are in the email header the email will not be processed at all and result in “Ignore” in Type:Matches column for Match State. "Discard Confidential": (only on Domain tab) allows a Cloud Admin or Domain Admin to exclude email from coming into the Match My Email cloud, based on policy level decision for all Users. If chosen from drop down menu, a Confidential Tag field will also become available. The Address to Ignore and Confidential Tag are both important fields to this rule type. For Address to Ignore: type email domain or email address to or from which the confidential emails will be coming. If you leave this blank, the system will apply tag to all imports with domain indicated in “User to Apply To” field For Confidential Tag: type in the word(s) that will be used in subject line or email body to tag this rule for discard. Tags are not case sensitive and can include symbols or spaces. If you leave the tag blank, all email relating to email address or domain in Address to Ignore field based on direction will not be imported into MME cloud. Also, please DO NOT use tag beginning with “mme” as this can conflict with other application features. Direction of Address: this allows a User to control if the ignore rule applies when the email address is the sender of an email, thus the From, the recipient of the email, thus the To, or if you want this email address ignored in any direction. User to Apply to: This option will only appear if a domain-wide ignore rule is being created. If there is only one domain operating with MME and added to the Domains & Users tab (Section 8.4 then there will only be one choice. If there are multiple domains added to MME, then the User has a choice. If the rule should apply to multiple email domains, then a separate rule will need to be created, applied to, and saved for each domain. For rules in the list, a User can choose to Delete or Modify a rule. Modifying might mean correcting a spelling mistake, changing the ignore type or direction, or changing to which domain it applies. However, it is important to know previously Ignored emails will not be automatically reprocessed since they already have a status of Ignore and MME considers them complete. Those emails need to be found in the MME cloud and manually reprocessed (see Section 5.7.3 and 5.11.5). 7.2 Internal Domain Ignore Rule A special type of ignore rule should be created in almost every MME account. It is a rule to ignore the email domain(s) of the company using MME. This is a protective measure against unnecessary or unwanted matching of internal email into Salesforce.com records that might contain employee email addresses. As a further explanation, imagine an employee exists in Salesforce as a Contact record including their company email address. Any email sent or received by them will have their email address in the header and MME will work to match the email to that record without the ability to judge if it is an internal or external email address. Thus, every email that employee sends and receives will contain their email address and will be matched. This can result in personal and unnecessary internal emails being uploaded and stored in Salesforce, which can be a storage and confidentiality issue. Match My Email MultiMatch – User Manual - 26 - To implement a rule to guard against this, typically a MME Cloud Admin would create this Internal Domain Ignore upon setting up MME. The rule is added under Ignore on the Domain tab. 8 For “Address to Ignore”: the company’s email domain would be entered. For example, if email addresses at the company were in the format ‘[email protected]’ then the email domain to be entered is everything after the @ symbol, or just ‘acme.com’. For “Ignore type” field choose “Just Address”. This is VERY important for this rule. This ignores processing for just this email domain but MME will still work to process other email addresses in an email header. If one chooses “entire message by address”, then you are essentially instructing MME not to process any emails containing the company email domain, and thus ignore all company email. Direction of Address: choose “Any” to ensure both incoming and outgoing email have this rule applied. User to Apply to: if only one email domain has been added on Domains & Users tab, then that domain will be the only option. If a company has more than one email domain, each domain should be ignored for the other, so 2 email domains results in 4 lines of ignore rules (i.e., A to A, A to B, B to A, B to B) Settings Page (Salesforce Integration, Adding Domains, Adding Users) Within Settings there are five tabs visible for the Cloud Admin: Salesforce Integration, Google Drive Integration, Google Mail Integration, Domains & Users, and Company. Domain Administrators and End Users see fewer options. 8.1 Salesforce Integration web tab Salesforce Integration is usually established during the set up of Match My Email. The default Access Type is Remote Access (OAuth) which enables continual authentication, even when the Salesforce password changes. MME Cloud Admins will be able to see a list of all MME Users and if their Salesforce integration is enabled, or if there is an issue, by noting the Status column far right as in the screenshot below. Clicking a check box to the left selects that particular Salesforce Integration setting and one can click Enable, Disable, Sync or Delete buttons to affect a change for that User. Clicking the name of the integration, which appears as an email address, will reveal details about that particular set up as shown below. A Cloud Admin cannot setup or change the integration assignment for other MME Users, but can modify Matching Rules and Upload Rules. Match My Email MultiMatch – User Manual - 27 - 8.1.1 Matching Rules By default, Matching Rules are set to match to all types of records. Unchecking a box will tell our system NOT to match to a particular type of record. This may be desired if an object is not used by an organization. This is also where Email-to-Case can be set up. In order to use Email-to-Case with MME, it must be enabled in Salesforce Organization and there should be an email address used to receive new support cases for the company. When set up properly, MME can identify the Case # in an email’s subject line and match the message to the appropriate Salesforce Case# instead of matching on email address. Contact MME support staff for setup information. 8.1.2 Upload Rules Under Upload Rules there is access to options such as Team DeDupe, and attachment handling options. Team Dedupe is a feature that allows the Cloud Admin to set up Salesforce Integration for all Users in an email domain so that our system can de-duplicate email matching to records when more than one MME User receives the same email. Due to the complexity of this feature, please contact support staff for a more details explanation and assistance with set up. Attachments can be handled in several ways. When MME matches an email, it uploads the email into Salesforce and stores it in your organizations Data storage. If using MultiMatch, our system uploads the email object only once, and creates links between matched records and that email, conserving storage space. Attachments are uploaded with email and stored in the more plentiful File storage of your Salesforce organization based on settings found in Upload Rules: If you uncheck the Upload Attachments box, then NO attachments and ONLY email will be uploaded into Salesforce on match. If you check the Upload Attachments box, but set it for 0 MB, actual attachments will not be uploaded but LINKS WILL be uploaded with email on match, and you will be able to click a link to view the attachment in the MME cloud for 45 days, after which email will be purged from cloud. If you check the Upload Attachment box, you can set the size in MB that can be uploaded; the limit into Salesforce being 5MB. Attachments larger than limit will not upload to Salesforce, but as long as attachments aren’t larger than 30MB you will be able to view attachment for 45 days in MME cloud. If you check Block Inline Images and leave it at 10 KB, then inline images such as signature logos up to 10KB will not be uploaded, or you can adjust this size incrementally using the arrows. If you check Google Drive uploads AND set up Google Drive integration (See next section 8.2), then MME will upload attachments to your Google Drive (based on Google size limitations) and upload a LINK with the email to it. If you check Google Drive uploads but do NOT grant Google Drive Integration, our system does not have appropriate credentials to access User’s Google account and will continue to upload attachments to Salesforce depending on other “Upload Attachments” settings. Match My Email MultiMatch – User Manual - 28 - 8.2 Google Drive Integration (User with Gmail account or Google Apps) Google Drive Integration is an addon for MatchMyEmail, which would allow uploading of attachments into Google Drive . Google Drive processing happens before Salesforce.com processing, thus attachments for ALL emails imported will be uploaded into Google Drive, regardless of No Match, Ignore, Match status that occurs later. This feature can be used together with Salesforce.com, by uploading only a link to Google Drive attachment in Salesforce.com for emails that match SF records. The Google Drive Integration tab under Settings is where a User can provide our system with the credentials to communicate with a User’s Google Drive. One would click the Grant button and be bounced to Google where a User can Grant Access. If a User might be logged on to more than one Google account, it is important to select the appropriate work-related Google account for Google Drive integration. Checking the box for associated domains would integrate all Users of that domain to the Google Drive established here. This is an option so other Users on MME need not set up their own Google Drive integration. If Google Drive integration is granted, AND if Upload Rule (Section 8.1.2) to “Upload Attachments” is checked (default setting), our system will upload copies of attachments to Google Drive AND also upload attachments based on size limits to Salesforce if “Use Google Drive uploads” is NOT checked . Uploads to Google Drive are subject to Google file type and size limitations and please note ALL attachments are uploaded, even for emails that come into the MME cloud as No Match status. The Google Drive integration tab settings can work in tandem with the “Use Google Drive uploads” option under Upload Rules described in 8.1.2 above. When “Use Google Drive uploads” is checked under Upload Rules AND Match My Email MultiMatch – User Manual - 29 - Google Drive Integration is granted on the tab, our system ONLY uploads attachments to Google Drive. Uploads to Google Drive are subject to Google type and file size limitations and please note ALL attachments are uploaded, even for emails that come into the MME cloud as No Match status. To reiterate what was mentioned above, if under Upload Rules you check Google Drive uploads but do NOT grant Google Drive Integration on the tab, our system does not have appropriate credentials to access User’s Google account and will continue to upload attachments to Salesforce depending on other “Upload Attachments” settings. When Google Drive settings are created or modified, a User should always click Save. 8.3 Google Mail Integration (Gmail Users)(optional) Google Mail integration is offered as a convenience to Gmail users but is not required. Users with Google Mail (Gmail) have the option of integrating to one Google Mail account. The advantage is that future changes to email passwords are automatically authenticated, eliminating the need to update this information in MME. It also allows those Users to login to MME by clicking the Google Login button on the login screen, instead of having to enter a username and password. Detailed steps about how to set up Google Mail integration can be found in the Set up Guides on MME’s support page. A User would click Grant and be bounced to Google where they would login to appropriate Google Mail account and click Grant Access. Clicking Save would save these settings for that User. 8.4 Domains & Users A ‘domain’ or ‘email domain’ is everything after the @ symbol in an email address. For example, if an email address at the company might be [email protected], then “acme.com” is the email domain. A company’s email is hosted on a server. MME requires Users have an IMAP email server, or exchange server enabled for IMAP. In this way, there will be an IMAP server hostname and dedicated IMAP port, as well as method of authentication. This information is needed to add your email domain into the MME account. Adding an email domain: Allows the Cloud Admin to apply any ignore rules, including the very important internal ignore rule (see Section 7.2), to all Users of that domain, instead of hoping each User creates their own such personal rules. If a company wants many Users on the MME account, the best way is to add the email domain, and then add Users for that domain. MME will allow Users to login by authenticating the email domain information using their email credentials. Allows a Cloud Admin to add Users to the MME account they have created. These Users can then also import and match their email into Salesforce. Match My Email MultiMatch – User Manual - 30 - Detailed steps and screenshots about adding an email domain and more Users to a Match My Email account can be found in Set Up Guides and in the Administrative Guide –Domains & Users documentation found on MME’s support page (http://www.matchmyemail.com/support/). The Domains and Users tab will only appear for the MME Cloud Admin and Users with the role of Domain Administrator. A Cloud Admin will be able to see the list of all Domains and all Users set up in MME account. A Domain Admin is the admin for the email domain in which they are listed and thus will only see information for that email domain. The screenshot below is an example. A domain is listed on the left – and users within that domain are on the right. It is important to note the Role each user has, as that pertains to what level of email communication they will be able to view. End Users can see only their emails in the MME cloud. Domain Admins can view all emails of all Users within that domain in the MME cloud. Once a User is added, they are authorized to the use the MME account already established by Cloud Admin but must still complete their individual settings. To do so, each new User can then login to Match My Email with their email address and email password. Once logged in, each user should set up their own Salesforce integration, IMAP import, and Salesforce Web Tabs as outlined in the Quick Set up Guide found on Match My Emails support page http://www.matchmyemail.com/support/. 8.5 Company tab A Cloud Admin will have access to the company tab. Cloud Admin is able to change the name of the Company if desired, and can also delete permanently the Match My Email subscription, as an alternative to requesting deletion by Match My Email support staff. 9 MME Special Features 9.1 Matching to Contacts using Secondary Email Addresses In product design, it was understood that some Contacts may utilize more than one email address for communication with a Salesforce user. To that end, as part of the MME package installation a User can choose to add the related list ‘Secondary Email Address’ to the page layout(s) for Contacts. MME will then also utilize email addresses here to match email to a particular Contact. This functionality is only available for Contacts, not Leads. If you do not see the related list available, please contact [email protected]. 9.2 Importing Legacy Email When a User sets up MME, emails begin importing with “Message Date: on or after yesterday” which means from the last 24 hours. Emails pre-dating the start of MME importing are termed Legacy Emails. This can include emails from two months prior or two years prior or more. It is possible to import these older messages into the MME cloud Match My Email MultiMatch – User Manual - 31 - for matching and uploading into Salesforce. This Legacy Importing is a free service available to annual MME subscribers only. Users should contact [email protected] to ask for assistance. 10 MME Results within Salesforce Records The results of Match My Email’s app will be displayed within Salesforce records based on choices made in its set up for the Salesforce organization. If a company has created and set up a Match My Email account, but has not installed the managed package from the AppExchange, then the company is using the SingleMatch version of Match My Email. If the managed package has been installed and the Salesforce organization has been configured, then the company is using the MultiMatch version of Match My Email. SingleMatch will match to one single object in Salesforce based on a set processing algorithm. Emails will log in the Activity History. This User Guide is primarily for MultiMatch users, and the below screenshots reflect functionality based on MultiMatch. 10.1 Web Tabs The Salesforce web tabs of Match My Email and Email Messages are typically added into the Salesforce menu ribbon during set up. Clicking the Match My Email web tab will allow a User to logon to Match My Email securely and have access to account settings and the MME cloud view to manage emails. One could also open a new browser tab and access Match My Email that way. The web tab is only offered as a convenience so a User can stay within Salesforce. The Email Messages web tab will provide a list of all email messages that have been uploaded into Salesforce. It is possible to use the check boxes and perform bulk actions using buttons at the top. 10.2 Visualforce view If you are using the Visualforce view option, then when in a Salesforce record the Email Messages object will appear as the screenshot below. Up to 5 email messages will be shown. To view more, you can use the links underneath the emails for ‘Next’ or ‘Show 5 more’. The date and time of the email will be displayed, the direction (whether this record was the Sender or Recipient of the email), if there is an Attachment linked with this email, and other matches for this message. This order of columns is very similar to the cloud view when logged into Match My Email. Match My Email MultiMatch – User Manual - 32 - Clicking ‘Show full list’ will expand the emails to allow for thread viewing. This link changes to ‘Hide full list’ which can be clicked to compress the view. Clicking the subject of any message will open the Email Message detail view. However, a quick way to read the email is to hover the mouse over the subject, opening a pop up window. Scroll bars will assist in reading content that may be outside the set window size. Clicking the link for the Attachment(s) will open the attachment. If the Salesforce Integration was configured (See Set Up Guides on www.matchmyemail.com/support) under Upload Rules to manage attachments, the link may open the attachment stored within the organizations file storage or the link may open the attachment from the MME cloud. In the later case, the attachment will be available for 45 days after which time the email is purged from the MME cloud. You can click the check boxes to the left to select a particular email message for action. Checking the box to the left of From will select the email messages in the view, not all emails in the log. To select all emails in the log, you would want to click Show Full List, and then click the check box next to From. Once messages are selected, the User can choose to manually match to another record, unmatch (remove the link between these messages and current record) or delete (which will remove the emails from this and ALL related objects in Salesforce). **Please note that the ability to Match, Unmatch and Delete from the Email Messages object is only available to Salesforce Enterprise & Unlimited editions, or Salesforce Professional edition with API calls enabled. 10.3 Related Lists If you are using a Related List to view Email Messages on each object’s page layout, then in a Salesforce record the Email Messages object will appear as the screenshot below. Up to 5 email messages will be shown. To view more, you can use the links underneath the emails for ‘Next’ or ‘Show more’. The date and time of the email will be displayed, the direction (whether this record was the Sender or Recipient of the email), and Attachments if there are any linked with this email. To read an email, click the subject of an email to open the Email Message detail view. At the bottom, there is a section called Related Objects which lists the other Salesforce Objects that are linked to this Email Message. Clicking the link for the Attachment(s) will open the attachment. If the Salesforce Integration was configured (See Set Up Guides on www.matchmyemail.com/support) under Upload Rules to manage attachments, the link may open the attachment stored within the organizations file storage or the link may open the attachment from the Match My Email MultiMatch – User Manual - 33 - MME cloud. In the later case, the attachment will be available for 45 days after which time the email is purged from the MME cloud. If a User has Salesforce Group or Professional edition without API calls enabled, the links to Edit or Delete can be used. The buttons Delete and Unmatch that appear in these screenshots are operational only for Salesforce Professional edition with API calls enabled, Enterprise & Unlimited editions. Delete will remove the email from this from Salesforce including the links to all related objects. If User has an edition in which buttons Delete and Unmatch buttons are operational, checking the box to the left of email message will select it for action. Checking the top check box next to Action column header will select the email messages in the view. Once messages are selected, the User can choose to unmatch (remove the link between these messages and current record) or delete (which will remove the emails from this and ALL related objects in Salesforce). One can check boxes next to emails for a record and click the UnMatch button to break the link for this record to the Email Message. This does not remove the message as it may be linked to other objects. Also, performing an unmatch in this manor does not affect the email’s match status in the MME cloud (indicated in the Type: Matches column). These messages will still show as matched. 10.4 Secondary Email Address The Secondary Email Addresses object provides a place to enter alternative email addresses for Contacts. It is available when the MME package is installed. It is a related list added to the page layout and is only available for Contact records. Match My Email MultiMatch – User Manual - 34 - To enter an alternative email address to the one in the standard Email field, click the “New Secondary Email Address” button. In the subsequent screen, fill in the fields based on following guidelines: Type is a descriptor field for the User. Once might type in ‘preferred’, or ‘personal’, or ‘sometimes used’; whatever might help describe the nature of this alternative address. In Email field one types the alternative email address. The Contact field should already be filled in with the Contact name. Click Save. Once entered, MME will use these additional address(es) for automatic matching to correct Contact record. 10.5 Permissions Match My Email makes use of a custom object Email Messages and its related Email Messages Related Object to contain and show the matching email information. Configuration of these is considered part of set up and is detailed in Section 13 of the Set up Guides found on Match My Email’s support page www.matchmyemail.com/support. Viewing our custom object content can be controlled in the following ways: Permission Sets ................................... User Specific ..............all Salesforce editions Sharing Settings ................................... Organization wide ......Professional, Enterprise & Unlimited editions Profile Custom Object Permissions ...... Profile wide................Enterprise & Unlimited editions Match My Email MultiMatch – User Manual - 35 - 11 Troubleshooting and Support MME maintains a wiki on its website for frequently asked questions and reference information. Please visit it at http://wiki.matchmyemail.com/index.php/Main_Page. Support team members are available between 6:00 a.m. and 8:00 p.m. Eastern U.S Monday through Friday. time to provide free online assistance. Emails should be sent to [email protected]. 12 Limitations 12.1 In MME MME Folder Limits: Basic MME subscription per user allows importing from up to 18 folders/subfolders per email address, up to 36 folders/subfolders when importing from two email accounts. There are no folder import limitations for MME Unlimited subscription. Contact Sales for rate differences.. MME Automatic IMAP Imports File Size Limit: There is a limit of 100 MB of emails imported per day per account into the Match My Email cloud. The daily import can be raised in increments of 100MB per day, but there is an extra monthly charge. Message Size Limit: The message size limit is 30 MB. Messages < 30MB are imported into MME cloud. If attachment is < 5MB (Salesforce limitation), it is uploaded into Salesforce with email by default (this Salesforce import limit can be adjusted by Users or attachments can be excluded from Salesforce.com.) Attachments exceeding Salesforce limit are replaced with link to MME cloud where attachment is available for 45 days, after which it is deleted. MME IMAP Imports Count Limit: 2 IMAP imports are available per MME account. Additional imports are offered for extra fees. MME IMAP import timeout Limit: Each MatchMyEmail import has 90 seconds timeout. Next automatic import will pickup emails from last check point of each IMAP folder, if timeout occurred on previous import. MME Legacy Imports Limits: Any folder that receives more than 150 ‘new’ emails in a twenty minute period is processed using a metering algorithm to avoid violating Salesforce daily processing limits. The metering algorithm is 5 emails every twenty minute import cycle, 360 per day and 10,800 per month per user. Legacy importing must be set up in coordination with MME support staff. 12.2 Salesforce Limits & MME Operations Salesforce API Usage Limits: Salesforce limits an organization on total API calls within a 24 hour period. Minimum limits are established at 5,000 API calls for most editions, which is the number used in strategizing import operation for MME. https://na4.salesforce.com/help/doc/en/integrate_api_rate_limiting.htm Salesforce Limits on Custom Apps: Salesforce limits the number of custom apps available from the AppExchange as follows: Group edition: 1 app, Professional edition: 5 apps, Enterprise edition: 10apps. (Unlimited edition has no limitation on custom apps.) http://na4.salesforce.com/help/doc/en/limits.htm. Salesforce File Size Limit: The maximum document size that can be uploaded is 5 MB. Therefore, MME does not import into the cloud any email that is larger than 5 MB. Salesforce Data & File Storage Limit: Salesforce provides a standard amount of 1GB of Data Storage and 12.5GB of File Storage shared by all users of organization. MME MultiMatch uploads emails as Data Storage but is able to upload email attachments as File Storage, of which there is more available for all users. Salesforce Custom Limits: Salesforce limits the number of custom objects, custom tabs, custom fields per objects and other aspects of customization. Custom objects and custom tabs limits can affect MME deployment. http://na4.salesforce.com/help/doc/en/limits.htm Match My Email MultiMatch – User Manual - 36 - 13 Master Services Agreement 13.1 Contact Match My Email support for a PDF of the Master Services Agreement or click on http://www.matchmyemail.com/legal/ Match My Email MultiMatch – User Manual - 37 -