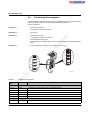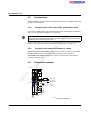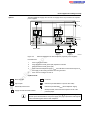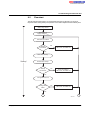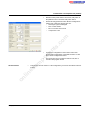
1
on
l
in
ec
om
po
ne
nt
s.
co
m
AUTOMATION
User Manual
IB IL MUX UM E
Order No.: —
Configuring and installing the
Inline field multiplexer
s.
nt
ne
po
om
in
ec
on
l
co
m
AUTOMATION
User manual
11/2008
IB IL MUX UM E
Revision:
02
Order No.:
—
Designation
in
ec
This user manual is valid for:
om
po
ne
Designation:
nt
s.
co
m
Configuring and installing the Inline field multiplexer
Order No.
2861205
IB IL MUX MA
2818413
on
l
IB IL MUX MA-PAC
Associated system components
5981_en_02
PHOENIX CONTACT
IB IL MUX MA (-PAC)
Please observe the following notes
In order to ensure the safe use of the product described, you have to read and understand
this manual. The following notes provide information on how to use this manual.
User group of this manual
The use of products described in this manual is oriented exclusively to qualified electricians
or persons instructed by them, who are familiar with applicable standards and other
regulations regarding electrical engineering and, in particular, the relevant safety concepts.
co
m
Phoenix Contact accepts no liability for erroneous handling or damage to products from
Phoenix Contact or third-party products resulting from disregard of information contained in
this manual.
Explanation of symbols used and signal words
nt
s.
This is the safety alert symbol. It is used to alert you to potential personal injury
hazards. Obey all safety messages that follow this symbol to avoid possible
injury or death.
po
ne
DANGER
This indicates a hazardous situation which, if not avoided, will result in death or serious
injury.
om
WARNING
This indicates a hazardous situation which, if not avoided, could result in death or serious
injury.
in
ec
CAUTION
This indicates a hazardous situation which, if not avoided, could result in minor or
moderate injury.
on
l
The following types of messages provide information about possible property damage and
general information concerning proper operation and ease-of-use.
NOTE
This symbol and the accompanying text alerts the reader to a situation which may cause
damage or malfunction to the device, either hardware or software, or surrounding
property.
This symbol and the accompanying text provides additional information to the reader. It is
also used as a reference to other sources of information (manuals, data sheets, literature)
on the subject matter, product, etc.
PHOENIX CONTACT
5981_en_02
IB IL MUX MA (-PAC)
General terms and conditions of use for technical documentation
Phoenix Contact reserves the right to alter, correct, and/or improve the technical
documentation and the products described in the technical documentation at its own
discretion and without giving prior notice, insofar as this is reasonable for the user. The
same applies to any technical changes that serve the purpose of technical progress.
nt
s.
co
m
The receipt of technical documentation (in particular data sheets, installation instructions,
manuals, etc.) does not constitute any further duty on the part of Phoenix Contact to furnish
information on alterations to products and/or technical documentation. Any other
agreement shall only apply if expressly confirmed in writing by Phoenix Contact. Please
note that the supplied documentation is product-specific documentation only and that you
are responsible for checking the suitability and intended use of the products in your specific
application, in particular with regard to observing the applicable standards and regulations.
Although Phoenix Contact makes every effort to ensure that the information content is
accurate, up-to-date, and state-of-the-art, technical inaccuracies and/or printing errors in
the information cannot be ruled out. Phoenix Contact does not offer any guarantees as to
the reliability, accuracy or completeness of the information. All information made available
in the technical data is supplied without any accompanying guarantee, whether expressly
mentioned, implied or tacitly assumed. This information does not include any guarantees
regarding quality, does not describe any fair marketable quality, and does not make any
claims as to quality guarantees or guarantees regarding the suitability for a special purpose.
ne
Phoenix Contact accepts no liability or responsibility for errors or omissions in the content
of the technical documentation (in particular data sheets, installation instructions, manuals,
etc.).
on
l
in
ec
om
po
The aforementioned limitations of liability and exemptions from liability do not apply, in so
far as liability must be assumed, e.g., according to product liability law, in cases of
premeditation, gross negligence, on account of loss of life, physical injury or damage to
health or on account of the violation of important contractual obligations. Claims for
damages for the violation of important contractual obligations are, however, limited to
contract-typical, predictable damages, provided there is no premeditation or gross
negligence, or that liability is assumed on account of loss of life, physical injury or damage
to health. This ruling does not imply a change in the burden of proof to the detriment of the
user.
5981_en_02
PHOENIX CONTACT
IB IL MUX MA (-PAC)
Statement of legal authority
This manual, including all illustrations contained herein, is copyright protected. Use of this
manual by any third party is forbidden. Reproduction, translation, and public disclosure, as
well as electronic and photographic archiving or alteration requires the express written
consent of Phoenix Contact. Violators are liable for damages.
Phoenix Contact reserves all rights in the case of patent award or listing of a registered
design. Third-party products are always named without reference to patent rights. The
existence of such rights shall not be excluded.
How to contact us
m
Up-to-date information on Phoenix Contact products and our Terms and Conditions can be
found on the Internet at:
Internet
co
www.phoenixcontact.com.
nt
www.download.phoenixcontact.com.
s.
Make sure you always use the latest documentation.
It can be downloaded at:
A conversion table is available on the Internet at:
ne
www.download.phoenixcontact.com/general/7000_en_00.pdf.
If there are any problems that cannot be solved using the documentation, please contact
your Phoenix Contact subsidiary.
Subsidiary contact information is available at www.phoenixcontact.com.
Published by
po
Subsidiaries
.
in
ec
om
PHOENIX CONTACT GmbH & Co. KG
Flachsmarktstraße 8
32825 Blomberg
Germany
Phone +49 - (0) 52 35 - 3-00
Fax
+49 - (0) 52 35 - 3-4 12 00
PHOENIX CONTACT
P.O. Box 4100
Harrisburg, PA 17111-0100
USA
Phone +1-717-944-1300
on
l
Should you have any suggestions or recommendations for improvement of the contents and
layout of our manuals, please send your comments to
PHOENIX CONTACT
[email protected].
5981_en_02
Table of contents
1
Information about this document and the documentation landscape for Inline Modular IO ......1-1
1.1
Function of this user manual...............................................................................1-1
1.2
The documentation landscape for Inline Modular IO in reference to the
field multiplexer .................................................................................................. 1-1
2
Notes on using the terminal in potentially explosive areas .......................................................2-1
3
Using a field multiplexer in the field multiplexer system ...........................................................3-1
3.2
Data transmission...............................................................................................3-2
3.3
Transmission time ..............................................................................................3-3
3.4
Diagnostics.........................................................................................................3-4
3.5
Additional system components...........................................................................3-4
3.6
Number of devices in a field multiplexer station..................................................3-4
s.
co
m
Arrangement of a field multiplexer system ..........................................................3-1
nt
Description of the field multiplexer ...........................................................................................4-1
General description ............................................................................................4-1
4.2
Diagnostic indicators ..........................................................................................4-3
4.3
Terminal point assignment..................................................................................4-4
4.4
Installation instructions .......................................................................................4-6
4.4.1
Transmission media in the field multiplexer system ............................4-6
4.4.2
Supply from a single power source .....................................................4-6
4.4.3
Alarm contact ......................................................................................4-6
4.4.4
Temperature measurements ...............................................................4-7
po
Configuration ......................................................................................................4-8
4.5.1
Configuring the "fiber optics (FO)" transmission mode ........................4-8
4.5.2
Configuring the station as a master or a slave .....................................4-8
on
l
in
ec
4.5
ne
4.1
om
4
3.1
5
4.6
Connection example...........................................................................................4-8
4.7
Installing and removing the field multiplexer station............................................4-9
4.8
Terminals approved for use on the field multiplexer..........................................4-11
4.8.1
Universal terminals that can be used on the field multiplexer ............4-11
4.8.2
Terminals that can actually be used on the field multiplexer .............4-11
Power supplies and voltage concept .......................................................................................5-1
5981_en_02
5.1
Power supplies ...................................................................................................5-1
5.1.1
Supply at the field multiplexer .............................................................5-1
5.1.2
Providing/supplying power at power and/or segment terminals ..........5-2
5.1.3
Demands on the voltage supplies .......................................................5-2
5.2
Voltage concept within an field multiplexer station..............................................5-3
5.2.1
Power and segment terminals .............................................................5-3
5.2.2
Electrical isolation ...............................................................................5-4
PHOENIX CONTACT
i
IB IL MUX MA (-PAC)
6
Surge protection ......................................................................................................................6-1
6.1
Surge protection for the remote bus cable ..........................................................6-2
6.2
Surge protection for the power supply and the entire control cabinet .................6-5
6.3
Surge protection measures in fiber optic mode ..................................................6-6
7
Transmission media.................................................................................................................7-1
8
Configuring and installing the field multiplexer systems with the help of an example project ...8-1
8.2
Selecting the required I/O terminals....................................................................8-2
8.2.1
Devices permitted in a field multiplexer station ...................................8-2
8.2.2
Checking the system limits ..................................................................8-6
8.3
Selecting suitable power supply units.................................................................8-7
8.4
Providing surge protection..................................................................................8-8
8.5
Selecting the transmission medium ....................................................................8-8
8.6
Determining the transmission time......................................................................8-8
8.7
Installing and configuring the field multiplexer system ........................................8-9
8.7.1
Basic information for installation .........................................................8-9
8.7.2
Arrangement of the field multiplexer system .....................................8-10
8.7.3
Connecting and configuring the field multiplexer ...............................8-11
po
ne
nt
s.
co
m
Describing and defining the task.........................................................................8-1
Commissioning and functional test ..........................................................................................9-1
9.1
Checking the installation.....................................................................................9-1
Startup behavior and system test .......................................................................9-2
on
l
in
ec
9.2
om
9
8.1
9.3
Operation............................................................................................................9-3
9.4
Diagnostic indicators ..........................................................................................9-4
9.4.1
Error causes and remedies .................................................................9-4
9.4.2
Localizing errors on a field multiplexer station .....................................9-6
9.5
Flowchart............................................................................................................9-8
10 Technical data and ordering data ..........................................................................................10-1
ii
PHOENIX CONTACT
10.1
Technical data of the field multiplexer...............................................................10-1
10.2
Ordering data ...................................................................................................10-6
5981_en_02
Table of contents
Technical appendix: The field multiplexer with different transmission media .......................... A-1
A1
Transmission over copper cable........................................................................ A-1
A2
Transmission over fiber optics ........................................................................... A-3
A 2.1
Devices for the field multiplexer station .............................................. A-3
A 2.2
PSI-MOS-RS485W2/FO... fiber optic converters that can be used
A-4
A 2.3
Basic field multiplexer settings ........................................................... A-4
A 2.4
Configuring fiber optic converters ...................................................... A-5
A 2.5
Connecting the cables ....................................................................... A-6
A3
Transmission over telephone line (modem)....................................................... A-7
A 3.1
Devices and software for the field multiplexer station ......................... A-7
A 3.2
Basic field multiplexer settings ........................................................... A-8
A 3.3
Configuring modems using software .................................................. A-8
A 3.4
Setting the DIP switches of the modems .......................................... A-10
A 3.5
Configuring the converters ............................................................... A-11
A 3.6
Connecting the cables ..................................................................... A-12
A4
Transmission over Bluetooth (wireless) ........................................................... A-15
A 4.1
Devices and software for the field multiplexer station ....................... A-15
A 4.2
Basic field multiplexer settings ......................................................... A-16
A 4.3
Setting the Bluetooth server (first Bluetooth converter) .................... A-16
A 4.4
Setting the Bluetooth client (second Bluetooth converter) ............... A-23
A 4.5
Setting the switch on the Bluetooth converter .................................. A-31
A 4.6
Connecting the cables ..................................................................... A-32
A5
Transmission over Ethernet (COM SERVER).................................................. A-33
A 5.1
Devices for the field multiplexer station ............................................ A-33
A 5.2
Basic field multiplexer settings ......................................................... A-34
A 5.3
Checking the firmware of the FL COM SERVER RS485 .................. A-34
A 5.4
Setting the Ethernet converters using software or
Web-Based Management (WBM) .................................................... A-35
A 5.5
Setting the switch on the Ethernet converter .................................... A-37
A 5.6
Connecting the cables ..................................................................... A-38
A 5.7
Example configuration ..................................................................... A-38
B
on
l
in
ec
om
po
ne
nt
s.
co
m
A
Index....................................................................................................................................... B-1
5981_en_02
PHOENIX CONTACT
iii
on
l
in
ec
om
po
ne
nt
s.
co
m
IB IL MUX MA (-PAC)
iv
PHOENIX CONTACT
5981_en_02
Information about this document and the documentation landscape for Inline Modular IO
1
Information about this document and the documentation
landscape for Inline Modular IO
1.1
Function of this user manual
The documentation landscape for Inline Modular
IO in reference to the field multiplexer
s.
co
1.2
m
At the beginning, this user manual describes the IB IL MUX MA (-PAC) field multiplexer.
This manual also helps you from configuration and installation to start up and function test
of a field multiplexer system.
nt
The documentation for Inline Modular IO is modular, providing you with the optimum
information for your specific application with your Inline terminals used.
The documentation can be downloaded at www.download.phoenixcontact.com.
ne
For a comprehensive list of the documentation, please refer to the ordering data (see
Section "Ordering data" on page 10-6).
po
Terminal-specific documentation can be found in the download area for the
corresponding device.
Make sure you always use the latest documentation.
om
The following documentation is available for the field multiplexer in association with
Inline Modular IO:
"Automation terminals of the Inline product range" user manual
in
ec
IL SYS INST UM E
on
l
This manual is the generic system manual for Inline and describes the use of
terminals/modules in the Inline product range for all bus systems.
5981_en_02
The following topics are covered:
– The device properties, which are the same for all bus systems
– Notes on the low voltage area
– Overview of the Inline product groups
– Structure and dimensions of Inline terminals
– Electrical potential and data routing
– Mounting and removing
– General technical data and ordering data
– Examples and tips
PHOENIX CONTACT
1-1
IB IL MUX MA (-PAC)
Data sheets
Terminal-specific data sheets
The data sheet describes the specific properties of each Inline terminal.
These include at the very least:
– Function description
– Local diagnostic and status indicators
– Pin assignment/terminal point assignment and connection example
– Programming data/configuration data
– Technical data
"Summary of key data for Inline devices" data sheet, DB GB IB IL DEVICE LIST
m
This data sheet is also referred to as the device list.
s.
co
In addition to terminal-specific data sheets, this data sheet also includes the key data of
every Inline Modular IO device. This includes, for example:
– Programming data: ID code, length code, process data channel, I/O address area
– Error messages
– Power supply/current consumption
nt
Application notes provide additional information about special topics.
In conjunction with the field multiplexer, these include, for example:
I/O modules at bus couplers
–
General information about use in Ex
zone 2 potentially explosive areas
ne
–
AH BK IO LIST
AH EN IL EX ZONE 2
po
Application notes
om
Device-specific application notes are listed in the device-specific data sheet and are
available in the download area for the relevant device.
A package slip contains key information for the electrical installation of an Inline terminal or
group of Inline terminals. This includes, for example:
– Short description
– Safety notes
– Assembly/removal
– Terminal point assignment
– Local diagnostic and status indicators
on
l
in
ec
Package slips
1-2
PHOENIX CONTACT
5981_en_02
Notes on using the terminal in potentially explosive areas
2
Notes on using the terminal in potentially explosive
areas
Approval according to directive 94/9/EC
X II 3 G Ex nAC IIC T4 X
Installation notes
6.
7.
8.
9.
m
co
s.
nt
5.
ne
4.
po
3.
This Inline terminal can be installed in zone 2.
The Inline terminal must only be installed, operated, and maintained by qualified
personnel.
Please follow the installation instructions given in the IL SYS INST UM E user manual
and the package slip.
Observe all applicable safety directives (even national safety regulations), accident
prevention regulations, as well as general rules of technology when installing and
operating the equipment.
Please refer to the corresponding documentation (user manual, data sheet, package
slip) and the certificates (EC type examination and other approvals, if applicable) for
safety-related data.
It is not permitted to access the circuits inside the Inline terminal. Do not repair the Inline
terminal by yourself but replace it with a terminal of the same type. Repairs may only be
carried out by the manufacturer.
IP20 (EN 60529) protection of the device is provided for a clean and dry environment.
Do not subject the Inline terminal to mechanical strain and thermal loads, which exceed
the limits specified in the product documentation.
The Inline terminal has not been designed for use in dust potentially explosive
atmospheres.
om
1.
2.
in
ec
Installation in zone 2
1.
2.
on
l
3.
5981_en_02
4.
Observe the specified conditions for use in potentially explosive areas.
When installing the terminal, use an appropriate and approved housing with a minimum
protection of IP54. Please observe the EN 60079-14 requirements, e.g., a steel housing
with a wall thickness of 3 mm.
In potentially explosive areas, only snap the Inline terminal onto the rail and connect the
cables when the power is switched off.
In zone 2, only connect devices to the supply and signal circuits that are suitable for
operation in potentially explosive areas of zone 2 and the conditions at the installation
location.
PHOENIX CONTACT
2-1
IB IL MUX MA (-PAC)
Restrictions/limit values
3.
4.
on
l
in
ec
om
po
ne
nt
s.
5.
m
2.
Only Inline terminals that are approved for use in potentially explosive areas
may be snapped next to this Inline terminal.
Before using an Inline terminal in a zone 2 potentially explosive area, first check that the
terminal has been approved for installation in this area.
For a list of terminals approved for use in zone 2 potentially explosive areas, please
refer to the AH EN IL EX ZONE 2 application note.
Please ensure that the supplies of UM and US at the field multiplexer do not exceed
4 A.
Please make sure that the maximum permissible current of 4 A flowing through
potential jumpers UM and US (total current) is not exceeded when using the Inline
terminals in potentially explosive areas.
Also ensure that the maximum permissible current of 2 A flowing through potential
jumper UL is not exceeded.
The maximum permissible current for each tension spring contact is 2 A.
co
1.
2-2
PHOENIX CONTACT
5981_en_02
Using a field multiplexer in the field multiplexer system
3
Using a field multiplexer in the field multiplexer system
The field multiplexer is a simple system for the transmission of signals between remote
stations. It has a modular design, and saves on conventional parallel cabling.
A field multiplexer system is set up using two identical field multiplexers. The multiplexers
are electrically linked over a 2-wire cable and may transmit digital and analog signals over
a distance of up to 12 km.
m
Data can also be transmitted over fiber optics, telephone lines, Bluetooth or Ethernet. In
these cases other maximum distances are possible (see Section "Transmission media" on
page 7-1).
Arrangement of a field multiplexer system
co
3.1
nt
s.
The field multiplexer and the Inline I/O terminals connected to it form a station. A field
multiplexer system consists of two stations. The two stations must be arranged in such a
way that each input terminal is assigned to an output terminal on the other side, and vice
versa (complementary arrangement, see Figure 3-1).
po
ne
In addition to the complementary arrangement of I/O terminals in each station and its
counterpart, a distinction must be made between the active (master) and the passive (slave)
field multiplexer station. This is done by inserting a jumper into one of the stations, which
thereby becomes the master. Further configuration settings are not required.
Up to 63 Inline I/O terminals can be connected to a field multiplexer station simply by
mounting them next to one another.
on
l
in
ec
om
The intelligent wiring method used by Inline terminals enables the field multiplexer station to
be created quickly and easily, since, for example, time-consuming wiring of the terminal
power supply is not required. It is only necessary for the power supply units integrated in the
field multiplexers to be supplied with 24 V DC on the input side. They generate the operating
voltage required for the field multiplexer and the connected Inline I/O terminals.
5981C002
Figure 3-1
5981_en_02
Complementary arrangement of I/O terminals
PHOENIX CONTACT
3-1
IB IL MUX MA (-PAC)
3.2
Data transmission
A maximum of 512 I/O data can be transmitted by each station. This corresponds to a
maximum of 512 digital or 32 analog inputs and/or outputs. Digital and analog signals may
also be mixed.
The transmission time for all I/O data depends on the number of inputs and outputs to be
transmitted, but is a maximum of 1 s. In practice, data is transmitted considerably faster (see
also "ransmission time" on page 3-3).
m
The field multiplexer transmits the signals that are present in parallel at the I/O terminals
serially along the cable. At the other end of the cable, the signals are output again through
the complementary I/O terminals in the opposite station.
co
Data is transmitted between two field multiplexer stations over a 2-wire copper cable.
RS-485 transmission reduces the effect of electromagnetic interference on the signals. A
maximum distance of 12 km may be covered.
s.
The maximum distance depends on the type of cable selected, as well as on EMC
environmental conditions.
on
l
in
ec
om
po
ne
nt
Data can also be transmitted over fiber optics, telephone lines, Bluetooth or Ethernet. In this
case, use additional interface converters from Phoenix Contact and configure the field
multiplexers and converters accordingly (see Section "Technical appendix: The field
multiplexer with different transmission media" on page A-1).
fiber-optic transmission is configured using a jumper on the first Inline connector.
3-2
PHOENIX CONTACT
5981_en_02
Using a field multiplexer in the field multiplexer system
3.3
Transmission time
The maximum time required for data transmission depends on the type of transmission
medium that has been selected, and can be calculated using the formula below.
Only the I/O terminals from one of the two stations have to be taken into consideration
when making the calculation.
When operating field multiplexer systems over copper cables, the following formula applies
tup = n * 6.8 ms/byte + 78 ms + m
=
Update time for field multiplexer I/O data
n
=
Number of bytes to be transmitted (n = 1 ... 64 bytes)
m
=
Delay when using different transmission media
co
m
tup
m = 0 ms
Telephone line
m = 20 ms
Ethernet cable
m = 0 ms
Bluetooth connection
m = 40 ms
nt
s.
Copper
ne
If the field multiplexer is operated over fiber optics, this formula applies
po
tup = n * 1.37 ms/byte + 10 ms
om
Both formulas are valid for worst case scenarios. Transmission is usually faster.
The number of bytes to be transmitted depends on the particular terminal:
Type of terminal
n [in bytes]
1
Digital terminal with 16 channels
2
Digital terminal with 32 channels
4
Analog terminal with 1 channel
2
Analog terminal with 2 channels
4
on
l
in
ec
Digital terminal with 2, 4, or 8 channels
5981_en_02
The transmission time typically varies within the following limits:
tup (copper):
80 ms ... 500 ms
tup (fiber optic):
10 ms ... 100 ms
PHOENIX CONTACT
3-3
IB IL MUX MA (-PAC)
3.4
Diagnostics
LEDs provide station diagnostics on the field multiplexer and the Inline I/O terminals. An
integrated alarm relay permits alarms or warning lamps to be connected locally.
3.5
Additional system components
3.6
co
m
The field multiplexer system is completed by additional system components from the
Phoenix Contact product range (see Section "Accessories: Additional system components"
on page 10-6).
Number of devices in a field multiplexer station
om
po
ne
nt
s.
The maximum number of devices that can be connected to a field multiplexer is determined
by the following system specifications:
1 Up to 63 devices can be connected to a field multiplexer.
2 A maximum of 512 digital or 32 analog signals can be transmitted (even mixed; each
analog channel is treated like a 16-bit digital terminal).
3 The field multiplexer can supply a maximum current of 2 A at 7.5 V DC in the logic area.
4 The field multiplexer can supply a maximum current of 0.5 A at 24 V DC to analog
terminals.
5 The maximum current for the I/O supply is 8 A at US, UM and GND (total current US +
UM).
Please refer to the IL SYS INST UM E user manual for detailed information on the
individual circuits within an Inline station, which also apply for a field multiplexer station.
on
l
in
ec
NOTE: Overload in the event of configuration errors
Observe the current consumption of each device at the individual potential jumpers when
configuring an field multiplexer station. It can be found in every terminal-specific data
sheet as well as in the DB GB IB IL DEVICE LIST data sheet.
To determine the maximum number of terminals, add up the current consumption of the
connected I/O terminals.
If the limit value is reached at one of the potential jumpers, a new appropriate power
terminal must be used.
NOTE: Malfunction or overload in the event of configuration errors
The permissible number of devices that can be connected depends on the specific station
arrangement. None of the system specifications given above must be exceeded.
3-4
PHOENIX CONTACT
5981_en_02
Description of the field multiplexer
4
Description of the field multiplexer
The IB IL MUX and IB IL MUX MA-PAC only differ in the scope of supply (see "Ordering
data" on page 10-6). Their function and technical data are identical. For greater clarity, the
order designation IB IL MUX MA-PAC is used throughout this document.
4.1
The field multiplexer
– forms the head of an field multiplexer station. All the necessary Inline I/O terminals are
connected to it.
– configures the station and manages data exchange with the opposite station over a
remote bus cable.
– supplies power to the connected I/O terminals.
The field multiplexer generates the logic voltage UL for all connected devices from the
supplied supply voltage UMUX as well as the supply voltage UANA for the connected
analog terminals.
ne
nt
s.
co
m
Functions
General description
po
Please refer to the IL SYS INST UM E user manual for information on the individual
circuits within an Inline station, which also apply for a field multiplexer station.
See Section "Diagnostic indicators" on page 4-3.
Connections
See Section "Terminal point assignment" on page 4-4.
Connection method
The field multiplexer is suitable for the connection of copper cables.
om
Indicators
in
ec
Connect cables with diameters of 0.08 mm2 through 1.5 mm2 (AWG 24 - 16) to the springclamp connections of the Inline connectors.
Protection
on
l
In order to implement data transmission over other transmission media, additional interface
converters from Phoenix Contact must be used (see Section "Transmission media" on
page 7-1 or Section "Technical appendix: The field multiplexer with different transmission
media" on page A-1).
Potential and data routing
The field multiplexer has protection against polarity reversal and excess voltage on UMUX.
The potential and data routing of the field multiplexer station begins at the field multiplexer.
Please refer to the IL SYS INST UM E user manual for detailed information on the
individual jumpers as well as on the maximum capacity of the jumper contacts.
Connection to functional
earth ground (FE)
If the remote bus cable is shielded, the shield is internally connected through a capacitor to
FE.
In the terminal, there is a capacitive connection of UMUX, UM, US, and GND to FE.
5981_en_02
PHOENIX CONTACT
4-1
IB IL MUX MA (-PAC)
The field multiplexer is grounded when it is snapped onto the grounded DIN rail via the FE
spring on the bottom of the terminal. This spring is connected to the potential jumper FE and
to the terminal points for an FE connection (see "Required additional grounding").
Required additional
grounding
Ground the field multiplexer additionally through the FE connection to ensure reliable
grounding of the station even if the FE spring is dirty or damaged. Connect the terminal
points for the FE connection to a grounded PE terminal.
co
m
Grounding
Additional grounding of the field multiplexer
nt
Figure 4-1
s.
5 9 8 1 A 0 1 2
ne
Please refer to the IL SYS INST UM E user manual for information on the grounding
concept.
Notes on the various voltage ranges in the field multiplexer can be found in Section 5.2.2
"Electrical isolation".
on
l
in
ec
om
po
Electrical isolation
4-2
PHOENIX CONTACT
5981_en_02
Description of the field multiplexer
4.2
Diagnostic indicators
Diagnostic indicators are used for local error diagnostics.
U L
S T
U S
R E
U M
C E
M U X
co
m
L E
LED
Color
Meaning
Status
UL
Green
ULogic
On
Flashing
Red
Stop
CE
Red
Configuration
Error
LE
US
UM
5981_en_02
Red
Remote bus
Error
on
l
RE
Red
Green
Green
Local Bus Error
USegment
UMain
24 V field multiplexer supply (UMUX),
7.5 V main supply UL and interface supply present
Hardware faulty and/or interface supply not present
Supply voltage not present
On
Field multiplexer in stop
Off
Field multiplexer system operating
On
Configuration error
Off
Configuration of both field multiplexers is OK
On
Error on remote bus
in
ec
ST
Description of the LED states
om
Off
ne
Diagnostic LEDs on the field multiplexer
po
Table 4-1
Diagnostic indicators
nt
Figure 4-2
s.
5 9 8 5 B 0 0 3
Flashing
Software versions of the two field multiplexers are not identical
Off
Communication between the field multiplexers functioning correctly
On
Error on the local bus of this field multiplexer station (e.g., a faulty I/O
terminal)
Flashing
Error on the local bus of the opposite station
Off
Local bus OK
On
24 V segment circuit supply present
Off
24 V segment circuit supply not present
On
24 V main circuit supply present
Off
24 V main circuit supply present
PHOENIX CONTACT
4-3
IB IL MUX MA (-PAC)
4.3
Terminal point assignment
The field multiplexer is delivered with connectors and labeling fields. To connect the cables
to the IB IL MUX terminal you need the IB IL MUX-PLSET connector set,
Order No. 2836036.
–
–
Remote bus connection
Configuration of transmission mode
Connector 2
–
No function
Connector 3
–
–
–
Floating alarm contact
Configuration of master/slave setting
Field multiplexer supply UMUX
that generates the communications power UL and the supply for the analog terminals
UANA.
Connector 4
–
Voltage supply for the segment (US) and the main circuit (UM)
1
2 .1
1 .2
2
2
2 .2
3
3
4
4
1 .3
1 .2
2
2
2 .2
1 .4
3
3
4
4
om
2 .1
in
ec
on
l
1
1
Figure 4-3
2
1 .1
1
1 .4
Terminal
point
1
1 .1
1 .3
Table 4-2
2
po
1
ne
nt
s.
co
m
Connector 1
2 .3
2 .4
2 .3
2 .4
5 9 8 1 A 0 1 9
Terminal point assignment
Terminal point assignment
Assignment
Remark
Connector 1 Remote bus, configuration of transmission mode (copper/fiber optics)
1.1, 2.1
CONFFO
Configuration of transmission mode (copper/fiber optics)
1.2
DATA
Differential signal, data line to the opposite station (remote bus)
2.2
DATA
Differential signal, data line to the opposite station (remote bus)
1.3, 2.3
GNDDATA
Reference potential for DATA and DATA
1.4, 2.4
Shield
Shield potential of the data line (remote bus)
Connector 2 No function
Cover for unused terminal points
4-4
PHOENIX CONTACT
5981_en_02
Description of the field multiplexer
Table 4-2
Terminal
point
Terminal point assignment
Assignment
Remark
Connector 3 Floating alarm contact, field multiplexer supply (UMUX), master/slave configuration
Alarm_IN
Alarm contact (floating, closed in the event of an error)
2.1
Alarm_OUT
Alarm contact (floating, closed in the event of an error)
1.2, 2.2
UMUX
field multiplexer supply (24 V DC)
1.3, 2.3
GNDMUX
GND for field multiplexer supply
The potential is reference ground for the field multiplexer electronics
1.4, 2.4
CONFMA
Master/slave configuration
m
1.1
Connector 4 Power connector for main and segment supply (UM / US)
US
24 V segment supply
The supplied voltage is directly routed to the potential jumper.
1.2, 2.2
UM
24 V main supply
The supplied voltage is directly routed to the potential jumper.
1.3, 2.3
GND
The reference potential is directly led to the potential jumper and is, at the same time,
reference ground for the main and segment supply.
1.4, 2.4
FE
Connection of the field multiplexer, i.e., of the field multiplexer station to functional earth
ground. The contacts are directly connected to the potential jumper and the FE spring on
the bottom of the housing.
ne
nt
s.
co
1.1, 2.1
om
po
Functional earth ground is only used to discharge interference.
in
ec
For information on the power supplies, please refer to the IL SYS INST UM E user
manual.
on
l
NOTE: Overload
The maximum permissible total current flowing through the potential jumpers UM and US
is 8 A.
NOTE: Malfunction
Connect the field multiplexer to functional earth ground via the FE connection of
connector 4. For this, connect the corresponding contact with a grounding terminal (see
also Figure 4-6 on page 4-8).
The following terminal points are jumpered internally in the module:
5981_en_02
PHOENIX CONTACT
4-5
IB IL MUX MA (-PAC)
Connector 1
Connector 2
Connector 3
CONFFO
CONFFO
DATA
DATA
UMUX
GNDDATA
GNDDATA
Shield
Shield
Connector 4
US
US
UMUX
UM
UM
GNDMUX
GNDMUX
GND
GND
CONFMA
CONFMA
FE
FE
Alarm_IN Alarm_OUT
5981B040
4.4.1
co
Installation instructions
Transmission media in the field multiplexer system
s.
4.4
Internal jumpering
m
Figure 4-4
Supply from a single power source
po
4.4.2
ne
nt
When you use an additional interface converter, you may use different transmission media
within the field multiplexer system. They are described in detail in Section "Transmission
media" on page 7-1.
om
If a field multiplexer station is to be supplied from a shared 24 V DC supply (UMUX, US and
UM), three cable jumpers must be inserted for this purpose (Figure 8-3 on page 8-12).
in
ec
NOTE:
In this case there is no electrical isolation between UMUX and US / UM.
on
l
4.4.3
4-6
PHOENIX CONTACT
Alarm contact
The field multiplexer has a floating alarm output (Alarm_IN and Alarm_OUT contacts at
connector 3, see Figure 4-6 on page 4-8) that allows to indicate operating errors remotely.
The contact is normally open, but it is closed in the event of an error and when the field
multiplexer power supply fails.
Notes on the current carrying capacity of the alarm contacts can be found in the technical
data in the Appendix.
5981_en_02
Description of the field multiplexer
4.4.4
Temperature measurements
Temperatures can be measured in the field multiplexer system using MCR temperature
measuring transducers from Phoenix Contact. They are connected in front of analog input
terminals (see Figure 4-5).
Make sure that the same transmission mode (copper) is always set for both field
multiplexers.
om
po
U
ne
nt
s.
R e m o te b u s c a b le
D O 2
D I 2
A O 2
F ie ld
M u ltip le x e r
B
co
D I 2
D O 2
A I 2
F ie ld
M u ltip le x e r
A
m
You will find MCR temperature measuring transducers that can be used in the field
multiplexer system in Section "Ordering data" on page 10-6. PT 100 and thermocouple
sensors can be connected to these types.
J
T e m p e ra tu re
m e a s u r in g
tra n s d u c e r
in
ec
J
on
l
Figure 4-5
5981_en_02
D is p la y
in s tr u m e n t
V
5 9 8 1 A 0 3 2
T e m p e ra tu re
s e n s o r
Circuit diagram “Temperature measurement”
Information on the configuration and connection of temperature measuring transducers
can be found in the corresponding documentation.
PHOENIX CONTACT
4-7
IB IL MUX MA (-PAC)
4.5
Configuration
The field multiplexer does not require any configuration software. It is configured with cable
jumpers on the connectors.
4.5.1
Configuring the "fiber optics (FO)" transmission mode
If you want to implement fiber optic data transmission, insert a cable jumper at connector 1
from 1.1 to 2.1 (CONFFO) (see Figure 4-6 on page 4-8).
co
m
NOTE: Malfunction
Ensure that the same transmission mode (copper/fiber optics) is always set on the field
multiplexer station and the opposite station.
s.
Set the required fiber optic converters to a transmission rate of 75 kbaud and a character
length of 11 bits (see also Section "Transmission over fiber optics" on page A-3).
Configuring the station as a master or a slave
nt
4.5.2
ne
One field multiplexer station must be configured as the master. To do this, insert a cable
jumper at connector 3 from 1.4 to 2.4 (CONFMA) (see Figure 4-6 on page 4-8).
4.6
om
po
The second station must be configured as a slave. It must not have a wire jumper at
connector 3 from 1.4 to 2.4.
Connection example
2
3
in
ec
Connector 1
4
UL
US
on
l
ST
CE
RE
LE
1
1
MUX
2
1
2
1
2
ALARM
1
11
11
11
1
2
22
22
22
2
3
33
33
33
3
4
44
44
44
4
+
FO
2
UM
-
Alarm signals
+
+
-
-
Possible 24 V
segment supply
(US)
24 V main
supply (UM)
Master
24 V field multiplexer
supply (UMUX)
Remote bus
Figure 4-6
4-8
PHOENIX CONTACT
5985A008
Typical connection of the cables to the field multiplexer
5981_en_02
Description of the field multiplexer
4.7
Installing and removing the field multiplexer
station
WARNING: Hazardous contact voltage
Before installing or removing the station, make absolutely sure that the power supply is
switched off and cannot be switched on again by unauthorized persons.
The field multiplexer is supplied in an ESD bag together with a package slip with installation
instructions. Please read the complete package slip carefully before unpacking the field
multiplexer.
m
Unpacking the field
multiplexer
s.
co
NOTE: Electrostatic discharge
The terminal contains components that can be damaged or destroyed by electrostatic
discharge. When handling the terminal, observe the necessary safety precautions against
electrostatic discharge (ESD) according to EN 61340-5-1 and EN 61340-5-2.
nt
Generic documentation
ne
Please refer to the IL SYS INST UM E user manual for information on how to install and
remove the field multiplexer and the connected Inline terminals.
A field multiplexer station is set up by mounting the individual components side by side. No
tools are required. Mounting the components side by side automatically creates potential
and bus signal connections between the individual station components.
Mounting location
As all other terminals of the Inline product range the field multiplexer has IP20 protection and
is designed for use in a closed control cabinet or control box (terminal box) with IP54
protection or higher.
DIN rail
The field multiplexer station is mounted on a 35 mm standard DIN rail. The station is
mounted perpendicular to the DIN rail.
om
in
ec
on
l
End clamp
End plate
po
Installation without tools
Mount end clamps on both sides of the field multiplexer station. They ensure that the field
multiplexer station is correctly mounted. End clamps fix the station on both sides and keep
it from moving from side to side on the DIN rail. Phoenix Contact recommends using
CLIPFIX 35-5 end clamps (Order No. 3022276).
The mechanical end of an field multiplexer station is the end plate. It has no electrical
function. It protects the station against ESD pulses and the user against dangerous contact
voltages. The end plate is supplied with the field multiplexer and does not have to be
ordered separately.
Mounting position
Install the field multiplexer station in a horizontal or vertical position.
Assembly/removal/
replacement
To do this, proceed as described in the IL SYS INST UM E user manual.
5981_en_02
PHOENIX CONTACT
4-9
IB IL MUX MA (-PAC)
Shielding
Shielding is used to reduce the effects of interference on the system. In the Inline system,
remote bus cables and the cables to connect terminals for analog signals are shielded.
Observe the following points when installing shielding:
– Connect the shielding via the shield connector. Fasten the shielding so that as much of
the braided shield as possible is held underneath the clamp of the shield connection.
– Make sure there is good contact between the connector and base.
– Do not damage or squeeze the wires. Do not strip more than 8 mm off the wires.
– Always connect analog sensors and actuators with shielded, twisted pair cables.
Connecting the remote
bus cable
The remote bus cable is shielded. It is connected using the shield connector.
co
m
Please refer to Section "Terminal point assignment" on page 4-4 for the assignment of the
terminal points.
Sensors and actuators are connected using the Inline connectors. Each terminal-specific
data sheet indicates which connector(s) can be used for which terminal.
on
l
in
ec
om
po
ne
nt
Connecting sensors and
actuators
s.
In order to improve noise immunity, Phoenix Contact recommends a 3-wire, shielded
cable.
4-10
PHOENIX CONTACT
5981_en_02
Description of the field multiplexer
4.8
Terminals approved for use on the field
multiplexer
4.8.1
Power terminals and segment terminals are available to supply the station with I/O voltage.
Different types can be used to meet your requirements:
– Basic power/segment terminal
– Power or segment terminal with integrated thermal or electronic fuse protection
– Power terminals for different voltage levels
m
Supply terminals
Universal terminals that can be used on the field
multiplexer
s.
co
NOTE: Consequential damage
Protect the power supply externally, regardless of the power and/or segment terminal
used.
nt
By connecting UMUX, US and UM in parallel, the entire station can be supplied by one
power supply. Supply terminals are then not required.
You may use Inline terminals for analog and digital signals on the field multiplexer.
ne
I/O terminals
po
Function terminals from the Inline product range (e.g., temperature sensors, counters, or
absolute encoder modules) are not permitted on the field multiplexer.
om
A basic description of the terminals can be found in the IL SYS INST UM E. For additional
information, please refer to the terminal-specific documentation.
Terminals that can actually be used on the field multiplexer
in
ec
4.8.2
on
l
The AH IL BK IO LIST application note lists all I/O terminals that can be used on the field
multiplexer.
5981_en_02
PHOENIX CONTACT
4-11
on
l
in
ec
om
po
ne
nt
s.
co
m
IB IL MUX MA (-PAC)
4-12
PHOENIX CONTACT
5981_en_02
Power supplies and voltage concept
5
Power supplies and voltage concept
5.1
Power supplies
To operate a field multiplexer station you must provide the supply voltage for the field
multiplexer, for the logic of the terminals and for the sensors and actuators.
The power supplies are connected using unshielded cables.
m
Please refer to Figure 4-3 on page 4-4 for the connector assignment in order to connect
the power supplies to the field multiplexer.
s.
co
If you use additional power or segment terminals, please refer to the terminal-specific data
sheets for the connector assignment.
Supply at the field multiplexer
po
5.1.1
ne
nt
WARNING:
Before removing a terminal from or inserting a terminal in the station, disconnect the
power to the entire station. Make sure the entire station is reassembled before switching
the power back on.
om
In the simplest case, the required 24 V supply voltages can be supplied at the field
multiplexer. The entire station is supplied with power from the field multiplexer.
In this case you must provide the following supply voltages:
24 V field multiplexer supply
on
l
in
ec
UMUX
UM
The following voltages are generated from the field multiplexer supply:
– Internal communications power of the field multiplexer
– Communications power for the field multiplexer station I/O terminals, supplied through
potential jumpers UL;
– Analog terminal supply provided through the potential jumper UANA.
If the UMUX power supply is switched off, the bus stops since the UL communication power
fails as well.
24 V main circuit supply
The main voltage UM supplies all of the devices connected to the main circuit.
US
24 V segment circuit supply
The segment voltage US can be supplied separately to the field multiplexer or tapped from
the main circuit. Install a jumper or create a segment circuit using a switch to tap the voltage
US from the main circuit UM.
5981_en_02
PHOENIX CONTACT
5-1
IB IL MUX MA (-PAC)
The voltage US supplies all of the devices connected to the segment circuit.
The supply voltage to the sensors and actuators (UM/US) should be installed and
protected independently of the field multiplexer supply (UMUX). In this way the bus
continues to run even if some I/O devices are switched off.
Electrical isolation
If electrical isolation is required between logic and I/O you must provide the field multiplexer
supply UMUX and the I/O supply UM/US from separate power supplies.
Providing/supplying power at power and/or segment
terminals
co
5.1.2
m
Please refer to the information in Section "Electrical isolation" on page 5-4 and in Section
"Connecting and configuring the field multiplexer" on page 8-11.
s.
In addition to supplying power for the I/Os on the field multiplexer you may also
provide/supply the voltages UM and/or US with power and/or segment terminals.
Demands on the voltage supplies
po
5.1.3
ne
nt
For detailed information on these terminals, please refer to the IL SYS INST UM E user
manual or the terminal-specific data sheets.
om
WARNING: Hazardous contact voltage
Only use power supplies that ensure safe isolation between the primary and secondary
circuits according to EN 50178.
on
l
in
ec
For additional voltage supply requirements, please refer to the data sheets for the power
terminals.
5-2
PHOENIX CONTACT
5981_en_02
Power supplies and voltage concept
5.2
Voltage concept within an field multiplexer station
5.2.1
Power and segment terminals
Please refer to the IL SYS INST UM E user manual for detailed information on the voltage
concept within an Inline station, which also applies for a field multiplexer station.
Power terminal
The power terminal interrupts the potential jumpers for the main circuit UM, the segment
circuit US, and the reference potential GND. To do this, the voltages are to be recreated.
A N A
nt
S
U
M
5 9 8 1 A 0 0 8
Example: Interruption/recreation of the potential jumpers through the power
terminal
om
Figure 5-1
L
U
U
ne
M U X
po
U
U
G N D L
s.
P W R IN
co
M U X
m
This principle is shown schematically in Figure 5-1 for a section of a field multiplexer station.
The segment terminal interrupts the potential jumper US of the previous terminal an
recreates it (segment circuit US). To do this, the voltage is tapped off from the potential
jumper UM.
in
ec
Segment terminal
This principle is shown schematically in Figure 5-2 for a section of a field multiplexer station.
S E G /F
on
l
M U X
U
L
U
A N A
G N D L
U
U
U
M U X
Figure 5-2
5981_en_02
S
M
5 9 8 1 A 0 0 9
Example: Interruption/recreation of the potential jumpers US through the
segment terminal
PHOENIX CONTACT
5-3
IB IL MUX MA (-PAC)
5.2.2
Electrical isolation
Electrical isolation:
Remote bus
In order to improve noise immunity, the remote bus interface voltage is isolated from the
station's electronics. The incoming remote bus interface shield is AC-coupled to earth
ground using a resistor and a capacitor.
Electrical isolation:
Functional earth
ground/shield
FE and FE capacitive (shield) represent two separate isolated groups.
The field multiplexer does not have electrical isolation for the I/O terminal communications
power. UMUX (24 V), UL (7.5 V) and UANA (24 V) are not electrically isolated.
on
l
in
ec
om
po
ne
nt
s.
co
m
The separate supplies for the logic (UMUX, UL and UANA) and for the I/O (US and UM) make
it easy to set up electrically isolated areas (logic and I/O). Figure 5-3 through Figure 5-5
illustrate various possible implementations of electrical isolation.
5-4
PHOENIX CONTACT
5981_en_02
Power supplies and voltage concept
Option 1
The field multiplexer supply UMUX and the I/O supply UM/US are provided from separate
power supplies.
Local bus
UL+
UANA
UL- (GNDMUX)
mC
1
4
5V
5V
24 V
1
+24 V (UM)
co
s.
3
ne
UMUX
(UL / UANA)
UM / US
Power
supply 1
Power
supply 2
5981B015
Electrical isolation in the field multiplexer (separate power supplies)
om
Potential areas:
Area of remote bus cable
Area of functional earth ground (FE) capacitive for shield
Area of functional earth ground (FE)
μC
on
l
in
ec
3
+24 V (US)
po
Figure 5-3
nt
Remote bus
2
5
2
2
1
24 V
m
24 V
7.5 V
4
Area of the field multiplexer supply UMUX from which the communications power UL
and supply for the analog terminals UANA are generated.
5
Area of the I/O voltages UM and US
Symbols used:
Microcontroller
Converter
1
Optocoupler
Electrically isolated area
Supply unit with electrical isolation
2
Reference potential GNDDATA (remote bus cable)
Reference potential GNDMUX (field multiplexer supply)
Shield potential; connected with a capacitor to FE of the
potential jumper
This isolation can also be achieved if the power supply UM/US is provided through a
separate power terminal with its own power supply (see page 5-8) instead of through the
power terminal integrated into the field multiplexer.
5981_en_02
PHOENIX CONTACT
5-5
IB IL MUX MA (-PAC)
Option 2
The field multiplexer supply UMUX and the I/O supply UM/US are provided from a power
supply unit:
Local bus
UL+
UANA
UL- (GNDMUX)
mC
1
4
5V
5V
7.5 V
24 V
24 V
m
24 V
co
4
1
+24 V (UM)
2
po
ne
Remote bus
UMUX / UM / US
(UL / UANA)
Power supply
5981B016
Electrical isolation in the field multiplexer (one voltage supply)
om
Figure 5-4
3
nt
s.
2
+24 V (US)
Potential areas:
1
Area of remote bus cable
Area of functional earth ground (FE) capacitive for shield
in
ec
2
Area of functional earth ground (FE)
4
Area of the field multiplexer supply UMUX from which the communications
power UL and analog terminal supply UANA are generated not isolated
from the I/O voltages UM and US
on
l
3
5-6
PHOENIX CONTACT
5981_en_02
Power supplies and voltage concept
Electrical isolation:
Digital terminal
Isolation of the I/O circuit of a digital terminal from the communications power is only
ensured if UMUX and UM/US are provided from separate power supplies.
Electrical isolation:
Analog terminals
The I/O circuit (measuring amplifier) of an analog module receives floating power from the
24 V supply voltage UANA. The power supply unit with electrical isolation is part of an analog
terminal. The voltage UANA is looped through each terminal and is therefore available to the
next terminal.
IB IL 24 MUX MA-PAC
IB IL AI 2/SF-PAC
mC
5V
5V
7.5 V
24 V
24 V
24 V
IB IL AI 2/SF
electronics
Local bus
UL+
UANA
UL- (GNDMUX)
+5 V
/ +10 V
µP
MUX
REF
EEPROM
nt
s.
24 V
co
m
OPC
1
4
US
UM
5981B017
Electrical isolation between field multiplexer and analog module
po
Figure 5-5
ne
2
on
l
in
ec
om
The potential jumpers hatched in the figure are not used in the analog terminal. This means
that the 24 V supply of the field multiplexer (UMUX) and the power terminal are electrically
isolated from the I/O circuit (measuring amplifier) of the analog terminal. The I/O circuit of
the analog module is supplied from the analog circuit UANA.
5981_en_02
PHOENIX CONTACT
5-7
IB IL MUX MA (-PAC)
Electrical isolation: Other
Other electrical isolation depends on how the supply voltages are provided. For instance,
electrical isolation can be provided by inserting a new 24 V supply using a power terminal.
During this process the 24 V power supply units on the low voltage side must not be
connected to one another.
One method of electrical isolation using a power terminal is illustrated in Figure 5-6.
Connection between the ground of a supply voltage (UMUX, US or UM) and functional earth
ground must only be made at one point within the station (point A). Electrical isolation is lost
if several grounds are connected to functional earth ground.
IB IL 2 4 P W R IN
IB S IL 2 4 M U X M A
D I
co
m
D O
U L
1
S T
U S
R E
U M
U M
L E
1
2
1
2
1
1 1
1 1
2
2 2
2 2
2 2
3
3 3
3 3
2
1
om
3 3
4 4
4 4
2
1
2
1
1 1
1
2
IN
2
1
1 1
1 1
1 1
1 1
1 1
2 2
2 2
2 2
2 2
2 2
3 3
3 3
3 3
3 3
4 4
4 4
4 4
4 4
2
2
1
2
1
2
1
2
1 1
1 1
1 1
1
2 2
2 2
2 2
2 2
2
3 3
3 3
3 3
3 3
3 3
3
4 4
4 4
4 4
4 4
4 4
4
3
on
l
in
ec
4 4
1
po
1 1
2
nt
2
1
4
P W R
M U X
ne
1
s.
C E
U
+
M U X
U
-
M
+
/ U
+
S
U
M
/ U
S
5 9 8 1 A 0 1 0
A
Figure 5-6
Creating electrical isolation
Electrically isolated areas within the station:
1 Bus logic of the complete field multiplexer station
2 I/O (outputs)
3 I/O (inputs)
5-8
PHOENIX CONTACT
5981_en_02
Surge protection
6
Surge protection
The following section should be considered as a general guide. If you require information
about comprehensive surge protection design, please contact Phoenix Contact.
Overvoltage can occur as a result of circuit events or lightning strikes. Safety equipment
against overvoltage should always be installed when installing the field multiplexer, as this
is required by the usual fields of application of the field multiplexer.
co
m
Field multiplexer systems used outdoors (e.g., for monitoring and control of a sewage
treatment plant) are exposed to increased risk of indirect effects of lightning. field
multiplexer systems used within industrial plants must also ensure the function and the
security of data transmission even in electromagnetically unfavorable circumstances.
Safety measures are therefore strongly recommended.
ne
nt
s.
Correct installation and assembly can minimize electromagnetic interference. Particular
attention should be paid to the cable layout, described in Section "Transmission over
copper cable" on page A-1. Rules for laying the remote bus cable are also given there.
Attention must also be paid to appropriate grounding and shielding measures (see Section
"Grounding" on page 4-2 and Section "Shielding" on page 4-10).
po
Before assembling a field multiplexer system, check the surroundings for interference,
and select a suitable location.
Install additional modules (e.g., interface converters, surge arresters) as close as
possible to the field multiplexer head station.
om
Overvoltage protection measures include the following points:
– Protecting the remote bus cable
– Protecting the power supply and the entire control cabinet
on
l
in
ec
Surge protection for the remote bus cable does not apply when fiber optics operation is
used. No other surge arresters are affected by the choice of the transmission medium.
The interface converter must also be included in the overvoltage protection measures.
5981_en_02
PHOENIX CONTACT
6-1
IB IL MUX MA (-PAC)
6.1
Surge protection for the remote bus cable
Electromagnetic fields affecting the remote bus can disturb data transmission, and in
extreme cases can damage the electronics of the field multiplexer. Phoenix Contact offers
two surge arresters from the TRABTECH range particularly designed for the field
multiplexer to protect the remote bus interface: DATA-PLUGTRAB.
The appropriate ordering data can be found in Section 10.2, "Ordering data" or in the
TRABTECH catalog from Phoenix Contact.
The surge arrester for the field multiplexer is connected in a different way, according to the
cable type. The following circuit diagrams (Figure 6-2 through Figure 6-5) illustrate various
methods of connection.
co
m
Connection methods
nt
s.
NOTE:
To operate the field multiplexer under unfavorable electromagnetic interference
conditions, Phoenix Contact recommends version 1a and 1b which use a 3-wire,
shielded cable. Versions 2 through 4 are not recommended from the point of view of surge
protection.
po
ne
The use of versions 2 through 4 may nevertheless be necessary for the following reasons:
– A cable type other than the recommended type has already been laid
– The distance between the field multiplexer stations is too great for the shielding to be
connected (because of increased capacitive load)
– Cost savings are required
in
ec
In this version the DATA and DATA signals, the reference potential GNDDATA and the shield
are connected. The surge arrester should be installed as directly as possible next to the field
multiplexer head station. The wiring between the field multiplexer and the surge arrester can
then be carried out using simple stranded wires. The shield is to be grounded at both ends
(Figure 6-1). Connect it using shield clamps of type UFBK-SAS shield clamps at both surge
arresters.
O U T
IN
D A T A
8
7
D A T A
1 2
G N D
D A T A
S h ie ld
1 0
4
S u rg e
p r o te c tio n
F ie ld
M u ltip le x e r
A
R e m o te b u s c a b le
IN
F ie ld
M u ltip le x e r
B
O U T
7
8
D A T A
1 1
1 1
1 2
D A T A
9
9
1 0
G N D
3
3
4
S h ie ld
S u rg e
p r o te c tio n
on
l
Version 1a
(recommended)
om
Ground both field multiplexer stations (see also "Grounding" and "Additional grounding"
on page 4-2).
D A T A
U F B K -S A S
5 9 8 1 B 0 3 5
Figure 6-1
6-2
PHOENIX CONTACT
Basic circuit diagram: Remote bus protection, version 1a
5981_en_02
Surge protection
If it is not possible to implement grounding at both ends because of equalization currents
arising as a result of different grounding systems, then
– a double shielded cable is to be used in which the outer shielding is grounded at both
ends, or
– a supplementary wire is to be laid for the remote bus cable, or
– ground the shield indirectly using a type TERMITRAB-SLKK5-F/110AC surge arrester
(see Phoenix Contact TRABTECH catalog) (Figure 6-2).
O U T
IN
D A T A
8
7
D A T A
1 2
S h ie ld
IN
7
8
D A T A
1 1
1 1
1 2
D A T A
9
9
1 0
G N D
3
4
F ie ld
M u ltip le x e r
B
O U T
m
1 0
D A T A
R e m o te b u s c a b le
co
G N D
S u rg e
p r o te c tio n
F ie ld
M u ltip le x e r
A
S u rg e
p r o te c tio n
Version 1b
(recommended)
4
S h ie ld
s.
3
D A T A
nt
T E R M IT R A B
U F B K -S A S
ne
5 9 8 1 B 0 2 7
Basic circuit diagram: Remote bus protection, version 1b
po
Figure 6-2
om
The remote bus cable is wired between the two surge arresters and the TERMITRAB
modular terminal block as illustrated in Figure 6-2. The remote bus cable shield must be
connected at both ends using a shield clamp of type UFBK-SAS (see Section 10.2,
"Ordering data") to the surge arrester of field multiplexer A and to the TERMITRAB terminal.
This version is suitable if only a 3-wire cable with no shield is available. In this case, only the
DATA and DATA signals and the reference potential GNDDATA are connected. The shield
connection of both field multiplexers is left open.
O U T
D A T A
D A T A
G N D
D A T A
S h ie ld
IN
F ie ld
M u ltip le x e r
B
O U T
D A T A
1 1
1 1
1 2
D A T A
9
9
1 0
G N D
3
3
4
S h ie ld
1 2
4
IN
8
7
1 0
R e m o te b u s c a b le
7
8
S u rg e
p r o te c tio n
on
l
F ie ld
M u ltip le x e r
A
S u rg e
p r o te c tio n
in
ec
Version 2
(not recommended)
D A T A
5 9 8 1 B 0 2 8
Figure 6-3
5981_en_02
Basic circuit diagram: Remote bus protection, version 2
PHOENIX CONTACT
6-3
IB IL MUX MA (-PAC)
If all that is available is an unshielded 2-wire remote bus cable, the surge arrester can only
be connected to the DATA and DATA signals.
O U T
IN
D A T A
8
7
D A T A
1 2
G N D
1 0
D A T A
S h ie ld
IN
F ie ld
M u ltip le x e r
B
O U T
8
D A T A
1 1
1 1
1 2
D A T A
9
9
1 0
G N D
3
3
4
S h ie ld
D A T A
m
4
R e m o te b u s c a b le
7
S u rg e
p r o te c tio n
F ie ld
M u ltip le x e r
A
S u rg e
p r o te c tio n
Version 3
(not recommended)
co
5 9 8 1 B 0 2 9
Basic circuit diagram: Remote bus protection, version 3
s.
Figure 6-4
If protection of the remote bus cable is omitted to reduce costs, the field multiplexers must
be connected, as shown in Figure 6-5. Surge protection is not provided in this version.
Phoenix Contact can therefore not recommend it. The user bears the risk for any
consequential damage.
ne
nt
Version 4
(not recommended)
in
ec
F ie ld
M u ltip le x e r
A
om
po
NOTE:
This connection version is not to be used if the DATA and DATA wires are not a twisted
pair. The shield must be grounded at both ends of the remote bus cable. To avoid any
occurrence of voltage equalization currents, the shield of the remote bus cable of a field
multiplexer station should be grounded with a TERMITRAB-SLKK5-F/110AC modular
terminal block (see TRABTECH catalog from Phoenix Contact).
D A T A
R e m o te b u s c a b le
D A T A
D A T A
G N D
D A T A
G N D
D A T A
on
l
S h ie ld
F ie ld
M u ltip le x e r
B
T E R M IT R A B
D A T A
S h ie ld
5 9 8 1 A 0 3 0
Figure 6-5
6-4
PHOENIX CONTACT
Circuit diagram: No remote bus protection
5981_en_02
Surge protection
6.2
Surge protection for the power supply and the
entire control cabinet
To protect the control cabinet power supply, Phoenix Contact offers the VALVETRAB
surge arrester (see TRABTECH catalog from Phoenix Contact.
Effective overvoltage protection can only be achieved with full equipotential bonding.
Inclusion of the module DIN rail in the equipotential bonding can be implemented, for
example, with the universal USLKG 5 ground terminal block, Order No. 0441504 (see
Section 10.2, "Ordering data" or the CLIPLINE catalog from Phoenix Contact).
co
m
Figure 6-6 illustrates an example of the surge protection circuitry for a field multiplexer
station. The most important components are shown there, and have the following
meanings:
1 Grounding terminals for DIN rail (e.g., UT 10)
s.
2 Surge protection for the control cabinet power supply (e.g., VAL-CP-1S-350)
3 Surge protection for the input/output channels (e.g., PT 4X1-24AC-ST, PT 4X1+F-BE)
nt
4 Surge protection for the remote bus cable (e.g., PT 3-PB-ST, PT 1X2+F-BE)
ne
5 Remote bus cable
6 Field multiplexer supplies
7 Grounding of the metal switch cabinet
po
8 Other loads with separate power supplies
in
ec
om
The variety of possible input and output signals calls for various overvoltage protection
measures. The surge arresters from the TERMITRAB, COMTRAB and PLUGTRAB
series offer the right protection for every application. Comprehensive advice can be found
in the TRABTECH catalog from Phoenix Contact.
Please contact Phoenix Contact if you have more specific questions.
on
l
The terminals are to be arranged in such a way that the connecting cables are as short as
possible, and that they do not lie in parallel to unshielded cables.
5981_en_02
PHOENIX CONTACT
6-5
IB IL MUX MA (-PAC)
5
8
I/Os
MUX
1
1
UL
1
4
1
L
co
N
1
D
2
D
2
1
1
2
2
1
AI2
2
1
2
1
11
11
11
11
11
11
11
1
2
22
22
22
22
22
22
22
2
3
33
33
33
33
33
33
33
3
4
44
44
44
44
44
44
44
4
5
5
6
6
po
ne
7
1
om
N PE
2
1
DO2
nt
PE
L
1
D
2
DI2
DI4
s.
2
2
1
4
MUX
2
D
2
3
UM
m
6
1
US
ST
CE
RE
LE
5981B033
Protecting the power supplies
in
ec
Figure 6-6
3
on
l
6.3
Surge protection measures in fiber optic mode
Since optical fibers are not sensitive to electromagnetic fields, field multiplexers that
transmit data over fiber optics do not need remote bus surge protection. Nonetheless, the
power supply unit for the interface converter should be included in the surge protection
scheme. Because of the mechanical sensitivity of fiber optics, only fiber types with a strong
cladding around the transmission medium should be used.
Applicable fiber optic types can be found in the INTERFACE catalog from
Phoenix Contact.
6-6
PHOENIX CONTACT
5981_en_02
Transmission media
7
Transmission media
Different media can be used for the signal transmission between field multiplexers
depending, for example, on the distance to be covered, the environmental conditions or the
existing infrastructure. For data transmission it is often possible to employ cables that have
already been laid but are not in use.Table 7-1 provides an overview of possible transmission
media and lists advantages that might be decisive for the selection.
Table 7-1
Possible transmission media
Medium
Transmission distance
Advantages
Copper cable
Up to 12 km
Use of existing data cables
Fiber optic
cable
From 100 m up to 45 km
Not sensitive to surge voltages (e.g.,
outdoor lightning strikes)
m
Converter (C)/
Modem (M)
required
co
No
Yes (C)
s.
For use in environments subject to high
levels of electromagnetic interference
Almost unlimited, depending on the type
of telephone line (private permanent line
up to 20 km)
Bluetooth
(Wireless)
Up to 150 m
Ethernet
Almost unlimited, depending on the signal
delay in the network
Use of public telephone lines possible
po
ne
Telephone line
nt
Electrical isolation of system
parts/buildings
Yes (C/M)
Yes (C)
Use of existing Ethernet networks
Yes (C)
om
Wireless transmission
in
ec
When selecting the transmission medium, please note that the number of signals to be
transmitted is limited for Bluetooth or Ethernet transmission:
on
l
Table 7-2
5981_en_02
Restrictions for signal transmission
Medium
Maximum number of signals to be transmitted
Bluetooth (Wireless)
50 digital and 2 analog signals
Ethernet
4 analog signals, no restrictions for digital signals
PHOENIX CONTACT
7-1
IB IL MUX MA (-PAC)
Table 7-3
Typical copper cables
Cable type
Theoretical
range*
Cable parameters
Cross
resistance
[GΩ * cm]
[mH/km]
Operating
capacitance
[nF/km]
J-Y(ST)Y ... 0,6 Lg
(Telephone line, 0.6 mm)
3.4
65
10
–
120
J-Y(ST)Y ... 0,8 Lg
(Telephone line, 0.8 mm)
4.9
36.6
10
–
100
LiYCY(TP) 2x2x1
(Data cable, shielded, 1 mm2)
5.3
20
20
0.65
160
co
The value specified is to be considered as a guide value only. Shorter and longer distances are possible depending
on the surrounding conditions.
s.
*
m
Cable
resistance
[Ω/km]
Inductance
[km]
on
l
in
ec
om
po
ne
nt
Please refer to the Appendix A „Technical appendix: The field multiplexer with different
transmission media“ for information on component wiring and configuration of the
converters (and modems when using a telephone line).
7-2
PHOENIX CONTACT
5981_en_02
Configuring and installing the field multiplexer systems with the help of an example project
8
Configuring and installing the field multiplexer systems
with the help of an example project
This section will use an example project to illustrate the configuration and installation of a
field multiplexer station. It is designed to help you to carry out the following steps on your
own project.
Signals are to be transmitted from a control room to a pumping station over a distance of
3.2 km. An existing copper cable can be used as the transmission medium. 4 digital input
signals, 2 digital output signals and 2 analog input signals are to be transmitted.
on
l
in
ec
om
po
Example project
Describing and defining the task
ne
8.1
nt
s.
co
m
The following sequence should be observed during configuration and installation:
•
Describe and define the task
(number of signals, transmission medium, distance etc.)
•
Select the required I/O terminals
•
Consider the system restrictions
•
Select suitable power supply units
•
Provide surge protection
•
Select the transmission medium
•
Determine the transmission time
•
Install the system and configure the field multiplexer
5981_en_02
PHOENIX CONTACT
8-1
IB IL MUX MA (-PAC)
8.2
Selecting the required I/O terminals
For operation, the field multiplexer station I/O terminals must be set up in a complementary
arrangement (see also Figure 3-1 on page 3-1). The field multiplexer does not process the
transmitted data, but merely transmits it to the opposite station.
Select the appropriate Inline terminals for the I/O signals in your project.
8.2.1
Devices permitted in a field multiplexer station
co
m
You will find a list of I/O terminals that can be operated on the field multiplexer including
the corresponding order numbers in the AH IL BK IO LIST application note.
Table 8-1 shows possible terminal combinations in a complementary station arrangement.
nt
s.
NOTE: Configuration error
Terminal combinations other than the ones listed in Table 8-1 are not permitted. They will
be detected as configuration errors and indicates with the CE LED (see Section
"Diagnostic indicators" on page 4-3).
ne
The IB IL AI 2/SF-PAC analog terminal can also be combined with two IB IL AO 1...
terminals, see also Table 8-2.
po
Further information on the current and voltage ranges of the permissible analog terminals
can be found in the terminal-specific data sheets.
om
Key for the table below:
1, 2, 4, 8, 16, 32
Number of available channels
–
Combination not possible
If possible, use the IB IL 24 DO 2-PAC terminal as a
complementary terminal for a power or segment terminal, as only
the fuse and not the main voltage is monitored.
on
l
in
ec
+
8-2
PHOENIX CONTACT
5981_en_02
Configuring and installing the field multiplexer systems with the help of an example project
.
2
2
1
1
IB IL 24 DO 4...
–
–
–
–
–
–
–
IB IL 24 DO 8...
–
–
–
–
–
–
IB IL 24 DO 16...
–
–
–
–
–
–
IB IL 24 DO 32/HD...
–
–
–
–
–
IB IL 24/230 DOR 1/W(-PC)-PAC
1+
1+
1+
1+
1+
IB IL 24/230 DOR 4/W(-PC)-PAC
–
–
–
–
–
2 x IB IL AO 1/SF-PAC
–
–
2 x IB IL AO 1/U/SF-PAC
–
–
1 x IB IL AO 1/SF -PAC
1 x IB IL AO 1/U/SF-PAC
–
–
–
–
–
–
–
–
–
–
–
–
–
2
–
4
–
–
–
–
–
s.
–
–
–
co
–
–
–
–
8
–
–
–
–
–
16
–
–
–
–
–
–
–
–
32
–
–
1
1
1
–
–
–
–
–
–
–
–
–
4
–
–
–
–
–
nt
–
–
ne
po
1
2
–
–
–
–
–
–
–
–
–
2
–
–
–
–
–
–
–
–
–
–
–
2
–
–
–
–
–
–
–
–
–
–
–
2
–
–
–
–
–
–
–
–
–
–
–
2
–
om
–
in
ec
1 x IB IL AO 2/U/BP...
IB IL 24 SAFE 1-PAC
2
IB IL AI 2/SF...
2
IB IL 24 DI 32/HD...
1
2
IB IL 24 DI 16...
1
IB IL 24 DO 2...
IB IL 24 DI 8...
1+
m
1+
IB IL 24 DI 4...
1+
IB IL 24 DI 2...
IB IL 120 PWR IN/F-D-PAC
1+
IB IL 230 DI 1-PAC
IB IL 24 SEG/F-D-PAC
1+
Outputs
IB IL 120 DI 1-PAC
IB IL 24 PWR IN/2-F-DF-PAC
IB IL DO 1 AC-PAC
Inputs
IB IL 24 PWR IN/2-F-D-PAC
Complementary terminal arrangement
IB IL 24 PWR IN/F-D-PAC
Table 8-1
Key:
IB IL 24 DI 2...
IB IL 24 DI 4-PAC
IB IL 24 DO 2-2A-PAC
IB IL 24 DO 4...
IB IL 24 DI 8-PAC
IB IL 24 DI 8-PAC/SN
IB IL 24 DI 16...
IB IL 24 DO 4-PAC
IB IL 24 DO 4-ME
IB IL 24 DO 8...
IB IL 24 DO 8-PAC
IB IL 24 DI 8/T2-PAC
IB IL 24 DO 8-PAC/SN
IB IL 24 DI 16-PAC
IB IL 24 DO 8-NPN-PAC
IB IL 24 DI 16-ME
IB IL 24 DO 8-2A-PAC
IB IL 24 DI 16-NPN-PAC
IB IL 24 DO 16...
IB IL 24 DI 16-PAC/SN
IB IL 24 DI 32/HD...
IB IL 24 DO 2-PAC
IB IL 24 DO 2-NPN-PAC
IB IL 24 DI 4-ME
IB IL 24 DI 8...
IB IL 24 DO 2...
IB IL 24 DI 2-NPN-PAC
on
l
IB IL 24 DI 4...
IB IL 24 DI 2-PAC
IB IL 24 DO 16-ME
IB IL 24 DI 32/HD-PAC
IB IL 24 DI 32/HD-NPNPAC
IB IL 24 DO 16-PAC
IB IL 24 DO 16-PAC/SN
IB IL 24 DO 32/HD...
IB IL 24 DO 32/HD-PAC
IB IL 24 DO 32/HD-NPNPAC
5981_en_02
PHOENIX CONTACT
8-3
IB IL MUX MA (-PAC)
IB IL AI 2/SF...
IB IL AI 2/SF-PAC
IB IL AO 2/U/BP...
IB IL AO 2/U/BP-PAC
IB IL AI 2/SF-230-PAC
IB IL AO 2/U/BP-ME
IB IL AI 2/SF-ME
IB IL AI 2/SF-PAC
4 mA ... 20 mA
IB IL AI 2/SF-PAC
0 mA ... 20 mA
x
x
x
x
nt
x
IB IL AO 2/UBP-PAC
±10 V
0 V ... 10 V
m
IB IL AI 2/SF-PAC
IB ILAO 2/UBP-PAC
0 V ... 10 V
±10 V
co
IB IL AI 2/SF-PAC
s.
Signal
IB IL AO 1/SF-PAC
0 V ... 10 V
Terminal
IB IL AO 1/U/SF-PAC
0 V ... 10 V
Possible combinations of analog I/O terminals
IB ILAO 1/SF-PAC
0 mA ... 20 mA
Table 8-2
ne
x
po
NOTE: Malfunction
Typically, digital terminals with the same number of channels are always combined (e.g.,
DI 4 with DO 4). For instance, DI 16 with 2 * DO 8 is not permitted.
There is one exception:
1
D I2
2
1
D O 1
2
1
1
2
D I2
2
1
D
1
2
D O 1
2
D
1
D I2
2
1
2
D I2
2
D
1
D I2
D O 1
D O 1
1
D
1
2
D I2
D O 1
D
1
D O 1
D
1
D O 1
D
1
D O 1
on
l
in
ec
om
1-channel DO output terminals can be combined with the IB IL 24 DI 2-PAC input
terminal. The second channel, however, cannot be used in this case.
5 9 8 1 A 0 2 1
Figure 8-1
8-4
PHOENIX CONTACT
Combining DO 1 and DI 2 terminals
5981_en_02
Configuring and installing the field multiplexer systems with the help of an example project
Example project
Table 8-3
The following components are needed in the master station for the example project on
page 8-1:
Components of the master station
Position
Order Designation
Number Function
1
IB IL MUX MA-PAC
1
Field multiplexer as the head of the master station
2
IB IL 24 DI 4-PAC
1
Connection of 4 digital input signals using 2 or 3-wire
technology
2
Connection of 4 digital input signals using 4-wire technology
Or IB IL 24 DI 2-PAC
IB IL 24 DO 2-2A-PAC
1
Connection of 2 digital output signals
4
IB IL AI 2/SF-PAC
1
Connection of 2 analog input signals
m
3
Components of the slave station
Order Designation
Number Function
1
IB IL MUX MA-PAC
1
Field multiplexer as the head of the slave station
2
IB IL 24 DO 4-PAC
1
Connection of 4 digital output signals using 2 or 3-wire
technology
Or IB IL 24 DO 2-2A-PAC
2
3
IB IL 24 DI 2-PAC
1
4
IB IL AO 1/SF-PAC
2
Or IB IL AO 2/U/BP-PAC
nt
Connection of 2 digital input signals
1
Connection of 2 analog output signals (voltage or current
signals)
po
2
Connection of 4 digital output signals using 4-wire technology
om
Or IB IL AO 1/U/SF-PAC
s.
Position
ne
Table 8-4
co
The following complementary terminals are used on the slave station:
Connection of 2 analog output signals (voltage signals)
Connection of 2 analog output signals (voltage signals)
The 4-channel terminals are selected at position 2.
on
l
in
ec
In the slave station the terminal for current and voltage signals is selected at position 4.
5981_en_02
PHOENIX CONTACT
8-5
IB IL MUX MA (-PAC)
8.2.2
Checking the system limits
During field multiplexer station configuration, observe the system specifications. They are
specified in Section "Number of devices in a field multiplexer station" on page 3-4.
Checking system limits:
Table 8-5
Checking system limits
Master station
Slave station
Devices in the station
63, maximum
4, maximum
4, maximum
Number of signals
512, maximum
4 DI + 2 DO + 2 AI
=> 4 + 2 + 2*16 = 38
4 DO + 2 DI + 2 AO
=> 4 + 2 + 2*16 = 38
Current at UL
2 A, maximum
0.165 A (see Table 8-6)
Current at UANA
0.5 A, maximum
0.018 A (see Table 8-6)
Current at US + UM
8 A, maximum
5 A (see Table 8-6)
m
System limit
co
0.159 A (see Table 8-7)
0.130 A (see Table 8-7)
2.5 A (see Table 8-7)
Table 8-6
Maximum current consumption of the master station devices
Order Designation
Number
UL [mA]
2
IB IL 24 DI 4-PAC
1
40
3
IB IL 24 DO 2-2A-PAC
1
35
4
IB IL AI 2/SF-PAC
1
po
ne
Position
UANA [mA]
US [A]
4
18
135
18
Number
UL [mA]
UANA [mA]
om
UM [A]
1
60
Sum (maximum)
Table 8-7
nt
s.
Please refer to the terminal-specific data sheets or the DB GB IB IL DEVICE LIST data
sheet for the current consumption of the terminals.
5
Current consumption of the slave station
Order Designation
2
IB IL 24 DO 4-PAC
1
44
2
3
IB IL 24 DI 2-PAC
1
35
0.5
4
IB IL AO 1/SF-PAC
2
2*40 = 80
2*65 = 130
159
130
on
l
in
ec
Position
Sum (maximum)
8-6
PHOENIX CONTACT
UM [A]
US [A]
2.5
The system limits are observed with the selected terminals. Additional power terminals are
not necessary.
5981_en_02
Configuring and installing the field multiplexer systems with the help of an example project
8.3
Selecting suitable power supply units
See also Section "Power supplies and voltage concept" on page 5-1.
The selection of suitable power supplies always depends on the individual system. 24 V DC
power supplies should always meet the following criteria:
24 V DC
Ripple:
5%
Permissible range:
19.2 V to 30 V (ripple included)
m
Nominal value:
If electrical isolation is required between logic and I/O you must provide the field multiplexer
supply UMUX and the I/O supply UM/US from separate power supplies.
co
Electrical isolation
s.
If you want to set up various electrically isolated areas within a field multiplexer station, use
additional power terminals that draw their current from separate power supplies.
nt
Notes on setting up electrically isolated areas can be found in Section "Voltage concept
within an field multiplexer station" on page 5-3.
There is no electrical isolation required between logic and I/O in the example project.
ne
Example project
The master and the slave stations are be supplied from separate voltage sources.
po
One voltage source provides both the field multiplexer supply (UMUX to generate UL and
UANA) as well as the I/O supply (US and UM) for a station.
on
l
in
ec
om
A selection of suitable power supply units can be found in Section "Ordering data" on
page 10-6 or in the INTERFACE catalog from Phoenix Contact.
5981_en_02
PHOENIX CONTACT
8-7
IB IL MUX MA (-PAC)
8.4
Providing surge protection
Surge protection measures are described in Section "Surge protection" on page 6-1.
•
Select a protection of the remote bus.
Version 1a is selected for the example.
•
Also provide protection for the power supply and the entire control cabinet.
8.5
Selecting the transmission medium
co
m
Possible transmission media are described in Section "Transmission media" on page 7-1.
•
Select a transmission medium that meets your demands.
Transmission over a copper remote bus cable is selected for the example.
Determining the transmission time
nt
s.
8.6
ne
The formulas to calculate the transmission time are given in Section "ransmission time" on
page 3-3.
The example station (see Figure 8-2) is equipped with a copper cable. Therefore, the
formula for copper cables is used for the calculation.
n
=
Update time for field multiplexer I/O data
om
tup
po
tup = n * 6.8 ms/byte + 78 ms
=
Number of bytes to be transmitted (n = 1 ... 64 bytes)
in
ec
Calculation of n:
Terminals used:
Number of bytes to be transmitted per terminal:
Total number of bytes to be transmitted:
DI 4
DI 2
DO 2
AI 2
1
1
1
4
n=1+1+1+1+4=7
on
l
This results in the following transmission time:
8-8
PHOENIX CONTACT
tup = n * 6.8 ms/byte + 78 ms = 7 bytes * 6/8 ms/byte + 78 ms
tup = 125.6 ms
5981_en_02
Configuring and installing the field multiplexer systems with the help of an example project
8.7
Installing and configuring the field multiplexer
system
8.7.1
Basic information for installation
As a rule, follow the instructions of the IL SYS INST UM E when installing the field
multiplexer and the connected Inline terminals.
Observe in particular the following points during installation:
Before setting up a field multiplexer station or inserting a terminal into a station, ensure that
the entire station is disconnected from the power. Make sure the entire station is
reassembled before switching the power back on.
Order of the Inline
terminals
Install analog terminals in a field multiplexer station to the right of digital terminals, as
otherwise the field multiplexer station reports a configuration error and the field multiplexer
system is not ready for operation. For later extensions, insert digital terminals before analog
terminals.
FE connection
To ensure reliable grounding of the field multiplexer station, ground the field multiplexer
through the FE connection. Connect the terminal points for the FE connection to a grounded
PE terminal (e.g., USLKG 5 universal ground terminal block, Order No. 0441504, see also
Figure 4-1 "Additional grounding of the field multiplexer").
End plate
Terminate each field multiplexer station with an end plate. It is supplied as standard with the
field multiplexer.
End clamp
Lock every field multiplexer station with end clamps at the beginning and the end of the
station (see Section "Ordering data" on page 10-6).
Electrical isolation
If you want to set up various electrically isolated areas within a field multiplexer station, use
additional power terminals that draw their current from separate power supplies.
in
ec
For information about the connection of I/O terminals and of sensors and actuators, please
refer to IL SYS INST UM E user manual and the terminal-specific data sheets.
on
l
I/O terminals
om
po
ne
nt
s.
co
m
Disconnect the power!
5981_en_02
PHOENIX CONTACT
8-9
IB IL MUX MA (-PAC)
8.7.2
Arrangement of the field multiplexer system
D
L E
D
1
D
1
2
1
2
2
1
2
1
D I2
D I4
2
1
1
2
D O 2
2
1
D O
D
A I2
2
1
2
S T
U S
R E
U M
L E
1
1 1
1 1
1 1
1 1
1 1
1 1
1 1
1
2
2 2
2 2
2 2
2 2
2 2
2 2
2 2
2
3
3 3
3 3
3 3
3 3
3 3
3 3
3 3
3
4
4 4
4 4
4 4
4 4
4 4
4 4
4 4
4
1
2
1
co
5
1
2
D O 2
2
D O 4
1
1
2
D I2
2
1
A O 1
2
1
A O 1
2
1
2
1 1
1 1
1 1
1 1
1 1
1 1
1 1
1 1
1
2
2 2
2 2
2 2
2 2
2 2
2 2
2 2
2 2
2
3
3 3
3 3
3 3
3 3
3 3
3 3
3 3
3 3
3
4 4
4 4
4 4
4 4
4 4
4 4
4 4
4 4
4
5
5
6
6
ne
nt
6
2
1
2
4
1
4
6
2
D
1
2
3
M U X
s.
5
1
D
1
C E
m
1
D
4
M U X
2
D
2
3
U L
1
A O
U M
A O
U S
D I 2
U L
S T
R E
C E
D O
M U X
1
1
2
A I 2
D
4
D O
D I 2
D I 4
M U X
2
Figure 8-2 illustrates the arrangement of the station and the opposite station in the example
project.
C o p p e r c a b le ; 3 .8 k m
po
Typical arrangement of an field multiplexer system
on
l
in
ec
om
Figure 8-2
5 9 8 1 A 0 2 0
8-10
PHOENIX CONTACT
5981_en_02
Configuring and installing the field multiplexer systems with the help of an example project
8.7.3
Connecting and configuring the field multiplexer
Wire the Inline connectors according to Section "Terminal point assignment" on page 4-4.
•
Connect the remote bus cable.
For interference-free transmission, Phoenix Contact recommends at least a 3-wire
shielded cable. In this case, connector 1 of both stations should be connected to the
DATA, DATA, and GNDDATA signals and the shield. In addition, DATA and DATA should
be a twisted pair.
If you are using fiber optic conductors configure the FO transmission mode.
To do so, insert a jumper from 1.1 to 2.1 (CONFFO) at connector 1 of the field
multiplexer (see also Figure 8-3).
m
•
co
NOTE: Malfunction
Make sure that the same transmission mode is always set for both field multiplexers.
in
ec
•
om
•
po
ne
•
nt
s.
For fiber optic transmission set the required FO converters to a transmission rate of
75 kbaud (see also Section "Transmission over fiber optics" on page A-3). Field
multiplexer and FO converter are linked with the IB IL MUX-CAB PSI adapter cable
(see also Section "Ordering data" on page 10-6).
If you use another transmission medium (telephone line, Bluetooth, Ethernet) the
jumper from 1.1 to 2.1 (CONFFO) at connector 1 of the field multiplexer must not be
inserted. Set additional system components accordingly. See
Section "Transmission over telephone line (modem)" on page A-7,
Section "Transmission over Bluetooth (wireless)" on page A-15 or
Section "Transmission over Ethernet (COM SERVER)" on page A-33.
Configure master and slave
One field multiplexer station must be configured as the master. To do this, insert a
jumper at connector 3 from 1.4 to 2.4 (CONFMA) (see Figure 8-3).
The second station must be configured as a slave. It must not have a jumper at
connector 3 from 1.4 to 2.4.
Connect the power supply.
If a field multiplexer station is to be supplied from a shared 24 V DC supply (UMUX, US
and UM), three jumpers must be inserted for this purpose (see Figure 8-3).
on
l
In this case there is no electrical isolation between UMUX and US / UM.
5981_en_02
NOTE: Overload
Use both of the adjacent contacts to supply the main voltage UM and to supply and/or tap
the segment voltage US.
PHOENIX CONTACT
8-11
IB IL MUX MA (-PAC)
UMUX
24 V DC
Connector 2
Connector 3
CONFFO
CONFFO
DATA
DATA
UMUX
GNDDATA
GNDDATA
Shield
Shield
Connector 4
US
US
UMUX
UM
UM
GNDMUX
GNDMUX
GND
GND
CONFMA
CONFMA
FE
FE
ALARM1 ALARM2
5981B018
co
Internal electrical connection
m
Connector 1
Field multiplexer wiring example
ne
Figure 8-3
nt
Field multiplexer and I/O supply
through common power supply
s.
FO transmission mode and configuration as “master"
If you want to power the field multiplexer and all I/Os using a single power supply unit, you
can connect the power to the field multiplexer as shown in Figure 8-3. The jumper on
connector 1 (CONFFO) is omitted, as the transmission medium is copper in the example
project (see page 8-1). The jumper on connector 3 (CONFMA) must only be inserted at the
master station.
Alarm contact
The field multiplexer has a floating alarm output (Alarm_IN and Alarm_OUT contacts at
connector 3) that allows to indicate operating errors remotely. The contact is normally open,
but it is closed in the event of an error and when the field multiplexer power supply fails.
om
po
Example project
on
l
in
ec
Notes on the current carrying capacity of the alarm contacts can be found in the technical
data in the Appendix.
8-12
PHOENIX CONTACT
5981_en_02
Commissioning and functional test
9
Commissioning and functional test
The field multiplexer system functions autonomously. The automatic startup of the system,
with its comprehensive selftest routines and automatic data assignment, eliminates the
need for time-consuming system configurations and avoids sources of error.
Commissioning is therefore very easy.
9.1
Checking the installation
Checking the installation
co
Table 9-1
m
The following points should be checked before the system is switched on, or if an error
occurs:
Step
Reference to documentation
Are all the Inline terminals approved for use
in the field multiplexer system?
AH IL BK IO LIST application note
2
Is the assignment of the terminals correct
(complementary arrangement)?
Table 8-1 on page 8-3
3
Are all the system limits observed?
Section "Checking the system limits" on
page 8-6
4
Are the field multiplexer stations correctly
configured (master/slave, copper/fiber
optic)?
Section "Connecting and configuring
the field multiplexer" on page 8-11
5
If any interface converters are connected,
are they ready-to-operate?
6
Has the wiring of the power
supply/supplies for the field multiplexer
and all other terminals been installed
correctly?
Figure 8-3 on page 8-12
Are all the sensors and actuators
connected correctly to the I/O terminals?
Terminal-specific data sheets
in
ec
om
po
ne
nt
s.
1
on
l
7
5981_en_02
If all of these points have been checked, the voltage supply of the field multiplexer system
can be switched on.
PHOENIX CONTACT
9-1
IB IL MUX MA (-PAC)
9.2
Startup behavior and system test
When the supply voltage UMUX (24 V DC) of the field multiplexer has been switched on, the
diagnostic LEDs UL, ST, CE, RE and LE light up for approximately one second (lamp test).
Then the ST, CE, RE and LE LEDs go out for one second. In these two seconds, the
connected I/O terminals initialize themselves and also receive their logic voltage when
UMUX is switched on.
System test
After startup, the field multiplexer changes to the stop state (ST LED on) and carries out a
system test. This involves the following activities:
– Reading the "master/slave" and "copper/fiber optic" configuration signals
– Testing of the field multiplexer hardware
– Examination of the local field multiplexer station
– Making contact with the opposite station and exchange of configuration data and status
messages
– Comparing of the two configurations
– Opening the alarm relay and switching off the ST LED if there are no errors
s.
co
m
Startup
nt
The system test activities mentioned above require about 0.5 s if there are no errors.
po
ne
After the system test, the field multiplexers start normal operation. If an error occurs during
one of these activities, the corresponding diagnostic LEDs light up, and the field multiplexer
starts again by testing the field multiplexer hardware. If the same error continues to occur
upon startup, there will be a permanent error indication that can be evaluated for service
purposes. The field multiplexers will nevertheless continue to attempt to start the system.
on
l
in
ec
om
Please refer to Section "Diagnostic indicators" on page 4-3 for information on the
diagnostic indicators of the field multiplexer.
9-2
PHOENIX CONTACT
5981_en_02
Commissioning and functional test
9.3
Operation
If all the green LEDs on the field multiplexer and the I/O terminals light up, the field
multiplexer station is operating, and data transmission is active.
NOTE: Malfunction
Changes to a local bus configuration during operation are not permitted under any
circumstances. Always switch off power first before you make any changes to the field
multiplexer system.
If data transmission is not possible within a predefined period (timeout), the alarm relay is
activated (see also "Flowchart" on page 9-8). Both field multiplexer stations enter the stop
state, and a reset is generated at both stations.
nt
s.
Controlling the alarm relay
co
m
The following activities take place during normal operation:
– Exchange process data on the local buses, and between a station and its opposite
station over the remote bus
– Display of I/O errors
– Monitoring of the field multiplexer timeout
ne
Only the digital outputs are reset. The analog terminal outputs remain unchanged
(maintain their last value), while the stations are stopped.
om
po
The field multiplexer system automatically tries to start up again after a timeout or after a
reset. If no error is found when restarting (remote bus and local bus operating correctly and
correctly configured for each other), data transmission is resumed automatically. If an error
is found, the field multiplexers will continue to attempt to restart the system.
on
l
in
ec
The alarm relays at the two field multiplexer stations are not always triggered at the same
time, as error detection occurs at each station independently of the remote station. For
instance, if the power to one field multiplexer station fails, the alarm relay is triggered at
the affected station immediately, but it may take up to 1 s before the opposite station
triggers.
If one station stops, the second station will always change to stop state as well.
5981_en_02
PHOENIX CONTACT
9-3
IB IL MUX MA (-PAC)
9.4
Diagnostic indicators
The five LEDs on the left of the field multiplexer have the following meanings (see also
Section "Diagnostic indicators" on page 4-3):
Table 9-2
Diagnostic LEDs on the field multiplexer
LED
Color
Meaning of the LED
UL
Green
ULogic
(Field multiplexer supply, communications power and interface
supply)
Red
Stop (Field multiplexer is in the stop state)
Red
Configuration Error
RE
Red
Remote Bus Error
LE
Red
Local Bus Error
(Error on the local bus of this field multiplexer station, e.g., a faulty
I/O terminal)
Error causes and remedies
ne
9.4.1
nt
s.
co
m
ST
CE
po
The LEDs on the field multiplexer do not light up or flash alone, but always together with
others. Each combination indicates a specific malfunction, which can then be localized and
rectified.
om
The various LED combinations are described in Table 9-3. The symbols used have the
following meanings:
{
LED OFF
~
LED flashing
z
LED ON
in
ec
Meaning
Possible LED combinations
on
l
Table 9-3
Symbol
No. UL
ST
CE RE
LE
Error
1)
{
{
{
{
{
Logic and interface power not present
Check field multiplexer supply UMUX
2)
~
z
{
{
{
Interface supply not present and/or
hardware faulty
Send field multiplexer for service
3)
z
z
z
{
{
–
–
–
–
–
Error on remote bus
"Master/slave" or "copper/fiber optic"
configuration incorrect
Opposite station not switched on or
faulty
Remedy
–
–
9-4
PHOENIX CONTACT
Check remote bus connection
Check field multiplexer configurations
("master/slave" and "copper/fiber optic"
jumpers properly inserted?), see
page 4-8
Check interface converter (if present)
Check supply of opposite station
5981_en_02
Commissioning and functional test
Table 9-3
Possible LED combinations
ST
LE
Error
Remedy
4)
z
z
z
z
{
(Same as 3) and local bus not operable
–
–
–
See 3)
Check correct position of the terminals
Check local bus supply
5)
z
z
z
z
z
(Same as 3) and local bus configuration
not permitted
–
–
See 3)
Check local bus configuration
(are all the terminals permitted, and is
the arrangement complementary?), see
page 8-2
6)
z
z
~
{
{
Different firmware versions on the field
multiplexer stations
–
Only use field multiplexers with the same
firmware in the system
Replace the field multiplexer
Send field multiplexer for service
–
–
z
z
{
z
{
Local bus not operable (bus error)
–
–
–
Check correct position of the terminals
Check local bus supply
Check the LEDs on the devices (D LED
flashing?), see terminal-specific data
sheets or Section "Localizing errors on a
field multiplexer station" on page 9-6
ne
nt
s.
7)
co
CE RE
m
No. UL
z
z
{
z
z
Local bus configuration not permitted
Check local bus configuration, see page 8-2
z
z
{
~
{
Local bus of the opposite station not
operable
–
–
in
ec
om
po
8)
9)
–
Check correct position of the terminals
Check local bus supply of the opposite
station
Check the LEDs on the devices (D LED
flashing?), see terminal-specific data
sheets or Section "Localizing errors on a
field multiplexer station" on page 9-6
z
z
{
~
~
Local bus configuration of the opposite
station not permitted
–
Check local bus configuration of the
opposite station, see page 8-2
11)
z
z
{
{
z
The local bus configurations of the two
stations do not correspond
–
Check local bus configurations of the
both stations, see page 8-2
12)
z
{
{
z
{
I/O error on the local station
–
Check I/O supply of the local station
13)
z
{
{
~
{
I/O error on the opposite station
–
Check I/O supply of the opposite station
14)
z
{
{
{
{
Field multiplexer system operating
–
on
l
10)
The errors have the following priority:
– An error on the local station has a higher priority than an error on the opposite station.
– A bus error has a higher priority than a configuration error.
Example: One station is operating correctly, the other station is faulty and has an illegal
configuration. The faulty bus must be repaired before the field multiplexer stations can
display the configuration error.
NOTE: Malfunction
Changes to a local bus configuration during operation are not permitted under any
circumstances. Always switch off power first before you make any changes to the field
multiplexer system.
5981_en_02
PHOENIX CONTACT
9-5
IB IL MUX MA (-PAC)
9.4.2
Localizing errors on a field multiplexer station
Diagnostic and status indicators on a field multiplexer station show the location of errors
clearly. An error is displayed on the station using LEDs.
U L
U M
L E
1
2
1
2
1
D
1
2
D
1
2
D
2
3
4
M U X
2
D
1
D I2
D I4
2
1
2
1
D O 2
2
1
A I2
2
1
2
1 1
1 1
1 1
1 1
1 1
1 1
1 1
1
2
2 2
2 2
2 2
2 2
2 2
2 2
2 2
2
3
3 3
3 3
3 3
3 3
3 3
3 3
3 3
3
4
4 4
4 4
4 4
4 4
4 4
4 4
4 4
4
6
6
nt
5
ne
5
s.
1
m
U S
5
4
co
S T
R E
C E
1
3
2
1
5 9 8 1 A 0 0 5
Example station for error localization
po
Figure 9-1
in
ec
om
Terminals used in the example station:
1 IB IL MUX MA-PAC
2 IB IL 24 DI 4-PAC
3 IB IL 24 DI 2-PAC
4 IB IL 24 DO 2-2A-PAC
5 IB IL 24 AI 2-PAC
on
l
When the system is operating correctly, the green LEDs on the field multiplexer and the
other terminals remain lit (Figure 9-2, A). All the red LEDs are off.
9-6
PHOENIX CONTACT
5981_en_02
Commissioning and functional test
Example
U L
S T
U S
R E
U M
M U X
D
1
5
4
D
1
2
C E
L E
3
2
1
D
1
2
D
2
3
4
D I4
D I2
D O 2
A I2
co
B
m
A
C
5 9 8 1 A 0 0 6
Station with example diagnostic indicators (states A to C)
s.
Figure 9-2
om
po
Figure 9-2 Example A:
Figure 9-2 Example B:
Figure 9-2 Example C:
ne
nt
Figure 9-2 shows a station with two example error states. It shows that an I/O error has been
detected at terminal 5 or that terminal 4 has failed and shows the behavior of the diagnostic
indicators on the adjacent terminals.
LED on or flashing at 0.5 Hz/2 Hz/4 Hz
(on / slow / medium / fast)
in
ec
Peripheral fault
No error
Peripheral fault
Bus error
Error:
Effect:
Short circuit at terminal 4 (IB IL 24 DO 2-2A)
Bus error
on
l
field multiplexer:
Opposite station:
Terminal 4:
Other terminals:
Alarm relay:
Error:
Effect:
UL LED and LE LED are on (see Table 9-3, no. 12)
UL LED is on, LE LED is flashing (see Table 9-3, no. 13)
D LED flashes at 2 Hz
Remain unchanged
Not activated
Local bus has been interrupted after terminal 3 and before terminal 4
field multiplexer:
Opposite station:
Terminal 4:
Other terminals:
Alarm relay:
UL, ST and LE LEDs are on (see Table 9-3, no. 7)
UL and ST LEDs are on, LE LED is flashing (see Table 9-3, no. 7)
D LED flashing at 4 Hz (bus error)
D LEDs on all other terminals flashing at 0.5 Hz *)
Activated
*)
5981_en_02
If the bus error is located on the forward path of the local bus, the devices before the
fault location flash at 0.5 Hz. If the error is located on the return path, irregular
flashing (switching off for short periods) can be observed on the LEDs of the
devices before the fault location.
PHOENIX CONTACT
9-7
Commissioning and functional test
9.5
Flowchart
The following flowchart (Figure 9-3) supplements Sections 9.2 through 9.4. The most
important states during startup and operation of the field multiplexer are listed briefly here.
A ll L E D s o ff,
a la r m r e la y c lo s e d
U X
m
C o n n e c tio n o f
s u p p ly v o lta g e U M
E r r o r a c c o r d in g to
L E D c o d e , s e e T a b le 8 - 2
ne
Y e s
N o
nt
S e lfte s t
s u c c e s s fu l?
s.
co
E x e c u tio n o f s e lfte s t
on
l
R e m o te b u s s ta rtu p
om
in
ec
"S ta rtu p "
po
L o c a l b u s s ta rtu p
S ta rtu p
s u c c e s s fu l?
N o
E r r o r a c c o r d in g to
L E D c o d e , s e e T a b le 8 - 2
Y e s
C o n fig u r a tio n c h e c k
C o n fig u r a tio n
v a lid ?
N o
E r r o r a c c o r d in g to
L E D c o d e , s e e T a b le 8 - 2
Y e s
1
2
5 9 8 1 A 0 2 4
5981_en_02
PHOENIX CONTACT
9-8
IB IL MUX MA (-PAC)
1
2
"S ta rtu p "
G re e n L E D s o n , re d L E D s
o ff, a la r m r e la y o p e n
Y e s
" O p e r a tio n "
s.
O p e r a tio n
O K ?
co
m
P ro c e s s d a ta e x c h a n g e
ne
nt
N o
Y e s
E r r o r a c c o r d in g to
L E D c o d e ( s e e T a b le 8 - 2 )
po
S y s te m c h e c k
O K ?
om
N o
in
ec
N o
on
l
"S to p a n d
re s ta rt"
PHOENIX CONTACT
s
c tio n
a te d ?
o u t)
Y e s
S T - L E D o n , a ll o
a la r m r e la y c
d ig ita l o u tp u ts
a n a lo g o u tp u ts m
th
lo
r
a
e rs
s e d
e s e
in ta
o ff,
,
t,
in e d
5 9 8 1 A 0 2 5
Figure 9-3
9-9
B u
c o n n e
te r m in
( tim e
Operating states of the field multiplexer
5981_en_02
on
l
in
ec
om
po
ne
nt
s.
co
m
IB IL MUX MA (-PAC)
9-10
PHOENIX CONTACT
5981_en_02
Technical data and ordering data
10 Technical data and ordering data
For technical data of the Inline system, please refer to the IL SYS INST UM E user
manual.
Technical data on the Inline I/O terminals can be found in the terminal-specific data
sheets.
Technical data of the field multiplexer
co
m
10.1
General data
48.8 mm x 136 mm x 72 mm (with connector set)
Weight
146 g (without connectors), 212 g (with connectors)
s.
Housing dimensions (width x height x depth)
- 25°C ... + 55°C
Ambient temperature (storage)
- 25°C ... + 85°C
Humidity (operation/storage/transport)
10% ... 95% according to EN 61131-2
Air pressure (operation/storage/transport)
70 kPa ... 106 kPa (up to 3000 m above sea level)
IP20
ne
Degree of protection
Class of protection
Class 3 according to EN 61131-2, IEC 61131-2
Basic material: ARNITE plastic
PA6.6, self-extinguishing (V0)
po
Housing material
Pollution degree according to EN 50178
2; condensation not permitted during operation
Surge voltage class
II (low-level signal)
om
Connection data for Inline connectors
Connection method
in
ec
Conductor cross-section
System data
nt
Ambient temperatures (operation)
Number of devices per station
Spring-cage terminals
0.08 mm2 to 1.5 mm2 (solid or stranded), 28 - 16 AWG
63, maximum
512 digital or 32 analog I/Os, maximum, can be mixed
1 s, maximum
Maximum field multiplexer current for supplying the logic of I/O terminals
2 A at UL
on
l
Number of I/O points per station
Update time of all inputs/outputs
Maximum current of the field multiplexer for supplying the analog terminals
0,5 A at UANA
Common data for 24 V main supply, segment supply, and field multiplexer supply
Connection
Through Inline connector; terminal point assignment see page 4-4
Connection method
Spring-cage terminals
Recommended cable lengths
30 m, maximum; routing cables through outdoor areas is not permitted
Continuation
Via potential routing
Special demands on the power supply
The field multiplexer supply UMUX is electrically isolated from UM/US if it is
supplied separately. This is only ensured if two separate power supplies are
used.
Nominal value
24 V DC
Ripple
± 5%
5981_en_02
PHOENIX CONTACT
10-1
IB IL MUX MA (-PAC)
Common data for 24 V main supply, segment supply, and field multiplexer supply (contd.)
Permissible range
19.2 V to 30 V (ripple included)
NOTE: Module damage due to overload
Each 24 V area must be protected externally. The power supply unit must be able to supply 4 times (400%) the nominal current of the external
fuse, to ensure that the fuse blows safely in the event of an error.
Observe the current consumption of every device on the individual potential jumpers when configuring a field multiplexer station. It is specified
in every terminal-specific data sheet. The current consumption can differ depending on the individual terminal. If the maximum current
carrying capacity of a potential jumper is reached, a new power terminal must be used.
Current carrying capacity
8 A, maximum
co
WARNING: Explosion hazard, restrictions regarding the Inline system
m
24 V main supply (UM)/24 V segment supply (US)
s.
When using the terminal in potentially explosive areas, observe the limitations on the current carrying capacity (see "Notes on using the
terminal in potentially explosive areas" on page 2-1).
24 V field multiplexer supply (UMUX)
nt
Current consumption at UMUX
60 mA (no local bus devices connected)
Maximum current consumption at nominal voltage
1.25 A
ne
Minimum current consumption at nominal voltage
po
Consisting of
0.060 A
+ 0.690 A
+ 0.5 A
Current consumption of field multiplexer, electronics
Communications power for all I/O terminals
Supply for the analog terminals
om
The field multiplexer supply UMUX (24 V) generates the communications power UL (7.5 V) and the analog supply UANA (24 V).
Nominal value
Maximum output current
Protective equipment
in
ec
Communications power (UL) and analog supply (UANA)
Communications power (potential jumpers)
7.5 V DC
2 A DC (observe derating)
Electronic short-circuit protection
Analog supply (potential jumpers)
on
l
Nominal value
24 V DC
Maximum output current
0.5 A DC (observe derating)
Protective equipment
Electrical short-circuit protection
10-2
PHOENIX CONTACT
5981_en_02
Technical data and ordering data
Derating of the communications power and the analog terminal supply
- I/O supply with a current carrying capacity at the field multiplexer of 8 A, maximum
100
90
80
70
P [%]
60
50
m
40
30
co
20
10
0
5
10
15
20
25
30
35
40
45
50
55
5520A012
nt
TA [°C]
s.
0
Current carrying capacity of the communications power (UL) and the analog supply (UANA) in %
TA [°C]
Ambient temperature in °C
ne
P [%]
po
- I/O supply with a current carrying capacity at the field multiplexer of 4 A, maximum
100
90
om
80
70
50
in
ec
P [%]
60
40
30
20
on
l
10
0
0
5
10
15
20
25
30
35
40
45
50
TA [°C]
P [%]
Current carrying capacity of the communications power (UL) and the analog supply (UANA) in %
TA [°C]
Ambient temperature in °C
5981_en_02
55
5520A013
PHOENIX CONTACT
10-3
IB IL MUX MA (-PAC)
Protective equipment
Surge voltage (segment supply US/main supply UM/field multiplexer supply
UMUX)
Input protective diodes (can be destroyed by permanent overload)
Polarity reversal (segment supply US/main supply UM)
Parallel diodes for protection against polarity reversal; in the event of an error
the high current through the diodes causes the preconnected fuse to blow.
Polarity reversal (field multiplexer supply UMUX)
Serial diode in the lead path of the power supply; in the event of an error only
a low current flows. In the event of an error, no fuse trips within the external
power supply. Ensure 2 A fuse protection to the external power supply.
Pulse loads up to 1500 W are short circuited by the input protective diode.
m
The field multiplexer supply is protected against polarity reversal and surge voltage. These protective elements are only used to protect the
power supply unit.
RS-485 interface/supply voltage
500 V AC
RS-485 interface/local bus
500 V AC
s.
Interfaces
co
Electrical isolation
Remote bus
Inline shield connector
nt
Connection
RS-485, modified
Transmission protocol
Special remote control protocol
ne
Interface type
Remote bus length (copper)
12 km, maximum and 5 km, typical
(depending on cable type and EMC environmental conditions)
Remote bus length (fiber optic)
Using fiber optic converters
Up to 100 m
po
– Polymer fiber
– HCS fiber
Up to 2400 m
– Multi-mode glass fiber
Up to 25 km
om
– Single-mode glass fiber
Local bus
Local functions
in
ec
Connection
Alarm output (floating contacts)
Up to 45 km
Inline data routing
N/C relay contact for 24 V DC/1 A, typical
Maximum contact power: 30 W DC or 60 VA AC
Maximum contact voltages: 150 V DC or 125 V AC
(A maximum switching current of 1 A must not be exceeded)
on
l
Observe high inrush currents when using lamps as alarm signals. Phoenix Contact recommends avoiding lamp loads greater than
24 V/40 mA.
Mechanical requirements
Vibration (operation)
2g, according to IEC 60068-2-6, criterion 1
Vibration (storage)
2g, according to IEC 60068-2-6
Shock (operation)
15g, according to IEC 60068-2-27, criterion 2
10-4
PHOENIX CONTACT
5981_en_02
Technical data and ordering data
Conformance with EMC directive 2004/108/EC
Noise immunity test according to DIN EN 61000-6-2
Electrostatic discharge (ESD)
EN 61000-4-2/
IEC 61000-4-2
Criterion B
Electromagnetic fields
EN 61000-4-3
IEC 61000-4-3
Criterion A
Fast transients (burst)
EN 61000-4-4/
IEC 61000-4-4
Criterion A
Surge voltage
EN 61000-4-5/
IEC 61000-4-5
Criterion B
6 kV contact discharge
8 kV air discharge
Field strength: 10 V/m
All interfaces: 1 kV
DC supply lines: 0.5 kV/0.5 kV (symmetrical/asymmetrical)
EN 61000-4-6
IEC 61000-4-6
Criterion A
EN 55011
Class A
s.
Approvals
co
Test voltage 10 V
Noise emission test according to EN 61000-6-4
Noise emission of housing
m
Signal cables: 1.0 kV/2.0 kV (symmetrical/asymmetrical)
Conducted interference
on
l
in
ec
om
po
ne
nt
For the latest approvals, please visit www.download.phoenixcontact.com or www.eshop.phoenixcontact.com.
5981_en_02
PHOENIX CONTACT
10-5
IB IL MUX MA (-PAC)
10.2
Ordering data
Products
Description
Type
Order No.
Pcs./Pkt.
Inline field multiplexer, complete with accessories (connectors and labeling
fields)
IB IL MUX MA-PAC
2861205
1
Inline field multiplexer, without accessories
IB IL MUX
2718413
1
Accessories
co
m
The listed connector set is needed for the complete fitting of the IB IL MUX.
Type
Connector set for the field multiplexer
IB IL MUX-PLSET
Keying profile
CP-MSTB
see COMBICON catalog
Zack marker strip to label the terminals
ZBF 6 ... see CLIPLINE catalog
ZBF 12 ... see CLIPLINE catalog
Order No.
Pcs./Pkt.
2836036
1
2742683
100
ne
nt
s.
Description
DIN EN 50022 DIN rail, 2 meters
0801733
0801681
CLIPFIX 35-5
3022276
50
1201662
50
po
Standard end clamp; snapped on without tools
NS 35/7,5 PERFORATED
NS 35/7,5 UNPERFORATED
End clamp for use in the event of vibrations or installation on vertical DIN rail;
secured with screws
USLKG 5
0441504
Remote bus cable to connect the field multiplexer stations (sold by the meter)
IBS RBC METER-T
2806286
field multiplexer adapter cable to interface converter
IB IL MUX-CAB PSI
2878476
Screwdriver according to DIN 5264, blade width 3.5 mm
SZF 1 - 0,6 x 3,5
1204517
1
in
ec
om
Universal ground terminal block
E/AL-NS 35
For a list of Inline terminals approved for use on the field multiplexer including the corresponding ordering numbers,
please refer to the AH IL BK IO LIST application note, Order No. 9015358.
on
l
Accessories: Additional system components
Description
Type
Surge protection
for protection of the remote bus cable, the power supply units, and the entire
control cabinet by fuses
See TRABTECH catalog
Fiber optic converters
for fiber optic data transmission
See INTERFACE catalog
See also Section "Transmission over fiber optics" on page A-3
RS-232/RS-485 converter
for data transmission over telephone lines
See INTERFACE catalog
See also Section "Transmission over telephone line (modem)" on page A-7
Bluetooth converter
for data transmission over Bluetooth
See INTERFACE catalog
See also Section "Transmission over Bluetooth (wireless)" on page A-15
Ethernet converter
for data transmission over Ethernet
See INTERFACE catalog
See also Section "Transmission over Ethernet (COM SERVER)" on
page A-33
Temperature measuring transducer
to acquire temperature values
See INTERFACE catalog
10-6
PHOENIX CONTACT
Order No.
Pcs./Pkt.
5981_en_02
Technical data and ordering data
Accessories: Additional system components
Description
Type
Order No.
Power supply units
to supply the field multiplexer stations
See INTERFACE catalog
End clamps, grounding clamps, and shield connection clamps
See CLIPLINE catalog
Cables suitable for copper or fiber optic transmission
See INTERFACE or AUTOMATION catalog
Pcs./Pkt.
Documentation
Type
Order No.
Pcs./Pkt.
"Automation terminals of the Inline product range" user manual
IL SYS INST UM E
2698737
1
"Summary of key data for Inline devices" data sheet
DB GB IB IL DEVICE LIST
9007007
1
"I/O modules at bus couplers" application note
AH BK IO LIST
9015358
1
"Inline terminals for use in zone 2 potentially explosive areas" application note
AH EN IL EX ZONE 2
–
–
co
m
Description
on
l
in
ec
om
po
ne
nt
s.
Make sure you always use the latest documentation. It can be downloaded from
www.download.phoenixcontact.com.
5981_en_02
PHOENIX CONTACT
10-7
on
l
in
ec
om
po
ne
nt
s.
co
m
IB IL MUX MA (-PAC)
10-8
PHOENIX CONTACT
5981_en_02
A Technical appendix: The field multiplexer with different
transmission media
The following sections describe a quick startup of the field multiplexer system when different
transmission media are used.
Further information can be found in the documentation for the products used. It can be
downloaded from www.download.phoenixcontact.com.
Transmission over copper cable
MUX 1
co
m
A1
CU
DATA
s.
DATA
MUX 2
DATA
nt
DATA
MUX
IB IL MUX MA-PAC
Copper cable, for example, IBS RBC METER-T from
Phoenix Contact
in
ec
CU
om
Key:
5981A041
Basic circuit diagram: Transmission over copper cable
po
Figure A-1
GNDDATA
SHD
ne
GNDDATA
SHD
on
l
No jumper must be installed from 1.1 to 2.1 (CONFFO) on connector 1 of both field
multiplexers.
When a field multiplexer system is being installed for the first time, Phoenix Contact
recommends a 3-wire shielded cable. In this case, connector1 of both stations should be
connected to the DATA, DATA, and GNDDATA signals and the shield (see also Section
"Terminal point assignment" on page 4-4). DATA and DATA should additionally be a twisted
pair.
Laying the remote bus cable
When laying the remote bus cable, note the following:
– Do not lay signal and bus cables in parallel to power cables
– If possible, lay remote bus cables and cables with voltages of 230 V and above in
separate cable ducts
– Always lay signal leads and equipotential bonding together in one cable following the
shortest route
– Avoid extending the remote bus cables with connecting plugs
5981_en_02
PHOENIX CONTACT
A-1
IB IL MUX MA (-PAC)
Phoenix Contact recommends the remote bus cable IBS RBC METER-T
(Order No. 2806286, see also Section "Ordering data" on page 10-6 or the
AUTOMATION catalog).
on
l
in
ec
om
po
ne
nt
s.
co
m
If you require further information on the selection of suitable remote bus cables, please
contact Phoenix Contact.
A-2
PHOENIX CONTACT
5981_en_02
A2
Transmission over fiber optics
This section describes the configuration of an Inline field multiplexer station with a fiber optic
path using the fiber optic converters PSI-MOS-RS485W2/FO...
CONVERTER
A
CONVERTER
RS-485
RS-485
D(B)
D(A)
GND
SHD
DATA
DATA
GNDDATA
SHD
D(B)
D(A)
GND
SHD
FO
FO
SHD
5981B031
s.
Basic circuit diagram: Transmission over fiber optics
Key:
IB IL MUX MA-PAC
A
Adapter cable; IB IL MUX-CAB PSI
CONVERTER
Fiber optic converter, see Section "PSI-MOS-RS485W2/FO... fiber
optic converters that can be used" on page A-4
FO
Remote bus cable (glass fiber/HCS)
po
ne
nt
MUX
Devices for the field multiplexer station
om
A 2.1
Table A-1
DATA
DATA
GNDDATA
co
FO
Figure 10-1
MUX 2
A
m
MUX 1
Devices that can be used
Type
Field multiplexer
Fiber optic converters
Number
IB IL MUX MA-PAC
2861205
2
PSI-MOS-RS485W2/FO...
See Section A 2.2
2
IB IL MUX-CAB PSI
2878476
2
on
l
Adapter cable
Order No.
in
ec
Type
5981_en_02
PHOENIX CONTACT
A-3
IB IL MUX MA (-PAC)
A 2.2
PSI-MOS-RS485W2/FO... fiber optic converters that can be
used
The fiber optic converters are available for both glass fiber and for HCS fiber cables in
different performance classes. The appropriate ordering data can also be found in the
INTERFACE catalog from Phoenix Contact.
Table A-2
Fiber optic converters (with one fiber optic interface)
Order No.
Cable type used
Distance
PSI-MOS-RS485W2/FO 660 E
2708313
POF
Up to 100 m
HCS/PCF
Up to 800 m
PSI-MOS-RS485W2/FO 850 E
2708339
HCS/PCF
Up to 2800 m
Up to 4200 m
Multi-mode glass fiber
Up to 25 km
Single-mode glass fiber
Up to 45 km
Fiber optic converters (T coupler with two fiber optic interfaces)
nt
Table A-3
2708562
s.
PSI-MOS-RS485W2/FO 1300 E
co
Multi-mode glass fiber
m
Order Designation
Order No.
Cable type used
Distance
PSI-MOS-RS485W2/FO 660 T
2708300
POF
Up to 100 m
HCS/PCF
Up to 800 m
HCS/PCF
Up to 2800 m
Multi-mode glass fiber
Up to 4200 m
A 2.3
Basic field multiplexer settings
Set the same transmission mode (FO) on both field multiplexers.
To do so, insert a jumper from 1.1 to 2.1 (CONFFO) at connector 1 (see also Figure 8-3
on page 8-12).
Configure one field multiplexer station as master and the other one as slave (see
Section "Configuring the station as a master or a slave" on page 4-8).
in
ec
•
po
2708326
om
PSI-MOS-RS485W2/FO 850 T
ne
Order Designation
on
l
•
A-4
PHOENIX CONTACT
You will find the additional terminal point assignment of the field multiplexer in Section
"Terminal point assignment" on page 4-4.
5981_en_02
Transmission over fiber optics
A 2.4
Please make the following settings at the fiber optic converters:
– Transmission speed: 75 kbps
– Telegram length: 11 bits
– Light idle position: INVERSE
– Echo evaluation (660 nm and 850 nm devices only): OFF
– Termination resistor: ON
– Other settings according to the application
Table A-4
Configuration of the converters using DIP switches
DIP switch
Position
1
OFF
2
ON
3
ON
4
OFF
5
OFF
Meaning
m
•
co
Both fiber optic
converters
Configuring fiber optic converters
s.
Transmission speed 75 kbps
nt
Telegram length 11 bits
on
l
in
ec
om
po
ne
NOTE: Malfunction
When connecting two optical fiber converters, pay attention to the signal direction of the
optical fiber. Connect the TD (sender) fiber connection of the first converter with the RD
(receiver) fiber connection of the second converter.
5981_en_02
PHOENIX CONTACT
A-5
IB IL MUX MA (-PAC)
A 2.5
Table A-5
Connecting the cables
Connection between converter and field multiplexer
Field multiplexer
IB IL MUX MA-PAC
Terminal point Signal
Connector 1,
Signal
Terminal point
Color
5
Shield
1.4 / 2.4
Shield
–
6
GND
1.3
GND
Gray
7
Data positive D(B)
1.2
Data
Yellow
8
Data negative D(A)
2.2
/Data
Green
m
Converter
PSI-MOS-RS485W2/FO...
ne
nt
s.
co
Phoenix Contact offers a pre-assembled adapter cable as an optional accessory for the
connection from the PSI-MOS-RS485W2/FO... converter to the IB IL MUX MA-PAC:
IB IL MUX-CAB PSI.
5981A043
IB IL MUX-CAB PSI cable
po
Figure A-2
on
l
in
ec
om
NOTE: Malfunction
If you assemble the adapter cable for the connection between field multiplexer and
interface converter by yourself: Please make sure that the cable is not longer than 1 m.
A-6
PHOENIX CONTACT
5981_en_02
A3
Transmission over telephone line (modem)
This section describes the configuration of an Inline field multiplexer station with a telephone
line path using the RS-232/RS-485 converters PSM-ME-RS232/RS485-P and
PSI-DATA/FAX-MODEM/RS232 modems.
CONVERTER
A
MODEM
CONVERTER
MODEM
RS-485
RS-485
D(B)
D(A)
GND
SHD
DATA
DATA
GNDDATA
SHD
MUX 2
A
D(B)
D(A)
GND
SHD
PSTN
TxD
RxD
CTS
GND
TxD
RxD
TxD
RxD
GND
GND
TxD
RxD
CTS
GND
RS-232
DATA
DATA
GNDDATA
SHD
m
MUX 1
co
RS-232
5981B036
Basic circuit diagram: Transmission over telephone line
s.
Figure A-3
nt
Key:
IB IL MUX MA-PAC
A
Adapter cable
CONVERTER
RS232/RS485 converter: PSM-ME-RS232/RS485-P
MODEM
Modem: PSI-DATA/FAX-MODEM/RS232
po
PSTN
ne
MUX
2-wire telephone line (Public Switched Telephone Network)
om
A detailed wiring examples is shown in Figure A-4 on page A-13.
Table A-6
Devices and software for the field multiplexer station
Devices and software that can be used
Description
on
l
Field multiplexer
Modem
in
ec
A 3.1
RS232/RS485 converter
Type
Order No.
Number
IB IL MUX MA-PAC
2861205
2
PSI-DATA/FAX-MODEM/RS232
2708203
2
PSM-ME-RS232/RS485-P
2744416
2
2761499
4
D-SUB male connector, 9-pos. SUBCON 9/F-SH
Software for modem
5981_en_02
PSI-MODEM-CONF V3.0 or later (software on CD)
1
PHOENIX CONTACT
A-7
IB IL MUX MA (-PAC)
A 3.2
•
Basic field multiplexer settings
Configure one field multiplexer station as master and the other one as slave (see
Section "Configuring the station as a master or a slave" on page 4-8).
No jumper must be installed from 1.1 to 2.1 (CONFFO) on connector 1 of both field
multiplexers.
Configuring modems using software
co
A 3.3
m
You will find the additional terminal point assignment of the field multiplexer in Section
"Terminal point assignment" on page 4-4.
First modem
Connect the modem and the PC via a serial 1:1 cable and
supply it with 24 V DC.
•
Start the PSI-MODEM-CONF configuration software on the
PC.
•
Select "Options, RS232" in the pulldown menu.
on
l
in
ec
om
po
ne
nt
s.
•
•
•
•
A-8
PHOENIX CONTACT
Select the COM port (e.g., COM1) in the "Serial Interface"
window.
Set the following parameters for the serial interface:
– Baud rate: 9600 bps
– Data bits: 8;
– Parity: Even
– Stop bits: 1
Store the settings with "OK".
•
Open a new configuration. To do so, select "File, New" in
the pulldown menu or click the "New" button.
•
Select the PSI-DATA/FAX-MODEM/RS232 modem and
confirm with "OK".
5981_en_02
Transmission over telephone line (modem)
Edit the modem profile. Select "PSI device, Edit profile" in
the pulldown menu or click the "Edit profile" button.
•
Set the following parameters in the "Modem Configuration"
window and confirm the settings with "OK".
– DTR Signal: Ignore DTR Signal
– Flow Control: NONE
– Error Correction: Direct mode
– Compression: OFF
ne
nt
s.
co
m
•
Transfer the configuration to the modem. Select "PSI
device, Write configuration" in the pulldown menu or click
the "Transfer configuration" button.
po
•
•
Configure the second modem. For the configuration, proceed as described for the first
modem.
on
l
in
ec
Second modem
The first modem is now configured. Select "File, Exit" or
click the "Exit program" button.
om
•
5981_en_02
PHOENIX CONTACT
A-9
IB IL MUX MA (-PAC)
A 3.4
•
Open the protective cover of the modem. Insert a small screwdriver into the slot at the
bottom of the cover and lever it open.
Set the DIP switches of the first modem according to Table A-7.
•
Table A-7
Function
Setting
1
Permanent line
ON
2
Fixed at 7200 bps
ON
3
Originate Mode
ON
4
Device Settings
OFF
co
m
DIP switch
Close the protective cover and execute a cold start (24 V OFF and ON).
•
Open the protective cover of the modem. Insert a small screwdriver into the slot at the
bottom of the cover and lever it open.
Set the DIP switches of the modem according to Table A-8.
s.
•
•
Table A-8
Setting the DIP switches of modem 2
Function
Setting
1
Permanent line
ON
po
DIP switch
2
4
om
3
•
nt
Second modem
Setting the DIP switches of modem 1
ne
First modem
Setting the DIP switches of the modems
Fixed at 7200 bps
ON
Answer Mode
OFF
Device Settings
OFF
Close the protective cover and execute a cold start (24 V OFF and ON).
on
l
in
ec
Further information on the configuration and connection of modems can be found in the
associated documentation.
A-10
PHOENIX CONTACT
5981_en_02
Transmission over telephone line (modem)
A 3.5
First converter
•
Configuring the converters
Release the housing cover of the RS-232/RS-485 converter on the left and right and
pull the housing cover with the printed circuit board out of the base element as far as
possible.
Set the interface converter using the internal DIP switches.
•
Table A-9
DIP switches of the interface converter
DIP switch
Function
Setting
1
ON
OFF
Transmission speed of 9600 bps
3
ON
ON
RTS/CTS control
6
RTS/CTS signal inverted
7
2-wire interface
8
RS-485
nt
s.
5
co
4
ON
ON
OFF
OFF
Second converter
•
Enter the settings for the second RS-232/RS-485 converter as well.
Both converters
•
Execute a cold restart on both RS-232/RS-485 converters (24 V ON).
po
ne
•
•
Activate the bus termination by switching the "Terminate" slide switch to the ON
position.
Set the DTE/DCE slide switch to DCE.
Push the housing cover into the base element until it locks
om
•
m
2
on
l
in
ec
Further information on the configuration and connection of interface converters can be
found in the associated documentation.
5981_en_02
PHOENIX CONTACT
A-11
IB IL MUX MA (-PAC)
A 3.6
•
Connecting the cables
Connect one modem with the RS-232 side of an RS-232/RS-485 converter using a
special 3-position SUB-D9 cable and the SUBCON 9/F-SH connectors (see Table
A-10).
Table A-10
Connection between converter and modem
Converter
PSM-ME-RS232/RS485-P
Modem
PSI-DATA/FAX-MODEM/RS232
SUBCON 9/F-SH,
Pin
SUBCON 9/F-SH,
Pin
Signal
Shield
Strain relief
Strain relief
Shield
CTS
8
3
RxD
2
co
5
TxD
s.
GND
m
Signal
5
GND
3
TxD
2
RxD
Assemble the adapter cable for the connection between field multiplexer and interface
converter. For the terminal point assignment, please refer to Table A-11.
po
•
ne
nt
Jumper pin 8 and
pin 2
om
NOTE: Malfunction
Please make sure that the cable is not longer than 1 m.
Table A-11
Connection between converter and field multiplexer
field multiplexer
IB IL MUX MA-PAC
Signal
Terminal point
Connector 1,
Terminal point
Signal
Color
Shield
8
1.4 / 2.4
Shield
–
GND
6
1.3
GND
Gray
Data + (B)
2
1.2
Data
Yellow
Data - (A)
1
2.2
/Data
Green
on
l
in
ec
Converter
PSM-ME-RS232/RS485-P
•
Connect one field multiplexer with the RS-485 side of an RS-232/RS-485 converter.
A wiring example is shown in Figure A-4.
A-12
PHOENIX CONTACT
5981_en_02
UL
1
1
US
ST
CE
RE
LE
D
2
1
D
2
1
1
2
1
2
1
2
D
2
UL
D
2
1
2
1
2
1
DI8
DO2
2
1
1
2
DI2
2
1
2
1
2
1
2
1
AI2
2
1
1
2
1
US
ST
CE
RE
LE
UM
MUX
D
2
1
D
2
1
1
2
1
2
1
2
AO 2
DO 2
DO 8
DI 2
MUX
AI 2
DI 2
DI 8
MUX
DO 2
Transmission over telephone line (modem)
D
2
D
UM
MUX
2
1
2
1
2
1
DO8
DI2
2
1
1
2
DO2
2
1
2
1
2
1
2
1
AO2
2
1
2
1
11
11
11
11
11
11
11
11
11
11
1
1
11
11
11
11
11
11
11
11
11
11
1
2
22
22
22
22
22
22
22
22
22
22
2
2
22
22
22
22
22
22
22
22
22
22
2
3
33
33
33
33
33
33
33
33
33
33
3
3
33
33
33
33
33
33
33
33
33
33
3
4
44
44
44
44
44
44
44
44
44
44
4
4
44
44
44
44
44
44
44
44
44
44
4
Master
+24 V
SUB D 9
1 DCD
3 TxD
2 RxD
7 RTS
8 CTS
4 DTR
6 DSR
9 RI
5 GND
b
a
Line
b
a
Wiring example
SUB D 9
DCD 1
TxD 3
RxD 2
RTS 7
CTS 8
DTR 4
DSR 6
RI
9
GND 5
PSM-ME-RS232/RS485-P
SUB D 9
D(A)
1
RS-485 D(B)
3
GND
2
7
8 RS-232
4
6
9
5 GND
5981A044
on
l
in
ec
om
po
ne
Figure A-4
Line
PSI-DATA/FAX-MODEM/RS232
max.
20 km
co
SUB D 9
D(A)
D(B) RS-485
1
3
GND
2
7
RS-232 8
4
6
9
GND 5
PSI-DATA/FAX-MODEM/RS232
s.
PSM-ME-RS232/RS485-P
0V
m
0V
nt
+24 V
5981_en_02
PHOENIX CONTACT
A-13
on
l
in
ec
om
po
ne
nt
s.
co
m
IB IL MUX MA (-PAC)
A-14
PHOENIX CONTACT
5981_en_02
A4
Transmission over Bluetooth (wireless)
This section describes the configuration of an Inline field multiplexer station with a Bluetooth
path using the Bluetooth converters PSI-WL-RS232-RS485/BT.
CONVERTER
A
CONVERTER
RS-485
SHD
RS-485
Bluetooth
D(B)
D(A)
GND
SHD
DATA
DATA
GNDDATA
D(B)
D(A)
GND
SHD
BT
DATA
DATA
GNDDATA
SHD
5981B037
co
BT
Basic circuit diagram: Transmission over Bluetooth
s.
Figure A-5
MUX 2
A
m
MUX 1
Key:
IB IL MUX MA-PAC
A
Adapter cable
CONVERTER
Bluetooth converter: PSI-WL-RS232-RS485/BT
Bluetooth
Bluetooth connection
po
ne
nt
MUX
om
NOTE: Malfunction
In combination with the PSI-WL-RS232-RS485/BT converter, up to 50 digital and two
analog signals can be transmitted.
Table A-12
Devices and software for the field multiplexer station
in
ec
A 4.1
Devices and software that can be used
Type
on
l
Field multiplexer
Bluetooth converter
Type
Order No.
Number
IB IL MUX MA-PAC
2861205
2
PSI-WL-RS232-RS485/BT
2708517
2
2799474
1 or 2
Required for configuration of the converters
RS-232 cable, 9-pos. SUB-D
female connector to 9-pos.
SUB-D female connector
PSM-KA9SUB9/BB/2METER
Converter software
PSI-BLUETOOTH-CONF V2.40
(software on CD)
5981_en_02
1
PHOENIX CONTACT
A-15
IB IL MUX MA (-PAC)
A 4.2
•
Basic field multiplexer settings
Configure one field multiplexer station as master and the other one as slave (see
Section "Configuring the station as a master or a slave" on page 4-8).
No jumper must be installed from 1.1 to 2.1 (CONFFO) on connector 1 of both field
multiplexers.
co
Setting the Bluetooth server (first Bluetooth converter)
Connect the first Bluetooth converter and the PC via a serial
1:1 cable and supply it with 24 V DC.
•
Open the Bluetooth converter housing and switch the
CONF/RUN switch to CONF mode.
•
Start the PSI-BLUETOOTH-CONF configuration software
on the PC.
nt
s.
•
ne
A 4.3
m
You will find the additional terminal point assignment of the field multiplexer in Section
"Terminal point assignment" on page 4-4.
Select the communication interface (e.g., COM1) and
confirm with "Next".
on
l
in
ec
om
po
•
A-16
PHOENIX CONTACT
5981_en_02
Transmission over Bluetooth (wireless)
Set the parameters specified for the serial interface and
confirm with "Next".
– Transmission speed: 7200 bps
– Data bits: 8
– Parity: Even
– Stop bits: 1
– Serial interface: RS485
•
Select "Bluetooth general settings" in the basic menu and
confirm with "Next".
on
l
in
ec
om
po
ne
nt
s.
•
co
m
The basic menu of the configuration wizard opens.
•
Select "Serial settings" and confirm with "Next".
5981_en_02
PHOENIX CONTACT
A-17
IB IL MUX MA (-PAC)
•
Enter a Bluetooth device name and confirm with "Next".
Select the "Bluetooth security enabled" option, enter a
password (e.g., 4711), and confirm with "Next".
•
To keep the Bluetooth converter discoverable and
connectable, select the "Connectable and discoverable"
option and confirm with "Next".
on
l
in
ec
om
po
ne
nt
s.
•
co
m
The name must be unique for every Bluetooth converter and
should refer to the technological unit.
A-18
PHOENIX CONTACT
5981_en_02
Transmission over Bluetooth (wireless)
In the "Automatic Disconnect" window disable the "Allow
automatic disconnection" option and confirm with "Next".
•
In the "Radio Power" window select the "Use default power
settings" option and confirm with "Next".
•
In the "Configuration over Bluetooth" window select the
"No" option, confirm with "Next", and store the settings with
"Save".
on
l
in
ec
om
po
ne
nt
s.
co
m
•
5981_en_02
PHOENIX CONTACT
A-19
IB IL MUX MA (-PAC)
Select "Bluetooth connection settings" in the basic menu
and confirm with "Next".
•
In the "Wireless Multidrop" window select the "Point to point
operation" option and confirm with "Next".
•
In the "Server Operation Mode" window select the "Act as a
server" option and the "Serial Port Profile", then confirm
with "Next".
on
l
in
ec
om
po
ne
nt
s.
co
m
•
A-20
PHOENIX CONTACT
5981_en_02
Transmission over Bluetooth (wireless)
In the "Client Operation Mode" window select the "Disable
client functionality" option, confirm with "Next", and store
the settings with "Save".
•
Select "Bluetooth pairing" in the basic menu and confirm
with "Next".
•
In the "Pairing" window select the "Perform pairing" option
and confirm with "Next".
on
l
in
ec
om
po
ne
nt
s.
co
m
•
5981_en_02
PHOENIX CONTACT
A-21
IB IL MUX MA (-PAC)
In the "Pairing" window select the "Accept pairing" option,
confirm with "Next", and store the settings with "Save".
•
The Bluetooth server is now configured. Close the
configuration software with "Exit".
on
l
in
ec
om
po
ne
nt
s.
co
m
•
A-22
PHOENIX CONTACT
•
Switch the CONF/RUN switch in the device back to RUN
mode. Close the Bluetooth converter.
•
Remove the serial 1:1 cable from the first Bluetooth
converter.
•
Restart the Bluetooth converter (24 V OFF/ON).
5981_en_02
Transmission over Bluetooth (wireless)
Setting the Bluetooth client (second Bluetooth converter)
•
Connect the second Bluetooth converter and the PC via a
serial 1:1 cable and supply it with 24 V DC.
•
Open the Bluetooth converter housing and switch the
CONF/RUN switch to CONF mode.
•
Start the PSI-BLUETOOTH-CONF configuration software
on the PC. Select the communication interface (e.g.,
COM1) and confirm with "Next".
ne
nt
s.
co
m
A 4.4
on
l
in
ec
om
po
The basic menu of the configuration wizard opens.
•
Select "Serial settings" and confirm with "Next".
5981_en_02
PHOENIX CONTACT
A-23
IB IL MUX MA (-PAC)
Set the parameters specified for the serial interface and
confirm with "Next".
– Transmission speed: 7200 bps
– Data bits: 8
– Parity: Even
– Stop bits: 1
– Serial interface: RS485
•
Select "Bluetooth general settings" in the basic menu and
confirm with "Next".
•
Enter a Bluetooth device name and confirm with "Next".
The name must be unique for every Bluetooth converter and
should refer to the technological unit.
on
l
in
ec
om
po
ne
nt
s.
co
m
•
A-24
PHOENIX CONTACT
5981_en_02
Transmission over Bluetooth (wireless)
Select the "Bluetooth security enabled" option, enter the
password of the Bluetooth servers (e.g., 4711), and confirm
with "Next".
•
To keep the Bluetooth converter discoverable and
connectable, select the "Connectable and discoverable"
option and confirm with "Next".
•
In the "Automatic Disconnect" window disable the "Allow
automatic disconnection" option and confirm with "Next".
on
l
in
ec
om
po
ne
nt
s.
co
m
•
5981_en_02
PHOENIX CONTACT
A-25
IB IL MUX MA (-PAC)
In the "Radio Power" window select the "Use default power
settings" option and confirm with "Next".
•
In the "Configuration over Bluetooth" window select the
"No" option, confirm with "Next", and store the settings with
"Save".
•
Select "Bluetooth connection settings" in the basic menu
and confirm with "Next".
on
l
in
ec
om
po
ne
nt
s.
co
m
•
A-26
PHOENIX CONTACT
5981_en_02
Transmission over Bluetooth (wireless)
In the "Wireless Multidrop" window select the "Point to point
operation" option and confirm with "Next".
•
In the "Server Operation Mode" window select the "Disable
server functionality" option and confirm with "Next".
•
In the "Client Operation Mode" window select the "Act as a
client" option and the "Serial Port Profile", then confirm with
"Next".
on
l
in
ec
om
po
ne
nt
s.
co
m
•
5981_en_02
PHOENIX CONTACT
A-27
IB IL MUX MA (-PAC)
Now the Bluetooth client must search for its Bluetooth
server. Make sure that the server is switched on. In the
"Server Device Selection" window select the "Search for
server devices" option.
•
Confirm with "Next". The search for communication
partners is thus started.
•
Select the previously configured Bluetooth server from the
"Available devices" list, transfer it with "Add" to the
"Selected devices" list and confirm with "Next".
on
l
in
ec
om
po
ne
nt
s.
co
m
•
A-28
PHOENIX CONTACT
5981_en_02
Transmission over Bluetooth (wireless)
The Bluetooth converters are to re-establish an interrupted
connection automatically. In the "Connection Scheme
Selection" window select the "Always connected" option,
confirm with "Next", and store the settings with "Save".
•
Select "Bluetooth pairing" in the basic menu and confirm
with "Next".
•
In the "Pairing" window select the "Perform pairing" option
and confirm with "Next".
on
l
in
ec
om
po
ne
nt
s.
co
m
•
5981_en_02
PHOENIX CONTACT
A-29
IB IL MUX MA (-PAC)
In the "Pairing" window select the "Initiate pairing" option
and confirm with "Next".
•
Check the entries, confirm with "Next", and store with
"Save".
on
l
in
ec
om
po
ne
nt
s.
co
m
•
A-30
PHOENIX CONTACT
•
When the pairing of the Bluetooth converters was
successful, the "Pairing succeeded" message appears.
Confirm this message with "OK".
•
When the pairing was not successful, the "Failed while
pairing" message appears. Confirm this message with
"OK". Check the antennas, the Bluetooth server function,
as well as the password used and repeat the configuration
starting with the step "Bluetooth connection settings".
5981_en_02
Transmission over Bluetooth (wireless)
The Bluetooth client is now configured. Close the
configuration software with "Exit".
•
Switch the CONF/RUN switch in the device back to RUN
mode. Close the Bluetooth converter.
•
Remove the serial 1:1 cable from the second Bluetooth
converter.
•
Restart the Bluetooth converter (24 V OFF/ON).
ne
nt
s.
co
m
•
The two Bluetooth converters now establish the connection automatically.
om
po
Further information on the configuration and connection of interface converters can be
found in the associated documentation.
A 4.5
Activate the bus termination by switching the "Terminate" slide switch on every
Bluetooth converter to the ON position.
on
l
in
ec
•
Setting the switch on the Bluetooth converter
5981_en_02
PHOENIX CONTACT
A-31
IB IL MUX MA (-PAC)
A 4.6
•
Connecting the cables
Assemble the adapter cable for the connection between field multiplexer and interface
converter. For the terminal point assignment, please refer to Table A-13.
NOTE: Malfunction
Please make sure that the cable is not longer than 1 m.
Field multiplexer
IB IL MUX MA-PAC
Signal
Terminal point
Connector 1,
Terminal point
Shield
10
GND
11
Data + (B)
17
Data - (A)
16
s.
Converter
PSI-WL-RS232-RS485/BT
Color
Shield
–
GND
Gray
1.2
Data
Yellow
2.2
/Data
Green
nt
1.4 / 2.4
1.3
po
ne
Signal
Connect each field multiplexer with one Bluetooth converter.
on
l
in
ec
om
•
Connection between converter and field multiplexer
co
Table A-13
m
NOTE: Malfunction
If you are using the IB IL MUX-CAB PSI (Order No. 2878476) adapter cable:
Swap the yellow and green wires at terminal points 16 and 17 of the Bluetooth converter
and remove the jumper (brown) from terminal 1.1 to 2.1. of the field multiplexer connector.
A-32
PHOENIX CONTACT
5981_en_02
A5
Transmission over Ethernet (COM SERVER)
This section describes the configuration of an Inline field multiplexer station with an Ethernet
network path using two Ethernet converters FL COM SERVER RS485.
CONVERTER
A
CONVERTER
D(B)
D(A)
GND
SHD
SHD
D(B)
D(A)
GND
SHD
LAN / WAN
ETH
co
ETH
DATA
DATA
GNDDATA
SHD
5981A042
Basic circuit diagram: Transmission over Ethernet
s.
Figure A-6
MUX 2
A
RS-485
RS-485
DATA
DATA
GNDDATA
m
MUX 1
Key:
IB IL MUX MA-PAC
A
Adapter cable
CONVERTER
Ethernet converter
For example, Phoenix Contact: FL COM SERVER RS485
LAN/WAN
Ethernet connection
po
ne
nt
MUX
om
NOTE: Malfunction
In combination with the FL COM SERVER RS485 converter, a maximum of four analog
signals can be transmitted.
Table A-14
in
ec
A 5.1
Devices and software that can be used
Type
on
l
Field multiplexer
Ethernet converter
5981_en_02
Devices for the field multiplexer station
Type
Order No.
Number
IB IL MUX MA-PAC
2861205
2
FL COM SERVER RS485
Firmware V1.89 or later
2708740
2
PHOENIX CONTACT
A-33
IB IL MUX MA (-PAC)
A 5.2
•
Basic field multiplexer settings
Configure one field multiplexer station as master and the other one as slave (see
Section "Configuring the station as a master or a slave" on page 4-8).
No jumper must be installed from 1.1 to 2.1 (CONFFO) on connector 1 of both field
multiplexers.
Checking the firmware of the FL COM SERVER RS485
co
A 5.3
m
You will find the additional terminal point assignment of the field multiplexer in Section
"Terminal point assignment" on page 4-4.
in
ec
om
po
ne
nt
s.
A firmware V1.89 or later is required to allow the FL COM SERVER RS485 to transmit the
communication protocol of the field multiplexer stations.
•
To check the firmware version, open your web browser and enter the address of the
FL COM SERVER RS485 (default 192.168.0.254). Then click "Device Information".
on
l
Figure A-7
A-34
PHOENIX CONTACT
•
FL COM SERVER RS485 firmware version
If a firmware version earlier than V1.89 is installed, update the firmware before you
proceed with the configuration.
5981_en_02
Transmission over Ethernet (COM SERVER)
A 5.4
Setting the Ethernet converters using software or
Web-Based Management (WBM)
•
Assigning IP addresses
po
Figure A-8
ne
nt
s.
co
m
Assign fixed IP addresses for both FL COM SERVER RS485:
•
Click "General Configuration".
•
Enter the password (default password: private) and confirm the entry by clicking
"Enter".
•
Select "IP" and enter the IP parameters.
Confirm the modification of the configuration with "Confirm".
on
l
in
ec
om
Proceed in the same way for both FL COM SERVER RS485:
•
Set the parameters of the serial interface.
Click on "Serial" and set the parameters specified below.
– Transmission speed: 7000 bps
– Data bits: 8
– Parity: Even
– Stop bits: 1
Figure A-9
5981_en_02
Assigning IP addresses
PHOENIX CONTACT
A-35
IB IL MUX MA (-PAC)
Confirm the modification of the configuration with "Confirm".
Set the FL COM SERVER RS485 in the "Application" menu to "UDP" operation mode
and make the following settings:
–
Own UDP Port:
Own UDP Port, default 3001
–
Remote UDP Port:
Remote UDP Port, default 3001
–
Remote IP address:
Remote IP address
–
Device type:
Client
–
Idle Force Timeout Characters:
1
UDP settings of COM SERVER 1
on
l
in
ec
om
Figure A-10
po
ne
nt
s.
co
m
•
•
Figure A-11
•
A-36
PHOENIX CONTACT
UDP settings of COM SERVER 2
Confirm the modification of the configuration with "Confirm".
5981_en_02
Transmission over Ethernet (COM SERVER)
•
Save the settings and reboot the FL COM SERVER RS485
ne
Figure A-12
nt
s.
co
m
Proceed as follows to store the configuration in the FL COM SERVER RS485 and to take it
over with a restart:
•
Open the "Save and Reboot" menu item.
•
Activate the "Save" and "Reboot" options.
•
Enter the password (default password: private) and confirm the entry by clicking
"Confirm".
Confirm your settings with "Confirm".
Activate the termination resistor on the interface converter (position ON).
in
ec
•
Setting the switch on the Ethernet converter
om
A 5.5
po
The FL COM SERVER RS485 restarts with the saved configuration.
on
l
Further information on the configuration and connection of interface converters can be
found in the associated documentation.
5981_en_02
PHOENIX CONTACT
A-37
IB IL MUX MA (-PAC)
A 5.6
•
Connecting the cables
Assemble the adapter cable for the connection between field multiplexer and interface
converter. For the terminal point assignment, please refer to Table A-15.
NOTE: Malfunction
Please make sure that the cable is not longer than 1 m.
Table A-15
Connection between converter and field multiplexer
Field multiplexer
IB IL MUX MA-PAC
Signal
Connector 1,
Terminal point
Signal
Color
Shield
1.4 / 2.4
Shield
–
GND
1.3
GND
Gray
Data
Yellow
/Data
Green
3
1.2
Data N (A)
8
2.2
nt
ne
Connect each field multiplexer with one Ethernet converter.
D
2
1
D
2
1
1
2
UM
MUX
2
1
2
1
11
11
2
22
22
3
33
33
4
44
44
2
1
2
1
1
2
1
2
D
2
1
2
1
2
1
2
1
1
1
2
1
US
ST
CE
RE
LE
AI2
2
D
2
1
D
2
1
1
2
1
2
1
2
AO 2
DO 2
DO 8
DI 2
MUX
UL
D
DI2
2
po
DI 2
1
2
D
2
D
UM
MUX
2
1
2
1
2
1
DO8
DI2
2
1
1
2
DO2
2
1
2
1
2
1
2
1
AO2
2
1
2
11
11
11
11
11
11
11
11
1
1
11
11
11
11
11
11
11
11
11
11
1
22
22
22
22
22
22
22
22
2
2
22
22
22
22
22
22
22
22
22
22
2
33
33
33
33
33
33
33
33
3
3
33
33
33
33
33
33
33
33
33
33
3
44
44
44
44
44
44
44
44
4
4
44
44
44
44
44
44
44
44
44
44
4
on
l
1
DI8
DO2
in
ec
1
1
US
om
UL
Example configuration
DI 8
MUX
DO 2
A 5.7
AI 2
•
ST
CE
RE
LE
s.
Data P (B)
co
SUB-D, PIN
m
Converter
FL COM SERVER RS485
Master
+24 V
+24 V
0V
1.2 = 3
2.2 = 8
UL
ER
UL
ER
FD
100
COL
FD
100
COL
0V
3 = 1.2
8 = 2.2
LAN / WAN
10/100
10/100
FL COM SERVER
Ord.-No.2708740
61451001
Figure A-13
A-38
PHOENIX CONTACT
FL COM SERVER
Ord.-No.2708740
61451001
5981A045
Example configuration
5981_en_02
B Index
A
F
Additional grounding .................................................. 4-2
Alarm contact ........................................................... 8-12
Fiber optic converter ................................................. A-3
Field multiplexer
Alarm contact ..................................................... 8-12
Configuration and installation ............................... 8-1
Connecting the remote bus ................................ 8-11
Connection to FE.................................................. 4-1
Connections ......................................................... 4-1
Copper transmission mode .................................. 4-8
Diagnostic indicators ............................................ 4-1
Electrical isolation ......................................... 4-2, 5-2
Fiber optics transmission mode............................ 4-8
Grounding ............................................................ 4-2
Laying the remote bus cable ............................... A-1
Master/slave configuration .......................... 4-8, 8-11
Required additional grounding ............................. 4-2
Transmission time ................................................ 8-8
Field Multiplexer system
Arrangement ........................................................ 3-1
Field multiplexer system
Configuration...................................................... 8-11
Power supply........................................................ 8-7
Startup.................................................................. 9-1
Station .................................................................. 3-1
Surge protection............................................ 6-1, 8-8
FL COM SERVER RS485 ....................................... A-33
Flowchart ................................................................... 9-8
Function test .............................................................. 9-1
B
Bluetooth converter................................................. A-15
m
C
ne
nt
s.
co
Complementary arrangement .................................... 3-1
Configuration............................................................ 8-11
Connection method.................................................... 4-1
Converter
Bluetooth ........................................................... A-15
Ethernet............................................................. A-33
FO ....................................................................... A-3
RS-232/RS-485................................................... A-7
po
D
om
Data routing ............................................................... 4-1
Diagnostic indicators........................................... 4-3, 9-4
Error causes and remedies .................................. 9-4
E
on
l
in
ec
Electrical isolation ...................................................... 5-4
Field multiplexer ................................................... 5-2
EMC directive........................................................... 10-5
Error
Diagnostics........................................................... 4-3
Localization .......................................................... 9-6
Error causes and remedies ........................................ 9-4
Ethernet converter................................................... A-33
EX ZONE 2 ................................................................ 1-2
Example project
Configuration...................................................... 8-12
Connecting the voltage supply ........................... 8-12
Power supply........................................................ 8-7
Arrangement ...................................................... 8-10
Task ..................................................................... 8-1
Terminal selection ................................................ 8-5
5981_en_02
I
I/O module
Complementary arrangement............................... 3-1
Select ................................................................... 8-2
IB IL MUX-CAB PSI................................................... A-3
Internal jumpering ...................................................... 4-6
J
Jumpering, internal .................................................... 4-6
PHOENIX CONTACT
B-1
IB IL 24 MUX MA (-PAC)
M
Maximum capacity of the jumper contacts ................. 4-1
Mechanical requirements......................................... 10-4
Modem...................................................................... A-7
P
co
m
Potential routing ......................................................... 4-1
Power supply ............................................................. 8-7
Protection................................................................... 4-1
PSI-DATA/FAX-MODEM/RS232 .............................. A-7
PSI-MOS-RS485W2/FO... ........................................ A-3
PSI-WL-RS232-RS485/BT...................................... A-15
PSM-ME-RS232/RS485-P........................................ A-7
s.
R
nt
RS-232/RS-485 converter......................................... A-7
in
ec
om
po
Shielding .................................................................. 4-10
Concept.............................................................. 4-10
Startup ....................................................................... 9-1
Supply terminal ........................................................ 4-11
Surge protection.................................................. 6-1, 8-8
Control cabinet ..................................................... 6-1
Fiber optic operation............................................. 6-6
Power supply................................................. 6-1, 6-5
Remote bus cable ......................................... 6-1, 6-2
System specifications ................................................ 3-4
System test ................................................................ 9-2
ne
S
on
l
T
Temperature measurements...................................... 4-7
Transmission
Bluetooth (wireless)........................................... A-15
Copper cable....................................................... A-1
Ethernet............................................................. A-33
Fiber optics.......................................................... A-3
Telephone line..................................................... A-7
Transmission time ...................................................... 8-8
B-2
PHOENIX CONTACT
5981_en_02