1
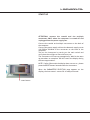
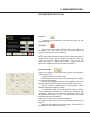
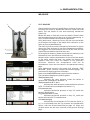
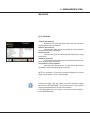
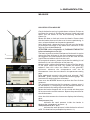
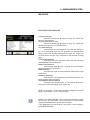
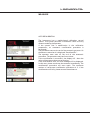
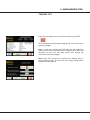
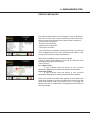
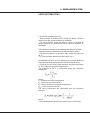
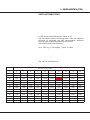
ELECTRONIC
APHROMETER
L.SENSOR.CO2
USER MANUAL
L PRO
SRL
gas sensing
L.SENSOR.CO2
SUMMARY
INTRODUCTION
GOODS RECEPTION
MECHANICAL CHARACTERISTICS
DISPLAY
START UP
PARAMETERS SELECTION
MEASURE
BOTTLE POSITIONING
FAST MEASURE
HIGH RESOLUTION MEASURE
BOTTLE CHECKING
AUTORECALIBRATION
TURNING OFF
WARNINGS
ERROR MESSAGES
USER INFORMATIONS
TEMPERATURE CORRECTION
DISSOLVED CO2 FORMULA
MEASURE METHODOLOGY
CALIBRATION
SAFETY RULES
PROPER USE OF THE INSTRUMENT
WARNINGS
LASER CLASS
LASER USAGE
TECHNICAL DATA
CE CERTIFICATION
REFERENCES
L PRO SRL, ALL RIGHTS RESERVED - v. 2.5
1
2
3
4
4
5
6
8
8
9
11
13
14
15
16
16
18
18
19
20
20
21
21
21
22
22
23
24
25
L.SENSOR.CO2
INTRODUCTION
This user manual will give you instructions for the use of the
instrument and important safety regulations (please refer to
“SAFETY REGULATIONS” - page 21).
Please read carefully this user manual before using the
instrument.
The instrument uses a touch screen PC interface. A basic
knowledge of using a PC is required to use this instrument.
Instruction course for the use of the instrument are available
at L pro srl. Please contact us.
L PRO SRL, ALL RIGHTS RESERVED - v. 2.5
2
L.SENSOR.CO2
GOODS RECEPTION
This instrument has been completely checked and tested
before shipping. When receiving the goods, please verify the
following points:
- check the presence of following components:
- the optical/mechanical part of the aphrometer
- the mechanical spacer under the centering base
- the computer
- the power supply cable
- the IR thermometer
- check every part of the instrument to be sure it has not been
damaged during transportation
- verify the power supply voltage written in the identify label.
If your net power supply voltage is different from the one in
the label, DO NOT turn on the instrument. Unplug the power
supply cable and contact L pro srl for clarifications.
L PRO SRL, ALL RIGHTS RESERVED - v. 2.5
3
L.SENSOR.CO2
MECHANICAL CHARACTERISTICS
1
2
3
4
5
6
1.
2.
3.
4.
5.
6.
7.
8.
9.
10.
11.
12.
13.
Laser ray (not visible)
Photodiode
Mechanical centering system for the bottle
Bottle height regulation
Height arrest warrant
Touch screen display
Reset button
Cooling fan
Laser multipin connector
Photodiode coaxial connector
Ethernet connector
Air intake
Power supply and general switch
DISPLAY
The display is touch screen. With the touch screen you have
access to all the instrument’s features and to the visualization
of the measure results.
7
8
9
10 11
12
L PRO SRL, ALL RIGHTS RESERVED - v. 2.5
13
4
L.SENSOR.CO2
START UP
ATTENTION: connect the coaxial and the multipin
connectors ONLY when the computer is turned off and
unplugged from the power supply net.
Connect the coaxial and multipin connectors on the back of
the computer.
Connect the power supply cable to the domestic supply net at
110/230Vac 50/60Hz to the connector on the back of the
computer.
Turn on the instrument by turning on the main switch and
verify that the red light on the switch turns on.
The instrument will start up automatically. Wait for the start
up procedure to complete. DO NOT touch the display during
the start up procedure.
NOTE: if after 30 seconds the display does not turn on, please
press the RESET button located under the instrument.
When the PARAMETERS SELECTION page appears on the
display, the instrument L.sensor.CO2 is ready to be used.
7. reset button
L PRO SRL, ALL RIGHTS RESERVED - v. 2.5
5
L.SENSOR.CO2
PARAMETERS SELECTION
This is the starting page. Please select the parameters for the
measure you are ready to make.
Type of measure:
- Quick: display the results after one single measure.
- High resolution: the instrument executes 3 different
measures. Between one measure and the following the
operator is asked to turn the bottles on its vertical axis for
about 60°. This procedure allows the instrument to
interpolate the optical defects of the bottle giving a better
result. This measure is recommended particularly for glass
bottles.
Internal neck diameter:
- Select the internal diameter of the neck of the bottle
in the point where the laser crosses the neck (in millimeters).
To determine the internal diameter, measure the external
diameter of the neck at the point where the laser ray crosses
the bottle and subtract the double of the glass thickness
(about 8mm for still wines bottles, 10/12mm for sparkling
wine bottles).
To select the correct value, press the left side of the bar for
decreasing and the right side for increasing the value.
Minimum incr.= 1mm
Temperature:
- Select the bottle’s temperature at the moment of
the measure.
To determine the temperature, measure the central part of
the bottle with the IR thermometer.
To select the correct value, press the left side of the bar for
decreasing and the right side for increasing the value.
Minimum incr.= 0,5°C
L PRO SRL, ALL RIGHTS RESERVED - v. 2.5
6
L.SENSOR.CO2
PARAMETERS SELECTION
Confirm:
- Confirms the parameters selected and goes to the
measuring page.
Turn OFF:
- Turns off the instrument. Please wait for the display to
completely turn off, then turn off the main switch to
completely shut down the instrument.
NOTE: after some minutes of inactivity the instrument goes in
“power save mode” with the display turned off. Touch the
screen to exit this “power save mode”. To turn off the
instrument when in “power save mode”, please, first exit
power save mode and then turn off the instrument.
General settings:
Pressing the spanner icon opens the general settings page.
From here you can:
- verify the software version in use
- modify date and time: use the controls and press “Apply”
to confirm modifications
- choose the language: to set the UI language, select the
language desired, press “Apply” and reboot the instrument.
- set the results in absolute bars or overpressure; select
the desired option and press “Close”.
- set dissolved sugar (g/l) and alcoholic content (%vol).
Those parameters modify the formula for dissolved CO2
calculation from the CO2 pressure measured: select the
desired values and press “Close”. The set values will be used
starting from the next measure.
Press “Close” to go back to the previous page.
For detailed information on the formula used, please refer to
page 15.
- define the IP address of the instrument. Please refer to
the Web Manual for more information.
L PRO SRL, ALL RIGHTS RESERVED - v. 2.5
7
L.SENSOR.CO2
MEASURE
1
2
BOTTLE POSITIONING
Put the bottle on the auto-centering mechanical system (3).
Rotate the base to lock and center the bottle. Please check
that the bottle does not tilt due to an incorrect positioning. In
case, release the bottle and repeat the operation.
3
4
5
Using both hands, release the screw (5) and turn the handle
(4) to adjust the height of the bottle with reference to the
laser ray (1) and photodiode (2).
ATTENTION: when using bottle >0,7lt REMOVE THE BOTTLE
before releasing the screw (5)!
The laser ray must cross the head space of the bottle in a point
where the glass thickness is the more homogenous possible.
We suggest in the mid between the end of the cork and the
liquid. Remove labels or dirt from the neck.
For an optimal measure, please check that the welding line of
the bottle in not in the direction of the laser ray.
For measuring small bottles, please use a spacer (optional) on
the centering base (3). For magnum bottles, remove the
spacer under the centering base. Unscrew the 8 screws,
remove the spacer and fix the base with 4 screws.
NOTE: the instrument performs a measure in the head space
where CO2 is in the gas state. The head space of the bottle
must be in an equilibrium state with the liquid to allow a
correlation between CO2 in the head space and CO2 dissolved
in liquid.
To facilitate the equilibrium please check the bottle before
measuring.
Attention: for security reasons, in sparkling wines DO NOT
remove the cork cage before or during the measure
L PRO SRL, ALL RIGHTS RESERVED - v. 2.5
8
L.SENSOR.CO2
MEASURE
1
FAST MEASURE
2
3
4
5
L PRO SRL, ALL RIGHTS RESERVED - v. 2.5
Check the bottle turning it upside down minimum 5 times to
facilitate the reach of equilibrium between liquid and head
space. Put the bottle on the auto-centering mechanical
system (3).
Rotate the base to lock and center the bottle. Please check
that the bottle does not tilt due to an incorrect positioning. In
case, release the bottle and repeat the operation.
Using both hands, release the screw (5) and turn the handle
(4) to adjust the height of the bottle with reference to the
laser ray (1) and photodiode (2).
The laser ray must cross the head space of the bottle in a point
where the glass thickness is the more homogenous possible.
We suggest in the mid between the end of the cork and the
liquid. Remove labels or dirt from the neck.
For an optimal measure, please check that the welding line of
the bottle is not in the direction of the laser ray.
Measure with a caliper the diameter of the neck of the bottle
in the point where the laser ray crosses the bottle and
subtract from this value the double of the glass/PET
thickness. Measure the temperature with the IR
thermometer. Insert the two values in the parameter setting
page.
Once positioned correctly the bottle and selected “FAST
MEASURE”, press “Confirm” to open the measuring page. The
instrument is ready to perform a measure.
Press once the MEASURE button to perform the measure.
The instrument displays the following data:
Total pressure (bar)
Indicates the total pressure inside the bottle in
absolute bar (atmospheric pressure = 1)
Total pressure at 20°C (bar)
Indicates the total pressure inside the bottle referred
at 20°C in absolute bar (atmospheric pressure = 1)
CO2 pressure (bar)
Indicates the partial pressure of only CO2 inside the
bottle in absolute bar
CO2 pressure at 20°C (bar)
Indicates the partial pressure of only CO2 inside the
bottle referred at 20°C in absolute bar
CO2 dissolved (g/l)
Indicates the concentration of CO2 inside the liquid, in
g/l. It is calculated from the CO2 pressure and temperature
values, with the formula described at page 18. Sugar and
alcohol values are the ones inserted in the general settings
page.
9
L.SENSOR.CO2
MEASURE
FAST MEASURE
Time of last measure
Indicates the time (hh:mm) when the last measure
displayed has been performed
Date of last measure
Indicates the date (dd.mm.yy) when the last measure
displayed has been performed
Measure mode
Indicates the type of measure performed (fast or high
resolution)
Diameter selected
Indicates the neck diameter previously selected in the
settings page (user selection)
Temperature of the measure
Indicates the temperature of the bottle previously
selected in the setting page (user selection)
NOTE: for pressure < 3 bar the instrument displays 2 decimal
digits, for pressure > 3 bar 1 decimal digit.
Pressing the icon with the white arrow the instrument goes
back to the “SETTING PAGE”. It is necessary only if you need to
change some parameter for the next measure.
If the parameters do not change, to execute a new measure,
press MEASURE again.
L PRO SRL, ALL RIGHTS RESERVED - v. 2.5
10
L.SENSOR.CO2
MEASURE
HIGH RESOLUTION MEASURE
1
2
3
4
5
Check the bottle turning it upside down minimum 5 times to
facilitate the reach of equilibrium between liquid and head
space. Put the bottle on the auto-centering mechanical
system (3).
Rotate the base to lock and center the bottle. Please check
that the bottle does not tilt due to an incorrect positioning. In
case, release the bottle and repeat the operation.
Using both hands, release the screw (5) and turn the handle
(4) to adjust the height of the bottle with reference to the
laser ray (1) and photodiode (2).
ATTENTION: when using bottle >0,7lt REMOVE THE BOTTLE
before releasing the screw (5)!
The laser ray must cross the head space of the bottle in a point
where the glass thickness is the more homogenous possible.
We suggest in the mid between the end of the cork and the
liquid. Remove labels or dirt from the neck.
For an optimal measure, please check that the welding line of
the bottle in not in the direction of the laser ray.
Measure with a caliper the diameter of the neck of the bottle
in the point where the laser ray crosses the bottle and
subtract from this value the double of the glass/PET
thickness. Measure the temperature with the IR
thermometer. Insert the two values in the parameter setting
page.
Once positioned correctly the bottle and selected “FAST
MEASURE”, press “Confirm” to open the measuring page. The
instrument is ready to perform a measure.
Press once the MEASURE button to perform the first of three
measures.
The instrument executes the first measure, shows a green V
on the Position 1 if everything in ok and prompts the user to
rotate the bottle for taking the second measure.
Rotate the bottle of approx. 60° on its vertical axis then press
OK to execute the second measure. Repeat the procedure for
the third measure.
After the third measure the instrument displays the following
data:
Total pressure (bar)
Indicates the total pressure inside the bottle in
absolute bar (atmospheric pressure = 1)
Total pressure at 20°C (bar)
Indicates the total pressure inside the bottle referred
at 20°C in absolute bar (atmospheric pressure = 1)
L PRO SRL, ALL RIGHTS RESERVED - v. 2.5
11
L.SENSOR.CO2
MEASURE
HIGH RESOLUTION MEASURE
CO2 pressure (bar)
Indicates the partial pressure of only CO2 inside the
bottle in absolute bar
CO2 pressure at 20°C (bar)
Indicates the partial pressure of only CO2 inside the
bottle referred at 20°C in absolute bar
CO2 dissolved (g/l)
Indicates the concentration of CO2 inside the liquid, in
g/l. It is calculated from the CO2 pressure and temperature
values, with the formula described at page 18. Sugar and
alcohol values are the ones inserted in the general settings
page.
Time of last measure
Indicates the time (hh:mm) when the last measure
displayed has been performed
Date of last measure
Indicates the date (dd.mm.yy) when the last measure
displayed has been performed
Measure mode
Indicates the type of measure performed (fast or high
resolution)
Diameter selected
Indicates the neck diameter previously selected in the
settings page (user selection)
Temperature of the measure
Indicates the temperature of the bottle previously
selected in the setting page (user selection)
NOTE: for pressure < 3 bar the instrument displays 2 decimal
digits, for pressure > 3 bar 1 decimal digit.
Pressing the icon with the white arrow the instrument goes
back to the “SETTING PAGE”. It is necessary only if you need to
change some parameter for the next measure.
If the parameters do not change, to execute a new measure,
press MEASURE again.
L PRO SRL, ALL RIGHTS RESERVED - v. 2.5
12
L.SENSOR.CO2
MEASURE
NOTE:
If one ore more measures report some errors, a green X
appears instead of the green V to signal the error. If all the
three measures gives an error a final error message is
displayed. If at least one measure is successful the
instrument displays the result that is calculated from the 1
or 2 measures performed correctly.
CHECKING OF THE BOTTLE
The instrument performs the measure in the head space of
the bottle. To have a correct correlation with the CO2
dissolved in the liquid it’s important that the head space is
in equilibrium with the liquid. To facilitate the equilibrium,
we suggest to check the bottle before the measure.
It’s up to the operator to find the right checking procedure,
because it may depend on many different factors.
We suggest to try many different measures with different
checking times for each kind of liquid/container till it
reaches a stable value.
L PRO SRL, ALL RIGHTS RESERVED - v. 2.5
13
L.SENSOR.CO2
MEASURE
AUTO RECALIBRATION
The instrument has a sophisticated calibration control
system. This system performs a calibration check at every
measure made by the operator.
If the system find a modification in the calibration
parameters, an automatic recalibration procedure is
performed.
The procedure starts at the end of the measuring process. On
the advance status bar it is displayed “Recalibration”.
The operator must wait till the end of the automatic
procedure. The procedure may last few minutes.
If the recalibration is successful, the display will show the
value of the measure that was performing.
If the recalibration fails, an error message will be displayed.
In this case, please reexecute the measure immediately. The
recalibration procedure will start again. The maximum
number of continuous recalibration procedures is 3. If the
recalibration still fails, please contact the assistance.
L PRO SRL, ALL RIGHTS RESERVED - v. 2.5
14
L.SENSOR.CO2
TURNING OFF
From the main page, to turn off the instrument, press OFF.
Once the system has shut down (display off), turn off the main
switch (red light).
Note: in stand by (display off/red light on) the measuring
system is still active, so to perform a complete shut down it is
necessary to turn off the main switch and unplug the
instrument from main supply.
Note: after few minutes of inactivity the display goes in
energy saving mode. To exit from the energy saving mode,
please touch the display.
L PRO SRL, ALL RIGHTS RESERVED - v. 2.5
15
L.SENSOR.CO2
ERRORS MESSAGES
The system shows some error messages in case of problems
that will not allow the correct operation of the instrument;
Some of these errors requires the reboot of the instrument:
- Laser power on problem
- Engine Servet Time Out
- Laser power off problem
- TEC power on failure
If one of those error appears, please press OK to exit from the
error message and turn off the instrument and reboot. If the
error persist, please contact the assistance.
Other error messages may not require a reboot.
If one of those errors appears, press OK to close the error
message and try again the measure.
The errors are:
Low signal (LOW)
it may indicate that the bottle is not correctly
positioned. Reposition the bottle and repeat the measure.
High signal (HIGH)
it may indicate that the bottle is not correctly
positioned. Reposition the bottle and repeat the measure.
Note: errors LOW and HIGH may appear in some particular
measuring conditions. If you find a particular bottle type that
gives alternatively HIGH and LOW errors, try cleaning the
bottle from dirt or condensation and position the bottle at a
different height.
L PRO SRL, ALL RIGHTS RESERVED - v. 2.5
16
L.SENSOR.CO2
ERRORS MESSAGES
Measure not valid (Error code AD01)
the instrument did not execute the measure; close the
error message and repeat the measure; this error could
happen for strong optical defects of the bottle or for measure
out of range. If the error persist, please contact the
assistance.
Measure >8 bar(!)
the instrument is calibrated for measuring pressure up
to 8 bar absolutes. If the internal pressure of the bottle is
higher than 8 bar but not out of range, the instrument
performs the measure and display a “!”, signaling that the
value is an approximate guess and not a certified measure.
Out of range
when the CO2 concentration is lower than the
minimum or the pressure in higher than 8.5 bar, the
instrument displays “Out of range”
L PRO SRL, ALL RIGHTS RESERVED - v. 2.5
17
L.SENSOR.CO2
USER INFORMATIONS
L.sensor.CO2 measures directly:
- total pressure (in absolute bar) inside the bottle. Value is
measured in the actual condition of the bottle.
- CO2 concentration inside the bottle; value is indicated as
partial pressure (in absolute bar) at the actual condition of
the bottle.
The instrument calculates and displays the following values:
- total pressure (in absolute bar) inside the bottle al 20°C.
- CO2 partial pressure (in absolute bar) inside the bottle at
20°C.
- CO2 concentration dissolved in the liquid, in g/l.
Visualizations at 20°C and CO2 dissolved in liquid are obtained
from the measured pressures with the following formulas.
1. Formula for calculating total pressure and partial pressure
at 20°C from the values at temperature t
The pressure at 20°C is calculated using the following
proportion:
where:
Pt = pressure at actual temperature
P20 = pressure calculated at 20°C
KHt = Henry coefficient at actual temperature
KH20 = Henry coefficient at 20°C
The Henry coefficient are calculated with the following
formula:
where:
T is the temperature at which the coefficient is calculated
L PRO SRL, ALL RIGHTS RESERVED - v. 2.5
18
L.SENSOR.CO2
USER INFORMATIONS
2. CO2 concentration dissolved in liquid, in g/l.
The instrument uses the following table, from the Gazzetta
Ufficiale, to calculate the CO2 concentration dissolved
starting from the partial pressure of CO2 at 20°C.
The formula used is the following:
conc. CO2 in g/l = PCO2(bar) * coeff. in table
The table is the following:
Alcohol vol % at 20°C
SUGAR
g/l
6
7
8
9
10
11
12
13
14
15
1
1,558
1,539
1,519
1,500
1,480
1,461
1,441
1,422
1,402
1,383
10
1,538
1,519
1,499
1,480
1,461
1,442
1,422
1,403
1,384
1,365
20
1,515
1,496
1,477
1,459
1,440
1,421
1,402
1,383
1,364
1,345
30
1,493
1,474
1,456
1,437
1,418
1,400
1,381
1,362
1,344
1,325
40
1,470
1,452
1,434
1,415
1,397
1,378
1,360
1,342
1,323
1,305
50
1,448
1,430
1,412
1,394
1,376
1,357
1,339
1,321
1,303
1,285
60
1,425
1,408
1,390
1,372
1,354
1,336
1,319
1,301
1,283
1,265
70
1,403
1,385
1,368
1,350
1,333
1,315
1,298
1,280
1,263
1,245
80
1,381
1,363
1,346
1,329
1,312
1,294
1,277
1,260
1,242
1,225
90
1,358
1,341
1,324
1,307
1,290
1,273
1,256
1,239
1,222
1,205
100
1,336
1,319
1,302
1,286
1,269
1,252
1,235
1,219
1,202
1,185
110
1,313
1,297
1,280
1,264
1,247
1,231
1,215
1,198
1,182
1,165
120
1,291
1,274
1,258
1,242
1,226
1,210
1,194
1,178
1,162
1,145
L PRO SRL, ALL RIGHTS RESERVED - v. 2.5
19
L.SENSOR.CO2
USER INFORMATIONS
MEASUE METHODOLOGY
L.sensor.CO2 executes the measure using the absorption of
the infrared light by the CO2 molecules; during the measure,
the head space is crossed by an IR laser ray that is attenuated
by the presence of CO2. The laser wavelength is modified to
scan some absorption lines of the gas analyzed. We measure
the width of the absorption line (related to total pressure)
and its intensity (related to the concentration of CO2).
CALIBRATION OF THE INSTRUMENT
L.sensor.CO2 is calibrated during the production line using a
complex series of known samples with different CO2
concentrations and pressures.
The calibration is definitive and does not have an expiration
date. No calibration operation is due to the user.
The instrument has a sophisticated autocalibration procedure
that starts at every measure and verifies the calibration of the
most important parameters of the instrument (see page 11).
Under request, L pro can supply known samples useful to
certify the correct operation of the instrument.
L PRO SRL, ALL RIGHTS RESERVED - v. 2.5
20
L.SENSOR.CO2
SAFETY REGULATION
The following instructions must be read and applied by the
operator of the L.sensor.CO2 aphrometer to operate in safe
conditions.
Allowed use:
-static measure of pressure in PET and glass bottles
containing water, soft drinks, beer or wine
-static measure of CO2 concentration in PET and glass
bottles containing water, soft drinks, beer or wine
-the measure must be performed with the instrument
positioned on a flat and leveled surface (a desk or a table).
NOT allowed use:
- use of the instrument by operator that did not read
the user manual
- use in external environment
- use on unstable surfaces or conditions
- modification of mechanical, optical and electrical
components
- opening or removing parts of the instrument
- execution of any kind of modification to the
instrument
WARNINGS
Use both hands when modifying the height of the centering
base. RISK OF NIPPING.
DO NOT TOUCH laser and receiver lenses. The modification
of those lenses causes warranty expiration.
The handle of sparkling bottles requires care. Those are
recipients under pressure and may explode. Please use the
maximum attention!
The instrument is supplied by 110-220Vac. RISK OF
ELECTRIC SHOCK: DO NOT OPEN or modify the instrument!
Not allowed use may cause damage to things and persons. The
person in charge of the instrument must inform the operator
about all the safety rules and the risks of a not allowed use of
the instrument.
L PRO SRL, ALL RIGHTS RESERVED - v. 2.5
21
L.SENSOR.CO2
SAFETY REGULATION
LASER CLASS
The laser aphrometer uses and infrared (not visible) laser ray
that is emitted by position (3), crosses the bottle and is
received by the photodiode (9).
The signal dissemination by the bottle is not dangerous for the
operator.
DO NOT use mirrors or magnifying lenses to deviate the
laser ray.
The laser is a Class 1 laser product, in conformity to:
- IEC60825-1: 1993 “Safety radiation of laser
products”
- EN60825-1: 1994 “Safety radiation of laser products”
USE OF LASER CLASS 1 PRODUCTS:
They can emit radiations in both visible and not visible range
and their beams are not dangerous if observed directly in a
non continuous mode, while they can be dangerous if
observed with instruments that amplify and concentrate the
optical ray (such as microscopes, binoculars, lenses etc.).
L PRO SRL, ALL RIGHTS RESERVED - v. 2.5
22
L.SENSOR.CO2
TECHNICAL DATA
Typical measuring acc.cy (*): +-0,1 bar(Ptot)/+-0,1
bar(PCO2)
(*) precision is higher for PET bottles, lower in glass bottles
Measuring medium time:
Measurable range:
5 sec
Ptot da 0,5 a 8 bar
CO2 from 50% to 100%
Extended CO2 range version
from 15% to 100%
Minimum unity displayed:
Ptot 0,1 bar
PCO2 0,1 bar
CO2 dissolved 0,1 g/l
Class laser:
I
Laser type:
IR, <1 mW
Stand by:
automatic after 20 min
Dimensions:
mech 300x250x550mm
electr 400x300x200mm
Temperature: stock from -20°C to +50°C
working from +5°C to +35°C without condensation
L PRO SRL, ALL RIGHTS RESERVED - v. 2.5
23
L.SENSOR.CO2
L pro srl -
Via Lister, 11 35143 Padova - P. IVA 04200620286 - Tel +39 049 9916081 - Fax +39 049 9919441 - Email: [email protected] - www.lpro.it
Padova, 10/12/2007
DICHIARAZIONE DI CONFORMITA’ ED INCORPORAZIONE
DECLARATION OF ACCORDANCE AND INCORPORATION
DECLARATION DE CONFORMITE’ ET INCORPORATION
La Soc. L pro srl di Padova – PD – Italia
Firm L pro srl from Padova – PD – Italy
La S.ètè L pro srl de Padova – PD – Italie
DICHIARA – DECLARES –
DECLARE
In qualità di costruttore, sotto la sua responsabilità che i suoi strumenti di misura, sono
CONFORMI ai requisiti prescritti dalle Direttive Comunitarie:
Under his own responsibility that his measuring instruments are in ACCORDANCE with the
requirements prescribed by the European Directives:
Sous sa responsabilité, que ses moyens de mesure sont CONFORMES aux conditions prescrites par
les Directives Communautaires :
*
*
*
73/23/EEC
98/37/EC
89/336/EEC
Bassa tensione – Low tension – Basse tension
Direttiva macchine – Machinery directive – Directive machine
Comp. elettromagnetica – Electromagnetic comp. – Comp. Èlèctromagnetique
relative al materiale elettrico destinato ad essere utilizzato entro il campo di tensione fra 50 e
1000 Volt in corrente alternata.
Concerning electric material used between 50 and 1000 Volt in alternative current.
Relatives au materiel èlèctrique destinè à l’utilisation entre les tensions 50 et 1000 Volt en courant
alternatif.
L pro srl
C.E.O.
Paolo Tondello
L pro srl – Sede legale: via Lister, 11 – 35143 Padova (PD)
Uffici: P.zza Don Rino Brasola, 4 – Cervarese S. Croce (PD) – Tel 049 9916081 Fax 049 9919441
Email: [email protected] - www.lpro.it
L PRO SRL, ALL RIGHTS RESERVED - v. 2.5
24
L.SENSOR.CO2
REFERENCES
L pro srl
via del Lavoro, 1/3
36043 Camisano Vicentino (VI)
Italy
web: www.lpro.it
email: [email protected]
tel: +39 0444 411527
fax: +39 0444 316320
L PRO SRL, ALL RIGHTS RESERVED - v. 2.5
25