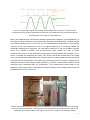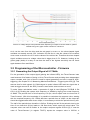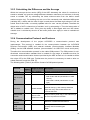
1
Development of a Proximity Based Alternative Input Device for Motor Disabled Persons Term paper submitted in partial fulfillment of the requirements for the degree of Bachelor of Science in Engineering at the University of Applied Sciences Technikum Wien - Degree Program BBE By: Franziska Horak Student Number: 1010227029 Supervisor 1: Dipl.-Ing. Christoph Veigl Vienna, 13.05.2013 Declaration „I confirm that this paper is entirely my own work. All sources and quotations have been fully acknowledged in the appropriate places with adequate footnotes and citations. Quotations have been properly acknowledged and marked with appropriate punctuation. The works consulted are listed in the bibliography. This paper has not been submitted to another examination panel in the same or a similar form, and has not been published. I declare that the present paper is identical to the version uploaded." Vienna, 13.05.2013 Franziska Horak Place, Date Signature Kurzfassung In dieser Arbeit soll die Entwicklung eines neuen alternativen Eingabegerätes für Personen mit physischen Einschränkungen beschrieben werden. Die Entwicklung fand im Rahmen des EU Projektes ‚AsTeRICS’ (Assistive Technology Rapid Integration & Construction Set) statt. Ziel dieses Projektes ist es, durch ein Konstruktionsset für assistierende Technologien welches aus verschiedenen Eingabehilfen und einer Softwareplattform besteht, den Zugang zu PC oder Mobiltelefon für Personen die an einer Tetra- oder Paraplegie (der oberen Extremität) leiden, zu vereinfachen. Für das neue Eingabegerät wurde ein Sensor welcher über eine Infrarotdiode Licht emittiert und das von einem Objekt reflektierte Infrarotlicht mittels Fototransistor detektiert, verwendet. Um den möglichen Einsatzbereich des Sensors zu ermitteln, wurden zahlreiche Messungen durchgeführt, welche als Ergebnis den Bereich der höchsten Sensibilität zwischen 5mm und 30mm lieferten. Um den Einfluss des Infrarotanteils des Umgebungslichtes zu reduzieren wird die Infrarotdiode gepulst betrieben und das Signal des Fototransistors über einen Schwingkreis zu einem sinusförmigen Signal modifiziert. Da auch Personen die an einer Tetraplegie leiden die neu entwickelte Eingabehilfe verwenden können sollen, wurde das Kinn gewählt um das Infrarotlicht zu reflektieren. Je nach Entfernung von Kinn zu Fototransistor, fällt mehr oder weniger Spannung über dem Fototransistor ab. Diese Spannungsänderung wird in den Analog-zuDigital Konverter eines ATMEL 8-bit AVR Mikrocontroller (AT90USB1286) auf einem Teensy Development Board (Teensy++ 2.0) geführt. Nach einer Mittelwertbildung der Messwerte können die Werte an die Softwareplattform (AsTeRICS Runtime Environment – ARE) versendet werden. Die Kommunikation zwischen neu entstandenem Communication Interface Module (CIM) und PC findet über eine USB-Verbindung und ein spezielles Kommunikationsprotokoll statt. Um die neue Eingabehilfe mit der ARE und der ACS (AsTeRICS Configuration Suite – ermöglicht einfaches Erstellen eines Modells welches die Werte die der neue Distanzsensor liefert zu Mauszeigerbewegungen ‚umwandelt’) verwenden zu können, musste die entsprechende Software geschrieben werden. Mit der daraus resultierenden neuen alternativen Eingabehilfe wurde eine weitere Möglichkeit geschaffen Personen mit starken physischen Einschränkungen den Zugang zu Bildung und Wissen, aber auch zur Teilnahme am sozialen Leben zu erleichtern. Schlagwörter: Assistierende Technologie, Alternatives Eingabegerät, Reflektierte Infrarotstrahlung messender Sensor, Teensy++ Development Board, EU Projekt AsTeRICS Abstract This work describes the development of a new alternative input device for people with physical limitations. The development was part of the project ‘AsTeRICS’ (Assistive Technology Rapid Integration & Construction Set) of the EU. Aim of this project is an easier access to PCs or cell phones for people who suffer from a Tetra- or Paraplegia (of the upper extremities). This is achieved due to a construction set that consists of several input devices and a software platform. For the development of the new input device a reflective object sensor that emits infrared light by an infrared diode and detects the light that is reflected by an object with a phototransistor, was used. To determine the possible operating range of the sensor, several measurements were carried out. Those measurements brought up the most sensitive area at distances between 5mm and 30mm. For a minimization of the ambient light’s fraction of infrared light, the infrared diode is pulsed. The signal that leaves the phototransistor is lead through a parallel resonant circuit in order to achieve a sinus-shaped signal. As also persons who suffer from a Tetraplegia should be able to use the new alternative input device, the chin functions as the object that reflects the infrared light. Depending on the distance between sensor and chin, either more (small distance) or less (greater distance) voltage drops across the phototransistor. These changes of voltage drop are sent to the digital-to-analog converter of an ATMEL 8-bit AVR microcontroller (AT90USB1286) mounted on a Teensy Development Board (Teensy++ 2.0). After averaging the measured values, they are forwarded to the software platform (AsTeRICS Runtime Environment – ARE). The communication between the new built Communication Interface Module (CIM) and the PC is carried out via an USB connection and a special communication protocol. For the new input device being compatible with the ARE and the ACS (AsTeRICS Configuration Suite – necessary to build a model that converts the values of the new distance sensor to mouse pointer movements), also the corresponding software had to be developed. With this new alternative input device a new opportunity for people, who have physical limitations, was developed to access education and to participate in social life more easily. Keywords: Assistive Technology, alternative input device, reflective object sensor, Teensy++ Development Board, EU project AsTeRICS 2 Table of Contents 1 Introduction .........................................................................................................................5 1.1 Background ....................................................................................................................5 1.1.1 AsTeRICS Runtime Environment (ARE) ...................................................................6 1.1.2 AsTeRICS Configuration Suite (ACS) .......................................................................6 2 Materials .............................................................................................................................7 2.1 Reflective Object Sensor QRD1114 ..............................................................................7 2.2 Teensy++ 2.0 Development Board ................................................................................8 2.3 Components of the AsTeRICS ACS-model that is used with the Proximity Sensor ......8 2.3.1 Utilized Processors ...................................................................................................9 2.3.2 Utilized Sensors ......................................................................................................10 2.3.3 Utilized Actuators ....................................................................................................11 3 Methods ............................................................................................................................11 3.1 Testing Sensor Properties ...........................................................................................11 3.1.1 Permanent Shining Infrared LED of the QRD 1114 ................................................11 3.1.2 Pulsed Infrared LED of the QRD 1114 and Dimensioning of the Parallel Resonant Circuit 15 3.2 Programming of the Microcontroller - Firmware ..........................................................18 3.2.1 Generating the Output Signal of 9.174kHz .............................................................18 3.2.2 Measuring Maxima and Minima – Triggering the ADC ...........................................19 3.2.3 Calculating the Difference and the Average ...........................................................20 3.2.4 Communication Protocol and Features ...................................................................20 3.2.5 Communication of the Teensy USB Development Board (Teensy++ 2.0)..............22 3.2.6 Overview of the Source Files (.c-files) and their Functions .....................................24 3.3 Writing the AsTeRICS Plugin Code .............................................................................26 3.3.1 Bundle Descriptor ...................................................................................................27 3.3.2 Component Lifecycle ..............................................................................................28 3.4 Design of the Printed Circuit Board (PCB) and the Mounting ......................................29 4 Results ..............................................................................................................................32 5 Discussion and Conclusion...............................................................................................37 Bibliography ............................................................................................................................39 3 List of Pictures ........................................................................................................................41 List of Tables ..........................................................................................................................43 A: Source files (.c-files) of proximity sensor CIM ....................................................................44 4 1 Introduction This thesis can be placed in the field of assistive technology for motor disabled persons. More precisely the content of the paper belongs to the sub-group of alternative input devices, which replace a computer mouse or a switch in general. Especially people who suffer from partially or complete motor impairments of all extremities (tetraparesis/-paralysis) are reliant on these alternative input devices in order to manage their daily routine or to use a computer. In order to make lives of motor disabled persons more comfortable there already exists a variety of systems for alternative human-computer interactions. The wide range of those systems reaches from eye- or face-tracking systems, which can be used with on-screen keyboards, to voice input and special mice or keyboards [1]. As tetraparesis/-paralysis (as well as motor disabilities in general) can differ in appearance and severity, it is important that the adjustment of alternative input devices can be done easily and individually to satisfy the users’ needs as good as possible. The project AsTeRICS (Assistive Technology Rapid Integration & Construction Set) [2] has exactly the goal to meet those before mentioned demands. This paper is another contribution to the AsTeRICS project as it describes the development of an alternative input device that can be used with the AsTeRICS software. The new device is going to be built out of a sensor that emits infrared light via an infrared diode and measures the infrared light that is reflected by an object via a phototransistor. Depending on the distance between sensor and object the measured voltage drop across collector and emitter changes [3]. In the context of the application and the project AsTeRICS, the sensor is going to be called proximity sensor. The reflecting object is going to be the chin of the user so that by moving the jaw, the amount of reflected light and therefore the amount of the measured voltage changes. The voltage then serves as input signal for the Analog-toDigital converter (ADC) of an ATMEL 8-bit AVR microcontroller (AT90USB1286) that is mounted on a Teensy USB Development Board (Teensy++ 2.0). The signal afterwards gets processed within the microcontroller in terms of averaging the measured values to achieve better results. Following this, the averaged values are sent to the AsTeRICS Embedded Computing Platform. Reaching the Embedded Computing Platform it is easily possible for the end-user to combine the sensor with a variety of already implemented actuators (e.g. onscreen keyboards), sensors and processors. These combinations are called models that are built in the AsTeRICS configuration suite (ACS). One model is going to be used for mouse movements. There is going to be the design of a printed circuit board (PCB) that contains the necessary circuits between sensor and ADC and of a fixation so that the sensor can be mounted at the right position near the chin. For the fixation an advanced head mounting that was already designed during the project AsTeRICS, with an appertaining box that is going to contain the PCB, is used. At the end of this paper a new, fully working and usable sensor shall be presented. 1.1 Background As already mentioned in the introduction (Chapter 1), the new developed alternative communication device (proximity sensor) is going to be part of the project AsTeRICS (Assistive Technology Rapid Integration & Construction Set). The project’s aim is to offer a flexible framework for Assistive Technologies that can be easily adapted to the needs of 5 users with motor disabilities. Besides the hardware components including sensor- and actuator modules (e.g. camera, switch), Communication Interface Modules (CIMs – interfaces to connect sensors/actuator to computing platform) and a computing platform to run the AsTeRICS software, there exists a software framework. This software framework consists of the AsTeRICS Runtime Environment (ARE) and the AsTeRICS Configuration Suite (ACS). [4] 1.1.1 AsTeRICS Runtime Environment (ARE) The ARE, as the basic software framework, is an OSGi-based middleware [www.osgi.org]. The ARE is necessary to run different plugins (programmed in JAVA, representing sensors or actuators), which can be combined to AsTeRICS applications – the so-called ‘models’. The plugins are implemented as independent OSGi bundles and the OSGi-based middleware makes it possible to run the software plugins in parallel. The runtime environment also starts and stops the operation of the plugins. The structure of a plugin (properties, inputs, outputs and event ports) is defined in XML files, which are also the base for the OSGi-middelware, to construct a runtime representation of an installed plugin. Furthermore there exists another XML file that comes from the ACS and represents a runtime model (system model). Due to the information provided by this system-model-XMLfile the ARE knows which plugins it has to activate and how the data flow between them has to be defined. The communication between the ARE and the ACS takes place via a TCP/IPbased communication protocol named ASAPI. Other services for plugin developers that are provided by the ARE are for example a communication support for COM ports for the connection of the CIMs, reporting errors that occur on the runtime environment and interacting with the graphical user interface (ARE GUI). This graphical user interface makes it easier for end-users to manipulate the ARE. [4], [5] For more information see AsTeRICS User Manual [4] p. 14 and AsTeRICS Developer Manual [5] p. 8-9 1.1.2 AsTeRICS Configuration Suite (ACS) The ACS is used to create new models for the ARE. Also these models can be manipulated, started, stopped and uploaded/downloaded to/from the ARE in the ACS. The ACS can – but does not need to – run on the same computer as the ARE. For the usage of the ACS there are some terms that are important to know [4]: - Plugins (pieces of software) are needed to communicate with a device and to perform certain calculations. [4] - Components can be divided into three types: o sensors: are the source of data flow in an AsTeRICS model. The newly developed component that is described in this work belongs to the group of sensors. o processors: are used to manipulate the data from a sensor or another processor in a way to deliver new output data for other processors or actuators 6 o actuators: execute the desired action and are driven directly or indirectly by data from sensors All the listed components have ports to connect to other components, so that a data exchange between them can occur. There exist four types of ports: input, output, event listener and event trigger ports. [4] Picture 1 Example of an ACS-model consisting of a sensor (FacetrackerLK: tracks the position of the nose or the chin via a web cam), a processor (Averager: stores a defined number of values that arrive at the input port, averages them and sends the value via the output port) and an actuator (Mouse: the mouse pointer movements in horizontal direction are now carried out via the horizontal movements of the user’s nose) 2 Materials 2.1 Reflective Object Sensor QRD1114 A reflective object sensor consists of an infrared light emitting diode (LED) and for sensing the reflected light a npn-phototransistor that converts light into electric current. Both, LED and phototransistor are placed side by side on the top of the sensor. The light that is measured with the phototransistor has to be reflected by an object in the near of the sensor. The more infrared light is reflected by an object, more voltage drops between base and emitter and therefore more current flows from collector to emitter. Also the voltage drop across the phototransistor (voltage drop across collector and emitter) changes with the intensity of the reflected infrared light (Picture 7, Picture 8 and Picture 9). The reflective object sensor QRD1114 reaches its maximum of current flow with a reflecting object at a distance of 25mils (0.635mm) [3] and a maximum of voltage drop within 0mm to 5mm using a 220Ω series resistor before the infrared LED (Picture 9). Picture 2 Reflective object sensor QRD 1114, dimensions: 6.1 x 4.39 x 4.65mm, weight: 2g 7 2.2 Teensy++ 2.0 Development Board The Teensy++ 2.0 Development Board is a microcontroller development system that is completely based on USB. To connect the Board to a PC, only a standard Mini-B USB cable is necessary. It is either available with only solder pads for all I/O signals or with header pins that are already soldered onto it. [6] Its key features are an AVR processor with 16MHz clock frequency, the possibility of single push button programming combined with the very easy-touse Teensy Loader application, the free software development tools and the fact that due to the USB connection it can be any type of device. [7] Specifications can be found on the table below (Table 1). Specification Teensy++ 2.0 Development Board Processor AT90USB1286 (8bit AVR, 16MHz) Flash Memory 130048 RAM Memory 8192 EEPROM 4096 I/O (Number) 46, 5 Volt Analog In 8 PWM 9 UART, I2C, SPI 1, 1, 1 Price 24$ Table 1 Key features and specifications of the Teensy++ 2.0 Development Board [7] Picture 3 Teensy++ 2.0 Development Board with header pins [7] 2.3 Components of the AsTeRICS ACS-model that is used with the Proximity Sensor In order to make the new proximity sensor usable as a mouse, it was necessary to develop a new model within the ACS. This model consists of several components that help to adjust the characteristics and the behavior of the proximity sensor. In this section only the components itself and their functions are shortly described. For the working principle of the whole model see Chapter 4. As source of information in this chapter the help-function of the ACS was used. Also look there for more detailed information about the different used components. 8 2.3.1 Utilized Processors - Averager This component consists of one input- and one output port. As its name already suggests, it averages values that enter the component via the input port. Therefor the user has the possibility to select the buffer size, thus the number of values over which the average should be built. In case of the proximity sensor four values first get filled in the buffer and then are averaged. This helps to flatten the curve even more. - SampleAndHold The SampleAndHold-component provides four input- and output ports and one event listener port. After capturing an event that was either sent by the AutostartEvent- or the ButtonGrid-component (button ‘Init’), it saves the current value that arrives via the input port. The stored value should equal the neutral point of the chin and therefore the neutral position of the mouse (no movement). - MathEvaluator This component consists of four input ports and one output port. Values that arrive via the input ports can be used for every mathematical expression the user wants to express and the result of the mathematical expression is delivered to the output port. In case of the proximity sensor, two input ports are used. The value that is saved in the SampleAndHold-component is subtracted from the current value that is sent from the Averager. This subtraction makes it possible that the movement of the chin can be interpreted as negative (equates to mouse movement to the left) and positive (equates to mouse movement to the right) values around the neutral point. - StringDispatcher The StringDispatcher-component provides one input-, one output- and one event listener port. After receiving an event from the ButtonGrid-component and after an individually defined delay, it sends the appropriate information through the output port. In the model that was designed for the proximity sensor, the StringDispatcher-component delivers information about the next click (double click, right click, drag click) to the mousecomponent. - PathSelector The PathSelector has one input-, one event listener- and four output-ports. The component provides the opportunity to link the input port (numerical signal) with one of the four output ports. The output port that should be linked with the input port can either be chosen directly by a dedicated event listener port or by using the event listener port the link connection is switched to the next or the previous output port. This enables the user to fulfill two-dimensional mouse cursor movements. After staying within the dead zone of the curve for a defined time period of 600ms (component Timer.1), the next output port is linked with the input port. Depending on the linked output port, the mouse component knows if the upcoming chin movement should be interpreted as movement into the horizontal or vertical direction. - Deadzone The Deadzone-component can also be called ‘resting zone’. With this component one is able to define active and passive zones where the mouse pointer should move or not. It has three input- and two output ports and one event trigger- and event listener port each. 9 To move the mouse pointer, it is necessary to exceed a defined value of a sensor. Using the component with two-dimensional values, as it is the case with the proximity sensor, the Deadzone-component can be described as a number line. After defining the zero point on the scale, the ‘radius’ (0.5) of the (in this case) passive zone around the zero point can be specified. For the usage of the proximity sensor only the event trigger port is used as output port. From this port events are sent every time the current value enters or leaves the defined ‘radius’. - AdjustmentCurve This component consists of two input ports and one output port. It shows the user the curve that is produced by the usage of any alternative input device (sensor) that provides two-dimensional values. Due to some sensor properties or anatomical conditions of the user it could be the case that the values in one direction away from the neutral point (zero point of resting zone scale) are different (e.g. in terms of acceleration) to those in the opposite direction. With the AdjustmentCurve-component it is possible to compensate such differences and to further adjust the values that represent the mouse pointer movement. Furthermore the output values of this AdjustmentCurve-component are used as input signal of the Deadzone-, the PathSelector- and the Oscilloscope-component to display the current values. 2.3.2 Utilized Sensors - AutostartEvent This component provides only one event trigger port and sends an event after the whole model is started. The moment for sending the event can be chosen individually due to defining a delay. For the usage of the proximity sensor a delay of 1000 seconds was chosen. - ButtonGrid The ButtonGrid works like an on-screen keyboard with the special feature that the keys can be defined individually. It provides only one port – an event trigger port. Via this port events are sent after buttons are pressed. The keys that are used in case of the proximity sensor are: ‘Init’, ‘Enable/disable’, ‘DOUBLECLICK’, ‘RIGHTCLICK’, ‘DRAGCLICK’ and ‘saveCurve’ (Picture 25). The button ‘Init’ is pressed after positioning the sensor correctly at the chin. The value that is now sent from the proximity sensor (thus the current position and the corresponding light reflection) is initialized as neutral point. Clicking the button ‘Enable/disable’ enables or disables the mouse function of the proximity sensor. If the function is disabled, the normal mouse can be used. Enabling the proximity sensor mouse function means that the normal mouse cannot be used. The buttons that are written in capital letters provide the choice between the different clicking possibilities for the next left click. ‘saveCurve’ is used to save the curve that was formed in the component AdjustmentCurve. - Timer This component has one input-, one output-, one event trigger and one event listener port. It can measure time in milliseconds. This measured time can either be reported on the output port or after defining a time period, events can be triggered when the time period has passed. Used with the proximity sensor only the event listener port (waits for 10 events that are sent from the Deadzone-component) and the event trigger port (sends events to PathSelector- and WavefilePlayer-component) are used. Both Timercomponents start to count after the user enters the defined dead zone. They stop counting after exiting the dead zone again or after the defined time period has passed and an event has been triggered. - Slider With the Slider-component it is possible to generate a slider of any size with an adjustable range of values on the ARE desktop. Connecting its only output port to the input port of a component that is designed for the slider’s values, it can be used to change parameters of the model during runtime. With regard to the proximity sensor the slider is used to adjust the value of the threshold that is necessary to send events if the corresponding sending mode was selected (see Table 4). 2.3.3 Utilized Actuators - Mouse This component facilitates the movement of the mouse cursor and the clicking process on the computer the ARE is running on. The three different input ports and the event listener port (cursor movement x-direction, cursor movement y-direction, press/release action) provide the mouse functions. - WavefilePlayer The WavefilePlayer has one input port and one event listener port. After receiving an event, a before specified .wav-file is played on the platforms sound output. In case of the proximity sensor, a sound is played every time the user stays within the dead zone for the defined time period that causes an event. - Oscilloscope This component can display one or two signal values. The trace color and update speed of the signal that enters the component via its input port can be configured via the component’s parameters. - EventVisualizer With the EventVisualizer-component events can be graphically displayed due to a simple text output that shows the names of the events. It is mainly used for testing the configurations during setup time. With regard to the proximity sensor it displays events that are produced after the corresponding sending mode (Table 4) has been selected. 3 Methods 3.1 Testing Sensor Properties 3.1.1 Permanent Shining Infrared LED of the QRD 1114 First of all it was necessary to measure the ratio of distance between object and sensor and the resulting output voltage. This ratio helped to detect the most sensitive area in front of the sensor and therefore gives indication of the right adjustment in the near of the head (more precisely in the near of the chin). In order to see if surrounding sunlight/daylight influences the output voltage, the measurement was once taken with closed sun-blinds and once taken 11 with opened sun-blinds. Also the forward current IF through the infrared diode was changed for the purpose of varying the intensity of the emitted light. To change the value of IF, different series resistors were used. According to the test conditions of the sensor’s datasheet [3] the first tested IF_1 was 15mA. Increasing IF to IF_2=27.5mA and IF_3=36mA increased the intensity of emitted infrared light. Knowing the maximum forward voltage VF of the diode (VF=1.7V) [3] and the operating voltage VOP of the whole system (VOP=5V), the values for the different series resistors could be calculated using Formula 1 first: 𝑉!" − 𝑉! = 𝑉𝑜𝑙𝑡𝑎𝑔𝑒 𝑎𝑝𝑝𝑙𝑖𝑒𝑑 𝑜𝑛 𝑠𝑒𝑟𝑖𝑒𝑠 𝑟𝑒𝑠𝑖𝑠𝑡𝑜𝑟 𝑉! Formula 1 Applied on the above-listed values VR = 5V – 1.7V = 3.3V. Secondly the value of the series resistor can be calculated by using a converted type of the Ohm’s law: 𝑈 =𝑅∙𝐼 Formula 2 Converted law: 𝑈 𝑅= 𝐼 Formula 3 Now the above-calculated voltage of 3.3V that has to be applied on the resistor in order not to exceed maximum VF of the diode and the desired IF can be inserted into Formula 3. Table 2 shows the calculation for the three different series resistors that are needed to generate the three values of IF. Resistor Voltage on Wanted Calculated Available and Real forward series resistor forward current value of series used resistor current IF VR [V] IF_wanted [mA] resistor [Ω] values [Ω] [mA] 20 165 220 15 30 110 120 27.5 40 82.5 91 36 R1 R2 R3 3.3 Table 2: Calculation of three different series resistors to gain three different values of IF (20mA, 30mA, 40mA) For the measurement itself the sensor and the corresponding series resistor were fixed on a pinboard (circuit drawing see Picture 4). This pinboard was mounted on one end of a guide rail and a white paper on a slide was moved away from it (Picture 5 and Picture 6). Every millimeter the slide was stopped and the current voltage value was measured with an oscilloscope (Tektronix, Four channel digital storage oscilloscope, TDS 2024). The whole circuit was supplied with 5V from a power supply (Manson, Switching mode power supply, NRP-3630). 12 Picture 4 Circuit diagram to measure the distance-voltage dependency (Permanent shining LED) Picture 5 Measurement setup to measure the Picture 6 Measurement setup to measure the dependency of object-to-sensor-distance and dependency of object-to-sensor-distance and voltage drop across the phototransistor – voltage drop across the phototransistor – permanent shining infrared LED (pinboard, sensor, permanent shining infrared LED (pinboard, sensor, white paper on slide) white paper on slide, guide rail, pointer to stop at every mm) Drawing the diagrams of dependency of the object-to-sensor-distance to the voltage drop across the phototransistor it has to be noticed that the part of the circuit containing the resistor RM and the phototransistor, works like a voltage divider. This means that with little or no reflected infrared light (reflecting object far away) the phototransistor acts like an almost infinite big resistor as there exists no voltage potential between base and emitter and a current flow from collector to emitter is not possible. Therefore all the supply voltage (VCC) drops across the resistor RM. By reducing the distance between object and sensor, the resistance of the phototransistor decreases as the voltage potential between base and emitter increases so that a current flow from collector to emitter is enabled. Now the supply voltage (VCC) drops across both parts (RM and the phototransistor) of the voltage divider. Hence the measured voltage across RM decreases. To be able to draw the dependency between the object-to-sensor-distance and the voltage drop across the phototransistor it is needed to subtract the voltage values that were measured across RM from VCC. 13 Picture 7 Voltage drop across phototransistor depending on object-to-sensor-distance, under artificial light conditions, three different series resistors (R1=220Ω, R2=120Ω, R3=91Ω) Picture 8 Voltage drop across phototransistor depending on object-to-sensor-distance, under artificial light & daylight conditions(cloudy sky, no direct sunlight), three different series resistors (R1=220Ω, R2=120Ω, R3=91Ω) 14 Picture 9 Voltage drop across phototransistor, artificial light compared to artificial light & daylight (cloudy sky, no direct sunlight), series resistor R1=220Ω Comparing the graphs of the three different series resistors (R1, R2, and R3) in Picture 7, it is apparent that the most sensitive area of R1 can be found within 5mm to 25mm. Increasing the intensity of the emitted infrared light by using smaller series resistors (R2 and R3) of the infrared diode the most sensitive area is shifted to distances within 7mm to 30mm. Looking at Picture 8 (opened sun-blinds) the comparison of the graphs of the three different series resistors (R1, R2, and R3) achieves nearly the same result as in Picture 7 (closed sun-blinds). While the most sensitive areas at short distances do not show a significant variation, a noticeable difference can be found at distances above 30mm. There, the influence of the amount of infrared light in daylight gets displayed. Even at big distances over 30mm the phototransistor detects infrared light. This effect is even better observable in Picture 9 where the measurements of R1 with and without daylight (cloudy sky, no direct sunlight) are compared directly. Due to the amount of infrared light in daylight a higher voltage drop over the phototransistor occurs (Picture 9: blue graph at higher voltages than red graph). As for the planned application an operating range above 30mm is not needed and a bigger series resistor lengthens the lifespan of the infrared LED, all further measurements and circuit designs are done using the 220Ω series resistor R1. 3.1.2 Pulsed Infrared LED of the QRD 1114 and Dimensioning of the Parallel Resonant Circuit To get rid of the influences caused by the amount of infrared light in the daylight, the infrared LED got pulsed with a square-wave signal (frequency: 10kHz, Picture 11: orange graph) that is produced by the microcontroller. This pulsing of the diode works, together with the parallel resonant circuit, to blind out the fraction of infrared light that is present in ambient light. This is possible as the resonant circuit can only be induced by the very special frequency of the pulsed diode. Therefore not only the fraction of infrared light that is present in the ambient light, but also all other frequencies of surrounding light are blinded out. Furthermore the resonant circuit transforms the by the phototransistor detected square-wave signal into a 15 nearly perfect sinus-shaped signal (Picture 11: green graph). For the dimensioning of the parallel resonant circuit the resonance frequency fR correlates to the frequency of the pulsed infrared LED. Therefore for further calculations one has to assume fR=10kHz. Starting with the dimensioning of the resonant circuit, either the value of the inductor LR or the capacitor CR can be chosen first. In this case LR was defined first: LR=10mH. 1 𝑓! ≈ 2𝜋 𝐿 ∙ 𝐶 Formula 4 𝐶 ≈ 1 𝐿 ∙ 𝑓! ∙ 2𝜋 ! Formula 5 By using Formula 4 [8] and transforming it to Formula 5, it is possible to calculate the right value for C. By applying the values of fR=10kHz and LR=10mH to Formula 5, the equation delivers the capacity CR=25nF. An available capacitor that fits best to this value has the capacity CR=22nF. Additionally to the parallel resonant circuit the operating point has to be raised to 2.5V so that the signal oscillates around 2.5V. This raising of the operating point has to be done with regard to the later use of the signal as input to the analog-to-digitalconverter of the microcontroller were the reference voltage VRef reaches from a minimum of 0V to a maximum of 5V and therefore negative values can not be converted. Further the maxima and minima of the sinus-shaped signal are measured (Picture 11: red lines) and subtracted, so that there can be developed another diagram of the dependency of the objectto-sensor-distance to the voltage drop across the phototransistor. Picture 10 Circuit diagram to measure the distance-voltage dependency (pulsed LED) including the parallel resonant circuit (to transform received square-wave signal into a sinus-shaped signal) and to raise the operating point to 2.5V (inserted 33kΩ resistors). VIn delivers the frequency of 10kHz to pulse the diode. Capacitor C (10nF) is used to filter the signal before it enters the microcontroller via VOut. VCC=5V. 16 Picture 11 Square-wave signal of the pulsed infrared diode with a frequency of 10kHz and the corresponding sinus-shaped signal that is produced by the parallel resonant circuit that follows the phototransistor with the points of measurement Before the measurements, which were needed to generate the diagram of the dependency of the object-to-sensor-distance to the voltage drop across the phototransistor, could be carried out another adjustment had to be done. As the used electronic components of the parallel resonant circuit have tolerances of ±10%, the signal frequency fR is not exactly 10kHz. By empirically adjusting the frequency, the resonance frequency of the real parallel resonant circuit fR_real equals 9.174kHz. The measurements were carried out with a similar measurement setup as it was used with the permanent shining infrared LED (Chapter 3.1.1). Picture 12 shows the measurement setup: The sensor, which was connected to the whole circuit on the pinboard, was fixed on the stationary part of a sliding caliper whereas the paper was fixed on the movable part. The paper was moved away from the sensor, stopped every millimeter and the current voltage values (maximum, minimum, delta between maximum and minimum) were measured with an oscilloscope. This measurement setup leads to the diagrams of the dependency of the object-to-sensor-distance to the voltage drop across the phototransistor shown in Picture 13. Picture 12 Measurement setup to measure the dependency of object-to-sensor-distance and voltage drop across the phototransistor – pulsed infrared LED (connections to pinboard, sensor fixed on the steady part of the sliding caliper, white paper fixed on the movable part of the sliding caliper) 17 Picture 13 Voltage drop across phototransistor depending on object-to-sensor-distance, pulsed infrared LED, green graph: Delta = Maximum - Minimum As it can be seen from the blue and the red graph in Picture 13, the sinus-shaped signal oscillates not exactly around 2.5V. Indication for this fact is, that the values of the maxima never come as close to the 2.5V as the values of the minima do. Therefore the sinus-shaped signal oscillates around a voltage value that is bigger than 2.5V. However, looking at the green graph (delta) it is easy to see that the area of the highest sensitivity can be found again between 5mm and 30mm. 3.2 Programming of the Microcontroller - Firmware 3.2.1 Generating the Output Signal of 9.174kHz For the generation of the output signal (pulsing the infrared LED), the Timer/Counter1 was used because of its feature of being a 16-bit Timer/Counter and providing three independent output compare units (one of them is used for signal generation and one is used for ADCtriggering, see Chapter 3.2.2, Measuring Maxima and Minima – Triggering the ADC) [9]. This assures that for both signals (9.174kHz-signal to pulse infrared LED and the signal that is used as trigger source for the ADC) Counter1 starts at the same moment to count. To make further calculations easier, a prescaler of eight is used (Register TCCR1B à Bit CS11=1) [9]. Dividing the system clock frequency of 16MHz by eight, gives a new frequency of 2MHz. The periodic time of this frequency is 0.5µs, which equals now one timer-tick of Timer/Counter1. With this knowledge it is possible to calculate the compare value, starting with the required frequency of 9.174kHz that has a periodic time of 109µs. As the output pin should be toggled twice within those 109µs, it is necessary to divide the periodic time by two. The half of the periodic time therefore is 54.5µs. Dividing the half of the periodic time by the time of one timer-tick (0.5µs) leads to 109 timer-ticks, which equal the reload value. The compare value now can be written to the output compare register OCR1A [9]. If now the value of Timer/Counter1 (in register TCNT1) equals the compare value in OCR1A, a 18 compare-match-A-interrupt is triggered and the output compare pin OC1A is toggled automatically (special function of pin PB5, adjusted in register TCCR1A (Bit COM1A=1) [9]) every 54.5µs. Because of the toggling the infrared LED of the sensor is either turned on or turned off. The interrupt service routine (ISR(TIMER1_COMPA_vect)) that gets called every time a compare-match-A-interrupt occurs, contains only one line, where the compare value is increased by 109. Otherwise Counter1 would first count to 216 and again to 109 to trigger an new interrupt so that a signal with another frequency than 9.174kHz would be generated. 3.2.2 Measuring Maxima and Minima – Triggering the ADC The configuration of the analog-to-digital converter (ADC) contains the following parts: First the ADC-prescaler that is defined with 64 (register ADCSRA [12], Bits ADPS0/1/2). Dividing the system clock frequency of 16MHz by 64 leads to an ADC clock frequency of 250kHz and a periodic time of 4µs. Secondly the source of the reference voltage is chosen as AREF-pin with the internal Vref turned off (register ADMUX [12], Bits REFS0/1). Thirdly pin ADC3 that is used as analog input pin is defined by writing the Bits MUX0 and MUX1 in the ADMUXregister [9] to 1. Also the ADC auto trigger mode has to be enabled by setting the ADATE-Bit of the register ADCSRA. In this mode the ADC will always start a conversion on a positive edge of a selected trigger signal. The trigger signal itself is defined in the ADCSRB-register [9]. Writing the bits ADTS0 and ADTS2 to one, selects Timer/Counter1 compare-match-B as trigger source. In the ADC auto trigger mode a whole conversion takes 13.5 cycles (2 cycles of the 13.5 cycles at the beginning of the conversion are needed for sample & hold) [9, Table 25-1]. Those 13.5 cycles multiplied by the periodic time of the ADC clock (4µs) give a conversion time of 54µs. As the time from one maximum to one minimum of the sinusshaped signal is only 0.5µs longer than the conversion time it would be theoretically possible to measure every of the maxima/minima. However, for the future application, it is not necessary to have about 18 000 values per second available. Hence the compare value of Timer/Counter1 (compare-match-B) that is written to the output compare register OCR1B has to be calculated. Instead of sampling the sinus-shaped signal with a frequency of 9.174kHz every 54.5µs (sampling rate 18.34kHz), a sampling rate of about 500 samples per second (fsample=500Hz, Tsample=2ms) would be sufficient as well. Dividing Tsample by the 54.5µs the obtained number of 36.69 delivers the information that every 36.69th maximum/minimum would have to be sampled to achieve a sample rate of 500Hz. To sample alternately one maximum and one minimum it has to be an odd number of maxima/minima that are skipped. Setting the number to 39 and multiplying it with 54.5µs we get a new periodic time of the sample rate Tsample_new=2.1255ms (fsample_new=470.47Hz). Dividing Tsample_new by the time of one timer-tick (0.5µs) the compare value that has to be written to OCR1B [9] is 4251. The interrupt service routine (ISR(TIMER1_COMPB_vect)) that gets called every time a compare-match-B-interrupt occurs, contains only one line, where the compare value is increased by 4251. Otherwise Counter1 would first count to 216 and again to 4251 to trigger an interrupt so that a signal with another frequency than fsample_new would be generated. 19 3.2.3 Calculating the Difference and the Average Within the interrupt service routine (ISR) of the ADC alternately the value of a maximum is saved to variable ‘top’ and the voltage difference between maximum and minimum is directly saved to variable ‘diff’ by subtracting the latest minimum-value from the before saved maximum-value ‘top’. For building the sum out of the constantly new calculated differences (variable ‘diff’) a buffer with the size of eight is used where the latest eight values of ‘diff’ are saved. Due to this buffer, a currently updated value for ‘sum’ can be provided. Therefore the oldest value of ‘diff’ is cleared out of variable ‘sum’ by subtracting it. Then the latest value of ‘diff’ is added to variable ‘sum’. Every time the buffer is filled again with new ‘diff’-values, variable ‘sum’ is divided by the size of the buffer (buffer size: eight) in order to calculate an average. 3.2.4 Communication Protocol and Features During the development of the project AsTeRICS a communication protocol was implemented. This protocol is needed for the communication between the AsTeRICS Runtime Environment (ARE) and external modules (Communication Interface Modules (CIMs)) via the USB standard interface (communication via USB CDC virtual serial ports). Therefore this communication protocol is also called CIM-protocol. The CIM-protocol is a bidirectional communication standard that is needed for the usage of available services for connection and communication that are provided by the ARE as well as it is needed to define the unique ID for the CIM type. Furthermore the protocol is necessary to read or write socalled ‘features’ from/to the CIM. [5] The following table (Table 3) shows the format of a CIM-protocol packet. Data field Packet ID Size (bytes) 2 Range of values Description “@T” (0x4054) Identifier of the beginning of a new packet Packet from ARE ID (CIM ID) - AREàCIM: ARE ID (identification of ARE 2 version) - CIMàARE: CIM ID (identification of CIM type) Commands/ answers from CIM can contain Data size 2 0x0000-0x0800 optional data (e.g. ADC values). Data size says how many data is attached to the command/answer. Serial packet number CIM-Feature address 0x00-0x7f (0x801 replies from CIM) 2 Request Code (Reply Code) 0xff for event- Helps to identify what reply of the CIM belongs to which request from the ARE. Definition of addressed CIM-feature LSB represents a command code that is 2 globally valid for all CIM-types MSB: 20 - ARE à CIM: specification of transmission mode - CIM à ARE: error/status code related to transmission Optional data Optional CRC checksum Additional data of a packet. Actual length 0-2048 given “Data size” field. CRC32 0 or 4 - checksum Table 3 CIM protocol structure – packet format (Italic descriptions refer to communication from CIM to ARE) [5, see also for more detailed descriptions of packet data fields] Generally speaking, the programming of the CIM-protocol can be categorized into two different parts: 1.) The first part to be shortly described here is the analysis of a new arriving packet that was sent from the ARE to the CIM. After recognizing the two synchronization bytes “@” and “T” one after the other, the parsing of the packet goes on. Now variables are filled up with the right byte according to Table 3. Reaching the end of the packet, the second part of the CIM-protocol is carried out. 2.) In this second part, depending on the command that was sent with the packet from the ARE, the addressed feature is carried out, including the sending of an answer-packet that is sent from the CIM to the ARE. The answer-packet is generated also according to the packet format of Table 3. The following table (Table 4) provides an overview and short descriptions of the features that are realized in the new developed CIM called proximity sensor. CIM-feature name Teensy_CIM_Feature _UniqueNumber Teensy_CIM_Feature _Set_Threshold Expecte CIM- d Size feature (Bytes) address 0 0x00 2 0x02 Description Read feature (reading unique number from CIM) Write feature (writing threshold to CIM – needed for event generation) Write feature (writing mode of operation to CIM) Choice by sending following values to CIM: - 0 à CIM will send continuous values (average of eight ‘diff’-values; see ‘Calculating the Difference and the Teensy_CIM_Feature _Mode_Selection Average’) 2 0x06 - 1 à CIM will send an event (1), if the second of two immediately consecutive values exceeds the before set threshold - 2 à CIM will send an event (0), if the second of two immediately consecutive values succeeds the before set threshold - 3 à Combination of point 1 & 2 Table 4 List and description of the CIM-features that are provided by the new developed CIM called proximity sensor 21 Calculating the transmission frequency from the CIM to the ARE (during the mode of operation where the average of eight ‘diff’-values is continuously sent (see Table 4)) it has to be considered that one time Tsample_new (2.1255ms) is needed to get the value of one maximum (saved in variable ‘top’). To sample the ‘corresponding’ minimum and calculating immediately the difference out of those two values (maximum – minimum), Tsample_new goes by a second time. So to get one value that can be saved in variable ‘diff’, 4.251ms elapse. As always the average of eight ‘diff’-values is sent, or in other words: the sending process always starts when the buffer (size of buffer: 8) is full, the 4.251ms have to be multiplied by eight. If the buffer is full, the average is calculated and sent. Between two sent averagevalues Tsending = (Tsample_new 8) = 34ms go by. This Tsending equates to a sending frequency fsending = 1/ Tsending of 29.4Hz. 3.2.5 Communication of the Teensy USB Development Board (Teensy++ 2.0) The Teensy USB Development Board ‘Teensy++ 2.0’ uses the ATMEL 8-bit AVR microcontroller AT90USB1286 with a system clock frequency of 16MHz. For the communication with the PC (host) a USB connection is used. This makes the usage of the Teensy Development Board very easy and comfortable. The board provides a programmable USB connection enabling the developer to implement several USB device classes on the board. These classes can be recognized on the PC with a respective driver. After plugging in a new device to the host, several descriptors, which are data structures with a defined format, define the device class and give information about the specific features to the host. The first two fields of all descriptors contain the total number of bytes in the descriptor and the identification of the descriptor type. Some fields of a descriptor contain references to string descriptors. These are descriptors, which contain information that can be displayed and are readable for humans (e.g. in the device descriptor exist references to string descriptors describing the manufacturer, the product itself and the serial number of the product. [10] Descriptors Device descriptor This descriptor contains general information about the USB device and the device’s entire configuration. Every USB device has only one device descriptor. With the device descriptor it is possible to configure: - the length of the descriptor itself, - the type of the descriptor (constant that belongs to the configuration descriptor: 01h), - the functionality of the device and the driver that has to be nominally loaded (configured by three bytes: DeviceClass, DeviceSubClass and DeviceProtocol), - the maximum packet size and - information about the manufacturer and the product itself (For more detailed configuration options see [11] p. 261-263, Table 9-8) With this information and a look at the USB class codes that are defined by the USB Implementers Forum, Inc. [12], it is easy to see from the usb_serial.c-file that comes with the 22 Teensy Development Board that the Teensy Board conforms to the Communication Device Class (CDC) specifications (DeviceClass = 2, DeviceSubClass = 0, DeviceProtocol = 0). Configuration Descriptor The configuration descriptor contains information about a specific device configuration and the number of interfaces that are provided by this configuration. Requesting the configuration descriptor, all related interface- and endpoint-descriptors are returned to the host. Different to the device descriptor, an USB device can have one or more configuration descriptors. Each of the configurations that are defined by the configuration descriptor has one or more interfaces (and the corresponding descriptors) and each interface has optional endpoints (and their according descriptors). The configuration descriptor contains information about: - the length of the descriptor itself, - the type of the descriptor (constant that belongs to the configuration descriptor: 02h), - the number of interfaces that are supported by this configuration, - a description of the configuration (string descriptor) - and the maximum power consumption of the USB device in a specific configuration (power comes from the bus, USB device is fully operational) (For more detailed configuration options see [11] p. 264-266, Table 9-10) Comparing the above-mentioned information with the usb_serial.c-file of the Teensy Development Board, one can see that it supports two interfaces, a maximum power consumption of 100mA, but no string descriptor that describes the configuration. Interface Descriptor The interface descriptor describes the interface that is used within a specific configuration and is therefore always returned as part of the configuration descriptor. This descriptor provides information about: - the length of the descriptor itself - the type of the descriptor, - a number to identify the interface - the total number of supported endpoints (endpoint 0 is not included in the number of endpoints) - the functionality of the device, similar to the device class (configured by three bytes: InteraceClass, InterfaceSubClass and InterfaceProtocol), (For more detailed configuration options see [11] p. 267-269, Table 9-12) In case of the proximity sensor, there exist two interface descriptors and three endpoint descriptors. One interface descriptor defines the device as communication device (communication device class – CDC) and the other descriptor tells the host that the device can also operate as data interface (belonging to the CDC). [10] All the other descriptors that are found in the usb_serial.c-file (namely: CDC Header Functional Descriptor, Call Management Functional Descriptor, Abstract Control Management Functional Descriptor and Union Functional Descriptor) are not explained at this point. For information about those descriptors see [13] Chapter 5.2.3. 23 Enumeration Process This chapter provides just a short overview about the process of how the host detects and connects a new attached USB device. After plugging the device into one of the host’s USB ports, it is recognized due to a voltage change within the USB port. Now the device is powered. While the port of the new device is reset, the host gets the information in which mode (full- or high-speed-mode) the device is going to communicate. After resetting the device, it remains in the state of default until the host sends a request to get further information of the descriptors. Now the host allots an explicit new address to the device. The entire communication between host and device is processed via this address. [10] As all USB devices have to have a serial number, a vendor ID and a product ID the host is able to create a new COM port (on Windows) for every unique combination of those three parameters. For the creation of a new COM port on Windows the so-called .inf-file is necessary. Normally a device of the communication device class (CDC) is able to create a COM port on its own, but Windows set the .inf-file as a standard. One device always gets the same COM port number as the host remembers each serial number. Data that should be sent is filled into an USB endpoint buffer first. The data of the endpoint buffer is transmitted to the host when it becomes full or if there is a timeout with no more writes. [14] 3.2.6 Overview of the Source Files (.c-files) and their Functions The firmware of the microcontroller consists of five source files. Those five source files are: ProximityCIM.c, Timer.c, Adc.c, CimProtocol.c and usb_serial.c. In this chapter the function of each file is going to be shortly described. A state-machine diagram (Picture 14) shall help to understand the program flow. Timer.c With this source file the pulsing of the infrared diode and the sampling rate of the sinusshaped signal are implemented. The file contains a function that configures both of the timers. On configuration relates to the compare match values that are written to the output compare registers OCR1A and OCR1B. The counter counts from zero to this defined value. Reaching the compare match value, the corresponding interrupt service routine is carried out. In case of reaching the value that was written to OCR1A (109, pulsing the diode see Chapter 3.2.1), the output compare pin (OC1A equals pin PB5 on the printed circuit board) gets toggled automatically. This toggling is defined due to the register TCCR1A. To make the start- and stop-command via the ARE/ACS possible, the compare match interrupts that correspond to the value written in OCR1B (sampling frequency, see Chapter 3.2.2) can be turned on/off via the functions start_timer1/stop_timer1. Furthermore the Timer.c-file contains the service routines (ISRs) that correspond to the output compare matches. Each of the both ISRs contains only one line that increases the compare match values of OCR1A and OCR1B every time by the initialization value in order to generate the needed/wanted frequencies. Otherwise there would only be a compare match interrupt when the counter reaches the initialization value. 24 Adc.c This source file contains a function that initializes and configures the ADC and clears the buffer that is used to store the eight most recent ‘diff’-values. The configuration includes: enabling the ADC auto trigger mode (conversion always starts at positive edge of the chosen trigger signal) and the ADC interrupts. It further contains the configuration of the ADC clock (register ADCSRA), the source of the reference voltage (ADMUX) and the signal that should be used for triggering (Timer/Counter1 Compare Match B). Within the ISR that is carried out after a conversion is completed, alternately the measured values for a maximum and for a minimum are saved. Further the difference of the latest two values is calculated. The calculated differences are saved into the buffer and added. (For a more detailed description of this computing process see Chapter 3.2.3.) If the buffer is full (eight values are saved), the variable ‘ADC_updates’ is set to one. As a result of the setting-to-one, within the ProximityCIM.c file the last function of the Adc.c-file is carried out. This function divides the sum of eight diff-values by the size of the buffer (eight) and therefore the average is calculated. usb_serial.c The usb_serial.c-file can be downloaded from the Teensy homepage [14]. It contains the data that is necessary for the enumeration process (descriptor data, see Chapter 3.2.5) and so-called ‘public functions’ that simplify the usage of the Teensy Development Board. For the implementation of the proximity sensor only five of them are used. The first one is called ‘usb_init’ and is activated in the main-function of the ProximityCIM.c-file. As the name already implies, it initializes the USB serial. The second function named ‘usb_configured’ returns zero if the USB is not configured or the configuration number that was selected by the host. In the ProximityCIM.c-file it is used within a while-loop. As long as zero is returned, the program stays there. The third function is called ‘usb_serial_available’ and returns the number of bytes that are available in the receive buffer. It is used in the cimprotocol.c-file to identify if there are bytes sent from the ARE that can be parsed. If there are bytes in the receive buffer, the fourth function is used. The so-called ‘usb_serial_getchar’-function is used to get the next character out of the available bytes in the receive buffer. The last used function is called ‘usb_serial_write’ and is used to send a packet from the CIM to the ARE. CimProtocol.c For a more detailed description of the CimProtocol see Chapter 3.2.4. This source file can be divided into two main parts. The first part is implemented in the function ‘parse_CIM_protocol’ and is used for the analysis of a new arriving packet that was sent from the ARE to the CIM. After recognizing the two synchronization bytes “@” and “T” one after the other, the parsing of the packet goes on. Now variables are filled up with the right byte according to Table 3. Reaching the end of the packet, the second part of the CIM-protocol is carried out. The second part, implemented in the function ‘process_ARE_frame’, is used to carry out the addressed feature that was defined by the command that was sent with the packet from the ARE. This includes the sending of an answer-packet that is sent from the CIM to the ARE. 25 The answer-packet is generated also according to the packet format of Table 3. Table 4 provides an overview and short descriptions of the features that are realized in the new developed CIM called proximity sensor. However, there are also features to start, stop or resume the CIM. Starting the CIM means that the timers and the ADC get initialized and the timer that is used for the sampling process is started. With the feature stop_CIM, only the timer that is used for the sampling process is stopped. ProximityCIM.c This source file is the one that contains the main-function. It calls up the before mentioned functions that are needed to initialize the ADC and the timers. Further it calls up the functions that are needed to generate the answer packet (implemented in CimProtocol.c) according to the selected sending mode after the buffer of the Adc.c-file that contains the diff-values is filled and the average was calculated. If one of the sending modes was chosen, the comparison of the current value with the threshold is also carried out in the ProximityCIM.cfile. Picture 14 Schematic drawing of the program flow. State ‘Init’ contains the blinking LED and the customization of the ADC trigger source. If the new arrived packet does not contain the identifier “@T”, the packet is faulty and the waiting for a new packet starts again. After recognizing a commando out of a right packet, the commando gets processed and an answer packet is replied. If the commando that is read out of the packet is ‘Start’, the trigger source of the ADC is started and therefore the sampling and all further steps are started too. Sending the command ‘Stop’ means that the trigger source of the ADC is turned off so that no sampling takes place anymore. 3.3 Writing the AsTeRICS Plugin Code Using the AsTeRICS Plugin Creation Tools creates the base frame of a new plugin (here: proximity). The Plugin Creation Tools provide the necessary folder structure, the bundle descriptor and a template for the JAVA source code. Main part of the Plugin Creation Tools is the Plugin Creation Wizard, which creates the folders and files that are needed for the Eclipse build flow. Those files also include already a JAVA source code skeleton and the bundle descriptor of the plugin. Within the Plugin Creation Wizard, the type (input, output, event listener, event trigger), the number and the appropriate data-type of desired ports and 26 the properties of the new plugin can be created easily. Properties can include for example a threshold that can be set by the user in the ACS. [5] For creating a new plugin, several ARE coding guidelines have to be considered. These guidelines are listed in [5], Chapter 4.1] and therefore the explanation in this paper is going to be rather short. Basically the names of plugins, ports and properties should be intuitively and suitable for the purpose they are going to serve. Variables in the plugin code should not be named differently to the names they were given in the bundle descriptor. For naming conventions of ports and properties and plugin activation in the ACS and the ARE see [5, Chapters 4.1 and 3.2]. 3.3.1 Bundle Descriptor The bundle descriptor can be seen as an abstraction layer between the developer and the user, who creates models out of different plugins in the ACS. Further it describes the content of an individual bundle by providing information about the included components (in this case, the proximity sensor is the only component), their ports and properties. [5] The proximity sensor’s bundle descriptor consists of: - General information about the component - Type, name, description and data-type of the input- and output port The output port “distance” delivers, if sending mode 0 (see Table 4, Picture 14) has been chosen, permanently the average of always eight ‘diff’-values (see Chapter 3.2.3). The input port “input” is used to set the threshold to produce events. For that sending mode 1, 2 or 3 (see Table 4, Picture 14) has to be chosen. 27 - Type, name and description of the event trigger ports The event triggerer ports “LowToHigh” and “HighToLow” are used when a threshold is set and the current value exceeds or succeeds the threshold. - Name, data-type, default value and description of the properties 3.3.2 Component Lifecycle Within the component lifecycle the actual component (proximity sensor) is implemented. The lifecycle can generally divided into two sections [5]: - the lifecycle support methods and - the component support methods The lifecycle support methods are used to handle events that are related to the component lifecycle. There exist four different states a component can be in [5]: • Ready If a component is in the state ‘Ready’, it is stateless. By starting the component becomes ‘Active’. • Active The state ‘Active’ is stateful. From this state the component can either become ‘Paused’ or ‘Stopped’. • Paused If the component is ‘Paused’ (stateful) it can either be activated again or completely stopped. • Stopped Stopping the component means that it becomes stateless again. The component support methods are used to access the input- and output ports of the component and to set or get it’s supported properties [5]. The plugin code of the proximity sensor contains the following component support methods: 28 - public IRuntimeOutputPort getOutputPort (String portID) This method is needed by the ARE to get the connection to the output port. Referencing to the port with the corresponding ID carries out the process of connecting to the port. - public IRuntimeInputPort getInputPort(String portID) This is a necessary method to connect the ARE with the input port. For further description see method ‚IRuntime OutputPort getOutputPort’. - public IRuntimeEventTriggererPort getEventTriggererPort(String eventPortID) To get the connection between ARE and the event trigger port, this method is needed. For further description see method ‚IRuntime OutputPort getOutputPort’. - public Object getRuntimePropertyValue(String propertyName) This function is necessary for the manipulation of internal component properties that have an influence on the process implemented in the component. - public Object setRuntimePropertyValue(String propertyName, Object newValue) The values of the component properties (threshold, sending mode) that are chosen via the ACS and imported to the ARE, are sent to the proximity sensor. Before sending the values, they have to be included into a CIM packet that was build regarding to the CIM protocol. - public void handlePacketReceived(CIMEvent e) This method is needed for the CIM communication as is parses the packets that are sent from the CIM to the ARE. - public void handlePacketError(CIMEvent e) If a packet that was sent from the CIM to the ARE is incorrect or an answer is missing at all, this method is used to handle the problem. 3.4 Design of the Printed Circuit Board (PCB) and the Mounting Designing the PCB, the free version of the CadSoft EAGLE PCB Design Software was used. The size of the circuit board was given by a mounting that can be placed on the head that already exists. This mounting includes a box where a circuit board is placed and protected against damage. On the PCB the circuit that is shown in Picture 10 was placed twice so that there exists the possibility to connect a second proximity sensor to the board to realize a control with directly selectable x- and y-coordinates. Further it was important to be able to fix the Teensy Development Board easily on the PCB. Therefore two rows of sockets were placed, so that the Teensy Board can be plugged in without any effort. Also a 3.5mm stereo jack connector (that is used as mono jack connector) was added and connected to a digitalin pin of the Teensy Board in order to connect it with, for example, a simple switch button. To facilitate an easy adjustment of the sensor at the chin, a pliable mounting wire was used. For the fixation of this wire a plane that is connected to ground is provided. Connecting the mounting wire with ground has the advantage that the thin ground wire has not to be in the shrinking hose. The connection between PCB and sensor(s) was planned with a 4-way header. However, as the mounting wire is fixed permanently on the PCB and a shrinking 29 hose holds the mounting wire and the signal wires of the sensor together permanently, a plug makes no sense any more. Therefore the signal wires of the sensor are soldered directly onto the PCB. Quantity Value Names of the parts on PCB-Layout Description LEISTE_GND, PIN LEISTE_VCC Contacts, 2.54mm 10nF C1, C2 Capacitor, SMT-Package 0805 1 10uF C5 Capacitor, SMT-Package 0805 1 1kΩ R7 Resistor, SMT-Package 0805 2 220Ω R3, R4 Resistor, SMT-Package 0805 2 22nF C3, C4 4 33kΩ R1, R2, R5, R6 Resistor, SMT-Package 0805 2 - 4WAY_HEADER_1, TE Connectivity /AMP, Header, 90°, 4 4WAY_HEADER_2 Contacts 2 - 2 10mH 2 - 2 STEREO_3,5MM_1, STEREO_3,5MM_2 L1, L2 HEADER/ Socket, 1 Row, 20 Capacitor, SMT-Package 1206 Replaced by normal sized components Lumberg, 1503-03, Socket, 3.5mm Jack Multicomp, Fixed Inductor, Tolerance 5% Table 5 Parts of the printed circuit board As up to now only one sensor is used, this sensor is connected to the holes of the 4WAY_HEADER_1 (Picture 15, Picture 18). Picture 15 PCB Layout for the proximity sensor 30 Picture 16 Unpopulated PCB, Top Layer Picture 17 Populated PCB, Top Layer One end of the mounting wire is soldered onto the plane that can be seen on the picture above. Approximately at the middle of 4WAY_HEADER_2 it is bent to 90° and leaves the PCB (Picture 18). At the other end of the mounting wire the reflective object sensor (QRD1114) is placed (Picture 18). For the protection of the contacts that are going into the sensor about three to four centimeters of wires before they enter the sensor are stuck together with hot glue (Picture 18). Afterwards all the wires (mounting wire, signal wires) were coated with a shrinking hose (Picture 19). Picture 18 PCB with connected mounting wires and signal wires, with hot glue stabilized sensor contacts, no shrinking hose Picture 19 PCB with connected mounting wires and signal wires, shrinking hose over mounting and signal wires 31 4 Results Picture 20 and Picture 21 show the PCB in the box that protects it against damage. The box was only adapted from an already existing SolidWorks-model. The adaption includes two holes for plugging in the wires (USB plug and Jack Plug 3.5mm) and one hole for the mounting wire. Picture 20 Box for fixing the PCB on the dedicated head mounting and protecting it against damage (Box open), holes for USB plug, Jack Plug 3.5mm and for the mounting wire Picture 21 Box for fixing the PCB on the dedicated head mounting and protecting it against damage (Box closed) Picture 22 Box containing the PCB fixed on the dedicated head mounting Picture 23 Sensor mounted on the head 32 On Picture 22 one can see the box that is fixed on the dedicated head mount. After donning the dedicated head mount, the sensor can be placed in the neutral position of the chin by bending the mounting wire. Picture 23 shows the sensor mounted on the head and Picture 26 shows the optimal distance between sensor and chin at the neutral/resting position. By moving the chin to the left (closer to the sensor) or to the right (away from the sensor) the amount of reflected infrared light increases/decreases and therefore the according values that are sent from the CIM change. Picture 24 shows the screen shot of the ACS-model that makes the mouse pointer movement possible. At this point the working principle of all the components together should be described. For more details about the components and their functions see Chapter 2.3. The Slider-component is only used if the corresponding sending mode (sending events, see Table 4) was chosen. As for the mouse pointer movement only the sending mode that sends continuous values (see Table 4) is used, the Slider- as well as the EventVisualizercomponent are not needed for the explanation of the working principle. Starting at the Proximity-component (representing the proximity sensor), the continuously sent values (representing the distance between object and sensor) are sent to the MathEvaluatorcomponent. There, the value that was either saved after the AutostartEvent-component sends an event or after the ‘Init’-button of the button grid is pressed, gets subtracted from the current values. This makes a calibration of the neutral point of the chin possible. To make the sensor as intuitively as possible, the result of the subtraction has to be multiplied by -1 in order to produce a mouse pointer movement to the left when the chin is moved to the left. After the calibration, the AdjustmentCurve-component enables the user to adjust the curve that is formed by his/her chin movement. This can be necessary to compensate the fact that the movement of the chin away from the sensor causes less acceleration as the movement closer to the sensor. Furthermore the dead zone/resting zone can be made broader or narrower. Now the signal that leaves the AdjustmentCurve-component is ready to be used as mouse pointer movement- or action- (clicking) signal. After choosing the action (right click, left click, drag click) for the next mouse click that should be performed over the buttons on the ButtonGrid-component, the StringDispatcher-component sends the according command to the input ‘action’ of the Mouse-component. After entering the defined dead-zone-radius an event is sent from the Deadzone-component and both Timer-components (Timer.1 and Timer.1.1) start to count the time (in milliseconds) that passes by. Timer.1 is used to change the direction of the mouse pointer movement from horizontal to vertical and the other way around. For changing the direction once, it is necessary to stay within the dead zone for 600ms. After the direction has been successfully changed (signalized due to an acoustic signal generated by the WavFilePlayer-component), the user has to exit the dead zone again to move the mouse pointer in the desired direction. Staying within the dead zone longer than 600ms, Timer.1.1 is called into action. Timer.1.1 triggers an event after 1500ms. This event has two consequences: On the one hand, the direction of the mouse pointer movement is set to horizontal movement (x-direction). This is necessary as waiting 1500ms within the dead zone means that after 600ms the direction of the mouse pointer movement is changed automatically due to Timer.1. On the other hand, the triggered event causes a mouse action. This could either be the kind of click that was chosen via the ButtonGrid-component, or a 33 normal double-left-click. If no special click-function was chosen on the ButtonGrid, every click that is generated after waiting 1500ms is a normal double-left-click. Clicking successfully also generates an acoustic signal. For enabling/disabling of the proximity sensor as mouse control, another button on the ButtonGrid is provided. This can for example be used to allow a technician to modify the ACS-model with a standard mouse. Picture 24 AsTeRICS ACS-model for mouse control The picture below (Picture 25) shows the graphical user interface of the mouse control model. Picture 25 Graphical user interface oft he ASC-model for mouse control Besides the model for controlling the mouse there already exist two other ready-to-usemodels within the ACS. One of them is a simple test-model that provides an oscilloscope to display the values that are sent from the sensor, an event visualizer to display incoming events, a bar display to visualize the current signal value that is sent from the CIM and it also provides a Slider-component to define the threshold. The other model is a model to play pinball. This model equals the mouse control model with the exception that the 34 AdjustmentCurve-component is followed by two Comparator-components. Those Comperators have a defined threshold. One of them triggers an event if the threshold (20) is exceeded and the other one triggers an event if the threshold (-20) is succeeded. Exceeding the threshold leads to local keyboard input of ‘L’ on the computer the ARE is running on. Now the right bouncer can be moved. Succeeding the threshold, a keyboard input of ‘A’ is generated to move the left bouncer. Picture 26 shows the sensor mounted on the head (chin in neutral position). The next picture (Picture 27) shows the chin movement closer to the sensor and therefore the mouse pointer movement to the left. Picture 28 shows the movement to the right. Picture 26 Sensor mounted on the head, chin in neutral position Picture 27 Sensor mounted on the head, chin moved to the left (closer to the sensor) Picture 28 Sensor mounted on the head, chin moved to the right (away from the sensor) The table below (Table 6) shows the performance data of the proximity sensor with the mouse control model. It was used with an on-screen keyboard and the characters that could be typed per minute at the first usage and after a little training (10th time usage) are shown. Also a comparison to the usage of on-screen keyboard, scanning methods and a single push button is included. 35 Way of using the on-screen keyboard Characters per minute First time usage of the proximity sensor with the mouse control model and an on-screen keyboard 10th time usage of the proximity sensor with the mouse control model and an on-screen keyboard On-screen keyboard with scanning method and single push button 26 51 50 st th Table 6 Performance data of the proximity sensor used with an on-screen keyboard (1 - and 10 -time usage) compared to the performance data of a single push button with an on-screen keyboard and a scanning method To test the performance of the mouse control even more, it was the task to open the AsTeRICS homepage (via Google and on-screen keyboard) and to further open the Quickstart Guide on page six (scrolled via the drag&drop function) that can be found in the menu ‘Downloads’ and ‘Manuals’. One time it was opened with a one-switch-mouse and the other time with the proximity sensor. For this use case the mouse model was changed a little bit (no oscilloscope, no slider to set the threshold and no event visualizer). Also the graphical user interface was moved to the right side of the screen. A screen shot of the graphical user interface, the browser window and the on-screen keyboard used with the proximity sensor can be seen on Picture 29. The results of this test can be found on the table below (Table 7). Picture 29 Screen shot of the use case: ‚Searching and downloading a file from a homepage’. On the right side of the screen the graphical user interface is illustrated. At the bottom one can see the OSKA on-screen keyboard and at the top the browser window was placed. One-switch-mouse Proximity sensor 7min 3min 40sec Table 7 Time that is needed to search and download a file on the Internet. One time the proximity sensor was used, the other time a one-switch-mouse. 36 5 Discussion and Conclusion With the new built alternative input device, called proximity sensor, another possibility to use a PC for people with physical limitations was developed. Using a reflective object sensor (consisting of an infrared diode and a phototransistor) to measure the distance between the user’s chin and the sensor, provides easier computer access also for people who suffer from a Tetraplegia and therefore are only able to move their head. Furthermore, after the calibration process that includes the correct placement of the sensor on the mounting wire at the chin, no strength is needed to operate the sensor. It is also important to mention that also small and very exact mouse pointer movements are possible as the chin can be moved very precisely and the corresponding curve of the chin movement can be adjusted individually. Due to the pulsing of the infrared diode a minimization of the influence that is caused by the ambient light’s amount of infrared light was achieved. However, the ambient light’s influence is not completely blinded out. This could be caused by the reason, that due to the amount of infrared light that is present in the ambient light, the amplitude of the square-wave signal and the therefore the amplitude of the sinus-shaped signal get higher. To counteract this circumstance, the ACS-models for mouse control and pinball include the AdjustmentCurvecomponent. This component makes it possible to define the zero point/neutral position of the chin every time the proximity sensor is started or after a change of the lighting conditions. With the mouse model, the user is able to control the mouse pointer movement in horizontal as well as vertical directions. Furthermore one can decide what kind of click should be carried out next. There are three possibilities: double click (left), right click and drag click. After the chosen click was carried out, the next click will be a double click as it is set as standard click. Before the proximity sensor could be used on the designed PCB, the printed circuit board was tested. This brought up some problems that were related to the SMT (surface-mount technology) 22nF capacitors (Table 5 and Picture 15, C3 and C4) of the parallel resonant circuit. Although the chosen SMT capacitors were film capacitors and have the same properties (according to their datasheet) like the normal sized through-hole capacitors, they do not show the same behavior at the frequency of 9.174kHz. This could either be caused by the capacitors tolerances or by a production fault. To solve the problem, the SMT capacitors were replaced by the through-hole capacitors that were used on the pinboard. After this exchange, the proximity sensor could be used as it was planned. As shown in the results, after a little training with the proximity sensor, the mouse pointer movements can be carried out rather fast. This is also good for applications that include an on-screen keyboard (e.g. Oska). The on-screen keyboard can be used directly instead of using it with scanning methods [1]. Although there is not a big difference in the number of characters that can be written when using the scanning methods (combined with a push button) and when using the proximity sensor, the latter has the huge advantage that not only the keyboard can be used, but all normal mouse functions can be carried out as well. Comparing the mouse functions of the proximity sensor with those provided by a one-switchmouse, one can see that the time that is needed to open a homepage and to download a file can be reduced by about 50%. 37 Another improvement can be brought about due to the possibility of connecting a second sensor to the PCB. This can be done easily as the circuit that is needed for one sensor was placed a second time on the PCB. By adding a second sensor and implementing some changes in the CIM’s firmware and the ARE-software, it is possible to generate horizontal and vertical mouse pointer movements separately. For that reason one sensor stays beside the chin (the position that is also used now) and the other one is fixed beneath the chin. Due to this further development it is no longer necessary to move the mouse pointer first to the desired horizontal/vertical position, changing the direction of the mouse pointer movement to vertical/horizontal and then move the mouse pointer to the desired vertical/horizontal position. With the usage of two sensors the mouse pointer can be moved directly, without spending time on the change of direction, to the desired position. 38 Bibliography [1] AsTeRICS Deliverable D2.4 – Report on the state of the art, (http://www.asterics.eu/index.php?id=2, Downloads à Deliverables, Date of last visit: 24.4.2013), p. 14 – 37, 54 Contact details: Kompetenznetzwerk, KI-I Projekt AsTeRICS Altenbergerstraße 69 4040 Linz, Austria Tel: +43 732 2468 3770 [2] AsTeRICS Homepage (http://www.asterics.eu/index.php?id=2, Date of last visit: 24.4.2013) Contact details see [1] [3] Datasheet of Reflective Object Sensor QRD1114, p. 2 [4] AsTeRICS User Manual, Verison 2.0 (http://www.asterics.eu/index.php?id=2, Downloads à Manuals, Date of last visit: 24.4.2013), p. 5f, 14, 15 Contact details see [1] [5] AsTeRICS Developer Manual, Version 2.0 (http://www.asterics.eu/index.php?id=2, Downloads à Manuals, Date of last visit: 24.4.2013), p. 8f, 50-53, 17f, 25f, 29, Contact details see [1] [6] http://www.pjrc.com/store/teensypp.html, Date of last visit: 29.4.2013 Contact details: PJRC.COM, LLC 14723 SW Brooke CT Sherwood, OR 97140 USA Tel: 503 625-9328 email: [email protected] (technical questions) [email protected] (financial/administrative questions) [7] http://www.pjrc.com/teensy/, Date of last visit: 29.4.2013 Contact details see [6] [8] U. Tietze, Ch. Schenk, Halbleiter-Schaltungstechnik, 12. Auflage, Springer, Erlangen und München 2002, p. 1544 39 [9] Datasheet of ATMEL 8-bit AVR microcontroller AT90USB1286, p.117, 142-145, 138-140, 326-331, 318 [10] J. Axelson, USB 2.0 – Handbuch für Entwickler, 3. Auflage, REDLINE GmbH, Heidelberg 2007, p. 99-102, 120 [11] Universal Serial Bus Specification, Revision 2.0, April 2000, (http://www.usb.org/developers/docs/, Date of last visit: 24.4.2013), p. 260-274, [12] http://www.usb.org/developers/defined_class, Date of last visit: 24.4.2013 Contact details: Martha Keizur USB Implementers Forum, Inc. Kavi Corporation 225 SE Main Street, Second Floor Portland OR 97214 [email protected] [13] Universal Serial Bus Class Definitions for Communications Devices, Revision 1.2, November 2010 (http://www.usb.org/developers/devclass_docs, Communication Device Class, Date of last visit: 24.4.2013), p. 15ff Contact details see [8] [14] Comments of the file: usb_serial.c (http://www.pjrc.com/teensy/usb_serial.html à USB Serial, Version 1.7, Date of last visit: 24.4.2013) 40 List of Pictures Picture 1 Example of an ACS-model consisting of a sensor (FacetrackerLK: tracks the position of the nose or the chin via a web cam), a processor (Averager: stores a defined number of values that arrive at the input port, averages them and sends the value via the output port) and an actuator (Mouse: the mouse pointer movements in horizontal direction are now carried out via the horizontal movements of the user’s nose) .................................... 7 Picture 2 Reflective object sensor QRD 1114, dimensions: 6.1 x 4.39 x 4.65mm, weight: 2g . 7 Picture 3 Teensy++ 2.0 Development Board with header pins [7] ........................................... 8 Picture 4 Circuit diagram to measure the distance-voltage dependency (Permanent shining LED) ....................................................................................................................................... 13 Picture 5 Measurement setup to measure the dependency of object-to-sensor-distance and voltage drop across the phototransistor – permanent shining infrared LED (pinboard, sensor, white paper on slide) .............................................................................................................. 13 Picture 6 Measurement setup to measure the dependency of object-to-sensor-distance and voltage drop across the phototransistor – permanent shining infrared LED (pinboard, sensor, white paper on slide, guide rail, pointer to stop at every mm) ................................................ 13 Picture 7 Voltage drop across phototransistor depending on object-to-sensor-distance, under artificial light conditions, three different series resistors (R1=220Ω, R2=120Ω, R3=91Ω) ....... 14 Picture 8 Voltage drop across phototransistor depending on object-to-sensor-distance, under artificial light & daylight conditions(cloudy sky, no direct sunlight), three different series resistors (R1=220Ω, R2=120Ω, R3=91Ω) ................................................................................ 14 Picture 9 Voltage drop across phototransistor, artificial light compared to artificial light & daylight (cloudy sky, no direct sunlight), series resistor R1=220Ω ......................................... 15 Picture 10 Circuit diagram to measure the distance-voltage dependency (pulsed LED) including the parallel resonant circuit (to transform received square-wave signal into a sinusshaped signal) and to raise the operating point to 2.5V (inserted 33kΩ resistors). VIn delivers the frequency of 10kHz to pulse the diode. Capacitor C (10nF) is used to filter the signal before it enters the microcontroller via VOut. VCC=5V. ............................................................. 16 Picture 11 Square-wave signal of the pulsed infrared diode with a frequency of 10kHz and the corresponding sinus-shaped signal that is produced by the parallel resonant circuit that follows the phototransistor with the points of measurement .................................................. 17 Picture 12 Measurement setup to measure the dependency of object-to-sensor-distance and voltage drop across the phototransistor – pulsed infrared LED (connections to pinboard, sensor fixed on the steady part of the sliding caliper, white paper fixed on the movable part of the sliding caliper) .................................................................................................................. 17 Picture 13 Voltage drop across phototransistor depending on object-to-sensor-distance, pulsed infrared LED, green graph: Delta = Maximum - Minimum .......................................... 18 Picture 14 Schematic drawing of the program flow. State ‘Init’ contains the blinking LED and the customization of the ADC trigger source. If the new arrived packet does not contain the identifier “@T”, the packet is faulty and the waiting for a new packet starts again. After recognizing a commando out of a right packet, the commando gets processed and an answer packet is replied. If the commando that is read out of the packet is ‘Start’, the trigger source of the ADC is started and therefore the sampling and all further steps are started too. 41 Sending the command ‘Stop’ means that the trigger source of the ADC is turned off so that no sampling takes place anymore. ......................................................................................... 26 Picture 15 PCB Layout for the proximity sensor .................................................................... 30 Picture 16 Unpopulated PCB, Top Layer ............................................................................... 31 Picture 17 Populated PCB, Top Layer ................................................................................... 31 Picture 18 PCB with connected mounting wires and signal wires, with hot glue stabilized sensor contacts, no shrinking hose ........................................................................................ 31 Picture 19 PCB with connected mounting wires and signal wires, shrinking hose over mounting and signal wires ...................................................................................................... 31 Picture 20 Box for fixing the PCB on the dedicated head mounting and protecting it against damage (Box open), holes for USB plug, Jack Plug 3.5mm and for the mounting wire ........ 32 Picture 21 Box for fixing the PCB on the dedicated head mounting and protecting it against damage (Box closed) ............................................................................................................. 32 Picture 22 Box containing the PCB fixed on the dedicated head mounting ........................... 32 Picture 23 Sensor mounted on the head ................................................................................ 32 Picture 24 AsTeRICS ACS-model for mouse control ............................................................. 34 Picture 25 Graphical user interface oft he ASC-model for mouse control .............................. 34 Picture 26 Sensor mounted on the head, chin in neutral position .......................................... 35 Picture 27 Sensor mounted on the head, chin moved to the left (closer to the sensor) ......... 35 Picture 28 Sensor mounted on the head, chin moved to the right (away from the sensor) ... 35 Picture 29 Screen shot of the use case: ‚Searching and downloading a file from a homepage’. On the right side of the screen the graphical user interface is illustrated. At the bottom one can see the OSKA on-screen keyboard and at the top the browser window was placed. .................................................................................................................................... 36 42 List of Tables Table 1 Key features and specifications of the Teensy++ 2.0 Development Board [7] ............ 8 Table 2: Calculation of three different series resistors to gain three different values of IF (20mA, 30mA, 40mA) ............................................................................................................. 12 Table 3 CIM protocol structure – packet format (Italic descriptions refer to communication from CIM to ARE) [5, see also for more detailed descriptions of packet data fields] ............. 21 Table 4 List and description of the CIM-features that are provided by the new developed CIM called proximity sensor ........................................................................................................... 21 Table 5 Parts of the printed circuit board ............................................................................... 30 Table 6 Performance data of the proximity sensor used with an on-screen keyboard (1st- and 10th-time usage) compared to the performance data of a single push button with an onscreen keyboard and a scanning method .............................................................................. 36 Table 7 Time that is needed to search and download a file on the Internet. One time the proximity sensor was used, the other time a one-switch-mouse. ........................................... 36 43 A: Source files (.c-files) of proximity sensor CIM ProximityCIM.c /* AsTeRICS Proximity CIM Firmware using Teensy 2.0++ Controller board file: ProximityCIM.c Version: 0.1 Authors: Chris Veigl (FHTW), Franziska Horak Date: 30/04/2013 */ #include <avr/io.h> #include <avr/pgmspace.h> #include <stdint.h> #include <util/delay.h> #include <inttypes.h> #include <avr/interrupt.h> #include <stdlib.h> #include <inttypes.h> #include <stdio.h> #include <string.h> #include <util/delay.h> #include "Adc.h" #include "Timer.h" #include "CimProtocol.h" #include "usb_serial.h" #define CPU_PRESCALE(n) (CLKPR = 0x80, CLKPR = (n)) #define AUTOUPDATE_VALUES 0 #define THRESHOLD_BELOW_ABOVE 1 #define THRESHOLD_ABOVE_BELOW 2 #define THRESHOLD_BOTH 3 extern struct CIM_frame_t CIM_frame; uint16_t oldVal; void setupHardware(void) { Timer_Init(); ADC_Init(); DDRD |= (1<<5); DDRD |= (1<<6); PORTD &= ~(1<<5); PORTD &= ~(1<<6); DDRB |= (1<<5); PORTB &= ~(1<<5); // PB5 bzw. OC1A --> Output, init: low DDRB &= ~(1<<0); PORTB |= (1<<0); // PB0: input with pullup // start_timer1(); } int main(void) { uint16_t value; CPU_PRESCALE (0); // initialize the USB, and then wait for the host // to set configuration. If the Teensy is powered // without a PC connected to the USB port, this // will wait forever. usb_init(); while (!usb_configured()) /* wait */ ; _delay_ms(1000); setupHardware(); init_CIM_frame(); sei(); 44 while (1) { parse_CIM_protocol(); // look if new command arrived from ARE and process it if (ADC_updates) // is a new buffer of ADC-values available ? // (updated via the ADC ISR) { value = mittl_berechnen(); // calculate averaged value ADC_updates=0; switch (selection) { case AUTOUPDATE_VALUES: generate_ADCFrame(value); break; case THRESHOLD_BELOW_ABOVE: if ((oldVal < threshold) && (value >= threshold)) generate_EventFrame(1); break; case THRESHOLD_ABOVE_BELOW: if ((oldVal > threshold) && (value <= threshold)) generate_EventFrame(0); break; case THRESHOLD_BOTH: if ((oldVal < threshold) && (value >= threshold)) generate_EventFrame(1); else if ((oldVal > threshold) && (value <= threshold)) generate_EventFrame(0); break; } oldVal = value; } } } Timer.c /* AsTeRICS Proximity CIM Firmware using Teensy 2.0++ Controller board file: Timer.c Version: 0.1 Authors: Chris Veigl (FHTW), Franziska Horak Date: 30/04/2013 */ #include <avr/io.h> #include <avr/interrupt.h> void Timer_Init(void) { TIMSK1=0; TIFR1=(1<<2)|(1<<1); TCNT1=0; OCR1A = 109; // Wert bei dem der Compare Match Interrupt (LED) ausgelöst wird (vorher Reload-Value 149 --> 256-149=107) OCR1B = 109+40; //Wert bei dem der Compare Match Interrupt (ADC) das erste Mal ausgelöst wird TCCR1A |= (1<<6); //OC1A toggeln bei Compare Match, keine PWM (alle WGMn-Bits sind 0) TIMSK1 |= ((1<<1) | (1<<2)); //Output Compare A und B interrupt enabled } void start_timer1() { TCCR1B |= (1<<1); //Prescaler 8 --> 1 Timer-Tick 0,5us; } 45 void stop_timer1() { TCCR1B = 0; } ISR(TIMER1_COMPA_vect) { OCR1A = OCR1A + 109; } ISR(TIMER1_COMPB_vect) { //PORTD = PORTD ^ (1<<5); OCR1B = OCR1B + 4251; } Adc.c /* AsTeRICS Proximity CIM Firmware using Teensy 2.0++ Controller board file: Adc.c Version: 0.1 Author: Chris Veigl (FHTW), Franziska HOrak Date: 30/04/2013 */ #include <avr/io.h> #include <avr/interrupt.h> #define BUFSIZE 8 volatile uint16_t ADC_updates=0; // counts ADC updates in ISR static volatile int16_t buffer[BUFSIZE]; static int16_t sum=0; static uint8_t buffer_pos=0, measure_top=1; void ADC_Init(void) { ADC_updates=0; ADCSRA = (1<<ADIF); ADCSRB = 0; ADMUX=0; sum=0; buffer_pos=0; measure_top=1; for (int i=0;i<BUFSIZE;i++) buffer[i]=0; ADCSRA |= ((1<<5) | (1<<3)); //ADC Auto Trigger enable, ADC Interrupt enable ADCSRA |= ((1<<2) | (1<<1)); //ADC Prescaler 64 --> 250kHz ADCSRB |= ((1<<2) | (1<<0) | (1<<7)); //Trigger-Source: Timer/Counter1 Compare Match B, High Speed Mode ADMUX = ((1<<6) | (1<<0) | (1<<1)); //VCC with external capacitor on AREF pin, Single Ended Input ADC3 DIDR0 |= (1<<3); //Digital Input Disabled ADCSRA|= (1<<7); //ADC enable --> in Auto-Trigger-Mode //the first conversion is started on a positive edge of the trigger signal } /*periodische ADC-Messungen --> über Compare Match ISR OCR1B getriggert*/ ISR(ADC_vect) { static int16_t berg; unsigned char low, high; low=ADCL; high=ADCH; uint16_t diff = 0; 46 if (measure_top) { berg = (((uint16_t)high<<8)+low); //1ste Messung --> Bergwert messen measure_top=0; } else { diff = berg - (((uint16_t)high<<8)+low); //2.Messung:Differenz bilden --> diff= berg - Talwert sum = sum - buffer[buffer_pos]; buffer[buffer_pos] = diff; sum += diff; if (!( buffer_pos= (buffer_pos+1) % BUFSIZE)) // buffer filled with values ! ADC_updates++; measure_top=1; } } uint16_t mittl_berechnen() { if (sum < 0) { measure_top=!measure_top; return (0);} // this is a workaround for the init-comparematch problem ! return (uint16_t)(sum/BUFSIZE); } cimprotocol.c /* AsTeRICS Proximity CIM Firmware using Teensy 2.0++ Controller board file: CimProtocol.c Version: 0.1 Author: Chris Veigl (FHTW), Franziska Horak Date: 30/04/2013 AsTeRICS CIM Protocol Packet Frame: =================================== Packet ID 2 bytes "@T" (0x4054 ) ARE ID / CIM ID 2 bytes Data Size 2 bytes 0x0000-0x0800 Packet serial number 1 byte 0x00-0x7f (0x80-0xff for event-replies from CIM ) CIM-Feature address 2 bytes Request / Reply code 2 bytes -------------------------------------------> 11 bytes = minimum frame length Optional data 0-2048 bytes Optional CRC checksum 0 or 4 bytes CRC32 -------------------------------------------> 2063 bytes = maximum frame length */ #include "CimProtocol.h" #include "Timer.h" #include "usb_serial.h" #include "Adc.h" #include <avr/io.h> #include <avr/interrupt.h> #include <stdlib.h> #include <stdio.h> #define ARE_MINIMAL_VERSION 1 const uint32_t TEENSY_CIM_UNIQUE_NUMBER = 0x050606FD; uint8_t autoreply_num=0x80; const char TEENSY_CIM_FEATURELIST[]= { 0x00,0x00, // unique number, data: 4 bytes 0x02,0x00, // Schwellwert zur Eventerzeugung setzen 47 0x03,0x00, // Sendet Events, 0 wenn aktueller Wert zuerst höher als der Schwellwert war und dann darunter fällt, 1 wenn aktueller Wert niederiger als Schwellwert war und dann darüber steigt 0x04,0x00, // Activate periodic ADC Reports, data: 2 bytes: period in milliseconds (0=off) 0x05,0x00, // ADC value report (berechneter Mittelwert), data: 2 bytes, Mittelwert wird ständig gesendet }; struct ARE_frame_t ARE_frame; struct CIM_frame_t CIM_frame; unsigned char readstate=0; unsigned int datapos=0; uint8_t first_packet=1; volatile uint16_t threshold=200; volatile uint16_t selection=0; uint16_t ADC_updatetime=0; void setupHardware(); void init_CIM_frame (void) { CIM_frame.packet_id=CIM_FRAME_START; // '@','T': Packet-ID/sync bytes CIM_frame.cim_id=CIM_ID_TEENSY; } uint8_t process_ARE_frame(uint8_t status_code) { uint8_t ack_needed; uint8_t data_size=0; uint8_t command; command=(uint8_t)ARE_frame.request_code; CIM_frame.cim_feature=ARE_frame.cim_feature; CIM_frame.serial_number=ARE_frame.serial_number; CIM_frame.reply_code=(((uint16_t)status_code)<<8) + command; data_size=(uint8_t)ARE_frame.data_size; ack_needed=1; if ((status_code & CIM_ERROR_INVALID_ARE_VERSION) == 0) { // UART_Print(" feature "); UART_Putchar(command); // no serious packet error switch (command) { // process requested command case CMD_REQUEST_FEATURELIST: if (data_size==0) { reply_FeatureList(); // reply requested feature list ack_needed=0; } else status_code |= CIM_ERROR_INVALID_FEATURE; break; case CMD_REQUEST_RESET_CIM: if (data_size!=0) status_code |= CIM_ERROR_INVALID_FEATURE; break; case CMD_REQUEST_START_CIM: if (data_size==0) { cli(); init_CIM_frame(); setupHardware(); start_timer1(); sei(); } else status_code |= CIM_ERROR_INVALID_FEATURE; break; 48 case CMD_REQUEST_STOP_CIM: if (data_size==0) { first_packet=1; // reset first frame indicator etc. stop_timer1(); } else status_code |= CIM_ERROR_INVALID_FEATURE; break; case CMD_REQUEST_READ_FEATURE: // read feature from CIM switch (ARE_frame.cim_feature) { case TEENSY_CIM_FEATURE_UNIQUENUMBER: //read unique serial number if (data_size==0) { reply_UniqueNumber(); ack_needed=0; }else status_code |=CIM_ERROR_INVALID_FEATURE; break; default: // not a valid read feature; status_code |= CIM_ERROR_INVALID_FEATURE; } break; case CMD_REQUEST_WRITE_FEATURE: //write feature to CIM switch (ARE_frame.cim_feature) { //which feature address ? case TEENSY_CIM_FEATURE_MODE_SELECTION: if (data_size==2) { cli(); selection = (uint16_t)ARE_frame.data[0]; selection += ((uint16_t)ARE_frame.data[1])<<8; sei(); } break; case TEENSY_CIM_FEATURE_SET_THRESHOLD: if (data_size==2) { cli(); threshold = (uint16_t)ARE_frame.data[0]; threshold += ((uint16_t)ARE_frame.data[1])<<8; sei(); } break; /*case TEENSY_CIM_FEATURE_SET_ADCPERIOD: if (data_size==2) { cli(); ADC_updatetime= (uint16_t)ARE_frame.data[0]; ADC_updatetime+= ((uint16_t)ARE_frame.data[1])<<8; sei(); } break;*/ default: // not a valid write feature; status_code |= CIM_ERROR_INVALID_FEATURE; } } } if (status_code & CIM_ERROR_INVALID_FEATURE) { // invalid data size or feature // LEDs_ToggleLEDs(LED5); // indicate wrong feature // UART_Print(" invalid data size or no feature "); } if (ack_needed) { reply_Acknowledge(); } return(1); } 49 void reply_FeatureList(void) { if (UEINTX & (1<<RWAL)) { //wenn Buffer nicht voll ist CIM_frame.reply_code |= (CIM_ERROR_CIM_NOT_READY<<8); } if (!(UEINTX & (1<<RWAL))) { //wenn Buffer voll ist CIM_frame.data_size=sizeof(TEENSY_CIM_FEATURELIST); // feature list length usb_serial_write ( (uint8_t *)&CIM_frame, CIM_HEADER_LEN); usb_serial_write ( (uint8_t *)&TEENSY_CIM_FEATURELIST, CIM_frame.data_size); } } void reply_UniqueNumber(void) { CIM_frame.data_size=4; // lenght of unique number usb_serial_write ((uint8_t *) &CIM_frame, CIM_HEADER_LEN); usb_serial_write ((uint8_t *) &TEENSY_CIM_UNIQUE_NUMBER, CIM_frame.data_size); } void reply_Acknowledge(void) { if ((UEINTX & (1<<RWAL))) { //wenn Buffer nicht voll ist CIM_frame.reply_code |= (CIM_ERROR_CIM_NOT_READY<<8); } if (!(UEINTX & (1<<RWAL))) { //wenn Buffer voll ist CIM_frame.data_size=0; // no data in ack frame usb_serial_write ((uint8_t *) &CIM_frame, CIM_HEADER_LEN); } } void reply_DataFrame(void) { usb_serial_write ((uint8_t *) &CIM_frame, CIM_HEADER_LEN); usb_serial_write ((uint8_t *) CIM_frame.data, CIM_frame.data_size); } void update_autoreplynum(void) { autoreply_num++; if (autoreply_num==0) autoreply_num=0x80; CIM_frame.serial_number=autoreply_num; CIM_frame.reply_code=CMD_EVENT_REPLY; } void generate_ADCFrame(uint16_t adcval) { CIM_frame.cim_feature=TEENSY_CIM_FEATURE_ADCREPORT; CIM_frame.data[0]=(uint8_t)(adcval&0xff); CIM_frame.data[1]=(uint8_t)(adcval>>8); CIM_frame.data_size=2; update_autoreplynum(); reply_DataFrame(); PORTD ^= (1 << 6); } void generate_EventFrame(int a) { CIM_frame.cim_feature=TEENSY_CIM_FEATURE_SEND_EVENT; CIM_frame.data[0]=a; CIM_frame.data_size = 1; update_autoreplynum(); reply_DataFrame(); PORTD ^= (1 << 6); } #define FRAME_DONE 99 //void parse_CIM_protocol(unsigned char actbyte) 50 void parse_CIM_protocol(void) { uint32_t checksum=0; static uint8_t transmission_mode; static uint8_t reply_status_code; static uint8_t last_serial; uint8_t actbyte; while (usb_serial_available()) { //PORTD |= (1<<6); actbyte=usb_serial_getchar(); switch (readstate) { case 0: // first sync byte reply_status_code=0; if (actbyte=='@') readstate++; break; case 1: // second sync byte if (actbyte=='T') readstate++; else readstate=0; break; // packet in sync ! case 2: // ARE-ID: SW-version low byte ARE_frame.are_id=actbyte; readstate++; break; case 3: // ARE-ID: SW-version high byte ARE_frame.are_id+=((uint16_t)actbyte)<<8; if (ARE_frame.are_id < ARE_MINIMAL_VERSION) //outdated ARE ? reply_status_code |= CIM_ERROR_INVALID_ARE_VERSION; readstate++; break; case 4: // data length low byte ARE_frame.data_size=actbyte; readstate++; break; case 5: // data length high byte ARE_frame.data_size+=((uint16_t)actbyte)<<8; if (ARE_frame.data_size > DATABUF_SIZE) { // dismiss packets of excessive length readstate=0; //ARE_frame.data_size=0; //reply_status_code |= CIM_ERROR_INVALID_FEATURE; } else readstate++; break; case 6: // serial_number ARE_frame.serial_number = actbyte; if (first_packet) // don't check first serial first_packet=0; else if (actbyte != (last_serial+1)%0x80) //check current serial number reply_status_code |= CIM_ERROR_LOST_PACKETS; last_serial=actbyte; readstate++; break; case 7: // CIM-feature low byte 51 ARE_frame.cim_feature= actbyte; readstate++; break; case 8: // CIM-feature high byte ARE_frame.cim_feature+=((int)actbyte)<<8; readstate++; break; case 9: // Request code low byte ( command ) ARE_frame.request_code=actbyte; readstate++; break; case 10: // Request code high byte (transmission mode) transmission_mode=actbyte; // bit 0: CRC enable // reply_status_code|=(actbyte & CIM_STATUS_CRC); // remember CRC state for reply if (ARE_frame.data_size>0) { readstate++; datapos=0; } else { // no data in packet if (transmission_mode & CIM_STATUS_CRC) readstate+=2; // proceed with CRC else readstate=FRAME_DONE; //frame is finished here! } break; case 11: // read out data ARE_frame.data[datapos]=actbyte; datapos++; if (datapos==ARE_frame.data_size) { if (transmission_mode & CIM_STATUS_CRC) //with CRC: get checksum readstate++; else readstate=FRAME_DONE; // no CRC: frame is finished here ! } break; case 12: // checksum byte 1 checksum=actbyte; readstate++; break; case 13: // checksum byte 2 checksum+=((long)actbyte)<<8; readstate++; break; case 14: // checksum byte 3 checksum+=((long)actbyte)<<16; readstate++; break; case 15: // checksum byte 4 checksum+=((long)actbyte)<<24; // check CRC now (currently not used): //if (checksum!=crc32(ARE_frame.data, ARE_frame.data_size)) reply_status_code |= CIM_ERROR_CRC_MISMATCH; // frame finished here ! readstate=FRAME_DONE; break; default: readstate=0; break; } 52 if (readstate==FRAME_DONE) { // frame finished: store command in ringbuffer process_ARE_frame(reply_status_code); readstate=0; } } } 53