1
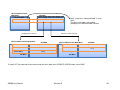
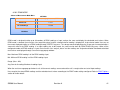
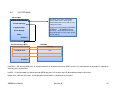
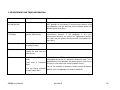
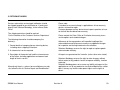
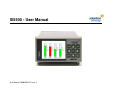
SI5500 - User Manual
User Manual SI5500 503147 Issue 1
User Manual SI5500 503147 Issue 1
GENERAL
TRADEMARKS AND COPYRIGHTS
Information in this document is subject to change without notice.
No part of this document may be reproduced or transmitted in any form or by means, electronic or mechanical, for any purpose,
without the express permission of Solartron Metrology.
© 2012 Solartron Metrology Ltd. All rights reserved. Microsoft®, Windows®XP, Windows®Vista, Windows®7, Excel®, VBA and VB
are registered trademarks or trademarks of Microsoft Corporation in the United States and/or other countries.
Orbit® is a registered trademark of Solartron Metrology Ltd
CONTACT INFORMATION
For updated information, troubleshooting guide and to see our full range of products, visit our website:
http://www.solartronmetrology.com
SI5500 User Manual 503147 ISSUE 1
3 of 53
TABLE OF CONTENTS
1
INTRODUCTION ................................................................................................................................................................................... 7
2
SCOPE .................................................................................................................................................................................................. 7
3
NAVIGATE THIS DOCUMENT ............................................................................................................................................................. 7
4
SAFETY SUMMARY ............................................................................................................................................................................. 8
5
GLOSSARY OF TERMS AND BASIC SYSTEM INFORMATION ........................................................................................................ 9
5.1
TERMS ASSOCIATED WITH SI5500 Read out ................................................................................................................................ 9
6
ELECTRICAL INSTALLATION........................................................................................................................................................... 11
7
DISPLAY AND KEYPAD .................................................................................................................................................................... 12
7.1
OPERATE SCREEN......................................................................................................................................................................... 12
7.2
Switching to the single channel configuration for the selected channel................................................................................... 18
7.3
Keypad functionality in single channel or multi channel configuration .................................................................................... 18
7.4
GAUGING Mode Screen.................................................................................................................................................................. 19
7.5
AUTOSENSE mode SCREEN ......................................................................................................................................................... 20
8
8.1
MENU SCREEN .................................................................................................................................................................................. 21
SetUp Menu ..................................................................................................................................................................................... 22
SI5500 User Manual 503147 ISSUE 1
4 of 53
8.2
Display Configuration Menu .......................................................................................................................................................... 23
8.3
Probes Menu ................................................................................................................................................................................... 24
8.4
computed measurement................................................................................................................................................................. 25
8.5
Measurement mode ........................................................................................................................................................................ 28
8.6
Preset/Limits Menu ......................................................................................................................................................................... 29
8.7
Input/Output Menu .......................................................................................................................................................................... 30
8.7.1 Pin Details of Discrete Outputs ............................................................................................................................................... 31
8.7.2
Pin Details of Discrete Inputs .................................................................................................................................................. 31
8.8
PRINT Options................................................................................................................................................................................. 33
8.8.1 PRINT FORMAT ..................................................................................................................................................................... 35
8.9
Serial Port Menu.............................................................................................................................................................................. 38
8.10
Advanced Measurement Mode Menu......................................................................................................................................... 39
8.10.1
PEAK MODE ....................................................................................................................................................................... 41
8.11
Utilities menu ............................................................................................................................................................................... 42
8.11.1
LOGGING SETTINGS ......................................................................................................................................................... 43
9
8.11.2
SCREEN SETTINGS ........................................................................................................................................................... 45
8.11.3
ABOUT ................................................................................................................................................................................ 45
SETTING UP PROBES ....................................................................................................................................................................... 46
9.1
setup steps before Starting measurement ................................................................................................................................... 47
10
SERIAL COMMANDS ...................................................................................................................................................................... 49
SI5500 User Manual 503147 ISSUE 1
5 of 53
11
MEASUREMENT AND TIMING INFORMATION ............................................................................................................................. 52
12
RETURN OF GOODS....................................................................................................................................................................... 53
SI5500 User Manual 503147 ISSUE 1
6 of 53
1 INTRODUCTION
This manual specifically caters for the SI5500 read out with Orbit Interface.
2 SCOPE
The SI5500 read out can interface up to 31 Orbit Sensors and communicates through Orbit Serial Protocol (via Orbit Interface). It can interface
with Orbit Digital Probes, Linear Encoders and Encoder Input Modules. The readings from the sensors are displayed on the front panel LCD
display. SI5500 includes a unique feature of configuring user defined formulas/expressions for each of the measurement channel. A maximum
of 31 measurement channels are supported. The read out can be configured through a 9-button keypad (3x3). Basic Input Output is provided
by discrete lines. A RS232 serial interface is provided for printing the current readings.
3 NAVIGATE THIS DOCUMENT
This is a large document, to aid electronic navigating the document; the following Navigation tip may be useful:
It is often necessary to jump to another item and then go back to where you jumped from.
This can be done in Adobe Reader by using the ‘Previous Page View’ button:
'Previous Page View'
Button
Other PDF readers will have a similar 'Previous Page View' option.
SI5500 User Manual
Revision A
7
4 SAFETY SUMMARY
WARNING statements identify conditions or
Warnings and Cautions
practices that could result in personal injury or
loss of life.
Warning: Do not operate in an explosive atmosphere.
CAUTION statements identify conditions or
practices that could result in damage to the
equipment or other property
Symbols in this manual
Warning: this equipment is not intended for safety critical applications
Warning: Do not operate without covers
Warning: do not exceed maximum ratings as specified in this document under individual
modules.
Indicates cautionary or other
information
Caution: Low Voltage
This equipment operates below the SELV and is therefore outside the scope of the Low
Voltage Directive
Service and Repair
CAUTION: This equipment contains no user serviceable parts. Return to
supplier for all service and repair
All of the Products are CE marked and comply with Low Voltage Directive (1997) standards.
SI5500 User Manual
Revision A
8
5 GLOSSARY OF TERMS AND BASIC SYSTEM INFORMATION
5.1 TERMS ASSOCIATED WITH SI5500 READ OUT
Display
The Liquid Crystal Display mounted on the front panel of the read out providing displayed information
Keypad
The 9-button keypad (3x3) mounted on the front panel of the read out allowing functional and menu navigation
Discrete Inputs
Digital lines into the read out which allows remote control of certain parameters/functionalities
Discrete Outputs
Digital lines output from read out that can be used to drive external loads. These can be with either NPN or PNP configuration
Serial Interface
This is a RS232 bus that is used to print the reading in ASCII format (as defined in this manual).
Digital Probe
This is a standard Solartron product that can be connected to the read out through Orbit Interface.
EIM
Encoder Input Module – A standard Solartron product that is used to interface with rotary encoders and can be read through Orbit Interface.
Linear Encoder (LE)
Highly accurate optical gauge that can be read out through Orbit Interface.
SI5500 User Manual
Revision A
9
Measurement Mode
This information represents the current measurement mode of the channel. It can take the values of ABS(Absolute), TARE(ZERO), PRE(Preset)
ABS(Absolute) – In this mode the displayed reading is same as the current absolute reading.
TARE(ZERO) – In this mode the displayed reading is referenced to a “Zero” value.
PRE(Preset) – In this mode the displayed reading is referenced to a user defined value.
Operation Mode
This information represents the mode in which the measurement channel is operating. It can take the values of TRACK, PEAK+, PEAK-.
TRACK – Tracks the current reading of the measurement channel
PEAK+ – Tracks the maximum value of the measurement channel
PEAK- – Tracks the minimum value of the measurement channel
Sensor/Orbit Sensor
This refers to Orbit Digital Sensor from Solartron. It can be one of Digital Probe or Linear Encoder or EIM sensor module.
SI5500 User Manual
Revision A
10
6 ELECTRICAL INSTALLATION
This section describes how to connect the unit.
I/O Connector
Refer to Discrete Lines
section for pin details and
input/output schematic
details
RS232 COMM Connector
Refer to RS232 section
for pin details
24V DC Input
Connect the DC power
adapter supplied as an
accessory along with the
read out.
Orbit Communication Interface Ports
Connect one end of the RS485 cable to
one of the ports and the other end to
the Orbit network.
Orbit Network Stack
Orbit Digital Probes of up to 31
sensors can be connected
together.
SI5500 read out supports
interface of DP probes (Spring
Push/Pneumatic), Linear
Encoders and Encoder Input
Modules.
SI5500 User Manual
Revision A
11
7 DISPLAY AND KEYPAD
SI5500 operates in four modes of display namely: OPERATE SCREEN, MENU SCREEN, GAUGING SCREEN and AUTOSENSE SCREEN
7.1 OPERATE SCREEN
The calculated readings are displayed in this mode. The operate screen can be of Single Channel Bar Display, Dual Channel Bar Display, 4-Channel
Bar Display, 8-Channel Bar Display, 16-Channel Bar Display, 8-Channel Text Display, 16-Channel Text Display. User can select the required type of
display through “Display Configuration Menu”.
In the multi-channel configuration, user can scroll through the required set of channels using and arrow keys. The scrolling is not possible in
single channel configuration.
•
Dual Channel Display Configuration
This mode displays two consecutive channel readings in bar panel mode. The blue cursor on top of the bar indicates the current selected channel.
The limits and the formula configured for the measurement channel will be missing on the display. User has to switch to Singe Channel Display
Configuration for getting complete information about the measurement channel.
SI5500 User Manual
Revision A
12
•
4-Channel Display Configuration
This mode displays 4 consecutive channel readings in bar panel mode. The blue cursor on top of the bar indicates the current selected channel.
NOTE that the resolution of max/min range values is limited to 3 decimal point resolution due to constraint in the available display area. User can
switch over to Single Channel Display Configuration for getting complete information about the measurement channel.
•
8-Channel Display Configuration
This mode displays 8 consecutive channel readings in bar panel mode. The blue cursor on top of the bar indicates the current selected channel. The
resolution of max/min range values is limited to 3 decimal points only due to constraint in the available display area. User can switch over to Single
Channel Display Configuration for getting complete information about the measurement channel. The measurement mode and channel operation
modes are abbreviated as a single text in this mode. Below are the abbreviated values:
• TR_AB – Operation mode is TRACK, Measurement mode is ABS
• TR_ZE – Operation mode is TRACK, Measurement mode is ZERO
• TR_PR – Operation mode is TRACK, Measurement mode is PRESET
• P+_AB – Operation mode is PEAK+, Measurement mode is ABS
• P+_ZE – Operation mode is PEAK+, Measurement mode is ZERO
• P+_PR – Operation mode is PEAK+, Measurement mode is PRESET
SI5500 User Manual
Revision A
13
•
•
•
•
P-_AB – Operation mode is PEAK-, Measurement mode is ABS
P-_ZE – Operation mode is PEAK-, Measurement mode is ZERO
P-_PR – Operation mode is PEAK-, Measurement mode is PRESET
16-Channel Bar Display Configuration
This mode displays the 16 consecutive channel readings in bar mode. The blue cursor on top of the bar indicates the current selected channel. NOTE
that in this mode the readings and no other information related to the measurement channel is displayed. The reading is indicated only through the
bar fill according to the current reading. This mode can be mainly used to find out which channels are out of limits/range. User can switch to Single
Channel Configuration for getting the complete information about that channel.
SI5500 User Manual
Revision A
14
•
8-Channel Text mode configuration
This mode displays the 8 consecutive channel readings in text mode. The blue cursor on left of the channel reading indicates the selected channel.
User can switch to Single Channel Configuration for getting the complete information about that channel.
SI5500 User Manual
Revision A
15
•
16-Channel Text Mode Configuration
This mode displays the 16 consecutive channel readings in text mode. The blue cursor on left of the channel reading indicates the selected channel.
User can switch to Single Channel Configuration for getting the complete information about that channel.
SI5500 User Manual
Revision A
16
•
Single channel configuration
This mode displays all the properties of the measurement channel. User can switch to this mode to get all the required information of the selected
channel.
Channel Number varies from:
C1 to C31
Configured Expression/Formula
Measurement Mode:
Can take values
TRACK, PEAK+, PEAK-
Operation Mode:
Can take values
ABS, TARE, PRE
Calculated Reading
Units of measure:
Can take values
mm, inch, deg, rad
Upper and lower limit
values
NOTE:
1. If any one of the sensor/multiple sensors used in the formula is in OverRange/UnderRange condition, then an “ERROR” status is displayed in
RED color instead of the current reading. The bar will be drawn with full scale in RED color.
2. If any of the sensors is not connected or not notified, then an “ERROR” status will be displayed for all the channels using that particular sensor
in their formula. The bar will be drawn with full scale in RED color.
3. OSError: This error occurs when one or more Linear Sensors used in the formula for the corresponding channel reports “OverSpeed Error”.
When this error occurs the bar is drawn with full scale in RED color. To reset this error, select the channel (in case of multi-channel
configuration scroll the cursor to that channel) and then press ZERO key. It will reset the error and note that the reading from Linear Sensor is
automatically re-zeroed. However it will not re-adjust (or re-Zero) the displayed reading if the channel is in ZERO mode. This operation has to
be explicitly performed by the user through ZERO key.
SI5500 User Manual
Revision A
17
7.2 SWITCHING TO THE SINGLE CHANNEL CONFIGURATION FOR THE SELECTED CHANNEL
To switch to single channel mode from any multi-channel configuration below steps has to be followed:
• Use and arrow keys in the multi-channel configuration to select the required channel.
• Press ENTER key to display the selected channel in single channel configuration mode.
• To go back to the previous multi-channel display configuration, press ENTER key again.
7.3 KEYPAD FUNCTIONALITY IN SINGLE CHANNEL OR MULTI CHANNEL CONFIGURATION
When the current display is of Single Channel or Multi-channel configuration mode, the metrology functions are performed through keypad buttons.
The functionality of each key is described in the table below:
KEY
MENU
Arrow Key
Arrow Key
PRINT Key
Arrow Key
ENTER Key
Arrow Key
ZERO Key
PEAK/TRACK Key
SI5500 User Manual
DESCRIPTION
Switches to Set Up MENU Screen.
Enables PRESET on the selected channel/on all channel depending on “ZERO/PRESET all”
setting in “Display Configuration” menu.
Performs PEAK RESET on the current channel. Continuous press of more than 1 second will
perform PEAK RESET on all the channels.
Prints the reading according to the mode selected. Refer to the PRINT Options section for
information on PRINT options configuration
Scrolls to the previous channel when the display is in multi-channel configuration. Hold the
key for more than 300ms for a continuous scroll to the previous channels. No operation in
single channel configuration.
Switches to single channel configuration for the selected channel from multi-channel
configuration. An ENTER key press again will switch back to the multi-channel configuration.
NOTE THAT when single channel configuration is selected through “Display Configuration”
MENU Screen, there is no functionality for ENTER key.
Scrolls to the next channel when display is in multi-channel configuration. Hold the key for
more than 300ms for a continuous scroll to the next subsequent channels. No operation in
single channel configuration.
Perform the ZERO operation on the current selected channel or on all channels depending on
“ZERO/PRESET all” setting in “Display Configuration” menu.
Changes the operation mode between PEAK+, PEAK- and TRACK on the selected channel.
Revision A
18
7.4 GAUGING MODE SCREEN
This screen displays the result when Gauging mode is enabled. Gauging mode is used to check if all the selected number of channels is within limits.
The count of channels to be used for gauging mode can be configured through “Advanced Measurement Mode” menu screen.
If all the channels selected for scanning are within limits, then “PASS” status is displayed. If one or more number of channels is outside limits, then
“FAIL” status is displayed.
User can select “Scan” option to display the channel in Single Channel Configuration mode. and arrow keys can be used to scroll through the
different channels. This mode is called as STATIC mode. NOTE THAT PRESET, PEAK/TRACK and PEAK RESET functionalities does not work in
STATIC mode. ZERO and PEAK/TRACK key functions similar to that of Single Channel Configuration. To exit STATIC mode, use PEAK/TRACK key.
“Search” option is used to display the channel/channels which are outside limits. If multiple channels are outside limits, then the first channel is
displayed in single channel configuration mode for the configured amount of time. After that the display scrolls to the next channel which is out of
limits. At the end, the display changes back to the result screen. The delay time for which each of the channels has to be displayed can be configured
through “Advanced Measurement Mode” menu screen.
If all the channels are within limits then screen with “No Faults Found” message is displayed for the configured amount of delay time and switches
back to the result screen.
“LOAD” option is used to enable the PRESET values for the measurement channels. If “LOAD” option is selected once again, it removes PRESET
values.
SI5500 User Manual
Revision A
19
7.5 AUTOSENSE MODE SCREEN
This screen displays the result when Autosense mode is enabled. Autosense mode is used to automatically select the channel which is within limits.
The count of channels to be used for scanning can be set through Autosense Mode menu screen. When a channel is within limits, it is displayed in
Single Channel Configuration mode. If none of the channel is within limits, then the status message “Probes Parked” message is displayed.
NOTE: When more than one channel is within limits, the first channel is displayed in single channel configuration mode. There is no scrolling possible
to switch to the next channel.
The keypad functions the same as for Single Channel Configuration mode.
SI5500 User Manual
Revision A
20
8 MENU SCREEN
The MENU screens are used to set up/configure the read out. Menu Screen can be activate through MENU key button on the keypad. The current
screen is stored and displayed back when MENU Screen mode is exit.
In MENU Screen mode the keypad functionality is as per the table below:
DESCRIPTION
KEY
MENU
Exits MENU Screen mode.
Arrow Key
Scrolls UP. Hold the key for more than 300ms to scroll UP continuously.
Arrow Key
Scrolls DOWN. Hold the key for more than 300ms to scroll DOWN continuously.
PRINT Key
No Operation.
Arrow Key
Scrolls to the right side. Hold the key for more than 300ms to scroll continuously.
ENTER Key
To select the option and also for number editing. Refer to the example below.
Arrow Key
Scrolls to the left side. Hold the key for more than 300ms to scroll continuously.
ZERO Key
Used only in Formula Edit Menu Screen.
Will erase the complete formula so that the user can enter the required formula from the
beginning.
PEAK/TRACK Key
Used only in Formula Edit Menu Screen.
Acts as a backspace key. Erases a single token (operator/operand) in the formula.
For e.g. Consider the formula “A+sinB” and the current cursor location is at B. Press of this
key will erase “sin” token and retains the remaining tokens in the formula string. The resultant
formula string will be “A+B”.
Example of editing a number:
There are many menu screens where number/range values are present. Below is the procedure for editing the same.
Consider the number +010.00000.
Key
+
0
1
0
.
0
0
0
0
0
Cursor is at first position. Default position at the start.
ENTER +
0
1
0
.
0
0
0
0
0
ENTER key will start edit mode.
0
1
0
.
0
0
0
0
0
UP arrow key will change the sign of the number.
0
1
0
.
0
0
0
0
0
RIGHT arrow key will change the current position to
the next digit ‘0’
0
1
0
.
0
0
0
0
0
RIGHT arrow key will change the current position to
the next digit ‘1’
0
2
0
.
0
0
0
0
0
UP arrow key will increment the number.
SI5500 User Manual
Revision A
21
ENTER -
0
2
0
.
0
0
0
0
0
ENTER key will stop edit mode. The final number (020.00000) will be saved and used further.
8.1 SETUP MENU
The main SetUp Menu has two pages (Page1 and Page2).
SetUp Menu Page 1
SetUp Menu Page 2
Display Configuration
ENTER
Input/Output
Probes
Computed Measurement
PRINT Options
Serial Port
ENTER
Measurement Mode
Advanced Measurement Mode
Preset/Limits
Utilities
Next Menu
SI5500 User Manual
Exit Menu
Back
Revision A
Exit Menu
22
8.2 DISPLAY CONFIGURATION MENU
Display Configuration Menu
OPTIONS
Display Config
1Ch, 2Ch, 4Ch, 8Ch Bar, 8Ch Txt, 16 Ch Bar, 16Ch Txt
Places after DP
1, 2, 3, 4, 5
Bar Offset
Bar AutoRange
+000.00000
OFF, ON
OFF, ON
ZERO/PRESET all
1, 2, 3, 4, 5
Last Digit Step
Exit Menu
NOTE: The “Display Config” menu item is a list box and the options under this item can be selected through and arrow keys. The options for this menu item are listed with a comma in between the options. The same convention will
be followed further in this document. All the options which are separated by a comma is a list box and can be
selected through andarrow keys.
“ZERO/PRESET all” menu option enables the setting of performing ZERO/PRESET operation on single channel or on all channels.
Last Digit Step – Defines the minimum step resolution for the reading displayed. The displayed reading is changed only in multiples of the configured
“Last Digit Step” configuration setting. For e.g. If the setting is set to ‘2’ and the reading changes from 7.5264 to 7.5267 the reading on the display is
changed to 7.5266 and not 7.5267 since it is not multiple of 2.
NOTE: To disable the “Last Digit Step” functionality, set it to ‘1’.
SI5500 User Manual
Revision A
23
8.3 PROBES MENU
Sensor number: Varies from ‘A’ to ‘Z’ and from ‘a’ to ‘e’.
Probes Menu – Sensor A
Probe Type
Direction
Range
Probe ID
OPTIONS
Orbit
Retract+, Extend+123.00000
ABCDEFGHIJ
Resolution
14-bit, 16-bit, 18-bit
Pulses/Rev
12345
These fields are not user editable- Will be filled
automatically according to the sensor Notified.
NOTE: The Pulses/Rev option is valid only for EIM
sensor type and will not appear for other Orbit Sensor
types. The Resolution and Pulses/Rev options do not
appear on start-up and will be visible if a valid probe is
notified.
Notify Back Next Menu
Probes Menu is used for setting up the probes. To Notify a probe follow the below procedure:
•
•
•
•
Select the direction type. For Spring-Push probes: it has to be set to “Retract+”, for pneumatic probes: it has to be set to “Extend-“.
Select “Notify” option. An on-screen tip will also be displayed on the screen.
Move the probe tip to get notified.
After notify command is successful, the “Range”, “Probe ID”, “Resolution”, “Pulses/Rev” parameters gets populated according to the sensor
type.
NOTE:
•
To Notify the probe tip has to be moved such that the readings change by about 1%. After moving the probe tip, it takes about 500ms to
update the data on the display.
SI5500 User Manual
Revision A
24
•
Resolution can be changed only for DP type probes. It is also not possible to change if a sensor is in Difference Mode. Difference mode is
started if MAX or MIN or DIFF math formula is applied on the particular probe.
8.4 COMPUTED MEASUREMENT
SI5500 User Manual
Revision A
25
Computed Measurement Menu
OPTIONS
Channel Nr
C1, C2, C3, ……., C31
Expression
MAXA
Units
Uni-/Bi-Polar
Range
User defined formula corresponding to
the selected Channel Nr
mm, inch, deg, rad
Auto, Unipolar, Bipolar
+000.000000
Exit Menu
ENTER Key to edit
the formula
Use and arrow keys to move through the formula string.
ZERO key will erase the formula completely and allows to
input formula from the beginning.
PEAK/TRACK works as backspace key.
Use and arrow keys to scroll between the options.
This screen is used to edit/enter the formula for the corresponding channel.
Opr, Opd, Num, Math options provides a pop-up window containing various mathematical operators, trigonometric functions and sensor numbers
(used as operands for mathematical or trigonometric functions) defined in the table below.
SI5500 User Manual
Revision A
26
Opr - +, -, *, /, (, ), , Exit
Opd – A, B, C, D, E, F, G, H, I, J, K, L, M, N, O, P, Q, R, S, T, U, V, W, X, Y ,Z, a, b, c, d, e, Exit
Num – 0, 1, 2, 3, 4, 5, 6, 7, 8, 9, Exit
Math – sin, cos, tan, inlog10, inloge, log10, loge, Mx, Mn, MAX, MIN, DIFF, Exit
User has to use ,, and arrow keys to scroll through the options displayed in Opr, Opd, Num, Math pop-up windows. The required option can
be selected through ENTER key. The selected option is inserted at the current indexed location in the formula string.
TIP:
1. It is not necessary to exit the pop-up window displayed before opening the new pop-up window. User can scroll to the next required option
using and arrow keys. Whenever the next option is selected before exiting the current pop-up window it is taken care to erase the
current pop-up and the new pop-up window will be displayed.
For eg: If user is in “Opd” pop-up window display and wants to open “Math” pop-up window, it is not necessary to scroll through all the way to
“Exit” option, close the window and then select the Math option. Instead user can use and arrow key to scroll to “Math” option and select
the same to display “Math” operations pop-up window.
2. Flexibility has been provided even to scroll through the formula expression string, without closing the pop-up window displayed. User can use
arrow key to scroll to the formula string and then and arrow keys to index to the required position in the formula string.
3. If a measurement channel is not used, leave the formula field blank by erasing the complete formula. This will yield a faster performance.
SI5500 User Manual
Revision A
27
8.5 MEASUREMENT MODE
Measurement Mode Menu
OPTIONS
Channel Nr
C1, C2, C3, ……., C31
Measure Mode
TRACK, PEAK+, PEAK-
Reset Mode
Trigger Time(ms)
Trigger Level
These options are applicable only for
PEAK+ and PEAK- measure mode options.
It will be displayed only if the corresponding
channel is in PEAK+ or PEAKmeasurement mode.
Manual, Automatic
12345
+000.000000
Exit Menu
NOTE: Trigger Time has to be a multiple of 20ms
This menu is used to configure the measurement mode of the channel.
If “Reset Mode” is set to Manual option, then the peak value is reset through arrow key.
If “Reset Mode” is set to Automatic option:
•
•
In PEAK+ mode, peak value is reset to the current reading if it goes below the configured trigger level for the configured trigger time period
In PEAK- mode, peak value is reset to the current reading if it goes above the configured trigger level for the configured trigger time period
SI5500 User Manual
Revision A
28
8.6 PRESET/LIMITS MENU
Preset/Limits Menu
Channel Nr
OPTIONS
C1, C2, C3, ……., C31
Preset
+000.00000
Upper Limit
+003.00000
Lower Limit
-003.00000
Exit Menu
SI5500 User Manual
Revision A
29
8.7 INPUT/OUTPUT MENU
Input/Output – Page 1
Logic Outputs
Active LOW, Active HIGH
Out1 <ChNr> <Func>
<C1, C2, C3, …., C31> <OK, Under, Over, None>
Out2 <ChNr> <Func>
<C1, C2, C3, …., C31> <OK, Under, Over, None>
Out3 <ChNr> <Func>
<C1, C2, C3, …., C31> <OK, Under, Over, None>
Out4 <ChNr> <Func>
<C1, C2, C3, …., C31> <OK, Under, Over, None>
Back
Next Menu
Input/Output – Page 2
Out5 <ChNr> <Func>
<C1, C2, C3, …., C31> <OK, Under, Over, None>
Out6 <ChNr> <Func>
<C1, C2, C3, …., C31> <OK, Under, Over, None>
Logic Inputs
Active LOW, Active HIGH
Inputs Config
Config1, Config2
Back
SI5500 User Manual
OPTIONS
Exit Menu
Revision A
30
SI5500 supports 6 discrete inputs and 6 discrete outputs. The discrete outputs can be mapped to any channel number through menu screen shown
above.
“OK” Control Function: Output is set when the reading for the associated channel is within limits.
“Over” Control Function: Output is set when the reading for the associated channel is above upper limit or above max. range (OverRange condition).
“Under” Control Function: Output is set when the reading for the associated channel is below lower limit or below min. range (UnderRange condition).
TIP: If any output is not used, set it to “None”.
8.7.1 Pin Details of Discrete Outputs
PIN No.
Description
1
Out1
14
Out2
2
Out3
15
Out4
3
Out5
16
Out6
4
Isolated O/P Common
8.7.2 Pin Details of Discrete Inputs
The functionality of discrete inputs depends on the “Inputs Config” type configured. Below is the table explaining the discrete inputs functionality:
PIN No.
17
5
18
Config1
ZERO
Edge Input type. When this input is set active, it will
ZERO the current selected channel or all channels
according to the ZERO/PRESET all configuration
PRESET
Edge Input type. When this input is set active, PRESET
operation will be performed on the current selected
channel or all channels according to the ZERO/PRESET
all configuration
PRINT
For Edge Input type – It sends single PRINT data onto
SI5500 User Manual
Config2
ZERO
Edge Input type. When this input is set active, it will
ZERO the current selected channel or all channels
according to the ZERO/PRESET all configuration
PRESET
Edge Input type. When this input is set active, PRESET
operation will be performed on the current selected
channel or all channels according to the ZERO/PRESET
all configuration
PRINT
For Edge Input type – It sends single PRINT data onto
Revision A
31
6
19
7
20
RS232 port.
For ACTIVE Input – It sends continual PRINT stream of
data onto RS232 port.
LOG
Starts data logging
PEAK RESET
Edge Input type. Performs complete PEAK RESET on all
the channels
PEAK TOGGLE
Edge Input type. Changes the mode of the current
selected channel between PEAK+/PEAK-/TRACK.
Similar to giving input through PEAK/TRACK key from
the keypad
Isolated I/P Common
RS232 port.
For ACTIVE Input – It sends continual PRINT stream of
data onto RS232 port.
Not Used
Not Used
Not Used
Isolated I/P Common
Discrete Inputs and Outputs Schematic:
External Supply
10V to 24V DC
PINS – 17,5,18,6,19,7
Load
(up to 500mA)
PINS – 1,14,2,15,3,16
PIN - 4
PIN 20
GND
Discrete Inputs Schematic
Discrete Outputs Schematic
SI5500 User Manual
Revision A
32
8.8 PRINT OPTIONS
PRINT OPTIONS Menu
OPTIONS
KeyPress
Single, Continuous
Discrete I/P
Single, Continuous
Print Mode
This Reading, Reading+Step,
All Readings
Exit Menu
Single PRINT will send the data onto RS232 only once.
Continuous PRINT will send data onto RS232 continuously.
The PRINT key or the discrete input functionality depends on the current mode in which SI5500 is operating. Below table summarizes the same:
Print Mode
OPERATE SCREEN
This Reading
Prints Current Readings of all If in SCAN mode i.e. current display Prints Current Reading of the When the unit is in
displayed channels
is Gauging Mode result Screen, no displayed channel within limits. “acquisition phase”, the
currently stored readings
SI5500 User Manual
GAUGING MODE
AUTOSENSE MODE
Revision A
PEAK MODE
33
print occurs.
If there is no channel within are printed.
limits, no information will be
If in STATIC mode i.e. “Scan” option printed.
When the unit is in
“analysis
phase”,
the
is selected through Gauging Mode
result Screen, current displayed
calculated result values
channel reading is printed.
are printed.
Reading+Step
Prints Current, max and min If in SCAN mode i.e. current display No Operation.
readings of all the displayed is Gauging Mode result Screen, the
channels
display is changed to STATIC mode
and the current displayed channel
reading is printed. Each PRINT will
advance to the next channel and
prints the reading. After the last
channel selected for scan is printed,
the display reverts back to the first
channel.
No Operation.
If in STATIC, each PRINT will
advance to the next channel and
prints the reading. After the last
channel selected for scan is printed,
the display reverts back to the first
channel.
All Readings
Prints Current Reading of all Prints the current reading of all the Prints the current reading of all All the stored readings and
the 31 channels
channels selected for scanning.
the channels selected for calculated result values
scanning.
are printed. This mode
works only when unit is in
“analysis phase”.
SI5500 User Manual
Revision A
34
8.8.1 PRINT FORMAT
Current Readings:
•
x
:
:
x
x
x
C
1
x
x
x
x
x
x
x
x
.
x
.
x
x
.
x
x
x
.
x
x
x
.
x
x
x
x
x
x
x
x
x
x
x
x
x
x
x
x
x
x
x
x
x
x
x
x
.
x
x
.
x
x
x
.
x
x
x
.
x
x
x
x
.
x
x
x
x
x
x
x
.
x
x
x
.
x
x
x
.
x
x
x
x
.
x
x
x
x
.
x
x
x
x
m
i
d
r
m
n
e
a
c
g
d
h
Limits
Space
Space
Sign
+
-
Units
>
<
=
!
\r
\n
Limits
>
<
=
!
Eg: For channel C1 with reading as +1.34815 with units as inch, within limits
:
+
1
.
3
4
8
1
5
i
n c
h
=
SI5500 User Manual
Line Feed
x
x
Reading
Right aligned with DP set throgh
"Places after DP" setting in
"Display Configuration" menu
Carriage
Return
C
C
Space
Channel Nr
(C1 to C31)
In any mode the current readings of the measurement channels are printed in the format below:
Revision A
\r
Description
Above Upper Limit
Below Lower Limit
Within lim its
Probe Error - One of the probe
used in the formula is not
notified or has under range/over
range error
\n
35
•
Current, Max, Min Readings:
C x
C x x
:
:
+
-
.
x
x
x
x
x
x
x
x
x
x
x
.
x
x
x
x
.
x
x
x
x
x
x
x
x
x
x
x
x
.
x
x
x
x
.
x
x
x
x
x
x
x
x
x
x
x
x .
x . x
x . x x
x . x x x
x
x x
x x .
x x . x
x x . x x
x
x x
x x x
x x x .
x x x . x
x
x
.
x
x
m
i
d
r
m
n c h
e g
a d
>
<
=
!
;
+
-
.
x
x
x
x
x
x
x
x
x
x
x
.
x
x
x
x
.
x
x
x
x
x
x
x
x
x
x
x
x
.
x
x
x
x
.
x
x
x
x
x
x
x
x
x
x
x
x .
x . x
x . x x
x . x x x
x
x x
x x .
x x . x
x x . x x
x
x x
x x x
x x x .
x x x . x
x
x
.
x
x
m
i
d
r
m
n c h
e g
a d
;
+
-
.
x
x
x
x
x
x
x
x
x
x
x
.
x
x
x
x
.
x
x
x
x
x
x
x
x
x
x
x
x
.
x
x
x
x
.
x
x
x
x
x
x
x
x
x
x
x
x .
x . x
x . x x
x . x x x
x
x x
x x .
x x . x
x x . x x
x
x x
x x x
x x x .
x x x . x
x
x
.
x
x
Units
m
i
d
r
Space
Carriage
return
Line Feed
Max. Reading
Right aligned with DP set
throgh "Places after DP"
setting in "Display
Configuration" menu
Space
Units
Sign
Space
Max. Reading
Right aligned with DP set
throgh "Places after DP"
setting in "Display
Configuration" menu
Space
Sign
Space
Limits
Units
Space
Reading
Right aligned with DP set
throgh "Places after DP"
setting in "Display
Configuration" menu
Space
Sign
Space
Channel Nr
(C1 to C31)
In any mode Current, Max, Min readings of the measurement channels are printed in the format below:
m
n c h
e g
a d
Example: For Channel C12: with current reading as +1.2456, above upper limit, units as mm and with max. & min. readings as +1.8634 & -0.0003 respectively
C 1 2 :
+
1 . 2 4 5 6
mm
> ;
+
1 . 8 6 3 4
mm
;
0 . 0 0 0 3
mm
SI5500 User Manual
Revision A
\r
\n
\r \n
36
•
PEAK Mode Print Format:
t
t
x
x
x
:
:
Sign
+
-
x
x
.
x
.
x
x
.
x
x
x
.
x
x
x
.
x
x
x
x
x
x
x
x
x
x
Line Feed
n
n
PEAK Reading
Carriage
return
P
P
Space
Reading Nr
The readings in the PEAK mode are printed in the below format:
\r
\n
Eg: PEAK readings values +7.4982, +10.6290 and +9.1863 are displayed as below
P n
t
1
:
+
7
.
4
9
8
2
\r
\n
P n
t
2
:
+
1
0
.
6
2
9
0
\r
\n
P n
t
3
:
+
9
.
1
8
6
3
\r
\n
The calculated result values are printed in the below format:
SI5500 User Manual
Revision A
37
a
i
a
v
:
:
g
r
e
a
g
e
:
:
:
:
Sign
+
-
x
x
.
x
.
x
.
x
x
Line Feed
M
M
R
A
x
n
n
e
Carriage
return
a
i
a
v
Space
Result Type
M
M
R
A
Result value
\r
\n
\r
\r
\r
\r
\n
\n
\n
\n
x
x
x
x
Eg: Max=+7.4982, Min=+7.3716, Range=+0.1266 and Average=+7.3915
x
:
:
+
7
.
4 9 8 2
n
:
:
+
7
.
3 7 1 6
n g e
:
+
0
.
1 2 6 6
e
r
a g e
:
+
7
.
3 9 1 5
8.9 SERIAL PORT MENU
Serial Port Menu
Baud Rate
OPTIONS
1200, 2400, 4800, 9600, 19200, 38400, 57600, 115200, 187500
No of Data Bits
7, 8, 9
No of Stop Bits
0.5, 1, 1.5, 2
Parity
Odd, Even, None
Exit Menu
Pin diagram of RS232 port:
SI5500 User Manual
Revision A
38
PIN
1
2
3
4
5
6
7
8
9
Description
Not Used
RS232 Tx
RS232 Rx
Not Used
RS232 GND
Not Used
Not Used
Not Used
Not Used
8.10
ADVANCED MEASUREMENT MODE MENU
SI5500 User Manual
Revision A
39
Advanced Measurement
Mode Menu
OPTIONS
Advanced Mode
None, Gauging, Autosense, PEAK mode
Exit Menu
Gauging mode selected
Advanced Measurement Mode Menu
Menu screen when “Advanced Mode” is set to
None.
The other menu options get enabled
according to the advanced mode selected.
Autosense mode selected
Advanced Measurement Mode Menu
OPTIONS
OPTIONS
Advanced Mode
None, Gauging, Autosense, PEAK mode
Advanced Mode
None, Gauging, Autosense, PEAK mode
No. of Channels
1 to 31
No. of Channels
1 to 31
Search Delay
02000
Search Delay
Exit Menu
Exit Menu
To switch OFF the advanced measurement mode and return back to the OPERATE SCREEN mode, select NONE.
SI5500 User Manual
Revision A
40
8.10.1 PEAK MODE
Advanced Measurement Mode Menu
OPTIONS
Advanced Mode
None, Gauging, Autosense, PEAK mode
Channel Nr
1 to 31
No. of Readings
2 to 99
Exit Menu
PEAK mode is designed to take up to 99 numbers of PEAK readings as input, analyze the same and display the calculated result values. When
PEAK mode is selected, the unit enters into “acquisition phase” and the selected channel reading is displayed in single channel mode. User can set
the current displayed reading as a PEAK reading through “ENTER” key press. The storage counter displayed on the screen gets incremented after a
successful store of the PEAK reading. If an input reading has to be erased, the same can be done by PEAK/TRACK key press. When all the
configured number of PEAK readings is input, the unit enters into “analysis phase” and the readings are analyzed and below mentioned calculated
result values are displayed through a result message pop-up window:
Max: Maximum PEAK reading in all the PEAK readings input
Min: Minimum PEAK reading in all the PEAK readings input
Range: (Max – Min)
Avg: Sum of all readings/Number of readings input
When the result message pop-up window is exit, all the current readings are erased and the unit is ready to take next set of input readings.
User can print the stored PEAK readings and the calculated result values according to the PRINT mode settings configured. Refer to PRINT Options
section for further details.
SI5500 User Manual
Revision A
41
8.11
UTILITIES MENU
Utilities Menu
This option reset all the configuration
data to default values. All the probes
notified information are lost and has to be
notified once again.
Restore Factory Settings
Password Settings
Logging Settings
A pop-up message indicating “FACTORY
SETTINGS
RESTORED. System
Resetting...” will be displayed. The unit
will automatically reset and come up with
default settings.
Screen Settings
About
Exit Menu
Password Settings Menu
OPTIONS
Password Enable
OFF, ON
Password Value
1234
Lock function
Lock Menu, Lock All, Button Lock
Exit Menu
Lock Menu – Will lock the MENU key. A valid password has to be entered whenever MENU screens has to be opened. No password is required for
other key press functionalities.
Lock All – A valid password has to be entered for MENU key press. All the other keys will be disabled and does not function.
Button Lock – Will lock all the keys. A valid password authentication is required for any key press.
SI5500 User Manual
Revision A
42
8.11.1 LOGGING SETTINGS
Logging Settings – Page 1
OPTIONS
Mode
Standard, Start on I/P, Trig. on I/P
Interval(ms)
0001000
Duration(ms)
0040000
Channel Count
1 to 31
Back
Next Menu
Logging Settings – Page 2
Opens a pop-up window
to choose the Log Page
OPTIONS
Log Page
Start Logging
OK
Stop Logging
Current, Page1, Page2, Page3,
Page4, Page5, Page6, Page7, Page8
Exit
Print Summary
OPTIONS
Print Log
Log Page
Save Log
Back
Next Menu
Opens a pop-up
window to choose
the Log Page
OK
Page1, Page2, Page3, Page4,
Page5, Page6, Page7, Page8
Exit
This menu screen allows user to configure the required logging settings. The required number of channels for logging can be selected through
“Channel Count” option. NOTE THAT the “Duration” and “Interval” time values have to be multiple of 20ms. User can log up to 8 sets of data onto
SI5500 User Manual
Revision A
43
FLASH through selecting one of Page1 to Page8. Each “Page” is of 512KB in size and can hold up to 4K readings from each measurement channel
when all the 31 channels are selected for logging. The number of readings can increase if less than 31 channels are selected for logging. The “Start
Logging” option will start logging the data onto RAM and not onto FLASH. User has to save the data onto FLASH through “Save Log” option. “Print
Log” and “Print Summary” options send the data through RS232 port.
Log Mode Options:
Standard – This mode is time triggered logging mode. In this mode the logging can be started/stopped through Start Logging/Stop Logging menu
options. The logging is automatically switched OFF after the configured duration time is elapsed.
Start on I/P – This mode is similar to “Standard” mode except that the logging can be started through LOG digital input only. Logging cannot be
started through “Start Logging” menu option in this mode. Logging can be stopped through “Stop Logging” menu option or it is switched OFF after the
configured duration time is elapsed in this mode. Refer to Pin Details of Discrete Inputs section for digital inputs pin diagram.
Trig. on I/P – In this mode a snapshot of the current readings are logged whenever there is an active input on LOG digital input pin. User has to start
logging through “Start Logging” menu option before logging of current readings can happen. Logging can be stopped through “Stop Logging” menu
option only and automatic logging switch-OFF is not present in this mode. Refer to Pin Details of Discrete Inputs section for digital inputs pin diagram.
Log Page Select Options:
Current – Selects the log data stored in RAM. This option is not available in “Save Log” option.
Page1 to Page8 – Selects the log data set stored in the selected FLASH page.
Log Summary printed will contain the below information per channel:
Number of Readings: Number of readings logged per channel
Max Reading of Ch: Maximum reading
Min Reading of Ch: Minimum reading
Limit> Ch: Number of readings above the upper limit
Limit< Ch: Number of readings below the lower limit
SI5500 User Manual
Revision A
44
Mean Ch: Mean of the readings
StdDev Ch: Standard Deviation of the readings
8.11.2 SCREEN SETTINGS
Screen Settings
Contrast
OPTIONS
0, 5, 10, 15, 20, 25, 30, 35, 40, 45,
50, 55, 60, 65, 70, 75, 80, 85, 90, 95,
100
Exit Menu
LCD screen contrast setting can be adjusted with the provided contrast levels options.
8.11.3 ABOUT
SI5500 Orbit Digital Display
Firmware Version
VXxxVXxx
Exit Menu
About Menu screen display firmware version of both MICRO1 and MICRO2. It is displayed in the format <MICRO1 Ver><MICRO2 Ver>.
SI5500 User Manual
Revision A
45
9 SETTING UP PROBES
•
•
•
•
•
After making the connections as explained in ELECTRICAL INSTALLATION section, go to SetUp Menu Page-1 through MENU Key and then
select “Probes” option to enter the Probes Menu.
In “Probes” menu, select the direction as Retract+ for Spring-Push type probe and as Extend- for Pneumatic type probe and select NOTIFY.
The NOTIFY screen will be displayed with an on-screen tip.
In the NOTIFY screen, NOTIFY option will no longer be available instead Cancel option will be available. The probe tip should be moved in
such a way that the readings change by more than 1%.
After the NOTIFY procedure is completed, all the parameters are populated according to the probe type. Move to the next probe through “Next
Menu”.
Follow the same procedure to NOTIFY all the connected probes. This completes the probes setting-up procedure. The formula for individual
measurement channel can be configured through computed measurement section.
SI5500 User Manual
Revision A
46
Probes Menu – Sensor A
Probes Menu – Sensor A
SetUp Menu Page 1
Probe Type
Orbit
Probe Type
Orbit
Direction
Retract+
Direction
Retract+
Display Configuration
Probes
ENTER
Range
Range
Probe ID
Probe ID
Computed Measurement
Measurement Mode
Preset/Limits
Notify
Next Menu
Move the Probe Tip or Select
Cancel to end Notify
Back Next Menu
Exit Menu
Cancel
Probes Menu – Sensor A
Probe Type
Orbit
Direction
Retract+
Range
+10.00000
Probe ID
110FC49P05
Resolution
18-bit
Notify
Back
Next Menu
Back Next Menu
NOTIFY SCREEN
<< On Completion of
NOTIFY process >>
<< Move to the Next
Probe >>
9.1 SETUP STEPS BEFORE STARTING MEASUREMENT
After setting up the probes as described in Setting up probes section, the probe readings has to be reset to a known initial value before starting the
measurement. Below procedure has to be followed in the same order as mentioned before starting the measurement:
•
Perform a PEAK reset on all the probes - Exit from menu screen and set the display in OPERATE screen mode to display the current
readings. Hold DOWN key for 1sec to perform the PEAK reset on all the probes. Alternatively, the operation can also be performed through a
discrete input. Refer to Input/Output Menu section for configuration and pin details of discrete inputs. This step will clear all the previously
tracked PEAK+ or PEAK- or run-out values.
NOTE: It takes 0.5sec to perform a PEAK reset on the probe if it is configured in “Difference mode” for tracking MAX/MIN/finding run-out. Wait
for the required time according to the number of sensors configured in “Difference mode”.
SI5500 User Manual
Revision A
47
•
Perform a ZERO operation - This operation will set the current reading of all the channels to Zero. Press ZERO key to perform this operation.
Alternatively, the operation can also be performed through a discrete input. Refer to Input/Output Menu section for configuration and pin
details of discrete inputs. Enable ZERO/Preset all setting through Display Configuration Menu to perform ZERO operation on all the channels
at once.
•
Instead of ZERO operation, PRESET operation can be performed according to the user requirements. Press UP arrow key to add pre-defined
PRESET values. Alternatively, the operation can also be performed through a discrete input. Refer to Input/Output Menu section for
configuration and pin details of discrete inputs. Enable ZERO/Preset all setting through Display Configuration Menu to perform PRESET
operation on all the channels at once.
•
User can start taking the measurements now.
SI5500 User Manual
Revision A
48
10 SERIAL COMMANDS
SI5500 supports two serial PRINT commands named below:
•
SI5500 PRINT Command:
This command is used to get the details of a single measurement channel or for all the measurement channels in complete format.
Command bytes – ‘^’ ‘P’ ‘S’ <channel number>. Channel number varies from 0 to 30. If set to 0xFF, details of all the channels are printed.
Print Data Format –
SI5500 User Manual
Revision A
49
:
:
+
x
x .
x . x
x . x x
x
.
x
x
x
.
x
x
x
x
x
x
x
x
x
x
x
x x
x x .
x x . x
x
x
.
x
x
x
.
x
x
x
x
.
x
x
x
x
x
x
x
x
x
x
x
x
x
.
x
x
x
.
x
x
x
x
.
x
x
x
x
.
x
x
x
x
x
x
x
x
x
x
x
x x
x x x
x x x .
m m
i n c h
>
<
=
!
+
-
x
x .
x . x
x . x x
x . x x x
x
x x
x x .
x x . x
x x . x x
x
x x
x x x
x x x .
x x x . x
x
x
.
x
x
.
x
x
x
x
x
x
x
x
x
x
x
.
x
x
x
x
.
x
x
x
x
x
x
x
x
x
x
x
x
.
x
x
x
x
.
x
x
x
x
x
x
x
x
x
x
+
x
x .
x . x
x . x x
x
.
x
x
x
.
x
x
x
x
x
x
x
x
x
x
x
x x
x x .
x x . x
x
x
.
x
x
x
.
x
x
x
x
.
x
x
x
x
x
x
x
x
x
x
x
x
x
.
x
x
x
.
x
x
x
x
.
x
x
x
x
.
x
x
x
x
x
x
x
x
x
x
x
x x
x x x
x x x .
User defined
formula
(Upto 100
chars)
Space
Carriage
return
Line Feed
Mode
Space
Upper Limit
Right aligned with DP set
throgh "Places after DP"
setting in "Display
Configuration" menu
Space
Lower Limit
Right aligned with DP set
throgh "Places after DP"
setting in "Display
Configuration" menu
Space
Sign
Units
Space
Limits
Space
Sign
Space
Space
Sign
Channel Nr
(C1 to C31)
C x
C x x
Reading
Right aligned with DP set
throgh "Places after DP"
setting in "Display
Configuration" menu
\r
A B S
T A R E
P R E
\n
Limits
Description
>
<
=
Above Upper Limit
Below Lower Limit
Within Limits
!
Error - One of the probe used
in the formula is not notified
or has under range/over
range error
Mode
ABS
TARE
PRE
Description
Normal mode
ZERO operation enabled
PRESET Enabled
Eg: For channel C1 with reading as +1.34815 with units as mm, within limits, Lower limit as -3.0000, Upper Limit as +3.0000, ABS mode and Formula as (A+B)
C 1
•
:
+
1
. 3 4 8 1 5
m m
=
-
3
.
0 0 0 0 0
+
3
. 0 0 0 0 0
A B S
( A + B )
\r
\n
SI5500 Truncated PRINT Command:
This command is used to get the details of a single measurement channel or for all the measurement channels in truncated format.
Command bytes – ‘^’ ‘P’ ‘T’ <channel number>. Channel number varies from 0 to 30. If set to 0xFF, details of all the channels are printed.
Print Data Format –
SI5500 User Manual
Revision A
50
:
:
x
x
x
C
1
x
x
x
x
x
x
x
.
x
x
x
x
x
x
x
x
x
x
x
.
x
x
.
x
x
x
.
x
x
x
x
x
.
x
x
.
x
x
x
.
x
x
x
.
x
x
x
x
.
x
x
x
x
x
x
x
x
x
x
x
x
x
.
x
x
x
.
x
x
x
.
x
x
x
x
.
x
x
x
x
.
x
x
x
x
x
x
x
x
x
x
x
.
Space
Space
Sign
+
-
m
i
d
r
m
n
e
a
c
g
d
\r
\n
\r
\n
h
Eg: For channel C1 with reading as +1.34815 with units as inch, within limits
:
+
1
.
3
4
8
1
5
i
n c
h
SI5500 User Manual
Line Feed
x
Units
Carriage
Return
x
x
Space
Channel Nr
(C1 to C31)
C
C
Reading
Right aligned with DP set throgh
"Places after DP" setting in
"Display Configuration" menu
Revision A
51
11 MEASUREMENT AND TIMING INFORMATION
Parameter
Update Rate/Value
Data Reading rate from Every 20ms
the Orbit Sensors
Remarks
This also depends on how many channels use MAX or MIN or
DIFF operators in their formula. If we have more channels using
these operators, then the data read rate can become slower (can
become greater than 20ms).
Data Refresh on the 30ms after reading the data This depends on the complexity of the formula used for the
LCD display
from the Orbit Sensors
measurement channels. If the complexity is less (less
measurement channels are used or less trigonometric functions
are used), then the update rate can be faster (can become less
than 30ms).
Response to digital input Within 100ms from the time
of setting the input
Digital Output Update
Within 10ms from the time of
reading the data from the
Orbit Sensors
Resolution
18-bit when not in Difference If MAX or MIN or DIFF operations have to be performed on an
mode
Orbit Digital Sensor then it is operated in Difference mode. This is
applicable only if the operations are performed on a single sensor
14-bit when in Difference and not on a sub-expression involving multiple sensors.
mode
For e.g. The resolution is lowered to 14-bit if the formula contains
User can change resolution MAX(A) and is not applicable if it contains MAX(A+B).
through Probes Menu.
SI5500 User Manual
Revision A
52
12 RETURN OF GOODS
Devices returned for service/repair/calibration should
be shipped prepaid to your distributor or, if purchased
directly from Solartron Metrology, to the relevant Sales
Office.
The shipping container should be marked:
‘For the Attention of the Customer Services Department’
The following information should accompany the
device(s):
1. Contact details of company/person returning device,
including return shipping instructions.
2. A statement of service required.
3. Description of the device fault and the circumstances
of the failure, including application environment and
length of time in service.
Alternatively there is a returns form available on our web
site, follow the link to “Service Repair and Recalibration”.
SI5500 User Manual
Please note:
A standard assessment charge is applicable on all non-warranty
devices returned for repair.
Customer damage and any device found, upon inspection, to have
no fault will be considered non-warranty.
Please contact the Sales Office or Distributor for warranty terms,
service options and standard charges.
Adherence to these procedures will expedite handling of the
returned device and will prevent unnecessary additional charges
for inspection and testing to determine the condition.
Solartron Metrology reserves the right to repair or replace goods
returned under warranty.
All repairs are guaranteed for 3 months (unless other-wise stated).
Solartron Metrology reserves the right to make changes without
further notice to any products herein to improve reliability, function
or design.
Solartron Metrology does not assume any liability arising out of the
application or use of any product or circuit described herein, neither
does it convey any licence under patent rights nor the rights of
others.
Revision A
53