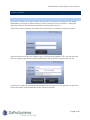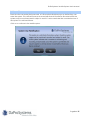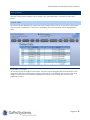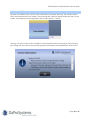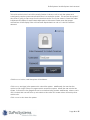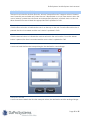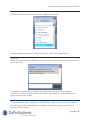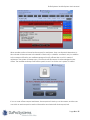
1
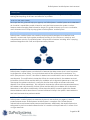
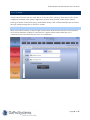
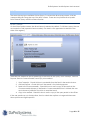
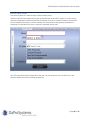
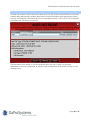
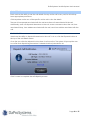
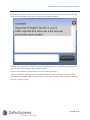
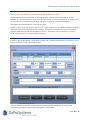
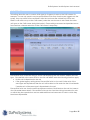
DaProSystems’ Mobile System User’s Manual DaProSystems’ Mobile System User’s Manual Table of Contents Overview ...................................................................................................................................................... 5 How to use this guide ................................................................................................................................... 5 Quick look ....................................................................................................................................................... 5 Officer Safety ............................................................................................................................................. 5 Information safety ..................................................................................................................................... 5 Login Screens .............................................................................................................................................. 6 User ID/Password ........................................................................................................................................... 6 Change Password......................................................................................................................................... 7 Disclaimer ....................................................................................................................................................... 8 Info Screen ................................................................................................................................................... 9 Online Units ..................................................................................................................................................... 9 Movable Columns .................................................................................................................................... 9 Version Number ........................................................................................................................................... 10 System Inofrmation ................................................................................................................................... 11 Status Information ....................................................................................................................................... 11 User Identifiers .......................................................................................................................................... 11 Connectivity ............................................................................................................................................. 11 Duty Status ................................................................................................................................................ 11 Quick Action Buttons ................................................................................................................................ 12 General quick actions................................................................................................................................ 12 Unit Status ................................................................................................................................................. 12 T-Stop ......................................................................................................................................................... 13 Officer Initiated........................................................................................................................................ 14 Day/Night ................................................................................................................................................. 15 Lock ........................................................................................................................................................... 16 CAD specific quick actions ....................................................................................................................... 17 Enroute ...................................................................................................................................................... 17 Arrived ....................................................................................................................................................... 17 Transport Enroute .................................................................................................................................... 17 Transport Arrived ..................................................................................................................................... 17 Cleared ..................................................................................................................................................... 18 Comment ................................................................................................................................................. 18 View Current call..................................................................................................................................... 18 Page 2 of 57 DaProSystems’ Mobile System User’s Manual Shortcuts ..................................................................................................................................................... 19 NCIC Screen .............................................................................................................................................. 21 Connectivity ................................................................................................................................................. 21 Registration Queries .................................................................................................................................... 22 License Query .......................................................................................................................................... 22 VIN Query ................................................................................................................................................. 23 Driver.............................................................................................................................................................. 24 Driver Licenses ......................................................................................................................................... 24 Driver name query .................................................................................................................................. 25 Stolen Article ................................................................................................................................................ 26 Stolen Gun .................................................................................................................................................... 26 Stolen Boat ................................................................................................................................................... 27 HazMat .......................................................................................................................................................... 27 Results ............................................................................................................................................................ 28 Hot File ........................................................................................................................................................... 30 CAD ............................................................................................................................................................ 31 Active Calls................................................................................................................................................... 31 Agency Filters........................................................................................................................................... 31 Column Headers ..................................................................................................................................... 31 Call Details .................................................................................................................................................... 32 Self-Dispatch ............................................................................................................................................ 32 Comment section ................................................................................................................................... 33 History ........................................................................................................................................................ 34 Vehicles..................................................................................................................................................... 34 Adding persons to a call ....................................................................................................................... 35 Viewing Person history ............................................................................................................................ 36 View Call History .......................................................................................................................................... 38 Searching by Date Range .................................................................................................................... 38 Searching by call number ..................................................................................................................... 38 Messaging ................................................................................................................................................. 39 Chat ............................................................................................................................................................... 40 Individual chat......................................................................................................................................... 41 Multiple persons chat ............................................................................................................................. 42 Mail ................................................................................................................................................................ 43 Page 3 of 57 DaProSystems’ Mobile System User’s Manual Reading a message ............................................................................................................................... 43 Sending a message ................................................................................................................................ 44 Deleting and refreshing a message .................................................................................................... 45 Spell Checking ............................................................................................................................................. 45 Search ........................................................................................................................................................ 46 Searching by name .................................................................................................................................... 47 Name search begins with ..................................................................................................................... 47 Name search contains .......................................................................................................................... 49 Name Search with the full name ......................................................................................................... 49 AdditionaL search criteria ......................................................................................................................... 49 User Admin................................................................................................................................................. 50 Mobile Preferences ..................................................................................................................................... 50 Navigation Positions ............................................................................................................................... 50 Navigation Style ...................................................................................................................................... 51 CAD settings ................................................................................................................................................. 53 Usage Note regarding Fire and EMS Mobile Units................................................................................. 53 Appendix A: System Administrator ......................................................................................................... 54 User Settings ................................................................................................................................................. 54 Select a user............................................................................................................................................. 55 Reset Password ........................................................................................................................................ 55 Delete a user ............................................................................................................................................ 55 Agency Settings .......................................................................................................................................... 56 Terminal Request ......................................................................................................................................... 56 Setup Fire or EMS mobile units .................................................................................................................. 56 Page 4 of 57 DaProSystems’ Mobile System User’s Manual OVERVIEW DaProSystems’ Mobile System is a mobile field reporting software. Our goal is to aid agencies by making field reporting as efficient and effective as possible. HOW TO USE THIS GUIDE We hope that this guide will help your agency use DaProSystems’ Mobile System and understand all of Mobile’s capabilities. Mobile is ideal for use in the field, because the system’s unique features make managing field information simple. This guide will teach you how to use Mobile, and is intended to be a step-by-step guide to DaProSystems’ Mobile System. QUICK LOOK DaProSystems’ Mobile System was carefully and purposefully designed to make field work, dispatch, and records work together seamlessly resulting in one continuous, cohesive, and comprehensive solution. The Mobile System is unique due to features including: NCIC querying, seamless integration with CAD, and important safety features. Mobile System Records Dispatch OFFICER SAFETY DaProSystems’ Mobile System contains built-in features that help ensure what is most important to all agencies: officer safety. Two such features are hot files and request for assistance. If a NCIC query returns a “hot hit”, the officer is alerted, and a notification is sent to all online officers and dispatch. The notification includes the officer who received the hit, the address and call information for that officer and the ability for available units to dispatch themselves to that call. The request for assistance button is a one-click function that notifies all officers online and dispatch if an officer needs help. This notification includes the officer who requested assistance, the address and call information for that officer and the ability for available units to dispatch themselves to that officer. Additionally, officers have the ability to search against the Master Name database which allows them to see an individual’s history in the system, alerts related to that individual and other pertinent details. INFORM ATION SAFETY DaProSystems’ Mobile System has measures in place to ensure that your agency’s data is protected and secure. DaProSystems’ Mobile System is compliant with CJIS advanced authentication requirements and password requirements. Additionally, the Mobile System has safeguards in place to make the deactivation of a mobile unit simple and swift, in cases of lost or rogue terminals. Page 5 of 57 DaProSystems’ Mobile System User’s Manual LOGIN SCREENS After the system is launched, the user will be directed to a login screen. USER ID/PASSWORD This screen is similar to most login screens and requires a username and password. The system administrator will assign an initial password to each user upon account creation. Upon initial login, the individual user will have the ability to change their password. Type in the correct username and password and click the LOGIN button to enter the system. The next screen shows the unit’s agency type, unit number and agency ORI. The user may only select an agency type that the system administrator has given that user permission to use. Unit Type, Unit, and ORI are preselected based on the last login. If at last login the unit type was Police, the system will automatically set the unit type as Police. Page 6 of 57 DaProSystems’ Mobile System User’s Manual CHANGE PASSWORD On the login screen is a count down until the expiration of the current password. Passwords expire every 60 days as a security measure, per CJIS requirements. The countdown feature allows each user to monitor the status of their password; the system will mandate that the password is changed upon expiration. To change a password at any time, click the CHANGE PASSWORD button. The next screen will prompt the user to type in their current password and then their new password. After the new password has been entered, click the CHANGE PASSWORD button. There are certain requirements enforced by the system that each password must meet in order to be considered secure according to CJIS. These requirements are listed at the bottom of the change passwords screen and listed below: Password must not be the same as your last ten passwords. Password must not contain your user name. Password must be 8-15 characters long. Password must include and uppercase letter, a lowercase letter, a number, and a special character i.e. a question mark, exclamation point, or a number sign. Page 7 of 57 DaProSystems’ Mobile System User’s Manual DISCLAIMER Each time the user enters their password, a CJIS-required disclaimer pops up before they can enter the system. This notification serves as a reminder that all information recorded within the systems may be monitored and is subject to audit. It is also a reminder that unauthorized use of the systems is a criminal offense. Click YES to continue to the Mobile system. Page 8 of 57 DaProSystems’ Mobile System User’s Manual INFO SCREEN After logging into the system, the user will be taken to the Info screen. The Info screen contains relevant information including: a list of online units, user information, connectivity, and duty status. ONLINE UNITS All online units are displayed in a grid on the Info screen. Each unit has a color that corresponds to their status. For example, if the unit is unavailable, the unit information will be highlighted in gray. MOVABLE COLUMNS As with all columns throughout the system, columns can be dragged and sorted based on the order each individual user prefers to see the information. To rearrange the columns, click and drag the column to be moved then release the mouse button to drop the column in the preferred location. Page 9 of 57 DaProSystems’ Mobile System User’s Manual VERSION NUMBER All users can identify which version of the software they currently are using. The current version link is at the bottom left of the screen. This will always be visible no matter where the user is in the system. For example, in the image below the current version is 1.0.0.82. The user can click on the version number for more information about the version they are using. By clicking, the user will see a popup listing all the new features and capabilities in that version. Page 10 of 57 DaProSystems’ Mobile System User’s Manual SYSTEM INOFRMATION When a user logs into the system, they will see status information along the top of the screen. This information will stay at the top of the screen no matter where the user is in the system. ST ATUS INFORM ATION There are three different sections at the top of each screen that contain information about the user’s status including: user identifiers, connectivity, and duty status. USER IDEN TIFIERS On the top left of the screen, the user’s identification information is displayed. This information includes unit status, current user and current unit. CONNECTIVITY In the top center is a connection indicator. A green check indicates that the user is connected and is online. This connection has a five second “heartbeat”. This means that the connection retrieves and updates information from the server every five seconds. A red X indicates that the user is not connected. Usually, this indicates that the unit is out of range of their network connectivity and/or has traveled into a “dead spot”. DUTY STA TUS On the top right of the screen there is an icon that displays the status of the officer as On Duty or Off Duty. This status is updated by dispatch when a unit is marked on or off duty in Roll Call. Page 11 of 57 DaProSystems’ Mobile System User’s Manual QUICK ACTION BUTTONS Along the top of the screen there are a series of “quick actions” buttons. These buttons will always be at the top of the screen no matter what screen the user is on. These buttons are the functions that mobile users will use most often. For example, adding a comment to a current call is a common function; therefore, there is a quick action button that allows comments to be added immediately. The quick action buttons can be separated into two groups: general quick actions and CAD-specific quick actions. GENER AL QUICK ACTIONS The first group is available when the officer is not currently dispatched to a call. This list includes Unit Status, T-Stop (Traffic Stop), Officer Initiated, Day/Night, and Lock. UNIT STA TUS This quick action button allows users to update their status i.e. Available, Unavailable, etc. In order to update, click the UNIT STATUS button. A window will appear with status options. Click the appropriate option and the status will automatically be updated. Page 12 of 57 DaProSystems’ Mobile System User’s Manual T-STOP This quick action allows a user to directly enter the information needed to conduct a traffic stop. Click the T-STOP button to enter traffic stop information. Fill in the appropriate information. If a red blinking border surrounds a field, it is an indicator that it is a required field that has not been entered yet and/or that invalid information has been entered. When conducting a traffic stop, only the street name is required. Next, click SUBMIT, and the T-Stop will be entered as a CAD call. The user will be directed to the CAD screen, and a popup will appear indicating that the user is dispatched on a call. Page 13 of 57 DaProSystems’ Mobile System User’s Manual OFFICER INITIA TED This quick action button allows a user to conduct Officer Initiated calls. Any call where the mobile user creates the call him or herself (instead of Dispatch creating the call) is considered an Officer Initiated call. There are many fields that can be filled in. A blinking red box indicates that the field must be filled in and/or has invalid data entered. For an Officer Initiated call, the street number and the street name is required in order to submit the information. Additionally, the user can select a call type as well as enter comments. Click SUBMIT to integrate the Officer Initiated call with CAD. The user will be directed to the CAD screen, and a popup will appear indicating that the user is dispatched on a call. Page 14 of 57 DaProSystems’ Mobile System User’s Manual Day/Night This quick action button allows the user to change the colors of the Mobile System in order to accommodate changing light conditions. Click the DAY/NIGHT button to change the colors. The “night” coloration is intended to be easier to see during the nighttime. The “day” coloration is intended to be easier to see during the daytime. Page 15 of 57 DaProSystems’ Mobile System User’s Manual Lock This quick action button is a built-in security feature. It allows a unit to lock the system and subsequently requires password authentication to re-enter the system. This secures the system if the officer is going to step away from the terminal and/or if he or she wants to insure that other individuals are unable to see the data displayed on the screen. Please note that popup notifications will still display if the unit has been dispatched to a call or if a hot hit has been returned. Click the LOCK button, and the system will lockdown. Click UNLOCK and type in the password to unlock the system. Additionally, the user has the option to click Logoff if they no longer need to access the system. When the user unlocks the system, it will return to the page that was in use before being locked. Additionally, when a user’s unit is locked, that user will show up as locked on the online unit screen when viewed by other mobile units. Click LOGOFF to shut down the system. Page 16 of 57 DaProSystems’ Mobile System User’s Manual CAD SPECIFIC QUICK ACTIONS The next six quick action buttons (Enroute, Arrived, Transport Enroute, Transport Arrived, Cleared, and Comment) are available only when the user is dispatched on a call. These buttons allow the user to instantly update the call record, and subsequently dispatch, with their status on the call. When these buttons are clicked the appropriate field is updated in CAD. Enroute Click the ENROUTE button to indicate the user is on the way to the call. Once the Enroute button is pressed, the time is recorded and the user’s status is updated in CAD. Arrived Click the ARRIVED button to indicate the user has arrived to the call location. Once the ARRIVED button is pressed, the time is recorded and the user’s status is updated in CAD. Transport Enroute A user can track the time the transport begins, the destination, and mileage. Transport Arrived A user can record details the time the transport arrives, the destination and the ending mileage. Page 17 of 57 DaProSystems’ Mobile System User’s Manual Cleared Click this quick action button once the unit is cleared from the call. Choose a Disposition code from the dropdown menu. Next click the Save button. Comment Click the Comment button to display all comments on the current call. This function only works for a current call. In addition to viewing existing comments, the button allows the user to add additional comments. To add a comment, type the information in the empty box at the bottom of the popup, and click ADD COMMENT. VIEW CURRENT CALL To view information about a current call, click the VIEW CURRENT CALL button to see the details of the call. The information displayed is from dispatch, and shows the current call for service number and the call type. Page 18 of 57 DaProSystems’ Mobile System User’s Manual SHORTCUTS To make navigating DaProSystems’ Mobile System simple, there are a series of shortcuts incorporated into the system. A list of the shortcuts can be accessed via Ctrl+H. Ctrl+H will bring up a list of all of the short cut functions. By utilizing shortcuts, the user will reduce the amount of time spent switching between the mouse and keyboard, therefore increasing the efficiency of task completion. An example of a shortcut is the Request for Assistance shortcut. If an officer is in need of assistance, they can simply click the F11 button. After F11 button is pressed, a message will be sent to all online units and dispatch as seen on the following page. Page 19 of 57 DaProSystems’ Mobile System User’s Manual When another online unit receives the request for assistance, they can dispatch themselves to the call and will have access to the details of that call (i.e. address, comments, etc.) In addition to the screen notification, an audible message will notify officers that a unit is in need of assistance. The system will beep every 15 seconds until the request is acknowledged by the officer. The audible and beep notifications persist, even if an online user’s system is locked. If two or more officers request assistance, the requests will stack up on the screen, and the user can click on each request to see the information associated with that request/call. Page 20 of 57 DaProSystems’ Mobile System User’s Manual NCIC SCREEN DaProSystems’ Mobile System has full NCIC query capabilities. Click the NCIC button from the main ribbon to access NCIC querying. There are six NCIC query categories available in the system: registration queries, driver queries, stolen article queries, stolen gun queries, stolen boat query, and HazMat Query. Each of these searches are accessed through corresponding tabs on the NCIC screen. CONNECTIVITY When on the NCIC screen, on the far right of the screen under the quick action tool bar there is an icon that indicates VCIN/NCIC connectivity. A green check mark means the unit is connected, and a red X means the unit is not connected. Page 21 of 57 DaProSystems’ Mobile System User’s Manual REGISTRATION QUERIES There are two possible registration queries: License and VIN. When a user clicks the red NCIC button, the screen defaults to a registration query; specifically the system defaults to the License query. LICENSE QUERY To run a license query, the only information required is the license plate number. Simply fill in the first box and click the QUERY button. The state will automatically be populated with the agency’s state. The user can choose a new state via scrolling or by typing in the state abbreviation. The type of vehicle is also auto-populated with “PC-passenger vehicle”. This can be changed in the same manner as the state via a drop-down menu. Additionally, there is a box that can be checked if the query is to be run for criminal purposes. If this is the case, click the box next to Criminal Purpose before clicking the Query button. Once a query is submitted, the user will be taken to the results screen. For more information about results see the Search Results section. Page 22 of 57 DaProSystems’ Mobile System User’s Manual VIN QUERY A VIN query is the second registration query. Click the vertical VIN query button on the left side of the registration tab. Next, type in the VIN number, select a state (the system will default to the home state of the agency), and check the Criminal Purpose box if applicable. Click the QUERY button. The user will then be directed to the results screen. For more information about the results, see the NCIC Search Results section. Page 23 of 57 DaProSystems’ Mobile System User’s Manual DRIVER The second query type available is Driver Query. To access the driver query screen, click the corresponding tab along the top of the NCIC screen. There are two possible driver queries: Driver License Query and Driver Name Queries. Driver Licenses On the Driver Queries screen, the driver license is selected by default. To initiate a query, the user must enter the OLN (operator license number). The state is auto populated to default to the state of the agency. There are four additional options pertaining to the results of the query: View Transcript, Criminal Purpose, Send to Commonwealth, and Copy to be Mailed. 1. View Transcript - Check this box to see details from the DMV in the results window. 2. Criminal Purpose - Check this box if the search is for criminal purposes. 3. Send to the Commonwealth - Check this box to mail a copy of the results to the Commonwealth Attorney. If the Send to Commonwealth button is clicked, the user must choose a jurisdiction for which to send that result. 4. Copy to be Mailed - Check this box to mail a copy of the query results to the officer. If the user queries an out-of-state driver, the four check-box options no longer exist because those options are Virginia-specific. Page 24 of 57 DaProSystems’ Mobile System User’s Manual DRIVER N AM E QUERY The second option for a driver query is Driver Name Query. Click the vertical Driver Name Query tab on the left side of the NCIC screen to run this query. The name and date of birth are required. The name must be in a specific format. The format is the last name followed by a comma and the first name without any spaces between the character i.e. lastname,first. Here is a specific example: Smith,John. Hint: For boxes that require information, the user can hover the mouse over the box to see specific details about the information required. Page 25 of 57 DaProSystems’ Mobile System User’s Manual STOLEN ARTICLE Click the corresponding tab from the NCIC page to run a Stolen Article Query. Fill in the serial number to search for a stolen article. Additionally, choose a type code (i.e. D for Disguised Gun) from the drop-down menu to narrow the search. Click QUERY to complete the search. STOLEN GUN Click the corresponding tab from the NCIC page to run a Stolen Gun Query. Fill in the serial number of the gun, which is required and indicated by the blinking red box. Next, choose the caliber, i.e. 10 for a 10-gauge shotgun. Additionally, the model and make can be filled in. The model can be typed in and the make can be chosen form a drop-down menu. Click QUERY to complete the search. Page 26 of 57 DaProSystems’ Mobile System User’s Manual STOLEN BOAT Click the corresponding tab from the NCIC page to run a Stolen Boat Query. There are two required fields in a stolen boat query: registration number and boat hall number. Enter the registration number and the boat hull number in order to run a query. Additionally, the state field will be auto populated with the agency’s state. Click QUERY to complete the search. HAZM AT Click the corresponding tab from the NCIC page to run a HazMat query. Fill in the UNN number. The red blinking box lets the user know the information is required to run a query. The UNN is the four-digit number that identifies the chemical being transported. Click the QUERY button to begin a HazMat query. Page 27 of 57 DaProSystems’ Mobile System User’s Manual RESULTS After a query has been submitted, the results will appear on the results screen. The results are color-coded based on the type of query (i.e., article, driver, boat, etc.) For example, if a registration query is submitted, the results returned will be highlighted in dark gray. All of the results are displayed in the “Select Query” column on the left side of the results screen. To view more details, click on the appropriate result in the select query column. Then, the details will appear in the box on the right side of the screen. Page 28 of 57 DaProSystems’ Mobile System User’s Manual The Search results are formatted in a tree view. Each type of search i.e. DMV or NICI will be housed under the main search. To expand or collapse each type of results, click to triangle next to the main entry. If a user runs multiple queries, all of the results will remain accessible in the Select Query column until the user logs off. The Clear Selection button does not delete search results. The Clear Selection button simply removes the details results from the right-hand side of the screen. Please note, that CJIS security regulations prohibit query results from being saved; results from the current session remain viewable on the screen until that session is logged off. After that session is logged off, those results will no longer be available. Page 29 of 57 DaProSystems’ Mobile System User’s Manual HOT FILE Hot Files are an alert system. If the results return a hot hit, the officer will be notified via visual and audible alerts (please note, audible alerts require computer speakers and appropriate volume settings). For example, if an individual has an outstanding warrant on file in NCIC, this information will come back in the form of a hot file. The user than has the ability to view more details about the call, or they can dispatch themselves to the call. Furthermore, a user are acknowledge the hot file without acting on it by clicking CANCEL. Page 30 of 57 DaProSystems’ Mobile System User’s Manual CAD To access dispatch information, click on the CAD tab at the left of the screen. This screen allows access to information about live, active CAD calls. ACTIVE CALLS When the user accesses the CAD screen, they will see a list of all currently active calls. This information is updated automatically, in real-time without refreshing. The active calls are color-coordinated to make it easy to differentiate between different types of calls. Fire calls are red, Sheriff calls are gold, Police calls are blue, EMS calls are green, etc. AGENCY FILTERS The individual user can choose which unit types are displayed in the active calls section via the check boxes above the active calls. Uncheck the unit types that do not need to be displayed. For example, if you do not want to see active calls for tow units, uncheck the box next to tow. That information will be removed from the live feed of calls. Conversely, if the user wants to see information that is not displayed simply check the box next to the desired unit type. COLUMN HEADERS All columns are sortable by clicking the column header. The width can be manipulated by dragging the column borders to the desired width. Click and drag the column header to a different screen location to reposition the order of the information. Page 31 of 57 DaProSystems’ Mobile System User’s Manual CALL DET AILS Each user has the ability to see the call details of every active call for any call, for which they have appropriate permissions. Click anywhere on the row of the specific active call to view the details. The user will see people associated with the call and other units associated with the call. Additionally, users can dispatch themselves to the call, access comments about the call, view associated history, view address associated with the call, and view vehicles associated with the call. SELF-DISPATCH Users have the ability to dispatch themselves to the call. To do so, click the Dispatch button at the top of the call details screen. Once the user clicks the dispatch button there is action notice. The system will prompt the user to confirm that dispatching themselves is indeed what they intended to do. Click CONFIRM to complete the self-dispatch process. Page 32 of 57 DaProSystems’ Mobile System User’s Manual COMMENT SECTION There are two portions of the comment sections: existing comments and Add Comment. If the user is not dispatched on the call, he or she cannot add comments. Click the COMMENT button on the top of the call details screen to view existing comments. All of the comments will be listed in the comment section. Click on the individual comment line to view the entire comment. Click the comment button from the call details screen to add a comment. All of the current comments will be listed in the comment section. Type the comment in the lower box, and then click ADD COMMENT button. Page 33 of 57 DaProSystems’ Mobile System User’s Manual HISTORY The user can view the history associated with the address of the call. Click the History button at the top of the call details to view all recorded incidents at that address. To view the details of a past call, click anywhere on the row and a box will pop up with all of the historical information including: call type, comments, and personal details. The systems will load 25 historical records at a time. Click the VIEW MORE HISTORY button at the button of the window to view additional calls if there are more than 25 historical records for that address. The previous 25 results will stay on the screen, and the additional records will be added to the list. The system will only load 25 at a time to enable timely results in low-bandwidth conditions. Vehicles If there is vehicle information associated with the call, it can be accessed by clicking the VEHICLES button at the top of the call details screen. Click on the vehicle and the cells will be populated with the details of that vehicle with information including: make, model year, person, and license. Page 34 of 57 DaProSystems’ Mobile System User’s Manual ADDING PERSONS TO A C ALL When a user initiates a call, a user can add a person to the call while the call is active. A user may only add people to his or her own officer initiated call. The + sign in the people section of the call details screen will be enabled. Click the + sign, and a new row will be generated where data can be entered. Select the type of person (complainant, suspect, victim, or witness) from the drop down menu or begin typing to auto fill the box. Tab to the person box to add the name of the person. The name must be entered in the same format as used in other portions of the system. The format is the last name followed by a comma and the first name without any spaces between them (i.e. lastname,first). Here is a specific example: Smith,John. Once the name is entered into the system, a dialogue with possible person matches will pop-up, based on the agency’s records to allow the user to select an existing name record (if available). When the user clicks on a potential match, that person’s details will be shown and the officer will be notified of potential alerts such as outstanding warrants and assault risks. If that is the correct person, click the USE SELECTED button and that individual will be added to the call details. Page 35 of 57 DaProSystems’ Mobile System User’s Manual If the desired person is not currently in the system, a PID/Master Name record can be created by clicking CREATE NEW PID button. VIEWING PERSON HISTORY If there is a person associated with the call, the user can access details about the person including: demographic information, address/employer information, and record history. These sections allow the user view the history of the agency’s prior dealings with that individual. Click on the person icon on the right side of the screen to view the person history and a widow will pop up. There are three tabs on this screen: personal information, address, and history. The personal information includes some demographics and alerts. The address/employer section includes the address of their work place and their home address. The history sections show their records. Page 36 of 57 DaProSystems’ Mobile System User’s Manual Page 37 of 57 DaProSystems’ Mobile System User’s Manual VIEW CALL HISTORY The View Call History allows users to access the records of all CAD calls. There are two ways to search the records: by call number and by date range. Searching by Date Range The system can search all historical records. However, search results are limited to a seven day date range. For example, a user could search for records in 2005 by indicating a week’s time period within that year. The system can only load results one week at a time due to the volume of records and bandwidth considerations. Click on the row of the desired call to see more details about that call. SEARCHING BY CALL NUMBER The system can also search historical calls by the call number Click the circle next to Call Number, and type in the call number. To view the details of the call click on the row of the call. Page 38 of 57 DaProSystems’ Mobile System User’s Manual MESSAGING DaProSystems’ Mobile System includes a messaging feature to enable communication between users. To access the messaging features, click on the MESSAGE button on the side of the screen. There are two functions in the messaging feature: chat and mail. The systems will notify the user if they have a new message. A number will be displayed in the messaging box if the user has a mail or chat message. An envelope with a number in the middle indicates the user has a new mail message. A thought bubble with a number in the middle indicates the user has a new chat message. Page 39 of 57 DaProSystems’ Mobile System User’s Manual CHAT When a user clicks the messaging button, the system will default to the chat feature. The chat feature allows users to instant message each other, and can only be used between online units. At the bottom right of the chat screen the user can see all online units. This box is automatically updated any time a user goes online or offline. There are two types of chats: group and individual. Page 40 of 57 DaProSystems’ Mobile System User’s Manual INDIVIDUAL CHAT To chat with an individual user, click on that user’s name and open a new chat window. The current chat units is a list of all the recipients that are in the active chat on the left side of the screen. Next, type the message in the white box at the bottom of the screen and click SEND. Page 41 of 57 DaProSystems’ Mobile System User’s Manual MULTIPLE PERSONS CHAT To chat with multiple people, users can either select multiple users to chat with, or create groups. Once a group is created it will be saved. Click New to create a group, select the people to be included in the new group, give the group a name (e.g. night shift), and click Save. A new group will be created. The group will now appear every time the user logs on. The user can chat with a group the same way as chatting with an individual. To chat with an existing group, select the group and click GROUP CHAT. For example, in the image below the available groups are Zone A and Zone B. By clicking on the triangle next the group a list of all the units in the group will be shown. Additionally, users can chat with all online users and dispatch at the same time via the broadcast feature. Click the BROADCAST button and a chat will begin with all users that are online. Page 42 of 57 DaProSystems’ Mobile System User’s Manual M AIL To access the mail function, click the vertical mail button on the side of the screen. All of the mail messages are displayed in the left column. READING A M ESSAGE Click on the message to read it, and view all of the details in the box on the right side of the screen. Page 43 of 57 DaProSystems’ Mobile System User’s Manual SENDING A MESSAGE Click NEW MESSAGE to begin a new mail message. Click the SELECT UNITS button to choose a recipient(s). All units that are part of the system will be displayed. The user can select one unit or multiple units. Select the unit(s) to receive the message. Then click FINISHED. Type in the subject and the body of the message. The mail message must contain a subject line and a body, as indicated by the blinking red lines. Spell check is enabled for the body. Click SEND to send the message after all of the information is in the subject and the body. Page 44 of 57 DaProSystems’ Mobile System User’s Manual DELETING AND REFRESHING A MESSAGE Click on the message to be deleted and click the DELETE button. To refresh the messages in the inbox click, the REFRESH button and new messages will appear in your inbox. SPELL CHECKING If a word is spelled wrong, it will be underlined by a red wavy line. Right click on the underlined word, and choose the correct spelling of the word. Page 45 of 57 DaProSystems’ Mobile System User’s Manual SEARCH Click on the SEARCH button on the side of the screen to access DaProSystems’ Mobile System’s search functions. This portion of the system allows users to search for information about an individual they encounter. There are no blinking red boxes on this screen. This means that there is no required information, and the user can search by any demographic they choose. There are many different ways to search including by name. Page 46 of 57 DaProSystems’ Mobile System User’s Manual SEARCHING BY N AME There are two options when typing in a name to search. The user can choose to search by Begins With or Contains. N AM E SEARCH BEGINS WITH For this search the user only needs to know what the name begins with. For example, if the users knows an individual’s last name begins with a J, they can click the BEGINS WITH circle, type in a J, and click SEARCH. The systems will return all results of last names that begin with the letter J. Additionally, typing “Smith” would return all individuals with the last name Smith or whose last name starts with Smith. Once the correct names are returned, click on the name to view the details of that individual. Page 47 of 57 DaProSystems’ Mobile System User’s Manual Clicking on a name will bring up a summary of the person’s records. In the picture above, Joyce,Dora has an outstanding warrant; and therefore, the warrant is featured in the alerts column. Click the VIEW PERSON button to see even more details about the selected individual. This will bring up detailed information about the person including: personal information, address, and history. Click the tabs to view the corresponding information. Page 48 of 57 DaProSystems’ Mobile System User’s Manual N AM E SEARCH CONT AINS For this search, the officer only needs to know part of the name. For example if a user knows an individual’s name contains the letters “son”, they can click the CONTAINS circle, type “son” and then click SEARCH. N AM E SEARCH WITH THE FULL N AM E This search follows the standard format of all name searches in the systems. The format is as follow: lastname,first (Smith,John). There are no spaces between any of the characters. Please note that the more specific the search entry is, the more restrictive the results will be. For example, entering Smith,Johnny will return Smith,Johnny; Smith, Johnny D; but will not return Smith,John. ADDITIONAL SEARCH CRITERI A There are many more options a user can search by including: PID, sex, ethnicity, race, email address, etc. For example, to search all white females in the records systems. Select “Female” from the drop down menu in the sex field. Next, select “white” in the race field. After the two search criteria are in filled in, click SEARCH. Page 49 of 57 DaProSystems’ Mobile System User’s Manual USER ADMIN The User Admin section allows users to maintain and change account settings and preferences. Every user has access to mobile preference and CAD settings (the other settings are available only to systems administrators). MOBILE PREFERENCES This tab is available to all users including administrators. This section allows users to adjust the way information is displayed on the screen. Each individual user can change the navigation position and the navigation style. These settings are saved and persist in future sessions, whereas using the keyboard shortcuts to change layout settings are temporary. N AVIGATION POSITIONS The user can choose if the navigation buttons (i.e. Info NCIC, CAD, etc.) appear on the left or right side of the screen. Click the DOCK TO LEFT circle to position the navigation buttons on the left side of the screen. Click the DOCK TO RIGHT circle to position the navigation buttons on the right side of the screen. Page 50 of 57 DaProSystems’ Mobile System User’s Manual N AVIGATION STYLE The user can choose how the navigation buttons (i.e. Info NCIC, CAD, etc.) appear on screen. The navigation buttons can appear in a ribbon style or a control style. Click the RIBBON STYLE circle to make the navigation buttons appear stacked horizontally. Page 51 of 57 DaProSystems’ Mobile System User’s Manual Click the CONTROL STYLE circle to make the navigation buttons appear vertically stacked. Hint: This setting is best for touch screen devices because the buttons are bigger. Page 52 of 57 DaProSystems’ Mobile System User’s Manual CAD SETTINGS This setting allows the user to control which type(s) of agency is seen on the CAD screen. For example, if a user only wants to see law enforcement units every time they are logged onto the system, they can select Police and Sheriff. After the two boxes are clicked only Police and Sheriff’s calls will show up on the CAD screen (unless the user chooses to also check the other unit types on the CAD screen during that session). These settings are saved and persisted across future sessions, whereas selection on the CAD screen is temporary. USAGE NOTE REGARDING FIRE AND EMS MOBILE UNITS Fire and EMS units will see the listing of active calls displaying the call number, address and call type. Fire and EMS units cannot click to view full call details unless the following situations apply: His/her unit is dispatched to the call If the global agency setting allows Fire and EMS units to view calls if other units of the same type are dispatched, then the unit will be able to click and view the full call details if another unit of the same type is dispatched to the call Fire and EMS units can view the name and phone number of individuals on the call, but cannot view full Master Name details. Fire and EMS units can also view the call log/comments for calls on which they have permissions and can add additional call comments to calls to which they have been dispatched. Page 53 of 57 DaProSystems’ Mobile System User’s Manual APPENDIX A: SYSTEM ADMINISTRATOR In the User Admin section there are certain functionalities that are available only to system administrators including: user settings, agency setting and terminal requests. Appendix USER SETTINGS This section allows system administrators to manage the accounts of individual users. The system administrator can change passwords, update cell phone numbers, enter Social Security Numbers, etc. Page 54 of 57 DaProSystems’ Mobile System User’s Manual SELECT A USER To make changes to a user’s account select the user from the list in the left column labeled “Select User”. Once a user is selected, their information will populate the fields on the right of the screen. Click the CLEAR SELECTION button to deselect a user and clear the fields to the right. The CLEAR SELECTION button does not delete the user, it simply takes that user’s information out of the information fields. RESET PASSWORD A system administrator can reset any user’s password in the system. Click the RESET PASSWORD button to reset the password. Resetting a password works the same way as changing a password. For more information see the changing password section. DELETE A USER A system administrator can delete users. Select the desired user, and click the DELETE button. Once the DELETE button is clicked, the system will ask for confirmation. Page 55 of 57 DaProSystems’ Mobile System User’s Manual AGENCY SETTINGS The administrator can determine if Fire and EMS units can see live CAD calls only if another Fire or EMS units are assigned to the call. The default setting does not allow Fire and EMS units to view CAD calls that only have law enforcement units dispatched to them. TERMINAL REQUEST The system administrator has the authority to authorize individual devices. Authorization is simple because it is a drag and drop process. When an individual user logs on with a new device (i.e. tablet, MDT, or laptop), the device will appear in the “Pending” column. Drag and drop the pending device into the “Authorized” box to authorize the device. If a device becomes compromised, the system administrator can easily de-authorize the device. Drag and drop the device into the “not authorized box” to de-authorization. This will shut down the system on that device within 5 seconds, and the mobile system will cease to run on that device. SETUP FIRE OR EMS MOBILE UNITS As with other mobile units, Fire and EMS mobile units need to have an officer code associated with that unit. Since it would be impractical to have an officer code for every individual Fire or EMS personnel member, it is recommended that a single officer code be set up for each individual apparatus unit. For example, a brush truck unit called B003 should have an officer code set up for B003 as well (each unit needs a single unique officer code, yet the agency would not want to set up an officer code for each individual who may drive/work that apparatus). Page 56 of 57 DaProSystems’ Mobile System User’s Manual The Mobile System Administrator will set up a global agency permission to allow or disallow Fire/EMS units from seeing the full call details for calls that contain the same agency unit type. For example, if the option below is checked, a Fire unit would be able to click and view call details for any call with other Fire units dispatched to it. The Mobile Administrator should insure that any Fire or EMS unit is set up with the appropriate agency permissions: Page 57 of 57