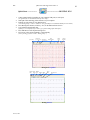
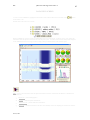
1
PBI
QRS-Card Cardiology Suite 4.06 Rev A
1
USER GUIDE
Cardiology Suite 4.06
Resting, Stress, Holter, and ABPM*
*
US Customers supplied with
software from device manufacturer
and not Cardiology Suite4.06 Software
Pulse Biomedical Inc.
1305 Catfish Lane
Norristown, PA 19403
USA
610-666-a.5510 Tel
610-666-5630 Fax
www.qrscard.com
June 24, 2009
PBI
QRS-Card Cardiology Suite 4.06 Rev A
2
Pulse Biomedical, Inc.
Corporate Summary
Pulse Biomedical, Inc. (PBI) is a manufacturer of computer based electrocardiogram (ECG) products. PBI
is located outside Philadelphia, Pennsylvania, USA. PBI designs, develops, manufacturers, and markets
both the hardware and software components of a twelve-lead, diagnostic quality ECG device for use with
an IBM or Microsoft Windows compatible personal computer. The company received FDA clearance to
market its resting QRS-Card ECG product in November 1991 and its Stress ECG in July 1998.
During the initial years, PBI invested in research and development while establishing a corporate presence
in the ECG marketplace through exhibiting at the American Heart and the American Cardiology
conferences. The initial product consisted of a separate card that was inserted into the PC with DOS based
software running in the PC. Through R&D, the product (QRSCard™ Cardiology Suite) has evolved to an
external hardware module about the size of a small cellular phone with communication to the PC via the
serial port. The system is a fully integrated true 32 bit Microsoft Windows® product.
In addition to the current Resting ECG and Stress ECG the company has developed software for signal
averaged, high resolution ECG. PBI’s Resting, Stress and High Resolution ECG use the same QRSCard™
hardware components. PBI owns all proprietary hardware design and has complete ownership to the
source code for its software including its own automatic ECG measurement algorithms, automatic ECG
interpretation algorithms and high resolution signal averaging ECG software.
PBI sells its products through independent dealers on a worldwide basis. In addition to the U.S. FDA
clearance, the company’s products are approved in Japan and China, and have the current European CE
mark. The company has sold its products on an OEM basis to a number of companies including Ergoline
(exercise bicycles) and Jaeger (pulmonary stress) in Europe, and for use with catheter laboratory products
by EP Medical and by Cortet in the U.S. PBI has licensed its technology to Intermedics for use with their
new pacemaker programmer. The company works closely with its OEM customers and in particular, has
integrated its stress product very closely with the Jaeger pulmonary stress product (Oxycon™). The
QRSCard™ Cardiology Suite is currently used in the United States, Canada and over 50 countries around
the world.
June 24, 2009
PBI
QRS-Card Cardiology Suite 4.06 Rev A
3
DISCLAIMER OF LIABILITY
PULSE BIOMEDICAL INC. MAKES NO WARRANTIES, EITHER EXPRESSED OR IMPLIED, REGARDING
THE QRS-Card™CARDIOLOGY SUITE 4.06, ITS MERCHANTABILITY OR ITS FITNESS FOR ANY
PARTICULAR PURPOSE, WITH THE EXCEPTION OF ANY LIMITED WARRANTIES WHICH ARE
DISCLOSED IN THIS MANUAL. THE EXCLUSION OF IMPLIED WARRANTIES IS NOT PERMITTED BY
SOME STATES. THE ABOVE EXCLUSION MAY NOT APPLY TO YOU. THIS WARRANTY PROVIDES
YOU WITH SPECIFIC LEGAL RIGHTS. THERE MAY BE OTHER RIGHTS THAT YOU MAY HAVE
WHICH VARY FROM STATE TO STATE.
CAUTION:
Federal Law restricts this device to be sold by or on the order of a physician.
Use the QRS-Card ST device under the direction of a physician. The Operator should read
and thoroughly understand the manual before use.
The intended use of this device is for Patients undergoing ECG Testing, and/or ECG Stress,
Blood Pressure, and Breathing analysis. The intended locations for use are in a physician‘s
office, hospital exercise rehabilitation facilities, or similar areas.
WARNINGS
1.
ISOLATION TRANSFORMER: It is required that all equipment attached to the patient be
electrically isolated. An Isolation Transformer is needed to isolate the computer and the operator
from the AC main for safety purposes.
2.
QRS-Card ECG device must be at least 6 feet away from the computer.
3.
PACEMAKER PATIENTS: The QRS-Card™ Cardiology Suite hardware and software does not
provide or detect pacemaker pulses. Do not rely on the QRS-Card™ Cardiology Suite output or
the heart rate meter for Pacemaker patients during cardiac arrest. Pacemaker patients must be
closely observed.
4.
LOW BATTERY: If the QRS-Card™ Cardiology Suite System is used with a battery operated
computer, the low battery indicator warning of the computer must be checked before using the
system on any patients.
5.
PROPER ELECTRICAL GROUND: Proper electrical grounding to the AC lines is an absolute
necessity for acquiring noise-free ECG recordings.
6.
PATIENT DATA BACKUP: It is important for users to backup their patient ECG data regularly.
In the case of accidental hard disk data loss, backup data can be restored to the hard disk.
7.
MODEM USAGE DURING ELECTRICAL STORMS: For patient's safety during Electrical
Storms, the telephone line to the modem and the patient ECG cable should NOT be hooked up at
the same time.
8.
SCREEN SAVER software programs that blank the computer screen must not be used while the
QRS- Card™ Cardiology Suite ECG system software is running.
9.
Use the QRS-Card software as stand-alone software. Do not run multiple software applications
simultaneously under Window’95 while running the QRS-Card software.
10. UL Listed PC computers must be used for noise-free recording of ECG‘s.
11. Do not use this device in areas where flammable, explosive, or anesthetic agents are used. The
device is not intended for use during anesthesia.
June 24, 2009
PBI
QRS-Card Cardiology Suite 4.06 Rev A
4
12. Due to the shock hazard that can exist within the PC when the cover is removed, only qualified
service personnel should perform service. Never use extension AC power cords with the PC
computer, chassis leakage current may increase.
13. In case of ECG leadwire replacement, use ONLY Pulse Biomedical recommended ECG lead
wires.
14. Erratic and/or non-rhythmic heartbeats, or artifacts can result in inaccurate ECG readings.
15. ECG lead changes during measurements can cause artifacts that can result in inaccurate readings.
16. Changing patient positions (e.g. supine, sitting, etc.) during measurements can cause artifacts that
can give inaccurate readings.
17. Choose an ECG lead other than V5 for patients experiencing cardiac occlusion.
18. Use during fibrillation or with cardioplegic agents will result in artifacts that can result in
inaccurate readings.
19. For better measuring results, select the optimum signal/lead for monitoring.
20. Avoid nearby electrical noise sources, if possible.
21. If questionable readings are obtained, re-check the patient's cardiac rhythms by an alternate means
before administering any medication.
22. Routinely inspect cables/leads assemblies for cracks, holes, tears, cuts, etc. that could present
problems to the system.
23. Secure the PC Monitor with the computer on the cart (if used) so that it does not tip over.
24. Consult the PC Monitor book for proper connection between the computer and the monitor.
25. Operation of the computer under low mains voltage conditions is established by the user's
computer choice. Use only UL listed computers to avoid this potential problem.
26. If the QRS-Card fails, please refer to the troubleshooting section in the user manual.
27. To acquire good quality ECGs, only use AAMI EC-12 approved electrodes.
28. Before cleaning the QRS-Card, disconnect it from the PC.
29. To clean the QRS-Card use warm soap and water and surface disinfectant only. Do not immerse
the QRS-Card in the cleaning solution. Permanent damage to the QRS-Card may occur.
June 24, 2009
PBI
QRS-Card Cardiology Suite 4.06 Rev A
IMPORTANT NOTICE
Acquiring good quality ECGs depends upon:
1. ECG equipment (quality of equipment)
2. ECG technician (operator experience)
3. Patient (patient electrode preparation)
4. Environment (low electrical interference)
PBI has provided you with a high quality QRS-Card™ Cardiology Suite device. When the QRS-Card™
Cardiology Suite is used in conjunction with a computer to acquire ECG data from a patient:
1) It is important that the computer you are using with the QRS-Card™ Cardiology Suite be of high
quality with low electrical noise generation. If you have not purchased your computer system
from PBI or do not have the list of approved low-noise computers in the marketplace, please call
us for assistance.
2) It is important that the Electrical Ground to the AC mains be properly grounded and in good working
order.
3) It is important that no electrical noise be generated by any equipment in the vicinity of the QRSCard™ Cardiology Suite ECG machine.
PBI has tested your QRS-Card™ Cardiology Suite for the best ECG performance.
If you find electrical noise in the signal during a patient ECG, please check the following before calling
PBI’s technical support line:
a.
b.
Check that the patient is properly prepared and the lead connections are tightly installed.
Check the ECG environment to see if there is other electrical equipment present that may be
creating the electrical noise.
c. Check your computer brand and model to make sure they are from an approved manufacturer.
Electrical noise can be controlled if the above noise detection steps are investigated and corrected.
For any further help, please call Pulse Biomedical Inc. at 610-666-5510.
Before calling PBI please note the
serial number of your QRS-Card™ Cardiology Suite.
June 24, 2009
5
PBI
QRS-Card Cardiology Suite 4.06 Rev A
6
System Setup
QRS-Card™ Cardiology Suite 4.0 Overview
The QRS-Card™ Cardiology Suite combines state-of-the-art ECG devices which, when interfaced to a Windows®
compatible personal computer, convert the computer into a highly sophisticated Cardiology Suite (Resting ECG,
Stress ECG system, Holter ECG, Ambulatory Blood Pressure Measurement and Spirometry System). Physicians can
run Resting, Stress, Holter, Blood Pressure and PFT tests on patients using a standard desktop or notebook computer.
Results of the tests can be viewed on the computer color screen and printed automatically (or on demand) at any time
during a test. The results of the tests can be saved on the computer hard disk for future referencing or report
generating.
The QRS-Card™ Cardiology Suite is programmable for treadmill and Ergometers controls. Input of blood pressure
can be performed automatically (screen prompts or direct interface to BP device) at predefined intervals.
QRS-Card™ Cardiology Suite Components and Assembly:
Depending on the total number of Cardiology Suite Modules you have purchased, the suite includes the following
hardware and software components:
Resting and Stress ECG System
1.
QRS-Card™ ECG device
2.
ECG Patient Lead Wires
3.
QRS-Card™ data cable (USB or Serial)
4.
QRS-Card Cardiology Suite Software CD
5.
User’s Guide
6.
Quick Reference Card
7.
USB Security Key with Product ID Number (PID)
* See Quick Reference Installation Guide for Hardware Installation and Setup
Holter ECG System
1.
Holter Recorder
2.
Holter ECG leadwires
3.
Holter Recorder Pouch
4.
Holter recorder data cable (or flash memory card reader)
5.
QRS-Card Cardiology Suite Software
6.
User Guide
7.
Quick Reference Card
8.
USB Security Key with Product ID Number (PID)
* See Quick Reference Installation Guide for Hardware Installation and Setup
June 24, 2009
PBI
QRS-Card Cardiology Suite 4.06 Rev A
7
Ambulatory Blood Pressure
WARNINGS
US Customers will be supplied with ONLY software supplied by the device manufacture (and not
the Cardiology Suite ABMP software module).
1.
Ambulatory Blood Pressure Recorder
2.
Blood Pressure Cuff
3.
Recorder Carrying Pouch
4.
Data Cable (serial or USB)
5.
QRS-Card Cardiology Suite Software
6.
User Guide (Supplied on Software CD)
7.
Quick Reference Card
8.
USB Security Key with Product ID Number (PID)
* For Hardware Installation and Setup see Quick Reference Installation Guide
Spirometry
WARNINGS
US Customers will be supplied with ONLY software supplied by the device manufacture (and not the
Cardiology Suite Spiromtery software module).
1.
Spirometer
2.
Disposable Mouth Piece
3.
Data cable (Serial or USB)
4.
QRS-Card Cardiology Suite Software
5.
User Guide (supplied on software CD)
6.
Quick Reference Card
7.
USB Security Key with Product ID Number (PID)
* For Hardware Installation and Setup see Quick Reference Installation Guide
June 24, 2009
PBI
QRS-Card Cardiology Suite 4.06 Rev A
Table of Contents
1.
Software Installation
Quick Start
2. Resting ECG
3. Resting ECG Flow Chart
4. Stress ECG
5. Stress ECG Flow Chart
6. Holter ECG
7. ABPM
8.
Master Screen
Full Instructions
9. Resting ECG
a. Modes
b. Starting a Test
c. Data View
d. Set Up
10. Stress ECG
a. Modes
b. Starting a Test
c. Data View
d. Set Up
11. Holter System
a. Downloading Holter Data
b. Features
c. Summary
d. Reclassifying
e. Screen Functions
12. ABPM
a. Downloading Data
b. Data View Screen
c. Utility
d. Logs Menu
p. 9
p. 10
p. 11
p. 12
p. 13
p. 14
p. 15
p. 16
p. 18
p. 19
p. 21
p. 25
p. 27
p. 28
p. 31
p. 35
p. 38
p. 40
p. 52
p. 55
p. 58
p. 63
p. 65
p. 67
p. 82
QRS-Card™ Cardiology Suite 4.06 Software Installation
June 24, 2009
8
PBI
QRS-Card Cardiology Suite 4.06 Rev A
9
The first time you use the system, you need to install the QRS-Card™ Cardiology Suite software by using the Setup
file on the QRS-Card™ Cardiology Suite software CD. Once the software is installed, you will be able to use the QRSCard™ Cardiology Suite for Resting, Stress, Holter, Ambulatory BP and Spirometry. It will take approximately 3 to 5
minutes for all of the directories to be created and for all of the files to be copied to your computer hard disk.
In order to install the QRS-Card™ Cardiology Suite software, the following steps are required:
1.
Switch on and boot up your computer with Windows XP, Window 2000 or Windows Vista
2.
Insert the QRS-Card™ Cardiology Suite software CD into the CD drive.
3.
Follow the instructions on the screen
4.
Once the installation is complete, you are ready to start using your computer for Resting ECG, Stress ECG,
Holter ECG, 24 hour BP and Spirometry.
NOTE:
1. Write down the Product ID (PID) of your QRS-Card™ ECG device written on the USB Security
Key and also on the back of your QRS-Card (or provided by dealer or distributor). For Demo software Tutorial the
PID is “0001-0001-2000-DEMOU”.
2. See Quick Reference Installation Guide for Hardware hookup and setup
Product License and Registration Screen
Company
Name
Serial Number (SN)
PID (Product ID)
License - Registered
Register
Modules Activated
(Bought/Acquired)
Press "CTRL F1" or Select from pulldown menu "HELP" then "About"
June 24, 2009
PBI
QRS-Card Cardiology Suite 4.06 Rev A
Quick Start ---------------1.
10
-------------------- RESTING ECG
Connect QRS-Card ECG machine to your computer USB port (or serial port).
(See Quick Reference Installation Guide for more help.)
2.
3.
Start QRS-Card Cardiology Suite Software on your computer
Perform one time Setup for your Resting ECG
(“File/Resting/Setup” or Press “CTRL F2”. See Quick Reference Installation Guide for more details.)
4.
5.
Press Resting ECG button (or Hot key “F2”) on the Main Software Screen
Type in Patient demographic data
(If Setup screen is displayed, press OK to go to patient demographic data input.)
6.
7.
Press OK button to start acquire Resting ECG
ECG report will be printed manually or automatically
(Select printing preferences under “Resting Setup.”)
Print ECG
Save Strip
If not Auto Save
ECG
If not Auto Print Finish Test
Measurements
If not Auto Save
Heart
Rate
Blood
Pressure
Resting ECG Acquisition
Resting ECG Acquisition
Patient ECG Tabular Reports
Help
Data Data Data
Heart
Rate
Blood Pressure
Resting DataView
Resting DataView
June 24, 2009
PBI
QRS-Card Cardiology Suite 4.06 Rev A
11
Resting ECG Flow Chart
Easy Steps To Perform Resting ECG
A. Press Resting Button to Start a Test
B. Enter Patient Demographic data
C. Auto or Manual Print Test Report
A
SETUP FOR AUTO PRINT:
For Auto Report Print to work:
a. Printer MUST be attached to the computer
b. Under Resting/Restup (CTL+F2)
i) Print ECG Report must be selected
ii) Type of Report
(e.g. 12 Lead Standard) must be selected
Start Resting Test
B
Enter Patient Data
PRINT
C AUTO
Must be defined
in Resting Setup
MANUAL PRINT
C
View Saved Test
MANUAL PRINT of reports can be done:
a. From Main Menu
- Select a desired Patient/Test
- Press Print Button
- Select Type of Report (s) to Print
List of Saved Tests
b. View / Edit / Typing of Notes/comments
- From Main menu Select a desired Patient/Test
- Press Open/View Test Button
- View Test and Type Notes
- Press Print Button
- Select Type of Report to Print
Print Report (s)
Multiple Style Reports
View / Type Notes
Task performed during a Resting ECG
Save Strip
Save Strip
Only When No Auto Save
June 24, 2009
Print ECG
on Demand
Single Style Report
Print ECG
Finish Test
Finish
Test
If No Auto Save
PBI
QRS-Card Cardiology Suite 4.06 Rev A
Quick Start --------------------1.
------------------- STRESS ECG
Connect QRS-Card ECG machine to your computer USB port (or serial port).
(See Quick Reference Installation Guide for more help)
2.
3.
Start your QRS-Card Cardiology Suite Software on your computer
Perform one time Setup for your Stress ECG
(“File/Stress/Setup” or Press “CTRL F3”)
See Quick Reference Installation Guidefor more details
4.
5.
Press Stress ECG button (or hot key “F3”) from the Main Software Screen
Type in Patient demographic data
(if Setup screen show then press OK to go to patient demographic data)
6.
7.
Press OK button to start acquiring Stress ECG
ECG report will be printed after the completion of the Stress Test
Begin
Recovery
Stress ECG - Acquisition
Advance
Stage
Save
Annotate
Strip
Enter
BP
Demand
Print
Finish
Test
Pause
Protocol
12 LEAD RHYTHM
AVERAGE
COMPLEX
TREND
HR, BP, ST
SPEED/ELEV
ARRHYTHMIA / RHYTHM
Protocol
Stress ECG - Acquisition
Phase Stage
Stage Time
METS
Speed
Heart Rate
Elevation Phase Time
(Pre, Exercise,
or Recovery)
FULL DISCLOSURE / RHYTHM / TREND
Page
View
Complex
Strips
Full Page /
Rhythm
BP
Target HR
Reference,85%,100%
Trend
PAGE / FULL DISCLOSURE
Demand Print
User Select Strip
User Select
Strip
RHYTHM
HR or RR
TREND
Stress DataView - Page/Rhythm/Trend
June 24, 2009
12
PBI
QRS-Card Cardiology Suite 4.06 Rev A
13
Stress ECG Flow Chart
Easy Steps To Perform
A Stress Test
Start
Stress Test
A
Enter
Patient Data
B
A. Press Stress button to Start Test
SUPINE
C. Acquire Pre Test Phase ECG
Perform
Pre Test C
Phase ECG
D. Acquire Exercise Phase ECG
HYPER
VENT
Pre Test
Phase
B. Input Patient Demographic Data
Advance
Stage
1
WARMUP Advance
Stage
E. Acquire Recovery Phase ECG
F. Complete Stress Test
Perform
Exercise D
Phase ECG
Advance
Stage
Exercise
Phase
STAGE E1
G. Print Stress Summary Reports
STAGE E2
2
STAGE E3
STAGE "X"
Perform
Recovery
Phase ECG
Note: Complete ECG for the COMPLETE Stress Test is SAVED
to computer hard disk which can then be EDITED/VIEWED/
PRINTED manually or automatically.
Complete
Stress
Test
E
RECOVERY Advance
Phase
Recovery
Phase
Blood Pressure Input is automatically prompted
on the computer screen as per protocol in use
3
F
Print Stress
Sumary Reports G
Multiple Style Reports
Task Performed During a Stress Test
Advance Stage
Advance
Stage
June 24, 2009
Begin
Revovery
Begin Recovery
Blood Pressure
Blood Pressure
Auto or Manual
Save Strip
Save Strip
& Annotate
Print ECG
Pause Protocol
Finish Test
Print ECG
Pause or
Finish
on Demand
Manual Protocol Test
Single Style Report
PBI
QRS-Card Cardiology Suite 4.06 Rev A
Quick Start
1.
--------------------
---------------------- HOLTER ECG
Record patient’s Holter ECG data for 24 or 48 hours.
(For setting up/using the recorder, see Recorder Operator guide)
2. Connect Holter recorder (or flash card) to the computer.
(See Quick Reference Installation Guidefor hardware setup.)
3. Start QRS-Card Cardiology Suite Software
4. Perform one time Holter Setup
(File/Holter/Setup or Press CTRL F5)
See Quick Reference Installation Guide for more details
5. Press HiRes Button or Hot Key F5 from Main Software Screen to start Holter ECG procedure
6. Press OK button to start downloading and Analysis of the Holter ECG
7. Enter Patient demographic data while Holter data is being downloaded
8. Highlight patient from database listing then double click to View, Edit and Print reports
9. Edit any Bins, Episodes and Strips (if necessary)
10. Print Reports
June 24, 2009
14
PBI
QRS-Card Cardiology Suite 4.06 Rev A
Quick Start ----------------------
15
----------------------- ABPM
WARNINGS
US Customers will be supplied with ONLY software supplied by the device manufacturer (and not the
Cardiology Suite ABMP software module).
1.
2.
3.
4.
5.
6.
7.
8.
9.
Record patient’s Ambulatory Blood Pressure (ABPM) data for 24 hours.
(For Using/Setup the ABPM Recorder see Recorder Operator Guide)
Connect Blood Pressure recorder to the computer via serial or USB Port
(See Quick Reference Installation Guidefor hardware setup)
Start QRS-Card Cardiology Suite Software
Perform one time Ambulatory BP Setup
(File/Ambulatory BP /Setup or Press CTRL F6)
See Quick Reference Installation Guide for more details
Press ABPM Button or Hot Key F6 to start Ambulatory BP data download
Press OK button to start downloading Ambulatory BP data
Type in the Patient demographic data
Highlight the patient test from database listing then double click to view ABPM data
Print Summary Report
June 24, 2009
PBI
QRS-Card Cardiology Suite 4.06 Rev A
16
MASTER SCREEN
Resting
ECG
Stress
ECG
Rest ECG
Stress ECG
Holter
ECG
Hi-Res
ECG
Hi-Res ECG
Holter ECG
Name
Date
ID
Ambulatory
Blood Pressure
ABP
Open
Spirometry
Spirometry
Print
Search by
Name, ID Open Patient
or Date
Mail
Print
Report
Help
Help
Add
Delete
Delete
Add
Patient
New Patient
Patient
Database
Test Report
Preview
MAIN SOFTWARE SCREEN
QRS-Card Cardiology Suite software master screen is divided into the following sections:
1.
Pull down menu selection for various items (File, Utility, Logs and Help)
2.
Buttons to QUICKLY access Test or to obtain Help (Resting, Stress, HiRes, Holter, AMPB,
Spriometry & Help)
3.
Folders for Patient Names and Test Database
4.
Patient Database tools (Search, Open, Print, Email, Add New Patient, Delete Patient)
5.
Test Report Preview
Database Tools:
Sort Test
The ECG Tests can be sorted by “name”, “patient ID” or “date acquired” by clicking on the respective buttons
(Partial name or date sort can be typed in the empty space between the database listing and the tool bar buttons)
To sort Tests by Name, press:
To sort Tests by patient ID, press:
June 24, 2009
PBI
QRS-Card Cardiology Suite 4.06 Rev A
17
To sort Tests by Date, press:
Open Test
After selecting Test, press
database.
to retrieve a previously saved test from the QRS
Print Test
Press
printer.
to save and print the selected ECG test to the QRS database and local
Mail Test
Press
to e-mail the ECG test.
Press
to compare patient ECGs.
Compare
Add New Patient
Press
to add a patient before testing them.
Delete a Patient
Press
to remove a patient or a test from the database.
Note: To quickly search for a Name, ID or Date in a large patient database, type partial name, ID or data to jump
to the closest match.
June 24, 2009
PBI
QRS-Card Cardiology Suite 4.06 Rev A
18
RESTING ECG
Topics
Modes of Operation
Starting a Resting ECG
Viewing a Resting ECG
Resting ECG Setup
(Acquisition Mode)
(Dataview Mode)
=====================================================
MODES OF OPERATION
During normal operation of the QRS-Card ECG the system performs in either of three modes:
Standby Mode
This mode occurs when QRS-Card Cardiology Suite Master screen is open and no test is selected.
In standby mode, certain operations like searching for, adding or deleting patients can be performed.
Acquisition Mode
In acquisition mode, the patient is attached to the QRS-Card and the ECG data is seen in real-time on the
computer screen.This mode supplies the functionality to acquire Resting ECG data. The monitor mode
displays an icon in the left hand corner of the title bar.
Print ECG
Save Strip
If not Auto Save
Heart
Rate
ECG
If not Auto Print Finish Test
Measurements
If not Auto Save
Blood
Pressure
Resting ECG Acquisition
Resting ECG Acquisition
Dataview Mode
This mode supplies the functionality to view previously acquired ECG data. Open a patient’s record to
access the Dataview Screen. For more details see Open Test Record.
Patient ECG Tabular Reports
Data Data
Help
Data
Heart
Rate
Blood Pressure
Resting DataView
Resting DataView
June 24, 2009
PBI
QRS-Card Cardiology Suite 4.06 Rev A
19
STARTING A RESTING ECG TEST
Start a Resting Test by using one of the following methods:
From the standby screen, select File > Resting > Perform Test
OR
From the toolbar, select
OR
Use the Hot Key F2
Start a Resting Test by one of the above methods will cause the Resting Setup dialog box to be displayed (IF the Show
This Window box has been selected in the Resting Setup. See Resting Setup.) After the Resting Setup dialog box, the
screen will display the Resting ECG Patient Information property box.
Fill in the appropriate Information in the Patient, Test Information and Medication tabs.
If the patient has previously been tested, the Browse option can be utilized. Click OK. The Electrode Placement
Diagram will be displayed. (If the Show Electrode Position diagram box has been selected in the resting setup mode,
click OK to start the test.)
June 24, 2009
PBI
QRS-Card Cardiology Suite 4.06 Rev A
Print ECG
Save Strip
ECG
If not Auto Print Finish Test
Measurements
If not Auto Save
If not Auto Save
Heart
Rate
20
Blood
Pressure
Resting ECG Acquisition
Resting ECG Acquisition
Save Strip:
The Save Strip option is only applicable if the “Exit When All Tasks Completed” box under the
Resting Setup is not selected.
Pressing this button Saves a 10 second ECG Strip.
During Normal Resting ECG Test, selecting this button is not necessary as 10 Seconds ECG trace
is automatically saved.
Note: Multiple Resting ECG traces can be saved under this setup.
Print ECG:
This Print button is only applicable if the “Exit When All Tasks Completed” box under the
Resting Setup is not selected.
During Normal Resting ECG, this option is not necessary because the 10 Seconds ECG trace is
automatically saved and can be printed automatically (or manually).
Note: Only one kind of report can be printed with this option and it requires a HP PCL5 printer
attached to computer for printing this report.
Finish Test:
This Print button is only applicable if the “Exit When All Tasks Completed” box under the
Resting Setup is not selected.
During Normal Resting ECG, this option is not necessary because after ECG Trace Resting ECG
Acquisition is automatically terminated after 10 seconds.
June 24, 2009
PBI
QRS-Card Cardiology Suite 4.06 Rev A
21
RESTING ECG – “DATAVIEW SCREEN”
To view (or edit) a Resting ECG test, select the desired ECG test from the Main Screen and click
OR
Double click on the test to be reviewed.
The test record will be displayed in the DataView screen.
From this screen, you can
View/edit patient data
View test data
Print reports
Patient ECG Tabular Reports
Data Data
Help
Data
Heart
Rate
Blood Pressure
Resting DataView
Resting DataView
Edit
Use the Edit option to view or edit information about the patient and trace recalled from the database. For further
information, see pg. 27.
Patient Tab – patient demographics
Test Tab – additional patient information
June 24, 2009
PBI
QRS-Card Cardiology Suite 4.06 Rev A
22
Medication Tab – patient medication information
Signal Tab – information on how the ECG was obtained such as the sampling and use of filters.
View
Click on the blue
crossed out
in the upper right hand corner of the window to display the toolbar. Click on the
to hide the toolbar.
Lead View –
Gain –
Speed –
View –
changes the number of leads to be displayed (1, 3, 6, or 12 lds).
changes gain for ECG data (5, 10, 20 and 50 mm/mV).
changes the Speed of ECG Data display (10, 25, and 40 mm/sec).
displays the rhythm data on the bottom of the screen along with Page View
on the top of the screen.
Rhythm Window
Gain –
Speed –
changes the gain for ECG data.
changes the Speed of ECG Data display.
Measure –
measures ECG Measurement. Click on the first point and drag to the
second point. The bottom number is time in sec. It can also measure the differential in height of
two points. The top right number is this differential in mV.
Print – Select
Grid – Press
to print the segment displayed in the “Rhythm window”.
to display a grid in the Rhythm window. Press it twice to remove the grid.
HR – Select
to display HR for annotations. Pressing this button a second time will show
RR time in seconds.
June 24, 2009
PBI
QRS-Card Cardiology Suite 4.06 Rev A
23
Summary
Pressing the Summary button provides summarized data for ECG measurements and automatic
ECG Interpretation.
Table – provides different amplitude measurements from all 12 ECG leads
General – provides ECG Complex measurements. Moving measurements marker (using
left mouse button) user can manually over ride the automatic ECG
measurements
P Wave – provides P wave measurement markers. Use the left mouse button to
move the marker to override automatic P wave measurements.
QRS Wave – provides QRS Complex measurement markers. Use the left mouse button
to move the individual marker to override automatic QRS Complex
measurements.
T Wave – provides T wave measurement markers. Use the left mouse button to move the
marker to override automatic T wave measurements.
Hypertrophy – provides Hypertrophy scores for Sokolow Lyon, Cornell and Estes.
Interpretation – provides computer generated Automatic ECG Interpretation. Typing free
text or accepting statements from the Statement Library can override
this Automatic ECG Interpretation box.
Note: For the Automatic Computer Interpretation to work in the Resting test, this option
has to be selected in the Resting Setup.
The Interpretation property sheet shows the computer-generated interpretation. The user
can also enter a personal interpretation.
Click on the arrow from the computer interpretation box to enter that into the Physician's
Interpretation box. Other interpretations are available in the Statement Library on the
right of the screen. Select the statement desired and click on the arrow to transfer it over
to the Physician's Interpretation box.
If the computer interpretation is not appropriate and no statements from the library can be
found to describe the test record, the physician can add a personal interpretation by
simply clicking in the Physician Interpretation box and typing.
In a view-only box at the bottom of the screen, the date and time of the computergenerated interpretation is displayed. If the computer interpretation is not used, the name
of the analyst who overread the interpretation and the physician that confirmed it, along
with the date and time, can be entered in the “Overread Report” box.
June 24, 2009
PBI
QRS-Card Cardiology Suite 4.06 Rev A
24
Report
Selected reports can be printed (automatically or manually) to any printer attached to the computer.
If the PDF File Viewer is selected, the report will print as a PDF file to the computer screen. The
Save option button from Adobe Acrobat Reader will save the report in PDF format, which can be
printed or emailed by the user, if required.
Note: In order to print PDF File Viewer to computer screen, installation of Adobe Acrobat Reader
6.0 or higher on user computer is required (also make sure that correct version of Acrobat Reader
is selected under “\Utility\Configuration\Option\PDF”. To make sure ,select “Detect”)
June 24, 2009
PBI
QRS-Card Cardiology Suite 4.06 Rev A
25
RESTING ECG SETUP
The Setup command is used to select various options for running a Resting ECG Test. Resting Setup can be accessed
two ways:
From the Standby Screen select File > Resting > Setup OR
Click on the Rest ECG icon. If the "Show This Window" in the Resting Setup has been selected, the Resting
Setup dialog box will automatically be displayed.
Show This Window
If selected, the Resting dialog box will appear when accessing the Resting Test (File > Resting > Perform
Test or clicking on the Resting ECG icon). If left unselected, the Resting setup box will not appear when
performing resting tests.
Show Electrode Position Diagram
If selected, the electrode positioning diagram will be displayed when performing resting tests.
Collect Blood Pressure Measurement
If selected, the Blood Pressure dialog box will be displayed after the Resting patient information has been
entered. Enter the patient's blood pressure and click "OK" to continue.
Start Test When Measurements Valid
If selected, the test will automatically start once it is determined that the blood pressure measurements are
valid. If not selected, the ECG will begin but the test will not start until the Save Strip icon is clicked on the
Resting ECG toolbar.
Provide Automatic ECG Interpretation
If selected, automatic ECG interpretations will be supplied.
Print ECG Report
If selected, an ECG Test report will be printed automatically at the end of the test and will be saved to the
computer hard drive.
If the Print ECG Report option is selected, select the desired type(s) of reports to be printed.
View Test Record
If checked, the ECG record will be displayed immediately after the data is collected.
Exit When All Tasks Complete
If selected, the program will return to the Standby mode when all the tasks selected for the Resting ECG test
are completed. (NOTE: This feature, unchecked, can be used to save multiple Resting ECGs from the same
patient.)
June 24, 2009
PBI
QRS-Card Cardiology Suite 4.06 Rev A
26
Screens
Defines “Default” parameters for Screen display values e.g. Gain, Speed, Lead Display etc for
Acquisition and Dataview Screens. See Quick Reference Installation Guide for more help and
details.
ECG Filter
Electrical Interference
Allows the user to apply a 50Hz or 60Hz filter to smooth out the signal. If desired, the filter can
also be turned off by selecting “None.”
Artifact Rejection
If the Artifact Rejection option is chosen by selecting “Standard,” artifacts like those caused by
muscle twitches will not be assigned as peaks.
Baseline Drift Reduction
Drift of the baseline will be minimized.
Default Reports:
Selected reports can be printed (automatically or manually) as default reports to printer attached to
the computer.
ECG Acquisition
Recorder
Defines if the signal is coming from a QRS Card, a simulated device (QRS demo) or a remote QRS Card.
Selecting “Try” allows you to confirm the signal.
Sample Rate
Defines the sampling rate, per second.
Length
Defines the length of the ECG trace, in seconds, that is saved.
Average Cycles
Defines the number of beats averaged to make a complex ECG.
Demo
Runs a demo of the test.
Reset Button
Resets the setup to its default positions.
June 24, 2009
PBI
QRS-Card Cardiology Suite 4.06 Rev A
27
STRESS ECG
Topics
Modes of Operation
Starting a Stress ECG
Viewing a Stress ECG
Stress ECG Setup
(Acquisition)
(Dataview)
=================================================================
MODES OF OPERATION
During normal operation of the QRS-Card ECG, the system performs in either of three modes:
Standby Mode
The QRS-Card Cardiology Suite Master screen is open and no selection of a test (new or review) has been
made. In standby mode, certain operations like patient search, adding a new patient or deleting a patient can
be performed.
Acquisition Mode
The patient is attached to the QRS-Card and the ECG data is displayed in. In Acquisition Mode, Stress ECG
data is acquired in real-time. The monitor mode displays an icon in the left hand corner of the title bar.
Begin
Recovery
Stress ECG - Acquisition
Advance
Stage
Save
Annotate
Strip
Enter
BP
Demand
Print
Pause
Protocol
Finish
Test
12 LEAD RHYTHM
AVERAGE
COMPLEX
TREND
HR, BP, ST
SPEED/ELEV
ARRHYTHMIA / RHYTHM
Protocol
Stress ECG - Acquisition
Phase Stage
Stage Time
METS
Speed
Heart Rate
Elevation Phase Time
(Pre, Exercise,
or Recovery)
BP
Target HR
Reference,85%,100%
Dataview Mode
In Dataview mode, one can view previously acquired Stress ECG data. Open a patient record to access the
Dataview Screen. For more details see Open Test Record.
FULL DISCLOSURE / RHYTHM / TREND
Page
View
Complex
Strips
Full Page /
Rhythm
Trend
PAGE / FULL DISCLOSURE
Demand Print
User Select Strip
User Select
Strip
RHYTHM
HR or RR
TREND
Stress DataView - Page/Rhythm/Trend
June 24, 2009
PBI
QRS-Card Cardiology Suite 4.06 Rev A
28
STARTING A STRESS ECG TEST
Start a Stress Test by one of the following methods:
From the Standby Screen, select File > Stress > Perform Test OR
From the toolbar, select the Stress ECG icon
OR
Use the Hot Key F3.
Starting a Stress Test by one of these methods will cause the Stress Setup dialog box to be displayed (IF the “Show
This Window” box has been checked in the Stress Setup. See Stress Setup). After the Stress Setup dialog box, the
Stress ECG Patient Information property box will be displayed. Fill in the appropriate information in the Patient, Test,
and Medication tabs. If the patient has been previously tested, the Browse option can be utilized.
The “Acquire Stress ECG” screen will appear and an ECG trace will start. The electrode placement diagram will be
displayed if the “Show Electrode Position Diagram” box has been selected in the stress setup. Click “OK” to start the
test.
Begin
Recovery
Stress ECG - Acquisition
Advance
Stage
Enter
BP
Save
Annotate
Strip
Demand
Print
Pause
Protocol
12 LEAD RHYTHM
Finish
Test
AVERAGE
COMPLEX
TREND
HR, BP, ST
SPEED/ELEV
ARRHYTHMIA / RHYTHM
Protocol
Stress ECG - Acquisition
Phase Stage
Stage Time
METS
Speed
Heart Rate
Elevation Phase Time
(Pre, Exercise,
or Recovery)
Clicking on the blue
the crossed out
June 24, 2009
BP
Target HR
Reference,85%,100%
in the upper right hand corner of the window will display the toolbar. Clicking on
will hide the toolbar.
PBI
QRS-Card Cardiology Suite 4.06 Rev A
29
Tasks Performed During a Stress Test:
Advance Stage
Advance
Stage
Begin
Revovery
Begin Recovery
Blood Pressure
Blood Pressure
Auto or Manual
Save Strip
Save Strip
& Annotate
Print ECG
Pause Protocol
Finish Test
Print ECG
Pause or
Finish
on Demand
Manual Protocol Test
Single Style Report
Stress ECG Test comprises of various Phases and Stages.
In general QRS-Card Stress ECG Test has three phases:
1.
2.
3.
Pre-Test Phase
Exercise Phase
Recovery Phase
Note: User Intervention is required in moving during Stages while in Pre-Test mode. While Exercise and
Recovery stages are timed (e.g. Each Exercise Stage in Bruce protocol is 3 minutes each).
Each Phase can have multiple stages:
Pre-Test Phase (User intervention is needed to complete/forward Pre-Test Stages)
Supine
Hyperventilation
Warm-up
Exercise Phase
Stage E1
Stage E2
Stage Ex
Recovery Phase
Stage R1
Stage Rx
Note: The Advance Stage command can only be accessed when a Stress Test is running.
Use the Advance Stage command to advance the Stress Test to the next Stage. The Advance Stage command can be
accessed the following way:
Press the Advance Stage
as defined by the protocol.
button on the Stress Status Bar to advance the Stress Test to the next Stage
This button can be used to acquire Pre-Test Stage ECG’s. This button can also be used to advance Stages while in
Exercise Phase or in Recovery Phase.
To begin Recovery, press the
button on the Stress Status Bar.
To manually enter blood pressure, press the
button on the Stress Status Bar.
To annotate or mark a Strip to print during final reports, press the
To print a real-time ECG Report, press the
Note:
June 24, 2009
button on the Stress Status Bar
button on the Stress Status Bar.
1. Number of pages (or continuous print) to print under “Stress/Setup”
2. HP PCL5 Printer is REQUIRED to perform real-time print
PBI
QRS-Card Cardiology Suite 4.06 Rev A
To pause (and manually control) the exercise stage and the protocol, press the
Status Bar.
30
button on the Stress
Note: Pressing this Pause Protocol Button will display four additional buttons on the Stress Status bur. These
additional buttons are then used to manually control the Exercise Device (Treadmill or Ergometer).
To complete or stop the test, press the
button on the Stress Status Bar. This button is usually
pressed while in RECOVERY phase. However this button can be pressed anytime during a test to FINISH a
test or to STOP a Test.
NOTE: In order to stop a Test in an EMERGENCY SITUATION use TREADMILL EMERGENCY STOP
BUTTON.
REPORTS:
Selected reports can be printed (automatically or manually) to a printer attached to the computer.
If the PDF File Viewer is selected, the report will print as a PDF file to the computer screen. (Installation of Adobe
Acrobat 6.0 or higher on the computer is required). The Save button from Adobe Acrobat Reader will save the report in
PDF format, to be printed or emailed if required.
June 24, 2009
PBI
QRS-Card Cardiology Suite 4.06 Rev A
31
STRESS TEST – “DATAVIEW SCREEN”
To view or edit a stress test, go to the Master Screen and select the desired Stress ECG Test and click the
button on the toolbar
OR
Double click on the test to be viewed. The test record will be displayed in the Dataview screen.
This screen allows the user to:
View/edit patient data
View test data
Print reports
Edit Selection
This selection is used to review and edit any patient demographics information and ECG device information.
Information is subdivided into:
Patient Tab –
Test Tab –
Medication –
Signal Tab –
for patient demographics
for additional patient info
medication information
information on how the ECG was obtained (i.e. the
sampling rate and use of filters)
Note: To see more about “Editing” and “Viewing” of Patient demographics information see Quick Reference Setup
Guide.
June 24, 2009
PBI
QRS-Card Cardiology Suite 4.06 Rev A
32
View Selection
This selection is used to review (and edit) acquired Stress Test ECG data in various formats.
View
FULL DISCLOSURE / RHYTHM / TREND
Page
Complex
Strips
Full Page /
Rhythm
Trend
PAGE / FULL DISCLOSURE
Demand Print
User Select Strip
User Select
Strip
RHYTHM
HR or RR
TREND
Stress DataView - Page/Rhythm/Trend
This selection shows full disclosure view of the complete stress test.
By Pressing
or
button under “Page” Rhythm data and Trend Data
can also be reviewed in conjunction with the page/full disclosure ECG data.
Rhythm ECG data is synchronized by clicking left mouse button anywhere on the Full
Disclosure ECG Page or on Trend graph.
Tab
This selection shows average complexes during different stages of the Stress Test.
By pressing the
or
button under, Rhythm and Trend Data can also
be reviewed in conjunction with the Average ECG Complex data.
Rhythm ECG data is synchronized by left-clicking the mouse button anywhere on the
Complex ECG Page or on the Trend graph.
June 24, 2009
PBI
QRS-Card Cardiology Suite 4.06 Rev A
33
Tab
This selection shows:
a. Auto Selected Arrhythmia Strips
b. Stress Event Strip (e.g every minute save for Bruce protocol)
c. Custom Save/Annotated Strips.
The strips shown with time stamps marked in “YELLOW” are the ones that are selected
to be printed. These strips can be marked and unmarked by using the tool bar buttons for
marking/unmarking.
Tab
This selection is used to review Stress Test Summary Data. This data include Stress Summary, tabular data
for Stress Test and Summarized Stress Test Interpretation.
Tab
Shows Summary of Stress test and the reason for the termination of the Stress Test (user has the option to
overwrite their comments for the Test termination).
Tab
Shows Stress Test Summary in a tabular format
Tab
Shows summary of computerize Interpretation of the Stress Test. User has the option to overwrite the final
Stress Test Interpretation with their own interpretation.
June 24, 2009
PBI
QRS-Card Cardiology Suite 4.06 Rev A
34
Tab
Selected reports can be printed (automatically or manually) to printer attached to the computer.
If a selection is made for PDF File Viewer then report will print as a PDF file to the computer screen. Hitting
the Save button from Adobe Acrobat Reader will save the report in PDF format, to be printed or emailed as
needed.
Note: In order to use the PDF File Viewer, installation of Adobe Acrobat Reader 6.0 or
higher on is required. Also make sure to use the correct version of Acrobat Reader is
selected under “\ Utility \ Configuration \ Option \ PDF”. To make sure, select “Detect.”
Tab
Selected reports can be saved after modifications are made.
June 24, 2009
PBI
QRS-Card Cardiology Suite 4.06 Rev A
35
STRESS ECG SETUP
The Setup command is used to select options for running a Stress ECG Test. The Setup command can be accessed by
two ways:
From the Standby Screen select File > Stress > Setup OR
Click on the Stress ECG icon. If the "Show This Window" in the Stress Setup has been selected, the Stress Setup
dialog box will automatically be displayed. See below.
Executing Setup makes the system display this Stress dialog box:
Stress Property Sheet
Protocol – defines the Stress Test Protocol to be used in the Stress Test.
Controlled Device – defines the Stress Test Exercise device.
Test –
tests the functionality and the connection between the computer and the Exercise device. To test a device,
select it under the Device option.
Test Property Sheet:
In testing a Treadmill Device, clicking on the arrows under Speed should increase and decrease the
speed of the Treadmill. Using the arrows under Treadmill should increase and decrease the
elevation of the device.
In testing an Ergometer Device, using the arrows under Ergometer should increase or decrease the
load. The Blood Pressure can also be measured to verify the BP aspect of the test is functioning
properly.
June 24, 2009
PBI
QRS-Card Cardiology Suite 4.06 Rev A
36
Limits Property Sheet
Lists the limits of the driver.
Metric – If selected, Exercise device measurements in will be given in Metric units.
Blood Pressure – defines whether or not a Blood Pressure reading will be used and if it is, whether it will be taken
automatically by the machine or whether the program will prompt the user to enter the BP
manually.
If NO BP is selected, the user will NOT be prompted for blood pressure input unless the blood pressure tool
button is manually executed.
Display Options
Show This Window
If selected, the Stress dialog box will appear when accessing the Stress Test (File > Stress > Perform Test or
clicking on the Stress ECG icon). If it is not selected, the Stress setup box will not appear at the start of a
Stress test.
Show Electrode Position Diagram
If selected, the electrode positioning diagram will be displayed.
Arrhythmia Screen
If selected, the Arrhythmia screen will be displayed during the Stress test.
Trend Screen
If selected, the Trend screen will be displayed during the Stress Test.
ST Segment Display
This option selects the display lead for the ST Trend Window. Selecting Normal provides the display of ST
for the user selected lead.
The Maximum ST Elevation or Depression Lead option automatically displays the ST values for the lead that
has either the maximum elevation or the maximum depression.
The Maximum ST Elevation Lead option automatically displays the ST values for the lead that has the
maximum ST elevation.
The Maximum ST Depression Lead option automatically displays the ST value for the lead that has the
maximum ST depression.
ECG Filter
Electrical Interference
This allows the user to apply a 50Hz or 60Hz filter to smooth out the signal. If desired, the filter
can also be turned off.
Artifact Rejection
If the Artifact Rejection option is chosen, artifacts, like those caused by muscle twitches, will not
be assigned as peaks.
Baseline Drift Reduction
Drift of the baseline will be minimized.
Reports
Demand
If desired, a printout of the ECG trace can be obtained while the test is running. Chose the number of pages
to be printed ( 1 to 6 pages or a continuous printout). Start the Stress test. Click on the Print ECG icon and
June 24, 2009
PBI
QRS-Card Cardiology Suite 4.06 Rev A
37
the printout will start from that point. If Continuous is chosen, the printout will continue until the Print ECG
icon is clicked again.
Protocol
If selected, an ECG trace will be printed for each time specified by the protocol.
Final
Specifies the type(s) of final reports.
Target Heart Rate
Defines whether the Target Heart Rate is to be calculated from the patient‘s age or be manually assigned.
ECG Acquisition
Recorder
Defines if the signal is coming from a QRS Card, a simulated device (QRS demo) or a remote QRS Card.
Sample Rate
Defines the sampling rate, per second.
Length
Defines the length of the ECG trace, in seconds, that is saved.
Average Cycles
Defines the number of beats averaged to make a complex ECG.
Save Strips
Allows the user to mark and annotate abnormalities during a Stress ECG Test.
Terminate Strings
Ends the Stress ECG Test so the user can review any annotations that have been made.
Screens
Defines “Default” parameters for Screen display (e.g. Gain, Speed, Lead Display, etc.) for
Acquisition and Dataview Screens. See Quick Reference Installation Guide for more help and
details.
Protocol Editor
See Protocol Editor
Defining a New Protocol
Protocol Information
Updating a Protocol
June 24, 2009
PBI
QRS-Card Cardiology Suite 4.06 Rev A
38
HOLTER SYSTEM
Topics
Downloading Data
Features
Summary
Reclassifying Beats
Screen Function
DOWNLOADING HOLTER SYSTEM DATA
Download Holter Data
Click “Download Holter Data” to start the Holter downloading procedure. The Begin Test command can be executed
by using the following methods:
From the File Menu, select Holter > Download (F5).
June 24, 2009
PBI
QRS-Card Cardiology Suite 4.06 Rev A
From the toolbar, press
39
to download Holter ECG data.
Press hot key “Ctrl+F5” to perform Holter ECG
Device – defines the recorder type to download from.
Record – defines the path for the Holter data file.
Show This Window
If selected, the Holter dialog box will appear when accessing the Holter Test (File > Holter > Perform Test
or clicking on the Holter ECG icon). If not selected, the Holter ECG Download dialog box will appear
first when accessing the Holter Test.
Enter patient demographics
If selected, the Holter ECG Patient Information dialog box will appear during Holter ECG download.
After Download
Exit: If selected, the main software screen will be displayed after download.
Edit: If selected, the Holter test will open for editing after download.
Print: If selected, default reports will be printed after download.
Default Report
The reports that will print after Holter ECG data is analysed. Selected reports can be printed (automatically
or manually) as default reports to a printer attached to the computer.
Upload Patient Data
Patient data can be uploaded to the recorder. (Note: Only if recorder supports this option)
Beats
Opens the Configure Beat Detection dialog box.
Episodes
Opens the Configure Episode Detection dialog box.
Reset
Resets setup to default positions.
June 24, 2009
PBI
QRS-Card Cardiology Suite 4.06 Rev A
HOLTER SYSTEM FEATURES
Standard features include:
Accurate arrhythmia analysis
Preset artifact detection
Simple user interface
Fast load and analysis
Color coded beats and trends
Full disclosure (24 or 48 hours)
3-channel ST analysis
Split-screen superimposition
Multiple report formats
Multiple format page mode
Network compatibility
Optional features include:
HRV (Heart Rate Variability) analysis
12-lead ECG analysis
Pacemaker function analysis
QT analysis
For the Tools option, select the Toolbar icon.
Select this to view or edit information about the patient and trace recalled from the database.
Holter ECG data and access the following options:
Beats
Episodes
Strips
June 24, 2009
40
PBI
QRS-Card Cardiology Suite 4.06 Rev A
Demographics
From the Dataview Screen select File > Demographics
When the Demographics option is executed; the Test Information dialog box will be displayed. This is used to enter
patient details.
Patient Property Sheets
Information about the patient is present in this property sheet. If necessary, the information can be edited.
Test Property Sheet
More detailed information about the patient can be entered.
Diary Property Sheet
Strips taken at different times and/or days from the same patient are stored here.
Medication Property Sheet
Information about the prescribed medication can be entered.
Signal Property Sheet
Defines parameters on how the ECG was obtained, such as the sampling rate and use of filters.
June 24, 2009
41
PBI
QRS-Card Cardiology Suite 4.06 Rev A
42
In Holter ECG data view mode click View button to view downloaded Holter ECG data and access the following:
Beats
Episodes
Strips
The View Holter ECG module has been divided into the above parts to allow for easy navigation and reclassification of
the Holter ECG data.
Beats
From the View option toolbar press
From the Dataview Screen select View > Beats
June 24, 2009
OR
OR
PBI
QRS-Card Cardiology Suite 4.06 Rev A
43
Use the Hot Key F2.
The Beats that match a particular template can be viewed by selecting the desired tab displayed above the template
view window. Beats are classified according to the software’s algorithms and are defined as follows:
- Normal
- Ventricular Ectopic Beats
- Supreventricular Ectopic Beats
- Aberrant
- Atrial Paced
- Ventricular Paced
- Atrio-Ventricular Paced
- Beats that are in segments too noisy to process
The Leads can be changed above the Rhythm Edit Screen and below the bins. The following options are also available:
- Prints the displayed page.
- Inserts beats.
- Adds a custom episode to the selected beat.
- Scans beats. When pressed twice, it stops scanning.
- Allows toggling with rhythms and complex screens.
- Measures beats.
- Enables grid display. (Default setting.)
- Displays heart rate values instead of RR intervals. (Default setting.)
Bins
Rhythm Edit Screen
June 24, 2009
PBI
QRS-Card Cardiology Suite 4.06 Rev A
Episodes
From the View toolbar, press
From the Dataview Screen, select View > Episodes
Use the Hot Key F3.
OR
OR
The Episodes Screen enables the user to review ECG data through the R-R interval window and the trend window.
Data in both windows is synchronized with the Rhythm Edit Screen as the user highlights the data.
As the ECG data is analyzed the Episodes are evaluated against predefined criteria and are stored in the following
categories:
Fastest Rates
Slowest Rates
Bradycardia
Pause
Isolated VEB
VEB Pair
VEB Run
Bigemny
SVEB Pair
SVEB Run
Recorder Episode
STe Abnormalities
R-R Interval
Episodes
List
Trend Screen
Rhythm Edit Screen
June 24, 2009
44
PBI
QRS-Card Cardiology Suite 4.06 Rev A
Strips
From the View option toolbar, press
The Strips screen allows the user to review and select which Episodes should be printed in the selected report.
Strips are displayed in the following categories:
VPB
VPB Pairs
Bigeminy
SVPB
SVPB Pair
SVT
Pause/Asystole
Patient Episodes
Selected Strips
ST Episodes
Tachy/Brady
Fast rate
Slow rate
There are also several methods to display them:
- Marks all strips.
- Clears all selected strips.
- Allows editing of strips.
- Displays all strips.
- Shows only marked strips.
- Shows only unmarked strips.
- Allows strips that are not displayed to be added.
- Updates any edits made.
- Deletes all marked strips.
June 24, 2009
45
PBI
QRS-Card Cardiology Suite 4.06 Rev A
After pressing F7, the first tab is
. This screen displays the patient’s atrial fibrillation. The user can
synchronize this data with the Rhythm Edit Screen.
Above the Rhythm Edit Screens are the options to change the leads and reclassify the beats as well as the following
options:
- Marks the start of an episode run.
- Marks the finish of an episode run.
- Measures the beats.
- Prints the displayed page.
- Inserts beats.
- Adds a custom episode to the selected strips.
- Displays Rhythm Edit Screen (default setting).
June 24, 2009
46
PBI
QRS-Card Cardiology Suite 4.06 Rev A
47
ST Table
ST
HR & ST Trend
List
Rhythm Edit Screen
From the View option at the top, press Tools
From press the Hot Key F7.
Once the Tool Screen is displayed, hit the tab labeled
OR
.
The ST Table screen displays data from the 3 ST channels individually as well as summarized data in the form of the
ST List. The user can synchronize this data with the Rhythm Edit Screen.
Above the Rhythm Edit Screens are the options to change the leads and the reclassify the beats as well as the following
options:
- Prints displayed page.
- Inserts beats.
- Adds a custom episode to the selected strips.
- Measures beats.
- Displays Rhythm Edit Screen (default setting).
- Displays the patient’s heart rate (default setting).
June 24, 2009
PBI
QRS-Card Cardiology Suite 4.06 Rev A
From the View drop-down menu, select Tools
Press the Hot Key F7.
OR
The QT option displays the measurements from Q to T and offers three different viewing options:
1. QT Time Table
2. T Trend Table
3. QT-HR Interval Plot
June 24, 2009
48
PBI
QRS-Card Cardiology Suite 4.06 Rev A
49
HRV Plot
From the toolbar press
This screen gives the user a graphical display of the ECG data through different parameters. This tool assists the user to
get an overview and analyze the ECG data at first glance.
The HRV screen functions give the user several options to view and analyze the ECG data with the help of several
graphical and statistical data views.
The lists of available options are:
The HRV Lorenz plots
General Tables
RR Tables
Spectral Tables
June 24, 2009
PBI
QRS-Card Cardiology Suite 4.06 Rev A
From the View drop-down menu, select Tools
Press the Hot Key F7.
OR
Select the tab that says
Above the Rhythm Edit Screen are the options to change the leads and reclassify the beats as well as the following:
- Prints displayed page.
- Inserts beats.
- Adds a custom episode to the selected strips.
- Measures beats.
- Displays the Rhythm Edit Screen (default setting).
- Displays the heart rate (default setting).
June 24, 2009
50
PBI
QRS-Card Cardiology Suite 4.06 Rev A
Superimposition
·From the Tools option toolbar, press
This screen allows the user to easily identify many kinds of ECG abnormalities such as changes in P-R intervals, Qwaves, QRS conduction, and ST elevation by rapidly displaying QRS complexes on top of the preceding complex
against a scale. Therefore the user can use the Superimpose mode to quickly determine if beats have been classified
correctly as any major fluctuations can be identified easily with the help of the scale.
June 24, 2009
51
PBI
QRS-Card Cardiology Suite 4.06 Rev A
52
SUMMARY
From the View drop-down menu, select Summary
Press the Hot Key F4.
OR
The Summary Screen displays useful quantitative data about individual parameters and includes the following tables:
General
Supraventricular
Ventricular
Supraventricular Runs
Ventricular Runs
Bigeminy
Tachy/Brady
Atrial Fibrilation
Paced
ST
Interpretation
Each table contains hourly results for each measurement and summary information for the entire record.
June 24, 2009
PBI
QRS-Card Cardiology Suite 4.06 Rev A
53
Reports Dialog Box
The reports dialog box is used to generate printed Holter reports.
Press the Report icon:
When the Print command is executed, the Print report dialog box will be displayed. The type of report desired can be
selected here. The system will then print the ECG Report. This report format can also be customized. For details on
customized formats, please contact a member of the PBI technical support team.
Configure Beat Detection
From the Dataview Screen, select the Measure drop-down menu and select Configure Beat Detection Parameters.
This option allows the user to edit beat template parameters. Switch between tabs to set parameters for desired beat
types.
June 24, 2009
PBI
QRS-Card Cardiology Suite 4.06 Rev A
54
Configure Episode Parameters
From the Measure drop-down menu, select Configure Episode Parameters.
This option allows the user to edit episode detection parameters. Switch between tabs to set parameters for desired
episode types.
Blood Pressure
From the Measure drop-down menu, select Blood Pressure.
Use the Blood Pressure command to enter the patient’s blood pressure values data.
The system displays the Blood Pressure Entry Dialog Box when the Blood Pressure command is executed. Enter the
patient’s blood pressure using this screen. Once entered, the system updates the blood pressure values.
June 24, 2009
PBI
QRS-Card Cardiology Suite 4.06 Rev A
55
RECLASSIFICATIONS
The Rhythm Edit Screen allows the user to edit ECG data and reclassify beats. Beat classifications are
indicated as follows:
- Normal
- Ventricular Ectopic Beats
- Supreventricular Ectopic Beats
- Aberrant
- Atrial Paced
- Ventricular Paced
- Atrio-Ventricular Paced
- Beats that are in segments too noisy to process
To Reclassify Single Beats
Select the beat(s) from the Bins that you want to reclassify in the Rhythm Edit Screen. To select a
single beat, click on the R-wave. To select multiple beats, drag the R-waves that you want to include.
Click the desired reclassify button to reclassify to reclassify the beats.
The selected beat(s) will be reclassified (or deleted if you click on A or X).
The beats can also be viewed in the multiple view mode.
To Reclassify Multiple Beats
1. Select the template class (VE, Normal, SVE, etc.).
2. Select the desired bin.
3. Click view button to Toggle view single/multiple template beats in the Rhythm Edit Screen.
4. Select the template beats you want to edit by clicking on multiple beats or clicking Mark Row, Mark
Page, Mark All.
5. Click N, V, P, A, S, B, or X to reclassify the beats.
The selected beats will be reclassified and the Rhythm Edit Screen will be updated with the remaining
template beats in the selected Template pane.
June 24, 2009
PBI
QRS-Card Cardiology Suite 4.06 Rev A
Reclassifying Single and Multiple Episodes
The Episodes Edit window allows the user to edit Episode data and reclassify Episodes. Episodes
classifications are indicated as follows:
- Normal
- Ventricular Ectopic Beats
- Supreventricular Ectopic Beats
- Aberrant
- Atrial Paced
- Ventricular Paced
- Atrio-Ventricular Paced
- Beats that are in segments too noisy to process
To Reclassify Single Episodes
Select the Episode(s) from the Episodes list that you want to reclassify in Rhythm Edit Screen. To
select a single Episode, click on the R-wave. To select multiple Episodes, drag the R-waves that you
want to include.
Click on the desired reclassify button to reclassify the Episode.
The Episode(s) will be reclassified (or deleted if A or X are selected).
Follow these steps to edit multiple Episodes using the Episode R-R Interval Histogram:
In the Episode List box, select the Episode type that you want to edit.
Drag the Episodes in the Episode R-R Interval Histogram to select the range of R-R intervals to edit.
Click Toggle to view multiple Episode in the Rhythm Edit Screen if the screen is not already displayed.
Select the Episodes to be edited by clicking on multiple Episodes or by clicking Mark Row, Mark
Page, or Mark All.
Click the reclassify buttons N, V, P, A, S, B, or X to edit the Episodes.
The selected Episodes will be reclassified and the ECG Edit window will be updated.
June 24, 2009
56
PBI
QRS-Card Cardiology Suite 4.06 Rev A
Follow these steps to edit multiple Episodes using the Event Trend:
In the Episode List box, select the Episode type that you want to edit.
Drag the episodes in the Episode Trend to select the time period to be edited.
Click View to view episodes in the Rhythm Edit Screen if it is not already displayed.
Select the template beas to be edited by clicking on multiple episodes or by clicking Mark Row, Mark
Page, or Mark All.
Click the reclassify buttons N, V, P, A, S, B, or X to edit the episodes.
The selected episodes will be reclassified and the ECG Edit window will be updated
Follow these steps to delete all Episodes of one Episode type:
In the Episode List box select the Episode type that you want to delete.
Drag all of the Episodes in the Episode R-R Interval Histogram or Episode Trend.
Click View above the Rhythm Edit Screen if the screen is not already displayed.
Click Mark All.
Click X to delete the beats and the template.
June 24, 2009
57
PBI
QRS-Card Cardiology Suite 4.06 Rev A
58
HOLTER SCREEN FUNCTIONS
The Strips window contains the following controls:
Strip Category List Box
The Strips list box is located above the ECG Data View window. The
list box displays ECG strips from the following categories:
VPB
VPB Pair
VTAC
SVPB
SVPB Pair
SVT
Pause/Asystole
Patient Event
Selected Strips
STe Deviation
Tachy/Brady
Fast Rate
Slow Rate.
Display Strips
These control which ECG strips are displayed in the Strips mode.
All - Use to display all strips for a category.
Marked -Used to display all marked strips from a category.
Unmarked - Used to display all unmarked strips from a category
Mark / Unmark Strips
These control which ECG strips are marked or unmarked. Marked strips are included the Holter report. When a strip is
selected (marked) it's start time is highlighted in yellow.
Mark All – Used to mark all strips in a category.
Unmark All – Used to unmark all strips in a category.
Toggle – Used to Mark or Unmark the current highlighted strip. Click on a strip to highlight it.
Strip Sorting Criteria
These controls are located above the top-most ECG strip. These are used to control the order that strips are displayed in
the window.
Time – Used to sort the strips in chronological order.
Prematurity (%) – Used to sort the strips according to the degree of prematurity.
Duration (seconds) – Used to sort the strips according to the strip duration.
June 24, 2009
PBI
QRS-Card Cardiology Suite 4.06 Rev A
The Rhythm Edit Screen contains the following controls along the top of the window:
Reclassify Buttons (N, V, S, B, PA, PV, PAV, A, X) – Used to reclassify beats.
Gain – Used to select the ECG gain. Choices range from 1- 50mm/mV.
Speed – Used to select the ECG time interval displayed in each pane. Choices range from 7.5 - 60
seconds.
Measure – Used to activate on-screen calipers for interval and amplitude measurements.
Print - Used to print one-page review screens.
Insert - Enables you to insert new beats by clicking in the Edit pane.
Select - Used to manually select ECG strips to be included in the Holter report.
View – Switches the edit window between single and multiple Edit panes on the beats and Episodes tabs.
The multi-edit pane mode also contains the following additional controls:
View – Used to select the number of panes displayed when the window is toggled to the multi-pane mode.
Choices include 2x2, 4x2, 8x2, and 12x3 panes.
Mark Row, Mark Page, Mark All - In the Beats and Episodes mode you can use these buttons to select
multiple Edit panes during the editing process.
Tip: Double-click in the ECG Edit window to toggle between single and multiple Edit panes.
June 24, 2009
59
PBI
QRS-Card Cardiology Suite 4.06 Rev A
Editing Rhythm Data
You can reclassify individual beats displayed in the Page window using the procedure described in
Lessons: Reclassifying Beats.
Follow these steps to edit multiple beats on the Page screen:
1.
Drag the beats on the page window that you want to edit.
2.
Click N, V, S, B, PA, PV, PAV, A, or X to reclassify the beats.
The selected beats will be reclassified and the Rhythm window will be updated.
Press
June 24, 2009
to view/hide the Rhythm Edit Screen.
60
PBI
QRS-Card Cardiology Suite 4.06 Rev A
Scanning ECG data
Click Scan to start and stop scanning ECG data.
The current time in the record and heart rate are displayed in the top left corner of the Superimpose window. The ST
markers are displayed as vertical lines in the Normal Beats pane. During scanning the position of the slider at the
bottom of the display is continuously updated to reflect the relative position in the ECG record.
Tips:
Use the slider to jump to different times in the record.
To quickly re-scan a section of ECG while scanning, move the slider back the desired amount.
Superimpose Settings – Change the scan rate and enable or disable individual panes in the Superimpose
mode.
To change the scan rate
Move the Scan Rate slider up to increase the number of beats/second (bt/s) or down to decrease the
number of beats/second.
The new rate is displayed above the slider. Note that with the scan rate set to 250 bt/s and an average heart
rate of 70 BPM it would take 6 minutes to scan an entire 24-hour record.
To hide individual superimpose panes
Click the appropriate toggle button to hide/unhide individual panes
June 24, 2009
61
PBI
QRS-Card Cardiology Suite 4.06 Rev A
Summary Screen Functions
From the View drop-down menu, select Summary
Press the Hot Key F4.
OR
To view a table
Click the table tab you want to display.
To zero table values
Select the hour in the table that has values you want to zero.
Select Zero.
Select the check boxes for the values you want to zero.
Click OK.
To edit table values
Select the hour in the table that has the values you want to edit.
Select Edit.
Edit the values.
Click OK.
June 24, 2009
62
PBI
QRS-Card Cardiology Suite 4.06 Rev A
63
Ambulatory Blood Pressure Measurement (ABPM)
WARNINGS
US Customers will receive ONLY the software supplied by the device manufacturer (and not the Cardiology Suite
ABMP software module).
Topics
Downloading ABPM data
Viewing and Printing ABPM Data
===============================================
DOWNLOADING ABPM DATA:
Use the Configure Ambulatory Blood Pressure Download property sheet to transfer the ABPM data from the device to
the QRS-Card program. This dialog box can be accessed by the following methods:
From the Acquisition Screen, select Procedures > Ambulatory BP > Download OR
From the toolbar, click on the ABPM icon
OR
Use the hot key F6.
The Configure Ambulatory Blood Pressure Download dialog box primarily allows the user to specify the device used
and the data file location.
Device – specifies the ABPM device used.
Port – defines which empty comport the device will be using or if a file is being downloaded.
Record – specifies the location of the data file to be downloaded, including the drive.
Show this Window – If this box is selected, the Setup dialog box will appear before each ABPM download. If the box
is unchecked the Setup dialog box will not appear before each download. The download will proceed in the
predesignated fashion.
June 24, 2009
PBI
QRS-Card Cardiology Suite 4.06 Rev A
64
Enter Patient Demographics – Checking this box will allow for the entering of patient demographics while the
ABPM data is being downloaded. Click on the Finish button when data entry is completed.
After Download
Exit:
If the Exit option is selected, the program will wait in standby in the Acquisition Screen after the
ABPM file is downloaded.
Edit:
If Edit is selected, the ABPM file will be downloaded and then the Dataview screen will appear to
allow review and editing of the data.
Print :
The Print option will download the ABPM file and proceed with printing the report selected.
Default Report – Allows for selection of a default report at the time of download. The type of report can be changed
after the download by opening the ABPM test and selecting File > Print Report in the ABPM Dataview screen.
Upload Patient Data – Allows the upload of ABPM data from the QRS system to the ABPM Device.
June 24, 2009
PBI
QRS-Card Cardiology Suite 4.06 Rev A
65
DATAVIEW SCREEN
To view or edit an ABPM test, highlight the desired ECG Test from the Main Screen and click on the
on the toolbar. OR
button
Double click on the Test to be reviewed.
When an ABPM test record is opened, the ABPM Dataview screen is displayed. From this screen, view and/or edit
information about the patient or data from the tests and print reports. An outline of the features and options displayed
on the ABPM Dataview screen is given below, along with any available links to other relevant topics.
Edit - View or edit information about the patient information and trace recalled from the database. Information is
subdivided into:
Patient Tab – patient demographics.
Test Tab – additional patient information.
Medication Tab – patient medication information.
Signal Tab – information about how the ECG was obtained, such as the sampling rate and the use of filters.
June 24, 2009
PBI
QRS-Card Cardiology Suite 4.06 Rev A
VIEW
Use the View option to see ABPM data in four different ways:
ALL views seen simultaneously
Trend data only
Pie data only
Bar data only
SUMMARY
Pressing the summary button provides summarized data for ABPM measurements (Summary, Hourly, Actual
Measurements) and location to type physician interpretation.
REPORT
Selected reports can be printed (automatically or manually) to any printer attached to the computer.
June 24, 2009
66
PBI
QRS-Card Cardiology Suite 4.06 Rev A
67
UTILITY
Topics
Configuration
Physicians
Clinics
Technicians
Import Reports
Queue System
Rebuild
CONFIGURATION:
The Configuration Section is used to set up various default parameters of using QRS-Card Cardiology Suite
Software. These options include:
Reporting
Database
Measurements
Options
GDT Interface
Real-Time Print
Email
REPORTING
Use the Reporting Configuration Property Sheet to set the default values for reporting ECG results.
Access the property sheet by the following method:
Select Utility > Configuration and click on the Reporting tab in the Configuration Setup property box.
Complex
Gain – defines the Gain for ECG complexes to be printed on the Stress or Hi-Res ECG reports.
Options are 5, 10, 20 or 40 mm/mV.
June 24, 2009
PBI
QRS-Card Cardiology Suite 4.06 Rev A
68
Speed – defines the Speed for ECG complexes to be printed on the Stress or Hi-Res ECG reports.
Options are 25, 50 or 100 mm/sec.
Lead 1 – defines the 1st complex lead to be printed on the Stress or Hi-Res ECG reports.
Lead 2 – defines the 2nd complex lead to be printed on the Stress or Hi-Res ECG reports.
Lead 3 – defines the 3rd complex lead to be printed on the Stress or Hi-Res ECG reports.
Rhythm
Gain – defines the Gain for the ECG to be printed on the ECG reports. Options are 5, 10 or 20
mm/mV.
Speed – defines the Speed for the ECG to be printed on the ECG reports. Options are 5, 10, 25 or
50 mm/sec.
Lead 1 – defines the 1st ECG Lead for the three lead ECG reports.
Lead 2 – defines the 2nd ECG Lead for the three lead ECG reports.
Lead 3 – defines the 3rd ECG Lead for the three lead ECG reports.
Hi-Res Complex/Vector Magnitude
Gain – defines the Gain to be printed on Hi-Res reports. Options are 50, 100, 500 or 1000
mm/mV.
Speed – defines the Speed to be printed on Hi-Res reports. Options are 50, 100 or 200 mm/sec.
June 24, 2009
PBI
QRS-Card Cardiology Suite 4.06 Rev A
69
DATABASE
The Database Property Sheet allows the user to select the location of ECG data files and the names of the
individual files. This property sheet can be accessed by the following method:
Select Utility > Configuration and select the Database tab in the Configuration Setup property box.
Root – defines the default root directory for all ECG data files. Below the Root are all the default database
file names.
Browse – allows change of the root directory.
Reset – sets all parameters back to their factory-set defaults.
Logging – Customer Support may ask for this to be checked in order to pinpoint a problem.
Note: ECG database is in published “SCP” format. Each test is a separate file. These files are stored in the
“qrsdb4/files” folder. It is important that the user backup these individual SCP files for data security
purposes.
June 24, 2009
PBI
QRS-Card Cardiology Suite 4.06 Rev A
OPTIONS:
Select Utility > Configuration and select the “Option” tab in the Configuration Setup property box.
This option selects the ST Value parameters, Multitask Message display, and PDF File Viewer Setup.
June 24, 2009
70
PBI
QRS-Card Cardiology Suite 4.06 Rev A
EMR
Select Utility > Configuration and select the “EMR” tab in the Configuration Setup property box.
This option allows the formatting of records and reports before printing and/or e-mailing them.
June 24, 2009
71
PBI
QRS-Card Cardiology Suite 4.06 Rev A
REALTIME PRINT
Select Utility > Configuration and select the “Real Time Print” tab in the Configuration Setup property box.
This option is used to enable or disable Real Time Printer and to setup Real Time Report parameters.
June 24, 2009
72
PBI
QRS-Card Cardiology Suite 4.06 Rev A
EMAIL
Select Utility > Configuration and select the “EMAIL” tab in the Configuration Setup property box.
This option is used to setup Server parameters for sending and receiving ECG’s via e-mail.
June 24, 2009
73
PBI
QRS-Card Cardiology Suite 4.06 Rev A
MEDICATION
Select Utility > Configuration and select the “Medication” tab in the Configuration Setup property box.
This tab allows the user to add, edit, or delete patient medication.
June 24, 2009
74
PBI
QRS-Card Cardiology Suite 4.06 Rev A
PHYSICIAN
Select Utility > Physician then property box will appear.
Names of attending and referring physicians are stored in the database using this option.
Add – select to enter a new or referring physician’s name
Update – select to update an existing entry in Physician Database
Delete – select to delete an entry in Physician database
Export – select to Export a listing of an existing Physician database in text format
Import – select to Import an existing text format Physician list into Physician database
June 24, 2009
75
PBI
QRS-Card Cardiology Suite 4.06 Rev A
Clinics
Select Utility > Clinics then property box will appear.
This option is used to enter Clinics’ Names for a multi-practice medical office.
Add – select to add a new clinic’s name in the Clinic Database.
Update – select to update an existing clinic’s name and address.
Delete – select to delete an existing clinic’s name in the database.
Export – select to export an existing clinic database to text format.
Import – select to import a text format of clinics’ names into Clinic Database.
June 24, 2009
76
PBI
QRS-Card Cardiology Suite 4.06 Rev A
Technician
Select “Utility > Technician” then property box will appear
This option is used to input Technician’s name acquiring the ECG data
Add – select to add a new Technician Name in the database.
Update – select to update an existing Technician name in the technician database.
Delete – select to Delete an existing technician name from the database
Export – select to Export an existing technician database to text format
Import – select to Import a text format technician names into technician database
June 24, 2009
77
PBI
QRS-Card Cardiology Suite 4.06 Rev A
78
Import Reports
Select “Utility > Import Reports” then the property box will appear.
The Import Report option is used to import any new ECG report formats supplied by Pulse Biomedical or to import any
changes made to already existing report formats. The Import Report command can be accessed by the following
method:
Executing the Import Report command will cause the system to display the Import QRS Report dialog box.
To import a report format, highlight the desired report and click on Open. The new report is now ready for use. To
make changes to the format of an existing report go to Windows Explorer. In the directory containing the QrsCard
software, select the report to be modified with the right mouse button. Click on Open and the existing report format
will open on the Notepad. Make and save any desired changes. Return to the QrsCard software and the Import Report
option. Highlight the modified report and click on Open. The modified report is now ready for use.
Open
Highlight one or all reports and select this option to import report(s) into the Report Database.
June 24, 2009
PBI
QRS-Card Cardiology Suite 4.06 Rev A
79
Queue System
Select “Utility > Queue System” then the property box will appear.
The Queue System places the ECG traces from the Patient Tests database in the queue system. At a later time, the user
can dump the queue to a printer, E-mail the traces, or export the traces to an external file (one not connected to the QRS
databases). Using the Queue system, the user can also receive ECG traces via E-mail or import a trace from an external
file.
After the test is complete, the Queue System command can be executed by the following method:
The system will display the QRS Queue System dialog box.
Dump Queue – will dump the entire selected queue to the appropriate output device and the Queue Dump
dialog box appears. The Queue Dump dialog box shows the status of the queue dump. Any errors that
occurred will be listed.
Delete Queue – will delete all items in the type of queue selected.
Reset Errors – will reset any errors that occurred when dumping a queue.
Add –will display the appropriate Add dialog box for the selected output device. See the Available Queues
below for more information.
Update – will bring up the Update QRS Queue Entry dialog box.
Details of the selected item can be edited in this dialog box. In particular, the type of report
selected for a particular queue item can be edited using this option.
Delete – allows the user to delete individual items from a particular queue.
June 24, 2009
PBI
QRS-Card Cardiology Suite 4.06 Rev A
80
Available Queue Options
Print Queue
To add to the Print Queue, double-click on Printer under Available Queues in the Queue Detail Dialog Box or highlight
Printer and click on the Add button. The Add Entries to QRS Print Queue Dialog Box will be displayed.
Select the test and the type of report desired, add any comments necessary and click on Add. Click on the Close button
to exit this dialog box. The selected traces will be copied to the Print Queue. Select Dump and the traces will be
printed. To aid in finding an encounter, the user may sort the database by name, ID or date/time the encounter was
obtained by clicking on the appropriate heading name.
Mail Out
The Mail Out option allows the user to e-mail ECG traces.
Note: For best results, connect to the Internet before entering the Queue System.
To add to the Mail Out Queue, double-click on the Mail Out option under Available Queues or highlight Mail Out and
click on the Add button. The Add Entries to QRS Mail Out Box Queue dialog box will appear. Highlight the
encounter to be e-mailed and, using the directory option, enter the recipient’s e-mail address. Click on Add to the
queue. Click on Close to exit the dialog box. Click on Dump Queue to start the e-mail process.
Mail In
The Mail In option allows the user to receive ECG traces via e-mail.
Note: For best results, connect to the Internet before entering the Queue System.
As the Queue System is accessed, a message "Retrieving message X or X" will appear if an e-mail has been sent since
the last log-in onto the Internet. The Mail In option in the Available Queue box will show the number of messages.
Highlight Mail In and click on Dump Queue. The messages will be dumped directly into your database.
Note: Be aware that the time on the encounter is when the test was taken and not when it was e-mailed or dumped into
the database.
Queue Export
Selecting the Export Queue option will allow the user to export ECG traces to an external file.
To export a file or files, double click on Export under Available Queues or highlight Export and click on the Add
button. The Add Entries to QRS Export Queue Dialog Box will be displayed.
Select the file(s) to be exported and click on Add Encounter. Click on the Close button to exit this dialog box. The
files will be copied to the Export Queue. Select Dump. The selected files will be exported into the Windows
Temporary (TAMP) Directory
Queue Import
Selecting the Import Queue option will allow the user to import ECG traces from an external file.
To add to the Import Queue, double-click on Import under Available Queues or highlight Import and click on the Add
button. The Add Entries to QRS Import Queue Dialog Box will be displayed.
Select the file to be imported and the format to be used and click Apply.
June 24, 2009
PBI
QRS-Card Cardiology Suite 4.06 Rev A
81
Rebuild
Select “Utility > Rebuild” then property box will appear
This selection is used to rebuild (Re-Index) a corrupted database or to aid in the merging of the database. It
can also be used if two or more database needs to be combined together into one database (e.g. copy both
database *.SCP files into “qrsdb4\files” folder then select the Rebuild command)
June 24, 2009
PBI
QRS-Card Cardiology Suite 4.06 Rev A
82
LOGS MENU
Log files are created each time the STWIN program runs. These files keep track of all operations performed by the
user. More importantly, these files keep logs of any errors that may occur while using this program.
Viewing the file can very helpful in finding any user problems with the program.
Status
Use the Status command to display the status log. The Status command can be executed by the following method:
From the “Logs” Menu select “Status”.
When the Status command is executed, the system displays the Log View Dialog Box. This log file shows the most
recent events the system executed.
Error
Use the Error command to display the error log. The Error command can be executed by the following method:
From the Logs Menu select Error.
Executing the Error command displays the Log View Dialog Box when the Error command is executed. This log file
shows the most recent errors that the system has encountered.
Note: Error Log file is the MOST IMPORTANT file for trouble shooting the QRS-Card™Hardware
and software. During technical support call to PBI, the information contained in this file will assist PBI in
giving the most information to solve or diagnose the problem via telephone.
June 24, 2009