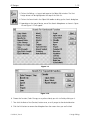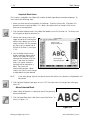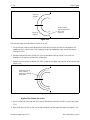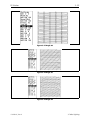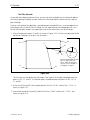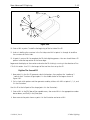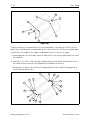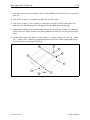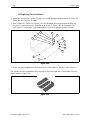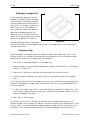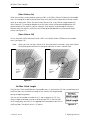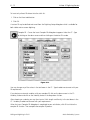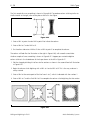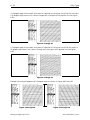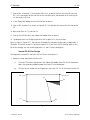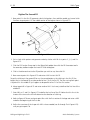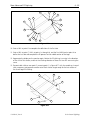
1
Editing and Digitizing
in EDS III
•
•
•
•
Part Number 110282-01, Revision A
Design Editing
Tablet and On-Screen Digitizing
Embroidery and Chenille Stitching
Scanning Compatibilities
A Saurer Group Company
1575 West 124th Avenue
Denver, Colorado 80234
United States of America
E-mail via Internet: [email protected]
Copyright © Melco Embroidery Systems, 1996
Portions of the imaging technology of this product are copyrighted by AccuSoft Corporation.
ALL RIGHTS RESERVED No part of this publication may be reproduced, stored in a retrieval system, or
transmitted in any form or by any means (electronic, mechanical, photocopying, recording, or
otherwise) without prior written approval of Melco Embroidery Systems. Melco reserves the right to
revise this publication and to make changes in it at any time without obligation of Melco to notify any
person or organization of such revisions or changes.
All precautions have been taken to avoid errors or misrepresentations of facts, equipment, or products.
However, Melco Embroidery Systems does not assume, any liability to any party for loss or damage
caused by errors or omissions.
Printed in the United States of America
First Printing February, 1996
Editing and Digitizing in EDS III
Table of Contents
Table of Contents
1. Design Editing
Object Edit Window
Editing Cursor
Digitizing Cursors
Toolbars
General Design
Layout Toolbar
Layout Toolbar Definitions
Object Edit Toolbar (1 of 3)
Object Edit Toolbar Definitions (1 of 3)
Object Edit Toolbar (2 of 3)
Object Edit Toolbar Definitions (2 of 3)
Object Edit Toolbar (3 of 3)
Object Edit Toolbar Definitions (3 of 3)
UNDO and REDO
Key Features/Limitations
Auto Save
Point Editing
All Designs
Condensed Data <-> Expanded Data Switch
Stitch List Display
Moving Through The Design
Search Function
Condensed Designs
Moving A Mark Point
Changing A Mark Point
Swapping Mark Points
Deleting Mark Points and Other Datasets
Inserting Datasets
Expanded Designs
Moving A Stitch Point
Deleting Stitches and Other Datasets
Inserting Datasets
Non-DOS Formats
Barudan File Limitations
Premier/Stellar File Limitations
Making Files for Premier/Stellar
EDS III / EDS II / SUPERSTAR Compatibility
i
1-1
1-1
1-1
1-1
1-1
1-2
1-3
1-4
1-5
1-6
1-7
1-8
1-9
1-9
1-9
1 - 10
1 - 11
1 - 11
1 - 12
1 - 13
1 - 13
1 - 14
1 - 16
1 - 16
1 - 17
1 - 17
1 - 18
1 - 18
1 - 19
1 - 19
1 - 19
1 - 20
1 - 20
1 - 20
1 - 20
1 - 21
1 - 22
Table of Contents
Editing and Digitizing in EDS III
Block Editing
Defining A Block
Define Block Manually
Graphical Block Select
Move Selected Block
Modify Block Parameters
Multiple Blocks
Save Changes
Layer By Color
1 - 22
1 - 22
1 - 23
1 - 24
1 - 24
1 - 25
1 - 26
1 - 26
1 - 26
2. Tablet Digitizer Operation
Power Requirements
Getting Power to Your System
About Electrostatic Discharge
Installing The Tablet
Inspection
Unpacking And Placing The Unit
Tables And Cabinets
Setup Procedure
First Option (Install at COM Port)
Second Option (Install at Stargate)
If You Encounter Trouble
How To Reconfigure The Accugrid Tablet Digitizer
Artwork Preparation
Enlarging
Recommended Tools
Methods For Enlarging
Plotting The Artwork
Plotting During A Digitizing Session
Place The Movable Menu On The Tablet
Attach The Artwork
Position Artwork
Mark The Design Center Point
2-1
2-1
2-1
2-2
2-2
2-2
2-2
2-2
2-2
2-3
2-3
2-3
2-4
2-4
2-4
2-5
2-6
2-7
2-7
2-7
2-7
2-8
3. Tablet Digitizing
Start The Hardware
Start The Software
Attach The Artwork
Initiate A Digitizing Session
Set Scale Factor
Initializing The Movable Menu
Menu ON Check Box
The Setup Dialog Box
Exit Digitizer Dialog Box
3-1
3-1
3-1
3-1
3-3
3-4
3-4
3-5
3-5
ii
Editing and Digitizing in EDS III
Table of Contents
Go To Object Edit Window
View Condensed Points
Design Center
Set Horizontal
Your First Design
Move To Start Of Design
Stitch Types
Running Stitches
Set Stitch Length
Make Lock Stitch Sequence
Straight Line Running Stitches
Movement Between Letters
Curved Line Running Stitches
Column Stitches (Satin Stitches)
Straight Columns
Column Stitches On An Arc
End The Digitizing Session
Save The Design
Other Column Stitching Techniques
Curve Smoothing
Closely Paired Mk3s
Closely Paired Mk2s
Singleline Column Stitching Method
Fill Stitches
Fill Stitch Characteristics
Fill Methods
Simple Fills
Prepare For Digitizing Fill Stitches
Plot The Artwork
Your First Fill Digitizing
Second Fill Of First Design
More Advanced Fill Digitizing
Digitize The First Fill
Digitize The Second Fill
Fill Digitizing The Last Section
Complete The Simple Fill Digitizing Session
Save The Design
Complex Fills
Digitizing A Complex Fill
Preliminary Steps
First Outline
Second Outline
Third And Fourth Outlines
Complex Fill Completion Steps
Complete The Complex Fill Digitizing Session
Save Design
iii
3-5
3-5
3-5
3-6
3-6
3-6
3-7
3-7
3-7
3-8
3-8
3 - 10
3 - 11
3 - 14
3 - 14
3 - 17
3 - 23
3 - 23
3 - 23
3 - 23
3 - 25
3 - 28
3 - 29
3 - 31
3 - 31
3 - 34
3 - 34
3 - 36
3 - 37
3 - 38
3 - 39
3 - 41
3 - 42
3 - 43
3 - 46
3 - 47
3 - 47
3 - 47
3 - 48
3 - 48
3 - 49
3 - 50
3 - 51
3 - 52
3 - 53
3 - 53
Table of Contents
Editing and Digitizing in EDS III
4. Chenille Digitizing
Stitch Types
Stitch Parameters
Stitch Length, Normal Stitch
Fills
Coil Stitch
Needle Height
Digitizing Session
Artwork
Session Setup
Important Notes
Digitize
4-1
4-1
4-1
4-2
4-2
4-3
4-4
4-4
4-4
4-4
4-5
5. Digitizing Reference
Movable Menu Functions
Chenille Functions
Speed Functions
Boring Functions
Sequins
Short Stitches (On/Off)
[Short Stitches On]
[Short Stitches Off]
Set Max. Stitch Length
Stitch Length
Set Horizontal
Fix X-Y Origin
Return To Origin
Clear Function
Needle Up
Normal Stitch
Jump Stitch
Color Change
Trim
Complex Fills
Auto Retrace
Column Fills
Column Fills ON / OFF
Stitch Length
Partition Line Seq. (Sequence)
iv
5-1
5-1
5-2
5-2
5-2
5-2
5-3
5-3
5-3
5-4
5-4
5-5
5-6
5-7
5-7
5-7
5-7
5-7
5-8
5-8
5-8
5-9
5-9
5-9
5-9
Editing and Digitizing in EDS III
Table of Contents
Underlay Functions
Underlay ON / OFF
Narrow Column
Center Walk
Edge Walk
Stitch Length
Column Density
% Width
Symbol Digitizing
Initiate Store Symbol Function
Digitize The Symbol
Storing Finish Symbol
Recall Symbol A / B
Mirror Symbol
Mirror Horizontal
Mirror Vertical
Mirror Both Horizontal And Vertical
Reset Symbol Mirror
Changing Size Of Recalled Symbol
Special Stitch
General Rules
Digitize Special Stitch
Use Special Stitch
Special Stitch Size
Bean
Column Density
Fills
The Blatt Stitch Fill
Step Stitch Fills
Fill Density
Fill Stitch Length
Fill Angle
Partition line Seq. (Sequence)
Reset Seq. (Sequence)
ON Singleline OFF
0 / 1 / 2 / 3 / 4 / 5 / 6 / 7 / 8 / 9 / . / Enter
Setup Dialog Box
Density
Fills
Complex Fill Underlay
v
5 - 10
5 - 10
5 - 10
5 - 11
5 - 11
5 - 11
5 - 11
5 - 11
5 - 11
5 - 12
5 - 12
5 - 13
5 - 13
5 - 13
5 - 14
5 - 14
5 - 14
5 - 15
5 - 15
5 - 16
5 - 16
5 - 16
5 - 17
5 - 17
5 - 18
5 - 18
5 - 19
5 - 19
5 - 20
5 - 20
5 - 21
5 - 21
5 - 22
5 - 22
5 - 22
5 - 22
5 - 23
5 - 23
5 - 24
5 - 24
Table of Contents
Editing and Digitizing in EDS III
6. On-Screen Digitizing
Start The System
Initiate A Digitizing Session
Load Image into EDS III Layout Window
Scaling Graphic Image
Start The Digitizing Function
Display Mode Settings
View Condensed Points
Object Edit Toolbar
Secondary Group Toolbars
Stitches Function Group Secondary Toolbar
Column Function Group Secondary Toolbar
Fill Function Group Secondary Toolbar
Stored Symbol Function Group Secondary Toolbar
Other Function Group Secondary Toolbar
Plotting The Image
Tips for On-Screen Digitizing
Your First Design
Move To Start Of Design
Stitch Types
Running Stitches
Set Stitch Length
Make Lock Stitch Sequence
Straight Line Running Stitches
Movement Between Letters
Curved Line Running Stitches
Column Stitches (Satin Stitches)
Straight Columns
Column Stitches On An Arc
End The Digitizing Session
Save The Design
Other Column Stitching Techniques
Curve Smoothing
Closely Paired Mk3s
Closely Paired Mk2s
Singleline Column Stitching Method
Fill Stitches
Fill Stitch Characteristics
Fill Methods
Simple Fills
Prepare For Digitizing Fill Stitches
Plot The Artwork
Your First Fill Digitizing
Second Fill Of First Design
vi
6-1
6-2
6-2
6-3
6-4
6-5
6-6
6-7
6-7
6-7
6-8
6 - 11
6 - 15
6 - 16
6 - 18
6 - 18
6 - 18
6 - 18
6 - 19
6 - 19
6 - 19
6 - 20
6 - 21
6 - 22
6 - 23
6 - 26
6 - 26
6 - 29
6 - 35
6 - 35
6 - 35
6 - 35
6 - 37
6 - 39
6 - 40
6 - 42
6 - 42
6 - 45
6 - 45
6 - 46
6 - 47
6 - 48
6 - 49
Editing and Digitizing in EDS III
Table of Contents
More Advanced Fill Digitizing
Load Graphic
Start New Digitizing Session
Digitize The First Fill
Digitize The Second Fill
Fill Digitizing The Last Section
Complete The Simple Fill Digitizing Session
Save The Design
Complex Fills
Digitizing A Complex Fill
Load Graphic
Start New Digitizing Session
Initiate Complex Fill
First Outline
Second Outline
Third And Fourth Outlines
Complex Fill Completion Steps
Complete The Complex Fill Digitizing Session
Save The Design
6 - 51
6 - 51
6 - 51
6 - 52
6 - 54
6 - 56
6 - 57
6 - 57
6 - 57
6 - 58
6 - 58
6 - 59
6 - 59
6 - 59
6 - 61
6 - 62
6 - 63
6 - 63
6 - 64
7. Scanning
Introduction
Setting Virtual Memory
Scan / Graphics
Graphic Load
Graphic Save
Import from Clipboard
Scanner Information
Select Scanner
Scan
Tips for Successful Scanning
Image Modification
Scale Graphic
Scale
Location
Orientation
Tip: Using Scale Graphic
Dull Graphic
Hide Graphic
Clear Graphic
INDEX
QUICK REFERENCE GUIDES
PRACTICE ARTWORK
vii
7-1
7-1
7-1
7-1
7-6
7-8
7-9
7 - 10
7 - 12
7 - 13
7 - 14
7 - 14
7 - 15
7 - 16
7 - 16
7 - 16
7 - 17
7 - 18
7 - 19
Table of Contents
Editing and Digitizing in EDS III
This page intentionally left blank
viii
Toolbars
1-1
1. Design Editing
In this chapter we will discuss design editing. We will discuss such topics as moving mark points in a
condensed design, inserting color changes and trim functions in expanded designs, and moving an
entire block of stitching.
Understanding the digitizing process is helpful in using the editing features. If you are digitizing
on-screen or with a tablet, using the editing features is helpful for on-the-spot fixes for minor
mistakes.
Object Edit Window
All windows have the capability of being minimized, moved, or closed. The toolbar and stitch list
are floating windows which may be moved around to any location within the windows or
minimized to reveal more screen area.
The toolbar consists of tools for edit, insert, and on-screen digitizing. All the common functions are
readily available to the user without opening a large dialog box. However, when multiple levels are
required, they are presented by secondary toolbars or by opening dialog boxes.
Editing Cursor
The editing cursor is the standard ‘‘Windows’’ arrow. The point of insertion for the various editing
functions is indicated as the tip of the arrowhead.
Digitizing Cursors
The on-screen digitizing cursor is offered in two choices. The first cursor is similar to the the editing
cursor arrow but is slightly thinner and reshaped for positioning the point of insertion for the
digitizing function. The second type of cursor is a cursor which consists of a bulls-eye located at the
intersection of a crosshairs target. This cursor provides for a more accurate positioning of the
insertion point by allowing you to see the point of insertion in the graphic totally surrounded by the
bulls-eye.
The second type of cursor is also an informative cursor that shows the current Mark button in
addition to a indicating insertion position. This cursor is dynamic and will change reflecting specific
Mark button currently selected.
The digitizing cursor type may be chosen in the Preferences dialog box. This dialog box is accessed
when you click File in the window menu bar and then select the Preferences menu item.
Toolbars
General Design
The toolbars are floating windows which may be moved, minimized, or closed like any other
windows.
110282-01, Rev A
1. Design Editing
1-2
Object Edit Window
Many of the tools that appear in the toolbars are classified as a ‘‘sticky’’ type of tool. That is, once
the tool is selected it remains functional until it is clicked again, a different sticky tool or the Normal
Cursor tool is clicked, or until the Esc key on the keyboard is pressed.
Layout Toolbar
The Layout toolbar consists of both layout tools and certain view tools. The Layout toolbar and
names of the tools appear in Figure 1-1. A brief description is found on the next page.
Text
Center Design
Open Design
Zoom In
Import Design
Zoom Out
Object Order
Zoom Last
Object Parameters
Pan
Adjust Parameters
Ruler
Create Condensed
Design
Normal Cursor
Create Expanded
Design
Editing <-> Layout
Figure 1-1
Editing and Digitizing in EDS III
Melco Embroidery Systems
Toolbars
1-3
Layout Toolbar Definitions
Text - Displays the text dialog box for creating lettering.
Open Design - Opens a DOS design into the current Layout window.
Import Design - Opens non-DOS format designs from diskette or paper tape.
Object Order - Displays the order in which object are sewn.
Object Parameters - Displays the Object Parameters dialog box to allow you to perform various
functions to the object such as scaling and rotating.
Adjust Parameters - Displays the Condensed Object Parameters dialog box to allow you to
perform various functions to the object such as stitch length, column density, and underlay.
Create Condensed Design - Click this tool to initiate a new condensed object and go to the
Object Edit window.
Create Expanded Design - Click this tool to initiate a new expanded object and go to the Object
Edit window.
Center Design - This button recenters your design in the screen when clicked.
Zoom In - Enables you to enlarge an area of a design.
Zoom Out - Allows you to see more of the current design.
Zoom Last - Returns you to previously viewed zoom level.
Pan - This tool allows you to move the screen view of the design to enable viewing different parts
of the design without zooming in or out.
Ruler - Allows you to measure various distances in the design on the screen.
Normal Cursor - Clicking this tool returns the cursor type to the standard arrow.
Editing <-> Layout - Click this tool to go to the Object Edit window. This same tool is located in
the Object Edit toolbar.
For additional information on how to use these tools, refer to the Getting Started with EDS III
manual.
110282-01, Rev A
1. Design Editing
1-4
Object Edit Window
Object Edit Toolbar (1 of 3)
A brief description of each tool is found on the next page.
Condensed Data <-> Expanded Data
First Dataset in Stitch List
Backward in Stitch List
Dataset Increments
Forward in Stitch List
Last Dataset in Stitch List
Previous Dataset in Circle
Next Dataset in Circle
Auto Retrace On
Auto Retrace OFF
STITCHES Function Group
STORED SYMBOL Function Group
Figure 1-2
Editing and Digitizing in EDS III
Melco Embroidery Systems
Toolbars
1-5
Object Edit Toolbar Definitions (1 of 3)
Condensed Data <-> Expanded Data - Click this tool to select the type of display information
presented in the stitch list.
First Dataset in Stitch List - Click this tool to move the editing position to the first dataset of the
design.
Backward in Stitch List - Click this tool to move the editing position one dataset increment
backward in the stitch list. (DO NOT confuse this tool with the Previous Dataset in Circle tool
function.)
Dataset Increments - Click this switch to set the number of datasets to move each time the
Backward in Stitch List or Forward in Stitch List tools are clicked. Each click of the switch will toggle
the number to the next in line of four multiples (1, 10,100, & 1000).
Forward in Stitch List - Click this tool to move the editing position one dataset increment forward
in the stitch list. (DO NOT confuse this tool with the Next Dataset in Circle tool function.)
Last Dataset in Stitch List - Click on this tool to move the editing position to the last dataset of
the design.
Previous Dataset in Circle - Click this tool to move the editing position one dataset backward
within the defined circle. (DO NOT confuse this tool with the Backward in Stitch List tool function.)
Next Dataset in Circle - Click this tool to move the editing position one dataset forward within
the defined circle. (DO NOT confuse this tool with the Forward in Stitch List tool function.)
Auto Retrace On - Click this tool to start the Auto Retrace function. (See Auto Retrace in the
associated digitizing sections of this manual.)
Auto Retrace Off - Click this tool to stop the Auto Retrace function. (See Auto Retrace in the
associated digitizing sections of this manual.)
STITCHES Function Group - Brings up various stitching functions used when editing or
performing on-screen digitizing.
STORED SYMBOL Function Group - Allows you to insert/digitize a stored symbol at various
placements in a design.
110282-01, Rev A
1. Design Editing
1-6
Object Edit Window
Object Edit Toolbar (2 of 3)
A brief description of each tool is found on the next page.
Normal Stitch
Needle Up
Jump Stitch
Bean Stitch
Color Change
Trim
Mk1
Mk2
Mk3
Mk4
COLUMN
Function Group
OTHER
Function Group
Figure 1-3
Editing and Digitizing in EDS III
Melco Embroidery Systems
Toolbars
1-7
Object Edit Toolbar Definitions (2 of 3)
Normal Stitch - Click this tool to insert a normal stitch command after the currently highlighted
dataset in the stitch list.
Needle Up - Click this tool to insert a needle up command after the currently highlighted dataset
in the stitch list.
Jump Stitch - Click this tool to insert a jump stitch command after the currently highlighted
dataset in the stitch list.
Bean Stitch - Click this tool to insert a bean stitch command after the currently highlighted dataset
in the stitch list.
Color Change - Click this tool to insert a color change command after the currently highlighted
dataset in the stitch list.
Trim - Click this tool to insert a trim command after the currently highlighted dataset in the stitch
list.
Mk1 - Click this tool to cause the next click of the left mouse button to insert a Mk1 dataset at the
cursor location on the screen. The location of the Mk1 command in the stitch list will occur after
the currently highlighted dataset in the stitch list.
Mk2 - Click this tool to cause the next click of the left mouse button to insert a Mk2 dataset at the
cursor location on the screen. The Mk2 command in the stitch list will occur after the currently
highlighted dataset in the stitch list.
Mk3 - Click this tool to cause the next click of the left mouse button to insert a Mk3 dataset at the
cursor location on the screen. The Mk3 command in the stitch list will occur after the currently
highlighted dataset in the stitch list.
Mk4 - Click this tool to cause the next click of the left mouse button to insert a Mk4 dataset at the
cursor location on the screen. The Mk4 command in the stitch list will occur after the currently
highlighted dataset in the stitch list.
COLUMN Function Group - Brings up various column function tools used when editing or
performing on-screen digitizing.
OTHER Function Group - Allows you to perform various editing and digitizing functions not
included in the other four function group tools.
110282-01, Rev A
1. Design Editing
1-8
Object Edit Window
Object Edit Toolbar (3 of 3)
A brief description of each tool is found on the next page.
Search
Zoom In
Zoom Out
Zoom Last
Pan
Ruler
Normal Cursor
Block Highlight
Move Block
Block Parameters
FILL Function Group
Editing <-> Layout
Figure 1-4
Editing and Digitizing in EDS III
Melco Embroidery Systems
Key Features/Limitations
1-9
Object Edit Toolbar Definitions (3 of 3)
Search - Click this tool to bring up the Search dialog box used for locating various types of datasets
in the design stitch list.
Zoom In - Enables you to enlarge an area of a design.
Zoom Out - Allows you to see more of the current design.
Zoom Last - Returns you to previously viewed zoom level.
Pan - This tool allows you to move the screen view of the design to enable viewing different parts
of the design without zooming in or out.
Ruler - Allows you to measure various distances in the design on the screen.
Normal Cursor - Clicking this tool returns the cursor type to the standard arrow.
Block Highlight - Click this tool to enable a block of datasets to be selected and highlighted as a
group.
Move Block - With a block of datasets highlighted, click on this tool to capture the highlighted
block of datasets for moving.
Block Parameters - With a block of datasets highlighted, clicking on this tool brings up the Block
Parameters dialog box.
FILL Function Group - Brings up various fill function tools used when editing or performing
on-screen digitizing.
Editing <-> Layout - Click this tool to go to the Layout window. This same tool is located in the
Layout toolbar.
UNDO and REDO
The Undo/Redo functions allow the user to easily recover from mistakes during editing or digitizing.
The Undo feature allows the user to undo most operations that modify a design. The Redo feature
allows the user to undo an undo.
Key Features/Limitations
Undo/Redo is only supported to one level of undo. This means the user can only undo the last
modification performed.
Undo/Redo is not available in Layout mode. Undo only supports operations that modify a design in
Object Edit mode which includes editing, on-screen digitizing, and tablet digitizing sessions. Actions
that do not modify the current design can not be undone. These actions include graphical
operations, stitch list selections, changing palette colors, file operations, grid and display mode
changes, preference changes, regenerate, rubberband, etc.
110282-01, Rev A
1. Design Editing
1 - 10
Auto Save
Manually generated saves will clear the Undo buffers, preventing undoing any modifications prior
to the save. The undo buffers will also be cleared after a regenerate or rubberband, when a design
is closed, or when EDS III is exited. The undo buffers reset also when starting/ending a digitizing
session or when switching between condensed and expanded datasets.
Auto-saves do not clear the undo buffers. This allows the last modification to be undone even after
an auto-save.
Undo does not automatically regenerate the design. After an Undo/Redo is performed, the actual
display of stitches may be incorrect while the stitch list changes to the correct information. Note,
however, that if a design change is regenerated, the change can not be undone. Also, any time a
design change is undone and then regenerated, it can not be redone.
The menu items for Undo and Redo are located in the Edit pulldown. Short-cut keys for the
features are Ctrl Z for Undo and Ctrl Y for Redo. The Undo and Redo menu items become grayed
out when they are not able to be performed.
Auto Save
The Auto Save feature performs automatic saving of designs during editing or digitizing. The
controls are located in the Preferences dialog box. To activate Auto Save, type a time interval other
than 0 (zero) into the [Minutes] text box. The interval may be controlled to tenths of a minute with
a range of 0.1 to 99.9 minutes. Type 0 (zero) in the text box to turn Auto Save OFF. As with all
Preference items, the Auto Save state is unchanged from one session of EDS III to the next.
Each time the Auto Save function executes, all open designs in EDS III are checked for unsaved
modifications. No action will occur with any designs that have not been modified. Those designs
that have been altered since the last save will be affected by one of the following two methods:
1. If the Prompt User checkbox in the Preferences dialog box is not checked, the current design
modifications will be automatically saved with no confirming action required from the user.
Note:
Auto Saving will write over existing data in the original filename. If you wish to avoid this,
rename the file before the first Auto Save interval occurs.
2. If the Prompt User checkbox in the Preferences dialog box is checked, the Save As dialog box
appears on the screen prompting the user for information on saving the design. (Checking the
prompt user checkbox is a safeguard to prevent saving unwanted changes in designs.)
If a filename does not yet exist for a design that is affected by Auto Save, the Save As dialog box
will also appear whether or not the prompt user checkbox is checked. The user then will provide a
filename for initially saving the design.
Note:
Saving designs is a time intensive operation which generally slows the system. During an
Auto Save function the user may notice an interruption, such as a digitizing tablet not
responding immediately to the entry of a mark button, or the inability to enter mark
points in an on-screen digitizing session.
Editing and Digitizing in EDS III
Melco Embroidery Systems
All Designs
1 - 11
Point Editing
All Designs
There are a few rules that apply to the editing processes in EDS III. These rules always apply.
#1
The design (object, expanded, or condensed) file must be initially drawn onto the monitor
screen.
#2
You must click on the object to highlight a box around it to enable editing (highlight the
Editing <-> Layout tool).
For this discussion, we will use the term object to mean any of the three file types (expanded,
condensed, or object) unless specifically identified. When an object in a Layout window is
highlighted on the screen with a box around it you may perform any editing feature available for
that type of file.
Figure 1-5 Layout Window with design
After highlighting an object in the Layout window (see Figure 1-5) click on the Editing <-> Layout
tool (shown at left) located in the Layout window toolbar (see Figure 1-1). This will take you to the
Object Edit window. The Object Edit window contains another set of tools in the toolbar shown in
Figures 1-3, 1-4, and 1-5.
110282-01, Rev A
1. Design Editing
1 - 12
Point Editing
Condensed Data <-> Expanded Data Switch
When in a condensed design, if you switch to an expanded format stitch list you will encounter the
Type Change dialog box (shown in Figure 1-6) if you attempt to make any modifications.
Figure 1-6
CAUTION! If you encounter the Type Change dialog box,
answering YES will convert a condensed design into an
expanded design. Once converted to expanded it cannot
be converted back to condensed.
If the Type Change dialog box appears, what has happened is that you have opened a condensed
design and clicked on the Condensed Data <-> Expanded Data switch (both states shown to the
left) in the Object Edit window to display the equivalent expanded stitch list of the design.
If you click Yes to change the design type it will cause the design to become an expanded design
only. The design will be converted permanently to an expanded file. You will not be able to convert
it back to condensed.
Editing and Digitizing in EDS III
Melco Embroidery Systems
All Designs
1 - 13
Stitch List Display
1. In the Object Edit window a list of all the datasets in the design is present. This list is called the
stitch list.
2. The list will be in stitch parameters if the design is an
expanded (.EXP ) design (see Figure 1-13). If the design is
condensed (.CND) (as shown in Figure 1-7), the stitch list
information will be in mark point parameters. If the design is
an object (.OFM) file, the stitch list information will be one of
the above.
3. If the stitch list is in condensed parameters, the Condensed
Data <-> Expanded Data switch will be highlighted and
display the letters {CND}. You may click on the switch to
convert to expanded parameters and the switch will display
the letters {EXP} and continue to be highlighted. You may
switch back to the condensed parameters if you do not edit
in the expanded mode.
NOTE!
If a condensed design is switched to expanded and then
edited, you cannot retrieve the (CND) mark point
parameters again.
A file saved as an expanded file cannot be changed
to a file with condensed parameters. The Condensed Data
<-> Expanded Data switch in this situation will display the
{EXP} letters, but the switch will not be highlighted.
4. Notice in Figure 1-7 that the first line in the stitch list is
shaded. This shaded line is called the dataset selection
highlight and refers to the location within the design where
the editing process is positioned to make a modification.
Figure 1-7 Stitch List
5. In the menu bar of the Object Edit window, click on View;
then click on Display Mode. In the resulting Display Mode
dialog box, select Condensed Points. Stitches is already
selected as a default condition. These modes will allow the
design to be drawn on the screen showing the stitch
connections and indicate mark point locations in condensed
designs or needle entry points in expanded designs.
Moving Through The Design
There are 4 basic methods to move the dataset selection highlight (see step 4 and Figure 1-7)
through the file.
Method 1. Click on the appropriate "movement in stitch list" tool in the Object Edit toolbar. (See Figure 1-8
and the following discussion for information about these various movement tools.)
110282-01, Rev A
1. Design Editing
1 - 14
Point Editing
In the first method there are several tools in the Object Edit toolbar you can use to move through
the datasets in the design.
The First Dataset in Stitch List tool moves the dataset selection highlight to the beginning
of the design as shown in Figure 1-7).
If you only want to move backward one dataset increment in the design click on the
Backward in Stitch List tool.
The Dataset Increments switch will change the number of datasets that the Back One
Increment and Forward One Increment tools will move the dataset selection highlight.
Each click on this switch toggles the number through the multiples of: 1, 10, 100, and
1000.
Click on the Forward in Stitch List tool to move one dataset increment forward in the design.
To move to the last dataset in the design click on the Last Dataset in Stitch List tool in the
Object Edit window tool list.
Select a stitch dataset within a general location in a design by clicking the left mouse
button with the cursor positioned in the location you desire. A circle is drawn around
the center of the cursor location with an X appearing at the first stitch dataset within
the circle. By clicking on the Previous Dataset in Circle the dataset selection highlight
(the X) moves to the previous stitch dataset within the circle. If you click on the Next
Dataset in Circle you advance to the next dataset in the design located within the circle.
Fig. 1-8
The minimum size of the circle is 20 embroidery points. However, the size of the circle
may be set to fit your editing needs. Click and hold the left mouse button in the
location you want the center of the circle. Drag the mouse in any direction until you
have enlarged the circle to the size you desire and release the mouse button. The
distance you dragged the mouse determines the radius of the circle. You may repeat
this to resize the circle.
Method 2. Press the Up Arrow or Down Arrow keys on the keyboard.
Method 3. Click on the desired mark point, function, or stitch in the stitch list.
Method 4. Click on the desired mark point (or stitch) directly in the design on the monitor.
Search Function
Search allows you to locate and move to various digitizing commands within a design stitch list,
such as Color Change, Jump Stitch, Trim, etc.
To select the area you wish to edit by using Search:
1. Bring the design that you wish to edit into the Layout window.
2. Click on the design. A box will form around the design.
Editing and Digitizing in EDS III
Melco Embroidery Systems
All Designs
1 - 15
3. Click on the Editing <-> Layout tool to go to the Object Edit window. The Start
Design dataset will be highlighted at the top of the stitch list.
4. Click on the Search tool in the Object Edit toolbar to bring up the Search dialog box.
5. Depending on the type of design, one of the Search dialog boxes as shown in Figure
1-9 and Figure 1-10 will appear.
Figure 1-9
Figure 1-10
6. Choose the function (Color Change, or any other choice) you wish to find by clicking on it.
7. Then click the Next or Prev (Previous) button once, or until you get to the desired location.
8. Click the Exit button to remove the dialog box from the screen when you are finished.
110282-01, Rev A
1. Design Editing
1 - 16
Point Editing
Condensed Designs
This section of point editing concentrates on editing designs consisting of mark points and other
datasets particular to a condensed format.
Moving A Mark Point
There are 4 methods to move a mark point within a design file. Select the mark point you wish to
move by using one of the methods for moving through the design stitch list (see page 1-12). Then
move the mark point using one of the methods below:
Method 1. Hold down the Shift key and use the Up Arrow, Down Arrow, Left
Shift + any arrow
1pt
Arrow, or Right Arrow keys on the keyboard to move the mark
Alt + any arrow
10pts
point 1 embroidery point each time. To move 10 embroidery
points, hold the Alt key and press the appropriate arrow key. For
Ctrl + any arrow 100pts
100 embroidery points per move, hold the Ctrl key when pressing
the arrow keys.
Method 2. Click and hold the selected mark point in the design with the right mouse button. Continue to
hold the right mouse button down and drag the mark point to the new location, releasing the
mouse button when the desired location is attained.
Method 3. Press the Enter key and the Modify Mark Button dialog box will appear on the screen (see Figures
1-11 and 1-12). Change the X or Y coordinates of the mark point to the desired value and click
OK.
Figure 1-11
Editing and Digitizing in EDS III
Melco Embroidery Systems
Condensed Designs
1 - 17
Method 4. Double click on the mark point in the stitch list with the mouse. The Modify Mark Button dialog
box (see Figures 1-11 and 1-12) appears on the screen. Change the X-Y values for the desired
mark point and click OK.
Figure 1-12
Changing A Mark Point
During a digitizing session you may generate an incorrect mark point. If this happens you must
change the mark point for the digitizing to be correct. There are 3 methods to change the type of
mark point within a design file. Select the mark point you wish to change by using one of the
methods for moving through the design stitch list (see page 1-12). Then change the mark point
using one of the methods below:
Method 1. Press and hold the Alt key and type the number on the computer keyboard which you wish to
change the mark point to. (i.e. to change any mark point to a Mk2, hold the Alt key and press
the number 2 on the keyboard.)
Method 2. Press the Enter key at the computer keyboard and the Modify Mark Button dialog box will appear
on the screen (see Figures 1-11 and 1-12). Click on the Mark Point button which you wish to
change the selected mark point to and click on OK.
Method 3. Double click on the mark point in the stitch list with the mouse. The Modify Mark Button dialog
box appears on the screen (see Figures 1-11 and 1-12). Click on the desired mark point select
button. Click OK.
Swapping Mark Points
This procedure is useful in fixing a "bowtie" effect in a column.
1. Select the first mark point of the pair which is incorrect by using one of the methods for moving
through the design.
2. Press F2 to exchange that mark point with the next mark point.
110282-01, Rev A
1. Design Editing
1 - 18
Point Editing
Deleting Mark Points and Other Datasets
1. Select the dataset you wish to delete by using one of the methods for moving through the
design.
2. Press the Del key on the computer keyboard to delete the dataset.
Inserting Datasets
Refer to the following steps to insert additional mark points or other datasets from the Object Edit
toolbar. By using one of the methods for moving through the design stitch list, move to the
position directly above where you want to insert a condensed dataset or mark point.
1. Click on the appropriate tool from the Object Edit toolbar which you wish to insert into the
design.
2. Each time you click on the tool, that function will be inserted into the stitch list.
To Generate An Auto Retrace Function
1. When you are in the position in the stitch list directly above where you want to initiate the Auto
Retrace, click the Retrace On tool in the Object Edit toolbar.
2. Move to the location in the stitch list where you want to finish the Auto Retrace function and
click the Retrace Off tool in the toolbar.
To Insert Mark Points
1. Move to the position in the stitch list directly in front of where you want to insert a mark point.
2. Click on the Mark button in the Object Edit toolbar which you wish to insert into the design.
3. Place the mouse pointer at the position in the design where the mark point is to be inserted and
click the left mouse button.
4. If more than one selected mark point is to be inserted, click again in the desired location in the
design.
NOTE:
DO NOT click in the design unless you want to insert a mark point. Each time you click in the
design a mark point will be inserted.
To Insert Datasets From The Group Function Buttons
1. After moving to the position in the stitch list directly in front of where the function is to be
inserted, click the desired group function button to bring up the associated secondary toolbar.
2. Click on the appropriate tool in the secondary toolbar associated with function you desire to
insert into the design. When you click the secondary tools an associated dialog box will appear.
Editing and Digitizing in EDS III
Melco Embroidery Systems
Expanded Designs
1 - 19
3. Click on the desired button in the the dialog box and/or type in the information or changes you
wish to make in the specific function dialog box.
4. When the desired information is correct in the dialog box click on OK.
5. Repeat these steps to make any further inserts or changes in the design from the group function
buttons.
Expanded Designs
This section of point editing concentrates on editing designs consisting
of stitch points and other datasets particular to an expanded format.
Moving A Stitch Point
There are 2 methods used to move a stitch point within a design file.
Select the stitch point you wish to move by using one of the methods for
moving through the design, then move the stitch point using one of the
methods below:
Method 1. Hold down the Shift key and use
the Up Arrow, Down Arrow, Left
Shift + any arrow
1pt
Arrow, or Right Arrow keys on the
keyboard to move the stitch point Alt + any arrow 10pts
1 embroidery point each time. To
Ctrl + any arrow 100pts
move 10 embroidery points, hold
the Alt key and press the
appropriate arrow key. For 100 embroidery points per move, hold
the Ctrl key when pressing the arrow keys.
Method 2. Click and hold on the selected stitch point in the design with the
right mouse button. Continue to hold the right mouse button
down and drag the stitch point to the new location, releasing the
mouse button when the desired location is attained.
Figure 1-13
Deleting Stitches and Other Datasets
1. Select the dataset you wish to delete by using one of the methods for
moving through the design.
2. Press the Del key on the computer keyboard to delete the dataset.
110282-01, Rev A
1. Design Editing
1 - 20
Point Editing
Inserting Datasets
You may insert stitches and other expanded datasets into an existing expanded design in EDS III. To
do this refer to the following steps:
1. By using one of the methods for moving through the design stitch list, move to the position
directly above where you want to insert an expanded dataset or stitch point.
2. To insert a Color Change or Trim Function:
a.
Click on either of the two dataset tools from the Object Edit toolbar which you wish to
insert in the design.
b.
Each time you click on the tool that function will be inserted into the stitch list.
3. To insert Stitch Points:
NOTE:
a.
Click on the stitch tool (Normal Stitch, Needle Up, Or Jump Stitch) in the toolbar which you
wish to insert in the design.
b.
Place the mouse pointer at the position in the design where the stitch point is to be
inserted and click the left mouse button.
c.
If more than one stitch point is to be inserted, click again in the desired location in the
design.
DO NOT click in the design unless you want to insert a stitch point. Each time you click in the
design the selected stitch point will be inserted.
Non-DOS Formats
Barudan File Limitations
Barudan FDR format files cannot exceed a file size of 5,461 stitches; and the Barudan FMC format
files cannot exceed 10,920 stitches. Designs which exceed these limitations need to be broken into
two or more design files that fall within the limitations.
Premier/Stellar File Limitations
When creating and editing designs for the Premier or Stellar embroidery systems, you must be
aware of various limitations and other situations particular to this format.
Premier and Stellar have the following limitations:
• Less than 4000 stitches per expanded design
• Less than 700 datasets per condensed design
Editing and Digitizing in EDS III
Melco Embroidery Systems
Non-DOS Formats
1 - 21
Designs which exceed these limitations need to be broken into two or more design files that fall
within the limitations. To insure proper overall design registration, be sure to follow the guidelines
discussed in "Making Files for Premier/Stellar."
The following types of datasets are not supported in Premier/Stellar format:
Simple Fills
Stored Symbols
Complex Fills
Chenille
Special Stitches
Short Stitches
Pattern Fills
Bean Stitches
Curve Smoothing Mk4s
Single Line Input Columns
If any of these datasets exist within your condensed file, do not attempt to EXPORT the condensed
design to Premier format. Instead, save the file first as an expanded (EXP) design using the Save As
function. Next, close the condensed design and open the expanded design you just created and
saved. Then, EXPORT the expanded design as a Premier format file.
Making Files for Premier/Stellar
Premier/Stellar formats ALWAYS transform the design data to all positive values. Therefore, if saving
a centered design in Premier format and then importing that same design will cause the design to
shift to the upper right quadrant of the screen. This is normal for a centered design in the Premier
format.
For designs produced specifically for the Premier or Stellar systems refer to the following procedure
to produce the desired registration in the embroidery hoop.
A. The first dataset after Start Design in any Premier/Stellar design should be a needle up at the
origin (0, 0 coordinates). See item 1 in Figure 1-14.
Figure 1-14
110282-01, Rev A
1. Design Editing
1 - 22
Block Editing
B. The next dataset should be a needle up defining the upper right (most positive coordinates) of
the design. See item 2 in Figure 1-14.
C. A third dataset should be a needle up defining the lower left (most negative coordinates) of the
design. See item 3 in Figure 1-14.
NOTE:
For existing designs these datasets should be added in the editing mode before exporting the
design to Premier format.
EDS III / EDS II / SUPERSTAR Compatibility
When editing designs that will be used with EDS II or SUPERSTAR machines, complex fills and single
line column datasets cannot be understood and must be removed. All complex fill and single line
column datasets may be removed from a design by pressing the [Alt] plus [Del] keys on the
computer keyboard. All "auto-generated" fill and column datasets will remain in the design but the
automatic function datasets will be deleted. This makes the design compatible with EDS II and
SUPERSTAR machines.
Block Editing
To perform such functions as moving, copying, cutting (deleting), or pasting a block of stitches in a
design, refer to the following section. We will use a simple example to explain defining and moving
a design block.
Defining A Block
There are several methods for defining a block for editing. We will discuss the more common and
practical ones here.
1. From any EDS III window menu bar click on File and New to open a new Layout window.
2. Click the Text tool in the Layout window toolbar and create a design using the following
parameters:
• letters
-
ABC
• alphabet
-
Open block
• height
-
1"
3. Click on OK to generate the design in the Layout
window as shown in Figure 1-15.
4. When the design is drawn on the screen click on the
object to select it. A box is drawn around it.
5. Click the Editing <-> Layout tool to take you to the
Object Edit window.
Editing and Digitizing in EDS III
Figure 1-15
Melco Embroidery Systems
Defining A Block
1 - 23
Define Block Manually
To select the area you wish to block by using the manual method:
1. Make sure there are no existing blocks in the design. To do this click on Edit. If Deselect All is
grayed there are no existing blocks. If it is black, click on Deselect All to assure there are no
existing blocks.
2. In the Object Edit toolbar click on the First Dataset in Stitch List tool to ensure you are at the
beginning of the design.
3. Using one of the methods for
moving through the design, move
to the location in the stitch list
where you wish to start the
definition of the selected block. For
this example, go to the first Needle
Up stitch that belongs to the letter
C (see Figure 1-16).
4. Click the Block Highlight tool to turn
it On. The check mark will change
from gray to red when On.
5. Again, using one of the methods
for moving through the design,
move to the location in the design
where you want to finish the
definition of the selected block. In
this example, move through the
letter C to the last Mk1 dataset
before the Needle Up (see Figure
1-17).
Figure 1-16
6. Click the Block Highlight tool again
to turn it Off. The check mark will
change from red to gray when Off.
Figure 1-17
110282-01, Rev A
1. Design Editing
1 - 24
Block Editing
Graphical Block Select
This function is available in the Object Edit window for both expanded and condensed designs. To
use it refer to the following steps:
1. Make sure there are no existing blocks in the design. To do this click on Edit. If Deselect All is
grayed there are no existing blocks. If it is black, you need to click on Deselect All to assure
there are no existing blocks.
2. Click the Block Highlight tool in the Object Edit toolbar to turn the function On. The check mark
will change from gray to red when On.
3. Position the mouse cursor at the
upper left corner of a rectangular
section of the design you wish to
select as a block. For this example,
put the cursor just above and to
the left of the letter C (see Figure
1-18).
4. Press and hold the left mouse
button and drag it down and to
right on the screen to create a
rectangle that encloses all of the
letter C and none of the other
letters. All stitches inside the
rectangle will be selected as a
block. The system will
automatically perform a block
select in the stitch list even though
multiple blocks may be selected.
NOTE:
mouse cursor,
drag start position
mouse cursor,
drag end position
Figure 1-18
If you select design features that do not touch each other at any location, multiple blocks will
be created.
5. Click the Block Highlight tool again to turn it Off. The check mark will change from red to gray
when Off.
Move Selected Block
1. Select a block of datasets in a design by one of the previously
discussed methods.
2. Click the Move Block tool. A box forms around the letter C as
shown in Figure 1-19.
Figure 1-19
Editing and Digitizing in EDS III
Melco Embroidery Systems
Modify Block Parameters
1 - 25
3. Click and hold inside the box
surrounding the letter C and
drag it to a new location on
the screen (see Figure 1-20).
4. Release the mouse button
and the letter C will be
regenerated where you
moved it as shown in Figure
1-21.
Figure 1-20
Figure 1-21
Modify Block Parameters
Another method of block editing is to use the Block Parameters dialog box.
1. Select a block of datasets in a design by one of the previously discussed methods.
2. Click the Block Parameters tool in the Object Edit toolbar and the Block Parameters dialog box as
shown in Figure 1-22 will appear on the screen.
Figure 1-22
3. Change any items in the dialog box and then click OK. The block you have selected will
regenerate with the new parameters.
4. When the design is modified to your satisfaction click on the Edit menu in the window and then
click on Deselect All in the drop down menu. This removes the block parameters from the
previously selected block and allows you to continue with any other operation in the Layout
window.
110282-01, Rev A
1. Design Editing
1 - 26
Layer By Color
Multiple Blocks
If you defined more than one block in a design, you may select all of the blocks you have created to
perform a universal function with them all a one time. To select all the blocks:
1. Click on Edit in the window menu bar.
2. Click on the Highlight Blocks drop down menu item.
All the blocks you have defined in the design without closing the design will now be selected and
highlighted
Save Changes
Any time you make modifications save your changes if you wish to keep the modified design. You
can save the modified design as the same name as the original if you want to replace it, or give it a
new name by using Save As when you save. This way you can keep the original and have the
modified design also. Refer to the EDS III manual for more information on saving designs.
1. Click on File in the window menu bar.
2. Click on Save As in the drop down menu item.
3. Give the modified design a new name and save it.
Layer By Color
Layer by Color allows you to view and perform editing functions on discrete color layers. This
feature proves itself as a useful editing tool.
Layer selections are chosen by opening the Layer by Color dialog box and clicking on one or more
list box selections (see Figure 1-23).
Figure 1-23
Editing and Digitizing in EDS III
Melco Embroidery Systems
Save Changes
1 - 27
The dialog box will remain on the screen while you perform other activities until you click the OK
button or the Cancel button.
When you click the OK button, the dialog box closes and the design is regenerated based on the
color layer selections in the list box.
When you click the Cancel button, the dialog box is removed from the screen with no design
changes.
Whenever the Layer Now button is clicked, the design is regenerated based on the color layer
selections in the list box, but the dialog box remains on the screen.
In the Layer Selection section of the dialog box, you can click on the All button to select all the
color layers, or you can deselect all colors by clicking on the None button.
You can also go forward and backward through the color layers by clicking on the Next or Prev
(Previous) buttons respectively.
To select an area you wish to modify by using Layer By Color refer to the following steps.
1. Bring the design that you wish to edit into the Layout window.
2. Click on the design. A box will form around the design.
3. Click on the Editing <-> Layout tool in the Layout toolbar to go to the Object Edit window.
4. Click on View, then on Layer By Color. The Layer By Color dialog box will appear on the screen.
Notice that all the colors will be highlighted when the dialog box first appears.
Figure 1-24
110282-01, Rev A
1. Design Editing
1 - 28
Layer By Color
5. Identify the color or colors you wish to affect by one of two methods:
a)
Deselect the colors you do not want affected, by clicking on each one independently, or
b)
Click the None button in the Layer Selection area to deselect all the colors, then select the
color or colors you want to affect by clicking on each one independently to highlight
them.
6. Notice that you may also click the All button or the Next and Prev. buttons (if only one color is
selected) in the Layer Selection area in the process for selecting colors to affect.
7. You may click on the Layer Now button to preview the color or colors you have selected. The
selected colors will be drawn on the screen, but with the dialog box remaining also on the
screen.
Figure 1-25
8. Click on OK and the color or colors you selected will be drawn on the screen, but this time the
dialog box will close.
9. Perform the design modifications you wish to make in this mode of operation.
10. After making modifications to a layer of color, you may save this color layer with its
modifications by clicking on File and then clicking on Save Layer As.
11. Give the layer a design filename and click OK to save.
Editing and Digitizing in EDS III
Melco Embroidery Systems
About Electrostatic Discharge
2-1
2. Tablet Digitizer Operation
The information in this section is written for attaching a tablet digitizer to an EDS III Embroidery
Design System. It is assumed that the EDS III and any associated embroidery peripherals are installed
and functional; and the user has operational knowledge of the system. Refer to the installation
documentation that accompanies that equipment for installing that system before performing the
tablet digitizer installation.
Power Requirements
Getting Power to Your System
The power supplied to your tablet digitizer may come from the dedicated line that you use for the
rest of your system. It is recommended that some type of line conditioning be installed for the
system as well. Some tablets do not have an individual power switch, therefore it’s a good idea to
have the tablet power cable connected to a power strip that has an ON/OFF switch.
About Electrostatic Discharge
Protecting your tablet digitizer and EDS III system from Electrostatic Discharge (static) is important
for trouble free operation. There are a number of good static protection products readily available
in most computer stores today. These range from simple to complex schemes. What scheme you
use depends on how your shop is set up, and the potential that exists for static problems. You can
reduce static problems by following the suggestions shown below:
• Maintain a relative shop humidity between 45 and 75 percent.
• Do not place your system on carpeting.
• If you must use carpeting, use a low pile type. Low pile carpets do not generate as large
a static charge as high pile types.
• Use a static control mat for the operator to stand on. These mats should be connected to
common ground with the equipment.
• If you choose not to use a static control mat, and have carpeting, periodically spray your
work area with an anti-static spray. Spray more frequently during periods of low
humidity.
Whatever you choose to do about static electricity, please do something about it. Using the
simplest precaution of spraying an anti-static solution on a carpet can prevent an expensive repair
and lost production time.
110282-01, Rev A
2. Tablet Digitizer Operation
2-2
Installing The Tablet
Installing The Tablet
The manufacturer and name of the tablet digitizer being installed with this procedure is the
Numonics Accugrid.
Inspection
You will most likely receive your Tablet Digitizer via truck or air carrier. The unit is designed to be
installed by the customer.
When you receive your tablet digitizer, inspect the outside of all cartons for any obvious physical
damage to the box. If any damage is found, contact the shipper. After installation, any malfunction
deemed a result of shipping should also be handled by a claim with the shipper.
Unpacking And Placing The Unit
When unpacking your tablet digitizer, use common sense. Be careful if opening boxes with a knife
not to cause damage to the equipment within. Continue to inspect the parts for any physical
damage that may not have been apparent from the condition of the carton. Again, contact the
shipper to report any damage that is found.
Tables And Cabinets
If you ordered custom furniture or stands for your tablet digitizer, Unpack and assemble these items
first. Refer to instructions that come with the furniture or stands for assembly.
Setup Procedure
In addition to the tablet digitizer, inside the shipping carton you will find a power cord, a digitizing
cursor (similar to a mouse), a data cable, and the Accugrid Setup Menu.
1. After assembling any furniture, place the tablet digitizer in position at its working station.
2. Attach the power cord to the connector in the base of the tablet. Plug the other end into a
power outlet strip.
3. Connect the cursor cable into the back of the tablet base.
4. Turn on the power. The LED on the cursor should light when it is set down in the "active" area
of the tablet.
There are two options for installing the data cable:
First Option (Install at COM Port)
1. Attach one end of the data cable to the output of the tablet digitizer.
2. Attach the other end of the data cable to any active 9-pin COM port.
Editing and Digitizing in EDS III
Melco Embroidery Systems
How To Reconfigure The Accugrid Tablet Digitizer
2-3
3. Go into the Config program in EDS and select the proper COM port for the tablet digitizer.
Second Option (Install at Stargate)
1. Attach one end of the data cable to the output of the tablet digitizer.
2. If you are using a Stargate with your system, attach the 9 pin to 24 pin adapter (provided with
the tablet) to the other end of the data cable and plug into the P4 port of the Stargate.
3. Go into the Config program in EDS and select the proper Stargate port (P4) for the tablet
digitizer.
4. Go into the Windows Control Panel, Ports settings, Advanced settings; and set the IRQ for
COM1 & COM3 to IRQ10
If You Encounter Trouble
After you have installed the tablet digitizer, you may encounter start up situations that cause the
tablet digitizer to not respond properly. Listed below are some known situations for these
occurrences.
• Check the connections between the tablet digitizer and the computer.
• When pushing the red (reset) button on the back of the tablet digitizer, does it chirp? If
not, make certain there is power to the unit. Check the power at the socket where the
tablet digitizer power cord is installed by plugging a working lamp into the socket to see
if the lamp works. Also check connections and the pins in the connectors.
• Perform the reconfiguration procedure (found after this section in this chapter).
• Ensure that the option is turned on. Go to the Melco Apps Config menu and into the
menu options. The name of the tablet digitizer you have should be "grayed out." If not,
enter the required password at this time. If you do not have a password, call your local
sales representative.
If you continue to have problems after checking the items above, call your Melco service
representative for advice and assistance.
How To Reconfigure The Accugrid Tablet Digitizer
1. Locate the sheet supplied with the tablet digitizer labeled Accugrid Setup Menu.
2. Position the menu sheet onto the tablet mid-way between top and bottom and aligning the left
side of the menu with the left edge of the tablet. Tape it in place.
3. Turn the tablet digitizer ON and place the cross hairs of the cursor into the box in the lower right
section of the tablet digitizer surface associated with the term "MENU." Press and hold down
the number 1 key on the cursor until it stops beeping. Lift up the cursor, you should hear
continuous beeping.
110282-01, Rev A
2. Tablet Digitizer Operation
2-4
Artwork Preparation
You are now into a function that will allow you to communicate with the system through the setup
menu.
4. Place the cross hairs of the cursor into the circle of the menu sheet that also has cross hairs
drawn in it. This cross hairs circle is located near the bottom, middle of the menu. Press and
hold the number 1 key until you hear 3 chirping sounds, then release.
5. Place the cursor cross hairs into the box labeled "Melco" on the setup menu sheet. This box is
located in the OUTPUT FORMAT field, on the Application line. Press the number 1 key once.
6. Place the cursor cross hairs into the APPLICATION1 box in the SAVE CONFIGURATION section of
the setup menu and press the number 1 key.
7. Place the cross hairs into the CONFIRM CHANGES box in the EXIT section of the setup menu and
press the number 1 key.
You are now out of the menu function you entered into at step 3.
8. Push the reset button at the top the rear of the unit and begin your digitizing session as
described in the associated operation section of this manual.
Artwork Preparation
Enlarging
Recommended Tools
• Paper - lightweight
• Pencils - #3 or #4 hard or semi-hard lead
• Colored Pencils
• T-Square
• Ruler - 18 inch plastic transparent
• Templates - curves, circles, rectangles, etc.
• Triangles
• Compass
• Pencil Sharpener
• Eraser
• Copy Machine
• Opaque Projector (optional) - check with Accessory Resource Corp. for availability and
price.
Editing and Digitizing in EDS III
Melco Embroidery Systems
Enlarging
2-5
Methods For Enlarging
There are many ways to enlarge artwork for digitizing. Two of the most basic methods will be
discussed here.
Method 1. Copy Machine
1. Determine the size you must draw your artwork by multiplying the desired size of the design by
the enlargement factor.
Example: If the finished sewn size of your design is to be 4" wide (desired size) and you wish to
make your artwork 3 times larger (enlargement factor) you must draw the artwork 12" wide (4" x
3 = 12").
2. Place the design in the copy machine and enlarge the design to the size determined in step 1.
Note:
If the determined size is too large for the copy machine paper, you will have to enlarge the
design by sections and tape them together to get the desired size.
3. Tape the copy machine copy to a large table.
4. Place a sheet of large, lightweight paper over the copy and tape it also to the table.
5. Trace the design using a #3 or #4 hard or semi-hard lead pencil.
6. Remove the newly traced design.
7. "Clean Up" any marginal areas using your ruler, templates, and other various tools.
8. Color the design. Try to use light colors to make plotting easier.
9. Plot the design.
10. Digitize the design.
Method 2. Opaque Projector
1. Determine the size you must draw your artwork by multiplying the desired size of the design by
the enlargement factor.
Example: If the finished sewn size of your design is to be 4" wide (desired size) and you wish to
make your artwork 3 times larger (enlargement factor) you must draw the artwork 12" wide (4" x
3 = 12").
2. Obtain an opaque projector and set it up to project onto a smooth vertical surface such as a
non-textured wall.
3. Draw two parallel vertical lines on a large sheet of lightweight paper the width of the artwork as
determined in Step 1.
110282-01, Rev A
2. Tablet Digitizer Operation
2-6
Artwork Preparation
Note:
In this example you would draw the lines 12" apart.
4. Tape the paper onto the surface where the image will be projected.
5. Place the design into the artwork enlarger.
6. Project the design image onto the paper.
7. Adjust the opaque projector position forward or backward; and up or down, until the size and
location of the projected image matches the vertical parallel lines previously drawn on the
paper.
8. Focus the projector to get a clear picture.
9. Lightly trace the outline and detail of the design image using a #3 or #4 or semi-hard pencil.
10. Remove the paper from the projection surface and "clean up" any marginal areas using your
ruler, templates, and other various tools.
11. Color the design. Use light colors to make plotting easier.
12. Plot the design.
13. Digitize the design.
Plotting The Artwork
After enlarging, tracing, and cleaning up the artwork, you will want to "plot" the design. Plotting
involves laying out (directly onto the artwork) the various details for digitizing. This includes
breaking columns into sections for digitizing straight or curves, and determining entry and exit
locations for fills. Plotting also entails marking the artwork with the factors needed to compensate
for pushing or pulling that may result with various embroidery situations.
Before performing any physical plotting of the design, plan the whole design by deciding the
sequence of operation. Decide where to start and stop with colors, when to perform needle ups,
and other functions you might perform to keep the embroidery moving smoothly.
Plotting is done many times with column stitching and almost always when digitizing a fill.
Most column stitching will run perpendicular to the column edges.
Curved column stitching should be generated from the "inside" edge to "outside" edge.
With mitered corners, the stitches must start slanting toward the corners at a farther distance so
the stitches will look good and properly turn the corners (see Figure 2-1).
Editing and Digitizing in EDS III
Melco Embroidery Systems
Position Artwork
2-7
2nd Mk2
start to slant your
letters toward the
corners about here
4th Mk2
1st Mk2
(3rd from
the previous
column)
3rd
Mk2
5th Mk2
6th
Mk2
square picture frame
Figure 2-1 Plotting Mitered Corners
Plotting During A Digitizing Session
During the digitizing process, situations will arise requiring you to further plot the artwork. You may
find you must segment various shapes to help determine how best to digitize the shape. It is often
helpful to make notations on the design to keep track of vital information about the digitizing
session.
Place The Movable Menu On The Tablet
A movable menu containing all the major digitizing functions comes with the tablet digitizer. The
menu may be placed in any orientation and anywhere in the active area of the tablet digitizer
surface. It must be placed completely within the active area for the system to function properly.
A common position for placing the movable menu is in the lower right corner of the active area as
shown in Figure 2-2.
Once the menu is placed you will need to tell the system where in the active digitizing area the
menu is located. This process is discussed in the initial setup in Chapter 3.
Attach The Artwork
The next requirement for tablet digitizing is to place the design artwork onto the tablet digitizer
and secure it with tape.
Position Artwork
1. To perform the first practice digitizing session in the next chapter, locate the "Melco" artwork in
the back of the manual and place it on the "active area" of the digitizer tablet (see Figure 2-2).
110282-01, Rev A
2. Tablet Digitizer Operation
2-8
Attach The Artwork
Tape (4
corners)
Artwork
Active
Area
Corners
Tablet
Digitizer
Movable
Menu
Figure 2-2
Note:
The active area of the tablet digitizer is that area that falls inside the four corners which
are marked with right angle lines.
2. Positioning the artwork perfectly square on the tablet is not necessary. Therefore, you may wish
to orient it to a comfortable position.
3. Do not cover up the movable menu with the artwork.
4. Secure the artwork firmly with tape to keep it from moving during the digitizing process.
Mark The Design Center Point
Determine the center point of the design. To do this, simply measure the overall width and height
of the design and divide those two dimensions in half. Next, measure in from the left (or right) and
down from the top (or up from the bottom) to locate the center of the design. Place a mark (X or
+) at the center point (see Figure 2-3).
Figure 2-3
Editing and Digitizing in EDS III
Melco Embroidery Systems
3-1
3. Tablet Digitizing
This chapter gets you started digitizing your first designs with EDS III and a tablet digitizer.
Start The Hardware
1. Turn on the tablet digitizer by pressing the switch on the tablet digitizer power supply to the on
position.
Note:
You may have the tablet digitizer power supply plugged into a common power
conditioning device that is controlled by one switch that turns on all the system
equipment. This is OK.
2. Turn on the Monitor and then the EDS III Computer. (See previous Note.)
Start The Software
NOTE:
Typically, with a system shipped complete from the Melco factory,
the Windows program automatically starts when the computer is turned on. If this is
your computer situation disregard step 1 and go directly to step 2 below.
1. From the computer keyboard, type win after the "c
prompt" (it should look like this: C:>win). Then press
[Enter] to start the Windows program.
2. Locate the Melco Apps group (see Figure 3-1) inside the
Windows Program Manager window and double click on
the EDS III Icon with the computer mouse to start EDS III.
Attach The Artwork
Figure 3-1
For use in describing the digitizing process there are sample
sheets of artwork included in this manual. Locate the artwork sheet at the end of this manual
entitled Melco Digitizing Artwork. Attach it to the digitizing tablet as explained in Chapter 2 of this
manual. This artwork will be the first design used in describing the digitizing process. We will plot
the artwork as we go, at times when the explanation is more closely tied to particular section being
digitized.
Initiate A Digitizing Session
1. Locate the two menu items in the Menu Bar of the EDS III Application Window that is now
showing on the monitor. Click on the "File" menu item in the Menu Bar (see Figure 3-2).
Figure 3-2
110282-01, Rev A
3. Tablet Digitizing
3-2
Initiate A Digitizing Session
2. Click on the "New" menu item in the drop-down menu (see Figure 3-3).
Figure 3-3
3. Click on the Edit menu item in the Menu Bar of the new Layout Window.
Figure 3-4
4. Click on the "Digitize" menu item in the drop-down menu that is now on the screen (see Figure
3-4). A dialog box will come onto the screen that is entitled "Digitizer: Idle" (see Figure 3-5).
Figure 3-5
Editing and Digitizing in EDS III
Melco Embroidery Systems
Set Scale Factor
3-3
Set Scale Factor
1. Next determine the scale factor for digitizing. Use the following to determine the scale factor.
• The default scale factor value is 1.000. Since a 1.000 (1:1) scale factor is not normally
recommended, this forces you to make a scale decision.
• To determine the approximate scale factor, divide the desired size of the design by the
actual size of the artwork.
• Most often, a scale factors of 3:1 (.333), 4:1 (.250), 5:1 (.200), or 6:1 (.167) will work in
any given situation.
• To match the scale factor you will want to make the artwork 3, or 4, or 5, or 6 times as
large as you want the design, but not larger than the active area of the tablet digitizer.
Note:
It is desirable to use the same scale factor from day-to-day and design-to-design to
maintain a consistency in your work.
2. Highlight the current value in the Scale area of the Digitizer dialog box, and type in the
determined scale factor value. Refer to Figure 3-6 where we typed .333 as our scale factor.
Figure 3-6
3. Click on the Start button in the Digitizer dialog box. Notice that the heading on the Digitize
dialog box changes to Digitize: Active to indicate that the tablet digitizer is ready for use (see
Figure 3-7).
Figure 3-7
110282-01, Rev A
3. Tablet Digitizing
3-4
Initiate A Digitizing Session
Step 4
Initializing The Movable Menu
With your initial digitizing session you will have to set the Move
function for identifying the location of the movable menu. Once the
menu location is set into the digitizing function, you will not need reset
it again even when restarting the digitizing function after the system
has been turned off. However, if you ever move the menu to a different
location in the future you will need to perform this function again.
1. Place the menu at the desired location within the active digitizing
area of the tablet (see Chapter 2 for information on menu
placement).
2. Click on "Move" in the Digitize dialog box with the left button of
the EDS III mouse.
3. Position the tablet digitizer cursor crosshairs on the target labeled #1
at the lower left corner of the menu (see Figure 3-8) and press the
Mk1 button. You should hear the tablet "beep" when the button is
pressed.
4. Next, move the tablet digitizer cursor crosshairs to the #2 target at
the upper left corner of the menu (see Figure 3-8) and again enter a
Mk1.
Menu ON Check Box
Normally you will have a check mark in the ON box in the Menu area of
the Digitize dialog box. This indicates that the movable menu is being
used on the tablet digitizer. However, it is possible to digitize in the area
of the movable menu.
You may wish to do this if there is no other way to tape a piece of
Step 3
artwork in place without covering up some of the movable menu.
When you install the artwork just leave the portion of the artwork
Figure 3-8
covering the movable menu area folded off of the movable menu during
the majority of the digitizing. When you get to the area of the design that is folded away from the
movable menu simply fold it back over the movable menu area, tape it in place, and perform the
following steps to digitize in this area.
1. Get into the Digitize dialog box by following the previous initialization steps.
2. Click in the ON box in the Menu area of the dialog box to remove the check mark from it.
3. Continue digitizing in the movable menu area.
4. When the digitizing is completed in this area, click the ON box to reinstall the check mark,
enabling the movable menu again.
Editing and Digitizing in EDS III
Melco Embroidery Systems
Design Center
3-5
The Setup Dialog Box
The Setup dialog box is used to set various digitizing parameters used when digitizing columns and
fills. The Setup dialog box will be discussed as it becomes appropriate throughout the manual.
Exit Digitizer Dialog Box
Click on Exit in the Digitizer dialog box to close the dialog box and proceed to the final stages of
initiating the digitizing session.
Go To Object Edit Window
Click on the Editing <-> Layout tool (shown at left) in the Layout window toolbar. This will bring up
the Object Edit window with the Object Edit toolbar and the stitch list.
View Condensed Points
During the digitizing session you will want to see the Mark points as they are digitized. To enable
this you must tell the program to display them. To indicate display information go to the Display
Mode dialog box. Refer to the following steps to perform this function:
1. Click on the View menu item in the current window Menu Bar.
2. Click on the Display Mode menu item in the
drop-down menu.
3. Inside the Display Mode dialog box, shown in Figure
3-9, click on the Condensed Points check box to
place a check mark in the box. You should also see
that there is a check mark in the Stitches check box.
4. Click OK to return to the digitizing window.
Figure 3-9
Design Center
Set the "Center Of The Design" by positioning the tablet digitizer cursor crosshairs at the X or + on
the artwork and enter a Mk1 (see Figure 3-10).
Mk1
Figure 3-10
110282-01, Rev A
3. Tablet Digitizing
3-6
Your First Design
Set Horizontal
This function is used to set up the horizontal orientation of the digitized design. By performing this
function you do not need to have the artwork perfectly "squared" on the tablet.
1. Position the tablet digitizer cursor crosshairs on the [Set Horizontal] box in the movable menu on
the tablet digitizer (see Figure 3-8) and enter a Mk1.
2. Next, locate a horizontal line on the design (or lightly draw in a line that represents the design’s
horizontal orientation). With our example artwork (attached at page 2-8) the tops of the legs of
the capital letter M are in horizontal alignment with the design.
3. Enter a Mk1 at the left end of this line (see item A in Figure 3-11).
4. Move to the right end of the line and enter another Mk1 (see item B in Figure 3-11).
A
B
Figure 3-11
Your First Design
In the first design called Melco Digitizing Artwork we will learn all the basic digitizing functions to
get you started with learning the digitizing process.
Move To Start Of Design
After exiting the Digitizing dialog box we entered a Mk1 at the X or + mark in the center of the
design. This is the current needle location. We now want to move the needle position to the start
our first stitch without stitching. We make this move with the needle not stitching since we do not
want a line of stitching from the center point to the letter M in the digitized design.
1. Enter a Mk1 in the [Needle Up] box at the tablet menu.
2. Enter a Mk1 at the location on the artwork where you want to "start" the design. This identifies
the location for the needle entry starting the first stitch. In our example, we will enter in the
lower right leg of the capital letter M (see Figure 3-12).
Editing and Digitizing in EDS III
Melco Embroidery Systems
Running Stitches
3-7
Mk1
Figure 3-12
Stitch Types
There are 3 stitch types in Melco digitizing: Running stitches, Column stitches, and Fill stitches. We
will cover each type.
Running Stitches
Our first digitizing will consist of several "running stitches" which are typically generated in making
underlay and outline stitching. We will discuss the making of underlay stitching when we get to
column stitches in the letter l. For now, however, we will perform running stitches around the
outline of the letters M and e in the name Melco.
In plotting the letters M and e you will enter into the letter M at the bottom right corner of the
bottom right leg and exit at the same location. In the letter e you will enter and exit in the upper
right corner of the lower tail. No special plotting is needed for generating the running stitches we
are going to digitize.
Running stitches are the simplest stitches to make when digitizing. Running stitches can be
generated in two methods, straight lines or automatic curves.
Set Stitch Length
The first running stitch function to perform is to set the stitch length. There are two ranges for
stitch length, one for underlay stitching and one for outline stitching.
• For generating underlay running stitches you would set the stitch length in the range of
30 to 40 points.
• The stitch length for making outline running stitches will range between 20 to 25 points.
1. Go to the movable menu and enter a Mk1 in the [Stitch Length] box (located just above the Set
Horizontal box you used earlier).
2. Next, move the tablet cursor to the number [2] on the menu and enter a Mk1, then move to the
[5] and enter another Mk1. Move to the [Enter] box on the menu and enter a Mk1 to complete
the function.
You have now selected a stitch length of 25 points to use with outlining the letters M and e in your
current design artwork.
110282-01, Rev A
3. Tablet Digitizing
3-8
Stitch Types
Make Lock Stitch Sequence
Lock stitches are used to keep the beginning and end of a digitized section from coming unraveled
between color changes or with trims and before and after a needle up. Generate lock stitches using
3 or 4 Mk1s in a back and forth zig zag motion. In our example put the lock stitch on the outside
edge of the letter M just up from the Mk1 establishing the start point. See the Figure 3-13 for an
indication of where you will be generating the lock stitches in the following steps.
initial lock stitch
sequence
Figure 3-13
1. Enter a Mk1 in the [Normal Stitch] box at the tablet menu. This will generate a stitch between
the previous Mk1 (see Figure 3-12) and the next Mk1 when the second Mk1 is made.
2. Enter a Mk1 slightly less than a stitch length above the first Mk1. This identifies the end the first
stitch.
3. Next enter a Mk1 near the original Mk1 that indicated the start of design.
4. Again, enter another Mk1 near the end of the first stitch.
5. Place one more Mk1 near the start of design.
You have now generated stitches designed to lock the thread. You may generate the lock stitches
in a "star" pattern, as some punchers prefer, or develop your own method for locking stitches.
Straight Line Running Stitches
Between every pair of Mk1s is a straight line. The simplest running stitch is a straight line created
when you enter a Mk1 at one end of a line and another Mk1 at the other end of the line. In the
example design you have placed a lock stitch sequence using running stitches. Now we will "Walk"
around the outside lines of the capital letter M with a running stitch, which will form a simple
outline of the letter.
Editing and Digitizing in EDS III
Melco Embroidery Systems
Make Lock Stitch Sequence
Note:
3-9
Normally you would create letter stitching by generating column stitches at this point. But
for our training purposes we need to outline the letter M with running stitches.
1. We will begin the outline from the last Mk1 of the initial lock stitch sequence which you entered
at the bottom right corner of the right leg of the letter M (see Figure 3-13).
2. To generate running stitches from the bottom right corner to the top right corner, put a Mk1 at
the top right corner (see Figure 3-14).
Mk1
Mk1
Mk1
Mk1
Mk1
Mk1
Mk1
Mk1
Mk1
Mk1
last Mk1
Figure 3-14
3. Now go left to the next corner and enter another Mk1 (see Figure 3-14). Notice that you don’t
see the stitching between the current entry and the last entry. You will always be one step
behind in viewing the digitizing.
4. In order, continue to go to each turning point in the letter M and enter a Mk1 at each
location until the letter M is completely outlined with running stitches.
5. Place the last Mk1 at the bottom right corner of the right leg.
6. After placing the last outlining Mk1 put another series of 3 or 4 lock stitches along the bottom
of the right leg of the letter M as you did in starting the M. Have the lock stitches run
horizontally along the bottom as not to be directly on the first set of lock stitches that
ran vertically from the corner (see Figure 3-15). The last Mk1 should end at or very near
the corner.
110282-01, Rev A
3. Tablet Digitizing
3 - 10
Stitch Types
last lock stitch
sequence
Figure 3-15
Movement Between Letters
Now move to the next letter to perform some automatic curve running stitches. We can get
between sections of digitized areas by one of two methods - Jump Stitch or Needle Up. (Keep in
mind that some machines for which you may be digitizing do not use jump stitches, therefore jump
stitches are rarely used.)
We will use the Needle Up method to move between the letters M and e.
1. At the movable menu enter a Mk1 in the [Needle Up] box.
2. Now go to the letter e in the example design and enter a Mk1 at the upper right corner of
the tail of the letter e (see Figure 3-16).
enter the initial Mk1 for the letter e and
generate lock stitches
Figure 3-16
Editing and Digitizing in EDS III
Melco Embroidery Systems
Make Lock Stitch Sequence
3 - 11
3. Next enter a Mk1 in the [Normal Stitch] box of the movable menu.
4. Return to the design and enter a Mk1 near the first Mk1 you entered in the letter e. This will
generate the first lock stitch at the entry point of the letter e.
5. Generate 3 or 4 more lock stitches in the letter e with Mk1 entries.
Curved Line Running Stitches
One method for producing curved lines is to generate the line with a series of short straight lines
with Mk1s. This method is time consuming and the result is usually somewhat uneven. If one
examines a curve closely, you will see that even the most uneven curve is usually made of several
portions of uniform curves strung together. Another method can be used that allows the computer
to create smooth and uniform curves by using the Mk3 button in conjunction with the Mk1 button.
In our exercise we will create a curved line using the first method. Then we will create curved lines
using the computerized (automatic) curving method.
Curved Line Using Only Mk1s
The needle position is now at the lock stitches in the upper right corner of the tail of the letter e.
1. Enter Mk1s along the inside edge of the tail of the letter e. Generate these Mk1s at intervals that
will allow the straight lines between them to stay closely aligned with the boundary of the wall
(see Figure 3-17).
Needle Up
at these 2
locations
Mk1s at all
indications
on the inside
walls
start
Figure 3-17
2. When you get to the crossbar put a Mk1 in the corner (see Figure 3-17).
3. Generate a Needle Up and go to the other side of the crossbar and generate another Mk1.
4. A Normal Stitch command must next be generated so the stitching will start again after skipping
over the crossbar in the needle up mode.
110282-01, Rev A
3. Tablet Digitizing
3 - 12
Stitch Types
5. Continue to put Mk1s on the inside edge of the letter e until you get back to the top left of the
crossbar.
6. Again generate the Needle Up, Mk1, Normal Stitch sequence and finish with a Mk1 at the lower
right corner of the crossbar. (This last Mk1 is also used for the beginning of the next method
for digitizing curves.)
Curved Line Using Mk1s And Mk3s
Note:
Again, you would normally create letter stitching by generating column stitches. However
for training purposes, we’re going to outline the letter e with curved running stitches.
To create the outside wall outline of the letter e we will now use the computerized method of
creating arcs. To generate curved lines of running stitches by this method we must comply with the
following rules:
Rules For Curves
#1
Start with a Mk1.
#2
ALWAYS Use Mk3s in pairs.
#3
Enter the first Mk3 at the peak (mid-point) of the arc. The second Mk3 goes at the end of
the arc.
#4
Create at least one pair of Mk3s per 180 degrees of rotation. Each Mk3 must not be more
than 90 degrees from the next mark point.
#5
When creating two or more arcs in succession, no Mk1 is necessary
between the Mk3 pairs.
Plot The Location Of The Mark Points
Generating curved outlines using the Mk3s is only practical when the curve is a uniform arc with no
deviations.
We now want to decide where to locate the pairs of Mk3s to create a uniform line outlining this
portion of the letter e. We can see that the letter is not exactly a perfect circle, but is slightly oval.
Therefore, let’s break it into arc segments that seem to have the same curvature characteristics (see
Figure 3-18).
To demonstrate the look of the Bean Stitch, let’s change to the Bean Stitch stitching mode for
outlining the outside wall of the letter e.
At the movable menu enter a Mk1 in the [Bean Stitch] box. This box is part of the Special Stitch
section located about in the middle of the menu.
Editing and Digitizing in EDS III
Melco Embroidery Systems
Make Lock Stitch Sequence
3 - 13
second arc segment
first arc
segment
third arc
segment
fourth arc segment
Figure 3-18
Digitize The Outline
Rule one states to always begin with a Mk1. The beginning Mk1 has already been put at the lower
right corner of the crossbar of the letter e (see step 6 in the previous section and Figure 3-19).
Mk3
second Mk3
Mk3
first Mk3
Mk3
Crossbar
Mk1
Mk3
Mk3
Mk3
Figure 3-19
We have the Mk1 at the beginning of the outside curve of the letter e so now we now want to
enter the first pair of Mk3s to create an outline in the first arc segment we plotted in a previous
step (see Figure 3-18).
1. Enter a Mk3 in the middle of the first arc segment and another Mk3 at the location between the
first and second arc segments (see Figure 3-19).
2. Now enter a Mk3 at the mid-point of the second arc segment and another Mk3 at the location
between the second and third arc segments.
110282-01, Rev A
3. Tablet Digitizing
3 - 14
Stitch Types
3. Continue to generate the Mk3 pairs for the third and fourth arc segments.
4. Put a Mk1 in the upper right corner of the tail of the letter e.
5. At the movable menu enter a Mk1 in the [Normal Stitch] box and generate a series of lock
stitches. Now you are ready to move to the letter l to perform column stitches.
Column Stitches (Satin Stitches)
You have completely outlined the letters M and e and have used the 2 methods for generating
running stitches. We will now go to the second stitch type, Column stitches, also referred to as
Satin stitches.
Column stitches are stitches generated back and forth between two outside lines that are parallel
(or nearly parallel) to each other.
Straight Columns
The simplest representation of a shape that would lend itself to column stitching is the letter l in
Melco in our current practice design. This shape is a straight column.
Basic Rules For Column Stitches
Here are some rules to follow when digitizing a column stitch:
#1
Always start with a Mk1 to identify the beginning of one side of the column.
#2
Always enter a Mk2 at the beginning of the other side of the column.
#3
When defining the end of the column, always enter a Mk2 at the end of the first side you
identified.
#4
Enter a Mk2 at the end of the other (or second) side of the column. This Mk2 will end the
column stitching sequence.
Column Stitch Density
Like the stitch length is set for running stitches, "column density" is set for column stitches. The
column density number represents the number of embroidery points between each stitch. Typical
density settings based on column width are:
Column Width
Density Setting
.5 inch (12.7mm)
4.7
1 inch (25.4mm)
4.2
1.5 inch (3.81cm)
3.8
Editing and Digitizing in EDS III
Melco Embroidery Systems
Column Stitches (Satin Stitches)
3 - 15
If you refer to the previous table for our example of column stitching the letter l, we would
generally set the stitch density to 4.7 points. This means that there is a distance of 4.7 points
between each stitch.
Since it is very difficult to see the definition of stitches this close, we will set the stitch density to 15
for this training session. Again, please understand that fifteen is not the normal density setting you
would use, but for illustration purposes we will use it here.
You establish the stitch density from the very beginning of the column by inserting a desired density
before generating column stitching. To set the column stitch density refer to the following steps:
1. Enter a Mk1 on the tablet digitizer movable menu box entitled [Column Density].
2. Now enter Mk1s on the movable menu number [1], number [5], and on the [Enter] box, in that
order.
You have just entered a column density of 15 points to be used in the column stitching. You
should notice an entry in the stitch list on the screen indicating this information.
Introduction To Underlay
In our previous digitizing exercises with running stitches we have only performed outline stitching.
Now we are going to "lay down" an underlay through the middle of the letter before we make the
column stitching.
Underlay is used with materials that will easily stretch or distort during the top stitching process.
Underlay is typically used under columns and fills. For information on automatic underlay, refer to
Chapter 5.
Let’s move to the letter l and generate underlay stitches.
When you finished the letter e you performed a lock stitch sequence. You now must move to the
entry point of the letter l.
1. From the information
previously learned,
perform a needle up, go
to the bottom portion
of the letter l, and then
put the needle back to
normal stitch (see Figure
3-20).
Mk1s making
underlay stitching
upward through the
middle of the letter
lock stitch
sequence
2. Now perform a simple
lock stitch sequence.
3. Next, lay down a running
stitch underlay in a
slight zig zag pattern up
110282-01, Rev A
Figure 3-20
3. Tablet Digitizing
3 - 16
Stitch Types
the length of the letter l by entering Mk1s before we begin our column stitching (see Figure
3-20).
Now generate column stitches in the letter l.
4. In this letter l, for simple straight column stitching, you define the beginning of the column with
a Mk1 on the left side of the column at the top (see Figure 3-21).
5. Next, enter a Mk2 at the beginning of the right side of the column at the top. (see Figure 3-21).
6. Now move to the bottom left of the letter to the end of the first line of the column and enter
another Mk2 (see Figure 3-21).
first Mk2
Mk1
second Mk2
third Mk2
Figure 3-21
7. The last step in generating the column is to go to the end of the second line of the column (at
bottom right of the letter) and enter a
third Mk2 (see Figure 3-21).
After the last Mk2 entry, the column
stitching will be generated and should
look similar to the illustration in Figure
3-22.
8. Refer to the following statement then
generate a lock stitch sequence to end
the letter l column digitizing.
Column Stitching
Any time we generate lock stitches in
columns, we want the stitches to lie in
the same direction as the column
Figure 3-22
stitches. Therefore, generate your lock
stitches from left to right in the letter
l. This will help keep the lock stitches from showing through the column stitching.
Editing and Digitizing in EDS III
Melco Embroidery Systems
Column Stitches (Satin Stitches)
3 - 17
Column Stitches On An Arc
We have just generated a simple straight column of stitches. Our next task will be to generate a
column around an arc.
General Rules
As with other digitizing, simple rules apply with column stitching on an arc:
#1
All the rules of straight column stitching still apply.
#2
Additionally, like with running stitches on an arc, you can define no more than 180
degrees per arc. This means you must not place Mk3s (arc-determining mark points)
farther than 90 degrees of arc from other mark points.
#3
A recommendation for digitizing columns on an arc is to digitize from inside to outside.
(For example, enter a Mk1 at the beginning of the arc at the inside line, then a Mk2 at
the beginning of the arc at the outside line; and continue this inside/outside relationship
throughout the column digitizing process.
#4
When digitizing 2 or more consecutive columns on an arc, do not redefine the beginning
of the second (and additional) columns with a Mk1 - Mk2. The last Mk2 - Mk2
sequence of the prior column defines the start of the next column.
There are two common methods for digitizing column stitches on an arc. The first method will be
demonstrated in the letter c, and the other method with the letter o. There are additional
techniques used in creating column stitches for irregularly shaped objects. You will find a discussion
of these techniques following the demonstration of the second common method for digitizing
columns on an arc.
Method One
Specific Rule For Method One
This is a specific rule for Method one, which makes it different from Method two. When defining a
column on an arc, using method one, enter a Mk3
in the middle of the column, mid-way around the arc being defined.
Plot The Letter c
The curvature of the letter c is more than 180 degrees, therefore we must break the digitizing into
2 separate arcs. Also, notice that the letter is not exactly circular, but is slightly oval (see Figure
3-23).
Make the upper half one arc; and the lower half a second arc. To plot the letter c for the first
method of digitizing a column on an arc, refer to Figure 3-23 and with a pencil, mark the
indications like the illustration.
110282-01, Rev A
3. Tablet Digitizing
3 - 18
Stitch Types
upper arc
segment
x
x
lower arc
segment
enter the letter
here and generate
lock stitch
sequence
Figure 3-23
You are now ready to make column stitches in an arc.
1. Ensure the lock stitches were generated at the end of the letter l; and then the perform the
needle up, Mk1, normal stitch, Mk1 sequence to get to the bottom right area of the letter c
(see Figure 3-23).
2. Generate the column lock stitches, this time up and down so they will be in line with the
direction of the column stitches that will be sewn.
3. Perform a running stitch underlay with Mk1s to get to the upper right portion of the letter c (see
Figure 3-24).
generate running
stitch underlay
sequence to the top
of the letter
Figure 3-24
Digitize The Column On An Arc
1. Go to the start of the inside line of the top of the letter c and enter the Mk1 to start (see Figure
3-25).
2. Now enter the first Mk2 at the start of the outside line of the top of the letter (see Figure 3-25).
Editing and Digitizing in EDS III
Melco Embroidery Systems
Column Stitches (Satin Stitches)
enter the letter
here and generate
lock stitch
sequence
3 - 19
first Mk2
first Mk3
Mk1 to start
third Mk2
second Mk2
fourth Mk2
second Mk3
final Mk2
Figure 3-25
3. We have previously plotted the letter into two arc segments since the circumference of the letter
c is more than 180 degrees rotation. For uniformity, we made the segments equal, divided at
the mid-point of the letter. Therefore, we will want to enter the first Mk3 (for the first column
on an arc) in the middle of the column and half way around to the middle of the letter (see
Figure 3-25). Notice that the Mk3 is defined by the specific rule for method one.
4. Enter the second Mk2 to define the end of the inside line of the column at the midpoint of the
letter (see Figure 3-25).
5. Enter the third Mk2 to define the end of the outside line of the column at the midpoint of the
letter (see Figure 3-25).
As rule #5 of the basic rules for columns indicates, the start of the second column is already
defined by the previous Mk2, Mk2 sequence.
6. Enter the second Mk3 in the middle of the column, mid-way around the bottom portion of the
letter c, in the middle of the letter (see Figure
3-25). Again notice that the Mk3 is defined by the
specific rule for method one.
7. Define the end of the inside wall of the second
column by entering the fourth Mk2 at the end of
the letter on the inside.
8. Finish the column definition with the final Mk2 at
the end of the outside line of the arc (see Figure
3-25).
9. Generate the standard lock stitch sequence at the
bottom right end of the letter c.
On the EDS III monitor you should now see the letter c
sewn in column stitches as shown in the Figure 3-26.
110282-01, Rev A
Figure 3-26
3. Tablet Digitizing
3 - 20
Stitch Types
Method Two (Paired Mk3s)
You are now ready to make column stitches in an arc using the second method (using "paired
Mk3s"). This method allows you to digitize non-symmetrically curved column segments that would
not be defined properly using the first method. All the rules used with the first method apply to the
second method with one exception:
Specific Rule For Method Two
When defining a column on an arc, you start with the Mk1, Mk2 sequence and end with the Mk2,
Mk2 sequence. Using the second method, you enter 2 Mk3s in the middle of the arc. The first
Mk3 is entered in the middle of the first line of the column, mid-way around the arc you want
to define. The second Mk3 is entered in the middle of the second line of the column, mid-way
around the arc you are defining.
The second method will be used on the letter o as soon as we position our digitizing location at a
start point in the letter o.
Plot The Letter O
As with the first method, since the
circumference of the letter o is more than 180
degrees rotation, we will generate the letter in
more than one arc segments. Typically we
would divide it into 2, 180 degree segments,
or 4, 90 degree segments, for uniformity. In
this example we will make a vertical line and a
horizontal line intersecting through the center
of the letter dividing it into four 90 degree
segments (see Figure 3-27).
Let’s now move to the letter o and digitize a
lock stitch sequence and an underlay.
1. Perform the needle up, Mk1, normal stitch,
Mk1 sequence to move to the bottom
middle area of the letter o (see Figure 3-28).
Figure 3-27
2. Generate lock stitches in the letter o in a vertical direction as shown in Figure 3-28.
3. Using all Mk1s, generate a simple running stitch underlay through the middle and completely
around the letter (see Figure 3-28). Finish with a Mk1 near where you put the lock stitch.
We are now ready to digitize the letter o in column stitches using the paired Mk3s method.
Editing and Digitizing in EDS III
Melco Embroidery Systems
Column Stitches (Satin Stitches)
3 - 21
generate a running
stitch underlay with
Mk1s entirely around
the middle of the letter
enter the letter here and
generate lock stitch
sequence
Figure 3-28
Digitize The Letter O
1. At the bottom middle of the inside circle of the letter o enter the first Mk1 (see Figure 3-29).
2. Now enter the first Mk2 directly below, at the bottom middle of the outside circle of the letter
(see Figure 3-29).
3. Enter your first Mk3 (for defining the curvature of the inside line of the left arc) directly on the
line of the inside circle exactly half way around to the top of the letter (see Figure 3-29).
4. Enter the second Mk3 (for defining the curvature of the outside line of the left arc) directly on
the line of the outside circle exactly half way around to the top of the letter (see Figure 3-29).
5. Enter the second Mk2 to define the end of the inside of the column directly at top of the inside
circle of the letter (see Figure 3-29).
6. Enter the third Mk2 to define the end of the outside of the column directly at the top of the
outside circle of the letter (see Figure 3-29).
third Mk2
digitizing the
left side of
the letter o
second
Mk2
second
Mk3
first
Mk3
first
Mk1
first Mk2
Figure 3-29
110282-01, Rev A
3. Tablet Digitizing
3 - 22
Stitch Types
Again, when digitizing 2 or more consecutive columns on an arc, you do not redefine the
beginning of the second (and other additional) columns with a Mk1, Mk2. The last Mk2, Mk2
sequence of the prior column defines the start of the current column (see Figure 3-30).
prior Mk2
digitizing the
right side of the
letter o
prior
Mk2
first
Mk3
second
Mk3
first
Mk2
last Mk2
Figure 3-30
7. The start of the right side column of the letter is already defined, therefore, enter the first Mk3
for this column directly on the inside circle, half way around to the bottom of the letter (see
Figure 3-30).
8. Enter the second Mk3 on the line of the outside circle and half way around to the bottom of the
letter (see Figure 3-30).
9. Enter the first Mk2 for the end of this column at the bottom middle of the inside circle to define
the end of the inside of the right half column (see Figure 3-30). This is the same location where
you started the column digitizing with a Mk1.
10. Enter the last Mk2, to define the end of the outside of the column, at the bottom of the outside
circle of the letter (see Figure 3-30). This is the
same location where you entered the first Mk2,
starting the column stitch digitizing.
11. Generate the standard lock stitch sequence in the
bottom middle of the letter o.
On the EDS III monitor you should now see the letter
o sewn in column stitches as shown in Figure 3-31.
The next section will discuss column stitching
techniques used with various irregularly shaped
objects. Before going to that discussion, let’s end this
digitizing session.
Editing and Digitizing in EDS III
Figure 3-31
Melco Embroidery Systems
Other Column Stitching Techniques
3 - 23
End The Digitizing Session
1. Enter a Mk1 in the [Needle Up] box of the movable menu.
2. Enter a Mk1 at the center point of the design (see Design Center on page 3-6 and in Figure
3-10).
3. Enter a Mk1 in the [Return to Origin] box of the movable menu.
4. At the Layout window menu bar, click on Edit, then click on Digitize in the drop down menu.
5. In the Digitizer dialog box, click on End, then click Yes to the question "Are You sure?" in the
End Digitizing Session dialog box that appears.
Save The Design
1. Determine a filename for this digitized design. Let’s call it digmelco if you don’t have a better
name.
2. Click on File in the Layout window menu bar, then click on Save As in the drop down menu.
3. In the Directory text box, type the name you have decided to call this design.
4. Click on File Type and click on Directory until you get the pathname directory and file type
information you want. For this digitizing session let’s make the pathname C:\EDS3\DESIGNS
and the filename extension .OFM.
5. Click OK and the example digitizing will be saved as an object file in the DESIGNS sub-directory.
Other Column Stitching Techniques
The following are tips and examples of various techniques for digitizing curved column segments
that are difficult (if not impossible) to digitize using the two common methods previously discussed.
Curve Smoothing
Digitizing the shapes shown below as column stitches is difficult at best. Using Mk4s to define the
sides of a column allows these shapes to be digitized easily and accurately with column stitches.
General Rules
#1
Always begin entering the Mk4s on the side of the column where you entered the Mk1 to
begin the column.
#2
You may enter up to 48 Mk4s per side when defining the sides of a column with multiple
Mk4s.
110282-01, Rev A
3. Tablet Digitizing
3 - 24
Stitch Types
Our first sample of curve smoothing is shown in Figure 3-32. To produce column stitching similar to
the illustration at the right, refer to the plot on the left in that figure.
1. Enter a Mk1 at point A and a Mk2 a point B to initiate the column.
2. Enter a Mk4 at C and a Mk2 at D.
3. On the other side enter a Mk4 at E then a Mk2 at point F to complete the column.
The column should look like the illustration at the right in Figure 3-32, with smooth curved sides.
Figure 3-32
Another sample of curve smoothing is shown in Figure 3-33. Suppose you wanted to digitize
column stitches in the shaded area of the shape shown at the left in Figure 3-33.
1. Plot the shape by dividing it into four similar sections as shown in the second from left illustration
in Figure 3-33.
2. Begin the column stitch digitizing with a Mk1 at A and a Mk2 at B. This is like you always start a
column.
3. Enter a Mk4 at the center point of the line from A to C, which is indicated with the number 1.
4. Enter a Mk2 at C and the final Mk2 at D to complete the column stitch digitizing for that section.
Figure 3-33
Editing and Digitizing in EDS III
Melco Embroidery Systems
Other Column Stitching Techniques
3 - 25
5. Since the last two Mk2s have defined the beginning of the lower section of the shape, the next
entry would be a Mk4 at point 2.
6. Now continue this process until all four sections are digitized. You should get a result similar to
the illustration at the right in Figure 3-33.
Curve Smoothing With Multiple Mk4s
Another type of curve smoothing column digitizing is to define a side or sides using multiple Mk4s.
The sample in Figure 3-34 illustrates this technique.
1. Refer to the Figure 3-34 and enter a Mk1 at point A and a Mk2 a point B to initiate the column.
2. Enter a series of Mk4s to define the side from point A to C.
3. Enter a Mk2 at point C to complete the definition of the first side.
4. Again, enter a series of Mk4s from point B to point D to define the shape of the second side of
the column.
5. At point D enter a Mk2 to complete the column definition.
The result of the above digitizing should yield a design similar to the one on the left in Figure 3-34.
Mk4s
Figure 3-34
Closely Paired Mk3s
This technique allows you to digitize curved column segments that are not feasible to digitize using
the standard paired Mk3 method. The technique simply calls for breaking the column into smaller
segments.
In the sample in Figure 3-35, we have plotted the segments as shown, and have identified each
Mark point with a letter.
110282-01, Rev A
3. Tablet Digitizing
3 - 26
Stitch Types
Figure 3-35
The way you break up the column segments before you digitize determines the direction the
stitches will lie. The first stitch of each segment will align with the line defining the beginning of
that segment; and the last stitch will align with the line defining its end. Therefore, you can better
control the lie of the stitches around a curved column by using this technique.
1. To digitize this shape, enter a Mk1 at point A and a Mk2 at point B to identify the start of the
column.
2. Continue to identify the remaining segments by entering Mk3s in alphabetical order at the
plotted points C through R. Remember to digitize each segment line in the same direction
(from inside to outside in this sample).
3. Complete the column with a Mk2 at point S and a Mk2 at point T. You will see the result of
closely paired Mk3s as shown in the sewout to the right in the illustration.
In the sample of the fat O in Figure 3-36, you can also use the closely paired Mk3s technique to
make column stitching.
Figure 3-36
1. After plotting the segments as shown, begin the column with a Mk1 at point A and a Mk2 at
point B.
2. Enter the Mk3 pairs, from inside to outside, around the O starting at line C-D, then line E-F, and
so on at each of the plotted segment lines. Your last Mk3 pair will be at line y-z.
3. End the column digitizing with the Mk2s at points A and B.
Editing and Digitizing in EDS III
Melco Embroidery Systems
Other Column Stitching Techniques
3 - 27
When using the closely paired Mk3 technique, such as on the letter S in Figure 3-37, you may need
to make the Mk3 pairs closer yet than you might originally think. Notice that the plotting of the
end segments of the letter S are too wide, with the end result being too straight as shown.
end segments
(too wide)
end
segments
too straight
Figure 3-37
If you make each of the end segments into two, you will achieve a much nicer formation at the
ends as shown in Figure 3-38.
end segments
(split into 2)
end segments
more round
Figure 3-38
110282-01, Rev A
3. Tablet Digitizing
3 - 28
Stitch Types
Closely Paired Mk2s
There are situations in digitizing columns where your best alternative is to just digitize using Mk2s,
but very closely paired. Refer to the palm tree in Figure 3-39 and notice that in certain areas, using
the other methods we have discussed will not work as well as maybe 3 or 4 columns using Mk2s.
Notice the two curved segments that make the turn located in circle A in Figure 3-39. These two
segments may be digitized by using "method one" as described earlier, by putting a Mk3 in the
middle of the curved column (The dots inside the sections indicate where a Mk3 may be placed).
In circle B, the two curved segments that make the turn are not symmetrical enough to allow the
method one technique. In this situation, it is recommended to make normal straight-line column
digitizing (Mk2s at each of the corners), but in smaller segments. (See the outset labeled C in Figure
3-39.)
A
C
B
Figure 3-39
Editing and Digitizing in EDS III
Melco Embroidery Systems
Other Column Stitching Techniques
3 - 29
Singleline Column Stitching Method
Another method for producing columns is to identify the column by entering mark points on a
single side or down the center of the column. This only works when you wish to maintain an equal
width throughout the column.
Singleline Input
For generating a straight column or straight angled column, the inputs are Mk1 points. To generate
a spline curve column, the inputs are a Mk1 and several Mk4s (at least 3 Mk4s for every 90 degree
arc). A circular column is generated with a Mk1 and an even number of Mk3s (an odd number of
Mk3s will cause the last Mk3 to be eliminated).
1. When you wish to generate a column by the Singleline method, select the [On] location to the
left of the [Singleline] box in the movable menu with a Mk1 and select [Enter] to start a
Singleline session.
2. Once you start a Singleline session, you must select the type of Singleline you wish to perform by
selecting one of the three boxes [Left], [Center], or [Right] in the Singleline section of the
movable menu to select the reference line you want.
3. Select [Enter] and then perform one of the next two steps, whichever one you desire.
4. The column width input establishes a constant width for the column.
a. You may elect the specific embroidery point size for the width by selecting the [Column Width]
box in the movable menu with a Mk1. Next enter the desired point value by selecting the
appropriate number boxes on the movable menu. Select [Enter] finish the command.
b. You may also select the column width by entering a Mk1 at one side of the column on the
artwork and then another Mk1 at the other side of the column, then begin the column
digitizing.
5. You must select the Singleline [Off] box in the movable menu then select [Enter] to finish a
Singleline session.
Refer to Figures 3-40 through 3-45 for illustrations of the various Singleline methods of column
digitizing.
110282-01, Rev A
3. Tablet Digitizing
3 - 30
Stitch Types
2nd
Mk1
2nd
Mk1
1st
Mk1
1st Mk1
2nd
Mk1
1st
Mk1
centerline
Fig. 3-40 Left Line
Fig. 3-41 Center Line
3rd
Mk1
2nd
Mk4
Fig. 3-42 Right Line
3rd
Mk4
last
Mk4
2nd
Mk1
1st Mk4
1st Mk1
1st Mk1
Fig. 3-43 Straight Angled Column
Fig. 3-44 Spline Curved Column
1st Mk3
2nd
Mk3
1st Mk1
Figure 3-45 Circular Column
Editing and Digitizing in EDS III
Melco Embroidery Systems
Fill Stitches
3 - 31
Fill Stitches
The Fill Stitch is used to generate a solid background for a design or to provide a solid-colored
design, or part of design. A fill "pattern" is made of many "rows" of running stitches going back
and forth over a designated area. The process of making fill stitches is the most comprehensive of
the three stitches. There are many more parameters that can be controlled, as well as more steps in
the process.
Fill Stitch Characteristics
As indicated, there are many factors that may be manipulated to form various "looks" in fill
stitching. (Refer to the Figure 3-46.)
Partition Lines:
0 4 3
2 1
0
Stitch Length
Stitch Density
Partition Line Set
(includes a row of
each partition line
This example
includes 5 rows
numbered 0
through 4)
Line of Stitching
Partition Line
Angle (here
equals 45
degrees
Figure 3-46
Stitch Density
Stitch density when applied to fills is very similar to the definition when describing column stitch
density. The fill stitch density is how many embroidery points there are between rows of stitches
(example: 4.2 points).
110282-01, Rev A
3. Tablet Digitizing
3 - 32
Stitch Types
Stitch Length
This is the same definition used in describing running stitches. Stitch length is the distance set for
maximum length between needle penetrations.
Partition Lines
Another parameter in creating fill stitching is called partition lines. The length of the stitches in a fill
can be divided into equal imaginary segments called "partitions." If imaginary lines are drawn
through the needle entry points dividing each partition, you will create a series of parallel lines.
These lines are called "partition lines." The number of partition lines are selectable from 2 to 8. The
example in Figure 3-46 is made of 5 partition lines.
Each row of stitching consists of needle penetrations made from one partition line. A partition line
"set" is when a row of stitching has been completed with each partition line. The number of rows
in a partition line set always equals the number of partition lines. In the case of the Figure 3-46
illustration the number of partition lines is 5, therefore 5 rows of stitching make up the partition
line set.
Partition Line Sequence
You may specify a variable (or scrambled) placement of the partition lines to each other from row
to row within a partition line set. This characteristic is called the "partition line sequence," and is
another of the fill parameters that is adjustable.
Angle
The "fill pattern" which we know so far is defined by the stitch length, density, number of partition
lines, and the partition line sequence, may be further modified by changing the "angle" of the
partition lines. The partition line angle is the angle made by the intersection of any given partition
line with the line of stitching in a fill pattern. The angle is measured in a counter-clockwise rotation
from the left end of the line of stitching (see Figure 3-46). The angle can be any number between 1
degree and 179 degrees.
A 90 degree angle will have each stitch point of a partition line always lining up directly under each
other, thus producing a line that is 90 degrees from the line of stitching, or directly perpendicular to
the line of stitching. (See the illustration of 2 partition lines at 90 degree angle in Figure 3-47).
A 45 degree angle will have each stitch point of a partition line lining up at an offset that will make
a 45 degrees angle when a line is drawn through each stitch point of the partition line (see Figure
3-48).
Likewise, a 30 degree angle will have each stitch point of a partition line lining up at an offset that
will make a 30 degree angle when a line is drawn through each stitch point of the partition line
(see Figure 3-49).
Editing and Digitizing in EDS III
Melco Embroidery Systems
Fill Stitches
3 - 33
Figure 3-47 Angle 90
Figure 3-48 Angle 45
Figure 3-49 Angle 30
110282-01, Rev A
3. Tablet Digitizing
3 - 34
Stitch Types
Also see the examples illustrating 60 degree and 120 degree angles in Figures 3-50 and 3-51.
Figure 3-50 Angle 60
Figure 3-51 Angle 120
Now let’s generate some fill stitches using our practice designs of a relatively fundamental uneven
shape; and then to the Saurer logo.
Fill Methods
There are two methods that can be incorporated in making fill stitches. There is no specific name
given to the first method, so for discussion purposes, we will label it the "simple" method. The
second method is called "complex" fills. During the discussion in this text we will refer to this
method as the complex method.
Simple Fills
General Rules
NOTE:
ALWAYS BEGIN YOUR FILL SESSION BY ENTERING A MK1 IN
THE [Fill] BOX OF THE MOVABLE MENU.
#1
Define the first line of stitches with a Mk1 at each end of line A-B, location A first, then B
(see illustrations in Figures 3-52 and 3-53). The first Mk1 (at location A) is the entry
point for the fill stitching.
#2
Define the last line of stitches with a Mk1 at each end of the line as shown in locations C
and D in the illustrations in Figures 3-52 and 3-53. (Line C-D may be defined in the
reverse direction, with location D to the left and C to the right.) The importance of the
direction of line C-D is that: The second Mk1 is the exit point for the fill stitching.
#3a
ALWAYS make the first and last line definitions parallel with each other.
#3b
The longer of the two lines determines the direction of the fill stitching, with the shorter
line always finishing parallel with the longer, regardless of the direction of the shorter
line.
Editing and Digitizing in EDS III
Melco Embroidery Systems
Fill Methods
3 - 35
#4
ALWAYS define the start of the first side with a Mk2 at location B in Figures 3-52 and 3-53.
#5
Use Mk1s in appropriate increments to define uneven sections of the first side, until you
get to line C-D.
#6
Continuing to refer to Figures 3-52 and 3j-53, define the end of the first side with a Mk2
at the end of line C-D closest to the first side.
#7
Define the start of the second side with a Mk2 at the end of line C-D closest to the second
side.
#8
Again use Mk1s in appropriate increments to define uneven sections of the second side,
until you get to point A of line A-B (see Figures 3-52 and 3-53).
#9
Enter a Mk3 at point A to complete the fill.
#10
ALWAYS digitize the smaller fills first when digitizing a design section that requires more
than one fill to complete the total fill. A good example of applying this rule is found
with the first fill digitized with the irregular shaped block, described on the pages
immediately following these rules.
A
B
Another
series of
Mk1s
Figure 3-52
110282-01, Rev A
Mk1
Mk1
Mk1
Mk1
Area to
be filled
C
B
A
Area to
be filled
D
Another
series of
Mk1s
D
C
Another
series of
Mk1s
Figure 3-53
3. Tablet Digitizing
3 - 36
Stitch Types
Prepare For Digitizing Fill Stitches
1. Remove the Melco artwork. Locate and attach the irregular shaped block artwork from the back
of the manual (see Figure 3-54).
2. Start a new digitizing session like you did at the beginning of this chapter including:
• setting the scale factor to .333.
• setting display mode to view stitches and condensed points.
• defining and entering a Mk1 at design center.
• setting horizontal.
• setting running stitches to 35 points.
Note:
Using a stitch length of 35 has been found to give good results.
3. If you repositioned the movable menu, you will have to perform the Menu Move portion of the
setup in the Digitizer dialog box. If you did not move the menu, no action is necessary in this
step.
4. Enter a Mk1 at the [Needle Up] box of the movable menu.
5. Position the tablet cursor in the area in the shape identified as location 1 in Figure 3-54 and
enter a Mk1.
2
3
5
1
7
8
4
6
Figure 3-54
6. Enter a Mk1 in the [Normal Stitch] box of the movable menu.
7. Generate the routine lock stitches, then to keep the material from puckering or migrating during
the fill stitching, put down a running stitch underlay by entering Mk1s at locations 2 through 8
as shown in Figure 3-54.
Editing and Digitizing in EDS III
Melco Embroidery Systems
Fill Methods
3 - 37
Plot The Artwork
As you did when digitizing columns on an arc, you now have to decide how and where to digitize
your fills by plotting the design artwork. Refer to the illustration below and the next few steps to
plot the design.
Since our rules indicate that digitizing is created between two parallel lines, we cannot digitize the
entire design with just one fill. For this design, we will need to create two independent fills - one
for the little triangular shape in the upper right, and the the other for the rest of the design.
1. Draw a line between points C1 and D1 as shown in Figure 3-55. This line must be parallel to the
top line of the design (A2 to B2 in the illustration).
B2
A2
C1
D1
B1
A1
A1
B1
Do not superimpose the two
Mks A1 and B1 on each
other. When the design is
sewn at 1/3 the artwork, it
will appear as a point.
C2
D2
Figure 3-55
This line now cuts the design into two shapes. One shape is the triangle created between the
points A1, B1, C1, and D1. The second shape is created between the points A2, B2, C2, D2,
C1, and D1.
2. At the first of the two fills (the triangle) label the first line "A1-B1" and last line "C1-D1" as
shown in Figure 3-55.
3. Around the second of the two fills, label the first line "A2-B2" and last line "C2-D2," also
shown in Figure 3-55.
110282-01, Rev A
3. Tablet Digitizing
3 - 38
Stitch Types
Your First Fill Digitizing
We first want to select a combination of fill parameters (density, stitch length, number of partition
lines, partition line sequence, and the partition line angle). You can select a pre-determined set of
parameters that are stored in the EDS III program. There are sixteen of these pre-defined fill
patterns. Fourteen of these patterns (Fills 2 through 8 and 12 through 18) are true fill patterns. The
other two patterns (Fills 1 and 11) are identical Blatt stitch patterns which will generate parallel
satin stitching when used.
A table containing all the specific parameter settings for each fill is located in Chapter 5 (the
Reference section) of this manual.
NOTE:
Rule number references in the following steps are for the General Rules for Simple Fills found
a few pages earlier in this section.
1. At the movable menu, enter a Mk1 in the [Fills] box.
2. Enter a Mk1 in the number [4] box (or any other one or two number boxes) to identify the
available fill number you wish to select.
3. Next enter a Mk1 in the [Enter] box. You have now selected Fill 4 to be used with this fill session.
4. Refer to rules #1, #3a, and #10; and enter a Mk1 at A1 in the illustration in Figure 3-56. This will
identify the ’A’ end of the first line of the first fill.
C1
D1
A1
B1
Figure 3-56
5. Enter another Mk1 at B1 (near, but not on A1) to identify the ’B’ end of the first line of the fill.
NOTE:
To avoid any undesirable effects, points A1 and B1 should not be superimposed on each
other. The line A1 - B1 is so short that when the design is sewn back at 1/3 of the
artwork, it will appear as a point.
Editing and Digitizing in EDS III
Melco Embroidery Systems
Fill Methods
3 - 39
6. Enter a Mk1 at location C1 and another Mk1 at D1 to identify the last line of the fill (see rule
#2). This is the longest of the two lines and as rule #3b states, the direction of fill stitching will
run the same as this line.
7. Refer to rule #4 and enter a Mk2 at point B1 as shown in the illustration Figure 3-56. This will
identify the start of the first side of the fill.
8. Next, as rules #6 and #7 indicate, enter Mk2s at C1; and then D1.
9. To complete your first fill digitizing using EDS III, enter a Mk3 (see rule #9) at point A1 in the
illustration.
Now, as shown in Figure 3-57, the monitor should display the triangular section you just digitized in
a fill pattern that enters at point A1 (see rule #1) and exits at point D1 (see rule #2). If you want the
fill stitching to exit at the left of the triangle, you may interchange points C1 and D1 when you
digitize (see rule #2).
Second Fill Of First Design
Let’s continue to digitize this first design with the second fill. We know the first fill exits at location
D1 (see rule #2).
1. Repeat the steps required to initialize a fill:
a)
At the movable menu, enter a Mk1 in the [Fills] box.
b)
Enter a Mk1 in the number [4] box, or depending on the first fill, the same number(s) of the
fill you selected for the first fill.
c)
Enter a Mk1 in the [Enter] box.
B2
A2
C1
D1
C2
D2
Figure 3-57
110282-01, Rev A
3. Tablet Digitizing
3 - 40
Stitch Types
2. Enter a Mk1 at A2 in the illustration in Figure 3-57 and another Mk1 at B2 to define the first line
of the fill.
3. Enter a Mk1 at location C2 and another Mk1 at D2 to identify the last line of the fill.
• Notice that the two lines (A2-B2 and C2-D2) are parallel to each other.
• Also, notice that line A2-B2 is the longer of the two lines, so it will determine the
direction of the stitches in the fill.
4. Now enter a Mk2 a point B2 in the illustration in Figure 3-57 to identify the start of the first side
of the second fill. Review rule #4 if you have a question on this step.
5. Enter a Mk2 at C2 to complete the first side; and then another Mk2 at D2 to identify the start of
the second side.
6. Notice that this side is not straight in getting back to A2 at the first line. As indicated by rule #8,
you must enter Mk1s at points C1 and then D1 to define the irregularity of the side before
finishing it and completing the fill.
7. After the last Mk1 (at D1) entered to define the irregularity of the side, enter a Mk3 at point A2
to complete the second fill of this design.
Now the monitor should display the entire shape (both the triangle and the second fill) in the fill
stitching pattern that enters at point A1 (see rule #1) and exits at point D2 (see rule #2).
Notice that the stitching in the second fill is running the same direction as the stitching in the
previous triangular fill. This is because the lines determining the stitching direction for each fill (line
C1, D1 for the first; and line A2, B2 for the second) are parallel to each other (see rule #3b).
8. End this digitizing session by going into the Edit menu and clicking on the Digitize menu item,
then clicking End in the dialog box. Click Yes to the question in the dialog box.
9. To save the digitizing session click File, then Save As.
10. Click on the file type until it is .ofm.
11. Click on the directory until the pathname is c:\eds3\designs
12. Type the filename digshape and click OK.
Editing and Digitizing in EDS III
Melco Embroidery Systems
More Advanced Fill Digitizing
3 - 41
More Advanced Fill Digitizing
We are going to advance to a little more complex shape for our second digitizing exercise. The
examples used in describing the rules (digitizing a square) are the simplest digitizing shapes. The
irregular shape we digitized for our first example was a good challenge for the first time digitizer.
Now try digitizing the Saurer logo.
Refer to the general rules for simple fills found earlier in this section if you need information in
understanding why we are entering Mark points where we do in any of the following steps.
1. Remove the irregular block artwork and attach the solid Saurer Logo artwork shown in the
illustration below. As with the other examples, find a copy of this artwork example at the end
of the manual.
2. Again, perform the routine steps to bring up the Digitize dialog box for setting the scale factor
to .333 and starting the digitizing session. You will also want to set the display mode to view
stitches and condensed points.
3. Define design center on the artwork and enter a Mk1 at the design center.
4. Set Horizontal; and then set running stitches to 35 points.
5. Enter a Mk1 at the [Needle Up] box of the movable menu.
6. Position the tablet cursor in the area in the shape identified as location 1 in Figure 3-58 and
enter a Mk1.
3
2
1
4
Figure 3-58
7. Enter a Mk1 in the [Normal Stitch] box of the movable menu.
8. Generate the routine lock stitches, then put down a running stitch underlay by entering Mk1s at
locations 2 through 4 as shown in the previous illustration.
110282-01, Rev A
3. Tablet Digitizing
3 - 42
Stitch Types
Digitize The First Fill
After generating the simple underlay in the design, perform the following required functions to
initialize the first fill:
1. At the movable menu, enter a Mk1 in the [Fills] box.
2. Enter a Mk1 in the number box or boxes to identify the fill number you wish to select.
3. Enter a Mk1 in the [Enter] box.
4. Next, go to the lower left area of the top section of the logo and enter a Mk1 at point A as
shown in Figure 3-59. This first Mk1 (identifying the beginning of the first line of stitches in the
fill) will be slightly offset from the exact mid-point of the arc in that shape.
C
D
A
B
Figure 3-59
5. Next enter a second Mk1 (at point B) in the same area, slightly offset from the the first Mk1, but
this time to the other side of the mid-point of the arc. This identifies the end of the first line of
stitches.
6. Now enter Mk1s at points C and D to identify the last line of stitches.
Refer to Figure 3-60 to define the sides of the fill. As the general rule #4 states: "Always define the
first side beginning with point B."
7. Enter a Mk2 at point B to start the definition of the first side of the fill.
8. To define the curvature of the arc from point B to the area where the line straightens, enter
Mk1s repeatedly around the arc to the straight area (see 1b through 4b in the illustration).
9. Next enter a Mk2 at point D to define the end of the first side.
Editing and Digitizing in EDS III
Melco Embroidery Systems
More Advanced Fill Digitizing
3 - 43
C
1c
D
2c
3c
4c
A
4b
B
1b
2b
3b
Figure 3-60
10. Enter a Mk2 at point C to define the beginning of the last side of the fill.
11. And as in defining the curvature in the first side, enter Mk1 at points 1c through 4c to define
the curvature of the last side.
12. At point A, enter a Mk3 to complete the fill stitch digitizing process. You now should have a fill
pattern inside the top section of the Saurer logo.
Regenerate the display on the monitor and notice the fill stitching is running in the direction of line
C-D of this section. Line C-D is the longest of the two lines that set up the fill.
Digitize The Second Fill
1. Near point D in the first fill, generate a lock stitch pattern, then perform the "needle up" /
"normal stitch" functions to go to point 1 in the middle section of the logo as shown in
Figure 3-61.
2. Put in a lock stitch pattern and then generate underlay stitches with Mk1s at points 2, 3, 4, and
5 in the illustration.
Start this fill at the left point of the shape (point A in the illustration).
3. Enter a Mk1 in the [Fills] box of the movable menu, then enter Mk1s in the appropriate number
box or boxes, and finally in the [Enter] box.
4 Now move to the point shown as point A in the illustration and enter a Mk1.
110282-01, Rev A
3. Tablet Digitizing
3 - 44
Stitch Types
C
2
D
1
A
B
3
5
4
Figure 3-61
To get the stitching in the second fill to run the same direction as the stitching in the first fill, the
longest line in the second fill must be parallel to line C-D of the first fill. The line running from point
A to point B in this middle fill just happens to be parallel to line C-D of the first section.
5. Move to point B in the illustration and enter another Mk1. You have just defined the first line of
the middle fill.
6. Enter Mk1s at C and D in the illustration to define the last line of the fill. Notice that this line is
the shorter of the two so line A-B will determine the direction of stitching.
7. Go to point B as with the first section of the logo and enter a Mk2 to define the beginning of
the first side (see Figure 3-62).
3c
2c
1c
C
5c
4c
D
6c
7b
A
6b
5b
B
1b
2b
3b
4b
Figure 3-62
Editing and Digitizing in EDS III
Melco Embroidery Systems
More Advanced Fill Digitizing
3 - 45
8. Define the curvature of the shape with Mk1s where needed (see 1b through 7b) until you get to
point 7b.
9. Enter a Mk2 at point D to complete the definition of the first side.
10. Enter a Mk2 at point C, Mk1s at points 1c through 6c, and the final Mk3 back at point A to
define the last side and complete the fill process for the middle section of the logo.
11. Regenerate the display on the monitor again. Notice the fill stitching is running in the direction
of line A-B of this section; and that the stitching direction of these first two fills are running the
same.
12. Generate lock stitches near point D, move to point 1 as shown in Figure 3-63 with the "needle
up" / "normal stitch" sequence, and generate another set of lock stitches to get ready for the
last section of the Saurer logo fill stitching.
A
1
B
5
2
4
C
3
D
Figure 3-63
110282-01, Rev A
3. Tablet Digitizing
3 - 46
Stitch Types
Fill Digitizing The Last Section
1. Remember to enter Mk1s in the [Fills] box, the number appropriate box or boxes, and then the
[Enter] box to initiate the fill mode.
2. Now, without any further instructions, use the knowledge you have acquired and follow the
illustrations associated with the third section (as shown in Figure 3-64) to complete the fill
stitching of the Saurer logo. If you have problems, refer to the previous sections for help.
4c
3c
A
B
2c
1b
1c
2b
3b
4b
5b
C
D
Figure 3-64
3. When you have completed the fill stitching with a Mk3 at point A, perform a lock stitch at D.
You should now have completed the fill stitching on the Saurer logo and it should look similar to
the illustration in Figure 3-65.
Figure 3-65
Editing and Digitizing in EDS III
Melco Embroidery Systems
Complex Fills
3 - 47
Complete The Simple Fill Digitizing Session
1. Enter a Mk1 in the [Needle Up] box on the movable menu.
2. Enter a Mk1 at the design origin (center point of the artwork).
3. Enter a Mk1 in the [Return To Origin] box on the movable menu.
4. At the computer, click with the mouse on Edit in the Layout Window menu bar.
5. Click on Digitize in the drop down menu.
6. Click on End, and then on Yes when the dialog box comes onto the screen asking if you wish to
end the session.
Save The Design
1. Click on File in the Layout Window menu bar.
2. Click on Save As in the drop down menu.
3. Click on the file type until it is .ofm.
4. Click on the directory until the pathname is c:\eds3\designs
5. Type the filename you want and click OK.
Complex Fills
The second method for digitizing fills within the digitizing option of EDS III, is called "Complex"
fills. Actually, the complex fill is the simpler of the two methods because the computer is used more
in automating the process.
General Rules
Following are some generalized statements describing the process of generating fill stitches using
the complex fill method.
• Digitizing in complex fill mode is initiated by entering a Mk1 in the [Complex Fill] box on
the movable menu.
• Once a complex fill is initiated, a series of instructions appears on the status line of the
EDS III Layout Window to guide you through the required inputs.
• Mk1s for straight lines and Mk4s for smooth curves are the only Mks used in developing
the complex fill outlines.
• When defining an outline, DO NOT overlap the first and last Mks. They will automatically
connect to complete the outline.
110282-01, Rev A
3. Tablet Digitizing
3 - 48
Stitch Types
Digitizing A Complex Fill
For our example in digitizing using the
complex fill method, remove the artwork
that is currently on the tablet and attach
the Saurer logo outline artwork (shown in
Figure 3-66). This artwork is found at the
back of the manual. We are going to
outline the outer shape of the design to
define the outside boundaries of the
digitizing. Then we will outline the three
sections of the Saurer logo as areas that we
do not wish to digitize in this exercise.
Figure 3-66
When this digitizing session is completed,
we will have a design which has digitizing around the 3 Saurer logo sections, but no digitizing in
the logo sections at all.
Preliminary Steps
Review the process at the beginning of this chapter for getting started digitizing in EDS III. After
entering the Mk1s at the center of the design and setting horizontal, refer to the following steps
and illustrations to learn how to digitize your first complex fill.
1. Enter a Mk1 in the [Needle Up] box in the movable menu.
2. Move the tablet cursor to the upper middle area of the design and enter a Mk1 in that location
(see item 1 in Figure 3-67).
3. Enter a Mk1 in the [Normal Stitch] box and enter another Mk1 near the first Mk1.
4. Initiate the complex fill process by entering a Mk1 in the [Complex Fill] box on the movable
menu.
At this time you will you will see a message at the status line on the EDS III monitor prompting you
to select a Fill Number. Fill Numbers come from the same list of fills in the Setup dialog box that is
used with simple fills.
5. To select a fill number, enter a Mk1 in the number box for the desired fill number. Enter a Mk1
in the number [4] box to select fill number four. (You do not have to select number 4, you may
select any available fill you desire.)
6. Enter a Mk1 in the [Enter] box.
At the status line on the EDS III monitor, you will next see a message prompting you for a CF
Underlay Number. You can select a fill underlay in the same way that you just selected the fill. To do
so, enter a Mk1 in the number box for the desired underlay number and then enter a Mk1 in the
[Enter] box. The Fill Underlay Number also comes from Setup dialog box used with simple fills.
Editing and Digitizing in EDS III
Melco Embroidery Systems
Digitizing A Complex Fill
3 - 49
7. Enter a Mk1 in the number [0] box for no underlay in this exercise.
8. Enter a Mk1 in the [Enter] box.
First Outline
Start CF Outline 1
After completing the previous steps, you are now prompted at the status line for the start of the
first complex fill outline.
1. Enter a Mk1 in the very top of the design shown as item A in Figure 3-67.
2. Enter another Mk1 at approximately point B in the illustration.
A
1
4d
B
3d
1b
2b
2d
3b
1d
4b
D
FIRST OUTLINE
C
Figure 3-67
110282-01, Rev A
3. Tablet Digitizing
3 - 50
Stitch Types
3. Now digitize around the curve of the design on the right edge with Mk4s at the approximate
locations 1b through 4b as shown.
4. Enter another Mk1 at point C on the very bottom corner of the design as shown in the
illustration.
5. Enter another Mk1 at point D with Mk4s around the curve of the left edge of the design in the
approximate locations shown as 1d through 4d.
You do not need to enter any more Mark points to finish the outline. When the first outline is
completed in the next step, the last Mark point entered (4d) will automatically be connected to the
first Mark point (A).
6. To conclude this initial outline of the design, enter a Mk1 in the [Enter] box of the movable
menu on the digitizing tablet.
When the Mk1 is entered in the [Enter] box, a message will appear on the status line of the
computer monitor prompting you to Start CF Outline 2. At this time, you may either start a second
outline (which we will do) or begin the completion steps for the complex fill. (We will discuss the
completion steps after the fourth outline has been created.)
Second Outline
1. Enter a Mk1 at point E in as illustrated in Figure 3-68. This is the upper corner point of the top
section of the Saurer logo.
2. Next, enter Mk1s at point F; and then point G.
3. Now enter Mk4s around the entire bottom left arc of this section (points 1g through 6g) to
provide the curvature of this arc.
Note:
You can put in more Mk4s than we have in this sample if you wish. Basically, (up to a
practical limit) the more Mk4s you enter, the smoother will be the formation of the arc.
As with the first outline, you do not need to enter any more Mark points to finish this second
outline. When the outline is terminated in the next step, the last Mark point entered (6g) will
automatically be connected to the first Mark point (E) of the second outline.
4. To complete this second outline of the design, enter a Mk1 in the [Enter] box of the movable
menu on the digitizing tablet.
When the Mk1 is entered in the [Enter] box, another message will appear on the status line of the
computer monitor, this time prompting you to start the third complex fill outline.
Editing and Digitizing in EDS III
Melco Embroidery Systems
Digitizing A Complex Fill
3 - 51
E
F
SECOND
OUTLINE
6g
5g
4g
3g
G
2g 1g
Figure 3-68
Third And Fourth Outlines
Now that you have generated the initial and second outlines, you are ready to complete the last
two outlines of the design - CF Outline 3 and CF Outline 4.
1. At this time, continue to follow the points shown in Figure 3-69 in their alpha-numeric order.
Enter the Mk1 from H through to the last Mk4 at location 4p near the top point of the lower
section of the logo. Enter Mk1s at the capital letter points defining lines, and Mk4s at the
numbers associated with lower class letters defining arcs. Remember to enter a Mk1 in the
[Enter] box at the end of the third outline (after the Mk1 at point K).
2. After entering the Mk4 at 4p, go to the next section in this manual to begin the steps to
complete the complex fill session.
110282-01, Rev A
3. Tablet Digitizing
3 - 52
Stitch Types
2i
L
3i
4p
M
3p
4i
1i
I
5i
6i
THIRD
OUTLINE
2p
7i
2m
1p
P
3m
4h
4m
3h
2h
3j
1m
2j
1j
5m
J
FOURTH
OUTLINE
H
1h
O
K
N
Figure 3-69
Complex Fill Completion Steps
1. As with the end of the other outlines, when you enter a Mk1 in the [Enter] box, the status line
message prompts you to start another outline (in this case, outline 5). We are not going to
generate any more outlines, so to indicate the end of the complex fill outlines, simply enter a
second Mk1 in the [Enter] box.
2. You will again get a message in the status line, this time prompting you to Select CF Entry point.
Enter a Mk1 at the point you want to start sewing within the complex fill area. If the Mk1 is
entered outside the complex fill area it will automatically be moved to the edge of the complex
fill.
Editing and Digitizing in EDS III
Melco Embroidery Systems
Complete The Complex Fill Digitizing Session
3 - 53
3. The next prompt is for you to Select CF Exit point for the complex fill. Enter a Mk1 at the
location you want the complex fill to finish. Any point on the outside boundary is a valid exit
point. If the exit point is entered inside or outside the fill area it will be moved to the outside
edge.
4. After the exit point is set, you will be prompted to Select CF Direction for the complex fill
stitching. To complete this function, enter 2 Mk1s along a true or imaginary line to define the
direction (or line) of stitching in the complex fill.
After the second Mk1 is entered, the stitches for the complex fill will be generated. Depending on
the complexity and size of the design, this will take a few moments to process. After processing,
the design will then be sewn onto the EDS III monitor screen.
Complete The Complex Fill Digitizing Session
Completing and saving a design with a complex fill is the same as we have already learned with
simple fills. Refer below for refresher steps in this area:
1. Enter a Mk1 in the [Needle Up] box on the movable menu.
2. Enter a Mk1 at the design origin (the x or + on the artwork).
3. Enter a Mk1 in the [Return To Origin] box on the movable menu.
4. At the computer, click with the mouse on Edit in the Layout Window menu bar.
5. Click on Digitize in the drop down menu.
6. Click on End, and then on Yes when the dialog box comes onto the screen asking if you wish to
end the session.
Save Design
1. Click on File in the Layout Window menu bar.
2. Click on Save As in the drop down menu.
3. Type in the information for the directory, design name, and file type. (example:
C:\EDS3\CMPLXFIL.OFM)
4. Click OK.
110282-01, Rev A
3. Tablet Digitizing
3 - 54
Stitch Types
This page intentionally left blank
Editing and Digitizing in EDS III
Melco Embroidery Systems
Stitch Parameters
4-1
4. Chenille Digitizing
The basic process of chenille stitching is to produce a design that is "filled" with loop stitches of
yarn. Typical designs digitized in chenille are the athletic "letters" sewn on jackets.
If you know how to digitize for embroidery, the transition to digitizing for chenille will be a simple
matter for you. Among the differences from ordinary embroidery is the distance between the
stitches. The stitches are placed at a lesser density that still gives a full-bodied, textured surface with
no visible background within the fill. When you digitize these designs you must be aware of this
and other differences in requirements. This chapter relates to digitizing in EDS III for the Melco CH 1
Chenille machine.
Stitch Types
There are two types of stitches that are generated for the chenille machine. They are:
1)
the MOSS stitch (also called a LOOP stitch).
2)
the CHAIN stitch.
The moss stitch provides the raised "chenille" stitching, while the chain stitch is used for outlining
and bordering the design (see Figure 4-1).
illustration looking similar to a
Chenille Moss Stitch
illustration looking similar to a
Chenille Chain Stitch
Figure 4-1
You may change from one type of stitch to the other as you digitize by selecting the stitch you
want on the tablet digitizer movable menu, or by entering into the chenille function of the Insert
Condensed Function dialog box if on-screen digitizing.
During the digitizing function, most often the order of stitches from outside to inside in a border is:
Chain, Chain, Moss. Some people however, prefer the order to be Chain, Moss, Moss. After the
border, the digitizing is done with moss stitches for the inner body of the design.
Stitch Parameters
The following stitch parameters work best for digitizing designs for the chenille machine:
Stitch Length, Normal Stitch
The yarn is a determining factor as to the exact densities and lengths you set as you digitize.
Ultimately, you and your customer will be the judge as to the aesthetic quality of your work.
110282-01, Rev A
4. Chenille Digitizing
4-2
Stitch Types
Don’t be afraid to practice. Remember, you can delete your density and length datasets and insert
new values if you need to change something.
• Use a stitch length from 18 to 22 points for both chain and moss stitches.
Fills
For large areas use fills, for small areas use coils.
Rules For Fills
• Set fill stitch length to 22 points.
• Set fill density from 35 to 38 points.
• The partition line angle is, for the most part, irrelevant.
• Lay down fill lines diagonally, not perfectly horizontal or vertical.
• Generate a fill twice, each perpendicular to the other.
Do not generate any underlay when making chenille fills.
Coil Stitch
The coil stitch provides another way to fill an area with moss stitches. The coil stitch is generated in
the pattern shown in Figure 4-2.
Figure 4-2
Regardless of how you create these stitches, i.e. Special Stitch, or for that matter, whether you
digitize the coils stitch-for-stitch, you must ensure that the machine is stitching in a
COUNTERCLOCKWISE direction at all times.
Editing and Digitizing in EDS III
Melco Embroidery Systems
Stitch Parameters
4-3
The reason for this is that if you were to sew in a clockwise direction you add more twist to the
thread in the same direction that it was originally twisted (see Figure 4-3). This added twist causes
the thread to become much tighter and distorts the moss stitch loops.
counter-clockwise loop
clockwise loop
Figure 4-3
Sample of digitized COIL
special stitch
Rules For Coils
• For large areas use fills, for small areas use coils.
Mk1
Mk1
• Never make a perfect circle with the coil, make an
ellipse.
first Mk1
• Make the coil special stitch the size that is required to
fill the inner body area (see Figure 4-4).
Mk1
Mk3
Mk1
Mk1
Mk1
width of
area to fill
with coils
• Make rotation of the coil special stitch
counter-clockwise.
• Never lay coils over each other. For example, in a capital
T, stitch coils from the upper left to the middle, walk
stitch out to the upper right
extreme, then come back to the
start
middle again with the coil
here
stitching and finish stitching coils
down the middle of the body (see
Figure 4-5).
stop
here
Figure 4-4
walk to
here
come back
to here
Needle Height
The Needle Height function provides a
finish down to
here
means of controlling the height of the loop
formed by the CH 1 when it is sewing a
moss stitch; and the width (fatness) of the
chain stitch. During the digitizing of a
Figure 4-5
chenille design, you click on the Needle
Height box in the movable menu to
generate a "change needle height" command in your design data. The actual height of the needle
is determined later at the keyboard of the CH 1 machine.
110282-01, Rev A
4. Chenille Digitizing
4-4
Digitizing Session
Digitizing Session
Artwork
Good digitizing begins with good artwork, and Melco’s punchers have found that artwork that is 3
to 6 times larger than the finished product is best to work with. The overall process is easier if the
artwork is exactly 3 times, 4 times, 5 times, or 6 times larger. If at all possible, you should try to
avoid using scale factors like 3.624, or 4.18, or 5.8375. In other words, make your artwork a whole
number multiple of the finished size.
Artwork for chenille digitizing is relatively simple. For the most part it consists of several parallel
lines. (See the plotting of a simple box shown in Figures 4-6 and 4-7.)
Spacing between the parallel lines is designated per the following table:
Artwork Ratio
Distance between lines
Inches
Millimeters
2:1
1/8"
3.2mm
3:1
3/16"
4.8mm
4:1
1/4"
6.4mm
5:1
5/16"
8.0mm
6:1
3/8"
9.6mm
Session Setup
Following are the initial setup conditions you must select in order to digitize for the chenille
machine.
1. Attach the artwork the same as with embroidery digitizing.
2. Initiate the beginning of the design the same as embroidery digitizing.
3. Set the Stitch Length to 22 points.
4. Set maximum stitch length to 50 points.
Important Notes
• Always do borders first.
• Remember to set the scale whenever you change design sizes.
• If possible, finish digitizing close to the 270 degree location (center of left edge) in a
design. The yarn will then slip off the needle hook more easily when you return to
center. Therefore, you do not drag yarn and possibly pull stitches out of the material.
Editing and Digitizing in EDS III
Melco Embroidery Systems
Digitize
4-5
Digitize
As an example, consider a simple box as shown in Figure
4-6. The customer wants this box digitized for chenille
stitching at a height and width of 2 inches. We’ve decided
to make the artwork 8 inches square (4:1 scale).
A
B
C
D
According to the table on the previous page, lines A, B, C,
and D should be 1/4" (6.4mm) apart. This will put the
moss stitches 1/16" (1.6mm) apart on the finished design.
8"
Lines A and B will be chain stitches, and will be digitized
first.
1. Begin by selecting the "Chain Stitch" command from
the movable menu.
Figure 4-6
2. Digitize lines A and B with Mk1s.
NOTE:
Do not start with a "needle height" command. (The beginning chain stitch will automatically
pick up the first needle height setting when the design begins sewing.)
Lines C and D will be moss stitches, and will be digitized second.
3. Generate a "needle height" command.
4. Select the Moss Stitch command.
5. Digitize lines C and D with Mk1s.
6. Generate another "needle height" command (for the following fills).
7. Enter a Mk1 in the [Fills] box and put in the information
for the fill type you desire.
Y
W
8. Digitize the two fills shown in Figure 4-7 with one
diagonally from W to X, and another diagonal fill from Y
to Z.
NOTE:
When digitizing the two crisscrossing fills as
shown in Figure 4-7, enter the Mark points for
the fill beyond the inner line (D) midway between
lines C and D.
C
D
Z
X
Figure 4-7
110282-01, Rev A
4. Chenille Digitizing
4-6
Digitizing Session
9. Start the first diagonal fill at W in the illustration in
corner W of
Fig. 4-7
Figure 4-7. Make the first line by entering a Mk1 at the
lower left end of the plot line running diagonally on the
corner shown as location (a) in the enlargement of the W
corner in Figure 4-8.
10. Finish the first line at W in the Figure 4-7 by entering a
Mk1 at the upper right end of the plot line running
diagonally on the corner shown as (b) in the enlargement
of the W corner in Figure 4-8.
second Mk1
(b)
first (a)
Mk1
11. Continue to digitize the first set of fill parameters by
identifying the second line at X in Figure 4-7 in the same
manner as in steps 8 and 9.
Figure 4-8
12. Finish the first fill the same way you would finish an embroidery fill (fill information is found in
Chapter 4).
13. Now identify the second fill starting at corner Y in Figure 4-7. Identify it in the same fashion as
you did the first fill.
We used two different needle heights for the moss stitches. In conjunction with the chain stitches,
we have a design that builds up in height from the edges to the middle. If we were to look at a
cross section of the box, it would look similar to the diagram in Figure 4-9.
Fill moss stitches
Lines C and D moss stitches
Lines A and B chain stitches
Figure 4-9
The drawing in Figure 4-10 is an example of 1:1 artwork for a 4" basketball.
The ball color chain stitch is done all the way around the ball and around each fill area. Then walk
around the moss stitch and fill for each fill area. Movement from one fill area to the next is
accomplished with a chain stitch. After a color change, the outline and detail chain stitch is done
twice on each line (in other words, a chain stitch on top of a chain stitch).
Editing and Digitizing in EDS III
Melco Embroidery Systems
Digitize
4-7
Two walks around with
moss stitch for each fill
area. Ball color.
Moss Stitch fills
in open areas.
Ball color.
One walk-around
with chain stitch.
Ball color.
Chain Stitch
detail and
outline.
Different color.
Figure 4-10
110282-01, Rev A
4. Chenille Digitizing
4-8
Digitizing Session
This page intentionally left blank
Editing and Digitizing in EDS III
Melco Embroidery Systems
Chenille Functions
5-1
5. Digitizing Reference
This chapter includes technical discussions of the various
functions associated with digitizing with EDS III. We will discuss
the functions found on the movable menu, the Setup Menu in
the Digitizing function of EDS III, and other terms used in the
digitizing process.
Movable Menu Functions
With EDS III software version number 2.10, the movable menu is
modified to incorporate the Auto Retrace function. Additionally,
the column stitching method previously termed Centerline has
been renamed to Singleline. Any previous versions of movable
menus will no longer be compatible.
The information in this section is technical reference information
describing the various sections of the movable menu shown in
Figure 5-1. The discussions also apply to the associated tools in
the Object Edit toolbar for On-Screen digitizing.
Chenille Functions
The three upper left boxes of the movable
menu apply only to digitizing for chenille
embroidery.
[Chain Stitch]
Enter a Mk1 in this box to set a command
in the digitizing to change from the moss
stitch function to the chain stitch function.
Figure 5-2
[Moss Stitch]
Enter a Mk1 in this box to set a command in the digitizing to
change from chain stitch to moss stitch.
[Needle Height]
Enter a Mk1 in this box when a new needle height is desired
during the digitizing for chenille embroidery. The command will
cause the chenille machine to automatically change the needle
height to a preset sequence determined by the operator at the
chenille machine or, as determined by the chenille machine
operator, it will stop the machine to allow the operator to
manually change needle height.
110282-01, Rev A
Figure 5-1
5. Digitizing Reference
5-2
Movable Menu Functions
Speed Functions
The Speed Normal/Slow and Speed High/Fast functions are used to control
speeds in machines that use formats that allow this feature. Examples of
machines that use these formats are: Marco, Plauen, Saurer, Zangs, and older
Barudan machines.
Enter a Mk1 in the box that applies when digitizing in a format that uses
these commands.
Figure 5-3
Boring Functions
The two Bore related boxes apply primarily to a feature of the Plauen and
Saurer formats. Unless you you are digitizing in formats that use this feature
these boxes are not used.
As with all the movable menu boxes, enter a Mk1 in the box that applies
when digitizing in a format that uses these commands.
Figure 5-4
Sequins
This feature provides the change-over code to activate or deactivate the sequin mechanism on
machines which have the sequin capability.
To properly execute the sequin function, digitize your design to the point
where you wish to begin sewing sequins, then enter a Mk1 in the [Sequin]
box on the movable menu. This will turn the sequin feature ON. Resume
digitizing for the sequins. When you reach the point where you wish to turn
the sequin mechanism off, enter a Mk1 again in the [Sequin] box on the
movable menu. This will turn the sequin feature OFF.
Figure 5-5
Short Stitches (On/Off)
These two boxes work together to control the feature that allows the software to automatically
generate a modified stitch sequence at locations where normal stitching is overcrowded.
When digitizing columns, particularly letters or numbers, stitches will build up
on the inside of a sharp arc or sharp turn in the design. This build-up often
causes thread breaks because stitches begin to fall on top of each other at
the same location. Even if thread breaks don’t occur, the look of the stitching
may not be pleasing. Using the short stitch feature prevents this build-up. See
the illustrations in Figures 5-7 and 5-8.
Figure 5-6
Editing and Digitizing in EDS III
Melco Embroidery Systems
Set Max. Stitch Length
5-3
[Short Stitches On]
When short stitches are activated by entering a Mk1 in the [Short Stitches On] box on the movable
menu, the computer is told to control these areas with short stitches where normal stitches would
stack up on each other. When the short stitches feature is on, short stitches are generated only
when necessary. The computer decides when the short stitches will be generated based on the
relative lengths of the sides of a column segment, their length as a percentage of the actual
distance across the column, and how many will be generated between any two normal length
stitches (see Figure 5-7).
[Short Stitches Off]
To turn the short stitches feature off enter a Mk1 in the [Short Stitches Off] box on the movable
menu (see Figure 5-8).
Note:
Unless you want no short stitches at all, leave the feature turned on, since short stitches
will only be generated when the computer identifies an area in need of them.
Short
Stitches
OFF
Short
Stitches
ON
Figure 5-7
Figure 5-8
Set Max. Stitch Length
The [Set Max. Stitch Length] box on the movable menu, in conjunction with the numeral boxes and
the [Enter] box, sets the maximum length of any stitches that are generated
during the digitizing process.
You may set the number no smaller than 5, and no larger than 127. Any
whole number in-between may be set by entering a Mk1 in the [Set Max.
Stitch Length] box, then Mk1s in the appropriate numeral box and a Mk1 in
the [Enter] box. The default value is 127 points.
110282-01, Rev A
Figure 5-9
5. Digitizing Reference
5-4
Movable Menu Functions
Stitch Length
The [Stitch Length] box on the movable menu is used to set the running stitch stitch length during
the digitizing process.
1. Enter a Mk1 on the [Stitch Length] box of the movable menu.
2. Enter a Mk1 on the number boxes that represent the desired stitch length.
3. Enter a Mk1 on the [Enter] box.
Stitch length is fully described in Chapter 3.
Set Horizontal
This function is used at the beginning of your digitizing session, immediately
after you enter the Mk1 to establish the design origin and start the digitizing
process.
1. To initiate the set horizontal function, enter a Mk1 in the [Set Horizontal]
box of the movable menu.
2. Enter a Mk1 at the left end of a straight horizontal line in the artwork and
another Mk1 at the right end of the line (see Figure 5-11).
This establishes the horizontal orientation of your digitized design, no
matter how offset the artwork may be on the tablet.
Figure 5-10
B
Design
Artwork
Tablet
Digitizer
Horizontal
Line on
Artwork
Movable
Menu
A
Figure 5-11
Editing and Digitizing in EDS III
Melco Embroidery Systems
Fix X-Y Origin
5-5
3. After the set horizontal function is completed, when you digitize your design the horizontal
orientation of the design will align with the "A-B" line you indicated (see Figure 5-12).
Digitized design as
seen on the monitor
screen
Figure 5-12
Fix X-Y Origin
This function allows you to digitize a design
which has artwork larger than the active area
of your tablet digitizer. You are able to
digitize up to a point, then move your
artwork and resume digitizing with no break
in your design.
Limits of digitizing
area
Artwork
Designated
point "X"
Horizontal line on
artwork used for
original "Set
Horizontal"
Note: For this feature to work properly you
must perform the Set Horizontal function at
the beginning of the digitizing session.
Refer to Figure 5-13 during the following
steps.
1. Assume that column A in the top
illustration has been digitized and we
now want to digitize column B from left
to right.
Limits of digitizing
area
Artwork
Point "X"
2. Enter the Mk1, Mk2 combination to begin
column B at the left side. Notice that we
can’t enter the Mk2, Mk2 combination to
complete column B without going out of
the active area of the tablet digitizer.
Horizontal line for
"Set Horizontal"
3. Enter a Mk1 in the [Fix X-Y Origin] box of
the movable menu.
4. Enter a Mk1 at point X on the artwork as
shown in the illustration.
110282-01, Rev A
Figure 5-13
5. Digitizing Reference
5-6
Movable Menu Functions
5. Move and secure the artwork so the end of column B is now in the active area of the tablet
digitizer.
Note:
The artwork does not have to be oriented the same on the tablet after the move as it was
when it was first applied. The next steps reset the horizontal to maintain the orientation
when you continue the digitizing process.
6. Enter a Mk1 at point X again.
The computer will now select the Set Horizontal function automatically.
DO NOT select the Set Horizontal function yourself!
7. Enter a Mk1 at the left end of the horizontal line you used to set horizontal initially; then another
Mk1 at the right end of the horizontal line, to set horizontal again.
8. Now enter the Mk2, Mk2 combination to complete the column digitizing process started before
the artwork was moved.
Return To Origin
This function is normally used at the end of the digitizing process to return the needle to the design
origin. It is most helpful to you and your customers to start and end a design at the exact center of
the design. See Design Origin
in Figure 5-14.
For example, assume you just
completed digitizing the
numeral seven as shown in
Figure 5-14, and the needle
is positioned at the lower
right corner of the vertical
leg (see finishing point in the
illustration). You are ready to
end the design. The objective
is to get the needle back to
the design origin without
sewing stitches over the
finished design.
Design Origin
Finishing point
Figure 5-14
To allow the computer to get you back to the exact origin:
1. Enter a Mk1 in the [Needle Up] box of the movable menu.
2. Enter a Mk1 in the [Return To Origin] box of the movable menu.
Editing and Digitizing in EDS III
Melco Embroidery Systems
Color Change
5-7
Clear Function
If you have selected a function that you did not want to perform at the current time, the clear
function command may be used to remove the function. Before you enter any further commands
simply enter a Mk1 in the [Clear Function] box of the movable menu. This cancels the function you
selected.
Needle Up
Use the Needle Up function to stop the sewing machine operation in order to move from one
needle point to another without sewing. This function is used at the very beginning of a design to
move from the origin to the point where you wish to start digitizing the design. It is also used at
the very end of a design to move from where you stopped the digitizing to the position where you
want the needle to be when the design is finished.
1. After you have entered the Mk1 at the point of origin of a design, enter a Mk1 in the [Needle
Up] box of the movable menu.
2. Move the tablet cursor to the point where you want to start digitizing and enter another Mk1.
3. Now, to cause the machine to begin sewing again, enter a Mk1 in the [Normal Stitch] box of the
movable menu and enter another Mk1 very near the same location where you entered the Mk1
in the previous step (see Normal Stitch).
Normal Stitch
This function is used any time you finish digitizing with a special stitch, bean
stitch, jump stitch, or needle up functions and wish to return to normal
stitching. Enter a Mk1 in the [Normal Stitch] box of the movable menu to
activate this function.
Jump Stitch
Use a Jump Stitch when you want to move the needle a distance that is
longer than your stitch length setting, and you don’t want stitches sewn
along the way. The Jump Stitch is different from Needle Up in that the sewing
Figure 5-15
machine will continue to rotate as if it were stitching, but the needle is kept
from penetrating the garment by the automatic operation of the jump stitch solenoid.
Color Change
This function allows you to enter a Color Change command at any point in a design where you
wish to change colors. Do no confuse this function with any color change feature of the
embroidery equipment you may be familiar with. The digitized Color Change command causes the
embroidery equipment to initiate this command to perform a color change.
110282-01, Rev A
5. Digitizing Reference
5-8
Movable Menu Functions
Trim
This function allows you to activate thread trimmers on machines which are equipped with
trimmers. To operate this feature between two letters follow this simply procedure:
1 Generate the lock stitches on the first letter.
2. Enter a Mk1 in the [Trim] box of the movable menu.
3. Move the tablet cursor to the area in the next letter where you want the
digitizing to begin and enter a Mk1.
4. Then continue digitizing as normal.
NOTE:
The trim function automatically enters a Needle Up, Mk1, and
Normal Stitch sequence.
Figure 5-16
Complex Fills
By entering a Mk1 in the [Complex Fills] box of the movable menu, you
initiate the complex fill function. This function is fully described in Chapter 3.
Refer to that section for details on complex fills.
Figure 5-17
Auto Retrace
This feature allows the user to double outline a design when digitizing a running stitch. When Auto
Retrace is turned ON the feature allows for the storage of the run stitch data from that point in the
design until it is turned OFF. Then the feature will cause a
duplicate re-sewing of the running stitches that were stored.
This feature is functional with either Tablet or On-Screen
digitizing. The movable menu associated with tablet digitizing
has the Auto Retrace ON and OFF box located at the top of
the menu just above Column Fills ON and OFF.
Figure 5-18
The Auto Retrace for On-Screen digitizing is comprised of 2 tools located in the Object Edit window
toolbar.
Auto Retrace ON is set immediately before point A (where the user wishes to start the double
outline), and Auto Retrace OFF is set immediately after point B (where the user wishes to end the
double outline).
NOTE:
Auto Retrace only is applicable when digitizing a standard running stitch.
Auto Retrace will not work if there is an Auto Retrace On without an Auto Retrace OFF, or if there
is an Auto Retrace OFF without an Auto Retrace ON.
Editing and Digitizing in EDS III
Melco Embroidery Systems
Column Fills
5-9
Column Fills
This feature allows you to convert column stitches into fill
stitches. When turned on, you may digitize portions of
the design as columns or column segments, and have
them sewn as fills. This is a great advantage when you
have to digitize wide columns.
The proper method for using the Column Fill feature is to
Figure 5-19
turn it on, enter a stitch length for the fill, and designate
the partition line sequence. Once this is done, any column stitching you digitize will be converted to
the designated fill stitching. This will continue until you turn the Column Fill function off.
Column Fills ON / OFF
Enter a Mk1 in the Column Fills [ON] box of the movable menu; then in the [Enter] box to start a
column fill. Enter a Mk1 in the Column Fills [OFF] box; then in the [Enter] box to end a column fill
session.
Stitch Length
To set the maximum stitch length for the column fill stitching:
1. Enter a Mk1 in the Column Fills [Stitch Length] box of the movable menu.
2. Enter Mk1s in the number boxes that indicate the stitch length you want.
3. Enter a Mk1 in the [Enter] box.
Partition Line Seq. (Sequence)
This box allows you to control two fill parameter functions: Number of Partition Lines, and Partition
Line Sequence. (The number of fill partition lines is determined by the number of digits you put into
the sequence.)
To set the partition line number and sequence for the column fill stitching:
1. Enter a Mk1 in the Column Fills [Partition Line Seq.] box of the movable menu.
2. Enter Mk1s in the number boxes that indicate the partition line sequence and the number of
partition lines you desire. The largest number in the sequence, and/or the number of digits in
the sequence will determine the number of partition lines. For example, if you want 5 partition
lines, then enter a sequence that includes 5 digits and no number larger than a 4. (The numbers
available for a 5 partition line fill are 0, 1, 2, 3, and 4.) As long as you do not put in a number
higher than a 4, you can enter the numbers in any order, ignoring some and repeating others,
and stopping with a total of 5 digits. If you were to enter 6 digits, but still not enter a number
higher than 4, the computer would assume you want 6 partition lines and that you don’t want
partition line #5 in the sequence.
110282-01, Rev A
5. Digitizing Reference
5 - 10
Movable Menu Functions
3. Enter a Mk1 in the [Enter] box to complete the partition line entry.
When you reach a point in your digitizing where you wish to return to normal column digitizing,
enter a Mk1 in the Column Fills [OFF] box of the movable menu; then a Mk1 in the [Enter] box.
Underlay Functions
With Underlay turned on, automatic "underlay" stitching will be generated under all column
stitching that you digitize. This will continue each time you digitize a column until you turn off the
feature. Within this feature, you may select 3 different types of underlay (Narrow Column, Center
Walk, and Edge Walk), and control 3 parameters (Stitch Length, Column Density, and % Width)
associated with the underlay. Refer to the examples in Figure 5-21 for illustrations of the underlays.
Underlay ON / OFF
Enter a Mk1 in either the Underlay [ON] or [OFF] box of
the movable menu, then a Mk1 in the [Enter] box to
obtain the desired function.
Narrow Column
To initiate this underlay stitch type, enter a Mk1 in the
[Narrow Column] box on the movable menu, then enter
a Mk1 in the [Enter] box.
Column to be
digitized
Narrow
Column
Figure 5-20
Edge Walk
Enter a density and
a width
Enter a stitch
length and a
width
Center
Walk
Enter a stitch
length
WIDTH is a percentage (40% to 95%) of the width of the column you are digitizing.
DENSITY may range from 2.6 points (many stitches) to 84.7 points (few stitches).
LENGTH may range from 5 points (very short) to 127 points (very long).
Figure 5-21
Editing and Digitizing in EDS III
Melco Embroidery Systems
Symbol Digitizing
5 - 11
Center Walk
This underlay stitch type is initiated by entering a Mk1 in the [Center Walk] box on the movable
menu then entering a Mk1 in the [Enter] box.
Edge Walk
To initiate this underlay stitch type, enter a Mk1 in the [Edge Walk] box on the movable menu, then
enter a Mk1 in the [Enter] box.
Stitch Length
You can control the stitch length for the underlay "walk" stitch types from a minimum of 5 points
to a maximum of 127 points. To do this enter a Mk1 in the [Stitch Length] box of the movable
menu, enter a Mk1 in the numeral boxes associated with the length you desire, and to complete
the selection enter a Mk1 in the [Enter] box.
Column Density
Narrow Column underlay stitch density may be controlled from between 2.6 points to 84.7 points.
To select the density enter a Mk1 in the [Column Density] box of the movable menu, enter a Mk1 in
the numeral boxes associated with the density you desire, and enter a Mk1 in the [Enter] box to
complete the selection.
% Width
This feature controls the percentage of the width of the column that the underlay stitches will
occupy. The % Width will be applied to Narrow Column or Edge Walk.
Symbol Digitizing
This function allows you to store, while digitizing, a part
of a design that is repeated often throughout the design.
For example, a flower may consist of several identical
petals which you wish to repeat. You will be able to
digitize the petal once and store it as a "symbol". Then
each time you want to digitize that petal in the design,
you can recall the "symbol" and place it in the design at
the location you desire. You may create 2 digitized
symbols (A and B) per design.
Figure 5-22
110282-01, Rev A
5. Digitizing Reference
5 - 12
Movable Menu Functions
Initiate Store Symbol Function
At any point during the digitizing session, you may initiate the Store Symbol function. To initiate the
Store Symbol function, enter a Mk1 in the [Store Symbol A] (to store as symbol A) or [Store Symbol
B] (to store as symbol B) boxes on the movable menu. At this time, as far as the software is
concerned, you have temporarily left the current design
digitizing function and are digitizing another design (the
symbol). Your very next digitizing entries must be a Mk1,
followed by a Mk4. This Mk1, Mk4 combination will establish a
digitized size and orientation for your symbol. The Mk1, Mk4
sequence also establishes the vertical reference for use with the
mirror feature of the recall symbol function discussed later in
this section.
Here’s how the Mk1, Mk4 combination works:
1. Refer to the illustration of the flower in Figure 5-23 and
choose the top petal as the model for the symbol.
2. Place a Mk1 in ’Store Symbol A’ on the movable menu.
3. Enter a Mk1 at the base (the point) of the petal. Refer to the
illustration of the single petal in Figure 5-24. This Mk1 is the
starting point for the digitizing and sets the first point of
reference for the digitized size and orientation for the
stored symbol.
Figure 5-23
4. Next enter a Mk4 in the middle of the curved end (at the
top) of the petal. This Mk4 is the ending point, which
establishes the digitized size and an the orientation for the
stored symbol.
Digitize The Symbol
The next step is to digitize the symbol.
The digitizing process for a symbol is the same as for any other
digitizing. Keep in mind that when symbols are inserted into
Figure 5-24
the design, it will be after you have moved from a point where
you entered a Needle Up or Jump Stitch. Thus, you will need to enter a Normal Stitch command so
the symbol will sew. After the Mk1, Mk4 combination establishing size and orientation, enter a
normal stitch command. After the Normal Stitch command, begin digitizing the symbol as you
would any other design. Remember that the Mk1 entered immediately after initializing the store
symbol function is where the digitizing starts.
When you have finished digitizing the symbol enter a Needle Up command to prepare to move to
the next location without the need for the needle up command each time you finish inserting a
symbol.
Editing and Digitizing in EDS III
Melco Embroidery Systems
Symbol Digitizing
5 - 13
Storing Finish Symbol
When the symbol is completely digitized, the final step is to tell the software that the symbol is
finished and is to be stored. This final procedure is to enter another Mk1 - Mk4 combination. You
can use the Mk1 which initiated the Needle Up command and simply enter a Mk4 somewhere near
that entry. After this Mk1 - Mk4 sequence the symbol you just digitized (A or B) will be stored and
you will return to the point in the design digitizing session where you were when you exited to
digitize the symbol.
Recall Symbol A / B
To recall symbols for use in digitizing the design perform the steps below:
1. Enter a Mk1 in the [Recall Symbol A] (to recall the symbol you stored as A) or [Recall Symbol B]
(to recall the symbol you stored as B) box on the movable menu.
If you followed the recommendation to begin the symbol digitizing with a Normal Stitch command
and end with a Needle Up command, you do not need to be concerned with these commands
at this time. If you have not digitized these commands, you must insert them at the appropriate
times.
2. Assuming the Normal Stitch command is digitized into the
symbol, enter a Mk1 at the location where you want to
insert the start of the symbol.
In our example, enter the Mk1 at the location shown at
position 1 in Figure 5-25. This will put the point of the petal
at that location.
3. Next, enter a Mk4 to establish the direction you want the
symbol oriented. This completes the insertion of the
recalled symbol at this location.
4. Repeat the recall symbol sequence at the other locations
Figure 5-25
where you want to insert the stored symbol. Remember to
enter the Mk1 in the appropriate recall symbol box; then enter the Mk1, Mk4 combination to
insert the symbol at the proper location and orientation you want them in the design (see
locations 2 through 8 in Figure 5-25).
Mirror Symbol
When using the symbol function, you have the ability to recall a symbol and display it in the design
as a "mirrored" image of the stored symbol. You may mirror the horizontal axis or the vertical axis,
or both. Refer to the illustrations Figure 5-26 and notice how the capital letter F is oriented with
each of the three combinations of mirroring. The Mk1, Mk4 sequence entered at the beginning of
the stored symbol process to establish the size and orientation of the stored symbol, is also the line
used to set the vertical axis direction.
110282-01, Rev A
5. Digitizing Reference
5 - 14
Movable Menu Functions
Mirror Horizontal
Perform the following steps to mirror a symbol in the
horizontal axis as it is recalled into a design:
1. Enter a Mk1 in the appropriate recall symbol box of the
movable menu.
Normal
Orientation
Mirror
Vertical
2. Enter a Mk1 in the [Mirror Horizontal] box.
3. Enter the Mk1, Mk4 combination at the desired location
and direction for inserting the symbol in the horizontally
mirrored orientation.
Mirror
Horizontal
Mirror both
Horizontal and
Vertical
Figure 5-26
4. Enter a Mk1 in the [Reset Symbol Mirror] box to turn off the mirror function and ensure the next
symbol recalled will not be mirrored.
Mirror Vertical
Perform the following steps to mirror a symbol in the vertical axis as it is recalled into a design:
1. Enter a Mk1 in the appropriate recall symbol box of the movable menu.
2. Enter a Mk1 in the [Mirror Vertical] box.
3. Enter the Mk1, Mk4 combination at the desired location and direction for inserting the symbol in
the vertically mirrored orientation.
4. Enter a Mk1 in the [Reset Symbol Mirror] box to turn off the mirror function and ensure the next
symbol recalled will not be mirrored.
Mirror Both Horizontal And Vertical
Perform the following steps to mirror a symbol in both the horizontal and vertical axes as it is
recalled into a design:
1. Enter a Mk1 in the appropriate recall symbol box of the movable menu.
2. Enter a Mk1 in the [Mirror Horizontal] box.
3. Enter a Mk1 in the [Enter] box of the movable menu.
4. Enter a Mk1 in the [Mirror Vertical] box.
5. Enter the Mk1, Mk4 combination at the desired location and direction for inserting the symbol in
the horizontally and vertically mirrored orientation.
6. Enter a Mk1 in the [Reset Symbol Mirror] box to turn off the mirror functions and ensure the
next symbol recalled will not be mirrored.
Editing and Digitizing in EDS III
Melco Embroidery Systems
Symbol Digitizing
5 - 15
Reset Symbol Mirror
Enter a Mk1 in the [Reset Symbol Mirror] box of the movable menu to turn off all mirror functions
that have previously been set. Until this is done, any time you recall a symbol it will be inserted in
the mirror orientation that was last set.
Changing Size Of Recalled Symbol
When recalling a symbol, it will always be the size that it was digitized unless you specify differently
by using the following procedure. If you want a symbol size other than what is stored, you may tell
the computer this by inserting a Mk3 between the Mk1, Mk4 combination.
1. Enter a Mk1 in the [Recall Symbol A] or [Recall Symbol B] box on the movable menu.
2. Enter a Mk1 at the location where you want to insert the start of the symbol.
3. Now, before you enter the Mk4 for completing the sequence for positioning the symbol in the
location and orientation, enter a Mk3 to indicate the size you want the symbol. The distance
between the Mk1 and the Mk3, in relation to the originally digitized Mk1, Mk4 combination,
will determine the size for the current symbol insertion. (See the illustrating examples in Figure
5-27.)
Size Of
Digitized
Symbol
Size Of Recalled Symbols Using Mk1, Mk4
Sequence As Indicated
Various Sizes Of Recalled
Symbols Using Mk1, Mk3,
Mk4 Sequence As Indicated
Figure 5-27
4. Enter the Mk4 to complete the sequence for recalling the symbol at the modified size.
110282-01, Rev A
5. Digitizing Reference
5 - 16
Movable Menu Functions
Special Stitch
The Special Stitch feature allows you to digitize a "design" to be used when generating a single
stitch. The digitizing process is limited to no more than
30 needle penetrations. When this special stitch is used in
digitizing running stitches, each running stitch will consist
of the digitized character or special stitch design and you
will create a decorative line of stitching.
General Rules
• You may make the stitch look like anything
you wish, as long as it does not exceed 30
needle penetrations.
Figure 5-28
• All Mark entries in the special stitch must be Mk1s except the last Mark entry.
• The last Mark entry must be a Mk3.
Digitize Special Stitch
To start a special stitch draw out the design of the stitch you want
somewhere in the active digitizing area, preferably off of the current
artwork.
Refer to the illustration in Figure 5-29 and the procedure below to
create a special stitch.
1. Draw the special stitch design big enough to be clear and so all
lines are easy to see. (When using the special stitch, it will take on
the size of the running stitch length that is set in the program.)
Assume we want a
special stitch that looks
like this
Figure 5-29
2. Decide what path the needle should follow so you don’t have to go
over any lines more than once.
Sometimes this is not possible.
The example special stitch in Figure 5-30
has 8 points. Label the points like the
example below so you can keep track of
your digitizing sequence.
3. Enter a Mk1 in the [Digitize A] or
[Digitize B] box of the movable menu.
4. Move the tablet cursor to the location
#1 on the special stitch design
artwork and enter a Mk1.
Figure 5-30
Editing and Digitizing in EDS III
Melco Embroidery Systems
Use Special Stitch
5 - 17
5. In turn, move to each of the other locations #2 through #7 entering a Mk1 at each of those
locations.
6. Move to the last location #8 and enter a Mk3.
Remember to make the last entry a Mk3! This tells the computer that you are finished digitizing
your special stitch.
7. Return to your current design digitizing session and continue digitizing.
Use Special Stitch
When you wish to incorporate the special stitch into the design, refer to the following steps after
the special stitch has been digitized.
Special Stitch Size
Control the size (length) of the special stitch at the
[Set Max Stitch Length] box on the movable menu.
The example in Figures 5-31 and 5-32 shows using
the special stitch to put a rectangular border around
the name Mike.
After digitizing the "e" in Mike in Figure 5-31 Let’s
digitize a running stitch border around the name
using the previously digitized special stitch.
Figure 5-31
1. Enter a Mk1 in the [Jump Stitch] box of the movable menu and enter a Mk1 at point A.
2. Enter a Mk1 in the Special Stitch [Use A] or [Use B] box of the movable menu. This will recall the
special stitch (A or B, whichever you digitized) and make it ready for use.
3. Change the stitch length at the [Set Max Stitch Length] box, applicable numeral boxes, and the
[Enter] box on the movable menu if you desire to
change the length (or size) of the special stitch.
4. Since the earlier jump stitch step moved the
needle location to point A, move the cursor to
point B in the illustration and enter a Mk1. (For
the special stitch function to work properly you
must place the first Mk1 of the special stitch
stitching at a different location from the needle
location just prior to initiating special stitch.)
Figure 5-32
5. Enter a Mk1 at point C, point D, and finally at point A to complete the 4 lines of special stitching.
6. Enter a Mk1 on the [Normal Stitch], then the [Enter] boxes to end the special stitch function.
110282-01, Rev A
5. Digitizing Reference
5 - 18
Movable Menu Functions
Bean
A Bean stitch is simply a pre-digitized special stitch that is included with the EDS III program
software. Where a normal stitch lays one length of thread down for each stitch, the Bean stitch lays
down 3 lengths of thread. The Bean stitch is often used to digitize a thicker outline around a figure
than you would get if you digitized normal running stitches. The Bean stitch design consists of
laying down a normal stitch in the forward direction, then going back to the original start of that
normal stitch with a second needle penetration, and again going forward to the end of the first
stitch with another needle penetration. If the Bean stitch was pulled apart slightly, it would
resemble the illustration in Figure 5-33.
Figure 5-33
Column Density
Note: This section explains how to select and change column densities during the digitizing session.
Column Density is fully described in Chapter 3. Refer to Chapter 3 for the explanation of column
density.
This movable menu function allows you to select any one of 4 preset column densities (A, B, C, or
D below) as you digitize. The "default" values for the 4 preset column densities are: A = 4.0
points, B = 4.5 points, C = 5.0 points, and D = 12.0 points. You may use the default settings or
change the densities to your own liking either at the EDS III Setup Menu Dialog Box or at the
movable menu itself. To select a preset column density in your digitizing session, refer to the
following steps:
1. Enter a Mk1 on the [A], [B], [C], or [D] box of the movable menu.
2. Then enter a Mk1 on the [Enter] box.
If you wish to select a column density that is not one of the preset densities, refer to the following
steps:
1. Enter a Mk1 on the [Column Density] box of the movable menu.
2. Enter a Mk1 on the number boxes for the value of the desired column density.
3. Enter a Mk1 on the [Enter] box.
To change value of any of the preset column densities, refer to the following steps:
1. Enter a Mk1 on the density box ([A], [B], [C], or [D]) you want to change.
2. Enter a Mk1 on the number boxes for the value you want for the new preset column density.
Editing and Digitizing in EDS III
Melco Embroidery Systems
Fills
5 - 19
3. Enter a Mk1 on the [Enter] box.
For example, to change the value of box [C] to 6.5 points, Enter a Mk1 on the [C] box, Enter a Mk1
on the number [6] box, next on the [.] box, and then on the [5] box, and finally on the [Enter] box.
Fills
This movable menu function box allows you to select and change fills and fill parameters during the
digitizing session. There are 16 pre-defined sets of fill parameter values identifying specific fill
patterns associated with the EDS III program. These fills are numbered 1 through 8 and 11 through
18. Within EDS III you can also create and save additional custom fill patterns. The number of
custom fills is limited to numbers 99 and less.
Note:
Fills are fully described in Chapter 3. Please refer to that section for details in digitizing fills
and for explanations of the various parts that make up a fill.
The Blatt Stitch Fill
Two of the 16 pre-defined fills (Fill 1 and Fill 11) are called Blatt Stitch Fills. The Blatt Stitch Fill is not
a true fill. It is a one-partition "fill" which will produce a single satin stitch pattern when digitized in
the same way that you would digitize any other fill. You might select this "fill" if you had a highly
irregularly-shaped column where the first line and the last line were parallel. The Blatt Stitch Fill is
an easier way to digitize the column than breaking it into various segments, digitizing each
segment as column fills.
As a digitizing example, if you had a shape like the one in Figure 5-34 to
digitize as a column, refer to the following steps in performing the Fill 1 or Fill
11 Blatt Stitch Fill:
1. Enter a Mk1 in the [Fills] box of the movable menu.
2. Enter a Mk1 in the number [1] box of the movable menu to select Fill #1
(Fill #11 is identical).
3. Enter a Mk1 in the [Enter] box.
Label the corners of your shape (A, B, C, and D in the figure) as you would for
any fill, then digitize the shape as a normal fill.
Figure 5-34
110282-01, Rev A
5. Digitizing Reference
5 - 20
Movable Menu Functions
Step Stitch Fills
The remaining 14 pre-defined fills contain from 2 to 8 partitions in various combinations of the fill
parameters. These fills may be selected and used in digitizing as described in Chapter 3 of this
manual.
Note:
The parameters in the pre-defined fills may be changed and resaved. If you change these
preset fills and wish to reset them to their original values, the table below provides the
original values.
Fill Name/Number
Number
of
Partitions
Density
Stitch
Length
Partition
Line Angle
Partition
Line
Sequence
Fill 1
1
4.2 points
38 points
90 degrees
0
Fill 2
2
4.2 points
38 points
30 degrees
01
Fill 3
3
4.2 points
38 points
30 degrees
012
Fill 4
4
3.0 points
60 points
90 degrees
0123
Fill 5
5
3.0 points
60 points
90 degrees
01234
Fill 6
6
3.0 points
60 points
90 degrees
012345
Fill 7
7
3.0 points
60 points
90 degrees
0123456
Fill 8
8
3.0 points
60 points
90 degrees
01234567
Fill 11
1
4.2 points
38 points
90 degrees
0
Fill 12
2
4.2 points
60 points
30 degrees
01
Fill 13
3
4.2 points
60 points
30 degrees
012
Fill 14
4
4.2 points
60 points
90 degrees
0123
Fill 15
5
4.2 points
60 points
90 degrees
01234
Fill 16
6
4.2 points
60 points
90 degrees
012345
Fill 17
7
4.2 points
60 points
90 degrees
0123456
Fill 18
8
4.2 points
60 points
90 degrees
01234567
Fill Density
There may be times during the digitizing session that you wish to temporarily change the density of
a fill for a particular situation. You can do this at the [Fill Density] box of the movable menu without
the need to create a new fill just for that purpose. Density is discussed in detail in Chapter 3, so
refer to that section of the manual for information on this parameter. To change the fill density
refer to the following steps:
1. Enter a Mk1 on the [Fill Density] box of the movable menu.
Editing and Digitizing in EDS III
Melco Embroidery Systems
Fill Angle
5 - 21
2. Enter a Mk1 on the number boxes of the movable menu for the value of the desired density.
3. Enter a Mk1 on the [Enter] box.
The new density will now be used for this fill sequence of the current digitizing session. When you
end this fill function sequence, the density change will not remain for any future fill functions.
When you load the fill number again for another fill digitizing sequence, or load a different fill
number, the changed density value will no longer be present.
Fill Stitch Length
This parameter is discussed in detail in Chapter 3. For information on this subject, refer to that
section of the manual. As with fill density, there may be times during the digitizing session that you
wish to temporarily change the fill stitch length for a particular situation. Again, as with the fill
density, you can also do this at the movable menu, with the [Fill Stitch Length] box. To change the
fill stitch length refer to the following steps:
1. Enter a Mk1 on the [Fill Stitch Length] box of the movable menu.
2. Enter a Mk1 on the number boxes of the movable menu for the value of the desired stitch
length.
3. Enter a Mk1 on the [Enter] box.
The new fill stitch length will now be used for this fill sequence of the current digitizing session.
When you end this fill function sequence, the stitch length change will not remain for any future fill
functions. When you load the fill number again for another fill digitizing sequence, or load a
different fill number, the changed stitch length value will no longer be present.
Fill Angle
Fill angle is discussed in detail in Chapter 3. Please refer to that section of the manual for
information on this subject. Again, as with the fill density and fill stitch length, you may temporarily
change the partition line angle of a fill for a particular situation. Just refer to the following steps to
perform this change:
1. Enter a Mk1 on the [Fill Angle] box of the movable menu.
2. Enter a Mk1 on the number boxes of the movable menu for the value of the desired angle.
3. Enter a Mk1 on the [Enter] box.
The new partition line angle will now be used for this fill sequence of the current digitizing session.
When you end this fill function sequence, the angle change will not remain for any future fill
functions. When you load the fill number again for another fill digitizing sequence, or load a
different fill number, the changed angle value will no longer be present.
110282-01, Rev A
5. Digitizing Reference
5 - 22
Movable Menu Functions
Partition line Seq. (Sequence)
Again, this parameter is discussed in detail in Chapter 3, so refer to that section of the manual for
information on using partition line sequences. To change the partition line sequence of a fill during
the fill digitizing function follow the steps below:
1. After initiating the fill function, and before starting the fill outline Mark entries, enter a Mk1 on
the [Partition Line Seq.] box of the movable menu.
2. Enter a Mk1 on the number boxes in the order you want the sequence to occur.
Note:
Make certain you use only the numbers allowed for each fill as indicated in the previous
table of preset fill parameter values. As a rule of thumb, the highest number allowed in
any partition line sequence is one number less than the number of partition lines.
(Remember that partition line numbers start with 0.)
3. Enter a Mk1 on the [Enter] box.
4. Continue to perform the fill function.
Reset Seq. (Sequence)
By entering a Mk1 on the [Reset Seq.] box of the movable menu, you will reset the partition line
sequence to the default sequence.
ON Singleline OFF
The Singleline function is associated with making even width columns by using one reference line
rather than defining both sides of the column independently. This feature is discussed in detail in
Chapter 3. Please refer to that section of the manual for more information on this subject.
0 / 1 / 2 / 3 / 4 / 5 / 6 / 7 / 8 / 9 / . / Enter
The number boxes of the movable menu will produce the value of the particular number into the
command currently activated when a Mk1 is entered in that box. When a Mk1 is entered at the
[Enter] box, the command currently engaged will be put into effect.
Editing and Digitizing in EDS III
Melco Embroidery Systems
Density
5 - 23
Setup Dialog Box
All of the items in the Setup dialog box have been explained in this manual already. In addition to
the brief statements in this section, you may refer to the prior explanations by finding the subject in
the Table of Contents, then turning to the pages where it is explained.
Figure 5-35
Density
When you digitize columns the density will be determined by one of three methods:
Method 1 Click on column density in the movable menu. Select a specific value in the numbers boxes at the
movable menu. Press Enter.
Method 2 Click on column density in the movable menu. Select one of the four letters in the movable menu
associated with the column density. The values associated with the letters selected at the movable
menu are the values that are present in the four density text boxes labeled A, B, C, and D in the
upper portion of the Setup dialog box. Press Enter
Method 3 If no value or letter is selected at the movable menu the density will "default" to 4.2 points.
110282-01, Rev A
5. Digitizing Reference
5 - 24
Setup Dialog Box
Once a density is determined, it will be the density of all columns digitized in that digitizing session,
unless or until you change the density by selecting another letter or inputting the actual value you
wish.
To set a specific value in the Density text boxes, highlight the current value information and type
the new information in its place.
Fills
In this section of the Setup dialog box you can load a fill pattern, change any of the five fill
parameters, and then save these new values either as the same fill number or a different one.
The parameter values in this Setup dialog box are the ones used when you select a fill number at
the movable menu.
These values are used for determining the fill patterns when in the complex fill mode as well as
when digitizing by the simple fill method.
Complex Fill Underlay
In this area of the Setup dialog box you can load a stored complex fill underlay pattern name,
change stitch length or density, and then save these new values either as the same complex fill
underlay number or a different one. These values will be used when using the automatic underlay
feature of the complex fill method for digitizing fills.
Editing and Digitizing in EDS III
Melco Embroidery Systems
6-1
6. On-Screen Digitizing
The features in this chapter are only available if you have purchased the options containing
On-Screen Digitizing and Scanning.
This chapter is developed to get you started in on-screen digitizing your first design with EDS III.
Much of the digitizing in this chapter is identical to the the chapter on tablet digitizing but using
the on-screen digitizing tools rather than the movable menu. As you digitize, you will become more
efficient and creative with every design you complete.
Start The System
1. Turn on the Monitor power and then the EDS III Computer.
NOTE:
Typically, with a system shipped complete from the Melco factory,
the Windows program automatically starts when the computer is turned on. If this
describes your computer situation disregard step 2 and go directly to step 3 below.
2. From the computer keyboard, type win after the "c prompt." It should look like this: C:>win.
Then press [Enter] to start the Windows program.
3. Locate the Melco Apps group inside the Windows Program Manager.
Figure 6-1
Skip steps 4 & 5 if you have already set Configuration
4. If you are using the On-Screen digitizing function for the very first time, you must double click on
the Config Icon with the left button of the computer mouse to go into the Configuration
program.
5. Select an any unused COM port for any tablet digitizer then click OK.
6. Now double click on the EDS III Icon with the left button of the computer mouse to start EDS III.
110282-01, Rev A
6. On-Screen Digitizing
6-2
Initiate A Digitizing Session
Initiate A Digitizing Session
1. Locate the two menu items in the Menu Bar of the EDS III Application Window that is now
showing on the monitor. Click on the File menu item in the Menu Bar.
2. Click on the New menu item in the drop-down menu that appears (see Figure 6-2).
Figure 6-2
Load Image into EDS III Layout Window
Before you can perform an on-screen digitizing session you must have an image in the EDS III
Layout window to digitize.
You will either scan an image, load a graphic file from a stored location, or import an image from
the clipboard into the EDS III Layout window. You will then modify the image to the desired
representation you wish to digitize.
For this session load the file entitled melcos.pcx from the c:\eds3\designs directory.
1. Click on the Edit menu item in the Menu Bar of the new Layout window.
2. In the Edit drop down menu click on Scan / Graphics and then click on Load Graphic.
3. Click and/or double click in the Open Graphic dialog box until you get the c:\eds3\designs
directory path and .PCX as the File Type.
4. Locate the file named melcos.pcx and load that file into the EDS III Layout window.
Refer to the Scanning section of this manual for additional information on loading a graphic.
When loaded properly the image on the display should look similar to the illustration in Figure 6-3.
Editing and Digitizing in EDS III
Melco Embroidery Systems
Scaling Graphic Image
6-3
Figure 6-3 melcos.pcx Graphic in Layout window
Scaling Graphic Image
Even though we are not scaling the image loaded in this exercise, you may wish to scale and orient
future images that you load for on-screen digitizing. Now is the time to perform any scale functions
you want before you begin your on-screen digitizing process. Refer to Chapter 7 in this manual for
information on Scale Graphic in the Image Modification section.
110282-01, Rev A
6. On-Screen Digitizing
6-4
Initiate A Digitizing Session
Start The Digitizing Function
1. Click on the Edit menu item in the Menu Bar of the new Layout Window (see Figure 6-4).
Figure 6-4
2. In the Edit drop down menu click on Digitize. The Digitize dialog box as shown in Figure 6-5 will
appear. The Source area in the dialog box allows you to select either a hardware digitizer or
on-screen digitizing.
Figure 6-5
Editing and Digitizing in EDS III
Melco Embroidery Systems
Display Mode Settings
NOTE:
6-5
For on-screen digitizing an image is loaded onto the EDS III Layout window and can be
manipulated with the View features of Pan, Zoom, and the various other sizing
functions.
3. To start an on-screen digitizing session, click on the circular option button next to On Screen in
the Source section of the Digitizer dialog box.
The dialog box will change to on-screen digitizing source as shown in Figure 6-6.
Figure 6-6
4. In the Session area of the Digitizer dialog box,
click on the Start button to begin your
on-screen digitizing session.
A new Object Edit window will appear on the
screen with the Object Edit toolbar and stitch
list on top of the loaded image (see Figure 6-9).
Refer to the discussion on the following pages for
basic on-screen digitizing features and functions.
Display Mode Settings
To indicate display information, get into the Display
Mode dialog box. Refer to the following steps to
perform this function:
1. Click on the View menu item in the current
Object Edit window Menu Bar.
2. Click on the Display Mode menu item in the
drop-down menu (see Figure 6-7).
Figure 6-7
110282-01, Rev A
6. On-Screen Digitizing
6-6
Initiate A Digitizing Session
View Condensed Points
During the digitizing session you will
want to see the Mark points as you
digitize. To enable them to be seen,
you need to tell the program to
display them.
3. Inside the Display Mode dialog
box, click on Condensed Points
to place a check mark in the box
(see Figure 6-8). You should also
see that there is a check mark in
the Stitches check box by default.
4. Click OK to return to the Object
Edit window (see Figure 6-9) for
digitizing.
Figure 6-8
Figure 6-9 melcos.pcx Graphic in Object Edit window
Editing and Digitizing in EDS III
Melco Embroidery Systems
Secondary Group Toolbars
6-7
Object Edit Toolbar
All the necessary digitizing functions for on-screen digitizing are accessed from the Object Edit
window toolbar. To use the features directly from the toolbar, simply click on the appropriate tool
when you wish to perform that function. For identifying the various Object Edit toolbar tools and a
brief description of each refer to Section 1 of this manual.
Secondary Group Toolbars
When any of the five Group tools located in the bottom two rows in the Object Edit toolbar are
clicked, additional tools will appear to the side of the toolbar. To use the features found within
these "secondary" toolbars, click the appropriate Group button and then click the applicable
secondary tool button for the feature you want.
Refer to the following pages for a brief description of the secondary toolbars that appear when the
various Group tools are clicked. With many of these commands, additional information is needed in
various dialog boxes that appear when they are clicked. Clicking on the other tools will cause
immediate results in the design stitch list. Refer to the following brief descriptions for each of the
individual secondary tools.
Stitches Function Group Secondary Toolbar
Figure 6-10
Stitch Length - Causes the Enter Stitch Length dialog box to appear. Enter the
embroidery point value in the text box and click OK.
Max Stitch Length - Causes the Enter Max Stitch Length dialog box to appear. Enter the
embroidery point value in the text box and click OK.
Digitize Special Stitch - Causes the Insert Special Stitch dialog box to appear. Select the
appropriate items in the two shaded areas for the function you want to perform and
click OK.
Figure 6-11
110282-01, Rev A
6. On-Screen Digitizing
6-8
Initiate A Digitizing Session
Lock Stitch - Causes the Insert Lock Stitch dialog box to appear. Select the appropriate
item in the shaded area for the function you want to perform and click OK.
Figure 6-12
Short Stitches - Causes the Insert Short Stitch dialog box to appear. Select On or Off and
click OK.
Chain Stitch - Used when editing or digitizing for chenille stitching. Clicking on the tool
causes a chain stitch command to be inserted immediately below the currently
highlighted dataset in the stitch list.
Moss Stitch - Used when editing or digitizing for chenille stitching. Clicking on the tool
causes a moss stitch command to be inserted immediately below the currently
highlighted dataset in the stitch list.
CH Needle Height - Used when editing or digitizing for chenille stitching. Clicking on the
tool causes a chenille needle height change dataset to be inserted immediately below
the currently highlighted dataset in the stitch list.
Column Function Group Secondary Toolbar
Figure 6-13
Editing and Digitizing in EDS III
Melco Embroidery Systems
Secondary Group Toolbars
6-9
Column Parameters - Causes the Insert Column Stitch dialog box to appear. Select the
item in the shaded area for the function you want to perform. For those functions that
require a Function Value (Stitch Length, Partition Line Sequence, Density, or Width),
enter the desired value and then click OK.
Figure 6-14
Underlay - Causes the Insert Underlay dialog box to appear. Select Underlay On or
Underlay Off, whichever function you wish to perform.
Figure 6-15
When performing the underlay function, also enter the value for the Width, Density, and Stitch
Length. Additionally, select one of the three choices (Narrow Column, Edge Walk, or Center Walk)
for the type of underlay to generate.
Note:
After initiating the underlay function, be sure to turn it Off when it is no longer required.
110282-01, Rev A
6. On-Screen Digitizing
6 - 10
Initiate A Digitizing Session
Singleline Column Input - Causes the Singleline Input dialog box to appear. Click inside
the On check box to select the function.
Figure 6-16
When the check mark is inside the On check box you must then select the type of Singleline
column you wish to create. Click on the down arrow in the list box that currently contains one of
the three Singleline types (Center Line, Left Line, or Right Line). Click on the desired type in the
drop down list box. Next, enter the embroidery point value for the Singleline column width in the
text box to the right of Column Width. Click OK when you have the desired information in the
dialog box.
Singleline Column Input Off - Clicking on this tool will terminate the Singleline column
stitching that is currently in process. No dialog box will appear, when the tool is clicked
the column will be generated.
Left Line - Clicking on this tool will change the Singleline column type that is currently in
process to the Left Line type.
Center Line - Clicking on this tool will change the Singleline column type that is currently
in process to the Center Line type.
Right Line - Clicking on this tool will change the Singleline column type that is currently
in process to the Right Line type.
Singleline Column Width - Causes the Enter Column Width dialog box to appear. Enter
the embroidery point value you desire for the width of the Singleline column you are
currently creating.
Editing and Digitizing in EDS III
Melco Embroidery Systems
Secondary Group Toolbars
6 - 11
Fill Function Group Secondary Toolbar
Figure 6-17
Fill Parameters - Causes the Insert Fill Stitch dialog box to appear. Select the item in the
left shaded area for the function you want to perform, then refer to the the following
steps associated with that function.
Figure 6-18
To insert a stock or custom fill dataset into the stitch list:
1. Click on the Step Stitch radio button.
2. Click on the Fill Type list box.
3. Select the desired fill.
4. You may modify the parameters as desired.
5. Click OK.
To insert only a Partition Line Sequence dataset into the stitch list:
1. Click on the Partition Line Sequence radio button.
2. Enter the desired line sequence into the Sequence edit box.
3. Click OK.
110282-01, Rev A
6. On-Screen Digitizing
6 - 12
Initiate A Digitizing Session
To insert only a Reset Fill dataset into the stitch list:
1. Click on the Reset radio button.
2. Click OK.
A custom fill may be defined and saved from the Digitizing Setup dialog box which is available for
both tablet and on-screen digitizing.
Complex Fill - Causes the Insert Complex Fill dialog box to appear. Select the CF - Type
by clicking on the down arrow and then clicking on the desire fill number.
Figure 6-19
You may change any of the values in the text boxes in the CF - Type shaded area to meet with your
fill requirements.
If you desire an automatic underlay with your complex fill, click on the down arrow in the CF Underlay list box and click on the underlay choice in the drop down list box.
After choosing an underlay you may then input a Stitch Length and Density in the text boxes in the
CF - Underlay shaded area to meet with your requirements.
When the Insert Complex Fill dialog box is completed to your satisfaction, click OK to initiate the
complex fill function. Then complete the complex fill process.
Editing and Digitizing in EDS III
Melco Embroidery Systems
Secondary Group Toolbars
6 - 13
Complex Fill Outline - You may insert an additional complex fill outline into an already
completed complex fill. To do this, move the stitch list highlight the dataset just above
the CF Entry dataset. Click on the Complex Fill Outline tool and enter the outline as you
would any other outline. When you have finished with the additional complex fill
outline, click on the currently active mark button, deactivating it to complete the outline.
Pattern Fill - Click on the Pattern Fill tool to cause the Pattern Fill Generator dialog box
to appear as shown in Figure 6-20.
Figure 6-20
Click on the appropriate radio buttons in the 15 by 15 bitmap array of the dialog box to shade
those buttons and create a pattern to have repeated in the fill area. Clicking on a clear radio button
changes it to shaded and clicking on a shaded radio button changes it to clear.
You may click and hold the left mouse button with the cursor on a clear radio button and move
continuously over several radio buttons to shade each one the cursor contacts. You may also clear
radio buttons by clicking and holding the left mouse button with the cursor on a shaded radio
button and moving it continuously over the radio buttons you wish to clear.
110282-01, Rev A
6. On-Screen Digitizing
6 - 14
Initiate A Digitizing Session
The bitmap pattern is shown in the Fill Preview area of the dialog box as you click on the radio
buttons. An example of a pattern fill on the dialog box is shown in Figure 6-21.
Figure 6-21
The pattern that is created by the shaded radio buttons will be embroidered into the fill. A stitch
entry will be at each shaded button and the pattern will touch at all four sides in both axes.
Click the Options button to bring up the Pattern Fill Options dialog box where you may change
pattern width and height. Enter the desired values in embroidery points. These values represent the
overall size of the pattern and have a direct affect on the stitch lengths within the fill being created.
The Rotate button allows you to rotate the pattern to four (4) different positions. Each time you
click the Rotate button the pattern rotates 90 degrees counter-clockwise.
You may click Cancel to terminate the current pattern fill process at any time. If the Cancel button
is clicked the bitmap entered in the dialog box will be discarded from the dialog box and lost unless
it was previously saved.
The current bitmap may be saved by clicking the Save button to bring up the Pattern Fill Bitmap
Save dialog box. Complete the information in the dialog box as you do for any other saving
function.
Editing and Digitizing in EDS III
Melco Embroidery Systems
Secondary Group Toolbars
6 - 15
A saved bitmap may be recalled for further editing or for use in generating a new pattern fill. To
bring a saved pattern bitmap into the Pattern Fill Generator, click on the Load button to bring up
the Pattern Fill Bitmap Load dialog box. Complete the information in the dialog box as you do for
any other loading function.
NOTE:
The only bitmaps that can be loaded are those that have been created specifically for the
Pattern Fill function. These bitmaps have the file name extension PBM.
When you are satisfied with the pattern in the Pattern Fill Generator, click the OK button to accept
the bitmap for the fill. The dialog will close and the stitch list is updated. The ordinary complex fill
prompts are used to get data for the Pattern Fill outlines, entry point, exit point, and fill
direction.
Modifying A Pattern Fill
A pattern fill which has already been generated with auto data may easily by modified at any time.
1. In the stitch list locate the first entry for the pattern fill you wish to change. The first entry will
always be the Pattern Size.
2. Double click on Pattern Size in the stitch list to bring the Pattern Fill Generator onto the screen.
(If you double click on any other stitch list entry nothing will happen.)
3. Proceed as previously described in creating a pattern fill to modify the pattern and regenerate it.
There is no requirement to create the complex fill parameters again.
Stored Symbol Function Group Secondary Toolbar
Figure 6-22
Digitize Symbol A / Digitize Symbol B - Clicking on these two tools will initiate the Stored
Symbol digitizing function. For an in-depth discussion on digitizing stored symbols refer
to Chapter 5 in this manual.
Recall Symbol A / Recall Symbol B - Clicking on these two tools will enable the recall of
either of the Stored Symbols that have been saved during the digitizing of the design.
For a further discussion on recalling stored symbols refer to Chapter 5 in this manual.
110282-01, Rev A
6. On-Screen Digitizing
6 - 16
Initiate A Digitizing Session
Digitize Symbol - Clicking on this tool causes the Insert Stored Symbol dialog box to
appear on the screen.
Figure 6-23
You may initialize or recall the stored symbols through this dialog just as you would use the
previous 4 tool buttons.
In addition, you may elect to mirror the horizontal axis or vertical axis of the selected symbol by
selecting HMirror or VMirror respectively. For an in-depth discussion on mirroring stored symbols
refer to Chapter 5 in this manual. By clicking the Reset option button and then OK, you turn off all
mirror functions that have previously been set.
Other Function Group Secondary Toolbar
Figure 6-24
Scale - Clicking on this tool causes the Insert Scale dialog box to appear on the screen.
Figure 6-25
Editing and Digitizing in EDS III
Melco Embroidery Systems
Secondary Group Toolbars
6 - 17
In this dialog box you may choose to set the scale for Stitch Length, Stitch Density, Fill Stitch
Length, or Fill Stitch Density. After clicking the option button for the item you want scaled, type a
number in the Scale text box to indicate the scale value. The number 1 equals no change actual size
scale. Numbers greater than one increase in scale size (i.e. 2 equals twice the size, 3 equals three
times the size, etc.). Numbers less than one decrease in scale (i.e. .5 equals one half the size, and
.333 equals one third the size).
Return To Origin - This button is usually chosen at the end of your design to return the
needle to the design origin.
Multi-Head Functions - Clicking on this tool causes the Insert Multihead Function dialog
box to appear on the screen.
Figure 6-26
In this dialog box you may select various functions associated with certain multihead machines
which may be embroidering the design you are digitizing. Click on the option button you desire,
then click OK.
110282-01, Rev A
6. On-Screen Digitizing
6 - 18
Your First Design
Plotting The Image
It is difficult to actually plot the image on the screen as you would if you were digitizing a piece of
artwork on a digitizer tablet. You must however, understand the plotting that is required with the
digitizing. Therefore, plots are included in this session as if you were able to pencil them onto a
paper artwork design.
Tips for On-Screen Digitizing
During your digitizing session, Zoom, Pan, and other view commands work for on-screen digitizing
just like tablet digitizing. If you want to place Mark Points with greater accuracy, zoom in on the
section you are digitizing.
As you input mark points with the system mouse the EDS III will beep to indicate it has received
information. You may turn off the sound for the mark points before starting or during your session,
but most people leave the sound checked, which is the default.
With on-screen digitizing you do not have to enlarge your drawings before digitizing. Just scan
them in at 254 dpi and zoom in for detail!
On-Screen digitizing allows you to perform the functions equivalent to those found on the tablet
digitizing movable menu. These functions are discussed in the Reference section of this manual.
The four mark buttons are located as push buttons in the Object Edit window toolbar. To select a
specific mark button for insertion, click on the desired mark button in the toolbar. Position the
cursor at the location you wish to insert the mark point and simply click the left mouse button. You
will hear a beep if you did not turn off the sound in the Digitize dialog box and the mark point will
be inserted.
To insert a Normal Stitch, Needle Up, Jump Stitch, Color Change, or Trim you may click on the
appropriate tool in the Object Edit toolbar to perform those functions during the digitizing session.
Other needle activity and positioning commands are found in the individual Group tools. Select
these functions by clicking the appropriate tool in the Object Edit toolbar.
Your First Design
Refer to the descriptions of the various Object Edit tools in Section 1 of this manual and the
descriptions of the tools in the Group secondary toolbars in this section of the manual.
Move To Start Of Design
The current needle location is at the center of the design. We now want to move the needle
position to the start of our first stitch. The next two steps are required to move to that location
without stitching.
1. Click the Needle Up tool in the Object Edit toolbar.
2. Click the Mk1 push button in the toolbar.
Editing and Digitizing in EDS III
Melco Embroidery Systems
Running Stitches
6 - 19
3. Click at the location on the displayed image where you want to place a Mk1 to start the design.
This identifies the location for the needle entry starting the first stitch. In our example we will
enter into the lower area of the right leg of the capital letter M (see Figure 6-27).
Note:
You may need to Zoom and Pan to get the digitizing area properly located on the screen
and maintain accuracy as you digitize.
Mk1
Figure 6-27
Stitch Types
There are 3 stitch types in Melco digitizing: Running stitches, Column stitches, and Fill stitches.
Running Stitches
Our first digitizing will consist of several running stitches which are typically generated in making
underlay and outline stitching. We will discuss the making of underlay stitching when we get to
column stitches in the letter l. For now, however, we will perform running stitches around the
outline of the letters M and e in the design.
In plotting the letters M and e enter into the letter M at the bottom right corner of the bottom
right leg and exit at the same location. In the letter e enter and exit in the upper right corner of the
lower tail. No special plotting is needed for generating the running stitches we are going to digitize.
Running stitches are the simplest stitches to make when digitizing. Running stitches can be
generated in two methods, straight lines or automatic curves.
Set Stitch Length
The first running stitch function to perform is to set the stitch length. There are two ranges for
stitch length, one for underlay stitching and one for outline or detail stitching.
• For generating underlay running stitches set the stitch length in the range of 30 to 40
points.
• The stitch length for making outline running stitches range between 20 to 25 points.
1. Click the Stitches Group tool to bring up the Stitches secondary toolbar.
2. Click the Stitch Length button to open the Enter Stitch Length dialog box.
110282-01, Rev A
6. On-Screen Digitizing
6 - 20
Stitch Types
3. Type the number 30 in the text box and click OK.
You have now selected a stitch length of 30 points to use with outlining the letters M and e in your
current design artwork.
Make Lock Stitch Sequence
Lock stitches are used to keep the beginning or end of a digitized section from coming unraveled
between color changes or with trims, and before and after a needle up. Generate lock stitches
using 3 or 4 Mk1s in a back and forth zig zag motion. In our example put the lock stitch on the
outside edge of the letter M just up from the Mk1 establishing the start point. See the Figure 6-28
for an indication of where you will be generating the lock stitches in the following steps.
1. Click on the Normal Stitch tool in the toolbar and note the entry in the stitch list. This will allow a
stitch to be generated between the first Mk1 (see Figure 6-27) and the second Mk1 when the
second Mk1 is placed.
2. Position the mouse cursor slightly less than a stitch length (about 1mm) above the first Mk1. You
may first need to Regenerate the screen from the View menu to see the first Mk1.
3. Click the left mouse button to place the second Mk1. This identifies the end the first stitch.
Note:
Do not click the Mk1 button again. Clicking the Mk1 button will cause it to become
deselected. The button stays selected until another Mark button is clicked or you click
the Mk1 button again.
4. Next enter a Mk1 near the original Mk1 that indicated the start of design.
5. Again, enter another Mk1 near the end of the first stitch.
initial lock stitch
sequence
Figure 6-28
Editing and Digitizing in EDS III
Melco Embroidery Systems
Make Lock Stitch Sequence
6 - 21
6. Place one more Mk1 near the start of design.
You have now generated stitches designed to lock the thread. You may generate the lock stitches
in a star pattern, as some digitizers prefer, or develop your own method for locking stitches.
Straight Line Running Stitches
Between every pair of Mk1s is a straight line. The simplest running stitch is a straight line created
when you enter a Mk1 at one end of a line and another Mk1 at the other end of the line. In the
example design you have placed a lock stitch sequence using running stitches. Now we will walk
around the outside lines of the capital letter M with a running stitch, which will form a simple
outline of the letter.
Note:
Normally you create letter stitching by generating column stitches at this point. But for
training purposes we will outline the letter M with running stitches.
1. We will begin the outline from the last Mk1 of the initial lock stitch sequence which you entered
at the bottom right corner of the right leg of the letter M (see Figure 6-28).
2. To generate running stitches from the bottom right corner to the top right corner, put a Mk1 at
the top right corner (see Figure 6-29). Follow the same method to place these Mk1s as you did
for the previous Mk1s.
Mk1
Mk1
Mk1
Mk1
Mk1
Mk1
Mk1
Mk1
Mk1
Mk1
last Mk1
Figure 6-29
3. Now go left to the next corner and enter another Mk1 (see Figure 6-29).
Notice that you don’t see the stitching between the current entry and the last entry. When
digitizing with Mk1s you will always be one step behind in viewing the digitizing.
4. Continue to go to each turning point in the letter M and enter a Mk1 at each location until
the letter M is completely outlined with running stitches.
110282-01, Rev A
6. On-Screen Digitizing
6 - 22
Stitch Types
5. Place the last Mk1 at the bottom right corner of the right leg.
6. After placing the last outlining Mk1 put a series of 3 or 4 lock stitches along the bottom of the
right leg of the letter M as you did starting the M. Have the lock stitches run horizontally
along the bottom as not to be directly on the first set of lock stitches that ran vertically
from the corner (see Figure 6-30). The last Mk1 should end at or near the corner.
last lock stitch
sequence
Figure 6-30
Movement Between Letters
Move to the next letter to perform some automatic curve running stitches. Move between the
sections of digitized areas by one of two methods - Jump Stitch or Needle Up. Keep in mind that
some machines for which you may be digitizing do not use jump stitches.
We will use the Needle Up method to move between the letters M and e.
1. Click the Needle Up tool in the Object Edit toolbar.
2. Go to the letter e in the example design and enter a Mk1 at the upper right corner of the
tail of the letter e (see Figure 6-31).
enter the initial Mk1 for the letter e and
generate lock stitches
Figure 6-31
Editing and Digitizing in EDS III
Melco Embroidery Systems
Make Lock Stitch Sequence
6 - 23
3. Next click the Normal Stitch tool in the toolbar.
4. Enter a Mk1 near the first Mk1 you entered in the letter e. This will generate the first lock stitch
at the entry point of the letter e.
5. Generate 3 or 4 more lock stitches in the letter e with Mk1 entries.
Curved Line Running Stitches
One method for producing curved lines is to generate the line with a series of short straight lines
with Mk1s. This method is time consuming and the result may be uneven. Another method can be
used that allows the computer to create smooth and uniform curves using the Mk3 button in
conjunction with the Mk1 button. In our exercise we will create a curved line using the first
method. Then we will create curved lines using the computerized (automatic) curving method.
Bean Stitch
To demonstrate the look of the Bean Stitch, change to the Bean Stitch stitching mode for outlining
the letter e.
1. When using the Bean stitch, generate your lock stitches prior to initializing the Bean feature.
2. In the Object Edit window toolbar click on the Bean Stitch tool.
Curved Line Using Only Mk1s
The needle position is now at the lock stitches in the upper right corner of the tail of the letter e.
1. Enter Mk1s along the inside edge of the tail of the letter e. Generate these Mk1s at intervals that
will allow the straight lines between them to stay closely aligned with the boundary of the wall
(see Figure 6-32).
Needle Up
at these 2
locations
Mk1s at all
indications
on the inside
walls
start
Figure 6-32
110282-01, Rev A
6. On-Screen Digitizing
6 - 24
Stitch Types
2. When you get to the crossbar put a Mk1 in the corner (see Figure 6-32).
3. Generate a Needle Up and go to the other side of the crossbar and generate another Mk1.
4. A Bean Stitch command must next be generated so the stitching will start again after skipping
over the crossbar in the needle up mode.
Note:
If you enter a Normal Stitch command instead of the Bean Stitch command in this step, the
Bean stitching will be discontinued and regular walk stitches will result.
5. Continue to put Mk1s on the inside edge of the letter e until you get back to the top left of the
crossbar.
6. Again generate the Needle Up, Mk1, Bean Stitch sequence and finish with a Mk1 at the lower
right corner of the crossbar. (This last Mk1 is also used for the beginning of the next method
for digitizing curves.)
Curved Line Using Mk1s And Mk3s
Note:
You would normally create letter stitching by generating column stitches. However for
training purposes, we will outline the letter e with curved running stitches.
To create the outside wall outline of the letter e we will now use the computerized method of
creating arcs. To generate curved lines of running stitches by this method we must comply with the
following rules:
Rules For Curves
#1
Start with a Mk1.
#2
ALWAYS Use Mk3s in pairs.
#3
Enter the first Mk3 at the peak (mid-point) of the arc. The second Mk3 goes at the end of
the arc.
#4
Use at least one pair of Mk3s per 180 degrees of rotation. Each Mk3 must not be more
than 90 degrees from the next mark point.
#5
When creating two or more arcs in succession, no Mk1 is necessary
between the Mk3 pairs.
Plot The Location Of The Mark Points
Generating curved outlines using the Mk3s is practical only when the curve is a uniform arc with no
deviations.
We now want to decide where to locate the pairs of Mk3s to create a uniform line outlining this
portion of the letter e. We can see that the letter is not exactly a perfect circle, but is slightly oval.
Editing and Digitizing in EDS III
Melco Embroidery Systems
Make Lock Stitch Sequence
6 - 25
Therefore, let’s break it into arc segments that seem to have the same curvature characteristics (see
Figure 6-33.
second arc segment
first arc
segment
third arc
segment
fourth arc segment
Figure 6-33
Digitize The Outline
Rule one states to always begin with a Mk1. The beginning Mk1 has already been put at the lower
right corner of the crossbar of the letter e (see step 6 in the previous section and Figure 6-34).
Mk3
second Mk3
Mk3
first Mk3
Mk3
Crossbar
Mk1
Mk3
Mk3
Mk3
Figure 6-34
We have the Mk1 at the beginning of the outside curve of the letter e so now we now want to
enter the first pair of Mk3s to create an outline of Bean stitches in the first arc segment that we
plotted in a previous step (see Figure 6-33).
110282-01, Rev A
6. On-Screen Digitizing
6 - 26
Stitch Types
1. Click on the Mk3 push button in the Object Edit toolbar then enter a Mk3 in the middle of the
first arc segment and another Mk3 at the location between the first and second arc segments
(see Figure 6-34).
2. Now enter a Mk3 at the mid-point of the second arc segment and another Mk3 at the location
between the second and third arc segments.
3. Continue to generate the Mk3 pairs for the third and fourth arc segments.
4. Click on the Mk1 push button in the Object Edit toolbar and put a Mk1 in the upper right corner
of the tail of the letter e.
5. Click on Normal Stitch to turn off the Bean Stitch mode before generating the lock stitches in
the next step.
6. Generate a series of lock stitches and you are ready to move to the letter l to perform column
stitches.
Column Stitches (Satin Stitches)
You have completely outlined the letters M and e using 2 methods for generating running stitches.
We will now go to the second stitch type, Column stitches, also called Satin stitches.
Column stitches are stitches generated back and forth between two outside lines that are parallel
to each other.
Straight Columns
• The simplest column stitching is the letter l. This shape is a straight column.
starting
Mk1
Basic Rules For Column Stitches
#1
Start with a Mk1 to identify the beginning of one side of the
column, shown as the starting Mk1 in Figure 6-35.
#2
Enter a Mk2 at the beginning of the other side of the column,
shown as the first Mk2 in Figure 6-35.
#3
When defining the end of the column, always enter a Mk2 at the
end of the first side you identified (see second Mk2 in Figure 636).
#4
Enter a Mk2 at the end of the other (or second) side of the column
(see third Mk2 in Figure 6-35) This Mk2 ends the column stitching
sequence.
x
second x
Mk2
x
first
Mk2
x third
Mk2
Figure 6-35
Editing and Digitizing in EDS III
Melco Embroidery Systems
Column Stitches (Satin Stitches)
6 - 27
Column Stitch Density
Like the stitch length is set for running stitches, "column density" is set for column stitches. The
column density number represents the number of embroidery points between each stitch. Typical
density settings based on column length are:
Column Length
Density Setting
.5 inch (12.7mm)
4.2 - 4.7
1 inch (25.4mm)
4.0 - 4.2
1.5 inch (3.81cm)
3.8
If you refer to the previous table for our example of column stitching the letter l, we should set the
stitch density to 4.2 points. This means that there is a distance of 4.2 points between each stitch.
Establish the stitch density from the very beginning of the column by inserting a desired density
before generating column stitching. To set the column stitch density refer to the following steps:
1. Click on the Column Group tool in the Object Edit toolbar to bring up the Column secondary
toolbar.
2. Click the Column tool in the secondary toolbar to open the Insert Column Stitch dialog box.
3. Click the Column Density diamond in the Insert Column Stitch dialog box.
4. Type in the number 4.2 in the Function Value text box.
5. Click on OK in the Insert Column Stitch dialog box to generate this density information in the
stitch list and return to the screen.
You have just entered a column density of 4.2 points to be used in the column stitching. Notice
the stitch list on the screen indicates this information.
Introduction To Underlay
In the previous digitizing exercises with running stitches we have only performed outline stitching.
Now we are going to use the running stitch to place an underlay before digitizing the column.
Underlay is used to help keep the material from stretching or distorting during the top stitching
process. Underlay is typically used under columns and fills. For information on automatic underlay
refer to Chapter 5.
Move to the letter l and generate underlay stitches.
When you finished the letter e you placed lock stitches, so now you may must move to the entry
point of the letter l.
110282-01, Rev A
6. On-Screen Digitizing
6 - 28
Stitch Types
1. Select Needle Up, put a Mk1 at the bottom portion of the letter l, then select Normal Stitch (see
Figure 6-36). To keep stitching inside the letter, put the Mk1 inside the letter, not on the line.
Mk1s making
underlay stitching
upward through the
middle of the letter
lock stitch
sequence
Figure 6-36
2. Now perform a lock stitch sequence.
3. Lay down a running stitch underlay in a slight zig zag pattern of Mk1s up the length of the letter
l (see Figure 6-36).
4. In this letter l, for simple straight column stitching, you define the beginning of the column with
a Mk1 on the left side of the column at the top (see Figure 6-37).
first Mk2
Mk1
second Mk2
third Mk2
Figure 6-37
5. Next click the Mk2 push button in the toolbar and enter a Mk2 at the beginning of the right side
of the column at the top. (see Figure 6-37).
6. Now move to the bottom left of the letter to the end of the first line of the column and enter
another Mk2 (see Figure 6-37).
7. The last step in generating the column is to go to the end of the second line of the column (at
bottom right of the letter) and enter a third Mk2 (see Figure 6-37).
Editing and Digitizing in EDS III
Melco Embroidery Systems
Column Stitches (Satin Stitches)
6 - 29
After the last Mk2 entry, the column stitching will be generated and will look similar to the
illustration in Figure 6-38.
Column Stitching
Figure 6-38
8. Generate a lock stitch sequence to end the letter l column digitizing.
When generating lock stitches in columns, we want the stitches to lie
in the same direction as the column stitches. Therefore, generate your lock stitches from left to
right to hide them in the column stitching and slightly inside the letter to keep them from
showing outside the letter.
Column Stitches On An Arc
We have just generated a simple straight column of stitches. Next we will generate a column in an
arc.
General Rules
Several rules apply to column stitching in an arc:
#1
The rules of straight column stitching still apply.
#2
Like running stitches on an arc, you can define no more than 180 degrees per arc. This
means you cannot place Mk3s (arc-determining mark points) farther than 90 degrees of
arc from other mark points.
#3
Digitize from inside to outside. (For example, enter a Mk1 at the beginning of the arc at
the inside line, then a Mk2 at the beginning of the arc at the outside line; continue this
inside/outside relationship throughout the column digitizing process.
#4
When digitizing 2 or more consecutive columns on an arc, do not redefine the beginning
of the second (and additional) columns with a Mk1 - Mk2. The last Mk2 - Mk2
sequence of the prior column defines the start of the next column.
110282-01, Rev A
6. On-Screen Digitizing
6 - 30
Stitch Types
There are two common methods for digitizing column stitches on an arc. The first method will be
demonstrated in the letter c, and the other method with the letter o. There are additional
techniques used in creating column stitches for irregularly shaped objects. These techniques are
explained following the demonstration of the two common methods for digitizing columns on an
arc.
Method One
Specific Rule For Method One
This is specific to Method one. When defining a column on an arc using method one, enter one
Mk3 in the middle of the column mid-way around the arc being defined.
Plot The Letter c
The curvature of the letter c is more than 180 degrees, therefore break the digitizing into 2
separate arcs. Notice that the letter is not exactly circular, but is slightly oval (see Figure 6-39).
upper arc
segment
x
x
lower arc
segment
enter the letter
here and generate
lock stitch
sequence
Figure 6-39
Divide the c into two sections. Refer to Figure 6-39 and make the indications like the illustration.
You are now ready to start digitizing for column stitches in an arc.
1. Ensure the lock stitches were generated at the end of the letter l; then perform the needle up,
Mk1, normal stitch, Mk1 sequence to move to the bottom right area of the letter c (see Figure
6-39).
2. Generate the column lock stitches up and down so they will be in line with the direction of the
column stitches.
3. Place a running stitch underlay with Mk1s to get to the upper right portion of the letter c (see
Figure 6-40).
Editing and Digitizing in EDS III
Melco Embroidery Systems
Column Stitches (Satin Stitches)
6 - 31
generate running
stitch underlay
sequence to the top
of the letter
Figure 6-40
Digitize The Column On An Arc
1. Go to the start of the inside line of the top of the letter c and enter the Mk1 to start (see Figure
6-41).
enter the letter
here and generate
lock stitch
sequence
first Mk2
first Mk3
Mk1 to start
third Mk2
second Mk2
fourth Mk2
second Mk3
final Mk2
Figure 6-41
2. Enter the first Mk2 at the start of the outside line of the top of the letter (see Figure 6-41).
3. We plotted the letter into two arc segments since the circumference of the letter c is more than
180 degrees rotation. For uniformity the segments are equal. Enter the first Mk3 (for the first
column segment) in the middle of the first segment, half way from the top end to the center of
the letter (see Figure 6-41).
4. Enter the second Mk2 to define the end of the inside line of the column at the midpoint of the
letter (see Figure 6-41).
5. Enter the third Mk2 to define the end of the outside line of the column at the midpoint of the
letter (see Figure 6-41).
110282-01, Rev A
6. On-Screen Digitizing
6 - 32
Stitch Types
The start of the second column is already defined by the previous Mk2, Mk2 sequence.
6. Enter the second Mk3 (for the second column segment) in the middle of the segment, half way
from the center of the letter to the bottom end of the letter c (see Figure 6-41).
7. Define the end of the inside wall of the second column by entering the fourth Mk2 at the end of
the letter on the inside.
8. Finish the column with a Mk2 at the end of the outside line of the arc (see Figure 6-41).
9. Generate the lock stitch sequence at the bottom right end of the letter c slightly inside the
column stitching.
On the EDS III monitor you will see the letter c sewn in column stitches.
Method Two (Paired Mk3s)
This method allows you to digitize non-symmetrically curved column segments that would not be
defined properly using the previous method.
Specific Rule For Method Two
When defining a column on an arc, start with the Mk1, Mk2 sequence and end with the Mk2, Mk2
sequence. Using the second method, enter 2 Mk3s in the middle of the arc. The first Mk3 is
entered in the middle of the first line of the column, mid-way around the arc you want to
define. The second Mk3 is entered in the middle of the second line of the column, mid-way
around the arc you are defining.
Plot The Letter O
As with the first method, since
the circumference of the letter o
is more than 180 degrees
rotation we will generate the
letter in more than one arc
segment. Typically we would
divide it into two 180 degree
segments, or four 90 degree
segments for uniformity. Make a
vertical line and a horizontal line
intersecting through the center
of the letter dividing it into four
90 degree segments (see Figure
6-42).
Figure 6-42
Editing and Digitizing in EDS III
Melco Embroidery Systems
Column Stitches (Satin Stitches)
6 - 33
Move to the letter o to digitize lock stitches and an underlay.
1. Perform the needle up, Mk1, normal stitch, Mk1 sequence to move to the bottom middle area
of the letter o (see Figure 6-43).
running stitch underlay
using Mk1s around the
middle of the letter
enter the column here and
generate lock stitch
sequence
Figure 6-43
2. Generate lock stitches in the letter o in a vertical direction as shown in Figure 6-43.
3. Using Mk1s, generate a running stitch underlay completely around the letter (see Figure 6-43).
Finish with a Mk1 near your lock stitches.
We are now ready to digitize the letter o in column stitches using the paired Mk3s method.
Digitize The Letter O
1. At the bottom middle of the inside circle of the letter o enter the first Mk1 (see Figure 6-44).
2. Enter the first Mk2 at the bottom of the outside circle of the letter (see Figure 6-44).
third Mk2
digitizing the left
side of the letter
o
second
Mk2
second
Mk3
first
Mk3
first
Mk1
first Mk2
Figure 6-44
110282-01, Rev A
6. On-Screen Digitizing
6 - 34
Stitch Types
3. Enter your first Mk3 for defining the curvature of the inside line of the left arc directly on the
inside boundary of the o, 90 degrees away as plotted in Figure 6-44.
4. Enter the second Mk3 for defining the curvature of the outside line of the left arc directly on the
outside boundary of the o, 90 degrees away as plotted in Figure 6-44).
5. Enter the second Mk2 defining the end of the inside of the column directly at top of the inside
circle of the letter (see Figure 6-44).
6. Enter the third Mk2 to define the end of the outside of the column directly at the top of the
outside circle of the letter (see Figure 6-44).
When digitizing 2 or more consecutive columns on an arc you do not redefine the beginning of the
second (and additional) columns with a Mk1, Mk2. The last Mk2, Mk2 sequence of the prior
column defines the start of the current column (see Figure 6-45).
prior Mk2
digitizing the
right side of the
letter o
prior
Mk2
first
Mk3
second
Mk3
first
Mk2
last Mk2
Figure 6-45
7. The start of the right side column is already defined, therefore, enter a Mk3 for this column
directly on the inside boundary of the column at the half way point to the bottom of the letter
(see Figure 6-45).
8. Enter the second Mk3 on the line of the outside border of the circle and half way around to the
bottom of the letter (see Figure 6-45).
9. Enter the first Mk2 for the end of this column at the bottom middle of the inside circle to define
the end of the inside of the right half column (see Figure 6-45). This is the location where you
started the column.
10. Enter the last Mk2 to define the end of the outside of the column at the bottom of the outside
circle of the letter (see Figure 6-45). This is the same location where you entered the first Mk2,
starting the column stitch digitizing.
11. Generate the lock stitch sequence in the bottom middle of the letter o.
Editing and Digitizing in EDS III
Melco Embroidery Systems
Other Column Stitching Techniques
6 - 35
End The Digitizing Session
1. Click on the Needle Up tool in the Object Edit toolbar.
2. Click on the Other Function Group tool in the Object Edit toolbar to bring up the secondary
toolbar.
3. Click the Return To Origin tool.
4. At the window menu bar, click on Edit, then click on Digitize in the drop down menu.
5. In the Digitizer dialog box, click on End, then click Yes to the question "Are You sure?" in the
End Digitizing Session dialog box that appears.
Save The Design
1. Determine a filename for this digitized design. Call it digmelco.
2. Click on File in the window menu bar, then click on Save As in the drop down menu.
3. In the Directory text box, type the name of the design.
4. Click on File Type and click on Directory until you get the pathname directory and file type
information you want. For this digitizing session choose the pathname C:\EDS3\DESIGNS and
the filename extension CND.
5. Click OK and the example will be saved as a condensed file in the DESIGNS sub-directory.
Other Column Stitching Techniques
The following are examples of various other techniques for digitizing curved column segments that
are difficult to digitize using the two common methods previously discussed.
Curve Smoothing
Digitizing the shapes shown below as column stitches is difficult at best. Using Mk4s to define the
sides of a column allows these shapes to be digitized easily and accurately with column stitches.
General Rules
#1
Always begin entering the Mk4s on the side of the column where you entered the Mk1 to
begin the column.
#2
You may enter up to 48 Mk4s per side when defining the sides of a column with multiple
Mk4s.
110282-01, Rev A
6. On-Screen Digitizing
6 - 36
Stitch Types
The first sample of curve smoothing is shown in Figure 6-46. To produce column stitching similar to
the illustration at the right, refer to the plot on the left in that figure.
Figure 6-46
1. Enter a Mk1 at point A and a Mk2 a point B to initiate the column.
2. Enter a Mk4 at C and a Mk2 at D.
3. On the other side enter a Mk4 at E then a Mk2 at point F to complete the column.
The column will look like the illustration at the right in Figure 6-46, with smooth curved sides.
Another sample of curve smoothing is shown in Figure 6-47. Suppose you wanted to digitize
column stitches in the shaded area of the shape shown at the left in Figure 6-47.
1. Plot the shape by dividing it into four similar sections as shown in the second from left illustration
in Figure 6-47.
2. Begin the column stitch digitizing with a Mk1 at A and a Mk2 at B. This is the way a column is
always started.
3. Enter a Mk4 at the center point of the line from A to C, which is indicated with the number 1.
4. Enter a Mk2 at C and the final Mk2 at D to complete the column stitch digitizing for that section.
Figure 6-47
Editing and Digitizing in EDS III
Melco Embroidery Systems
Other Column Stitching Techniques
6 - 37
5. Since the last two Mk2s have defined the beginning of the lower section of the shape the next
entry would be a Mk4 at point 2.
6. Continue this process until all four sections are digitized. You will get a result similar to the
illustration at the right in Figure 6-47.
Curve Smoothing With Multiple Mk4s
Another type of curve smoothing column digitizing is to define a side or sides using multiple Mk4s.
The sample in Figure 6-48 illustrates this technique.
Mk4s
Figure 6-48
1. Refer to the Figure 6-48 and enter a Mk1 at point A and a Mk2 a point B to initiate the column.
2. Enter a series of Mk4s to define the side from point A to C.
3. Enter a Mk2 at point C to complete the definition of the first side.
4. Enter a series of Mk4s from point B to point D to define the shape of the second side of the
column.
5. At point D enter a Mk2 to complete the column definition.
The result of the above digitizing will yield a design similar to the one on the left in Figure 6-48.
Closely Paired Mk3s
This technique allows you to digitize curved column segments that are not easily digitized using the
standard paired Mk3 method. The technique simply calls for breaking the column into smaller
segments.
In the sample in Figure 6-49, the segments are plotted as shown, and each Mark point is identified
with a letter.
110282-01, Rev A
6. On-Screen Digitizing
6 - 38
Stitch Types
Figure 6-49
The way the column segments are broken up before you digitize determines the direction the
stitches will lay. The first stitch of each segment will align with the line defining the beginning of
that segment; the last stitch will align with the line defining its end. Therefore, you can better
control the lay of the stitches around a curved column by using this technique.
1. To digitize this shape enter a Mk1 at point A and a Mk2 at point B. This identifies the start of the
column.
2. Continue to identify the remaining segments by entering Mk3s in alphabetical order at the
plotted points C through R. Remember to digitize each segment line in the same direction
(from inside to outside in this sample).
3. Complete the column with a Mk2 at point S and a Mk2 at point T. The result of closely paired
Mk3s is shown in the sewout to the right in the illustration.
In the sample of the O in Figure 6-50, you can also use the closely paired Mk3s technique to make
column stitching.
1. Plot the segments as shown and begin the column with a Mk1 at point A and a Mk2 at point B.
2. Enter the Mk3 pairs inside to outside, around the O starting at line C-D, then line E-F, and
continue to each of the plotted segment lines. Your last Mk3 pair will be at line y-z.
3. End the column digitizing with the Mk2s at points A and B.
Figure 6-50
Editing and Digitizing in EDS III
Melco Embroidery Systems
Other Column Stitching Techniques
6 - 39
When using the closely paired Mk3 technique on letters such as the S in Figure 6-51, you may need
to make the Mk3 pairs closer than you might originally think. Notice that the plotting of the end
segments of the letter S are too wide, with the end result being too straight as shown.
end segments
(too wide)
end
segments
too straight
Figure 6-51
By dividing each of the end segments into two you will achieve a much smoother formation at the
ends as shown in Figure 6-52.
end segments
(split into 2)
end segments
rounder
Figure 6-52
Closely Paired Mk2s
There are situations in digitizing columns where your best alternative is digitize using Mk2s, but
very closely paired. Refer to the palm tree in Figure 6-53 and notice that in certain areas, using the
other methods will not work as well as 3 or 4 columns using Mk2s.
Notice the two curved segments that make the turn located in circle A in Figure 6-53. These two
segments may be digitized by using "method one" as described earlier, by putting a Mk3 in the
middle of the curved column (The dots inside the sections indicate where a Mk3 may be placed).
110282-01, Rev A
6. On-Screen Digitizing
6 - 40
Stitch Types
In circle B, the two curved
segments that make the
turn are not symmetrical
enough to allow the
method one technique. In
this situation, it is
recommended to make
normal straight-line
column digitizing (Mk2s at
each of the corners), but
in smaller segments. (See
the outset labeled C in
Figure 6-53.)
A
C
B
Singleline
Column
Stitching
Method
Another method to
produce columns is to
Figure 6-53
identify the column by
entering mark points on a
single side or down the center of the column. This method only works when you wish to maintain
an equal column width throughout.
Singleline Input
For generating a straight column or straight angled column the inputs are Mk1 points. To generate
a spline curve column the inputs are a Mk1 and several Mk4s (at least 3 Mk4s for every 90 degree
arc). A circular column is generated with a Mk1 and an even number of Mk3s (an odd number of
Mk3s causes the last Mk3 to be eliminated).
Refer to Figures 6-54 through 6-59 for illustrations of the Singleline methods of column digitizing.
1. To generate a column by the Singleline method, click on the Column Group tool in the Object
Edit toolbar and click on the Singleline Input button in the secondary toolbar.
2. You must select the type of Singleline you wish to perform by clicking one of the three tool
choices (Left Line, Center Line, or Right Line).
3. To establish a width for the column click the Width tool to open the Enter Column Width dialog
box. Type the specific embroidery point size for the width in the text box and click OK.
4. When you have finished a Singleline column session click on the Singleline Input Off tool in the
Column Group secondary toolbar or press Enter on the computer keyboard.
Editing and Digitizing in EDS III
Melco Embroidery Systems
Other Column Stitching Techniques
6 - 41
2nd
Mk1
2nd
Mk1
1st
Mk1
1st Mk1
2nd
Mk1
1st
Mk1
centerline
Fig. 6-54 Left Line
Fig. 6-55 Center Line
3rd
Mk1
2nd
Mk4
Fig. 6-56 Right Line
3rd
Mk4
last
Mk4
2nd
Mk1
1st Mk4
1st Mk1
1st Mk1
Fig. 6-57 Straight Angled Column
Fig. 6-58 Spline Curved Column
1st Mk3
2nd
Mk3
1st Mk1
Figure 6-59 Circular Column
110282-01, Rev A
6. On-Screen Digitizing
6 - 42
Stitch Types
Fill Stitches
The Fill Stitch is used to generate a solid background for a design or to provide a solid-colored
design. A fill pattern is made of many rows of running stitches going back and forth over a
designated area. The process used in making fill stitches is the most comprehensive of the three
stitches. There are many more parameters which can be controlled and more steps in the process.
Fill Stitch Characteristics
There are many factors that may be manipulated to form various looks in fill stitching. (Refer to the
Figure 6-60.)
Partition Lines:
0 4 3
2 1
0
Stitch Length
Stitch Density
Partition Line Set
(includes a row of
each partition line
This example
includes 5 rows
numbered 0
through 4)
Line of Stitching
Partition Line
Angle (here
equals 45
degrees
Figure 6-60
Stitch Density
Stitch density when applied to fills is similar to the definition describing column stitch density. Fill
stitch density is how many embroidery points there are between rows of stitches (see Figure 6-60).
Stitch Length
This is the same definition used to describe running stitches. Stitch length is the distance set for
maximum length between needle penetrations.
Editing and Digitizing in EDS III
Melco Embroidery Systems
Fill Stitches
6 - 43
Partition Lines
The length of the stitches in a fill can be divided into equal imaginary segments called partitions. If
imaginary lines are drawn through the needle entry points dividing each partition, you will create a
series of parallel lines. These lines are called partition lines. The number of partition lines range from
2 to 8. The example in Figure 6-60 consists of 5 partition lines.
Each row of stitching consists of needle penetrations made from one partition line. A partition line
set is when a row of stitching has been completed with each partition line. The number of rows in
a partition line set always equals the number of partition lines. In Figure 6-60 the number of
partition lines is 5, therefore 5 rows of stitching make up the partition line set.
Partition Line Sequence
You may specify a variable (or scrambled) placement of the partition lines to each other from row
to row within a partition line set. This characteristic is called the partition line sequence, and is
another adjustable fill parameters.
Angle
The fill pattern defined by the stitch length, density, number of partition lines, and the partition line
sequence, may be further modified by changing the angle of the partition lines. The partition line
angle is the angle made by the intersection of any given partition line with the line of stitching in a
fill pattern. The angle is measured in a counter-clockwise rotation from the left end of the line of
stitching (see Figure 6-60). The angle can be any number between 1 degree and 179 degrees.
A 90 degree angle will have each stitch point of a partition line always lining up directly under each
other, producing a line that is 90 degrees from the line of stitching, or directly perpendicular to the
line of stitching. (See the illustration Figure 6-61).
Figure 6-61 Angle 90
110282-01, Rev A
6. On-Screen Digitizing
6 - 44
Stitch Types
A 45 degree angle will have each stitch point of a partition line lining up at an offset that will make
a 45 degrees angle when a line is drawn through each stitch point of the partition line (see Figure
6-62).
Figure 6-62 Angle 45
A 30 degree angle will have each stitch point of a partition line lining up at an offset that makes a
30 degree angle when a line is drawn through each stitch point of the partition line (see Figure
6-63).
Figure 6-63 Angle 30
Examples illustrating 60 degree and 120 degree angles are shown in Figures 6-64 and 6-65.
Figure 6-64 Angle 60
Editing and Digitizing in EDS III
Figure 6-65 Angle 120
Melco Embroidery Systems
Fill Methods
6 - 45
Fill Methods
There are two methods which can be used in making fill stitches. There is no specific name given to
the first method, so for this discussion we will label it the simple fill method. The second method is
called complex fill and is discussed later in this chapter.
Simple Fills
General Rules
NOTE:
#1
Always begin your fill session by clicking on the FILL Group Function button in the Object
Edit toolbar and selecting the Fill Parameters secondary tool. After choosing the desired
parameters in the Insert Fill Stitch dialog box click OK to initiate the fill session.
Define the first line of stitches with a Mk1 at each end of line A-B, location A first, then B
(see illustrations in Figures 6-66 and 6-67). The first Mk1 (at location A) is the entry
point for the fill stitching.
A
B
Another
series of
Mk1s
Figure 6-66
Mk1
Mk1
Mk1
Mk1
Area to
be filled
C
B
A
Area to
be filled
D
Another
series of
Mk1s
D
C
Another
series of
Mk1s
Figure 6-67
#2
Define the last line of stitches with a Mk1 at each end of the line as shown in locations C
and D in the illustrations in Figures 6-66 and 6-67. (Line C-D may be defined in the
reverse direction, with location D to the left and C to the right.) The importance of the
direction of line C-D is that: The second Mk1 is the exit point for the fill stitching.
#3a
Always make the first and last line definitions parallel with each other.
#3b
The longer of the two lines determines the direction of the fill stitching, with the shorter
line always finishing parallel with the longer, regardless of the direction of the shorter
line.
#4
Always define the start of the first side with a Mk2 at location B in Figures 6-66 and 6-67.
#5
Use Mk1s in appropriate increments to define uneven sections of the first side until you get
to line C-D.
110282-01, Rev A
6. On-Screen Digitizing
6 - 46
Stitch Types
#6
Continuing to refer to Figures 6-66 and 6-67, define the end of the first side with a Mk2 at
the end of line C-D closest to the first side.
#7
Define the start of the second side with a Mk2 at the end of line C-D closest to the second
side.
#8
Again use Mk1s in appropriate increments to define uneven sections of the second side,
until you get to point A of line A-B (see Figures 6-66 and 6-67).
#9
Enter a Mk3 at point A to complete the fill.
#10
Always digitize the smaller fills first when digitizing a design that requires more than one
fill to complete the total fill. An example of this rule is found with the first fill digitized
with the irregular shaped block in Figure 6-68.
Prepare For Digitizing Fill Stitches
Start a new digitizing session. For this session load the file from the c:\eds3\designs directory titled
irgshape.pcx.
1. Click on the Edit menu item in the Menu Bar of the Object Edit window.
2. In the Edit drop down menu click on Scan / Graphics and then click on Load Graphic.
3. Click and/or double click in the Open Graphic dialog box until you get the c:\eds3\designs
directory path and .PCX as the File Type.
4. Locate the file named irgshape.pcx and load that file into the EDS III Object Edit window.
The image on the display will look similar to the illustration in Figure 6-68.
2
3
5
1
7
8
4
6
Figure 6-68
Editing and Digitizing in EDS III
Melco Embroidery Systems
Fill Methods
6 - 47
5. Click the Needle Up button in the Object Edit toolbar then click the Mk1 button in the toolbar to
select it.
6. Click in the area in the shape identified as location 1 in Figure 6-68 to put a Mk1 at that location.
7. Click the Normal Stitch button in the toolbar, then generate the lock stitches.
8. To keep the material from puckering or migrating during the fill stitching, digitize a running
stitch underlay by entering Mk1s at locations 2 through 8 as shown in Figure 6-68.
Plot The Artwork
You now have to decide how and where to digitize your fills by plotting the design artwork. Refer
to the illustration and steps below to plot the design.
Since digitizing is created between two parallel lines, we cannot digitize the entire design with just
one fill. For this design, we need to create two independent fills - one for the little triangular shape
in the upper right and the the other for the rest of the design.
1. Draw a line between points C1 and D1 as shown in Figure 6-69. This line must be parallel to the
top line of the design (A2 to B2 in the illustration).
This line divides the design into two shapes. One shape is the triangle created between the points
A1, B1, C1, and D1. The second shape is created between the points A2, B2, C2, D2, C1, and
D1.
B2
A2
C1
D1
B1
A1
A1
B1
Do not superimpose the two
Mks A1 and B1 on each
other. When the design is
sewn it will appear as a point.
C2
D2
Figure 6-69
2. At the first of the two fills (the triangle) label the first line "A1-B1" and last line "C1-D1" as
shown in Figure 6-69.
3. Around the second of the two fills, label the first line A2-B2 and last line C2-D2, also shown in
Figure 6-69.
110282-01, Rev A
6. On-Screen Digitizing
6 - 48
Stitch Types
Your First Fill Digitizing
First select a combination of fill parameters (density, stitch length, number of partition lines,
partition line sequence, and the partition line angle). You can select a pre-determined set of
parameters that are stored in the EDS III program. There are sixteen pre-defined fill patterns.
Fourteen of these patterns (Fills 2 through 8 and 12 through 18) are true fill patterns. The other
two patterns (Fills 1 and 11) are identical Blatt stitch patterns which generate parallel satin stitching
when used.
A table containing all the specific parameter settings for each fill is located in Chapter 5 (the
Reference section) of this manual.
NOTE:
Rule number references in the following steps are for the General Rules for Simple Fills
found a few pages earlier in this section.
1. Click on the Fill Group tool in the Object Edit toolbar to bring up the Fill secondary toolbar.
2. Click the Fill Parameters tool in the secondary toolbar to open the Insert Fill Stitch dialog box.
3. Click on Fourths to identify the fill partition, then click OK.
4. If the Mk1 button is not selected in the Object Edit toolbar click the Mk1 button to select it.
5. Enter a Mk1 at A1 in the illustration in Figure 6-70. This will identify the ’A’ end of the first line
of the first fill.
6. Enter another Mk1 at B1 (near, but not on A1) to identify the ’B’ end of the first line of the fill.
NOTE:
To avoid any undesirable effects, points A1 and B1 should not be superimposed on each
other. The line A1 - B1 is so short that when the design is sewn it will appear as a point.
C1
D1
A1
B1
Figure 6-70
Editing and Digitizing in EDS III
Melco Embroidery Systems
Fill Methods
6 - 49
7. Enter a Mk1 at location C1 and another Mk1 at D1 to identify the last line of the fill (see rule
#2). This is the longest of the two lines and as rule #3b states, the direction of fill stitching will
run the same as this line.
8. In the Object Edit toolbar click the Mk2 button to select it.
9. Enter a Mk2 at point B1 as shown in Figure 6-70. This identifies the start of the first side of the
fill.
10. Next enter Mk2s at C1; and then D1.
11. Click on the Mk3 button in the Object Edit toolbar click to select it.
12. To complete your first fill digitizing enter a Mk3 at point A1 in the illustration.
Now, as shown in Figure 6-71, the monitor will display the triangular section you just digitized in a
fill pattern that enters at point A1 and exits at point D1. If you want the fill stitching to exit at the
left of the triangle, you may interchange points C1 and D1 when you digitize.
Second Fill Of First Design
Let’s digitize the second fill. We know the first fill exits at location D1.
1. Repeat the steps required to initialize a fill:
a)
Click the Fill Function Group tool in the Object Edit toolbar then click the Fill Parameters
tool in the secondary toolbar to open the Insert Fill Stitch dialog box.
b)
Click on Fourths to identify the fill partition, then click OK. This fill will match the first fill.
B2
A2
C1
D1
C2
D2
Figure 6-71
110282-01, Rev A
6. On-Screen Digitizing
6 - 50
Stitch Types
2. In the Object Edit toolbar click the Mk1 button to select it.
3. Enter a Mk1 at A2 in the illustration in Figure 6-71 and another Mk1 at B2 to define the first line
of the fill.
4. Enter a Mk1 at location C2 and another Mk1 at D2 to identify the last line of the fill.
• Notice that the two lines (A2-B2 and C2-D2) are parallel to each other.
• Also, notice that line A2-B2 is the longer of the two lines, so it will determine the
direction of the stitches in the fill.
5. In the Object Edit toolbar click the Mk2 button to select it.
6. Now enter a Mk2 a point B2 in the illustration in Figure 6-71 to identify the start of the first side
of the second fill.
7. Enter a Mk2 at C2 to complete the first side; and then another Mk2 at D2 to identify the start of
the second side.
Note:
This side is not straight in getting back to A2 at the first line. You
must enter Mk1s at points C1 and then D1 to define the irregularity of the side before
finishing it and completing the fill.
8. In the Object Edit toolbar click the Mk1 button and put the Mk1s in the locations C1 and D1.
9. After the last Mk1 (at D1) to define the irregularity of the side, change the Mark button in the
Object Edit toolbar to Mk3 and enter a Mk3 at point A2 to complete the second fill of this
design.
Now the monitor should display the entire shape (both the triangle and the second fill) in the fill
stitching pattern that enters at point A1 (see rule #1) and exits at point D2 (see rule #2).
Notice that the stitching in the second fill is running the same direction as the stitching in the
previous triangular fill. This is because the lines determining the stitching direction for each fill (line
C1, D1 for the first; and line A2, B2 for the second) are parallel to each other.
10. Finish the design by clicking Needle Up, placing a Mk1 in the center of the design, and clicking
the Return To Origin tool from the Other Function Group secondary toolbar.
11. End the digitizing session by going into the Edit menu and clicking on the Digitize menu item,
then clicking End in the dialog box. Click Yes to the question in the dialog box.
12. To save the digitizing session click File, then Save As.
13. Click on the file type until it is .cnd.
14. Click on the directory until the pathname is c:\eds3\designs
15. Type the filename digshape and click OK.
Editing and Digitizing in EDS III
Melco Embroidery Systems
More Advanced Fill Digitizing
6 - 51
More Advanced Fill Digitizing
The examples used in describing the rules (digitizing a square) are the simplest digitizing shapes.
The irregular shape we digitized for our first example was a good exercise for the beginning
digitizer.
Now try digitizing the Saurer logo.
Load Graphic
For this session please load the file from the c:\eds3\designs directory titled sfill.pcx.
1. Click on the Edit menu item in the Menu Bar of the Object Edit window.
2. In the Edit drop down menu click on Scan / Graphics and then click on Load Graphic.
3. Click and/or double click in the Open Graphic dialog box until you get the c:\eds3\designs
directory path and .PCX as the File Type.
4. Locate the file named sfill.pcx and load it into the EDS III Object Edit window. When loaded
properly the image on the display will look similar to the illustration in Figure 6-72.
2
3
1
4
Figure 6-72
Start New Digitizing Session
1. Click the Fill Function Group tool in the Object Edit toolbar then click the Fill Parameters tool in
the secondary toolbar to open the Insert Fill Stitch dialog box.
2. Click on Fourths to identify the fill partition, then click OK.
3. Click the Needle Up button in the toolbar then click the Mk1 button.
4. Click in the area in the shape identified as location 1 in Figure 6-72 and enter a Mk1.
110282-01, Rev A
6. On-Screen Digitizing
6 - 52
Stitch Types
5. Click the Normal Stitch button in the toolbar.
6. Generate the lock stitches, then put down a running stitch underlay by entering Mk1s at
locations 2 through 4 as shown in Figure 6-72.
Digitize The First Fill
1. After generating the simple underlay in the design, perform the following required functions to
initialize the first fill:
2. Click on the Fill Group tool in the Object Edit toolbar to bring up the Fill secondary toolbar.
3. Click the Fill Parameters tool in the secondary toolbar to open the Insert Fill Stitch dialog box.
4. Click on Fourths to identify the fill partition, then click OK.
5. Go to the lower left area of the top section of the logo and enter a Mk1 at point A as shown in
Figure 6-73. This first Mk1 (identifying the beginning of the first line of stitches in the fill) will
be slightly offset from the exact mid-point of the arc in that shape.
C
D
A
B
Figure 6-73
6. Enter a second Mk1 at point B in the same area, slightly offset from the the first Mk1, but this
time to the other side of the mid-point of the arc. This identifies the end of the first line of
stitches.
7. Now enter Mk1s at points C and D to identify the last line of stitches.
Editing and Digitizing in EDS III
Melco Embroidery Systems
More Advanced Fill Digitizing
6 - 53
Refer to Figure 6-74 to define the sides of the fill. Remember to define the first side beginning with
point B.
C
1c
D
2c
3c
4c
A
4b
B
1b
2b
3b
Figure 6-74
8. Change the toolbar Mark selection to Mk2 and enter a Mk2 at point B to start the definition of
the first side of the fill.
9. To define the curvature of the arc from point B to the area where the line straightens, change
the toolbar Mark selection to Mk1 and enter Mk1s repeatedly around the arc to the straight
area (see 1b through 4b in Figure 6-74).
10. Change the toolbar Mark selection to Mk2 again and enter a Mk2 at point D to define the end
of the first side.
11. Enter a Mk2 at point C to define the beginning of the last side of the fill.
12. As in defining the curvature in the first side, enter Mk1 at points 1c through 4c to define the
curvature of the last side.
13. At point A, change the toolbar Mark selection to Mk3 and enter a Mk3 to complete the fill
stitch digitizing process. You now will have a fill pattern inside the top section of the Saurer
logo.
Regenerate the display on the monitor and notice the fill stitching is running in the direction of line
C-D of this section since line C-D is the longest of the two lines that set up the fill.
110282-01, Rev A
6. On-Screen Digitizing
6 - 54
Stitch Types
Digitize The Second Fill
1. Near point D in the first fill, generate a lock stitch pattern, then add the needle up / normal stitch
functions to go to point 1 in the middle section of the logo as shown in Figure 6-75.
C
2
D
1
A
B
3
5
4
Figure 6-75
2. Put in a lock stitch pattern and generate underlay stitches with Mk1s at points 2, 3, 4, and 5 in
Figure 6-75.
3. Click the Fill Function Group tool in the Object Edit toolbar then click the Fill Parameters tool in
the secondary toolbar to open the Insert Fill Stitch dialog box.
4. Click in the diamond next to the fill partition you wish to use, then click OK.
5. Now move to point A in Figure 6-75 and enter a Mk1 to start this fill.
To get the stitching in the second fill to run the same direction as the stitching in the first fill, the
longest line in the second fill must be parallel to line C-D of the first fill. The line running from point
A to point B in this middle fill just happens to be parallel to line C-D of the first section.
6. Move to point B in Figure 6-75 and enter another Mk1. You have just defined the first line of the
middle fill.
7. Enter Mk1s at C and D in Figure 6-75 to define the last line of the fill. Notice that this line is the
shorter of the two so line A-B will determine the direction of stitching.
8. Refer to Figure 6-76 now and go to point B as with the first section of the logo and enter a Mk2
to define the beginning of the first side.
9. Define the curvature of the shape with Mk1s where needed (see 1b through 7b in Figure 6-76)
until you get to point 7b.
Editing and Digitizing in EDS III
Melco Embroidery Systems
More Advanced Fill Digitizing
6 - 55
3c
2c
1c
C
4c
5c
D
6c
7b
A
6b
5b
B
2b
1b
3b
4b
Figure 6-76
10. Enter a Mk2 at point D to complete the definition of the first side.
11. Enter a Mk2 at point C, Mk1s at points 1c through 6c, and the final Mk3 back at point A to
define the last side and complete the fill process for the middle section of the logo.
12. Regenerate the display on the monitor again. Notice the fill stitching is running in the direction
of line A-B of this section; and that the stitching direction of these first two fills are running the
same.
13. Generate lock stitches near point D, move to point 1 in Figure 6-77 with the needle up / normal
stitch sequence, and generate another set of lock stitches to get ready for the last section of
the Saurer logo fill stitching.
A
1
B
5
2
4
C
3
D
Figure 6-77
110282-01, Rev A
6. On-Screen Digitizing
6 - 56
Stitch Types
Fill Digitizing The Last Section
1. After generating the simple underlay in the design, perform the steps required to initialize the fill.
2. Without any further instructions, use the knowledge you have acquired and refer to Figures 6-76
and 6-77 to complete the last fill stitching of the Saurer logo. Refer to the previous sections for
help, if needed.
3. When you have completed the fill stitching with a Mk3 at point A, perform a lock stitch at D in
Figure 6-78.
4c
3c
A
B
2c
1b
1c
2b
3b
4b
5b
C
D
Figure 6-78
You have completed the fill stitching on the Saurer logo and it should look similar to the illustration
in Figure 6-79.
Figure 6-79
Editing and Digitizing in EDS III
Melco Embroidery Systems
Complex Fills
6 - 57
Complete The Simple Fill Digitizing Session
1. Click on the Needle Up tool in the Object Edit toolbar.
2. Place a Mk1 in the center of the design.
3. Click the Other Function Group tool and click the Return to Origin button in the secondary
toolbar.
4. At the window menu bar, click on Edit, then click on Digitize in the drop down menu.
5. In the Digitizer dialog box, click on End, then click Yes to the question "Are You sure?" in the
End Digitizing Session dialog box that appears.
Save The Design
1. Determine a filename for this digitized design. Let’s call it digsfill.
2. Click on File in the window menu bar, then click on Save As in the drop down menu.
3. Click on the file type until it is .cnd.
4. Click on the directory until the pathname is c:\eds3\designs.
5. Type the filename digsfill and click OK.
Complex Fills
The second method for digitizing fills within the digitizing option of EDS III, is called Complex fills.
Actually, the complex fill is the simpler of the two methods because the computer is used more in
automating the process.
General Rules
Following are some generalized statements describing the process of generating fill stitches using
the complex fill method.
• Digitizing in complex fill mode is initiated by clicking on the Complex Fill button from the
Fill Function Group tool. From there, the Insert Complex Fill dialog box opens for you to
modify as required and accept by clicking OK.
• Once a complex fill is initiated, a series of instructions appears on the status line of the
EDS III Layout Window to guide you through the required inputs.
• Mk1s for straight lines and Mk4s for smooth curves are the only Mks used in developing
the complex fill outlines.
• When defining an outline, DO NOT overlap the first and last Mks, or any other Mk that
makes up the outline. Outlines cannot be touching.
110282-01, Rev A
6. On-Screen Digitizing
6 - 58
Stitch Types
Digitizing A Complex Fill
For digitizing a complex fill we will use the Saurer logo outline shown in Figure 6-80.
Load Graphic
For this session please load the file from the c:\eds3\designs directory titled scomplx.pcx.
1. Click on the Edit menu item in the Menu Bar of the Object Edit window.
2. In the Edit drop down menu click on Scan / Graphics and then click on Load Graphic.
3. Click and/or double click in the Open Graphic dialog box until you get the c:\eds3\designs
directory path and .PCX as the File Type.
4. Locate the file named scomplx.pcx and load it into the EDS III Object Edit window. When loaded
properly the image on the display will look similar to the illustration in Figure 6-80.
stitching in the
border
void in
these
sections
Figure 6-80
We are going to outline the outer shape of the design to define the outside boundaries of the
stitching. Then we will outline the three sections of the Saurer logo as areas that we do not wish to
stitch. When this digitizing session is completed we will have a design which has stitching around
the 3 Saurer logo sections, but no stitching in the logo sections.
Editing and Digitizing in EDS III
Melco Embroidery Systems
Digitizing A Complex Fill
6 - 59
Start New Digitizing Session
1. Click the Needle Up button in the toolbar then click the Mk1 button.
2. Click in the area in the shape identified as location 1 in Figure 6-81 and enter a Mk1.
3. Click the Normal Stitch button in the toolbar then click the Mk1 button.
4. Generate the lock stitches at location 1 in Figure 6-81.
Initiate Complex Fill
1. After generating the simple underlay in the design, perform the following required functions to
initialize the first fill.
2. Click on the Fill Function Group tool in the Object Edit toolbar to bring up the Fill secondary
toolbar.
3. Click the Complex Fill tool in the secondary toolbar to open the Insert Complex Fill dialog box.
This dialog box contains several text boxes for the various fill parameter items which have been
discussed in the simple fills section. There are also text boxes for fill underlay information. You may
change any of the items in the various text boxes in the dialog box, but for this session leave all the
settings in the dialog as they appear.
4. Click OK and you are ready to Start CF Outline 1.
First Outline
After completing the previous steps, you are now ready for the start of the first complex fill outline.
1. Enter a Mk1 in the very top of the design shown as item A in Figure 6-81.
2. Enter another Mk1 at approximately point B in Figure 6-81.
3. Now digitize around the curve of the design on the right edge with Mk4s at the approximate
locations 1b through 4b as shown in Figure 6-81.
4. Enter another Mk1 at point C on the very bottom corner of the design as shown in Figure 6-81.
5. Enter another Mk1 at point D with Mk4s around the curve of the left edge of the design in the
approximate locations shown as 1d through 4d in Figure 6-81.
You do not need to enter any more Mark points to finish the outline. When the first outline is
completed in the next step, the last Mark point entered (4d) will automatically be connected to the
first Mark point (A).
110282-01, Rev A
6. On-Screen Digitizing
6 - 60
Stitch Types
A
1
4d
B
3d
1b
2b
2d
3b
1d
4b
D
FIRST OUTLINE
C
Figure 6-81
6. To conclude the initial outline of the design, press the Enter key on the computer keyboard. The
status line at the bottom of the screen prompts for Start CF Outline 2. You may now start the
second complex fill outline.
At this time, you may either start a second outline (which we will do) or begin the completion steps
for the complex fill. We will discuss the completion steps after the fourth outline has been created.
Editing and Digitizing in EDS III
Melco Embroidery Systems
Digitizing A Complex Fill
6 - 61
Second Outline
1. Enter a Mk1 at point E in Figure 6-82. This is the upper corner point of the top section of the
Saurer logo.
2. Next, enter Mk1s at point F; and then point G.
3. Now enter Mk4s around the entire bottom left arc of this section (points 1g through 6g) to
provide the curvature of this arc.
As with the first outline, you do not need to enter any more Mark points to finish this second
outline. When the outline is terminated in the next step, the last Mark point entered (6g) will
automatically be connected to the first Mark point (E) of the second outline.
4. To conclude the second outline of the design press the Enter key on the computer keyboard.
E
F
SECOND
OUTLINE
6g
5g
4g
3g
G
2g 1g
Figure 6-82
110282-01, Rev A
6. On-Screen Digitizing
6 - 62
Stitch Types
Third And Fourth Outlines
Now that you have generated the initial and second outlines, you are ready to complete the last
two outlines of the design, CF Outline 3 and CF Outline 4.
1. Continue to follow the points shown in Figure 6-83 in their alpha-numeric order. Enter the Mk1
from H through to the last Mk4 at location 4p near the top point of the lower section of the
logo. Enter Mk1s at the capital letter points defining lines, and Mk4s at the numbers associated
with lower class letters defining arcs.
2i
L
3i
4p
M
3p
4i
1i
I
5i
6i
THIRD
OUTLINE
2p
7i
2m
1p
P
3m
4h
4m
3h
2h
3j
1m
2j
1j
5m
J
FOURTH
OUTLINE
H
1h
O
K
N
Figure 6-83
2. Remember to press the Enter key on the computer keyboard at the end of the third outline, after
the Mk1 at point K.
Editing and Digitizing in EDS III
Melco Embroidery Systems
Complete The Complex Fill Digitizing Session
6 - 63
3. After entering the Mk4 at 4p, go to the next section in this manual to begin the steps to
complete the complex fill session.
Complex Fill Completion Steps
1. As with the end of the other outlines, when you press the Enter key on the computer keyboard
you may start another outline. We have no more outlines, so to indicate the end of the
complex fill outlines press the Enter key on the computer keyboard a second time. The status
line at the bottom of the screen prompts for Select CF Entry.
2. Now select the complex fill entry point. Enter a Mk1 at the point you want to start sewing within
the complex fill area. If the Mk1 is entered outside the complex fill area it will automatically be
moved to the edge of the complex fill. The status line at the bottom of the screen prompts for
Select CF Exit.
3. Next select the exit point for the complex fill. Enter a Mk1 at the location you want the complex
fill to finish. Any point on the outside boundary is a valid exit point. If the exit point is entered
inside or outside the fill area it will be moved to the outside edge.
4. After the exit point is set the status line at the bottom of the screen prompts for Select CF
Direction. To select a direction for the complex fill stitching enter 2 Mk1s along a true or
imaginary line to define the direction (or line) of stitching in the complex fill.
After the second Mk1 is entered the stitches for the complex fill will be generated. Depending on
the complexity and size of the design, this will take a few moments to process. After processing,
the design will then be shown on the EDS III monitor screen.
Complete The Complex Fill Digitizing Session
Completing and saving a design with a complex fill is the same as with simple fills.
1. Click on the Needle Up tool in the Object Edit toolbar.
2. Place a Mk1 in the center of the design.
3. Click the Other Function Group tool and click the Return to Origin button in the secondary
toolbar.
4. At the window menu bar, click on Edit, then click on Digitize in the drop down menu.
5. In the Digitizer dialog box, click on End, then click Yes to the question "Are You sure?" in the
End Digitizing Session dialog box that appears.
110282-01, Rev A
6. On-Screen Digitizing
6 - 64
Stitch Types
Save The Design
1. Determine a filename for this digitized design. Call it cmplxfil.
2. Click on File in the window menu bar, then click on Save As in the drop down menu.
3. Click on the file type until it is .cnd.
4. Click on the directory until the pathname is c:\eds3\designs.
5. Type the filename cmplxfil and click OK.
Editing and Digitizing in EDS III
Melco Embroidery Systems
Graphic Load
7-1
7. Scanning
Introduction
The EDS III Scanning and On-Screen Digitizing option allows you to scan or load graphic images
onto the EDS III monitor for digitizing directly on the screen without the use of a tablet digitizer.
The on-screen digitizing feature duplicates all the functionality of a hardware based digitizer. This
feature uses the system mouse to select menu commands located on the monitor screen, then
allows you to digitize over the displayed design image on the screen, using the same system mouse.
Setting Virtual Memory
IMPORTANT!
Working with graphic files with Scanning and On-Screen Digitizing requires a large amount of
memory available within the computer system. It is recommended that your system have 20
megabytes or more of virtual memory, with a requirement of at least 16 megabytes. If you do not
have the required amount of virtual memory, the brief procedure below may help you set up the
required virtual memory allocation. If you need additional information on memory management,
refer to the Microsoft Windows User’s Guide.
1. Close all open windows programs and go to the Program Manager window.
2. In the Main group window, double click on the Control Panel icon.
3. In the Control Panel group window, double click on the 386 Enhanced icon.
4. In the 386 Enhanced dialog box, click on the Virtual Memory... button. The Virtual Memory
Current Setting information box will indicate the Size of the memory. This should equal at least
16,000 KB or more.
If so, stop here, you need not change the memory allocation. If less than 16,000 KB, click on the
Change>> button and go to the next step.
5. In the New Size text box, type in the new value for virtual memory then click the OK button.
6. Click the Yes button to make the changes.
7. Click the Restart Windows button.
Scan / Graphics
Graphic Load
Before you can perform any on-screen digitizing you must get an image onto the monitor screen.
This can be done by scanning a new design or loading an existing graphic image file. This section
describes the graphic image file loading function.
110282-01, Rev A
7. Scanning
7-2
Scan / Graphics
The EDS III Scanning and On-Screen Digitizing option allows you to load and save bitmaps in the
following formats:
Format Acronym
Format Description
Extension
MIF
Melco Image Format
.mif
PCX
PC Paintbrush Format (ZSOFT)
.pcx
BMP
Windows (and OS/2) Bitmap
.bmp
TIFF
Tagged Information File Format
.tif
GIF
Graphic Interchange Format (Compuserve)
.gif
TGA
Targa Image Format
.tga
JPEG
Industry standard compressed image Format
.vpg
PCD
Kodak Photo CD Format
.pcd
PICT
Apple Macintosh PICT Format
.pic
1. In the EDS III Application window click on File in the menu bar and then click on New in the drop
down menu. If already in a Layout window go to step 2 to start a graphic load.
2. Click on Edit in the new Layout window.
Figure 7-1
3. Click on Scan / Graphics in the Edit drop down menu.
4. Click on Load Graphic in the Scan / Graphics menu.
Editing and Digitizing in EDS III
Melco Embroidery Systems
Graphic Load
7-3
The Open Graphic dialog box will appear as shown in Figure 7-2. This dialog box allows you to
locate the available graphic file types and file names in various directories of your computer.
This example indicates there are no MIF type files located in the d:\eds3 directory.
Figure 7-2
5. Double click in the directories list box until you get your desired directory pathname showing in
the directory name location. In the example in Figure 7-3 we have chosen the d:\eds3\designs
directory.
6. Click in the diamond-shaped option button to the left of the file type you wish to load. This will
put a dark highlight mark inside the button indicating that all files in the selected directory with
this file type extension will be shown in the files list box. If no files are in the list box (as Figure
7-2 shows), no file with that extension is located in that directory.
NOTE:
See the chart on Page 7-2 for file types and extensions.
110282-01, Rev A
7. Scanning
7-4
Scan / Graphics
In the following example we have clicked on the PCX file type and have found that one file exists in
the d:\eds3\designs directory. This file is named sgraphic.pcx (Note: your system may not have
this specific file).
Figure 7-3
7. Click on the file name in the Files list box to highlight it, then click the OK button.
The filename you have chosen will load into the Layout window in EDS III as shown in the Figure
7-4.
Editing and Digitizing in EDS III
Melco Embroidery Systems
Graphic Load
7-5
In the example shown in Figure 7-4 we have loaded the file named sgraphic.pcx into the EDS III
Layout window.
NOTE:
Your system may not have this specific file. You should choose a file of your choice to
load for on-screen digitizing.
Figure 7-4
ATTENTION! EDS III will handle almost any type of image,
from black and white to gray scale, and even color. Be
aware, however, that 24 bit color images take up a
considerable amount of memory and may slow the
performance of EDS III significantly.
110282-01, Rev A
7. Scanning
7-6
Scan / Graphics
Graphic Save
Graphic Save allows you to save your currently loaded or scanned image in the same formats that
are available in load.
1. In the Layout window, click on Edit.
Figure 7-5
2. In the Edit drop down menu, click on Scan / Graphics.
3. In the Scan / Graphics menu, click on Save Graphic.
The Save Graphic dialog box will appear as shown in Figure 7-6. This dialog box allows you to save
the graphic in your Layout window to a designated directory as a graphic file. The graphic may be
saved in the same file format types as were available in the Load Graphic function.
Editing and Digitizing in EDS III
Melco Embroidery Systems
Graphic Save
7-7
In the example in Figure 7-6, we are saving the graphic file named sgraphic into the d:\eds3\designs
directory in the MIF file format. As described in the Load Graphic section of this chapter, you may
name your file with any allowable 8 digit name, select any directory, and choose any other available
graphic formats.
NOTE:
Only the MIF format will save information on the scale, orientation, and offset for a particular
graphic. All other formats are read in and displayed at a default scale of 1 pixel per
point, centered on the design origin, and in a normal non-rotated orientation.
Figure 7-6
110282-01, Rev A
7. Scanning
7-8
Scan / Graphics
Import from Clipboard
This option is only available if a graphic image is currently in the clipboard. You can move graphics
to the clipboard from Graphic applications (such as Paintbrush or Corel Draw) by selecting the area
to be copied and choosing Copy or Cut from their Edit menu. Then in EDS III you can load the
graphic clip into the Layout window.
After a graphic is in the clipboard refer to the following steps to import the graphic into EDS III.
1. In the Layout window click on Edit.
Figure 7-7
2. In the Edit drop down menu click on Scan / Graphics.
3. In the Scan / Graphics menu click on Import from Clipboard. The image will be imported and
displayed at a resolution of 1 pixel per point.
Editing and Digitizing in EDS III
Melco Embroidery Systems
Import from Clipboard
7-9
Scanner Information
The scanning function allows you to scan a design directly into the monitor screen for on-screen
digitizing. This function works with any scanner which complies with the "TWAIN" scanning
industry standard communications format. You may buy any TWAIN compatible scanner to
implement scanning in EDS III.
Note 1:
TWAIN 32 compatible scanners are not the same as TWAIN compatible scanners and
can not be implemented from the EDS III program.
Note 2:
Be advised that Melco cannot and does not support any scanners in the market place.
Any technical assistance that may be required with the scanner you purchase must be
obtained through the scanner dealer.
If you attempt to use a scanner which does not comply with TWAIN, you will not be able to access
the scanning program directly from the EDS III program. You must go into the scanning program
independent from EDS III to perform the scanning operation. Then you will be able to "load" any
properly saved graphic files that have been scanned with that scanner.
The only requirement for loading a graphic file is that the file format is one of the formats
supported by EDS III. The graphic load and save functions support most industry standard graphic
formats. See the "Graphic Load" section of this chapter for information on which formats are
supported.
An additional feature in the On-Screen Digitizing and Scanning option allows you to import
graphical data from the clipboard to the EDS III Layout window. This feature allows you to import
graphics from any Windows based application.
Once loaded into the Layout window, images can be scaled, rotated, dimmed, zoomed, and
panned to give you the maximum flexibility in displaying your image for digitizing a design on
screen.
110282-01, Rev A
7. Scanning
7 - 10
Scanner Information
Select Scanner
This function need only be performed when you start the scanning process for the first time. You
will not need to return to this function unless you add a scanner or want to change to a different
scanner that already exists with the system. The last scanner you select in this function will remain
the "default" scanner indefinitely.
1. If in the EDS III Application window, click on File in the menu bar and then click on New in the
drop down menu. If already in a Layout window go to step 2 to start a graphic load.
2. In the new Layout window click on Edit.
Figure 7-8
3. In the Edit drop down menu click on Scan / Graphics.
4. In the Scan / Graphics menu click on Select Scanner
Editing and Digitizing in EDS III
Melco Embroidery Systems
Select Scanner
7 - 11
The Select Source dialog box will appear (see Figure 7-9) showing the available TWAIN compatible
scanners associated with your system. The example shown below indicates that there is one
scanner source (DeskScan II) attached to the example system.
NOTE:
If your scanner does not appear in the Sources list, refer to the following discussion:
* For the Select Scanner function to identify the available TWAIN compatible scanners attached to
the computer system, the TWAIN software which came with your scanner must first be
properly installed and configured for your system.
* Melco has found that a common mistake is the failure to add the path for your scanner to the
autoexec.bat file.
* Refer to your scanner manual and the Microsoft Windows user’s Guide for information on
modifying the autoexec.bat file.
Figure 7-9
5. Click on the source you wish to scan with to highlight the desired source.
6. Click on the Select button to choose the scanner and return to the current EDS III Layout
window.
NOTE:
Each time you open EDS III and perform the Scan function from this point forward, the
scanner you just selected will remain the selected scanner. The scanner you select will
remain the "default" scanner until you go into the Select Scanner function and select a
different scanner.
110282-01, Rev A
7. Scanning
7 - 12
Scanner Information
Scan
EDS III does not directly interface with any scanner. When you select Scan you are telling EDS III to
load the selected scanner’s software to perform the scan and return the image to EDS III. As a
result, the screen that you see when you select Scan will depend on the software that came with
your scanner. When the TWAIN driver you selected is finished, it will return the image to EDS III for
display. At that point you can change the scale or orientation, etc.
1. In the Layout window click on Edit.
Figure 7-10
2. In the Edit drop down menu click on Scan / Graphics.
3. In the Scan / Graphics menu click on Scan.
The selected scanner manufacturer’s operating software will appear on the screen and the
scanning operation will begin. You will be able to work inside the scanner operating software just
as if you had opened it independent of the EDS III program.
Editing and Digitizing in EDS III
Melco Embroidery Systems
Scan
7 - 13
Tips for Successful Scanning
1. If your scanning software supports a custom resolution, set it to 254 dots per inch. This is the
native resolution of EDS III.
2. Avoid resolutions greater than 254 dpi. Higher resolutions (such as 300 dpi) will consume more
memory, slow down your system, and give you a resolution no greater than 254 dpi, which is
the EDS III resolution.
3. Avoid color if possible. Color images significantly slow your system and make it harder to see
your stitches, even with Dull Graphic.
4. If you use color, use no higher color resolution than the driver you have installed in Windows. If
your Windows uses 16 color graphics (standard VGA) then scanning a graphic as a 24 bit
graphic makes it 6 times larger than it needs to be! Check your scanner manual for instructions
to select your color resolution.
After the scanning operation is completed and you close the scanner manufacturer’s software
program, the screen returns to the active EDS III program and you may begin to perform some of
the available image modifications or go directly to the on-screen digitizing function. Discussions for
both situations follow.
110282-01, Rev A
7. Scanning
7 - 14
Image Modification
Image Modification
When a graphic file is loaded, a clipboard is imported, or an image is scanned into the EDS III
Layout window, you may manipulate the image in several areas. These areas are: Scale Graphic,
Dull Graphic, Hide Graphic, and Clear Graphic.
Scale Graphic
To enter into the scale graphic mode perform the following steps:
1. In the Layout window click on Edit.
Figure 7-11
2. In the Edit drop down menu click on Scan / Graphics.
3. In the Scan / Graphics menu click on Scan.
Scale Graphic displays the dialog box shown in Figure 7-12.
Editing and Digitizing in EDS III
Melco Embroidery Systems
Scale Graphic
7 - 15
This dialog not only allows you to scale the graphic, but also lets you control the orientation and
offset.
Figure 7-12
Scale
The Scale can be Proportional or not, depending on whether the Proportional checkbox has been
checked. In a proportional scale the Horizontal scale is exactly the same as the Vertical scale, and
the image is not distorted (see Figure 7-13). In a non-proportional scale there are separate
horizontal and vertical scales, allowing you to distort the picture as shown in Figure 7-14.
Fig. 7-13 Proportional
110282-01, Rev A
Fig. 7-14 Horizontal Scale Set at 3 times the vertical
7. Scanning
7 - 16
Image Modification
Location
Location represents the number of embroidery points (1/254th of an inch) that the center of the
image is offset from the center of the design (or Layout window). This allows you to move your
image with respect to the design.
X Offset allows you move the image left or right. Enter numerical points to move right. Put a minus
(-) before the numerical points to move left.
Y Offset allows you move the image up or down. Enter numerical points to move down. Put a
minus (-) before the numerical points to move up.
Orientation
Once an image is located in the Layout window, you may manipulate the horizontal and vertical
presentation of the image from the orientation section of the Scale Graphic dialog box. This
function presents combinations of axis mirroring and axis property swapping in such a way to
present the 8 views shown in the orientation box as you click on the box.
The F in the orientation box represents the position that the image on the screen is currently being
presented.
NOTE:
The image modification attributes are only saved when your image is saved in a MIF format.
If you have loaded or scanned and then modified the image in the Scale Graphic
function, you can only save that orientation, scale, and offset by saving the file as a MIF!
Tip: Using Scale Graphic
When EDS III displays a design or image at actual size, it is displaying the information at one
embroidery point per pixel, or 1 pixel per 1/254th of an inch. To display an image at actual size, you
should scan the image at 254 pixels per inch or calculate the scale according to the following
formula:
scale = 254/ dpi where dpi is the dots per inch of the image.
For example: a 100 dpi image would have a scale of 2.54 ( 254/100 ) if you wanted to display the
image at the original size for digitizing.
Editing and Digitizing in EDS III
Melco Embroidery Systems
Dull Graphic
7 - 17
Dull Graphic
When selected, this will reduce the intensity and color saturation of your image to make it easier to
see your stitches and mark points as you digitize.
To enter into the dull graphic mode, perform the following steps:
1. In the Layout window click on Edit.
Figure 7-15
2. In the Edit drop down menu click on Scan / Graphics.
3. In the Scan / Graphics menu click on Dull Graphic.
When Dull Graphic is checked as shown in Figure 7-16, your
graphic is dulled. Click again on Dull Graphic to return to
the non-dulled condition.
Figure 7-16
110282-01, Rev A
7. Scanning
7 - 18
Image Modification
Hide Graphic
Will hide the current image temporarily. When Hide Graphic is checked on the menu, there is
already a hidden image.
To enter into the hide graphic mode perform the following steps:
1. In the Layout window click on Edit.
Figure 7-17
2. In the Edit drop down menu click on Scan / Graphics.
3. In the Scan / Graphics menu click on Hide Graphic.
When Hide Graphic is checked as shown in Figure 7-18,
your graphic will disappear from the screen. Click again on
Hide Graphic to return to the non-hidden condition.
Figure 7-18
Editing and Digitizing in EDS III
Melco Embroidery Systems
Clear Graphic
7 - 19
Clear Graphic
Clears the graphic from the EDS III Layout window.
Attention! This function will erase any modified or
unsaved graphic currently located in the Layout window
if not saved before performing!
To clear the graphic from the EDS III Layout window perform the following steps:
1. In the Layout window click on Edit.
Figure 7-19
2. In the Edit drop down menu click on Scan / Graphics.
3. In the Scan / Graphics menu click on Clear Graphic.
If the graphic image has been saved, the file will close and the image will be erased from the EDS III
Layout window.
If you have not saved the image or have modified the image since the last save function, a warning
dialog box will appear asking if you want of save your graphic image before closing.
110282-01, Rev A
7. Scanning
7 - 20
Image Modification
You may click on the Yes button to save the graphic file in any of the acceptable file formats.
You may click the No button to clear and not save the graphic.
Attention! If you choose the No button, note that if the
graphic has never been saved it will be cleared from
memory and cannot be retrieved again. If the graphic has
been previously saved but modified since the last time it
was saved, the graphic is cleared from the Layout
window, but the last saved file can be reloaded.
You may click the Cancel button to not clear the graphic image. This will return you to the Layout
window without any activity by this function.
Editing and Digitizing in EDS III
Melco Embroidery Systems
Editing and Digitizing in EDS III
INDEX
Color Change
reference
Column Density
reference
underlay
Column Fills
reference
Column Group Tools
descriptions
Column Stitches
curve smoothing
density
digitizing
on an arc
rules for digitizing
A
Accugrid Setup Menu
Angle, Fill
reference
Application Window
Artwork
attaching to tablet
chenille
enlarging
plotting
preparation
scaling
Auto Retrace
Auto Save
2-3
3-32, 6-43
5-21
3-1
2-7
4-4
2-5
2-6, 3-37
2-5
3-3
5-8
1-10
B
Bean Stitch
reference
Blatt Fill Stitch
reference
Block
defining
Block Editing
Boring Functions
reference
5-9
6-9
3-23, 6-35
3-14, 6-27
3-14, 6-26
3-17, 6-29
3-14, 3-17, 3-20, 6-30
6-32
3-29, 6-40
3-14, 6-26
singleline method
straight columns
COM Port
attaching tablet digitizer to
2-2
Complex Fills
3-47, 6-57
digitizing
3-48, 6-58
end outlines
3-52, 6-63
ending session
3-52 - 3-53, 6-63
fill number
3-48
reference
5-8
rules
3-47, 6-57
select direction
3-53, 6-63
select entry
3-52, 6-63
select exit
3-53, 6-63
start outline
3-49, 6-59
underlay
5-24
underlay number
3-48
Condensed Points
view
3-5, 6-6
Cursor
digitizing
1-1
editing
1-1
Curve Smoothing
digitizing
3-23, 6-35
rules
3-23, 6-35
Curved Lines
digitizing
3-11, 6-23
running stitches
3-11, 6-23
Curves
curve smoothing
3-23, 6-35
plotting
3-12, 6-24
rules for digitizing
3-12, 6-24
3-12, 6-23
5-18
5-19
1-22
1-22
5-2
C
Center Walk
underlay
Chain Stitch
Changing Size
symbol
Chenille Digitizing
initializing session
scaling artwork
Chenille Digitizing Chapter
Chenille Fill Stitches
rules
Chenille Stitches
chain
coil
digitizing
moss
needle height
parameters
session setup
Clear
reference
Clear Graphic
Coil Stitches
chenille
rules
5-7
3-14 - 3-15
5-18, 5-23
5-11
5-11
4-1
5-15
4-4
4-4
4-1
4-2
4-1
4-2
4-4
4-1
4-3, 5-1
4-1
4-4
5-7
7-19
D
Data Selection Highlight
Datasets
deleting condensed
4-2
4-3
1
1-13
1-18
INDEX
Editing and Digitizing in EDS III
deleting expanded
1-19
inserting condensed
1-18
inserting expanded
1-20
Defining A Block
graphically
1-24
manually
1-23
Density
column
5-23
fill
5-20
Design Center
setting
3-5
Design Editing
1-1
Dialog Box
Digitizer
3-3, 6-4 - 6-5
Display Mode
3-5
Layer by Color
1-26
On-Screen Digitizing
6-5
Open Graphic
7-3 - 7-4
Save Graphic
7-7
Scale Graphic
7-15
Search For Condensed Function
1-15
Search For Expanded Function
1-15
Select Source
7-11
Setup
3-5, 5-23
Digitizer
dialog box
3-3, 6-4 - 6-5
on-screen dialog box
6-5
tablet
3-1
Digitizing
chenille
4-1, 4-4 - 4-5
column stitches on arc
3-18, 6-31
complex fills
3-48, 6-58
ending complex fill session
3-53, 6-63
ending session
3-23
ending simple fill session
3-47
fill stitches
3-31, 3-38, 6-42
first design
3-7, 6-19
initializing session
3-1
lock stitches
3-8, 6-20
more advanced fills
3-41, 6-51
movement between letters
3-10, 6-22
on-screen
6-1
running stitches
3-7, 6-19
singleline column method
3-29, 6-40
special stitch
5-16
symbol (reference)
5-11 - 5-12
Digitizing Cursors
1-1
Digitizing Reference Chapter
5-1
Display Mode
1-13, 6-5
dialog box
3-5
Dots Per Inch
recommended for scanning
7-13
Dull Graphic
7-17
E
Edge Walk
underlay
Editing
block editing
defining a block
layer by color
moving through a design
Editing Chapter
Editing Cursor
EDS II Files
compatibility
Electrostatic Discharge
general information
Embroidery Digitizing Chapter
5-11
1-22
1-23
1-26
1-13
1-1
1-1
1-22
2-1
3-1
F
Fill Angle
3-32, 6-43
reference
5-21
Fill Density
reference
5-20
Fill Group Tools
descriptions
6-11
Fill Methods
3-34
Fill Number
complex fill
3-48
Fill Stitches
angle
3-32, 6-43
chenille
4-2
completing session
3-47
digitizing
3-31, 3-38, 6-42, 6-48
digitizing preparation
3-36
partition line sequence
3-32, 6-43
partition lines
3-32
patterns
5-24
stitch density
3-31, 6-42
stitch length
3-32, 5-21, 6-42
Fills
pre-defined, table of
5-20
reference
5-19
Fix X - Y Origin
reference
5-5
G
Graphic File Formats
table of information
Graphic Load
Graphic Save
Graphical Block Select
2
7-2
7-1
7-6
1-24
Editing and Digitizing in EDS III
INDEX
Mirror Symbol
reference
Modify A Block
Moss Stitch
Movable Menu
functions
illustration
moving
placing
Movement Between Letters
jump stitch
needle up stitch
Moving
a block
mark points
stitch points
through design during editing
to start of design
Multiple Blocks
H
Hardware
starting
Hide Graphic
Horizontal
setting
3-1
7-18
3-6
I
Icon
EDS III
Image Modification
Import from Clipboard
Inserting
expanded datasets
mark points
3-1
7-14
7-8
1-20
1-18
J
Jump Stitch
reference
5-7
Narrow Column
underlay
Needle Height
chenille
Needle Up Stitch
digitizing
reference
Normal Stitch
reference
Number Keys
reference
1-26
1-26
7-19
7-17
7-18
7-8
7-2
7-6
7-14
7-12
7-10
7-5
1-2
7-1
3-10
3-10
1-24
1-16
1-19
1-13
3-6, 6-18
1-26
5-10
4-3, 5-1
3-10
5-7
5-7
5-22
O
Object
relating to point editing
1-11
Object Edit Window
1-1
toolbar
1-4, 1-6, 1-8, 6-7
On-Screen Digitizing
dialog box
6-5
first design
6-18
initializing session
6-2
loading image onto screen
6-2
tips
6-18
On-Screen Digitizing Chapter
6-1
Open Graphic
dialog box
7-3 - 7-4
Orientation
in scale graphic mode
7-16
Other Function Group Tools
descriptions
6-16
Outline Stitching
complex fills 3-49 - 3-51, 6-59, 6-61 - 6-62
7-16
3-8, 6-20
4-1
M
Mark Points
changing type
inserting additional
moving
swapping
Max Stitch Length
reference
Melco Apps Window
5-1
5-1
3-4
2-7, 3-4
N
L
Layer by Color
dialog box
editing
Layout Window
clear graphic
dull graphic
hide graphic
import from clipboard
load graphic
save graphic
scale graphic
scan
select scanner
sgraphic.pcx
toolbar
Load Graphic
Location
in scale graphic mode
Lock Stitches
digitizing
Loop Stitch
(See Moss Stitch)
5-13 - 5-14
1-25
4-1
1-17
1-18
1-16
1-17
5-3
6-1
3
INDEX
Editing and Digitizing in EDS III
Scale
in scale graphic mode
Scale Graphic
dialog box
location
orientation
scale
tips
Scaling
chenille artwork
graphic image
Scan
Scan / Graphics
Scanner Information
Scanning
recommended dots per inch
setting virtual memory
tips
Scanning Chapter
Search For Condensed Function
dialog box
Search For Expanded Function
dialog box
Secondary Group Toolbars
Select CF Direction
Select CF Entry
Select CF Exit
Select Scanner
Select Source (scanner)
dialog box
Sequins
reference
Set Horizontal
reference
Setup
dialog box
Short Stitches
reference
Simple Fills
rules
Singleline Column Stitching
Singleline Input
digitizing
reference
Size
special stitch
Software
starting
Special Stitch
digitizing
reference
rules
size
P
Partition Line Sequence
column fill
standard fill
Partition Lines
Pattern Fill
Plotting
artwork for fills
column stitches on arc
curves
Point Editing
condensed designs
expanded designs
general
rules
Premier / Stellar
file limitations
making files for
3-32, 6-43
5-9
5-22
3-32
6-13
3-37
3-17, 3-20, 6-30
6-32
3-12, 6-24
1-16
1-19
1-11
1-11
1-20
1-21
R
Recall Symbol
reference
Redo/Undo
Reset Sequence
reference
Return To Origin
reference
Rules
chenille coil stitches
chenille fill stitches
column stitches
column stitches on arc
complex fills
curve smoothing
curved lines
point editing
simple fills
special stitch
Running Stitches
curved lines
digitizing
straight lines
underlay
5-13
1-9
5-22
5-6
4-3
4-2
3-14
3-17, 3-20, 6-30
6-32
3-47, 6-57
3-23, 6-35
3-12, 6-24
1-11
3-34, 6-45
5-16
3-11, 6-23
3-7, 6-19
3-8, 6-21
3-15
S
Satin Stitches
digitizing
3-14, 6-26
Save Design 3-23, 3-47, 3-53, 6-35, 6-57, 6-64
Save Graphic
dialog box
7-7
4
7-15
7-14
7-15
7-16
7-16
7-15
7-16
4-4
6-3
7-12
7-1
7-9
7-13
7-1
7-13
7-1
1-15
1-15
6-7
3-53, 6-63
3-52, 6-63
3-53, 6-63
7-10
7-11
5-2
3-6
5-4
3-5, 5-23
5-2
3-34, 6-45
3-29, 6-40
3-29, 6-40
5-22
5-17
3-1
5-16
5-16
5-16
5-17
Editing and Digitizing in EDS III
INDEX
using
5-17
Speed Functions
reference
5-2
Stargate
attaching digitizer tablet to
2-3
Start Of Design
moving to
3-6, 6-18
Starting The System
6-1
Static
(See Electrostatic Discharge)
2-1
Step Stitch Fill
reference
5-20
Stitch Density
column stitches
6-27
fill stitches
3-31, 6-42
Stitch Length
chenille stitches
4-1
column fill stitches
5-9
fill stitches
3-32, 5-21, 6-42
setting
3-7
underlay
5-11
Stitch List
data selection highlight
1-13
display
1-13
Stitch Point
moving
1-19
Stitch Types
3-7, 6-19
bean
5-18
bean stitch
3-12, 6-23
blatt stitch fill
5-19
chenille
4-1
column stitches
3-7, 3-14, 6-26
fill stitches
3-7, 3-31, 6-42
lock stitches
3-8, 6-20
running stitches
3-7, 6-19
satin stitches
3-14, 6-26
step stitch fill
5-20
Stitches Group Tools
descriptions
6-7
Store Symbol
reference
5-12
Stored Symbol Group Tools
descriptions
6-15
SUPERSTAR Designs
compatibility
1-22
Symbol
changing size
5-15
digitizing
5-11
mirroring
5-13
recalling
5-13
storing
5-13
System
starting
6-1
T
Tablet Digitizer
Accugrid setup menu
2-3
attach to COM port
2-2
attach to Stargate
2-3
installing
2-2
power requirements
2-1
setup procedure
2-2
troubleshooting
2-3
Tablet Digitizer Operation Chapter
2-1
Toolbars
layout window
1-2
object edit
1-4, 1-6, 1-8
object edit window
6-7
secondary group
6-7
Tools
object edit
1-11
Trim
reference
5-8
TWAIN
information
7-9
U
Underlay
complex fills
reference
Underlay Number
complex fills
Underlay Stitching
Undo/Redo
5-24
5-10
3-48
3-15, 6-27
1-9
V
Virtual Memory
setting for scanning
7-1
W
Width
underlay %
Window
EDS III Application
EDS III Layout
Melco Apps
Object Edit
Program Manager
5
5-11
3-1
1-11
3-1, 6-1
1-1
3-1
EDS III Editing Quick Reference
General Editing
Moving Through a Design (4 methods)
Editing While Digitizing
Swapped Mk2’s
Method 1. Click with the mouse on the Up Arrow
or Down Arrow on the screen in the
toolbar.
This is when two Mk2’s forming a column are
swapped forming a "bowtie" effect.
1.Find the first Mk2 of the pair.
Method 2. Press the Up Arrow or Down Arrow on
the keyboard.
Method 3. Click on the desired Mark point on the
screen with the mouse. This highlights
the Mark in the stitch list.
2.Press the F2 key on the keyboard one time. The
two Mk2 coordinates will swap with each
other.
3.Click on View in the Layout window menu bar.
Method 4. Click on the desired dataset in the
stitch list.
Moving a Mark Point (3 methods)
In each of the following methods, first use one of
the previous methods for moving through a design to get on the Mark point you wish to move.
Method 1. Hold down the Shift key and use the
four Arrow keys on the keyboard to
move the Mark point to the desired
location.
Method 2. Click, hold, and drag the Mark point
with the right mouse button.
Method 3. Press Enter on the keyboard and
change the X and Y coordinates in the
dialog box. Then click OK.
Changing a Mark Point (2 methods)
(example: Change a Mk1 to a Mk2)
Get on the Mark point you wish to change using
one of the 4 methods for moving through a design.
Method 1. Double click on the Mark point in the
stitch list with the mouse. A dialog box
will appear. Click on the desired Mark
point and then click OK.
Method 2. Hold the Alt key and press the number
key on the keyboard which
corresponds with the desired Mark
point number (1, 2, 3, or 4).
4.Click Regenerate in the drop down menu.
Placing Mark Point at Specific Location
1.Click on the Mark point that you wish to
position to a specific location.
2.Check the X and Y coordinates of the selected
Mark point in the stitch list against the X and Y
coordinates you want.
3.Change the values by using the Shift key and
the four arrow keys on the keyboard to move
the Mark point.
OR
Double click on the Mark point dataset in the
stitch list and type in the change you want in
the dialog box on the screen.
4.Click on View.
5.Click on Regenerate.
Forgotten Lock Stitches
1.Click in the stitch list on the last stitch of the
design before where locks should be located.
2.Click on the Mk1 tool in the toolbar.
3.Place the Mark point where desired in the
design by clicking on the screen in that
location.
4.Repeat for two or three more stitches to form a
lock stitch pattern.
Quick
Reference
Guide
for
EDS III
Editing
Part Number 110282-01, Rev A
EDS III On-Screen Digitizing Quick Reference
Start Up Sequence
1.Click on File in the Application window.
2.Click on New.
Load the Image On the Screen
If you are digitizing from a saved graphic file, follow these steps. If you wish to scan a graphic to
to that section of this procedure.
1.Click on Edit.
2.Click on Scan/Graphics.
3.Click on Load Graphic.
4.Click in the Open Graphic dialog box to go to
the graphic file you want.
5.Click OK to load the graphic onto the screen.
Scan A Graphic
1.Click on Edit.
2.Click on Scan / Graphics.
3.Click on Scan.
4.Follow the manufacturer’s instructions for
scanning.
5.Save The Graphic:
Set Up On-Screen Digitizer
1.Click on Edit.
2.Click on Digitize (Source at Digitizer).
3.Choose On-Screen.
4.Click on Start.
Turn on Condensed Points
1.Click on View.
2.Click on Display Mode.
3.Click on Condensed Points.
4.Click on OK.
Set the Stitch Length
1.Click on the Stitches Function button.
2.Click on the Stitch Length tool.
3.Enter Stitch Length value.
4.Click on OK.
Set the Density (if digitizing columns)
2.Click on the Mk1 tool.
3.Click on View, select Display Mode, and click
on Design Origin.
4.Move to the approximate center of the design
and place a Mk1 at that location.
5.Click on the Other Function button.
4.Click on the Return to Origin Tool.
5.Click on Edit.
6.Click on Digitize.
7.Click on End.
8.Click on Yes.
Saving the Design
1.Click on File.
2.Click on Save As.
3.Type in Directory, Design, and File Type.
(Example:
A:Boat.Cnd)
4.Click on OK.
1.Click on the Column Function button.
2.Click on the Column Parameters tool.
a. Click on Edit.
b.Click on Scan / Graphics.
To End A Session In The Middle Of A
Design
3.Set Density.
c. Click on Save Graphic.
d.Type in the desired filename, file type, and
directory.
The Digitizing Session
When you are digitizing a design and need to
stop the digitizing session and close EDS III, you
may do so and come back at a later time and pick
up where you left off.
e. Click on OK.
Scale The Graphic (if needed)
1.Click on Edit.
2.Click on Scan / Graphics.
3.Click on Scale Graphic.
4.Set the desired scale.
5.Click on OK.
4.Click on OK.
Starting the Design
1.Click on the Needle Up Tool.
2.Click on the Mk1 Tool.
To Stop the Session
1.Click on Edit.
3.Click where you want to start the Design.
2.Click on Digitizer.
3.Click on End.
4.Click on the Normal Stitch Tool.
5.Click AT THE SAME STARTING POINT.
4.Click on Yes
5.Click on File.
6.Continue the digitizing process.
6.Click on Save As.
Ending the Session
1.Click on the Needle Up Tool.
7.Give it a name.
8.Click on File.
9.Click on Close.
To Complete the Digitizing Session
1.Click on File.
2.Click on Open.
3.Load the named design.
4.Click on the object on the screen to highlight it
with a box.
5.Click on the Editing <-> Layout tool.
6.Click on Edit.
7.Click on Digitize.
8.Click on On-Screen.
9.Click on Start.
Load Image
1.Click on Edit.
Quick
Reference
Guide
for
2.Click on Scan/Graphics.
3.Click on Load Graphic.
4.Click in the Open Graphic dialog box to go to
the graphic file you previously saved.
5.Click OK to load the graphic onto the screen.
Finish the design
EDS III
On-Screen
Digitizing
Part Number 110282-01, Rev A
EDS III Tablet Digitizing Quick Reference
Start Up Sequence
Set Up The Artwork (at the Tablet)
1.Tape the artwork to the digitizing tablet.
2.Find the center point of the design and with a
pencil mark an X.
3.Measure the artwork.
4.Determine the scale factor by dividing the
desired size by the actual size.
Set Up The Computer
1.Click on File.
2.Click on New.
3.Click on Edit.
4.Click on Digitize (Source at Digitizer).
5.Set your Scale Factor.
6.Click on Start.
7.Set your Movable Menu (if necessary).
a. Click on Move.
b. At the Tablet, enter a Mk1 at the lower left
corner of the Menu and a Mk1 at the upper
left corner of the Menu.
8.Set the Densities and the Fills (Setup dialog
box).
a. Click on Setup.
b. Set your Densities.
c. Set your Fills.
d. Click on OK.
9.Click on Exit (Digitizer Active).
Turn on Condensed Points (at the Computer)
1.Click on View.
2.Click on Display Mode.
3.Click on Condensed Points.
4.Click on OK.
Set Origin (at the Tablet)
1.Enter a Mk1 at the penciled X (or center point)
of your design.
Set the Horizontal (at the Tablet)
1.Enter a Mk1 on the Set Horizontal box.
2.Find a straight line on the artwork.
3.Enter a Mk1 on the left and a Mk1 on the right
of the straight line.
Set the Density if digitizing columns
(at the tablet)
1.Enter a Mk1 on the Column Density box.
2.Enter a Mk1 on the Numbers or Letter of the
desired density.
3.Enter a Mk1 on the Enter box.
Set the Stitch Length (at the tablet)
1.Enter a Mk1 on the Stitch Length box.
2.Enter a Mk1 on the numbers of the desired
Stitch Length.
3.Enter a Mk1 on the Enter box.
5.Click on Digitize.
6.Click on End.
7.Click on Yes.
Saving the Design
1.Click on File.
2.Click on Save As.
3.Type in Directory, Design, and File Type.
(Example: A:Boat.Cnd)
4.Click on OK.
To End A Session In The Middle Of A
Design
When you are digitizing a design and need to
stop the digitizing session and close EDS III, you
may do so and come back at a later time and pick
up where you left off.
To Stop The Session
1.Click on Edit.
2.Click on Digitizer.
The Digitizing Session
3.Click on End.
4.Click on Yes
Starting the Design
5.Click on File.
1.Enter a Mk1 on the Needle Up box.
2.Enter a Mk1 where you want to START the
Design.
3.Enter a Mk1 on the Normal Stitch box.
4.Enter a Mk1 AT THE SAME STARTING POINT.
5.Continue the digitizing process.
Ending the Design
6.Click on Save As.
7.Type in filename with .cnd extension.
8.Click on File.
9.Click on Close.
To Complete The Digitizing Session
1.Click on File.
2.Click on Open.
2.Enter a Mk1 at the X Center Point.
3.Enter a Mk1 on the Return to Origin box.
3.Open the saved design.
4.Click on the object on the screen to highlight it
with a box.
4.At the Computer, Click on Edit.
5.Click on the Editing <-> Layout tool.
1.Enter a Mk1 on the Needle Up box.
6.Click on Edit.
7.Click on Digitize.
8.Set the EXACT same scale factor.
9.Click on Start.
10.Set the SAME center.
11.Set the SAME horizontal.
12.Finish the design.
Quick
Reference
Guide
for
EDS III
Tablet
Digitizing
Part Number 110282-01, Rev A
MELCO DIGITIZING ARTWORK
IRREGULAR SHAPE BLOCK
Horizontal line
SAURER LOGO OUTLINE
Horizontal line
SOLID SAURER LOGO