1
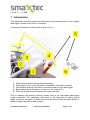
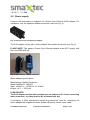
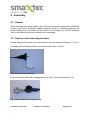
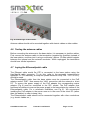
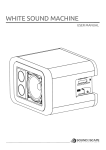
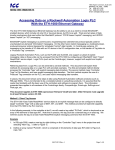
Installation manual
Version 1.0
©smaXtec animal care
11.05.2011 confidential
Page 1 of 27
Table of contents
1 INTRODUCTION ........................................................................................................... 3 2 SCOPE OF SUPPLY ........................................................................................................ 4 3 BILL OF MATERIALS ..................................................................................................... 4 BASE STATION ..................................................................................................................... 4 ETHERNET/PATCH CABLE ....................................................................................................... 5 ETHERNET/PATCH CABLE CONNECTION ..................................................................................... 5 ANTENNA CABLES ................................................................................................................ 5 CABLE CONNECTOR MODEL 21_N‐50‐3‐8/133_N (FEMALE) FOR ANTENNA CABLE RG_223_/U OR ALTERNATIVE CABLE G_03212_D‐01 ............................................................................................ 5 3.6 CABLE CONNECTOR MODEL 11_N‐50‐3‐29 (MALE) FOR ANTENNA CABLE RG_223_/U OR ALTERNATIVE CABLE G_03212_D‐01 ............................................................................................ 6 3.7 ANTENNA AS433 (AUREL) .................................................................................................. 6 3.8 POWER SUPPLY ................................................................................................................... 7 3.1 3.2 3.3 3.4 3.5 4 ASSEMBLY ................................................................................................................... 8 4.1 4.2 4.3 4.4 4.5 4.6 4.7 4.8 GENERAL ........................................................................................................................... 8 FIXATION OF THE MOUNTING BRACKETS ................................................................................... 8 POSITIONING THE ANTENNAS ............................................................................................... 11 POSITIONING THE BASE STATION ........................................................................................... 13 LAYING THE ANTENNA CABLES .............................................................................................. 15 TESTING THE ANTENNA CABLES ............................................................................................. 16 LAYING THE ETHERNET/PATCH CABLE ..................................................................................... 16 STARTING‐ UP THE SYSTEM .................................................................................................. 17 5 INTERNET CONNECTION ............................................................................................ 18 6 APPENDIX .................................................................................................................. 19 6.1 6.2 6.3 6.4 6.5 ASSEMBLY INSTRUCTIONS 21_N‐50‐3‐8/133_N ................................................................... 19 ASSEMBLY INSTRUCTIONS 11_N‐50‐3‐29 ............................................................................. 20 ASSEMBLY INSTRUCTIONS HAN MAX‐M CABLE CONNECTOR ....................................................... 21 POSITIONING ANTENNAS AND BASE STATION IN DIFFERENT STABLES ............................................. 23 NECESSARY MATERIAL FOR THE INSTALLATION ......................................................................... 27 ©smaXtec animal care
11.05.2011 confidential
Page 2 of 27
1 Introduction
This installation manual contains information about an antenna receiver for a wireless
data logger located in the rumen of livestock.
A schematic illustration of the system is given in fig. 1.
Fig. 1: Schematic illustration of the system
1.
2.
3.
4.
6.
Pellet feeding station/milking station/massager
Data logger in the rumen of livestock (hereinafter referred to as bolus)
One/several antennas (433 MHz) receive the data from the data logger
Base station saves the data on a server on the Internet (5.)
Client PC accesses and interprets the measured data
Prior to installing the antenna receiver, please refer to the information about each
single component. The installation instructions in the Appendix for cables and/or
plugs as well as examples for positioning both the antenna and the base station in
different stables should be read carefully.
©smaXtec animal care
11.05.2011 confidential
Page 3 of 27
2 Scope of supply
In addition to the parts needed for installation (see Chapter 3. Bill of materials), the
packaging contains an envelope (including a user manual, a smaXtec USB antenna
and a magnet). This envelope should be given to the farmer. The packaging further
includes a termination for the antenna (model 65_N-50-0-31/133_NE by
Huber+Suhner) with which the antenna cables can be tested (see Chapter 4.6
Testing the antenna cables).
3 Bill of materials
3.1 Base station
Fig. 2 shows a picture of the base station. Up to eight antennas may be connected to
it in the course of installation. In addition the base station must be connected to the
network or the client PC using Power Over Ethernet adapters and an Ethernet patch
cable.
Sockets
connection
for
antenna
Ethernet-/patch cable
connection
Fig. 2: Base station
The optional UMTS antenna connection is located laterally, on the same side as the
Ethernet/patch cable socket.
©smaXtec animal care
11.05.2011 confidential
Page 4 of 27
3.2 Ethernet/patch cable
For the connection between the base station and the Power Over Ethernet adapter
as well as for the connection between the Power Over Ethernet adapter and the
network (client PC), an Ethernet/patch cable, model
• CAT 5e – UTP
should be used. Cabling must be done in accordance with the TIA/EIA-568-B
standard (regarding length, bending radius etc.).
3.3 Ethernet/patch cable connection
To ensure a secure connection between the Ethernet/patch cable and the base
station, a cable connector model Han Max-M should be used. For the corresponding
assembly instructions please refer to Appendix 7.3.
3.4 Antenna cables
The following antenna cables should be used
For an antenna cable length of up to 50 m, a coaxial cable RG_223_/U from
Huber+Suhner should be used. Make sure not to exceed the maximum bending
radius during assembly (static case). This radius must be five times the outer
diameter, in this case 30 mm. Lengths > 50 m should be avoided.
3.5 Cable connector model 21_N-50-3-8/133_N (female) for antenna
cable RG_223_/U or alternative cable G_03212_D-01
Connect the cable connector 21_N-50-3-8-/133_N to the one end of the antenna
cable RG_223_/U or alternative cable G_03212_D-01 (connection to antenna). For
the corresponding assembly instructions refer to Appendix 7.1.
©smaXtec animal care
11.05.2011 confidential
Page 5 of 27
3.6 Cable connector model 11_N-50-3-29 (male) for antenna cable
RG_223_/U or alternative cable G_03212_D-01
Connect the cable connector 11_N-50-3-29 to the other end of the antenna cable
RG_223_/U or alternative cable G_03212_D-01 (connection to base station). For the
corresponding assembly instructions, refer to Appendix 7.2.
3.7 Antenna AS433 (AUREL)
The antenna (including washer and screw nut) is supplied with a 20 cm long antenna
cable RG_223_/U (or G_03212_D-01) Huber+Suhner, a coaxial cable and a 11_N50-3-29 (male) Huber+Suhner coaxial cable connector. Mounting brackets for
installing the antennas in the stables are included with the antenna (Fig. 3). To install
the antenna, so-called mounting brackets are used.
A
B
A: Antenna
B: Mounting Bracket
E
C: Antenna Cable
D: Washer
D
E: Screw Nut
C
Fig. 3: AS433 Antenna parts
©smaXtec animal care
11.05.2011 confidential
Page 6 of 27
3.8 Power supply
Power to the base station is supplied via a Power Over Ethernet (PoE) adapter. For
installation, only the specified adapter should be used (see Fig. 4).
Fig. 4: Passive Power Over Ethernet adapter
The PoE adapter comes with a mains adapter from wattac electronics (see Fig. 5).
PLASE NOTE: This passive Power Over Ethernet adapter does NOT comply with
the norm IEEE 802.3af.
Fig. 5: Mains adapter wattac electronics
Mains adapter specifications:
Manufacturer: Wattac Electronics
Model: BA0241C1-180-A03
Input: 100-240 V ~, 50/60 Hz, 0.7 A MAX
Output: 18 V --- 1200 mA
PLEASE NOTE:
The PoE adapter and the mains adapter are not subject to IP norms concerning
water protection, e.g. they must be by all means kept dry!
If necessary, a 230V shock-proof female plug should be used for connecting the
mains adapter that supplies the base station with power via the mains cable.
©smaXtec animal care
11.05.2011 confidential
Page 7 of 27
4 Assembly
4.1 General
When installing the cables, please refer to the forthcoming European Norm EN62305
(outdoor and indoor protection against lightning) which is especially important for
cables leading from the interior to the exterior of a building (e.g. UMTS antenna).
Such conductions should be protected from overvoltage.
4.2 Fixation of the mounting brackets
Please separate the screw nut and the washer from the antenna (Chapter 3.7, Fig. 3)
Now apply the mounting bracket to the antenna as shown in Fig. 6.
Fig.6: Antenna Assembly (Step 1)
Plug the antenna cable with the jagged side up (Fig. 7) on the antenna (Fig. 8).
Fig. 7: Antenna Cable with Jagged Side Up
©smaXtec animal care
11.05.2011 confidential
Page 8 of 27
Fig. 8: Antenna Assembly (Step 2)
Apply the washer (Fig. 9) and afterwards the screw nut (Fig. 10) to the antenna and
screw it together
Fig. 4: Antenna Assembly
(with washer, Step 3)
©smaXtec animal care
11.05.2011 confidential
Page 9 of 27
Fig. 10: Antenna Assembly
(with screw nut, Step 4)
As the last step put the protection cap over the screw connection (Fig. 11).
Fig. 11: Antenna Assembly (Step 5)
©smaXtec animal care
11.05.2011 confidential
Page 10 of 27
4.3 Positioning the antennas
It is possible to connect up to eight antennas to one base station. The antennas
should be mounted in a place where the livestock rest for an extended period of time.
The anntenas read out the boli in the livestock within a radius of 5 m.
Typical locations are:
•
•
•
•
Milking station
Feeding station
Massaging station
Rest stop in front of milking station
Antennas may be mounted at a height of 1 to 2 meters above the animal. The
antenna must always be mounted to the left of the animal.
Antennas placed behind or in front of the animal should be mounted parallel and in
the viewing direction of the animal.
Wherever the antennas are mounted directly above the animal (in any case to its lefthand side), the viewing direction of the antenna should correspond to the viewing
direction of the animal. This would mean that the antenna points from above directly
down to the animal (not parallel to it, but at an angle of 90°). Fig. 13 shows an
antenna installed at an angle of 90° above livestock that are directly underneath.
Fig. 14 shows a bar parallel to the animal, which is why the antenna was also
mounted parallel to it.
©smaXtec animal care
11.05.2011 confidential
Page 11 of 27
Fig. 13: Antenna oriented 90 degrees downwards
Fig. 14: Antenna running parallel
Wherever antennas are mounted to iron bars and/or electrically conductive bars,
please make sure to insulate the mounting brackets using the supplied plastic pieces
(see e.g. Fig. 15, Fig. 16).
When using universal strap clamps, make sure to insulate them from the antenna
mounts. Universal strap clamps are preferrable to PVC cable ties due to their
reduced material fatigue.
Fig. 15: Insulated mounting bracket fastened to an electrically conductive bar with insulating
tape
©smaXtec animal care
11.05.2011 confidential
Page 12 of 27
Fig. 16: Insulated mounting bracket with piece of wood
4.4 Positioning the base station
The base station should be mounted in such a way that a cable with a maximum
length of 50 m suffices to connect the antennas to the corresponding base station.
Four screws are necessary to ensure a stable position. The width of the screw head
must be between 8 and 8.4 mm in order to fit into the corresponding borings. Make
sure to use stainless steel screws (V4A) since galvanized screws tend to corrode
after a few years. The openings intended for assembly must be covered with special
cover strips. These cover strips are included in the base station packaging.
Fig. 17 and Fig. 18 show possible locations for the base station.
©smaXtec animal care
11.05.2011 confidential
Page 13 of 27
Fig. 17: Base station mounted to wall
Fig. 18: Base station mounted to pillar
The base station in Fig. 18 was mounted to a pillar using a perforated metal plate
(Fig. 19).
©smaXtec animal care
11.05.2011 confidential
Page 14 of 27
Fig. 19: Fixation using perforated metal plate
4.5 Laying the antenna cables
When laying the cables, make sure to avoid any pressure on them, e.g. from
brackets or clamps etc. Cables connected to the base station and to antennas must
not be taut and should neither hang by more than 1 m nor be under direct tension. An
optimum solution would be to have a small loop before the actual connection point. In
doing so, adhering to the bending radius instructions is essential. (see Chapter 2.4)
Laying the cables inside empty tubes or cable trays etc. has also proven to be
effective.
As described in Chapters 2.5 and 2.6 above, the antenna cables RG_223_/U oder
alternative G_03212_D-01 must be crimp-connected on one end with the cable
connector model 21_N-50-3-8-/133_N (female), and on the other end with the cable
connector model 11_N-50-3-29 (male). It is essential to use the crimping tool model
76_Z−0−0−15 (large) or model 75_Z−0−3−4/B2 (small) of Huber+Suhner, otherwise
no liability may be assumed for successful cable contact.
The cable connector model 21_N-50-3-8-/133_N (female) is connected to the
antenna, and the cable connector model 11_N-50-3-29 (male) to the base station.
Please note which antennas were connected to which socket of the base station.
Fig. 20 shows the numberings at the base station.
©smaXtec animal care
11.05.2011 confidential
Page 15 of 27
Fig. 20: Numberings of base station
Antenna cables should not be mounted together with electric cables or other cables.
4.6 Testing the antenna cables
Before connecting the antennas to the base station, it is necessary to test the cables.
First connect the antenna cable to the termination (supplied by smaXtec) instead of
the base station, and then test it using a multimeter. Approx. 50 Ohm should register
between the internal and the external conductor. When unplugged, the termination
should have infinite impedance.
4.7 Laying the Ethernet/patch cable
The Ethernet cable model 5e–UTP is connected to the base station using the
Han Max-M cable connector. To do this, refer to the assembly instructions in
Appendix 5.3. For assembly, a crimp tool (model Ethernet Crimp Tool – CAT 5e UTP)
should be used.
The Ethernet/patch cable from the base station must be connected to the PoE
adapter socket “POE”. Now ensure the “LAN“ connection with the network or client
PC. To ensure the power supply of the PoE adapter the corresponding mains
adapter (Fig. 6) must be connected to the “DC“ socket. The PoE adapter thus
functions as interface to ensure the power supply to the base station by means of the
Ethernet/patch cable. For a schematic illustration, see Fig. 21. We recommend
installing the PoE adapter in the server room or in the room of the client PC (rather
than the stables) in order to keep it dry.
The Ethernet/patch cable should not be connected together with other conductions
(e.g. electric cables etc.).
©smaXtec animal care
11.05.2011 confidential
Page 16 of 27
Wattac
Electronics
Mains
Adapter
Fig. 21: Schematic illustration of the Ethernet cabling
Cabling must comply with the norm TIA/EIA-568-B.
4.8 Starting- up the system
The base station has been programmed beforehand and may be used once it is
connected. The acceptance test is done using a testing programme supplied by
smaXtec. To run this test, the base station must be integrated into the network – the
necessary steps are described in the following chapter (Internet connection).
©smaXtec animal care
11.05.2011 confidential
Page 17 of 27
5 Internet connection
For the connection of the base station to the Internet, the following requirements
must be met:
• A DHCP router connected to the Internet must be installed on the base
station network.
• The DHCP service of the router must be activated and correctly set
(usually with the default parameters of the router).
• High ports (from 1024 upward) must NOT be blocked (the base station
uses Port 1194 UDP).
In order to test the Internet connection, download the connection test software from
www.smaxtec-animalcare.com/install/Verbindung.zip
and
execute
the
file
Verbindungstext.exe. This software will conduct the following tests:
• Connection between client PC and base station
• Connection between base station and switch (Internet connection to server)
A functioning connection will be indicated by “OK”.
If the connection between client PC and base station is “NOT OK“, check the
following aspects:
• If the LEDs at the base station are not lit (green should be on permanently and
yellow should be blinking), check if the PoE adapter has been correctly
installed (see Chapter 3.5) and replace it, if necessary.
• Check the Ethernet cable from the client PC to the base station for defects.
• Check Windows Firewall settings (either deactivate or set them correctly).
• Check the DHCP settings of the router.
If the connection between base station and switch is “NOT OK“, check the following
aspects:
• First check whether the Internet connection to your provider is working (using
a PC or laptop computer).
• Verify the DHCP settings of the router.
• Check the Firewall settings of the router, e.g. whether ports from 1024
upwards connect through (e.g. if it is possible to unlock them for the public
network and back).
• Check the NAT settings of the router (they must be activated).
©smaXtec animal care
11.05.2011 confidential
Page 18 of 27
6 Appendix
6.1 Assembly instructions 21_N-50-3-8/133_N
©smaXtec animal care
11.05.2011 confidential
Page 19 of 27
6.2 Assembly instructions 11_N-50-3-29
©smaXtec animal care
11.05.2011 confidential
Page 20 of 27
6.3 Assembly instructions Han Max-M cable connector
©smaXtec animal care
11.05.2011 confidential
Page 21 of 27
©smaXtec animal care
11.05.2011 confidential
Page 22 of 27
6.4 Positioning antennas and base station in different stables
Example 1
©smaXtec animal care
11.05.2011 confidential
Page 23 of 27
Example 2
Internet connection
pellet feeding station
The milking room is designed
for 2x6 cows.
Low ceiling height.
RG223
massager
HOUSE
16 m
7
5
milking room6
34m
4
garage
7m
1
7m
2
7m
6m
3
5,4m
base station
25 m
antenna
not only calving
50 m
©smaXtec animal care
11.05.2011 confidential
Page 24 of 27
Example 3
©smaXtec animal care
11.05.2011 confidential
Page 25 of 27
Example 4
©smaXtec animal care
11.05.2011 confidential
Page 26 of 27
6.5 Necessary material for the installation
For cabling of the base station the installation company must use and provide
following material:
•
•
•
•
Coax cable RG223/U or alternative cable G_03212_D-01 (ca. 150 m per barn)
Cable connector model 11_N-50-3-29 (max. 8 per base station)
Cable connector model 21_N-50-3-8-/133_N (max. 8 per base station)
Crimping tool (model 76_Z−0−0−15 (large) or model 75_Z−0−3−4/B2 (small))
for mounting the cable connectors (model 11_N-50-3-29 and model 21_N-503-8-/133_N) with the coax cable RG223/U or alternative cable G_03212_D-01
(Cavity B2).
• Ethernet cable (CAT5e-UTP)
• Crimping tool (standard) for ethernet cable-connector
The coax cable RG223/U (or alternative the cable G_03212_D-01), the cable
connectors (model 11_N-50-3-29 and model 21_N-50-3-8-/133_N) and the crimping
tool can be order by the company Huber + Suhner.
Homepage and the contact person for German and Austrian customers you can find
under:
http://www.hubersuhner.com/
[email protected]
+49 (0) 89 612 01-256 phone
Jürgen Schäfer
HUBER+SUHNER GmbH
Mehlbeerenstraße 6
D- 82024 Taufkirchen, Germany
The contact persons in other countries:
- France (Mrs. Capra: +41 71 353-4668)
- Netherlands (Mrs. Capra: +41 71 353-4668)
- Denmark (Mrs. Hofstetter: +41 71 353-4032)
- Italy (Mrs. Capra: +41 71 353-4668)
- Finnland (Mrs. Hofstetter: +41 71 353-4032)
©smaXtec animal care
11.05.2011 confidential
Page 27 of 27