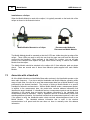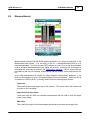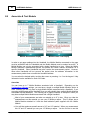
1
LSIZE Wireless v11
Copyright © 2008-2011 MicroRidge Systems, Inc.
All rights reserved. No parts of this work may be reproduced in any form or by any means - graphic, electronic, or
mechanical, including photocopying, recording, taping, or information storage and retrieval systems - without the written
permission of the publisher.
Products that are referred to in this document may be either trademarks and/or registered trademarks of the respective
owners. The publisher and the author make no claim to these trademarks.
While every precaution has been taken in the preparation of this document, the publisher and the author assume no
responsibility for errors or omissions, or for damages resulting from the use of information contained in this document or
from the use of programs and source code that may accompany it. In no event shall the publisher and the author be liable
for any loss of profit or any other commercial damage caused or alleged to have been caused directly or indirectly by this
document.
Printed: Friday, May 06, 2011 at 8:28 AM in Sunriver, Oregon.
Contents
1
Table of Contents
Chapter 1 How...................................................................................................................................
to Get Started
3
Chapter 2 Introduction
...................................................................................................................................
5
1 LSIZE
...................................................................................................................................
Handheld
6
2 LSIZE
...................................................................................................................................
Mobile Software on Handheld
6
3 LSIZE
...................................................................................................................................
Wireless Components
7
4 Spare
...................................................................................................................................
Parts & Accessories
8
5 Country
...................................................................................................................................
Certification & Approvals
9
6 Setup
...................................................................................................................................
& Printing Options
10
Chapter 3 LSIZE
...................................................................................................................................
for the PC
13
Chapter 4 LSIZE
...................................................................................................................................
Mobile Lite Setup
15
1 Handheld
...................................................................................................................................
Transfer
16
2 Machine
...................................................................................................................................
Setup
17
3 Product
...................................................................................................................................
specs
18
4 Handheld
...................................................................................................................................
Bins
19
Chapter 5 LSIZE
...................................................................................................................................
Mobile Quick Print
21
1 Communications
................................................................................................................................... 21
2 Bin Specs
................................................................................................................................... 22
3 Report
...................................................................................................................................
Setup
23
4 Measurements
................................................................................................................................... 24
5 Summary
................................................................................................................................... 25
6 Charts
................................................................................................................................... 27
Chapter 6 LSIZE
...................................................................................................................................
Handheld
29
1 Docking
...................................................................................................................................
Station
29
2 ActiveSync
...................................................................................................................................
& Windows Mobile Device Center
31
3 Power
...................................................................................................................................
On & Off
31
4 Battery
................................................................................................................................... 32
5 Keypad
................................................................................................................................... 34
6 Reboot
...................................................................................................................................
(Warm Reset)
35
7 Touch
...................................................................................................................................
Screen
35
8 Date...................................................................................................................................
& Time
35
9 Mobile
...................................................................................................................................
Base
36
Copyright © 2008-2011 MicroRidge Systems, Inc.
2
Contents
10 Starting
...................................................................................................................................
LSIZE Mobile
36
11 Other
...................................................................................................................................
Applications
36
12 Documentation
................................................................................................................................... 37
Chapter 7 Mobile
...................................................................................................................................
Module
39
1 Buttons
...................................................................................................................................
& LEDs
40
2 Installation
...................................................................................................................................
on a Caliper
41
3 Associate
...................................................................................................................................
with a Handheld
42
4 Battery
...................................................................................................................................
& Cable Replacement
43
5 LED...................................................................................................................................
Error Codes
46
Chapter 8 LSIZE
...................................................................................................................................
Mobile Software
47
1 Handheld
...................................................................................................................................
Parameters (Lite Setup)
47
2 Configuration
...................................................................................................................................
Switches (LSIZE on PC)
48
3 Main...................................................................................................................................
Screen
50
4 Bin Select
...................................................................................................................................
& Clear
51
5 Measure
...................................................................................................................................
Boards
53
6 Statistical
...................................................................................................................................
Reports
57
7 System
...................................................................................................................................
Info & Settings
62
8 Associate
...................................................................................................................................
& Test Module
66
9 Data...................................................................................................................................
Transfer
68
10 About
...................................................................................................................................
LSIZE Mobile
70
11 Registration
...................................................................................................................................
Dialog
71
12 Select
...................................................................................................................................
Database
72
Chapter 9 Warranty
................................................................................................................................... 73
Chapter 10 Support
................................................................................................................................... 75
1 Contact
...................................................................................................................................
Information
75
............................................................................................................................................................. 77
Index
Copyright © 2008-2011 MicroRidge Systems, Inc.
LSIZE Wireless v11
1
How to Get Started
3
How to Get Started
As with any new computer and measurement acquisition system you must devote some time to
become familiar with the operation of the new hardware and software, LSIZE Wireless will be
easy to use once you understand the components within the system. The steps outlined below
are a guide to the things you should do to get LSIZE Wireless up and running.
Read this User's Guide cover to cover.
LSIZE Mobile can be set up with LSIZE on the PC or LSIZE Mobile Lite Setup.
The LSIZE Mobile software in the Handheld will only work with the LSIZE software on
your PC or LSIZE Mobile Lite Setup if all applications are of the same version. For
example, LSIZE Mobile v11 on the Handheld will only work with LSIZE v11 on your PC.
The software versions are displayed in the About dialogs in each of the applications. If
you have not installed the proper versions on your PC, you should do that now.
Set up bin specs for the Handheld in the LSIZE software on your PC or LSIZE Mobile Lite
Setup.
Connect the Docking Station to your PC. Refer to the Docking Station section in the
LSIZE Handheld chapter for more details.
Insert the Handheld into the Docking Station and start the LSIZE Mobile application.
Refer to the Starting LSIZE Mobile section in the LSIZE Handheld chapter for more
details.
Select the Data Transfer button in LSIZE Mobile.
The follow discussion refers to the use on LSIZE on the PC for specs setup and transfer.
The process of using LSIZE Mobile Lite Setup for the specs configuration is very similar.
In the LSIZE software on your PC, select the menu item Wireless/Communications setup.
Select the serial port that the Docking Station is connected to. If you have several serial
ports you may have to use a trial and error approach with the next few items in this list.
Start the ComTestSerial communications test program by selecting the menu item
Wireless\Communications test.
Press the Send Info button on LSIZE Mobile. The Send Info button is available in the
Data Transfer display.
If you get the copyright and other information to display in ComTestSerial, proceed to the
next item. If nothing is displayed in ComTestSerial, try selecting a different serial port in
ComTestSerial and try the previous step again.
You now have established serial communications and are ready to transfer the bins specs
to the Handheld.
Close the ComTestSerial communications test program. You cannot send specs or read
measurements from the Handheld if ComTestSerial is open.
Be sure the LSIZE Mobile is in the Data Transfer function.
In LSIZE on the PC, select the menu item Wireless/Send bin specs to Handheld.
Send the specs to the Handheld. You will get messages on the PC and the Handheld if
your transfer was successful
Copyright © 2008-2011 MicroRidge Systems, Inc.
4
How to Get Started
LSIZE Wireless v11
Verify that your gage is associated with the Handheld. The Mobile Module(s) associated
with the Handheld are checked in the Associate & Test Module function. If your gage is
not associated with the Handheld, you must go through the association procedure before
you can take measurements. Refer to the Associate with a Handheld section in the
Mobile Module chapter for more details.
You are now ready to take some test measurements. We recommend you take test
measurements in your office until you are comfortable with the operation of LSIZE
Wireless.
Select the Measure Board function on LSIZE Mobile and take some measurements.
Select another bin and take some more measurements.
Retake a measurement, enter a missing measurement, view the reports and explore the
LSIZE Mobile application.
Download your collected test measurements into the LSIZE software on your PC. You
should later delete these test boards from your database.
Download the measurements again. What does LSIZE tell you?
How do you clear the measurements in the Handheld? The answer is "You normally do
not clear Handheld measurements". You should let LSIZE Mobile manage this clearing
process for you. When measurements are downloaded to the LSIZE software on your
PC, LSIZE Mobile will delete boards older than the specified number of days. The
number of days to retain boards is part of the bin specs setup in the LSIZE software on
your PC.
Read this User's Guide cover to cover.
Congratulations, you have completed the first steps in becoming an "LSIZE Wireless
Expert".
Copyright © 2008-2011 MicroRidge Systems, Inc.
LSIZE Wireless v11
2
Introduction
5
Introduction
LSIZE Wireless is a wireless measurement collection and analysis tool designed for use in
forest products manufacturing facilities such as sawmills, veneer mills, panel plants, etc.
LSIZE Wireless allows you to collect and store measurement information from multiple
machine centers and identify the cutting location and target size within the machine center.
Each machine center, cutting location and target size that is being monitored is stored in a
separate measurement bin. LSIZE Wireless allows you to specify up to 300 separate
measurement bins for each database on LSIZE Wireless. You can have up to 10 different
databases on LSIZE Wireless.
The wireless technology that is used by LSIZE Wireless was developed by MicroRidge
Systems and has been shipping to general manufacturing facilities since October 2006. LSIZE
Wireless is the only wireless measurement collection system available that has been designed
specifically for forest products manufacturing facilities.
LSIZE Handheld with Mobile Module on Caliper
LSIZE Wireless must be used in conjunction with the LSIZE software on your PC. The LSIZE
software on your PC is used to configure the measurement bins for LSIZE Wireless and to
receive the measurements collected by LSIZE Wireless. The bin specifications and
measurements are transferred to and from LSIZE Wireless when the Handheld is placed into
the Docking Station that is included with LSIZE Wireless.
Copyright © 2008-2011 MicroRidge Systems, Inc.
6
2.1
Introduction
LSIZE Wireless v11
LSIZE Handheld
The Handheld is an industrial unit manufactured by Psion (pronounced sy on) and is referred
to by Psion as the WORKABOUT PRO. The current model is the WORKABOUT PRO3.
Psion is a well established company that has been manufacturing rugged portable computers
for many years. In case you are wondering where the word Psion comes from, it stands for
"Potter Scientific Instruments or Nothing".
Some of the key features of the Handheld are listed below:
Windows Mobile 6.1 Classic Operating System.
3.7" (diagonal) color touch screen with 480 x 640 pixel resolution.
Withstands 6 foot drop to polished concrete while powered on.
Rain/dust IP65 rating.
4,400 mAh super high capacity battery pack.
624 MHz 32 bit RISC processor.
1,000 MB flash memory.
256 MB RAM memory.
For those of you familiar with the MicroPak (manufactured by MicroRidge from 1990 until
March 2009), the MicroPak ran at 1.6 MHz, had 64K of flash memory and 32K of RAM
memory. If you could purchase a MicroPak today, it would cost you more than the LSIZE
Handheld. The MicroPak was the portable measurement collection technology available to the
forest products industry prior to LSIZE Wireless.
2.2
LSIZE Mobile Software on Handheld
The application on the Handheld was developed by MicroRidge Systems and is called LSIZE
Mobile. The features contained in the LSIZE Mobile software are the result of user request
and over 25 years of experience in developing measurement collection and analysis tools for
the forest products industry.
Key features of the LSIZE Mobile software include:
Supports up 10 database.
Configure up to 300 bins/database for monitoring machine centers, cutting locations and
product codes.
Configure each bin with product specs and number of measurements per piece (up to 16
measurements/piece).
Shape charts automatically build as measurements are being taken.
Enter missing measurements if you are unable to get a measurement at the desired
measurement location.
Enter measurements via wireless connection and keyboard.
Add a note to items measured (notes are selected from a predefined list).
Copyright © 2008-2011 MicroRidge Systems, Inc.
LSIZE Wireless v11
Introduction
7
Retake measurements.
View statistical calculations.
View histograms.
View XBar & R (Average & Range) control charts.
Retain measurements on Handheld to provided additional information for the calculations
and charts.
Transfer measurements to the LSIZE software on your PC for additional analysis.
Smart measurement deletion from the Handheld. LSIZE Mobile will automatically remove
measurements older than the specified retention period.
Automatic date and time update on your Handheld. Since your PC is the source for the
current date and time, you must be sure that your PC has the proper date and time.
Help screens on many of the available displays.
2.3
LSIZE Wireless Components
The wireless portion of LSIZE Wireless was developed by MicroRidge Systems. The wireless
hardware components consist of the Mobile Base board installed in the Handheld and the
Mobile Module attached to your gage. When the Handheld receives a measurement from the
Mobile Module, a message is sent back to the Mobile Module that the Handheld has received
the measurement. This transmission back to the Mobile Module provides notification to the
user that the measurement data was successfully received by the Handheld.
The Mobile Module is powered by a commonly available photo lithium battery. When the
Mobile Module is used with Mitutoyo gages, the Mobile Module battery life is measured in
years. The gage cable that connects the Mobile Module to your gage is field replaceable by
the user. It is recommended that you always have a spare gage cable available.
LSIZE Wireless is designed so that you can use multiple Handhelds in close proximity to each
other. When you set up the association between a Mobile Module and a Handheld, that
Mobile Module will only communicate with the Handheld that it has been associated with. You
do not have to be concerned about data being sent to other Handheld units.
The range of the Mobile Module to the Handheld is up to 100 feet. When you are collecting
measurements, you will be putting the Handheld in a location where it can be seen as you are
taking the measurements. Typically this distance would be less than 25 feet. Remember, only
a single gage should be used to communicate with a Handheld. If you want to collect
measurements with 2 gages at the same time, you must have 2 Handhelds.
A complete LSIZE Wireless package consists of the components listed below. If you are using
multiple Handhelds to collect measurements, you normally only need a single Docking Station
to transfer data to and from the Handheld.
Handheld with Mobile Base board and LSIZE Mobile application software
Handheld nylon pouch with belt swivel (optional item)
Copyright © 2008-2011 MicroRidge Systems, Inc.
8
Introduction
LSIZE Wireless v11
Docking Station package
o Docking station
o AC Adapter with interchangeable plugs
o USB/RS-232 Adapter with Null Modem Adapter
o 3' USB Extension cable
o 6' 9-pin (M/F) serial extension cable
o 6' Serial to USB interface cable with CD
o USB Sync cable with for use with ActiveSync (Windows XP) or Windows Mobile
Device Center (Windows 7)
Mobile Module with gage cable
Adhesive pads for attaching Mobile Module to gage
Mobile Module labels for displaying Module ID
Screwdriver
User's Guide with application CD
An appropriate gage is also required with the LSIZE Wireless. If you already have a Mitutoyo
caliper or micrometer with SPC output, you can use that gage. You must be sure you order the
proper gage cable for the gage you intend to use with the LSIZE Wireless. Mitutoyo gages can
be ordered directly from MicroRidge Systems.
2.4
Spare Parts & Accessories
There are several spare parts and accessories available for LSIZE wireless. All of these parts
are available directly from MicroRidge Systems. Please contact us for current pricing.
Gage Cables
We recommend you always keep at least one spare gage cable in stock. When ordering spare
cables, be sure you have the brand and model number of your gage. For Mitutoyo gages, we
need the code number rather than the model number.
Screen Protectors
These are clear plastic overlays for the Handheld touch screen. These screen protectors are
optional; however, we strongly recommend that you use a screen protector on all of your
Handhelds. The screen protectors come in packages of 4.
Stylus
A replacement stylus is available for the Handheld. You should not use pens, pencils or
pointed metal objects as a stylus. Most of the displays within LSIZE Mobile can be navigated
by using the keyboard or by using a finger on the touch screen. There are a few instances
where it will be easier to navigate by using a stylus.
Copyright © 2008-2011 MicroRidge Systems, Inc.
LSIZE Wireless v11
Introduction
9
Mobile Module Battery
At some point you will need to replace the battery in the Mobile Module. The life of the Mobile
Module battery should be in excess of one year. The battery used in the Mobile Module is a
CR2 photo lithium battery. This battery is widely available and can be obtained directly from
MicroRidge or in the retail market from places such as Walmart, Safeway, etc.
Handheld Battery Pack
The battery pack in the Handheld must be purchased from MicroRidge Systems. When you
notice that battery capacity tends to fall faster than when the battery was new, you should
order a new battery. You can monitor the battery capacity on the main LSIZE Mobile screen.
Refer to the Battery section for more information.
2.5
Country Certification & Approvals
LSIZE Wireless has been approved for use in North America (Canada, United States and
Mexico), South America, Australia, New Zealand and European Union countries. MicroRidge
Systems has not obtained approval for operation in other parts of the world. If your application
for this Wireless System is for other regions, contact us about possible approvals for your area.
The radios used in the LSIZE Wireless operate in the Industrial, Scientific & Medical (ISM)
frequency band at 2.4 GHz. This frequency is typically higher than the frequency used by cell
phones.
The Mobile Module and Handheld can be used in close proximity to an individual. The
approval allows for the Mobile Module to be closer than 8.7 inches (22 cm) to an individual.
The following statement is included in this manual for the Mobile Module. A similar statement
is already displayed on a label on the back of the Handheld.
This device complies with Part 15 of the FCC Rules. Operation is subject to the following two
conditions:
1. This device may not cause harmful interference, and
2. This device must accept any interference received, including interference that may
cause undesired operation.
The wireless approvals for the LSIZE Mobile Module is covered under 1 or more of the
following:
FCC ID: U6TZIGBIT-A2
FCC ID: OUR-XBEE
IC: 7036A-ZIGBITA2
IC: 4214A-XBEE
N24679
Copyright © 2008-2011 MicroRidge Systems, Inc.
10
2.6
Introduction
LSIZE Wireless v11
Setup & Printing Options
LSIZE Wireless Setup
LSIZE Wireless must be set up before you can begin collecting measurement data. There are
2 set up options available.
LSIZE for the PC
LSIZE Mobile Lite Setup
The following table summarizes the the differences between the 2 setup methods.
Feature
LSIZE for PC
Lite Setup
PC-based software
x
x
Set up bin specs on PC and download to
Handheld
x
x
Long-term analysis
x
Quick Print utility
x
Detailed analysis & charts
x
Histogram & control charts
x
Combine multiple machine centers in
analysis
x
Download measurements to PC for longterm data storage
x
Use for incoming product inspection
x
x
Use for spot checks in the mill
x
x
Export data to Excel
x
x
1-line summary report
x
x
Select individual boards to be included in
reports
x
x
x
If you use LSIZE Mobile Lite Setup to configure LSIZE Wireless, you cannot transfer the
collected measurement to LSIZE on the PC for long term storage and analysis
Copyright © 2008-2011 MicroRidge Systems, Inc.
LSIZE Wireless v11
Introduction
11
Printing LSIZE Wireless Reports
LSIZE Mobile Quick Print can be used to print measurements, statistics and charts base in the
data in LSIZE Wireless. You can use the Quick Print utility regardless of the method to
configure LSIZE Wireless.
Copyright © 2008-2011 MicroRidge Systems, Inc.
LSIZE Wireless v11
3
LSIZE for the PC
13
LSIZE for the PC
If you configure LSIZE Wireless with LSIZE for the PC you will be able to transfer the collected
measurements to LSIZE for long term data storage and analysis. You can also generate
reports from LSIZE and LSIZE Mobile Quick Print. Refer to the LSIZE for PC User's Guide for
additional information.
Copyright © 2008-2011 MicroRidge Systems, Inc.
LSIZE Wireless v11
4
LSIZE Mobile Lite Setup
15
LSIZE Mobile Lite Setup
If you configure LSIZE Wireless with LSIZE Mobile Lite Setup you will not be able to transfer
the collected measurements to LSIZE for the PC. You will be able to generate reports with
LSIZE Mobile Quick Print.
The operation of LSIZE Mobile Lite Setup is very straight forward. The program consists of 4
tabs were information is selected and entered.
Handheld Transfer
Machine Setup
Product Specs
Handheld Bin
The Handheld must be in the docking station and connected to the PC via the serial cable in
order to transfer information to the Handheld. Be sure to select the serial port (Setup/Serial
Port menu) before you try to communicate with the Handheld.
All of the bin specs files need to be save to a single folder location. You can change the folder
location with the Setup/Default Setup File Folder menu item.
Copyright © 2008-2011 MicroRidge Systems, Inc.
16
4.1
LSIZE Mobile Lite Setup
LSIZE Wireless v11
Handheld Transfer
You can have up to 15 different spec files for you Handhelds. However, only the Handheld
can only contain a single spec file at any one time. Select the spec file you want to edit or
transfer to the Handheld. You can select the file by double-clicking the file or pressing the
Load File button.
Press the Handheld Status button to see what information is currently in the Handheld. Press
the Send Specs to Handheld button to send the selected specs file to the Handheld.
Copyright © 2008-2011 MicroRidge Systems, Inc.
LSIZE Wireless v11
4.2
LSIZE Mobile Lite Setup
17
Machine Setup
In order to edit any of the items on this tab, you must enable the edit mode with the Edit toolbar
button. You need to enter items in the Machine, Sawline and Size columns that you will be
monitoring. To create a process combination, select an item in each of these 3 columns and
press the Create Process Combo button. If you rename an item in one of the first 3 columns
(change CNS to Twin), every place the original item name appeared, will be replaced by the
new item name.
Copyright © 2008-2011 MicroRidge Systems, Inc.
18
4.3
LSIZE Mobile Lite Setup
LSIZE Wireless v11
Product specs
In order to edit any of the items on this tab, you must enable the edit mode with the Edit toolbar
button. The Machine and Size fields for each Process Combination you create are
automatically added to this tab. If you have a CNS : Left : 2T and CNS : Right : 2T process
combination, the row added to this tab will be CNS : 2T. You then need to add information to
other fields as required. You do not have to enter product spec information in order to use
LSIZE Mobile. However, it is recommended that you fill in the information for all of the fields.
There are instructions shown at the bottom of the display for each cell in the grid.
Copyright © 2008-2011 MicroRidge Systems, Inc.
LSIZE Wireless v11
4.4
LSIZE Mobile Lite Setup
19
Handheld Bins
In order to edit any of the items on this tab, you must enable the edit mode with the Edit toolbar
button. You build the bin specs to be sent to the Handheld from this tab. To move a Process
Combination from the lower grid to the upper grid you can drag and drop the item or doubleclick the item. If you double-click the item, the cursor in the upper grid must be in one of the
first 3 columns. Any changes you make in the Machine Setup or Product Specs tabs are
automatically reflected on this tab.
Copyright © 2008-2011 MicroRidge Systems, Inc.
20
LSIZE Mobile Lite Setup
LSIZE Wireless v11
Handheld Parameters
Be sure to review the Handheld Parameters. The first 2 items (Unit ID and Product type) are
labels that are displayed on the Handheld.
Copyright © 2008-2011 MicroRidge Systems, Inc.
LSIZE Wireless v11
5
LSIZE Mobile Quick Print
21
LSIZE Mobile Quick Print
The LSIZE Mobile Quick allows you to generate printed reports based on the measurement
data in the Handheld. The Quick Print utility reads the spec and measurement data from the
Handheld and allows you to select what you want printed to a printer that is accessible your
your PC. To use the Quick Print utility put the Handheld into the docking station and select the
Data Transfer item on the main Handheld screen. If possible you should print the information
to a color printer. The out-of-spec and out-of-control standout much better on a color printer
rather than a black & white printer.
5.1
Communications
The Communications tab is used to retrieve the Handheld status and data information. If you
click the Handheld Status button, you get the data for this tab and the Bin specs tab. If you
click the Handheld Data button, you get the status information and all of the measurement data
in the Handheld.
The Communications tab is also used to delete measurement in the Handheld. You can select
the bins that you want to delete measurements from and you can also specify the range of
dates to be deleted.
If you are also downloading you measurements to LSIZE on the PC, you should not manually
delete any measurement from the Handheld. LSIZE on the PC will automatically manage the
measurement deletion process for you.
Copyright © 2008-2011 MicroRidge Systems, Inc.
22
5.2
LSIZE Mobile Quick Print
LSIZE Wireless v11
Bin Specs
The Bin Specs tab displays the specs that are currently in the Handheld. These specs may
have been transferred from LSIZE on the PC or the LSIZE Mobile Lite Setup utility. The
source of the bins specs is shown in the Handheld status on the communications tab.
The specs information can be displayed in the print preview and/or sent to a printer. The page
orientation for this report is always landscape.
You can select a range (or all) of cells and copy these cells to the clipboard. You can then
paste these cells into another application such as Excel.
Copyright © 2008-2011 MicroRidge Systems, Inc.
LSIZE Wireless v11
5.3
LSIZE Mobile Quick Print
23
Report Setup
The Reports Setup tab allows you to select what bins you want to include in a report. You can
also specify the range of dates to be used for the selected bins. If you change the selected
bins or date range, the Measurement, Summary and Chart tabs will update when when one of
these tabs are selected. The update consists of recalculating the statistics and displaying the
results. This update process typically takes less than 0.5 seconds to complete.
Copyright © 2008-2011 MicroRidge Systems, Inc.
24
5.4
LSIZE Mobile Quick Print
LSIZE Wireless v11
Measurements
The Measurement tab displays shows the measurement used in the current calculated reports.
Since you can have up to 8 measurements/edge, there are always 8 measurements columns.
If the specs for the bin specify less than 8 measurements/edge, the unused columns are
shown with a light gray background. If a measurement is out-of-spec, it is shown in red.
After a report is calculated, you can manually remove individual pieces from the report. To
exclude a piece, place the focus cell on the piece and press the space bar. The background
will change to a light yellow and the word Exclude will be display in the first column. Next
select the Summary or charts tab to see the new calculation without the excluded pieces. The
put a piece back into the calculations press the space bar when the focus cell is on the
excluded piece. You can also click the
toolbar button to unselect all of the excluded
pieces.
The measurement information can be displayed in the print preview and/or sent to a printer. If
the number of measurements/edge for any bin is 7 or 8, the orientation of the printed report will
always be landscape. For 1 to 6 measurements/edge, the printed report can be portrait or
landscape. The select for the printed report orientation is done in the Setup/Preferences
dialog box.
You can select a range (or all) of cells and copy these cells to the clipboard. You can then
paste these cells into another application such as Excel.
Copyright © 2008-2011 MicroRidge Systems, Inc.
LSIZE Wireless v11
5.5
LSIZE Mobile Quick Print
25
Summary
The Summary tab displays shows the calculated results for the bins included in the report. If a
calculated value is outside of the calculated or specified limits, it will be shown in red.
The control limits (X-Bar and Range) show on this display are the limits set by the user. If no
limits were set and Quick Print calculated the limit, the calculated limits are only shown on the
charts.
You cannot change the columns that are shown on the display; however, you can specify what
columns will be printed. The default columns to print can be set in the Setup/Preferences
dialog box. You can make temporary changes to the columns to print by enabling the edit
mode with the toolbar button
, then moving to the last row in the grid. If you press the
toolbar button, you will jump to the last row in the grid. You can toggle the columns to print by
pressing the space bar or P character. The first 3 columns will always be printed.
The report orientation of this report will always be landscape. If you have specified more
columns than can be printed with the page width, the additional columns will be printed on
another page. If another page is printed, the first 3 columns will be repeated on the additional
page.
You can select a range (or all) of cells and copy these cells to the clipboard. You can then
paste these cells into another application such as Excel.
Report Columns
To someone who understands basic statistics, an explanation of the majority of the report
columns is not necessary. If you do not understand basic statistics, you should get the
Copyright © 2008-2011 MicroRidge Systems, Inc.
26
LSIZE Mobile Quick Print
LSIZE Wireless v11
appropriate training so that you can fully understand and utilize the information presented by
Quick Print. For clarification purposes, we will explain a few of the columns included in the
Summary Report.
Num S/G
Number of subgroups. The term subgroup is commonly uses in statistical process control
(SPC) and refers to a piece that is being measured. For example if you are measuring
lumber and you have measured 18 boards and you are taking 5 measurements along 2
edges, you have 18 subgroups with a subgroup size of 10.
Meas % Lo
The percent of measurements below the low spec limit.
Meas % Hi
The percent of measurements above the high spec limit.
Meas % On
The percent of measurements within the spec limits. The sum of % Lo + % On + % Hi will
always be 100%.
% Pcs With Lo
The percent of the measured pieces (number subgroups) that contain at least 1 low
measurement.
% Pcs With Hi
The percent of the measured pieces (number subgroups) that contain at least 1 high
measurement.
% Pcs With On
The percent of the measured pieces (number subgroups) that only contain is-spec
measurements. Unlike the % Meas calculations, the sum of % Lo + % On + % Hi for pieces
does not have to equal 100%. It is possible to have pieces that contain both high and low
measurements. The % Pieces calculations can indicated if the out-of-spec measurements
tend to be on just a few pieces or are spread across most of the pieces measured.
Copyright © 2008-2011 MicroRidge Systems, Inc.
LSIZE Wireless v11
5.6
LSIZE Mobile Quick Print
27
Charts
The Charts tab shows a statistical summary, histogram and control chart for each bin included
in the calculation. Select the bin you want to display from the bins along the left edge of the
window.
Copyright © 2008-2011 MicroRidge Systems, Inc.
28
LSIZE Mobile Quick Print
LSIZE Wireless v11
A sample printout of chart window is shown below. We recommend that the charts be printed
on a color printer.
Copyright © 2008-2011 MicroRidge Systems, Inc.
LSIZE Wireless v11
6
LSIZE Handheld
29
LSIZE Handheld
The Handheld used with LSIZE Wireless is a rugged unit designed for the industrial market. It
is important that you carefully read this entire chapter on the Handheld. There are aspects of
the Handheld operation that may not be apparent, and you will save yourself a lot of frustration
by better understanding how the Handheld works. Especially important is the management of
the battery charging. With the proper battery management, you should never experience a low
battery condition. Additional documentation sources for the Handheld can be found in the
Documentation section in this chapter.
6.1
Docking Station
The Docking Station is a key element in LSIZE Wireless and consists of the Docking Station
along with various cables and adapters. It is important that you carefully follow the instructions
for connecting the Docking Station to your computer. The Docking Station is used for the
following functions with LSIZE Wireless.
Communications with the LSIZE software on your PC for transferring product specs to the
Handheld and receiving the measurements from the Handheld. This communications link
uses the USB/RS-232 Adapter.
ActiveSync communications between the Handheld and your PC. This communications
link is used when you need to install or upgrade the LSIZE Mobile application. Refer to
the ActiveSync section for additional details.
Charging the internal Handheld lithium battery pack.
Charging a spare lithium battery pack.
The components included with the Docking Station are listed below. Some of the items may
not be used with your installation.
Docking Station.
AC Adapter with interchangeable plugs for worldwide use.
USB ActiveSync cable with CD. You will not initially need to use this cable. Refer to the
ActiveSync section for additional details.
3' USB extension cable
USB/RS-232 Adapter with Null Modem adapter.
6' 9-pin (M/F) serial extension cable. You may not need to use this cable.
6' Serial to USB interface cable with CD. You may not need to use this cable.
There are 3 connections available on the back side of the Docking Station.
connections are used for the AC Adapter and the connections to your PC.
These
Left connection:
Round connector for AC Adapter.
Center connection:
Rectangular connector for data transfer to and from your PC. You
should connect the 3' USB extension cable into this connection.
Copyright © 2008-2011 MicroRidge Systems, Inc.
30
LSIZE Handheld
Right connection:
LSIZE Wireless v11
Square ActiveSync cable connection. You will not initially need to
use this cable. Refer to the ActiveSync section for additional details.
Connecting the AC Adapter to the Docking Station
Connect the AC Adapter to a power source that will always be on. When you place the
Handheld into the Docking Station for transferring data to and from your PC, the Handheld
battery will be charging while the Handheld is in the Docking Station. If the AC Adapter is not
always on, you may end up with a dead battery in the Handheld. You do not have to remove
the Handheld from the Docking Station when the battery is fully charged.
Connecting the Docking Station to Your PC
To PC Serial or USB Port
Connecting Docking Station to PC
(3' Extension cable not show in example)
Connect the 3' USB extension cable to the center rectangular connector on the back of the
Docking Station. Next connect the black USB/RS-232 Adapter with the Null Modem adapter to
the USB extension cable. The last step is to connect the DB9 female connector on the USB/
RS-232 Adapter to your PC. This final connection is done with the 6' serial extension cable or
the 6' Serial to USB interface cable. The cable that should be used depends on the
connections available on your PC.
Connection Using 6' Serial Extension Cable
If your PC has an available serial port you can use the serial extension cable to make the
final connection to your PC. A PC serial port will be a DB9 male connector. Many newer
PCs will not have any physical serial ports. If your PC does not have a physical port, you
must use the Serial to USB cable described below.
Connection Using 6' Serial to USB Cable
If you will be using the Serial to USB cable, you must install the USB drivers before
connecting this cable to your PC. To install the USB drivers, insert the USB drivers CD into
your PC and follow the instructions on the screen. After the drivers are installed, connect
the Serial to USB cable to the Null Modem adapter on the black USB/RS-232 adapter and
to a USB port on your PC.
The final step in connecting the Docking Station to your PC is to let LSIZE know what serial
port the Docking Station is connected to. Start the LSIZE software on your PC, open a
database and select the Wireless/Communications setup menu item. Select the serial port
that the Docking Station is connected to. If you are using a physical serial port, you will
Copyright © 2008-2011 MicroRidge Systems, Inc.
LSIZE Wireless v11
LSIZE Handheld
31
probably be selecting COM1 or COM2. If you are using the Serial to USB cable, you will be
selecting a port that has a Registry Description such as \Device\VCP0, \Device\VCP1, etc.
6.2
ActiveSync & Windows Mobile Device Center
ActiveSync and Windows Mobile Device Center are Microsoft communication utilities that can
be used to access and update the contents of the Psion Handheld. ActiveSync is used with
Windows XP and Windows Mobile Device Center is used with Windows 7.
You will need to use one of these utilities if you update LSIZE Mobile on the Handheld to v11
from a previous version. Once you have LSIZE Mobile v11 installed on the Handheld, you will
probably not have to use ActiveSync or Windows Mobile Device Center for program updates in
the future. LSIZE Mobile v11 contains a function that allows you to update the software on the
Handheld via the RS-232 serial cable.
6.3
Power On & Off
There is a dedicated power key to turn the Handheld on and off. To turn the Handheld on,
press and hold the Power key. Once you see the Handheld starting to come on, release the
Power key. To turn the Handheld off, press and release the Power key. Refer to the diagram
below for the location of the Power key.
Handheld Keys Used to Turn Unit On and Off.
To conserve battery life, you should always turn the Handheld off when you are done using the
unit.
Copyright © 2008-2011 MicroRidge Systems, Inc.
32
LSIZE Handheld
LSIZE Wireless v11
Automatic Power Off
The Handheld will automatically shut down if there is no activity for a period of time. There are
separate timeout periods when the Handheld is being powered by the internal battery pack and
when the Handheld is being powered by an AC adapter. The timeout periods are set in the
Setting dialog. To get to the Setting dialog, follow the steps below.
Select the
icon in the upper left corner of the screen or press and release the
Windows Logo key.
The Start menu should be displayed along the left side of the screen.
Select the Settings item near the bottom of the menu list.
The Setting dialog will be displayed.
Select the Systems tab along the bottom of the screen.
Select the Power icon.
Select the Advanced tab.
You will see power off times for "On battery power" and "On external power".
recommended settings for these values are as follows:
The
o On battery power: 5 minutes
o On external power: 15 minutes
6.4
Battery
The Handheld is powered by a 4,400 mAh rechargeable lithium-ion battery pack. This battery
is charged when the Handheld is placed in the Docking Station or when an AC adapter is
connected to the power port on the bottom of the Handheld. The battery is accessed from the
lower rear of the unit by rotating the 2 silver battery fasteners. If you need to remove the
battery, be sure you turn the Handheld off before opening the battery compartment. Once the
battery is removed, the internal backup battery will prevent data loss for up to 5 minutes. A
spare battery can be charged in the Docking Station in the area behind the Handheld.
The lithium-ion battery used in the Handheld does not experience the memory problems that
were common in the older NiCad battery technology. With NiCad batteries, you should drain
the batteries before recharging them. With lithium-ion batteries, you can used the battery for a
brief period of time and then recharge the battery without causing any battery degradation
problems.
Battery Life & Recharge Time
With proper management of the Handheld, you should never run into a low battery condition.
We ran a battery life test for 12 hours with the Handheld and the Mobile Base radio at full
power. After the the 12 hour test, the battery capacity remaining was 14%. When you are
collecting wireless measurements, your power on time in a 24 hour period will be much less
than our 12 hour test. Typically, we would expect less than 4 hours of measurement collection
time in a 24 hour period. After running the 12 hour test, we recharged the Handheld in the
Docking Station and it took about 4 hours to bring the battery up to the 100% level.
Copyright © 2008-2011 MicroRidge Systems, Inc.
LSIZE Wireless v11
LSIZE Handheld
33
To keep the battery pack at the highest level of charge you should follow the steps below. If
you detect that the battery seems to discharge faster than when it was new, you should
contact MicroRidge Systems and order a spare battery pack.
Leave the Handheld in the Docking Station after downloading measurements and at the
end of the shift.
Leave the Handheld in the docking Station at the end of the day.
If you have more than 1 Handheld and only a single Docking Station, purchase an AC
Adapter for each Handheld so that they can be kept charged.
If you download your measurements at the main office once a day (or every few days),
and you keep the Handheld in the sawmill office, purchase an AC Adapter so that you can
charge the Handheld in the sawmill office.
Even when the Handheld and its internal radio are off, the Handheld is still using battery
power. If the Handheld is not used for a week, it will loose about 50% of its battery capacity.
We recommend that if the Handheld is not being used on a regular basis, you fully charge the
Handheld at least once a week.
Battery Capacity Indicator
There are several ways to view the remaining Handheld battery capacity. The easiest one to
view is displayed on the main LSIZE Mobile screen. The percent of battery capacity remaining
is shown in blue near the bottom of the main LSIZE Mobile screen. When the battery capacity
is at or below 20%, the battery capacity status will switch to blinking red characters (Battery @
19%).
Main screen showing battery capacity at 95%
Copyright © 2008-2011 MicroRidge Systems, Inc.
34
6.5
LSIZE Handheld
LSIZE Wireless v11
Keypad
There are only a few of the keys on the Handheld that you will need to use. Most of the keys
require only a single press. However, there are a couple of key sequences that require you to
press the Blue FN key followed by an additional key. The keys that are used by LSIZE Mobile
are shown on the picture below.
Keys used by LSIZE Mobile
The function of the keys and key sequences are listed below. For multiple key sequences,
press and release the first key and then press and release the second key.
Tab
Move input focus to next dialog control.
Blue FN
This key is used in connection with other keys such as F1, F10 and
Enter. To turn the Handheld off, press the Blue FN key and then press
and release the Enter key.
FN + F1
Show help text. Press and release Blue FN key and then press and
release F1 key.
FN + F10
Enter a missing measurement. Press and release Blue FN key and then
press and release F10 key.
Escape
Exit the current window.
Cursor
Move input focus within a window. There are 4 cursor keys: left, right,
up and down. There are no keys for PgUp, PgDn, Home or End.
Enter
Press and hold to turn on or press to select item with current input focus.
`Windows
Show Start Menu items. This key sequence will not work if you have
hidden the Windows Start menu. Refer to the Configuration Switches
for more information.
Copyright © 2008-2011 MicroRidge Systems, Inc.
LSIZE Wireless v11
6.6
LSIZE Handheld
35
Reboot (Warm Reset)
You can do a reboot or warm reset of the Handheld by pressing 2 specific keys. Doing a
reboot should only be required if you are having a problem with an application. If an
application will not properly start or you cannot close the application, you probably should
reboot the Handheld. When you reboot your Handheld, the registry settings and any installed
programs (stored on the flash file system) and data are preserved.
If you need to reload the Windows Mobile 6 operating system, refer to "Resetting the
WORKABOUT PRO Handheld" in the Psion User Manual. Refer to the Documentation section
for information on how to access the Psion User Manual.
Follow the sequence described below to reboot your Handheld.
Turn off the Handheld.
Press and hold the Blue FN key and the Power Key simultaneously for a minimum of 8
seconds.
Release the keys when information starts to appear on the screen.
When the main screen appears, the Handheld is ready to use.
It may take about 30 seconds for the main screen to appear.
6.7
Touch Screen
The graphic user interface in Windows Mobile 6 utilizes a "point & click" navigation. On the
Handheld this is accomplished using a touchscreen and a stylus rather than a mouse. In
addition to the stylus, LSIZE Mobile is designed for navigation by using the keypad or a finger.
Do not use metal objects such as a caliper on the touch screen.
Do not use a pen or a pencil as a stylus.
Clear plastic screen protectors are available for the Handheld and are highly recommended.
Refer to Spare Parts & Accessories for more information.
6.8
Date & Time
When you record the first measurement for a board, the date and time are also recorded. It is
very important that the Handheld has the proper date and time. The current Handheld date
and time are displayed near the bottom of the main LSIZE Mobile screen. The Handheld date/
time are automatically checked when you transfer specs to the Handheld or you send
measurements to the LSIZE software on your PC. If the the date/time difference between your
Handheld and PC is more than 2 minutes, the Handheld date/time will be adjusted to match the
date/time on your PC. Therefore, if your PC has the wrong time, your Handheld will also have
the wrong time.
Be Sure Your PC Has the Proper Date & Time
Copyright © 2008-2011 MicroRidge Systems, Inc.
36
6.9
LSIZE Handheld
LSIZE Wireless v11
Mobile Base
The Handheld is purchased from Psion and MicroRidge Systems adds its Mobile Base to an
expansion slot within the Handheld. This Mobile Base contains the radio and the firmware for
communicating with the Mobile Module attached to your gage. The Mobile Base is powered by
the Handheld battery pack.
The Mobile Base contains a processor and firmware in flash memory. When firmware updates
become available for the Mobile Base, the firmware can be updated via the Docking Station
and the serial connection used by the LSIZE software on your PC.
6.10
Starting LSIZE Mobile
When LSIZE Mobile is installed on the Handheld, an icon is placed in the Start Menu list. To
start LSIZE Mobile, select the Start Menu and then select
. As shown below,
there will probably be several other programs in the Start Menu list.
Start Menu with LSIZE Mobile
Another way to start LSIZE Mobile is to open the
from the Start Menu and
navigate to Program Files\LSIZE Mobile. Find the LSIZE_Mobile application and run it.
6.11
Other Applications
There are several other applications that come with the Handheld. These applications are
embedded in the Handheld and cannot be removed. MicroRidge Systems does not support
these other applications and will not answer questions about these other applications. The
MicroRidge Systems application support is limited to LSIZE Mobile.
Copyright © 2008-2011 MicroRidge Systems, Inc.
LSIZE Wireless v11
6.12
LSIZE Handheld
37
Documentation
Additional documentation covering the Psion WORKABOUT PRO Handheld is available in a
PDF document from Psion. The Psion User Manual contains over 300 pages of information
and most of this information is not really needed for the LSIZE Wireless user. We recommend
that you do take a look at the Psion User Manual so that you can determine if there are
additional features that may be of interest to you.
The cover from the Psion User Manual is shown below and the entire PDF manual is available
on the LSIZE CD.
Copyright © 2008-2011 MicroRidge Systems, Inc.
LSIZE Wireless v11
7
Mobile Module
39
Mobile Module
The Mobile Module provides the wireless link between your gage and the Handheld. The
Mobile Module was designed to mount on the back side of a caliper or to a micrometer. Even
though the Mobile Module can be used with any gage that has an SPC output, we recommend
that you use only Mitutoyo gages with the Mobile Module. If you use other gage brands with
the Mobile Module, your gage cable replacement cost will be higher and the Mobile Module
battery life will typically be reduced. Additionally, MicroRidge stocks replacement parts for
Mitutoyo calipers, but does not have replacement parts and does not repair other brands of
gages.
LSIZE Mobile Module Shown with Mitutoyo Caliper Cable
The Mobile Module is easy to set up and use. Carefully read the following sections about the
Mobile Module so that you fully understand the buttons, LED indicators and the concept of
Mobile Module association.
Key features of the Mobile Module include:
Compact design measures 2.14" x 1.44" x .79" and weighs 1.6 oz.
Threaded inserts and captive panel screws used to secure the Mobile Module case cover
(you will not lose screws or strip threads in plastic case when changing cables or
replacing batteries).
Push buttons on Mobile Module (Setup & Read) rated for 1,000,000 cycles.
User can replace the battery & gage cable without removing the Mobile Module from the
gage.
Highly visible LEDs indicate successful gage reading and wireless transmission.
Advanced power management eliminates the need for on/off switch.
Uses one commonly available CR2 Photo Lithium battery.
Firmware (software within the Mobile Module) can be upgraded in the field.
Copyright © 2008-2011 MicroRidge Systems, Inc.
40
Mobile Module
LSIZE Wireless v11
Uses proven wireless technology. MicroRidge Systems has been shipping wireless
systems to general manufacturing since October 2006.
7.1
Buttons & LEDs
The Mobile Module contains 2 push buttons and 2 LEDs. The picture below shows the
location of the buttons and LEDs. When the LEDs are off, the lenses over the LEDs will
appear clear. When an LED is turned on, it will be a bright red or green as shown in the
picture.
Mobile Module Buttons & LEDs
The 2 push buttons are located along the top edge of the Mobile Module just to the right of the
gage cable. There may also be a third button on your gage cable.
Read Mode
The Mobile Module must be associated with a Handheld before any data will be accepted by
the Handheld. To associate a Mobile Module with a Handheld refer to the Associate with
Handheld section.
To send a gage reading to a Handheld, be sure your gage is turned on and connected to the
Mobile Module. Press the read button on the gage cable or the Mobile Module to start the
transmission process. When you press the read button and the gage reading is successfully
sent to the Handheld, the Mobile Module will go through the following steps. Remember, the
Mobile Module must be associated with the Handheld before any data will be accepted by the
Handheld.
The Mobile Module wakes up and requests a reading from the gage
When a gage reading is obtained, the Red Gage Read LED is turned on and the radio is
turned on. The Gage Read LED will be turned off after about 150 milliseconds (msec).
A measurement packet is sent to the Handheld that the Mobile Module is associated with.
When the Mobile Module receives notification from the Handheld that the measurement
packet was received, the radio is turned off and the Green Handheld Accept LED is
turned on. The Handheld Accept LED will be turned off after about 150 msec.
Copyright © 2008-2011 MicroRidge Systems, Inc.
LSIZE Wireless v11
Mobile Module
41
After the Handheld LED is turned off, the Mobile Module will enter a low power sleep
mode.
The entire process from turning on the Mobile Module to turning it off typically takes from
250 to 350 msec. The actual time the transmitter is sending data is about 20 msec (0.020
seconds).
If there were problems with the measurement capture process, wireless transmission or low
battery condition, the LEDs will blink to indicate the nature of the problem. Refer to the LED
Error Codes section for more details.
Setup Mode
The Setup button is used to put the Mobile Module into the Setup Mode. The Setup Mode is
used for the following procedures:
Associating a Mobile Module with a Handheld.
Updating the firmware in the Mobile Module.
Diagnostic procedures per MicroRidge technical support.
To enter the Setup Mode follow the steps below. You do not have to turn your gage off or
disconnect it from the Mobile Module prior to entering the Setup Mode.
Press and hold the Setup button.
While you continue to press the Setup button, press and release the Read button.
Once both LEDs start to flash, release the Setup button.
Both LEDs will flash 5 times when the Mobile Module enters the Setup Mode. When in the
Setup Mode, both LEDs will quickly flash every 300 msec (0.3 seconds). The Mobile Module
will exit the Setup Mode and turn itself off after 20 seconds of inactivity. To exit the Setup
Mode prior to the 20 second timeout, press the Read button.
Use of the Setup Mode is required when you Associate a Mobile Module with a Handheld.
Refer to the Associate with a Handheld section for the steps required for association.
7.2
Installation on a Caliper
The Mobile Module should be attached to your gage (caliper, micrometer, etc.) with the
adhesive provided with the Mobile Module. The Mobile Module should be mounted in such a
way that all of the following items are true.
The LEDs are visible to the operator.
The Read button on the Mobile Module is accessible to the operator.
The Mobile Module cover can be removed without having to remove the Mobile Module
from the gage. This allows for easy access in replacing the gage cable and battery.
Copyright © 2008-2011 MicroRidge Systems, Inc.
42
Mobile Module
LSIZE Wireless v11
Installation on a Caliper
When the Mobile Module is used with a caliper, it is typically mounted on the back side of the
caliper as shown in the illustration below.
Mobile Module Mounted on a Caliper
Recommended Adhesive
Placement on Mobile Module
The Mobile Module should be mounted so that the 2 LEDs are visible along the top edge of the
caliper. These LEDs are used to notify the user that the gage was read and the data was
received by the Handheld. When mounted in this fashion on a caliper, you can still gain
access to the batteries and replace the gage cable without having to remove the Mobile
Module from the caliper.
The Mobile Module should be attached to the caliper with 3 foam adhesive pads as shown
above. There are several sets of these foam adhesive pads supplied with each Mobile
Module.
7.3
Associate with a Handheld
All of the Mobile Modules and the Mobile Base radio receivers in the Handhelds operate on the
same radio frequency. If you have multiple Handhelds and Mobile Modules operating within
range of each other, we need to be sure that measurement data from a Mobile Module is only
processed by the desired Handheld. The process of linking a Mobile Module to a specific
Handheld is referred to as Association. When a Mobile Module sends a measurement packet,
in addition to the measurement data, the packet also contains address information that
identifies the target Handheld. If a Handheld receives a measurement packet and the address
information in the packet does not match the address information in the Handheld, that
measurement packet is discarded. When a Handheld receives a measurement packet with
matching address information, the Handheld verifies that the measurement packet is valid, and
if the packet is valid, the Handheld sends a data received acknowledgement back to the
Mobile Module.
The Handheld address information that is used in the wireless
communications is all preset and the user does not have to manually enter this address
information.
Copyright © 2008-2011 MicroRidge Systems, Inc.
LSIZE Wireless v11
Mobile Module
43
Steps for Association
To Associate a Mobile Module with a Handheld, follow the steps below. You may find it useful
to use the stylus when working with the Association display. The Association procedure is also
outlined in the Help available from the Association Display. Help can be accessed by pressing
and releasing the Blue FN key and then F1 or by selecting the
corner of the display.
symbol in the upper right
Start LSIZE Mobile and select "Associate & Test Module".
The button in the lower right-hand corner will be labeled "Enable Edit" or "Enter
Password". If the button is labeled "Enable Edit", press the button and proceed to the
next step. If the button is labeled "Enter Password", press the button and enter the
password. Refer to the Configuration Switches for more information.
Check the "Enable the Mobile Module Association" box.
You can have up to 7 Mobile Modules associated with a Handheld. Through the
Configuration Switches, you can specify if only a single Mobile Modules or all of the
Mobile Modules can be active at any one time.
Select the radio button (1 to 7) where you want to place the Association information. It
really does not matter which radio button is selected.
Place the Mobile Module into the Setup Mode. Refer to Setup Mode in the Buttons &
LEDs section in this chapter.
Press and release the Setup button on the Mobile Module. In a few seconds you should
see the Mobile Module ID displayed on the Handheld. The Mobile Module is a unique
identifier starting with UM and followed by 4 digits (ie: UM0001).
The Mobile Module is now Associated with the Handheld and the next step is to check the
Active box next to the Mobile Module you want to use with the Handheld.
To test the operation of the Mobile Module, select the "Meas Test" tab and take a reading
with your gage.
7.4
Battery & Cable Replacement
The batteries and gage cable can be accessed by removing the Mobile Module top cover held
in place by the 3 screws. These screws are captive panel screws and should only be
loosened enough to remove the cover from the bottom assembly of the enclosure. A small
screwdriver is included with the Mobile Module for the loosening of these screws. The screws
are secured in the bottom assembly of the enclosure by brass inserts. These brass inserts
provide a secure method of holding the cover in place and eliminate the possibility of stripping
threads in the plastic case. When replacing the Mobile Module cover, just tighten the screws
so they are snug. If you over tighten the screws, it is possible to pull the brass inserts through
the case.
Caution: The components within the Mobile Module are subject to damage as a result
of static electricity. Be sure to ground yourself before touching any component within
the Mobile Module.
Copyright © 2008-2011 MicroRidge Systems, Inc.
44
Mobile Module
LSIZE Wireless v11
Battery
The battery used by the Mobile Module is a CR2, 3 volt photo lithium battery. This battery is
available from MicroRidge Systems and anywhere photo batteries are sold. The Mobile
Module case shown on the left in the picture below has the battery orientation highlighted in
the picture. The negative terminal is on the flat side of the battery and is the same as found on
standard AA, C and D cell batteries. The positive terminal must be installed toward the top of
the case.
The Mobile Modules shown below utilize the new MicroRidge radio technology that was
released in mid 2010. The color of the enclosure for your Mobile Modules may be blue (as
shown on previous pages) or black as shown in the photos below. The save and placement of
the battery is the same for all of the Mobile Modules used with LSIZE Mobile.
No Battery Installed
Battery Installed
Mobile Module Interior
Copyright © 2008-2011 MicroRidge Systems, Inc.
LSIZE Wireless v11
Mobile Module
45
Gage Cables
The gage cable should be installed as shown in the photo below. The wires coming from the
black grommet should press against the positive battery contact and then curve toward the top
of the case.
Mobile Module Gage Cable
To replace a gage cable, follow the steps below:
Remove the Mobile Module cover.
Note how the current gage cable is installed.
Ground youself to eliminate any static charge.
Remove the battery from the Mobile Module.
Remove the current gage cable by pulling up on the wires going into the connector.
Press and release the Setup or Read button to remove stored voltage in the Mobile
Module.
Install your new gage cable.
Replace the battery.
Replace the Mobile Module cover.
Press and release the Setup button. You should see the LED blink back and forth 3
times as the Mobile Module does a Warm Start. When the Mobile Module does a Warm
Start, it will identify the gage cable connected to the Mobile Module.
Copyright © 2008-2011 MicroRidge Systems, Inc.
46
7.5
Mobile Module
LSIZE Wireless v11
LED Error Codes
There are several LED blink sequences associated with the Mobile Module. These blink
sequences provide information to the user about reading failures, wireless transmission failure,
low battery, etc. Normally the user only needs to be concerned with the error code sequences
shown in the table below.
LED Error Codes for Typical Operation
What You Observe
Things to Check
You press the Read button and after a The Mobile Module could not get a reading from
few seconds, the red Gage Read LED the gage.
flashes several times.
Is your gage turned on and is the gage
cable connected to the gage?
Do you have a defective gage cable?
You press the Read button and the red You got a reading from the gage, but you did not
Gage Read LED comes on. However, receive an acknowledgement that the data was
the green Handheld Accept LED blinks received by the Handheld.
several times.
Have you associated the Mobile Module
with the Handheld?
Are you within range of the Handheld?
You press the Read button and both
the red Gage Read and green
Handheld Accept LEDs come on
steady for a brief period. After the
LEDs turn off, the red Gage Read LED
blinks several times.
Copyright © 2008-2011 MicroRidge Systems, Inc.
You got a gage reading and the measurement
packet was received by the Handheld. However,
you have a low battery condition in the Mobile
Module. You should replace the batteries as
soon as possible.
LSIZE Wireless v11
8
LSIZE Mobile Software
47
LSIZE Mobile Software
The MicroRidge Systems developed software for the Handheld is called LSIZE Mobile. LSIZE
Mobile provides displays for functions such as for bin selection, measurement input, reports
selection, data transfer with the LSIZE software on your PC, etc. Most of the operation of
LSIZE Mobile can be performed with specific keys on the keypad or by using the touch screen.
Refer to the Keypad section in the LSIZE Handheld chapter for more details.
The following sections cover each of the functions available from the Main Screen. If a screen
displays the
symbol in the upper right corner of the screen, a Help window is available. In
order to access the Help item, select the
then press the F1 key.
symbol or press and release the Blue FN key,
The last section contains information that explains the LSIZE Mobile Registration ID. Normally
the only time you have to enter a Registration ID is when you do a major version upgrade of
LSIZE Mobile. A new Registration ID is not required for bug fixes or minor updates.
8.1
Handheld Parameters (Lite Setup)
The Handheld Parameters are used to set Handheld operating characteristics that are not bin
dependent and are defined in LSIZE Mobile Lite Setup. These parameters need to be
configured if you are using the Lite Setup utility to configure LSIZE Mobile. Refer to the LSIZE
Mobile Lite Setup section for more information.
Copyright © 2008-2011 MicroRidge Systems, Inc.
48
8.2
LSIZE Mobile Software
LSIZE Wireless v11
Configuration Switches (LSIZE on PC)
The Configuration Switches are used to set Handheld operating characteristics that are not bin
dependent and are defined in LSIZE on your PC. To access the Configuration Switches,
select the Wireless/Setup bin specs menu item on the PC. The LSIZE Mobile Bins
Specifications dialog box show below is displayed when the "Config Sw" button is pressed.
The Configuration Switches are downloaded to the Handheld each time bin specs are
downloaded to the Handheld. The default values for the Configuration Switches are shown in
the dialog below. These parameters need to be configured if you are using the LSIZE on the
PC to configure LSIZE Mobile.
Date
This switch allows you set the format of the date display to a Month-Day-Year or Day-MonthYear.
Clock
This switch allows you set the format of the time display to a 12-hour (ie: 2:38 pm) or 24-hour
(ie: 14:38 )clock.
Hide Windows Start Menu
The Windows Start Menu is located in the upper left hand corner of the screen. If the Start
Menu is enabled, the user will be able to navigate from LSIZE Mobile to other applications on
the Handheld (i.e. Games, etc). If the Start Menu is hidden and you enable a password for
program exit, the user will not be able to access other applications on the Handheld.
Copyright © 2008-2011 MicroRidge Systems, Inc.
LSIZE Wireless v11
LSIZE Mobile Software
49
Allow Multiple Gages to be Active
This item should only be checked if you need to switch gages in during your normal
measurement collection process. For example, you may use an 8" caliper for some
measurements and you use a 12" caliper for measuring the wider products.
Mobile Module Association Password
If you need to prevent the user from changing the Mobile Module association, check this box
and enter a password. The actual password is not hidden in this dialog. This display of the
password is done so that when you forget your password (and some of you will), you can enter
this dialog to determine what the password is set to.
Program Exit Password
If you need to prevent the user from exiting LSIZE Mobile, check this box and enter a
password. The actual password is not hidden in this dialog. This display of the password is
done so that when you forget your password (and some of you will), you can enter this dialog
to determine what the password is set to.
Product Type
The product type can be selected from a predefined list. The product type label is used in
numerous locations in LSIZE Mobile. If you would like additional product types added to the
list please contact us.
Process Center, Location and Product Code
These process labels can be selected from predefined lists. The process labels are used in a
few locations in LSIZE Mobile. If you would like additional process labels added to the lists
please contact us.
Number of Days to Retain Measurements
LSIZE Mobile will automatically delete product measurements from the Handheld that are older
than the specified number of days. LSIZE Mobile will also automatically manage the product
measurement deletion and what measurements need to be sent to LSIZE on your PC. To
specify how long downloaded should be preserved on the Handheld, select a value from the
list.
Copyright © 2008-2011 MicroRidge Systems, Inc.
50
8.3
LSIZE Mobile Software
LSIZE Wireless v11
Main Screen
Main LSIZE Mobile Screen
When Set Up with
LSIZE on the PC
Main LSIZE Mobile Screen
When Set Up with
LSIZE Mobile Lite Setup
The Main Screen is displayed when you start LSIZE Mobile and is used to navigate between
the various functions of LSIZE Mobile. To access a function, you can press the function button
on the screen or used the cursor keys and Enter key to select a function. The text below the
function buttons provides a brief description of the button with the focus.
Database Name
This title is shown on line 2 and is the name of the current active database. This name is the
database filename (excluding the .lsz extension) used by LSIZE on your PC.
Unit ID
This item is shown on line 3 and the Unit ID of the bin specs file transferred from LSIZE on
your PC. The Unit ID string can be change in LSIZE on your PC by selecting the Wireless/
Setup bin specs menu. From the LSIZE Mobile Bin Specs setup dialog, press the Unit ID
button.
Current Bin Number, Machine Center, Sawline & Size Code
These items are displayed in dark red near the bottom of the screen. This information
automatically changes when a new bin is selected. If K/B appears after the bin number,
keyboard entry of data is allowed for the bin. The keyboard entry option is specified when you
set up the bin specs through LSIZE on the PC.
Copyright © 2008-2011 MicroRidge Systems, Inc.
LSIZE Wireless v11
LSIZE Mobile Software
51
Handheld Date & Time
The current data and time are displayed near the bottom of the screen. You should check
these values daily to be sure they are correct. When you send specs to the Handheld or read
measurements from the Handheld with the LSIZE software on your PC, the date and time
values are always checked. If the time between the handheld and PC differ by more than 2
minutes, the Handheld will be updated to match the time on your PC. Therefore, if the date
and/or time are incorrect on your Handheld, they will also be incorrect on your PC. Be sure
your PC time is correct.
Battery Charge Remaining
This item is also displayed near the bottom of the screen. The value displayed is a percent of
the full battery capacity. You should monitor the battery capacity so that you do not end up
with a dead battery while trying to take measurements. With proper management, you should
never have a low battery issue. Refer to the Battery section in the LSIZE Handheld chapter for
additional information about the battery.
8.4
Bin Select & Clear
Bin Select & Clear Display
The Bin Select display is used to select a bin for entering measurements and to select a bin for
report generation. When you are selecting a bin for measurement entry, all of the defined bins
will be displayed. When you are selecting a bin for report generation (from within the
Statistical Reports function), only those bins that have measurements for the reports will be
displayed.
Copyright © 2008-2011 MicroRidge Systems, Inc.
52
LSIZE Mobile Software
LSIZE Wireless v11
The columns that are used in the grid are listed below. Several of the column titles are defined
by the Configuration Switches in the LSIZE software on your PC. You cannot change process
combination names or specs on the Handheld.
Bin Number
If you skipped bin numbers when you set up the bin, those numbers will
not be displayed in the list. In the display shown above, bins 10 and 11
are not defined. You can have up to 300 bins. If K/B appears after the
bin number, keyboard entry of data is allowed for the bin. The keyboard
entry option is specified when you set up the bin specs through LSIZE
on the PC.
Machine Center
This is an 8 character string defined in the LSIZE software on your PC.
The actual title for this column is specified in the Configuration
Switches.
Sawline
This is an 8 character string defined in the LSIZE software on your PC.
The actual title for this column is specified in the Configuration
Switches.
Size Code
This is an 8 character string defined in the LSIZE software on your PC.
The actual title for this column is specified in the Configuration
Switches.
Boards
The number of boards, panels, parts, etc. in the bin. The actual title for
this column is specified in the Configuration Switches. The 2 numbers
displayed indicate the number of boards that have been downloaded to
LSIZE and the number of boards that have not been downloaded. For
example a value of 12 + 5, indicates that there are 17 boards in the bin.
12 of these boards have already been sent to the LSIZE software on
your PC and you have 5 new boards that have not been sent to LSIZE.
Normally you will let LSIZE Mobile manage the board deletion process.
Target Size
This value is defined in the Product Specs dialog in the LSIZE software
on your PC.
Lo Spec
This value is defined in the Product Specs dialog in the LSIZE software
on your PC.
Hi Spec
This value is defined in the Product Specs dialog in the LSIZE software
on your PC.
You can use the left and right cursor to move between the grid and the buttons at the bottom of
the display. Use the up and down cursor to change the bin selection. To exit this display
without changing the bin selection, press the Cancel button or the Esc key.
Clear Button
If you entered the Bin Select function from the main screen, you can clear the measurements in
the bins. If the clear button is disabled, clearing is not available or you do not have any bins
with measurements.
When you enter the Clear display, you will need to enter the range of bins to be cleared. You
will be given 2 chances to change your mind about clearing the bins. Once the bins are
cleared, the measurements cannot be recovered.
Copyright © 2008-2011 MicroRidge Systems, Inc.
LSIZE Wireless v11
8.5
LSIZE Mobile Software
53
Measure Boards
Measurement Input Display
Measurements received from the Mobile Module attached to your gage are displayed on the
Measurement Input display. You can have as few as 1 measurement/board and up to 8
measurements/edge. You must use the LSIZE software on your PC to set up the parameters
used to configure the Measurement Input display for each bin. Several of the text strings on
this display are control by the setting in the Configuration Switches. If K/B is shown after the
bin number at the top of the display, measurements can be entered via the keyboard for this
bin.
As you take measurements on a board, the shape diagram is automatically displayed. If you
have not defined specs for a bin, the shape diagram will not be displayed. When you set up
your specs in LSIZE on the PC, you really need to have the following specs defined.
Target size
This should be the current target size for the machine. This should not be the number that
you hope to get to someday.
Upper and lower spec limits
These spec limits are limits on individual measurements and are used to show the shape
charts on the display.
XBar value
This is really the target of the board average and should be the same as the target size.
Copyright © 2008-2011 MicroRidge Systems, Inc.
54
LSIZE Mobile Software
LSIZE Wireless v11
XBar control limits
These are the limits on board averages. These values represent the capabilities of the
cutting machine and are used in the control charts. See the Statistical Reports in this
chapter for more information.
Range target
Like the XBar control limits, the range target is based on what the machine center is
capable of doing.
Range upper control limit
This value is based on what the machine center is capable of doing.
When you are learning how to use the Handheld and the Measurement Input display, you
should put in sample measurements to help you understand the operation of this display. The
Measurement Input display is the most involved display in the LSIZE Mobile software. Take
the time to learn its operation so that when you go to the mill to collect real measurements, you
really understand the operation of the Measurement Input display.
The first measurement is always placed in the upper left corner of the display. When you take
the first measurement on a board, the date and time are also saved. The input measurement
pattern is specified for each bin when the specs are set up in the LSIZE software on your PC.
You currently have 2 different measurement input patterns that can be used.
End-to-End
Take all the measurements along Edge #1 (Top edge in sample display)
and then take the measurements along Edge #2 (Bottom edge in sample
display). This is the most typical measurement pattern.
Edge-to-Edge
Take a measurement on Edge #1 and then Edge #2 at measurement
position 1. Move to measurement position 2 and take a measurement on
Edge #1 and then Edge #2. Repeat at measurement position 3, 4, etc.
When a measurement is received it is displayed in a measurement cell. In the sample above,
there are 8 measurement cells. There are several background colors used for these
measurement cells.
--------------
Ameasurement cell that has not received any measurement information.
--------------
The current measurement cell. The next measurement received will be
placed in this cell.
--------------
A measurement that falls within the specification limits. This color is also
used for measurements if target and/or spec limits are not defined for the
bin.
--------------
A measurement that falls outside of the spec limits. Missing measurements
are also shown with the red background.
If you need to retake a measurement, move the blue input field to the desired measurement cell
and retake the measurement. You can move the current measurement cell by using the up
and down cursors or by using the touch screen.
If you have entered a measurement in the last measurement cell for a board, and you take
Copyright © 2008-2011 MicroRidge Systems, Inc.
LSIZE Wireless v11
LSIZE Mobile Software
55
another measurement, LSIZE Mobile will display a new board and place this new measurement
into the first measurement cell. You can also move to a new board by pressing the New Brd
button. The New Brd button will only be enabled if there is at least one measurement on the
current board . If the current board is not the last board in the bin, the New Brd button is
labeled Next Brd.
Board Selection Buttons
You can move between boards in a bin with the following board selection buttons.
Prev Brd will select the previous board.
Board will display a list of the boards in the bin and allow you to select or delete boards.
Next Brd will take you to the next board. The label on this button changes to New Brd if
you are on the last board in the bin.
The display below illustrates the display you will see when the Board button is pressed.
Display Shown when Board Button is Selected
You can select a different board by using the up and down cursors or the touch screen. The
Status column in the Board Selection display can contain 3 different values.
New
This is a board that contains measurements, but has not been sent to the LSIZE
software on your PC.
Delete
This is a board that is marked as deleted. This board has not been sent to the
LSIZE software on your PC. When you download the boards to LSIZE, LSIZE
will ignore this board. You can undelete a board prior to sending to LSIZE by
pressing the Delete button on the Board Selection display.
Copyright © 2008-2011 MicroRidge Systems, Inc.
56
LSIZE Mobile Software
Sent
LSIZE Wireless v11
These are boards that have been sent to the LSIZE software on your PC. This
group of boards includes boards that were previously labeled as New and
Delete.
You can delete and undelete boards by pressing the Delete button. After pressing the Delete
button, select the appropriate item and boards.
Bin Selection Buttons
Similar to the Board Selection buttons, the Bin Selection allows you to move from bin to bin.
When you set up your bins in the LSIZE software on your PC, you should set the bins up in
the order that you will be taking measurements. If you take measurements in bin 1, then bin 2,
then bin 3, etc., you can use the Next Bin button to move through the bins.
Reload Button
If you are changing the measurements on a previously measured board, you can revert back to
the previous measurement by pressing the Reload button. The Reload button cannot be used
on a Saved (board previously sent to LSIZE) board or the current board if this is a new board.
Reports Button
To quickly access the calculated reports for the current bin press the Reports button. Pressing
the Reports button takes you to the same place as pressing the Statistical Reports button on
the Main Screen.
Board Notes
The board notes are a predefined list of notes that can be attached to a board and sent to the
LSIZE software on your PC. The user cannot modify or add notes to the list. If you would like
to see additional notes in the list, let MicroRidge Systems know what you would like added.
We are looking for mill feedback so that this list can be expanded.
The board notes currently in the list are as follows.
No notes for this board
Measured incorrectly
Wrong M/C, S/L or S/C (Machine center, Sawline or Size code)
Not a typical board
Problem with process
Copyright © 2008-2011 MicroRidge Systems, Inc.
LSIZE Wireless v11
8.6
LSIZE Mobile Software
57
Statistical Reports
There are 3 statistical reports available in LSIZE Mobile. Along with the reports, the user has
some control over the time period used for the reports. These reports can be accessed from
the Statistical Reports button on the Main Screen and the Reports button in Measure Boards
display.
The reports are displayed in a set of tabbed windows. The windows can be accessed via the
touch screen or by pressing the number of the keypad that is displayed on the tab. The tabs
available are as follows.
Calculated statistics and user defined values
Histogram of measurements
XBar & R control charts
Report duration options
Calculated Statistics
The calculated statistics consists of calculations from the bin measurements and bin spec
parameters received from the LSIZE software on your PC.
Calculated Statistics Report
The items included in this report are as follows:
Boards with measurements
Number of new boards
Number of measurements
Copyright © 2008-2011 MicroRidge Systems, Inc.
58
LSIZE Mobile Software
LSIZE Wireless v11
Number of missing measurements
Average
Range average
Standard deviation
Minimum measurement
Maximum measurement
% Low measurements
% High measurements
Subgroup size (number of measurements/board)
Target size
High spec
Low spec
XBar (report indicates if this is a user set limit or calculated limit)
XBar upper control limit (report indicates if this is a user set limit or calculated limit)
XBar lower control limit (report indicates if this is a user set limit or calculated limit)
Range target (report indicates if this is a user set limit or calculated limit)
Range upper control limit (report indicates if this is a user set limit or calculated limit)
Copyright © 2008-2011 MicroRidge Systems, Inc.
LSIZE Wireless v11
LSIZE Mobile Software
59
Histogram Report
The histogram report shows the user defined limits (if specified) and the normal curve. The
horizontal scale is automatically adjusted to all or most of the data. If your data contains outlier
measurements that fall outside the range of the horizontal scale, these outlier measurements
are not displayed. The histogram shown below contains 279 measurements from 35 boards.
Histograms with just a few measurements may look a little rough. When creating a histogram,
the more measurements the better.
Ideally your measurement data would be normally distributed. If the bars in the histogram do
not tend to follow the normal curve, you should try to determine why your data does not appear
to be normally distributed. Chances are you have factors influencing your process that are
causing the measurements to deviate from the normal distribution. These factors could be
caused by the machine operator, poor maintenance, etc.
Histogram Report
Copyright © 2008-2011 MicroRidge Systems, Inc.
60
LSIZE Mobile Software
LSIZE Wireless v11
Control Charts Report
The XBar and Range control charts show the average and measurement range for each board
used in the calculations. On the sample control charts shown below, you will notice a light blue
line between the charts and toward the left edge of the charts. In the chart below, there are 35
boards displayed. 10 of these boards are New and have not been downloaded to the LSIZE
software on your PC. These 10 new boards are identified by the light blue line.
Th light blue line is only used when you have used LSIZE on the PC to set up LSIZE Mobile.
The light blue line is not used if LSIZE Mobile was set up with Lite Setup.
The vertical white line can be moved from point to point by using the up and down cursor keys
or by touching the screen. Data for the point at the white line is displayed below the charts.
If you have not specified control limits for the bin, LSIZE Mobile will calculate control limits.
The XBar control limits will be based on 2 x standard deviation. The range control limits are
based on the standard SPC table values for range control charts. A label on the right side of
the control chart indicates if the control limits are Set or Calculated.
Control Charts Report
Copyright © 2008-2011 MicroRidge Systems, Inc.
LSIZE Wireless v11
LSIZE Mobile Software
61
Report Duration Options
The report duration options allow you to specify the time period or group of boards to be
included in the reports. When viewing the histogram or calculated statistics reports, you may
want to have these reports based on the more recently measured boards. If you have set up
LSIZE Wireless with the LSIZE Mobile Lite Setup utility, there is no differentiation between
New and Saved boards.
By selecting the New boards, Measured during the last 12 hours or Measured during the last
24 hours, you will only included the more recent boards in the calculations. If you base the
reports on the Saved & new boards, the calculated statistics and the shape of the histogram
may be influenced by the older boards in the bin. The Save & new boards report duration is
useful when you want to get a longer term view of the sizes being generated at a machine
center.
Report Duration Options
When Set Up with
LSIZE on the PC
Report duration Options
When Set Up with
LSIZE Mobile Lite Setup
Copyright © 2008-2011 MicroRidge Systems, Inc.
62
8.7
LSIZE Mobile Software
LSIZE Wireless v11
System Info & Settings
The System Info & Settings function gives you access to backlight control, memory utilization
status and local setup options. The settings done through this display are not transferred from
LSIZE on the PC and are local to each of your Handhelds.
Backlight Control
Display & Keyboard Backlight Control
This tab gives you convenient access to setting the intensity of the display and keyboard
backlights. The backlights can consume a significant power from the battery. Therefore, you
should keep these setting to the lowest possible values that still provides adequate intensities.
Copyright © 2008-2011 MicroRidge Systems, Inc.
LSIZE Wireless v11
LSIZE Mobile Software
63
Memory Utilization
Memory Utilization
This display is strictly informational. It is only important if you are using multiple databases with
a large number of measurements or you have installed other applications on the Handheld.
Remember, MicroRidge does not provide support for other applications that you install on the
Handheld.
Copyright © 2008-2011 MicroRidge Systems, Inc.
64
LSIZE Mobile Software
LSIZE Wireless v11
Setup Options
Setup Options Display
The setup options were added to LSIZE Mobile to allow a QC supervisor to limit an individuals
ability to change or delete measurement information. We have had several request for this
type of functionality in our portable data collectors. The settings you select for these options
can be password protected. If you use a password and then forget the password, contact
MicroRidge Systems for information on how to reset the password.
Copyright © 2008-2011 MicroRidge Systems, Inc.
LSIZE Wireless v11
LSIZE Mobile Software
65
Program Update
Program Update
The LSIZE Mobile software installed in the Handheld can be update by using the Sync Cable
or the regular RS-232 cable. It is much easier to update the software using this display and
the RS-232 cable that is used to transfer information to and from the Handheld. Updates for
the LSIZE Mobile software will be posted on the web at www.lsize.com/updates.htm. The
LSIZE CD also contains the latest LSIZE Mobile software
Copyright © 2008-2011 MicroRidge Systems, Inc.
66
8.8
LSIZE Mobile Software
LSIZE Wireless v11
Associate & Test Module
Module Association Display
Measurement Test Display
In order to get gage readings into the Handheld, the Mobile Module connected to the gage
must be associated with the Handheld and the Mobile Module must be marked as active. A
Mobile Module can only be associated with a single Handheld at a time. When the Mobile
Module transmits a measurement packet, this packet will contain address information for a
specific Handheld. Other Handhelds may also receive the measurement packet. However,
these other Handhelds will not process the packet since the address information in the
measurement packet does not match the Handheld address.
You can select the desired tab by touching the screen or pressing 1 or 2 on the keypad. Help
information is also available for each of the tabs.
Associate
You can have up to 7 Mobile Modules associated with a Handheld. Depending on the
Configuration Switches settings, you can have a single or multiple Mobile Modules active at
once. Normally you will only have a single Mobile Module associated with a Handheld. If you
are using multiple gages with a Handheld, then you will probably have multiple Mobile Modules
associated with that Handheld. The following list of gages illustrates an example of when you
may have multiple Mobile Module associated with a single Handheld.
Most of your measurements are taken on material up to 8" in size. When you take the
measurements on this material you use your 8" Mitutoyo caliper. This 8" caliper has a
Mobile Module attached to it with the small adhesive pads supplied with the Mobile
Module.
Your mill also produces a small amount of 10" and 12" material. When you measurement
this 10" and 12" material you use your 12" Mitutoyo caliper. You do not like to use this
Copyright © 2008-2011 MicroRidge Systems, Inc.
LSIZE Wireless v11
LSIZE Mobile Software
67
12" caliper to measure your 4" or 8" material because of the size of the caliper. This 12"
caliper has a Mobile Module attached to it with the small adhesive pads supplied with the
Mobile Module.
You use a Mitutoyo digital indicator to measure offset from your double arbor gang. This
digital indicator is mounted in a small frame that makes it very easy to measure the offset.
This gage also has a Mobile Module attached to the digital indicator frame.
To associate a Mobile Module with a Handheld refer to the Associate with a Handheld section
in the Mobile Module chapter. Once a Mobile Module is associated with a Handheld, you
should not have to re-associate the Mobile Module with that Handheld. If you do firmware
updates to the Mobile Base or the Mobile Module, you will have to re-associate the Mobile
Module.
Measurement Test
It is important that you become familiar with the Measurement Test display. After you
associate a Mobile Module and make it the active module, you should take a few
measurements in the Measurement Test display.
The information displayed in the
Measurement Test window, is all of the data sent from the Mobile Module. The address
information for the Handheld and Mobile Mobile are not shown. The data items displayed are
as follows.
Measurement
The measurement on the gage.
Units
The units on the gage for Mitutoyo gages. If you are not using a
Mitutoyo gage, no units will be displayed.
Module ID
The Mobile Module ID. This is a unique module identifier and is
preset by MicroRidge Systems.
Signal strength
Strength of the signal received by the Handheld. These signal
strength values will vary from about 45 to just over 100. The lower
the number the better. To help you understand this strength value,
we have designated 3 strength groups. When using the Handheld in
the mill, you should place the Handheld such that the signal strength
is strong or moderate.
Strong
Strength values less than 75.
Moderate Strength values from 75 to 89.
Weak
Strength values 90 and above.
Send attempts
The Mobile Module will attempt to send the measurement packet up
to 7 times. This number indicates how many attempts it took to get a
data valid response from the Handheld.
Voltage (radio off)
This is the Mobile Module battery voltage when the radio is turned
off.
Copyright © 2008-2011 MicroRidge Systems, Inc.
68
LSIZE Mobile Software
Voltage (radio on)
8.9
LSIZE Wireless v11
This is the Mobile Module battery voltage when the radio is turned
on. Along with the battery voltage, the Measurement Test display will
indicate the condition of the battery. The battery in the Mobile
Module is a CR2 Photo lithium battery.
New
Battery voltage is 3.00 volts or more
Good
Battery voltage is between 2.80 and 2.99 volts
Low
Battery voltage is between 2.70 and 2.79 volts. The
battery should be replaced.
Replace
Battery voltage is less than 2.70 volts. The battery
must be replaced as soon as possible.
Data Transfer
Data Transfer
The Data Transfer display is used to transfer data between the Handheld and your PC. The
Data Transfer button on the Main Screen is only enabled when the Handheld is in the Docking
Station. The Data Transfer display will show commands received from your PC and for some
commands will show progress information while a command is being processed.
All of the data transfer is done via the Docking Station USB/RS-232 Adapter (rectangular
connection on back of Docking Station). The ActiveSync cable (square connection on back of
Docking Station) is not used with the data transfers performed by the Data Transfer function.
The type of data transferred and applications that use the Data Transfer function are listed
below.
Bin specs received from the LSIZE software on your PC.
Measurements sent to the LSIZE software on your PC.
Copyright © 2008-2011 MicroRidge Systems, Inc.
LSIZE Wireless v11
LSIZE Mobile Software
69
Information sent from and received by ComTestSerial on your PC. ComTestSerial is a
serial communications test program that can be used to verify the serial communications
with the Handheld and to query the Handheld. The commands that can be used with
ComTestSerial are listed later in this section.
Firmware update utilities for updating the firmware in the Mobile Base board and the
Mobile Module.
The "Send Info" button is used for testing the serial communications with your PC. To test the
communications with the LSIZE software on your PC, select the Wireless\Communications
test (ComTestSerial) menu item. Press the "Send Info" button on the Data Transfer display. If
you have communications established, you will see information appear in ComTestSerial. If
you do not see information appearing in ComTestSerial, you do not have something connected
and/or you have selected the wrong serial port on your PC. Check the cable connections as
described in the Docking Station section in the LSIZE Handheld chapter. You may also need
to try a different serial port in ComTestSerial.
User Commands
The following is a list of commands that you can use to check the communications and status
of the Handheld. You should use ComTestSerial to send these commands to the Handheld.
There are also additional commands used by the LSIZE software on your PC and commands
used by technical support for troubleshooting purposes. You do not need to send a carriage
return (Enter key) at the end of the following commands.
<*
Send copyright and version information packet to the PC.
<Bnnn
Send the board measurement data for bin nnn. To get the measurement data for
bin 14, you would send the command <B014.
<N
Send bin number with measurements. The first line received is the number of
bins with measurements. Each of the following lines contain the following
information for a bin.
Bin number
Number of new boards
Number of new boards marked as deleted
Number of saved boards
Number of saved marked as deleted
<V
Send the version information string to the PC.
Copyright © 2008-2011 MicroRidge Systems, Inc.
70
8.10
LSIZE Mobile Software
LSIZE Wireless v11
About LSIZE Mobile
About LSIZE Mobile
Contact Information
The About LSIZE Mobile function displays version, product and contact information. There are
several items shown on the About LSIZE Mobile display that need to be pointed out to you.
Major Version Number
The LSIZE Mobile major version number in the above example is v11. This means that this
version of LSIZE Mobile will only work with LSIZE v11 on your PC or LSIZE Mobile Lite Setup
v11.
Terminal Serial Number
If you have purchased the 36-Month Handheld Service Agreement for a Handheld, the terminal
serial number is used to identify the Handheld covered by the service agreement. The terminal
serial number shown in the above example is A203-K004-0153. The dashes shown in this
serial number are not actually part of the serial number and are included to make the number
easier to read.
Application Serial Number & Registration ID
Each copy of LSIZE Mobile requires a Registration ID. Each Registration ID must be used with
a specific Application Serial Number. When you upgrade to a new major version (i.e., Upgrade
from LSIZE Mobile 2010 to LSIZE Mobile v11) you will need to provide MicroRidge Systems
with the Application Serial Numbers of each Handheld that will be upgraded.
Copyright © 2008-2011 MicroRidge Systems, Inc.
LSIZE Wireless v11
8.11
LSIZE Mobile Software
71
Registration Dialog
Registration ID Entry Screen
The Registration ID entry screen will be displayed when you are required to enter a new
Registration ID. You should use the stylus to enter the Registration ID via the keyboard
displayed in the lower portion of the screen. Normally, the only time you will need to enter a
new Registration ID is when you upgrade to a new major version. Remember, a Registration
ID can only be used with the specified Application Serial Number
Copyright © 2008-2011 MicroRidge Systems, Inc.
72
8.12
LSIZE Mobile Software
LSIZE Wireless v11
Select Database
This display is only available when you use LSIZE on the PC to set up LSIZE Mobile. You will
not see this display if you set up LSIZE Mobile with the Lite Setup utility.
Select Database Display
This display is used to select the active database when you have multiple databases on the
Handheld. To be sure you have selected the correct database, you will be asked to confirm
your new selection before leaving this display. The Database name is the LSIZE filename
(without the .LSZ extension). The Unit ID is the description associated with the wireless bin
spec file on your PC. Both the Database name and Unit ID are displayed on the main LSIZE
Mobile screen. You can have up to 10 databases in the Handheld.
To prevent you from transferring measurement to the wrong database in LSIZE on your PC,
LSIZE will only accept measurements from the Handheld if the active database name on the
Handheld matches the currently open database on LSIZE. If these names do not match, no
measurement transfer will occur
When sending bin specs for a database to the Handheld, the current active Handheld
database does not have to match the LSIZE database on the PC. The Handheld will
automatically store the bin spec information in the appropriate location.
Copyright © 2008-2011 MicroRidge Systems, Inc.
LSIZE Wireless v11
9
Warranty
73
Warranty
The following covers the hardware and software warranty of Products supplied by MicroRidge
Systems, Inc.
MicroRidge warrants that equipment manufactured by MicroRidge to be free from defects
in material and workmanship, when properly maintained under normal use, for a period of
twelve (12) months from date of purchase of the product (the “warranty period”). Some
products sold and distributed by MicroRidge are warranted by the manufacturer of the
products.
Warranty for gage and RS-232 interface cables is 30 days from date of shipment.
Products which do not confirm to their description or which are defective in material or
workmanship will, by MicroRidge decision, be replaced or repaired, or, at MicroRidge’s
option, credit for the original purchase price may be allowed provided that customer
notifies MicroRidge in writing of such defect within thirty (30) days of discovery and
returns such products in accordance with the MicroRidge instructions. No products may
be returned without MicroRidge prior written authorization.
This warranty does not apply to any product which has been subjected to misuse, abuse,
negligence or accident by the customer.
MicroRidge makes no other warranty or representation of any kind with respect to the
products, either express or implied, including without limitation, that of merchantability or
fitness for a particular use. Failure to make any claim in writing, or within the thirty (30)
day period set forth above, shall constitute an irrevocable acceptance of the products and
an admission by the customer that the products fully comply with all terms, conditions and
specifications of customer’s purchase order. MicroRidge shall not be liable for direct,
indirect, incidental, special or consequential damages, under any circumstances,
including, but not limited to, damage or loss resulting from inability to use the products,
increased operating costs or loss of sales, or any other damages. To make a claim under
this warranty, customer must notify MicroRidge in writing within the warranty period.
Customer will pay all shipping charges (and duty and taxes) for equipment returned to
MicroRidge for warranty service. MicroRidge will pay shipping charges for equipment
returned to customer in North America. Customers outside the USA are responsible for
duty and taxes on equipment returned to them.
Software developed by MicroRidge is warranted to operate in accordance with the
software documentation on the hardware specified in such documentation, for a period of
six (6) months from date of shipment. During the warranty period, MicroRidge will at no
charge correct any programming error in the software that interferes with normal
operation of the software provided that MicroRidge is able to reproduce such error on
MicroRidge computer.
Copyright © 2008-2011 MicroRidge Systems, Inc.
LSIZE Wireless v11
10
Support
75
Support
Contact SiCam Systems for LSIZE sales & support if you are in any of the following geographic
areas:
Australia
Canada
Ireland
New Zealand
United States
For all other geographic areas, contact MicroRidge Systems for LSIZE sales & support.
10.1
Contact Information
Sicam Systems
SiCam Systems
#102-15910 Fraser Hwy
Suite 837
Surry, BC V3W 3E9 Canada
604.584.7151
Fax 604.584.7151
[email protected]
www.sicamsystems.com
MicroRidge Systems
MicroRidge Systems, Inc.
56888 Enterprise Drive
PO Box 3249
Sunriver, OR 97707-0249 USA
541.593.1656
Fax 541.593.5652
[email protected]
www.lsize.com
Copyright © 2008-2011 MicroRidge Systems, Inc.
Index
Memory
62
Mobile Base 36, 66, 68
Mobile Module 7, 39, 66, 68
Mobile Module ID 50
Index
-AAC Adapter 29, 32
ActiveSync
29, 31, 68
Application serial number 70, 71
Associate 3, 7, 39, 40, 42, 66
-BBacklight 62
Battery
8, 32, 43, 50, 66
Bin Select 51
-NNull modem adapter
7, 29
-PPower off 31
Power on 31
Program Update
Psion 6
62
-R-
-CComTestSerial 3, 68
Configuration switches
34, 42, 48, 50, 51, 53, 66
-DDatabase 72
Date 35, 50
Docking Station
Error codes
Range 7
Read button 40
Read mode 40
Reboot 35
Registration ID 47, 70, 71
-S29, 31, 32
-E46
-G-
Screen protector 8
Setup button 40
Setup mode 40, 42
Spare parts 8
Stylus 8, 35, 42, 71
-T-
Gage cable
43
Terminal serial number 70
Time 35, 50
Touch screen 6, 8, 35, 47, 53
-KKeypad
77
31, 34, 47
-U-
-L-
USB/RS-232 Adapter
7, 29, 68
LED 40, 46
Lite Setup 47, 72
Local Options 62
LSIZE on the PC 72
-MMeasurement input
53
Copyright © 2008-2011 MicroRidge Systems, Inc.