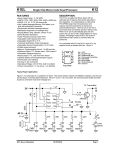
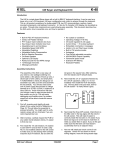
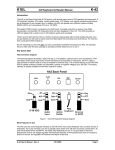
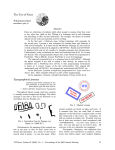
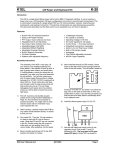
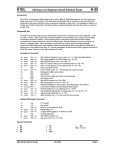
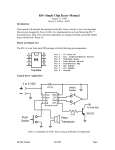
1
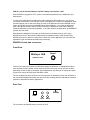
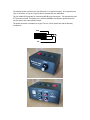
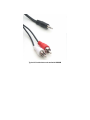
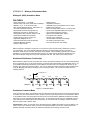
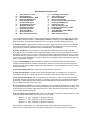
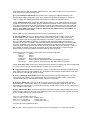
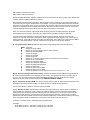
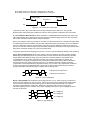
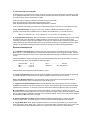
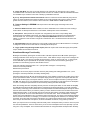
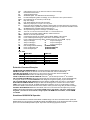
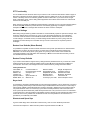
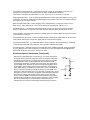
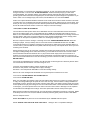
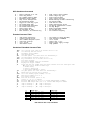
WKUSB3 QUICK START GUIDE
September 17, 2013
Revision 1.0
Thank you for purchasing a WKUSB_SMT kit from K1EL. The first thing to do is to assemble your
WKUSB kit. The assembly instructions are in WKUSB_SMT_assy.pdf.
The assembly document will guide you through final assembly and check out of your
WKUSB_SMT. Please read it all the way through BEFORE you start. WKUSB operates in two
modes, standalone and host mode. The assembly guide will instruct you how to do basic checks
in standalone mode to make sure it is working properly. Once that is complete the next step is to
check out WKUSB_SMT in host mode, connected to a PC.
A word about USB drivers
WKUSB_SMT uses a USB interface IC manufactured by FTDI. This is one of the most popular
USB devices in existence. We depend on their expertise with USB and they do a good job of
maintaining reliable USB drivers that run on a PC and interface to their controllers. Most WIN7
and WIN8 computers now ship with the FTDI USB driver preinstalled so you can just plug in
WKUSB_SMT and you are good to go. Older WIN-XP computers may not have a FTDI driver
installed so it’s a good idea to preinstall the driver before plugging WKUSB_SMT in. Refer to the
file ReadMeFirst_wk3.pdf file for further instructions.
Once the USB driver is installed and you have plugged WKUSB into your PC, refer to Appendix A
in this document and determine which com port your WKUSB is assigned to. You will need this
piece of information to configure your PC applications so that they can find your WKUSB.
K1EL provides two applications on the CD and
also downloadable from the k1el website at:
http://www.k1el.com/wk3apps.html
WK3DEMO is a general purpose test
application that can exercise all of WK3’s
capabilities. The installation file is called:
WK3_Demo_Setup.exe
Once the application is installed, start it up and
you will see the dialog box show at left. All you
need to do to get started is to configure the
serial communications port. Click on Setup and
the com port selection list is shown. Only the
currently active USB com ports are are shown.
Select the com port that you found in the
Device Manager dialog box.
Click on ? in the upper left, that will give you
enough info to get you going. Even though it
looks complicated it really isn’t.
Click on Open to connect to WKUSB. If all is
well it will show you the WK3 IC version. Click
on Setup again and this time you will be shown
the Setup dialog box as shown on the next
page. This presents all of WK3’s various
configuration options.
Click Cancel for now and go back to the main dialog box. You can type into the Keyboard entry
window and if sidetone is on you will be able to listen to your CW. If serial echo is on then what
you type will be echoed in the Outgoing Morse Window.
Now hook up some paddles and test paddle entry. If PdlEcho is on, letters entered on the
paddles will be echoed in the Outgoing Morse window. You can use the Setup Dialog to try
different keying options. You have to go back to the main dialog to transfer new settings to
WKUSB.
When PotLock is checked, the speed pot will set the WPM rate. The upper and lower WPM limits
of the speed pot can be specified. When PotLock is unchecked Up and Down arrows next to the
WPM readout will control the speed or you can directly enter a speed.
WKtest is strictly a hardware test tool; it gives you a good view at the operation of WKUSB and
assures you that it is operating properly. The next step is to move on to a ‘real’ application, but
before that we will briefly look at standalone mode.
When WKUSB is not connected to a host application it will run in standalone mode. This can be
while disconnected from a PC running on batteries or connected to a PC but not connected to a
host application. There is an extensive set of standalone capablities that are described in detail in
the file: WK3_Datasheet_v1.pdf. The Standalone section starts on page 19. Settings can be
entered by paddle commands or through the WK3Tools application which runs on a Windows PC.
The WK3tools installation file is called wk3tools_setup.exe. After installation, start the app up and
the following dialog box is shown:
It will be empty since you haven’t uploaded the current configuration of your WKUSB. When
WKUSB is powered up for the very first time, all settings are loaded with defaults. To view these,
connect WKUSB to your PC, set the ComPort and click on ReadWK. After a couple of seconds
the dialog box will be updated to show the current settings, in this case you should see:
Now you can go in and tailor the standalone settings the way you want. The biggest timesaver is
the ability to load messages. A tally of available message bytes left is shown on the lower left
corner. Even though the WKUSB box has only four message pushbuttons, it has the capability to
handle 12 in two banks. Don’t forget that you have to write the messages back to WKUSB before
they can be played.
When you are happy with your settings, or want to update messages, click on WriteWK and the
settings will be stored in WKUSB’s non-volatile memory. You can then disconnect WKUSB from
the PC and all the settings will be ready to go.
TestWK
This control will tell WK3tools to connect to WKUSB and read back current status. This should be
used after setting the com port to be sure WKUSB is accessible. Once the command completes
the current firmware revision, supply voltage and message swtich status will be displayed.
Restoring Factory Settings
This dialog button is provided to let you restore WKUSB back to original default settings. All the
the control settigns are initialized and messages are erased. Don't forget that you need to write
this block back to WKUSB when you are done.
Help File
A help file is included with WK3tools, click on the Help entry on the menu bar. Since the Help file
was created for the older WinHelp utility it may not run under Win7 or Win8 (thanks Microsoft) to
get around this, there is a utility you can run that will add this capabilty. The Microsoft website that
describes this is: http://support.microsoft.com/kb/917607
Upgrading WK3 Firmware
WK3tools can be used to install new firmware revisions in the field. K1EL keeps a list of versions
on the K1EL website on this page:
http://www.k1el.com/wk3upgrade.html
There are two version types, one for WKUSB_SMT and one for upgrading the 14 pin version
used in legacy WKUSBs. Multiple revisions are available, any version can be loaded, in other
words you can either back rev, forward rev, or reload the current revision. After you have
downloaded the firmware version you wish to download and have placed it in an easily accessible
place on your PC, click on the FW Update button. You will be shown this dialog box:
Click on Load BIN File and a file open dialog box will be displayed. Navigate to the image file you
downloaded and click OK. The file will be loaded and you will now see something like this:
Verify that the desired version number matches what is displayed and simply click on Program
WKUSB to transfer the image file to WKUSB. When the load is complete, a reset command will
be given to WKUSB and it will restart and sound a C in sidetone. Now you can click Test WK and
you should now see the new version number displayed.
FAQ #1: What is Standalone Mode and How is it different than Host Mode?
The original WinKeyer1 was designed to operate only while connected to a PC, under control of a
PC based application, this is Host Mode. WinKeyer obtained power directly from the PC over
unused RS232 control lines; if it was disconnected from a PC it was inoperative. Soon hams
started putting batteries in WinKeyers and using them standalone, in other words, not connected
to a PC. This spawned many requests to add features to make a standalone WK more useful.
When WKUSB was designed, we decided to include a complete ‘second’ keyer in the box and
Standalone Mode was born. This second keyer shares the core ‘K1EL Keyer Engine’ with Host
Mode but in All other respects it is independent. It can operate on battery power or connected to a
PC. It has its own settings memory and 12 message slots. Commands can be issued via paddle
commands or through the use of WK3tools. Standalone settings do not influence Host Mode
settings. In Host Mode, keyer settings are stored on the PC by the application and are loaded
when you connect to WKUSB. In Standalone Mode the settings reside in EEPROM inside
WKUSB. If you disconnect from an application, WKUSB will automatically go into Standalone
mode and load saved settings from EEPROM.
FAQ #2: Are the internal batteries required if always connected to a PC?
When WKUSB is plugged into a PC, power is automatically switched over to USB power by a
diode switch.
In other words, WKUSB can operate with or without batteries. With batteries out, you can only
use it when connected to a PC USB port. When first plugged in it will start up in standalone mode
and then change over to host mode when you start up an application that uses WKUSB. In host
mode, the PC app has control of WKUSB settings and messages. If you close the application
down, WKUSB will remain powered but will revert back to standalone mode and the settings
loaded by WK3tools (or manually by paddle). If you start another host application up WKUSB will
go back into host mode.
With batteries installed the functionality is identical with the exception that you can unplug
WKUSB from your PC and operate independently in standalone mode. Avoid disconnecting
WKUSB from your PC while it is under active control from a host application, this can cause the
application to get confused and possibly stop functioning.
WKUSB Controls and connectors
Front View
Speed
WinKeyer USB
www.k1el.com
There is one knob that is used to set WKUSB’s operational WPM rate. In standalone mode the
knob will always control speed. In host mode the speed control may or may not have an affect
depending on how the app is configured. Some applications only allow you to change the speed
by their own controls and will ignore WKUSB’s control.
The four pushbuttons on top of the unit are used primarily for standalone mode; the red button is
the command/message button while the other three are message buttons. Standalone command
operation is described in detail in Appendix B.
Rear View
PTT1
PTT2
Paddle
USB
KEY1
KEY2
The connectors are labeled clearly, there are six in all:
The leftmost square connector is for the USB cable, it is a type B connector, PC’s generally have
Type A connectors, a Type A to Type B cable is included with your WKUSB kit.
The four middle RCA jacks are for connecting WKUSB to you transceiver. Two separate Key and
PTT pairs are provided. This allows you to connect WKUSB to two different rigs and select the
one you want to key under software control.
The paddle connector is located on the right. This is a 1/8 inch stereo jack with the following
connections:
GND
DAH
DIT
Connecting WKUSB-SMT to your station
Minimally all you need to do is connect the USB cable from WKUSB to a USB port on your PC
and connect the key output to the keying input on your rig. Since WKUSB performs the keying
function it drives your rig in the same manner as a straight key. In other words there are only two
leads, ground and key control. You will need to purchase or make up a keying cable.
K1EL does not sell these cables as of this writing but here is a great source:
http://www.sweetwater.com/store/detail/CPR103/
One end of the cable will be an RCA plug and on the other end the connector that will mate to
your rig’s key input. Usually this is a ¼ inch phone plug. A two wire cable is all that is required to
key a typical transceiver. Plug the RCA side into either KEY1 or KEY2 and the other side directly
into your transceiver’s key input jack. Make sure you disable the internal keyer in your rig (if it has
one) and set it up for straight key mode. If you are trying to key a vintage vacuum tube based
transmitter, WKUSB-SMT will work fine because it employs solid state relays rated for +\-300V
switching at 100ma. This covers grid block keying but it may not be suitable for cathode keying.
If you decide to use keying paddles with WKUSB they plug into the paddle jack input on the back
of the unit. A 1/8 inch stereo jack is used on WKUSB for space reasons so if your paddles have a
¼ inch size plug an adapter cable will be necessary.
You can use WKTEST to make sure that WKUSB is keying your rig properly. If you run into
problems, make sure you have selected the correct key output port. This is done in Output
Config area of WKTEST the dialog box.
95% of all installations will use the KEY outputs only. The PTT outputs are intended for
installations that require control of antenna relays or linear amplifiers. PTT is asserted before KEY
and is held asserted for the entire transmit interval. The delays are adjustable, look at lead in and
tail delays settings.
WKUSB’s RCA connectors are electrically isolated from the WKUSB enclosure and ground. This
means that you can directly connect to your transceiver with WKUSB connected to your PC and
not have to worry about ground loops or RF getting into your PC through a DC path.
The real power of WKUSB is only released when you connect it to your favorite logging or contest
application.
A note about mono vs. stereo keying cables
Some rigs, the Elecraft K3 for example, require the use of a stereo keying connector even though
you only connect to tip and sleeve. The ring connection must be left unconnected, a mono
connector will ground the ring connection and the rig will not operate properly. It’s highly
recommended to make your keying cable up using a stereo connector on the rig side and it will
save you trouble in the future if you ever want to use WKUSB with various radios.
A standard 1/8” (3.5mm) to RCA stereo cable makes a very nice keying cable. These cables are
very common and inexpensive. They are used with video cameras, MP3 players, and other audio
devices. They provide a stereo jack on one side and two RCA jacks on the other which is perfect
for WKUSB. In most cases you will only use one of the RCA jacks (Key side) and leave the other
(PTT) unconnected. If your rig requires a ¼” plug then you would need to find a 1/8” to1/4” stereo
adapter.
Typical A/V cable that works well with WKUSB
Appendix A
How to find out what COM port your WKUSB is mapped to:
Left click on Start and then right click on MyComputer:
Click on Properties:
Click on Hardware:
Click on Device Manager:
Then Double Click on Ports (COM & LPT) to expand the port list:
The port labeled USB Serial Port (COMx) is the WKUSB port:
If you want to change the port assignment, double click on USB Serial Port and
Then Click on Port Settings:
Click on Advanced:
Finally you will see the port selection control:
By clicking on the down arrow to the right of the COM Port Number List Box you
will get a list of available com ports. Click on the one you want and you are
finished.
In the event you installed a new USB com port or reassigned a different port the
com port you last used may not be available. In that case you will need to map
WKUSB to a new com port.
APPENDIX B - Winkeyer2 Standalone Mode
Winkeyer3 (WK3) Standalone Mode
FEATURES
• Keyer speed range: 5 - 99 WPM
• HSCW: 1000, 1500, 2000, 3000, 4000 or 6000 lpm
• QRSS: 3, 6, 10, 12, 30, 60 second dits
• Non-Volatile Message Memory: 240 letters in 12
slots with embedded commands.
• Dynamically allocated message memory
• Backspace correction on message entry
• Keying Modes: Bug, Ultimatic, Iambic A or B
• Automatic Serial Number Generation
• Audio Frequency keying mode (PTT)
• Adjustable Weight 25 to 75 %
• Automatic letterspace mode (Autospace)
• Unlimited Message Stacking
• Supply voltage monitor
• SO2R Support
• Adjustable Letterspace
• Adjustable Keying Compensation 0 to 31 mSec
• Paddle swap command
• Beacon: Programmable interval: 1 to 99 seconds
• Continuously Adjustable Sidetone Frequency
• Two separate Keying/PTT outputs
• Speed control potentiometer support
• Push-button user interface
• 39 easy to use commands
• Downloadable messages and settings
• Tx and Rx code practice utility
• Two user setups each with callsign
WK3 will operate in standalone mode when not connected to a host and will closely emulate the K14 keyer
IC in functionality. The most noticeable difference between host and standalone mode is that when in
standalone mode the user can enter commands on the paddles. This is initiated by pressing the command
pushbutton. In host mode the pushbuttons are ignored. Low power mode is activated in standalone mode,
this means that WK3 will go into a low power sleep state when idle. This makes it very battery friendly.
Standalone Pushbutton Functionality
WK3 standalone requires at least one push-button control, this switch is referred to as the command push-button
and is connected to pin 13. It serves two functions, command control and message record/playback control. Up
to five additional message push-buttons can be added to provide a total of six message slots. Be sure to use
normally open switches for the push-buttons. Pin 13 is an analog input which senses the switch network shown
in Fig 22. Message push-buttons 2 through 6 are connected as shown. Use 5% tolerance resistors for the
switching network.
To WK2 Pin 13
+5V
4.7K
CMD/MSG1
2.2K
MSG2
2.2K
MSG3
2.2K
MSG4
2.2K
MSG5
2.2K
MSG6
Figure 9 – Pushbutton Matrix
Standalone Command Mode
If the command push-button is pressed and held, the WK3 will respond after about two seconds with the letter R
in sidetone only. This means WK3 is ready to accept a command, you simply enter the command letter in Morse
on the paddles and the command will be executed. Some commands require additional information which WK3
will prompt you for by outputting the letter E (for enter). All commands provide some sort of feedback to tell you
if the command was understood and executed properly, in most cases an R. If an illegal command is entered
WK3 will respond with a question mark.
Important Note ! When in command mode, transmitter keying is disabled and replies are sent in sidetone only.
Thus in order to use command mode you must have a sidetone speaker of some sort. If sidetone had been
disabled with the A command it will be re-enabled automatically when entering command mode.
WK3 Standalone Command List
A
B
C
D
E
F
G
H
I
J
K
L
M
-
Select sidetone on or off
Start Easy Beacon
Set Command Speed in WPM
Decrement Serial Number
Swap message banks
Set Farnsworth Speed
Set 50% Duty Cycle Tune
Set Paddle Hang Time
Set Letterspace Adjust
Set Paddle Sensitivity
Select Keyer Mode
Set PTT Lead-In Time
Mute Transmit (CPO mode)
N
O
P
Q
R
S
T
U
V
W
X
Y
Z
-
Load 4 Digit Serial Number
Select output key port
Start Practice Mode
Query current settings
Review message without transmitting
Set preferred WPM speed
Load PTT Tail Time
Select Autospacing on/off
Set Keying compensation in mSec
Set Key Weight
Select Extended Command Mode
Set Dit/Dah Ratio
Select sidetone frequency
In the command descriptions below, the [n] or [nn] notation means that additional parameters must be entered
on the paddles after the command. A letter displayed in BOLD is something you enter, BOLD ITALIC is what
WK3 responds with. A [pb] means that WK3 will wait for you to press one of the message pushbuttons.
A - Sidetone enable is toggled when this command is entered. Toggle means if the sidetone was on when this
command was issued it will be turned off and vice versa. WK3 will acknowledge this command by responding
with an R. Note: If sidetone is disabled it will be re-enabled while in command mode.
B [m,dd] - Easy Beacon: Any message slot in the current bank can be repeated at a specified rate. After
entering B, the user is prompted to enter a single digit message number (1-6) and then prompted to enter a two
digit beacon cycle time (1-99) in seconds. A beacon is interrupted by hitting either paddle. The beacon is timed
from start of beacon to start of next beacon. For example if you set a delay time of 10 seconds, the beacon will
start every 10 seconds regardless how long the message is. If the message is longer than delay time, then there
will be no gap between messages.
C [nn] – Command WPM: The WK3 uses different speeds for command transactions and keyed transmit.
Changes in transmit speed will not affect command speed. After the C command is issued enter the speed in
WPM. If the speed is valid the WK3 responds with an R, otherwise a? See the S command for details on setting
transmit Morse speed.
D - Decrement Serial Number by 1: WK3 responds with a D after the decrement.
E - Swap message banks: The WK3 has two separate message banks, six messages each. In response to
this command a single dit is echoed when bank one is selected and two dits when bank two 2 is selected.
F [nn] - Set Farnsworth Speed: This is a used primarily for code practice. Letters are sent at the Farnsworth
speed while maintaining the default code speed. For example, if Farnsworth is set to 25 WPM and the operating
speed is set to 7 WPM; individual letters will be sent at 25 WPM while spacing between letters is at a 7 WPM
rate. To disable Farnsworth mode, set it to zero.
G – Set tune duty cycle default: This sets the default tune duty cycle which can be either 50% or 100%. Some
folks prefer a 50% tuning duty cycle to reduce power dissipation in transmitter finals and/or linear amplifier. An A
is echoed when 50% is enabled, an N is echoed when set to 100%. Note that once tune starts, the duty cycle
can be changed by hitting the paddles.
H [n] - Set Transmit PTT Hang Delay Time: Sets a PTT delay that is proportional to sending speed. The delay
begins after paddle sending stops. You can select one of four delays:
HangTime = 0:
HangTime = 1:
HangTime = 2:
HangTime = 3:
wait 1 wordspace + 1 dit before ending PTT
wait 1 wordspace + 2 dits before ending PTT
wait 1 wordspace + 4 dits before ending PTT
wait 1 wordspace + 8 dits before ending PTT
After entering the command letter, you will be prompted with an E to enter the desired hang time as a
number 0 to 3 as indicated in the table. Hang delay is different than PTT tail delay in that it is proportional to
code speed while PTT delay is a primarily a fixed delay time. This means you don’t have to change the PTT
delay every time you change sending speed.
I [nn] - Set Letterspace Adjustment: nn is a value 0 to 31, specifying an additional letterspace to be
applied between letters. Multiply nn by two to arrive at the actual adjustment percentage. For example a
value of 7 applies 14% additional letterspace between letters. The maximum adjustment is 62%.
J [nn] - Paddle Sample Point controls when WK3 will start looking for a new paddle press after sensing the
current one. If there is not enough delay the keyer will send unwanted dits or dahs, if there is too much delay
it may slow you down because you can't send ahead of the keyer. The default value is one dit time (50) and
is adjustable in a fraction of a dit time. Faster operators report a setting somewhat less than default is more
pleasing. If the paddle sensitivity is set to zero, both dit and dah paddle memories are disabled. The
delay is calculated with this formula:
DELAY_TIME = (nn×DIT_TIME)/50 where switch point is a value between 01 and 99.
K - Set Keying Mode: There are six different keying modes supported by WK3: Iambic mode A, Iambic
mode B, Straight Key/Bug, Ultimatic, Dit priority mode, and Dah priority mode. In either iambic mode,
alternating dits and dahs are sent while both paddles are held closed. In mode B an extra alternate dit or
dah is sent after both paddles are released. In straight key/bug mode a dah paddle press will key the
transmitter for as long as the paddle is pressed and dits will be generated automatically when the dit paddle
is pressed. In Ultimatic mode when both paddles are pressed the keyer will send a continuous stream of
whichever paddle was last pressed. Hold dah then press dit->sends dits. Hold dit then press dah -> dahs are
sent. Ultimatic dit and dah priority mode will generate dits and dahs automatically in response to single
paddle presses, but when both paddles are pressed either dit or dah has priority.
After the K command is issued the current mode is set by entering a single letter:
Iambic B:
Enter B
Iambic A:
Enter A
Ultimatic:
Enter U
Straight Key:
Enter S (This is also the Bug setting)
Dit Priority:
Enter E (Ultimatic: dits take priority when both paddles are pressed)
Dah Priority:
Enter T (Ultimatic: dahs take priority when both paddles are pressed)
L [nn] - PTT Lead In Time can be set to a value between 0 and 99 which is a subset of the entire possible range
of 0 to 255. See the Set PTT Lead/Tail description on page 7 for more information.
M - Toggle transmit mute: Mute transmit when you want to use the WK3 as a Code Practice Oscillator (CPO)
When muted, WK3 will send CW in sidetone only. In response to this command, the WK3 will echo an A when
mute is turned on and an N when mute is turned off.
N [nnnn] - Load 4 Digit Serial Number All four digits must be entered including leading zeroes. The serial
number is played by inserting a play message token /N into a message. The serial number is automatically
incremented after playing. See Embedded Command section for more details.
O - Swap Key Output Port: Each time the O command is issued, the key port is toggled back and forth
between key port 1 and key port 2. When port 1 is selected WK3 responds with a single dit and two dits are
echoed when port 2 is selected. If you have two transceivers, this feature frees you from moving cables around
when you want to switch radios.
P [m,d] - Start Practice Mode: A dual mode multi-level code practice program is built into WK3.There are two
styles of practice, receive only and echo (receive/respond) practice. There are four levels of practice organized
by easy to difficult letter groups. The four levels are:
Level 1:
Level 2:
Level 3:
Level 4:
ETANIMWSGDUKOR
C Q P J F B V Y H X Z L including level 1
1234567890
including level 1 & 2
? / , . AR SK BT AS
including level 1 & 2 & 3
The syntax for entering a practice mode is:
P m d where m is R for receive or E for echo practice and d is a single digit 1 to 4 to select diffculty level.
P R 2 selects Level 2 receive practice
P E 4 selects Level 4 echo practice
Receive Practice Description: Random characters from the selected level are sent in groups of five. Practice will
continue until the command pushbutton is pressed.
Echo Receive/Transmit Practice Description: WK3 will send a random character from the selected level and you
must respond by echoing the character back on the paddles. If you get it right WK3 will repeat the first character
followed by a new character. Now you must echo back both characters. WK3 will continue to add characters until
a set of five characters has been completed successfully. After that it will start over with a new set. If you miss a
character WK3 will respond with an X and start over with a new sequence of characters.
When you want to end practice, respond with di-dah-di-dah or press the command pushbutton. By default
practice will be sent on the active output key port, enable transmit mute (M command) to inhibit this.
A pseudo random letter generator is used to generate the sequence of letters. Normally the seed for the
generator is a random number but sometimes it is useful to generate the same sequence over and over during
training sessions. Use the P command with an S to set a fixed seed. The format for the command then is P S d
where d is a seed value between 1 and 99. A seed value of 0 will return to fully random operation.
Q - Query WK3 Current Settings: WK3 will respond with current settings sent in the following format:
WPM
N
M
C
W
L
T
E
V
F
I
J
Y
B
T
V
is sent first
followed by Serial Number
followed by free msg memory space in letters available
followed by command WPM
followed by weight
followed by lead time
followed by tail time
st
followed by 1 extension (this parameter described in host mode section)
followed by key compensation
followed by Farnsworth WPM
followed by Letterspace adjustment
followed by Paddle Sample Adjust
followed by dit/dah ratio
followed by speed pot min WPM
followed by speed pot max WPM
followed by firmware revision, major.minor; 30.01 for 3.0 version 3.1… etc.
R [pb] - Review a message without transmitting: After the R command is entered WK3 will respond with an
E. Press the message button of the message you wish to play. The message will be sent in sidetone only. If
you try to play an empty slot, WK3 will respond with MT. Embedded commands will be sent as is without
expansion. In other words /S10TEST will be sent as: DAH-DI-DI-DAH-DIT 10TEST
S [nn] - Set Favorite Speed in WPM: One value is entered between 5 and 99. This speed is activated when the
speed pot is turned fully counterclockwise. The speed pot will act normally above this setting.
The minimum WPM is 5 WPM, the maximum speed is 99 WPM.
T [nn] - Set PTT Tail Time: WK3 provides a transmitter PTT output that can be used to switch a transmitter or
linear amplifier over to transmit mode in advance of actual CW keying. You have control over the time delay
between when PTT is asserted and when CW keying will start, this is lead-in. You also have control over how
long the transmitter will stay in transmit after keying has stopped; this is tail delay. The tail delay is handled
differently for CW sent by paddle and CW sent by message. Paddle delay is controlled by the Hang Time setting
while message PTT delay is controlled by the Tail setting. The formula to calculate tail time is:
Tail Delay = Three Dit Times + (Tail Setting times 10 milliseconds)
Examples:
At 20 WPM, Tail set to 7, Tail Delay = (3x60)+(7x10) = 250 mSec
At 40 WPM, Tail set to 7, Tail Delay = (3x30)+(7x10) = 160 mSec
At 20 WPM, Tail set to 0, Tail Delay = (3x60)+(0x10) = 180 mSec
At 15 WPM, Tail set to 55, Tail Delay = (3x80)+(55x10) = 790 mSec
PTT
Lead-in Delay
Tail Delay
The letter A
Key
Figure 10 – PTT Lead-in and Tail Example
In general we want a very short tail time when sending messages and we want PTT to stay asserted
between letters while sending with a paddle set. That’s the reason the delay is dictated by two mechanisms.
U - Turn Autospace Mode Off and On When autospace is enabled WK3 will automatically insert proper interletter space between letters. Each time the U command is issued WK3 will toggle between modes responding
with an A for autospace enabled an N for autospace disabled.
Here is how autospace works: If you pause for more than one dit time between a dit or dah WK3 will interpret this
as a letter-space and will not send the next dit or dah until the letter-space time has been met. The normal letterspace is 3 dit spaces but this can be increased by using the I command. WK3 has a paddle event memory so
that you can enter dits or dahs during the inter-letter space and WK3 will send them as they were entered. With a
little practice, autospace will help you to send near perfect Morse.
If autospace seems to be less forgiving than you like, you can increase the letterspace setting to relax the timing.
V [nn] - Keying Compensation allows a fixed amount of time to be added to the length of all dits and dahs.
QSK keying on modern transceivers can cause shortening of these elements which is especially noticeable
at high speeds. WK3 allows the length of the elements to be increased uniformly to compensate for this.
The adjustments can be made in one-millisecond steps. The maximum adjustment is 31 mSecs. Key
compensation is very similar to Weighting in that any adjustment added to the dits and dahs is subtracted
from the spacing so the resulting speed is not changed. The difference between weighting and keying
compensation is that compensation is independent of speed, so if 10 mSec of key compensation is selected,
10 mSec will be always be added regardless of speed. So be careful at high speeds with large values of
keying compensation, dits and dahs may run together with no spacing at all.
Letter R without compensation
nn
Letter R with compensation
Figure 11 – Key Compensation
W [nn] - Keying Weight can be adjusted in percentage from 25% to 75%. When set to 50 % the dit time is
equal to the inter-element time, which is normal. Values less than 50 reduce weighting while values greater
than 50 increase weighting. Note that weighting does not affect sending speed because any increase in
keyed time is subtracted from spacing time. Reduction in weighting results in a thinner sound while
increased weighting results in a heavier sound. Since weighting tracks speed, a given weighting will sound
the same at all speeds.
25 % weighting
50 % weighting
75 % weighting
Figure 12 – Key Weighting
X – Enter Extended Command Mode
An additional set of commands are located in a sub menu. These are commands that are not entered very often
so an additional paddle action is not a significant issue. Extended commands require two entries, an X followed
by a sub command. Here is the procedure in detail:
Press and hold the command pushbutton and WK3 will respond with an R
Enter an X and WK3 will respond with an E (command request)
Enter desired Extended Command with additional parameters, if required.
A list of extended commands is provided in the section titled Extended Command List found after this section.
Y [nn] - Set Dit/Dah Ratio: nn ranges from 33 to 66. Entering Y 50 sets the standard 1:3 ratio. For
example a value of 33 selects a dit/dah ratio of 1:2 while a value of 66 selects 1:4. The ratio formula is:
Ratio of 1:N where N = (nn * 3)/ 50 example nn = 40 give a ratio of 1:((40*3)/50) = 1:2.4
Z - Change Sidetone Frequency: After this command is entered the sidetone oscillator will be keyed at a steady
rate with transmit muted. Pressing the paddles will raise or lower the frequency. The range varies nearly
continuosly from 300 Hz at the low end to 2000Hz on the high end. It takes a while to sweep through the whole
range. Pressing the command pushbutton will end this command and store the new sidetone frequency. Like all
settings, use the Preserve Settings extended command to save the new sidetone setting in EEPROM.
Extended Command List
A – Pushbutton Input Diagnostic: is used to verify the correct operation of the switch network connected to
WK3 input pin 7. This design allows four switches and a potentiometer to share a single pin on WK3. The state
of the network will produce a unique numeric value which WK3 uses to identify a pushbutton press or speed pot
change.
After the Extended A command is issued, the numeric network state will be sent in Morse sidetone. For proper
operation the input values must fall within the following ranges:
Command PB ..... 0 to 11
PB 2 ................... 12 to 31
PB 3 ................... 32 to 57
PB 4 ................................. 58 to 89
Speed Pot
90 to 205 (approx)
WK3 will remain in this diagnostic state until power is cycled.
C - Toggle Contest Spacing: When contest spacing is enabled, word space is set to 6 dit times as opposed to
the normal 7 dit times. An A is sent when CT space is enabled; an N is sent when it is turned off.
E[nn] - First Element Extension: Forces the first dit or dah of a transmission to be elongated to allow for
receive to transmit delay. Enter a value between 0 and 99 mSecs for nn.
F - Toggle Fast Command Response Time: Normally WK3 will enter command mode when the command
pushbutton is pressed for 2 seconds. This may be too long for some operators. When fast response is enabled,
the delay time is reduced to 1.3 seconds. An A is sent when fast is enabled; an N is sent when it is turned off.
M - Load Callsign: Use this command to load a stored callsign. It works just like a message entry and the
destination is the currently enabled user slot. Each user slot has one unique callsign. Since the callsign is treated
like any other message, embedded commands can be included if desired. The only way to play back a callsign is
by embedding the /M command in a message.
N - Select Cut Number for number 9: When enabled, an N will be substituted for the number nine when
sending a serial number. Command response: an A is sent when enabled; an N is sent when disabled.
O- Toggle SO2R Mode: When SO2R is enabled normal PTT is turned off and instead PTT1 is used to signal
which output port is active. When port 1 is active, PTT1 is asserted (radio 1 selected) when port 2 is active, PTT1
is not asserted (radio 2 selected) Note that the PTT1 output is open collector and is on when asserted.
P - Toggle PTT Mode: The user can choose whether to use automatic PTT while keying. This is a toggle
command and after it is entered, WK3 will respond with an A for PTT enabled, or N for PTT disabled. Automatic
PTT is diabled if you wanted to control PTT manually by embedded command.
R [nn nn] - Set Speed Pot minimum and maximum: After the command is entered WK3 will prompt for two
values, the minimum WPM and the maximum WPM. An error will be flagged if the minimum value entered is
greater than the maximum, if the minimum value is less than 5 WPM. Maximum WPM allowed is 99.
S - Preserve Settings in EEPROM: will respond with a letter R to signify that settings were saved
succesfully.
T - Select Cut Number for Zero: When enabled, a T will be substituted for the number zero when sending a
serial number. An A response means this cut is enabled, an N response means it is disabled.
U - Swap Users: WK3 provides two complete user configurations, each with a unique callsign. Both
message banks are available to both users. This allows a universal set of messages to be created that will
work with either user. For example a message like CQ CQ CQ DE /M /M K will send the selected user’s
callsign. In response to this command a single dit is echoed when user 1 is selected and two dits when user
2 is selected.
V - Voltage Readout: WK3 will measure the current supply voltage and send it in Morse sidetone. For example
a voltage of 4.52 will be sent as 4r52 with the r indicating the decimal point.
X - Toggle paddle swap (Exchange dit/dah inputs): WK3 will respond with a letter A to signify when paddle
swap is enabled and an N when turned off.
Standalone Message Functionality
Messages are loaded by pressing the command button until WK3 responds with an R and then pressing the
message pushbutton of the memory slot you wish to enter. When WK3 is ready to accept a new message it will
respond with an E. If you wait too long WK3 will respond with a ? and you have to start over. In some keyers,
such as WKUSB, only four pushbuttons are provided, messages 5 and 6 are accessed by pressing two
pushbuttons in the following sequence after the R is echoed:
Press and hold either message button 2 or 3. (this specifies message 5 or 6 respectively)
Press the command pushbutton.
Release both push buttons.
(Message 5 and 6 can be played in a similar manner by first pressing and holding pushbutton 2 or 3, then
pressing the command pushbutton, and finally releasing both)
After WK3 responds with an E, enter the message directly on the paddles at a steady rate, making sure to leave
proper space between letters. To insert a word space simply pause for longer than a word space and WK3 will
respond with an E to signify a word space insertion. You can force a wordspace insertion by entering di-di-dahdah (IM). This allows you to put a wordspace at the beginning of a message or insert more than one wordspace
in a row. A ½ letterspace pad character can be inserted by entering di-di-dah-dah-dit (IG).
When the message has been completely entered, press the command push-button or enter di-dah-di-dah (AA)
and WK3 will respond with an R to signify that the message was accepted and stored. If you make a mistake
while entering a message, press and hold the command pushbutton and WK3 will backspace through the letters
that have been entered. When you reach the position you want, release the button and new letters can then be
added after that position. If the message memory becomes full while entering a message, WK3 will stop further
loading, respond with an F, and return WK3 back to non-command mode. There are 240 letters in message
memory that can be distributed in any way between twelve message slots. The length of the individual message
slots is not fixed. This means, for example, you could have one message of 80 characters, one message with 5
characters, and a third with 10 characters and still have 141 locations left to split among the remaining three
slots. Keep in mind that each word spaces, as well as embedded commands, occupy memory locations.
When you stop at the end of a message, WK3 will usually enter a wordspace before you have a chance to press
the command pushbutton. There are cases when you do not want a wordspace at the end, especially if you are
using PTT to key an amplifier. This is because WK3 will hold PTT during that added wordspace which will delay
an exchange turnaround. The best way around this is to end a message with the di-dah-di-dah (AA) character
inserted immediately after the last letter in the message. This ends message entry mode immediately.
If you are having problems loading messages into WK3, make sure you leave adequate space between letters
and are not sending much faster or slower than current command speed. If, for example, you enter an A
followed by a T and end up with an N, you are not allowing enough space between letters. It’s a fine line though
because if you allow too much space WK3 will interpret that as a word space. Temporarily lowering the
command speed (see command C) can help while you learn how the process works.
To play a message back, simply press the desired message button and the message will be sent. There are two
ways to abort a message: 1) Press both command and PB4 or 2) Press and hold either paddle.
If you want to review the message without keying the transmitter, use the R (review) command. Note that review
will expand the play ½ letterspace pad character as di-di-dah-dah-dit and expand embedded commands.
Standalone ‘Two Press’ Message Button Functionality
You can trigger message 5 and 6 directly with the following sequence:
1) Press and hold PB2 for message 5 or PB3 for message 6
2) Press the command PB (you now have two PBs pressed)
3) Now release both pushbuttons and selected message will play.
Standalone Quick Tune Command
This follows a Two Press sequence:
1) Press and hold PB4
2) Press the command PB (you now have two PBs pressed)
3) Now release both pushbuttons and the key and PTT outputs will be enabled.
Pressing the command pushbutton will end tune. You can toggle between 50% and 100% tune duty cycle by
hitting the paddles during tune. Tune will be automatically turned off after 99 seconds.
Standalone Quick Serial Number Decrement
Sometimes during contest operation, a serial number has to be reissued. Since the serial number is
automatically incremented when it’s played, we need a way to decrement the serial number. This can be done
one of two ways, using the D paddle command or by pressing and holding the CMD PB and then quickly
pressing either paddle. In either case, after the serial number is decremented, WK3 echoes a single dit.
There is a third way to decrement a serial number, that is with a /D command embedded in a message. A
message can be built that predecrements the serial number before sending it. For example the following two
messages can be created:
Message 1: 5NN /N QSL ?
Message 2: /D/N QSL ?
Message 1 is played as the initial exchange and if the serial number needs to be resent, message 2 would be
used. The second message pre-decrements the serial number before sending it. Both of these messages leave
the serial number incremented after it is sent.
Embedded Message Command List
It is an easy procedure to embed commands in a message. The format is the fraction bar DN (D and N sent
together as one letter) followed by the desired command letter. If you want to insert the DN prosign into a
message but don’t want it to be interpreted as a command simply enter DN twice.
Example: K1EL/1 would be entered as K1EL//1
Embedded message command table
/Bnn
Set a beacon cycle time of nn seconds (nn=00 to 99). Put this at the beginning of a message
to set the beacon period.
/Cn
/D
/E
/Hn
/Inn
/Knn
/M
/N
/On
/P
/Q
/Snn
/Un
/V
/Wnn
/Xn
/Yn
/Zn
/1
/3
/5
AA
IG
IM
Call message in slot n (1-6), return and resume current message.
Decrement serial number.
Toggle message banks
Set HSCW speed. See table below for determining n.
Increase letterspacing within a message, nn is a value from 0 to 31 percent times 2.
Key transmitter for nn seconds. (nn=00 to 99)
Play user callsign.
Play Serial Number with auto post increment.
Select key output port; 1 for port 1 or 2 for port 2.
Pause and wait for paddle entry and then continue after one word space time. The pause is
ended three ways 1) paddle entry 2) Press a msg PB (2-6) or 3) Press the cmd PB to cancel.
Set QRSS speed. See table below for determining n.
Set a speed change within a message. (nn=WPM, 5 to 99)
Turn PTT on or off. PTT is turned on when n = 1 and off when n=0.
Send the current supply voltage in Morse, useful for beacons.
Wait for nn seconds. (nn=00 to 99)
Cancel speed override, for example cancel HSCW, QRSS, or /Snn speed.
Force a relative speed change up. Add n to the current WPM. n=(0-9)
Force a relative speed change down. Subtract n from the current WPM. n=(0-9)
Jump to message 1
/2
Jump to message 2
Jump to message 3
/4
Jump to message 4
Jump to message 5
/6
Jump to message 6
End message load immediately
(DI-DAH-DI-DAH)
Insert ½ letterspace pad
(DI-DI-DAH-DAH-DIT)
Insert wordspace pad
(DI-DI-DAH-DAH)
Rate Table
n
HSCW Rate
0
1000 lpm (200 wpm)
1
1500 lpm (300 wpm)
2
2000 lpm (400 wpm)
3
3000 lpm (600 wpm)
4
4000 lpm (800 wpm)
5
6000 lpm (1200 wpm)
QRSS Rate
3 sec dit
6 sec dit
10 sec dit
12 sec dit
30 sec dit
60 sec dit
Embedded Command Examples
/B60BCON DE K1EL BEDFORD NH will send BCON DE K1EL BEDFORD NH every 60 seconds
UR RST IS /P QSL will pause to allow the user to enter the RST then resume automatically
/K05 /W10 VVV DE K1EL will key down for 5 secs, wait 10 secs, and then send VVV DE K1EL
CQ CQ CQ DE /M /M /M will send a 3x3 CQ using the user callsign
st
nd
/H2CQ CQ DE K1EL K1EL K1EL/S15 DE K1EL will send 1 part at 1500 lpm and the 2 at 15 WPM
CQ CQ CQ DE K1/I10TMT/I00 K will send message with 20% extra space in TMT. A more manageable way
of doing this would be to load K1/I10TMT/I00 in the callsign slot to get this spacing any time /M is used.
CQ CQ CQ DE /Z4K1EL K1EL K1EL/Y4 K send the callsigns 4 WPM slower then return to normal WPM.
QTH IS /E/C1/E NAME IS STEVE Will play the QTH from message bank 1 and then return for the name.
/Q2EL /1 will continuously send EL at QRSS10 speed (this message is in slot 1). Avoid inserting a space
between the QRSS command and the start of text: /Q2 EL unless you want a long delay at start of message.
/B10K1EL BCON/W2/VVOLTS sends K1EL BCON, wait 2 secs, send XrXX VOLTS repeat every 10 secs
SOM/E/C3/E/U1/W5/U0/S50K1EL//1/XEOM Send SOM, swap to msg bank 2, call msg 3, swap back to
msg bank 1, turn PTT on for 5 seconds, change speed to 50 WPM and send K1EL/1, cancel 50WPM
send EOM.
Standalone QRSS/HSCW Operation
The /H and /Q buffered commands allow HSCW or QRSS strings to be sent in standalone mode. (Note that
QRSS speeds are not supported in Host Mode) HSCW and QRSS strings can be aborted with either a paddle
press or a Command+PB4 pushbutton press. Upon abort normal keying speed is resumed.
PTT Functionality
PTT in standalone mode works the same way as it does in host mode and is described in detail on page 15.
Note that in standalone mode the maximum allowable value for paddle entry is 99. This means the largest
lead-in or tail delay that can be entered by paddle command is 990 mSec. If you need to enter a longer
delay in standalone mode, use the WK3_TOOLS application which allows these values to be entered from
the host over the USB port.
When entering a message by paddle and minimal tail time is essential, be sure to end all messages with the
di-dah-di-dah (AA) character to prevent WK3 from automatically appending a wordspace. If there is a
wordspace at the end of a message WK3 will hold PTT till the end of the wordspace.
Preserve Settings
WK3 setting changes made by paddle commands are not automatically copied into permanent storage. That
means the settings will be lost if power is cycled. To save the settings permanently, use extended P
command. Press and hold the command PB until the R and enter an X followed by a P. This will save
current settings in nonvolatile memory so that all settings will be retained on power cycling. Note that
messages are saved directly into nonvolatile memory so the P command is not required to preserve
messages.
Restore User Defaults (Warm Restart)
It’s possible that a paddle command could be entered incorrectly which puts WK3 into an undesired state.
Rather than try to figure out what went wrong, an easier way to handle this is restore settings from
EEPROM. You can do this by either cycling power or by forcing a warm restart. Press and hold the
command pushbutton. First an R will be sent followed by a W about 5 seconds later which lets you know
user defaults have been reloaded.
Restore Factory Defaults
If you want to restore WK3 to original “factory” settings hold the pushbutton down as you would for a warm
restart and at the same time hold both paddles closed. First an R will be sent followed by a W about 5
seconds later. At that time, all messages have been erased and factory settings have been loaded.
Factory Defaults are:
Fixed WPM: 15
Command WPM: 15
KeyComp: 0
Interchar Spacing: Normal
Sidetone: On
Autospace: Off
TX Mute: Off
User: 1
Speed Pot Min: 5
Speed Pot Max: 35
Dit/Dah Ratio: 1:3
Sidetone: On
Sidetone: 800Hz
SampleAdjust: None
OutputMode: KEY/PTT
Message Bank: 1
First Extension: 0
Tune Duty Cycle: 100%
Weight: No adjustment
KeyMode: Iambic B
Serial Number: 0001
Messages: All Erased
Farnsworth: Off
Extra Letterspace: None
Keyer Lock
A lock feature is provided to disable paddle input and message pushbuttons. This is useful when you want to
pack up a battery powered keyer and insure that it stays off with batteries still connected. It is also handy to
lock the keyer paddles to keep little hands from sending “messages”. While the keyer is locked it is held in
low power shutdown mode. To lock the keyer, press the command pushbutton, wait for the R, and then
enter a period (di-dah-di-dah-di-dah). WK3 will respond with an L to let you know it is now in a locked state.
To unlock the keyer, press and hold the both paddles closed for about 8 seconds and WK3 will wake up and
send an R. This is a very reliable lock mechanism because once the paddles are removed there is no
possible way to accidentally unlock WK3.
Shortcuts and Speed Ups
A goal for WK3 design was to streamiline command entry, here are some notable improvements:
Fast Command responses – WK3 uses A for positive responses instead of an R or Y
Cut Numbers on Command Entry – When entering numeric values use cut numbers to save time. For
example when changing the command speed to 19 WPM, use S U N instead of S 2 9
These are the command cuts used in WK3: T=0, A=1, U=2, V=3, 4=4, 5=5, 6=6, B=7, D=8, N=9
Single digit number entry – If you are entering a parameter that usually requires two digits but you only need
to enter one, just enter the single digit and WK3 will figure out that there is only one. For example instead of
entering T 0 7 you can simply enter T 7.
WK3 will respond with an E or I when swapping users, message banks, or output port. Think of it as a
single dit for 1 and a double dit for 2. This is much faster than responding with a Morse 1 or 2.
Fast Message Entry – Just press the command button till you get an R then simply press the message
button you want to load. To stop load mode, either press the command button or enter di-dah-di-dah.
Fast Tune Mode – Press and hold pushbutton 4 and then press the command button to start tune. Press the
command button to end tune.
Fast Serial Number decrement – Press the command button and then press either paddle to decrement the
serial number. WK3 echoes a single dit to signify that the command was accepted.
Fast Command Response – If you think WK3 takes to long to respond to the command button, enable fast
command reply mode which halves the delay time. This is the extended command F.
Command Prompts – WK3 will respond to commands that require additional input with an E. The E stands
for “Entry Required” and is fast and efficient. For example if you enter the Weight command W, WK3 will
respond with an E to let you know it is wating for the value.
Standalone Speed Potentiometer Functionality
WK3 uses a 10K potentiometer connected to pin 10 to set sending speed.
Turning the speed control will change the speed and update the WPM rate
immediately with minimal lag. The entire sweep of the speed pot is called
the speed window and it can be modified with two commands. The B
command sets the bottom, or lowest point of the sweep. The S command
sets the WPM range. Generally an operator sets the speed bottom first to
set the starting point and then enters a range value which determines the
upper WPM. Entering 10 WPM for the bottom with a range of 40 WPM will
specify a window that starts at 10 WPM and sweeps up to 50 WPM. This
allows you to tailor the speed control to an area that you prefer, but it can be
changed at any time. The minimum acceptable values for bottom and range
are 5 WPM. A 5 WPM range is rather useless, better ranges are in the
vicinity of 20 to 40 WPM. If it is desired to set the speed to an exact speed,
the easiest way to do this is to turn the speed control fully counter clockwise
and set the speed bottom to the desired speed. Otherwise you can
determine the current speed control setting with the Q (query) command.
To WK2
Pin 10
470Ω
10KΩ
.0047uF
Figure 13
WK3 Standalone Tutorial
st
On 1 time power up, or by the restore factory defaults command, WK3 will be reset to these settings:
Operating WPM:15
KeyComp:0
Sidetone:On
Min Speed Pot: 5 WPM
User: 1
Command WPM:15
Letterspace Adjust:0
Autospace:Off
Max Speed Pot: 35 WPM
Message Bank: 1
Sidetone: 800 Hz
SampleAdjust:50%
Key/PTT: Port 1
SO2R Mode: Off
Tune Duty Cycle: 100%
Weight:50%
KeyMode:Iambic B
Serial Number:0001
No 0 or 9 Cuts
Farnsworth: Disabled
After WK3 has been powered up, pressing the paddle keys will generate dits and dahs both in sidetone and
keyed output. Let’s enter a simple command to change the sidetone frequency. Press and hold the command
pushbutton (CMD PB) until WK3 answers with an R. Then, without hesitation, enter a Z on the paddles. If it did
not understand the command or you are late entering the command, WK3 will respond with a question mark.
After a successful command entry, WK3 will respond by turning on a constant sidetone with keyed output
disabled. By pressing the paddles you can raise or lower the sidetone frequency. When you are satisfied with the
pitch, end the command by pressing the command PB. With some keyers, such as WKUSB which uses a small
speaker, you’ll find that higher frequencies produce the loudest sidetone.
Now we will enter an extended command, one that will swap the paddles. Press and hold the command
pushbutton (CMD PB) until WK3 answers with an R. and then, without hesitation enter an X on the paddles. WK3
will answer with an E to let you know it is waiting for an extended command entry. In this case, enter another X
which is the swap command. WK3 will reply with an A letting you know that paddle swap is now enAbled and the
dit and dah paddles have been reversed. To swap the paddles back, repeat the command and this time WK3 will
respond with an N for Not enabled.
Now try changing the keying mode. Enter the K command followed by a letter signifying a keying mode (see
page 21). Here are three examples, K B will set iambic mode B, K A will set iambic mode A, or K U will set
Ultimatic mode. Yopu might want to experiment with a couple of the modes just to get familiar with them. The
sample adjust command allows you to tweak the paddle sample point, the default is a value of 50. Setting the
sample point to zero will disable both dit and dah paddle memories.
Let’s learn about the speed pot. If you turn the speed pot while sending you will notice that the sending speed will
change. It will go faster clockwise and slower counterclockwise. When the pot is turned all the way
counterclockwise, favorite speed is selected. Favorite speed is set by the S comand. To change this, press the
CMD PB, wait for the R, and then enter S. WK3 will respond with an E telling you it’s waiting for you to enter the
favorite WPM. Enter a 1 followed by a 0 to set 10 WPM. Now you will get 10 WPM fully counterclockwise.
The default range for the speed pot is 5 to 35 WPM. Let’s change the range using the extended R command
(see page 21). Let’s set a 10 WPM minimum and a 25 WPM maximum. Press the CMD PB, wait for the R, and
then enter X, wait for the E and then enter R for pot range. WK3 will respond with an E telling you it’s waiting for
you to enter the minimum WPM value. Enter a 1 followed by a 0. WK3 will then send another E while it waits for
the maximum WPM value, enter a 2 followed by a 5. If you did it right, WK3 will answer with an R and now the
speed range will be 10 WPM to 25 WPM. Repeat the command and use the T shortcut for the zero, in other
words enter a 1 followed by a T.
The WPM rate used while entering commands can be changed using the C command. If you accidentally set the
command rate faster than you can copy, use the warm reboot command on page 28 to get it back to 15 WPM.
The Weight, Keying Compensation, Letterspace, and Dit/Dah Ratio commands adjust the way Morse is
generated. Read each command descriptions on pages 21, 23, and 24 to understand how they work.
You can save your settings in WK3’s internal EEPROM with the extended command S for Save settings.
You can change the keyer’s output port with the O command. This allows you to key one of two radios from the
same keyer. This saves swapping cables around when you want to move from one radio to another. It does
require a separate keying cable from WKUSB to each keyer.
Now try entering some messages. Review the procedure for message loading on page 25. WK3 has two great
features associated with messages. The first is backspace, if you make a mistake while entering a message you
can backspace to fix the error. The second is that the size of the message slots is not fixed. If you only use two
bytes in slot one, only two bytes of message memory are used up, not an entire slot. Once you have mastered
message loading you can tackle some embedded commands. An easy command to start with is the speed
change command. In slot one enter: /S10SLOW /S25FAST. Note that the DN prosign (/) is used as the
command identifier. This message will play at two different speeds. Note that after playing this message the
operating speed will be returned to the original speed, in other words the speed change is not permanent. If you
need to insert / into a message simply enter it twice, this tells WK3 it is not a command: K1EL//1
Another set of speed related embedded commands are /Y and /Z. These invoke a relative increase or decrease
in sending rate. They are different than the /S command since they add or subtract from the current speed. That
means you can move you speed pot around to different speeds but the relationship between the current speed
and the /Y and /Z commands remains constant. For example, look at the message:
/Y5CQ TEST CQ TEST DE /Z5 WB6JJB.
The CQ TEST CQ TEST portion will be sent 5 WPM faster than the current WPM rate and then slowed back
down for the callsign portion. If the current WPM rate was 10 WPM the accelerated rate would be 10+5=15
WPM. If the current WPM rate was 23 WPM, the accelerated rate would be 28 WPM. The message would have
the same affect in both cases; to send the CQ portion of the message 5 WPM faster than the callsign portion.
This feature can be helpful to emphasize a portion of a messsage by slowing it down.
Now let’s compose a beacon message. In message slot 2 enter: /B60/K05 BCON DE K1EL NH When this
message is played, the keyer will key down for 5 seconds and then send BCON DE K1EL NH. The /B60
command tells the keyer to repeat the message every 60 seconds no matter how long the message itself is. To
cancel a beacon, press the CMD PB or the paddle, WK3 will stop the loop and respond with an I to let you know
something was cancelled.
Serial numbering is easy to use. First enter a starting serial number with the N command. You need to enter all
four digits including leading zeroes. Next select the way you want WK3 to send 0s and 9s in a serial number.
Use the extended T and N commands for this. To play a serial number simply insert a /N command into a
message. It’s tricky though since the serial number is automatically incremented everytime it is played. If you
want to send a serial number twice in the same message you have to decrement it after you send it like this: UR
NR /N/D /N QSL ?
Let’s look at the embedded Pause command. The /P command can be thought of as a three way branch. When
it is encountered, WK3 will wait for one of three things to occur:
1st branch: User paddles something and the message will continue
2nd branch: User presses a message button to play a message
3rd branch: User dual-presses CMD+PB4 to cancel the message entirely.
Here’s a set of two messages that will illustrate one way the /P pause command can be used.
In slot 2 enter: CQ TEST DE K1EL K /P UR NR/N QSL?/P
In slot 3 enter: UR NR /D/N QSL?
When you press PB 2, the message in slot 2 will send CQ and then pause to let you listen for a reply. If there is
no reply, hit message PB 2 again to repeat the CQ. If there is a reply, enter the station’s callsign and WK3 will
automatically continue, send the serial number, and then pause again. If the station needs a repeat of the serial
number press PB 3 to play the message in slot 3. Since the serial number is incremented after the /N command
in message 2, you need to pre-decrement it in order to send the correct number. Message 3 can be repeated
until the station acknowledges the exchange. At that time press PB2 to start the whole process again.
WK3 supports two alternate sending formats. They are selected by embedded commands in a message. QRSS
is extremely slow CW for VLF work, and HSCW is extremely fast CW typically used for meteor scatter QSOs.
Here are examples of each:
QRSS: /K10/ Q2EL/2 Key down for 10 seconds followed by EL at QRSS6 rate then repeat.
HSCW: /H3K1EL K1EL K1EL K1EL K1EL K1EL K1EL /1 Callsign in slot 1 is repeated at 3000 lpm
WK3 Standalone Commands
A
B
C
D
E
F
G
H
I
J
K
L
M
-
Select sidetone on or off
Start Easy Beacon
Set command speed in WPM
Decrement serial number
Swap active message bank
Set Farnsworth Speed
Toggle 50% tune duty cycle
Set Paddle Hang Time
Set Letterspace Adjustment
Set Paddle sensitivity
Select keyer mode
Set PTT Lead In Time
Mute Transmit, Tx sidetone only
N
O
P
Q
R
S
T
U
V
W
X
Y
Z
-
Load 4 digit serial number
Select output key port
Start Practice Mode
Query current settings
Review message without transmitting
Set favorite WPM
Load PTT Tail Time
Select Autospacing on/off
Set Keying compensation in mSec
Set Key Weight
Enter an Extended Command
Set Dit/Dah Ratio
Set sidetone frequency
Extended Command Table
A
C
F
M
N
P
-
Push button diagnostic
Contest spacing on/off
Fast command response on/off
Load user callsign
Cut 9 on/off
PTT enable on/off
R
S
T
U
V
X
-
Set speed pot range (Min/Max)
Save settings in EEPROM
Cut 0 on/off
Select user 1 or 2
Report power supply voltage
Swap paddles
Standalone Embedded Command Table
/Bnn
/Cn
/D
/E
/Hn
/Inn
/Knn
/M
/N
/O
/P
/Qn
/R
/Snn
/Un
/V
/Wnn
/X
/Yn
/Zn
/1
/3
/5
Set a beacon cycle time of nn seconds (nn=00 to 99).
Call message and then return
Decrement serial number.
Swap message banks
Set HSCW speed. See table below for determining n.
Set Letterspace increase (nn=00 to 31)
Key transmitter for nn seconds (nn=00 to 99)
Play User Callsign
Play Serial Number with auto increment.
Keying Port Toggle command
Pause and wait for paddle entry and then continue after one word space time.
The pause can be ended in three ways:
1) Paddle Press,
2) Press a message PB
3) Dual-press CMD+PB4 to cancel.
Set QRSS speed. See table below for determining n
Merge next two letters into a prosign
Set a new sending speed (nn=WPM, 5 to 59)
PTT Off/On command (n=0 or 1)
Play supply voltage
Wait for nn seconds (nn=00 to 99)
Cancel /S, /H, or /Q command
Relative WPM Change Up (n=0 to 9) current WPM changed to WPM+n
Relative WPM Change Down (n=0 to 9) current WPM changed to WPM-n
Jump to message 1
/2
Jump to message 2
Jump to message 3
/4
Jump to message 4
Jump to message 5
/6
Jump to message 6
n
0
1
2
3
4
5
HSCW
1000
1500
2000
3000
4000
6000
Rate
lpm (200 wpm)
lpm (300 wpm)
lpm (400 wpm)
lpm (600 wpm)
lpm (800 wpm)
lpm (1200 wpm)
QRSS Rate
3 sec dit
6 sec dit
10 sec dit
12 sec dit
30 sec dit
60 sec dit
Rate Table for /Hn or /Qn commands
Contact Information
Please post questions on the K1EL Message Board:
http://groups.yahoo.com/group/k1el_keyers/
You can contact K1EL directly at:
Steven T. Elliott K1EL
43 Meadowcrest Drive
Bedford, NH 03110 USA
e-mail: [email protected]
website: www.hamcrafters.com