1
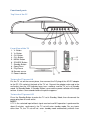
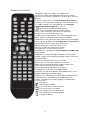
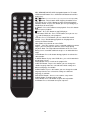
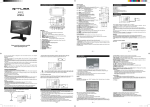
DVT-1542
39 CM (15,4") LCD TV WITH INTEGRATED DVD PLAYER, DVB-T AND CI
User Manual
For information and support, www.lenco.eu
UM_DVT-1542_GB
V1.0
Table of content
What’s in the box? .................................................................................................... 3
Safety Precautions ................................................................................................... 4
IMPORTANT SAFETY INSTRUCTIONS - READ CAREFULLY BEFORE USE. .... 4
Functional parts ........................................................................................................ 7
Top View of the TV .................................................................................................. 7
Front View of the TV................................................................................................ 7
To turn the TV power ON ........................................................................................ 7
To turn the TV power OFF ...................................................................................... 7
Rear view of the TV ................................................................................................. 8
Remote control unit .................................................................................................. 9
TV Mode................................................................................................................... 11
CHANNEL menu ................................................................................................... 11
Picture menu ......................................................................................................... 12
Sound menu .......................................................................................................... 12
Time menu ............................................................................................................ 13
Lock menu ............................................................................................................. 13
Option menu .......................................................................................................... 13
AV/SCART/YPBPR/PC ......................................................................................... 14
USB Operation ........................................................................................................ 14
Inital Settings (DVD) ............................................................................................... 14
Troubleshooting ..................................................................................................... 15
Service and support ............................................................................................... 16
Specifications ......................................................................................................... 16
Personal notes ........................................................................................................ 17
End of life ................................................................................................................ 18
2
Dear customer,
Thank you for purchasing this Lenco product. Quality and usability is our top priority.
In order to let you fully enjoy this product, we manufactured this product using high
quality standards, materials, components and care.
Note:
This user manual is printed prior to the product development. When a part of the
product specification must be changed to improve operability or other functions,
priority is given to the product specification itself. In such instances, the instruction
manual may not entirely match all the functions of the actual product. Therefore, the
actual product and packaging, as well as the name and illustration, may differ from
the manual. The screen shown as an example in this manual may be different from
the actual screen display.
Lenco is not liable for any consequential damage.
What’s in the box?
Our factory assembles the content of the box with the utmost care. If unfortunately an
accessory is missing in the box, please contact your dealer as soon as possible.
Checking the accessories supplied:
1 x TV
1 x AC/DC Power adaptor
1 x Remote Control
2 x AAA Battery
1x User manual
3
Safety Precautions
IMPORTANT SAFETY INSTRUCTIONS - READ CAREFULLY BEFORE USE.
CAUTION
RISK OF ELECTRICAL SHOCK
DO NOT OPEN
CAUTION: TO PREVENT ELECTRICAL SHOCK, DO NOT REMOVE ANY
COVER SCREWS. THERE ARE NO USER SERVICEABLE PARTS INSIDE.
REQUEST A QUALIFIED SERVICE PERSON TO PERFORM SERVICING.
This symbol indicates that there are important operating maintenance instructions
in the user manual accompanying this unit.
This symbol indicates that dangerous voltage is present within this unit
constituting a risk of electric shock or personal injury.
Keep these instructions in mind:
Do not use this unit near water.
Clean only with a slightly damp cloth.
Do not cover or block any ventilation openings. When placing on a shelf leave 5 cm (2”) free
space around the whole unit.
Install in accordance with the supplied user manual.
Protect the power cord from being walked on or pinched, particularly at plugs, and the point where
it exits the unit. Do not place heavy items on the power cord, which may damage it. Take note that
the power cord cannot be reached and pulled by young children, avoiding injury.
Unplug this unit during lightning storms or when unused for a long period of time.
Keep the unit away from heat sources such as radiators, heaters, stoves, candles and other heatgenerating products.
WARNING! NEVER INSERT AN OBJECT INTO THE PRODUCT THROUGH VENTS OR
OPENINGS. HIGH VOLTAGE FLOWS IN THE PRODUCT AND INSERTING AN OBJECT CAN
CAUSE ELECTRIC SHOCK AND/OR SHORT INTERNAL PARTS. FOR THE SAME REASON,
DO NOT SPILL WATER OR LIQUID ON THE PRODUCT.
Do NOT use in wet or moist areas such as bathrooms, steamy kitchens or near swimming pools.
Do not use this unit when moisture condensation may occur.
4
SAFETY PRECAUTIONS (continued)
This unit has been produced according to all current safety regulations. The following safety tips
should safeguard users against careless use and the dangers connected with such use.
Although this unit has been carefully manufactured and rigorously checked before leaving the
factory, as with all electrical appliances, it is possible for problems to develop. If you notice smoke,
an excessive build up of heat or any other unexpected phenomena, you should disconnect the
plug from the mains power socket immediately.
Ensure that the unit is sufficiently ventilated!
This unit must operate on a power source specified on the specification label. If you are not sure
of the type of power supply used in your home, consult your dealer or local power company.
The socketoutlet must be installed near the equipment and must be easily accessible.
Do not overload AC outlets or extension cords. Overloading can cause fire or electric shock.
Units with Class 1 construction shall be connected to a mains socket outlet with a protective
earthing connection.
Keep away from rodents. Rodents enjoy biting into power cords.
Always hold the plug when pulling out the plug from the mains supply socket. Do not pull the
power cord. This can cause a short circuit.
The screen is made of plastic and can break if damage is done to it. When broken, be careful with
sharp edged plastic splinters to avoid injury.
Avoid placing the unit on any surfaces that may be subject to vibrations or shocks.
To protect the unit during a thunderstorm unplug the AC power cable and disconnect the aerial.
Caution: Do not touch the aerial (RF) connector.
When the unit is not used for long periods of time, unplug the AC power cable for safety reasons.
. Do NOT tap or shake the screen, you may damage the internal circuits. Take good
Care of the remote control, do not drop.
To clean the TV use a soft dry cloth. Do NOT use solvents or petrol based fluids. For stubborn
stains, you may use a damp cloth with dilute detergent.
CD
Before playing, clean the DVD / CD with a cleaning cloth..
Do not expose the DVD / CD to direct sunlight or heat sources such as hot air ducts. Do not leave
it in a car parked in direct sunlight as there can be a considerable rise in temperature inside of the
car.
Do not stick paper or stickers on the DVD / CD, nor scratch the DVD / CD.
After playing, store the DVD / CD in its case. Scratches, dirt or fingerprints on the DVD / CD may
cause tracking errors or skipping.
If the player is moved directly from a cold to a warm location, or is placed in a very damp room,
moisture may condense on the lens inside of the DVD / CD player section. Should this occur, the
player will not operate properly In this case. Remove the DVD / CD and wait about an hour for the
moisture to evaporate.
This DVD / CD player is designed to be played on a stable vibration-free position. If you bump the
set during DVD / CD play, the music will stop or skip for a few seconds. This is normal for this type
of player.
5
Safety instructions – continued
Scratched discs
If your disc is badly scratched, it will not play. You may be able to repair the disc if you use a disc
polisher.
Cleaning the Lens
If the lens becomes dirty, it may cause a skipping of sound during DVD / CD operation. Clean the lens
with a commercially available lens cleaner and blower or carefully wipe it with a soft dry cloth.
IMPORTANT NOTE:
The USB memory stick should be plugged into the unit directly. Don’t use an USB
extension cable because it can cause interference resulting in failing of data.
WARNING: long term exposure to loud sounds may lead to temporary or permanent
hearing impairment.
Declaration of Conformity
Products with the CE marking comply with the EMC Directive (2004/108/EC) and the Low
Voltage Directive (2006/95/EC) issued by the Commission of the European Community.
Where to install
Locate the television away from direct sunlight and a strong light, soft indirect lighting is recommended
for comfortable viewing. Use curtains or blinds to prevent direct sunlight falling on the screen. Place
the TV on a sturdy platform of which the surface should be flat and steady. This will prevent it from
falling over. Make sure the television is located in a position where it cannot be pushed or hit by
objects, as pressure will break or damage the screen, and so that small objects cannot be inserted into
the ventilation slots or openings in the cabinet.
6
Functional parts
Top View of the TV
Front View of the TV
1. V- Button
2. V+ Button
3. CH- Button
4. CH+ Button
5. MENU Button
6. SOURCE Button
7. Standby Button
8. Open/Close
9. Play/Pause
10. Remote sensor
11. Power indicator
To turn the TV power ON
Put the TV set on the correct place, then connect the DC plug of the AC-DC adaptor
to the DC 12V socket at the back of the TV set. Connect the adaptor main cord to the
wall outlet ,then the LCD indicator lamp turns red/blue and the TV set is at Standby
mode. At Standby Mode, if Standby Button is pressed the power indicator will change
to blue. It takes a few seconds before the picture appears.
To turn the TV power OFF
Press the Standby Button to make the TV set in Standby Mode, then disconnect the
power plug from the wall outlet.
NOTE:
If TV is the selected input without signal received and NO operation is performed for
about 5 minutes continuously, the TV set will enter standby mode. For any inputs
other than TV, the TV set will not enter standby mode automatically without users
7
instruction. If you are not going to use this TV set for a long time, switch off the set
and disconnect the power plug from the wall outlet.
Rear view of the TV
NOTE:
When using external equipment with this TV set, please read the instruction manual
of the external equipment. Switch off all power supplies to the equipment and TV set
before connection. Always ensure that the input and output terminals are correctly
connected.
8
Remote control unit
STANDBY: Switch on TV when at standby mode.
AUTO: Press to do auto configuration directly in PC source.
MUTE: Press to mute the sound. Press again or press VOL+ to
unmute.
0-9: Press 0-9 to select a TV channel directly when you are
watching TV. To enter page number in teletext mode and so on.
-/--: - for 1,-- for 11. Press this button to enter a program
number with different digits.eg. ,--- for 111
: Returns to the previously viewed program.
CH+/-: Press to scan through or to select a channel.
VOL+/-: Press to increase / decrease the sound level.
ASPECT: To select the aspect of screen.
NICAM: Change audio mode in ATV source: Stereo/ Dual I/II/
Mono. Change audio mode in other source: Left/Right.
DISPLAY: Press to display the source and channel’s information.
▼ / ▲ / ◄ / ►/ K: Allows you to navigate the on-screen menus
and adjust the system settings to your preference.
MENU: Brings up the main menu to the screen.
EXIT: Press EXIT to exit menu or sub menu.
SOURCE: Press to select the input source.
PMODE: Press repeatedly to cycle through the available video
picture modes.
SMODE: Press to cycle through the different sound settings.
SLEEP: Let you select amount of time before your TV turn itself
off automatically.
FAV: Press to display FAV menu in TV mode.
FAV+/-: Press to select the channel in fav channel.
EPG: Press to show the Electronic Program Guide menu.
TEXT: Switch On or Off the teletext mode.
HOLD: Hold On or Off for current page display.
TV/RADIO: Press to select TV or RADIO mode.
SUBTITLE: To switch the dialogue at the bottom of the screen.
INDEX: INDEX request the index page.
REVEAL: Press REVEAL to reveal or hidden the hidden words.
SUBPAGE: Press SUBPAGE to sub coded page access.
LANG: To show the list of audio languages available for the
current channel.
: Play/pause
: Stop playing /recording
: Press to go to the previous chapter
: Press to go to the next chapter
: Play a program in fast rewind mode
: Play a program in fast forward mode
: To begin recording
9
DEL/ RENAME/ MOVE/ SKIP: Navigation buttons in TV mode.
OPEN/CLOSE Button: Press OPEN/CLOSE button to load disc
on disc tray.
Button: Press these button to go to the previous/next chapter(DVD).
Button: These buttons allow skipping ahead/back at 5level speed. Press “PLAY”button to return to normal playback.
REPEAT Button: To press this button you can repeatedly play a
title(DVD) or all tracks(CD) .
Button : Press this button to start playback. Press this button
again to pause playback.
Button : Press this button to stop DVD player.
TITLE button: DVD disc: Press TITLE button, then you can use
" " and OK button to select programs.
VCD disc: Press TITLE button, you can switch PBC on/off.
ZOOM : Press ZOOM during playback or still playback to
activate the Zoom function.
Note: Zoom may not work on some DVDs.
ANGLE : If the disc contains scenes recorded at different camera
angles, you can change to a different camera angle during
playback. Note: The angle indicator will blink on the TV screen
during scenes recorded at different angles as an indication that
angle
SLOW Button: Press this button during playback to activate the
slow function.
D MENU Button: If play some DVD discs, press this button back
to root menu screen.
PROG Button: Place a track on the program list.
SUBTITLE Button: To press this button, you can change the
subtitle language from one selected to the initial settings to a
different language, if available.
AUDIO Button: To press this button, you can change the audio
language from the one selected at settings to a different
language, if available.
DVD SETUP Button : Accesses or removes setup menu.
D DISP Button: To display player OSD.
GOTO Button: Press this button to go to desired position.
A-B Button: Press this button to repeat sequence.
10
TV Mode
CHANNEL menu
Press [MENU] to display the main menu.
Press [◄/►] to select "CHANNEL" in the main
menu, then press [▼] to select and [OK] to
enter.
Auto Tuning: Press [▼] and [OK] to enter AUTO
Tuning and press [▲/►/▼/◄] to select a language and
press [OK] to start.
DTV Manual Tuning: Press [▼] and [OK] to enter
DTV Manual Tuning submenu.
Press [◄/►] to change channel number, then press [OK] to
search programs.
ATV Manual Tuning: Press [▼] and [OK] to enter
ATV Manual Tuning submenu.
Press [◄/►] button to select channel number you want to
store.
Press [▲/▼] button to select the second option.
Press [◄/►] button to select audio system.
Press [▲/▼] button to select search, then press [◄/►]
button to start tuning.
Press RED button to save the current channel.
Programme Edit: Press [▼] and [OK] to enter "Programme
Edit" submenu. This option has five functions:
1. Press DEL button to delete the current channel.
2. Press RENAME button to rename the current channel
(For ATV only).
3. Press MOVE button and [▲/▼] to move the current
channel.
4. Press SKIP button to skip the current channel.
5. Press [FAV] to set the current channel to your favorite
channel, there will be a red heart at the behind of the
channel selected. If the current channel is already be one of
your favorite channel, press it again will set it to a normal
one.
11
Signal Information (For DTV only): Press [▼] and [OK] to enter "Signal Information"
submenu. This menu displays signal details, including Channel, Network,Modulation,
Quality and Strength.
Picture menu
Press [MENU] to display the main menu.
Press [◄/►] to select "PICTURE" in the main
menu, then press [▼] and [OK] to enter.
Picture Mode: Press [▼] and [OK] to enter
"Picture Mode" submenu. Press [◄/►] to
change the picture mode in sequence: Standard
— Dynamic — Mild — User. You can press
[PMODE] repeatedly on the remote control to change the picture mode directly.
Colour Temp: Press [►] or [OK] to enter "Colour Temp" submenu. Press [▲/▼] to
change the colour temperature in sequence: Warm — COOL — USER — Medium.
Press [◄/►] to adjust contrast,Brightness colour,tint,sharpness in user mode. Noise
Reduction: Press [▼] or [OK] to enter "Noise Reduction" submenu. Press [o/p] to
change the noise reduction in sequence: Off — Low — Middle — High.
Sound menu
Press [MENU] to display the main menu.
Press [◄/►] to select "SOUND" in the main
menu, then press [▼] and [OK] to enter.
Sound Mode: Press [▼] and [OK] to enter
"Sound Mode"submenu. Press [◄/►] to
change the sound mode in sequence: Standard
— Music — Movie — Sports — User. You can
press [SMODE] repeatedly on the remote control to change the sound mode directly.
Press [▲/▼] to adjust treble,hass in user mode.
Balance: use the same way as above.
Auto Volume: Press [▼] or [OK] to set the automatic volume level to "On" or "Off".
SPDIF Mode: Press [▼] or [OK] to set the SPDIF mode to "Auto" or "PCM".
Surround Sound: Press [▼/▲] button to select Surround Sound, then press button to
enter sub-menu.Press [▼/▲] button to adjust.(Available Surround Sound: Off,
Surround).
EQ: Press [▼/▲] button to select EQ, then press [OK] button to enter submenu.
Press [▼/▲] button to select. Press [▼/▲] button to adjust.(Available EQ: 120Hz,
500Hz, 1.5KHz, 5KHz,10KHz).
12
Time menu
Press [MENU] to display the main menu.
Press [◄/►] to select "TIME" in the main
menu, then press [▼] and [OK] to enter.
Clock (For DTV only): Display the current
system time. It’s not available. Time Zone (For
DTV only): Press [►] or [OK] to enter "Time
Zone" submenu. Press [▲/►/▼/◄] to set the proper time zone according to your
region.
Sleep Timer: Press [►] or [OK] to enter "Sleep Timer"submenu. Press [▲/▼] to
change the sleep timer as Off, 10 Min, 20 Min, 30 Min, 60 Min, 90 Min, 120 Min, 180
Min, 240 Min. You can press [SLEEP] repeatedly on the remote control to change the
sleep timer directly.
Lock menu
Press [MENU] to display the main menu.
Press [◄/►] to select "LOCK" in the main
menu, then press [▼] and [OK] to enter.
Password: Enter the default password "0000"
to go to the LOCK function menu if you have
set "Lock System" to "On".
Lock System: Press [►] or [OK] toSet the lock system to "On" or "Off" which enables
or disables below lock functions.
Set Password: Press [►] or [OK] to enter submenu to set new password.
You can change the password by entering the old and a new password and then reentering it to confirm the new one.
Block Program: Press [►] or [OK] to enter "Block Program"submenu.
1. You can add or release a lock to some special program.When watch a locked
program, a dialogue box appears. You should enter the correct password. The initial
password is “0000”. If you forget your password, input “2588”.
2. Press rename button to lock the desired channel, press it again to unlock it.
Parental Guidance (For DTV only): Press [►] or [OK] to enter "Parental Guidance"
submenu. Press [▲/▼] to set the parental guidance level.
Option menu
Press [MENU] to display the main menu.
Press [◄/►] to select “OPTION” in the main
menu then press [▼] and [OK] to enter.
OSD Language: Press [▲/►/▼/◄] to set the
on-screen display menu language.
TT Language: Press [◄/►] to set the teletext
13
language.
Hearing Impaired (For DTV only): Press [►] or [OK] to set the hearing impaired to
"On" or "Off".
Restore Factory Default: Press [▲/▼] button to select Restore Factory Default, then
press [OK] button to enter a dialogue.Press [◄] button selecting Yes to restore
factory default by choosing OSD language,country and conducting Channel Tuning .
AV/SCART/YPBPR/PC
HDMI
Notes:
1. PICTURE ,SOUND, TIME AND OPTION menu and description are the same as
that for DTV mode.
2. No Channal and Lock menu.
USB Operation
Press [◄/►] button to select MOVIE in the
main menu, then press OK button to enter.
Press [◄/►] button to select drive disk you
want to watch, then press OK button to enter.
Press [▲/►/▼/◄] button to select the file you
want , then press OK to select and press
button to play on the remote controller.
Press EXIT button to return to the previous
menu and exit menu to quit.
NOTE:
THE OPERATION OF PHOTO,MUSIC AND TEXT SAME AS MOVIE.
PVR OPERATION
In DTV mode, puls your usb device to the TV set, Press the button to record and
press
button to stop.
Inital Settings (DVD)
COMMON PROCEDURES OF INITIAL SETTINGS
Press DVD SETUP button to get the setup menu. Use direction buttons "
" to
select the preferred item. After finishing settings, press DVD SETUP again to TV
display. The following menu items can be changed:
GENERAL: Selects the GENERAL SETUP PAGE menu.
AUDIO : Selects the AUDIO SETUP PAGE menu.
PREFERENCE: Selects the PREFERENCE SETUP PAGE menu.
14
1.Press
buttons to select
submenu and change it in General setup page
2.Use the same way to change other submenu
in AUDIO and Preference.
Troubleshooting
Before calling for service, you can check the following items on symptoms and
solutions.
No picture:
Check other channel, maybe station problem.
Adjust the tuning control.
Ensure that the input setting is at TV state.
Ensure that the LCD is on.
Ensure that the equipment is connected properly.
No sound and distorted sound:
Ensure that the input settings for the TV and sound are proper. Adjust the tuning control.
Probably local interference, such as an appliance. Re-orient aerial(if indoor type).
Ensure that the equipment is connected properly.
No remote Control:
Check the battery are installed with the correct polarity.
Point the remote control unit at the remote control sensor and operate.
Remove the obstacles between the remote control and the remote control sensor.
Operate the remote control unit at a distance of not more than 8 meters from the
remote control sensor.
NO SIGNAL displayed. Check if the wire is connected correctly.
Ensure the computer or other equipments are at power on mode.
Ensure the TV input setting is at pc mode.
INVALID FORMAT displayed Check if the input setting is compatible to the
monitor specification.
Lcd lamp indicator on but no picture Check the monitor setting: contrast
,brightness. Check if the wire is connected correctly.
Some unusual spots on screen: Some dot defects may appear on the screen, like
red, green or blue, Spots, However, this will have no impact or effect on the monitor
performance.
Lost password:On the password screen , enter the following master password: 8888
You may use the master password to set a new password as desired . Please
remember your password and keep it carefully.
15
Service and support
Lenco has written this user manual with the utmost care. If you still have difficulties
using this product after you have read user manual than you can contact us via
www.lenco.eu or by phone:
Lenco helpdesk:
Germany
The Netherlands
Belgium
France
0900-1520530 (Local charges)
0900-23553626 (Local charges + 1ct P/min)
026-200115 (Local charges)
017-0480005 (Local charges)
The helpdesk is accessible from Monday till Friday from 9 AM till 6 PM.
In case your device needs repair, our helpdesk will redirect you to your local dealer.
Lenco offers service and warranty in accordance to European law, which means that
in case of repair (both during and after the warranty period), you should contact your
local dealer. Please note: it is not possible to send repairs to Lenco directly.
Important note: If the unit is opened by a non-official service center, the warranty
expires.
Specifications
Tuner receiving range
Input Impedance
Video system
ATV
Sound system
Max. Storage Channels
Teletext
Tuner Receiving Range
Input Impedance
Channel Bandwidth
Modulation
DVB-T
DTV
Video System
Sound system
PC-RGB
CVBS
Component
HDMI
49MHz - 863 MHz
75 Ω
Pal, secam
BG, DK, I, L/L'
Nicam/A2
100 CH
1000 Pages (ATV)
VHF (174MHz - 230MHz)
UHF (474MHz - 862MHz)
75 Ω
7MHz/8MHz
COFDM 2K/8K QPSK, 16QAM, 64QAM
MPEG-2 MP@ML
MPEG-4 ASP
MPEG-1, MPEG-2 (layerI/II)
MPEG-4 AAC-LC
Dolby AC3
EPG, Subtitle, Teletext
Basic functions
Up to 1920x1080@60Hz
PAL/NTSC/SECAM
480i, 480p, 576i, 576p, 720p, 1080i, 1080p
480i, 480p, 576i, 576p, 720p, 1080i, 1080p
16
SCART
PC-IN
CVBS
Component
Speaker output
Power In
Power
consumption
Panel
CVBS & RGB
Earphone input 0.2-2.0Vrms
L/R RCA input 0.2-2.0Vrms
2x2.5W THD+N<10%
DC +12V 4A
ON 26W, Standby <1W
Screen size
Resolution
Luminance
Contrast ratio
Viewing angle
15.4"
Up to 1280x800
200 cd/m²
400:1
Hor. 45° vert. 45°
Personal notes
_____________________________________________
_____________________________________________
_____________________________________________
_____________________________________________
_____________________________________________
_____________________________________________
_____________________________________________
_____________________________________________
_____________________________________________
_____________________________________________
_____________________________________________
_____________________________________________
_____________________________________________
_____________________________________________
_____________________________________________
_____________________________________________
17
End of life
This symbol indicates that the relevant electrical product or battery should
not be disposed of as general household waste in Europe. To ensure the
correct waste treatment of the product and battery, please dispose them in
accordance to any applicable local laws of requirement for disposal of
electrical equipment or batteries. In doing so, you will help to conserve
natural resources and improve standards of environmental protection in
treatment and disposal of electrical waste (Waste Electrical and Electronic
Equipment Directive).
When you see a crossed-out wheeled waste container on the product, it means that the
product is subject to the EU directive 2002/96/EC.
18