1
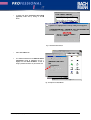
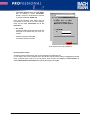
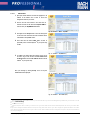
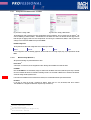
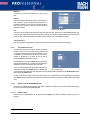
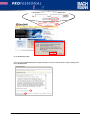
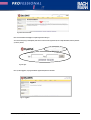
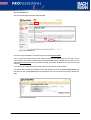
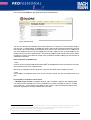
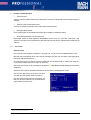
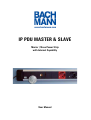
IP PDU MASTER & SLAVE
Master / Slave Power Strip
with Internet Capability
User Manual
Table of contents
Illustrations..........................................................................................................................................................................................3
Important safety notes .......................................................................................................................................................................4
Legal notice ..........................................................................................................................................................................................5
Welcome ...............................................................................................................................................................................................6
1
Items included in the delivery...................................................................................................................................................8
1.1
Content of package .......................................................................................................................................................8
1.2
Minimum requirements for operating the IP PDU .....................................................................................................8
1.3
LED indicators................................................................................................................................................................8
1.4
Supported operating systems / browsers...................................................................................................................9
2
Installation................................................................................................................................................................................10
2.1
Step 1: connecting the IP PDU...................................................................................................................................10
2.2
Step 2: functions of the IP PDU.................................................................................................................................10
2.3
Step 3: changing the IP-address in the IP PDU ........................................................................................................11
2.4
Step 4: the DynDNS service – dynamic DNS for the home.....................................................................................11
2.5
Step 5: administration of the IP PDU........................................................................................................................11
3
Starting the IP PDU .................................................................................................................................................................12
3.1
Unpacking and connecting .........................................................................................................................................12
3.2
Functions......................................................................................................................................................................13
3.2.1
Master/slave function....................................................................................................................................13
3.2.2
Separate switching in the LAN ......................................................................................................................13
3.2.3
Control via the Internet .................................................................................................................................14
3.2.4
WAP – control via mobile phone ....................................................................................................................14
3.2.5
Safety first....................................................................................................................................................14
3.2.6
Power cut protection.....................................................................................................................................14
3.3
Configuration...............................................................................................................................................................15
3.3.1
Configuration of the local area network (LAN) ..............................................................................................15
3.3.2
Router configuration......................................................................................................................................22
3.3.3
Configuration and Administration of IP PDU..................................................................................................26
3.3.4
Administration of IP PDU power strip via WAP .............................................................................................28
4
Dynamic Domain Name Services (DynDNS) ..........................................................................................................................30
5
Examples of IP PDU applications ...........................................................................................................................................36
5.1
Tips & Tricks ...............................................................................................................................................................36
6
Information, Updating & Support...........................................................................................................................................37
6.1
Technical data .............................................................................................................................................................37
6.2
Updating .......................................................................................................................................................................38
6.3
Support/Technical support.........................................................................................................................................38
Bachmann IP_PDU_Hanbuch_en_REV02.doc
Seite 2 von 38
Erstelldatum 24.04.2007 13:25:00
Illustrations
Fig. 1: Power strip IP PDU/LEDs...................................................................................................................................................8
Fig. 2: LED indicators .................................................................................................................................................................10
Fig. 3: Operation via WAP...........................................................................................................................................................12
Fig. 4: LEDs on the IP PDU power strip ......................................................................................................................................13
Fig. 5: Overview – capability – example – IP PDU......................................................................................................................14
Fig. 6: WAP – login – switching on or off...................................................................................................................................14
Fig. 7: Start – Win9x..................................................................................................................................................................16
Fig. 8: Control panel, network WIN9x.........................................................................................................................................16
Fig. 9: TCP/IP configuration WIN9x............................................................................................................................................16
Fig. 10: Information about TCP/IP ..............................................................................................................................................17
Fig. 11: Properties of TCP/IP Win 9x..........................................................................................................................................17
Fig. 12: Properties TCP 9x with permanent IP ...........................................................................................................................18
Fig. 13: Start – Network connections ........................................................................................................................................19
Fig. 14: Properties LAN (TCP/IP) ................................................................................................................................................19
Fig. 15: Use the following IP-address .........................................................................................................................................20
Fig. 16: Integrating Mac Ethernet...............................................................................................................................................21
Fig. 17: Mac – Ethernet manual .................................................................................................................................................21
Fig. 18: Mac – IP address...........................................................................................................................................................21
Fig. 19: Fritz!Box – Menu - DynDNS .........................................................................................................................................23
Fig. 20: Fritz!Box – DynDNS Entry.............................................................................................................................................23
Fig. 21: Fritz!Box – Port enable..................................................................................................................................................23
Fig. 22: Fritz!Box - Port enable (list)..........................................................................................................................................23
Fig. 23: D Link – Tools - Firmware..............................................................................................................................................24
Fig. 24: D-Link - Tools - DDNS....................................................................................................................................................24
Fig. 25: D Link - Advanced – VirtualServer .................................................................................................................................24
Fig. 26: D Link – VirtualServer (List)...........................................................................................................................................24
Fig. 27: T-Com – Configuration menu.........................................................................................................................................25
Fig. 28: T-Com - DynDNS ...........................................................................................................................................................25
Fig. 29: T-Com – DynDNS – Entry..............................................................................................................................................25
Fig. 30: T-Com – Config – NAT & Port.......................................................................................................................................25
Fig. 31: T-Com – Config – NAT ..................................................................................................................................................26
Fig. 32: T-Com – Config – NAT & Port2 ....................................................................................................................................26
Fig. 33: IP PDU - Network ..........................................................................................................................................................27
Fig. 34: IP PDU - User.................................................................................................................................................................27
Fig. 35: Outlets...........................................................................................................................................................................27
Fig. 36: WAP – call ‘n’ switch ....................................................................................................................................................28
Fig. 37: WAP – command line.....................................................................................................................................................29
Fig. 38: dyndns.org start page....................................................................................................................................................30
Fig. 39: DynDNS Sign Up Now ...................................................................................................................................................31
Fig. 40: Terms of usage..............................................................................................................................................................31
Fig. 41: Create user name and password....................................................................................................................................32
Fig. 42: Account Created............................................................................................................................................................32
Fig. 43: Account Confirmed........................................................................................................................................................33
Fig. 44: Login..............................................................................................................................................................................33
Fig. 45: Logged In.......................................................................................................................................................................33
Fig. 46: Dynamic DNS Service....................................................................................................................................................34
Fig. 47: New Dynamic DNS Host................................................................................................................................................34
Fig. 48: Hostname Created.........................................................................................................................................................35
Fig. 49: BIOS –AC BACK Function ............................................................................................................................................36
Fig. 50: IP PDU - Firmware Update............................................................................................................................................38
Fig. 51: IP PDU – Firmware Update 2 ........................................................................................................................................38
Fig. 52: IP PDU – Firmware Update 3 ........................................................................................................................................38
Fig. 53: Firmware Update...........................................................................................................................................................38
Bachmann IP_PDU_Hanbuch_en_REV02.doc
Seite 3 von 38
Erstelldatum 24.04.2007 13:25:00
Important safety notes
Please observe the following notes when handling the IP PDU power strip in order to protect yourself and the power strip
against damage.
Please read all of these notes and pay attention to them.
Make sure to keep these instructions in a safe place for later use.
▪
Never open up the housing of the IP PDU. Unauthorised opening of the housing and inappropriate repairs may cause risks
for the users of the device. In addition, the warranty will become null and void when the housing has been opened.
▪
Never touch the electrical contacts with pointed and/or metal objects.
▪
Never place the connecting leads where they can cause people to trip!
It is imperative that you observe the following notes when placing, connecting and operating the unit:
▪
Place the unit away from heat sources and direct sun light.
▪
Protect the unit from dampness, dust, aggressive liquids and vapours.
▪
Make sure to use the correct socket for connecting plugs / cables to your equipment.
▪
The unit does not have an ON/OFF switch, therefore the power strip has to be easily accessible so that it can be quickly
disconnected from the power supply if there is a fault.
▪
Only ever connect approved equipment or accessories.
▪
The unit must be disconnected from the mains network before cleaning it.
▪
For cleaning the unit use a soft, damp cloth. Aggressive cleansing agents or solvents are not suitable.
▪
The unit may only be repaired by authorised service personnel.
▪
Bachmann GmbH & Co. KG does not accept liability for injury or damage resulting from using the IP PDU power strip for
purposes other than the design purpose.
▪
Do not allow liquids to penetrate the inside of the IP PDU power strip as this may lead to electric shock or short
circuiting.
▪
The IP PDU is only intended for applications within buildings and should only be used inside buildings.
▪
Please also take note of the further safety notes listed in the following chapters.
Bachmann IP_PDU_Hanbuch_en_REV02.doc
Seite 4 von 38
Erstelldatum 24.04.2007 13:25:00
Legal notice
Bachmann GmbH & Co. KG shall only be responsible for any damage or injury resulting directly or indirectly from the use of the
documentation or the other programs as well as incidental or consequential damage where the company has acted with intent
or gross negligence. Any liability claims for the loss or damage of hardware, software or data owing to direct or indirect faults
or destructions as well as costs, including the costs for e.g. ISDN, GSM and XDSL connections, which are related to the
programs and documentation supplied and are due to faulty installation that was not carried out by Bachmann GmbH & Co. KG,
are expressly precluded.
Information contained in this documentation and the associated programs may be changed without prior notice in order to
reflect technical advances.
Copyright©
1992-2006 Bachmann GmbH & Co. KG, Stuttgart, retains all rights relating to this user manual /documentation.
No part of this manual may be reproduced or recirculated in any form without permission in writing by
Bachmann GmbH & Co. KG. Likewise, any processing, in particular the translation of the documentation, is not
permitted without the permission by Bachmann GmbH & Co. KG.
Trademarks
Microsoft Windows, Microsoft Office, Microsoft Word, Microsoft Excel, Microsoft PowerPoint, Microsoft
Outlook and Microsoft SQL Server are registered trademarks of Microsoft Corporation.
Other product names are only used for the purpose of identifying these products and may be registered
trademarks / brands of the respective manufacturers.
Liability
Bachmann GmbH & Co. KG Stuttgart offers a warranty of 24 months for all mechanical and electrical
components.
- Mark
This device complies with the requirements of EU Directive:
Directive 1999/5/EC on radio equipment and telecommunications terminal equipment and the mutual recognition
of their conformity.
The CE-mark on the device confirms the conformity with the above directive.
Bachmann GmbH & Co. KG
Bachmann IP_PDU_Hanbuch_en_REV02.doc
Ernsthaldenstrasse 7 - D-70565 Stuttgart - Germany
Seite 5 von 38
Erstelldatum 24.04.2007 13:25:00
Welcome
Congratulations on buying your IP PDU power strip from Bachmann GmbH & Co. KG. We are pleased to have provided you
with a powerful yet simple communication device for the remote switching of your computer environment and/or your local
network (LAN) via the Internet.
This power strip offers a convenient and powerful solution to all those wishing to access their ‘home office’ and to control
equipment via the Internet at the least possible expense and effort.
The IP PDU power strip for switching smaller computer environments
The IP PDU power strip makes it possible to switch electrical apparatus ON and OFF via a TCP/IP network. To start up the IP
PDU, simply connect it to the existing mains (voltage either 230V or 110V) as well as the respective network. Once the IP PDU
has been assigned a free IP-address by the router (DHCP-Server) it is possible to control the two slave socket pairs individually
from all computers of the same network, using a web browser.
The IP PDU power strip has an Ethernet interface, which can be used to connect it with a switch, hub or DSL router. It is
controlled via an integrated web server, which allows an intuitive configuration of all switch functions as well as the
administration of several users with differing access authorisations.
The IP address for the power strip can be assigned permanently or obtained dynamically via a DHCP server. Apart from a
master output, the IP PDU features two double slave connections. This configuration makes it possible to switch the computer
ON and OFF via the Internet as well as facilitating the switching on site. For example, if the monitor connected to the master
port is switched ON, the power strip will recognise that an appliance has been switched ON and will automatically switch ON
the devices connected to the slave sockets.
Simply clever.
If there is a power cut, the IP PDU will remember the last switching status of the connections and switch the appliances ON
accordingly as soon as the power is available again. On each connection it is possible to control appliances with a power input
of up to 5 ampere, while the power input of the power strip itself is less than 1.5 watt.
Is there really a need for an intelligent power strip?
Just imagine the following situation:
▪
You are away on business and forgot to update your laptop with the important documents that are on your home office
PC. Just before you arrive at your business partners you remember that you are supposed to present your new proposal
today and of course your home office PC is switched off. Going back home would involve at least an hour’s drive, which
would mean being late for your meeting and leave a bad impression with your business partners.
Bachmann IP_PDU_Hanbuch_en_REV02.doc
Seite 6 von 38
Erstelldatum 24.04.2007 13:25:00
However, thanks to your new IP PDU power strip you are now more flexible. Even while you are travelling, you can start your
home office PC via your mobile phone and then, when you arrive, you can collect your data with a few mouse clicks via the
Internet.
▪
Another situation could be that you have left your desktop computer ON and can access it but you don’t have access to a
printer. Although there is enough time for you to drive home and then on to your meeting, you would still have to wait for
the printing of the documents and that could not be done within your time schedule. Unfortunately, your printer is
switched off and you cannot start the print command.
Thanks to your new IP PDU power strip you are equipped to deal with this situation as well: While you are still travelling, you
can use your mobile phone or your laptop (with UMTS card) to switch ON your printer at home and start the print order so that
the document will already be printed out when you reach your office.
▪
You are with friends and tell them about your last holiday and the fantastic pictures you took. Nobody believes you and
they all want to see proof. Your friends think that you don’t have access to your PC at home since you always shut down
your PC when you leave the house.
Thanks to your new IP PDU you configure your PC in such a way that it uses the DSL flat rate connection to connect up to the
Internet after booting up. In this way you can access your PC from anywhere in the world and download your holiday pictures
from the laptop of your friends with the help of just a few mouse clicks.
Bachmann IP_PDU_Hanbuch_en_REV02.doc
Seite 7 von 38
Erstelldatum 24.04.2007 13:25:00
1
Items included in the delivery
1.1
Content of package
▪
Power strip IP PDU including 1.5m connection cable for connecting to the mains power network.
▪
Mini-CD-ROM with manual
▪
Short instructions for quick installation
1.2
Minimum requirements for operating the IP PDU
Your system will need to meet the following minimum requirements in order to be able to operate the IP PDU: You will need a
computer (PC1) with Windows, Macintosh or Linux operating system and an Ethernet adapter2 fitted as well as a web/Internet
browser such as e.g. Internet Explorer or Firefox, with the Java-Script function activated.
In addition you will need:
1.3
▪
a standard patch cable (Ethernet cable, e.g. Cat. 5e, STP)
▪
a router3, a hub or an Ethernet switch4
▪
an xDSL connection with permanent or dynamic IP-address and a DSL-flat-rate5 (any-time) connection.
LED indicators
Indicator for ‘ready’ (1)
Indicator for network connections (5)
Indicator for network traffic (6)
Indicator for master (7)
Indicator for slave 1 (8)
Indicator for slave 2 (9)
1
Personal Computer
Network card, Ethernet Standard 10/100 Base-T
3
A router is a go-between computer that will receive data in a protocol and pass them on to the intended target network or subnetwork
(the process is called routing). In brief: a router connects a network of computers with the Internet.
4
A switch is an electronic device for connecting several computers or network segments into one local area network (LAN), similar to a
hub. A switch is also sometimes called an intelligent hub, which has a similar structure to a router but with the difference that a router
can connect up to the Internet.
5
Important: Using a DSL router without a suitable flat rate subscription contract can cause high online costs. Please obtain advice from a
specialist supplier or consultant.
2
Bachmann IP_PDU_Hanbuch_en_REV02.doc
Seite 8 von 38
Erstelldatum 24.04.2007 13:25:00
▪
Performance characteristics and advantages:
▪
Can be used immediately
▪
Several items of equipment within the LAN can be controlled.
▪
Remote switching and control of several items of equipment of the whole network (LAN) via the Internet.
▪
Control of the IP PDU / several items of equipment via WAP (mobile phone).
▪
After a power cut, the IP PDU will remember the previous settings.
▪
Low power consumption owing to power input of less than 1.5 W.
Advantages of the IP PDU:
1.4
▪
Can be used as an extension lead with several sockets and master/slave function in the office.
▪
Simple and quick ‘plug ‘n play’ installation.
▪
No other software has to be installed.
▪
Operated via web browser hence platform-independent.
▪
Easy and flexible configurations via the web browser.
▪
Dynamic assignment of a network address via DHCP or manual assignment of a permanent IP-address.
▪
The switch status is displayed individually for each socket pair by LEDs on the front of the unit.
▪
As soon as the IP PDU has been connected to a TCP/IP network it can be switched by all computers in this network via
the website (http://IP-address of the IP PDU).
▪
Access protection through HTTP password for one administrator and two other users.
▪
Reset function at the front of the unit.
▪
WAP control possible via mobile phone.
▪
Pulse function – optional control via time-controlled switching6.
▪
Firmware updates are possible via Internet/Ethernet.
Supported operating systems / browsers
Operating systems
The IP PDU power strip is connected to a switch or router via a network cable7. PC computers with Windows or Linux
operating systems as well as Apple computers with their operating systems are supported.
With the help of this technology – using a network connection and operation via browser – the IP PDU can be used with all
operating systems.
Browsers:
Generally, all web browsers with a graphic interface (JavaScript plug-in) can be used, such as MS Internet Explorer or FireFox.
6
7
Some applications, e.g. when starting a server from fresh, require time-controlled switching (pulse
pulse).
pulse
Also known as Ethernet cable or patch cord or cable.
Bachmann IP_PDU_Hanbuch_en_REV02.doc
Seite 9 von 38
Erstelldatum 24.04.2007 13:25:00
2
Installation
2.1
Step 1: connecting the IP PDU
Unpack your power strip and plug the mains power cable into a socket supplying 230V or 110V.
The green >>Power<< LED should now light up. (If the LED does not light up, carefully remove the plug from the socket
and contact your supplier.)
Now connect a patch cable to the RJ45 socket and connect the other end of the cable with your router8. Now the two LEDs
(see Fig. no. 5 + 66) at the RJ45 socket should light up.
2.2
Step 2: functions of the IP PDU
The master/slave function
The master/slave function makes it possible to switch all appliances connected to the power strip simultaneously or separately
by switching on the appliance connected to the master socket. For example it is possible to switch ON a PC system complete
with peripherals just by operating the switch of the monitor9. The switch point can be set on a dial controller (see Fig. no. 3);
the setting should be selected such that the appliance at the master socket will always exceed it.
To make the setting proceed as follows:
Switch ON the ‘master’ and slowly turn the controller until the switch point is reached at which the master indicator (7) goes
off. Now turn the controller just a little in the opposite direction until the master indicator (7) comes on again. Now test the
function several times. If the master indicator always lights up when the appliance at the master socket is switched on, the
setting has been completed.
IMPORTANT
If no equipment is connected to the master socket, the dial controller10 must be turned fully to the left (anti-clockwise)!
Warning!
Unplug
or
turn off all
appliances
at the slave
socket
before
Going back to default settings
In order to reset all settings, operate the reset button until the indicators 7, 8 and 9 light up together and then go off again.
The default settings of the power strip:
IP-number :
192.168.000.211
Login :
admin
Gateway :
192.168.000.254
Password :
admin
Network mask : 255.255.255.000
(Class C network)
8
9
Or Ethernet switch.
Provided this is connected to the master socket.
Potentiometer.
10
Bachmann IP_PDU_Hanbuch_en_REV02.doc
Seite 10 von 38
Erstelldatum 24.04.2007 13:25:00
2.3
Step 3: changing the IP-address in the IP PDU
Network connection
Connect the unit to the network using a standard patch cable. The connection status is indicated at LED 5 and network traffic
at LED 6.
Setting the network parameters:
Once you have connected your IP PDU to your network, assign a permanent IP-address to your PC that is in the same network
area as the one of the power strip (see default settings). For example: 192.168.000.150.
Activate/open the Internet browser on your PC and enter the following URL: http://192.168.000.211.
Register with the user11 admin and the password admin.
In the Network menu you can now enter the IP number you have selected. In order to adopt the settings you have to reboot the
power strip12.
Tip: Simply confirm your entered data by pressing the Return key – this will restart the IP PDU.
Once you have set the IP number you can reset your computer back to the original settings.
2.4
Step 4: the DynDNS13 service – dynamic DNS for the home
In order to be able to make use of the full functional scope of your new power strip wherever you are in the world and
whenever you want, you will either need a permanent IP-address for your network (the one that you use the IP PDU for) or a
service that simulates a ‘permanent’ IP-address. This is where DynDNS helps you. By having an account with this free-ofcharge service you will be given a domain name of your choice through which you will always have access to your network
(LAN). You need this service only in order to obtain a current IP-address for your network. If you have another option for
obtaining that address, you don’t need the DynDNS service. For more detailed information please refer to chapter 4.
You can start an account under http://dyndns.org from your LAN14. In order to register, you have to enter a user name, your
email address and a password (at least 5 characters, not the same as the user name).
Once you have registered successfully and logged in again select the service ( DNS-Service and then Dynamic DNS)
Press the button ‘Add dynamic DNS’ to add a new service.
Select a free host name and enter this into the respective field. The host name together with your domain name will later make
up the address for your router /network and hence for your IP PDU. An example for your host name could be your surname or
any other word such as:
Host name: johnsmith + domain: dyndns.org which together makes up the address johnsmith.dyndns.org.
This is your address which you can use to gain access to your router / IP PDU power strip from anywhere in the world.
2.5
Step 5: administration of the IP PDU
User administration
In addition to the administrator it is possible to enter two further users in the user administration. The default settings already
have three pre-defined users: admin, user1 and user2. The passwords in the default settings are identical with the user
names. You can choose a name and password for each user. In addition, access to the slave sockets can be limited by the
admin. For the passwords please use at least 5 and not more than 8 characters – avoiding special characters.
11
Username = a chosen name to distinguish different users
Reboot = restart (you don’t necessarily have to press the reboot button – you can also confirm your entry by pressing the Enter key).
13
DNS (Domain Name Service) – This service assignes a permanent name (domain name) to each IP-address.
14
It is important that you register for this service from your LAN, in which you are using the IP PDU, since the registration is also
connected with your current IP-address.
12
Bachmann IP_PDU_Hanbuch_en_REV02.doc
Seite 11 von 38
Erstelldatum 24.04.2007 13:25:00
Operation via the Internet
In the window (outlets) for the operation of the IP PDU power strip it is possible to switch each slave pair ON and OFF. IN
addition, the Pulse button can be used to switch the slave socket ON and OFF for a set time period. The switch status is
indicated on the website by the LEDs in exactly the same way as on the power strip.
The operation via the Internet works in exactly the same way as from your LAN.
In order to gain access to your IP PDU when you are travelling, you will need an Internet connection or a mobile phone with
WAP capability.
If you have an Internet connection, simply enter your DynDNS address followed by a colon and the port number.
(http://yourchosenname.dyndns.org:80). For detailed information please refer to chapter 3.
If you have a mobile phone with WAP capability, your WAP address will be made up of your DynDNS address followed by
/!wap.
http://yourchosenname.dyndns.org/!wap or without the DynDNS service http://IP-number/!wap.
Fig. 1: Operation via WAP
3
Starting the IP PDU
The IP PDU power strip makes it possible to switch electrical apparatus ON and OFF via a TCP/IP network. To start up the IP
PDU, simply connect it to an existing mains power supply and the required network.. Once the IP PDU has been assigned a free
IP-address by the router it is possible to control the two slave socket pairs individually from all computers of the same network,
using a web browser.
3.1
Unpacking and connecting
Open the packaging and carefully remove your new IP PDU power strip. Insert the shock-proof plug of the IP PDU strip into a
mains socket with an operating voltage of 230V or 110V.
The green Power LED should now light up. (If the LED does not light up, carefully remove the plug from the socket and contact
your supplier.)
In the next step take a standard patch cord or cable (Ethernet or other network cable) and connect one side to the network port
(4) provided on the unit and the other side to a free port on your router. As soon as you have made the connection between
your router and the IP PDU power strip, the two LEDs (5 + 6) will light up on the power strip. LED (6) is reserved for indicating
network traffic; it will only light up when data is exchanged between the router and the IP PDU.
Bachmann IP_PDU_Hanbuch_en_REV02.doc
Seite 12 von 38
Erstelldatum 24.04.2007 13:25:00
Fig. 2: LEDs on the IP PDU power strip
3.2
3.2.1
Functions
Master/slave function
The main unit connected to the master socket will automatically switch up to 4 devices (e.g. PC, monitor, printer, fax or
modem). This means that these devices don’t need to be switched individually. When the consumers are switched on, two red
LEDs light up for the two slave socket pairs and a yellow LED for the master. To adjust the master socket for the master
device to be connected (the main device) it is possible to adjust the switching threshold individually via a dial controller (3).
3.2.2
Separate switching in the LAN
In addition to the master/slave function in conventional power strips, the IP PDU features a new function which makes it
possible to switch several devices/consumers in the network ON and OFF (e.g. monitor, PC, modem, printer….). The IP PDU has
two switchable slave socket pairs, which are password-protected and can be switched from different users.
Bachmann IP_PDU_Hanbuch_en_REV02.doc
Seite 13 von 38
Erstelldatum 24.04.2007 13:25:00
3.2.3
Control via the Internet
By connecting the IP PDU to a switch or router, the ‘simple’ extension lead adapter becomes a multiple socket outlet which can
be used to switch devices in the home office ON and OFF via the Internet.
3.2.4
WAP15 – control via mobile phone
Today there is an increasing number of Internet connection access points yet unfortunately, when you desperately need it, you
are often too far away from the nearest access point. For this reason, the power strip was given an additional function – a
web server supporting WAP, which allows you to switch the power strip – and therefore all devices connected to it – ON or
OFF via your mobile phone, whether you are just stuck in a traffic jam or travelling on a train.
F
F
i
g
.
3
:
W
A
P – login – switching on or off
3.2.5
Safety first
In order to ensure that the settings of the power strip cannot be changed by just anybody, the device has access protection via
HTTP password for an administrator and two other users.
3.2.6
Power cut protection
If there is a power cut, the IP PDU will remember the last switching status of the connections and switches the consumers ON
accordingly as soon as the power is available again.
15
The Wireless Application Protocol (WAP
WAP) refers to a collection of technologies and protocols aimed at making Internet contents
WAP
available for the slower transfer rate and longer response times in mobile telephony as well as the smaller displays on mobile phone sets.
Bachmann IP_PDU_Hanbuch_en_REV02.doc
Seite 14 von 38
Erstelldatum 24.04.2007 13:25:00
3.3
Configuration
Configuration of the local area network (LAN16)
3.3.1
Changing the TCP/IP settings
For the configuration of the IP PDU you have to configure the network settings of one computer in your LAN so that you use
the same IP-address and the same sub-network as the IP PDU. The standard network setting (default setting) of the IP PDU is
as follows:
IP-address: 192.168.000.211
sub-network mask: 255.255.255.0
Note: These settings can be changed to suit the requirements of your network, but you have to configure at least one computer
as described in this chapter so that you can work with the web configuration interface of the IP PDU multiple socket outlet.
For information about configuring the IP PDU see section 3.3.3.
Important: If you have not yet configured the TCP/IP for your computer, please refer to the appropriate section of the user
manual for your router/switch.
The IP-address of the connected PC should be 192.168.000.x (whereby x represents a value between 2 and 254). You can
determine the IP-address for your PC either by automatically obtaining an IP-address from the DHCP service of your router or
by configuring it manually.
3.3.1.1
Under Windows 95/98/2000/Me
Changing network settings with permanent/dynamic (LAN) IP-address
The steps described below may not exactly match the steps necessary for your version of Windows. The reason is that these
steps and illustrations are based on a Windows 98SE version. Although the Windows 95 and Windows Millennium Edition are
both similar to this version they are not identical to it.
16
Lokal Area Network (LAN) = local network of computers
Bachmann IP_PDU_Hanbuch_en_REV02.doc
Seite 15 von 38
Erstelldatum 24.04.2007 13:25:00
1
Click on Start, then place the cursor on Settings in
Control panel and click on it.
2
In the control panel window double click on the
network symbol.
Fig. 4: Start – Win9x
3
In the Network window that opens up, click on the
Configuration tab and then double click on TCP/IP17
for the network card (Ethernet card) installed in your
computer and select it.
4
If you have several network cards installed, select the
card through which you want to reach the network.
5
This can be a card or a WLAN (radio) adapter.
Fig. 5: Control panel, network WIN9x
TCP/IP protocol
Network card
Fig. 6: TCP/IP configuration WIN9x
17
TCP/IP (TTransmission Control Protocol/IInternet Protocol) is an Internet protocol used for the transmission of data packages from one
computer to another via the Internet. It is the basis for network communication via the Internet.
Bachmann IP_PDU_Hanbuch_en_REV02.doc
Seite 16 von 38
Erstelldatum 24.04.2007 13:25:00
6
A window will appear (Information about TCP/IP
properties); confirm this by clicking on the OK
button.
Fig. 7: Information about TCP/IP
7
Select the IP-address tab.
8
In a standard installation the item Obtain IP-address
automatically should be highlighted (see Fig. ).
Highlight the item Define IP-address in order to
assign a permanent IP-address to your network card.
Fig. 8: Properties of TCP/IP Win 9x
Bachmann IP_PDU_Hanbuch_en_REV02.doc
Seite 17 von 38
Erstelldatum 24.04.2007 13:25:00
9
Select Define IP-address and in the field IP-address
enter the following IP number: 192.168.000.x
(whereby x stands for a number between 2 and 254).
Try using the number 192.168.000.150.
Please ascertain beforehand, which address range you
have allocated in your router for your other computers.
Please enter the number 255.255.255.0 into the field
Subnet mask.
10 Now click OK.
A window will appear with the message that your new
setting will not be effective until you restart your
computer.
11 Confirm this message by clicking OK.
Your computer will now be restarted.
Fig. 9: Properties TCP 9x with permanent IP
Reversing network settings
You will not need this section until later, after you have configured your IP PDU power strip.
In a few minutes, when you have configured your IP PDU and have made the network settings by highlighting the field USE
DHCP, you proceed similar to steps 8 and 9 in the previous section and reverse the highlighting of Define IP-address by
selecting Obtain IP-address automatically and confirming the change by pressing OK.
Bachmann IP_PDU_Hanbuch_en_REV02.doc
Seite 18 von 38
Erstelldatum 24.04.2007 13:25:00
3.3.1.2
Under Windows XP Home/Pro
Changing network settings with permanent/dynamic (LAN) IP-address
The steps described below may not exactly match the steps necessary for your version of Windows. The reason is that these
steps and illustrations are based on a Windows XP Home version SP1. Although the Windows XP Professional version is similar
to this one, it is not identical.
1 Click on Start and then select the item
Control panel.
2 Select
Network
and
Internet
connections and then click on Network
connections (see Fig. s).
3 Double click on the LAN connection which
connects you to your router and click on
Properties (s. Fig. .
Fig. 10: Start – Network connections
4 Highlight the Internet protocol (TCP/IP)
and in that window click on Properties.
5 If
the options ‘Obtain IP-address
automatically’ and ‘DNS Server Address’
are activated18, your computer is
configured.
Fig. 11: Properties LAN (TCP/IP)
18
(Place a dot in the circle.)
Bachmann IP_PDU_Hanbuch_en_REV02.doc
Seite 19 von 38
Erstelldatum 24.04.2007 13:25:00
6 Select the option Use the following IPaddress by clicking it and then enter a
free IP-address of your network into the
respective field. It is important that the
IP-address has the following format:
192.168.000.x (x represents a value
between
2
and
254,
e.g.
192.168.000.150.) and enter the
following numbers into the Subnet mask
field: 255.255.255.0. The other fields
should remain empty.
Fig. 12: Use the following IP-address
7 Click the OK button to confirm that all settings should be adopted.
Reversing network settings
You will not need this section until later, after you have configured your IP PDU power strip.
In a few minutes, when you have configured your IP PDU and have made the network settings by highlighting the field USE
DHCP, you proceed similar to steps 6 and 7 in the previous section and reverse the highlighting of Define IP-address by
selecting Obtain IP-address automatically and confirming the change by pressing OK.
Bachmann IP_PDU_Hanbuch_en_REV02.doc
Seite 20 von 38
Erstelldatum 24.04.2007 13:25:00
3.3.1.3
Apple Mac OS X19
Changing network settings with permanent/dynamic (LAN) IP-address
1 Open the Apple menu. Click on Network and
select System Properties.
2 Under Show: Network configuration select
Ethernet (integrated).
Fig. 13: Integrating Mac Ethernet
3 Next, select Manual in the TCP/IP tab under
Configuration in order to assign a permanent
IP-address.
4 For
example, enter the IP-address
192.168.000.150 and under Part Network
Mask 255.255.255.0.
Fig. 14: Mac – Ethernet manual
Note:
The IP address is a unique address for
each computer in the network, which is
only used by that computer. For example,
you want to assign the IP-address
192.168.000.150 to your computer.
5 All you have to do now is click on Activate Now.
Fig. 15: Mac – IP address
Reversing network settings
In order to reverse the network settings (for example when you want to obtain a dynamic IP-address from the DHCP service of
the router) you have to reverse the step described in section 3. To do that change the selection from Manual to Use DHCP
under Configuration in the TCP/IP tab.
19
Apple Macintosh (MAC) configuration
Bachmann IP_PDU_Hanbuch_en_REV02.doc
Seite 21 von 38
Erstelldatum 24.04.2007 13:25:00
3.3.2
Router configuration
In the following section, three different routers will be illustrated to show you which settings to perform so that you can
access your network from anywhere in the world via the power strip.
Fast facts
In order to reach your power strip via the Internet you require amongst other things the service from DynDNS (see chap. 4) and
correct port forwarding of the request from the Internet to your IP PDU.
Using Port Forwarding20, computers in a LAN (not directly accessible from an external network) will be capable of functioning
as server even outwith this network, i.e. in the Internet as the latter may be made clearly addressable via a defined port (and IP
masquerading).
In order to obtain access to your LAN via the Internet in the first place your router must update your DynDNS address (see
chap. 4) for every new connection. To do so you must notify your router of your newly created account data at DynDNS.org
and enter it in its configuration menu.
A router that is, for instance, connected to a private local network (LAN) and the Internet will hereby wait for data packets at
a specific port. When packets arrive at this port they will be forwarded to a specific computer and possibly another port in the
internal network. All data packets from this specific computer and port will, if they belong to an incoming connection, be
changed by NAT21 in such a way that in the external network it looks as if the router had sent the packets.
In the following steps you will be shown how and which settings must be performed in your router so that you can activate a
DynDNS service and also how you can enable a port for your power strip so that you can access your home office from
anywhere in the world.
20
21
Port Forwarding permits the forwarding – or also initiation of connections via freely selectable ports to computers within a network
NAT (Network Address Translation) is a procedure by means of which an IP address may be replaced by another in a data packet in
computer networks . This is frequently used to image private IP addresses to public IP addresses. If port numbers are also rewritten it is
called masquerading or PAT (Port Address Translation).
Bachmann IP_PDU_Hanbuch_en_REV02.doc
Seite 22 von 38
Erstelldatum 24.04.2007 13:25:00
3.3.2.1
AVM FritzBox
1 Open your Internet browser and enter the appropriate 22 IP
address in the address bar in order to access the
configuration menu of your router.
2 Click on the left menu column in the main menu at
Internet and then the sub menu item Dynamic DNS in
order to enter your DynDNS Account there.
Fig. 16: Fritz!Box – Menu - DynDNS
3 Click again on the Accept button to save the settings and
on the next router connection the new IP address will be
transmitted to the DynDNS service.
4 Then select the sub menu enable port23 in order to
specifically ‘direct’ external requests24 to your power strip
in LAN.
Fig. 17: Fritz!Box – DynDNS Entry
5 To enable a port please select the settings as they are to
be seen in Fig 21. Tick the box for Port enable active
for: HTTP server and in the IP address field enter the IP
address25 of your power strip
Save your settings by clicking Accept. A list of all ports
enabled will then be displayed
Fig. 18: Fritz!Box – Port enable
Fig. 19: Fritz!Box - Port enable (list)
22
If you have forgotten the IP address refer to your router manual or try out the standard gateway IP address of your network. It can be
found in ‘Network
Network settings’.
settings
23
see 20 Port forwarding.
24
“external requests” refers to when you wish to access your home office via the Internet and data packets are sent to your home office
router.
25
If you have assigned a fixed IP address to the power strip, please enter it here. If you have assigned a dynamic IP address via a DHCP
server please look at the DHCP menu of your router to check which IP address has been assigned to the power strip. Enter this address in
the corresponding field.
Bachmann IP_PDU_Hanbuch_en_REV02.doc
Seite 23 von 38
Erstelldatum 24.04.2007 13:25:00
3.3.2.2
D-Link DI-614+
1
Open your Internet browser and enter the
appropriate 26 IP address in the address bar in
order to access the configuration menu of your D
link router.
2
Click the Tools rider in top main menu line and
then in the DDNS column 27.
3
Should your router not have this entry please
ensure that the most recent Firmware is on your
router and update it as required.
Fig. 20: D Link – Tools - Firmware
Tip: It might be that your router already has an option
of making a DDNS entry under the Misc entry.
4
5
If you have the DDNS entry in the column of
your configuration menu, click on it and you will
see that you can enter your host name (from the
example: yourchosename.dyndns.org), your user
name and the password, as in Fig. 21
Very important: Select the server address
DynDNS.org in the pull-down menu and mark
the Enabled entry via the pull-down menu. Click
Apply to restart the router and accept the
settings.
Fig. 21: D-Link - Tools - DDNS
In the next step the aforementioned port
forwarding takes place. In the case of D link
routers this is performed via the menu option
Advanced28 and the sub menu Virtual Server29.
Fig. 22: D Link - Advanced – VirtualServer
In this entry mask you select a suitable name (e.g. IP PDU) for
this entry so that it will subsequently be immediately
recognisable in the list.
Enter the IP address of the IP PDU in the Private IP field. Set
the Protocol Type to TCP and enter the port number of your IP
PDU (see page 36 for more details) in the Private and Public
Port fields.
Fig. 23: D Link – VirtualServer (List)
26
If you have forgotten the IP address refer to your router manual or try out the standard gateway IP address of your network. It can be
found in „Network
Network settings“.
settings
27
DDNS (Dynamic DNS)
28
Advanced means that one can perform extended settings in this menu.
29
Virtual Server – here a virtual server assumes the function of distributing external data packet requests from the Internet to the
computers in the local network and forward these to the appropriate ports.
Bachmann IP_PDU_Hanbuch_en_REV02.doc
Seite 24 von 38
Erstelldatum 24.04.2007 13:25:00
3.3.2.3
Telekom T-Com Speedport W 501V
1 Open your Internet browser and enter the appropriate 30 IP
address in the address bar in order to access the
configuration menu of your Speedport W 501V router.
2 Click on Network in the left menu column under
Configuration and then in the middle of the window on
Dynamic DNS (see Fig. 24: T-Com – Configuration menuIn
Fig. 25: T-Com - DynDNSthe opening window is displayed.
Mark the On option field in the top part of the window
(Dynamic DNS).
Fig. 24: T-Com – Configuration menu
3 Select the dyndns.org address in the pull-down menu
(Provider selection).
4 Please enter your DynDNS service host name (in our example
Yourchosen name.dyndns.org) in the (Domain name) field,
and below your user name in the (Username) field and lastly
your password. Now click the Save button to store all
entries.
5 Click on Network again in the left menu column to redisplay
Fig. 24: T-Com – Configuration menu Then click there to
select the NAT&Portrules entry (see Fig. 27: T-Com –
Config – NAT & Port).
Fig. 25: T-Com - DynDNS
6 Click on NAT settings and in the opening window On
(operating status) must be set – if it isn’t, click on it to
switch it on (see Fig. 28: T-Com – Config – NAT).
7 Mark the option field (On) in (standard server use) and enter
the IP address of your IP PDU power strip in the field
provided.
8 N
o
w
Fig. 26: T-Com – DynDNS – Entry
Fig. 27: T-Com – Config – NAT & Port
click the Save button to accept all settings.
9 You can now close the browser window.
30
see footnote 25
Bachmann IP_PDU_Hanbuch_en_REV02.doc
Seite 25 von 38
Erstelldatum 24.04.2007 13:25:00
Configuration and Administration31 of IP PDU
3.3.3
Fig. 29: T-Com – Config – NAT & Port2
Fig. 28: T-Com – Config – NAT
The IP PDU power strip is operated very easily and intuitively via the web browser. To do so please open your browser32 and
enter the following IP address (number) - 192.168.000.211 in the address bar. After a few moments the start page of the IP
PDU will open for logging in with user name and password. You must log in as administrator (admin) in order to perform all
settings. As user name enter: admin and as password admin.
IP PDU configuration
The top menu bar of the IP PDU configuration menu is divided up as follows.
Outlets
Network
User
Update
Logout
In the configuration menu the following properties, which we will now run through step-by-step, may be specified for the IP
PDU:
3.3.3.1
Network settings (Network33)
All important IP Settings are performed under this menu.
Device name34
A name (max. 15 characters) can be assigned here. The IP PDU logs into the DHCP server with this name.
Use DHCP
Click the Use DHCP box to automatically assign a IP address from the DHCP server (router) when the power strip is rebooted
the next time. When the function is activated on rebooting a check is run on whether a DHCP server is featured in the network
and the IP settings will be requested from it.
In the event that no DHCP-Server is featured in the network, it is recommended that this option be deactivated.
IP address
If you wish to assign the IP PDU a permanent IP address, please enter it in the (IP address) field. The IP address
192.168.000.211 is assigned and entered for the power strip at the factory .
31
Operation / Administration / Control
e.g. Internet Explorer, Firefox
33
Here the IP PDU IP settings can be changed manually.
34
Device name (IP PDU – Office HH)
32
Bachmann IP_PDU_Hanbuch_en_REV02.doc
Seite 26 von 38
Erstelldatum 24.04.2007 13:25:00
Netmask
If you wish to use another sub netmask you can enter it in this
field.
Gateway
If you have selected the Use DHCP option you can disregard this
field. If, however, you have assigned the IP PDU power strip a
permanent IP address, you must enter your gateway IP address
there (see router settings) to assure that the IP PDU may be
accessed via Internet.
Fig. 30: IP PDU - Network
Port
If necessary the port number of the internal HTTP web server may be set here. Values from 1 to 65534 (HTTP-Standard: Port
80) are possible. Should the value have been changed the IP PDU may be restarted by clicking the reboot button. The new port
number e.g. Port 1080 is now attached to the address of the IP PDU (e.g. http: //192.168.000.211:1080/).
Auto logout time (s)
Here you can specify the remaining time in seconds before automatic logout of the configuration menu happens.
3.3.3.2
User administration (User)
The password access protection may be optionally activated or
changed. In this case a user and admin access password must
be assigned / changed. Passwords must be a minimum of 5 and
a maximum of 8 characters long. Special characters are not
allowed. An administrator35 can switch all ports as well as
change all IP PDU and individual port settings.
The administrator’s user name is admin. The user names of the
user are user1 and user2. As a standard, the passwords of the
administrator and user are the same as their user names.
A user can control the slave outlet pair enabled to him but is not
Fig. 31: IP PDU - User
authorised to change other IP PDU settings. As administrator
you can enable one slave outlet pair, both outlet pairs or none for the users (user1 and user2) via the Allowed Outlets option
fields (see Fig. 31: IP PDU - User).
To select a user and, for example, assign them a new password, the corresponding user may be selected from the pull-down
menu (Select) and then assigned the new password. The new password must be retyped in the (Confirm) field to avoid typing
errors.
3.3.3.3
Operation via LAN and INTERNET (Outlets)
The power strip is illustrated underneath this menu option. In addition to switching on and off, time-controlled switching may
be set. This is performed using the pulse function.
3.3.3.4
Firmware update
If necessary your IP PDU firmware may be updated under the Update menu option. This subject is dealt with in ch. 6.2
Updating.
35
Admin
Bachmann IP_PDU_Hanbuch_en_REV02.doc
Seite 27 von 38
Erstelldatum 24.04.2007 13:25:00
3.3.3.5
Works settings reset
Set as follows:
Switch on the master and turn the controller slowly until the switch point is reached and the master display (7) extinguishes
(see Fig). Now turn a little in the opposite direction so that the master display (7) lights up again. Please now test function
several times. If the master display now always lights up when the consumer is switched on the master socket outlet, setting
is completed.
Works setting reset
To reset all settings the reset button must be activated until displays 7, 8 and 9 light up together and go back out again.
The power strip works settings are as follows:
3.3.4
IP number
:
192.168.000.211
Gateway
:
192.168.000.254
Netmask
:
255.255.255.000 (class C network)
Login
:
admin
Password
:
admin
Administration36 of IP PDU power strip via WAP
Fig. 32: WAP – call ‘n’ switch
IP PDU operation via WAP – by mobile phone
Use your mobile phone to call the IP address of your IP PDU with the following extender: http://Ip-Number/!wap or
http://yourchosenname.dyndns.org/!wap
You can now log into your mobile phone as usual and switch every socket outlet.
36
Operation / Administration / Control
Bachmann IP_PDU_Hanbuch_en_REV02.doc
Seite 28 von 38
Erstelldatum 24.04.2007 13:25:00
»NC« leaves the socket outlet in its current condition,
at »On« it is switched on and
at »Off« switched off.
Note:
To use this function you must ensure that your power
strip is assigned an official IP number or that your DSL
router is assigned an unambiguous name via the Dynamic
Name Service (DynDNS) and that requests at port 80
(selectable) are forwarded to your power strip.
Operation via the command line
The power strip can also be controlled via a command
line programme. The following commands are available
for this purpose(httpget.exe is optionally available in the
Internet).
Fig. 33: WAP – command line
Commands:
usage:
http://ip/sw?u=user&p=passwd&o=n&f=func
or:
http://ip/sw?s=0
ip:
ipaddress
user:
username
passwd:
password
n:
outlet number to switch
func: on
off
pulse
toggle
?s=0
read status
Bachmann IP_PDU_Hanbuch_en_REV02.doc
Seite 29 von 38
Erstelldatum 24.04.2007 13:25:00
4
Dynamic Domain Name Services (DynDNS)
To ensure that the IP PDU or your router is always available in the „Home Office“ – after all, the IP address of your routers
changes at least once a day – free services such as DynDNS or No-IP are available.
With an account with DynDNS
http://yourchosenname.dyndns.org.
your
router
is
always
available
at
a
DynDNS
address
such
as
DynDNS37 is a free Internet service that allows the set up of a permanent host name as pseudonym for a dynamically changing
IP address. This ensures that a computer can always be addressed by the same domain name.
Prerequisites:
To use DynDNS options extensively you need a xDSL connection with an ISP38 at best with a flat rate39 and a router that links
your „Home Office“ (LAN) with the Internet.
No liability is accepted by us or function guarantee furnished for this manual intended to assist the user.
To open an account you must go to the DynDNS start page. http://www.dyndns.org/. Click Sign Up Now at the top right.
Fig. 34: dyndns.org start page
37
Dynamic Domain Name Service
ISP – Internet Service Provider e.g. T-Online, AOL, 1&1, Gmx
39
see footnote 5
38
Bachmann IP_PDU_Hanbuch_en_REV02.doc
Seite 30 von 38
Erstelldatum 24.04.2007 13:25:00
Fig. 35: DynDNS Sign Up Now
In the next step the Create Account page is displayed whereby you must first accept the terms of usage by marking them in
the Fig 40 highlighted box.
Fig. 36: Terms of usage
Bachmann IP_PDU_Hanbuch_en_REV02.doc
Seite 31 von 38
Erstelldatum 24.04.2007 13:25:00
Then assign a user name. This is not yet the domain name, which will be assigned later on. Now enter your email address and a
password (min. 5 characters) chosen by you that is different to the user name and then click Create Account.
xxxxxxxxxxxxxxxx
xxxxxxxxxxxxxxxx
xxxxxxxxxxxxxxxx
Fig. 37: Create user name and password
Assuming this user name is not yet assigned the following message should be displayed.
Fig. 38: Account Created
You will then receive an email with the appropriate activation link at the email address you specified. After clicking the link you
will be led automatically to the DynDNS.org homepage. The page that is then displayed should look like the one illustrated
below and it should contain the following message:
Bachmann IP_PDU_Hanbuch_en_REV02.doc
Seite 32 von 38
Erstelldatum 24.04.2007 13:25:00
Fig. 39: Account Confirmed
Click on the underlined word login to complete registration and log in.
You can then always log in subsequently with the user name used for registration (in our example Bachmann) and the password
you chose yourself.
Fig. 40: Login
Once you have logged in, the page should look approximately like the one below.
Fig. 41: Logged In
Bachmann IP_PDU_Hanbuch_en_REV02.doc
Seite 33 von 38
Erstelldatum 24.04.2007 13:25:00
Now click the Services tab.
Then select Dynamic DNS and afterwards Add Dynamic DNS.
1
2
3
Fig. 42: Dynamic DNS Service
You can now assign a host name. In our example we use the host name Yourchosenname.
Later on, the host name, together with the domain, will form the address for your router and thus for the IP PDU, i.e. choose
your last name for the host name or another word, for instance host name: lastname + domain: dyndns.org; and in turn, the
address lastname.dyndns.org. This is your address from which you now have worldwide access to your router or IP PDU
power strip.
Tip: It is best if you stay with the dyndns.org domain as there are routers that only accept this domain.
Your current IP address should now be displayed in the IP address window. Here we will use Yourchosenname.dyndns.org as
host name. In the next step add dyndns.org from the right pull-down menu. You don’t need to enter anything in the other entry
fields.
Fig. 43: New Dynamic DNS Host
Bachmann IP_PDU_Hanbuch_en_REV02.doc
Seite 34 von 38
Erstelldatum 24.04.2007 13:25:00
Once you have clicked Add Host the page should refresh and take the following form:
Fig. 44: Hostname Created
Your router or IP PDU will now be available in future at this address (host) – as chosen by you. As the IP address changes at
least once a day – as initially explained - the DynDNS must receive a signal from the computer/router several times a day when
the IP changes. This is possible nowadays with practically all new routers. To this end you must search for a DDNS entry in
your router configuration menu and enter your DynDNS access data there. Should your router not support DDNS it is not a
problem as instead you can use an appropriate client40 that informs the DynDNS at specific intervals of your current IP address.
In chapter 3.3.2 (page 22) you can find a few examples of how you should proceed when configuring your router and what you
should observe in the process.
Router configuration for DynDNS service
1. Step:
In order to link the local network (LAN) with the Internet (WAN41) the DynDNS data/host name must be entered in your router.
This is performed via your router’s configuration menu.
Most routers are configured via a browser. Please refer to your router user manual on how to configure your router.
2. Step:
Look for DDNS in the configuration menu42. Enter your host name (Host+Domain), user name and password chosen by you
there.
No responsibility is accepted for external content!
© 1992-2006 All rights reserved. In its judgement of May12, 1998 - 312 O 85/98 - "Liability for links" Hamburg regional
court ruled that those incorporating a link are also co-responsible for the contents of the linked site. This may – according
to the regional court - only be prevented in that liability for these contents is expressly disclaimed. We hereby expressly
disclaim any responsibility for all contents of all linked sites in our forums.
40
A client is available for downloading on the DynDNS Internet site. A client is a small program that must be installed on your computer
insofar as your router does not support DDNS so that your current IP address may be communicated to the DynDNS service.
41
WAN (Wide Area Network) is frequently used colloquially as a synonym for Internet
42
Dynamic DNS = Dynamic Administration of Domain Names
Bachmann IP_PDU_Hanbuch_en_REV02.doc
Seite 35 von 38
Erstelldatum 24.04.2007 13:25:00
5
Examples of IP PDU applications
▪
Jointly used printer
A printer in a home or company network used by several persons and rooms may be switched on and off without leaving one’s
workplace.
▪
‘Restarting’ servers located a distance away
A server that is possibly even located in another country may be remotely restarted.
▪
Switching IP PDU via Internet
Devices outside Intranet may be switched with the help of port forwarding or a permanent IP address.
▪
All telecommunication devices may be centrally reset
Banish NTBA, stations for mobile components, ISDN telephone systems, router, etc. to the cellar, connected by a plug
connector to the IP PDU. In event of problems two, three clicks of the mouse are all that is required to reboot all devices at the
same time.
5.1
Tips & Tricks
Office PC settings
At 1.5 watts the power strip power consumption is a real energy saver, so its use can save a considerable amount in a year.
Many users will now wonder how the PC starts up just by switching on the power strip. The answer is quite simple and the
device works with practically every PC.
To ensure that the PC starts up once the power strip is switched on, the "AC BACK Function" or "Restore on AC Power loss"
in your computer’s BIOS43 must be set to "Full On" or "Always On".
BIOS may be accessed once your PC is booted by pressing either the Entf key, Del key or F2 key depending on the main board
manufacturer.
This function may be found on most BIOS manufacturers in the main category/ PowerManagement function.
Only the correct BIOS setting can also ensure that the PC
does really start when the mains voltage is switched on.
Once this setting has been performed successfully in your
BIOS, your PC may be started as if by an invisible hand by
simply switching on the power strip.
Fig. 45: BIOS –AC BACK Function
43
Basic Input Output System (BIOS)
Bachmann IP_PDU_Hanbuch_en_REV02.doc
Seite 36 von 38
Erstelldatum 24.04.2007 13:25:00
6
6.1
Information, Updating & Support
Technical data
Weight
Power input
Voltage
Network connection
Connection type*
Master outlet
Slave outlet per pair
Maximum total power
Switching type
Switch functions
Approval
:
:
:
:
:
:
:
:
:
:
:
1.5 kg
1.5 VA
85-250 V AC
10 Mbit RJ 45
Depending on version incl. 1.5 m connection lead
max. 16 amps
max. 8 amps
16 amps
single pole
WEB, WAP
CE
*Connection type differs according to the version:
On the outputs, a load of 8 amps each is possible for two slave outlets or 920 watts per socket. This should suffice for almost
all applications. The master outlet itself is designed for up to 16A for an output of 3680 W (3.6KW).
MODEL
Article designation
Version
Description
IP PDU
Office Model
Grounding outlet - 250V 10A DIN 41494, DIN 57620, VDE
0629
Countries: Germany, Austria, Finland, (Italy), Netherlands,
Luxembourg, Sweden, Norway, Spain, Portugal, Turkey
IP PDU-1
Office Model
Swiss Standard 250V 10 A SEV
Country: Switzerland
IP PDU-2
Office Model
UTE 250 V 10A NFC 61-303
Countries: France, Belgium
IP PDU-3
Office Model
English Standard 250 V 10A
Country: United Kingdom
Bachmann IP_PDU_Hanbuch_en_REV02.doc
Seite 37 von 38
Erstelldatum 24.04.2007 13:25:00
6.2
Updating
If necessary your IP PDU firmware may be updated under
the Update menu option.
The firmware is part of the program in your IP PDU
power strip in which the entire functions of the built-in
web server are saved. You have bought a up to date
product. Nevertheless the firmware may have to be
adjusted at some point to new circumstances. You will
find these new programs in the Internet.
Fig. 46: IP PDU - Firmware Update
At http://www.bachmann.com you will find a link on the
start page under the Products – Downloads menu
option. Immediately afterwards a safety indication is
displayed which you must acknowledge with a Yes. The
next window to open contains drivers for various devices
under Updates. Please select IP PDU.
Download the file(s) and save this software on your
computer
Fig. 47: IP PDU – Firmware Update 2
Remember or note down the settings of your IP PDU
before performing a Firmware Update44.
Click the Update menu option in the opened
configuration menu and then on the Search button.
Select the directory and file in which you have stored
the downloaded file in the ‘explorer-like’ window.
Double click on the file and the entire path to this file will
be displayed in the field opposite search.
Fig. 48: IP PDU – Firmware Update 3
Click on the Press button to start the procedure.
Fig. 49: Firmware Update
6.3
Support/Technical support
Updated versions of software and the user’s manual may be found on the Bachmann GmbH & Co. KG web site
www.bachmann.com
Our customers can request technical support by email: [email protected] or telephone (+49 711 86602-0).
44
Update firmware.
Bachmann IP_PDU_Hanbuch_en_REV02.doc
Seite 38 von 38
Erstelldatum 24.04.2007 13:25:00