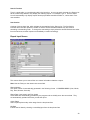
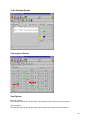
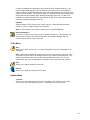
1
Dodge Market Leader
for Windows 95 and NT
User Manual
Dodge Market Leader™ is a product of The McGraw-Hill Companies, Inc.
Unauthorized use of this system is strictly prohibited.
© 1995-2000 The McGraw-Hill Companies, Inc.
All Right Reserved
Table of Contents
Welcome ...........................................................................................................................1
Conventions .....................................................................................................................1
A note to Windows™ users................................................................................................2
Installation........................................................................................................................3
Hardware Requirements....................................................................................................3
License Control.................................................................................................................3
Local Installation ...............................................................................................................3
Server Installation.............................................................................................................6
Upgrade Installation..........................................................................................................8
Uninstall ...........................................................................................................................8
Getting to Know Market Leader..................................................................................9
Main Screen.....................................................................................................................9
Menu Bar .........................................................................................................................9
Feature Bar ......................................................................................................................9
Status Bar ...................................................................................................................... 10
Tool Box......................................................................................................................... 10
Commands..................................................................................................................... 11
Crystal Reports™ ........................................................................................................... 12
Dial Up Feature .............................................................................................................14
Overview........................................................................................................................ 14
Getting Started ............................................................................................................... 14
Commands..................................................................................................................... 14
How to set up accounts ................................................................................................... 15
How to dial accounts....................................................................................................... 17
Report Manager Feature.............................................................................................18
Overview........................................................................................................................ 18
Getting Started ............................................................................................................... 18
Commands..................................................................................................................... 22
Importing........................................................................................................................ 25
Exporting........................................................................................................................ 28
Mail merging................................................................................................................... 29
Sorting ........................................................................................................................... 30
Tracking leads ................................................................................................................ 31
Searching....................................................................................................................... 33
Viewing selected reports ................................................................................................. 37
User Report Input ........................................................................................................... 38
Calendar Feature..........................................................................................................45
Overview........................................................................................................................ 45
Getting Started ............................................................................................................... 45
Commands..................................................................................................................... 47
Viewing selected reports ................................................................................................. 49
How to add a To Do note................................................................................................. 49
Contact Manager Feature...........................................................................................50
Overview........................................................................................................................ 50
Getting Started ............................................................................................................... 50
Commands..................................................................................................................... 52
Mail merging................................................................................................................... 54
Viewing selected contacts ............................................................................................... 56
How to edit groups .......................................................................................................... 57
Direct Mailer Feature ...................................................................................................59
Overview........................................................................................................................ 59
Getting Started ............................................................................................................... 59
Commands..................................................................................................................... 60
Mail merging................................................................................................................... 63
How to type a document .................................................................................................. 64
How to edit a document ................................................................................................... 65
How to use the header and footer .................................................................................... 65
How to spellcheck your document .................................................................................... 65
How to use dictionaries ................................................................................................... 66
Quick Quoter Feature..................................................................................................67
Overview........................................................................................................................ 67
Getting Started ............................................................................................................... 67
Commands..................................................................................................................... 68
Administration Utility ..................................................................................................71
Overview........................................................................................................................ 71
Getting Started ............................................................................................................... 71
Privileges ....................................................................................................................... 72
Maintenance Utility ......................................................................................................73
Overview........................................................................................................................ 73
Getting Started ............................................................................................................... 73
Functions ....................................................................................................................... 74
Maintenance Options ...................................................................................................... 74
Who’s There Utility.......................................................................................................75
Overview........................................................................................................................ 75
Getting Started ............................................................................................................... 75
Functions ....................................................................................................................... 75
Magic Number Utility ...................................................................................................76
Overview........................................................................................................................ 76
Getting Started ............................................................................................................... 76
How to register your software........................................................................................... 76
Appendix ........................................................................................................................77
Index ................................................................................................................................97
Welcome
What is Dodge Market Leader for Windows 95 and NT?
Dodge Market Leader for Windows 95 and NT (hereafter Market Leader) combines powerful, easy-to-use
features to leverage your Dodge investment. With frequent use, Market Leader will help you plan,
execute, and manage sales, bidding, and quoting processes more efficiently than ever.
Your information management system...
Market Leader automates your sales force. It allows you to download and import reports directly from
your Dodge service (e.g. DataLine), exchange them with other Market Leader users, sort, filter, and
search for reports, track leads, and assign follow up tasks – usually with a few keystrokes or mouse
clicks. Intuitive icons speed you through business development tasks, and sophisticated tracking
functions keep you poised for action when you see a job you want.
Your dedicated personal assistant...
The Contact Manager provides you with a system that not only organizes your potential clients but
dynamically links them to their specific projects. The Calendar, comprised of the Bid Calendar and the To
Do Calendar, ensures that you never miss an appointment or bid opportunity again, since the all lists are
updated automatically when you import reports.
Your business forms and estimating database...
Mail merging of form letters and mailing labels is available throughout the main features of Market
Leader. The Direct Mailer provides robust word-processing capabilities and the Quick Quoter provides
familiar spreadsheet capabilities. All these features together help you deliver bids, estimates, and critical
correspondence quickly and intelligently so you can devote more time to building business.
Market Leader. One smart tool for building business.
Conventions
This user manual uses the following conventions:
Commands
For easy recognition, command names from the tool box and menu bar are displayed in small caps. For
example: IMPORT command, EDIT C ONTACT command, etc.
Dialog Box Elements
Buttons, lists, and other dialog box elements are displayed in italics, For example: Print Preview
checkbox, OK button, etc.
Shortcut Keys
Shortcut keys are pre-programmed keys or combinations of keys (usually beginning with either <Ctrl> or
<Alt> and ending with a letter or number on the keyboard) that enable you to execute a command
without using the tool box or menu bar. Examples of commonly used shortcut keys are <Ctrl>+C for
COPY and <Ctrl>+V for PASTE. To use a shortcut key, press and hold the bracketed keys and the letter or
number following the "+" sign at the same time. The available shortcut keys can be found next to the
command names in the menu bar for each key feature in Market Leader.
1
A note to Windows™ users
Market Leader is easy to install and use, but it does assume a certain level of proficiency on your part,
particularly with Windows™ and the DOS operating system. If you are not familiar with Windows or DOS
or if you need to review the basic terminology and procedures, please refer to your Microsoft Windows
User’s Guide or your PC owner’s manual.
2
Installation
Please make sure that all Windows and TSR applications are closed before installing Market Leader.
You do not need to create a new directory prior to installation – the installation program will do this for
you.
Hardware Requirements
This product can be installed and is supported on Microsoft 95/98/NT/2000.
Minimum configuration:
Pentium 75mhz, 100mhz or higher recommended
16 MB RAM, 32 MB or more recommended
30 MB or more of available disk space
SVGA monitor that is capable of displaying 256 colors simultaneously
Modem that is capable of 14400 BPS or better
Additional recommendations:
Resolution should be set to 800x600
Font Size should be set to Small Fonts (Control Panel > Display icon > Settings tab)
Regional Settings should be set to English (United States) (Control Panel > Regional Settings icon >
Regional Settings tab)
To open the Control Panel, from the Windows taskbar click Start/Settings/Control Panel.
License Control
A license control mechanism has been developed to allow Dodge to control licenses. Market Leader
installs with a temporary license allowing 5 hours of use, during which you have full use of the program.
Prior to expiration, you must register with Technical Support to convert your temporary license to a
permanent license allowing unlimited use. If the temporary license expires, Market Leader will not work.
The word DEMO appears on the splash screen, the About dialog box, and title bar if the user has a
temporary license.
The license control mechanism is controlled through the use of a “magic number”. See Magic Number
Utility on page 76 for more information on how to register your software.
Local Installation
1.
Close all programs that you currently have open.
2.
Insert the Market Leader CD into your CD drive. The CD menu program will open in a few moments
if your PC is configured to play CDs automatically.
3
3.
If the CD menu program does not open after a few moments, open the Run dialog box from the
Windows taskbar and type or browse for the file dodge.exe on the CD. Then, click the OK button to
open the CD menu program.
4.
Click the Install Market Leader option to open the actual installation program.
5.
Once the installation program is opened, the following dialog box will open.
6.
Select the Local Installation option and click the OK button.
7.
The Welcome dialog box will appear, with a default installation directory chosen. If you have a
previous version of Market Leader already installed, then the installation program will choose that
directory. To choose a different directory, click the Browse button and a dialog box will open,
allowing you to select another destination.
4
8.
Click the Next > button to start the installation.
9.
The Backup Replaced Files dialog box will appear, with the default option being Yes. It is
recommended that you do not change this setting. Click the Next > button to continue.
10. The Select Backup Directory dialog box will appear, with a default backup directory chosen. It is
recommended that you do not change this directory. Click the Next > button to continue.
11. The Ready to Install dialog box will appear. Click the Next > button to continue, or the Cancel button
to abandon the installation.
12. The Installing dialog box will appear, showing the progress of the installation. At this point, there is
nothing for you to do but monitor the installation until the first Iinstallation Complete dialog box
appears. When it does, click the OK button to close it.
13. The second Installation Completed dialog box will appear. Click the Exit button to close the
installation program. The Market Leader program and release notes will both be opened
automatically. However, Windows may require you to reboot the system to allow changes to take
effect before you can begin using Market Leader.
5
14. The CD menu program will still be open, so click Exit to close it. If it is not visible, then first click on
F.W. Dodge Setup on the Windows taskbar to make it visible.
Server Installation
If you have multiple users who will be installing Market Leader, you can copy the setup files to a common
server on your LAN. Then, all the users can install Market Leader from there rather than from a CD.
Once the setup files are installed to a server, instruct each user to run the installation program (setup.exe)
from that location, and to follow the Local Installation steps – beginning with step 5.
1.
Close all programs that you currently have open.
2.
Insert the Market Leader CD into your CD drive. The CD menu program will open in a few moments
if your PC is configured to play CDs automatically.
6
3.
If the CD menu program does not open after a few moments, open the Run dialog box from the
Windows taskbar and type or browse for the file dodge.exe on the CD. Then, click the OK button to
open the CD menu program.
4.
Click the Install Market Leader option to open the actual installation program.
5.
Once the installation program is opened, the following dialog box will open.
6.
Select the Copy Setup files to Server option and click the OK button.
7.
The Welcome dialog box will appear, with a default installation directory chosen. The default
installation directory will be the root directory on first network drive you have mapped. To choose a
different directory, click the Browse button and a dialog box will open, allowing you to select another
destination. Be sure to select a directory on a network drive.
8.
Click the Next > button to start the installation.
9.
The Ready to Install dialog box will appear. Click the Next > button to continue, or the Cancel button
to abandon the installation.
10. The Installing dialog box will appear, showing the progress of the installation. At this point, there is
nothing for you to do but monitor the installation until the Setup Complete dialog box appears. When
it does, click the OK button to close the installation program.
7
11. The CD menu program will still be open, so click Exit to close it. If it is not visible, then first click on
F.W. Dodge Setup on the Windows taskbar to make it visible.
Upgrade Installation
An upgrade installation requires that you have a previously installed version of Market Leader on your PC
because it will only install files that have changed in this version.
Automatic Upgrade
When Market Leader starts up, it looks in the download directory (as specified in the Dial Up feature) for
an upgrade file. If it finds one, you are prompted to decide whether to run it right then. If you choose yes,
then Market Leader shuts itself down and runs the upgrade. The installation program re-starts Market
Leader upon completion. When Market Leader re-starts, the upgrade file is renamed so that it is not found
again.
For more information, follow the steps for a Local Installation – beginning with step 5.
From CD
Follow the steps for a Local Installation, however click the Install Market Leader Upgrade option from
the CD menu program instead.
Other
If you acquired an upgrade file via email or from our web site for example, then can run it manually.
1.
Open the Run dialog box from the Windows taskbar and type or browse for the upgrade file on your
PC. Then, click the OK button to open the installation program.
2.
Follow the Local Installation steps – beginning with step 5.
Uninstall
If you need to uninstall the program, from the Windows taskbar click Start/Programs/Dodge Market
Leader for Windows 95 and NT/Uninstall, and follow the instructions of the Uninstall Wizard.
8
Getting to Know Market Leader
Main Screen
Menu Bar
The menu bar is the thin horizontal bar that appears above the feature bar on every feature screen. Each
of the key features in Market Leader have their own menu bar which contains all the commands in the
feature. To use any of these commands, simply select the appropriate menu choice by pointing and
clicking with your mouse.
Note: The Help menu is same throughout the program. That is, even though the menu bar commands
differ between features, the Help menu is always present and always the same in all features.
Feature Bar
The feature bar is the thick horizontal bar that appears at the top of every feature screen. It contains
buttons for each of the key features in Market Leader: Dial Up, Report Manager, Calendar, Contact
Manager, Direct Mailer and Quick Quoter. There are also buttons for DataLine For Windows and Help.
To access any of these features from anywhere in the program, simply click the appropriate button.
Note: All of the features can also be chosen from the menu bar.
9
Status Bar
The status bar is the thin horizontal bar that appears at the bottom of some of the feature screens. The
status bar elements differ and serve different purposes, depending in the feature, such as providing
status messages and access to screen functions.
Tool Box
The tool box is the thick bar that you can dock (position) on the top, bottom, right or left of the screen.
Several of the key features in Market Leader have their own tool box which contain buttons for the key
commands in the feature. To use any of these commands, simply click the appropriate button.
Note: All of the commands in a feature can also be chosen from the menu bar.
How to customize the tool box
In most cases of Market Leader’s features you can customize the tool box.
From the Options menu, select Tool Box and then select Customize. The following dialog box will
appear.
The commands currently available on the tool box are in the Tool Box Buttons list. The commands still
available for the tool box are in the Available Buttons list.
To add a command, select it in the Available Buttons list, then click where you want it to be positioned in
the tool box. Click the Add >> button and the command will be removed from the Available Buttons list
and inserted into the Tool Box Buttons list.
10
To remove a command from the tool box, select it in the Tool Box Buttons list. Click the Remove <<
button and the command will be removed from the Tool Box Buttons list and inserted into the Available
Buttons list.
To add a spacer in between the buttons, select the “>” in the Available Buttons list, then click where you
want it to be positioned in the tool box. Click the Add >> button and a spacer will be inserted into the Tool
Box Buttons list.
Use the Move Up and Move Down buttons to adjust the order of the fields in the Tool Box Buttons list.
Click the Default button and the you are returned to the main screen, with the tool box reset to the default
configuration.
Click the OK button and the you are returned to the main screen, with the tool box customized
accordingly.
Commands
File Menu
DATABASE L OCATION…
Opens a standard Windows file dialog box, which lets you choose an existing database to open.
The opened, or current, database is always displayed in the status bar and in the About dialog
box.
Note: By default, on startup Market Leader always opens the previous database. The first time
you open Market Leader, a default database is created and opened for you. If for some reason
the previous database cannot be opened, you will be automatically prompted to choose another
database.
CHANGE PASSWORD…
Opens a dialog box, which allows you to change your password.
Note: This command is only available when using a shared database.
EXIT DODGE MARKET L EADER
Exits the program.
Features Menu
DIAL UP
Closes the current feature, if any, and opens the Dial Up feature.
R EPORT MANAGER
Closes the current feature, if any, and opens the Report Manager feature.
CALENDAR
Closes the current feature, if any, and opens the Calendar feature.
CONTACT MANAGER
Closes the current feature, if any, and opens the Contact Manager feature.
DIRECT MAILER
Closes the current feature, if any, and opens the Direct Mailer feature.
11
QUICK Q UOTER
Closes the current feature, if any, and opens the Quick Quoter feature.
DATALINE FOR W INDOWS
Close Market Leader and opens DataLine for Windows.
Note: Market Leader assumes that DataLine for Windows is installed to c:\DataLine. If not, then
a standard Windows file dialog box is opened, which allows you to locate it.
Options Menu
PERSONALIZE CAPTION…
Opens a dialog box, which prompts you for a caption to place in the Market Leader title bar. For
example, enter your company name.
TO DO R EMINDER…
Opens a dialog box, which allows you to configure the To Do Reminder. Choices include
Everytime I start the program, Once a day and Never.
Note: By default, on startup Market Leader will check for To Do notes scheduled for that day. If
any are found then a dialog box opens, which allows you to review and print them.
SHOW F EATURE BAR
When checked, this command displays the feature bar. When not checked, the feature bar is not
visible and you must use the Feature menu to switch between the features.
Help Menu
CONTENTS…
Opens the Market Leader help file at the table of contents.
SEARCH FOR H ELP ON…
Opens the Market Leader help file at the index tab so you can search for a specific topic or word.
SHOW H ELP TIPS
When checked, this command displays help tips when you move the mouse over commands on
the tool box.
ABOUT D ODGE MARKET L EADER…
Opens a dialog box, which contains various pieces of information such as the version number,
legal and copyright notices, the current database in use and the word DEMO if the user has a
temporary license. Click the System Info button to open another dialog box with extensive
technical information about your PC.
Crystal Reports™
Most of the printing in Market Leader is accomplished through the use of a third party tool called Crystal
Reports. All report and contact printing, as well as mailing labels, is done using pre-defined Crystal
Report files that are distributed with Market Leader.
Market Leader includes 6 basic reports and 16 mailing label reports. In addition, there are text only
versions of these of these reports, i.e. no graphical elements, suitable for a dot matrix printer.
Here is a brief description of each of the basic reports:
12
Full Report – Full page format, contains all the information about each report.
Report List – Compact list format, contains a few key pieces of information about each report.
Bid Report List – Compact list format, contains a few key pieces of information about each bidding report.
To Do Report – Compact list format, contains all the information about each To Do note.
Contact List – Compact list format, contains a few key pieces of information about each contact.
Contact Profile – Full page format, contains all the information about each contact.
User Reports
If you want more formats than the basic reports provide, you can purchase Crystal Reports (version 5.0 or
later) to create custom user reports, and access them from Market Leader. However, do not confuse
custom user reports created with Crystal Reports with inputting your own reports (i.e. project information)
in the Report Manager.
To access your custom reports from Market Leader, you must place them in the user reports subdirectory (\usrrpts) under Market Leader. For example, assuming you installed Market Leader to the
default location, then you must place your reports in c:\dml95nt\usrrpts.
When using Market Leader, the print dialog box lists the basic reports that are available within the current
context. If there are any reports found in the user reports sub-directory, then they are added to the
bottom of the list with a “[User]” prefix.
Note: You are responsible for the development and support of your user reports. Dodge Technical
Support cannot assist you in matters related to user reports.
13
Dial Up Feature
Overview
The Dial Up feature is a TAPI compliant communications vehicle that provides simplified and stable dial
up access to our host applications. Dodge DataLine, Dodge DataLine Direct and Dodge Reports LT
users can use this vehicle to dial up the respective host applications, search through Dodge’s extensive
report database (DataLine only) and download their data.
Getting Started
Main Screen
Commands
File Menu
DIAL
This command will dial your default account and establish a connection. Your default
account is the one you designate with the Auto Dial option when setting up your
accounts. See How to set up accounts on page 15 for more information.
HANG UP
This command will terminate the current connection.
SETUP ACCOUNTS
This command displays a dialog box from which you create and maintain your accounts.
From this dialog box, you can select and Dial any account that you have setup. You can
also Add, Edit and Delete accounts. This is also where you specify the Download
Directory and Dialing Prefix required to reach and outside line.
14
PROPERTIES
This command displays a dialog box from which you can configure your computer's
communications settings. For example, you can select which modem to use if you have
more than one or you can modify your modem's connection preferences such as parity or
flow control.
EXIT DIAL UP
Exits this feature and returns you to Market Leader’s main screen.
Edit Menu
COPY
Copies the text you have highlighted to the clipboard.
PASTE
Inserts text you have copied wherever you place the cursor.
CLEAR
Clears the screen.
How to set up accounts
You can have multiple accounts defined to support the scenario where you subscribe to several Dodge
services. For example, you may have a Dodge DataLine account and 2 Dodge Reports LT accounts.
There is no limit to the number of accounts that you can define. However, only one account can be
designated as the default via the Auto Dial option. The default account will be the one dialed whenever
the D IAL button is clicked on the tool box or selected from the menu bar. Other accounts can be dialed
from the S ETUP A CCOUNTS dialog box. See How to dial accounts on page 17 for more information on
dialing.
How to add an account
1.
Click the SETUP A CCOUNTS button, or choose it from the File menu, and the following dialog box will
appear.
15
2.
Click the Add button and another dialog box will be displayed.
3.
Type in the Account Name. This is the name that will be displayed in the list on the S ETUP A CCOUNTS
dialog box.
4.
Click the Auto Dial checkbox if you want to designate this account as the default.
5.
Type in the User Id and Password of the Dodge service to which this account will connect.
6.
When finished, click the Save button. The new account will added to the list.
How to edit an account
1.
Click the SETUP A CCOUNTS button, or choose it from the File menu, and the S ETUP ACCOUNTS dialog
box (shown above) will be displayed.
2.
Select the account you want to edit by clicking on its name in the list.
3.
Click the Edit button and another dialog box will be displayed.
4.
Change the information as desired, following the same process as when adding an account.
5.
When finished, click the Save button.
How to delete an account
1.
Click the SETUP A CCOUNTS button, or choose it from the File menu, and the S ETUP ACCOUNTS dialog
box (shown above) will be displayed.
2.
Select the account you want to delete by clicking on its name in the list.
3.
Click the Delete button.
16
How to dial accounts
How to dial your default account
1.
Click the DIAL button on the tool box, or choose it from the File menu, and your default account will be
dialed automatically.
How to dial an account other than your default
1.
Click the SETUP A CCOUNTS button, or choose it from the File menu, and the S ETUP ACCOUNTS dialog
box (shown above) will be displayed.
2.
Select the account you want to dial by clicking on its name in the list.
3.
Click the Dial button on this dialog box.
17
Report Manager Feature
Overview
The Report Manager gives you access to all the report information in the database. This information
consists of typical things such a project title, valuation, action stage and valuation. In addition, this
information includes Tracking Lists, user notes and extra user fields that you manage.
You can import, export, print, mail merge, sort and filter the reports in the database. You can search the
database quickly and easily, using complex criteria that you define in no time. This allows you to track
projects that interest you, so that you can act upon them efficiently and effectively. And, as with other
Market Leader features, contact information is automatically updated for you whenever you import more
project data.
Getting Started
The Report Manager screen has several elements that you need to understand. The main screen is
organized into 6 tabs, each displaying a different part of the current report. Along the bottom is a status
bar that is comprised of several elements. Each of these is described below.
Project Summary Screen
18
Contacts Screen
Bidders/Results Screen
19
Plans/Bonds Screen
Project Details Screen
20
User Screen
Current set of reports description
The left-most pane of the status bar usually displays a description of the current report set. It also
displays status messages in different situations.
Current set of reports count and index
The second pane of the status bar usually displays the number of reports in the current set of reports, as
well as the index of the current report within that set. It also displays other information in different
situations, e.g. in custom search mode, it displays “Custom Search” to indicate the mode.
Active checkbox
The active checkbox, to the left of the navigation buttons, is used to indicate whether the current report is
selected for further activity, such as viewing, printing or deleting. To select the current report, click the
checkbox. See Viewing selected reports on page 37 for more information.
Navigation buttons
Consists of 4 buttons that, from left to right, when clicked go to the first, previous, next and last report in
the current set of reports.
21
Commands
File Menu
IMPORT …
Opens a dialog box, which allows you to import report and contact information from
various sources. During import you can Auto Assign reports to Tracking Lists or Follow
Up Tracking. See Importing on page 25 for more information.
EXPORT …
Opens a dialog box, which allows you to export reports. See Exporting on page 28 for
more information.
PRINT…
Opens a dialog box, which allows you to print reports in various formats. Also includes a
Print Preview option.
MAIL MERGE…
Opens a dialog box, which allows you to mail merge a mailing list to create Form Letters
and Mailing Labels. The Mailing Labels option also includes a Print Preview option. See
Mail merging on page 29 for more information.
EXIT R EPORT MANAGER
Exits this feature and returns you to Market Leader’s main screen.
Search Menu
SINCE M Y LAST LOGIN
Selects reports imported since your last login for the current set of reports, based upon
which of the following you select:
ALL – Includes all reports imported since your last login.
ADDED – Includes only reports that were added since your last login.
U PDATED – Includes only reports that were updated since your last login
Note: This command is only available when using a shared database.
MOST R ECENT IMPORT
Selects reports from the most recent import for the current set of reports, based upon
which of the following you select:
ALL – Includes all reports from the most recent import.
ADDED – Includes only reports that were added during the most recent import.
U PDATED – Includes only reports that were updated during the most recent import.
ALL REPORTS
Selects all the reports in the database for the current set of reports.
ALL USER R EPORTS
Selects all the user reports in the database for the current set of reports.
CUSTOM …
Opens custom search mode to allows you to search for reports in the database, based
upon various criteria. The search results become the current set of reports. See
22
Searching on page 33 for more information.
AUTOSEARCH…
Opens a dialog box, which allows you to select and run one of your previously saved
Autosearches. The search results become the current set of reports. See Searching on
page 33 for more information.
View Menu
SELECTED R EPORTS
This command switches to viewing all the reports selected as active in the current set of
reports. See Viewing selected reports on page 37 for more information.
ALL CURRENT R EPORTS
The command reverts to viewing all the reports in the current set of reports, not just the
ones selected as active. See Viewing selected reports on page 37 for more
information.
LIST OF C URRENT R EPORTS…
Opens a dialog box, which list all the reports in the current set of reports. You can select
specific reports to view, delete or print. You can also customize the data displayed in the
list. See Viewing selected reports on page 37 for more information.
Reports Menu
TRACKING LIST …
Opens a dialog box, which allows to you create, manage and search your Tracking Lists.
See Tracking leads on page 31 for more information.
FOLLOW UP TRACKING...
Opens a dialog box, which allows you to assign a simple identifier to the current report
for tracking purposes. See Tracking leads on page 31 for more information.
SORT
Opens a dialog box, which allows you to define how the reports are sorted. You can
specify which fields (up to 5) the reports are sorted on and in what order, i.e. ascending
or descending. See Sorting on page 30 for more information.
FILTER CONTACT DISPLAY…
Opens a dialog box, which allows you to filter out specific contact types from the display.
Filtered contact types are not deleted, they are just not displayed.
GOTO …
Searches for, and moves to, a specific report within the current report set. You are
prompted for the report number.
D ELETE…
Opens a dialog box, which allows you to delete reports from the database. Options
include Current Report, Current Set of Reports, Most Recent Import and Date Range.
The Date Range option opens an additional dialog that prompts you for the date range,
as well as whether to delete based upon the report date or import date.
Note: To spare tracked reports from being deleted, click the Spare Tracked Reports
checkbox (if it isn’t already checked).
Note: You can stop the deletion process by clicking the Cancel button. Reports which
were deleted before clicking Cancel cannot be retrieved.
23
ATTACH CONTACTS…
Opens a dialog box, which allows you to attach non-bidder contacts to the current report.
Attached contacts appear in a separate list on the Contacts tab.
Note: To remove an attached contact, select it contact from the list on the Contacts tab
and hit the <Delete> key. Deleting the attached contact only removes it from the current
report, it does not delete the contact from the database.
User Menu
R EPORT INPUT …
Opens user input mode to allows you to enter your own reports in the database. See
User Report Input on page 38 for more information.
EDIT FIELDS …
Opens a dialog box, which allows you to edit the user fields for the current report.
Note: You can change the label associated with a field by clicking it. An input box will
appear and allow you to change the label. When finished, type <Enter>. While each
report has its own user field information, the labels associated with each field are the
same for all reports.
NOTES …
Opens a dialog box, which allows you to add, edit and delete notes associated with the
current report. Each new entry is automatically stamped with the current date.
Note: When importing an External Report Set, these notes are either overwritten or
appended, based upon the option you select on the import dialog box.
Options Menu
SEARCH ALL R EPORTS O N STARTUP
Allows you to specify ALL R EPORTS as the default set of reports, i.e. current report set,
when opening the Report Manager. If not selected, then S INCE MY LAST LOGIN – ALL (for
shared databases) or MOST R ECENT IMPORT – ALL (for non-shared databases) will be the
default.
ADD TO DO …
Allows you to add a To Do note, and associate it with the current report. The associated
report number and project title will be listed with the To Do note in the Calendar feature.
You will be prompted for the To Do information via a dialog box.
Note: With a shared database, Admin users can add To Do notes for other user (via a
drop down list on the Add To Do dialog box that is only visible for administrators). The
Admin users and the other user can see, edit and delete the To Do note. For the
administrator, the user’s name appears in brackets in front of the note text in the list.
TOOL BOX
Allows you to dock (display) the tool box on Left, Right, Top or Bottom of the screen.
You can also choose to Hide the tool box, or Customize it to suit your needs.
24
Importing
The Report Manager offers several types of import, however most of the time you will be importing Dodge
Report data acquired from one of our host applications such as DataLine or DataLine Direct. Most likely
you will have downloaded the data or received it via email.
Whether downloaded or received via email, the data is delivered in a compressed zip file (.zip extension)
to reduce the file size and transfer time. Inside the zip file is a capture file (.cap extension) that contains
the Dodge Report data.
Downloaded files are placed in your download directory (specified via the Dial Up feature). If you receive
compressed files from a different source, e.g. email or diskette, they must be manually copied into your
download directory in order to use the Automatic Import option.
When Report Manager opens, if checks for the existence of any zip files in your download directory. If it
finds any then the import dialog box is automatically opened with the Automatic Import option already
selected.
Once an import begins, a status dialog box opens to allow you to watch the progress. This dialog box
tracks the files and reports as they are imported and also logs errors and advisories, if any.
How to import
1.
Acquire your data, e.g. via Dial Up, DataLine for Windows, or email.
2.
Open the Report Manager.
3.
The import dialog box will automatically appear if you have any zip files in your download
directory. If it doesn’t, click the IMPORT button, or choose it from the File menu.
4.
Select the desired option and click the OK button to start the import.
5.
When complete, if desired, click the View Log button to view any errors and advisories.
6.
When done, click the Close button to return to the main screen. All of your imported reports
become the current set of reports, as well as the most recent import.
25
Each import type, as well as the important Auto Assign function, are described in the following sections.
Automatic Import
This option will automatically import all of the zip files found in your download directory. If there is more
than one and you prefer to import them one at a time, then use the Manual Import option.
During import, zip files are automatically decompressed and the capture files are extracted and
processed. Following import, the zip files are archived by renaming them with a z__ extension. If instead
you want to delete all of the zip files after importing, click the Delete Data File(s) after Import checkbox (if
it isn’t already checked).
Manual Import
This option will allow you to select, via a standard Windows file dialog box, a specific Dodge Report data
file to import. This option will accept a zip file or capture file for import.
External Report Set
This option is for importing Dodge Reports which have been exported to you by another Market Leader
user. An External Report Set is also a compressed zip file (.rxp extension).
When importing an External Report Set, for reports that already exist, the user notes are always updated,
even if the report itself is not updated, so that you always get the latest notes. For example, if you are
importing version 6 of a particular report, and version 6 of that report already exists in your database, then
the user notes are updated but the report itself is not.
User notes are updated by overwriting or appending the existing notes. You can dictate this behavior by
selecting which option you prefer, i.e. Overwrite User Notes or Append User Notes, the later is the
default.
ACT! Type DBF File
Portions of the ACT! for Windows .dbf file can be imported into Market Leader. In fact, Market Leader will
import .dbf files from any software program providing that the fields map to the definitions described
below.
Field Name
Company
Contact
Addr1
Addr2
City
State
Zip
Phone
Fax_Phone
Number of Characters
50
50
50
30
30
2
10
20
20
Note: Market Leader only imports the standard two letter state code as used by the U.S. Postal System.
If the state is spelled out, the first two letters are imported, which is not correct in most cases.
ACT! for Windows creates a secondary database for the Notes field with a file a .ndb extension. This field
is automatically read by Market Leader up to 255 characters. If you are attempting to load a .dbf file other
26
than ACT! for Windows, with a secondary database for the Notes field, it is important that you give it an
.ndb extension.
When viewing contacts in the Contact Manager, the origin field will indicate Other (as opposed to Dodge
and User) for contacts imported using this option.
Auto Assign
The Auto Assign function allows you to automatically run Autosearches against the reports just imported
and assign them to Tracking Lists or Follow Up Tracking. Hence, to use this function you must create the
Autosearches and Tracking Lists in advance.
How to setup Auto Assign
1.
Click the IMPORT button, or choose if from the File menu.
2.
Click the Auto Assign Activated checkbox (if it isn’t already checked) to activate this function.
3.
Click the Setup Auto Assign button, and the following dialog box will open.
4.
Select an Autosearch from the Autosearch list.
5.
Select the Tracking List option or the Follow Up Tracking option, Tracking List is selected by default.
If you selected Tracking List, then choose the desired one from the list. If you selected Follow Up
Tracking, then type the identifier in the input box.
6.
Click on the Add > button to match them and they will appear in the Pairs list.
27
7.
To remove a pair, select the pair you want to remove and click the Remove button. Click the Remove
All button to remove all the pairs.
8.
Repeat steps 4-7 to until you are finished.
9.
Click the OK button to close this dialog box and return to the IMPORT dialog box.
When importing is finished, each auto assign pair will be processed. That is, the Autosearch will be
executed and the results assigned to the paired Tracking List or Follow Up Tracking.
Exporting
The Report Manager has 2 export options: Current Set of Reports and Entire Database. With both
options, the output from the export process is a compressed file (.zip extension). Inside the compressed
file is a collection of comma delimited text files. The number and format of the text files differs based
upon the export option.
The output from the Current Set of Reports option is a compressed zip file (.rxp extension) and is
intended for sharing with other Market Leader users. That is, an exported report set can be given to
another Market Leader user for import into their database via the External Report Set import option.
The output from the Entire Database option is a compressed zip file (.exp extension) and is intended for
use into programs other than Market Leader. It cannot be re-imported into Market Leader.
If you want to export your entire database to another Market Leader user, search for ALL R EPORTS, and
then choose the Current Set of Reports export option.
Both of the exported file formats can be imported into other programs with a modicum of programming
involved. First, you need to have the software necessary to decompress the exported zip file. Once
decompressed, most common database programs import comma delimited text files.
When importing into other programs, it may be necessary to remove carriage returns from the data. For
example, on multiple project reports, project titles are positioned on individual lines rather than being
strung across one long line. Sometimes, importing data formatted like this can result in each project title
being read as an distinct field and separate field. To work around this potential problem, check the
Remove Carriage Returns option before starting the export.
How to export
1.
Click the EXPORT icon on the tool box or choose it from the File menu).
2.
Select the desired option and click the OK button.
3.
A standard Windows file dialog box will appear so that you can specify a file name for the exported
data.
4.
If you chose the Current Set of Reports option, when the export begins, a status dialog box opens to
allow you to watch the progress. If you chose the Entire Database option, when the export begins,
you can watch the progress by observing the status messages in the title bar of the export dialog
box.
5.
Click the Close button to return to the main screen.
28
Mail merging
With Report Manager, it’s easy to create form letters and mailing labels for mass mailings. To mail merge
a form letter, you must have already created it in the Direct Mailer. See Direct Mailer Feature on page 59
for information on how to create a form letter.
Click the MAIL MERGE button, or choose it from the File menu. The following dialog box will appear.
To mail merge form letters
1.
Select the Current Report option to include all the contacts from the current report in the mailing list.
Select the Current Set of Reports option to include all the contacts from all the reports in the current
set of reports in the mailing list.
2.
Select the Form Letters option.
3.
Provide a name for the Mailing List, via the Select button or by typing in the file name in the input
box. Clicking the Select button will open a standard Windows file dialog box.
4.
Select the contact types that you want labels for by clicking the appropriate buttons in the Send To
frame.
5.
When you click Print, the mailing list will be created.
6.
When the mailing list is ready, the following dialog box will appear, asking whether you want to mail
merge and print now.
29
7.
Click Yes to mail merge and print the form letters now.
8.
Click No to cancel and return to the main screen. You can still use the mailing list that was just
created at a later time from the Direct Mailer. See Direct Mailer Feature on page 59 for more
information on mail merging.
To mail merge mailing labels
1.
Select the Current Report option to create labels for the contacts from the current report. Select the
Current Set of Reports option to create labels for the contacts from all the reports in the current set of
reports.
2.
Select the Mailing Labels option.
3.
Select the type of label you want from the list of Available Label Reports.
4.
Select the contact types that you want labels for by clicking the appropriate buttons in the Send To
frame.
5.
If you want to review the mailing labels before printing, click the Print Preview checkbox (if it isn’t
already checked). You can print the mailing labels from the Print Preview screen.
6.
Click Print to print the mail merged mailing labels.
Sorting
You can specify which fields (up to 5) the reports are sorted on and in what order, i.e. ascending or
descending.
How to sort
1.
Click the SORT icon, or select it from the Reports menu, and the following dialog box will appear.
30
2.
Select a field to sort on from the Sort By list.
3.
Select the Ascending or Descending option.
4.
Click the Add > button, and the field will be added to the Sort Order list. The field name will be
prefixed with an ‘A’ to indicate ascending or a ‘D’ to indicate descending order.
5.
Repeat steps 2-4, until up to 5 fields are in the Sort Order list.
6.
Use the Move Up and Move Down buttons to adjust the order of the fields in the Sort Order list.
7.
Click the Default button and the you are returned to the main screen, with the reports sorted in the
default order, which is shown in the dialog box above.
8.
Click the OK button and the you are returned to the main screen, with the current set of reports
sorted accordingly.
Tracking leads
The Report Manager provides two tools that can help you automate your sales force and streamline your
lead identification and development process: Tracking Lists and Follow Up Tracking. You can use the
Tracking Lists and Follow Up Tracking to identify the projects that interest you and assign them for follow
up. Used in tandem, Tracking Lists and Follow Up Tracking can help you construct a substantial edge on
your competition.
A Tracking List is a group of reports that you have identified as having some specific value. You provide
a title for the list, you manually assign and remove reports from the list and you can easily search for the
reports on the list at any time.
Follow Up Tracking is a tracking mechanism whereby you tag reports with an identifier, typically it ‘s an
person’s name or a territory number. You manually assign and remove the identifiers from the reports,
and you can search for the reports by identifier.
You can also have reports automatically assigned to Tracking Lists and Follow Up Tracking during an
import by using the Auto Assign function. See Auto Assign on page 27 for more information.
The Project Summary screen shows the Tracking Lists and Follow Up Tracking that current report is
assigned to, if any.
31
How to create a Tracking List
1.
Click the TRACKING L IST button, for choose if from the Reports menu. The following dialog box will
appear.
2.
Click the Create New List button, and a dialog box will prompt you for a title. Type the title, click OK,
and you’ll return to the Tracking List dialog box. The new list will be selected in the Tracking Lists list.
How to delete a Tracking List
3.
From the Tracking List dialog box described above, select the list to delete in the Tracking Lists list.
4.
Click the Delete button.
How to edit a Tracking List title
1.
From the Tracking List dialog box described above, select the list to edit in the Tracking Lists list.
2.
Click the Edit List Title button, and a dialog box will prompt you with the current title. Modify the title
as desired, click OK, and you’ll return to the Tracking List dialog box. The new title will be displayed
in the Tracking Lists list.
32
How to assign reports to a Tracking List
1.
From the Tracking List dialog box described above, select the list the desired Tracking List in the
Tracking Lists list.
2.
Select Current Report to assign the current report to the Tracking List. Select Current Set of Reports
to assign all the reports in the current set of reports to the Tracking List.
3.
Click the Assign to List button.
How to remove reports from a Tracking List
1.
From the Tracking List dialog box described above, select the list the relevant Tracking List in the
Tracking Lists list.
2.
Select Current Report to remove the current report from the Tracking List. Select Current Set of
Reports to remove all the reports in the current set of reports from the Tracking List.
3.
Click the Remove from List button.
How to search for reports on a Tracking List
1.
From the Tracking List dialog box described above, select the list the desired Tracking List in the
Tracking Lists list.
2.
Click the Search button and all the reports on the Tracking List are selected for the current set of
reports. Note: You can only search for 1 Tracking List at a time this way; use custom search mode to
search for multiple lists at one time.
DataLine Tracking Lists
If you are a DataLine user and you use Tracking Lists on-line, then you should set up Market Leader
Tracking Lists to mirror them, i.e. define the same criteria. This way, you will always have easy access to
the latest information imported into your database, in the same fashion that you are accustomed to.
Searching
You can search the database in a variety of ways: canned search, custom search and Autosearch.
A canned search is one that is pre-defined, such as ALL REPORTS.
A custom search is one where you select the search criteria and the scope of the search. You can
execute the search, reject the results, modify the criteria and search again until you are satisfied.
An Autosearch is a saved search. That is, you select the search criteria and save it so it can be executed
later over and over again without having to re-select the criteria.
The remainder of this section will discuss custom search mode and how to create and execute searches
as well as how to use Autosearches.
33
Custom search mode screen
The custom search mode screen has several important elements that you need to be familiar with: the
Search frame, the Last Search frame, the Autosearch frame and the category buttons.
Search frame
The drop down list in this frame allows you to define the scope of the search. You can select from Since
My Last Login (for shared databases), Most Recent Import, Entire Database and User Reports. The
default is Entire Database.
The Run button initiates the search, based upon the criteria you have selected.
Last Search frame
The Load button re-loads all the criteria from the last custom search, i.e. the previous one. This is useful
if you elect to view search results, but subsequently decide that it needs more refinement. You can reenter custom search mode, re-load the last search criteria and modify it until you get the desired results.
Autosearch frame
The Load button opens a dialog box, from which you select one of your Autosearches. The criteria for the
selected Autosearches is loaded. You can then run the search or you can modify the criteria and re-save
it.
The Save button allows you to save the current criteria as an Autosearch. A dialog box opens, prompting
you to name the Autosearch and to enter some identifying description and notes.
Exit button
Click the Exit button to exit custom search mode and return to the main screen with last set of reports you
were viewing.
34
Category buttons
When clicked, each of buttons presents a relevant screen for selecting criteria within the category. You
can select criteria from as many categories as you want. Categories with selected criteria appear in red.
A brief description of each category is provided below:
Geography: Allows you to search for projects based on states/counties in the United States,
provinces/counties in Canada, provinces in Mexico and over 200 countries around the world. The
number of counties selected within a state or province is shown to the left of the state or province name.
Action Stage: Allows you to search for projects based on their stage of development, such as Planning
and Bidding.
Bid Date: Allows you to search for projects bidding on a specific date or within a date range.
Type of Work: Allows you to search for projects based on the type of work it involves, such as new or
alterations/renovations.
Project Type: Allows you to search for projects based on an overall grouping of project types, such as
Commercial or Transport. You can also select individual project types within the groupings
Valuation: Allows you to search for projects by the total dollar value of the project, within a minimum and
maximum range.
Story Height: Allows you to search projects by story height by selecting minimum and maximum heights.
If you do not choose a maximum height (shown as To), the program will search to the maximum story
height available.
Square Footage: Allows you to search projects by square footage, in thousands of square feet. The From
value defaults to zero when you only enter a To value. The To value defaults to the maximum square
footage available when you only enter a From value.
Site ZIP Code: Allows you to search for projects found within a ZIP code. You can use an asterisk
wildcard (*).
Text: Allows you to search several fields for key words.
Tracking Lists: Allows you to search for reports assigned to the selected Tracking Lists.
Follow Up: Allows you to search for reports assigned to the specified Follow Up Tracking. You can use
an asterisk Willard (*).
User: Allows you to search for reports based upon the values of any of the 15 user fields associated with
each report.
Clear Current button
Click this button to de-select all the criteria in the current category.
Clear All button
Click this button to de-select all the criteria in all the categories.
35
How to perform a custom search
1.
Click the CUSTOM S EARCH button, or choose it from the Search menu, and the program will enter
custom search mode.
2.
Click the category buttons desired, select the relevant criteria, click the OK button to close each
relevant screen as you go. Each category with criteria selected will appear in red.
3.
Define the scope of the search by selecting from the drop down list in the Search frame.
4.
Click the Run button in the Search frame and the search will be executed.
5.
A status dialog box will appear indicating how many reports were found. If none were found, your
only choice is to cancel to close the dialog box. At this point you should refine your criteria. If reports
were found, the following dialog box will appear.
6.
Click No to remain in custom search mode so that you can modify the criteria.
7.
Click Yes to exit custom search mode and return to the Report Manger’s main screen with the search
results as the current set of reports.
How to create an Autosearch
1.
Click the CUSTOM S EARCH button, or choose it from the Search menu, and the program will enter
custom search mode.
2.
Click the category buttons desired, select the relevant criteria, click the OK button to close each
relevant screen as you go. Each category with criteria selected will appear in red.
3.
Click the Save button in the Autosearc h frame and a dialog box will open, prompting you to name the
Autosearch and to enter some identifying description and notes.
How to modify an Autosearch
Click the CUSTOM S EARCH button, or choose it from the Search menu, and the program will enter custom
search mode.
Click the Load button in the Autosearch frame and a dialog box will open, from which you select one of
your Autosearches. The criteria for the selected Autosearches is loaded.
Modify the selected criteria, as described above in How to create an Autosearch.
36
Click the Save button in the Autosearc h frame and a dialog box will open, allowing you to modify the
name, description and or notes of the Autosearch.
Viewing selected reports
You can view a selected reports within the current set of reports by marking them as active. You can
mark a report as active 2 ways: by clicking the Active checkbox while viewing the report, or by selecting it
from the VIEW L IST OF C URRENT R EPORTS dialog box and then clicking the View button.
If you click the Active checkbox for a report and then open VIEW L IST OF CURRENT R EPORTS dialog box,
you will see that report already highlighted in the list.
The active selections are only relevant within the current set of reports. When the current set of reports
changes, then all the selections are cleared.
How to view selected reports
1.
Click the VIEW L IST OF C URRENT R EPORTS button, or choose it from the View menu, and the following
dialog box will appear.
2.
To select reports, click the left-most column. Use the <Ctrl> and <Shift> keys in combination to select
multiple reports and ranges of reports. Your selections will be highlighted. Click the Clear All button
to reset the selections and start over.
3.
Click the View button and the dialog box will close and return you to the main screen viewing all the
selected reports within the current set of reports. Notice that all the reports are marked as active (the
Active checkbox is checked).
4.
To toggle back to the all the reports in the current set of reports, choose the ALL C URRENT R EPORTS
command from the View menu.
5.
To toggle back again to the selected (active) reports, choose the SELECTED R EPORTS command from
the View menu.
37
User Report Input
Market Leader gives you the added benefit of entering your own reports into the database. There are
several important screens that you need to understand. Each of them is described below.
Report List Screen
Add Report button
Click the Add Report button to add a new report, and the Report Input screen will be displayed.
Edit Report button
Click the Edit Report button to edit the report currently selected in the Report List, and the Report Input
screen will be displayed initialized with all the current field values.
Delete Report button
Click the Delete Report button to delete the report currently selected in the Report List.
Contact List >> button
Click the Contact List >> button to toggle to the Contact List screen, which displays the contacts for the
report currently selected in the Report List.
Exit button
Click the Exit button to exit user input mode and return to the Report Manager’s main screen.
38
Search Function
Type in a project title, or a partial project title in the input box. As you type each character, the Report List
will be continuously filtered to only display the matching reports. For example, type ‘s’ and the Report
List will automatically only display reports whose project titles start with the letter ‘s’, notice that it is not
case sensitive.
Sort function
Consists of 2 drop down lists, which indicate the sort settings for the Report List. The first list box
indicates which field the reports are sorted on and the second indicates whether they are sorted in
ascending or descending order. To change the sort settings, simply select the desired field and sort order
from the list boxes, and the reports are immediately re-sorted accordingly.
Report Input Screen
This screen allows you to enter all the non-contact information related to a report.
Note: Use the F8 key to clear data in the current field.
Report Number
The report number is automatically generated in the following format: YY-MMDDHHMMSS (Year, Month,
Day, Hour, Minutes, Seconds).
Report Date, Last Issued, and First Issued
These dates are automatically generated by the program and are initially set to the current date. They
are automatically updated each time you edit the report.
Action Stage
Select a primary/secondary action stage from the drop down lists.
Bid Date
Indicate the bid date by choosing a month/day/year from the drop down lists.
39
Bid Time
Enter the bid time and select a time zone from the drop down list.
Type of Work
Indicate the type of work is by clicking the appropriate checkboxes.
Valuation
Enter a valuation for the project. Note: Do not use dollar signs, letters, or any type of punctuation
(commas, periods, dashes).
Project Type
Select the project type category from the first drop down list, and then (if desired) select the specific
project type from the second drop down list. You must select the category before selecting the specific
project type.
Project Title, Address and City
Enter the information by typing in the appropriate input boxes.
State and County
Select the state from the drop down list, and then (if desired) select the specific county from the county
drop down list. You must select the state before selecting the county.
Zip Code and Country
Enter the information by typing in the appropriate input boxes.
Status
Enter information regarding the current status of the project.
Details
Enter information regarding project details such as materials and additional features.
Square Footage and Number of Stories
Enter the square footage and number of stories by typing in the appropriate input boxes.
Contract Method
This field typically contains information such as TO BE COMPETITIVELY BID, TO BE NEGOTIATED or
TO BE DETERMINED.
Bid Bond, Payment Bond, Performance Bond and Bond Remarks
Enter any bonding information (percentages) and remarks in the spaces designated for this information.
Plans From
This is for information detailing from whom the plans and specs can be obtained, deposit, refunds
involved, and method of payment.
Plan Room
This is for making any notes regarding where you have stored the plans and specs within your office, or
keep track of who is using what portion of the plans for estimating. Because the project lead you are
entering has not been found in Dodge Reports, please contact your local F.W. Dodge office with the
information so that we can follow up for you and report it in Dodge Reports.
40
Contact List Screen
Add Contact button
Click the Add Contact button to add a new contact to the report, and the Contact Input screen will be
displayed. You can add a new contact or select one already in the database.
Edit Report button
Click the Edit Contact button to edit the contact currently selected in the Contact List, and the Contact
Input screen will be displayed initialized with all the current field values.
Delete Report button
Click the Delete Contact button to delete the contact currently selected in the Contact List.
Report List >> button
Click the Report List >> button to toggle to the Report List screen.
Exit button
Click the Exit button to exit user input mode and return to the Report Manager’s main screen.
41
Contact Input Screen
This screen allows you to enter all the contact information related to a project.
Note: When entering the information, use the F8 key to clear data in the current field and the F7 key to
restore the previously saved value.
Contact Type
Select the contact type from the drop down list. The default label for this contact type will be pre-filled in
the Label input box below.
Label
Use this field for further qualifying thew contact type, e.g. you might want to change Architect to
Landscape Architect.
Company
You enter your own information Company information (including Address, City, State, etc) or you can
select and existing contact from the database. If you enter your own information, a new contact will be
created for it in the database. If you select an existing contact and then you subsequently change some
of the contact information, such as the address, the changes will be saved and overwrite the existing
values. To select an existing contact from the database, click the “…” button beside the Company label,
and the Firm List screen will appear. Select a contact from this list and click the Select Firm button to
return to Contact Input screen. All the contact information will be pre-filled in the appropriate places. See
Firm List Screen on page 43 for more information.
Contact, Address and City.
Enter the information by typing in the appropriate input boxes.
State and County
Select the state from the drop down list, and then (if desired) select the specific county from the county
drop down list. You must select the state before selecting the county.
Zip Code, Country, Phone and Fax
Enter the information by typing in the appropriate input boxes.
42
Bidder Amount and Base Bid Amt
If the contact type is a bidder, then enter any relevant bid amount information.
Firm List Screen
The Firm List screen lists all the contacts in the database. To select a firm in the list, click anywhere in
the row of the desired firm column. Your selection will be highlighted.
Select Firm button
Click the Select Firm button to select the highlighted firm and return to the Contact Input screen.
Cancel button
Click the Cancel button to return to the Contact Input screen, without selecting a firm.
Search Function
Type in a company name, or a partial company name in the input box. As you type each character, the
Firm List will be continuously filtered to only display the matching contacts. For example, type ‘s’ and the
Firm List will automatically only display contacts whose company name start with the letter ‘s’, notice that
it is not case sensitive.
Sort function
Consists of 2 drop down lists, which indicate the sort settings for the Firm List. The first list box indicates
which field the contacts are sorted on and the second indicates whether they are sorted in ascending or
descending order. To change the sort settings, simply select the desired field and sort order from the list
boxes, and the contacts are immediately re-sorted accordingly.
43
How to add a report
1.
Select Report Input from the User menu, and user input mode is opened with the Report List screen
visible.
2.
Click the Add Report button, and the Report Input screen will appear.
3.
When you have finished entering the report information, click the Save Report button to save the
report and return to the Report List screen. Click Cancel Add button instead to cancel adding the
report.
4.
To add contacts to the report, click the Contact List >> button to open the Contact List screen.
5.
Click the Add Contact button, and the Contact Input screen will appear.
6.
Click the “…” button to select an existing contact from the database, and the Firm List screen will
appear.
7.
Select a firm and click the Select Firm button to return to the Contact Input screen.
8.
When you have finished entering the contact information, click the Save Contact button to save the
contact and return to the Contact List screen. Click Cancel Add button instead to cancel adding the
contact.
9.
When you have finished entering all the contacts, click the Report List << button to return to the
Report List screen.
10. Repeat steps 2-9 to add another report.
44
Calendar Feature
Overview
The Calendar feature actually comprises 2 calendars: a Bid Calendar and a To Do Calendar. You can
switch back and forth between the calendars by using the tabs at the top of the screen.
The Bid Calendar allows you to track bidding projects easily, and Market Leader automatically updates
this information for you whenever you import more project data.
The To Do Calendar allow you to create and track To Do notes to help you remember all those important
meetings, business lunches, and even your personal forget-me-nots, like your spouse’s birthday or your
anniversary.
Together, these calendars help to reduce stress and take you to the top of your industry.
Getting Started
The Calendar screen has 3 main elements that you need to understand: the list (on the left), the calendar
(on the right) and the view options (buttons across the top of the list and calendar).
The list shows reports/notes based upon the current view set and the view options selected.
The calendar shows you all the important days in a particular month/year. In the Bid Calendar, days with
projects bidding are shaded red. In the To Do Calendar, days with notes scheduled are shaded yellow.
National holidays are shaded green. The currently selected date is shaded blue.
Bid Calendar Screen
45
To Do Calendar Screen
Year at glance Screen
View Options
Month at a glance
The calendar shows all the reports/notes in the indicated month, within the current view set.
Year at a glance
The calendar shows all the reports/notes in the indicated year, within the current view set.
46
ALL
Shows all reports/notes in the current view set, regardless of the calendar date.
Month
Shows all reports/notes in the current view set for the month indicated on the calendar.
Week
Shows all reports/notes in the current view set for the a week 7 days forward from the current date
(shaded blue) indicated in the calendar.
Day
Shows all the reports/notes in the current view set for the current date indicated in the calendar.
Example:
The current view set is the date range January 1, 2000 to July 1, 2000. The current view set can be
ENTIRE DATABASE, DATE RANGE or C URRENT R EPORT S ET.
th
The calendar indicates June 2000, the current date is June 6 , and Month at a glance is selected.
If the view option ALL is selected, then the list will show all the reports/notes in the current view set.
If the view option Month is selected, then the list will show all the reports/notes in the current view set for
the month of June 2000.
If the view option Week is selected, then the list will show all the reports/notes in the current view set for
th
th
June 6 through June 12 (7 days from the currently selected date in the calendar).
If the view option Day is selected, then the list will show all the reports/notes in the current view set for
th
June 6 .
Commands
File Menu
PRINT…
Opens a dialog box, which allows you to print reports/notes in various formats from the
list. You can specify the current report/item in the list, the selected reports/notes or all
the reports/notes in the list. Also includes a Print Preview option.
EXIT CALENDAR
Exits this feature and returns you to Market Leader’s main screen.
View Menu
ENTIRE DATABASE…
Selects your entire database of reports/notes for the current view set.
DATE RANGE…
Selects reports/notes within a date range for the current view set. You will be prompted
for the date range via a dialog box.
CURRENT R EPORT SET …
This command is related to the Report Manager Feature. When you open Market
Leader, if you first open the Calendar without opening the Report Manager, then this
47
command is disabled and the default current view set is the ENTIRE DATABASE. If you
open the Report Manager first, then the Calendar, the report set you were viewing is
used to create the C URRENT R EPORT S ET, which will be the default current view set in the
Calendar in this situation. For the Bid Calendar, the CURRENT R EPORT S ET would include
all the reports that are bidding within that Report Manager report set. For the To Do
Calendar, the C URRENT R EPORT S ET would include all the To Do notes associated with
reports in that Report Manager report set.
ORPHANS
Selects orphaned To Do notes for the current view set. Orphaned notes are those
owned by a user no longer defined in the database.
Note: This command is only visible to Admin users in a shared database.
SELECTED R EPORTS…
To view the full text of any report you see in the Bid Calendar or To Do Calendar lists,
selected them and then this command will switch to the Report Manager with the
selected reports are the current report set.
To Do Menu
ADD…
Allows you to add a To Do note. You will be prompted for the To Do information via a
dialog box.
Note: With a shared database, Admin users can add To Do notes for other user (via a
drop down list on the Add To Do dialog box that is only visible for administrators). The
Admin users and the other user can see, edit and delete the To Do note. For the
administrator, the user’s name appears in brackets in front of the note text in the list.
EDIT…
Allows you to edit the selected To Do note.
D ELETE…
Allows you to delete the selected To Do notes.
Options Menu
TOOL BOX
Allows you to dock (display) the tool box on Left, Right, Top or Bottom of the screen.
You can also choose to Hide the tool box, or Customize it to suit your needs.
48
Viewing selected reports
1.
To select a report in the list that you want to view, click the left-most column. Use the <Ctrl> and
<Shift> keys in combination to select multiple reports and ranges of reports. Your selections will be
highlighted.
2.
Click the VIEW S ELECTED R EPORTS button, or choose S ELECTED R EPORTS from the View menu. The
Report Manager will open with the selected reports as the current report set.
How to add a To Do note
1.
Click the ADD TO DO button, or choose A DD from the To Do menu. The following dialog box will
appear.
2.
Categorize the To Do by clicking on the appropriate Type button (Meeting, Call, Business Trip, etc.).
3.
Choose a date for the To Do by selecting the month/day/year from the Date drop down lists. The
default is always the current date.
4.
Click in the Note input box and type your notes.
5.
When you have finished, click OK to create the To Do.
Note: If you want to associate a To Do with a specific report, it must be done in the Report Manager.
49
Contact Manager Feature
Overview
The Contact Manager gives you access to all the contact information in the database. This information
consists of typical things such as company name, address and phone numbers. In addition, this
information includes the specialty and origin of the contact, as well as user notes and extra user fields
that you manage.
You can add, edit, delete, search, group and mail merge contacts. This allows you to track and
communicate with important contacts efficiently and effectively. And, as with other Market Leader
features, contact information is automatically updated for you whenever you import more project data.
Getting Started
The Contact Manager screen has several elements that you need to understand. Down the left hand side
are the navigation buttons, current lookup and group indicators and the Find and Sort functions. The rest
of the screen to the right consists of the contact information. Each of these elements are described
below.
Main screen
Navigation buttons
Consists of 4 buttons that, from left to right, when clicked go to the first, previous, next and last contact in
the current lookup. Below the buttons is a label that indicates the index of the current contact within the
current lookup.
50
Current lookup and group indicators
Lookups and groups define the set of contacts that you are viewing, thus the terms current lookup and
group. A lookup is a subset of a group. For example, upon entering the Contract Manager, the default
group is ALL, meaning all the contacts in the database. The default lookup is EVERYONE, meaning all the
contacts in the group. Lookup searches, such as custom or keyword, are always performed against the
current group. Switching to a different group automatically resets the current lookup to EVERYONE.
The main screen always indicates the current lookup and group, via labels high on the left hand side.
Below these labels is another label that indicates the number of contacts in the current lookup.
Find function
Consists of an input box and a Find button. To go to a specific contact within the current lookup, type in
the company name and click the Find button. You do not have to type in the entire company name, in
fact, you can type only the first few letters if you want. For example, type ‘john’ to go to the first contact
whose company name starts with the letters ‘John’, notice that it is not case sensitive.
Sort function
Consists of 2 drop down lists, which indicate the sort settings for the current lookup. The first list box
indicates which field the contacts are sorted on and the second indicates whether they are sorted in
ascending or descending order. To change the sort settings, simply select the desired field and sort order
from the list boxes, and the contacts are immediately re-sorted accordingly.
Contact Information
Contact fields – Consists of primary and user fields. Primary fields are things like company name,
address and phone number. User fields are extra fields provided to you to use as you see fit. You can
edit and search them as needed. There are 15 user fields provided for each contact, the first 2 are
numeric and the rest are text.
Report list – Consists of a list of reports associated with the current contact. That is, the current contact
appears on each of the reports in this list.
Origin
All contacts are categorized by their origin, i.e. where they originate from. A pre-defined group exists for
each of these origins.
Dodge – The contact originates from a Dodge Report, i.e. it was added during an import.
User – The contact originates from the user, i.e. you added it yourself.
Other – The contact originates from an external source, e.g. it was added during an import of an ACT!
database.
51
Commands
File Menu
PRINT…
Opens a dialog box, which allows you to print contacts in various formats from the
current lookup, or the reports associated with the current contact. Also includes a Print
Preview option.
MAIL MERGE…
Opens a dialog box, which allows you to mail merge a mailing list to create Form Letters
and Mailing Labels. The Mailing Labels option also includes a Print Preview option. See
Mail merging on page 54 for more information.
EXIT CONTACT MANAGER
Exits this feature and returns you to Market Leader’s main screen.
Edit Menu
CUT
Deletes the currently selected text and copies it to the clipboard.
COPY
Copies the currently selected text to the clipboard.
PASTE
Pastes the text currently in the clipboard to the document at the cursor position.
CURRENT CONTACT…
This command opens edit mode to allows you to modify the contact information of the
current contact. When finished, click on Save to apply the modifications.
Note: Remember that any modifications you make to the primary fields of a Dodge
contact will be overwritten the next time you import reports. To work around this, create
a duplicate of the contact and make your modifications to it. You can create a duplicate
contact by adding a new contact and initializing it with All Values. The duplicate contact,
as with any contact you add, is a User contact, as indicated in the Origin field.
Note: You can change the label associated with a user field by clicking it. An input box
will appear and allow you to change the label. When finished, type <Enter>. While each
contact has its own user field information, the labels associated with each field are the
same for all contacts.
N EW …
Opens a dialog box, which allows you to add a new contact. You decide how the new
contact is initialized by choosing one of the following options:
Default Values – Use field default values defined in the database.
Primary Values – Use field values from the current contact for each primary field (nonuser fields).
All Values – Use field values from current contact for all fields.
After clicking the button for the desired initialization option, edit mode is opened to allow
you to modify the contact information for the new contact. When finished, click on Save
to apply the modifications.
52
D ELETE
Opens a dialog box, which allows you to delete the current contact or all the contacts in
the current lookup.
Note: When you delete a contact, you delete the contact’s name from all reports in which
it appears. Deleting contacts cannot be undone.
Groups Menu
SWITCH GROUP
Opens a dialog box, which allows you to switch to a different group of contacts. The
dialog box lists all of the available groups, which includes several pre-defined ones and
any that you have created. The pre-defined groups cannot be edited or deleted, and
they are described below.
ALL – This group includes all the contacts in the database – those from Dodge Reports,
those you added and any that have been imported from an external source.
DODGE – This group includes all the contacts from imported Dodge Reports.
USER – This group includes only the contacts that you have added.
OTHER – This group contains only the contacts imported from an external source, such
as an ACT! database.
Current Report Set – This group is related to the Report Manager Feature. When you
open Market Leader, if you first open the Contact Manager without opening the Report
Manager, then this group is not available and the default group is ALL . If you open the
Report Manager first, then the Contact Manager, the report set you were viewing is used
to create the Current Report Set group, which will be the default group in the Contact
Manager in this situation. The Current Report Set group would include all the contacts
from all of the reports within that Report Manager report set.
EDIT
Opens a dialog box, which allows you to add, edit and delete groups of your own. See
How to edit groups on page 57 for more information.
Lookup Menu
EVERYONE
Selects all the contacts in the current group for the current lookup.
CUSTOM …
Opens a dialog box, which allows you to search for contacts within the current group,
based upon various criteria. The search results become the current lookup.
K EYWORD…
Opens a dialog box, which allow you to search for contacts within the current group,
based upon a keyword. If the keyword is found in any field of the contact information of
any contact, then that contact is included in the search results. The search results
become the current lookup.
Note: You can search for multiple keywords by separating each keyword with a semicolon (;).
53
ORPHANS
Selects all the orphan contacts in the current group for the current lookup. Orphaned
contacts are Dodge contacts that are no longer associated with a Dodge Report. This
situation arises because when reports are deleted from the database, the associated
contacts are not deleted.
PREVIOUS
Re-executes the last Lookup command.
View Menu
CONTACT LIST …
Opens a dialog box, which lists all of the contacts in the current lookup, from which you
can select specific contacts for viewing. The selected contacts become the current
lookup. See Viewing selected contacts on page 56 for more information.
USER NOTES …
Opens a dialog box, which allows you to add, edit and delete notes associated with the
current contact. Each new entry is automatically stamped with the current date.
Note: When importing an External Report Set, these notes are either overwritten or
appended, based upon option you select on the import dialog box in the Report Manager.
SELECTED R EPORTS
To view the full text of any reports you see in the list associated with the current contact,
selected them and then this command will switch to the Report Manager with the
selected reports are the current report set.
Options Menu
TOOL BOX
Allows you to dock (display) the tool box on Left, Right, Top or Bottom of the screen.
You can also choose to Hide the tool box, or Customize it to suit your needs.
Mail merging
With Contact Manager, it’s easy to create form letters and mailing labels for mass mailings. To mail
merge a form letter, you must have already created it in the Direct Mailer. See Direct Mailer Feature on
page 59 for information on how to create a form letter.
Click the MAIL MERGE button, or choose it from the File menu. The following dialog box will appear.
54
To mail merge form letters
1.
Select the Form Letters option.
2.
Provide a name for the Mailing List, via the Select button or by typing in the file name in the input box.
Clicking the Select button will open a standard Windows file dialog box.
3.
When you click Print, the mailing list will be created. The mailing list will include all of the contacts in
the current lookup.
4.
When the mailing list is ready, the following dialog box will appear, asking whether you want to mail
merge and print now.
5.
Click Yes to mail merge and print the form letters now.
6.
Click No to cancel and return to the main screen. You can still use the mailing list that was just
created at a later time from the Direct Mailer. See Direct Mailer Feature on page 59 for more
information on mail merging.
55
To mail merge mailing labels
1.
Select the Mailing Labels option.
2.
Select the type of label you want from the list of Available Label Reports.
3.
If you want to review the mailing labels before printing, click the Print Preview checkbox (if it isn’t
already checked). You can print the mailing labels from the Print Preview screen.
4.
Click Print to print the mail merged mailing labels.
Viewing selected contacts
Click the LIST C ONTACTS button, or choose CONTACT L IST from the View menu. The following dialog will
appear.
This list includes all the contacts in the current lookup. You can select one or more contacts from this list
to view, thereby further refining the current lookup.
The Find function allows you to a specific contact within the current list, type in the company name and
click the Find button. You do not have to type in the entire company name, in fact, you can type only the
first few letters if you want. For example, type ‘john’ to go to the first contact whose company name
starts with the letters ‘John’, notice that it is not case sensitive.
1.
Scroll though the contacts in the list and select the one(s) that you want to view. To select a contact,
click the left-most column. Use the <Ctrl> and <Shift> keys in combination to select multiple contacts
and ranges of contacts. Your selections will be highlighted.
2.
Click the OK button. You will returned to the main screen with the selected contacts as the current
lookup.
56
How to edit groups
Click the EDIT G ROUPS button, or choose EDIT from the Groups menu. The following dialog will appear.
From this dialog, you can create, edit and delete groups of your own.
The Available Contacts drop down list shows all the available groups, which includes the pre-defined
groups as well as those you have created. The list below lists all the contacts in the selected group.
The Group drop down list shows all the groups that you have created. The list below lists all the contacts
in the selected group.
Contacts in the Available Contacts list can be added to the selected group in the Groups list by the Add >
button.
Contacts in the Groups list can be removed from the selected group by the Remove button.
Upon clicking the Profile button, a dialog box opens which allows you to review all the contact information
for the selected contact.
How create a new group
1.
Click the Create New button and a dialog box will open, which allows you to type a name for the
group.
2.
After naming the new group, click OK and you will be returned to the EDIT GROUPS dialog box. The
new group will be added to the Groups drop down list and is automatically selected.
3.
To add contacts to this group, follow the steps below in the next section.
57
How to add contacts to a group
1.
Select a group to edit from the Groups list.
2.
Select a group from the Available Contacts list, to provide a source of contacts to add.
3.
Scroll though the contacts in the Available Contacts list and select the one(s) that you want to add to
the group selected in the Groups list. To select a contact, click the left-most column. Use the <Ctrl>
and <Shift> keys in combination to select multiple contacts and ranges of contacts. Your selections
will be highlighted.
4.
Click the Add > button. All the of selected contacts from the Available Contacts list will be added to
the group selected in the Groups list.
5.
When finished, click the Done button to close the dialog box.
How to remove contract from a group
1.
Select a group from the Groups list.
2.
Scroll though the contacts in the Groups list and select the one(s) that you want to remove. To select
a contact, click the left-most column. Use the <Ctrl> and <Shift> keys in combination to select
multiple contacts and ranges of contacts. Your selections will be highlighted.
3.
Click the Remove button. All the of selected contacts from the Groups list will be removed from the
group selected in the Groups list.
4.
When finished, click the Done button to close the dialog box.
58
Direct Mailer Feature
Overview
The Direct Mailer enables you to generate form letters. Form letters are letters that contain the same body
text (i.e., standard language), but which are modified, or personalized, to a mailing list of contacts. This
mailing list, which you specify from open reports in the Report Manager and save as a .mai file, can be
formulated based on projects that interest you or the individuals you want to reach. To generate a form
letter, just create and save a standard document in the Direct Mailer, pick your previously created mailing
list, and then run a mail merge. The Direct Mailer will then generate a personalized form letter for each
contact on your mailing list.
Note: Any mailing list file (.mai) created in the Direct Mailer can be seamlessly used with Microsoft Word
for Windows for mail merging.
Getting Started
Main Screen
When you open the Direct Mailer, a new untitled document is opened automatically. To open an existing
document, choose the O PEN command from the File menu and select the file. When you open a
document, the current document is automatically closed. If it has been changed and not saved, you will
be prompted and asked if you want to save it. If it is a new document, and you elect to save it, you will
also have to provide a file name.
Note: The document name appears in the status bar in the lower left corner of the screen. New
documents are named Untitled by default. You should change this to something more appropriate when
you save it.
59
The Toolbar
All commands in this feature are available from the menu bar. Many of the commonly used commands
are also available on the toolbar, shown above.
Setting that are in effect are indicated by a depressed button. For example, in the toolbar shown above,
the depressed buttons indicate that left justify and single spacing are in effect.
The Ruler
The ruler indicates where the left and right margins and tabs are located. You can adjust these settings
directly from the ruler, instead of using the relevant menu bar commands.
The left margin is indicated by the split triangle at the left, underneath the inch markers. To adjust the left
margin, click and drag the split triangle until you have reached the desired location on the ruler. You can
also click and drag the top half of the split triangle to offset the first line of the paragraph from subsequent
lines.
The right margin is indicated by the solid triangle at the right, underneath the inch markers. To adjust the
right margin, click and drag the solid triangle until you have reached the desired location on the ruler.
The default tabs are indicated by inverted T characters, underneath the inch markers. To add a tab, click
anywhere underneath the inch markers and a new tab marker will in that locations.
Commands
File Menu
N EW…
Clears the current document and opens a new untitled one.
OPEN …
Opens a standard Windows file dialog box, which lets you choose an existing document
to open.
SAVE…
In a existing document, this command saves your current document. In a new document,
this command opens a standard Windows file dialog box, which allows you to name and
save your document.
SAVE AS…
Opens a standard Windows file dialog box, which allows you to name and save your
document.
PRINT…
Opens the Print dialog box, which allows you to specify the pages to print (all, selection,
or a range), print quality, collated copies, and the number of copies.
PRINT PREVIEW
60
This command is a toggle that switched between Print Preview mode and normal editing
mode.
MAIL MERGE…
Opens a standard Windows file dialog box, which allows you to select a mailing list to
mail merge into the current document. Once selected, the mail merge begins and the
resulting form letters are printed.
EXIT DIRECT MAILER
Exits this feature and returns you to Market Leader’s main screen.
Edit Menu
UNDO
Reverses the last action, e.g. Undo typing, Undo Insert Picture.
CUT
Deletes the currently selected text and copies it to the clipboard.
COPY
Copies the currently selected text to the clipboard.
PASTE
Pastes the text currently in the clipboard to the document at the cursor position.
CLEAR
Deletes the currently selected text.
SELECT ALL
Selects or highlights all text in the current document.
SEARCH…
Opens the Search dialog box, which allows you to search the document for occurrences
of certain text .
SEARCH N EXT …
Re-executes the last Search command.
R EPLACE...
Opens the Replace dialog box, which allows you to search the document for occurrences
of certain text and replace them with different text.
H EADER/FOOTER
Creates a split screen, allowing you to edit the header and footer by clicking the area you
choose with the mouse.
SPELLCHECKER...
This command checks the spelling in your document.
DICTIONARY MAINTENANCE…
Allow you to open or create custom dictionaries, calculates number of words in
document, displays language document is written in, performs word searches and
provides thesaurus-like list of words.
61
Insert Menu
DATA FIELDS...
Opens the DATA FIELDS dialog box, which allows you to insert DATA FIELDS in your
document. These fields are replaced with the appropriate data during a mail merge.
DOCUMENT …
Opens a standard Windows file dialog box, which lets you choose an existing document
to insert into the current document at the cursor position.
PICTURE…
Opens a dialog box, which lets you choose an existing picture file to insert into the
current document at the cursor position.
TOGGLE PAGE B REAK…
Inserts or removes a page break at the cursor position.
Format Menu
DOCUMENT …
Opens a dialog box, which allows you to adjust margins settings for the document.
FONT…
Opens a dialog box, which allows you to adjust font settings.
Type
Size
Color
Bold
Italic
Underline
Strikethru
Superscript
Subscript
PARAGRAPH…
Opens a dialog, which allows you adjust paragraph and tab settings.
Align Left
Align Center
Align Right.
Justify
Single Spacing
1.5 Spacing
62
Double Spacing
COLOR …
Opens a dialog box, which allows you to change the font color.
TEXT
Activates adjustments you may have made to your document settings, e.g. margins, tabs
and page breaks.
R EPAGINATION
Executes the page breaks and other effects that you specify within a document.
W ORD W RAP
When selected, this command causes the text to wrap around to the next line at the right
margin. If not selected, the text will continue without wrapping past the right margin.
CONTROL C HARACTERS
When selected, this command displays the control characters in the document, e.g. tab
markers, paragraph markings and spaces.
Mail merging
With Market Leader, it’s easy to create form letters for mass mailings. Once you have created a form
letter, you can mail merge it with a mailing list created it in the Report Manager or Contact Manager. In
fact, once you have already created a form letter, you can perform the mail merge directly from those
features following creation of the mailing list.
Below, we’ve outlined the steps needed to create/open a form letter and perform a mail merge from within
the Direct Mailer.
1.
Click NEW from the File menu to create a new document. If you want to use a form letter that you
have already created, click OPEN from the File menu instead and proceed to step 4.
2.
Type in your letter and insert the desired data fields.
3.
Click SAVE As from the File menu to save your document.
4.
Click MAIL MERGE from the File menu and select the desired mailing list. Once selected, the mail
merge will begin and the form letters will be printed.
63
How to insert data fields
1.
Click DATA FIELD from the Insert menu and the following dialog box will appear.
2.
Place the cursor inside the document where you want to insert a data field.
3.
Select the data field you want to insert and click the Insert button. The data field will be inserted at
the cursor location.
4.
Repeat step 2-3 for each data field you want to insert.
5.
When finished inserting data fields, click the Close button to close the dialog box.
How to type a document
1.
For our example, let’s open an existing document.
2.
Use the O PEN command under the File menu.
3.
Select Sample.hed from the file dialog box. Your screen should show the following letter:
4.
Let’s break the paragraph into thirds: place the cursor after the words, “...with a list of data field
5.
Hit the <Enter> key twice to create a blank line and a new paragraph. Depending on where you
placed your cursor, you may have to press the <Delete> key once or twice to bring the word “To”
flush with the left margin.
6.
To create an indent, press the <Tab> key one time.
7.
Let’s do that again. This time, place the cursor before the words, “When mail merging...”.
8.
Click <Enter> twice, then press the <Tab> key once. Now we have our three paragraphs.
64
How to edit a document
Continuing with the same document, let’s cut and paste a line of text.
1.
Place the cursor at the beginning of the second paragraph, click, hold, and drag the mouse to select
the first sentence: “To insert a field, double-click on the field you want or single-click the field and then
2.
To remove this sentence from the document, choose CUT from the Edit menu.
3.
To place the sentence somewhere else in the document, place the cursor anywhere in the document
and choose PASTE from the Edit menu. Note: If you have some text highlighted and then choose
PASTE, you will delete the highlighted text and replace it with the text from your last C UT. To select all
of the text in your letter, click SELECT ALL from the Edit menu.
How to use the header and footer
The header and footer appear at the top and bottom of printed pages respectively, and usually identify the
document or show the page number. To edit the header and footer, click the HEADER/FOOTER from the
Edit menu. The screen will split into two windows. The top window is the header; the bottom window is
the footer. To place text within either, click in the appropriate screen, then type in the information. When
you have finished, click HEADER/FOOTER from the Edit menu again to toggle back to the main document.
How to spellcheck your document
You should always spell check your document before you print it. To begin, simply choose SPELLCHECK
from the Edit menu.
When a misspelled word is found, a dialog box will appear with several options, including suggested
alternatives.
Spellcheck options
Always Ignore
Ignores all occurrences of the word in the document.
Always Replace
Automatically replaces all occurrences of the word in the document with the suggested correction.
Replace Word
Prompts you to verify the change each time it sees the word.
Ignore
Ignores the word and the suggested correction.
Stop/Edit
Cancels spellchecker.
65
Style/Description
Opens a dialog box for the suggested replacement word. It lists synonyms and descriptions of the words,
if any. You can also add your own synonyms to the list by selecting the desired word from the default (or
any custom) dictionary.
How to use dictionaries
Click DICTIONARY MAINTENANCE from the Edit menu. A dialog box will open that provides several
maintenance functions for the dictionary in use. You can add, edit and modify the style and description of
words. You can also open and add additional dictionaries.
You can have more than one dictionary open at a time. Initially, only the default dictionary is open. All
the open dictionaries are listed in the Dictionaries list on the D ICTIONARY MAINTENANCE dialog box.
To open an existing dictionary, click the Open button and a standard Windows file dialog box will open.
Choose the desired dictionary and it will be added to the Dictionaries list.
To open a new dictionary, click the New button and a standard Windows file dialog box will open.
Choose a name for the new dictionary and it will be added to the Dictionaries list. Initially, there are no
words in the new dictionary, so you must add them. For example, type a word in the input box at the
bottom of the dialog and click Insert. The word will be added to the Word List.
To close a dictionary, select it in the Dictionaries list and click the Close button.
66
Quick Quoter Feature
Overview
The Quick Quoter can be used to create worksheet templates for use in quickly estimating a job. If you
are familiar with such spreadsheet packages as Lotus 1-2-3 and Microsoft Excel, the interface will not be
foreign to you. For those of you who have never used a spreadsheet package, we provide a brief outline
of what a spreadsheet is and how it can be used.
Note: We have also included an appendix of spreadsheet formulas that you can use to create your own
worksheet templates.
Getting Started
Main Screen
About Worksheets
Worksheets are composed of individual cells that are arranged into a grid of rows and columns. Rows run
horizontally across the page (from left to right, beginning with A); columns run vertically down the page
(from top to bottom, beginning with 1). To define your worksheet, you can use the menu commands to
enter values and formulas in the cells you select.
Note: When you open a worksheet, the cursor will automatically appear in cell A1 (the top left cell).
67
Working with worksheet templates
To make the business of delivering quotes and estimates simpler, we’ve included a few templates for you
to open and customize to your specific needs. You should find that they are helpful tools for getting
started with the Quick Quoter. We recommend that you review them in depth before creating your own
templates, since you will need to practice executing menu and tool box commands to familiarize yourself
with Quick Quoter’s estimating capabilities. Also, please review the formulas we have included in the
Appendix to this manual.
Commands
File Menu
N EW
Clears the current worksheet and opens a new untitled one.
OPEN...
Opens a standard Windows file dialog box, which lets you choose an estimating template
or existing worksheet to open.
SAVE
In a existing worksheet, this command saves your current worksheet. In a new
worksheet, this command opens a standard Windows file dialog box, which allows you to
name and save your worksheet.
SAVE AS...
Opens a standard Windows file dialog box, which allows you to name and save your
worksheet.
PRINT...
Opens a dialog box, which allows you to specify the pages to print (all, selection, or a
range), print quality, collated copies, and the number of copies.
PRINT RANGE...
See the PRINT command.
PRINT TITLE…
Allows you to select adjacent rows and columns to print on every page. S ET fixes the title;
CLEAR cancels it.
PAGE S ETUP...
Opens a dialog box, which allows you to change headers and footers, margins, page
titles, alignment, print options, and scale.
EXIT Q UICK Q UOTER
Exits this feature and returns you to Market Leader’s main screen.
Edit Menu
CUT
Copies the selected range to the clipboard and deletes it.
COPY
Copies the selected range to the clipboard.
PASTE
68
Pastes the information stored on the clipboard to the cell(s) you select.
CLEAR
Opens a dialog box, which allows you to clear all parameters, formats, and values for any
selected cells or cell range. Same as pressing the <Del> key on the keyboard.
INSERT
Choices include RANGE R IGHT: inserts the selected range and shifts cells to the right,
RANGE D OWN: inserts the selected range and shifts cells down, COLUMNS R IGHT: inserts
the selected number of columns and shifts existing columns to the right, ROWS DOWN:
inserts the selected number rows and shifts existing rows down.
D ELETE
Choices include RANGE L EFT: deletes the selected range and shifts cells to the left,
RANGE U P: deletes the selected range and shifts cells up, COLUMNS L EFT: deletes the
selected number of columns and shifts existing columns to the left, ROWS U P: deletes the
selected number rows and shifts existing rows up.
COPY RIGHT
Copies the left cell rows in any range you highlight and pastes them across the columns
you select.
COPY DOWN
Copies the top left column cell in any range you highlight and pastes it to the rows you
select.
GOTO...
Allows you to jump to a specific cell by typing in the cell reference (i.e., F12).
CALCULATION...
Opens a dialog box, which allows you to specify the time between the worksheet
calculation updates.
R ECALCULATION
Instantly calculates the worksheet and updates all numbers.
D EFINE NAME...
Allows you to apply a name to a cell or a range of cells.
Format Menu
FONTS...
Opens a dialog box, which allows you to define the font, style, point size, effects, and
color.
NUMBERS ...
Opens a dialog box, which allows you to define the number format to be applied to your
selected cells.
ALIGNMENT ...
Opens a dialog box, which allows you to define how characters are positioned within a
cell.
BORDERS ...
Opens a dialog box, which allows you to define your worksheet’s border style and color.
PATTERNS ...
Opens a dialog box, which allows you to apply a pattern to any range you select.
69
COLUMN W IDTH...
Opens a dialog box, which allows you to define the width of the selected columns and
how they appear on the screen (Hide/Show subsequent cells in the selected range).
ROW H EIGHT ...
Opens a dialog box, which allows you to define the width of the selected columns and
how they appear on the screen Hide/Show subsequent cells in the selected range).
PROTECTION
Choices include: D EFINE... which allows you to lock or hide cells; and E NABLE and
D ISABLE, which allow you to turn on/off your defined protection.
SORT...
Allows you to sort your selected range by row or column, keys, and key reference, in
ascending or descending order.
70
Administration Utility
Overview
The Administration Utility is used to configure databases for multiple users. By default, all new databases
are configured for a single user. If you desire to share a particular database, then use this utility to add,
edit and delete user accounts and to assign the appropriate privileges.
All users accessing a shared database will be required to login with a name and password, assigned via
this utility.
When using a shared database, Market Leader coordinates concurrent editing and searching by multiple
users. It allows one user to edit data in a record while preventing others from simultaneously changing
the same data. In addition, one user can delete a record while preventing others from simultaneously
deleting the same data.
Once a database is configured to be shared, you will need to copy it to a location on your LAN where all
the users can see it.
Only users with Admin privileges can run this utility.
When you add a user, the default password is welcome. You can change a user’s password at any time.
Getting Started
71
Privileges
By default, all users have read privileges to the database. There are additional privileges that can be
assigned and they are listed below, along with an example of what they allow.
•
•
•
•
Write – Allow you to add reports, contacts and notes.
Delete – Allows you to delete tracking lists and contact groups.
Import – Allows you to import data into the database.
Admin – Allows you access to the Administration Utility.
Note: Reports, contacts and the User Notes associated with them are common data. That is, anyone
with Write privileges can add notes to a particular report and anyone with Delete privileges can delete
those notes. To Do notes, however, are not common data. That is, To Do notes added by you can only
be seen and deleted by you and users with Admin privileges. Even you cannot delete your To Do notes if
you do not have Delete privileges.
72
Maintenance Utility
Overview
The Maintenance Utility is used to perform various maintenance functions on databases. The most
important of the maintenance functions is Backup. By default, you will be reminded every 3 days to
BACKUP the database. You can configure this reminder as well elect to COMPACT and or R EPAIR the
database.
Anytime Market Leader is improperly shut down, e.g. your PC crashes, it is recommended that you
R EPAIR the database before starting Market Leader again.
Only users with Admin privileges can run this utility.
The maintenance functions require exclusive use of the database. Therefore, the specified database
must not be in use by any users in order to perform maintenance.
Getting Started
73
Functions
BACKUP
This function makes a BACKUP of the database using the file name and location that you specify.
COMPACT
This function compacts the database. Compacting on a regular basis is recommended to keep the
database file as small and efficient as possible.
REPAIR
This function repairs the database. Anytime Market Leader is improperly shut down, e.g. your PC
crashes, it is recommended that you REPAIR the database before starting Market Leader again.
VIEW LOG
All maintenance activity is logged to a file, including a user’s acceptance or denial of the reminder to
BACKUP the database. This function opens the maintenance log file in Microsoft WordPad™ for your
review.
Maintenance Options
Reminder Interval
This option determines how often the BACKUP reminder will be issued. The default is 3 days. This means
that every 3 days, when you start Market Leader, you will be prompted to BACKUP the database. If you
accept the reminder then Market Leader will be closed and the Maintenance Utility opened. Then,
perform the BACKUP and you won’t receive the reminder again until the specified interval passes.
Before Backup
This option allows you to elect to COMPACT and or R EPAIR the database before performing the BACKUP.
Auto Initiate Backup
This option allows you to elect to, from within Market Leader, automatically initiate the BACKUP each time
it is due, rather than having to stop Market Leader, start the Maintenance Utility and then subsequently
manually restart Market Leader. This option only works when the user attempting the maintenance has
exclusive access to the database.
Note: With this option, the same backup file name is used each time so that same file keeps getting
overwritten. It is recommended you occasionally make additional backups with different names.
74
Who’s There Utility
Overview
The Who’s There Utility produces a list of the users currently logged into the specified database.
If a user appears in the list when, in fact, the user is not actually logged on, you can correct the problem
by repairing the database via the Maintenance Utility. Most likely, this situation is the result of an
improper shut down of Market Leader, e.g. your PC crashed.
Only users with Admin privileges can run this utility.
Getting Started
Functions
R EFRESH
This function refreshes the list of users currently logged into the specified database.
LOGOUT
This function will logout the selected user.
75
Magic Number Utility
Overview
The Magic Number Utility is used to register your Market Leader software with Dodge Technical Support.
Upon registering your software, your license will be updated from a temporary license to a permanent
one.
Getting Started
How to register your software
1.
2.
3.
4.
5.
6.
7.
Run the Magic Number Utility by clicking, from the Windows desktop, Start/Programs/Dodge Market
Leade for Windows 95 and NT/Magic Number.
Call Dodge Technical Support at 800-393-6343 and tell the support representative
that you want to register your copy of Market Leader.
The support representative will ask you for your Registration Id, which you will find in the grayed-out
box labeled as such. Read this number to the support representative.
The support representative will then read you back a number. Type this number in to the input box
labeled Magic Number.
Click the Update button shown on the dialog.
Click OK in the confirmation dialog that follows. This dialog tells you that your license has been
updated from temporary to permanent.
Click Exit to close the Magic Number Utility.
76
Appendix
This appendix provides a reference list of the available worksheet functions.
ABS
Description
Syntax
Remarks
See Also
Examples
Returns the absolute value of a number.
ABS(number)
number is any integer.
An absolute value does not display a positive or negative sign.
SIGN function
ABS(-1) returns 1
ABS(1) returns 1
ACOS
Description
Syntax
Remarks
See Also
Examples
Returns the arc cosine of a number.
ACOS(number)
number is the cosine of the angle. The cosine can range from 1 to –1.
The resulting angle is returned in radians (from 0 to p). To convert the resulting radians to degrees, multiply the
radians by 180/PI().
COS and PI functions
ACOS(.5) returns 1.05
ACOS(-.2) returns 1.77
ACOSH
Description
Syntax
See Also
Examples
Returns the inverse hyperbolic cosine of a number.
ACOSH(number)
number is any number equal to or greater than 1.
ASINH, ATANH, and COSH functions
ACOSH(1.2) returns .62
ACOSH(3) returns 1.76
ADDRESS
Description
Syntax
See Also
Examples
Creates a cell address as text.
ADDRESS(row, column, ref_type [, a1] [, sheet])
row is the row number for the cell address.
column is the column number for the cell address.
ref_type is the cell reference type. The following table lists the values for this argument.
Argument Reference type
1 Absolute
2 Absolute row, relative column
3 Relative row, absolute column
4 Relative
a1 is the reference format. This argument must be TRUE() to represent an A1 reference format; Formula One
does not support the R1C1 reference format.
sheet is the name of an external spreadsheet. Omitting this argument assumes that the reference exists in the
current spreadsheet.
COLUMN, OFFSET, and ROW functions
ADDRESS(5, 6, 1) returns “$F$5” ADDRESS(5, 6, 4, TRUE(), “SALES.VTS”) returns “SALES.VTS!F5”
AND
Description
Syntax
See Also
Examples
Returns True if all arguments are true; returns False if at least one argument is false.
AND(logical_list)
logical_list is a list of conditions separated by commas. You can include in the list. The list can contain logical
values or a reference to a range containing logical values. Text and empty cells are ignored. If there are no
logical values in the list, #VALUE! Is returned.
IF, NOT, and OR functions
AND(1+1=2, 5+5=10) returns True because both arguments are true.
AND(TRUE(), FALSE()) returns False.
ASIN
Description
Syntax
Remarks
See Also
Examples
Returns the arcsine of a number.
ASIN(number)
number is the sine of the resulting angle, ranging from -1 to 1.
The resulting angle is returned in radians (ranging from -p/2 to p/2). To convert the resulting radians to
degrees, multiply the radians by 180/PI()
ASINH, PI, and SIN functions
ASIN(-1) returns -1.57
77
ASIN(.4) returns .41
ASINH
Description
Syntax
See Also
Examples
Returns the inverse hyperbolic sine of a number.
ASINH(number)
number is any number.
COSH, ASIN, ATANH, and SINH functions
ASINH(5.3) returns 2.37
ASINH(-4) returns -2.09
ATAN
Description
Syntax
Remarks
See Also
Examples
Returns the arctangent of a number.
ATAN(number)
number is the tangent of the angle.
The resulting angle is returned in radians, ranging from -p/2 to p/2. To convert the resulting radians to degrees,
multiply the radians by 180/PI()
ATAN2, ATANH, PI, and TAN functions
ATAN(3.5) returns 1.29
ATAN(-4) returns -1.33
ATAN2
Description
Syntax
Remarks
See Also
Examples
Returns the arctangent of the specified coordinates.
ATAN2(x, y)
x is the x coordinate. y is the y coordinate.
The arctangent is the angle from the x axis to a line with end points at the origin (0, 0) and a point with the given
coordinates (x, y). The angle is returned in radians, ranging from -p to p, excluding -p.
ATAN, ATANH, PI, and TAN functions
ATAN2(3, 6) returns 1.11
ATAN2(-1, .1) returns 3.04
ATANH
Description
Syntax
See Also
Examples
Returns the inverse hyperbolic tangent of a number.
ATANH(number)
number is a number between -1 and 1, excluding -1 and 1.
ACOS, ASINH, and TANH functions
ATANH(.5) returns .55
ATANH(-.25) returns -.26
AVERAGE
Description
Syntax
See Also
Examples
Returns the average of the supplied numbers. The result of AVERAGE is also known as the arithmetic mean.
AVERAGE(number_list)
number_list is a list of numbers separated by commas. As many as 30 numbers can be included in the list,
and the list can contain numbers or a reference to a range that contains numbers. Text, logical expressions, or
empty cells in a referenced range are ignored. All numeric values (including 0) are used.
MIN and MAX functions
AVERAGE(5, 6, 8, 14) returns 8.25
AVERAGE(C15:C17) returns 134; C15:C17 contains 24,144, and 234
CALL
Description
Syntax
Remarks
Calls a custom function in a dynamic linked library (DLL).
CALL(file_name, func_name, data_type, argument_list)
file_name is the name of the DLL that contains the custom function. The file name should be provided as a
quoted text string. You can also provide the path for the file.
func_name is the name of the custom function to be called from. The function name should be provided as a
quoted text string.
data_type is the data type, as a quoted text string, of the arguments and return value of the custom function.
The following table lists the data type codes that can be used for this argument.
argument_list is the list of arguments supplied to the custom function.
For declarations made in C, it is assumed that your compiler defaults to 8-byte doubles, 2-byte short integers,
and 4-byte long integers. In the Windows programming environment, all pointers should be far pointers. Pascal
calling conventions are used for all functions called from DLLs. For most C compilers, you must add the—
Pascal keyword to the function declaration.
If the return value for your custom function uses a pass-by-reference data type, a null pointer can be passed as
the return value. The null pointer is interpreted as the #NUM! error value.
For F and G data types, a custom function can modify an allocated string buffer. If the return value type code is
F or G, the value returned by the function is ignored. The list of function arguments is searched for the first data
type that corresponds to the return value type. The current contents of the allocated string buffer is taken for
the return value. 256 bytes is allocated for the argument; therefore, a function can return a larger string than it
receives. You can use a single digit (n), with a value from 1 to 9, as the code for data_type. The variable in the
location pointed to by the nth argument is modified instead of the return value; this process is referred to as
modifying in place. The nth argument must be a pass-by-reference data type. In addition, you must declare the
function void. For most C compilers, you can add the Void keyword to the function declaration.
78
Example
CALL(“\VTFORM1\DEMO4\CUSTFUNC.DLL”,“Quotient”, “BBB”, 3, 2)
CEILING
Description
Syntax
Remarks
See Also
Examples
Rounds a number up to the nearest multiple of a specified significance.
CEILING(number, significance)
number is the value to round. Significance is the multiple to which to round.
Regardless of the sign of the number, the value is rounded up, away from zero. If number is an exact multiple
of significance, no rounding occurs. If number or significance is non-numeric, #VALUE! is returned. When the
arguments have opposite signs, #NUM! is returned.
EVEN, FLOOR, INT, ODD, ROUND, and TRUNC functions
CEILING(1.23459, .05) returns 1.25
CEILING(-148.24, -2) returns -150
CHAR
Description
Syntax
Remarks
See Also
Examples
Returns a character that corresponds to the supplied ANSI code.
CHAR(number)
number is a value between 1 and 255 that specifies an ANSI character.
The character and associated numeric code are defined by Windows in the ANSI character set.
CODE function
CHAR(70) returns F
CHAR(35) returns #
CHOOSE
Description
Syntax
See Also
Examples
Returns a value from a list of numbers based on the index number supplied.
CHOOSE(index, item_list)
index is a number that refers to an item in item_list. index can be a cell reference. index can also be a formula
that returns any value from 1 to 29. If index is less than 1 or greater than the number of items in item_list,
#VALUE! is returned. If index is a fractional number, it is truncated to an integer.
item_list is a list of numbers, formulas, or text separated by commas. This argument can also be a range
reference. You can specify as many as 29 items in the list.
INDEX function
CHOOSE(2,”Q1”, “Q2”, “Q3”, “Q4”) returns “Q2”
AVERAGE(CHOOSE(1, A1:A10, B1:B10, C1:C10)) returns the average of the contents of range A1:A10.
CLEAN
Description
Syntax
Remarks
See Also
Examples
Removes all non-printable characters from the supplied text.
CLEAN(text)
text is any worksheet information.
Text that is imported from another environment may require this function.
CHAR and TRIM functions
CLEAN(“Payments “ & CHAR(8) & “Due”) returns Payments Due because the character returned by CHAR(8) is
non-printable.
CODE
Description
Syntax
Remarks
See Also
Examples
Returns a numeric code representing the first character of the supplied string.
CODE(text)
text is any string.
The numeric code and associated string are defined in your computer’s character set. The character set used
by Windows is the ANSI character set.
CHAR function
CODE(“A”) returns 65
CODE(“b”) returns 98
COLUMN
Description
Syntax
See Also
Examples
Returns the column number of the supplied reference.
COLUMN(reference)
reference is a reference to a cell or range. Omitting the argument returns the number of the column in which
COLUMN is placed.
COLUMNS and ROW functions
COLUMN(B3) returns 2
COLUMN() returns 4 if the function is entered in cell D2.
COLUMNS
Description
Syntax
See Also
Example
Returns the number of columns in a range reference.
COLUMNS(range)
range is a reference to a range of cells.
COLUMN and ROWS functions
COLUMNS(A1:D5) returns 4
COS
Description
Syntax
Returns the cosine of an angle.
COS(number)
79
See Also
Examples
number is the angle in radians. If the angle is in degrees, convert the angle to radians by multiplying the angle
by PI()/180.
ACOS, ASINH, ATANH, COSH, and PI functions
COS(1.444) returns .126
COS(5) returns .28
COSH
Description
Syntax
See Also
Examples
Returns the hyperbolic cosine of a number.
COSH(number)
number is any number.
ASINH, ATANH, and COS functions
COSH(2.10) returns 4.14
COSH(.24) returns 1.03
COUNT
Description
Syntax
Remarks
See Also
Examples
Returns the number of values in the supplied list.
COUNT(value_list)
value_list is a list of values. The list can contain as many as 30 values.
COUNT only numerates numbers or numerical values (e.g. logical values, dates, or text representations of
dates). If you supply a range, only numbers and numerical values in the range are counted. Empty cells,
logical values, text, and error values in the range are ignored.
AVERAGE, COUNTA, and SUM functions
COUNT(5, 6, “Q2”) returns 2
COUNT(“03/06/94”, “06/21/94”, “10/19/94”) returns 3
COUNTA
Description
Syntax
Remarks
See Also
Examples
Returns the number of non-blank values in the supplied list.
COUNTA(expression_list)
expression_list is a list of expressions. As many as 30 expressions can be included in the list.
COUNTA returns the number of cells that contain data in a range. Null values (“\x130013”) are counted, but
references to empty cells are ignored.
AVERAGE, COUNT, PRODUCT, and SUM functions
COUNTA(32, 45, “Earnings”, “”) returns 4
COUNTA(C38:C40) returns 0 when the specified range has empty cells
DATE
Description
Syntax
See Also
Examples
Returns the serial number of the supplied date.
DATE(year, month, day)
year is a number from 1900 to 2078. If year is between 1920 to 2019, you can specify two digits to represent
the year; otherwise specify all four digits.
month is a number representing the month (e.g. 12 represents December). If a number greater than 12 is
supplied, the number is added to the to the first month of the specified year.
day is a number representing the day of the month. If the number you specify for day exceeds the number of
days in that month, the number is added to the first day of the specified month.
DATEVALUE, DAY, MONTH, NOW, TIMEVALUE, TODAY, and YEAR functions
DATE(94, 6, 21) returns 34506
DATE(99, 3, 6) returns 36225
DATEVALUE
Description
Syntax
See Also
Examples
Returns the serial number of a date supplied as a text string.
DATEVALUE(text)
text is a date, in text format, between January 1, 1900, and December 31, 2078. If you omit the year, the
current year is used.
NOW, TIMEVALUE, and TODAY functions
DATEVALUE(“3/6/94”) returns 34399
DATEVALUE(“12/25/95”) returns 35058
DAY
Description
Syntax
See Also
Examples
Returns the day of the month that corresponds to the date represented by the supplied number.
DAY(serial_number)
serial_number is a date represented as a serial number or as text (e.g. “06-21-94” or “21-Jun-94”).
NOW, HOUR, MINUTE, MONTH, SECOND, TODAY, WEEKDAY, and YEAR functions
DAY(34399) returns 6
DAY(“06-21-94”) returns 21
DB
Description
Syntax
Returns the real depreciation of an asset for a specific period of time using the fixed-declining balance method.
DB(cost, salvage, life, period [, months])
cost is the initial cost of the asset.
salvage is the salvage value of the asset. life is the number of periods in the useful life of the asset.
period is the period for which to calculate the depreciation. The time units used to determine period and life
must match.
80
See Also
Example
months is the number of months in the first year of the item’s life. Omitting this argument assumes there are
12 months in the first year.
DDB, SLN, SYD, and VDB functions
DB(10000, 1000, 7, 3) returns 1451.52
DDB
Description
Syntax
Remarks
See Also
Example
Returns the depreciation of an asset for a specific period of time using the double-declining balance method or
a declining balance factor you supply.
DDB(cost, salvage, life, period [, factor])
cost is the initial cost of the asset.
salvage is the salvage value of the asset.
life is the number of periods in the useful life of the asset.
period is the period for which to calculate the depreciation. The time units used to determine period and life
must match.
factor is the rate at which the balance declines. Omitting this argument assumes a default factor of 2, the
double-declining balance factor.
The double-declining balance method uses an accelerated rate where the highest depreciation occurs in the
first period, decreasing in successive periods. All arguments for this function must be positive numbers.
DB, SLN, SYD, and VDB functions
DDB(10000,1000, 7, 3) returns 1457.73
DOLLAR
Description
Syntax
See Also
Examples
Returns the specified number as text, using currency format and the supplied precision.
DOLLAR(number [, precision])
number is a number, a formula that evaluates to a number, or a reference to a cell that contains a number.
precision is a value representing the number of decimal places to the right of the decimal point. Omitting this
argument assumes two decimal places.
FIXED, TEXT, and VALUE functions
DOLLAR(1023.789) returns “$1023.79”
DOLLAR(495.301, -2) returns “$500”
ERROR.TYPE
Description
Syntax
Remarks
See Also
Example
Returns a number corresponding to an error.
ERROR.TYPE(error_ref)
error_ref is a cell reference.
The following table lists the error text and associated error numbers returned by this function.
ISERR and ISERROR functions
ERROR.TYPE(A1) returns 2 if the formula in cell A1 attempts to divide by zero.
EVEN
Description
Syntax
See Also
Examples
Rounds the specified number up to the nearest even integer.
EVEN(number)
number is any number, a formula that evaluates to a number, or a reference to a cell that contains a number.
CEILING, FLOOR, INT, ODD, ROUND, and TRUNC functions
EVEN(2.5) returns 4
EVEN(2030.45) returns 2032
EXACT
Description
Syntax
See Also
Examples
Compares tw o expressions for identical, case-sensitive matches. True is returned if the expressions are
identical; False is returned if they are not.
EXACT(expression1, expression2)
expression1 is any text.
expression2 is any text.
LEN and SEARCH functions
EXACT(“Match”, “Match”) returns True
EXACT(“Match”, “match”) returns False
EXP
Description
Syntax
See Also
Examples
Returns e raised to the specified power. The constant e is 2.71828182845904 (the base of the natural
logarithm).
EXP(number)
number is any number as the exponent.
LN and LOG functions
EXP(2.5) returns 12.18
EXP(3) returns 20.09
FACT
Description
Syntax
See Also
Returns the factorial of a specified number.
FACT(number)
number is any non-negative integer. If you supply a real number, FACT truncates the number to an integer
before calculation.
PRODUCT function
81
Examples
FACT(2.5) returns 2
FACT(6) returns 720
FALSE
Description
Syntax
See Also
Returns the logical value False. This function always requires the trailing parentheses.
FALSE()
TRUE function
FIND
Description
Syntax
Remarks
See Also
Examples
Searches for a string of text within another text string and returns the character position at which the search
string first occurs.
FIND(search_text, text [, start_position])
search_text is the text to find. If you specify an empty string (“”), FIND matches the first character in text.
text is the text to be searched.
start_position is the character position in text where the search begins. The first character in text is character
number 1. When you omit this argument, the default starting position is character number 1.
FIND is case-sensitive. You cannot use wildcard characters in the search_text.
EXACT, LEN, MID, and SEARCH functions
FIND(“time”, “There’s no time like the present”) returns 12
FIND(“4”, “Aisle 4, Part 123-4-11”, 9) returns 19
FIXED
Description
Syntax
See Also
Examples
Rounds a number to the supplied precision, formats the number in decimal format, and returns the result as
text.
FIXED(number [, precision][, no_commas])
number is any number.
precision is the number of digits that appear to the right of the decimal place. When this argument is omitted, a
default precision of 2 is used. If you specify negative precision, number is rounded to the left of the decimal
point. You can specify a precision as great as 127 digits.
no_commas determines if thousands separators (commas) are used in the result. Use 1 to exclude commas in
the result. If no_commas is 0 or the argument is omitted, thousands separators are included (e.g. 1,000.00).
DOLLAR, ROUND, TEXT, and VALUE functions
FIXED(2000.5, 3) returns “2,000.500”
FIXED(2009.5, -1, 1) returns “2010”
FLOOR
Description
Syntax
Remarks
See Also
Examples
Rounds a number down to the nearest multiple of a specified significance.
FLOOR(number, significance)
number is the value to round.
significance is the multiple to which to round.
Regardless of the sign of the number, the value is rounded down, toward zero. If number is an exact multiple of
significance, no rounding occurs. If number or significance is non-numeric, #NAME? is returned. When the
arguments have opposite signs, #NUM! is returned.
CEILING, EVEN, INT, ODD, ROUND, and TRUNC functions
FLOOR(1.23459, .05) returns 1.2
FLOOR(-148.24, -2) returns –148
FV
Description
Syntax
Remarks
See Also
Examples
Returns the future value of an annuity based on regular payments and a fixed interest rate.
FV(interest, nper, payment [, pv] [, type])
interest is the fixed interest rate.
nper is the number of payments in an annuity.
payment is the fixed payment made each period.
pv is the present value, or the lump sum amount, the annuity is currently worth. When you omit this argument,
a present value of 0 is assumed.
type indicates when payments are due. Use 0 if payments are due at the end of the period or 1 if payments are
due at the beginning of the period. When you omit this argument, 0 is assumed.
The units used for interest must match those used for nper. For example, if the annuity has an 8% annual
interest rate over a period of 5 years, specify 8%/12 for interest and 5*12 for nper. Cash paid out, such as a
payment, is shown as a negative number. Cash received, such as a dividend check, is shown as a positive
number.
IPMT, NPER, PMT, PPMT, PV, and RATE functions
FV(5%, 8, -500) returns 4,774.55
FV(10%/12, 240, -700, 1) returns 531,550.86
HLOOKUP
Description
Syntax
Searches the top row of a table for a value and returns the contents of a cell in that table that corresponds to
the location of the search value.
HLOOKUP(search_item, search_range, row_index)
search_item is a value, text string, or reference to a cell containing a value that is matched against data in the
top row of search_range.
82
Remarks
See Also
Examples
search_range is a reference to the range (table) to be searched. The cells in the first row of search_range can
contain numbers, text, or logical values. The contents of the first row must be in ascending order (e.g. -2, -1, 0,
2...A through Z, False, True). Text searches are not case-sensitive.
row_index is the row in search_range from which the matching value is returned. row_index can be a number
from 1 to the number of rows in search_range. If row_index is less than 1, #VALUE! is returned. When
row_index is greater than the number of rows in the table, #REF! is returned.
HLOOKUP compares the information in the top row of search_range to the supplied search_item. When a
match is found, information located in the same column and supplied row (row_index) is returned.
If search_item cannot be found in the top row of search_range, the largest value that is less than search_item
is used. When search_item is less than the smallest value in the first row of the search_range, #REF! is
returned.
INDEX, LOOKUP, MATCH, and VLOOKUP functions
In the preceding worksheet:
HLOOKUP(“Northeast”, B1:E5, 3) returns 22.63
HLOOKUP(“Pacific”, B1:E5, 7) returns #REF!
HOUR
Description
Syntax
Remarks
See Also
Examples
Returns the hour component of the specified time in 24-hour format.
HOUR(serial_number)
serial_number is the time as a serial number. The decimal portion of the number represents time as a fraction
of the day.
The result is an integer ranging from 0 (12:00 AM) to 23 (11:00 PM).
DAY, MINUTE, MONTH, NOW,SECOND, WEEKDAY, and YEAR functions
HOUR(34259.4) returns 9
HOUR(34619.976) returns 23
IF
Description
Syntax
See Also
Example
Tests the condition and returns the specified value.
IF(condition, true_value, false_value)
condition is any logical expression.
true_value is the value to be returned if condition evaluates to True.
false_value is the value to be returned if condition evaluates to False.
AND, FALSE, NOT, OR, and TRUE functions
IF(A1>10, “Greater”, “Less”) returns Greater if the contents of A1 is greater than 10 and Less if the contents of
A1 is
less than 10.
INDEX
Description
Syntax
Remarks
See Also
Examples
Returns the contents of a cell from a specified range.
INDEX(reference [, row] [, column] [, range_number])
reference is a reference to one or more ranges. If reference specifies more than one range, separate each
reference with a comma and enclose reference in parentheses (e.g. (A1:C6, B7:E14, F4)). If each range in
reference contains only one row or column, you can omit the row or column argument. For example, if
reference is A1:A15, you can omit the column argument (e.g. INDEX(A1:A15, 3,, 1)).
row is the row number in reference from which to return data.
column is column number in reference from which to return data.
range_number specifies the range from which data is returned if reference contains more than one range. For
example, if reference is (A1:A10, B1:B5, D14:E23), A1:A10 is range_number 1, B1:B5 is range_number 2, and
D14:E23 is range_number 3.
If row, column, and range_number do not point to a cell within reference, #REF! is returned. If row and column
are omitted, INDEX returns the range in reference specified by range_number.
CHOOSE, HLOOKUP, LOOKUP, MATCH, and VLOOKUP functions
In the preceding worksheet:
INDEX(A2:B6, 2, 2) returns $1415.35
INDEX((A2:B6, D2:E6), 4, 2, 2) returns $1634.58
INDIRECT
Description
Syntax
See Also
Example
Returns the contents of the cell referenced by the specified cell.
INDIRECT(ref_text [, a1])
ref_text is a reference to a cell that references a third cell. If ref_text is not a valid reference, #REF! is returned.
a1 is the reference format. This argument must be TRUE() to represent an A1 reference format; Formula One
does not support the R1C1 reference format.
OFFSET function
NDIRECT(C1) returns the contents of the cell that C1 references. If C1 contains “D1”, the contents of D1 is
returned by INDIRECT.
INT
Description
Syntax
See Also
Examples
Rounds the supplied number down to the nearest integer.
INT(number)
number is any real number.
CEILING, FLOOR, MOD, ROUND, and TRUNC functions
INT(10.99) returns 10
INT(-10.99) returns –11
83
IPMT
Description
Syntax
Remarks
See Also
Examples
Returns the interest payment of an annuity for a given period, based on regular payments and a fixed periodic
interest rate.
IPMT(interest, per, nper, pv, [fv], [type])
interest is the fixed periodic interest rate.
per is the period for which to return the interest payment. This number must be between 1 and nper.
nper is the number of payments.
pv is the present value, or the lump sum amount the annuity is currently worth.
fv is the future value, or the value after all payments are made. If this argument is omitted, the future value is
assumed to be 0.
type indicates when payments are due. Use 0 if payments are due at the end of the period or 1 if payments are
due at the beginning of the period. When you omit this argument, 0 is assumed.
The units used for interest must match those used for nper. For example, if the annuity has an 8% annual
interest rate over a period of 5 years, specify 8%/12 for interest and 5*12 for nper. Cash paid out, such as a
payment, is shown as a negative number. Cash received, such as a dividend check, is shown as a positive
number.
FV, PMT, PPMT, and RATE functions
IPMT(8%/12, 2, 48, 18000) returns -117.87
IPMT(8%/12, 2, 48, 18000, 0, 1) returns -117.09
IRR
Description
Syntax
Remarks
See Also
Examples
Returns internal rate of return for a series of periodic cash flows.
IRR(cash_flow [, guess])
cash_flow is a reference to a range that contains values for which to calculate the internal rate of return. The
values must contain at least one positive and one negative value. During calculation, IRR uses the order in
which the values appear to determine the order of the cash flow. Text, logical values, and empty cells in the
range are ignored.
guess is the estimate of the internal rate of return. If no argument is supplied, a rate of return of 10 percent is
assumed.
The internal rate of return is the interest rate received for an investment consisting of payments (specified by
negative numbers) and investments (specified by positive numbers). IRR is calculated iteratively, cycling
through the calculation until the result is accurate to .00001 percent. If the result cannot be found after 20
iterations, #NUM! is returned. When this occurs, supply a different value for guess.
MIRR, NPV, and RATE functions
In the preceding worksheet:
IRR(B1:B6) returns 3.72%
IRR(B1:B3, -20%) returns -49.26%
ISBLANK
Description
Syntax
Remarks
See Also
Example
Determines if the specified cell is blank.
ISBLANK(reference)
reference is a reference to any cell.
If the referenced cell is blank, True is returned. False is returned if the cell is not blank.
ISERR, ISERROR, ISLOGICAL, ISNA, ISNONTEXT, ISNUMBER, ISREF, and ISTEXT functions
ISBLANK(A1) returns True if A1 is a blank cell.
ISERR
Description
Syntax
Remarks
See Also
Example
Determines if the specified expression returns an error value.
ISERR(expres sion)
expression is any expression.
If the expression returns any error except #N/A!, True is returned. Otherwise, False is returned.
ISBLANK, ISERROR, ISLOGICAL, ISNA, ISNONTEXT, ISNUMBER, ISREF, and ISTEXT functions
ISERR(A1) returns True if A1 contains a formula that returns an error (e.g. #NUM!).
ISERR
Description
Syntax
Remarks
See Also
Examples
Determines if the specified expression returns an error value.
ISERROR(expression)
expression is any expression.
If the expression returns any error value (e.g. #N/A!, #VALUE!, #REF!, #DIV/0!, #NUM!, #NAME?, or #NULL!),
True is returned. Otherwise, False is returned.
ISBLANK, ISERR, ISLOGICAL, ISNA, ISNONTEXT, ISNUMBER, ISREF, and ISTEXT functions
ISERROR(4/0) returns True
ISERROR(A1) returns False if A1 contains a formula that does not return an error.
ISLOGICAL
Description
Syntax
Remarks
See Also
Example
Determines if the specified expression returns a logical value.
ISLOGICAL(expression)
expression is any expression.
If the expression returns a logical value, True is returned. Otherwise, False is returned.
ISBLANK, ISERR, ISERROR, ISNA, ISNONTEXT, ISNUMBER, ISREF, and ISTEXT functions
ISLOGICAL(ISBLANK(A1)) returns True because ISBLANK returns a logical value.
84
ISNA
Description
Syntax
Remarks
See Also
Example
Determines if the specified expression returns the value not available error.
ISNA(expression)
expression is any expression.
If the expression returns the #N/A! error, True is returned. Otherwise, False is returned.
ISBLANK, ISERR, ISERROR, ISLOGICAL, ISNONTEXT, ISNUMBER, ISREF, and ISTEXT functions
ISNA(A1) returns True if cell A1 contains the NA() function or returns the error value #N/A!.
ISNONTEXT
Description
Syntax
Remarks
See Also
Examples
Determines if the specified expression is not text.
ISNONTEXT(expression)
expression is any expression.
If the expression returns any value that is not text, True is returned. Otherwise, False is returned.
ISBLANK, ISERR, ISERROR, ISLOGICAL, ISNA, ISNUMBER, ISREF, and ISTEXT functions
ISNONTEXT(F3) returns True if cell F3 contains a number or is a blank cell.
ISNONTEXT(“text”) returns False.
ISNUMBER
Description
Syntax
Remarks
See Also
Examples
Determines if the specified expression is a number.
ISNUMBER(expression)
expression is any expression.
If the expression returns a number, True is returned. Otherwise, False is returned. If expression returns a
number represented as text (e.g. “12”), False is returned.
ISBLANK, ISERR, ISERROR, ISLOGICAL, ISNA, ISNONTEXT, ISREF, and ISTEXT functions
ISNUMBER(123.45) returns True
ISNUMBER(“123”) returns False
ISREF
Description
Syntax
Remarks
See Also
Example
Determines if the specified expression is a range reference.
ISREF(expression)
expression is any expression.
If the expression returns a range reference, True is returned. Otherwise, False is returned.
ISBLANK, ISERR, ISERROR,ISLOGICAL, ISNA, ISNONTEXT, ISNUMBER, and ISTEXT functions
ISREF(A3) returns True
ISTEXT
Description
Syntax
Remarks
See Also
Example
Determines if the specified expression is text.
ISTEXT(expression)
expression is any expression.
If the expression returns text, True is returned. Otherwise, False is returned.
ISBLANK, ISERR, ISERROR, ISLOGICAL, ISNA, ISNONTEXT, ISNUMBER, and ISREF functions
ISTEXT(“2nd Quarter”) returns True
LEFT
Description
Syntax
See Also
Examples
Returns the leftmost characters from the specified text string.
LEFT(text [, num_chars])
text is any text string.
num_chars is the number of characters to return. This value must be greater than or equal to zero. If
num_chars is greater than the number of characters in text, the entire string is returned. Omitting this argument
assumes a value of 1.
MID and RIGHT functions
LEFT(“2nd Quarter”) returns “2”
LEFT(“2nd Quarter”, 3) returns “2nd”
LEN
Description
Syntax
See Also
Examples
Returns the number of characters in the supplied text string.
LEN(text)
text is any text string. Spaces in the string are counted as characters.
EXACT and SEARCH functions
LEN(“3rd Quarter”) returns 11
LEN(“1-3”) returns 3
LN
Description
Syntax
Remarks
See Also
Examples
Returns the natural logarithm (based on the constant e) of a number.
LN(number)
number is any positive real number.
LN is the inverse of the EXP function.
EXP, LOG, and LOG10 functions
LN(12.18) returns 2.50
LN(20.09) returns 3.00
85
LOG
Description
Syntax
See Also
Examples
Returns the logarithm of a number to the specified base.
LOG(number [, base])
text is any positive real number.
base is the base of the logarithm. Omitting this argument assumes a base of 10.
EXP, LN, and LOG10 functions
LOG(1) returns 0
LOG(10) returns 1
LOG10
Description
Syntax
See Also
Examples
Returns the base-10 logarithm of a number.
LOG10(number)
number is any positive real number.
EXP, LN, and LOG functions
LOG10(260) returns 2.41
LOG10(100) returns 2
LOOKUP
Description
Syntax
Remarks
See Also
Examples
Searches for a value in one range and returns the contents of the corresponding position in a second range.
LOOKUP(lookup_value, lookup_range, result_range)
lookup_value is the value for which to search in the first range.
lookup_range is the first range to search and contains only one row or one column. The range can contain
numbers, text, or logical values. To search lookup_range correctly, the expressions in the range must be
placed in ascending order (e.g. -2, -1, 0, 1, 2...A through Z, False, True). The search is not case-sensitive.
result_range is a range of one row or one column that is the same size as lookup_range.
If lookup_value does not have an exact match in lookup_range, the largest value that is less than or equal to
lookup_value is found and the corresponding position in result_range is returned. When lookup_value is
smaller than the data in lookup_range, #N/A is returned.
HLOOKUP, INDEX, and VLOOKUP functions
In the preceding worksheet:
LOOKUP(“North”, A2:A7, B2:B7) returns Detroit
LOOKUP(“Alabama”, A2:A7, B2:B7) returns #N/A
LOWER
Description
Syntax
See Also
Examples
Changes the characters in the specified string to lowercase characters. Numeric characters in the string are not
changed.
LOWER(text)
text is any string.
PROPER and UPPER functions
LOWER(“3rd Quarter”) returns “3rd quarter”
LOWER(“JOHN DOE”) returns “john doe”
MATCH
Description
Syntax
Remarks
See Also
Examples
A specified value is compared against values in a range. The position of the matching value in the search
range is returned.
MATCH(lookup_value, lookup_range, comparison)
lookup_value is the value against which to compare. It can be a number, text, or logical value or a reference
to a cell that contains one of those values.
lookup_range is the range to search and contains only one row or one column. The range can contain
numbers, text, or logical values.
comparison is a number that represents the type of comparison to be made between lookup_value and the
values in lookup_range. When you omit this argument, comparison method 1 is assumed. When comparison
is 1, the largest value that is less than or equal to lookup_value is matched. When using this comparison
method, the values in lookup_range must be in ascending order (e.g. ...-2, -1, 0, 1, 2..., A through Z, False,
True). When comparison is 0, the first value that is equal to lookup_value is matched. When using this
comparison method, the values in lookup_range can be in any order. When comparison is -1, the smallest
value that is greater than or equal to lookup_value is matched. When using this comparison method, the values
in lookup_range must be in descending order (e.g. True, False, Z through A, ...2, 1, 0, -1, -2...).
When using comparison method 0 and lookup_value is text, lookup_value can contain wildcard characters. The
wildcard characters are * (asterisk), which matches any sequence of characters, and ? (question mark), which
matches any single character. When no match is found for lookup_value, #N/A is returned.
HLOOKUP, INDEX, LOOKUP, and VLOOKUP functions
In the preceding worksheet:
MATCH(7600, B2:B7,1) returns 5
MATCH(“D*”, A2:A7,0) returns 2
MAX
Description
Syntax
Returns the largest value in the specified list of numbers.
MAX(number_list)
number_list is a list of as many as 30 numbers, separated by commas. The list can contain numbers, logical
values, text representations of numbers, or a reference to a range containing those values. Error values or text
86
See Also
Examples
that cannot be translated into numbers return errors. If a range reference is included in the list, text, logical
expressions, and empty cells in the range are ignored. If there are no numbers in the list, 0 is returned.
AVERAGE and MIN functions
MAX(50, 100, 150, 500, 200) returns 500
MAX(A1:F12) returns the largest value in the range
MID
Description
Syntax
Remarks
See Also
Examples
Returns the specified number of characters from a text string, beginning with the specified starting position.
MID(text, start_position, num_chars)
text is the string from which to return characters.
start_position is the position of the first character to return from text. If start_position is 1, the first character in
text is returned. If start_position is greater than the number of characters in text, an empty string (“”) is
returned. If start_position is less than 1, #VALUE! is returned.
num_chars is the number of characters to return. If num_chars is negative, #VALUE! is returned.
If start_position plus the number of characters in num_chars exceeds the length of text, the characters from
start_position to the end of text are returned.
CODE, FIND, LEFT, RIGHT, and SEARCH functions
MID(“Travel Expenses”, 8, 8) returns “Expenses”
MID(“Part #45-7234”, 7, 2) returns 45
MIN
Description
Syntax
See Also
Examples
Returns the smallest value in the specified list of numbers.
MIN(number_list)
number_list is a list of as many as 30 numbers, separated by commas. The list can contain numbers, logical
values, text representations of numbers, or a reference to a range containing those values. Error values or text
that cannot be translated into numbers return errors. If a range reference is included in the list, text, logical
expressions, and empty cells in the range are ignored. If there are no numbers in the list, 0 is returned.
AVERAGE and MAX functions
MIN(50, 100, 150, 500, 200) returns 50
MIN(A1:F12) returns the smallest value in the range
MINUTE
Description
Syntax
Remarks
See Also
Examples
Returns the minute that corresponds to the supplied date.
MINUTE(serial_number)
serial_number is the time as a serial number. The decimal portion of the number represents time as a fraction
of the day.
The result is an integer ranging from 0 to 59.
DAY, HOUR, MONTH, NOW, SECOND, WEEKDAY, and YEAR functions
MINUTE(34506.4) returns 36
MINUTE(34399.825) returns 48
MIRR
Description
Syntax
Remarks
See Also
Examples
Returns the modified internal rate of return for a series of periodic cash flows.
MIRR(cash_flows, finance_rate, reinvest_rate)
cash_flows is a reference to a range that contains values for which to calculate the modified internal rate of
return. The values must contain at least one positive and one negative value. During calculation, MIRR uses
the order in which the values appear to determine the order of cash flow. Values that represent cash received
should be positive; negative values represent cash paid. Text, logical values, and empty cells in the range are
ignored.
finance_rate is the interest rate paid on money used in the cash flow.
reinvest_rate is the interest rate received on money reinvested from the cash flow.
The modified internal rate of return considers the cost of the investment and the interest received on the
reinvestment of cash.
IRR, NPV, and RATE functions
In the preceding worksheet:
MIRR(B1:B6, 12%, 8%) returns 5.20%
MIRR(B1:B3, 12%, 8%) returns -40.93%
MOD
Description
Syntax
See Also
Examples
Returns the remainder after dividing a number by a specified divisor.
MOD(number, divisor)
number is any number.
divisor is any non-zero number. If divisor is 0, #DIV/0! is returned.
INT, ROUND, and TRUNC functions
MOD(-23, 3) returns 1
MOD(-23, -3) returns -2
MONTH
Description
Syntax
Remarks
Returns the month that corresponds to the supplied date.
MONTH(serial_number)
serial_number is the date as a serial number or as text (e.g. “06-21-94” or “21-Jun-94”).
MONTH returns a number ranging from 1 (January) to 12 (December).
87
See Also
Examples
DAY, NOW, HOUR, MINUTE, SECOND, TODAY, WEEKDAY, and YEAR functions
MONTH(“06-21-94”) returns 6
MONTH(34626) returns 10
N
Description
Syntax
Remarks
See Also
Examples
Tests the supplied value and returns the value if it is a number.
N(value)
value is a value or a reference to a cell containing a value to test.
Numbers are returned as numbers, serial numbers formatted as dates are returned as serial numbers, and the
logical function TRUE() is returned as 1. All other expressions return 0.
T and VALUE functions
N(32467) returns 32467
N(A4) returns 1 if A4 contains the logical function True
NA
Description
Syntax
Remarks
See Also
Returns the error value #N/A, which represents “not
NA()
Use NA to mark cells that lack data without leaving them empty. Empty cells may not be correctly represented
in some calculations. Although NA does not use arguments, you must supply the empty parentheses to
correctly reference the function.
ISNA function
NOT
Description
Syntax
Remarks
See Also
Examples
Returns a logical value that is the opposite of its value.
NOT(logical)
logical is an expression that returns a logical value (e.g. True or False).
If logical is false, NOT returns True. Conversely, if logical is true, NOT returns False.
AND, IF, and OR functions
NOT(TRUE()) returns False
NOT(MONTH(“12/25/94”) = 12) returns False
NOW
Description
Syntax
Remarks
See Also
Returns the current date and time as a serial number.
NOW()
In a serial number, numbers to the left of the decimal point represent the date; numbers to the right of the
decimal point represent the time. The result of this function changes only when a recalculation of the worksheet
occurs.
DATE, DAY, HOUR, MINUTE, MONTH,SECOND, TODAY, WEEKDAY, and YEAR functions
NPER
Description
Syntax
See Also
Examples
Returns the number of periods of an investment based on regular periodic payments and a fixed interest rate.
NPER(interest, pmt, pf [, fv] [, type])
interest is the fixed interest rate.
pmt is the fixed payment made each period. Generally, pmt includes the principle and interest, not taxes or
other fees.
pf is the present value, the lump-sum amount that a series of future payments is currently worth.
fv is the future value, the balance to attain after the final payment. Omitting this argument assumes a future
balance of 0.
type indicates when payments are due. Use 0 if payments are due at the end of the period or 1 if payments are
due at the beginning of the period. When you omit this argument, 0 is assumed.
FV, IPMT, PMT, PPMT, PV, and RATE functions
NPER(12%/12, -350, -300, 16000, 1) returns 36.67
NPER(1%, -350, -300, 16000) returns 36.98
NPV
Description
Syntax
Remarks
See Also
Example
Returns the net present value of an investment based on a series of periodic payments and a discount rate.
NPV(discount_rate, value_list)
discount_rate is the rate of discount for one period.
value_list is a list of as many as 29 arguments or a reference to a range that contains values that represent
payments and income. During calculation, NPV uses the order in which the values appear to determine the
order of cash flow. Numbers, empty cells, and text representations of numbers are included in the calculation.
Errors and text that cannot be translated into numbers are ignored. If value_list is a range reference, only
numeric data in the range is included in the calculation. Other types of data in the range (e.g. empty cells,
logical values, text, and error values) are ignored.
The time span NPV uses for calculation begins one period before the first cash flow date and ends when the
last cash flow payment is made. This function is based on future cash flows. When your first cash flow occurs
at the beginning of the first period, the first value must be added to the NPV result, not supplied as a value in
value_list.
FV, IRR, and PV functions
NPV(8%, -12000, 3000, 3000, 3000, 7000) returns 811.57
88
ODD
Description
Syntax
See Also
Examples
Rounds the specified number up to the nearest odd integer.
ODD(number)
number is any number, a formula that evaluates to a number, or a reference to a cell that contains a number.
CEILING, EVEN, FLOOR, INT, ROUND, and TRUNC functions
ODD(3.5) returns 5
ODD(6) returns 7
OFFSET
Description
Syntax
Remarks
Examples
Returns the contents of a range that is offset from a starting point in the spreadsheet.
OFFSET(reference, rows, columns [, height] [, width])
reference is a reference to a cell from which the offset reference is based. If you specify a range reference,
#VALUE! is returned.
rows is the number of rows from reference that represents the upper-left cell of the offset range. A positive
number represents rows below the starting cell; a negative number represents rows above the starting cell. If
rows places the upper-left cell of the offset range outside the spreadsheet boundary, #REF! is returned.
columns is the number of columns from reference that represents the upper-left cell of the offset range. A
positive number represents columns right of the starting cell; a negative number represents columns left of the
starting cell. If columns places the upper-left cell of the offset range outside the spreadsheet boundary, #REF!
is returned.
height is a positive number representing the number of rows to include in the offset range. Omitting this
argument assumes a single row.
width is a positive number representing the number of columns to include in the offset range. Omitting this
argument assumes a single column.
OFFSET does not change the current selection in the worksheet. Because it returns a reference, OFFSET can
be used in any function that requires or uses a cell or range reference as an argument.
OFFSET(B1, 3, 2, 1, 1) returns the contents of cell D4
SUM(OFFSET(A1, 2, 4, 3, 2)) equals the sum of the range E3:F5
OR
Description
Syntax
See Also
Example
Returns True if at least one of a series of logical arguments is true.
OR(logical_list)
logical_list is a list of conditions separated by commas. You can include as many as 30 conditions in the list.
The list can contain logical values or a reference to a range containing logical values. Text and empty cells are
ignored. If there are no logical values in the list, the error value #VALUE! is returned.
AND, IF, and NOT functions
OR(1 + 1 = 1, 5 + 5 = 10) returns True because one of the arguments is true.
PI
Description
Syntax
Remarks
See Also
Returns the value of pi (p), which is approximately 3.14159265358979 when calculated to 15 significant digits.
PI()
Although PI does not use arguments, you must supply the empty parentheses to correctly reference the
function.
COS, SIN, and TAN functions
PMT
Description
Syntax
Remarks
See Also
Examples
Returns the periodic payment of an annuity, based on regular payments and a fixed periodic interest rate.
PMT(interest, nper, pv [, fv] [, type])
interest is the fixed periodic interest rate.
nper is the number of periods in the annuity.
pv is the present value, or the amount the annuity is currently worth.
fv is the future value, or the amount the annuity will be worth. When you omit this argument, a future value of 0
is assumed.
type indicates when payments are due. Use 0 if payments are due at the end of the period or 1 if payments are
due at the beginning of the period. When you omit this argument, 0 is assumed.
PMT returns only the principal and interest payment, it does not include taxes or other fees. The units used for
interest must match those used for nper. For example, if the annuity has an 8% annual interest rate over a
period of 5 years, specify 8%/12 for interest and 5*12 for nper. Cash paid out, such as a payment, is shown as
a negative number. Cash received, such as a dividend check, is shown as a positive number.
IPMT, FV, NPER, PPMT, PV, and RATE functions
PMT(8%/12, 48, 18000) returns -439.43
PMT(8%/12, 48, 18000, 0, 1) returns -436.52
PPMT
Description
Syntax
Returns the principle paid on an annuity for a given period.
PPMT(interest, per, nper, pv, [fv], [type])
interest is the fixed periodic interest rate.
per is the period for which to return the principle.
nper is the number of periods in the annuity.
pv is the present value, or the amount the annuity is currently worth.
fv is the future value, or the amount the annuity will be worth. When you omit this argument, a future value of 0
is assumed.
89
Remarks
See Also
Examples
type indicates when payments are due. Use 0 if payments are due at the end of the period or 1 if payments are
due at the beginning of the period. When you omit this argument, 0 is assumed.
The units used for interest must match those used for nper. For example, if the annuity has an 8% annual
interest rate over a period of 5 years, specify 8%/12 for interest and 5*12 for nper.
FV, IPMT, NPER, PMT, PV, and RATE functions
PPMT(8%/12, 2, 48, 18000) returns -321.56
PPMT(8%/12, 2, 48, 18000, 0, 1) returns -319.43
PRODUCT
Description
Syntax
See Also
Example
Multiplies a list of numbers and returns the result.
PRODUCT(number_list)
number_list is a list of as many as 30 numbers, separated by commas. The list can contain numbers, logical
values, text representations of numbers, or a reference to a range containing those values. Error values or text
that cannot be translated into numbers return errors. If a range reference is included in the list, text, logical
expressions, and empty cells in the range are ignored. All numeric values, including 0, are used in the
calculation.
FACT and SUM functions
PRODUCT(1, 2, 3, 4) returns 24
PROPER
Description
Syntax
Remarks
See Also
Examples
Returns the specified string in proper-case format.
PROPER(text)
text is any string.
In proper-case format, the first alphabetic character in a word is capitalized. If an alphabetic character follows a
number, punctuation mark, or space, it is capitalized. All other alphabetic characters are lowercase. Numbers
are not changed by PROPER.
LOWER and UPPER functions
PROPER(“3rd Quarter”) returns “3Rd Quarter”
PROPER(“JOHN DOE”) returns “John Doe”
PV
Description
Syntax
Remarks
See Also
Examples
Returns the present value of an annuity, considering a series of constant payments made over a regular
payment period.
PV(interest, nper, pmt [, fv] [, type])
interest is the fixed periodic interest rate.
nper is the number of payment periods in the investment.
pmt is the fixed payment made each period.
fv is the future value, or the amount the annuity will be worth. When you omit this argument, a future value of 0
is assumed.
type indicates when payments are due. Use 0 if payments are due at the end of the period or 1 if payments are
due at the beginning of the period. When you omit this argument, 0 is assumed.
The units used for interest must match those used for nper. For example, if the annuity has an 8% annual
interest rate over a period of 5 years, specify 8%/12 for interest and 5*12 for nper. Cash paid out, such as a
payment, is shown as a negative number. Cash received, such as a dividend check, is shown as a positive
number.
FV, IPMT, NPER, PMT, PPMT, and RATE functions
PV(8%/12, 48, 439.43) returns 17999.89
PV(8%/12, 48, -439.43) returns 17999.89
RAND
Description
Syntax
Remarks
Example
Returns a number selected randomly from a uniform distribution greater than or equal to 0 and less than 1.
RAND()
Although RAND does not use arguments, you must supply the empty parentheses to correctly reference the
function.
RAND()*10 returns a random number greater than or equal to 0 and less than 10.
RATE
Description
Syntax
Remarks
See Also
Returns the interest rate per period of an annuity, given a series of constant cash payments made over a
regular payment period.
RATE(nper, pmt, pv [, fv] [, type] [, guess])
nper is the number of periods in the annuity.
pmt is the fixed payment made each period. Generally, pmt includes only principle and interest, not taxes or
other fees.
pv is the present value of the annuity.
fv is the future value, or the amount the annuity will be worth. When you omit this argument, a future value of 0
is assumed.
type indicates when payments are due. Use 0 if payments are due at the end of the period or 1 if payments are
due at the beginning of the period. When you omit this argument, 0 is assumed.
guess is your estimate of the interest rate. If no argument is supplied, a value of .1 (10%) is assumed.
RATE is calculated iteratively, cycling through the calculation until the result is accurate to .00001 percent. If
the result cannot be found after 20 iterations, #NUM! is returned. When this occurs, supply a different value for
guess.
FV, IPMT, NPER, PMT, PPMT, and PV functions
90
Example
RATE(48, -439.43, 18000) returns .0067 (rounded to 4 decimals), which is the monthly interest rate. The
annual interest rate (.0067 multiplied by 12) is 8%.
REPLACE
Description
Syntax
See Also
Examples
Replaces part of a text string with another text string.
REPLACE(orig_text, start_position, num_chars, repl_text)
orig_text is the original text string.
start_position is the character position where the replacement begins. If start_position is greater than the
number of characters in orig_text, repl_text is appended to the end of orig_text. If start_position is less than 1,
#VALUE! is returned.
num_chars is the number of characters to replace. If this argument is negative, #VALUE! is returned.
repl_text is the replacement text string.
MID, SEARCH, and TRIM functions
REPLACE(“For the year: 1993”, 18, 1,“4”) returns “For the year: 1994”
REPT
Description
Syntax
Remarks
Example
Repeats a text string the specified number of times.
REPT(text, number)
text is any text string.
number is the number of times you want text to repeat. If number is 0, empty text (“”) is returned.
The result of REPT cannot exceed 255 characters.
REPT(“error-“, 3) returns “error-erro
RIGHT
Description
Syntax
See Also
Examples
Returns the rightmost characters from the given text string.
RIGHT(text [, num_chars])
text is any text string.
num_chars is the number of characters to return. The value must be greater than or equal to zero. If
num_chars is greater than the number of characters in text, the entire string is returned. Omitting this argument
assumes a value of 1.
LEFT and MID functions
RIGHT(“2nd Quarter”) returns “r”
RIGHT(“2nd Quarter”, 7) returns “Quarter”
ROUND
Description
Syntax
See Also
Examples
Rounds the given number to the supplied number of decimal places.
ROUND(number, precision)
number is any value.
precision is the number of decimal places to which number is rounded. When a negative precision is used, the
digits to the right of the decimal point are dropped and the absolute number of significant digits specified by
precision are replaced with zeros. If precision is 0, number is rounded to the nearest integer.
CEILING, FLOOR, INT, MOD, and TRUNC functions
ROUND(123.456, 2) returns 123.46
ROUND(9899.435, -2) returns 9900
ROW
Description
Syntax
See Also
Examples
Returns the row number of the supplied reference.
ROW(reference)
reference is a cell or range reference. Omitting this argument returns the row number of the cell in which ROW
is entered.
COLUMN and ROWS function
ROW(B3) returns 3
ROWS
Description
Syntax
See Also
Examples
Returns the number of rows in a range reference.
ROWS(range)
range is a reference to a range of cells.
COLUMNS and ROW functions
ROWS(A1:D5) returns 5
ROWS(C30:F35) returns 6
SEARCH
Description
Syntax
Locates the position of the first character of a specified text string within another text string.
SEARCH(search_text, text [, start_position])
search_text is the text to find. The search string can contain wildcard characters. The available wildcard
characters are * (asterisk), which matches any sequence of characters, and ? (question mark), which matches
any single character. To search for an asterisk or question mark, include a tilde (~) before the character.
text is the text to be searched.
start_position is the character position where the search begins. If the number you specify is less than 0 or
greater than the number of characters in text, #VALUE! is returned. Omitting this argument assumes a starting
position of 1.
91
Remarks
See Also
Examples
Text is searched from left to right, starting at the position specified. The search is not case-sensitive. If text
does not contain the search string, #VALUE! is returned.
FIND, MID, REPLACE, and SUBSTITUTE functions
SEARCH(“?5”, “Bin b45”) returns 6
SEARCH(“b”, “Bin b45”, 4) returns 5
SECOND
Description
Syntax
See Also
Examples
Returns the second that corresponds to the supplied date.
SECOND(serial_number)
serial_number is the time as a serial number. The decimal portion of the number represents time as a fraction
of the day.
DAY, HOUR, MINUTE, MONTH, NOW, WEEKDAY, and YEAR functions
SECOND(.259) returns 58
SECOND(34657.904) returns 46
SIGN
Description
Syntax
Remarks
See Also
Examples
Determines the sign of the specified number.
SIGN(number)
number is any number.
SIGN returns 1 if the specified number is positive, -1 if it is negative, and 0 if it is 0.
ABS function
SIGN(-123) returns -1
SIGN(123) returns 1
SIN
Description
Syntax
See Also
Examples
Returns the sine of the supplied angle.
SIN(number)
number is the angle in radians. If the angle is in degrees, convert the angle to radians by multiplying the angle
by PI()/180.
ASIN and PI functions
SIN(45) returns .85
SIN(90) returns .89
SINH
Description
Syntax
See Also
Examples
Returns the hyperbolic sine of the specified number.
SINH(number)
number is any number.
ASINH and PI functions
SINH(1) returns 1.18
SINH(3) returns 10.02
SLN
Description
Syntax
See Also
Example
Returns the depreciation of an asset for a specific period of time using the straight-line balance method.
SLN(cost, salvage, life)
cost is the initial cost of the asset.
salvage is the salvage value of the asset.
life is the number of periods of the useful life of the asset.
DDB, SYD, and VDB functions
SLN(10000, 1000, 7) returns 1285.71
SQRT
Description
Syntax
See Also
Examples
Returns the square root of the specified number.
SQRT(number)
number is any positive number. If you specify a negative number, #NUM! is returned.
SUMSQ function
SQRT(9) returns 3
SQRT(2.5) returns 1.58
STDEV
Description
Syntax
See Also
Example
Returns the standard deviation of a population based on a sample of supplied values. The standard deviation
of a population represents an average of deviations from the population mean within a list of values.
STDEV(number_list)
number_list is a list of as many as 30 numbers, separated by commas. The list can contain numbers or a
reference to a range that contains numbers.
STDEVP, VAR, and VARP functions
STDEV(4.0, 3.0, 3.0, 3.5, 2.5, 4.0, 3.5) returns .56
STDEVP
Description
Syntax
Returns the standard deviation of a population based on an entire population of values. The standard deviation
of a population represents an average of deviations from the population mean within a list of values.
STDEVP(number_list)
92
See Also
Example
number_list is a list of as many as 30 numbers, separated by commas. The list can contain numbers or a
reference to a range that contains numbers.
STDEV, VAR, and VARP functions
STDEVP(4.0, 3.0, 3.0, 3.5, 2.5, 4.0, 3.5) returns .52
SUBSTITUTE
Description
Syntax
See Also
Examples
Replaces a specified part of a text string with another text string.
SUBSTITUTE(text, old_text, new_text [, instance])
text is a text string that contains the text to replace. You can also specify a reference to a cell that contains
text.
old_text is the text string to be replaced.
new_text is the replacement text.
instance specifies the occurrence of old_text to replace. If this argument is omitted, every instance of old_text
is replaced.
REPLACE and TRIM functions
SUBSTITUTE(“First Quarter Results”, “First”, “Second”) returns “Second Quarter Results”
SUBSTITUTE(“Shipment 45, Bin 45”, “45”, “52”, 2) returns “Shipment 45, Bin 52”
SUM
Description
Syntax
See Also
Examples
Returns the sum of the supplied numbers.
SUM(number_list)
number_list is a list of as many as 30 numbers, separated by commas. The list can contain numbers, logical
values, text representations of numbers, or a reference to a range containing those values. Error values or text
that cannot be translated into numbers return errors. If a range reference is included in the list, text, logical
expressions, and empty cells in the range are ignored.
AVERAGE, COUNT, COUNTA, PRODUCT, and SUMSQ functions
SUM(1000, 2000, 3000) returns 6000
SUM(A10:D10) returns 4000 when each cell in the range contains 1000
SUMSQ
Description
Syntax
See Also
Example
Squares each of the supplied numbers and returns the sum of the squares.
SUMSQ(number_list)
number_list is a list of as many as 30 numbers, separated by commas. The list can contain numbers, logical
values, text representations of numbers, or a reference to a range containing those values. Error values or text
that cannot be translated into numbers return errors. If a range reference is included in the list, text, logical
expressions, and empty cells in the range are ignored.
SUM function
SUMSQ(9, 10, 11) returns 302
SYD
Description
Syntax
See Also
Example
Returns the depreciation of an asset for a specified period using the sum-of-years method. This depreciation
method uses an accelerated rate, where the greatest depreciation occurs early in the useful life of the asset.
SYD(cost, salvage, life, per)
cost is the initial cost of the asset.
salvage is the salvage value of the asset.
life is the number of periods in the useful life of the asset.
period is the period for which to calculate the depreciation. The time units used to determine period and life
must match.
DDB, SLN, and VDB functions
SYD(10000, 1000, 7, 3) returns 1607.14
T
Description
Syntax
Remarks
See Also
Examples
Tests the supplied value and returns the value if it is text.
T(value)
value is the value to test.
Empty text (“”) is returned for any value that is not text.
CELL, N, and VALUE functions
T(“Report”) returns “Report”
T(A4) returns empty text (“”) if A4 contains a number
TAN
Description
Syntax
See Also
Examples
Returns the tangent of the specified angle.
TAN(number)
number is the angle in radians. To convert a number expressed as degrees to radians, multiply the degrees by
180/PI().
TAN, ATAN2, PI, and TANH functions
TAN(45) returns 1.62
TAN(90) returns -2.00
TANH
Description
Syntax
Returns the hyperbolic tangent of a number.
TANH(number)
93
See Also
Examples
number is any number.
ATANH, COSH, SINH, and TAN functions
TANH(-2) returns -.96
TANH(1.2) returns .83
TEXT
Description
Syntax
See Also
Examples
Returns the given number as text, using the specified formatting.
TEXT(number, format)
number is any value, a formula that evaluates to a number, or a reference to a cell that contains a value.
format is a string representing a number format. The string can be any valid format string including “General,”
“M/DD/YY,” or “H:MM AM/PM.” The format must be surrounded by a set of double quotation marks. Asterisks
cannot be included in format.
DOLLAR, FIXED, T, and VALUE functions
TEXT(123.62, “0.000”) returns 123.620
TEXT(34626.2, “MM/DD/YY”) returns 10/19/94
TIME
Description
Syntax
See Also
Examples
Returns a serial number for the supplied time.
TIME(hour, minute, second)
hour is a number from 0 to 23.
minute is a number from 0 to 59.
second is a number from 0 to 59.
HOUR, MINUTE, NOW, SECOND, and TIMEVALUE functions
TIME(12, 26, 24) returns .52
TIME(1, 43, 34) returns .07
TIMEVALUE
Description
Syntax
See Also
Examples
Returns a serial number for the supplied text representation of time.
TIMEVALUE(text)
text is a time in text format.
HOUR, MINUTE, NOW, SECOND, and TIME functions
TIMEVALUE(“1:43:43 am”) returns .07
TIMEVALUE(“14:10:07”) returns .59
TODAY
Description
Syntax
Remarks
See Also
Returns the current date as a serial number.
TODAY()
This function is updated only when the worksheet is recalculated.
DATE, DAY, and NOW functions
TRIM
Description
Syntax
Remarks
See Also
Example
Removes all spaces from text except single spaces between words.
TRIM(text)
text is any text string or a reference to a cell that contains a text string.
Text that is imported from another environment may require this function.
CLEAN, MID, REPLACE, and SUBSTITUTE functions
TRIM(“ Level 3, Gate 45 “) returns “Level 3, Gate 45”
TRUE
Description
Syntax
See Also
Returns the logical value True. This function always requires the trailing parentheses.
TRUE()
FALSE function
TRUNC
Description
Syntax
Remarks
See Also
Examples
Truncates the given number to an integer.
TRUNC(number [, precision])
number is any value.
precision is the number of decimal places allowed in the truncated number. Omitting this argument assumes a
precision of 0.
TRUNC removes the fractional part of a number to the specified precision without rounding the number.
CEILING, FLOOR, INT, MOD, and ROUND functions
TRUNC(123.456, 2) returns 123.45
TRUNC(9899.435, -2) returns 9800
TYPE
Description
Syntax
Remarks
See Also
Examples
Returns the argument type of the given expression.
TYPE(expression)
expression is any expression.
The following table lists the expression types and numbers.
ISBLANK, ISERR, ISERROR, ISLOGICAL, ISNA, ISNONTEXT, ISNUMBER, ISREF, and ISTEXT functions
TYPE(A1) returns 1 if cell A1 contains a number.
TYPE(“Customer”) returns 2
94
UPPER
Description
Syntax
Remarks
See Also
Examples
Changes the characters in the specified string to uppercase characters.
UPPER(text)
text is any string.
Numeric characters in the string are not changed.
LOWER and PROPER functions
UPPER(“3rd Quarter”) returns “3RD QUARTER”
UPPER(“JOHN DOE”) returns “JOHN DOE”
VALUE
Description
Syntax
See Also
Examples
Returns the specified text as a number.
VALUE(text)
text is any text string, a formula that evaluates to a text string, or a cell reference that contains a text string.
You can also specify a date or time in a recognizable format (e.g. M/DD/YY for dates or H:MM AM/PM for
time). If the format is not recognized, #VALUE! is returned.
DOLLAR, FIXED, and TEXT functions
VALUE(9800) returns 9800
VALUE(“123”) returns 123
VAR
Description
Syntax
See Also
Example
Returns the variance of a population based on a sample of values.
VAR(number_list)
number_list is a list of as many as 30 numbers, separated by commas. The list can contain numbers or a
reference to a range that contains numbers.
STDEV, STDEVP, and VARP functions
VAR(4.0, 3.0, 3.0, 3.5, 2.5, 4.0, 3.5) returns .31
VARP
Description
Syntax
See Also
Example
Returns the variance of a population based on an entire population of values.
VARP(number_list)
number_list is a list of as many as 30 numbers, separated by commas. The list can contain numbers or a
reference to a range that contains numbers.
STDEV, STDEVP, and VAR functions
VARP(4.0, 3.0, 3.0, 3.5, 2.5, 4.0, 3.5) returns .27
VDB
Description
Syntax
See Also
Examples
Returns the depreciation of an asset for a specified period using a variable method of depreciation.
VDB(cost, salvage, life, start_period, end_period [, factor] [, method])
cost is the initial cost of the asset.
salvage is the salvage value of the asset.
life is the number of periods in the useful life of the asset.
start_period is the beginning period for which to calculate the depreciation. The time units used to determine
start_period and life must match.
end_period is the ending period for which to calculate the depreciation. The time units used to determine
end_period and life must match.
factor is the rate at which the balance declines. Omitting this argument assumes a default of 2, which is the
double-declining balance factor.
method is a logical value that determines if you want to switch to straight-line depreciation when depreciation is
greater than the declining balance calculation. Use True to maintain declining balance calculation; use False or
omit the argument to switch to straight-line depreciation calculation.
DDB, SLN, and SYD functions
VDB(10000, 1000, 7, 3, 4) returns 1041.23
VLOOKUP
Description
Syntax
Remarks
See Also
Searches the first column of a table for a value and returns the contents of a cell in that table that corresponds
to the location of the search value.
VLOOKUP(search_item, search_range, column_index)
search_item is a value, text string, or reference to a cell containing a value that is matched against data in the
top row of search_range.
search_range is the reference of the range (table) to be searched. The cells in the first column of
search_range can contain numbers, text, or logical values. The contents of the first column must be in
ascending order (e.g. -2, -1, 0, 2...A through Z, False, True). Text searches are not case-sensitive.
column_index is the column in the search range from which the matching value is returned. column_index can
be a number from 1 to the number of rows in the search range. If column_index is less than 1, #VALUE! is
returned. When column_index is greater than the number of rows in the table, #REF! is returned.
VLOOKUP compares the information in the first column of search_range to the supplied search_item. When a
match is found, information located in the same row and supplied column (column_index) is returned. If
search_item cannot be found in the first column of search_range, the largest value that is less than search_item
is used. When search_item is less than the smallest value in the first column of the search_range, #REF! is
returned.
HLOOKUP, INDEX, LOOKUP, and MATCH functions
95
Examples
In the preceding worksheet:
VLOOKUP(“Clark”, A2:E9, 4) returns $28,700
VLOOKUP(“Lee”, A2:E9, 3) returns 3961
WEEKDAY
Description
Syntax
Remarks
See Also
Examples
Returns the day of the week that corresponds to the supplied date.
WEEKDAY(serial_number)
serial_number is the date as a serial number or as text (e.g. “06-21-94” or “21-Jun-94”).
WEEKDAY returns a number ranging from 1 (Sunday) to 7 (Saturday).
DAY, NOW, TEXT, and TODAY functions
WEEKDAY(34399.92) returns 1, indicating Sunday
WEEKDAY(“06/21/94”) returns 3, indicating Tuesday
YEAR
Description
Syntax
See Also
Examples
Returns the year that corresponds to the supplied date.
YEAR(serial_number)
serial_number is the date as a serial number or as text (e.g. “06-21-94” or “21-Jun-94”).
DAY, NOW, HOUR, MINUTE, MONTH, SECOND, TODAY, and WEEKDAY functions
YEAR(34328) returns 1993
YEAR(“06/21/94”) returns 1994
96
Index
A
ACT! Type DBF File ...................................... 26
Active checkbox............................................ 21
ADD.............................................................. 48
ADD TO D O.................................................... 24
Admin .............................. 24, 48, 71, 72, 73, 75
Administration Utility ..................................... 71
ALIGNMENT .................................................... 69
ALL CURRENT R EPORTS .................................. 23
ALL REPORTS................................................. 22
ALL USER R EPORTS ........................................ 22
Appendix...................................................... 77
ATTACH CONTACTS ......................................... 24
Auto Assign.................................................. 27
Auto Dial ........................................... 14, 15, 16
Auto Initiate Backup...................................... 74
Automatic Import........................................... 26
Automatic Upgrade .........................................8
AUTOSEARCH................................................. 23
Auto Assign............................................... 27
Searching.................................................. 33
B
BACKUP ........................................................ 74
Bid Calendar...................................... 45, 47, 48
BORDERS. ..................................................... 69
C
CALCULATION................................................. 69
Calendar ...................................................... 45
How to add a To Do note............................ 49
CHANGE PASSWORD ....................................... 11
CLEAR
Dial Up...................................................... 15
Direct Mailer.............................................. 61
Quick Quoter............................................. 69
COLOR.......................................................... 63
COLUMN W IDTH.............................................. 70
COMPACT ...................................................... 74
CONTACT L IST................................................ 54
Contact Manager .......................................... 50
How to edit groups..................................... 57
Viewing selected contacts .......................... 56
CONTROL CHARACTERS................................... 63
Conventions ...................................................1
COPY
Dial Up...................................................... 15
Direct Mailer.............................................. 61
Quick Quoter............................................. 68
COPY DOWN
Quick Quoter............................................. 69
COPY R IGHT .................................................. 69
Crystal Reports™ ......................................... 12
CURRENT CONTACT ........................................ 52
CURRENT R EPORT S ET.................................... 47
CUSTOM
Contact Manager ....................................... 53
Report Manager......................................... 22
CUT
Contact Manager ....................................... 52
Direct Mailer.............................................. 61
Quick Quoter............................................. 68
D
DATA FIELDS .................................................. 62
DATABASE LOCATION ...................................... 11
DataLine...................................1, 14, 15, 25, 33
DataLine Direct....................................... 14, 25
DATA LINE FOR W INDOWS................................. 12
DataLine For Windows ....................................9
DataLine Tracking Lists................................. 33
DATE RANGE.................................................. 47
D EFINE NAME................................................. 69
D ELETE
Calendar ................................................... 48
Contact Manager ....................................... 53
Quick Quoter............................................. 69
Report Manager......................................... 23
DEMO...................................................... 3, 12
D IAL ............................................................. 14
Dial Up......................................................... 14
How to add an account .............................. 15
How to delete an account ........................... 16
How to edit an account............................... 16
How to set up accounts.............................. 15
Dialing Prefix................................................ 14
D ICTIONARY MAINTENANCE .............................. 61
Direct Mailer................................................. 59
How to edit a document.............................. 65
How to spellcheck your document............... 65
How to type a document............................. 64
How to use dictionaries .............................. 66
How to use the header and footer ............... 65
DOCUMENT.................................................... 62
Dodge Reports LT................................... 14, 15
download directory ...............................8, 25, 26
Download Directory....................................... 14
E
EDIT
Calendar ................................................... 48
Contact Manager ....................................... 53
EDIT F IELDS ................................................... 24
ENTIRE DATABASE.......................................... 47
EVERYONE..................................................... 53
EXPORT ........................................................ 22
Exporting...................................................... 28
97
External Report Set....................................... 26
F
Feature Bar ....................................................9
FILTER CONTACT D ISPLAY ............................... 23
Find ............................................................. 51
FOLLOW U P TRACKING .................................... 23
FONT ............................................................ 62
FONTS .......................................................... 69
Contact Manager ....................................... 52
Direct Mailer.............................................. 60
Quick Quoter............................................. 68
NOTES .......................................................... 24
NUMBERS ...................................................... 69
O
GO TO
Quick Quoter............................................. 69
Report Manager......................................... 23
OPEN
Direct Mailer.............................................. 60
Quick Quoter............................................. 68
Origin........................................................... 51
ORPHANS
Calendar ................................................... 48
Contact Manager ....................................... 54
H
P
HANG U P....................................................... 14
Hardware Requirements..................................3
H EADER/F OOTER............................................ 61
help.............................................................. 12
Help ...............................................................9
PAGE SETUP.................................................. 68
PARAGRAPH................................................... 62
PASTE
Contact Manager ....................................... 52
Dial Up...................................................... 15
Direct Mailer.............................................. 61
Quick Quoter............................................. 68
PATTERNS ..................................................... 69
PERSONALIZE CAPTION.................................... 12
PICTURE........................................................ 62
PREVIOUS ...................................................... 54
PRINT
Calendar ................................................... 47
Contact Manager ....................................... 52
Direct Mailer.............................................. 60
Quick Quoter............................................. 68
Report Manager......................................... 22
PRINT PREVIEW .............................................. 60
PRINT RANGE................................................. 68
PRINT TITLE ................................................... 68
printing......................................................... 12
Privileges ..................................................... 72
PROPERTIES .................................................. 15
PROTECTION.................................................. 70
G
I
IMPORT ......................................................... 22
Importing...................................................... 25
INSERT.......................................................... 69
Installation......................................................3
K
KEYWORD...................................................... 53
L
License Control...............................................3
LIST OF C URRENT R EPORTS ............................. 23
Local Installation .............................................3
LOGOUT ........................................................ 75
M
Magic Number Utility..................................... 76
How to register your software ..................... 76
MAIL MERGE
Contact Manager ....................................... 52
Direct Mailer.............................................. 61
Report Manager......................................... 22
Mail merging
Contact Manager ....................................... 54
Direct Mailer.............................................. 63
Report Manager......................................... 29
Maintenance Utility ....................................... 73
Manual Import .............................................. 26
Menu Bar .......................................................9
Month at a glance ......................................... 46
MOST R ECENT IMPORT .................................... 22
Q
Quick Quoter................................................ 67
R
R ECALCULATION ............................................. 69
R EFRESH....................................................... 75
R EPAGINATION ............................................... 63
R EPAIR ......................................................... 74
R EPLACE....................................................... 61
R EPORT INPUT ............................................... 24
Report Manager............................................ 18
ROW H EIGHT.................................................. 70
N
S
Navigation buttons
Contact Manager ....................................... 50
Report Manager......................................... 21
N EW
SAVE
Direct Mailer.............................................. 60
Quick Quoter............................................. 68
SAVE AS
98
Direct Mailer.............................................. 60
Quick Quoter............................................. 68
SEARCH ........................................................ 61
SEARCH ALL R EPORTS O N STARTUP ................. 24
SEARCH N EXT................................................ 61
Searching..................................................... 33
SELECT ALL ................................................... 61
SELECTED R EPORTS
Calendar ................................................... 48
Contact Manager ....................................... 54
Report Manager......................................... 23
Server Installation...........................................6
SETUP A CCOUNTS .......................................... 14
shared database............... 11, 22, 24, 34, 48, 71
Shortcut keys .................................................1
SHOW F EATURE BAR....................................... 12
SHOW H ELP TIPS ............................................ 12
SINCE MY LAST LOGIN ..................................... 22
SORT
Contact Manager ....................................... 51
Quick Quoter............................................. 70
Report Manager......................................... 23
Sorting
Report Manager......................................... 30
SPELLCHECKER .............................................. 61
Status Bar .................................................... 10
SWITCH G ROUP.............................................. 53
T
TO DO R EMINDER ........................................... 12
TOGGLE PAGE BREAK ..................................... 62
Tool Box....................................................... 10
How to customize the tool box .................... 10
Tracking leads .............................................. 31
TRACKING L IST............................................... 23
U
UNDO
Direct Mailer.............................................. 61
Uninstall .........................................................8
Upgrade Installation........................................8
USER NOTES .................................................. 54
User Report Input ......................................... 38
User Reports ................................................ 13
V
VIEW L OG ...................................................... 74
Viewing selected reports
Calendar ................................................... 49
Report Manager......................................... 37
W
Who’s There Utility........................................ 75
Windows™.....................................................2
W ORD W RAP ................................................. 63
Y
Year at a glance............................................ 46
TEXT............................................................. 63
To Do Calendar ........................... 45, 46, 47, 48
99