1
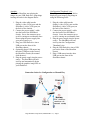
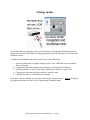
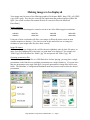
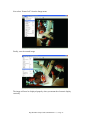
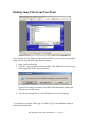
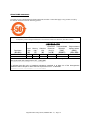
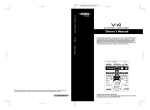
Digi ShowBox
™
Presentation Player
Setup Guide
www.digi.com
The Digi ShowBox™ is a stand-alone presentation player that may be used for:
• Trade show exhibits
• Information displays
• Mobile workforce presentations
• Any other electronic exhibit
The cost-effective Digi ShowBox eliminates the need for dedicated notebook PCs with electronic
presentations, displays or exhibits. Benefits include
• Small – easy to mount or hide on a tradeshow floor or even slip in your jacket pocket
• Rugged – no fans or hard drive make it easy and safe to carry or ship
• Light weight – easy to carry and inexpensive to ship
• Inexpensive – much less cost than a notebook PC
• Flexible – eliminates the costs and hassle of printed graphics
• Simple – simply put images on a USB flash drive and it is ready to begin playing
The Digi ShowBox features several operation modes
• Play mode
o Auto play mode begins displaying images as soon as the USB drive is inserted
o Manual play mode allows you to advance images with a mouse click
• Configuration/Thumbnail mode
o View graphics as thumbnails
o Select a presentation if more than one are included on a single flash drive
o Customize how and when presentations appear
Image sorting
Image playing – auto or manual
Startup mode
Digi ShowBox Setup Guide (90000898 Rev. C) – Page 1
Hook it up
To set up your ShowBox to display graphics images, connect it to your display device and power
source, and insert a USB flash drive with the graphics images. If you wish to configure the
ShowBox or give your presentation manually, you may also insert a mouse.
The connectors for the power adapter and
the VGA display cable are on the back of
the ShowBox chassis.
The connectors for the USB flash drive and
the optional USB mouse are on the front of
the ShowBox chassis.
The order things are connected will be different depending on whether you want to begin playing
images automatically or first go to the configuration and thumbnail screen.
Connection Order for Autoplay
Digi ShowBox Setup Guide (90000898 Rev. C) – Page 2
Autoplay
To have the ShowBox start playing the
images on your USB flash drive, plug things
in using the order in the diagram above:
1. Plug the video cable into the
display’s video (VGA) port and the
ShowBox’s video (VGA) port (on
the back of the chassis).
2. Connect the power supply’s cable
into the back of the ShowBox’s
chassis. Screw the connector on to
avoid it coming out accidentally later.
Do not plug the power supply into
your power source yet.
3. Plug your USB flash drive into a
USB port on the front of the
ShowBox chassis.
4. Optionally plug a USB mouse into
the other USB port on the front of
the ShowBox chassis (for manual
slide advance).
5. Plug the power supply into the power
source. The ShowBox will boot
itself up and automatically begin
playing the graphics image files on
your flash drive.
Configuration/Thumbnail view
To configure the slide playback before
displaying your images, plug things in
using the following order:
1. Plug the video cable into the
display’s video (VGA) port and the
ShowBox’s video (VGA) port (on
the back of the chassis).
2. Connect the power supply’s cable
into the back of the ShowBox’s
chassis. Screw the connector on to
avoid it coming out accidentally later.
3. Plug the power supply into the power
source. The ShowBox will boot
itself up into the Configuration/
Thumbnail view.
4. Plug the USB flash drive into a USB
port on the front of the ShowBox
chassis.
5. Plug a USB mouse into the other
USB port on the front of the
ShowBox chassis.
Connection Order for Configuration or Manual Play
Digi ShowBox Setup Guide (90000898 Rev. C) – Page 3
Change modes
If your ShowBox is in Autoplay mode, you can change to Configuration/Thumbnail mode by
simply removing the USB flash drive and plugging it back into the USB port on the front of the
ShowBox chassis.
Configuration/Thumbnail mode may be used for any of the following:
1. Selecting which folder of graphic images to play if your USB flash drive has multiple
folders of images
2. Changing the ShowBox startup mode (Autoplay or Configuration/Thumbnail)
3. Selecting whether to advance from slide to slide by time interval or mouse click
4. Changing the time interval between slides in autoplay mode
5. Changing the order in which slides are presented
If you have a mouse attached, you may also switch modes using the mouse. Double clicking on
the right mouse button will take you to Configuration/Thumbnail mode.
Digi ShowBox Setup Guide (90000898 Rev. C) – Page 4
Configuration/Thumbnail Mode
Several options exist in Configuration/Thumbnail mode:
Choose graphics
If more than one presentation is included on a single flash drive, each should be placed in its own
folder. To select which presentation to play, navigate to the desired folder in the upper left
navigation pane using the USB mouse (see picture above). If “Show” is selected in the
“Thumbs” area at the bottom of the page, thumbnail images of the graphics files in that folder
will be displayed in the thumbnails area. The font size to use to display the image file names can
be set in the “Font” area at the bottom of the page.
Choose startup mode
In the “Start Mode” area at the lower left of this screen, choose “Slideshow” if you wish the
ShowBox to boot up in Autoplay mode. Choose “Thumbnails” if you wish the ShowBox to boot
up in Configuration/Thumbnails mode.
Choose slide playing mode
In the “Play Mode” area, choose “Auto” if you wish the graphic slides to play automatically with
a specified time interval between slides. Choose “Manual” if you wish to advance from slide to
slide by clicking the mouse. If you chose “Auto” for slide playing mode, use the up or down
buttons in the “Interval” area to specify the time interval between each slide.
Choose sorting rule
In the “Sort” area, select your desired image order from the pull down menu. This will affect
what order images are displayed when in play mode. Choices are alphabetic by file name or by
date/time each image was created.
Play
Click on the “Play” button at the lower right of this screen to play the selected graphics.
Digi ShowBox Setup Guide (90000898 Rev. C) – Page 5
Displaying images
Auto play mode
If you selected the Auto play mode, your images will loop automatically, in the sorted order you
specified and with the delay interval you specified. If none of these were configured, the default
is Auto mode with images sorted alphabetical by file name, with a 10 second interval between
images.
Change from Auto to Manual
If you wish to change modes from Auto to Manual while images are being displayed, click on
either the left or right mouse button. That will take you to manual mode where you may advance
images by mouse click. [Note that the unit will continue displaying the last image displayed
until a mouse click is given to advance to the next image.]
Auto → Manual
Manual play mode
If you selected Manual play mode, your images will display in the sorted order you specified.
To advance to the next image, click the left mouse button. To go back to the previous image,
click the right mouse button.
next image
previous image
Change from Manual to Auto
If you wish to change modes from Manual to Auto, double click on the left mouse button.
Double clicking on the right mouse button will take you to Configuration/Thumbnail mode.
Manual → Auto
[double click]
→ Configuration/Thumbnail
[double click]
Digi ShowBox Setup Guide (90000898 Rev. C) – Page 6
Making images to be displayed
Your images may be in any of the following graphics file formats: BMP (.bmp), GIF (.gif), JPEG
(.jpg), PNG (.png). They may be created by any application that produces images of these file
types. [See a later section in this manual for how to create such files with Microsoft
PowerPoint.]
Image resolution
It is recommended that images be created or saved in one of the following pixel resolutions:
640x480
800x600
1024x768
1280x1024
1366x768
1440x900
1400x1050
1600x1200
Using one of these resolutions will allow your images to fill up the entire screen on most
common monitors or displays. [See a later section in this manual for how to change the
resolution of your images after they have been created.]
Image file names
When your images are displayed, they will be shown in alphabetic order by their file names, so
name your files alphabetically in the order you wish them to be displayed. For example, the
“Slide12.jpg” file will follow the “Slide11.jpg” file and precede the “Slide13.jpg” file.
Grouping presentation files
When you copy your image files to a USB flash drive for later playing, you may place a single
presentation on the flash drive or multiple presentations on a single flash drive. If you put more
than one presentation on a single flash drive, keep each presentation’s image files in their own
folder. The ShowBox’s Configuration/Thumbnail mode may then be used to select the desired
presentation.
Digi ShowBox Setup Guide (90000898 Rev. C) – Page 7
Configuring Image Resolution & Delay
Resolution
The ShowBox automatically configures the resolution at which images are displayed to match
the native resolution of the LCD, plasma, or monitor display to which it is connected. In some
cases, however, that resolution may be different than the resolution in which the images were
created. In that case, the image may not fully fill the display space, as shown above.
To reconfigure the ShowBox to use the image resolution of the images on the flash drive, add a
text file called “slideshow.txt”. A sample of such a file is contained on the CD that shipped with
this product. The slideshow.txt file should contain a text line specifying the resolution of the
images (e.g. 1024 x 768). The format of the command in this file is:
ScreenResolution = Width x Height x Refresh
Width and Height are in pixels. Refresh is the screen refresh rate. Refresh is optional and may
be omitted. Allowable values for ScreenResolution are:
640x480
640x480x60
640x480x72
800x600
800x600x60
800x600x75
1024x768
1024x768x60
1024x768x75
1280x1024
1280x1024x60
1280x1024x75
1280x1024x85
1366x768
1366x768x60
1440x900
1440x900x60
1400x1050
1400x1050x60
1400x1050x75
1600x1200
1600x1200x60
This file must be a raw text file, not a formatted file. If created in Microsoft Windows, it is
recommended that the file be created by Notepad. If Microsoft Word is used to create this file,
make sure to use “Save As” specifying “Plain text (*.txt)” as the file type.
If a “slideshow.txt” file is present on the flash drive, the ShowBox will automatically reconfigure
itself to use this resolution, causing the images to fill the display area.
Digi ShowBox Setup Guide (90000898 Rev. C) – Page 8
Delay
The slideshow.txt file may also include the delay you wish to use between slides in autoplay
mode. This allows you to conveniently time your slides depending on the images in a specific
presentation. To specify the delay simply include the following command as another line in the
slideshow.txt file.
Delay = seconds
“Seconds” is the number of seconds each slide will be displayed before moving to the next slide.
Resizing Graphics Images
If you want to change the resolution of the graphics image files themselves, you may do so with
the IrfanView graphics software application. A free copy of IrfanView for Microsoft Windows
is included on the CD that shipped with your ShowBox.
To install IrfanView on your Windows PC, insert your ShowBox CD and double click on
“iview400_setup.exe”. Then simply follow directions to install the program on your PC.
Digi ShowBox Setup Guide (90000898 Rev. C) – Page 9
Once installed, run IrfanView to resize any graphics image file as follows.
1. Open the file from the File menu of IrfanView’s main screen.
2. Select “Resize/resample” from the “Image” menu
Digi ShowBox Setup Guide (90000898 Rev. C) – Page 10
3. Select the desired new graphics resolution
4. Save the resized file
5. Copy the resized file(s) to your USB flash drive for later displaying on your ShowBox.
Digi ShowBox Setup Guide (90000898 Rev. C) – Page 11
Reorienting Graphic Images
For some applications, you may want to hang your electronic display vertically rather
than horizontally as in the example below.
Since the Digi ShowBox displays rectangular images with the width as the longest image,
you will need to rotate the vertical image for it to display properly on a vertical display.
The IrfanView software described in the last section is perfect for performing this image
rotation.
Start by loading the vertical image in IrfanView.
Digi ShowBox Setup Guide (90000898 Rev. C) – Page 12
Next select “Rotate Left” from the Image menu.
Finally, save the rotated image.
The image will now be displayed properly when you mount the electronic display
vertically.
Digi ShowBox Setup Guide (90000898 Rev. C) – Page 13
Making Image Files from PowerPoint
If you already have your images in Microsoft PowerPoint, you can easily create graphic
image files for your ShowBox right from PowerPoint.
1. Open your PowerPoint file
2. “Save As”, using a graphics file format (JPEG, GIF, BMP, PNG) as the file type.
3. Save a single slide or the entire presentation
If you save the entire presentation, PowerPoint will automatically number the
slides in the saved file names.*
4. Copy the saved image files to your USB flash drive for later displaying
* You may have to change “Slide1.jpg” to “Slide01.jpg” for the alphabetic sorting to
yield your desired results.
Digi ShowBox Setup Guide (90000898 Rev. C) – Page 14
Regulatory and Other Information
Digi ShowBox Setup Guide (90000898 Rev. C) – Page 15
© 2007 Digi, Digi International, the Digi logo, Presentation Player, and ShowBox are either trademarks or
registered trademarks of Digi International, Inc. in the United States and/or other countries. IrfanView is a trademark
of Irfan Skiljan. All other trademarks are the property of their respective holders.
Information in this documentation is subject to change without notice and does not represent a commitment on the
part of Digi International.
Digi International provides this document “as is,” without warranty of any kind, either expressed or implied,
including, but not limited to, the particular purpose. Digi International may make improvements and/or changes to
this documentation or to the product(s) and/or program(s) described in this documentation at any time.
Digi International assumes no responsibility of any errors, technical inaccuracies, or typographical errors that may
appear in this documentation, nor liability for any damages arising out of its use. Changes are made periodically to
the information herein; these changes may be incorporated in new editions of the publication.
For U.S. Government use:
Any provision of this document and associated computer programs to the U.S. Government is with “Restricted
Rights.” Use, duplication, or disclosure by the government is subject to the restrictions set forth in, subparagraph (c)
(1) (ii) of the Rights in Technical Data and Computer Software clause of DFARS 52.277-7013.
For non-U.S. Government use:
These programs are supplied under a license. They may be used, disclosed, and/or copied only as supplied under
such license agreement. Any copy must contain the above copyright notice and restricted rights notice. Use,
copying, and/or disclosure of the programs is strictly prohibited unless otherwise provided for in the license
agreement.
Federal Communications Commission (FCC) Regulatory Information (USA only)
This equipment has been tested and found to comply with the limits for a Class B digital device, pursuant to Part 15
of the FCC Rules. These limits are designed to provide reasonable protection against harmful interference in a
residential installation. This equipment generates, uses, and can radiate radio frequency energy and, if not installed
and used in accordance with the instructions, may cause harmful interference to radio communications. However,
there is no guarantee that interference will not occur in a particular installation. If this equipment does cause harmful
interference to radio or television reception, which can be determined by turning the equipment off and on, the user
is encouraged to correct the interference by one or more of the following measures:
• Reorient or relocate the receiving antenna.
• Increase the separation between the equipment and the receiver.
• Connect the equipment into an outlet that is on a circuit different from the receiver.
• Consult the dealer or an experienced radio/TV technician for help.
Warning: The connection of a non-shielded interface cable to this equipment will invalidate the FCC Certification
for this device.
FCC Regulation - Part 15
Declaration of Conformity (DoC)
This device complies with the requirements of the Code of Federal Regulations listed below:
FCC Title 47 CFR, Part 15 Class B for a digital device.
Operation is subject to the following two conditions:
This device may not cause harmful interference, and
This device must accept any interference received, including interference that may cause undesired operation.
Department of Communication (DOC) Notice (Canada only)
This Class B digital apparatus meets the requirements of the Canadian Interference-Causing Equipment Regulations.
Cet appareil numérique de la Classe B respecte toutes les exigences du Règlement sur le matériel brouiller du
Digi ShowBox Setup Guide (90000898 Rev. C) – Page 16
Canada.
European Community - CE Mark
Declaration of Conformity (DOC)
According to ISO/IEC Guide 22 and EN 45014
Manufacturer’s Name:
Digi International
Manufacturer’s Address:
11001 Bren Road East
Minnetonka, MN 55343
declares that the product
Product Name:
ShowBox
Model Number(s):
CP-DIS-M22-SB
Product Options:
All
conforms to the relevant EU Directives listed here:
EMC Directive 2004/108/EC|
Low Voltage Directive 2006/95/EC
R&TTE 1999/5/EC
using the relevant section of the following EU standards and other normative documents:
EMC:
EN55022 Class B(2006)
EN55024 (1998+A1,A2)
EN61000-3-2(2000+A2)
EN61000-3-3(1995+A1,A2)
Safety:
EN 60950 (2001)
The following summarizes the specifications and requirements for EN55024, EN55022 Class B & CISPR 22 Class
B emission and immunity tests. If the actual test levels are higher or different than required, these levels are listed in
the appropriate tables.
EN55022
Test
Specification
EN55022
Requirement
Radiated Emissions
—
Class B
Conducted
Emissions
CISPR 22
Class B
Digi ShowBox Setup Guide (90000898 Rev. C) – Page 17
EN 55024
Test
Specification
EN55024
Requirement
Electrostatic
Discharge
EN61000-4-2
+2,+4 kV direct contact
+2,+4 kV and +8kV air
(insulated surfaces)
+2,+4 kV(HCP&VCP)
indirect
Radiated Immunity
EN61000-4-3
3 V/m, 80Mhz-1000Mhz,
amp mod 1kHz sine wave
at 80%
Electrical Fast
Transient Burst
EN61000-4-4
+0.5kV,+ 1kV (A/C)
+0..5kV (I/O)
Surge
EN61000-4-5
+0.5kV,+ 1kV 1kV
Conducted
Immunity
EN61000-4-6
3Vrms, .150Mhz to
80Mhz, amp mod. 1kHz
wave at 80%
Magnetic Immunity
EN61000-4-8
1 A/m Not Applicable
Voltage Dips &
Interrupts
EN61000-4-11
>95%10ms, 30%@500ms
& >95%@5sec reduction
at rated voltage
European Contact
Digi International
Joseph-von-Fraunhofer Str. 23
44227 Dortmund, GERMANY
49-231-9747-0
UL/CSA Safety Information
This device complies with the requirements of following safety standards below:
UL 1950, 3rd edition
CSA No. 950
Quality Manager
Austin, Texas
July 2006
Digi ShowBox Setup Guide (90000898 Rev. C) – Page 18
China RoHS statement:
The Table of Toxic and Hazardous Substances/Elements and their Content shall apply to any product covered by
this manual and labeled with the following symbol:
The Table of Toxic and Hazardous Substances/Elements and their Content
as required by China’s Management Methods for the Control of Pollution from Electronic Information Products
Toxic and Hazardous Substances or Elements
Part Name
Lead
(Pb)
Mercury
(Hg)
(部件名称)
301-1002-08
(铅)
X
(汞)
O
(有毒有害物
有毒有害物质
有毒有害物质或元素)
或元素
Hexavalent Polybrominated
Cadmium Chromium
biphenyls
(Cd)
(Cr (VI))
(PBB)
(镉)
O
(六价铬)
O
(多溴联苯)
O
Polybrominated
diphenyl ethers
(PBDE)
(多溴二苯醚)
O
O: Indicates that this toxic or hazardous substance contained in all of the homogeneous materials for this
part is below the limit requirement in SJ/T 11363-2006.
表示该有毒有害物质在该部件所有均质材料中的含量均在 SJ/T11363-2006 标准规定的限量要求以下.
X: Indicates that this toxic or hazardous substance contained in at least one of the homogeneous
materials used for this part is above the limit requirement in SJ/T 11363-2006.
示该有毒有害物质至少在该部件的某一均质材料中的含量超出 SJ/T11363-2006 标准规定的限量要求.
Digi ShowBox Setup Guide (90000898 Rev. C) – Page 19
Digi International
11001 Bren Road East
Minnetonka, MN 55343
[email protected]
www.digi.com
Corporate
Headquarters:
952-912-3444
877-912-3444
Fax: 952-912-4952
Digi Europe: +49-231-9747-0
Digi Hong Kong: +852-2833-1008
Digi North America: 877-912-3444
Digi ShowBox Setup Guide (90000898 Rev. C) – Page 20