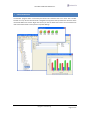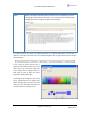
1
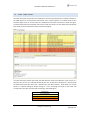
Release 2.1 User Manual User Manual Mirador Release 2.1 1 CONTENTS 2 INTRODUCTION .................................................................................................. 4 3 USER INTERFACE ................................................................................................. 5 3.1 Application Controls ............................................................................................................. 6 3.1.1 Main Menu ...................................................................................................................... 6 3.1.2 Main Toolbar ................................................................................................................... 9 3.2 Tree Nodes ........................................................................................................................... 10 3.2.1 Hawk Environment Node ............................................................................................... 13 3.2.2 Cluster Node.................................................................................................................. 15 3.2.3 Agent Node ................................................................................................................... 16 3.2.4 Rulebase Engine Node ................................................................................................... 16 3.2.5 Schedules Node ............................................................................................................. 16 3.2.6 Rulebase Node ............................................................................................................... 16 3.2.7 Microagent Group Node ................................................................................................ 18 3.2.8 Microagent Node ........................................................................................................... 18 3.2.9 Microagent Method Group Node .................................................................................... 19 3.2.10 Microagent Method Node .............................................................................................. 20 3.2.11 Mirador Agent ............................................................................................................... 37 3.3 4 Alert Table Panel................................................................................................................. 38 CONFIGURATION AND PERSISTENCY ................................................................ 40 4.1 Application Properties ........................................................................................................ 40 4.1.1 Hawk Environments ...................................................................................................... 41 4.1.2 Formats ......................................................................................................................... 44 4.1.3 Alerts ............................................................................................................................ 44 copyright centeractive ag Page 2 of 57 User Manual Mirador Release 2.1 4.1.4 4.2 Microagents................................................................................................................... 44 Saving Work Settings .......................................................................................................... 45 4.2.1 Hawk Environment Configuration .................................................................................. 45 4.2.2 Microagent Method Subscriptions .................................................................................. 47 5 AGENT COLLECTION MICROAGENTS ................................................................. 49 6 ENHANCED VIEWS ............................................................................................ 51 6.1 7 BusinessWorks Monitoring ................................................................................................. 51 6.1.1 Process Engines Group Node ......................................................................................... 52 6.1.2 Process Engine Node ..................................................................................................... 53 6.1.3 Process Definitions Node ............................................................................................... 54 REPORT GENERATION ...................................................................................... 57 copyright centeractive ag Page 3 of 57 User Manual Mirador Release 2.1 2 INTRODUCTION The Mirador program lets you monitor computer systems in a distributed environment. It offers easy to use and convenient functionality to directly invoke remote methods and to show the result in different views such as tables, forms and charts. The program enables you to subscribe to events that may occur at any place within different networks. Mirador uses TIBCO Hawk® application programming interfaces. In order to understand the Mirador program and the way it interacts with the TIBCO Hawk® system, it is recommended to be familiarized with the concepts of TIBCO Hawk®. It is not advisable to use the Mirador program as the sole monitoring and alerting console in a production environment. The robust Tibco Hawk® standard applications should primarily be used. The Mirador program is a complementary tool that adds great benefit in terms of visualization, debugging and testing of the overall monitoring solution. The Mirador program cannot be used for creating new Hawk rulebases and schedules or editing existing ones. copyright centeractive ag Page 4 of 57 User Manual Mirador Release 2.1 3 USER INTERFACE The Mirador program offers a customary structured user interface that has a menu and a toolbar located on its top. On the left-hand side a navigation tree appears that represents the structure of the monitored Hawk environment. Right of that tree you see the detail view of the current selected tree node. Some detail views can be pinned in separate dialogs. copyright centeractive ag Page 5 of 57 User Manual Mirador Release 2.1 3.1 APPLICATION CONTROLS 3.1.1 MAIN MENU The main menu is composed by sub menus and menu items as described below. Submenu / Menu Item Description File Show Application Properties… Displays the dialog with the application properties that lets the user customize the Mirador program. Document Agents… Displays the “Document Agents” dialog that lets the user document the Hawk agents (supported output formats are PDF, XLS and HTML). Save… Saves the current state of the Mirador session (not its view and microagent method subscriptions) to the mirador.hmo file located in the ".mirador/bin" folder located in the user home directory. The previous version of the mirador.hmo file gets copied to the ".mirador /backup" folder with a name of the format <yyyyMMddHHmmss>-mirador.hmo. The save button has to be pressed each time you change the application properties, otherwise these changes will be lost when you exit the Mirador program. Exit Stops running the Mirador program. Prior to closing the main window, you are asked whether you want to save the current configuration. If you confirm by pressing the “Yes” button, the same function gets performed as if you had selected the menu item File > Save… View Go To Previous Selection Moves to the previous node from the node selection history. Go To Next Selection Moves to the next node from the node selection history. This button is enabled only in case the “Previous” button was pressed before. As soon as the user actively selects a new node, it gets added to the selection history and the “Next” button gets disabled. copyright centeractive ag Page 6 of 57 User Manual Mirador Release 2.1 Submenu / Menu Item Save Current View… Description Allows the user to save the current view to a file for later use. The user can determine the location and the name of the file. The program by default proposes to store the view file in the ".mirador/export/views" folder located in the user home directory. The default file extension is ".mvw". When the current view is saved to a file, the Mirador program collects the items (listed below) and writes them in XML format to the chosen file. All agent collection microagents Current active subscriptions All pinned dialogs Such a persistent view definition can be reloaded during the same session or during any other Mirador session later on (see menu item “Load View…” below). Load View… Allows you to choose a view definition file and it’s reloaded. Such a view file must have been saved at some previous point through the menu item “Save Current View…” described above. The view definition file should have been saved from within the same Hawk environment; otherwise the microagent method subscriptions and pinned dialogs cannot be recreated. Environment <Environment 1> <Environment 2> <Environment n> The “Environment” sub menu shows all Hawk environments configured within the Mirador program. New environments can be added and existing ones can be changed in the application properties dialog (“Hawk Environments” panel). The current selected environment is marked by the symbol ‘’. The environment can be switched only if monitoring is not running. Monitoring Run Starts monitoring the current selected Hawk environment Stop Stops monitoring the current selected Hawk environment Enable Discovering New Agents Enables discovering of new Hawk agents. As long as no agents appear in the Hawk environment tree, discovering new agents is automatically enabled. Enabling discovering new agents does not actively try to discover running agents. Ratherit would only discover agents that start running from this moment on. Disable Discovering New Agents Subscriptions Disables discovering of new Hawk agents. This would still discover Hawk agents that appear in the navigation tree but were not yet discovered in the current session. The “Subscriptions” sub menu contains menu items related to Hawk microagent method subscriptions. copyright centeractive ag Page 7 of 57 User Manual Mirador Release 2.1 Submenu / Menu Item <Microagent method path 1> <Microagent method path 2> <Microagent method path n> Description This is a dynamic list of tree paths to microagent methods that have an active subscription. If a microagent has more than one active subscription, it only appears once in the list. The unix type of tree paths start with the name of the cluster followed by the agent and every dependent node name, down to the final microagent method name, each of these names are separated by a slash (‘/’). An example of such a tree path could be: “TEST-CLUSTER/tst0034/Microagents/Self/getUpTime”. If the current selected tree node is a microagent method node with that has one or several subscriptions, its path within the list is marked by the symbol ‘’. Save Subscriptions… Saves all microagent method subscriptions from one agent to a file. The user has to select the agent of his choice from a dialog and he can freely choose the name of the target file. The program by default proposes to store the subscription definition file in the ".mirador/export/subscriptions" folder located in the user home directory. The default file extension is ".sub". Saved subscription definitions can easily be loaded to the same agent or any other agent during the same Mirador session or during subsequent sessions (see menu item “Load Subscriptions …” below). Load Subscriptions… Loads microagent method subscriptions from a file on to one or several agents and starts them. The user can choose the target agents from within a dialog. The subscriptions on these agents will be created only if the corresponding microagent method can be found there. Stop All Subscriptions Stops all active microagent method subscriptions Tool Clean Up GUI Resources Cleans up GUI resources that are currently not visible and are no longeractive. This may significantly free up memory. Result charts and tables, as well as specific node settings, will be lost. Pin In Independent Dialog Pins the current detail view or part of it (i.e. a tabbed panel) in an independent dialog that remains open even if another node gets selected in the Hawk environment tree. This function is available for the agent overview of the cluster nodes and for the subscription panels of microagent method nodes. Mirador Help… This shows the Mirador user manual in a browser window. Help Show System Properties… Shows an independent dialog and displays the current system properties copyright centeractive ag Page 8 of 57 User Manual Mirador Release 2.1 Submenu / Menu Item About Mirador Description Displays the “About” dialog of the Mirador program. 3.1.2 MAIN TOOLBAR The main toolbar contains a number of buttons that are basically shortcuts to menu items; they are explained in the table below Button Shortcut to Menu Item File > Save… View > Go To Previous Selection View > Go To Next Selection Monitoring > Run Monitoring > Stop Monitoring > Enable Discovering New Agents Monitoring > Enable Discovering New Agents Tool > Pin In Independent Dialog Tool > Show System Properties… File > Document Agents… Help > Mirador Help copyright centeractive ag Page 9 of 57 User Manual Mirador Release 2.1 3.2 TREE NODES This section explains the different tree nodes in detail. The following table gives an overview of the icons that get used in the left located navigation tree to represent single nodes. Icon Hawk Environment Description This is a top level node that corresponds to the Hawk environment that’s being monitored. The node appears red colored ( ) if there are non-dismissed console warnings present in its detail view. Icon Annotations One or several agents within the monitored Hawk environment have at least one open (not cleared) notification. One or several agents within the monitored Hawk environment have at least one open warning. There may also be open notifications. One or several agents within the monitored Hawk environment have at least one open error. There may also be open warnings and/or notifications. Agent Collection This node contains structured agent collection microagents. Such microagents are inbuilt components that invoke multiple identical microagents on different Hawk agents and present all results within a single table. The “Agent Collector” node only appears if at least one agent collection microagent has been defined by the user. Cluster Node Cluster nodes are containers that group a series of agent nodes. The cluster name can be configured on each Hawk agent (please consult the Hawk documentation). The cluster node shows a number to the right of its name, enclosed in parentheses. This figure reports the number of agent nodes that are contained within that cluster node. Icon Annotations One or several agents within the cluster have at least one open (not cleared) notification. One or several agents within the cluster have at least one open warning. There may also be open notifications. One or several agents within the cluster have at least one open error. There may also be open warnings and/or notifications. copyright centeractive ag Page 10 of 57 User Manual Mirador Release 2.1 Icon Agent Node (inactive) Description This node represents a non-detected or inactive Hawk agent. Icon Annotations The agent is recognised by the Mirador software because it was detected when the Hawk environment was monitored in a previous session. Currently the status of the agent is unknown; it may not yet have been detected or it may not be running at all. The agent was detected during the current monitoring session but was reported as expired. Agent Node (active) This node represents a detected and active Hawk agent. Icon Annotations One or several agents within the cluster have open (noncleared) notifications. One or several agents within the cluster have open warnings and maybe notifications. One or several agents within the cluster have open errors and maybe warnings and/or notifications. Rulebase Engine The rulebase engine contains all schedules and rulebases deployed on the agent to which it belongs. Schedules Shows the schedules that can be used for determining if a rulebase or part of the rulebase should be 'in-schedule' or 'out-of-schedule' at a given time. Rulebase A single rulebase is shown through this icon Icon Annotations There exist open (not yet cleared) notifications issued by the rulebase. There exist open warnings and maybe notifications issued by the rulebase. There exist open errors and maybe warnings and/or notifications issued by the rulebase Microagent Group Microagents are placed in a group node that is named “Microagents” by default. Depending on the application options and the name of the microagent, it gets placed inside a different group node that is created on the fly. copyright centeractive ag Page 11 of 57 User Manual Mirador Release 2.1 Icon Microagent Description Each agent has a set of microagents that are represented like this and placed within a group node ( ) or a branch of group nodes. Microagents can also appear underneath the inbuilt Mirador pseudo agent if they are successfully loaded from the Mirador plugin directory. The user can also define agent collection microagents that are based on existing microagents found on any remote agent. Such microagents are placed within the “Agent Collection” node ( ) that appears as soon as the first agent collection microagents is defined. Icon Annotations The microagent description could not be retrieved from the agent Method Group Microagent method nodes are placed directly below the owning microagent node. Depending on the application options and the name of the method, it may be placed inside a method group node that is created on the fly. Read Method This icon stands for a read-only microagent method Icon Annotation There is at least one subscription active on that method Write Method This icon stands for a write microagent method, a method that has an impact agent’s side. Icon Annotation There is at least one subscription active on that method Read/Write Method Read-write microagent methods are represented by this icon. Icon Annotation There is at least one subscription active on that method Mirador Agent This top level node represents the internal Mirador agent that acts like a pseudo Hawk agent in the way that it is able to load Hawk microagents present in the directory named “plugin”. If no microagent is present or if none can be loaded, this node does not appear in the tree. copyright centeractive ag Page 12 of 57 User Manual Mirador Release 2.1 The following nodes are related to BusinessWorks process engine monitoring. They will appear only in case BusinessWorks process engine microagents are present on one or several Hawk agent within the monitored environment. Icon Description BusinessWorks Engines This folder node contains one or several BusinessWorks (BW) process engine nods. Mirador offers a specialized view on BW engines and allows user-friendly access of their data. BusinessWorks Engine This node represents a single BW process engine. The node name corresponds to the deployment name. BW process engine nodes appear directly underneath the folder node. Process Definition Folder This folder node is used to hierarchically structure the process definitions contained in a BW process engine. Starter Process Definition This node represents a process definition that is directly linked to a process starter Process Definition This node represents a process definition 3.2.1 HAWK ENVIRONMENT NODE The top most tree node represents the Hawk environment that is going to be or is already being monitored by the Mirador program. The environment can be changed by selecting a different item from within the Environment menu. That menu shows all the environments that were defined in the application properties dialog. Changing the environment is only possible if the monitoring session is not running. The Hawk environment node is responsible for the communication with the Hawk system against which it maintains event listeners. It delegates detected events to depending nodes (i.e. agent node), which in turn change their appearance to show the new state. The detail view of the environment node contains two tabs named “All Alerts” and “Console Warnings” respectively. 3.2.1.1 ALL ALERTS The “All Alerts” tab shows a table that contains the whole set of alerts reported by all agents of the current monitored Hawk environment. The details of an alert are shown within a panel below the table as soon as an alert row gets selected by the user. A detailed description of this panel can be found in the chapter titled “Alert Table Panel”. . copyright centeractive ag Page 13 of 57 User Manual Mirador Release 2.1 3.2.1.2 CONSOLE WARNINGS The “Console Warnings” has a table that contains warnings issued by the underlying Hawk console. Such warnings report some unexpected events that happened while monitoring a Hawk environment. Such a warning would appear if you unplug the network cable from the computer that is running the Mirador program. Warnings remain in the table until they get actively dismissed by pressing the button located top right of the table. The top level Hawk environment node in the navigation tree is shown with red color ( ) if the table contains non-dismissed console warnings. copyright centeractive ag Page 14 of 57 User Manual Mirador Release 2.1 3.2.2 CLUSTER NODE Cluster nodes are containers that group a series of agent nodes. Every Hawk agent belongs to a cluster whose name can freely be configured (please consult the Hawk documentation). The default cluster name of an agent is the IP subnet address in which its host computer is located. All agents with the same cluster name are shown within the same cluster node. New cluster nodes get created upon agent detection if no other agent with the same cluster name was previously detected. Cluster nodes disappear if their last agent node is removed by the user. The detail view of the cluster node represents all contained agents in form of an icon representing a computer. These icons are of different style and color depending on the status of the agent they represent. If a mouse click occurs on one of these icons, the corresponding agent node gets selected in the project tree and the agent detail view will show up. The detail view can be detached from its default location and be shown in an independent dialog (see example on the right) by selecting the menu item Tool > Pin Detail View In Independent Dialog. The same action can be triggered by pressing the button in the main toolbar. This convenient feature lets you quickly move to the detail view of different agents or it can be placed outside the Mirador main window to constantly show the health status of the whole cluster. The following table lists the different types of icons with which an agent can be identified: Icon Status Description Unknown The Mirador program has not yet detected any event from this agent, its status is unknown. This icon gets used if the represented structure of a monitored Hawk environment was built during the previous monitoring session or it was loaded from a previously stored session. OK The agent is alive and there is no open notification, warning or error Notice The agent is alive but it reports at least one open notification (no warnings nor errors) Warning The agent is alive but it reports at least one open warning but no errors. There may also be open notifications. copyright centeractive ag Page 15 of 57 User Manual Mirador Release 2.1 Icon Status Description Error The agent is alive but it reports at least one open error. There may also be open notifications and warnings. Expired The agent doesn’t send heartbeats anymore. The agent is no longer running or there is a problem with the network connection. 3.2.3 AGENT NODE Agent nodes in the tree are represented by an electric bulb. If the bulb looks like being switched on, the Mirador program still receives heartbeat messages that indicate that the agent is alive. If the bulb is switched off ( ), the agent state is unknown because heartbeat messages are no longer being received. The agent or even its host computer may not be running anymore or there may be a problem with the network connection. The detail view of the agent node shows a table with notifications and alerts issued by the agent. 3.2.4 RULEBASE ENGINE NODE This node contains all rulebases deployed on the agent to which it belongs. When an agent is newly detected, its rulebases are not known immediately but their existence gets announced through notification events. Therefore the rulebase repository node only gets dependent rulebase nodes added shortly after agent discovery. Some agents do not have any rulebases installed, hence the rulebase repository node will not contain any rulebases. 3.2.5 SCHEDULES NODE Schedules can be used for determining if a rulebase or part of the rulebase should be 'in-schedule' or 'out-of-schedule' at a given time. If a schedule is not specified in a rulebase, then the rulebase is always in-schedule. 3.2.6 RULEBASE NODE Every rulebase installed on an agent gets represented by such a node, optionally decorated with a small icon that represents the status of the rulebase. The detail view of a selected rulebase node shows a detailed description of it. You cannot create new rulebases or change existing ones through the Mirador program. copyright centeractive ag Page 16 of 57 User Manual Mirador Release 2.1 The example below shows the detail view of the Hawk standard rulebase HawkWindowsEventLog. copyright centeractive ag Page 17 of 57 User Manual Mirador Release 2.1 3.2.7 MICROAGENT GROUP NODE This tree node groups microagents depending on their display name. The name of the default group node is “Microagents”. By default, the Mirador program checks for colons, commas, dots and slashes in the microagent display name and uses them as separators to build up a group node hierarchy. Therefore certain microagents are not placed in the “Microagents” group but in a specific node or branch. If the generated group names are of the “<name>=<value>” format, only the value part is shown by default. The microagent with the display name “Sample:env=test,release=3.2.6,name=Cleaner” for example would be represented as follows: Keep in mind that the group node provides a structured view on non-structured entities. All microagents directly depend on an agent node; hence logically they are all on the same hierarchy level. The separators to be used to split microagent names into group names and the decision to partially blank out the group name, can be changed in the “Microagents” panel of the application properties dialog. To display the dialog, select the menu item File > Show Application Properties…. 3.2.8 MICROAGENT NODE The microagent node contains a logical group of methods each shown as individual nodes. The detail view of the microagent node shows a tabbed pane with a description panel that contains the name and description of the microagent. For some microagents the detail view contains an additional tab named “Attributes” that lets you view and edit attributes in a quick mode.A closer look shows that microagents do not know about a concept of attributes but they expose methods that may be used for reading and writing an attributes value, the attribute accessor methods. This concept is based on the properties accessor methods described in the JavaBeans API specification (see http://java.sun.com/products/javabeans/docs/spec.html). Mirador analyses all methods of a microagent and provides a field on the “Attributes” panel in case a method is considered to be an attribute getter method. If for that same attribute there is also a setter method, the field is made editable and its background color is changed to white. Methods with a name that start with _get or _set can also be accessor methods, the underscore is used by Tibco to mark attribute accessor methods in certain products that extend Hawk standard functionality. The values on the “Attribute” panel get retrieved from the corresponding microagent methods when the microagent node is selected the first time and each time the node is re-selected. If you want to refresh the values while the node selection remains unchanged, you have to press the refresh button located top right on the panel. copyright centeractive ag Page 18 of 57 User Manual Mirador Release 2.1 The following figure shows a sample “Attribute” panel that contains fields for three attributes, two of them (‘Description’ and ‘Name’) are editable. The background color of the ‘Description’ attribute field is gray because it contains multi line text that cannot be edited in the single line field directly but must be edited in a dialog that pops up if a mouse click occurs on the field or the edit button appears right of it. that 3.2.9 MICROAGENT METHOD GR OUP NODE This tree node optionally groups microagent methods depending on their name. The Mirador program does not do any method structuring by default. Depending on the user preferences the program checks for certain characters in the method name and uses them as separators to build a group node hierarchy. Therefore certain microagent methods are not placed directly beneath the owning microagent node but within a group node or even a branch of group nodes. The microagent method with the name “mgmt/mib-2/interfaces/getIfTable” for example would be represented as follows: copyright centeractive ag Page 19 of 57 User Manual Mirador Release 2.1 Keep in mind that the group node provides a structured view on non-structured entities. All microagent methods depend directly on a microagent node; hence logically they are all on the same hierarchy level. The separators used to split microagent method names into group names can be changed in the “Microagents” panel of the application properties dialog. To display the dialog, select the menu item File > Show Application Properties…. 3.2.10 MICROAGENT METHOD NO DE Micoragent methods may expect arguments (parameters) provided by the user and may return data as the result of the method invocation. Methods are named synchronous if they can directly be invoked through the Mirador program. Asynchronous methods on the other hand are invoked by the Hawk environment if a certain event occurs. To have asynchronous methods interact with the Mirador program, the user must subscribe to them. You can also subscribe to synchronous methods by providing a time interval, this instructs the Hawk environment to invoke and re-invoke that method as long as the subscription exists. There are special types of microagents where the Mirador program itself orchestrates synchronous subscriptions. Such microagents are the ones that get loaded locally on to the inbuilt pseudo agent but also the so-called agent collection microagents that are used to collect data from microagents found on different remote agents. copyright centeractive ag Page 20 of 57 User Manual Mirador Release 2.1 The microagent method nodes are represented by different icons depending on their impact. Icon - Impact Synchronous Info Description This is a synchronous “read only” method that only provides information without provoking any action or changing any data. Icon Annotations This annotation indicates that there exist one or several active subscriptions on this method. Asynchronous Info This is an asynchronous method that provides information when a certain event occurs. Icon Annotations This annotation indicates that there exist one or several active subscriptions on this method. Action This method type does not return any data but provokes an action on the target agent. Such actions can be the execution of a script, modification of some data etc. Icon Annotations This annotation indicates that there exist one or several active subscriptions on this method. Action-Info This method type provokes an action on the target agent and returns some data related to that action. Icon Annotations This annotation indicates that there exist one or several active subscriptions on this method. The microagent detail view by default contains the two tabbed panels “Invocation” and “Description”. Additional tabbed “Subscription” panels are added each time you subscribe to a method within the “Invocation” panel. copyright centeractive ag Page 21 of 57 User Manual Mirador Release 2.1 The “Description” panel shows a detailed description of the method, from its arguments and from the expected result. copyright centeractive ag Page 22 of 57 User Manual Mirador Release 2.1 The “Invocation” panel represents the main user interface to interact with the Hawk agents on remote hosts. copyright centeractive ag Page 23 of 57 User Manual Mirador Release 2.1 Both “Invocation” and “Subscription” panels have the same toolbar appearing in the top right corner. The individual buttons are described in the following table. Button Description Show Result in Form Shows the current and future result data within the same panel in a form. This button only appears if the result is of composite data structure. Show Result as HTML Table Shows the current and future result data within the same panel as an HTML formatted table. This button appears only if the result data is of composite data that by default gets displayed in form. Create Agent Collection Microagent Method Creates a collection microagent that is based on the current selected microagent method. The collection microagent is a Mirador software component that appears as a tree node within the “Agent Collection” node ( ). The “Agent Collection” node itself becomes visible only as soon as the first collection microagent has been defined. Invoke Invokes the microagent method with the argument values (if any) entered by the user and displays the result, unless the method impact is of type “Action”. Subscribe Subscribes to the microagent method. In case of a synchronous method, the user has to enter the method invocation interval within the pop up dialog as seen in the example. Such an interval should be at least 5 seconds; Hawk agents usually can’t cope with smaller intervals. However, if the subscription is created on a microagent method from within the Mirador agent, also small intervals (i.e. 1 second) will be applied correctly. In order to free up the “Invocation” panel for other method invocations or additional subscriptions, an independent “Subscription” panel gets added to the detail view of the microagent method as soon as the subscription is created. When an agent expires, all subscriptions to its microagent methods are terminated. When an expired agent is discovered again during the same monitoring session, Mirador automatically tries to re-create all the subscriptions that were active when the agent expired. Unsubscribe Unsubscribes from a microagent method. The “Subscription” panel remains in place after you unsubscribe from a method. On that same panel you can subscribe to the method again at any time in the future. If the “Subscription” panel is no longer used, you can remove it by selecting the appropriate menu item from the pop up menu that appears when you right click on the tab. copyright centeractive ag Page 24 of 57 User Manual Mirador Release 2.1 Button Description Clear Historic Restult Table Removes all rows from the historic result table. This button appears only if the historic view can be selected in the context of the current panel. Clearing the historic view is useful when you have an active method subscription and all previous results from that subscription are no longer of any interest. Hide Result Controls Hides the result control box that appears right on the “Invocation” panel. This frees up space for showing the method result. Show Result Controls Displays the result control box right on the “Invocation” panel and lets you change the result view. 3.2.10.1 RESULT VIEW Depending on the method, the “Invocation” as with the “Subscription” panel let you enter method arguments and they both display the results from synchronous method invocations and/or asynchronous event notifications. The default look of the result view can be changed within the result control box that appears right on the “Invocation” and the “Subscription” panel. The following result views can be selected from a combo box within the result control box. Result View Default Description Depending on whether the method returns individual fields or tabular data, this view shows the result in a form or a table according to the following examples made with the standard microagent “Process”. Example Method Process.getInstanceCount: This method expects one argument and returns two fields. If a result field contains multiple line text data, a mouse click on the editor icon behind the field lets you pop up a dialog where you can display the data in its full mode. Example Method Process.getProcess: This also expects one argument but returns a table where each row represents a process running on the related host. The rows can be sorted by any column by clicking on the corresponding column header. Selecting the check box appearing top right of the table will adjust its width to the enclosing panel. copyright centeractive ag Page 25 of 57 User Manual Mirador Release 2.1 Result View Description In order to display the data of a single row in a well-structured format on the bottom of the panel, select it. Double click a row to show the row data in a pop up dialog that looks similar to the one shown below. copyright centeractive ag Page 26 of 57 User Manual Mirador Release 2.1 Result View historic Description Other than the default view, the historic view does not overwrite previous results each time a method is invoked. Up to a certain number of results from different method invocations are kept and displayed in a table together with a timestamp. The maximum number of retained results can be configured within the “Microagents” panel of the application properties dialog (menu item File > Show Application Properties…). The historic view table can be sorted by the “Result Timestamp” column only. The historic view is not available for methods that return tabular data by default. copyright centeractive ag Page 27 of 57 User Manual Mirador Release 2.1 Result View line chart Description The line chart is available for methods that return tabular data where at least one of the columns contains numeric data. Within the result control box, one of the table columns has to be chosen to become the label column. The label column makes the distinction between categories of data and must contain unique values over all table rows. If the value of the chosen label column is not unique, the label can be extended and made unique by the value of a second row (“Label Column 2”). One or several columns representing numeric data can be selected to be used as the value columns.. The lower bound field can be used to explicitly define the lower bound of the chart’s vertical value axis. The label orientation can be changed through a slider control. This is useful where long labels would otherwise be overlaid. copyright centeractive ag Page 28 of 57 User Manual Mirador Release 2.1 Result View line chart 3D Description The behavior and configuration of this view is the same as the one of the simple line chart described above. The lines however appear in 3D mode. bar chart The bar chart has same characteristics and restrictions as the line chart. The different types of values are shown in bars with different values. Between categories, the data of the same type are shown in bars with the same color. copyright centeractive ag Page 29 of 57 User Manual Mirador Release 2.1 Result View bar chart 3D Description The behavior and configuration of this view is the same as the one of the simple bar chart described above. The bars however appear in 3D mode. copyright centeractive ag Page 30 of 57 User Manual Mirador Release 2.1 Result View pie chart Description The pie chart is used to visualize the data proportionately representing a total of 100%. Therefore the result control box lets you choose a single value column with numeric data. One of the table columns has to be chosen as the label column. The label column defines the name of individual pie segments and must contain unique values over all table rows. If the value of the chosen label column is not unique, the label can be extended and made unique by the value of a second row (“Label Column 2”). The pie can be easily rotated by using the slider control. The section labels can be shown or hidden by changing the selection of the related checkbox. copyright centeractive ag Page 31 of 57 User Manual Mirador Release 2.1 Result View pie chart 3D Description The behavior and configuration of this view is the same as the one of the simple pie chart described above. The pie however appears in 3D mode. As with the simple 2D pie, you can rotate the pie and show or hide the section labels. An additional slider from the result control box lets you change the depth of the 3D pie. copyright centeractive ag Page 32 of 57 User Manual Mirador Release 2.1 Result View multiple pie chart Description This view shows several pies, one for each row from the result table data. Every single pie proportionally shows data from different type in relation to a total of 100%. One of the table columns has to be chosen as the label column. The label column defines the name of individual pies and must contain unique values over all table rows. If the value of the chosen label column is not unique, the label can be extended and made unique by the value of a second row (“Label Column 2”). As with the simple pie chart, you can rotate the pies and show or hide their section labels. copyright centeractive ag Page 33 of 57 User Manual Mirador Release 2.1 Result View multiple pie chart 3D Description This view is identical to the multiple pie chart described above except that the pies appear in 3D mode. You can also rotate the pies and show or hide their section labels. An additional slider from the result control box lets you change the depth of the 3D pies. copyright centeractive ag Page 34 of 57 User Manual Mirador Release 2.1 Result View time chart Description The time chart is very similar to a line chart, except that the values on the domain axis are dates rather than numbers. Through a time chart you can visualize the evolution of microagent method result data from multiple invocations, over a certain period of time. A time chart is fed by a method subscription that repeatedly provides the data as long as it’s active. The lower bound field can be used to explicitly define the lower bound of the chart’s vertical value axis. The value in the duration field determines the time period covered by the chart’s data. When new data is added to the chart, old data that exceeds the defined number of minutes are automatically removed from the chart. copyright centeractive ag Page 35 of 57 User Manual Mirador Release 2.1 Result View Errors Description When a microagent method invocation results in an error (exception), the error message gets shown with the stack trace. This is helpful for failure tracking when debugging custom microagents or AMI enabled programs. As explained above, the result of a method invocation or a method subscription can be shown in different chart types. All these charts are displayed together with a legend that may look like the example below. If you move the mouse pointer over a legend and you observe that it turns into a hand cursor, you can further adapt your chart. Simply click on a legend item (i.e. CPU Time) in order to open the “Series Properties” dialog shown right. This dialog lets you change the color of the series represented by the legend item. When working with line charts and time charts, you can also adapt the width of a line that represents a specific series. copyright centeractive ag Page 36 of 57 User Manual Mirador Release 2.1 3.2.11 MIRADOR AGENT Mirador acts as a pseudo Hawk agent in a way that it can load user defined Hawk microagents from a plug-in directory. At program start-up, Mirador automatically scans the plugin folder located in its installation directory and tries to load the microagents defined by the .hma files (service microagents are not loaded). Successfully loaded microagents appear as dependants of the top level node “Mirador Agent” ( navigation tree. ). The Mirador Agent node appears below the Hawk environment node in the Microagents of the Mirador Agent are presented the same way as those belonging to Hawk agents. The interaction with microagents managed by the Mirador Agent works exactly the same as the interaction with microagents managed by any Hawk agent. You can invoke methods or subscribe to them. The Mirador Agent is meant to be used during development and testing of custom microagents, it provides a straightforward way to check the correct behavior of these software components. Unlike Hawk agents, the Mirador Agent does not contain rulebases and it does not provide an interface to applications using the Hawk Application Management Interface (AMI). copyright centeractive ag Page 37 of 57 User Manual Mirador Release 2.1 3.3 ALERT TABLE PANEL The alert table panel shows alerts and notifications that are generated by the rulebases installed on the Hawk agents of the monitored environment. Such a panel appears in the detail view of each individual agent node; it contains alerts and notifications that were issued by this particular agent. The detail view of the top level Hawk environment node also contains an alert table panel (see below) that shows alerts and notifications from all monitored agents. The alert table panel initially just shows the table with the alerts and notification, each of them in a separate row. As soon as a row gets selected by the user, its details are displayed in a section below the table within the fields “Alert Text”, “Cleared Info” and “Alert Context”. These details can also be shown in a separate dialog by double clicking on a row. The background color of each table row corresponds to the alert severity (level) according to the following list. Notification Low Level Alert Medium Level Alert gh Level Alert copyright centeractive ag Page 38 of 57 User Manual Mirador Release 2.1 The individual alert table columns are explained below: Column Name Read Cleared Level Time Rulebase Alert Text Description Indicates whether the alert has already been read by the user. An alert is marked as read if the user clicks inside the “Read” cell or if he displays the alert data in the alert detail dialog. The alert detail dialog gets shown if you double click on an alert row. Indicates whether the alert is already cleared. You cannot clear an alert yourself through the Mirador program, this is an event issued by the corresponding Hawk agent. The level is also known as the alert severity. The following values can appear: Notification, Low, Medium and High. As stated above, the level is also represented by the background color of the table row. The time the alert was generated The rulebase that generated the alert The generated alert text A small toolbar appears right top of the alert table. It contains the following buttons Button Description Export to Excel Exports the alerts from the alert table to an excel file defined by the user Suspend Pops up the dialog shown below and lets the user suspend the selected alert for a number of minutes,depending on his choice. The default reason “got suspended by user” may be overwritten in order to clearly state why a particular alert got suspended. Mark All Cleared As Read Mark All As Read Marks all currently cleared alerts from the table as being read by the user. Marks all alerts from the table as being read by the user. Depending on the Hawk environment being monitored, a high number of alerts may be generated. These alerts remain buffered in the Mirador program until they expire. Alerts expire a certain time after they were cleared and read by the user, this time period can be changed in the application properties dialog within the Alert panel. copyright centeractive ag Page 39 of 57 User Manual Mirador Release 2.1 To avoid high memory consumption due to a huge number of buffered, hence non-expired alerts, Mirador also lets you configure the time after which cleared, but not yet read, alerts get removed from the tables. This time period is important and needs to be defined shorter when the Mirador is not being watched permanently and cleared alerts are not marked as being read on a regular basis. Otherwise the Mirador program may run out of memory or it may no longer properly react to monitoring events. 4 4.1 CONFIGURATION AND PERSISTENCY APPLICATION PROPERTIES The basic behavior of Mirador can be customized through the application properties dialog that is invoked by selecting the menu item File > Show Application Properties… from the main menu. The same dialog is also shown if you press the button from the main toolbar. Here you can easily define: Hawk environments you want to monitor, date and time patterns to be shown in the display, settings used to structure microagents etc. copyright centeractive ag Page 40 of 57 User Manual Mirador Release 2.1 4.1.1 HAWK ENVIRONMENTS The “Hawk Environments“page lets you define the Hawk environments you want to monitor. Through the button and the button you can add or remove single environment definitions. The environment definition cannot be removed if it corresponds to the one that is currently selected for monitoring. The buttons and let you change the position of environment definitions by moving them up or down. The details from the selected table row (environment) appear on the bottom of the page according to the following description. Option Description Definition Name Every definition must have a distinct name that gets freely assigned by the user. Please note that the name cannot be changed if the environment definition corresponds to the one that is currently selected for monitoring. Hawk domains are used if you wish to isolate groups of Hawk agents into independent monitoring sets. This lets you select the communication channel Mirador uses to gather information from the monitored Hawk agents and to remotely invoke microagent methods. Depending on the options you chose when installing the Mirador program, you have the choice between the communication channels “Rendezvous” and “Enterprise Message Service”. Hawk Domain Communication Channel Communication Channel “Rendezvous” Option Description Rendezvous Service Rendezvous Network Rendezvous Daemon The Rendezvous parameters are required by Mirador to create a session in order to connect to a Rendezvous daemon see above see above Communication Channel “Enterprise Message Service” Option Description Server URL User Password This parameter is required by Mirador to create a session on the EMS server The user is an optional parameter if the EMS session requires authentication The password is an optional parameter if the EMS session requires authentication copyright centeractive ag Page 41 of 57 User Manual Mirador Release 2.1 4.1.1.1 ADVANCED OPTIONS Advanced Hawk Environment options can be defined in a separate dialog that pops up if you press the “Advanced…” button right to the common option fields. The individual advanced options are explained in the table that follows. Option Security Class Description Name of the Java class that implements the Hawk Security Policy Character Encoding When defining a standard security class, please make sure the <HAWKHOME>/bin directory is in the variable path. This is required because Hawk needs an additional DLL (HawkTrustedUserID.dll), which is located in that directory. Character encoding used by the TIBCO Rendezvous daemon copyright centeractive ag Page 42 of 57 User Manual Mirador Release 2.1 Option Method Invocation Customizer Class Description Name of the Java class that adds simple customized functionality for microagent method invocations within the Mirador program. You can automatically set initial argument values, disable individual input fields or show them as password fields where the entered characters are replaced by a placeholder character. The entered class must implement the Java interface MethodInvocationCustomizer from the package com.centeractive.mirador.custom and it must have a public accessible parameter-less constructor, its documentation can be found in javadoc format at the following location: <MIRADOR_HOME>\help\html\javadoc\index.html Mirador provides a convenient class that’s ready to be used. It is set by default when a new Hawk environment definition is created. The full class name is com.centeractive.mirador.agent.microagent.DefaultMe thodInvocationCustomizer and it acts as follows: Alert Description File In case the name of an argument is “user” or “user name” (not case sensitive), its initial value is set to the same value as the system property named “user.name”. In case the name of an argument is “password” (not case sensitive); its edit field will not show the entered text but only substitution characters. After each successful method invocation or creation of a subscription, the class caches the entered attribute values and sets them as initial value to identically named arguments where method invocation panels are visited for the first time. Where the microagent method descriptor specifies itself a default value for an argument, above specified cases are overruled and the default value is set initially instead. Full path of the XML file that contains further description of alerts issued by Hawk rules. The format of such a file has to comply with the XML schema defined in the file HawkAlertDescription.xsd, which is located in the resource folder within the Mirador installation directory. Maintaining and using such a file considerably improves the usefulness of Mirador as it immediately provides the user with information about alerts, their context and possible solutions. A detailed description and measures (actions to be taken) can be defined for any alert. The alert defined in Hawk rulebases and corresponding entry from the XML file are linked by an alert ID. If this ID, prefixed by a ‘$’, appears at the beginning of the alert text, Mirador retrieves the description (if any) from the XML file and shows it to the user upon request. Simply press on the button that appears on the alert detail panel, right of the alert title. copyright centeractive ag Page 43 of 57 User Manual Mirador Release 2.1 4.1.2 FORMATS Within this panel, you can change the way certain data gets formatted and represented in the GUI. 4.1.2.1 DATE FORMATS This box lets you define date and time formats that are used throughout the Mirador program. The entered patterns must conform to the specifications valid for the Java class SimpleDateFormat (see http://java.sun.com/j2se/1.5.0/docs/api/java/text/SimpleDateFormat.html) Option Description Date Format Pattern that specifies a date, without the time. The default value is “yyyy.MM.dd”. Pattern that specifies a date together with the time. The default value is “yyyy.MM.dd HH:mm:ss”. Pattern that specifies a date together with the time and should include milliseconds. The default value is “yyyy.MM.dd HH:mm:ss SSS”. Date/Time Format Date/Time + ms Format 4.1.3 ALERTS This panel relates to alerts issued by the monitored Hawk agents. Option Description Remove cleared and read alerts after… This option defines after how much time in seconds cleared alerts shall be removed from the alert tables when these alerts have been read by the user. Remove cleared only alerts after… An internal worker process repeatedly goes through all buffered alerts and checks whether the defined number of seconds has expired since an alert reached its “read & cleared” state. Each time the worker process has checked all alerts, it waits a few seconds before it starts checking them again. This option defines after how much time in minutes cleared alerts shall be removed from the alert tables regardless of whether the alerts are already marked as being read by the user. An internal worker process repeatedly goes through all buffered alerts and checks whether the defined number of minutes has expired since an alert was cleared. Each time the worker process has checked all alerts, it waits a few seconds before it starts checking them again. 4.1.4 MICROAGENTS This panel lets you customize both the structure of microagent nodes within the Hawk environment tree andhow certain microagent method results are displayed. 4.1.4.1 MICROAGENT STRUCTURING copyright centeractive ag Page 44 of 57 User Manual Mirador Release 2.1 This box lets you define the way microagents get structured in the Hawk environment tree. A detailed description of how microagents get structured and represented by the Mirador program can be found in the section 3.2.7 Microagent Group Node. Option Hierarchically structure microagents Separator Characters Omit “name” part… Microagents to be excluded… Description If this checkbox is selected, the microagents get hierarchically structured according to the settings in the other fields within this box. If the checkbox is not structured, all microagents appear on a same hierarchy level within the default microagent group node. Characters that get used to split the microagent display names into tokens from which the hierarchy structure is derived. This checkbox indicates how individual microagent group names and microagent names (display name tokens) are represented. If the checkbox is selected and a name token represents a name/value pair with the format <name>=<value>, the name part together with the equals sign get removed from the token. A list of microagents that should not be structured but simply be contained in the default group node named “Microagents”. When adding new entries to the list, please be sure to enter the name of the microagent and not its display name. To find out about the name of a microagent, simply select the corresponding node in the navigation tree and select the description tab in its detail view; the name appears there in the first line. Excluding single microagents from being structured can make sense in a case where an otherwise widely useful separator character is contained in the microagent display name and that splitting that name would produce an undesired result. The slash (‘/’) separator character for example makes sense to be used for a microagent with the display name “TIBCO/RepositoryServer ca_domain” but its use doesn’t make sense for the microagent with the display name “JMS_controller (tcp://localhost:7222)”. 4.1.4.2 METHOD INVOCATION This box lets you define options related to microagent method invocations. Option Result history size 4.2 Description This option defines how many rows shall be retained (shown) in the result table when the historic view gets chosen within the result control box of a microagent method invocation panel. SAVING WORK SETTINGS Beside the settings available in the application properties dialog described in the previous chapter, Mirador lets you save different aspects from your current defined workspace to files for further use. 4.2.1 HAWK ENVIRONMENT CONFIGURATION copyright centeractive ag Page 45 of 57 User Manual Mirador Release 2.1 The current Hawk environment state with all clusters and agents visible in the navigation tree is saved to the mirador.hmo file located in the ".mirador/bin" folder located in the user home directory. This happens each time you press the save button ( ) or when you select the menu item File File > Save…. The cluster and agent nodes (in unknown state) of the selected Hawk environment are re-established as soon as you re-launch the Mirador program or when you switch to another environment through the Environment menu. Prior to start actively monitor your environment, you’ll already know what agents were there when you saved the environment last time. The stored Hawk environment configuration can be considered to be a reference composition. When saving the state of the hawk environment, the previous version of the mirador.hmo file initially gets copied to the ".mirador/bin/backup" folder with a name of the format <yyyyMMddHHmmss>-mirador.hmo. If you unintentionally overwrite the mirador.hma file, you can easily replace it with a file from within the ".mirador/bin/backup" folder. Saving the monitored Hawk environments is especially useful should you want to make sure all current displayed agents also get detected during a subsequent Mirador session. If one of the agents would not be detected then, it would still be shown as being unknown. The save button has to be pressed each time you change the application properties, otherwise these changes will be lost should your Mirador program unexpectedly terminate. When you close the Mirador application through the menu item File > Exit, the program also asks you, if you want to save the current Hawk environment state (see figure beside). Press the “Yes” button only in case you’re sure the current state shall be used as the reference state in further Mirador sessions. copyright centeractive ag Page 46 of 57 User Manual Mirador Release 2.1 4.2.2 MICROAGENT METHOD SU BSCRIPTIONS All microagent method subscriptions from any agent (including the Mirador pseudo agent) can be saved and easily loaded to one or several agents at any time in the future. This feature is commonly used if an identical set of microagent method subscriptions need to be present simultaneously on different agents. You would then first define all subscriptions on a single agent and carefully configure the individual method result views. Once the set has been successfully tested, simply save the subscriptions from that host to a file and reload them to the other agents of your choice. Saving microagent method subscriptions is initiated by selecting the menu item Subscriptions > Save Subscriptions…. This opens a dialog that contains a list with all current detected Hawk agents. The list also contains the Mirador agent should one or several microagents have been loaded from the local Mirador plugin directory. The user now has to select an agent that shall ensure all its method subscriptions are saved to a file. The agents that do not have any active subscriptions are grayed out and cannot be selected. When the “OK” button gets pressed, another dialog appears where the user can freely choose the name of the target file. The program, by default, proposes to store subscription definition files in the ".mirador/export/subscriptions" folder. The default file extension is ".sub". If the user chooses to overwrite an already exiting subscription definition file, its previous version gets copied to the ".mirador/export/subscriptions/backup" folder with a name of the format <yyyyMMddHHmmss>-<previous filename>. Saved subscription definitions can easily be loaded through the menu item Subscriptions > Load Subscriptions…, either to the same agent or to any other agent during the same Mirador session or during subsequent sessions. Microagent method subscriptions can also be loaded simultaneously to multiple agents. The Mirador program can load subscriptions only if the chosen target agent contains a microagent method that is identical with the one the subscription was running on when it was saved to the file. When microagent method subscriptions are successfully loaded, the Mirador program also tries to start them. After the loading process, you can easily switch to the different microagent method subscription panels by selecting the entries from the Subscriptions menu. If you load the same microagent method subscriptions on an agent that already has the same subscriptions loaded,these subscriptions will not be overwritten. The Mirador program will always try to create new subscriptions. This is not a problem for standard microagent method nodes but may not be possible when the target node does not directly represent a remote microagent (i.e. BusinessWorks monitoring nodes). Views The Mirador program lets the user save the current view by selecting the menu item View > Save Current View…. When the current view is saved to a file, the Mirador program collects the items, listed below,and writes them in XML format to a file. copyright centeractive ag Page 47 of 57 User Manual Mirador Release 2.1 All agent collection microagents Current active subscriptions All pinned dialogs The user can determine the location and the name of the view file. The program, by default, proposes to store them in the folder ".mirador/export/views" folder located in the user home directory, the default file extension is ".mvw". If the user chooses to overwrite an already exiting view definition file, its previous version gets copied to the ".mirador/export/views/backup" folder with a name of the format <yyyyMMddHHmmss>-<previous filename>. Persistent view definition can be reloaded during the same session or during any other Mirador session later on through the menu item View > Load View…. When reloading a view, the Mirador program will first do the following clean-up activities, if the user confirms the related question. Cancel all active microagent method subscriptions Remove all agent collection microagents Close all pinned dialogs The user will then have to choose the file that contains the view definition; you may also select a file from within the ".mirador/export/views/backup" folder. The view definition file however should have been saved from within the same Hawk environment; otherwise the microagent method subscriptions and pinned dialogs cannot be re-created. copyright centeractive ag Page 48 of 57 User Manual Mirador Release 2.1 5 AGENT COLLECTION MICROAGENTS With agent collection microagents you can invoke identical microagent methods on a series of remote Hawk agents within the monitored environment and present the return data in a compact form depending on your needs. You interact with the agent collection microagent methods just as you would with any other microagent method. That way you can create subscriptions that suit your whole network and present result data in form of tables and charts. A typical use case would be to display the resource usage (CPU time and/or memory consumption) of a number of servers within a single time chart. The agent collection microagent is a Mirador software component that gets defined (added) by the user through a simple mouse click within the detail view of a mircroagent method node. If such a node references a microagent method on a remote node, you will see the button that adds a new agent collection microagent to the Mirador program or simply a new method on an already existing one. Agent collection microagents appear underneath the “Agent Collection” node ( becomes visible only when the first agent collection microagent gets defined. ) that Every method of an agent collection microagent is based on the microagent method from where the button was activated. The name and display name of the agent collection microagent and its methods remain identical to the ones of the base microagent and methods. The descriptions are the same as the ones from the base microagent plus some text that gives further information about the collection related behavior. The real apparent differences are the following: The agent collection microagent most often contains only a subset of the methods found on the base microagent. copyright centeractive ag Page 49 of 57 User Manual Mirador Release 2.1 Two elements are added to the method arguments. The new arguments are named “Cluster Names” and “Agent Names” and they let you specify the remote agents that shall have their corresponding microagent method invoked. When an agent collection microagent method is invoked, the method invocation is forwarded to all remote agents if their settings match the values from the attributes “Cluster Names” and “Agent Names”. If those remote methods return data, this data is first collected and then passed to the Mirador presentation layer. When a subscription is created on a synchronous agent collection microagent method, Mirador orchestrates the subscription and invokes the agent collection microagent method repeatedly by observing the specified interval. The requests get forwarded to the corresponding microagent method on all active agents where the settings match the values from the attributes “Cluster Names” and “Agent Names” at the time of every individual method invocation . When a subscription is created on an asynchronous agent collection microagent method, a corresponding remote subscription is created on all agents if their settings match the values from the attributes “Cluster Names” and “Agent Names”. Results from asynchronous methods that arrive in form of notification events will always contain data from the originating agent only. When a remote agent expires, its subscriptions are cancelled; as soon as such an agent is alive again, the Mirador program tries to re-create the corresponding remote subscription. This also applies if a new agent gets detected and its settings match the values from the attributes “Cluster Names” and “Agent Names”, the Mirador program also tries to create a new remote subscription. All response data – if any - from remote microagent methods (synchronous invocations and asynchronous event notification) is collected and passed to the Mirador presentation layer in tabular format. Every such table has two leading columns named “Cluster” and “Agent” respectively, which indicate from where each individual table row comes from. copyright centeractive ag Page 50 of 57 User Manual Mirador Release 2.1 6 6.1 ENHANCED VIEWS BUSINESSWORKS MONITORING Mirador offers a special view on BusinessWorks (BW) process engines by using certain data retrieved from the TIBCORuntimeAgent microagent (COM.TIBCO.admin.TRA) and the individual BW process engine microagents (COM.TIBCO.ADAPTER.bwengine.<domain>.<engine name>.Process Archive). The original microagents appear unchanged with all their methods as do all other microagents but the program creates additional tree nodes and panels underneath the BusinessWorks Engines folder node . The alternate view only access data from read-only microagents where no side effects occur. Therefore in order to increase user comfort, Mirador automatically requests and shows the current data from the corresponding microagents each time the user navigates to a different node or selects a different panel. The data of the current selected panel can also be refreshed manually at any time by activating the top right located invoke button interval, simply activate the subscribe button . If you want the data to be refreshed at a fixed and define the interval in seconds. The different result views (historical, bar charts, pie charts, time charts etc.) are also available on most panels, the same as in the standard microagent view. copyright centeractive ag Page 51 of 57 User Manual Mirador Release 2.1 6.1.1 PROCESS ENGINES GROUP NODE The BusinessWorks Engines folder node groups all detected BW process engines. Its detail view contains a summary with useful resource data from all depending BW process engines. Their status, CPU and memory usage for example is visible on the fly. In a large environment with a high number of BusinessWorks engines, you may be interested in a limited set of engines only. Also for some specific monitoring tasks, you may want to limit the number of displayed engines, especially if you want to represent their resource consumption in a chart. To restrict the number of displayed engines, simply click on the “Define Filter” button on top of the result control panel. A dialog will pop up (see example) and let you select the engines you want to have included in the result table. copyright centeractive ag Page 52 of 57 User Manual Mirador Release 2.1 6.1.2 PROCESS ENGINE NODE Every deployed BusinessWorks process engine is represented as a package node and appears directly beneath the Business Engines folder node ( ). Its detail view contains a series of tabbed panes, each of them showing BW engine data of a certain type such as process definitions as shown in the figure below. The underlined blue text in the table and within the row detail view represents a link to another tree node. If a mouse click occurs on them, the referenced node gets selected. This lets you easily navigate between related nodes. copyright centeractive ag Page 53 of 57 User Manual Mirador Release 2.1 6.1.3 PROCESS DEFINITIONS NODE The process definitions contained within a BW engine are hierarchically structured using the process folder node . The process definitions appear as leaf nodes with a gear icon either directly beneath the engine node or inside the corresponding folder node. Process definitions that are linked to a process starter are represented by an additional green arrow . The process definitions from the BW engine shown in the figure in the previous chapter would be structured as follows. Each process definition has again a number of tabbed panes that let you easily retrieve and display data obtained from the underlying microagents. Especially within the “Activity Hierarchy” and the “Process Monitor” panels, you’ll see the real benefit of this alternate BusinessWorks view. In fact it’s not just a view but the data gets retrieved from different microagents, aggregated and displayed in a way to give an accurate and quick overview of what’s going on. copyright centeractive ag Page 54 of 57 User Manual Mirador Release 2.1 6.1.3.1 ACTIVITY HIERARCHY The activities of the selected process definition are shown in a hierarchical structured way. Activities must have been executed at least once in order to appear in the structure. Subprocess definition nodes with all their activities can be collapsed and expanded individually by clicking the plus/minus icon in front of the node. You can also expand the entire process definition structure using the top left located expand all button or the collapse all button . If you have to deal with a very large process definition structure, you may also find useful the following buttons: expands all subprocess definitions that contain an activity whose last return code was ERROR. expands all subprocess definitions that contain an activity whose last return code was WAITING. copyright centeractive ag Page 55 of 57 User Manual Mirador Release 2.1 6.1.3.2 PROCESS MONITOR The process monitor gives real time information about the execution of BusinessWorks process instances. Within the top located table, every newly started process instance (job) appears as a new row with its start time, end time and duration. The top right located combo box “Process History Size” determines how many rows are shown in the table. Old process instances are discarded automatically if a new instance exceeds the selected number. The process monitor can be started by activating the start button . A running process monitor can be stopped again if you activate the stop button . If you select a process instance row from the table, you can follow its execution path within the panel that appears at the bottom of the panel. Every executed activity gets listed together with its start time and also its end time and duration where applicable. Processes often call subprocesses through multiple levels; indentation is used to show the activity names in the correct context. If you select an activity from the table, all its sibling activities are represented with a yellow background color. This useful feature adds clarity especially when parallel execution of subprocesses occurs. copyright centeractive ag Page 56 of 57 User Manual Mirador Release 2.1 7 REPORT GENERATION You can generate useful reports from the Hawk agents found in the monitored environment. Report generation is defined in the “Document Agents” dialog that is invoked by selecting the menu item File > Document Agents… from the main menu. The same dialog is also shown if you press the button from the main toolbar. Here you can define, among other things, the Hawk agents you want to document, the output format (currently only HTML) as well as the filename and path of the output file. copyright centeractive ag Page 57 of 57