1
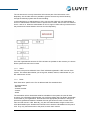
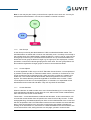
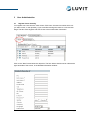
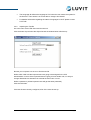
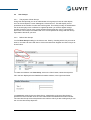
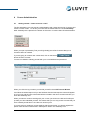
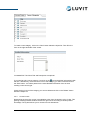
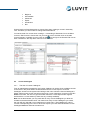
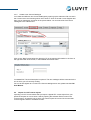
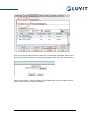
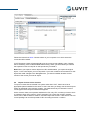
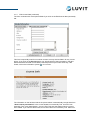
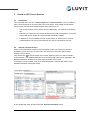
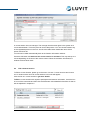
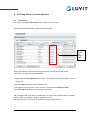
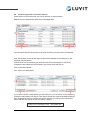
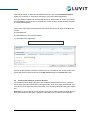
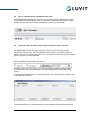
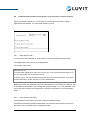
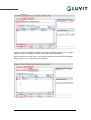
www.luvit.com
LUVIT Resource Centre 1.4
Administrator Manual
1 Administrator Introduction ........................................................................................... 4
1.1 Administration – main structure ..................................................................................... 4
1.1.1
The Repository.......................................................................................................... 4
1.1.2
Units.......................................................................................................................... 4
1.1.3
Users......................................................................................................................... 5
1.1.4
Roles......................................................................................................................... 5
1.1.5
User Groups.............................................................................................................. 6
1.1.6
Course Objects ......................................................................................................... 6
1.1.7
Course Sessions....................................................................................................... 6
1.1.8
Course Catalogues ................................................................................................... 7
1.2 Administrator menu ....................................................................................................... 7
1.3 Administrator main Window in Edit Users, Edit Courses and Edit Units....................... 8
1.3.1
Linking principles ...................................................................................................... 9
1.3.2
Show linked objects only ........................................................................................ 10
1.3.3
Search in object list................................................................................................. 10
2 Basic Structure............................................................................................................. 12
2.1 Define Units ................................................................................................................. 12
2.2 Standard LRC Roles and Permissions........................................................................ 12
2.2.1
The Standard Roles ................................................................................................ 12
2.2.2
Roles and Permissions ........................................................................................... 13
2.3 Edit LRC Roles and Permissions ................................................................................ 14
2.3.1
Create a new LRC Role.......................................................................................... 15
2.3.2
Edit Roles................................................................................................................ 15
3 User Administration..................................................................................................... 16
3.1 Register Users manually ............................................................................................. 16
3.1.1
Automatic mail to the registered user of the system............................................... 17
3.2 Importing Users from text file....................................................................................... 17
3.2.1
The Text file ............................................................................................................ 17
3.2.2
Importing the Text file ............................................................................................. 19
3.3 User Groups ................................................................................................................ 21
3.3.1
The purpose of User Groups .................................................................................. 21
3.3.2
Define User Groups ................................................................................................ 21
3.4 Link Users to User Groups .......................................................................................... 22
3.5 Link Users and User Groups to Units.......................................................................... 22
3.6 Edit the Role of a User in Units ................................................................................... 23
3.7 Course History update in LRC Administration............................................................. 23
4 Course Administration ................................................................................................ 24
4.1 Getting started – Create a Course “shell”.................................................................... 24
4.1.1
Practical considerations and tips regarding creation of Courses in LUVIT ............ 25
4.2 Course Definitions ....................................................................................................... 25
4.2.1
Course Types.......................................................................................................... 25
4.2.2
Course Categories .................................................................................................. 26
4.2.3
Course Levels ......................................................................................................... 27
4.3 Course Catalogues...................................................................................................... 28
4.3.1
The Use of Course Catalogues .............................................................................. 28
4.3.2
Create a new Course Catalogue ............................................................................ 29
4.4 Import of LUVIT Course objects .................................................................................. 29
4.5 Exporting LUVIT Courses............................................................................................ 31
4.5.1
Export of LUVIT Course objects from LRC............................................................. 31
4.6 Import of other Online Courses ................................................................................... 32
4.7 Course Object Data ..................................................................................................... 33
4.7.1
Introduction ............................................................................................................. 33
4.7.2
Edit Course Data..................................................................................................... 33
LRC 1.4 Manual
LUVIT AB 2003
2(54)
4.7.3
Edit Course Data (continued) ................................................................................. 34
4.8 Link Course Objects to Units ....................................................................................... 35
5 Create a LEC Course Session .................................................................................... 36
5.1 Introduction .................................................................................................................. 36
5.2 Activate a Course Session .......................................................................................... 36
5.3 Edit a Course Session ................................................................................................. 38
6 Enrolling Users to Course Sessions.......................................................................... 39
6.1 Introduction .................................................................................................................. 39
6.2 Enroll a single User to a Course session .................................................................... 40
6.3 Enroll an User Group to a Course session.................................................................. 41
6.4 How is a Course Session displayed to the user? ........................................................ 42
6.5 Search for Users or User Groups before enrolling to Course sessions ...................... 42
6.6 E-mail alternatives when enrolling Users or User Groups to Course sessions........... 44
6.6.1
Send default e-mail ................................................................................................. 44
6.6.2
Use external e-mail client ....................................................................................... 44
6.6.3
Don’t send e-mail .................................................................................................... 45
7 Recommending courses to users .............................................................................. 45
7.1 Introduction .................................................................................................................. 45
7.2 Link an User to a Course object .................................................................................. 45
7.3 How is a recommended course displayed to the user? .............................................. 47
8 Create a new Non-online Course or Activity ............................................................. 47
8.1 Introduction .................................................................................................................. 47
8.2 Create a new non-online "activity” object .................................................................... 47
8.3 Additional Information.................................................................................................. 48
9 Pre-tests........................................................................................................................ 50
9.1 About Pre-tests............................................................................................................ 50
9.2 Create Pre-tests .......................................................................................................... 50
9.3 Pre-tests and units....................................................................................................... 51
9.4 How is pre-tests displayed in the Course catalogue? ................................................. 51
10 Administrator News ..................................................................................................... 51
10.1 About LRC news.......................................................................................................... 51
10.2 Standard News ............................................................................................................ 51
10.3 News Alert ................................................................................................................... 51
11 Reports.......................................................................................................................... 52
11.1 About Reports.............................................................................................................. 52
11.2 Course Report ............................................................................................................. 52
11.3 Server Report .............................................................................................................. 52
11.4 Course Recommendations Report .............................................................................. 52
11.5 Personal Courses Report ............................................................................................ 53
11.6 View and Print Reports................................................................................................ 53
11.7 Save a Report as an Excel file .................................................................................... 53
12 Settings ......................................................................................................................... 53
12.1 Preferences ................................................................................................................. 53
12.2 Headings...................................................................................................................... 54
12.2.1 Introduction ............................................................................................................. 54
12.2.2 The List Headings menu......................................................................................... 54
LRC 1.4 Manual
LUVIT AB 2003
3(54)
1
Administrator Introduction
1.1
Administration – main structure
To understand LUVIT Resource Centre (LRC) from an administration point of view, you
need to be familiar with the terminologies of the system. You also need to be familiar with
certain basic structures and workflows.
The following text and images will help you to understand how it works, and will be useful
when working with any administrative feature in LRC.
1.1.1
The Repository
The Repository is the heart of LRC. The Repository could be considered equivalent to the
organization as a whole, e.g. "University X". You may as well consider the Repository as the
highest level of LRC. It is from this point the Repository Administrator starts creating sub
units of the Repository and then adding the first users and course objects to the system. No
matter in what unit you place a course object or user, they will always be visible in the
Repository to a Repository Administrator.
It is possible to work with more than one Repository. Then the created Repositories will be
totally separate from each other in terms of the information handling.
1.1.2
Units
To start working in LUVIT Resource Centre you need to create at least one unit. The
number of units that need to be created depends on the criteria on which the division is
based and needs to be decided through the implementation phase. One of the ideas of units
is to divide the responsibility between different parts of the organization. Each unit will have
its own Unit Administrator. All units are placed on one and the same lower level below the
Repository, as shown in the model below:
The units defined may be a replication of the organizational structure, e.g. faculties or
departments, but this is not necessary. It might be more appropriate to arrange LRC into a
unit structure that corresponds to other needs, e.g. the existing educational organization,
professions or occupations, the number of administrators working in the system and so on.
There are no restrictions regarding the amount of units that can be created. But it is
advisable to keep it simple to begin with. The system is flexible and you may add, delete or
rearrange the unit system later. A rearrangement of the unit structure will not necessarily
affect the user interface. Building and changing the unit structure is solely an administration
feature at Repository Administrator level.
LRC 1.4 Manual
LUVIT AB 2003
4(54)
The unit structure is not truly hierarchical. All units are part of the information in the
Repository. On the other hand it is possible to give the structure a practical hierarchy
through the authority system and the user handling.
In the model below, an administrator in Unit A can give the rights to a new administrator in
Unit A1 to administrate a limited number of persons and courses, which in fact is a subset of
Unit A - and so on. When the administrator of Unit A1 logs in he/she will only have access to
the persons and courses linked to this unit from the Repository.
Once the organizational structure of LRC has been set (at least for the moment), it is time to
fill the system with users and courses.
1.1.3
Users
The next concept to be defined is User. Each individual registered in LRC is a user of the
system. This means that whether you are a guest, student, teacher, administrator etc. you
are called a user of LRC.
1.1.4
Roles
Each User has a specific role. LRC is delivered with five standard roles:
- Unit Administrator
- Educator
- Content Provider
- Learner
- Guest
The association with a role decides what functionalities in the system the user will have
access to. As a Repository Administrator you are free to define new LRC Roles, appropriate
to the needs of your organization, and link them with appropriate permissions. The type of
permission granted will determine whether the user gets access to more or fewer of the
main and sub menus in LRC. Normally, only the Unit administrators will get access to the
LRC administration part. Students and Teachers don’t need the URL-address to this part of
LRC. They only need the access to the portal, to reach their courses.
LRC 1.4 Manual
LUVIT AB 2003
5(54)
Note: A user may be part of many units and have a specific role in each unit. You may for
example be an administrator in one unit, but a student or teacher in another.
1.1.5
User Groups
A User Group is used by the administrators of LRC to make administration easier. The
individual learner or teacher will not see or use this facility at all - it is solely a tool to help in
the everyday work of the administrator. Instead of linking e.g. user by user to a new unit, an
entire group of users may be connected at the same time. It is up to the administrators to
decide how a user group is defined. It might e.g. be a group for new employees, a certain
profession or some other relevant grouping that is often used. The user group feature will
also make the registration of larger groups of users to course sessions easier.
1.1.6
Course Objects
A course registered in LRC may be a LUVIT Education Centre Course, a course produced
by another content provider, a classroom based course, a seminar, a conference etc. The
online courses have to be imported to LRC, while non online courses are "created" from
inside LRC. The courses that the administrator sees and organizes in LRC are course
objects. This means that they should be regarded as "Potential active courses". These
course objects so far have no course participants, no educators, no responsible course
administrator and no start and end dates. They are only shells of information.
1.1.7
Course Sessions
When the decision is made to make one or more Course Session(s) of a course object, the
LRC Administrator activates a course object in a unit, within which he/she is administrator,
then connects users to this course session.
These users – course administrators, students and educators, in this course session, will
now see the course session from the portal in the menu Personal / My Courses. To start
studying/teaching, the student/educator just clicks on the underlined title of the course and
will then be passed to the LUVIT Education Centre environment where the course will take
place. If the course session is an non online course he/she gets further information by
clicking on an information icon, and if there is a www-link added to the course session, the
course name will be a link, taking the user to a web page, opened in a new window.
LRC 1.4 Manual
LUVIT AB 2003
6(54)
1.1.8
Course Catalogues
From an Administrator perspective, a Course Catalogue is used to show available courses
to users in the portal. When the administrator links a course to a course catalogue, all users
in the system, who belong to the unit to which the course catalogue is linked, will see these
courses in the menu, Course Catalogue / Courses. The user can get information here about
the course object and/or register her/himself to a course session, if there are any currently
available and if the administrator creating the course session has opened up the SelfRegistration option for the course session.
1.2
Administrator menu
The main and sub menus in the Administrator window contain the following alternatives
when everything is visible, i.e. for the Repository Administrator.
In Preferences you may change Password and System
Language.
In Headings, the administrator can select which columns
should be displayed in some administrative modules, such as
Edit Users and Edit Courses.
Log Out when you are finished with your work.
In Authority, Roles are created, edited and linked to
submenus.
In Enroll users¸ you enter the section where Users are
registered to Course sessions.
In Edit Users you create, edit and link Users to user groups.
You also recommend course objects to users.
In Course Settings, Course Types and Course Categories
are created and edited.
In Course Sessions you edit already created Course
sessions, change role of and remove assigned users.
In Edit Courses, you create, edit and link Courses to other
objects.
In Assembly Tool you create LUVIT Education Centre
Course Objects.
LRC 1.4 Manual
LUVIT AB 2003
7(54)
In Edit Units, the Repository administrator creates, edits, and
links Units to other objects.
In Edit News, Standard News and News Alerts are created
and edited.
In Show News, all News are previewed.
In Show Reports you choose between various database
reports.
In Help, you get to the LUVIT online manual.
1.3
Administrator Main Window in Edit Users, Edit Courses and Edit Units
The Administration window found in Edit Users, Edit Courses and Edit Units is the most
complex part of LUVIT Resource Centre.
The main structure of the display consists of three frames and is shown and described
below:
The Object list shows all objects in the selected unit that can be displayed according to the
search criteria you have entered (e.g. all participants, all courses etc.) The Object list shows
LRC 1.4 Manual
LUVIT AB 2003
8(54)
30 objects at a time, with the help of the scroll down list. If the number of objects exceeds
30, use the arrows placed in the light blue banner, below the list, to see more objects:
When you check a box (or boxes) beside an object in the object list and click on "Select"
below the list, it will be displayed in the Selected objects list in the upper right frame.
Instead of checking a box you can click the -icon beside an object. Then you instantly get
more information about that object in the Detailed Information frame.
1.3.1
Linking principles
Linking between two objects is done in the same manner, whatever objects you might want
to link. In the following example we are going to link a user to a user group. Please see the
steps in the picture:
Now change from the Users tab to User Groups tab. Choose a User Group from the list by
checking the box in front of it. Click on the "Link" button and it's finished. The (
)symbol
shows that there is a direct link between an object in the object list and the previously
selected object.
LRC 1.4 Manual
LUVIT AB 2003
9(54)
Groups
Note: It doesn't matter if you e.g. link a user to a user group or reverse.
1.3.2
Show linked objects only
To get a clear overview of linked objects, you simply check the box beside the chain icon
) and a list of only those who are linked to the item in the "Selected objects to link" will
(
show up in the list. In the example below, you can see which persons are linked to the user
group "New Employees". All other users that belong to Repository 7are hidden.
1.3.3
Search in object list
When the number of objects in the object list grows you may need to search for a specific
object. The search function has the same structure no matter what you are looking for. It
may be a course object, the last name of a person, a course catalogue, a specific user
group, when an object was registered and so on.
LRC 1.4 Manual
LUVIT AB 2003 10(54)
In the example below you will see an object list of registered users in a unit.
The default setting for searching is "Show all".
To search for a specific object, start by choosing one of the searchable items in the dropdown menu. In this case you can choose to search by "Last Name" and "First Name". Note:
The items to search for are restricted to the visible headings chosen, which in this case are
"Last Name" and "First Name". (How to rearrange the headings in the object lists – see
chapter 13.2 – Headings .
Then type the word/name you are looking for in the left hand box, which is <<Search for>>
by default. The result of a search for last name Bond is shown below:
LRC 1.4 Manual
LUVIT AB 2003 11(54)
2
Basic Structure
2.1
Define Units
Normally, only the Repository Administrator has access to define, change or delete units. To
define a new unit, go to Units / Edit Units and select Repository.
button below the object list.
Then click on
Fill in the fields in the Detailed Information frame:
1. Name (required)
2. A description of the unit you are creating (optional)
Click the "OK" button below Detailed Information to finish.
You can now see the new unit in the object list on the left side of the screen.
2.2
Standard LRC Roles and Permissions
2.2.1
The Standard Roles
LUVIT Resource Centre is delivered with seven Standard Roles. These roles are:
Name
Description
Learner
Learner (Student)
Educator
Educator (Teacher)
Content Developer
Creator of Courses
Unit Administrator
Administrator in an LRC unit
Guest
Guest (registered or self-registered)
Repository
Administrator
Main administrator of entire Repository
System
Administrator
Main administrator with access to System
Administration Tool, as well as repository
administrator in master repository
LRC 1.4 Manual
LUVIT AB 2003 12(54)
The roles in LRC are administrative roles, and usually have no connection to the role a user
have when he/she is inside an LEC Course session. The role that a user shall be given in
a specific LEC course session is set when the Unit administrator registers/enrolls the user to
the course session. Then this person can be given any of the LEC roles:
-
Course Administrator
-
Educator
-
Learner
-
Guest
New roles may be created in addition to the standard roles supplied with LRC (see 2.3.1.).
2.2.2
Roles and Permissions
Learners, Educators, Course Administrators and Guests normally only log in to the LRC
Portal. This means that they normally do not have access to the LRC administration part (in
some organizations though, for instance educators are allowed to enroll students – then this
can be made possible – see chapter 2.3 Edit Roles). In the portal though, they will have
access to the following menus:
Personal / My courses
Personal / Course History
Personal / CV
Personal / Preferences
Course Catalogue / Courses
Course Catalogue / Free Courses
News / LRC News
Log out
For more information about the portal, please consult the LRC User Manual.
Unit Administrators and Content Developers must have authority to see and use some of
the menus in LRC administration. The Repository Administrator has access to everything
in the menus except enrolling users and editing course sessions. Below is a scheme of the
menus and sub menus these three roles can normally access when they are registered.
Personal / Preferences
Personal / Log out
Content Developer
Courses / Assembly Tool
Help / Help
Personal / Preferences
Personal / Headings
Personal / Log out
Users / Enroll Users
Users / Edit Users
Courses / Course Settings
Unit Administrator
Courses / Course Sessions
Courses / Edit Courses
News / Edit News
News / Show News
Reports / Show Reports
Help / Help
LRC 1.4 Manual
LUVIT AB 2003 13(54)
Repository
Administrator
2.3
Personal / Preferences
Personal / Headings
Personal / Log out
Users / Authority
Users / Edit Users
Courses / Course Settings
Courses / Edit Courses
Courses / Assembly Tool
Units / Edit Units
News / Edit News
News / Show News
Reports / Show Reports
Help / Help
Edit LRC Roles and Permissions
Normally, only the Repository Administrator has authority to define, change and delete
roles. If you are responsible for those actions go to the sub menu Authority in the Users
menu.
Below is the list of six standard roles (called System Roles) which are set as default when
the system is delivered. You cannot edit or delete the system roles, but it is easy to create
new ones with links to suitable permissions.
LRC 1.4 Manual
LUVIT AB 2003 14(54)
2.3.1
Create a new LRC Role
Start by clicking on the New button below the list of existing roles (see above). Now a new
window opens up.
Type the name of your new role in the Title field. Fill in a Description if desired.
Choose which of the submenus are going to be visible to the users associated with this role.
When you check a submenu box, the main menu will automatically be checked as well.
Finish by clicking the OK button on the lower left side of the screen. You will then return to
the list of LRC Roles, which is updated with the new role.
2.3.2
Edit Roles
If you want to edit something in a role (name, permissions), click on the title of the role in the
list of roles. Then continue with editing as described in the section above.
LRC 1.4 Manual
LUVIT AB 2003 15(54)
3
3.1
User Administration
Register Users manually
You register new users from the menu Users / Edit Users. Choose from within which unit
you want to work, or the repository if you would like to assign the users to a unit at a later
stage. The tabs User Register and Users have to be marked white. See below.
Click on the "New" button below the object list. The form below should now be visible at the
right hand side of the screen, in the Detailed Information window:
LRC 1.4 Manual
LUVIT AB 2003 16(54)
You must fill in First Name, Last Name, E-mail and Password (fields marked with *).
Chosen Language will be the default system language when the new user logs in to the
system. He/she is of course able to change this.
Do not forget to choose the correct Initial Role from the drop-down menu. In this example
the new user will be registered as an Educator and he/she will get this role in the unit in
which you are currently working as administrator, in this case; Special Guests (see
"Working Unit:" in the upper picture). The user will also be registered with a Guest role in
Repository by default.
To edit the role of a user in a unit - see 3.5.
To link a person to another unit, see chapter 3.4.
Note! The fields you fill in can be used to search for a person or groups of persons that are
registered according to specific criteria. It is of course possible to use for example the
Country field for something else, such as the name of the department.
3.1.1
Automatic mail to the registered user of the system
Messages regarding registration to LRC will not be sent. Messages will only be sent when a
learner are registered to a course session.
3.2
Importing Users from text file
With the user import facility it is possible to register more than one person to the LRC
system at a time. To do this you need to have a text file containing certain information.
3.2.1
The Text file
The minimum of information in the text file is:
First Name
Last Name
E-mail address
The first row in the text file should contain the names of the columns and be comma
separated:
firstname,lastname,email
A correct text file looks like this:
LRC 1.4 Manual
LUVIT AB 2003 17(54)
The maximum information in the text file is:
Pnr
First Name
Last Name
Address
Postal Code
City
Phone
Fax
E-mail
Gender
Company
Alt. Phone
Country
Language ID
Use the categories in bold text above as a minimum, and then add others as required.
The first row in the text file should contain the names of the columns and be comma
separated:
pnr,firstname,lastname,address,postalcode,city,phone,fax,email,gender,company,altphone,
country,languageid
Note!
•
Make sure that there are no empty lines after the last row.
•
If Gender is left out it will be set to female.
•
The gender codes are: Female = 0, Male = 1
•
If Language ID is left out it will be set to English
•
If Language ID is used, please use the following numbers according to chosen
language:
English
Swedish
Lithuanian
Norwegian
Spanish
German
Danish
French
Finnish
Chinese
Portuguese
Italian
Greek
Turkish
LRC 1.4 Manual
1
2
3
4
5
6
7
8
9
10
11
12
13
14
LUVIT AB 2003 18(54)
•
The Language ID defines the language of LRC when the user enters the system for
the first time. Then he/she is of course able to change it him/herself.
•
For detailed information regarding the status of languages in LUVIT please contact
LUVIT AB.
3.2.2
Importing the Text file
Go to the menu Users /Edit Users and choose unit.
Click the button Import below the Object list and the window below will show up:
Browse your computer or a server to find the text file.
Define which initial role the imported users are going to be assigned in the LRC
administration. If some of the imported users are going to have another role, it is easy to
change afterwards. An alternative is to divide the lists in two or more.
Define a password. (All the imported users will get the same password).
Click the OK button.
If the text file was correctly configured, a list of the users shows up:
LRC 1.4 Manual
LUVIT AB 2003 19(54)
If the list of users is correct, click the Select All button and then OK.
Alternatively, you may check the boxes individually and the click OK.
If one or more users should not be imported, uncheck the box(es) beside the user(s) and
click on the OK button.
The Deselect button unchecks all boxes that are checked.
If a user that you try to import already exists in the system, you will get a warning:
Please continue as described above. This warning is for information only.
LRC 1.4 Manual
LUVIT AB 2003 20(54)
3.3
3.3.1
User Groups
The purpose of User Groups
Using User Groups help you as an administrator to link groups of users to other objects,
such as Course objects, Course Catalogues, Units and so on. This will simplify a lot of
operations as the number of users and courses grows. This facility is solely an administrator
tool in the everyday work. It will also be a great help when you need to register a large
number of users to one or many course sessions at the same time. So it’s a good idea to
plan which User Groups are needed and it is of course possible to change the User Group
organization whenever you want.
3.3.2
Define User Groups
You find User Group handling in the Users menu. Start by choosing which Unit you want to
work in, from the sub menu Edit Users. Click on the tabs User Register and User Groups as
shown below:
To create and define a new User Group, click on the "New" button, below the object list.
Fill in the form displayed in the Detailed Information window, in the right lower frame.
You must enter a title for the new User Group. A description of the new User Group is
optional but recommended. Click the "OK" button below the Detailed Information window.
The new User Group will now be placed in the Unit from which you are working and you can
see it in the User Group Object list.
LRC 1.4 Manual
LUVIT AB 2003 21(54)
3.4
Link Users to User Groups
Go to the submenu Edit Users in the Users menu and choose the Unit you want to work in.
Then go through the following steps:
1. Click on the tabs User Register and then User Groups. Now check the box in front of the
User Group you want to fill with Users, and click the “Select” button below the Object list
frame.
2. The selected User Group, "New students 2003", is now visible in the Selected Objects to
link-list in the upper right frame. Now, change sub tabs from User Groups to Users, and a
list of users will appear in the object list on the left side of the screen. Check the box(es) in
front of the user(s) you want to link to the User Group. Finish by clicking the “Link” button
below the object list.
In this example, Jenny Bond and two more persons are now linked to the User Group New
students 2003. This is confirmed by the chain symbols below the header Linked in the
object list beside these persons.
3.5
Link Users and User Groups to Units
Go to the menu Units / Edit units and choose Repository. Click on the tab User Register
and then click the sub tab Users or User Groups.
Check the box beside the User or User Group that you want to link to a Unit. Click on the
Select button. Now you will find the selected Users/User Groups in the upper right window
Selected objects to link.
LRC 1.4 Manual
LUVIT AB 2003 22(54)
Now change the active sub tab Users to Units by clicking on it. Choose the Unit to which the
selected Users / User groups is to be linked by checking the boxes beside them.
Finish by clicking on the Link button.
3.6
Edit the Role of a User in Units
Any time you need to get an overview of, or edit the role specifications of a User, just click
on the -icon in front of that person. Then click the third tab "Units user belongs to" in the
detailed personal information window. Each unit the person is attached to has its own dropdown menu for role specification.
Change the unit role by choosing the preferred role in the drop-down menu beside each
unit.
To associate a new registered person with an initial unit, see chapter 3.1
To link a person to an additional unit, see chapter 3.5
3.7
Course History update in LRC Administration
When an Educator or Course Administrator has graded a student on a course session
(entire course), the title of the course, the course period and the grading will be visible even
to Administrators in LRC.
Whenever you click on the -icon beside a user you access all kinds of information about
this user. The second tab Course History shows the result for all courses the user has been
through in this LRC as long as he/she is graded by the Educator:
LRC 1.4 Manual
LUVIT AB 2003 23(54)
4
4.1
Course Administration
Getting started – Create a Course “shell”
The first step before you can start any administration and content structuring of courses is to
create a course “shell”. To do this you must have the authorization to use the Assembly
tool. Assembly tool is placed in the bottom of the menu Courses inside LRC administration.
When you open up Assembly Tool you will (probably) see a list of courses that you or
someone else has created.
If you are going to create a new course shell, click on the button
above the list of courses.
You are now asked to identify yourself with your e-mail address and password:
When you click the Log in button you will find yourself in the LUVIT Course Wizard.
Just follow the wizard steps until you are finished. After the last step the course will appear
in front of you and the new course shell will be included in the list of courses next time you
enter the Assembly Tool.
When you want to continue working with your course, just click on the title and it will open
up after you have identified yourself. This means that you can only access courses that you
have created yourself and no one else can access yours.
If you are going to develop a course together with someone else, you simply register this
person from the menu Administrate / Participants / New in the Assembly Tool.
LRC 1.4 Manual
LUVIT AB 2003 24(54)
As you might have already concluded, Assembly Tool looks very similar to the LUVIT
Education Centre. This means that if you are going to use Assembly Tool in a more
advanced way, you should go to the LUVIT Education Centre manual 3.7 for information on
how to upload files, manage the navigation tree, develop tests and so on.
When you have finished creating the course in Assembly Tool, you have to export it from
there to be able to import it to LRC administration. When the course object is imported to
LRC you can continue to create course sessions for this course object.
4.1.1
Practical considerations and tips regarding creation of courses in LUVIT
Let us say that you as an Administrator of LRC know a group of teachers or other content
developers who need a course shell to upload their content to.
The easiest way of getting this practically organized is this:
1. Create an empty course shell in AT yourself
2. Export it to your PC or a server
3. Go to LRC administration and import the zip-file you previously exported (see 4.4).
4. Give it a proper name and activate a course session (see chapter 5).
5. Register the person who is to be responsible for this course as a Course Session
Manager.
6. Now this person will find her/his new course in the Portal / My Courses (and no one
else will see it) and continue to upload files etc.
This means that when a teacher is going to create a new course he/she does not need to go
inside Assembly Tool at all. And you as an administrator simply import the same “empty”
zip-file each time anyone needs an empty course to work with.
4.2
4.2.1
Course Definitions
Course Types
All courses may be registered according to what type of course they are. This will help you
to make a clear distinction between different online courses and between online courses
and classroom based courses and so on. There is no restriction as to how to classify a type.
The only standard types delivered with the system are LUVIT Education Centre (LEC)
courses and n/a.
To get a short description of a specific type, click on the -icon. You are free to add new
course types whenever you want. The course types will be used in the whole LRC, in
whatever unit you are working.
LRC 1.4 Manual
LUVIT AB 2003 25(54)
To create a new course type, first go to Courses / Course Settings in the menu:
Click on the "New" button below the object list. Fill in Title and a short description in the form
on the right of the screen. Short Description is optional.
If you want to make changes later on, either check the box in front of the course type and
click on the "Edit" button below the object list, or just click on the -icon next to the course
type and you will be passed to the same Detailed Information form as when creating a new
course type.
Check the box in front of the type you want to delete and click the "Delete" button below the
object list.
4.2.2
Course Categories
All courses may be registered according to the category they belong to. Below is an
example of what it can look like when the category is set by subjects. You are free to
delete them or replace them with categories appropriate to your organization.
LRC 1.4 Manual
LUVIT AB 2003 26(54)
To create a new category, click on the "New" button below the object list. Then fill in the
form on the right hand side of the screen.
You must fill in Title. Short Title and Description are optional.
If you need to edit a course category, just click on the -icon and edit the information inside
the form. Alternatively, check the box in front of the Category you want to edit and click on
the "Edit" button. You will be passed to the same Detailed Information form as when
creating a new course type.
Check the box in front of the category you want to delete and click on the "Delete" button
below the Object list.
4.2.3
Course Levels
Determining the level of a course is a qualitative action from the author’s point of view. This
grading will help potential students choose the right course according to her/his present
knowledge. The system allows you to choose from six alternatives:
LRC 1.4 Manual
LUVIT AB 2003 27(54)
•
•
•
•
•
•
Beginner
Intermediate
Advanced
Expert
Introduction
N/A
Course levels are fixed alternatives to choose from when creating a course in Assembly
Tool. Therefore you are not able to change these alternatives.
You set the level of a course when creating it - or amending it afterwards. Go to the Menu
Courses / Edit Courses. Choose the unit you want to work in and then click on the tabs
Course Register / Available Courses. Click on the -icon and go to the first tab Edit Course
data. Choose from the drop-down menu at "Course Level".
4.3
4.3.1
Course Catalogues
The Use of Course Catalogues
From an administrator perspective, the Course Catalogue is used to show available courses
to the users in the portal. When the administrator links a course object to a Course
Catalogue, all users of the system who belong to the unit to which the Course Catalogue is
linked, will get access to this course from the menu Course Catalogue / Courses in the LRC
Portal. From here, the user can get information about the course object and/or register
her/himself to a course session (if there are any currently available).
Note: As an administrator you may work with as many Course Catalogues you think are
suitable for the administrative work. No matter how many Course Catalogues you create,
the user will only see one Course Catalogue in her/his menu. That Catalogue is a list of
courses corresponding to the sum of all course objects you have linked to different Course
Catalogues and then linked to the same unit.
LRC 1.4 Manual
LUVIT AB 2003 28(54)
4.3.2
Create a new Course Catalogue
You create and define a new Course Catalogue by opening up the submenu Edit Courses in
the Courses menu and choosing which unit to work in. Click on the tab Course Register and
then Course Catalogues, as shown in the picture below. You now see a list of all course
catalogues in the selected unit.
Click on the "New" button below the object list. Fill in the required information in the form on
the right hand side of the screen, in the Detailed Information frame.
You must fill in Title, but Description is optional. The new catalogue will be connected to the
unit in which you are currently working.
For how to self-register to a course in the Course catalogue as a user, please see the LRC
User Manual.
4.4 Import of LUVIT course objects
Importing a LUVIT Course means that you import a zipped LEC course object from your
personal computer or from a server. Start by opening the submenu Edit Courses in the
Courses menu. Choose the unit to which you want to import the course. Click on the tabs
Course Register and then Available Courses.
LRC 1.4 Manual
LUVIT AB 2003 29(54)
Click on the "Import" button below the object list. A new window will appear, asking you to
browse your personal computer or server for the zipped course object you want to import.
Click on the "Browse..." button and search for the zipped LEC course, and then click the
"Open" button as shown in the picture below.
LRC 1.4 Manual
LUVIT AB 2003 30(54)
After that, the previous window will show up again. Click on the "OK" button.
In a couple of seconds you will get a message telling you that the “Import was successful”.
Click "OK" again and you can now see the imported course object in the Available Course
Object list.
4.5
Exporting LUVIT Courses
LUVIT courses can be exported to zip-files from three different places.
1. From inside a LEC course through the Administrate menu
2. From Assembly Tool
3. From LRC administration
Note that only files that are published in the Navigation Tree will be exported.
4.5.1
Export of LUVIT Course objects from LRC
Exporting a LUVIT Course object from Resource Centre is very easy.
Open up a list of Available courses in the Object list. Check the box in front of the course
you want to export. First, click on the Select button and then Export. A small window will
show up and you are asked to click on the name of the course.
LRC 1.4 Manual
LUVIT AB 2003 31(54)
Follow the instructions below. Choose where on your computer or on which server the
course should be saved.
LUVIT Resource Centre will automatically give the course a long arbitrary name. Change
this to something more understandable before saving. When you are finished you will find
the exported course as a zip-file on the spot where you saved it.
Note! When you export a course object from LRC administration, you export the original
object, i.e. the same object you once imported. If you have created a course session for this
object and made changes in the Navigation tree, you should consider whether it is this
version of the course you want to export.
4.6 Import of other Online Courses
To import courses that are created in a system other than LUVIT, there has to be an
appropriate parser installed on the server. If this is the case you simply use the same import
facility as explained in the previous chapter. Just make sure that you choose the correct
course type in the first import window that appears.
At the moment, there are no parsers available for LRC, only LEC, so what you have to do is
to create an empty LEC course in LUVIT Assembly Tool, import the course in another
format, AICC, IMS or NetG for instance, and then export the course in LEC format. The LEC
course package can now be imported to LRC according to section 4.3 above.
LRC 1.4 Manual
LUVIT AB 2003 32(54)
4.7
Course Object Data
4.7.1
Introduction
When a course object is imported, general information filled in by the course author will be
imported as well. This information will be displayed if you click on the -icon before the
course title in the Course Object list. The information will be displayed in the Detailed
Information window on the lower right hand side of the screen. Some of the information
already filled can be edited.
Some of the information will also be displayed to users of LRC Portal when they ask for
information about a course.
4.7.2
Edit Course Data
The first tab, Edit Course Data, contains the following information (already filled in or empty,
depending on what was filled in by the Course Wizard when the course was first created)
•
•
•
•
•
•
•
•
•
•
•
Title: Must always be filled in.
Description: Is optional
Course Type: If the course is an LEC course, this setting cannot be changed.
Course Category: Click on the dropdown menu and choose an available category from
the list.
Course Level: Click on the dropdown menu and choose an available level from the list.
Default Language: Click on the drop-down list and choose an appropriate system
language, which will be the default language when the students open a course session
in LUVIT Education Centre.
Price: Setting a price on a course object is optional. Only numbers are allowed.
Max number of course participants: This is also optional as well and should be seen
as a recommendation.
Link: Optional information field for any www-link.
Creation Date: This is the date showing when this course object was created and
cannot be changed.
Course Author: The author of the course. Can be edited.
LRC 1.4 Manual
LUVIT AB 2003 33(54)
4.7.3
Edit Course Data (continued)
The form continues with more optional fields if you click on the Edit Course data (continued)
tab:
This form is especially used for non online courses, but may also be filled in for any course
object. If you click on the Preview button you will see which of the information in the tabs
Edit Course data and Edit Course data (continued) shows up for users when they, LRC
Portal, click on the information symbol, , for a course:
The information on the left hand side in the picture above is automatically brought here from
"Short course presentation" in the course wizard #3 in Assembly Tool. Access it from
Assembly Tool, menu Administrate / Course / Edit. This text was written when the course
was created. If you want to edit this text, this must be done from Assembly Tool. Either turn
LRC 1.4 Manual
LUVIT AB 2003 34(54)
to AT and open the course from there, or export the course from LRC to AT, change the text
and export it again.
The Prerequisites field can also be created in Assembly Tool, Course Wizard #3 and
cannot be edited from inside LRC.
4.8
Link Course Objects to Units
Go to the menu Units / Edit units and choose Repository. Click on the tab Course register
and then the sub tab Available Courses.
Check the box in front of the course object(s) and click on the Select button. Now you will
find the Course object(s) in the upper right window “Selected objects to link”.
Change the sub tab from Available Courses to Units.
Check the box in front of the Unit(s) you want to link the Course(s) to. Finally click on the
Link button. Now you will see a link symbol to the right of the units to which the selected
courses are linked.
For extended linking information, go to chapter 1.3.1
LRC 1.4 Manual
LUVIT AB 2003 35(54)
5
Create an LEC Course Session
5.1
Introduction
This is the step when you turn a Course Object into a Course Session. You can create as
many course sessions as you need using one course object. Every single course session
will be unique with respect to registered users, time limit and so on.
•
You cannot create a course session from the Repository. You need to work inside a
unit.
•
Note that you cannot see any course sessions from inside the Repository. You need
to be inside the unit where the course session was initially created.
•
Furthermore, it is not possible to link a course session to another unit. It must be
created inside a unit, and a course session can only be connected to one unit.
5.2 Activate a Course Session
When a LUVIT Education Centre Course is imported to LRC you will find it in the list of
Available Courses. Go to the Courses menu and click on the sub menu Edit Courses.
Choose a unit to work in.
Then click on the -symbol to the left of the course object for which you want to create a
Course Session. The detailed information for that course object will now be displayed in the
Detailed Information window on the lower right hand side of the screen.
To activate a course session, click on the “Activate Session” button at the bottom of the
Detailed Information frame (see below).
A new window will open up with the first tab, Session Information active:
LRC 1.4 Manual
LUVIT AB 2003 36(54)
Read, and edit if necessary, the information in the fields above.
Title means the name of the course session.
Description may be used to elucidate the content of the course.
Language: Choose what system language should be the default when a user logs in for the
first time.
Course start: The date from which students will be able to log in.
Course end: The date from which students no longer have access to the course.
LEC Server: If your LRC is connected to more than one LEC server, you are able to choose
on which server you want this Course session to be activated.
Price: Optional
Number of Participants: Define the maximum number of students to be registered to this
course session. This field must be filled in.
Type of Course:
a) Standard Course session – The student will see the course session as Active on My
Courses page immediately after log in.
b) Self Registration Enabled – If the course object is placed in a course catalogue, the
students will be able to register to this specific course session if the alternative Self
Registration Enabled is used.
c) Free Course means that the course session will be accessed from the login page
through the Free Courses link as well as from inside the portal in the menu Courses
/ Free Courses.
Now switch to the second tab, Course Session Manager:
LRC 1.4 Manual
LUVIT AB 2003 37(54)
A course session has one manager. The manager has the same rights in the system as a
course administrator. This is the place to choose that person. You can choose between any
of the registered persons in the unit. Just click the radio button beside the name of that
person and click OK.
You will now be taken automatically back to the Session Information window.
Press the OK button and wait until the course session is activated. This may take up to a
minute depending on the size of the course content. When the activation is finished, the
window will close down itself.
5.3
Edit a Course Session
To Edit a Course Session, please go to the menu Courses / Course sessions and choose
unit. A window with a list of all course sessions in this unit will appear.
Click the link of a course session to get more details.
To Edit a course session with regard to participants and session information, check the box
in front of the course title and then click the Edit button. More detailed information of what to
edit is explained in chapter 5.2
LRC 1.4 Manual
LUVIT AB 2003 38(54)
6
Enrolling Users on Course Sessions
6.1
Introduction
Go to the menu Users / Enroll Users, then select a unit to work in.
After a unit has been selected, a new window will appear:
Note!
These
are
roles in
LRC!
Now you are able to choose which user(s) are going to be enrolled on the course
session(s). You have four basic alternatives:
a) Select one or several persons from the list, by checking the box(es) beside the name of
the user(s)
b) Use the Search function to find a specific user.
c) Change from the tab Users to User Groups, to enroll a defined Group of Users
d) Use the Search function to find a specific User Group.
Tip 1: Organize the list of users to choose from, by sorting them by either Name, Company,
Country, Role or Created (i.e. date of registration in LRC)
Tip 2: Click on the user’s name to get more information about the user
LRC 1.4 Manual
LUVIT AB 2003 39(54)
6.2
Enroll a single user on a course session
Check the box in front of the user you want to enroll on a course session.
First click on the Select button below the list and then Next.
(Use the Show Selected Only button to get a list containing only those who are selected).
After clicking Next, a new window pops up, with all the available course sessions in this
particular unit (see below).
Choose which course session(s) you want to enroll the chosen User(s) on. Do this by
checking the box beside the course session you want to enroll the user on.
Click on the Select button.
Then click on the Next button.
If you cannot see the course session you are looking for, you can search for this session by
clicking the radio button Use Search. Then either choose one of the saved Search settings
from the dropdown menu or make a new search category by clicking on the Edit Search
button and fill in the criteria for this new search category.
More info on searching in LRC – see chapter 6.5
LRC 1.4 Manual
LUVIT AB 2003 40(54)
After having clicked on Next, the last window opens up. This is a Confirmation window
where you are shown an overview of the actions you have ordered (see below).
If you are satisfied, please turn to the dropdown menu “Enroll users as”, where you choose
which profile the user is to have in the particular course session (Guest, Student, Educator
or Course Administrator).
Finish at the mail section at the bottom of the screen and choose whether the Student will
receive:
a) a standard mail
b) a mail edited in your local mail system
c) no mail about this registration
More info on mail alternatives – see chapter 6.6
As soon as the OK button has been clicked, the user is enrolled on the course session and
he/she will see this course as Active on the My Courses page in the Portal after login.
6.3
Enroll a User Group to a Course Session
The procedure for enrolling a group of users instead of single persons is more or less the
same. When you have entered the Enrollment window, click on the right hand tab that says
User Groups, then follow the same instructions as for enrolling individual users (see chapter
6.2).
Note! Before you are able to use this function you have to create at least one User Group in
LRC and link users to this group. Chapter 3.2 describes how you perform this operation.
LRC 1.4 Manual
LUVIT AB 2003 41(54)
6.4 How is a Course Session displayed to the user?
In the portal menu Personal / My Courses, the course will now be displayed as an Active
course, below the header Status / Role. The title will be underlined, which means that the
student may start the course session immediately by clicking on the title link.
6.5
Search for Users or User Groups before enrolling on course sessions
The default setting for the user list is “Show all”. This gives you a list of all persons
registered in a specific unit. You may sometimes wish to search for a specific person, or
persons who live in a certain country and so on. The Search function will help you to find the
person or persons you have specified.
Start by marking the radio button Use Search
In the drop down menu you specify if you want to make a New Search setting, search
according to the Last Search setting or use a search setting that you have previously
Saved.
To make a New Search setting, choose New Search in the drop-down menu and then click
on the Edit Search button.
In the example above, we are searching for all users registered with the name Svensson.
LRC 1.4 Manual
LUVIT AB 2003 42(54)
Start by clicking on Add Field.
Fill in the phrase that you want to use to search on. If you want to search for all users with
the name Svensson, type Svensson in the empty field beside The phrase.
In the second field you can choose between “Must exist in” and “Must not exist in”. If you
choose Must exist in the user list will show all persons with the surname Svensson. If you
choose “Must not exist in” the result will show all registered persons except those with the
name Svensson.
In the third field you specify the registration field in which the search is to take place.
The order of the above fields will differ, depending on what you choose to look for. This will
be true when you search by Gender, Country, Language, Role and User Group
The search can take place in all fields that are used for registering persons in the system.
Those are:
Name
Username
Pnr
Comment
Address
Gender
Postal code
Company
City
Country
Telephone
Language
Alt phone
Role
Fax
User Group
E-mail
LRC 1.4 Manual
LUVIT AB 2003 43(54)
6.6
E-mail alternatives when enrolling users or user groups on course sessions
When you register a learner to a course session, a message may be sent to his/her
registered e-mail address. You have three different choices:
6.6.1
Send default e-mail
If you choose the first alternative, Send default e-mail, the message will look like this:
The Subject title of the mail is: Course Registration
The content of the mail is:
Welcome xxx xxx!
You have been registered for the LUVIT course “zzz”. The course will start at 2003-xx-xx
and you will find the course at http://xxxxxxxx.
In order to log in, use the username and password you have received earlier. If you have
lost the information, please contact your LUVIT administrator.
Note! When users are registered in the LRC administration, they are given a password. This
is the password mentioned in the message above (See chapter 3.1.1). This password is not
sent to the users until they are registered to a specific course session, as in the example
above.
6.6.2
Use external e-mail client
This alternative is useful when you want to edit the message yourself.
Activate the radio button beside the alternative Use external e-mail client and click on the
OK button. Now you will be shown a message like this:
LRC 1.4 Manual
LUVIT AB 2003 44(54)
Follow the instructions of right clicking and “save target as”. Save the textfile somewhere on
your computer. The file looks like this:
Inside this text document there will be a list of all the registered persons’ e-mail addresses
configured for copying and pasting to the “Send” field in your mail browser.
Now you can type whatever message you like to these persons.
6.6.3
Don’t send e-mail
Use this alternative when you want to deliver the registration information to your students by
hand.
7
7.1
Recommending courses to users
Introduction
Recommending a course to a user means that the user will see the course object in My
Courses list when logged in to the portal. The status of the course object will be
"Recommended". The user may now click on the - icon where he or she can read
information concerning the course object and, if available, self-register on one of the course
sessions offered in the Course Session list.
7.2
Link a User to a course object
To recommend a course to a user you need to link the user to the course object.
Go to the Users menu / Edit Users and choose Unit. Click on Course Register on the main
tab row. You will now get a list of the users in this unit. Check the box in front of the person
you are going to link to a course object. Click on the Select button at the bottom of the
screen.
LRC 1.4 Manual
LUVIT AB 2003 45(54)
When the name of the person is visible in the window "Selected objects to link" - change
from tab "Users" to "Available courses" at the lower tab row (see below).
Now, check the box in front of the course object you want to recommend to the selected
person. Click on "Link" at the bottom of the screen.
LRC 1.4 Manual
LUVIT AB 2003 46(54)
7.3
How is a recommended course displayed to the user?
The selected person will now be able to see the course object as "Recommended" under
My Courses in the LRC Portal.
To get information regarding the course, the user clicks on the -icon to the left of the
course title. If there are any course sessions available, this will be described on the lower
part of the page:
To finalize the registration, the user clicks on the arrow ( ) )below the header Register to
Course. The registration will be activated automatically and the user will be moved to My
Courses page and the recommended course will now be shown as Active.
8
8.1
Create a new Non-online Course or Activity
Introduction
As mentioned before, in addition to online courses, LUVIT Resource Centre may also
handle other activities that are not based on LUVIT Education Centre (or any other
online based e-Learning platform). In those cases, LRC is used as an information and
registration channel only. In this way even pure classroom based courses, seminars,
conferences etc. can be viewed by the student from her/his My Courses page or in the
course catalogue.
8.2
Create a new non-online "activity” object
To create such an activity in LRC, go to the Courses menu and Edit Courses. Choose the
unit in which you want to work. Click on the tabs Course Register and Available Courses.
Now click on the "New" button below the object list and you will get a form to fill in, placed in
the Detailed Information window on the right hand side of the screen.
LRC 1.4 Manual
LUVIT AB 2003 47(54)
A Title must be entered. All other criteria are optional, but as you see, some of the
information fields are set as default, which means that this is what will be shown if you do
not change the information in the drop-down lists. Therefore, we recommend that you make
an active choice regarding the following criteria:
Description (Optional, will be empty if not filled in)
Course Type (Choose from the drop-down list. If you need a new type, create a new one
from the menu Courses / Course Settings)
Course Category (Choose from the drop-down list. If you need a new category, create a
new one from the menu Courses / Course Settings).
Course Level (Choose from the drop-down list – new levels cannot be created).
Default Language (The chosen language will be used by students for searching courses in
specific languages)
Price (Will be 0, if not filled in)
Max number of course participants (Will be 1, if not filled in)
Link (This link to an internet page will be active from the portal, My Courses)
Creation Date (Date of creation in AT)
Course Author (Will be empty, if not filled in)
When you are finished, click the "OK" button below the form. You will now see the title of the
"course" and some of the filled in information in the Available Courses list.
8.3
Additional Information
When the new course is registered, as explained above, you are given an additional
possibility to fill in more detailed information about the activity. Click on the -icon next to
the name of the new course and you will see a two-part form in the Detailed Information
window. The left form, Edit Course Data, is the one you have just filled in. Click on the
middle tab Edit Course data (continued).
LRC 1.4 Manual
LUVIT AB 2003 48(54)
The information in this form, except Picture, will be displayed when a student or teacher
clicks on the information icon ( ) for this course, in the menus Personal / My Page and/or
Course Catalogue / Courses. See below:
LRC 1.4 Manual
LUVIT AB 2003 49(54)
9
Pre-tests
9.1 About pre-tests
Pre-tests can be used as a prerequisite for self-registration on a course session in the user’s
course catalogue presented in the LRC Portal. When the user opens up the course
catalogue, a list of course objects are presented. If you want the potential student to do a
pre-test first, this symbol (
) will be shown to the left of the - -icon. When the pre-test is
finished and the student has passed the test, he/she is free to self-register on the course
session.
Pre-tests are created with the help of the Quiz tool which is part of LRC administration –
only for this purpose. If you are familiar with the quiz tool from LUVIT Education Centre, you
can create a pre-test at once. If not, please turn to the LEC 3.7 manual for instructions.
9.2
Create pre-tests
Pre-tests are created from the menu Courses / Edit Courses in LRC administration.
Choose the unit to work in, then click on the tab Extensions.
From here it is possible to create a new pre-test by clicking on the button New below the
Object list.
The tool for creating the pre-test now appears. Please turn to the LEC 3.7 manual for
instruction about creating quizzes.
LRC 1.4 Manual
LUVIT AB 2003 50(54)
9.3
Pre-tests and units
Pre-tests are not unit-specific. This means that all pre-tests created in LRC will be visible to
all unit administrators.
9.4
How are pre-tests displayed in the course catalogue?
The pre-test is displayed with an orange circle with a dot inside,
the left of the information icon.
This is positioned to
When the test is finished and the student has passed the test, the symbol will change to this
one
.
10 Administrator News
10.1 About LRC news
The LRC administrator may present various news items to the users of the system. All users
will get access to the news from the log-in page. They can also access news from the menu
News from inside the portal.
News items that are presented in LRC are visible to all users irrespective of which unit they
belong to. This means that the news created here should be of common interest. Coursespecific news should be created from inside each course session.
10.2 Standard News
A standard news item is written with a subject title which will be the link to a more extended
text. The content page is limited to 238 characters.
Go to the menu News / Edit News. Choose the tab Standard.
Click on the New button.
Enter a title.
Enter a content
Choose whether or not the news should appear on the login page by checking / unchecking
the box.
Click the OK button.
10.3 News Alert
News alert is a one row message for shorter information.
Choose the Alert tab and click on the New button.
Fill in the empty field with information and click the OK button.
LRC 1.4 Manual
LUVIT AB 2003 51(54)
11 Reports
11.1 About Reports
The report functionality is useful for getting a better overview of what courses are connected
to which users and so on. There are four different reports to choose from, and they can
viewed only, printed out or exported to Excel. The reports you receive summarize what is
going on in all units. It is not possible to get a unit-specific report.
11.2 Course Report
To choose the course report, click on the radio button beside Course Report.
Then click on the desired button below. A course report gives you the following information:
Title of Course Session
No of Participants
Contact Person
Participant’s Name
11.3 Server Report
Server
name
No of
Participants
No of
Courses
Site ID
Title of Course
Session
Participant’s
Name
11.4 Course Recommendations Report
Title of Course Session
LRC 1.4 Manual
Recommended person
Course session ID
LUVIT AB 2003 52(54)
11.5 Personal Courses Report
Unit name
Course session title
Course Administrator
Participant Name
11.6 View and Print Reports
You can choose whether to receive the information in a pure HTML list or in a printable
version.
Choose which report alternative you want and then click on either View or View printable
version.
11.7 Save a report as an Excel file
If you want to edit the report data, the alternative is to save the reports in an Excel file.
Each column in the Report will get an equivalent column in Excel. Then you are free to use
Excel’s features for different purposes.
12 Settings
12.1 Preferences
In the menu Personal / Preferences you are able to change your Personal language and
your Password.
In the Language drop-down menu you find the language alternatives that are installed on
the server.
When changing password, first type your old password and then the new one two times.
In both cases, finish by clicking the OK button.
LRC 1.4 Manual
LUVIT AB 2003 53(54)
12.2 Headings
12.2.1 Introduction
For greater flexibility regarding the information that is displayed to the administrator in the
different object lists, every single administrator is able to individualize what information
should be revealed. In the example below, the administrator gets information on courses in
a unit by Title, Category, Level and Language:
These headers can be changed on an individual level. Four columns of information is the
maximum number possible. Each administrator decides the information that should be
displayed in the object list.
The list of headings to choose from varies according to what the object list is going to
display:
•
•
•
•
Courses - Title, Course Level, Course Category, Course Type, Recommended Price,
Recommended No. of Course Participants, Department, Contact Person and Creation
Date.
Course Catalogues - Title, Description
Users - First Name, Last Name, Company, City, Country, Email, Phone, Fax and
Creation Date.
User Groups - Title, Description
Note that a course object has even more data than can be displayed in the object list. To get
this additional information, click on the -symbol in front of the course title, as shown in the
picture above.
12.2.2 The List Headings menu
To organize the display to your own satisfaction, go to the Personal menu and choose List
Headings in the submenu. You will now see drop-down menus for each column and object.
Just choose what information you want to be displayed in which column. Then click the "OK"
button. You are free to adjust this setting whenever you need to.
LRC 1.4 Manual
LUVIT AB 2003 54(54)