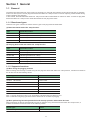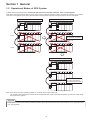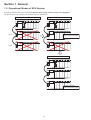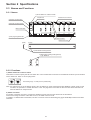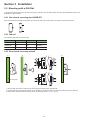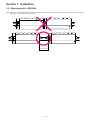
1
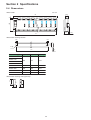
series USER’S MANUAL Base Board with Station No. Setup Function Type : : : : NP1BP-13S NP1BS-13S NP1BS-11S NP1BS-08S (13-slot item) (13-slot item) (11-slot item) (8-slot item) Hot Plug Base Board with Station No. Setup Function Type : : : : : : NP1BP-13D (13-slot item) NP1BS-13D (13-slot item) NP1BP-11D (11-slot item) [under development] NP1BS-11D (11-slot item) NP1BP-08D (8-slot item) [under development] NP1BS-08D (8-slot item) FEH218a Preface Thank you for purchasing Fuji Electric Programmable Controller MICREX-SX Series. This user's manual describes the specifications of the “Base Board with Station No. Setup Function” and “Hot Plug Base Board with Station No. Setup Function” for MICREX-SX series SPH. Read this manual carefully to ensure correct operation. When using modules or peripheral devices, be sure to read the corresponding user's manuals listed below: <SX-Programmer Expert (D300win)> Title Manual No. Contents User's Manual Instruction, MICREX-SX series FEH200 Explains the memory, language and system definitions of the MICREX-SX series. User's Manual Hardware, MICREX-SX series SPH FEH201 Explains the system configuration, the specifications and operations of modules in the MICREX-SX series. User's Manual D300win <Reference>, MICREX-SX series FEH254 Explains the installation procedure, functions and operations of D300winV2. User's Manual D300win <Reference>, MICREX-SX series FEH257 Explains the installation procedure, functions and operations of D300winV3. User's Manual D300win <LD/FBD Editor>, MICREX-SX series FEH257-1 Explains the operations of LD/FBD added to D300winV3. <SX-Programmer Standard (Standard loader)> Title Manual No. Contents User's Manual Instruction, MICREX-SX series FEH588 Explains the memory, language and system definitions of the MICREX-SX series. User's Manual Hardware, MICREX-SX series SPH FEH201 Explains the system configuration, the specifications and operations of modules in the MICREX-SX series. User's Manual SX-Programmer Standard <Reference>, MICREX-SX series FEH590 Explains the functions and operations of SX-Programmer Standard. * This manual is available for both D300win and Standard loader. * In addition to the above manuals, the following Fuji Electric FA Components & Systems Co., Ltd. site offers various manuals and technical documents associated with MICREX-SX. URL http://www.fujielectric.co.jp/fcs/eng/ Notes 1. This manual may not be reproduced in whole or part in any form without prior written approval by the manufacturer. 2. The contents of this manual (including specifications) are subject to change without prior notice. 3. If you find any ambiguous or incorrect descriptions in this manual, please write them down (along with the manual No. shown on the cover) and contact FUJI. Safety Precautions Be sure to read the “Safety Precautions” thoroughly before using the module. Here, the safety precaution items are classified into “Warning” and “Caution.” Warning : Incorrect handling of the device may result in death or serious injury. Caution : Incorrect handling of the device may result in minor injury or physical damage. Even some items indicated by “Caution” may also result in a serious accident. Both safety instruction categories provide important information. Be sure to strictly observe these instructions. Warning Never touch any part of charged circuits as terminals and exposed metal portion while the power is turned ON. It may result in an electric shock to the operator. Turn OFF the power before mounting, dismounting, wiring, maintaining or checking, otherwise, electric shock, erratic operation or troubles might occur. Place the emergency stop circuit, interlock circuit or the like for safety outside the PC. A failure of PC might break or cause problems to the machine. Do not connect in reverse polarity, charge (except rechargeable ones), disassemble, heat, deform, throw in a fire or short-circuit the batteries, otherwise, they might burst or take fire. If batteries have any deformation, spilled fluids, or other abnormality, do not use them. The use of such batteries might cause explosion or firing. Safety Precautions Caution Do not use one found damaged or deformed when unpacked, otherwise, fire, failure or erratic operation might be caused. Do not shock the product by dropping or tipping it over, otherwise, it might be damaged or troubled. Follow the directions of the operating instructions when mounting the product. If mounting is improper, the product might drop or develop problems or erratic operations. Use the rated voltage and current mentioned in the operating instructions and manual. Use beyond the rated values might cause fire, erratic operation or failure. Operate (keep) in the environment specified in the operating instructions and manual. High temperature, high humidity, condensation, dust, corrosive gases, oil, organic solvents, excessive vibration or shock, might cause electric shock, fire, erratic operation or failure. Select a wire size to suit the applied voltage and carrying current. Tighten the wire terminals to the specified torque. Inappropriate wiring or tightening might cause fire, malfunction, failure or might cause the product to drop from its mounting. Contaminants, wiring chips, iron powder or other foreign matter must not enter the device when installing it, otherwise, fire, accident, erratic operation or failure might occur. Remove the dust-cover seals of modules after wiring, otherwise, fire, accident, erratic operation or failure might occur. Connect the ground terminal to the ground, otherwise, electric shock or erratic operation might occur. Periodically make sure the terminal screws and mounting screws are securely tightened. Operation at a loosened status might cause fire or erratic operation. Put the furnished connector covers on unused connectors, otherwise, erratic operation or failure might occur. Put the furnished terminal covers on the terminal blocks, otherwise, electric shock or fire might occur. Sufficiently make sure of safety before program change, forced output, starting, stopping or anything else during a run. Wrong operation might break or cause problems to the machine Engage the loader connector in a correct orientation, otherwise, an erratic operation might occur. Before touching the PC, discharge any static electricity that may have been collected on your body. To discharge it, touch a grounded metallic object. Static electricity might cause erratic operation or failure. Be sure to install the electrical wiring correctly and securely, observing the directions of the operating instructions and manual. Wrong or loose wiring might cause fire, accident or failure. When disengaging the plug from the outlet, do not pull the cord, otherwise, break of cable might cause fire or failure. Do not attempt to change system configurations (such as installing or removing I/O modules) while the power is ON, otherwise, erratic operation or failure might occur. Do not attempt to repair the module by yourself, but contact your Fuji Electric agent. When replacing the batteries, correctly and securely connect the battery connectors, otherwise, fire, accident or failure might occur. Do not remodel or disassemble the product, otherwise, failure might occur. Follow the regulations of industrial wastes when the device is to be discarded. The modules covered in these operating instructions have not been designed or manufactured for use in equipment or systems which, in the event of failure, can lead to loss of human life. If you intend to use the modules covered in these operating instructions for special applications, such as for nuclear energy control, aerospace, medical or transportation, please consult your Fuji Electric agent. Be sure to provide protective measures when using the module covered in these operating instructions in equipment which, in the event of failure, can lead to loss of human life or other grade results. External power supply (such as 24 V DC power supply) which is connected to DC I/O should be strongly isolated from AC power supply, otherwise, accident or failure might occur. (Use of EN60950 conforming power supply is recommended.) Revision *The manual No. is printed at the bottom right of the cover of this manual. Printed on *Manual No. Revision contents Mar. 2005 FEH218 First edition Dec. 2006 FEH218a Specifications of the following types of Hot Plug Base Boards with Station No. Setup Function were added. 11-slot item (type: NP1BS-11D) 11-slot item (type: NP1BP-11D) 8-slot item (type: NP1BS-08D) 8-slot item (type: NP1BP-08D) Contents Preface Safety Precautions Revision Contents Section 1 General 1-1 General ........................................................................................................................................... 1-1 1-1-1 Base board types ................................................................................................................................. 1-1 1-1-2 Supported versions .............................................................................................................................. 1-1 1-2 Operational modes of SPH system ............................................................................................... 1-2 1-2-1 Fail-soft operation mode ..................................................................................................................... 1-2 1-2-2 Fail-soft start-up operation mode ........................................................................................................ 1-5 Section 2 Specifications 2-1 General Specifications .................................................................................................................. 2-1 2-2 Performance/Functional Specifications ...................................................................................... 2-2 2-2-1 List of specifications ............................................................................................................................ 2-2 2-2-2 Station No. setup function .................................................................................................................... 2-2 2-2-3 Hot plugging function ........................................................................................................................... 2-3 2-3 Names and Functions .................................................................................................................... 2-7 2-3-1 Names .................................................................................................................................................. 2-7 2-3-2 Functions .............................................................................................................................................. 2-7 2-4 Dimensions ..................................................................................................................................... 2-9 Section 3 Installation 3-1 Mounting the Base Board Directly onto the Control Panel ........................................................ 3-1 3-1-1 Mounting dimensions .......................................................................................................................... 3-1 3-1-2 Base board mounting method ............................................................................................................ 3-1 3-2 Mounting with a DIN Rail ............................................................................................................... 3-2 3-2-1 Base board mounting stud (NP8B-ST) ............................................................................................... 3-2 3-2-2 DIN rail .................................................................................................................................................. 3-2 3-2-2 Base board mounting method ............................................................................................................ 3-2 Section 1 General 1-1 General The base board with station No. setup function is necessary for using fail-soft operation mode and fail-soft start-up operation mode of an SPH system. The hot plug base board with station No. setup function is used for replacing a failed module during system operation (hot plugging). In this manual, the base board with station No. setup function will be abbreviated as “station No. base” and the hot plug base board with station No. setup function will be abbreviated as “hot plug base” below. 1-1-1 Base board types There are four types of station No. bases and two types of hot plug bases as listed below. (1) Base board with station No. setup function Type Specification outline NP1BP-13S 13-slot item (Processor bus: 10 slots) NP1BS-13S 13-slot item (Processor bus: 3 slots) NP1BS-11S 11-slot item (Processor bus: 3 slots) NP1BS-08S 8-slot item (Processor bus: 3 slots) (2) Hot plug base board with station No. setup function Type Specification outline NP1BS-13D 13-slot item (processor bus: 3 slots) NP1BP-13D 13-slot item (processor bus: 10 slots) NP1BS-08D 8-slot item (processor bus: 3 slots) NP1BP-08D 8-slot item (processor bus: 6 slots) NP1BS-11D 11-slot item (processor bus: 3 slots) NP1BP-11D 11-slot item (processor bus: 9 slots) 1-1-2 Supported versions (1) When using hot plugging function When mounting and removing a module using the hot plug base board with station No. setup function, a module connected to the SX bus must be the following version. Module types Version SPH300 NP1PS-32 V2463 or later SPH300 NP1PS-32R V2663 or later SPH300 NP1PS-74 V2363 or later SPH300 NP1PS-74R/117/117R V2663 or later SPH300 NP1PS-245R V2064 or later SPH2000 NP1PM-48R/48E/256E V2102 or later Other modules directly connected to the SX bus Hardware version: 20 or later Note 1: The hot plugging function is not supported by standard CPUs and NP1PS-117H. Note 2: Modules on a group-type base board of remote I/O do not allow hot plugging. (2) When performing fail-soft operation/fail-soft start-up operation with station No. base When performing the fail-soft operation/fail-soft start-up operation using a base board with station No. setup function, a module connected to the SX bus must be the following version. Module types Version Module directly connected to the SX bus Hardware version: 20 or later 1-1 Section 1 General 1-2 Operational Modes of SPH System 1-2-1 Fail-soft operation mode In normal operation mode, the CPU is always monitoring modules and units in the SPH system. Therefore, if a module or a unit is disconnected from the system due to a failure or power cut, the system goes into a fatal fault state and stops operation. In fail-soft operation mode, even if a module or a unit is disconnected from the system because of failure or power cut, the entire SPH system can continue its operation. In this mode, when the disconnected module is restored, it can return to the SPH system. (1) Operation performed when a module/unit is disconnected In a fail-soft system, even if a module or a unit with fail-soft enabled is disconnected from the system because of failure or power cut, the SPH system continues its operation. Operating normally Operating in a nonfatal fault state Fail-soft enabled Disconnected due to power cut, etc.. (2) Operation performed when units are restored When a unit that has been disconnected due to power cut is powered up again and restored, the operation varies depending on how to be restored. 1) When all the units disconnected due to power cut are restored at once All the units disconnected due to power cut are restored and the SPH system that has been operating in a nonfatal fault state returns to its normal state. * This operation is common to all station No. bases, hot plug bases, and standard bases. Operating in a nonfatal fault state Normal operation is restored. All units are powered on. 1-2 Section 1 General 1-2 Operational Modes of SPH System 2) When each disconnected unit is restored at different times (not using station No. base or hot plug base) Until all the units disconnected due to power cut have been restored, the SPH system continues its operation in a nonfatal fault state. The moment when all the disconnected units have been restored, the system returns to its normal state. Operating in a nonfatal fault state (Status 1) Operating in a nonfatal fault state (Status 2) Unit A Unit A is powered up, but cannot return to the system. Unit B Normal operation is restored. (Status 3) After unit B is powered up, unit A and unit B return to the system at the same time. Note: Even when unit A is powered up (Status 2), it cannot return to the system yet. The moment when all the disconnected units are restored after unit B is powered up (Status 3), both unit A and unit B can return to the system. Key point If you want to restore the unit that is powered up before all the disocnnected units have been restored, use a “station No. base” or a “hot plug base”. 1-3 Section 1 General 1-2 Operational Modes of SPH System 3) When each disconnected unit is restored at different times (using station No. base or hot plug base) The disconnected unit is restored the moment when it is powered up. Operating in a nonfatal fault state (Status 1) Operating in a nonfatal fault state (Status 2) Unit A Unit A is powered up, and it returns to the system Unit B Normal operation is restored. (Status 3) Unit B is powered up, and it returns to the system. 1-4 Section 1 General 1-2 Operational Modes of SPH System 1-2-2 Fail-soft start-up operation mode In normal operation mode, if all the modules registered in the system configuration definition do not start when the SPH system is powered up, the system cannot start operating. On the other hand, in fail-soft start-up operation mode, the specified unit can be activated later. <Example of fail-soft start-up operation> SX bus expansion unit B and C are not powered up (Status 1). Only unit A is activated in the SPH system, which is operating in a nonfatal fault state. (In normal mode, the system cannot operate in this condition.) If SX bus expansion unit B is powered up, unit B joins the system. (The SPH system is in a nonfatal fault state.) If SX bus expansion unit C is powered up, unit C joins the system and the SPH system returns to its normal state. Fail-soft start-up setting Status 1 Unit A: operating in a nonfatal fault state SX bus expansion unit B: power cut SX bus expansion unit C: power cut UG30 series “Station No. base” or “Hot plug base” Status 2 Unit A: operating in a nonfatal fault state SX bus expansion unit B: power-up SX bus expansion unit C: power cut UG30 series Status 3 Unit A: operating normally SX bus expansion unit B: power-up SX bus expansion unit C: power-up UG30 series Note 1: Fail-soft start-up operation can be set only for a module/unit whose SX station number can be selected with the local module/local unit. Therefore, if fail-soft operation is performed on a base board basis as shown in the above figure, you need to use a “station No. base” or a “hot plug base” for the base board. Note 2: Fail-soft start-up operation differs from fail-soft operation. When it is necessary to set fail-soft operation, you need to set it besides the fail-soft start-up setting. (See the following pages.) 1-5 Section 1 General 1-2 Operational Modes of SPH System Fail-soft operation mode and fail-soft start-up operation mode are set in the system definition of the program loader. <Example of fail-soft operation setting> Click the [Fail-Soft Operation Setting] tab on the “CPU parameter” dialog box to display the fail-soft operation setting window. Select the module for which you want to set fail-soft operation, and then click the [>] button. For example, if TLINK-0 is registered, all the modules on the expansion unit are registered. After determining the setting, click the [OK] button. Note: For a expansion unit on remote I/O, fail-soft operation is set on a unit basis. It is not possible to set fail-soft operation on a module basis. 1-6 Section 1 General 1-2 Operational Modes of SPH System <Example of fail-soft start-up operation setting> Click the [Fail-soft operation setting] tab on the “System property” dialog box to display the fail-soft operation setting window. When there is a device for which you want to set fail-soft start-up operation, select the “Partial Fail-soft start up” and enter the SX station No. that starts fail-soft start-up operation. After determining the setting, click the [OK] button. 1-7 Section 2 Specifications 2-1 General Specifications Item Specification Physical Operating ambient environmental temperature conditions Storage (transportation) temperature 0 to + 55 Mechanical service conditions Electrical service conditions -25 to 70 Relative humidity 20 to 95%RH, no condensation Pollution degree 2 (no condensation) Corrosion immunity Free from corrosive gases. Not stained with organic solvents Corrosive gas Free from corrosive gases. Operating altitude 2000 m or less above sea level Transport condition: 70 kpa (equivalent to 3000 m above sea level) or more Vibration Half amplitude: 0.15 mm, Constant acceleration: 19.6 m/s2 2 hours in each of X, Y and Z directions, total 6 hours Shock Peak acceleration: 147 m/s2 , 3 cycles in each direction Noise immunity Rise time 1 ns, pulse width 1 μs, 1.5 kV (noise simulator) Electrostatic discharge Contact discharge: 6 kV, Aerial discharge: 8 kV Radioelectromagnetic field 10 V/m (80 MHz to 1,000 MHz) Internal current consumption (supplied from the power module) Base board with station No. setup function NP1BP-13S: 80mA or less NP1BS-13S: 80mA or less NP1BS-11S: 70mA or less NP1BS-08S: 60mA or less Hot plug base board with station No. setup function NP1BP-13D: 80mA or less NP1BS-13D: 80mA or less NP1BP-11D: 70mA or less NP1BS-11D: 70mA or less NP1BP-08D: 60mA or less NP1BS-08D: 60mA or less Installation conditions Structure Panel built in type, IP30 Cooling method Natural air cooled Mass Base board with station No. setup function NP1BP-13S: approx. 850g NP1BS-13S: approx. 850g NP1BS-11S: approx. 730g NP1BS-08S: approx. 550g Hot plug base board with station No. setup function NP1BP-13D: approx. 850g NP1BS-13D: approx. 850g NP1BP-11D: approx. 750g NP1BS-11D: approx. 730g NP1BP-08D: approx. 560g NP1BS-08D: approx. 550g Outside dimensions Refer to "2-4 Dimensions". 2-1 Section 2 Specifications 2-2 Performance/Functional Specifications 2-2-1 List of specifications Item Specifications Type NP1BP-13S NP1BS-13S NP1BS-11S NP1BS-08S NP1BP-13D NP1BS-13D NP1BP-11D NP1BS-11D NP1BP-08D NP1BS-08D No. of slots 13 slots Number of slots with 10 slots processor bus connectors 13 slots 11 slots 8 slots 13 slots 13 slots 11 slots 11 slots 8 slots 8 slots 3 slots 3 slots 3 slots 10 slots 3 slots 9 slots 3 slots 6 slots 3 slots Station No. setup function Provided Station No. setting range (see note.) 1 to 288 01 to E4 (hexadecimal) Target module for station No. setup V20 or later hardware versions of modules However, modules that have the station No. setup function, such as CPU modules and processor link modules are not the target. The station No. selection switch on the module is enabled. * If the station No. setup function is used in a hot plug base (even if the hot plugging function is not used), be sure to use a CPU module of SPH300 or SPH2000 supporting hot plug bases. Hot plugging function Not provided Provided Note: If a value that is out of the setting range is set, the station No. setup function becomes disabled. It means that the base board performs the same operation as a baseboard that does not have the station No. setup function. 2-2-2 Station No. setup function <About SX bus station Nos. of modules mounted on the base board with station No. setup function> The set value of the station No. selection switch is assigned to the module that is mounted on the leftmost slot but the power module. The station numbers for the modules mounted on remaining slots are automatically determined by adding one in order. D BC E D BC E 9 78 A 34 56 F 01 2 34 56 F 01 2 9 78 A “1E” =30 30 SX bus Power supply (31) I/O 32 33 I/O I/O P-link (See note.) (34) 35 36 37 38 39 40 I/O I/O I/O I/O I/O I/O Vacant Note: For a processor link module such as a P-link module, a value set with the CPU No. selection switch on the module becomes the SX bus station No. For example, if the CPU No. is set at “8”, the SX bus station No. becomes “246”. CPU Nos. are in one-to-one correspondence with SX bus station Nos. as listed below. CPU No. SX bus station No. CPU No. SX bus station No. 0 254 8 246 1 253 9 245 2 252 10 244 3 251 11 243 4 250 12 242 5 249 13 241 6 248 14 240 7 247 15 239 2-2 Section 2 Specifications 2-2 Performance/Functional Specifications 2-2-3 Hot plugging function Modules mounted on a hot plug base board with station No. setup function can be mounted and removed while the system power is on. With this function, you can replace a failed module without powering off the system. (1) Conditions for hot plugging Condition Description Target system In a system configured with the following version of CPU, modules whose hardware versions are 20 or later can be replaced while the system power is on. SPH300 NP1PS-32: V2463 or later, NP1PS-32R: V2663 or later, NP1PS-74: V2363 or later NP1PS-74R/117/117R: V2663 or later, NP1PS-245R: V2064 or later SPH2000 NP1PM-48R: V2102 or later, NP1PM-48E: V2102 or later, NP1PM-256E: V2102 or later * For a multi-CPU system or a duplex system, all the CPUs must be the above versions. Unavailable module and system Modules whose hardware versions are earlier than V20 Standard CPU module D Although the module is mounted on a hot plug base, the CPU is reset and cannot operate. NP1PS-117H High-performance CPU module that is currently operating (However, it is possible to replace a waiting CPU in a duplex system and a failed CPU in a multi-CPU system.) SX bus optical link module Power supply module (Even if the power supply module is duplicated, hot plugging is not allowed.) It is not possibe to use as a base board for group-type remote I/O because hot plugging of modules on group-type remote I/O is not allowed. SPH operational mode Because a module is mounted and removed while the SPH system is operating, both "fail-soft operation mode" and "fail-soft start-up operation mode" need to be set for the module. The system output (system DO) function is not available. No. of units that can be bedirectly connected to the SX bus cable No. of units that are supplied with power for SX bus transmission from the base board (POD, invertor, servo amplifier, etc.): Max. 8 units for each side (IN side and OUT side) of SX bus expansion connector (2) Module removing procedure Coupler lock By pulling the coupler lock in the direction of the blue arrow, release the coupler lock. Then immediately remove the module pulling it in the direction of the black arrow. Note: If the module is left at an incomplete angle, a fatal error of the system may occur. Therefore, remove it immediately. The lower part (the aluminum part) of the base board 2-3 Section 2 Specifications 2-2 Performance/Functional Specifications (3) Module mounting procedure Coupler lock 1) Raise the coupler lock which is attached to the slot where the module is inserted. Hang the hook of the module’s backside on the lower part (the aluminum part) of the base board. Hook The lower part (the aluminum part) of the base board Within 2 seconds 2) Fix the upper part of the module’s backside on the base board. * This operation must be completed within two seconds. Otherwise, an SX bus transmission error will occur and, at worst, a system fatal fault may occur. * Confirm that the hook of the module is stable on the lower part of the base board and is not sliding left or right. If the module is pushed in a sliding position, the connector may be damaged. The lower part (the aluminum part) of the base board 3) Confirm the coupler lock to hang on the hole which is in the upper part of the module’s backside. If the module is loose, push the coupler lock in the direction of the arrow to make it tight. 2-4 Section 2 Specifications 2-2 Performance/Functional Specifications (4) Operations during module hot plugging The operation during hot plugging and necessity of fail-soft setting of each module type are explained below. Condition Power supply module Fail-soft setting Operational specification Unnecessary Hot plugging of a power supply module is not allowed. However, while the module is not suppulied with power and "PWR LED" is off, hot plugging is possible. Note: When a module is removed while PWR LED is on, the base board may be damaged. The operation during hot plugging of a CPU module in a duplex system or a multiCPU system CPU module Communication module Unnecessary Unnecessary 1) The module is disconnected. (system nonfatal fault, the remaining part of the system continues its operation.) L 2) The failed module is replaced. (restored) L 3) Normal operation is restored. 1) The module is disconnected. (system nonfatal fault, the remaining part of the system continues its operation.) L 2) The failed module is replaced. (restored) L 3) Normal operation is restored. Note: While the communication module is removed, communications will stop. Some additional measure (fail-safe measure) needs to be taken against breakdown of communications. Modules that occupy I/O memory (I/O module, Positioning control module, etc.) The fail-soft operation cen be set for a desired module in the system definition of the program loader. If a module with no fail-soft enabled is disconnected, a systme fatal fault will occur and the CPU will stop. Necessary 1) The module is disconnected. (system nonfatal fault, the remaining part of the system continues its operation.) L 2) The failed module is replaced. (restored) L 3) Normal operation is restored. * Fail-soft setting is necessary only for modules that occupy I/O memory. Modules that do not occupy I/O memory, such as CPUs and communication modules (common modules), always operate in fail-soft operation mode. (5) When the reconnected module does not match the system definition 1) When a module whose type or station No. does not match the system definition is mounted The “ONL” LED of the module keeps flickering and the module does not join or affect the SX system. The status of the SX system is not changed. 2) Under the condition of 1), when a module that is registered in the system definition is mounted Even if a module registered in the system definition is mounted on another slot with an unregistered module connected to the SX system, as is the case with an unregistered module, the “ONL” LED keeps flickering and the module cannot join the SX system. Under this condition, it is not possible to distinguish between a registered module and an unregistered module. By removing the unregistered module, the registered module can return to the SX system. 2-5 Section 2 Specifications 2-2 Performance/Functional Specifications (6) Other cautions Hot plugging of processor link modules must be performed on a one-by-one basis. If two or more processor link modules are mounted or removed at once while the system power is on, there is a high possibility that processor bus errors will occur in two or more modules at the same time. For that, the distortion of the processor bus will exceed the tolerance of the system and a fatal fault will most likely occur. Especially when a processor link module is mounted while the system power is on, confirm that the “ONL” LED starts blinking after mounted, and then mount the next module. When using multiple processor link modules, set the takt period at 3ms or longer. The SX bus takt is set in the system definition of the program loader. (For the setting procedure, refer to the user’s manual of the loader being used.) The moment when a processor link module is mounted or removed while the system power is on, a processor bus access error may occur. Even if the error occurs, the SX system performs restoring processing, such as retry processing, to prevent the entire system from being damaged seriously. However, if its takt period is shorter than 3ms, there is high possibility that such retry processing will use up all the time which is also necessary for other normal operations. Thus, by hot plugging of a processor link module, SX system may not be able to continue its normal operation and go into a fatal fault state. A “processor bus access error (nonfatal fault)” may occur during hot plugging of a processor link module. This nonfatal fault can be recovered with the user application. When using D300win D Processor bus access error (%MX10.11.14) When using Standard loader D Processor bus access error flag (SM11E) During hot plugging operation, the SX bus takt period may become longer for a brief moment. The positioning control system is a typical example of the system that operates under the bus takt period time. In such a system, hot plugging operation may cause problems such as displacement, therefore, including preliminary verification, the application program must be created with extreme caution. If a module that is performing processor bus access with the application program is removed, processor bus access to the module becomes impossible and the processing is delayed until a timeout of the processor bus occurs. For that, while a module is removed, the task period may always be longer than usual. The more processor bus access in the application program is performed, the longer the takt period becomes. As a rule of thumb, when processor bus access is normally performed, the processing time is approximately 3μs per access. However, if a timeout occurs, the processing time is extended to approximately 30ms. For a CPU in a system using a hot plugging base, set the waiting time for configuration check at 5 seconds or longer. (The default value, 20 seconds, is recommended.) This is because a power-on delay controlling cirucuit is installed in hot plug bases to prevent a rapid change of power supply to the modules during hot plugging operation. 2-6 Section 2 Specifications 2-3 Names and Functions 2-3-1 Names 1) SX bus station No. selection switch Coupler lock Processor bus connector 2) SX bus connector (IN) 2) SX bus connector (OUT) Direct-mount hole 3) Hot plug recognition seal SX bus connector Direct-mount hole (Side) (Front) 4) Base board mounting bracket 5) Base board mounting studs (optional) Type: NP8B-ST (Front) (Side) 2-3-2 Functions 1) SX bus station No. selection switch This switch is used to specify the SX bus station No. of the module that is mounted on the leftmost slot but the power module of the “station No. base” or the “hot plug base”. D BC E Note: Setting range: 1 to 228 (01 to E4 (hexadecimal)) 9 78 A D BC E F 01 2 34 56 3 45 6 F 01 2 9 78 A Note: If a value that is out of the setting range is set, the station No. setup function becomes disabled. In other words, in this condition, the operation of “station No. base” or the “hot plug base” is the same as that of a base board that does not have the station No. setup function. 2) SX bus connector For SX bus connection, be sure to connect the cable that comes from the OUT terminal to the IN terminal. Connect the orange connector of the cable to OUT; the white connector to IN. In addition, if a base board is used alone, be sure to connect a SX bus terminating plug (type: NP8B-BP) to both IN and OUT terminals. 2-7 Section 2 Specifications 2-3 Names and Functions 3) Hot plug recognition seal This seal indicates that the base board is a hot plug base board with station No. setup function and is attached on the lower left part of a base board. 4) Base board mounting bracket (type: NP8B-13/11/08) This is used to mount a base board onto a control panel using screws, and supplied with the base board. For more information about the installing method, refer to “Section 3 Installation”. 5) Base board mounting stud (type: NP8B-ST) This is used to mount a base board onto a control panel using the DIN rail. This item is optionally available (package of two studs). For more information about the installing method, refer to “Section 3 Installation”. 2-8 Section 2 Specifications 2-4 Dimensions <Base board> Unit: mm 20.3 L1 31 105 8 W <Base board mounting bracket> 5.8 28.5 5.8 2-φ6 L2 Base board type 4 W (mm) L1 (mm) L2 (mm) 483 465 476.5 NP1BS-11S 413 395 406.5 NP1BS-08S 308 290 301.5 NP1BS-11D 413 395 406.5 NP1BS-08D 308 290 301.5 NP1BP-13S NP1BS-13S NP1BP-13D NP1BS-13D 42 <Base board mounting studs (optional)> 17 17 2-9 (11) Section 3 Installation When mounting the SPH onto the control panel, there are two method for mounting: mounting the base board directly onto the control panel, and mounting the base board using the DIN rail. 3-1 Mounting the Base Board Directly onto the Control Panel To mount the base board directly onto the control panel, use the base board mounting bracket (NP8B-) supplied as an accessory. 3-1-1 Mounting dimensions W 1.8 Base board mounting bracket contour 30 105 8 Base board contour 6mm dia. (4 holes) L Note: The hole size shown in the figure above is a size of hole which is drilled in a base board and a mounting bracket. Base board type W (mm) L (mm) NP1BP-13S NP1BS-13S NP1BP-13D 483 465 NP1BS-13D NP1BS-11S 413 395 NP1BS-08S 308 290 Base board type W (mm) L (mm) NP1BP-11D 413 395 NP1BS-11D 413 395 NP1BP-08D 308 290 NP1BS-08D 308 290 3-1-2 Base board mounting method 1) 2) 3) 4) Base board mounting bracket Control panel 1) 2) 3) 4) Fix the base board mounting bracket onto the control panel with M5 screws. Hang the base board on the base board mounting bracket. Fix the base board by inserting the screws through the direct-mount holes. After mounting the base board, mount the power supply module, the CPU module and other modules. 3-1 Section 3 Installation 3-2 Mounting with a DIN Rail To mount the base board on the control panel using a DIN rail, use the base board mounting studs (NP8B-ST) which are available as optional items. 3-2-1 Base board mounting stud (NP8B-ST) Fix the base board mounting studs (options) on the both side of the base board, so that the base board is fixed. 3-2-2 DIN rail The following DIN rails should be used. Type Height (mm) Length (mm) Material TH35-7.5 7.5 900 Iron TH35-7.5AL 7.5 900 Alminum TH35-15AL 15 900 Alminum 3-2-2 Base board mounting method 1) 2) 3) DIN rail Control panel 1) Fix the DIN rail onto the control panel, and hang the base board on the DIN rail. 2) Insert the base board mounting studs to the sheaths of the base board from the both sides through the DIN rail. 3) Screw down the base board mounting studs. (Tightening torque: 1.0 to 1.3 N m ) 3-2 Section 3 Installation 3-2 Mounting with a DIN Rail Note: Be sure to fix the base board mounting studs on the both sides of each base board. In addition, keep an open space of 80mm (or more) between base boards. 80mm or more 3-3 Gate City Ohsaki, East Tower, 11-2, Osaki 1-chome, Shinagawa-ku, Tokyo, 141-0032, Japan Phone: +81-3-5435-7135 ~ 8 Fax: +81-3-5435-7456 ~ 9 URL http://www.fujielectric.co.jp/fcs/eng/ Information in this manual is subject to change without notice.