1
029,(0$*,&
6&+('8/,1*
TUTORIAL/USER’S MANUAL
FOR USE WITH
MICROSOFT WINDOWS
& APPLE MACINTOSH
Copyright ®2002, Movie Magic Technologies, Inc., All Rights Reserved
Scheduling is a trademark of Movie Magic Technologies, Inc., and Movie Magic is a
registered trademark of Movie Magic Technologies, Inc., with the United States and
other countries. Macintosh is a registered trademark of Apple Computer, Inc. Windows is a registered trademark of the Microsoft Corporation. All other trademarks are
held by their respective owners.
Movie Magic Scheduling
i
&RQWHQWV
Introduction . . . . . . . . . . . . . . . . . . . . . . . . . . . . . . . . . . . . . . . . . xi
How to Use this Book. . . . . . . . . . . . . . . . . . . . . . . . . . . . . . . . . . . . . . . . . xi
Tips and Cautions . . . . . . . . . . . . . . . . . . . . . . . . . . . . . . . . . . . . . . . . . . xi
Differences between the PC and Macintosh Interfaces . . . . . . . . . . . . . xi
Overview of Scheduling. . . . . . . . . . . . . . . . . . . . . . . . . . . . . . . . . . . . . . . xii
Breaking Down a Script . . . . . . . . . . . . . . . . . . . . . . . . . . . . . . . . . . . . . xii
Manipulating the Schedule . . . . . . . . . . . . . . . . . . . . . . . . . . . . . . . . . . . xii
Creating Output: Schedules and Reports . . . . . . . . . . . . . . . . . . . . . . . . xii
PART I - TUTORIAL
Lesson 1: Getting Started . . . . . . . . . . . . . . . . . . . . . . . . . . . . . . 3
Launching the Program . . . . . . . . . . . . . . . . . . . . . . . . . . . . . . . . . . . . . . . 4
Windows 98 . . . . . . . . . . . . . . . . . . . . . . . . . . . . . . . . . . . . . . . . . . . . . . . 4
Macintosh . . . . . . . . . . . . . . . . . . . . . . . . . . . . . . . . . . . . . . . . . . . . . . . . . 4
Looking at a Completed Schedule . . . . . . . . . . . . . . . . . . . . . . . . . . . . . . . 4
Open the Schedule for It’s a Wonderful Life . . . . . . . . . . . . . . . . . . . . . . 4
The Parts of the Scheduling Screen . . . . . . . . . . . . . . . . . . . . . . . . . . . . . 5
The Breakdown Sheets . . . . . . . . . . . . . . . . . . . . . . . . . . . . . . . . . . . . 5
The Strip Board . . . . . . . . . . . . . . . . . . . . . . . . . . . . . . . . . . . . . . . . . . 6
Reports and other Output . . . . . . . . . . . . . . . . . . . . . . . . . . . . . . . . . . . 7
Close the Demo Schedule . . . . . . . . . . . . . . . . . . . . . . . . . . . . . . . . . . . . . . 7
Create a New Schedule . . . . . . . . . . . . . . . . . . . . . . . . . . . . . . . . . . . . . . . . 8
Add Production Information . . . . . . . . . . . . . . . . . . . . . . . . . . . . . . . . . . . 8
Save your Schedule . . . . . . . . . . . . . . . . . . . . . . . . . . . . . . . . . . . . . . . . . . . 9
Review . . . . . . . . . . . . . . . . . . . . . . . . . . . . . . . . . . . . . . . . . . . . . . . . . . . . . 10
Lesson 2: Breaking Down a Script . . . . . . . . . . . . . . . . . . . . . . 11
Creating Elements . . . . . . . . . . . . . . . . . . . . . . . . . . . . . . . . . . . . . . . . . . . 12
Entering Scene Information . . . . . . . . . . . . . . . . . . . . . . . . . . . . . . . . . . 12
Entering Script Elements . . . . . . . . . . . . . . . . . . . . . . . . . . . . . . . . . . . . . 14
Using the Quick Entry Screen . . . . . . . . . . . . . . . . . . . . . . . . . . . . . . . . 14
Using the Element Info Window . . . . . . . . . . . . . . . . . . . . . . . . . . . . . . 16
Adding a New Breakdown Sheet . . . . . . . . . . . . . . . . . . . . . . . . . . . . . . 17
Contents
ii
Movie Magic Scheduling
Entering Elements into Later Breakdown Sheets . . . . . . . . . . . . . . . . . .18
Closing the Schedule . . . . . . . . . . . . . . . . . . . . . . . . . . . . . . . . . . . . . . . . . .19
Review . . . . . . . . . . . . . . . . . . . . . . . . . . . . . . . . . . . . . . . . . . . . . . . . . . . . .20
Lesson 3: Manipulating the Schedule. . . . . . . . . . . . . . . . . . . . 21
Working with the Schedule . . . . . . . . . . . . . . . . . . . . . . . . . . . . . . . . . . . .22
Defining ID numbers . . . . . . . . . . . . . . . . . . . . . . . . . . . . . . . . . . . . . . . . .22
Reorder IDs by Page Count . . . . . . . . . . . . . . . . . . . . . . . . . . . . . . . . . .23
Reordering Elements Manually . . . . . . . . . . . . . . . . . . . . . . . . . . . . . . .24
Locking the ID numbers . . . . . . . . . . . . . . . . . . . . . . . . . . . . . . . . . . . .25
Working with the Strip Board . . . . . . . . . . . . . . . . . . . . . . . . . . . . . . . . . .26
Viewing the Strip Board . . . . . . . . . . . . . . . . . . . . . . . . . . . . . . . . . . . .26
Understanding the Strip Board Views . . . . . . . . . . . . . . . . . . . . . . . . . .26
Contents of a Strip . . . . . . . . . . . . . . . . . . . . . . . . . . . . . . . . . . . . . . .26
Color of a Strip . . . . . . . . . . . . . . . . . . . . . . . . . . . . . . . . . . . . . . . . . .26
Different Views for strips . . . . . . . . . . . . . . . . . . . . . . . . . . . . . . . . . .27
Moving Strips Manually . . . . . . . . . . . . . . . . . . . . . . . . . . . . . . . . . . . .27
Using Sort and Select . . . . . . . . . . . . . . . . . . . . . . . . . . . . . . . . . . . . . . . . .28
Opening the Sort and Select Screen . . . . . . . . . . . . . . . . . . . . . . . . . . . .28
Basic Sorting . . . . . . . . . . . . . . . . . . . . . . . . . . . . . . . . . . . . . . . . . . . . .29
Sorting by Character . . . . . . . . . . . . . . . . . . . . . . . . . . . . . . . . . . . . . . .30
Review . . . . . . . . . . . . . . . . . . . . . . . . . . . . . . . . . . . . . . . . . . . . . . . . . . . . .31
Lesson 4: Completing a Schedule . . . . . . . . . . . . . . . . . . . . . . . 33
Using the Calendar . . . . . . . . . . . . . . . . . . . . . . . . . . . . . . . . . . . . . . . . . . .34
Creating a Standard Week . . . . . . . . . . . . . . . . . . . . . . . . . . . . . . . . . . .34
Inserting Company Travel . . . . . . . . . . . . . . . . . . . . . . . . . . . . . . . . . . .35
Inserting a Holiday . . . . . . . . . . . . . . . . . . . . . . . . . . . . . . . . . . . . . . . .36
Inserting Day Breaks . . . . . . . . . . . . . . . . . . . . . . . . . . . . . . . . . . . . . . . . .37
Manually Inserting Daybreaks . . . . . . . . . . . . . . . . . . . . . . . . . . . . . . . .37
Moving Daybreaks on the Strip Board . . . . . . . . . . . . . . . . . . . . . . . . .37
Using Auto Daybreaks . . . . . . . . . . . . . . . . . . . . . . . . . . . . . . . . . . . . . .38
Inserting a Day Break for a Complicated or Long Scene . . . . . . . . . . . .38
Inserting a Banner . . . . . . . . . . . . . . . . . . . . . . . . . . . . . . . . . . . . . . . . . . .38
Using Board Swaps . . . . . . . . . . . . . . . . . . . . . . . . . . . . . . . . . . . . . . . . . . .39
Creating a Board Swap . . . . . . . . . . . . . . . . . . . . . . . . . . . . . . . . . . . . .40
Restoring Board Swaps . . . . . . . . . . . . . . . . . . . . . . . . . . . . . . . . . . . . .41
Using Board Swaps . . . . . . . . . . . . . . . . . . . . . . . . . . . . . . . . . . . . . . . . . . .42
Review . . . . . . . . . . . . . . . . . . . . . . . . . . . . . . . . . . . . . . . . . . . . . . . . . . . . .42
Contents
Movie Magic Scheduling
iii
Lesson 5: Creating Output . . . . . . . . . . . . . . . . . . . . . . . . . . . . 43
Ready to Output. . . . . . . . . . . . . . . . . . . . . . . . . . . . . . . . . . . . . . . . . . . . . 44
Printing the Strip Board . . . . . . . . . . . . . . . . . . . . . . . . . . . . . . . . . . . . . . 44
Printing the Shooting Schedule . . . . . . . . . . . . . . . . . . . . . . . . . . . . . . . . 45
Printing the Day out of Days. . . . . . . . . . . . . . . . . . . . . . . . . . . . . . . . . . . 46
Review . . . . . . . . . . . . . . . . . . . . . . . . . . . . . . . . . . . . . . . . . . . . . . . . . . . . . 46
PART II - REFERENCE
Chapter 1: Getting Started . . . . . . . . . . . . . . . . . . . . . . . . . . . . 49
General Setup . . . . . . . . . . . . . . . . . . . . . . . . . . . . . . . . . . . . . . . . . . . . . . . 49
Installing Movie Magic Scheduling . . . . . . . . . . . . . . . . . . . . . . . . . . . . 49
Launching Movie Magic Scheduling . . . . . . . . . . . . . . . . . . . . . . . . . . . 49
Windows 98 . . . . . . . . . . . . . . . . . . . . . . . . . . . . . . . . . . . . . . . . . . . . 49
Macintosh . . . . . . . . . . . . . . . . . . . . . . . . . . . . . . . . . . . . . . . . . . . . . . 49
Exiting Movie Magic Scheduling . . . . . . . . . . . . . . . . . . . . . . . . . . . . . . 49
Online Help. . . . . . . . . . . . . . . . . . . . . . . . . . . . . . . . . . . . . . . . . . . . . . . . . 50
Navigation. . . . . . . . . . . . . . . . . . . . . . . . . . . . . . . . . . . . . . . . . . . . . . . . . . 51
Using the Menu Bar . . . . . . . . . . . . . . . . . . . . . . . . . . . . . . . . . . . . . . . . 51
Using the Mini-Stripboard . . . . . . . . . . . . . . . . . . . . . . . . . . . . . . . . . . . 52
Using the Breakdown Toolbar . . . . . . . . . . . . . . . . . . . . . . . . . . . . . . . . 53
Using the Strip Board Toolbar . . . . . . . . . . . . . . . . . . . . . . . . . . . . . . . . 53
Switching from Breakdown Sheets to the Strip Board . . . . . . . . . . . . . . 54
Switching from the Strip Board to Breakdown sheets . . . . . . . . . . . . . . 54
Setting Preferences . . . . . . . . . . . . . . . . . . . . . . . . . . . . . . . . . . . . . . . . . . 54
Application Specific Preferences . . . . . . . . . . . . . . . . . . . . . . . . . . . . . . 55
Changing Reaction to a Click on Categories . . . . . . . . . . . . . . . . . . . 55
Changing the Auto-Save response . . . . . . . . . . . . . . . . . . . . . . . . . . . 55
Changing Miscellaneous Attributes . . . . . . . . . . . . . . . . . . . . . . . . . . 56
Schedule Specific Preferences . . . . . . . . . . . . . . . . . . . . . . . . . . . . . . . . 57
Changing Breakdown Sheet Display . . . . . . . . . . . . . . . . . . . . . . . . . 57
Allowing Multi-Day Breaks . . . . . . . . . . . . . . . . . . . . . . . . . . . . . . . 57
Sorting Elements . . . . . . . . . . . . . . . . . . . . . . . . . . . . . . . . . . . . . . . . 58
Changing Action after Last Field . . . . . . . . . . . . . . . . . . . . . . . . . . . . 58
Adjusting Response to Unrecognized Element . . . . . . . . . . . . . . . . . 59
Setting Function Keys . . . . . . . . . . . . . . . . . . . . . . . . . . . . . . . . . . . . . . . . 59
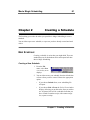
Chapter 2: Creating a Schedule . . . . . . . . . . . . . . . . . . . . . . . . 61
New Schedule . . . . . . . . . . . . . . . . . . . . . . . . . . . . . . . . . . . . . . . . . . . . . . . 61
Creating a New Schedule . . . . . . . . . . . . . . . . . . . . . . . . . . . . . . . . . . . . 61
Contents
iv
Movie Magic Scheduling
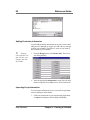
Adding Production Information . . . . . . . . . . . . . . . . . . . . . . . . . . . . . . .62
Importing Script Information . . . . . . . . . . . . . . . . . . . . . . . . . . . . . . . . .62
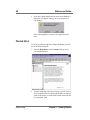
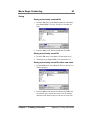
Opening, Closing Schedules . . . . . . . . . . . . . . . . . . . . . . . . . . . . . . . . . . . .64
Opening a Schedule . . . . . . . . . . . . . . . . . . . . . . . . . . . . . . . . . . . . . . . .64
Opening a Recently Used Schedule . . . . . . . . . . . . . . . . . . . . . . . . . . . .64
Saving . . . . . . . . . . . . . . . . . . . . . . . . . . . . . . . . . . . . . . . . . . . . . . . . . .65
Saving a previously unsaved file . . . . . . . . . . . . . . . . . . . . . . . . . . . .65
Saving a previously saved file . . . . . . . . . . . . . . . . . . . . . . . . . . . . . .65
Saving a previously saved file with a new name . . . . . . . . . . . . . . . .65
Closing a Window . . . . . . . . . . . . . . . . . . . . . . . . . . . . . . . . . . . . . . . . .66
Closing a Schedule . . . . . . . . . . . . . . . . . . . . . . . . . . . . . . . . . . . . . . . .66
Exiting Movie Magic Scheduling . . . . . . . . . . . . . . . . . . . . . . . . . . . . .66
Chapter 3: Breakdown Sheets . . . . . . . . . . . . . . . . . . . . . . . . . 67
Viewing Breakdown Sheets . . . . . . . . . . . . . . . . . . . . . . . . . . . . . . . . . . . .67
Defining the Screen Areas . . . . . . . . . . . . . . . . . . . . . . . . . . . . . . . . . . . . .67
Scene Information . . . . . . . . . . . . . . . . . . . . . . . . . . . . . . . . . . . . . . . . .67
Categories . . . . . . . . . . . . . . . . . . . . . . . . . . . . . . . . . . . . . . . . . . . . . . .68
Storyboard . . . . . . . . . . . . . . . . . . . . . . . . . . . . . . . . . . . . . . . . . . . . . . .68
Entering Scene Information. . . . . . . . . . . . . . . . . . . . . . . . . . . . . . . . . . . .68
Adding a New Breakdown Sheet . . . . . . . . . . . . . . . . . . . . . . . . . . . . . . . .69
Elements. . . . . . . . . . . . . . . . . . . . . . . . . . . . . . . . . . . . . . . . . . . . . . . . . . . .70
Using Quick Entry . . . . . . . . . . . . . . . . . . . . . . . . . . . . . . . . . . . . . . . . . . .71
Opening the Quick Entry Palette . . . . . . . . . . . . . . . . . . . . . . . . . . . . . .71
Menu . . . . . . . . . . . . . . . . . . . . . . . . . . . . . . . . . . . . . . . . . . . . . . . . . .71
Keyboard . . . . . . . . . . . . . . . . . . . . . . . . . . . . . . . . . . . . . . . . . . . . . . .71
Mouse . . . . . . . . . . . . . . . . . . . . . . . . . . . . . . . . . . . . . . . . . . . . . . . . .71
Changing the Quick Entry Mode . . . . . . . . . . . . . . . . . . . . . . . . . . . . . .71
Selecting the Category . . . . . . . . . . . . . . . . . . . . . . . . . . . . . . . . . . . . . .72
Adding New Elements to the Breakdown Sheet . . . . . . . . . . . . . . . . . .73
Removing Elements from the Breakdown Sheet . . . . . . . . . . . . . . . . . .74
Adding and Removing Elements Simultaneously . . . . . . . . . . . . . . . . .74
Creating New Elements without Adding them . . . . . . . . . . . . . . . . . . .75
Finding an Element in the Breakdown Sheets . . . . . . . . . . . . . . . . . . . .75
Select with Mouse . . . . . . . . . . . . . . . . . . . . . . . . . . . . . . . . . . . . . . . .75
Select by Keyboard . . . . . . . . . . . . . . . . . . . . . . . . . . . . . . . . . . . . . . .76
Finding a List of Related Elements . . . . . . . . . . . . . . . . . . . . . . . . . . . .76
Sorting the Element List . . . . . . . . . . . . . . . . . . . . . . . . . . . . . . . . . . . .77
Getting Information about an Element . . . . . . . . . . . . . . . . . . . . . . . . .78
Deleting an Element from the Category . . . . . . . . . . . . . . . . . . . . . . . .78
Using the Mouse to Add Elements. . . . . . . . . . . . . . . . . . . . . . . . . . . . . . .79
Contents
Movie Magic Scheduling
v
Using the Element Info Window. . . . . . . . . . . . . . . . . . . . . . . . . . . . . . . . 79
The Element Info Windows . . . . . . . . . . . . . . . . . . . . . . . . . . . . . . . . . . 80
Creating New Elements . . . . . . . . . . . . . . . . . . . . . . . . . . . . . . . . . . . . . 81
Adding Info to an Existing element . . . . . . . . . . . . . . . . . . . . . . . . . . . . 82
Manually Defining the Drop # . . . . . . . . . . . . . . . . . . . . . . . . . . . . . . . . 82
Hiding and Displaying Empty Categories . . . . . . . . . . . . . . . . . . . . . . . . 82
Modifying Categories . . . . . . . . . . . . . . . . . . . . . . . . . . . . . . . . . . . . . . . . 83
Changing Category Names . . . . . . . . . . . . . . . . . . . . . . . . . . . . . . . . . . . 83
Adding a New Category . . . . . . . . . . . . . . . . . . . . . . . . . . . . . . . . . . . . . 84
Using Storyboard Pictures . . . . . . . . . . . . . . . . . . . . . . . . . . . . . . . . . . . . 84
Adding a Storyboard Picture . . . . . . . . . . . . . . . . . . . . . . . . . . . . . . . . . 84
Removing a Storyboard Picture . . . . . . . . . . . . . . . . . . . . . . . . . . . . . . . 86
Duplicating Breakdown Sheets. . . . . . . . . . . . . . . . . . . . . . . . . . . . . . . . . 86
Working with Board ID Numbers . . . . . . . . . . . . . . . . . . . . . . . . . . . . . . 87
Reorder IDs by Page Count . . . . . . . . . . . . . . . . . . . . . . . . . . . . . . . . . . 87
Reordering Elements Manually . . . . . . . . . . . . . . . . . . . . . . . . . . . . . . . 88
Locking the ID Numbers . . . . . . . . . . . . . . . . . . . . . . . . . . . . . . . . . . . . 89
Unlocking the ID Numbers . . . . . . . . . . . . . . . . . . . . . . . . . . . . . . . . . . . 89
Removing ID Numbers . . . . . . . . . . . . . . . . . . . . . . . . . . . . . . . . . . . . . . 90
Renumbering Breakdown Sheets . . . . . . . . . . . . . . . . . . . . . . . . . . . . . . . 90
Merging Breakdown Sheets . . . . . . . . . . . . . . . . . . . . . . . . . . . . . . . . . . . 90
Chapter 4: The Strip Board . . . . . . . . . . . . . . . . . . . . . . . . . . . 93
What are Strips? . . . . . . . . . . . . . . . . . . . . . . . . . . . . . . . . . . . . . . . . . . . . 93
Setup . . . . . . . . . . . . . . . . . . . . . . . . . . . . . . . . . . . . . . . . . . . . . . . . . . . . . . 93
Standard Colors . . . . . . . . . . . . . . . . . . . . . . . . . . . . . . . . . . . . . . . . . . . 93
Changing the Color of Strips . . . . . . . . . . . . . . . . . . . . . . . . . . . . . . . . . . 94
Viewing the Strip Board . . . . . . . . . . . . . . . . . . . . . . . . . . . . . . . . . . . . . . 95
The Different Views . . . . . . . . . . . . . . . . . . . . . . . . . . . . . . . . . . . . . . . . 95
Switching between Different Views . . . . . . . . . . . . . . . . . . . . . . . . . . . . 95
Standard Information on a Strip . . . . . . . . . . . . . . . . . . . . . . . . . . . . . . . 95
Sorting Strips Manually . . . . . . . . . . . . . . . . . . . . . . . . . . . . . . . . . . . . . . 95
Using Drag and Drop . . . . . . . . . . . . . . . . . . . . . . . . . . . . . . . . . . . . . . . 95
Using the Reorder Command . . . . . . . . . . . . . . . . . . . . . . . . . . . . . . . . . 96
Sort and Select . . . . . . . . . . . . . . . . . . . . . . . . . . . . . . . . . . . . . . . . . . . . . . 97
Opening Sort and Select . . . . . . . . . . . . . . . . . . . . . . . . . . . . . . . . . . . . . 97
Entering Sort and Select Commands . . . . . . . . . . . . . . . . . . . . . . . . . . . 98
Choosing commands . . . . . . . . . . . . . . . . . . . . . . . . . . . . . . . . . . . . . 98
Selecting elements . . . . . . . . . . . . . . . . . . . . . . . . . . . . . . . . . . . . . . . 99
Putting it together . . . . . . . . . . . . . . . . . . . . . . . . . . . . . . . . . . . . . . . . 99
Performing the sort/select . . . . . . . . . . . . . . . . . . . . . . . . . . . . . . . . 100
Contents
vi
Movie Magic Scheduling
Clearing the text window . . . . . . . . . . . . . . . . . . . . . . . . . . . . . . . . .100
Sorting Syntax and Examples . . . . . . . . . . . . . . . . . . . . . . . . . . . . . . .100
Sort by set . . . . . . . . . . . . . . . . . . . . . . . . . . . . . . . . . . . . . . . . . . . . .100
Other common sorts . . . . . . . . . . . . . . . . . . . . . . . . . . . . . . . . . . . . .100
Sorting Syntax . . . . . . . . . . . . . . . . . . . . . . . . . . . . . . . . . . . . . . . . . .101
Selecting Syntax and Examples . . . . . . . . . . . . . . . . . . . . . . . . . . . . . .101
Select by Elements . . . . . . . . . . . . . . . . . . . . . . . . . . . . . . . . . . . . . .101
Select Any . . . . . . . . . . . . . . . . . . . . . . . . . . . . . . . . . . . . . . . . . . . . .101
Selecting Banners & Daybreaks . . . . . . . . . . . . . . . . . . . . . . . . . . . .102
Selecting partial matches to sheet fields . . . . . . . . . . . . . . . . . . . . . .102
Moving Strips with a Select Command . . . . . . . . . . . . . . . . . . . . . . . .102
Saving a Sort or Select Command . . . . . . . . . . . . . . . . . . . . . . . . . . . .103
Loading a Sort or Select Command . . . . . . . . . . . . . . . . . . . . . . . . . . .104
Troubleshooting Sort and Select . . . . . . . . . . . . . . . . . . . . . . . . . . . . .105
Basic Syntax Errors . . . . . . . . . . . . . . . . . . . . . . . . . . . . . . . . . . . . .105
Use of Terminology . . . . . . . . . . . . . . . . . . . . . . . . . . . . . . . . . . . . .105
Using the Calendar . . . . . . . . . . . . . . . . . . . . . . . . . . . . . . . . . . . . . . . . . .106
Entering Production Dates . . . . . . . . . . . . . . . . . . . . . . . . . . . . . . . . . .107
Setting Days Off . . . . . . . . . . . . . . . . . . . . . . . . . . . . . . . . . . . . . . . . .108
Navigating through the Calendar . . . . . . . . . . . . . . . . . . . . . . . . . . . . .108
Setting Special Days . . . . . . . . . . . . . . . . . . . . . . . . . . . . . . . . . . . . . .108
Day Breaks. . . . . . . . . . . . . . . . . . . . . . . . . . . . . . . . . . . . . . . . . . . . . . . . .109
Inserting Day Breaks Automatically . . . . . . . . . . . . . . . . . . . . . . . . . .109
Inserting Day Breaks Manually . . . . . . . . . . . . . . . . . . . . . . . . . . . . . .109
Removing Individual Day Breaks . . . . . . . . . . . . . . . . . . . . . . . . . . . .110
Deleting Daybreaks . . . . . . . . . . . . . . . . . . . . . . . . . . . . . . . . . . . . . .110
Moving Daybreaks to the Boneyard . . . . . . . . . . . . . . . . . . . . . . . . .110
Removing all Day Breaks . . . . . . . . . . . . . . . . . . . . . . . . . . . . . . . . . .111
Moving Daybreaks . . . . . . . . . . . . . . . . . . . . . . . . . . . . . . . . . . . . . . . .111
Using Multiple Daybreaks for Long or Complicated Scenes . . . . . . . .111
Banners . . . . . . . . . . . . . . . . . . . . . . . . . . . . . . . . . . . . . . . . . . . . . . . . . . .112
Using the Banner Types . . . . . . . . . . . . . . . . . . . . . . . . . . . . . . . . . . . .112
Comment only . . . . . . . . . . . . . . . . . . . . . . . . . . . . . . . . . . . . . . . . . .112
End of day . . . . . . . . . . . . . . . . . . . . . . . . . . . . . . . . . . . . . . . . . . . . .112
Permit Multiple Day Breaks Across Banner . . . . . . . . . . . . . . . . . . . .113
Using the Boneyard. . . . . . . . . . . . . . . . . . . . . . . . . . . . . . . . . . . . . . . . . .113
Moving Strips to the Boneyard . . . . . . . . . . . . . . . . . . . . . . . . . . . . . .113
Moving Strips back to the Schedule . . . . . . . . . . . . . . . . . . . . . . . . . .114
Swapping Boards . . . . . . . . . . . . . . . . . . . . . . . . . . . . . . . . . . . . . . . . . . .114
Creating a Board Swap . . . . . . . . . . . . . . . . . . . . . . . . . . . . . . . . . . . .114
Restoring Board Swaps . . . . . . . . . . . . . . . . . . . . . . . . . . . . . . . . . . . .115
Contents
Movie Magic Scheduling
vii
Renaming Board Swaps . . . . . . . . . . . . . . . . . . . . . . . . . . . . . . . . . . . . 115
Deleting Board Swaps . . . . . . . . . . . . . . . . . . . . . . . . . . . . . . . . . . . . . 115
Using Board Swaps . . . . . . . . . . . . . . . . . . . . . . . . . . . . . . . . . . . . . . . . 116
Recalculating the Schedule . . . . . . . . . . . . . . . . . . . . . . . . . . . . . . . . . . . 117
Chapter 5: Designing Custom Output . . . . . . . . . . . . . . . . . . 119
Design Palette . . . . . . . . . . . . . . . . . . . . . . . . . . . . . . . . . . . . . . . . . . . . . . 119
The Buttons . . . . . . . . . . . . . . . . . . . . . . . . . . . . . . . . . . . . . . . . . . . . . . 119
The Tool Palette . . . . . . . . . . . . . . . . . . . . . . . . . . . . . . . . . . . . . . . . . . 120
Font, Size & Style . . . . . . . . . . . . . . . . . . . . . . . . . . . . . . . . . . . . . . . . . 120
Defining Fields . . . . . . . . . . . . . . . . . . . . . . . . . . . . . . . . . . . . . . . . . . . 121
Draw Lines/Line Size . . . . . . . . . . . . . . . . . . . . . . . . . . . . . . . . . . . . . . 121
Field Orientation . . . . . . . . . . . . . . . . . . . . . . . . . . . . . . . . . . . . . . . . . . 121
Clipping and Wrapping . . . . . . . . . . . . . . . . . . . . . . . . . . . . . . . . . . . . . 122
Text . . . . . . . . . . . . . . . . . . . . . . . . . . . . . . . . . . . . . . . . . . . . . . . . . 122
Pictures . . . . . . . . . . . . . . . . . . . . . . . . . . . . . . . . . . . . . . . . . . . . . . . 122
Growable . . . . . . . . . . . . . . . . . . . . . . . . . . . . . . . . . . . . . . . . . . . . . . . . 122
Using Fields . . . . . . . . . . . . . . . . . . . . . . . . . . . . . . . . . . . . . . . . . . . . . . . 123
Creating a New Field . . . . . . . . . . . . . . . . . . . . . . . . . . . . . . . . . . . . . . 123
Defining the Field . . . . . . . . . . . . . . . . . . . . . . . . . . . . . . . . . . . . . . . . . 123
Changing Field Options . . . . . . . . . . . . . . . . . . . . . . . . . . . . . . . . . . . . 123
Resizing Fields . . . . . . . . . . . . . . . . . . . . . . . . . . . . . . . . . . . . . . . . . . . 124
Moving Fields . . . . . . . . . . . . . . . . . . . . . . . . . . . . . . . . . . . . . . . . . . . . 124
Ordering the Fields . . . . . . . . . . . . . . . . . . . . . . . . . . . . . . . . . . . . . . . . 125
Entering Text in a Text Field . . . . . . . . . . . . . . . . . . . . . . . . . . . . . . . . 125
Using Interpreted Text . . . . . . . . . . . . . . . . . . . . . . . . . . . . . . . . . . . . . 125
Interpreted text in a text field . . . . . . . . . . . . . . . . . . . . . . . . . . . . . . 126
Interpreted text in headers and footers . . . . . . . . . . . . . . . . . . . . . . . 126
Designing Custom Reports . . . . . . . . . . . . . . . . . . . . . . . . . . . . . . . . . . . 126
Opening the Design Reports Window . . . . . . . . . . . . . . . . . . . . . . . . . 127
Changing the Report Layout . . . . . . . . . . . . . . . . . . . . . . . . . . . . . . . . . 127
Creating a New Layout . . . . . . . . . . . . . . . . . . . . . . . . . . . . . . . . . . . . . 128
Aligning Fields on the Report . . . . . . . . . . . . . . . . . . . . . . . . . . . . . . . . 129
Set Grid Size . . . . . . . . . . . . . . . . . . . . . . . . . . . . . . . . . . . . . . . . . . 129
Align fields to grid . . . . . . . . . . . . . . . . . . . . . . . . . . . . . . . . . . . . . . 129
Designing New Fields on the Report . . . . . . . . . . . . . . . . . . . . . . . . . . 129
Using the Header and Footer Lines . . . . . . . . . . . . . . . . . . . . . . . . . . . 129
Suggestions for Designing Breakdown Pages . . . . . . . . . . . . . . . . . . . 130
Exporting a Report Layout . . . . . . . . . . . . . . . . . . . . . . . . . . . . . . . . . . 131
Importing a Report Layout . . . . . . . . . . . . . . . . . . . . . . . . . . . . . . . . . . 131
Deleting a Report Layout . . . . . . . . . . . . . . . . . . . . . . . . . . . . . . . . . . . 132
Contents
viii
Movie Magic Scheduling
Duplicating a Report Layout . . . . . . . . . . . . . . . . . . . . . . . . . . . . . . . .132
Choosing Report Options . . . . . . . . . . . . . . . . . . . . . . . . . . . . . . . . . .132
Name . . . . . . . . . . . . . . . . . . . . . . . . . . . . . . . . . . . . . . . . . . . . . . . . .133
Report by: . . . . . . . . . . . . . . . . . . . . . . . . . . . . . . . . . . . . . . . . . . . . .133
One section per page . . . . . . . . . . . . . . . . . . . . . . . . . . . . . . . . . . . . .134
Page break on new day . . . . . . . . . . . . . . . . . . . . . . . . . . . . . . . . . . .134
Separate sections with a line . . . . . . . . . . . . . . . . . . . . . . . . . . . . . . .134
Print day strips . . . . . . . . . . . . . . . . . . . . . . . . . . . . . . . . . . . . . . . . .134
Margins . . . . . . . . . . . . . . . . . . . . . . . . . . . . . . . . . . . . . . . . . . . . . . .134
Default font . . . . . . . . . . . . . . . . . . . . . . . . . . . . . . . . . . . . . . . . . . . .135
Text above font . . . . . . . . . . . . . . . . . . . . . . . . . . . . . . . . . . . . . . . . .135
Text below font . . . . . . . . . . . . . . . . . . . . . . . . . . . . . . . . . . . . . . . . .135
Text above shoot day . . . . . . . . . . . . . . . . . . . . . . . . . . . . . . . . . . . .135
Text below shoot day . . . . . . . . . . . . . . . . . . . . . . . . . . . . . . . . . . . .135
Designing Custom Strips . . . . . . . . . . . . . . . . . . . . . . . . . . . . . . . . . . . . .135
Opening the Design Strips Window . . . . . . . . . . . . . . . . . . . . . . . . . .136
Changing the Strip Layout . . . . . . . . . . . . . . . . . . . . . . . . . . . . . . . . . .136
Creating a New Strip Layout . . . . . . . . . . . . . . . . . . . . . . . . . . . . . . . .136
Aligning Fields on the Report . . . . . . . . . . . . . . . . . . . . . . . . . . . . . . .137
Set Grid Size . . . . . . . . . . . . . . . . . . . . . . . . . . . . . . . . . . . . . . . . . . .137
Align fields to grid . . . . . . . . . . . . . . . . . . . . . . . . . . . . . . . . . . . . . .137
Designing New Fields on the Strip . . . . . . . . . . . . . . . . . . . . . . . . . . .137
Exporting a Strip Layout . . . . . . . . . . . . . . . . . . . . . . . . . . . . . . . . . . .137
Importing a Strip Layout . . . . . . . . . . . . . . . . . . . . . . . . . . . . . . . . . . .138
Deleting a Strip Layout . . . . . . . . . . . . . . . . . . . . . . . . . . . . . . . . . . . .138
Duplicating a Strip Layout . . . . . . . . . . . . . . . . . . . . . . . . . . . . . . . . . .139
Choosing Strip Options . . . . . . . . . . . . . . . . . . . . . . . . . . . . . . . . . . . .139
Strip length . . . . . . . . . . . . . . . . . . . . . . . . . . . . . . . . . . . . . . . . . . . .140
Strip width . . . . . . . . . . . . . . . . . . . . . . . . . . . . . . . . . . . . . . . . . . . . .140
Header width . . . . . . . . . . . . . . . . . . . . . . . . . . . . . . . . . . . . . . . . . . .140
Header font . . . . . . . . . . . . . . . . . . . . . . . . . . . . . . . . . . . . . . . . . . . .140
Strip orientation . . . . . . . . . . . . . . . . . . . . . . . . . . . . . . . . . . . . . . . .141
Format name . . . . . . . . . . . . . . . . . . . . . . . . . . . . . . . . . . . . . . . . . . .141
Left margin offset . . . . . . . . . . . . . . . . . . . . . . . . . . . . . . . . . . . . . . .141
Extra spacing between strips . . . . . . . . . . . . . . . . . . . . . . . . . . . . . . .141
Print header board . . . . . . . . . . . . . . . . . . . . . . . . . . . . . . . . . . . . . . .141
Modifying the Day out of Days . . . . . . . . . . . . . . . . . . . . . . . . . . . . . . . .142
Abbreviations . . . . . . . . . . . . . . . . . . . . . . . . . . . . . . . . . . . . . . . . . .143
Columns and Margins . . . . . . . . . . . . . . . . . . . . . . . . . . . . . . . . . . . .144
Header and DOOD Fonts . . . . . . . . . . . . . . . . . . . . . . . . . . . . . . . . .144
Header and Footer . . . . . . . . . . . . . . . . . . . . . . . . . . . . . . . . . . . . . . .145
Contents
Movie Magic Scheduling
ix
Days Between Drop/Pickup: . . . . . . . . . . . . . . . . . . . . . . . . . . . . . . 145
Minimize Hold Days (Best Drop) . . . . . . . . . . . . . . . . . . . . . . . . . . 145
Skip Names After First Page . . . . . . . . . . . . . . . . . . . . . . . . . . . . . . 145
Designing Categories . . . . . . . . . . . . . . . . . . . . . . . . . . . . . . . . . . . . . . . . 146
Changing a Category’s Name . . . . . . . . . . . . . . . . . . . . . . . . . . . . . . . . 146
Changing the Order of Categories . . . . . . . . . . . . . . . . . . . . . . . . . . . . 146
Removing Categories from the Breakdown . . . . . . . . . . . . . . . . . . . . . 147
Adding Categories to the Breakdown . . . . . . . . . . . . . . . . . . . . . . . . . . 147
Creating Categories . . . . . . . . . . . . . . . . . . . . . . . . . . . . . . . . . . . . . . . 147
Changing How Elements are Sorted Within Categories . . . . . . . . . . . . 148
Changing the Default Casing for Elements . . . . . . . . . . . . . . . . . . . . . 148
Setting the Default Check Boxes . . . . . . . . . . . . . . . . . . . . . . . . . . . . . 148
Designing or Customizing Element Info Windows . . . . . . . . . . . . . . . 149
General Customization . . . . . . . . . . . . . . . . . . . . . . . . . . . . . . . . . . 149
Adding Checkboxes . . . . . . . . . . . . . . . . . . . . . . . . . . . . . . . . . . . . . 150
Saving Categories . . . . . . . . . . . . . . . . . . . . . . . . . . . . . . . . . . . . . . . . . 150
Loading Categories . . . . . . . . . . . . . . . . . . . . . . . . . . . . . . . . . . . . . . . . 151
Creating Category Export Names . . . . . . . . . . . . . . . . . . . . . . . . . . . . . 151
Chapter 6: Putting it Together - Output . . . . . . . . . . . . . . . . 153
Exporting a Schedule. . . . . . . . . . . . . . . . . . . . . . . . . . . . . . . . . . . . . . . . 153
Creating Category Export Names . . . . . . . . . . . . . . . . . . . . . . . . . . . . . 153
Exporting Schedule Information . . . . . . . . . . . . . . . . . . . . . . . . . . . . . . 154
Exporting to Wireless . . . . . . . . . . . . . . . . . . . . . . . . . . . . . . . . . . . 154
Exporting to Movie Magic Budgeting . . . . . . . . . . . . . . . . . . . . . . . 154
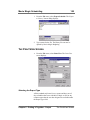
The Print/View Screen. . . . . . . . . . . . . . . . . . . . . . . . . . . . . . . . . . . . . . . 155
Selecting the Report Type . . . . . . . . . . . . . . . . . . . . . . . . . . . . . . . . . . 155
Selecting the Print/View Range . . . . . . . . . . . . . . . . . . . . . . . . . . . . . . 156
Selecting Items to Include in the Report . . . . . . . . . . . . . . . . . . . . . . . . 156
Ordering and Sort/Selection . . . . . . . . . . . . . . . . . . . . . . . . . . . . . . . . . 156
Schedule order . . . . . . . . . . . . . . . . . . . . . . . . . . . . . . . . . . . . . . . . . 157
Breakdown order . . . . . . . . . . . . . . . . . . . . . . . . . . . . . . . . . . . . . . . 157
Sort order . . . . . . . . . . . . . . . . . . . . . . . . . . . . . . . . . . . . . . . . . . . . . 157
Selecting Strip Options . . . . . . . . . . . . . . . . . . . . . . . . . . . . . . . . . . . . . 157
Types of Reports . . . . . . . . . . . . . . . . . . . . . . . . . . . . . . . . . . . . . . . . . . . 157
Strips . . . . . . . . . . . . . . . . . . . . . . . . . . . . . . . . . . . . . . . . . . . . . . . . . . . 158
Reports . . . . . . . . . . . . . . . . . . . . . . . . . . . . . . . . . . . . . . . . . . . . . . . . . 158
Day out of Days . . . . . . . . . . . . . . . . . . . . . . . . . . . . . . . . . . . . . . . . . . 158
Printing Reports. . . . . . . . . . . . . . . . . . . . . . . . . . . . . . . . . . . . . . . . . . . . 159
Printing Standard Reports . . . . . . . . . . . . . . . . . . . . . . . . . . . . . . . . . . . 159
Printing the Boneyard . . . . . . . . . . . . . . . . . . . . . . . . . . . . . . . . . . . . . . 159
Contents
x
Movie Magic Scheduling
Printing the Day Out of Days . . . . . . . . . . . . . . . . . . . . . . . . . . . . . . .159
Printing the Strip Board. . . . . . . . . . . . . . . . . . . . . . . . . . . . . . . . . . . . . .161
Printing the Strip Board on Standard Paper . . . . . . . . . . . . . . . . . . . . . .161
Printing on the Striperf Paper . . . . . . . . . . . . . . . . . . . . . . . . . . . . . . . .161
Aligning the Strips . . . . . . . . . . . . . . . . . . . . . . . . . . . . . . . . . . . . . .161
PART III - APPENDICES
Appendix A: Keyboard Shortcuts for Commands . . . . . . . . 167
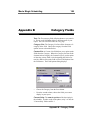
Appendix B: Category Fields . . . . . . . . . . . . . . . . . . . . . . . . . 169
Contents
Movie Magic Scheduling
xi
Introduction
HOW TO USE THIS BOOK
This book is divided into two parts. The first is a tutorial to walk you through the basic
uses of Scheduling and point out many of the features of the application. The second
part is a general reference guide to Movie Magic Scheduling.
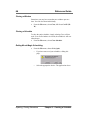
Tips and Cautions
In this book, when there is information outside of main text,
we have placed that information in the left margin, and prefaced it with one of two icons.
O
This icon appears beside either a tip or an
alternative method of performing the task.
M
This icon appears with a caution. Pay special attention to the note when you see this
in the margin.
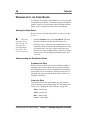
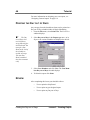
Differences between the PC and Macintosh Interfaces
Movie Magic Scheduling works equally on the PC and the
Macintosh. However, there are some details that you will want
to note.
In general, actions and commands are performed in the same
way, with the following exceptions:
•
The Control key on the PC is replaced by the Command (z) key on the Macintosh.
•
The mini-Strip Board and associated information is
located at the top of the screen on the PC and at the
bottom on the Macintosh.
Any additional items will be pointed out as we work our way
through this tutorial.
Introduction
xii
Movie Magic Scheduling
Because this book was written on the PC, certain conventions
have been used. The screen illustrations show Movie Magic
Scheduling on the PC, rather than the Macintosh. So if you are
using a Mac, you will see slightly different, though almost
identical, screens.
In addition, all keyboard commands are written with the PC in
mind. Macintosh commands are provided in parentheses after
the command has been given.
OVERVIEW OF SCHEDULING
Creating a schedule in Movie Magic Scheduling consists of
three main stages: breaking down the script, manipulating the
schedule and producing a printed schedule and reports.
Breaking Down a Script
Breakdown involves putting all relevant information from
scenes in a script onto corresponding breakdown sheets.
Breakdown sheets consist of basic Scene Information such as
set, scene number and page count and categories of elements
needed to create the scene such as cast members, props and
costumes. As you create these sheets in Movie Magic, the elements are tracked and can be used to sort and order the schedule.
Manipulating the Schedule
After the breakdown is completed you can view the breakdown sheets as the traditional production board strips. These
strips can be moved, sorted and grouped to form the film’s
production schedule.
An electronic calendar and a very powerful sort and select feature allow for maximum flexibility in generating schedules.
Creating Output: Schedules and Reports
After the schedule is created, Movie Magic Scheduling can
produce output in many different forms.
A traditional production board or Strip Board can be created,
along with multiple reports such as shooting schedules, prop
lists, day-out-of-days and many more. In addition, the schedule can be exported to Movie Magic Budgeting to automate
the budgeting process as well.
Introduction
1
Part I - Tutorial
2
Movie Magic Scheduling
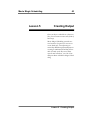
Lesson 1
3
Getting Started
Movie Magic Scheduling is a flexible
scheduling tool that allows you to track
elements of the script while developing a
shooting schedule for your production.
In this lesson you will learn how to
launch the application, walk through a
brief overview of a completed schedule,
create a new schedule and add production information to it. You will then save
your schedule to the hard drive before
moving on to a review.
Lesson 1 - Getting Started
4
Tutorial
LAUNCHING THE PROGRAM
Windows 98
1. Click on the Start menu
2. Choose Programs, Movie Magic Scheduling, Movie
Magic Scheduling. The application launches.
Macintosh
1. Double-click on your Hard Drive icon.
2. Double-click on the Movie Magic Scheduling folder.
3. Double-click on the Movie Magic Scheduling file icon.
The application launches.
LOOKING AT A COMPLETED SCHEDULE
To give you an idea of how a schedule works, we will open a
demonstration schedule and take a look around. Provided with
your copy of Movie Magic Scheduling was a shooting schedule for Frank Capra’s It’s a Wonderful Life.
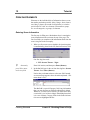
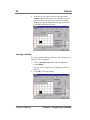
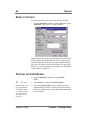
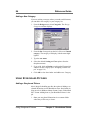
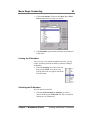
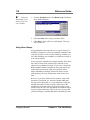
Open the Schedule for It’s a Wonderful Life
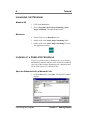
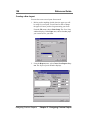
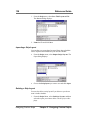
1. From the File menu, select Open. The Open File window
displays.
Launching the Program
Lesson 1 - Getting Started
Movie Magic Scheduling
O
A Movie
Magic Scheduling
file has an extension of .mms.
5
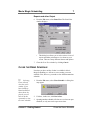
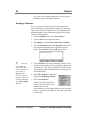
2. Select Wonderful Demo and then click Open. The demo
schedule opens.
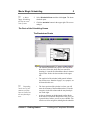
3. Click the maximize button in the upper right. The screen
enlarges.
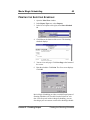
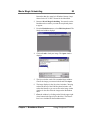
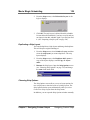
The Parts of the Scheduling Screen
The Breakdown Sheets
O
Depending
on the size of your
monitor, you may
have to scroll to see
the storyboard picture.
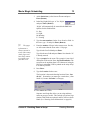
•
The schedule automatically opens to the first Breakdown sheet. Since this demo has been sorted for
shooting, it is not the first Breakdown sheet in chronological order. Notice the sheet number in the upper
left.
•
The top third of the window holds general information for the scene. Number of pages, set, synopsis, are
all located in this area.
•
The lower portion of the window is where you will
enter the elements of the Breakdown sheet. Note the
categories in the left column and the storyboard picture in the right.
•
At the top (bottom on the Macintosh) of the Breakdown sheet is a miniature Strip Board. This gives you
a general idea of where you are in your schedule. You
can also use it for navigation, although as the schedule
Lesson 1 - Getting Started
Looking at a Completed Schedule
6
Tutorial
gets larger and moves from strictly chronological
order this becomes more difficult.
4. Click one of the strips on the mini-Strip Board. Notice
how the Breakdown sheet below changes. Also notice that
the small arrow on the top of the board moves. You can
also drag this arrow from strip to strip to move between
sheets. Notice how the description of the scene changes
above the mini-Strip Board as you do this.
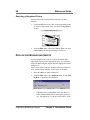
The Strip Board
O
Alternately,
click on the
colored bar at the
bottom of the window, or press
Ctrl–U (z-U).
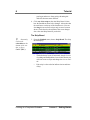
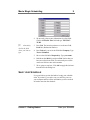
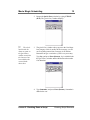
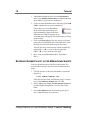
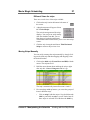
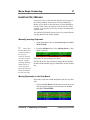
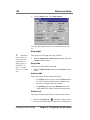
5. From the Schedule menu, choose Strip Board. The Strip
Board displays.
•
The default strip layout is horizontal, simply for ease
of reading and manipulation. Later in this tutorial you
will learn to move strips and change the view to vertical.
•
Each strip is color-coded to indicate int/ext and time
of day.
Looking at a Completed Schedule
Lesson 1 - Getting Started
Movie Magic Scheduling
7
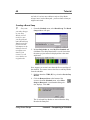
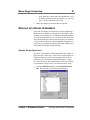
Reports and other Output
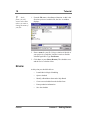
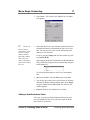
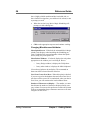
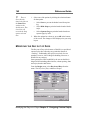
6. From the File menu, select Print/View. The Print/View
window displays.
•
This dialog box allows you to select various views of
reports and either print them or view them on your
screen. There are many different formats and options.
7. Close the Print/View window by clicking Cancel.
CLOSE THE DEMO SCHEDULE
Now that you have an idea of what is available in Movie
Magic Scheduling, we will move on to creating your own
schedule. First, however, you need to close the demonstration
schedule.
O
Selecting
Close will only
close the active
window. If you
have both Strip
Board and Breakdown sheets displayed, you will
have to do this
repeatedly to close
the entire schedule.
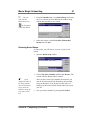
1. From the File menu, select Close Schedule. A dialog box
may appear.
2. If it does, in this case, click Don’t Save.
3. Opening another schedule will also serve to close an open
schedule, as only one can be open at one time.
Lesson 1 - Getting Started
Close the Demo Schedule
8
Tutorial
CREATE A NEW SCHEDULE
Now you will create a new schedule for a tutorial production.
•
From the File menu, select New, and then select From
Default Form. A blank schedule opens, and the Breakdown sheet displays. Notice that Movie Magic Scheduling
has numbered the Breakdown sheet for you as Sheet #1.
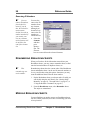
ADD PRODUCTION INFORMATION
The first thing you should do when you open a new schedule
is to enter the production information for the picture. This will
make it easier to track the file later. Don’t worry if you don’t
know all of this information yet; just enter what you do know,
and add the rest later.
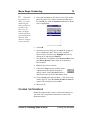
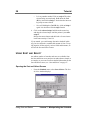
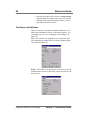
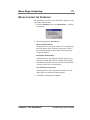
1. From the Design menu, select Picture info. The Picture
Info window displays.
Create a New Schedule
Lesson 1 - Getting Started
Movie Magic Scheduling
9
2. We are only going to enter information in a few fields.
Click in the Picture Title field and type TEST PICTURE.
O
Alternately,
click in the field
where you want to
type.
3. Press Tab. The insertion point moves to the next field,
Prod. No. (Production Number).
4. Press Tab until you are in the field titled Company. Type
Testers Unlimited.
5. Move to the field titled Prepared by. Type your name.
6. Hold down the Shift key and press Tab. Notice that you
have moved back one field. You can usually move backwards one field at a time in this manner.
7. We’re going to stop here. Click OK to apply this information and close the dialog box.
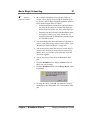
SAVE YOUR SCHEDULE
It’s a good idea to get into the habit of saving your schedule
often. If you don’t, you can be sure you will lose power to
your computer and lose all the information you have worked
so hard to enter into the schedule.
Lesson 1 - Getting Started
Save your Schedule
10
O
In the
future, you will
want to select Save
unless you want to
change the name of
your file.
Tutorial
1. From the File menu, select Save or Save As. As this is the
first time you have saved this file, the Save As window
displays.
2. Enter a name for your file. Using a variation of the title of
your project is a good idea. It makes it easier to find the
schedule again later. Type TestPicture.
3. Click Save, or press Enter (Return). The schedule saves
and the Save as window closes.
REVIEW
At this point you should be able to:
Review
•
Launch Movie Magic Scheduling
•
Open a schedule
•
Identify a Breakdown sheet and a Strip Board
•
Create a new schedule from the default form
•
Enter production information
•
Save the schedule
Lesson 1 - Getting Started
Movie Magic Scheduling
Lesson 2
11
Breaking Down a Script
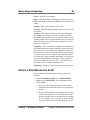
The breakdown involves putting information from every scene of a script into
a corresponding Breakdown sheet.
The Breakdown sheet is the core of all
production scheduling, serving as the
fundamental source of information for
the schedule.
Movie Magic Scheduling has duplicated
all of the functionality of the manual
Breakdown sheet while greatly increasing ease of accessing and manipulating
all of the information contained in the
breakdown.
The Movie Magic Breakdown Sheet is
divided into three main sections: Scene
Information, Categories and Storyboard
Frames.
As you create these sheets in Movie
Magic Scheduling, the elements are
tracked and can be used to sort and
order the schedule.
In this Lesson you will learn how to start
entering breakdown information into
Movie Magic Scheduling and begin filling out the scene information.
Lesson 2 - Breaking Down a Script
12
Tutorial
CREATING ELEMENTS
Elements are the individual bits of information about a scene
that makes production possible. Mary, George, Jason, Jason’s
cast, Mary’s glasses, the sound of an explosion, or even the
special effect of “rain” are elements. Cast members, props,
etc. are all categories, or groups, of elements.
Entering Scene Information
The first step in filling out a Breakdown sheet is entering the
scene information in the section at the top of the page. The
first four fields you complete with information taken from the
scene’s slug line in the screenplay.
1. When you first create a new schedule, the insertion point
is automatically placed in the I/E (Interior/Exterior) field.
Our first slug line reads:
1 INT- Stewart Theatre – Night
O
Alternately,
press Tab to move
to the next field.
Enter i for interior, and then press Enter (Return).
2. In the Set field, type in the set from the slug line: Stewart
Theatre. Press Enter (Return).
Notice that you do not advance to the next field. Instead,
an error message appears above the mini-stripboard: “Element doesn’t exist.”
The Set field is a special Category field. Any information
that you enter becomes an Element within Movie Magic.
Whenever you enter a new element, you must follow it by
a semicolon (;) to let Movie Magic Scheduling know that
it is a new element. Category fields in the Scene information area are highlighted in blue.
Creating Elements
Lesson 2 - Breaking Down a Script
Movie Magic Scheduling
13
3. Add a Semicolon (;) after Stewart Theatre and press
Enter (Return).
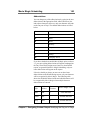
4. In the Day/Night field, type “n” for “Night”
and press Enter (Return).
“Night” will automatically be entered in the D/N field.
Options for this field include:
D - Day
N- Night
M- Morning
E - Evening
5. Type the scene number(s) in the Scene Numbers field – in
this case, type “1” and press Enter (Return).
O
The pages
information is
always entered in
terms of how many
whole pages and
how many remaining eighths comprise the scene.
6. Enter the number of Pages in the current scene. For this,
we will assume that the scene takes 1 3/8 pages.
Type 1 in the first field and press Enter.
Type 3 in the next field and press Enter. Note that the "/8"
is already entered.
7. Type a synopsis for the scene. The synopsis is just a brief
description of the action. Enter Jay finds Samantha. The
synopsis can be anything from 0-255 characters in length,
but keep in mind that it will be printed on the strips. Keep
it as short as possible.
8. Press Enter.
9. Type the Location for the scene.
The Location is the actual shooting location. Enter “Studio 19;”. Remember, you must type a semicolon (;) after
Studio 19, because Location is a category.
10. Press Enter three times.
Sequence and Script Day allow you to assign arbitrary
names to groups of scenes. This can help you in later organization. Both fields are optional, and we will leave them
blank. (See “Entering Scene Information” on page 68.)
Lesson 2 - Breaking Down a Script
Creating Elements
14
Tutorial
11. Enter the script page number where the scene begins. As
this is the first scene, type 1 and then press Enter
(Return). The Quick Entry window displays.
ENTERING SCRIPT ELEMENTS
Each script will have multiple elements in each scene. Items
like props, stunts, cast, etc. need to be entered individually and
applied to the appropriate Breakdown sheets. Movie Magic
Scheduling provides several easy ways to do this.
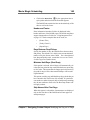
Using the Quick Entry Screen
The quickest way to enter multiple elements into the Breakdown sheets is Quick Entry. When you pressed Enter
(Return) after the Script Page field, the Quick Entry window
automatically came up, but you can open the Quick Entry window at any point.
1. Close the Quick Entry window by clicking on the Done
button, or type CTRL-W (z-W).
Entering Script Elements
Lesson 2 - Breaking Down a Script
Movie Magic Scheduling
15
2. Reopen the Quick Entry window by typing CTRL-E
(z-E). The Quick Entry window displays.
O
The checkmark beside the
character name in
the Quick Entry
window means that
the character has
been added to the
current Breakdown sheet.
3. The Quick Entry window always opens to the Cast Members category as this is usually the first category you fill
out. Everything entered into a category is an element.
Remember to type a semicolon (;) after every new entry.
Type Jay; and press Enter (Return). Jay is added in both
the Quick Entry window and the Breakdown sheet under
Cast Members.
4. Type Samantha; and press Enter (Return). Samantha is
added to the cast.
Lesson 2 - Breaking Down a Script
Entering Script Elements
16
O
If you prefer
to use the keyboard, you can type
the first two or
three letters of a
category and a
colon (:) to switch
categories.
Tutorial
5. Move to the Props category. Click on the drop down
menu where it says Cast Members, and select Props.
6. Type Jay’s Book; and then press Enter (Return).
Jay’s Book is now entered as a prop in this scene.
7. Close the Quick Entry window.
Using the Element Info Window
You can instantly access the Element Info Window by clicking
on any category and selecting New... from the drop down
menu that appears.
O
If you have
changed your settings (see “Changing Reaction to a
Click on Categories” on page 55 of
the Reference Section) you may have
to hold down the
Alt (Option) key
while clicking.
1. Click on the category Cast Members. A
drop down menu appears. Listed on it are the
two cast members you have added, and an
option for New....
Entering Script Elements
Lesson 2 - Breaking Down a Script
Movie Magic Scheduling
17
2. Select New… The Element Info Window for Cast Members appears.
O
You do not
have to enter a
semicolon (;) after
the new element
name in the Element Info window.
This is the only
place in the application where this is
the case.
3. Notice that the Element Info window contains much more
information about the element than the Quick Entry window. You can enter the actors’ names and contact information for each character.
For now, just enter Jasper and close the window by pressing Ctrl-W (z-W).
Jasper appears under the Cast Members on the Breakdown
sheet. Notice that Jasper has been automatically assigned
an ID number of 1.
We will assign ID numbers to all of our Cast Members
later.
4. Save your schedule. From the File menu, select Save.
5. You can also get to the Element Info window for existing
elements by double-clicking on their name. In the Props
category, double-click on Jay’ book. The Element Info
window appears.
6. Close the Element Info window for Jay’s book.
Adding a New Breakdown Sheet
Of course, you can’t put all the information from one script
into one Breakdown sheet. You will want a separate Breakdown sheet for each scene.
Lesson 2 - Breaking Down a Script
Entering Script Elements
18
Tutorial
1. Add another Breakdown sheet. From the Breakdown
menu, select Add Breakdown Sheet. A blank Breakdown
sheet displays. Notice that it is numbered 2.
2. Create one more Breakdown sheet. This time, type Ctrl-B
(z-B). Another sheet is created, numbered 3.
Notice that as you create Breakdown
sheets small strips representing each
page automatically appear in the ministripboard area. With each page you create, another strip will appear. You can navigate by clicking
on these strips.
3. Click on the first strip, the blue one, and you will jump
back to the first Breakdown sheet. The little arrow above
the strips lets you know which strip you are seeing.
You can also move between sheets with the keyboard by
typing Ctrl- → (z-→) to go to the next page and
Ctrl-← (z-←) to go to the previous page.
4. Move to the second Breakdown sheet. Type Ctrl-→
(z-→).
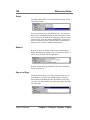
ENTERING ELEMENTS INTO LATER BREAKDOWN SHEETS
Your new Breakdown sheets will also need elements. The
script would be boring if only the first scene had actors and
props.
1. First fill out some of the scene information. Assume the
slug line is
2 INT Student Commons – Day
Fill in the first four fields, remembering to type a semicolon (;) after Student Commons in the Set field.
2. Enter 2 1/8 for page length, NC State Student Center for
location and 2 for Script Page. Leave the other fields
blank.
3. Press Enter (Return) after the Script Page, the Quick
Entry window displays Cast Members.
Entering Elements into Later Breakdown Sheets Lesson 2 - Breaking
Movie Magic Scheduling
O
When adding characters to
sheets, we recommend using the
mouse as much as
possible. If you
type every element, you might
end up with jasper,
jsper, and jaxper as
elements in the
character category
because of typos.
19
4. Jasper and Samantha are also in this scene. Click on Jasper in the Quick Entry window and then, holding down
the Ctrl (z) key, click on Samantha. Both names should
now be highlighted.
5. Click Add.
6. Sometimes you may find you have added the wrong person to a Breakdown sheet. This is easily remedied.
Remove Jasper from the scene. Highlight his name by
clicking on it, and then click Remove.
7. Now add a new Cast Member: Enter Professor Boaz; and
press Enter (Return). Don’t forget the semicolon (;).
Boaz is added.
8. Close the Quick Entry window.
9. Click on the Props category with the mouse.
A drop down menu appears listing New…
and Jay’s Book. Select Jay’s book and it is
added to the props list for this Breakdown sheet.
10. Click on Props again and select New…. The Element Info
window pops up. Type Two bottles of Soda and close the
window. The new prop has been added.
11. Save your file.
CLOSING THE SCHEDULE
Rather than input an entire script’s worth of information, we
will work with a script that has already been entered into
Breakdown sheets.
Lesson 2 - Breaking Down a Script
Closing the Schedule
20
O
You can
also press CtrlShift-W (z-shift
W) to close the
schedule.
Tutorial
•
To close the schedule you have been working on, from the
File menu, choose Close Schedule.
REVIEW
You should now be able to
Review
•
Create Breakdown sheets
•
Move between Breakdown sheets
•
Enter scene information
•
Enter elements into the appropriate categories from
the Quick Entry window, the Element Information
window, via keyboard, and by mouse-click
Lesson 2 - Breaking Down a Script
Movie Magic Scheduling
Lesson 3
21
Manipulating the
Schedule
After you have entered your element
information, you will begin to create a
schedule that actually looks like a schedule.
Now you will begin to arrange shooting
times, and define daybreaks.
In this lesson, you will learn how to
define I.D. numbers, view and move the
strips on the Strip Board, and use Sort
and Select to easily arrange your strips.
Lesson 3 - Manipulating the Schedule
22
Tutorial
WORKING WITH THE SCHEDULE
Once you have finished a breakdown, you can begin ordering
and manipulating your schedule. In order to effectively demonstrate how to manipulate a schedule we will need to use a
complete breakdown from a script. Movie Magic has provided
a complete breakdown for the movie It’s a Wonderful Life.
1. From the File menu, select Open. The Open window displays.
2. Select the Tutorial file and then click Open. The file will
open with the first sheet of the completed breakdown for
It’s a Wonderful Life.
3. This tutorial file is read-only. Since we’ll want to save
changes later, from the File menu, select Save As. Save
this file as MyTutorial.
DEFINING ID NUMBERS
One of the first things you will need to do upon completing a
breakdown is number the board IDs for Cast Members. Board
ID numbers are very important because as we move away
from the breakdown sheets and begin working with strips, the
cast members are represented on the strips only through their
ID numbers.
Working with the Schedule
Lesson 3 - Manipulating the Schedule
Movie Magic Scheduling
23
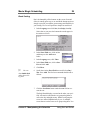
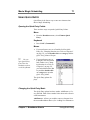
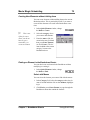
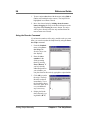
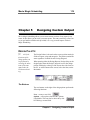
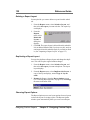
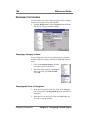
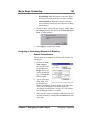
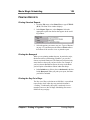
Reorder IDs by Page Count
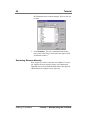
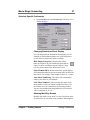
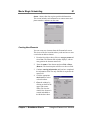
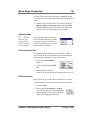
1. From the Breakdown menu, select Renumber Board
IDs. The Renumber Board IDs window displays.
Depending on how you entered your Cast Members into
your breakdown sheets, your cast may or may not have
numbers already beside them.
If you used Quick Entry to enter your cast, then no numbers will be assigned. If you entered your cast via the Element Info window, then your cast will be numbered in the
order you entered them. Usually you will want to renumber before proceeding to other aspects of scheduling.
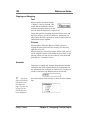
2. From the Arrange Elements by: menu,
select Page Count.
This is one of the most common ways of
ordering the cast. It uses the information
you entered in your breakdown sheets, and
calculates the number of pages each actor appears on in
the script, sorting them from most pages to fewest.
The cast list is instantly reordered, and the page count for
each player appears to the right of the name. Notice that
Lesson 3 - Manipulating the Schedule
Defining ID numbers
24
Tutorial
the ID numbers have not been changed. They are now out
of order.
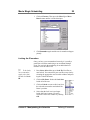
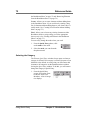
3. Press Renumber. The cast is renumbered based upon
page count, with George, who has the most pages, listed
as character number 1.
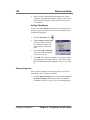
Reordering Elements Manually
Now suppose you need to alter this order slightly. For example, suppose the actor playing Clarence was contractually
obligated to be no lower than ID number three. Moving individual characters around the list is quite easy.
Defining ID numbers
Lesson 3 - Manipulating the Schedule
Movie Magic Scheduling
25
1. Click on Clarence. Then press the Move Up or Move
Down button until he is in the third spot.
2. Click Renumber again and the cast is renumbered appropriately.
Locking the ID numbers
Once you have your cast numbered correctly, it is usually a
good idea to lock the numbering so no accidental changes
occur. You can lock the numbering for an individual cast
member or for the whole cast.
O
To lock only
one cast member,
simply select that
ID and click Lock
ID.
1. Press Select All and then press Lock ID. Your IDs are
now locked. You can unlock your cast IDs at any time by
selecting the appropriate cast from this window and pressing the Unlock ID button.
2. Click on Mr. Potter. Notice the Lock Icon
beside all of the cast.
3. Click on Unlock to remove this icon from
the selected cast member and unlock Mr.
Potter’s position.
4. Notice that the lock icon is no longer
beside Mr. Potter’s name. Close the
Renumber Board IDs window by clicking
OK.
Lesson 3 - Manipulating the Schedule
Defining ID numbers
26
Tutorial
WORKING WITH THE STRIP BOARD
Now that the cast member’s ID numbers are set, you can begin
to manipulate the schedule. In a manner keeping with industry
practice, when you view and work with the schedule in Movie
Magic, you are working with some form of Strip Board.
Viewing the Strip Board
Before you can work with a Strip Board, you have to be able
to see it.
M
This bears
repeating: If you
delete a strip, you
also delete the
associated breakdown sheet. The
reverse is also true.
•
From the Schedule menu, select Strip Board. The Strip
Board will display in the thin horizontal strip view.
Each strip you see represents one breakdown sheet. It is
important to think of strips and breakdown sheets as being
one and the same. The strip is simply a different, compressed view of the breakdown sheet, so that if you delete
a strip, you are also deleting that breakdown sheet, and
vice versa.
Understanding the Strip Board Views
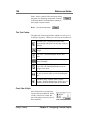
Contents of a Strip
When you first see them, the strips are listed horizontally, in
breakdown sheet order, starting with the first sheet number
and continuing to the last. Each strip displays the breakdown
sheet number, the scene number(s), interior/exterior, the set,
day/night, the page count and the ID numbers of all the cast
members in that scene.
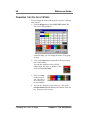
Color of a Strip
The default colors of the strips instantly tell you whether a
scene is interior/exterior and day/night. You can change these
colors. (See “Changing the Color of Strips” on page 94.)
White - interior day
Yellow -exterior day
Blue - interior night
Green - exterior night
Working with the Strip Board
Lesson 3 - Manipulating the Schedule
Movie Magic Scheduling
27
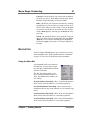
Different Views for strips
There are several views of the strips available.
1. Click on the strip icon in the bottom left corner of
the screen.
2. A drop down menu will appear. Select
11" Vertical Strips.
The vertical arrangement of the strips
displays. You can just as easily manipulate the schedule from this view as
from the previous horizontal format.
The thin horizontal format allows you to view more strips
at once.
3. Click the strip icon again and choose Thin Horizontal
Strips to return to the previous view.
Moving Strips Manually
You can easily rearrange the strips manually by simply clicking on a desired strip and then dragging and dropping it into
the desired location.
1. Click on the third strip (Frozen River and Hill) with the
mouse. The strip turns red.
2. Hold the mouse button down and drag the strip to right
after strip 16 – Gower’s Drugstore and let it go.
The strip is automatically inserted between 16 and 17.
3. Like most drag and drop features, you can select groups of
items in different ways.
•
Click on strip 5 with the mouse. Now, hold down the
shift key and click on strip 7 as well. Notice how all
three strips are selected in red. Release the shift key.
Lesson 3 - Manipulating the Schedule
Working with the Strip Board
28
Tutorial
•
Let’s try another method. Click on strip 4. The other
selected strips are unselected. Hold down the Ctrl
(z) key and click on Strip 7. Notice that the intervening strips are not selected.
•
Now, still holding the Ctrl (z) key, click on Strip 4
again. It is deselected. Select strips 5 and 6.
4. Click on the selected strips, hold down the mouse key
and drag the selected strips until the pointer is just after
strip 13.
Release the mouse button and the block of scenes inserts
itself between strips 13 and 14.
If you wanted, you could arrange the entire schedule in this
way, but it would take a considerable amount of time. To rapidly organize all the strips by various fields and elements, we
will use the Sort and Select feature.
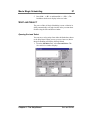
USING SORT AND SELECT
An endless number of searches and sorts are available from
the Sort and Select screen and you can make them as simple or
as complex as you want. For more detailed information on the
Sort and Select screen, see “Sort and Select” on page 97.
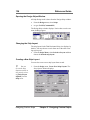
Opening the Sort and Select Screen
•
Using Sort and Select
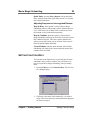
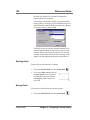
From the Schedule menu, select Sort & Select. The Sort
& Select window displays.
Lesson 3 - Manipulating the Schedule
Movie Magic Scheduling
29
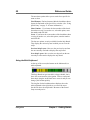
Basic Sorting
Don’t be daunted by all the buttons on the screen. Sort and
Select is actually quite easy to use and all the buttons are there
simply to provide you with the greatest range and flexibility in
your sorting. First we will perform a simple but useful sort.
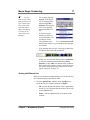
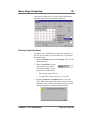
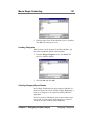
1. In the Language area click Sort, then Strips, then By.
Notice that as you press the buttons the words appear in
the main text screen.
2. In the Sheet Field area, click on Set
and then press the Add button
below.
3. In the Language area, click Then.
4. In the Sheet Field area, click on Int/
Ext and click Add.
5. Click Then.
O
You can
also double-click
rather than clicking Add.
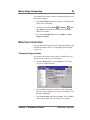
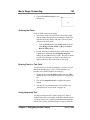
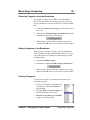
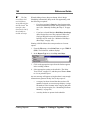
6. Scroll down in the Sheet Field area and click on Day/
Nite. Press Add. The final sort command should read as
follows:
7. Click the Sort/Select button under the text field to execute the sort.
The Strip Board displays, resorted to the order you specified. All exteriors and interiors are grouped together as
well as the day and night scenes. Within each group the
scenes are ordered alphabetically by set. So multiple
scenes that are on the same set are grouped together. You
Lesson 3 - Manipulating the Schedule
Using Sort and Select
30
Tutorial
just saved a lot of manual sorting time. You can go on to
manipulate your board further if needed.
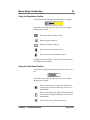
Sorting by Character
Next, we will use the select feature to locate and move all
scenes containing a certain character. Suppose the actor playing Clarence was only available at the very beginning of the
shooting schedule. You would need to bring all of his scenes
to the top of the schedule.
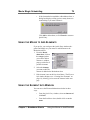
1. From the Schedule menu, select Sort & Select.
2. Click on Clear to clear the sort window.
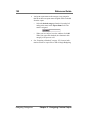
3. In Language area click Select, Strips, That, Contains.
4. Click Cast Members under the Categories Field. All the
cast members will appear to the right in the Elements
Field. Click Clarence and then Add directly below.
O
If you execute a sort, the
order of the strips
will be changed. If
you execute a
select then the
results will be displayed or moved as
you have indicated
in the Move Strips
To: area.
5. Click Sort/Select. All scenes containing Clarence are displayed in a new window, but the original Strip Board still
exists below it. Close the new window by clicking on the
X in the upper right (or the Close button in the upper left
on the Macintosh).
6. In the Move Strips To: field on the
right, select Beginning of Board.
7. Now click Sort/Select.
All the scenes that contain Clarence are moved to the top of the
schedule and selected.
Notice that they are still ordered in the way you specified
before – by Int/Ext, Day/Night, etc. The rest of your board
is unaffected.
Using Sort and Select
Lesson 3 - Manipulating the Schedule
Movie Magic Scheduling
M
Even if you
open a new schedule, the Select and
Sort settings will
remain as you last
set them. Always
check to make sure
they are all set
where you want
them.
31
8. Open the Sort and Select screen again. Notice that your
last settings are the ones that display. It is important to be
aware of this. For example, if you were to perform another
sort or select, you would probably want to change the
Move Strips To field back to Display in a Window.
9. Close the Sort/Select window.
10. Also remember that your reordered schedule isn’t finalized until you save your file. Save your file now.
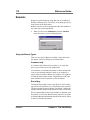
REVIEW
You should now be able to perform the following tasks:
•
Define, Reorder and Renumber Cast ID numbers
automatically
•
Reorder Cast ID numbers manually
•
Lock ID numbers
•
Manually change the order of strips in the Strip Board
•
Use the Sort & Select window to reorganize your
schedule
Lesson 3 - Manipulating the Schedule
Review
32
Review
Tutorial
Lesson 3 - Manipulating the Schedule
Movie Magic Scheduling
Lesson 4
33
Completing a Schedule
Once you have sorted your schedule into
the order you think you should or could
shoot, you will need to separate the
shooting times into days. Some scenes
will be short and you will be able to
shoot several in one day. Others will be
much longer, sometimes taking several
days to shoot.
To do this you will need to set up a calendar, put Day Breaks into your Strip
Board, and possibly save several versions of the board until you can massage
it into a shape you like.
Lesson 4 - Completing a Schedule
34
Tutorial
USING THE CALENDAR
You can’t have a schedule without relating it to a calendar of
some sort. After all, only you know when your shoot will
begin and end. You use the calendar to provide the basic information about your schedule: Day you start shooting, Company
Travel, Holidays, etc. Any information you enter will impact
your schedule.
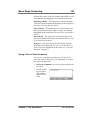
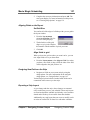
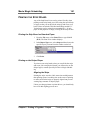
Creating a Standard Week
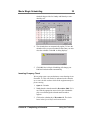
1. From the Schedule menu, select Calendar, or type
CTRL-L (z-L). The calendar appears.
2. The most important information to enter is the production
start date. This field is already selected; type in a new
date: Dec 1, 2000.
The end of production date cannot be changed from the
calendar, but will be determined by how you schedule
your Strip Board.
3. Deselect the check box beside Saturday. Select the check
box beside Monday.
When you first open a schedule, the calendar assumes a
week that has Saturday and Sunday as standard days off.
After changing the checkboxes above, you now have a
Using the Calendar
Lesson 4 - Completing a Schedule
Movie Magic Scheduling
35
schedule that provides for Sunday and Monday as standard days off.
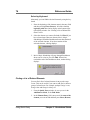
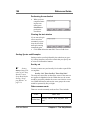
4. The calendar does not automatically update. To have the
calendar reflect your new Production Start Date you must
close the calendar. Click OK. A dialog displays:
5. Click OK. Movie Magic Scheduling will change your
End Post Production date automatically.
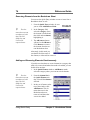
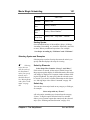
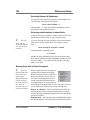
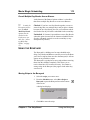
Inserting Company Travel
We are going to move our production to a new shooting site on
December 19. This will need to be indicated on the calendar,
as we won’t be able to shoot while all the equipment and people are moving.
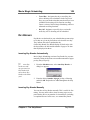
1. Open the Calendar.
2. Verify that the calendar month is December, 2000. If it is
not, click the appropriate arrows below the calendar display to scroll through the calendar until December
appears.
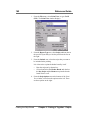
3. Click on the calendar day of December 19. The checkboxes in the Special Days area become active.
Lesson 4 - Completing a Schedule
Using the Calendar
36
Tutorial
4. In the Special Days area, select the check box beside
Company Travel. This day is now scheduled as a company travel day. Note the moving van on the calendar.
Shooting will not be scheduled on this day, and the Day
out of Days will reflect the travel.
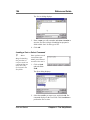
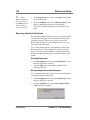
Inserting a Holiday
We will be generous and provide the day after Christmas as a
holiday for all cast and crew.
1. Click on December 26 and then click the check box
beside Holiday.
This day is now designated as a holiday day off for cast
and crew.
2. Click OK to close the calendar.
Using the Calendar
Lesson 4 - Completing a Schedule
Movie Magic Scheduling
37
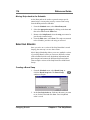
INSERTING DAY BREAKS
Now that we have set the start date and the basic structure of
the weekly schedule, the next step is to begin adding Day
Breaks. A Day Break is the point where we stop shooting for
one day. There can be several scenes shot on one day, if they
are short, or, it may take several days to shoot one particularly
complex scene.
You can insert Day Breaks one at a time or you can perform an
auto Day Break for the whole schedule.
Manually Inserting Daybreaks
1. On the Strip Board, click on the fourth strip down (EXT
NICK’S BAR).
O
Notice that
the Day Break was
inserted just above
the strip you
selected. Any time
you insert or move
an item, whether
you drag and drop;
choose insert, or
cut or copy and
paste, the item will
be inserted before
the line you select.
2. From the Schedule menu, select Add Day Break. A Day
Break is inserted.
Day breaks are always displayed in black.
The Day Break day strip will always display the day number,
the date and the number of pages scheduled to be shot for that
day.
Moving Daybreaks on the Strip Board
Day breaks can be moved and manipulated just like any other
strip.
•
Click on the Day Break, hold down the mouse button and
drag the strip one strip up so that it follows the second
strip (EXT CEMETERY).
Lesson 4 - Completing a Schedule
Inserting Day Breaks
38
Tutorial
Using Auto Daybreaks
You can also set automatic Day Breaks for the entire Strip
Board by specifying the maximum number of pages to be shot
per day. Movie Magic Scheduling will set Day Breaks after
that number of pages.
O
Inserting
auto Day Breaks
will move all Day
Breaks inserted
previously to the
Boneyard.
1. From the Schedule menu, select
Auto Day Breaks. A dialog box
displays.
2. Type in 4.5 as the maximum number of pages and then click OK.
Daybreaks are inserted every 4.5 pages.
Even though you have inserted automatic Day Breaks,
you can still shift them around individually with the drag
and drop technique, and add others manually if needed.
After you insert Day Breaks there will probably be more sorting, changing the calendar or even adding items to the breakdown sheet before the Strip Board approaches a completed
state.
Inserting a Day Break for a Complicated or Long Scene
Note that Strip #121: Toll House on Bridge (between day 4 &
5) is six pages long. Movie Magic Scheduling can’t break the
scene up despite our limit on number of pages. If we think this
scene will take more than one day to shoot, we need to add a
Day Break.
1. Click on the End of Day 5 strip.
O
You can
also add a Day
Break by typing
Ctrl-, (z-,)
2. From the Schedule menu, select Add Day Break.
Another Day Break is added and we now have enough
shooting time to cover the longer scene.
INSERTING A BANNER
Banners are general-purpose strips that you use to indicate a
Holiday, Company Move, Travel Day, or anything special you
want to note on the Strip Board. There are two kinds of banners: Comment Only and End of Day. We are going to insert a
Inserting a Banner
Lesson 4 - Completing a Schedule
Movie Magic Scheduling
39
Comment only banner into our Strip Board. For more information see “Using the Banner Types” on page 112.
1. On the Strip Board, click on the fifth strip down,
NICK’S BAR.
2. From the Schedule menu, select Add Banner. The Banner Options dialog displays.
3. Enter TEST BANNER in the text field.
4. Make sure that Comment Only is selected in the selection
area near the middle of the screen.
5. Click OK. The banner is inserted before the selected strip.
USING BOARD SWAPS
Movie Magic Scheduling allows you to save multiple versions
of your Strip Board, so that you can create different versions
of the schedule from the same breakdown information and
then compare and contrast the different Strip Board orders.
These multiple versions are called Board Swaps.
The board swaps merely save the order of your strips and your
calendar information.
It is important not to think that you are saving the entire
schedule with a board swap. You are only saving the order of
the strips. If you were to actually delete a strip while in a
board swap, it would be permanently deleted from the schedule, including all of your other board swaps. To remove strips
or Day Breaks from one board swap and use them in another,
move them to the Boneyard.
The Boneyard is a holding area for strips, Day Breaks and
banners that are not in use in the current board order. As a gen-
Lesson 4 - Completing a Schedule
Using Board Swaps
40
Tutorial
eral rule, it is wise to never delete a strip or a Day Break.
Always move it to the Boneyard - you never know when you
might want it back.
Creating a Board Swap
O
Every time
you make changes
to your Strip
Board, you will
need to re-save
your Strip Board
under Board Swap.
Simply saving the
file will save the
information in the
main file but will
not update your
board. If you
restore it, it will
revert back to its
original order.
1. From the Schedule menu, select Board Swap. The Board
Swap window will open.
2. In Save Strip Order as: enter My First Schedule and
click Save. Your Strip Board order is saved. Notice that
the name you just entered is displayed above the ministripboard.
Now suppose you weren’t sure about the first several days of
the schedule. You want to remove the first several Day Breaks
from the schedule.
3. Holding down the CTRL (z) key, select the first six Day
Breaks.
4. Click the Boneyard icon at the bottom of the
screen or from the Schedule menu, select Move
Strips to Boneyard. A confirmation dialog window displays. Click OK.
The six selected Day Breaks are moved from the Strip
Board to the Boneyard.
Using Board Swaps
Lesson 4 - Completing a Schedule
Movie Magic Scheduling
O
You can
also click the
Board Swap icon
41
5. From the Schedule menu, select Board Swap. Notice that
My First Schedule has been added to the window along
with the date and time it was created.
at the bottom
of the Strip Board
6. Name this current version First Order Without Day
Breaks and click Save.
Restoring Board Swaps
At some point, you will want to view one of your saved
boards.
1. Open the Board Swap window.
2. Click on My First Schedule and then click Restore. The
version with Day Breaks will be restored.
M
If you
change the order of
the strips, and do
not save the board
swap, when you
Restore a swap, the
new order will be
lost.
After you have closed your schedule, the next time you
open it, the strip order will be dictated by the last board
swap you had open. If you do not save this order as a
board swap, this order will still remain when you reopen
your file.
3. Save your entire schedule by pressing Ctrl-S (z-S).
Lesson 4 - Completing a Schedule
Using Board Swaps
42
Tutorial
USING BOARD SWAPS
Saving multiple board swaps allows you a great measure of
flexibility. Using them, you can save multiple schedules in the
same file. If actors or crew are only tentatively available you
can, while finalizing your schedule, save different versions of
it for each possibility.
One word of caution, however. Remember that any time you
delete something from the schedule it is gone and the ID number that once was assigned to it can be reused by later items.
Restoring a board swap that used the deleted item can result in
some strange schedules. It is a better policy to move things
you aren’t using to the Boneyard, where they remain out of
sight, but still available. Conversely, when you add something
to a Strip Board, remember to re-save the board swap as well
as the schedule. Otherwise the schedule will revert to its original form.
REVIEW
When you finish this lesson, you should be able to:
Using Board Swaps
•
Set up the calendar for your production, including
standard weeks, holidays, and company moves
•
Insert manual Day Breaks
•
Insert auto Day Breaks
•
Move Day Breaks around in your schedule
•
Insert a banner
•
Create a board swap
•
Restore a board swap
Lesson 4 - Completing a Schedule
Movie Magic Scheduling
Lesson 5
43
Creating Output
Once you have a schedule in a form you
like, you will want to create some form of
hard copy.
Movie Magic Scheduling provides several varieties of reports you can use to
create hard copy. From printing an
entire Strip Board on perforated paper to
creating a traditional board that is movable by hand, to the Day out of Days
reports and call sheets, you can create
and print them with Movie Magic Scheduling.
Lesson 5 - Creating Output
44
Tutorial
READY TO OUTPUT
You can print and view all reports from the same window.
•
Open the Print/View window. From the File menu, select
Print/View. The Print/View window displays.
There are three main report types listed in the first field of the
window: Strips, Reports and Day out of Days. Each of these
contain multiple pre-made reports by Movie Magic Scheduling, and we will discuss some of them below. For more information, or to custom design your own reports see “Designing
Custom Output” on page 119.
PRINTING THE STRIP BOARD
1. Open the Print/View window by typing Ctrl-P
(z-P).
O
For information about creating a Strip Board
on StripPerf paper
or printing in color,
see “Printing the
Strip Board” on
page 161.
Ready to Output
2. Select Strips by clicking the selection button.
3. Select the desired format of strips from the list at the
right and then click Print to print the board. The board is
printed on standard paper, easily photocopied and handed
out at meetings.
Lesson 5 - Creating Output
Movie Magic Scheduling
45
PRINTING THE SHOOTING SCHEDULE
1. Open the Print/View window.
2. In the Report Type area, select Reports.
3. In the list of reports to the right, select Shoot Schedule
#1.
4. Click View at the bottom of the screen. The shooting
schedule displays.
5. You can view each page. Click Next Page at the bottom of
the screen.
6. Print the schedule. Click Print. The Print screen displays.
Click OK.
Movie Magic Scheduling provides several different layouts of
Shooting Schedules, all viewable from the Print/View window. Like all reports in Movie Magic Scheduling, you can
also design your own custom version of the shooting schedule.
Lesson 5 - Creating Output
Printing the Shooting Schedule
46
Tutorial
For more information on designing your own reports, see
“Designing Custom Output” on page 119.
PRINTING THE DAY OUT OF DAYS
Any category from the breakdown sheets can be printed as a
Day out of Days schedule in Movie Magic Scheduling.
1. From the File menu, select Print/View. The Print/View
window displays.
M
The Day
out of Days does
not include any
strips following the
last Day Break. You
must put a Day
Break at the end of
the schedule to
include all strips.
The Auto Day
Break command
does this automatically.
2. Select Day out of days in the Report type area. As in
Reports, the various schedules are displayed to the left.
3. Select Cast Members and click View. The Cast Members Day out of Days schedule displays.
4. To Print this report click Print.
REVIEW
After completing this lesson you should be able to:
•
View or print the Strip Board
•
View or print any pre-designed report
•
View or print any Day out of Days
Printing the Day out of Days
Lesson 5 - Creating Output
47
Part II - Reference
48
Movie Magic Scheduling
&KDSWHU
49
*HWWLQJ6WDUWHG
GENERAL SETUP
Installing Movie Magic Scheduling
w
See the Installation and Release Notes Guide.
Launching Movie Magic Scheduling
Windows 98
1. Click on the Start menu.
2. Choose Programs, Movie Magic Scheduling, Movie
Magic Scheduling. The application launches.
Macintosh
1. Double-click on your Hard Drive icon.
2. Double-click on the Movie Magic Scheduling
folder.
3. Double-click on the Movie Magic Scheduling
file icon. The application launches.
Exiting Movie Magic Scheduling
1. From the File menu, choose Exit (Quit).
Chapter 1 - Getting Started
50
Reference Guide
2. If you have made changes but not saved your schedule, a
dialog box will appear, asking you if you wish to save
your changes.
Choose the appropriate response. The application will
close.
ONLINE HELP
If you have problems with Movie Magic Budgeting, you can
access the built-in help file.
1. From the Help menu, select Contents. Help opens in
your internet browser.
w
Online Help
The tabs on the left side of the screen give you the choices
of browsing the table of contents (the default), search keywords in the index, or search all the words in the help file
for a particular word.
Chapter 1 - Getting Started
Movie Magic Scheduling
51
Contents: Choose the book you want to look at and double-click it to open it. Then double-click the page within
that book. Help will display in the left-window.
Index: On this tab you can browse the index by scrolling
up and down, or you can enter a keyword to search for it.
The list will scroll as you enter letters. Click on the entry
you want to read. If there is more than one entry for that
word, a menu displays, allowing you to choose the entry
you want.
Search: The search tab allows you to enter the word you
want. Type the word in the Search field, and press Enter
(Return). A list of topics containing that word displays.
Click on the topic you want to see. The topic displays to
the right.
NAVIGATION
In Movie Magic Scheduling there are several ways to access
most commands. (See “Keyboard Shortcuts for Commands”
on page 167 for a list of possible keyboard commands.)
Using the Menu Bar
All commands can be accessed from
the Menu bar. You can also navigate
between Strips and Breakdown sheets
from the Goto menu.
The first four options allow you to
move between breakdown sheets or
strips, depending on the window you
are viewing.
First Breakdown Sheet/Strip - Move to the first breakdown
sheet or strip in the schedule as it is currently organized.
Previous Breakdown Sheet/Strip - Move to the previous
breakdown sheet or strip in the schedule as it is currently organized.
Next Breakdown Sheet/Strip - Move to the next breakdown
sheet or strip in the schedule as it is currently organized.
Last Breakdown Sheet/Strip - Move to the final breakdown
sheet or strip in the schedule as it is currently organized.
Chapter 1 - Getting Started
Navigation
52
Reference Guide
The next three options allow you to search for a specific element or sheet.
Find Element - Find an element within the breakdown sheets.
Opens the find mode of the Quick Entry window. (See “Using
Quick Entry” on page 71 for more information.)
Sheet Number - If you know the sheet number of the breakdown sheet or strip you need to see, select this option, enter
the number and click OK.
Scene - If you know the scene number of the breakdown sheet
or strip you need to see, select this option, enter the number
and click OK.
The last two options are only available from the Strip Board.
They display the various layouts in which you can view the
strips.
Previous Strip Layout - Moves to the previous layout from
the one currently used and re-displays the strip board.
Next Strip Layout - Moves to the next layout from the one
currently in effect and re-displays the strip board.
Using the Mini-Stripboard
At the top of the screen (the bottom on the Macintosh) is a
mini-stripboard.
This Strip Board can get crowded in a large schedule, but it
does offer some measure of navigation. Click on a strip and
then simply drag the small black arrow across it and you can
change your location quickly.
The slug line for the breakdown sheet displays above the
mini-stripboard to the right side as you move the arrow.
On the left above the strip board is the name of the Board
Swap currently active.
Navigation
Chapter 1 - Getting Started
Movie Magic Scheduling
53
Using the Breakdown Toolbar
At the bottom of the Breakdown window there is a toolbar.
Each icon on the toolbar provides an easy way to navigate
through your schedule.
Selects the entire breakdown sheet
Hides all empty categories
Displays all empty categories
Moves to the next breakdown sheet
Moves to the previous breakdown sheet
In addition, after the icons is a colored row. Clicking on this
will display the Strip Board.
Using the Strip Board Toolbar
At the bottom of the Strip Board window there is also a toolbar.
Each icon on the toolbar provides an easy way to navigate
through your schedule.
From a vertical strip view, hides the headerboard
on the strip board. (Horizontal strip views have no
headerboard.)
From a vertical strip view, displays the headerboard
on the strip board. (Horizontal strip views have no
headerboard.)
Calls a menu of the various strip layouts.
Chapter 1 - Getting Started
Navigation
54
Reference Guide
Displays the Board Swap dialog.
Moves selected strips to the boneyard.
Switching from Breakdown Sheets to the Strip Board
w
From the Schedule menu, choose Strip Board.
w
Or, type Ctrl-U (z-U).
w
Or, click on the colored bar in the lower toolbar.
Switching from the Strip Board to Breakdown sheets
w
From the Breakdown menu, choose Breakdown Sheets.
w
Or type Ctrl-Y (z-Y).
SETTING PREFERENCES
There are several preferences you can set to make Movie
Magic Scheduling work the way you like to work. Some of
these, once set, are application-specific, and will be used
every time you open the application, unless you change them
again. Others are specific to the schedule you are working on
and will revert to the default when you create a new schedule.
Setting Preferences
Chapter 1 - Getting Started
Movie Magic Scheduling
55
Application Specific Preferences
w
From the Edit menu, select Preferences. The Preferences
window displays.
Changing Reaction to a Click on Categories
You can change the way the application responds when you
click on a category on the breakdown sheet.
Single-Click Pops out Menu
w
Choosing this option will pop up the element menu when
you click on the category, allowing you to choose an element to add, or to choose New to call up the Element Info
window.
In this view, you can hold down the Alt (Option) key
temporarily enable double-click mode (see below).
Double-Click for Quick-Entry menu
w
Choosing this option will bring up the quick-entry menu
when you double-click on a Category name on a breakdown sheet.
In this view, you can hold down the Alt (Option) key to
temporarily enable single-click mode (see above).
Changing the Auto-Save response
Movie Magic Scheduling automatically prompts you to save
your files while you work. You can change the amount of time
between autosaves by changing the value in this drop-down
menu. The default is 30 minutes, but if you have an unreliable
machine you might want to change it to 15. Alternately, if you
Chapter 1 - Getting Started
Setting Preferences
56
Reference Guide
have a highly reliable machine and don’t mind the risk, or
have a habit of saving often, you could set it for an hour, or not
to prompt you at all.
w
When the set time is up, Movie Magic Scheduling will
prompt you with a dialog box:
w
Click on the appropriate response and continue working.
Changing Miscellaneous Attributes
Show Splash Screen - If checked, the animated Movie Magic
splash screen displays when launching the Scheduling program. Unchecked, the program launches without the splash
screen, ready for you to open a file.
Show Palette Windows - If selected, displays the tool palette
appropriate to the window you’re working in. Shows:
•
In any Design window, it displays the Field palette
•
In any other window, it displays the Mini-Stripboard
If not selected, palettes do not display. The commands on
them can still be selected from the menu bar.
Goto Next Creates New Sheet - When this option is checked,
if you are at your last breakdown sheet and select Goto Next, a
new sheet will be created. If it is unchecked, when you choose
Goto Next, you will remain on the last breakdown sheet.
Number of Characters to Display... - The number you enter
here dictates the number of characters displayed in any category column. You can use this preference to make the column
wider to accommodate larger elements or narrower to fit more
categories on the screen.
Setting Preferences
Chapter 1 - Getting Started
Movie Magic Scheduling
57
Schedule Specific Preferences
w
From the Edit menu, select Preferences. The Preferences
window displays.
Changing Breakdown Sheet Display
You can change how the breakdown sheet displays in your
schedule. In the Breakdown Sheets area of the Preferences
screen, select or deselect the options available.
Hide Empty Categories. Choosing this option
hides all categories on your breakdown sheets that are
empty. It can be overridden using the Display Categories icon at the bottom of the Breakdown screen.
Show Element ID #s. When selected, this option displays
all element ID numbers before the element name on the breakdown sheet. For example, Jasper might be shown as 1. Jasper.
Auto Sheet Numbering. This option will automatically
number your sheets as you add them.
Lock Sheet Numbers. When selected, this option locks
sheet numbers so that you cannot renumber the sheets. It is
useful when you have established your shooting schedule.
Any new sheets added after the numbers have been locked
will be numbered 2a, 2b, etc.
Allowing Multi-Day Breaks
Multiple Day Breaks occur when 2 or more Day Break strips
are placed next to each other on the schedule, indicating that
Chapter 1 - Getting Started
Setting Preferences
58
Reference Guide
the scenes on the preceding strips may be shot on any of the
production days designated by the day break strips.
•
When checked, the Day out of Days will reflect shooting on both days of the schedule.
•
When unchecked, the Day out of Days and shoot
schedules will reflect no work on the second day. The
day will still be included in the schedule, but nothing
will be scheduled on that day.
Sorting Elements
This preference controls when elements are sorted. Elements
are usually in the proper order, but making changes to their
names, ID numbers, or sort order can force them to be
resorted.
Usually leaving this option selected at Always is appropriate.
If, however, you prefer a custom order for your elements, or if
you feel that the performance of your computer is too slow,
turning off or delaying resorting of elements can sometimes
improve speed.
Always. forces the elements to be sorted whenever there is a
change that will affect the order.
Before Print/Save. forces the elements to be sorted when
you print or save the file. This prevents reports, strips, or dayout-of-days being printed in the incorrect order.
Never. does not re-sort the elements unless specifically
ordered to do so. You can resort the elements by selecting
Recalculate from the Schedule menu.
Changing Action after Last Field
O
Pressing
Tab will always go
to the first field at
the top of the sheet.
The options mentioned above work
only with the Enter
(Return) key.
To speed up the breakdown process, this option controls what
happens when you press Enter (Return) while you're in the
Script Page field on the breakdown sheet.
Go to First Field. pressing Enter (Return) takes you to the
Sheet Number field.
Insert Elements. pressing Enter (Return) inserts a blank
line in the first category of the element breakdown area so that
you can enter elements quickly by keyboard.
Setting Preferences
Chapter 1 - Getting Started
Movie Magic Scheduling
59
Quick Entry. pressing Enter (Return) calls up the Quick
Entry window. Because the Quick Entry screen is so versatile,
this is the default option.
Adjusting Response to Unrecognized Element
Beep & Retry. if this option is selected, Movie Magic
Scheduling will beep and prompt you that “element does not
exist.” This allows you to either enter a semicolon to create
the element or retry with a different spelling.
Beep & Continue. when this option is selected, Movie
Magic Scheduling will beep, but it will also create the element
that it did not recognize. This can be quicker than the first
option, but can also lead to various versions of the same element all spelled slightly differently.
Create Element. with this option selected, Movie Magic
Scheduling will simply create an unrecognized element and
continue to the next field.
SETTING FUNCTION KEYS
You can also set the function keys to perform specific menu
commands. Once you have set these, they will work every
time you open Movie Magic Scheduling, until you change
them.
1. From the Edit menu, select Function Keys. The Function
Keys dialog displays.
2. Click next to the name of the function key you want to
assign. Then select the menu command from the appropriate menu to assign it.
Chapter 1 - Getting Started
Setting Function Keys
60
Reference Guide
For example, click on F4. That line is highlighted. Then
select Add Banner from the Schedule menu. Add Banner
appears next to F4 in the dialog.
From now on, when you press the F4 key, Movie Magic
Scheduling will perform the Add Banner command. If
you find yourself making the same commands over again,
consider setting function keys for those commands to
eliminate extra keystrokes.
Setting Function Keys
Chapter 1 - Getting Started
Movie Magic Scheduling
&KDSWHU
61
&UHDWLQJD6FKHGXOH
The first thing you need to do when you open Movie Magic Scheduling is create a
schedule.
You can either open a new schedule, or open one you have already created and work
with it.
NEW SCHEDULE
Creating a schedule is easier than you might think. There are
standard layouts for breakdown sheets and reports built into
Movie Magic Scheduling.
Creating a New Schedule
1. From the File
menu, select New.
A secondary menu
displays.
2. You can either create your schedule from the default form
or from a form you have created. Choose the appropriate
option.
•
If you choose Default form, a new scheduling file
will open.
•
If you choose Pick a Form, the Pick a Form window
displays, allowing you to choose the form you wish to
use. In general, this will be a schedule form that you
have created for another script, with custom categories, reports or strips.
Chapter 2 - Creating a Schedule
62
Reference Guide
Adding Production Information
You can add production information at any time in the scheduling process, although we suggest you add it when you begin
creating your schedule. This makes it easier to keep track of
the revisions of your schedule.
O
Pressing
enter from this window will save your
changes and close
the window.
1. From the Design menu, select Picture Info. The Picture
Info dialog displays.
2. Enter the appropriate information in each field. All information is optional. Press Tab to move from field to field.
Importing Script Information
You can import information from several of the scriptwriting
software packages on the market.
1. Follow the instructions in your Scriptwriting application
to export information to Movie Magic Scheduling.
New Schedule
Chapter 2 - Creating a Schedule
Movie Magic Scheduling
63
2. Create a new schedule. (See “Creating a New Schedule”
on page 61.)
3. From the File menu, select Import. A dialog window displays. Click OK to continue.
4. The Import File menu displays.
5. Select the file you exported and click OK. Movie Magic
Scheduling creates breakdown sheets and populates them
with any appropriate elements tagged in the original
script.
If there is already information in the schedule, any new
breakdown sheets will be appended to the end.
Chapter 2 - Creating a Schedule
New Schedule
64
Reference Guide
OPENING, CLOSING SCHEDULES
Opening a Schedule
1. From the File menu, select Open. The Open file window
displays.
2. Select the schedule you want to open and click OK. The
schedule opens, displaying the Breakdown sheets for the
script.
Opening a Recently Used Schedule
If you have recently used a schedule that you want to open
again, you can do this without using the open command.
1. From the File menu, select Recent Files. A list of recently
opened files displays.
2. Choose the file you want from this list. The file will open,
displaying the first breakdown sheet in the schedule.
Opening, Closing Schedules
Chapter 2 - Creating a Schedule
Movie Magic Scheduling
65
Saving
Saving a previously unsaved file
1. From the File menu, select Save or Save As. Alternately,
press Ctrl-S (z-S). The Save Schedule as window displays.
2. Enter the name of the document and then click OK.
Saving a previously saved file
w
From the File menu, select Save. The document saves.
w
Alternately, press Ctrl-S (z-S). The document saves.
Saving a previously saved file with a new name
1. From the File menu, select Save as. The Save Schedule as
window displays.
2. Enter the name of the document and then click OK. The
file remains open, with the new name. The file with the
old name is not deleted, and you can open it at any time.
Chapter 2 - Creating a Schedule
Opening, Closing Schedules
66
Reference Guide
Closing a Window
Sometimes you may have more than one window open at a
time. You can close them individually.
w
From the File menu, select Close, OR Press Ctrl-W (zW).
Closing a Schedule
To close the entire schedule, simply selecting Close will not
work. Even if all windows are closed, the schedule is still considered open.
w
From the File menu, select Close Schedule.
Exiting Movie Magic Scheduling
w
From the File menu, choose Exit (Quit).
•
If you have not saved your schedule, a dialog displays.
•
Select the appropriate choice. The application closes.
Opening, Closing Schedules
Chapter 2 - Creating a Schedule
Movie Magic Scheduling
&KDSWHU
67
%UHDNGRZQ6KHHWV
The Breakdown sheet is the core of all production scheduling, serving as the fundamental source of information. Movie Magic Scheduling has all of the functionality of
a manual Breakdown sheet and makes it easier to access and manipulate all of the
information contained in the Breakdown. The Movie Magic Breakdown Sheet is
divided into three main sections: Scene Information, Categories and Storyboard
Frames.
VIEWING BREAKDOWN SHEETS
Movie Magic Scheduling opens automatically to the Breakdown sheet view of the schedule. However, if you have
changed to the strip board view you can change back very easily.
w
From the Breakdown menu, select Breakdown Sheets.
w
Press Ctrl-Y (z-Y). The Breakdown sheets display.
DEFINING THE SCREEN AREAS
Scene Information
The top section of the Movie Magic Breakdown sheet is comprised of scene information that is similar to most manual
Breakdown sheets.
The Information contained in this area consists of the Breakdown Sheet Number, Interior/Exterior, Set, Day/Night, Scene
Numbers, Page Count, Synopsis, Location, Sequence, Script
Day and Script Page.
Chapter 3 - Breakdown Sheets
68
Reference Guide
Categories
The second section of the Breakdown sheet is the Category
area. Categories are listed down the left-hand side of the
screen under the Scene Information. In a manual Breakdown
sheet, empty categories can occupy the majority of the page.
Categories include everything from cast to greenery to stunts
and everything in between. When starting a new schedule
using the default form, 21 commonly used categories are
already defined and listed for your convenience. You may
rename, delete or add categories up to a total of 31. For more
information on this process, see “Modifying Categories” on
page 83.
Storyboard
The third area on the Breakdown sheet, located on the right
side of the screen under the Scene information, is a Storyboard
area that allows you to add a picture to each Breakdown page.
The pictures must be in a Bitmap (.bmp) format for the PC and
a PICT format on the MAC. One storyboard picture can be
added on each Breakdown page. For more information on
adding pictures, see “Adding a Storyboard Picture” on page
84.
ENTERING SCENE INFORMATION
Scene information is entered at the top of the Breakdown
sheet. Items colored blue in the Scene Information area are
considered categories; there are special rules for adding new
elements into categories (see “Elements” on page 70).
Sheet # - This is the number of the Breakdown sheet. Unless
you renumber these at some point, this will correspond to the
scene number.
I/E - Interior/Exterior. You only need to enter I or E and
Movie Magic Scheduling will automatically enter the standard
abbreviation.
Set - Enter a brief description of the set. For example, “Outside the Bailey home.”
D/N - Day/Night/Morning/Evening/Dusk. You can enter D, N,
M, E or DU in this field and Movie Magic Scheduling will
automatically enter the appropriate word.
Entering Scene Information
Chapter 3 - Breakdown Sheets
Movie Magic Scheduling
69
Scenes - Enter the scene number.
Pages - Enter the number of script pages covered by the scene.
Enter whole numbers, then press Tab and enter the number of
1/8ths.
Synopsis - Enter a brief synopsis of the scene.
Location - Enter the shooting location of the scene. For example, Studio.
Sequence - The sequence option can be used to manipulate
the schedule. For example, if you have a script that will be
shot in three different locations, you can enter sequences such
as Paris, London and Los Angeles and later sort your strips so
that the shoot days for each location are together. (See “Sort
and Select” on page 97.)
Script Day - This is an arbitrarily assigned word which notes
the chronological time period in which this scene takes place
in the script. For scripts that heavily depend on the change of
time, this feature can be used to help usefully organize groups
of scenes in the script. For example, if the script takes place
over three days, Friday, Saturday and Sunday, you can assign
a day to each Breakdown sheet. Likewise if the script takes
place over a number of years, say 1927, 1935 and 1941 you
can assign a year to each corresponding scene.
Script Page - The page of the script where the scene appears.
ADDING A NEW BREAKDOWN SHEET
You can add a new Breakdown sheet to any point in your
schedule.
w
From the Breakdown menu, select Add Breakdown
Sheet, or type Ctrl-B (z-B). A new Breakdown sheet
will be added.
•
If you are at the end of the sheets, the new sheet is
added after the current sheet with a new, consecutive
number.
•
If you are in the middle of the schedule, the new sheet
is added directly after the current sheet, and the new
number appends a letter to the end of the current number. For example, you are on sheet 24 when you add a
new sheet. The new sheet will be added after 24 and
Chapter 3 - Breakdown Sheets
Adding a New Breakdown Sheet
70
Reference Guide
be numbered 24A. If you then add another, the second
new sheet will be numbered 24B and so forth.
ELEMENTS
Elements are the smallest parts of the Breakdown that Movie
Magic Scheduling tracks and categorizes throughout the
Breakdown sheets.
Examples of elements are the characters listed under the Cast
Members category: Steve, Paul, Alicia and Daisy would each
be a separate element. As a general rule, elements are the
items listed under any category on the Breakdown sheet, but
there are four exceptions. The Scene Information at the top of
the window contains four fields which contain elements: Set,
Location, Sequence and Script Day. You can manipulate the
information contained in these four fields in the same way as
other elements in the Breakdown sheet, and the same rules
apply.
Because Movie Magic tracks and records all elements there
are certain rules concerning the names of elements that are
important to remember:
Elements
w
Element Names can be anywhere from 1 to 255 characters
long.
w
No two elements in the same category may share the exact
same name. For example there cannot be two “Steve
Smiths” under Cast or two “Black Tables” under Props.
You must distinguish between similar names. It is possible
to have the same names in two different categories, for
example, a “Steve Smith” under Cast and a “Steve Smith”
under Extras or an “Explosion” in both Optical FX and
Mechanical FX. We recommend that you keep all names
unique and distinct in order to keep recognition of element
names easy and immediate.
w
Element Names must not begin with a period, contain a
colon (:) or a semicolon (;). Movie Magic already uses
these three special characters for different functions
involving elements.
w
Element Names cannot contain curly braces ({}). Curly
braces serve as a command in the Design area. (For more
information, see “Using Interpreted Text” on page 125.)
Chapter 3 - Breakdown Sheets
Movie Magic Scheduling
71
USING QUICK ENTRY
Quick Entry is the fastest way to enter new elements into
Movie Magic Scheduling.
Opening the Quick Entry Palette
There are three ways to open the Quick Entry Palette.
Menu
w
From the Breakdown menu, select Element Quick
Entry.
Keyboard
w
Press Ctrl-E (Command-E).
Mouse
O
You can
open Quick Entry
from either the
Breakdown sheets
or the Strip Board.
w
If your preferences are set to Double-click for Quick
Entry (see “Changing Reaction to a Click on Categories”
on page 55), you can double-click on a category and the
Quick Entry palette will open.
w
If your preferences are set
to Single-Click for Element
Info window (see “Changing Reaction to a Click on
Categories” on page 55),
you can hold down the Alt
key and then double-click
on a category to open the
Quick Entry palette.
The Quick Entry palette displays.
Changing the Quick Entry Mode
The Quick Entry palette has three modes: Add/Remove, Create, and Find. Each of these modes limits what can be done in
a different manner.
Add/Remove - Allows you to add or remove elements from
the current Breakdown Sheet. (See “Adding New Elements to
Chapter 3 - Breakdown Sheets
Using Quick Entry
72
Reference Guide
the Breakdown Sheet” on page 73 and “Removing Elements
from the Breakdown Sheet” on page 74.)
Create - Allows you to create elements without adding them
to the Breakdown sheet. If you work best by creating a long
list of elements and then adding them to your sheets, this is a
useful mode. (See “Creating New Elements without Adding
them” on page 75.)
Find - Allows you to locate any existing element on either
Breakdown sheets or strips, taking you to the appropriate
sheet or strip. (See “Finding an Element in the Breakdown
Sheets” on page 75.)
You can easily change the mode where you work.
1. From the Quick Entry palette, click
on the name of the mode.
2. Select the mode you want from the
drop-down menu.
Selecting the Category
The Element Quick Entry window always opens to whatever
category is selected. If no category is selected, it opens to Cast
Members as the default. At some point you will want to add
elements to all categories on the Breakdown sheet without
leaving the Quick Entry window. To do this, you will want to
change the category in Quick Entry.
1. From the Quick Entry
screen, click on the arrow
beside the words Cast
Members. A list of categories displays.
Using Quick Entry
Chapter 3 - Breakdown Sheets
Movie Magic Scheduling
73
2. Select the category you want to work
with from the list. The category
changes. Now any element you add will
be placed under the selected category.
Adding New Elements to the Breakdown Sheet
The easiest way to add elements to the Breakdown sheet is by
using the mouse.
1. In the Add/Remove mode, select the category where you want the element to
appear.
2. The list of available elements displays in the element field.
3. If the element you want to
add is on the list, select the
element by clicking on it.
Then click Add. (Or just
double-click on the element). The element is added
to the Breakdown sheet
under the selected category.
4. If the element you want to
add is not on the list, type
the name in the first field (above the buttons), followed by
a semicolon. For example, enter Fred; and press Enter
(Return). The element is created and added to the Breakdown sheet under the selected category.
Chapter 3 - Breakdown Sheets
Using Quick Entry
74
Reference Guide
Removing Elements from the Breakdown Sheet
You can use the Quick Entry window to remove items from a
Breakdown sheet as well.
1. From the Quick Entry window, be sure
you are in the Add/Remove Mode.
O
To select
more than one item
not adjacent, hold
down the Ctrl
(Shift) key and
click on the
required items.
2. In the Category field,
select the category where
the element is located and
then click on that element,
highlighting it.
3. The add/remove button
will now be titled Remove.
Click Remove to remove
the element from the current Breakdown sheet.
Alternately, in this mode you
can double-click the name of
the element, to either add or remove it.
Adding and Removing Elements Simultaneously
If you discover that there are some elements in a category that
need to be removed and others that need to be added, you can
do this all at one time.
1. In the Quick Element window, Add/Remove mode,
select the category where you want to switch elements.
O
To select
more than one item
not adjacent, hold
down the Ctrl
(Shift) key and
click on the
required items.
Using Quick Entry
2. From the element list in
the Quick Element window, select all the elements
affected.
3. In the row of buttons at the
top of the window, click
Add/Remove. The elements that were in the
Breakdown sheet are
removed, and those that
weren’t are added.
Chapter 3 - Breakdown Sheets
Movie Magic Scheduling
75
Creating New Elements without Adding them
You can create elements without adding them to the current
Breakdown sheet. This is particularly useful if you want to
create all the elements to be used in the Breakdown at one
time.
1. In the Quick Element window, change
the Mode to Create.
O
This is one
of the few cases
where you do not
have to type a
semicolon (;) to
create an element.
2. Select the category where
you want to add elements.
3. Enter the name of the elements in the entry field and
then press Enter (Return)
(or click Create). The element is added to the current
category, but not to the
Breakdown sheet.
Finding an Element in the Breakdown Sheets
You can also locate an element in the Breakdown without
modifying or creating it.
1. In the Quick Element window, change
the Mode to Find.
Select with Mouse
You can select the element you want to find with the mouse.
1. In the Category field, select the category where the element is located and then click on that element, highlighting it.
2. Click Find or press Enter (Return) to page through the
Breakdown sheets that contain the element.
Chapter 3 - Breakdown Sheets
Using Quick Entry
76
Reference Guide
Select by Keyboard
Alternately, you can find the desired element by using the keyboard.
1. Enter the beginning of the element name in the entry field
and then pressing Enter (Return). All of the elements
beginning with those letters display at the bottom of the
Quick Entry window. See “Finding a List of Related Elements” below.
2. Select the element you want to find and click Find. If you
have selected more than one element, Movie Magic
Scheduling will find the Breakdown sheets that contain all
of the selected elements. If no sheet contains all the
selected elements, a dialog displays.
3. Movie Magic Scheduling will page through Breakdown
sheets one at a time as you click Find. When it has
reached the end of the Breakdown sheets, another dialog
displays.
Finding a List of Related Elements
You can find a list of related elements in any mode except
Create. This can be useful if you want to add, find, or delete a
group of related items. For example, perhaps George’s coat,
George’s hat and George’s rickety car.
1. From the Quick Entry window, be sure you are in the
Add/Remove Mode, or the Find Mode.
2. In the Element Entry field, enter part of the name of the
element you want to find and then press Enter (Return).
Using Quick Entry
Chapter 3 - Breakdown Sheets
Movie Magic Scheduling
M
Do not
enter a semi-colon
after the letters you
type to find. Entering a semi-colon
will cause Movie
Magic Scheduling
to create an element rather than
finding it.
77
•
For example, entering
George in Wonderful
Life, or entering Geo,
and pressing Enter
(Return) will bring up
a list of all elements
that include those letters.
•
If what you typed
matches a portion of
several elements, a list
will display in the
lower portion of the
Quick Entry window so you can choose the appropriate element.
•
If the element does not exist, a message to that effect
will display above the mini stripboard.
In this case, to create the element, enter a semicolon
(;) after the element name and then press Enter
(Return) or click Add. The element will be added to
the list and to the category you have selected. Be sure
the correct category has been selected. (See “Selecting the Category” on page 72.)
Sorting the Element List
While you are working with Quick Entry, you can sort the way
the elements display in the element field.
1. From the Quick Entry window, in the Sort By menu,
select the way you want the elements to display.
•
ID - will sort them by ID number. This is particularly
useful for Cast. Elements that do not have IDs will be
sorted alphabetically.
•
Name - will sort alphabetically by the name of the
element.
Chapter 3 - Breakdown Sheets
Using Quick Entry
78
Reference Guide
•
Occurrence - will sort
the element list by
number of occurrences
on Breakdown sheets.
The number of occurrences will display to
the right of the element
name.
2. The elements are immediately sorted by the method
you have chosen.
Getting Information about an Element
M
Clicking
on Info for an element that does not
exist when you are
in the Add/
Remove mode will
create that element. This can
result in slightly
different entries for
the same element.
From the Quick Entry window you can also access the Element information window.
1.
From the Quick Entry window, select the category of the
element.
2. Click on the desired element from the list of elements
displayed at the bottom of the Quick Entry Screen.
3. Under the Element Entry field, click the Info button.
Deleting an Element from the Category
1.
O
Alternately,
you can select a
group of related
elements. See
“Finding a List of
Related Elements”
on page 76.
Using Quick Entry
From the Quick Entry window, select the category of the
element.
2. Click on the desired element from the list of elements displayed at the bottom of the Quick Entry Screen.
3. Under the Element Entry field, click Delete.
•
If the element has not been added to a Breakdown
sheet, it is deleted from the category.
Chapter 3 - Breakdown Sheets
Movie Magic Scheduling
•
79
If the element has been added to a Breakdown sheet, a
dialog box displays, telling you how many sheets use
it and asking if you want to delete it.
Click OK to delete them, or click Cancel to return to
Quick Entry.
USING THE MOUSE TO ADD ELEMENTS
If you prefer, you can bypass the Quick Entry window altogether and simply use your mouse to add elements to the
Breakdown sheets.
1. From the Breakdown sheet, click on
the category where
you want to add an
element. A window
pops up with a list of
possible elements.
2. Select the element
you want to add. The
element is added to the Breakdown sheet.
3. If the element is not on the list, select New.... The Element
Info window displays (see “Creating New Elements” on
page 81), allowing you to create the element in this category.
USING THE ELEMENT INFO WINDOW
You can access the Element Information window in three
ways.
•
From the Quick Entry window, select an element and
click Info.
•
From the Breakdown sheet, double-click on an element.
Chapter 3 - Breakdown Sheets
Using the Mouse to Add Elements
80
Reference Guide
•
From the Breakdown sheet, click on a category name
and select New. This option will create a new element
and add it to the current Breakdown Sheet, as well as
open the Element Info window.
The Element Info Windows
There are three pre-set element information windows. If you
need custom information for any of the other categories, you
can design your own. (See “Designing Custom Output” on
page 119).
Cast - This window was designed for easy retrieval of such
cast information as contact info for the actor (including agent),
rate, start/finish dates, etc.
Extras - This window was designed for easy retrieval of such
information about extras as how many extras are required, and
their pay rate.
Using the Element Info Window
Chapter 3 - Breakdown Sheets
Movie Magic Scheduling
81
Stunts - Stunts often also require specialized information.
This screen includes such information as contact names and
phone numbers, and notes on the stunt.
Creating New Elements
You can create new elements from the Element Info screen.
This is one of the few locations where you do not have to enter
a semicolon to add an element.
1. From the Breakdown sheet, click on a category name and
select New. The Element Info window displays, with an
entry point in the element name field.
2.
Enter the name of the element and press Tab or Enter
(Return). The insertion point will move to the next field.
3. Continue entering information until you have completed
the information field. The only field that is required is the
name field.
4. Click the appropriate
check boxes to select
or deselect them.
5. Close the window by
clicking on the X in the
upper right corner.
When you close the
window, the element is
created and added to
the Breakdown sheet.
Chapter 3 - Breakdown Sheets
Using the Element Info Window
82
Reference Guide
Adding Info to an Existing element
You can also add information to an existing element in the
Element Info window.
1. Open the element info window for the element in one of
the following ways:
•
Double-click on the element in the category list of a
Breakdown sheet.
•
Select the element from the Quick Entry window and
click Info.
2. Click in the field where you want to add information, and
type it in. You can move from field to field by pressing
Tab or Enter (Return).
Manually Defining the Drop #
From the Cast Members Element Information window, you
can define which drop period you want to use for that cast
member. For example, if in your schedule you have more than
one period possible to drop that cast member, you can choose
the second, or third opportunity rather than the first.
By default, Movie Magic Scheduling will drop the cast member at the first opportunity, unless Minimize Hold Days (Best
drop) is selected on the Day out of Days option window. (See
“Minimize Hold Days (Best Drop)” on page 145.)
However, if you know there is more than one opportunity for a
drop, you can enter a number in the Drop # field of the cast
member.
w
Enter 1 to use the first opportunity to drop that cast member, enter 2 to use the second, and so on.
HIDING AND DISPLAYING EMPTY CATEGORIES
As you add elements, the list of categories expands as necessary across your screen. If you are working on a particularly
large production there may simply be too many categories on
the screen. At this point the empty categories are just taking
up space that could be better used by elements or by the storyboard illustration.
Hiding and Displaying Empty Categories
Chapter 3 - Breakdown
Movie Magic Scheduling
83
You can hide these empty categories and only display the ones
that contain elements.
w
Type Ctrl-H (z-H) to hide the categories or display them
if they have been hidden.
w
Alternately, click on the Hide
or Display
Category button on the toolbar at the bottom of the Breakdown sheet window.
w
Or, from the Breakdown menu, select Hide (or Show)
Empty Categories.
MODIFYING CATEGORIES
For more detailed information about designing categories and
element information sheets, see “Designing Custom Output”
on page 119.
Changing Category Names
If a category name doesn’t match what you need for the production you are working, you can change it.
1. From the Design menu, select Categories. The Design
Categories window displays.
2. From the list of categories on the left, click on the category you want to change. The category will display, with
the name highlighted.
3. Type the new name and then press Enter. (Or click OK.)
The design window closes and the name is changed.
Chapter 3 - Breakdown Sheets
Modifying Categories
84
Reference Guide
Adding a New Category
If you are missing a category where you need to add elements,
you can add a new category to your category list.
1. From the Design menu, select Categories. The Design
Categories window displays.
2. From the list of categories on the left, click on an Unused
category. The category will display, with the name highlighted.
3. Type the new name.
4. Select the desired Sorting and Case options from the
drop-down menus.
5. If you wish, click on Design to redesign the Element info
window for this Category. (See “Designing Custom Output” on page 119.)
6. Click OK to close the window and add the new Category.
USING STORYBOARD PICTURES
Adding a Storyboard Picture
Movie Magic Scheduling provides the option of adding a storyboard illustration to each Breakdown sheet. Storyboard pictures must be in Windows bitmap format (.bmp) or Macintosh
PICT format. Adding them to your Breakdown sheets is simple.
1. Save your storyboard illustrations in a common folder
where they will be easy to locate.
Using Storyboard Pictures
Chapter 3 - Breakdown Sheets
Movie Magic Scheduling
85
Remember that they must be in Windows bitmap (.bmp)
format for the PC or PICT format for the Macintosh.
2. Return to Movie Magic Scheduling. You must be on the
Breakdown sheet where you want the storyboard picture
to appear.
3. From the Breakdown menu, select Edit Storyboard. The
Storyboard window displays.
4. Click on Load to load your image. The Open window
displays.
5. The Open window works like a standard Open window.
Choose the image you want to include and click Open.
6. The image displays in the Storyboard window. Choosing
reduced at the top of the Edit Storyboard window will
reduce the bitmap so you can see the entire image in that
window. It does not affect the image on the Breakdown
sheet.
7. Close the window by clicking on the X in the upper right
(close button in the upper left on the Mac). The illustration is now included on the Breakdown sheet.
Chapter 3 - Breakdown Sheets
Using Storyboard Pictures
86
Reference Guide
Removing a Storyboard Picture
You can also remove a storyboard picture that you have
inserted.
1. On the Breakdown screen, click on the storyboard picture
to select it. That section of the screen will be highlighted
in blue.
2. From the Edit menu, select either Cut or Clear. Or, press
Ctrl-X (z-X) The Storyboard image is removed.
DUPLICATING BREAKDOWN SHEETS
You may find that one scene is so similar to another that,
rather than entering all the information twice, you would be
better off duplicating the original and just making the various
changes to it.
This is also useful if you have changes to the script that need
to be included in the schedule. New scenes, for example.
1. Go to the sheet you want to duplicate.
2. From the Edit menu, select Duplicate sheet, or type CtrlD (z-D). A duplicate sheet displays.
•
If the duplicate is in the middle of several sheets, it
will be numbered the same as the original, plus an A
(e.g., the original is 133, the new sheet will be 133A).
Duplicating Breakdown Sheets
Chapter 3 - Breakdown Sheets
Movie Magic Scheduling
•
87
If the duplicate is at the end of the Breakdown, it will
be numbered directly after the original (e.g., the original is 143, the new sheet will be 144).
3. Make any changes to the sheet that are required.
WORKING WITH BOARD ID NUMBERS
One of the first things you will need to do upon completing a
Breakdown is to number or renumber the board IDs for some
elements, most particularly, Cast Members. Board ID numbers
are very important because as we move away from the Breakdown sheets and begin working with strips, the cast members
are represented on the strips only through their ID numbers. If
you create your elements using the Quick Entry window, they
will not have Board IDs assigned to them.
Reorder IDs by Page Count
In general, cast members will be numbered by the number of
pages they have in the script. There will be exceptions due to
contracts, but these can be moved manually after the basic
reordering. (See “Reordering Elements Manually” on page
88.) You can also use these instructions to order any element
by the number of pages where it is mentioned in the script.
1. From the Breakdown menu, select Renumber Board
IDs. The Renumber Board IDs window displays.
Chapter 3 - Breakdown Sheets
Working with Board ID Numbers
88
Reference Guide
2. Select the category of elements you want to work with
from the Category menu (usually this will be Cast Members, so that is the category that automatically displays).
3. From the Arrange Elements by: menu,
select Page Count.
This is one of the most common ways of
ordering the cast. It uses the information
you entered in your Breakdown sheets, and
calculates the number of pages each actor appears on in
the script, sorting them from most pages to fewest.
The cast list is instantly reordered, and the page count for
each player appears to the right of the name. The ID numbers are not changed at this point.
4. Click Renumber. The elements are renumbered based
upon page count. The number of pages where each element occurs is listed to the right of the name.
Reordering Elements Manually
You can also reorder the element lists manually. For example,
perhaps the actor playing Clarence is contractually obligated
to be no lower than ID number three. Moving individual elements around the list is quite easy.
Working with Board ID Numbers
Chapter 3 - Breakdown Sheets
Movie Magic Scheduling
89
1. Click on an element. Then press the Move Up or Move
Down button until it is where you want it.
2. Click Renumber again and the elements are renumbered
in this order.
Locking the ID Numbers
Once you have your elements numbered correctly, you may
want to lock their positions so that they cannot be changed
accidentally.
w
Select the elements you wish to lock and
then press Lock ID. Your IDs are now
locked, and a lock icon appears beside the
locked element.
Unlocking the ID Numbers
You can unlock a locked ID.
w
Select the locked element or elements you wish to
unlock and then press Unlock ID. The IDs are unlocked
and can now be renumbered.
Chapter 3 - Breakdown Sheets
Working with Board ID Numbers
90
Reference Guide
Removing ID Numbers
M
You can
remove ID numbers
from locked elements. If you do
this, the locked element remains
locked, but with no
number attached. If
you reorder your
list, any elements
in this position will
be moved to the
end of the element
list.
You can also
remove the ID
numbers from
any element,
although you
do not have to
remove the ID
numbers to
reorder the list.
w
Select the
elements
and then
press
Remove
IDs. The
ID numbers are removed from the selected elements.
RENUMBERING BREAKDOWN SHEETS
When you first have all the information entered into your
Breakdown sheets, you may want to renumber them, to eliminate the lettered numbers of duplicate sheets, etc.
M
This
renumbering cannot be undone.
Renumbering sheets takes the current order of the Breakdown
sheets and numbers them 1 to the end. It cannot be undone, so
be very careful when using this option. Sometimes you may
want the additional letters after the sheet number.
1. Put the Breakdown sheets your chosen order. Usually you
will do this using the strip board. (See “Sorting Strips
Manually” on page 95, “Sort and Select” on page 97, or
“Using the Reorder Command” on page 96.)
2. From the Breakdown menu, select Renumber sheets.
The strips are renumbered.
MERGING BREAKDOWN SHEETS
You may find that you need to merge two Breakdown sheets
into one. When you do this, there are several things you need
to keep in mind.
Renumbering Breakdown Sheets
Chapter 3 - Breakdown Sheets
Movie Magic Scheduling
M
Merging
cannot be undone.
w
91
Movie Magic Scheduling will merge most fields. In
essence, a new sheet is created using the elements from
the first two. Movie Magic Scheduling includes information from the merged sheets as follows:
•
Information from the second sheet replaces information from the first sheet in elements from the Scene
Information area (Int/Ext, Set, D/N, and Script Page).
•
Elements from the lower half of the Breakdown sheet,
in Categories such as Cast, Props, Stunts, etc. are
merged together and all information is included on the
new Breakdown sheet.
w
You cannot merge two sheets that both have storyboard
pictures. One of the pictures must be removed first. (See
“Removing a Storyboard Picture” on page 86).
w
You can only merge sheets that are next to each other. If
you have two sheets to be merged, and are separated by
another sheet, you will have to go to the strip view and
move them together.
w
You can only merge sheets from the Breakdown sheet
view.
1. From the Breakdown view, display the first of the two
sheets you wish to merge.
2. From the Breakdown menu, select Merge Sheets. A dialog displays.
3. To merge the sheets, click OK. The sheets are merged,
and the sheet takes the number of the second sheet of the
pair.
Chapter 3 - Breakdown Sheets
Merging Breakdown Sheets
92
Merging Breakdown Sheets
Reference Guide
Chapter 3 - Breakdown Sheets
Movie Magic Scheduling
&KDSWHU
93
7KH6WULS%RDUG
The Strip Board is where you will actually do most of your scheduling. It works like a
manual Strip Board. In a manner keeping with industry practice, when you view and
work with the schedule in Movie Magic, you are working with some form of Strip
Board.
WHAT ARE STRIPS?
Strips are the schedule’s version of the breakdown sheets.
They are, in fact, a different view of the breakdown sheets. If
there is no breakdown sheet for a scene, there will be no strip.
On the other side of the coin, if you delete a strip, you will
also delete the associated breakdown sheet.
SETUP
When you first see them, the strips are listed in breakdown
sheet order, starting with the first sheet number and going to
the last. Each strip displays the breakdown sheet number, the
scene number(s), interior/exterior, the set, day/night, the page
count and the ID numbers of all the cast members in that
scene.
Standard Colors
The colors of the strips instantly tell you whether a scene is
interior/exterior and day/night. The default strip colors are as
follows:
White - interior day
Yellow -exterior day
Blue - interior night
Green - exterior night
Chapter 4 - The Strip Board
94
Reference Guide
CHANGING THE COLOR OF STRIPS
You can change the colors of the strips if you prefer a different
color scheme.
1. From the Design menu, choose INT/EXT colors. The
Edit Colors dialog displays.
From this dialog, you can change the colors of any group
of strips.
2. Click on the square that corresponds to the type of strip
you want to change.
You can also change the colors of highlighted strips, day strips, or Banners. Click
on the corresponding label.
3. Click on a color
on the color palette. The color of
the selected type
of strip changes.
4. You can also change the color of the text. Click on the
selection button labelled Text near the bottom of the dialog. Then proceed as in step 2.
Changing the Color of Strips
Chapter 4 - The Strip Board
Movie Magic Scheduling
95
VIEWING THE STRIP BOARD
The Different Views
Movie Magic can accommodate up to eight different strip
designs per schedule. Eight layouts are already defined in the
Movie Magic default form. These include an 11” vertical strip
view, several 14” vertical strips views, the thin horizontal strip
view and two other horizontal strip displays.
w
From the Schedule menu, select Strip Board, or type
CTRL-U (z-U). The Strip Board displays in its default
layout “Thin Horizontal Strip” or in the last layout in
which the board was viewed.
Switching between Different Views
You can move between Strip Board Layouts in three ways.
w
From the Goto menu, select Next Strip Layout or Previous Strip Layout
w
From the Keyboard, press Ctrl-0 (z-0) for Next Strip
Layout or Ctrl-9 (z-9) for Previous Strip Layout.
w
From the bottom of the screen you can use the Layout
icon
and then choose the layout you want to use.
Standard Information on a Strip
The standard information that displays on the strips includes
the sheet number, the scene number(s), INT/EXT, set, DAY/
NITE, page count, and the cast member IDs. On the vertical
strip views the synopsis is included as well. It is possible to
customize your Strip Boards to include information. (See
“Designing Custom Strips” on page 135 for more information.)
SORTING STRIPS MANUALLY
Using Drag and Drop
Strips on the Strip Board can be moved using standard dragand-drop methods.
Chapter 4 - The Strip Board
Viewing the Strip Board
96
Reference Guide
1. To move strips select them with the mouse (using Shift or
Ctrl to select multiple strips at once). The strips will be
highlighted in red when selected.
2. Move the selected strips by holding down the mouse
button, dragging the strips to the desired location on the
Strip Board and releasing the mouse button. The strips
will be place directly before the strip outlined when the
mouse button was released.
Using the Reorder Command
If you know the numbers of the strips, and the order you want
them, you can also reorder the Strip Board by using the Reorder Strips command.
1. From the Schedule
menu, select Reorder Strips.The
Reorder Strips window displays.
2. Enter the sheet
numbers in the
field, separating
them by pressing
Enter (Return). If
you have already
added Daybreaks to
your schedule, you
can place them in this order by typing D as a placeholder.
3. Click OK to reorder
the strips. The Strip
Board is reordered
immediately. To see
the breakdown sheets
in the new order, however, an additional
step is necessary.
4. Display the Breakdown Sheets by typing Ctrl-Y (z-Y).
Sorting Strips Manually
Chapter 4 - The Strip Board
Movie Magic Scheduling
97
5. Press Ctrl - → (z-→) and then Ctrl - ← (z-←). The
breakdown sheets now display in the new order.
SORT AND SELECT
The power of Movie Magic Scheduling is most evident in its
ability automatically sort strips into the order you want them.
Do this using the Sort and Select window.
Opening Sort and Select
You can sort or select strips from either the Breakdown sheets
or the Strip Board. When you run your sort, however, Movie
Magic Scheduling will display the Strip Board.
1. From the Schedule menu, select Sort and Select. The
Sort and Select window displays.
Chapter 4 - The Strip Board
Sort and Select
98
Reference Guide
Entering Sort and Select Commands
The Sort and Select window is one of the most powerful
screens available in Movie Magic Scheduling. With it you can
order, reorder, search, and move strips automatically.
Choosing commands
Sort commands are entered by clicking the buttons in the middle of the window and then selecting elements in the lower
area. (See below.)
In general, any sort and select that you can think of that makes
sense can be entered and executed. Occasionally you will
receive a “Syntax Error” when executing a sort or select. This
usually occurs because of a typographical error, or because
you have asked to perform a sort and select that is impossible,
or too broad. (See “Troubleshooting Sort and Select” on page
105, below.)
w
Sort and Select
Click on the buttons in the order you want to create the
command. The command appears in the Text field with
the appropriate punctuation included.
Chapter 4 - The Strip Board
Movie Magic Scheduling
99
Selecting elements
You select elements in the same general manner as Commands. In the bottom third of the window are three lists.
1. The first two lists (Sheet Field and Category) are groupings of elements. Click on one of the items in these fields
and possible elements for that selection appear in the Element list.
2. When you have clicked on the Sheet Field item or Element that you want to include in the command, click on
Add and it displays in the text field.
Putting it together
Almost any sort or select you can think of can be executed.
One important rule to remember is that you can’t sort or select
by category. For example, the command:
Sort Strips by “Cast Member”
O
If you want
to sort by a category, an element
must be selected
from that category.
is meaningless to Movie Magic Scheduling. Every strip usually contains cast members and most contain multiple cast
members. Movie Magic Scheduling doesn’t know which cast
members to sort by unless you tell it.
The command should include a specific cast member, and be
entered as follows:
Sort Strips by “Mary”
or
Sort Strips Where “Cast Members” Contains “Mary”
or
Sort Strips that Contains “Mary”
All of these commands are valid, provided that you have not
named multiple elements by the same name. If you have a cast
member and an extra both named Mary, you will need to specify the category.
Chapter 4 - The Strip Board
Sort and Select
100
Reference Guide
Performing the sort/select
w
When you have
completed entering the command, press
Sort/Select to
perform the
Sort/Select.
Clearing the text window
If you want to begin
a new sort/select
command, you can
clear the text field
and begin entering
commands again.
w
Click Clear below the text field. The text field clears.
Sorting Syntax and Examples
Sorting reorders your Strip Board by the order that you specify. Sorting interprets each of the criteria that you specify one
at a time in a hierarchical manner.
Sort by set
M
Sorting
always changes the
order of your Strip
Board. Create a
Swap Board before
Sorting “Swapping Boards” on
page 114.
You may want to sort your board by Set in order to put all like
sets together.
Sort By “Set” Then “Int/Ext” Then “Day/Nite”
The strips are sorted first so that all the scenes in the same set
are together in alphabetical order. Within the sets, the scenes
would be grouped by whether the scenes were interior or exterior. Within the interior and exterior scene groups the scenes
would be separated by Day or Night.
Other common sorts
There are several commonly used sort lists. These include:
To Do:
Color Sort
Sort and Select
Enter This:
Sort by “int/ext” then “day/nite” then
“set”
Chapter 4 - The Strip Board
Movie Magic Scheduling
101
To Do:
Enter This:
Set Sort
Sort by “Set”
Scenes
Sort
Sort by “Scenes”
Sheet #
Sort
Sort by “Sheet Number”
Location
Scout Sort
Sort by “Set”, “Day/Nite”, “Int/Ext.”
Sorting Syntax
Sort commands and any of the modifiers (Strips, All Strips,
Ascending, Descending, etc.) should be followed by one field
or more, and any conditional expressions. For example:
Sort Strips Ascending by “Fieldname” and “Fieldname”
Selecting Syntax and Examples
Selecting strips searches for strips that meet the criteria you
specify and then displays the strips for viewing.
M
Selecting
strips does not
alter the order of
the Strip Board
unless you specify
that the strips
should be moved.
See “Moving Strips
with a Select Command” on page
102.
Select by Elements
Select Strips That Contains “George” And “Mary”
If this criteria is entered, all the strips in which George and
Mary appear together display. In the default mode, these strips
will simply be displayed in a separate window without affecting the Strip Board. You can specify that the selected scenes
be moved if you wish. For further information on this feature
see “Moving Strips with a Select Command” on page 102.
Select Any
You can also select strips based on any category or field type,
for example:
Select strips with any “Extras”
will select strips containing any element from the category
“Extras.” Using this option from the Print/View window
allows you to generate reports that contain only the selected
strips. (See “Ordering and Sort/Selection” on page 156).
Chapter 4 - The Strip Board
Sort and Select
102
Reference Guide
Selecting Banners & Daybreaks
You can also select only the Day Breaks or the Banners from
your schedule. Enter the select as follows:
Select “Sheet Number” <1
Sheet Number “<1” tells Movie Magic Scheduling to select
strips that are not breakdown sheets.
Selecting partial matches to sheet fields
Using the select term “contains” usually searches for an exact
match with an element. There is one exception to this.
O
This will
work with any
sheet field, whether
or not it contains
elements.
If you are selecting by a sheet field you can use the keyboard
enter part of an entry for that item. For example, you can
enter:
Select all strips if “Synopsis” contains
using the buttons. and then type in:
“Car Chase”
and Movie Magic Scheduling will select all the strips where
the synopsis contains the phrase car chase, including “Ned &
Tim’s Car Chase,” “Car Chase from the Theater” and “Big
finale - Car Chase”.
Moving Strips with a Select Command
O
If you use
both sort and select
in the same command, Movie
Magic Scheduling
always performs
the select first and
then sorts the
selected strips, not
the entire schedule.
When you perform a sort, the strips are
automatically reordered on the Strip
Board in the order you have requested.
When you perform a select, however,
the results will be displayed in a new
window and the Strip Board will not
be changed unless you specifically tell
Movie Magic Scheduling where to move the strips. You have
several options for displaying or moving selected strips.
Display In a Window – This is the default selection for the
Sort and Select Screen. Selected strips display in a separate
window from the Strip Board and the order of the Strip Board
will not be affected.
Highlight Only – The selected strips are highlighted in red on
the Strip Board itself. The order of the Strip board will not be
Sort and Select
Chapter 4 - The Strip Board
Movie Magic Scheduling
103
affected. This can be useful for selecting strips which you can
move manually (by dragging) to any location on the board.
Beginning of Board – This option moves all selected strips
from their current location to the beginning of the Strip Board.
The order of the Strip Board is altered.
After Selection – This option moves all selected strips from
their current location to after whatever strip(s) are currently
highlighted on the Strip Board. The order of the Strip Board is
altered.
End of Board – This option moves all selected strips from
their current location to the end of the Strips Board. The order
of the Strip Board is altered.
Boneyard – This option moves all selected strips from the
Strip Board to the Boneyard. The order of the Strip Board is
altered. For more information on this option, see “Using the
Boneyard” on page 113.
Saving a Sort or Select Command
You can save a sort and select function to use later. If you
often find yourself entering the same information over again,
this may be the thing to do.
1. Fill out the command as if you were going to perform the
sort/select.
2. Instead of clicking Sort/Select,
click on Save
under the Text
Field.
Chapter 4 - The Strip Board
Sort and Select
104
Reference Guide
The Save As dialog displays.
3. Enter a name you will remember and select a location to
store the file. Movie Magic Scheduling has prepared a
folder called “Sort” for this type of file.
4. Click OK.
Loading a Sort or Select Command
O
Movie
Magic Scheduling
has provided several pre-saved sort
commands that are
often used. They
are located in the
Sort folder.
Once you have saved
a sort/select command, you will need
to retrieve it to use it.
1. Click on Load
under the Text
Field.
The Open dialog displays.
2. Select the sort file you want to use, and click OK. The
command displays in the Text Field. Click Sort/Select to
perform the sort or select.
Sort and Select
Chapter 4 - The Strip Board
Movie Magic Scheduling
105
Troubleshooting Sort and Select
You may find that Movie Magic Scheduling doesn’t understand the instructions you put into a list.
•
When this occurs, a Syntax Error dialog displays.
•
After you have clicked OK, the cursor will display in
the text field as close to the error as possible. This
makes it easier for you to find and correct the problem.
Syntax errors can be caused by several possible problems.
Basic Syntax Errors
The easiest solution to most syntax problems is to be more
specific. If you receive a syntax error in a command that
includes element name like “Nora,” try clarifying the instruction by saying “Cast Member” equals “Nora” or “Cast Member” Contains “Nora”.
Use of Terminology
Another common problem is that you are using one of the sort
and select terms incorrectly. This may also be the case if you
find you have received what you consider a strange result
from a sort or select.
By, Containing, Do, Does, For, That, Where, Which,
and With. are ignored by Movie Magic. However, they are
allowed to make the instructions sound like proper English.
For example:
Select all strips with “Fred”
or
Select all strips that contains “Fred”
mean the same thing as:
Select “Fred”
Commas. can be interpreted as either “or” or “then”, depending on whether they are in a sort or a select.
Chapter 4 - The Strip Board
Sort and Select
106
Reference Guide
•
When selecting, commas stand for the word “or”.
•
When sorting, commas stand for the word “then”.
Contains. the element name must be an exact match unless
you are searching a sheet field. In the latter case, partial text
matches are allowed.
•
If you do not constrain a “contains” statement with a
sheet field or category title, CONTAINS tells Movie
Magic to look for any category element that matches
that name. For example:
Select all strips that contains “Explosion”
will select all the strips that have the special effect
called “Explosion” in them. In addition, if for some
reason you had a prop called “Explosion” it, too,
would be selected.
•
If you constrain a “contains” statement to a specific
sheet field, all strips that match the search text, partial
or exact, will be found. For example:
Select all strips if “Synopsis” contains “Car Chase”
will select all the strips where the synopsis contains
the phrase car chase, including “Ned & Tim’s Car
Chase,” “Car Chase from the Theater” and “Big finale
- Car Chase”.
Equal or Equal To. Finds the corresponding element and
chooses the strips that have that element in it. The element
name must be an exact match. For example,
Select all strips where “Cast” equals “Nora”
will select all the strips on which the cast member
“Nora” appears.
Is. means the same thing as “Equals”.
Strips. includes sheets. To Movie Magic, these are simply
different views of the same information.
USING THE CALENDAR
How you set up the calendar is important to every aspect of
scheduling that relates to actual days in production. If you
have not set up your calendar, automatic Day Breaks will not
Using the Calendar
Chapter 4 - The Strip Board
Movie Magic Scheduling
107
work properly, and the day out of days report and shooting
schedules will be missing important information.
Entering Production Dates
A schedule isn’t a schedule unless it has dates assigned to it.
The first step in setting up your calendar is to set up the Production Start Date.
1. From the Schedule menu, select Calendar. The Calendar
Window displays.
2. Click in Prod Start field and
enter the date you will enter
the Production phase of your
project (the first Shoot Day).
•
You can type out the date, or
•
Use the numeric abbreviation (e.g. 12-15-00)
3. Enter the Prep Start and End Post dates if you wish.
These fields are optional at this time. If you do not enter
an End Post date, a dialog will display notifying you that
End Post cannot be less than the Production date.
Chapter 4 - The Strip Board
Using the Calendar
108
Reference Guide
4. Click OK. The calendar will close, adjusting the dates in
the process. The End Prod (End Production) date is calculated automatically when Day Breaks are added and the
schedule is finalized.
Setting Days Off
These checkboxes allow you to set the days the production
will normally have off during the shoot. The default when you
enter the calendar for the first time is always Saturday and
Sunday.
w
Change the days off by selecting or deselecting the check
box beside the appropriate days. When a day is selected,
that day is marked with a red X in every week of the calendar.
Navigating through the Calendar
You can page through the months on the calendar.
Under the Calendar, there are two arrows. Click on them to
move through the calendar.
•
→ Μove to next month
•
← Move to previous month
Setting Special Days
Special days on the calendar include Company Travel, Holidays, Travel days, and Days off.
1. Select the desired day on the calendar by clicking on the
calendar box for that day.
2. Select the check box beside the appropriate Special Day
option. The icon for that kind of day displays on the calendar day and the change is reflected on your schedule and
reports.
Using the Calendar
•
Co. Travel (Company Travel)- designates the day as a
travel day for the entire company. Prevents Movie
Magic Scheduling from scheduling shooting on this
day.
•
Holiday - designates a specific day as a day-off specifically for a holiday. Prevents Movie Magic Scheduling from scheduling shooting on this day.
Chapter 4 - The Strip Board
Movie Magic Scheduling
109
•
Travel Day - designates the day as travelling, but
allows shooting to be scheduled. On the Day out of
Days, any cast member that has started work but is not
scheduled for shooting will be listed as travelling.
Future versions of Movie Magic Scheduling will have
enhanced travelling functions.
•
Day Off - designates a specific day as a miscellaneous day off. No shooting will be scheduled.
DAY BREAKS
Day Breaks are the breaks in your schedule that separate strips
to be shot on a given day from those to be shot the next day.
They indicate the end of a production day.
On the Strip Board, Day Breaks display as black strips with
the day number, the date and the number of pages to be shot
that day displayed on them.
Inserting Day Breaks Automatically
Movie Magic Scheduling can insert Day Breaks for you automatically, basing its decisions on a maximum number of pages
per day that you specify.
O
Auto Day
breaks override
any previously set
Day Breaks and
moves those Day
Breaks to the Boneyard.
1. From the Schedule menu, select Auto Day Breaks. A
dialog box appears.
2. Enter the desired number of pages per day of shooting
and click OK. Daybreaks are added throughout the Strip
Board.
Inserting Day Breaks Manually
You can also set Day Breaks manually. This is useful for finetuning. You may not be able to shoot as many pages on one
particular day due to any number of circumstances, including
a complicated scene. In this case, set a manual Day Break.
Chapter 4 - The Strip Board
Day Breaks
110
O
Movie
Magic Scheduling
always inserts an
item before the element/strip/sheet
you have selected.
Reference Guide
1. In the Strip Board view, click on the strip you want after
the new Day Break.
2. From the Schedule menu, select Add Day Break. A Day
Break is added directly before the selected strip.
The dates on all other Day Breaks are adjusted accordingly.
Removing Individual Day Breaks
Removing Day Breaks could be necessary if you discover that
you can shoot more pages on a particular day than you had
originally specified. There are two ways to remove Day
Breaks from the schedule. You can delete them, or you can
move them to the Boneyard.
If you delete the Day Breaks, the ID numbers for those Day
Breaks become free. Those numbers are then used on new
strips. If you are using Swap Boards, you should move Day
Breaks to the Boneyard so they are available when you swap
boards.
Deleting Daybreaks
1. On the Strip Board, select the desired Daybreak, or more
than one Day Break, if desired.
2. From the Edit menu, select Clear or Cut. The Day
Breaks are deleted.
Moving Daybreaks to the Boneyard
See “Using the Boneyard” on page 113 for more information
on using the Boneyard effectively.
1. On the Strip Board, select the desired Daybreak, or more
than one Daybreak, if desired.
2. From the Schedule menu, select Move Strips to Boneyard. A dialog box displays.
Day Breaks
Chapter 4 - The Strip Board
Movie Magic Scheduling
111
3. If you are sure you want to move the Day Breaks, click
OK. The dates on all other Day Breaks are adjusted
accordingly.
Removing all Day Breaks
You might find that you want to remove all the Day Breaks in
the schedule and start over. Removing all your Day Breaks is
the equivalent of cutting them and not pasting them back into
the schedule. They will be lost forever. This option does NOT
move them to the Boneyard.
M
Removing
all Day Breaks
cannot be undone.
1. From the Schedule menu, select Remove Day Breaks. A
dialog box displays.
2. Press OK to remove the Day Breaks.
Moving Daybreaks
Daybreaks can also be moved about the schedule like any
other strip. Drag and drop them into the appropriate location.
(See “Sorting Strips Manually” on page 95.)
Using Multiple Daybreaks for Long or Complicated Scenes
Occasionally, you will have a long or complex scene that will
span more than one day of shooting. Auto Day Breaks does
not split up strips, so if 3 pages a day has been specified, and
there is a scene that is six pages long, that scene will be scheduled to be shot on one day by Auto Day Breaks.
To schedule the scene to be shot over two or more days, manually add the appropriate number of Day Breaks after the
scene, as described in “Inserting Day Breaks Manually” on
page 109. Any number of Day Breaks can be entered.
The exception to this is if you have changed the Allow Multiple Day Breaks option in your preferences selection. (See
“Allowing Multi-Day Breaks” on page 57.)
Chapter 4 - The Strip Board
Day Breaks
112
Reference Guide
BANNERS
Banners are general-purpose strips that you use to indicate a
Holiday, Company move, Travel Day, or anything special you
want to note on the Strip Board.
Banners can be moved, cut and pasted in the same manner as
any other strip on the Strip Board.
w
When you first select Add Banner from the Schedule
menu, the Banners Options dialog displays.
Using the Banner Types
There are two types of Banners available. Select them from
the options screen by clicking the selection button.
Comment only
A Comment Only banner is just a marker. It is a strip that
allows you to insert text in your Strip Board.
You could use a Comment Only banner to mark an important
event in your shooting schedule, much as you might use a
grease pencil on the Strip Board. For example, you might use
a Comment Only banner to enter “Big helicopter stunt” and
draw attention to the strip before or after the banner.
End of day
The End of Day banner creates a Day Break as well as allowing you the text field. However, it is included as only a banner.
The strip created will not be labeled “Day Break,” and the day
number and other pertinent information will not be included.
We recommend that you do not use Banners to delineate your
Day Breaks. Use the Day Break function instead. If you need
to include additional information about that Day Break, follow
it with a Comment Only banner.
Banners
Chapter 4 - The Strip Board
Movie Magic Scheduling
113
Permit Multiple Day Breaks Across Banner
At the bottom of the Banner Options window is a checkbox
that allows multiple Day Breaks to occur across Banners.
O
In order for
this option to function, the Allow
Multi Day Breaks
options must be
checked in the
Preferences window. (See “Allowing Multi-Day
Breaks” on page
57.)
Checked. If you have two Day Breaks together (a scene or
scenes being shot over multiple days) and you place a banner
between the two Day Breaks, the cast, crew and items scheduled for the first day will still be scheduled for the second day.
Unchecked. If a banner is inserted between two Day Breaks
when this option is turned off, the elements scheduled for the
first day will not be carried over to the second day (or any
subsequent Day Breaks).
USING THE BONEYARD
The Boneyard is a holding area for non-scheduled strips.
Strips, Day Breaks and Banners can all be moved to the Boneyard. Once a strip has been moved to the Boneyard, it will not
appear on any schedule or report.
The Boneyard is a good place to store strips without removing
them from the schedule completely. This allows you to
retrieve them later if it becomes necessary. You cannot rearrange strips in the Boneyard; they appear in the order they
were moved.
Moving Strips to the Boneyard
1. Select the strips you want to move.
2. From the Schedule menu, select Move Strips to
Boneyard or press the Boneyard icon at the bottom
of the screen.
A dialog box displays.
3. Click OK to move the strips.
Chapter 4 - The Strip Board
Using the Boneyard
114
Reference Guide
Moving Strips back to the Schedule
As the Boneyard can be used as a general storage spot for
unused strips, at some point you may want to return a strip
from the Boneyard to the Schedule.
1. From the Schedule menu, select Show Boneyard.
2. Select the appropriate strips by clicking on the them and
then select Cut from the Edit menu.
3. Return to the Strip Board, select the strip you want to be
just after the returned strips.
4. From the Edit menu, select Paste. The strips are returned
to the Schedule, just above the strip you selected.
SWAPPING BOARDS
Once you arrive at a version of the Strip Board that is worth
keeping, the next step is to save that version.
Movie Magic Scheduling allows you to save multiple versions
of your Strip Board, so that you can create different versions
of the schedule from the same breakdown information and
then compare and contrast the different Strip Board orders.
These multiple versions of the Strip Board are called Board
Swaps.
Creating a Board Swap
1. From the Schedule menu, select Board Swap, or
click the Board Swap icon. The Board Swap
window will open.
2. In the Save Strip Order as: field enter the name you want
to use for the board and click Save. Your Strip Board
order is saved.
Swapping Boards
Chapter 4 - The Strip Board
Movie Magic Scheduling
115
Restoring Board Swaps
O
If you have
not saved the current swap when
you restore
another, you will
lose all changes,
even if you have
saved your schedule from the File
menu.
At some point, you will want to view one of your saved
boards.
1. Open the Board Swap window.
2. Click on the Board Swap you saved previously and then
click Restore.
After you have closed your schedule, the next time you open
it, the strip order will be dictated by the last board swap you
had open.
Renaming Board Swaps
You can rename a board swap if necessary. This is done from
the board swap window.
1. From the Schedule menu, select Board Swap.
2. Click on the name of the Board Swap you want to
rename. That board swap is highlighted.
3. Enter the new name in the Save Board Swap as: field
and then click Rename. The window closes. The Board
Swap has been renamed.
Deleting Board Swaps
You can delete board swaps when they become obsolete. This
may happen because strips have been deleted rather than
moved to the Boneyard, or simply because the strips have
been altered so many times that the Swap is unusable.
Deleting a board swap is permanent. Once you click Delete,
the swap you have selected is deleted permanently. You can,
however, close Movie Magic Scheduling without saving your
schedule. When you reopen it, all of your changes since the
last save will be deleted, and your deleted board swaps
restored.
Chapter 4 - The Strip Board
Swapping Boards
116
M
Deleting a
Board Swap is permanent if you save
your schedule.
Reference Guide
1. From the Schedule menu, select Board Swap. The Board
Swap window displays.
2. Select the name of the swap you want to delete.
3. Click Delete. There will be no confirmation. The swap
will be removed.
Using Board Swaps
Saving multiple board swaps allows you a great measure of
flexibility. Using them, you can save multiple schedules in the
same file. If actors or crew are only tentatively available you
can, while finalizing your schedule, save different versions of
it for each possibility.
Every strip in the schedule has an unique number. These numbers can be reused (if the original strip is deleted) or rearranged (if you renumber the strips). If you move a strip to the
Boneyard that ID number remains the same and your board
swaps which use that strip will have no problem. Movie
Magic Scheduling will simply look for the strips it needs
when opening your swap, and put them in the correct locations.
However, if you cut or delete an item, element, strip, breakdown sheet, Day Break, etc. from the schedule rather than
moving it to the Boneyard, or if you renumber the strips, the
internal strip numbers can be reused by other parts of the
schedule. Be aware that when you open a previously saved
board swap in this case, new Day Breaks or breakdown sheets
may have replaced old ones. If this is the case, you may find
yourself looking at a schedule that makes absolutely no sense.
Swapping Boards
Chapter 4 - The Strip Board
Movie Magic Scheduling
117
RECALCULATING THE SCHEDULE
The Recalculate screen is used to force Movie Magic to recalculate three different items.
1. From the Schedule menu, select Recalculate.... A dialog
box displays.
2. Select the appropriate check boxes.
Re-Sort Sheet Elements
Checking this box puts the elements on every breakdown
sheet into proper order. Elements can get out of order if
the automatic sorting has been turned off in the Design
Categories window.
Recalculate Element Days
Checking this box will update the number of days every
element is needed on the current schedule. Movie Magic
Scheduling recalculates this every so often, but sometimes
you may need to force a recalculation.
Check Element Occurrences
Checking this box will recalculate the number of breakdown sheets on which each element appears.
3. Click OK to recalculate the schedule.
Chapter 4 - The Strip Board
Recalculating the Schedule
118
Recalculating the Schedule
Reference Guide
Chapter 4 - The Strip Board
Movie Magic Scheduling
&KDSWHU
119
'HVLJQLQJ&XVWRP2XWSXW
Movie Magic Scheduling allows you to create custom versions of any report it can
create. It also allows you to create your own reports. This can seem tricky at first, but
as you get familiar with the tools provided, it is a very powerful aspect of Movie
Magic Scheduling.
DESIGN PALETTE
O
All of the
functions of the
design palette can
be performed by
selecting the menu
item of the same
name under the
Field menu heading.
The Design Palette is the tool used to create, position and style
fields on reports, strips and categories. The palette remains the
same regardless of which format is being designed.
When opening either the Design Reports, Design Strips or the
design option from the Design Categories screen, the design
palette will display at the top of the screen above the form on
the PC, or at the bottom of the screen, below the form, on the
Macintosh.
The Buttons
The text buttons on the right of the design palette perform the
following functions:
New – creates a new field.
Options – calls up the selected field’s options,
if applicable. This can also be achieved by double-clicking a created field.
Chapter 5 - Designing Custom Output
120
Reference Guide
View – shows a sample of the report page being
designed, or in the design strips mode, switches
to the Strip Board. This button does nothing in
the Design Categories mode.
Done – exits the design mode.
The Tool Palette
The right side of the Design Palette contains six tools (seven
in Design Categories). Clicking on a tool icon selects that tool.
Selection Tool - Clicking on an item in the
report design will select it for moving, sizing or
deleting.
Text Tool - Use this to add text labels to your
design.
Line Tool - Click and drag this tool to draw
lines.
Rectangular Graphic Tool - Click and drag to
draw a rectangle.
Field Ordering Tool - Using this tool will allow
you to move an item behind another item, or
bring it to the front.
Field Creation tool - Creates a field the size of
the box you create when you click and drag this
tool.
Checkbox (Only available from Category
Design) - Displays dialog box to choose type of
checkbox desired and then adds the checkbox.
Font, Size & Style
Each field can have a unique font,
font size and style attributes. When
a field is selected or created, this
part of the palette can be used to set
these attributes.
Design Palette
Chapter 5 - Designing Custom Output
Movie Magic Scheduling
121
Clicking on the menu icons will bring up standard font and
style drop-down menus. Select the fonts and styles from these
menus.
w
Changes can be seen from the View window. From the
Reports, Strips, or Categories menu, select View this
Layout. The report layout will display in its final form,
and you can see the font changes you have made.
Defining Fields
O
You must
draw the field
using the Draw
Field tool before
you can define it.
The scrollable list on the far left of
the screen defines the type of fields
you create. When a new field is created, it is assumed to be a text field
unless otherwise specified.
Draw Lines/Line Size
This option controls whether to draw lines above a field,
below a field, or in a box around a field. The line thickness
option sets the line thickness to one of three sizes.
1. Click on the desired field to
select it.
2. Click in the appropriate check
box.
3. Choose from the line size
option: click on the appropriate line thickness to select it.
Field Orientation
Many fields can be created either horizontally or vertically.
Vertical fields are most useful when designing vertical strips.
1. Select the field.
2. Select either the horizontal or vertical
icon. The selected icon will be highlighted
in blue, and the text of the field will shift to
display in the appropriate direction.
Chapter 5 - Designing Custom Output
Design Palette
122
Reference Guide
Clipping and Wrapping
Text
When a field is created, the default
“Clipping” is always selected. This
means that the field drawn will not
automatically resize and any text that
does not fit in the field will be “clipped” off.
Setting this option to wrapping allows the field to resize and
the text to wrap so you can see all the text. Sometimes clipping is more desirable, especially if you have many fields in a
report placed closely together.
Pictures
Pictures behave differently than text. When a picture is
clipped, the entire picture will be resized to fit in the field,
regardless of its size.
When wrapping is selected, the picture will be at full size but
will be cropped if it does not fit within the given field. To display the picture at its full size in its entirety, select Wrap and
growable (see “Growable” below).
Growable
This field is available only from the Design Reports window.
This option lets fields expand vertically to accommodate all
the information from a category or custom list. For example if
a field is created for Cast Members that is one line tall,
O
A growing
field will push any
field below it further down the
page. If it runs out
of page, the displaced field will
not be displayed.
Design Palette
the field will grow when necessary to show all of the information.
Chapter 5 - Designing Custom Output
Movie Magic Scheduling
123
USING FIELDS
To design a report, strip layout or category, you create fields
on the design area then size, position and style them. All of the
information that was put into the breakdown can be extracted
and displayed on reports and strips in the form of fields.
Placing a field of type “Today’s Date” on a report will result in
that field being filled with the current date when the report or
strip is printed or viewed. Other fields, such as “Set” will
extract specific information from the breakdown during printing or viewing.
Creating a New Field
There are several different ways to create a new report field.
•
Click New field button. The new field
displays in the upper left of the report
window.
•
From the Field menu, select Create New Field from
the menu or type Ctrl-N (z-N). The new field displays in the upper left of the report window.
•
Select an existing field and then from the Edit menu
select Duplicate Field (or type Ctrl-2 (z-2)).
•
Select the field creation tool on the tool palette. Click in the design area and drag until
the new field is the desired size.
Defining the Field
When you have created a field, unless you want it to remain a
text field, you will need to change the definition.
1. Click on the field to select it and
then click on the appropriate
option from the list that displays. (See Appendix B “Category Fields” on page 169 for a
description of the fields available.)
Changing Field Options
w
Some fields have alternate options available. To access
these options, double-click the field after it is drawn and
Chapter 5 - Designing Custom Output
Using Fields
124
Reference Guide
the field type defined. Or, select the field and click
Options on the Design palette.
For example, a field of the Category type automatically
brings up the Cast Category. To list a different category in
that field, double-click the field, and choose the appropriate category from the list provided.
From this screen you can also define the number of columns presented in the field, remove the category name
from the field on the final form, and choose to separate
elements with commas instead of with a carriage return.
Simply select the appropriate buttons and checkboxes.
Resizing Fields
Fields can be resized after they are drawn.
1. Select the Selection Tool from the Tools Palette.
2. Click in the field, and then click on
the grey square in lower right corner, hold down the mouse button
and drag the window to the size
you want.
Moving Fields
You can move fields around on your design page.
1. Select the Selection Tool from the Tools Palette.
Using Fields
Chapter 5 - Designing Custom Output
Movie Magic Scheduling
125
2. Click on the field and drag it to the
desired area.
Ordering the Fields
Order of fields can mean two things.
w
First, newer fields will be drawn in front of older fields.
You can change the back-to-front ordering of fields. This
will affect how they display and print. The one in front
will cover the one in back.
•
w
From the Field menu, select Order and then choose
either Bring to Front (CTRL-[ {z-[}) or Send to
Back (CTRL-] {z-]}).
Second, the order in which you place fields on the screen
is particularly important when designing categories.
When you press tab in an Info window, the order in which
you will move through text fields is controlled by the
order in which you placed the fields on the report.
Entering Text in a Text Field
Text placed in a text field is unchanging. If you have a report
that spans multiple pages, such as a shoot schedule, text
placed in a text field will appear on each page.
w
Double-click on the text field and type your text. Click
outside the area of the field when you have completed typing.
w
Text will be printed/viewed in a completed report as
entered.
w
You may also use Interpreted text in a text field. (See
“Interpreted text in a text field” on page 126.)
Using Interpreted Text
Any Report field created in a report layout uses a form of
interpreted text. The term simply means that when the report
is printed/viewed, text is replaced with information from the
named field. Usually, the named field is a category from the
Chapter 5 - Designing Custom Output
Using Fields
126
Reference Guide
Breakdown sheets, or information that is updated regularly,
such as the current day or date.
Interpreted text in a text field
You can also use multiple pieces of interpreted text within one
report field. Interpreted text affords you the freedom to create
fields that intermix normal text with text from a report field -without the extraneous space that would appear if you created
it as different fields.
O
Because the
space between the
fields of interpreted
text is variable,
interpreted text is
preferred when you
want different
fields to consecutively follow each
other. Use standard
report fields if you
want to create a
column that lines
up.
Interpreted Text can be one of the most useful items in creating your custom reports.
w
Enter the name(s) of a Report Field(s) in curly braces
(one set of braces per name), as follows:
{Int/Ext} {Set} - {Day/Nite}
When the report is printed, the field names enclosed by the
braces are interpreted and substituted with text from the
named field, as follows:
Ext. South Pacific (1832) -- Day
Int. Dilapidated Shack -- Day
Ext. Jungle -- Morning
Interpreted text in headers and footers
Another use for interpreted text is in headers and footers,
where it is easier to type a single line containing several fields
than to line up several separate fields.
w
Create a text field that spans the header/footer. Enter the
information as described above.
DESIGNING CUSTOM REPORTS
Reports are the principal means for viewing and printing
scheduling/breakdown information, including breakdown
sheets, shooting schedules, cast lists, etc. Movie Magic provides several standard report formats which can be found
under the Print/View window. It is possible to create custom
reports, including any of the information that has been entered
into the breakdown or schedule.
Designing Custom Reports
Chapter 5 - Designing Custom Output
Movie Magic Scheduling
127
Opening the Design Reports Window
All design work on reports is done from the Design reports
window.
w
From the Design menu, select Reports.
w
or type Ctrl-R (z-R).
The Design Reports window displays with the report layout
for breakdown sheets already open. Notice that several extra
menu headings appear.
Changing the Report Layout
You may choose to work from one of the existing report layouts.
w
From the
Reports
menu,
choose
Switch to
Layout
and then
the desired
report layout.
Chapter 5 - Designing Custom Output
Designing Custom Reports
128
Reference Guide
Creating a New Layout
You can also create a new layout from scratch.
1. Before you do anything, decide what size paper you will
be using for your layout. You will not be able to change
the paper size once you have begun creating your form.
From the File menu, choose Print Setup. The Print Setup
window displays. In the Paper area, choose the size paper
you want to use for your form.
2. From the Report menu, select Create New Reports Layout. The Report Options Window displays.
Designing Custom Reports
Chapter 5 - Designing Custom Output
Movie Magic Scheduling
129
3. Complete the necessary information and press OK. The
new layout will be displayed. For more information on
this process, see “Choosing Report Options” on page 132.
Aligning Fields on the Report
Set Grid Size
You can line all of the edges of a field up with a pre-set grid in
the layout window.
1. From the Layout menu,
select Set Grid Size. The Set
Grid Size dialog displays.
2. The default size of the grid
aligns every 8 pixels. Replace
this number with the number of pixels you want.
3. Click OK.
Align fields to grid
When you have the grid set where you want it to be, you can
now align fields to it as you draw them.
w
From the Layout menu, select Align to Grid. Now when
you draw a new field, or drag a field, the sides of the field
will be aligned to the grid you have set.
Designing New Fields on the Report
w
Design new fields on your custom report by using the
design palette. See “Design Palette” on page 119.
Using the Header and Footer Lines
When you first create a new layout, the screen will be blank,
with the exception of two lines. These lines mark the header
and the footer. The body of your report should be placed
between these lines.
You can move the header and footer lines up and down on the
page.
1. Move the pointer over one of the lines (the pointer will be
in the shape of a hand).
Chapter 5 - Designing Custom Output
Designing Custom Reports
130
Reference Guide
2. Click and hold down the mouse button on the line you
want to move. The hand will change to grasp the line.
3. Drag the line to the location on the page where you want
the header or footer to begin.
Suggestions for Designing Breakdown Pages
There are several special options that must be set to successfully design and print breakdown sheets. These options can be
found in the Report Options dialog in the Design Reports
menu. If you are designing your own breakdown sheets,
please take note of the following:
•
One Section Per Page must be selected for “B-pages”
to be printed. B-Pages of breakdown sheets are
printed when any element cannot fit into its category
field.
•
In order to see the B-page number, you must have a
Sheet Number field on the breakdown page report.
You cannot use the interpreted text {Sheet Number}
in a text field or the B-Page number will not appear.
•
Do not put the top portion of the breakdown above the
header line (sheet number, set, location, synopsis,
etc.). You won’t see anything in these fields when you
print your Breakdown sheets. Generally, a breakdown
sheet won’t have a header or footer -- the entire page
will be in the body section of the report.
•
Make sure you include one Custom field with the All
Remaining Elements option selected. By including
this miscellaneous category you guarantee that any
elements that don’t belong under any other category
box will be printed. We recommend that you make
this box a large one.
•
Do not use growable fields on a breakdown sheet. The
design of breakdown sheets is generally to allow fixed
fields that, when filled, will generate a “B-page” automatically so that no information is lost.
Designing Custom Reports
Chapter 5 - Designing Custom Output
Movie Magic Scheduling
131
Exporting a Report Layout
As you change and alter reports, these changes are automatically saved when you save your schedule. These reports will
always be accessible from that schedule.
Additionally, any report that you create or modify can be
saved as an external file for future use with other schedules.
1. From the Reports menu, select Save This Layout to File.
The Save Report As dialog displays.
2. Name and save the file.
Importing a Report Layout
Layouts that were created and saved in other schedules can be
imported and loaded into your current schedule.
w
From the Reports menu, select Import Layout. The
Open dialog displays.
w
Choose the report layout you want to use and click
Open.
Chapter 5 - Designing Custom Output
Designing Custom Reports
132
Reference Guide
Deleting a Report Layout
You may decide you want to delete a report from this schedule.
1. From the Reports menu, select Switch to Layout, and
then select the report you want to delete. The report layout displays.
2. From the
Reports
menu, select
Delete this
Layout. A
dialog box
displays.
3. Click OK. The report layout is deleted from this schedule.
It is not deleted from the disk if you have saved it, and you
can import it into this schedule again if you find you need
it. (See “Importing a Report Layout” on page 131.)
Duplicating a Report Layout
You can also duplicate a Report layout and change the duplicate. This will keep the original without changes.
1. From the Reports menu, select Switch to Layout, and
then select the report you want to duplicate. The report
layout displays.
2. From the Reports menu, select Duplicate this Layout. A
copy of the layout displays, named Copy of...layout
name.
3. Rename the Report. Open the Report Options screen
(see “Choosing Report Options” on page 132) and change
the name in the name field.
Choosing Report Options
The Report Options screen sets layout options for new layouts
or alters the layout of existing reports. The Reports Option
window opens automatically when you create a new Report
Designing Custom Reports
Chapter 5 - Designing Custom Output
Movie Magic Scheduling
133
Layout. You can also access it whenever you are in the Design
mode.
w
From the Strips menu, select Report Layout Options.
The Report Options screen displays.
Name
This field displays the name of this particular report layout.
You can use it to name a new report, or to rename an existing
report. This is particularly useful when duplicating a report to
utilize the basic layout. When creating a new report layout,
type in the name for the new layout in this field.
When you exit the options screen the name supplied here will
be displayed on the Switch to Layout menu of this schedule. In
order to have it available to other schedules you need to export
it to a file where you can import it later. (See “Exporting a
Report Layout” on page 131.)
Report by:
This option controls the type of report that will be made.
There are three different report types.
Sheet. This is the most common type of report. Sheet type
reports are based on the breakdown sheets and page through
the schedule on a sheet-by-sheet basis. Breakdown sheets,
one-liners, and shooting schedules are some examples of
reports of this type.
Chapter 5 - Designing Custom Output
Designing Custom Reports
134
Reference Guide
Category. Category reports use lists of elements from a specified category as the basis for the report. When this option is
selected, a specific category must also be selected from the list
that appears below in the window. Cast lists, prop lists and set
lists are examples of this type of report.
Day. Day-based reports merge the information from all the
breakdown sheets/strips for each scheduled day for each section of the report. Extras-by-days and call sheets are examples
of this type of report.
One section per page
When you select this option, Movie Magic Scheduling places
only one report section on a printed page, with a header on top
and a footer on bottom. The net result is that each page will
contain information from only one sheet/strip.
This is extremely important for breakdown page reports.
Page break on new day
This option ensures that each new day will start at the top of a
new sheet. This is useful for Day-based reports such as call
sheets.
Separate sections with a line
This option prints a line between production days and banners
in the report. This option is useful for printing one-liners,
shooting schedules and element lists.
Print day strips
This option includes day strip information on the report. The
day strip can be printed using interpreted text typed in the Text
Above Shoot Day field or in the Text Below Shoot Day field.
(See below.)
Margins
These options set the amount of space to push the report in
from the top, left and bottom. For most reports the right margin is ignored.
Above, Below, and Between refers to the space after the “Text
Above Day”, the space before “Text Below Day” and the
space between the bottom of the “Text Below Shoot Day” and
the top of the “Text Above Shoot Day”.
Designing Custom Reports
Chapter 5 - Designing Custom Output
Movie Magic Scheduling
135
Default font
This option sets the default font, font size, and style for the
fields on the report when they are first created.
Text above font
This option sets the font, font size, and style of the text in the
Text Above Shoot Day field.
Text below font
This option sets the font, font size, and style of the text in the
Text Below Shoot Day field.
Text above shoot day
This option places text that will be printed above the start of a
new day. Typically, this field will contain interpreted text.
For example,
*** Start of day {shoot day} ***
would be a typical entry.
Text below shoot day
This option places text that will be printed after the end of a
day. Typically, this field will contain interpreted text.
For example,
*** End of Day {shoot day}–Total Pages: {page count} ***
would be a typical entry.
DESIGNING CUSTOM STRIPS
Strips displayed on the Strip Board contain critical information from the breakdown.
Strip Boards are displayed either in a vertical or horizontal
format. Movie Magic Scheduling contains several pre-defined
formats for the Strip Board in both horizontal and vertical layouts. However, you may find that you need a strip that is more
specific to your project.
The Design Strip window provides the ability to design custom strips, including any of the information that has been
entered into the breakdown or schedule.
Chapter 5 - Designing Custom Output
Designing Custom Strips
136
Reference Guide
Opening the Design Strips Window
All Strip Design work is done from the Design Strips window.
w
From the Design menu, select Strips.
w
or type Ctrl-M (Command-M).
The Design Strips window displays. Notice that several extra
menu headings appear.
Changing the Strip Layout
The strip layout for the Thin Horizontal Strip view displays by
default. You may choose to work from one of the other existing strip layouts.
w
From the Strips Menu, select Switch to Layout and then
choose the desired strip layout.
Creating a New Strip Layout
You can also create a new strip layout from scratch.
O
You can
access the Strip
Options window at
any point by selecting Strip Layout
Options from the
Strip menu.
1. From the Strips menu, Create New Strips Layout. The
Strip Options Window displays.
Designing Custom Strips
Chapter 5 - Designing Custom Output
Movie Magic Scheduling
137
2. Complete the necessary information and press OK. The
new layout display. For more information on this process,
see “Choosing Strip Options” on page 139.
Aligning Fields on the Report
Set Grid Size
You can line all of the edges of a field up with a pre-set grid in
the layout window.
1. From the Layout menu,
select Set Grid Size. The Set
Grid Size dialog displays.
2. The default size of the grid
aligns every 8 pixels. Replace
this number with the number of pixels you want.
3. Click OK.
Align fields to grid
When you have the grid set where you want it to be, you can
now align fields to it as you draw them.
w
From the Layout menu, select Align to Grid. Now when
you draw a new field, or drag a field, the sides of the field
will be aligned to the grid you have set.
Designing New Fields on the Strip
w
Design new fields on your custom strip by using the
design palette. For more information on the using the
design palette, see “Design Palette” on page 119.
Vertical Strips layouts include a header board which can be
customized in the same way as the strips.
Exporting a Strip Layout
As you change and alter strips, these changes are automatically saved when you save your schedule. These strip layouts
are associated with the schedule in which they were created or
altered and will always be accessible from that schedule.
Additionally, any strip layout that you create or modify can be
saved as an external file for future use with other schedules.
Chapter 5 - Designing Custom Output
Designing Custom Strips
138
Reference Guide
1. From the Strip menu, select Save This Layout to File.
The Save as dialog displays.
2. Name the file and click Save.
Importing a Strip Layout
Layouts that were created and exported from other schedules
can be imported and loaded into your current schedule.
w
From the Strips menu, select Import Strips Layout. The
Open dialog displays.
w
Choose the Strip layout you want to use and click Open.
Deleting a Strip Layout
You can also delete a strip layout if you discover you do not
want it in this schedule.
1. From the Strips Menu, select Switch to Layout, and then
select the report you want to delete. The Strip layout displays.
Designing Custom Strips
Chapter 5 - Designing Custom Output
Movie Magic Scheduling
139
2. From the Strips menu, select Delete this Layout. A dialog box displays.
3. Click OK. The strip layout is deleted from this schedule.
It is not deleted from the disk if you have saved it, and you
can import it into this schedule again if you find you need
it. (See “Importing a Strip Layout” on page 138.)
Duplicating a Strip Layout
You can also duplicate a Strip layout and change the duplicate.
This will keep the original unchanged.
1. From the Strips menu, select Switch to Layout, and then
select the strip layout you want to duplicate. The strip
layout displays.
2. From the Strips menu, select Duplicate this Layout. A
copy of the layout displays, named Copy of...layout
name.
3. Rename the Strip layout. Open the Strip Options screen
(see “Choosing Strip Options” on page 139) and change
the name in the name field.
Choosing Strip Options
The Strip Options screen allows you to set layout options for
new strip layouts or alter the layout of existing layouts. The
Strip Option window opens automatically when you select
Create New Strips Layout from the Strips menu.
In addition, you can open the Strip Options window manually.
Chapter 5 - Designing Custom Output
Designing Custom Strips
140
Reference Guide
w
From the Strips menu, select Strip Options.
From the Strip Options, there are several functions you can
set.
Strip length
O
Remember
when setting custom lengths and
widths that our
Striperf paper is
available in 11”
and 14” lengths,
and in 3/8” widths
only.
This option sets the length of the strip in inches.
w
Enter the length of the strip in inches and then select the
Custom selection button.
Strip width
This option sets the width of each strip.
w
Enter the width in inches and select the Custom selection
button.
Header width
This option sets the width of the header board.
•
For viewing strips on screen, select the Onscreen button. This is a narrow header board and allows more
room for viewing the strips on a monitor.
•
For printing strips, select the Printed button. This
width matches the width of out plastic header board.
Header font
This option sets the font and font size for the header board.
1. Click on the menu icon
to display a menu of possible fonts. Select the font you want to use by clicking on it.
Designing Custom Strips
Chapter 5 - Designing Custom Output
Movie Magic Scheduling
141
2. Enter the point size of the font to change the font size. Or,
click on the menu icon again and choose the font size
from the list.
Strip orientation
This option sets whether the strip layout will be vertical or
horizontal.
Format name
This field displays the name of this particular strip layout.
w
When creating a new strip layout, type in the name for
the new layout in this field.
When you exit the Options screen the name supplied here
will be displayed under Strips, Switch to Layout.
Left margin offset
This option is a number entered in pixels to offset the left margin when lining up strips on the Striperf paper for printing.
The number you enter here will depend upon the printer you
are using. Some experimentation will probably be necessary
to find a number that gives the correct result. This option can
be overridden on the Print/View screen when you go to print
your report. (See “Printing on the Striperf Paper” on page
161.)
Extra spacing between strips
This is the number of pixels of blank space that are placed
between each printed strip. This is a useful tool for lining up
the printed strips on the Striperf paper. Again, some experimentation will probably be necessary. This option can be
overridden on the Print/View screen when you go to print your
report. (See “Printing on the Striperf Paper” on page 161.)
Print header board
This option controls whether or not to print a header board
when the strips are printed.
Chapter 5 - Designing Custom Output
Designing Custom Strips
142
O
There is
also a header
board check box in
the Print/View
window in the
Include area. This
check box will
override the Strip
options selected
here.
Reference Guide
1. Select one of the options by clicking the selection button
for that option.
•
Select None to prevent the header board from printing.
•
Select With Strips to print the header board with the
strips.
•
Select Separate Page to print the header board on a
separate page by itself.
2. When the options have been set, press OK at the bottom
of the screen. The changes will be displayed on your strip
layout.
MODIFYING THE DAY OUT OF DAYS
The Day out of Days (also known as DOOD) is a specialized
report used to show what days any particular element is
“working”. Traditionally, this report is used only for cast
members, however, Movie Magic Scheduling can create a
DOOD for any category.
Some parameters can be modified by the user on the Movie
Magic DOOD including abbreviations, column spacing, fonts
and styles, headers and footers.
From the Design menu, select Day Out of Days from the
menu. The Day Out of Days window will open.
Modifying the Day out of Days Chapter 5 - Designing Custom Output
Movie Magic Scheduling
143
Abbreviations
You can change any of the abbreviations by typing in the new
abbreviation in the appropriate field. Abbreviations are limited to three characters; however, only one character will print
on the Day out of Days. The default abbreviations are listed
below.
S
Start
F
Finish
W
Work
H
Hold
/
Holiday
D
Drop
T
Travel
P
Pickup
M
Company Travel
If you have schedules created in Movie Magic prior to release
3.1, your pre-existing abbreviations will appear unchanged on
the Day Out of Days Design screen; however when DOOD
reports are generated in Movie Magic Scheduling, only one
letter abbreviation will appear on the reports.
Likewise, should you choose to enter two or three-letter
abbreviations on the DOOD Design screen, only one character
will be recognized by Movie Magic. The following table
shows the old default abbreviations and which characters will
be recognized by Movie Magic when multiple character
abbreviations are entered.
Day
Type
Old
Abbrev.
Current
Character
Start
SW
S
First character
Finish
WF
F
Second character
Drop
WD
D
Second character
Movie Magic Uses:
Chapter 5 - Designing Custom Output Modifying the Day out of Days
144
Reference Guide
Pickup
PW
P
First character
Work
W
W
First character
Hold
H
H
First character
No longer supported
in Movie Magic
Scheduling
Start
Work
Finish
SWF
None
Holiday
/
/
First character
Company
Travel
R
M
First character
Travel
T
T
First character
Columns and Margins
w
The column settings control the positioning and widths of
the various DOOD information. See the image below to
understand which controls affect which section of the
DOOD report. All values should be entered in inches.
w
The margins (measured in inches) control where the
DOOD information is printed on the paper. To view the
DOOD report before printing, select the day-out-of-days
report from the Print/View window.
Header and DOOD Fonts
You can change the fonts or styles for the header or the main
body of the report.
Modifying the Day out of Days Chapter 5 - Designing Custom Output
Movie Magic Scheduling
w
145
Click on the menu icon
by the appropriate font or
style option and select from the menu that appears.
The DOOD Font controls the font on the main body of the
sheet as well as the footer.
Header and Footer
Enter information into these fields to be displayed in the
header and footer of the DOOD report. The header and footer
support interpreted text fields (See “Using Interpreted Text”
on page 125). Some examples that can be used, are:
•
{Picture Title}
•
{Today’s Date/L}
•
{Report Page}
Days Between Drop/Pickup:
Specify the number of days the DOOD allows between drop
and pickup. The default is 10, which is the current minimum
number set by the Screen Actors Guild. For a description of
how drop and pickup work, consult the Screen Actors Guild
Codified Agreement (and website).
Minimize Hold Days (Best Drop)
If this option is selected, Movie Magic will automatically calculate the best period to drop each individual actor according
to SAG rules. This means that the longest period of inactivity
(beyond 10 days) will be chosen and hold days will be at the
legal minimum.
This option overrides any individual drop day periods that you
have entered in the The Element Info window. If a particular
cast member or other element is drop or hold exempt, meaning
they do not conform to SAG rules, the Best Drop feature will
not apply to them.
Skip Names After First Page
When this option is selected the element names are displayed
only on the first sheet of the DOOD and will not appear on
subsequent pages.
Chapter 5 - Designing Custom Output Modifying the Day out of Days
146
Reference Guide
DESIGNING CATEGORIES
You can modify any of the existing categories in Movie Magic
or create new categories for your schedule.
w
From the Design menu, select Categories from the menu.
The Design Category window displays.
Changing a Category’s Name
You can change the name of an existing category. Elements
included under the category will now be listed under the new
name.
1. Click on the desired category from the
list on the left side of the screen.
2. The name of the category is highlighted
in the text field. Type the new name.
Click OK.
Changing the Order of Categories
1. In the list of categories to the left, click on the category
you want to move and drag-and-drop to the position you
want them.
2. When the list is in the correct order, click OK when you
are ready to exit the window.
Designing Categories
Chapter 5 - Designing Custom Output
Movie Magic Scheduling
147
Removing Categories from the Breakdown
If a category is empty, you can hide it on the Breakdown
sheets. This only works with an empty category. If the category you choose has even one element in it, it will not be hidden.
1. Click on the name of the category in the list to the left of
the screen.
2. Check the box Exclude Category from Sheets.This will
mark the selected category for exclusion.
3. When you have marked all the categories you want to
exclude, click OK when you are ready to exit the window.
Adding Categories to the Breakdown
When you have excluded a category, you may find that you
want to include it on the breakdown sheets after all. You can
reverse the process of excluding it so that it displays on the
breakdown sheet.
1. Select the excluded category.
2. Deselect the checkbox Exclude Category from Sheets.
3. When you have deselected all the categories you want to
include, click OK when you are ready to exit the window.
Creating Categories
Creating a new category is performed in the same way as
renaming a category.
1. In the list of categories, scroll down the
list and select one of the Unused category headings.
2. Type the name for the new category in
the field at the top of the screen.
3. Deselect the check box in the Exclude
Category from Sheets field.
Chapter 5 - Designing Custom Output
Designing Categories
148
Reference Guide
4. When you are ready to leave the window, click OK. The
new category will appear on the breakdown sheets.
Changing How Elements are Sorted Within Categories
The default for ordering elements is By ID.
•
Select By ID in the Sort Category field to list the elements by ID number. If there are no ID numbers
assigned, the elements will be listed alphabetically.
•
Select By Name in the Sort Category field to list the
elements alphabetically by name, whether ID numbers have been assigned or not.
•
Select Unsorted in the Sort Category field to leave
the elements in the order in which they were entered.
Changing the Default Casing for Elements
By default, elements are left exactly as they were typed into
Movie Magic Scheduling. You can change this and allow the
application to automatically adjust the element names to display in a particular way.
•
Select Capitalize Words to capitalize the first letter
of every word.
•
Select ALL CAPS to captitalize all letters.
•
Select Don’t Change to leave words as they are
entered.
Setting the Default Check Boxes
There are three default check boxes located near the bottom of
the window. These are described below.
•
Designing Categories
Track on Board: When this option is selected, the
designated category will be tracked on the strip board.
Normally only the Cast Members are tracked on the
production board, but any category can be selected.
However, in order for the category information to be
visible on the strip board, you must first design an
area on the strip board where this category can be displayed. For more information on designing strips,
“Designing Custom Strips” on page 135.
Chapter 5 - Designing Custom Output
Movie Magic Scheduling
149
•
Drop/Pickup: When this option is selected it allows
the drop/pickup rule on the day-out-of-day schedule.
•
Allow Held Days: When this option is selected it
allows held days on the day-out-of-days for the designated category.
1. To activate these options with any category, simply select
the category from the list on the left and select the check
boxes. A dialog displays.
2. Select Apply to complete the change.
Designing or Customizing Element Info Windows
General Customization
You can design and customize the Element Info Window for
any category.
1. Click on the name
of the category
from the list on the
left and then click
Design. The design
display for that category’s Element Info
Window opens.
2. You can select and
delete fields from
the Element Info
Window and add new fields as needed, in the same manner as you would design a new Report layout (see
“Designing Custom Reports” on page 126). For information on adding checkboxes, see below.
3. When you have made your changes, close the design Element Info Window by clicking the Close button (X) at the
upper right.
Chapter 5 - Designing Custom Output
Designing Categories
150
Reference Guide
4. When you have finished making changes to the various
categories, click OK. The changes you have made will be
reflected in the Breakdown Sheets and Element Information windows.
Adding Checkboxes
You can also add a checkbox to the Element Information window for a specific category. This icon is not available on the
standard Design palette.
1. Click the Checkbox icon
.
2. On the category layout, click
where you want your checkbox. When you release the
mouse button, a dialog displays.
3. Choose the type of checkbox
you want to add, and change
the title if necessary.
4. Click OK. The checkbox is added to your layout, with its
title displaying to the right of the box. You can now drag
this field around the layout and drop it wherever you want
it.
Saving Categories
Once your have changed or altered categories, you can save
that category for use in future schedules.
1. From the Design Categories screen, click on the name of
the desired category from the list on the left and then
click Save. The Save Category Layout as dialog displays.
Designing Categories
Chapter 5 - Designing Custom Output
Movie Magic Scheduling
151
2. Enter the name of the file and location to save it, and then
click OK. The category is saved.
Loading Categories
When you have saved categories from other schedules, you
may want to load them into the current schedule.
1. From the Design Categories screen, click Load. The
Open file window displays.
2. Select the file and click OK.
Creating Category Export Names
Movie Magic Scheduling can export categories and their elements to a library file for use with Movie Magic Budgeting. A
basic set of categories to be exported is defined within the
application.
However, you may find that you want to export other categories as well. You can specify which categories you want to
include in an export to Movie Magic Budgeting.
Chapter 5 - Designing Custom Output
Designing Categories
152
Reference Guide
w
w
Designing Categories
Assign an export name to the category. Any categories
that do not have an export name assigned will be excluded
from the export.
•
Select the desired category from the list on the left
and type the name in the Export Name field. The
name is assigned.
•
When you are ready to leave the window, click OK.
When you export the schedule, the elements in this
category will export as well.
See “Exporting a Schedule” on page 153 for more information on how to export files to Movie Magic Budgeting.
Chapter 5 - Designing Custom Output
Movie Magic Scheduling
153
&KDSWHU 3XWWLQJLW7RJHWKHU2XWSXW
Movie Magic Scheduling is a powerful tool when used to organize information that
can later be massaged into a production schedule. It can also export this information to
a Movie Magic Budgeting file for use in budgeting the project.
EXPORTING A SCHEDULE
Movie Magic Scheduling can transfer certain breakdown
information to the Movie Magic Budgeting system via the
export command.
Exporting creates a library file of defined categories that can
then be opened in Movie Magic Budgeting. Each library entry
contains one detail per breakdown element and lists the days
worked and the dollar rate if this information has been entered
on the Element Info Window.
Creating Category Export Names
Before you can export a library file to Budgeting, Movie
Magic Scheduling needs to know which categories should be
exported. A basic set of categories to be exported is defined
within the application. These categories include: Cast Members, Props, Extras, Vehicles, and Set.
However, you may find that you want to export other categories as well. You can specify which categories you want to
include in an export to Movie Magic Budgeting.
w
Assign an export name to the category. Any categories
that do not have an export name assigned will be excluded
from the export.
Chapter 6 - Putting it Together - Output
154
Reference Guide
•
Select the desired category from the list on the left
and type the name in the Export Name field. The
name is assigned.
•
When you are ready to leave the window, click OK.
When you export the schedule, the elements in this
category will export as well.
Exporting Schedule Information
Movie Magic Scheduling offers two methods to export information from your schedule. You can export the entire schedule
to be used on Movie Magic Wireless (previously known as
2AD), or you can export marked categories and their contents
to a library file for use with Movie Magic Budgeting.
Exporting to Wireless
Once you have a schedule defined, you can export it to Movie
Magic Wireless. For more information about Movie Magic
Wireless, please see our website at www.moviemagicproducer.com, or call our Technical Support Center at (323) 6342600.
1. From the File menu, select Export to Wireless. The
Export to Wireless window displays.
2. Type a name for the file. The scheduling file can now be
opened by Movie Magic Wireless.
Exporting to Movie Magic Budgeting
Once you have the Categories defined for export, you are
ready to actually save the Movie Magic Budgeting Library
file.
Exporting a Schedule
Chapter 6 - Putting it Together - Output
Movie Magic Scheduling
155
1. From the File menu, select Export Schedule. The Export
to Library Named dialog displays.
2. Type a name for the file. The library file can now be
opened by Movie Magic Budgeting.
THE PRINT/VIEW SCREEN
w
From the File menu, select Print/View. The Print/View
screen displays.
Selecting the Report Type
All the standard strip board views, reports and days-out-ofdays schedules that come with Movie Magic as well as any
custom reports that the user has designed are available under
the Report Type field.
Chapter 6 - Putting it Together - Output
The Print/View Screen
156
Reference Guide
1. Click the selection button beside Strips, Reports or Dayout-of-days to display all the available formats in each
area. The available schedules/reports will appear in the
scrolling window.
2. To view a schedule/report, click on the schedule/report
name to highlight it.
3. Click View or Print at the bottom of the screen to either
view or print the selected schedule/report.
Selecting the Print/View Range
This field allows you to choose whether to view or print all of
a schedule/report or a selected range within the schedule/
report. The default mode for this field is for “All” to be
selected.
O
Page range
can be entered in
the following print
window, and supersedes this setting.
You can, however print or view a range.
1. Select either Days, Dates, Scenes (Scene Number), or
Sheets (Breakdown Sheet numbers).
2. Enter the values of the range in the From: and To: fields.
Selecting Items to Include in the Report
This field controls what is to be included in the specified
schedule/report. If this field is grey, it is not relevant to the
specified schedule/report.
You can choose to include information from the day strips,
banners and the boneyard as well as choosing to display the
header board on certain strip board print-outs.
Ordering and Sort/Selection
These options control the order in which the schedule/report
will be printed or viewed.
The Print/View Screen
Chapter 6 - Putting it Together - Output
Movie Magic Scheduling
157
Schedule order
This is the default order. It prints/views the schedule in the
current order of the Strip Board.
Breakdown order
This option will order the print/view the schedule in the order
of breakdown sheet number.
Sort order
This option will print/view the schedule by a specific sort or
selection entered in the Sort/Selection area.
You can enter the sort/selection manually or you can load a
saved sort/select list (See “Loading a Sort or Select Command” on page 104) by clicking on the Load button and
selecting the file.
You can also associate a sort and select command with a particular schedule/report by clicking Keep S/S. The result is that
the next time this specific schedule/report is printed or
viewed, the Sort and Select command will automatically
appear in the Sort/Selection window.
Selecting Strip Options
The strip options are available only when printing strips. The
three options to the left allow for printing strips in color, printing lines between strips and for printing the black day strips,
meaning the day breaks and the banners.
On the right you can specify the left margin offset and the
space between each of the strips. For more information on
these features, see “Printing the Strip Board” on page 161.
TYPES OF REPORTS
Movie Magic Scheduling is capable of producing several different types of report. These can be viewed on your screen or
printed out on your local printer.
Chapter 6 - Putting it Together - Output
Types of Reports
158
Reference Guide
Strips
The Strips option offers you several different layouts for the
strip board to print.
You can print these in several different ways. You can print
them out as a standard document in either horizontal or vertical view that you can hand out at a meeting, giving everyone a
personal copy of the strip board. Additionally, you can print
them out on Striperf paper, and insert them in strip sheets so
that they can be used as a traditional strip board.
Reports
Reports are the most flexible of the forms of output Movie
Magic Scheduling can produce. You can create new forms, or
use the ones provided with the application.
Reports include shooting schedules, call sheets, breakdown
sheets, prop lists, etc.
Day out of Days
The most common Day out of Days produced is the one for
Cast Members, and this is the default category. However,
Movie Magic Scheduling provides the ability to print a day
out of days for any category. Just select the category from the
list to the right.
Types of Reports
Chapter 6 - Putting it Together - Output
Movie Magic Scheduling
159
PRINTING REPORTS
Printing Standard Reports
1. From the File menu, select Print/View, or type CTRL-P
(z-P). The Print/View window displays.
2. In the Report Type area, select Reports. Select the
appropriate report from the list that appears in the scrolling window.
3. Select the options you want to use (see “Types of Reports”
on page 157) and then press the View or Print button at
the bottom of the screen to view or print the report.
Printing the Boneyard
When you are printing standard reports, in particular, strips,
Breakdown sheets, and shooting schedules, you can also
choose to print the Boneyard. The Boneyard will print in the
same format as the report you have chosen. For example, if
you have chosen Breakdown Sheets, the strips in the Boneyard will print as Breakdown Sheets rather than Strips.
w
In the Include area, click to place a checkmark in the box
beside Boneyard. When you print your report, the Boneyard will be included.
Printing the Day Out of Days
The Day out of Days (also known as DOOD) is a specialized
report used to show what days any particular element is
“working.” Traditionally, this report is used only for cast
members; however, Movie Magic Scheduling can create a
DOOD for any category.
Chapter 6 - Putting it Together - Output
Printing Reports
160
M
The Day
out of Days does
not include any
strips following the
last day break. You
must put a daybreak at the end of
the schedule to
include all strips.
Reference Guide
When deciding when to drop an element, Movie Magic
Scheduling automatically drops at the first opportunity, with
the following exceptions:
•
if you have assigned a Drop # to that element on the
Element Information window, that opportunity will be
used. (See “Manually Defining the Drop #” on page
82.)
•
if you have selected Minimize Hold Days (best drop)
on the Design Day out of Day options window, the
first legal drop that causes the smallest number of
hold days will be used. (See “Minimize Hold Days
(Best Drop)” on page 145.)
Printing a DOOD follows the same procedure as for most
reports.
1. From the File menu, select Print/View, or type CTRL-P
(z-P). The Print/View window displays.
2. In the Report Type area, select Day out of days.
3. Click on the appropriate report from the list that appears
in the scrolling window.
4. Select appropriate options as described in “The Print/
View Screen” on page 155, and then press View or Print
to view or print the report.
An error message will appear saying that there is not enough
information to generate the day-out-of-days report if:
Printing Reports
•
a category has been selected that does not have ID
numbers assigned, an error message displays. Assign
ID numbers to the elements in the category and print
or view the report again. (See “Reordering Elements
Manually” on page 88.)
•
or no day breaks are present in the schedule.
Chapter 6 - Putting it Together - Output
Movie Magic Scheduling
161
PRINTING THE STRIP BOARD
Any of the Strip Board views can be printed. Usually when
printing out the strip board you will be using the special Striperf paper so that you can divide the strips up and create your
board. However both the Thin Horizontal Strips and the 11”
Vertical strips can be printed out on standard 8½ x 11 inch
paper for the purposes of simply viewing all the strips at once.
Printing the Strip Board on Standard Paper
1. From the File menu, select Print/View, or type Ctrl-P
(z-P). The Print/View window displays.
2. In the Report Type area, select Strips and then choose the
specific layout you want from the window on the left.
3. Click Print.
Printing on the Striperf Paper
To print out your strip board so that you can divide the strips
and create your own physical board, you will need to use the
Striperf paper, created especially for Movie Magic Scheduling.
Aligning the Strips
Printing the strips can take a little more time and adjustment
than printing reports, but taking time at the outset of printing
to make sure that the strips are properly aligned can prevent
wasting large amounts of Striperf paper.
Unless you change printers or printer drivers, you should only
have to do this aligning process once.
Chapter 6 - Putting it Together - Output
Printing the Strip Board
162
Reference Guide
1. From the File menu, select Print/View, or type Ctrl-P
(z-P). The Print/View window displays.
2. From the Report Type area, select Strips and then choose
the specific layout that you wish to print from the list on
the right.
3. From the Include area, select the strips that you want to
be included in the printing.
It is often easier to print the header board by itself.
•
Print the strips out by themselves.
•
Go back and select the Header Board and deselect
the Day Strips and the Banners to print the header
board alone as well.
4. From the Strip Options area at the bottom of the Print/
View window, select from the options on the left. There
are three options to the right:
Printing the Strip Board
Chapter 6 - Putting it Together - Output
Movie Magic Scheduling
O
If you have
many strips, this
action will use a lot
of ink from your
color cartridges.
Remember that you
can add color to
your white strips
with Striperf holders.
163
•
Print Strips in Color - If you have a color printer,
this allows you to print the strips in their designated
colors.
•
Print Line Between Strips – Turn this option off. It
prints a black line between each strip. This option can
be useful when printing out your strips on standard
paper, but on Striperf paper it can throw off the alignment of strips.
•
Print Black Daystrips – This option will print the
daybreaks and banners in the schedule in black as
they appear on your screen. When this option is not
selected, these black strips will be printed like the
other daystrips – black text on white.
5. Print the first page of the strip board on standard paper.
6. Hold the printed paper up to the Striperf paper to see if the
strips are aligned. Don’t worry about all the strips at once.
Try and get the first strip to line-up, and then the others
will fall into place more easily.
•
If the first strip is not lining up, go back to the Print/
View window and change Strip Left Margin Offset
field accordingly.
•
Print out the strips on standard paper again and compare. Repeat this until the first strip is aligned.
7. Once the first strip is aligned, if the following strips are
still not aligned, go back to the print window and change
the Space Between Strips field. This field should almost
always be “0” or “1”. If the strips are drifting to the right,
set the field to “0”; if they are drifting to the left, set the
field to one.
8. When the strips are aligned, you can repeat the printing on
the Striperf paper.
9. If the strips are still not aligned after making the above
adjustments then you have a scaling problem: the strips
are printing too large for the perforated strips.
You should be able to tell whether this is the case by
examining the first strip. It should fit easily between the
top of the page and the first perforation. If it does not,
change the scale as follows:
Chapter 6 - Putting it Together - Output
Printing the Strip Board
164
Reference Guide
•
On the PC, from the Print dialog screen select Properties and adjust the scale to 96%.
•
On the Macintosh, select PostScript Options, then
from the File, Page Setup window, select the Precision Bitmap Alignment.
Some trial and error may be required as each printer model is
different. Sometimes older printers cannot grab the Striperf
paper properly or keep it straight. If this is the case, try a new
printer tray or perform a manual feed.
Once you have the correct settings, these should stay the same
for all subsequent strip boards. Movie Magic will keep the last
settings you entered in the Print/View window, so that the next
time that you print strips, the correct setting is available.
Printing the Strip Board
Chapter 6 - Putting it Together - Output
165
Part III - Appendices
166
Movie Magic Scheduling
$SSHQGL[$
Windows
167
.H\ERDUG6KRUWFXWVIRU
&RPPDQGV
Macintosh
Command
CTRL-1
z-1
Goto First Sheet/Strip
CTRL-2
z-2
Goto Previous Sheet/Strip
CTRL-3
z-3
Goto Next Sheet/Strip
CTRL-4
z-4
Goto Last Sheet/Strip
CTRL-9
z-9
Goto Previous Strip Layout
CTRL-0
z-0
Goto Next Strip Layout
CTRL-B
z-B
Add Breakdown Sheet/Banner
CTRL-Shift-B
z-Shift-B
Add Sheet at End/Add Banner
CTRL-C
z-C
Copy
CTRL-D
z-D
Duplicate Sheet
CTRL-E
z-E
Opens Quick Entry
CTRL-Shift-E
z-Shift-E
Opens Quick Entry Create Mode
CTRL-F
z-F
Goto Find Element
CTRL-G
z-G
Goto Sheet # …
CTRL-H
z-H
Hide Empty Categories on Current
Sheet
CTRL-I
z-I
Insert Element
CTRL-J
z-J
Goto Scene # …
Appendix A - Keyboard Shortcuts for Commands
168
Windows
Macintosh
Command
CTRL-K
z-K
Opens Element Info Window
CTRL-L
z-L
Opens Calendar
CTRL-M
z-M
Design Strips
CTRL-N
z-N
New Schedule
CTRL-O
z-O
Open Schedule
CTRL-P
z-P
Open Print/View Window
CTRL-Q
z-Q
Quit Schedule
CTRL-R
z-R
Design Reports
CTRL-S
z-S
Save Schedule
CTRL-T
z-T
Open Sort and Select
CTRL-U
z-U
View Strip Board
CTRL-V
z-V
Paste
CTRL-W
z-W
Closes Active Window
CTRL-Shift-W
z-Shift-W
Closes Active Schedule
CTRL-X
z-X
Cut
CTRL-Shift-X
z-Shift-X
Delete Element/Move Strip to Boneyard
CTRL-Y
z-Y
View Breakdown Sheets
CTRL-Z
z-Z
Undo
CTRL-Space
z-Space
Hide/Reveal Control Panel
CTRL-, (comma)
z-, (comma)
Add Day Break
CTRL-Shift-F1
z-Shift-F1
Define Function Keys
CTRL - ←
z-←
Next Sheet/Strip
CTRL - →
z-→
Previous Sheet/Strip
CTRL - ↑
z-↑
First Sheet/Strip
CTRL - ↓
z-↓
Last Sheet/Strip
Appendix A - Keyboard Shortcuts for Commands
Movie Magic Scheduling
$SSHQGL[%
169
&DWHJRU\)LHOGV
Text: The Text category field will print whatever you enter in
it. This is useful for adding labels to different areas of your
report. The text will be the same on every page.
Category List: The Category List lists all the elements of a
category in the field. Choose the category from the Field
options screen as described below.
Custom List: A Custom List field allows you to print certain
fields from the Category. Where the Category list lists all the
elements in that Category, the Custom list gives you the option
of choosing various fields. After designating the field a custom list, double-click on the field or select Field Options from
the Field menu. The Field Options dialog displays.
•
Choose the Category from the first column.
•
From the second column, choose the fields you want to
display in your report.
Current Strip: The numeric position of the sheet/strip in
the schedule. In other words, in the phrase, strip 3 of 209, the
"Current Strip" field would be 3.
Appendix B - Category Fields
170
Date: Prints the shoot date of the sheet/strip. This field type
has two options: display the date as long (Sunday, May 7,
2000) or short (5/7/00) format. The default is the short format.
Day/Night: Prints the contents of the D/N field from the
Breakdown sheet.
Element Sum: Prints the number of elements in a specified
category. Select the category from the Field Options dialog.
File Name: Prints the name of the schedule file. Useful for
making headers and footers that identify the report.
ID list: Prints a list of Board IDs for a specified category.
For example, on a standard strip, Cast members are listed by
their ID numbers (1,5,9,12,22).
Int/Ext: Prints the contents of the I/E field from the Breakdown sheet.
I/E - Set - D/N: Prints a slug line. For example, INT. Theatre -- Day, this is useful on strip layouts.
Location: Prints the content of the location field from the
breakdown sheet.
Page Count: Prints the total number of pages and eighths
of pages of the script. When placed in the footer portion of
the report, this field totals all the page counts that appear on
the entire page.
Report Name: Prints the name of the report.
Report Page: Prints the page number of the report.
Scenes: Prints the contents of the Scenes field from the
Breakdown sheet.
Script Day: Prints the contents of the Script Day field from
the Breakdown sheet.
Script Page: Prints the contents of the Script Page field
from the Breakdown sheet.
Sequence: Prints the contents of the Sequence field from the
Breakdown sheet.
Set: Prints the contents of the Set field from the Breakdown
sheet.
Appendix B - Category Fields
Movie Magic Scheduling
171
Sheet Number: Prints the breakdown sheet number.
Shoot Day: The numeric day the sheet/strip is scheduled to
shoot (for example, "Day 5").
Synopsis: Prints the contents of the Synopsis field from the
Breakdown sheet.
Time: Prints the current time as defined by the computer’s
clock when the report is printed.
Today’s Date: Prints the current date as defined by the
computer’s clock. This field type has two options: display the
date as long (Sunday, May 7, 2000) or short (5/7/00) format.
The default is the short format.
Total Strips: The total number of the sheets/strips in the
schedule. In the phrase 3 of 209, the total strips would be 209.
Weekday: Prints the long form week day text (for example,
Tuesday or Friday).
Bar Code: Prints a bar code which represents the sheet
number of the sheet/strip. NOTE: This field ALWAYS prints
in a special bar code font -- you do not need to set the font or
the font size of this field.
Picture Title: Prints the Picture Title as defined in the Picture Info dialog. (See “Adding Production Information” on
page 62.)
Prod. No. Prints the Production Number as defined in the
Picture Info dialog. (See “Adding Production Information”
on page 62.)
Company: Prints the name of the Company as defined in
the Picture Info dialog. (See “Adding Production Information” on page 62.)
Director: Prints the name of the Director as defined in the
Picture Info dialog. (See “Adding Production Information” on
page 62.)
Producer: Prints the name of the Producer as defined in the
Picture Info dialog. (See “Adding Production Information” on
page 62.)
U.P.M. Prints the name of the UPM as defined in the Picture
Info dialog. (See “Adding Production Information” on
page 62.)
Appendix B - Category Fields
172
Asst. Director: Prints the name of the Asst. Director as
defined in the Picture Info dialog. (See “Adding Production
Information” on page 62.)
Art Director: Prints the name of the Art Director as
defined in the Picture Info dialog. (See “Adding Production
Information” on page 62.)
Set Dresser: Prints the name of the Set Dresser as defined
in the Picture Info dialog. (See “Adding Production Information” on page 62.)
Script Dated: Prints the date of the current script as defined
in the Picture Info dialog. (See “Adding Production Information” on page 62.)
Prepared by: Prints the name of the person who prepared
the schedule as defined in the Picture Info dialog. (See “Adding Production Information” on page 62.)
Timing: Prints the Timing Information as defined in the
Picture Info dialog. (See “Adding Production Information” on
page 62.)
Episode No. Prints the Episode number as defined in the
Picture Info dialog. (See “Adding Production Information” on
page 62.)
Misc. #... Prints the miscellaneous information defined in
the Picture Info dialog. (See “Adding Production Information” on page 62.)
Storyboard: Prints the storyboard picture, if there is one
on the breakdown sheet.
Appendix B - Category Fields
Movie Magic Scheduling
173
,QGH[
Page numbers in bold face are found in the Tutorial section. Other page numbers are
found in the Reference section.
Numerics
2AD 154
A
Action after Last Field 58
Auto Sheet Numbering 57
Auto-Save 55
B
Banner
insert 38
Banners 112
Board IDs 22, 87
reorder 87
Board Swap 39, 114
creating 40, 114
deleting 115
renaming 115
restoring 41, 115
using 42, 116
Boneyard
moving day breaks 110
moving strips from 114
moving strips to 113
Breakdown Sheet 5, 67
adding 17, 69
categories 68
creating 56
duplicating 86
element, adding 18, 73
finding elements 75
lock sheet numbers 57
merging 90
remove element 74
renumbering 90
scene information 67
screen areas 67
storyboard 68
switching to 54
viewing 67
Budgeting
exporting to 153
C
Calendar 34, 106
company travel 35, 108
day off 108
days off 108
holiday 36, 108
navigation 108
production dates 107
special days 108
standard week 34
travel days 108
Categories
add 147
adding new 84
change element order 148
change name 146
change order of 146
create 147
displaying empty 82
element casing 148
export names 151
hiding empty 82
Index
174
loading 151
modifying 83
remove 147
saving modified/new 150
set defaults 148
Category Column Width 56
Changing Category Names 83
Check Element Occurences 117
Click on Category 55
Closing
Movie Magic Scheduling 66
schedules 19, 66
windows 66
Company Travel 108
Company travel 35
Creating Fields 123
Creating New Elements 75
D
Day Breaks 109
automatic insertion 38, 109
deleting 110
insert manually 37
inserting manually 109
moving 37, 111
multiple for long scenes 38, 111
removing all 111
removing individual 110
Day Off 109
Day Out of Days
abbreviations 143
columns and margins 144
days between drop/pickup 145
fonts 144
header/footer 145
modifying 142
printing 46, 159
Day/Night 68
Days Off 108
Deleting
Index
Tutorial/User’s Manual
day breaks 110
Design
change field options 123
create field 123
define field 123
interpreted text 125
move field 124
order fields 125
resize fields 124
text in text fields 125
Design Categories 146
Design Element Information 146
Design Element Information Windows 149
Design Palette 119
buttons 119
clipping and wrapping 122
defining fields 121
draw lines/line size 121
field orientation 121
font size & style 120
growable fields 122
tool palette 120
Design Report
delete layout 132
duplicate layout 132
import layout 131
new fields 129
Design Reports 126
breakdown pages 130
change layout 127
create new layout 128
duplicate layout 132
export layout 131
header/footer lines 129
open design window 127
report options 132
Design Strips 135
change layout 136
create new layout 136
delete layout 138
Movie Magic Scheduling
duplicate layout 139
export layout 137
import layout 138
new fields 137
open 136
strip options 139
Designing Categories
using fields 123
Designing Custom Reports 119
Designing Fields 121
Designing Reports
using fields 123
Designing Strips
using fields 123
DOOD 158
Drag and Drop 95
Drop days 82
Duplicating
breakdown sheets 86
E
Element IDs
locking 89
Element Info 55, 78
cast 80
extras 80
stunts 81
Element Info Window 16, 79
Element List 77
Elements 70
adding 79
adding info to 82
creating 12, 75, 81
deleting 78
element info window 16
finding 75
ID numbers 22, 87
ID numbers, locking 25, 89
info window 79
information about 78
175
quick entry 14, 71, 73
remove from breakdown sheet 74
reorder IDs 23, 87
reorder manually 24, 88
script 14
sorting 58, 77
unrecognized 59
Exiting 49, 66
Exporting
creating export names 153
schedule information 154
to 2AD 154
to budgeting 154
to wireless 154
Exporting Schedule 153
F
Function Keys 59
G
Goto Next 56
Growable Fields 122
H
Hide Empty Categories 57
Holiday 36, 108
I
ID Numbers 22, 87
Importing Script Information 62
Installation 49
Interior/Exterior 68
Interpreted Text 125
in headers/footers 126
in text fields 126
L
Launching 4, 49
Loading
Index
176
sort commands 104
Location 69
Lock Sheet Numbers 57
M
Merging Breakdown Sheets 90
Mouse Entry 79
Multi-Day Breaks 111
Multi-day Breaks 57
N
Navigation 51
breakdown toolbar 53
menu bar 51
strip board toolbar 53
O
Opening
quick entry 71
recently used files 64
schedule 64
P
Pages 69
Palette Windows 56
Preferences 54
application specific 55
click on category 55
miscellaneous attributes 56
schedule specific 57
Print/View 44, 155
breakdown order 157
included items 156
schedule order 157
select range 156
select report type 155
sort order 157
strip options 157
Printing 159
Index
Tutorial/User’s Manual
day out of days 46, 159
standard reports 45, 159
strip board 44, 161
standard paper 161
striperf paper 161
Production Dates 107
Production Information 8, 62
Q
Quick Entry 14, 55, 71
add/remove 71, 73, 74
category selection 72
changing modes 71
create 72
find 72
new elements 73
opening 71
Quitting 49
R
Recalculate Element Days 117
Recalculating 117
Recently Used Files 64
Renumbering Breakdown Sheets 90
Reorder Board ID 87
Reorder Strips 96
Report Options
category 134
day 134
default font 135
margins 134
name 133
one section per page 134
page break on new day 134
print day strips 134
report by 133
separate sections with a line 134
sheet 133
test below shoot day 135
text above font 135
Movie Magic Scheduling
text above shoot day 135
text below font 135
Report Types 157
day out of days 158
reports 158
strips 158
Reports 7
printing 45, 159
Re-sort Sheet Elements 117
Response to Unrecognized Element
59
S
Save 9, 65
autosave 55
new file 65
previously saved file 65
renaming a file 65
sort and select commands 103
Saving
sort commands 103
Scene Information 12
entering 68
Scenes 69
Schedule
close 7, 19, 66
create 8, 61
new 61
open 4, 64
overview xii, 4
production information 62
recalculating 117
save 9, 65
Script Day 69
Script Information
importing 62
Script Page 69
Select
moving strips 102
Sequence 69
177
Set 68
Sheet Number 68
Show Element ID Numbers 57
Sort 100
elements 58
Sort and Select 28, 97
basic sorting 29
clearing text window 100
loading 104
moving strips 102
opening 28, 97
performing 100
saving commands 103
sort syntax 30, 100
Splash Screen 56
Storyboard 84
adding picture 84
removing picture 86
Strip Board 6, 26
changing views 95
contents of strip 26
printing 44
switching to 54
viewing 26, 95
Strip Options 26
color 26
different views 27
extra spacing 141
format name 141
header font 140
header width 140
left margin offset 141
print header board 141
strip length 140
strip orientation 141
strip width 140
StripPerf
aligning strips 161
StripPerf paper 161
Strips 93
changing colors 94
Index
178
colors 93
moving in select command 102
moving manually 27
reorder 96
reordering 96
setup 93
sorting 100
sorting manually 95
standard information 95
viewing 94
Synopsis 69
T
Text Fields 125
Toolbar
breakdown 53
strip board 53
V
Viewing the Stripboard 95
W
Windows
close 66
Index
Tutorial/User’s Manual