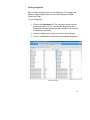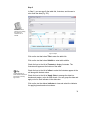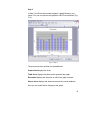
1
User’s Guide
1
Acknowledgement
This database software has been developed with the cooperation of the UN system. The product has been
adapted from UNICEF ChildInfo technology.
2
Contents
INTRODUCTION ...................................................................................................................... 7
C H A P T E R ............................................................................................................................ 5
1
........................................................................................................................................... 5
GETTING STARTED ................................................................................................................................................. 5
System Requirements................................................................................................................................................ 6
Installing CARICOMINFO 1.0 .................................................................................................................................... 6
CHAPTER
2
................................................................................................................................................... 7
THE HOMEPAGE ...................................................................................................................................................... 7
Making a Selection ....................................................................................................................................................... 9
Deleting a Selection .................................................................................................................................................... 10
CHAPTER
3
................................................................................................................................................. 11
SELECTING DATA PARAMETERS .............................................................................................................................. 12
Selecting Indicators ...................................................................................................................................................... 12
Selecting Time ............................................................................................................................................................... 13
Selecting Areas ............................................................................................................................................................. 14
CHAPTER
4
................................................................................................................................................. 16
VIEWING DATA ....................................................................................................................................................... 17
Data View....................................................................................................................................................... 17
Viewing Statistics......................................................................................................................................................... 18
Viewing Sources .......................................................................................................................................................... 19
Viewing Units .............................................................................................................................................................. 20
Viewing Subgroups ...................................................................................................................................................... 21
Sorting Data ................................................................................................................................................................ 22
3
CHAPTER
5
.................................................................................................................................................. 2
PRESENTATION WIZARDS ............................................................................................... 24
CREATING TABLES ................................................................................................................................................. 25
STEP 1 - Selecting Rows and Columns ...................................................................................................................... 25
STEP 2 - Entering Table Options ................................................................................................................................ 26
STEP 3 - Preview Table .............................................................................................................................................. 28
STEP 4 - Saving the Table ......................................................................................................................................... 29
CREATING GRAPHS ................................................................................................................................................ 31
STEP 1 - Selecting X and Y Axis ................................................................................................................................ 31
STEP 2 - Sorting the Data .......................................................................................................................................... 31
STEP 3 - Preview the Graph ....................................................................................................................................... 31
STEP 4 - Saving the Graph ........................................................................................................................................ 32
CREATING MAPS .................................................................................................................................................... 33
STEP 1 - Selecting the Map Theme ........................................................................................................................... 33
STEP 2 - Selecting Map Options. ............................................................................................................................... 35
STEP 3 - Customizing the Map ................................................................................................................................... 36
STEP 4 - Preview the Map .......................................................................................................................................... 37
STEP 5 - Saving the Map ........................................................................................................................................... 37
CHAPTER
6
.............................................................................................................................................. 72
GALLERY
VIEW OBJECTS IN GALLERY .......................................................................................................................... 73
CREATE POWERPOINT PRESENTATION .......................................................................................................... 74
CHAPTER
7
................................................................................................................................................. 75
REPORTS
CREATING REPORTS ..................................................................................................................................... 75
4
CHAPTER
8
................................................................................................................................................. 75
CALCULATE .........................................................................................................................................78
PERCENT ..................................................................................................................................................... 79
100 MINUS ................................................................................................................................................... 85
COMPOSITE INDEX ........................................................................................................................................ 89
SUBTOTAL .................................................................................................................................................... 95
TRANSFORM UNIT ....................................................................................................................................... 100
USER-DEFINED FORMULA ........................................................................................................................... 106
APPENDIX ...........................................................................................................................................111
MENU BAR OPTIONS ............................................................................................................................................ 111
File Menu ....................................................................................................................................................... 111
Open ......................................................................................................................................................................... 111
Database Summary Report ...................................................................................................................................... 111
User Preferences ...................................................................................................................................................... 113
Exit ............................................................................................................................................................................ 118
Help Menu ...................................................................................................................................................... 118
Support ..................................................................................................................................................................... 118
INDEX ..................................................................................................................................................120
5
Introduction
CARICOMINFO 1.0 is an adaptation of DevInfo (DI) 5.0. DevInfo (DI)
5.0 is an advanced database management system to keep track of
the commitments towards human development. It is endorsed by the
UN to report on the progress towards the Millennium Goals. With
DevInfo, you are literally a few mouse clicks away from facts that help
you to:
• Analyze data for evidence-based decision making.
• Undertake results-based monitoring and evaluation.
• Link different levels—national, sub national and regional—of
planning.
• Reach out to a large and diverse audience through thematic
advocacy.
The introduction gives a preview of:
1. Features of CARICOMINFO 1.0
2. Content Overview
3. User Interface
1. Features of CARICOMINFO 1.0
The features of the software give you a lot of options in querying for
data and help to undertake results-based monitoring and effective
advocacy. These features include:
• User friendly interface for hassle
• Online data access and query.
• Grouping bar in data view to better organize and analyze data.
• Enhanced Table wizard features: Aggregate function, more
options for cross tabulation.
• Enhanced Map Wizard features: Options for Dot density and chart
theme, label nudging, inset and exporting to raster image.
• Reports feature to store report templates and apply ready-to-use
report formats across databases.
6
2. Content Overview
This guide contains eight chapters, an appendix and an index. It
provides a step-by-step explanation for querying data and generating
reports. Key steps have been graphically illustrated to help you better
understand CARICOMINFO 1.0 and effectively use it in achieving
your work objectives.
Chapter 1, “Getting Started” outlines the systems requirements and
installation procedure.
Chapter 2, “The Homepage” introduces the opening page of
CARICOMINFO 1.0 and tells you about different ways of accessing
data.
Chapter 3, “Searching Data” explains the steps in querying data
using key parameters: Indicator, Time and Area.
Chapter 4, “Viewing Data” introduces options to customize the Data
view. You can learn to use statistical options and get more information
from the data view.
Chapter 5, “Presenting Data” explains the steps in creating
professional output using wizards: Table, Graph and Map. Here you
can learn to use advanced wizard options.
Chapter 6, “Gallery” takes you through the steps in viewing tables,
graphs and maps in the gallery. Learn to create a PowerPoint
presentation in the Gallery wizard.
Chapter 7, “Reports” outlines the steps in applying report templates
to different databases.
Chapter 8, “Calculate” takes you through the steps in using the
utilities in the Calculate wizard.
“Appendix 1” explains the menu bar options in the home page of
CARICOMINFO 1.0.
7
3. User Interface
The CARICOMINFO 1.0 Interface different tool bars and buttons to
help you intuitively navigate the application. A typical interface
includes following elements:
Fig. 1 Interface elements
Title bar: Displays application name followed by the name of the
database in use.
Menu bar: Displays Menu options: File, Menu, and Help. Each of
those options is explained in Appendix 1.
Navigation bar: Displays the page tabs in CARICOMINFO 1.0. There
are six tabs in the navigation bar: Indicator, Time, Area, Data, Gallery,
and Reports.
Click on a tab to display the corresponding page. You can move to a
desired page at any point of time by clicking on the respective tab.
There are two buttons on the Navigation bar.
Opens the User Preference window where you can modify
display options.
Home allows you to access the home page from any page.
8
Page Option Bar: Displays available options for the selected page. In
figure 1, page option for the Indicator page—sector, goal, framework,
theme, source, institution and convention—are displayed in the page
option bar.
Tool Bar: Displays buttons that help you achieve specific tasks.
Buttons that are active for the page appear in color while the inactive
buttons appear in grayscale.
Open the window to select a different database.
Print the contents of the selected pane to a PDF file.
Export the contents of the selected pane into the following file
formats: MS Excel Spreadsheet (xls), Comma Separated Value (csv),
Portable Digital File (pdf), Hyper Text Markup Language (html) and
eXtensible Markup Language (xml). In the data view, you can also
export to a Database (mdb) or to a data entry spreadsheet.
Open the Information window and display metadata for the
highlighted element.
Toggle Pane View between horizontal and vertical view.
Search for the keyword mentioned in the text bar. The elements
matching the search criteria are displayed in the available pane.
Open the Sort window to choose the sort elements and sort order
for sorting records in the data view.
Apply Filter criteria to screen records in the data view.
Pane Header: The Pane header identifies the pane contents and also
displays the count of items in the pane.
Status Bar: Displays progress of the action being processed. It also
displays system time and date.
Shows the status of the speakers.
9
Displays “Offline” when a local database is accessed.
Displays “Online” when a database is accessed from a remote
server.
Making a Selection
Selection refers to making the item appear in the Selected pane. To
Select do the following:
•
•
•
•
Double-click on the item in the Available pane.
Click and drag the item from the Available pane and Drop it in
the Selected pane.
To select items highlighted in the Available pane:
o Click in the Available pane header
or
o Choose the Select Highlighted option from the right click
menu.
To select all items listed in the Available pane:
o Click in the Available pane header
or
o Choose the Select All option from the right click menu.
Deleting a Selection
Deleting refers to removing the item from the Selected pane. To
delete, do one of the following:
• Double-click on the item in the Selected pane.
• To remove item(s) Highlighted in the Selected pane:
o Click in the Selected pane header
or
o Choose the Remove Highlighted option from the right click
menu.
or
o Press Delete key
•
To remove all items listed in the Selected pane:
o Click in the Selected pane header
Or
o Choose the remove all option from the right click menu.
10
CHAPTER
1
Getting Started
CARICOMINFO 1.0 is a database system that helps to organize and
present data on social development indicators. The database consists
of the following elements:
• Indicators
• Time Periods
• Geographic Areas
• Subgroup, classified into four categories: Sex, Location, Age
Group and Others
• Units
• Sources
• Data values
The system provides access to indicators organized by sectors, goals,
themes and other data management schemes. CARICOMINFO 1.0 is
a user-friendly software application integrated with Microsoft Office for
easy presentation of data in tables, graphs and maps.
System Requirements
The minimum computer requirements to install this software
application are:
• Pentium II or higher recommended
• 128 MB of RAM
• 300 MB of free hard disk space.
• Display resolution 640 x 480 (1024 x 768 or higher recommended)
• Microsoft Windows 95 or above (optimized for Windows 98, 2000
& XP)
• Microsoft Office 97 or above
• IE 5.0 or above
11
Installing CARICOMINFO 1.0
To install this software application on your computer, follow the steps
given below:
Insert the CARICOMINFO 1.0 User Interface CD into the CDROM drive.
Wait for auto-run to open the setup screen.
Follow the instructions on the screen to complete the setup.
Double click on the CARICOMINFO 1.0 desktop icon to start
the application.
If the set-up program does not load automatically:
Go to Start and, choose Run.
Type d:\setup where d is the letter of your CD-ROM drive and
press the Enter key.
Follow the instructions that appear on your screen to complete
the setup.
Double click on the CARICOMINFO 1.0 icon to start the
application.
12
CHAPTER
2
The Homepage
This is the home page of CARICOMINFO 1.0. Notice that the home
page has a column of buttons next to the animation (Fig. 2.1). Place
the mouse pointer on any button to reveal menu options.
Fig 2.1 The Home page
13
Information menu has two options: Product and Organization.
Product: Opens the default internet browser and displays information
about CARICOMINFO 1.0.
Organization: Opens the default internet browser and displays
information about the UN.
Data menu has four options: Indicator, Time, Area, and Data
Indicator: Opens the Indicator page and lets you view and choose
indicators.
Time: Opens the Time page and lets you view and choose time
periods.
Area: Opens the Area page and lets you view and choose areas.
Tip
To view all the data
records click on the
data option in the
Data menu.
Data: Opens the Data page and lets you view data. You can choose
to view all the data records in the database or generate a data view
based on Indicator, Time and Area selections.
Gallery menu has two options: Presentations and Images.
Presentations: Opens the presentation folder in gallery and lets you
view
CARICOMINFO 1.0 presentations—Table, Graph and Map.
Images: Opens the Images folder and lets you view the images
appearing in the flash animation.
Help menu has three options: Content, Tour and Support.
Content: Link for the pdf file of the User’s manual.
Tour: Run the CARICOMInfo tour.
Support: Opens the default mail client with the DevInfo support
address in the “To” text bar.
Others: Displays any additional link.
14
To open a database, select File | Open. The Open Database window
appears. Notice that there are two tabs: Online and Offline (Fig. 2.2).
If you click on any
sub menu under
Data without
selecting a
database, you will
get the message;
“Select Database”.
Fig. 2.2 Open Database
The Offline tab window lists databases available in the default
location on your local hard disk. To select, highlight the desired
database from the list and click OK.
Click
to browse and select a database from a desired location.
To select an Online database:
• Click on the Online tab to view the Online window (Fig. 2.2).
• Click on the down arrow and select any online connections
available from the drop-down list. The list of databases available
on the specific server is displayed in the window.
• Highlight the desired database and click OK
15
Fig. 2.3 Select Online Database
Click
to connect to a server that is not listed. Provide the details in
the New Connection window (Fig. 2.4).
Click on the Connection Details box to select type of database from
the drop-down list.
The next time
the application
is opened, the
database last
used gets
automatically
selected.
Enter the Connection Name to assign a name to the connection.
Enter the Internet Protocol (IP) address in the Server Name.
Enter the Database name of the CARICOMINFO 1.0 database
located on the server.
Enter the User Name and Password to access the database.
Click Test to authenticate the user name and password on the
specified server. The program returns a “connection successful”
message after authentication.
Click Save to save the connection for future use.
16
Fig. 2.4 New Connection
Click
list.
to delete any server connection available in the drop-down
17
CHAPTER
3
Data Parameter
There are three data parameters that define the data value: Indicator,
Time and Area.
A Data parameter
defines a particular
characteristic of the
data value.
These parameters help you to query the database and generate a
Data view. You can then prepare a Table, Graph or a Map.
You can select the parameters in any sequence. You can choose to
modify the parameters at any time.
The process of making and deleting a selection is similar for all the
parameters.
18
Selecting Data Parameters
Selecting Indicators
An Indicator is a
pointer or yardstick
to access the
progress of the
intended goal or
objective. In DI,
Indicators are linked
with Units, and
Subgroups to form IU-S combinations.
You can select indicators from the indicator page. In the home page,
place the mouse pointer on
and select Indicator from the data
menu. Not ice that the Indicator page is divided into three panes (Fig.
3.1).
Tip
Select File | User
Preferences |
Indicator to select
the default
Indicator
Classification view
for the Indicator
page.
Fig. 3.1 Indicator Page
If you highlight a node
with multiple sub
nodes, then the
Available pane
displays indicators
linked to the
highlighted sub node.
Tip
Use
to search
and locate
indicators.
The left pane displays the tree view of the Indicator Classification (IC)
method. The IC type is displayed in the pane header. The default IC
type is Sector.
Click on a Sector or on to the left of the Sector to display targets
defined under the Sector. Highlight a target to display all Indicators
linked with the target in the Available pane.
Select one or several indicators to generate a data view. To select,
drag the highlighted indicator from the Available pane and drop it in
the Selected pane or use other methods.
The indicator appears in the Selected pane.
By default, the Available pane displays the Indicator-Unit-Subgroup
19
(I-U-S) combinations. Click
to view only indicators. Click on the
button to revert to the I-U-S view.
Click in the Sector pane to Auto Select all indicators in the Sector
pane for which data is available.
The Auto Select
Option builds on the
choices made for
any other parameter.
For example, if you
have already
selected time, then
auto-select selects
indicators for the
chosen time period.
Click in the Available pane to Auto Select all indicators in the
Available pane for which data is available.
To remove indicators from the Selected pane, highlight the
indicator(s) and click .
Indicator Classifications
Indicators are classified under seven types:
In Sector indicators are classified on the basis of their functionality.
Common sectors are Health, Education, Demography, etc.
In Goal indicators are organized on the basis of an agreed purpose or
objective. Common Goals are the Millennium Development Goals, the
National planning goals, etc.
Tip
Click on the column
header’s in the
Selected and
Available pane to
quickly sort the
indicators in
ascending or
descending order.
In Framework indicators are organized on the basis of a systematic
format or logical structure. Common frameworks are DFID’s
sustainable livelihoods framework and IFAD’s food security
framework.
In Theme indicators are grouped on the basis of a broad perspective.
Common themes are Poverty, Gender, etc.
In Source indicators are linked to the agency producing data for the
particular indicator. Common sources are Government, Nongovernment agencies, etc.
In Institution indicators are linked to Organization. Common
Institutions are UN, International NGOs, Government, etc.
In Convention indicators are classified on the basis of formal UN
multilateral treaties negotiated with a large number of states.
Common Conventions are Child Rights Convention, Convention on
Bio Diversity and Vienna Convention on Law of Treaties.
20
Selecting Time Period
Click on the Time Period tab in the navigation bar to access the Time
Period page. Here you can select the time period(s) for generating a
data view.
Notice that the time period page has two panes: Selected and
Available (Fig. 3.2).
Fig. 3.2 Time Period page
To select one or several time periods, drag the highlighted time
period(s) from the Available pane to the Selected pane
To remove a time period from the Selected pane, highlight the time
period and click . Click on the column header of available or
selected panes to sort the time periods.
21
Selecting Areas
Click on the Area tab in the navigation bar to access the Area page
and select areas. Here you can select the geographical areas for
generating the data view. If you have made a selection for
Indicator/Time, the data records for the chosen areas for the selected
Indicator(s) and Time period(s) is displayed in the data view.
Notice that the Area page has two page options: Name and Map (Fig.
3.3). You can select areas either by their name or on a map.
Selecting Area by Name
The name page is divided into three panes: Area tree, Available pane
and Selected pane.
Tip
Click on
to
select the level of area
from the drop-down list.
The Select highlighted
button will now select
areas for the specified
level.
Fig. 3.3 Area page
Each area has a unique
Area ID. The Area ID is
used to link the area
name with the map files
for the area.
The left pane displays the Area tree. Click on the area name or on to
the left of the area to reveal the sub levels of a given area.
The areas under the highlighted node are displayed in the available
pane. The available pane lists the Area name, Area ID and the level
at which the area exists.
22
Select areas to generate the data view based on the selected areas.
To select, drag an area from the Available pane and drop it in the
Selected pane or use other methods of making a selection as
explained on page 11.
The area appears in the Selected pane.
Selecting Area by Map
Click on the Map tab in the page option bar to view the map window
(Fig. 3.4).
Tip
In Map view, click
to
horizontally dock the
available and selected
panes. This lets you
view the map better.
Fig 3.4 Map option
In the Map view, the Available pane shows the map for the node
selected in the area tree. The map tool bar in the Available pane
helps you to achieve following tasks:
Change mouse to pointer mode. Point and click on Area to select
area. The selected area is highlighted and appears in the selected
pane.
View full extent of the map file.
Magnify the selected area to the pane extent.
Zoom inby a fixed magnitude.
Zoom out by a fixed magnitude.
Pan to a particular location on the map file.
Display Label (Area Name) on the map.
23
CHAPTER
4
Viewing Data
The Data page lets you view the data records of the selected
database.
You can view all the records in the database or view limited records
from the database by specifying the data parameters: Indicator, Time,
and Area.
The Data page contains nine page options (Fig. 4.1):
View: Displays data records. It includes following data elements: Time
Period, Area ID, Area Name, Indicator, Data Value, Unit, Subgroup
and Source.
Source: View the sources available and those selected for the data
view. Here you can remove or add new data sources.
Unit: View the Units available and those selected for the data view.
Here you can remove or add new units.
Subgroup: View the subgroups available and those selected for the
data view. Here you can remove or add new subgroups.
Statistics: View basic statistics for the data records: Count, Range,
Mean, and Standard Deviation.
Calculate: Perform calculations on the records in the data view:
Percent, 100 Minus, Composite Index, Subtotal, Transform Unit and
User defined formula.
Table: Open the Table wizard and create a table presentation.
Graph: Open the Graph wizard and create a graph presentation.
Map: Open the Map wizard and create a map presentation.
24
Data View
To generate a data view, click on the Data tab in the navigation bar
after selecting the data parameters: Indicator, Time and Area.
Tip
On the home page, select
the Data option in the Data
menu to view all the data
records for the selected
database.
Notice that there are eight columns in the data window: Time Period,
Area ID, Area Name, Indicator, Data Value, Unit, Subgroup and
Source (Fig. 4.1).
Data page options
Data Grouping bar
Right click to view
subgroup categories record
Tip
Click on any data column
header to quickly sort the
data in ascending or
descending order.
Uncheck to remove record
Data page navigation bar
Data records count
Tip
The export button
lets you export the data
from the data view into
the following file formats:
XLS, CSV, PDF, HTML,
XML, Database and
DevInfo Data Entry
Spreadsheet format
Fig. 4.1 Data View
You can use the right click menu option to expand the subgroup
column and view the subgroup categories. Subgroups are classified
under four categories: Age, Sex, Location and Others.
“Selected (27)”
displays the total number of records checked.
Notice that the data records have a checkbox to the left of each
record. Uncheck the checkbox to remove the record from the data
view. The data records that you have removed will not be considered
while generating a table, graph or map.
To make the deleted record available, click
filter window.
and select Reset in the
25
Data Page Navigation Bar
When you have a data view with too many records, the data view gets
paginated. The data view navigation bar helps in managing the data
view.
Tip
To prevent
pagination, uncheck
the Paging-Liners
per Page check box
in the general tab of
user preferences
window.
Click
to go to the first page of the data view.
Click
to display the previous data page.
Click
to display the next data page.
Click
to go to the last page of data view.
To move to a specific page, click
from the drop-down list.
and select the desired page
Data Grouping Bar
The data grouping bar helps you to organize the data view.
To group the data view, drag and drop the column headings into the
grouping bar area. You can change the order of grouping by dragging
the elements in the grouping bar and arranging them in the desired
order.
Drag the grouping element back to the data window to revert to the
default data view.
26
Data Sort
Click
to open the Sort window and organize the Data view (Fig.
4.2). The sort option allows you to specify the sort criterion and
arrange the elements of the various columns in the data view as per
the sort criterion. If you have a data view of several pages, the sort
function is applied to the current page view.
Tip
Use
to
change the order in
which the sort
function will be
applied.
Fig. 4.2 Page Option: Sort
You can specify multiple criteria for sorting. To specify criteria for
sorting, double-click on the element in the Available pane. The
element appears in the Selected pane. Click OK to apply the sorting
criteria and view the sorted records in the data view.
27
Data Filter
to open the Apply Filters window and screen the records
Click
appearing in the Data view (Fig. 4.3). As with the sort option, in case
of a data view of multiple pages, the filter option is applied to data
records in the current page.
Fig. 4.3: Page Option: Apply Filter
Check the box to the left of Most Recent to filter and view the data for
the most recent time period for an I-U-S and a given area.
The filter tool has two tabs: I-U-S and Data Value
Click on the I-U-S tab to set the minimum and maximum range for
each I-U-S combination. The records are filtered based on the
specified range. The default view displays only indicators. Click
to view the I-U-S combination.
The Data Value tab lets you filter records based on the data value
(Fig. 4.4).
28
Tip
If you have specified any
filter criteria under both
I-U-S and Data Value
tabs, only the I-U-S tab
filter criteria are applied.
Fig. 4.4 Data Value tab
Click on the text box to choose from the following options in the dropdown list:
• Between (two values)
•
Greater than (specified value)
•
Less than (specified value)
•
Equal to (specified value)
Click OK to apply the specified filters.
Click Cancel to reject the filters and exit the filter window.
Click Reset to revert to the default data view.
Before you can produce a table, graph or map based on the Data
View, you may need to further fine-tune the Data View. There are a
number of options to help you do this. Each option is explained below.
Once Data View contains the data you require, you are ready to click
on the Presentation tab to create a table, graph or map.
29
Viewing Statistics
Click on the Statistics tab to find out basic statistical values for the
I-U-S combinations included in the Data view.
The Statistics tab window displays several useful statistical values
Fig. 4.5 Statistics
Count: Displays the number of unique I-U-S combination records.
Minimum: Displays the minimum data value for a given I-U-S
combination.
Maximum: Displays the maximum data value for a given I-U-S
combination.
Mean: Displays the simple arithmetic mean for the range of data
values for a given I-U-S combination.
Standard Deviation: Displays the standard deviation for a given
I-U-S combination.
30
Viewing Sources
Use this view to select data coming from a particular source to create
a presentation or report. To view the available data sources:
1. Click on the Source tab. This opens the Sources page, which
is divided into two panes. The left pane lists the Available
Indicators and their Data Sources and the right pane shows
the selected Indicator - Sources. This page also gives you the
ability to select different Sources for different Subgroups or
Units of the same Indicator. Sources can be selected by the
Indicator-Unit-Subgroup triplet.
2. Select the Source for which you want to view data from the
Available pane.
3. Click on the View tab after selecting the data source to see the
data pertaining to the selected sources in the Data View.
Fig. 4.6 Source
31
Viewing Units
The Unit view shows the data units for the selected Indicators. An
indicator may have more than one unit. For example, the indicator
Adult Literacy may be measured in units of Number and Per cent.
To select a Unit,
1. Click on the Unit tab to view the Units of measurement of the
selected Indicators. This screen has two panes as shown in
Fig 4.4.
The left pane displays all the units used to measure a
particular indicator. The right pane displays your final selection
of units.
2. Click on the View tab after selecting units to see the data
based on the selected units in the Data View.
Fig 4.7 Units
32
Viewing Subgroups
Each indicator may have one or more Subgroups. For example, the
indicator Infant Mortality Rate may have the Subgroups of Male,
Female and Total.
To view Subgroups,
1. Click on the Subgroups tab. The Subgroups screen has two
panes as shown in Fig 4.5. The left pane displays the list of
Subgroups available and the right pane displays your selection
of Subgroup populations.
2. Select the Subgroups for which you want to view data and
3. Click on the View tab to view data for the selected Subgroups.
Fig 4.8 Subgroups
33
CHAPTER
5
Presentation Wizards
CARICOMINFO 1.0 has inbuilt presentation wizards to help you
prepare professional presentations and reports.
The wizards guide you through a series of steps to help you decide
the content and style of the output. The output is saved along with
the data sheet and data sources.
You can use the wizards to produce outputs in three formats: Table,
Graph and Map.
Table: Helps you prepare and save a Table presentation in seven
steps.
Graph: Helps you prepare and save a Graph presentation in four
steps.
Map: Helps you prepare and save a Map presentation in five steps.
34
Creating Tables
Before creating a table, make sure the data view contains the data
that you want to present as a table.
Click on the Table button in the Data Page Option bar to activate the
Table wizard.
The Table wizard involves seven steps. Steps 1 through Step 5 allow
you to modify the row and column settings and table formatting. Step
6 gives you a preview of the table. Step 7 lets you specify the table
name and save it in the gallery.
When you open the Table wizard, it automatically applies a default
setting for the rows, columns and other table formatting elements. It
straightaway takes you to Step 6 of the Table wizard (Fig. 5.1).
Tip
Use the filter option to
further refine your data
view before creating the
table.
Fig. 5.1 Table
Click Next to proceed to Step 7 and save the table in the Gallery with
the default formatting and presentation.
If you are not happy with the applied table format, you can go back to
Steps 1 through 5 and make the necessary changes.
Click Back to go to the previous step. You can also click on the
combo box and select the desired step from the drop-down list.
35
Step 1
In Step 1, you can specify the row and column elements that you want
to include in the table. You can also choose to insert aggregates—
sum, count, and mean—and categorize the data records.
Notice that the Step 1 window is divided into four panes (Fig. 5.2).
Tip
You can either use the
subgroup or the
elements of the
subgroups such as age,
sex, location, etc. This
gives you more options
for cross tabulation.
Fig 5.2 Rows and Column
Available Pane: Contains the list of elements that you can select for
the rows and columns. You can choose from the following elements:
• Indicator
• Time Period
• Unit
• Subgroup
• Area ID
• Area Name
• Age Group
• Sex
• Location
• Others
• Source
36
Column Pane: Displays the elements selected for the column(s) of
the table.
Row Pane: Displays the elements selected for the rows of the table.
To specify the elements for the row or column, drag and drop the
elements from the Available pane to the respective panes.
Tip
The Move up
and down buttons on the
row and column header
helps you to change the
order of the elements.
Aggregates Function Pane: Provides options for grouping the data
records and generating summary statistics such as sum, count, and
mean.
Check the box to the left of Aggregate Function to activate aggregate
menu. You can select from three available aggregate functions: Sum,
Count and Mean. Click on the radio button to the left of these options
to choose the desired aggregate function.
You can specify the criterion for grouping the data records and
applying the aggregate function. Click on the text bar below Groups
and select the criterion for grouping from the drop-down list.
Check the box to the left of Suppress Duplicate Headings to hide
any table headings that only for the column headings. For example, if
the table contains indicators with same units, then the units get
combined and are displayed in one cell.
Click Next to apply the changes and proceed to Step 2.
The drop-down list
for selecting the
grouping criteria
contains elements
selected for table
rows.
37
Step 2
In Step 2, you can specify the table title, footnotes, and choose to
color code the data (Fig. 5.3).
The Table wizard
allows you to specify
the color for a
maximum of 10
breaks.
Click to select method of break
Fig. 5.3 Step 2
Click on the text bar below Title to enter the table title.
Click on the text bar below Subtitle to enter table subtitle.
Check the box to the left of Footnote to display footnotes. The
footnotes will appear at the bottom of the table.
Tip
A data value with an
inline footnote will have a
red square on the top
right corner.
Check the box to the left of Inline to make the footnotes appear in the
cell along with the data value.
Check the box to the left of Apply Color to arrange the data into
breaks and assign a color for each break. You can group the data and
apply color for each indicator in the data view.
Click on the text box below Indicator to view and select the indicator
for applying breaks and color scheme.
38
To select the number of breaks, enter the desired number of breaks
in the text box below Breaks. You can set a maximum of ten and a
minimum of two breaks.
Click on the text box next to breaks to select the method of break.
You can choose from the following types of breaks:
Tip
Choose equal count to
distribute the data values
for the indicator ‘poverty
head count ratio’ into
four quarters to find out
which countries fall in the
fourth quarter.
Equal count: Data values are distributed across the specified breaks
so that each class interval has approximately same number of areas.
You can not change the ‘From’ and ‘To’ Columns. Choose the equal
count method if you want to divide the areas based on a quantile
classification.
Equal size: Data values are distributed across the specified breaks
so that difference between the ‘From’ value (lower class limit) and the
‘To’ value (upper class limit) is the same for all the class intervals.
You can not change the ‘From’ and ‘To’ Columns. Choose equal size
as the method of break to retain the inherent variation in the data
values.
Tip
Choose continuous when
you want to find out
which sub national
regions are close to the
national average for the
given indicator. You can
manually change the ‘To’
value to decide on the
appropriate class limits.
Tip
When you want to group
the data for the maternal
mortality ratio across
developed countries and
developing countries,
use the discontinuous
method to accommodate
the wide range of values
for the indicator across
the regions.
Continuous: You can change the value of ‘To’ column. On changing
the ‘To’ column in one class interval, the ‘From’ and ‘To’ columns for
all the intervals are automatically recalculated to ensure continuity.
The continuous method is useful when you want to manually set the
class limit while retaining the continuity across the class intervals.
Discontinuous: You can change both the “To” and “From” values.
On changing either of the values, the interval limits do not get
recalculated. The discontinuous method is very useful to group data
values that are widely dispersed
The default values are displayed in the text boxes below Minimum
and Maximum. You can set the Minimum and Maximum range value
for the data set. The values specified here influence the method of
break.
Specify the decimal precision in the text box below Decimal. The
upper and lower limits of the breaks are sensitive to the decimal
range, the data values can fall in one break or the other depending on
the decimal places.
39
The High is good option lets you apply the reverse color scheme for
indicators that measure the level of the negative factor.
For instance the indicator “Illiteracy rate” has an inverse relationship
with literacy. When you are deciding the breaks for such indicators,
you can set the high is good option to No to apply the color scheme in
reverse order.
Click Apply to apply the number and method of break specified
above.
The bottom portion of the window gives a preview of the break
ranges, count, and color applied to each range.
You can edit the Legend labels by clicking on the text boxes in the
legend column.
You can change the color for any data range. Click on the Color tab
for a range to choose the desired color from the color palette window.
Click Next to proceed to Step 3.
Tip
Specify the level of
classification
arrangement in the text
box above the
classification select
pane.
Specify classification level
Tip
Use
to modify
the order of both the
classification and column
arrangement.
Fig. 5.4 Step 3
40
Check the box to the left of Classification Arrangement to group the
data rows by Indicator Classification (IC) categories. You can choose
from the seven ICs: Sector, Goal, Framework, Theme, Source,
Institution, and Convention.
Highlight the IC type in the left pane to view the available categories
in the Classification select pane. The check boxes to the left of each
classification help you control the visibility of the classifying criterion in
the table.
Check the box to the left of Column Arrangement to change the
order in which the columns appear in the table.
Click Next to proceed to Step 4.
Step 4
In Step 4, you can specify the sort order for the elements in the table.
Notice that the Sort window has two panes: Available pane and
Selected pane (Fig. 5.5).
Tip
Use
to prioritize
the sort elements.
Fig. 5.5 Step 4
41
Along with Data Value, the Available column lists the elements
selected in the rows box in Step 1.
To select an element for sorting, drag and drop the element from the
Available pane to the Selected pane. The arrow pointer before the
element gives you the sort order. Click on the arrow to reverse the
sort order.
Click Next to proceed to Step 5.
Step 5
In Step 5, you can specify the formatting style for the table elements
(Fig. 5.6).
Fig. 5.6 Formatting the Table
To apply a style theme, click on the text bar below Format and
choose a style theme from the drop-down list. You can further modify
the theme settings by highlighting the formatting elements in the Item
pane and modifying the settings.
To create a custom theme, click on New, enter a theme name in the
pop up window and click OK. The theme name will appear in the
Format text bar. Select the custom theme from the format bar to
modify the formatting.
42
Click on the text bar below Font Name to select the desired font
from the drop-down list.
Click on the text bar below Font Style to choose from the styles
available in the drop-down list.
Enter the size in the text box below Font Size. You can also use the
arrow buttons to scroll to the desired font size.
Click on the color tabs below Font Color to modify the font color.
Click on the color tabs below Background Color to modify the table
background color.
Check the box to the left of Show Border line to make the grid
outline visible for the table. Uncheck it to hide grid lines.
Click Delete to delete an existing format theme.
Click Save to save the formatting changes to the selected format
theme.
Click Next to proceed to Step 6.
43
Step 6
In Step 6, you can preview the effect of the changes made in Steps 1
through Step 5. The output is presented as a Microsoft Excel
workbook. Notice that there are three worksheets in the workbook
(Fig. 5.7).
Fig. 5.7 Step 6
Table sheet displays the table created using the Table wizard.
Data sheet displays the Data View used to create the table.
Source sheet displays the list of data sources. It also gives you the
name and location of the current database. Here you can make
further changes to the table before saving it in the Gallery.
Click Save Report to save the I-U-S combinations and table format
options as a template. You can apply these settings on a
CARICOMINFO 1.0 database to quickly generate a table.
44
Click Next to proceed to Step 7.
Step 7
In Step 7, you can save the table in the Gallery (Fig. 5.8).
Fig. 5.8 Step 7
Specify a name for the table. By default, the table is saved in the
presentation folder. Click
to browse and save the table at a
different location.
Click Finish to save the table and exit the table wizard.
45
Creating Graphs
The graph wizard lets you create graphs based on the data view.
Click on the Graph option to activate the graph wizard.
Creating a graph involves four steps.
Step 1
In Step 1, you can select the elements for the X and Y Axis (Fig. 5.9).
Fig. 5.9 Step 1
Drag and drop elements from the Available box to the X-Axis and YAxis boxes.
46
Step 2
In Step 2, you can specify the title and subtitle for the base table used
to create the graph (Fig. 5.10).
Fig. 5.10 Step 2
Check the box to the left of Sort by Data Value to sort the table on
the data values of the first data column. You can change the order of
sorting by clicking on the arrow button next to the checkbox.
Click Next to start the process of specifying the graph type. Here the
graph wizard of MS Excel takes over and lets you choose from the
different types of graphs and other settings.
47
Step 3
In Step 3, the Excel chart wizard prepares a graph based on your
inputs. You can now preview the graph as a MS Excel workbook (Fig.
5.11).
Fig. 5.11 Step 3
The preview window contains four spreadsheets:
Graph sheet displays the chart.
Table sheet displays the table used to generate the graph.
Data sheet displays the data view on which the graph is based.
Source sheet displays the data sources and the current database.
Here you can make further changes to the graph.
48
Click Next to proceed to Step 4.
Step 4
Step 4 is the final step in the graph wizard. Here you can save the
graph in the gallery (Fig. 5.12).
Tip
Click
to browse and
save the graph at any
other location.
Fig. 5.12 Step 4
Specify a name for the graph to save it in the gallery.
The graph can be viewed in the Gallery. This graph can be copied into
other MS Office application with the help of the tools available in the
Gallery.
49
Creating Maps
The map wizard lets you link data to geographical units to create a
thematic map. The map helps you effectively visualize data and
communicate information on development trends within geographical
areas (countries, regions, etc) or administrative units (sub national).
It includes advanced functions for performing geo-statistical analysis.
You can create a wide range of thematic maps using gradients,
colors, patterns and charts and use these themes alone, or in
combination.
You can associate feature layers such as roads and rivers onto the
thematic map to improve its visual impact. You can also overlay the
thematic map on a three dimensional globe (a raster image) depicting
regions and landscape.
DevInfo projects the
thematic maps onto the
raster images from
NASA’s WorldWind
application.
Making a map in the Map wizard involves five steps. Click on the map
button in the data view to activate the Map wizard.
When you open the Map wizard, it automatically applies a default
color scheme to the data values of the selected indicators and
generates a map preview (Fig. 5.13).
Fig. 5.13 Map wizard
50
Click Next to accept the system suggested map and proceed to
Step 4 to preview the map in Excel.
To modify the map, click on the GO TO box and select Step 1 from
the drop-down list.
Step 1
In Step 1, you can modify the theme, specify the legend title and
decide on the statistical classification method and number of breaks.
You can also change the legend text and border color.
You can choose from a
maximum of ten breaks
and a minimum of two
breaks
Fig. 5.14 Step 1
Uniqueness of a theme
is defined by a
combination of IndicatorUnit-Subgroup and
Theme Type. Multiple
themes can be created
fro the same I-U-S but
different theme type.
By default, mapping module generates a color theme based on a
unique I-U-S combination.
Click on the text box below Theme to select a theme from the
dropdown list.
To modify the selected theme, click Edit.
To add a new theme, click New.
51
You can create a new theme or edit the existing one in the theme
dialogue box (Fig. 5.15).
Fig. 5.15 Theme dialogue box
Enter the theme name in the text box below Theme. Choose the I-US combination for the theme by clicking on the drop-down lists below
Indicator, Unit and Subgroup.
Next, choose from the four available theme symbols:
Color to represent data ranges with different colors or color
gradients. Use the color theme to present interval data such as Infant
mortality rate, etc.
Hatch to represent data ranges with different patterns. Use Hatch
Patterns to present nominal data such as subgroups— male and
female.
Dot Density to represent data by a number of dots corresponding
to the data values. Use dot density theme to represent absolute
numbers. It is not effective to use this theme for presenting
percentages.
Chart to represent data with a column chart over the map. It is an
effective method to compare different values.
52
Create a color theme
To create a color theme, click
.
Click OK to apply the color theme and close the theme window.
Click the text box below Legend Title to enter a title for the legend.
Enter the number of breaks that you want to use to represent the data
values in the text box below Breaks.
Specify the method of break. Click on the drop-down list next to the
break text box and select from the four types of break options:
Equal count, Equal size, Continuous and Discontinuous.
The Minimum, Maximum and Decimal values are generated from
the selected data. You can edit these values to set custom ranges
and decimal places.
Click Apply to implement the changes.
You can view the changes in range values in the columns below (Fig.
5.14).
Legend column displays the legend name. Click on the default name
to customize it.
From column displays the minimum value included in the range.
To column displays the maximum value included in the range.
Count column displays the number of areas included in each range.
Color column shows the default color scheme applied for each range.
To modify the color, click on the color tab and choose the desired
color from the color palette window.
The row of Missing Data lists the count of areas that were selected in
the Area page but do not have a data value available. You can
choose the color for the missing data areas by clicking on the color
tab.
Click Smooth to create a color gradient from the first to last color of
the range. Choose the color of the first and last range to apply a color
gradient for the in-between ranges.
53
You can also change the Border style for the geographical areas.
Click on the color tab below Border to change the default color for the
boundaries.
Click on the Border outline box to choose the desired border style
from the drop-down list.
To change the border thickness, click
you specify the thickness.
. The arrow buttons let
You can save the changes made to the number of breaks, break
legend and the legend color.
Click
to save the changes.
to open the legend window (Fig. 5.16) and choose
Click
from the available options. Check the boxes to the left of Labels,
Color and Legend to apply all or any of these options.
Fig. 5.16 Legend window
Click
to ignore any changes made to the default settings.
54
Create a Hatch theme
To create a hatch theme, click
. Notice that the Hatch theme has
the same options in Step 1 as the color theme (Fig. 5.17).
Fig. 5.17 Hatch theme
The only difference is that in the Hatch theme, you can change both
the color and the hatch pattern.
To change the polygon pattern, click on any cell in the polygon
column to choose the desired pattern from the drop-down list.
You can also change the color for the desired pattern by clicking on
the color tab.
55
Create a Dot Density theme
To create a dot density theme, click
.
Fig. 5.18 Dot Density theme
Click on the text bar under Legend Title to specify a name for the dot
legend (Fig. 5.18).
Click on the color tab under Style to open the color pop up window
and choose the desired color.
Click
Click
list.
to enter the desired font size for the marker.
to choose a different marker style from the dropdown
If you want to use a custom marker, click on the drop-down arrow
below Style and select the last item from the drop-down menu (Fig.
5.19).
You can modify the font and character by clicking and choosing from
the drop-down lists below Custom font and Custom Character
respectively.
56
Fig. 5.19 Custom Marker options
To modify the default data value that a dot represents, click on the
text bar below Value and enter the desired value.
Create a Chart theme
. The chart theme window lets you
To create a chart theme, click
modify chart display options (Fig. 5.20).
Fig. 5.20 Chart theme
Click on the text bar under Legend Title to specify a name for the bar
legend.
Check on the box to the left of View Data Value to display the value
for each bar. Uncheck to suppress the data value.
57
Click and drag the slider below Chart size to modify the size of the
bar.
By default a bar is created for each subgroup, associated with the
selected indicator.
Check the box to the left of Subgroup to display the subgroup on the
map. Uncheck the box to suppress the subgroup. Click on the color
tab next to each subgroup to change the color for each subgroup bar.
After deciding on the themes, click Next to proceed to Step 2.
Step 2
In Step 2, you can add a title, subtitle and disclaimer. You can also
modify the font style for various map elements.
Fig 5.21 Step 2
Enter the map title in the text bar below Title.
Enter the map subtitle in the text bar below Subtitle.
Enter the disclaimer in the text bar below Disclaimer.
58
To choose from available style themes, click on the text bar below
Template and select a theme from the drop-down list.
To add your custom style theme, click New. Enter a name for the new
style theme and make the desired changes to the map elements listed
in the Item pane.
The Item pane lists the elements of the map for which you can modify
the style format. Highlight an element to modify the default style
settings for the element.
To modify the font, choose the desired font from the drop-down list
below Font Name.
To modify the font style, choose the desired font style from the dropdown list below Font Style.
To modify the font size, click on the text box below Font Size and
enter the desired font size.
Click Next to proceed to Step 3.
Step 3
In Step 3 you can preview the map. The preview reflects the changes
made in Steps 1 and 2.
Notice that Step 3 window contains a vertical panel to the left and a
horizontal tool bar on the top (Fig. 5.22).
59
Fig. 5.22 Step-3
The left pane contains four panels—Theme, Layer, Features and
Inset. Click on the panel heading or on to expand and reveal panel
options.
Theme Panel
The Theme panel displays the legend for all the themes that you
created in Step 1. You can apply a theme from the theme panel.
Check the box to the left of the theme name. The window displays the
effect of the theme.
For the Chart theme and Color themes, you can change the color
option for the theme elements. To change the color for a theme range
or a chart bar, click on the color tab to the left of the range or
subgroup respectively.
For the Hatch theme, you can change the hatch pattern for each
range. Click on the hatch pattern tab to change the pattern.
The Counter on the bottom left of the screen gives you the latitude
and longitude position of the mouse pointer. It also gives you an
approximate reading of the extent of the thematic map that you are
viewing.
60
Layer Panel
The layer panel displays the shapefile name of the base layer and the
custom layer. Base layers are represented by plain icons
in layer legend, where as Feature layer and Custom Layers
are represented by colored icons.
represents Polygon shapefiles. Common examples of polygons
are administrative boundaries, lakes and national parks.
Base Layers are the
Polygon or Point
layers that define the
administrative
boundaries/location
of an area. Base
layers are rendered
based on theme
settings, while
feature and custom
layers are rendered
based on user
defined color and
patterns.
represents Point shapefiles. Common examples of points are
villages, hospitals, and service centers.
represents Line shapefiles. Common examples of lines are rivers,
rail networks and roads.
Click on the button to the left of the feature or custom layer to modify
the layer settings.
For a Polygon layer, you can set fill color, transparency and fill style.
You can also change the border color, border style and border width.
For a Line layer, you can change the border color, border style and
border width.
For a Point layer, you can change the marker color, marker style and
marker size.
Ordering of the layers affects the map display as the layers are
rendered in a bottom to top sequence. Highlight a layer and use the
layer toolbar or right click menu options to modify the layer order (Fig.
5.23).
61
Tip
Click
to zoom to the
highlighted layer. The
layer is displayed in the
preview window.
Fig. 5.23 Layer tool bar
To move the highlighted layer up by one step, do one of the following:
Click
in the layer tool bar.
Choose Move | Move Up from the right click menu option.
To move the highlighted layer down by one step, do one of the
following:
Click
in the layer tool bar.
Choose Move | Move Down from the right click menu option.
To move the highlighted layer to the top of all layers, do one of the
following:
Click
in the layer tool bar.
Choose Move | Move To Top from the right click menu option.
To move the highlighted layer to the bottom of all layers, do one of the
following:
Click
in the layer tool bar.
Choose Move | Move To Bottom from the right click menu option.
62
Feature Panel
The feature panel displays the default features associated with areas
in the database. The features could be a polygon, line or point map
file.
The Tool bar buttons help you achieve the following tasks:
Tip
After using any tool, click
to prevent applying
the tool effect to any
further areas.
Change mouse to pointer mode.
View full extent of map file.
Zoom in frame to zoom selected area to the pane extent.
Zoom in by a fixed magnitude.
Tip
When you use the
information button, the
area remains highlighted.
to remove the
Click
highlighting.
Zoom out by a fixed magnitude.
Pan to a particular location on the map file.
Information on the highlighted area.
The information window (Fig. 5.24) gives you details such as Area Id,
Area name, Data value, Indicator name, Unit, Subgroup and Time
period.
63
Fig. 5.24 Information window
Select to Highlight areas on the map.
Remove highlighting of a highlighted area.
Zoom to highlight areas. The map extent covers the highlighted
areas.
Labels to switch between displaying and hiding map labels.
Label Nudge to view uncluttered labels. Drag the label that you
want to displace. A leader line automatically connects the label with
the area (Fig. 5.25).
64
The default location of
label is the centroid of
the area. At times this
may be problematic for
areas where the centroid
position falls outside the
boundary of the area.
Nudge option helps you
to rectify the problem.
Fig. 5.25 Label Nudge
Edit Label to modify the label settings at three levels.
Tip
Modifying label settings
for the Active Selection
helps to focus on areas
using distinct label
settings.
Fig. 5.26 Label setting
•
•
Active Theme level: Label settings are applied to the active color
theme. All base layers are affected.
Active Layer level: Label settings are applied to the active layer.
65
To select the layer, highlight the layer in the layer panel.
•
Active Selection: Label settings are applied to areas selected
.
using
Tip
Replacing the base layer
helps when the map file
associated with the area
is outdated due to
changes in
administrative
boundaries. If the
updated map file is
available, it can be
substituted in place of
the old file residing in
database.
Insert North pointer into the map.
Hide left panel and provide more viewing space. Click on it again
to make the left panel visible.
Add layers such as roads, rivers, health centers and villages.
The Add Layer window (Fig. 5.27) displays the shapefiles available in
the database itself. It lists the map files for each available level.
Here the map files are available under two levels: Continent and
Country.
Fig. 5.27 Add layer
To select a shapefile, double-click on the desired shapefile from the
Available pane.
Click OK to add the layer and exit the window.
Click Apply to add the layer and select more layers from the window.
Click Cancel to exit the add layer window without selecting any
66
shapefile.
Click
Buffers are concentric
polygons drawn around
point or lines. Map buffer
is a very effective tool for
impact analysis under an
influence zone.
to access and use external shapefiles.
Replace Base Layer with an external layer.
Create Buffer zones around the line or point layer. The buffer
window lets you modify the buffer settings.
Fig. 5.28 Buffer settings
Click on the text box below Name to specify the buffer name.
Tip
Click on buffer layer after
from the
selecting
toolbar. The Information
dialog window will
display the count of
target features lying
inside the buffer. If the
target layer is a base
layer, then sum and
mean are also displayed.
Click and enter the area for buffer coverage in the text box under
Radius.
Click on the radio button next to Layer to choose the layer to which
you want to apply the buffering.
Click on radio button next to Customize to create your own buffering.
You can choose a point layer or line layer from the dropdown list.
Click on the text bar under Target to choose any particular layer from
the drop-down list where you want to apply the buffer.
Create Inset of specific sections of the map. The inset images
67
are placed along with the main map file. You can view them in Step
4. The Inset panel (Fig.5.29) lists the insets that you have created.
Fig. 5.29 Inset label
Check the box to the left of the inset name to make the inset visible.
Overlay the thematic map on a raster image. The image is super
imposed in NASA’s WorldWind application.
Create Time Series maps for all time periods available in the data
view. A Time series bar (Fig.5.30) appears at the bottom of the map
preview.
Fig. 5.30 Time Series bar
Most recent tab displays the latest data.
Auto Cycle tab lets you view animated map for all time periods in
sequence.
A tab is created for every time period for which data are displayed in
the data view.
Create Area series maps for all available levels of area in the
data view. An Area series tab (Fig.5.31) gets appended to the map
preview.
Fig. 5.31 Area Series bar
68
All tab lets you view all the levels in one map.
Auto Cycle tab lets you view animated map for each Area level in
sequence.
A tab is created for each level of area.
Click Next to proceed to Step 4.
Step 4
In Step 4, you can preview the map in MS Excel format.
Fig. 5.32 Map preview
The Excel workbook (Fig. 5.32) includes spreadsheets of the data
view and sources.
Click Next to proceed to Step 5.
69
Step 5
In Step 5, you can provide a name for the map presentation that you
created.
By default the map is saved in the Gallery. Click to save the map at a
desired location.
Click Finish to save the presentation and exit the map wizard.
70
CHAPTER
6
Gallery
CARICOMINFO 1.0 uses the Gallery to manage the Table, Graph and
Map presentations created in DevInfo. You can organize the objects
in different folders under the Gallery and transfer the objects directly
into MS PowerPoint.
To activate the Gallery, do one of the following:
In the Home page, place your mouse pointer over and click on
Presentations in the Gallery menu (Fig. 6.1).
Click on the gallery page tab in the navigation bar.
Fig. 6.1 Home page gallery menu
71
View objects in Gallery
Notice that the Gallery window is divided into two panes (Fig. 6.2).
Fig 6.2 Gallery window
The pane on the left lists items available in the presentation folder.
Highlight a presentation object to display in the right pane.
By default they are stored at the following location:
C:\DevInfo\ CARICOMINFO 1.0 \Gallery\Presentations
Click to open presentation objects from a different location.
Click to delete a presentation from the folder.
72
Create PowerPoint Presentation
You can copy the presentation objects directly onto MS PowerPoint in
the gallery folder.
Click to copy the selected presentation object to a slideshow.
The Copy to slideshow window appears.
Click New in the window to copy the presentation into a new file.
Click Open to copy into an existing presentation.
On choosing New/Open, the presentation window is split into three
panes (Fig. 6.3).
Fig. 6.3 Presentation window
The extreme right pane displays the presentation object in MS
PowerPoint.
Click
to close the slide show window pane.
73
CHAPTER
7
Reports
Creating Reports
The Reports wizard simplifies the process of creating a table
presentation in DevInfo. It helps you apply the table formatting options
and the I-U-S combinations to create a report in table format. You can
thus generate standard reports by applying the saved formatting
options to other databases.
Click on Reports tab in the Navigation bar to open the Reports
window. The report window lists all formats that you have already
created (Fig. 7.1).
Tip
Use Report to store
format for tables
generated on a regular
basis.
Fig. 7.1 Reports window
By default the report formats are saved under the following location:
C:\DevInfo\DevInfo 5.0\Reports
Click
to import report formats from a desired location.
74
Click to export reports to a desired location. The report files are
stored in .xml format.
Click
to delete the saved reports.
Highlight a report from the window and click
to match the I-U-S
combinations in the report with those of the database that you have
selected. The result of the matching process is displayed in a MS
Excel Worksheet (Fig. 7.2).
Fig. 7.2 Matching results
The first section of the report shows the list of Indicators present in
the report as well as in the current database.
The second section shows the I-U-S combinations present in the
report as well as the current database.
Only the matched I-U-S combinations will be considered to create the
table.
You can choose the level of Area for generating the table. Click on the
text bar next to Area Level and select the desired area level from the
drop-down list.
75
Check the box to the left of Data to generate the table based on the
data view that you have generated.
Click OK in the report window to generate the table. The table is
displayed in Step 6 of the Table wizard (Fig. 7.3).
Fig. 7.3 Preview Table in Reports wizard
Click Next to proceed to Step 7. In Step 7, enter the desired name
and click Finish to save the table in the Gallery.
76
CHAPTER
8
Calculate
CALCULATE PERCENT VALUES
Percent is calculated
as (Numerator X 100) /
Denominator.
The Percent Wizard calculates the percentage for a particular
Indicator – Subgroup set. To open this wizard, select the data for
calculation, then from the Data View, click on the Calculate tab, then
click on Percent.
The Indicator Selection screen of the Percent Wizard is divided into
two panes, the left pane, which displays the available Indicators Subgroups and the right pane that displays the selected Indicators Subgroups. To calculate percent using the wizard, follow the steps
given below.
STEP 1
Selecting Numerator
Select the Indicator you want to use as a numerator value from the
Available pane. If you select more than one Indicator the sum of their
data values is used as the numerator.
STEP 2
Selecting Denominator
Select the Indicator you want to use as a denominator value from the
Available pane. If you select more than one Indicator, the sum of their
data values is used as the denominator.
STEP 3
Assigning Properties
Assign the Sector, Class, Indicator, Unit, and Subgroup values for the
new Indicator. When you save the calculated values of the percent
77
function, the new Indicator values will be saved under these
properties. Change the properties by choosing from the drop down list
or type in new properties under each of the heads. Assign the decimal
places for calculation of percentage values.
STEP 4
Preview Calculations
Tip
You may modify the
calculations in the
preview sheet.
This step opens a preview spreadsheet in which you can view the
data values and the percentage calculations.
STEP 5
Saving the Data Entry Spreadsheet
Click on the Finish button to save the calculations to a new database
in the Data folder.
CALCULATE 100 MINUS
The 100 minus wizard helps in calculating the inverse percentage
data value for the selected Indicator. For example, you can use this
wizard to calculate percentage illiterate from percentage literate.
STEP 1
Selecting Indicator
The 100 Minus value
is calculated as 100 Indicator value.
The Indicator selection page has two panes. The left pane displays
the list of Indicators for which data is available and the right pane
displays the list of selected Indicators. Select only one Indicator from
the list of available Indicators.
STEP 2
Assigning Properties
Assign the Sector, Class, Indicator, Unit, and Subgroup values for the
new Indicator you are calculating. When you save the calculated data
values the new Indicator will be saved under these properties.
Change the properties by choosing from the drop down list or type in
78
new properties under each of the heads. Assign the number of
decimal places for the calculation.
STEP 3
Preview Calculations
The preview spreadsheet displays the data values and the
calculations.
STEP 4
Saving the Data Entry Spreadsheet
Click on the Finish button to save the calculations to a new database
in the Data folder.
CALCULATE COMPOSITE INDEX
Use this Calculate Wizard to combine a set of related indicators into
an index. The wizard allows you to assign weights to each indicator
selected.
STEP 1
Selecting Indicators
Select the Indicators you want to use for the Composite Index. The
Indicator selection screen is divided into two panes, the left pane
displays the list of available Indicators and the right pane displays the
list of selected Indicators. To view the Subgroups for the Indicators,
click on the Show Subgroups checkbox.
STEP 2
To Assign Weights and Scale
Assign weights to the Indicators by entering the percentage weight
against each Indicator. The sum of weights must be 100. Click on the
checkbox against each Indicator, to signify if “High is Good”. For
example, for the indicator Adult Literacy, “High is Good” = True, and
for the indicator Infant Mortality Rate “High is Good” = False.
79
STEP 3
Assigning Properties
Assign the Sector, Class, Indicator, Unit, and Subgroup values for the
new Indicator you are calculating. When you save the calculated data
values the new Indicator will be saved under these properties.
Change the properties by choosing from the drop down list or type in
new properties under each of the heads. Assign the number of
decimal places for the calculation. Enter the scale on which you want
to calculate the index by assigning the minimum and maximum values
to the scale.
STEP 4
Preview Calculations
The fourth step opens a preview spreadsheet in which you can view
the data values and the Index calculations.
STEP 5
Saving the Data Entry Spreadsheet
Click on the Finish button to save the calculations to a new database
in the Data folder.
CALCULATE SUBTOTALS
Use the Subtotal Wizard to sum up data values from low sublevels to
higher levels. For example, use this wizard to calculate state and
district totals from sub-district values.
STEP 1
Selecting Indicators
The Indicator selection screen is divided into two panes. The left pane
displays the available Indicators and the right pane displays the
selected Indicators. Select the indicators you want to subtotal from the
Available pane.
80
STEP 2
Selecting Levels
In this screen, the left pane shows you the level for the Indicator
selected in the previous screen, from the right pane you can choose
the level of data you want to derive. To choose the level, click on the
checkbox next to the level for which subtotals are to be calculated.
STEP 3
Preview Calculations
In the preview spreadsheet you can view the data values and the
scale calculations..
STEP 4
Saving the Data Entry Spreadsheet
Click on the Finish button to save the calculations to a new database
in the Data folder.
TRANSFORM UNIT
The Transform Unit Wizard converts one unit of measurement into
another using a valid multiplier. For example, use this wizard to
transform population size in thousands to millions.
STEP 1
Selecting Indicator
The wizard screen has two panes. The left pane displays the
available Indicators and the right pane shows you selection of
Indicators. Select the Indicator from the Available pane.
STEP 2
To Specify Target Unit and Conversion factor
Specify the Source Unit, the Target Unit and the Conversion factor.
For example, to convert Thousand to Million, the Target Unit is Million,
the Source Unit is Thousand and the Conversion Factor is 0.001.
81
STEP 3
Assigning Properties
The Target Unit is the
unit you want at the
end of the conversion
process.
The Source Unit is the
unit that you want to
transform.
Conversion Factor is the
value that is to be
multiplied to the Data
value to change the
unit.
In the Save As page, assign Sectors, Class, Indicators, and
Subgroup value for the new Indicator you are calculating. When you
save the calculation the new Indicator will be saved under these
properties. The default values are taken from the selections made by
you in the Data View page. Change the properties by choosing from
the drop down list or type in new properties under each of the heads.
Assign the decimal places to be used for calculation.
STEP 4
Preview Calculations
In the preview spreadsheet you can view the calculated data.
STEP 5
Saving the Data Entry Spreadsheet
Click on the Finish button to save the calculations to a new database
in the Data folder.
CALCULATE WITH USER DEFINED FORMULA
With the help of User Defined Formula wizard you can perform
mathematical calculations on one or more Indicators and derive a new
Indicator. Click on the User Defined Formula function from the
Calculate page to open the Wizard. To use the wizard, follow the
steps given below.
STEP 1
Selecting Indicators
The wizard screen has two panes, the top pane shows the list of
available Indicators that can be used in creating the formula.
To define a formula, click on the Indicator, and click on the numeric
function you wish to use from the buttons given. Validate the formula
you have created by clicking on the Validate button. This will check if
he formula you have created is numerically correct.
82
STEP 2
Tip
You can cancel the
Wizard at any stage
by clicking on the
Cancel button or go
back to the last step
by clicking on the
Back button. When
you click on the
Cancel button, you
will be prompted to
close the wizard.
Click on Yes to
confirm.
Assigning Properties
Assign the Sector, Class, Indicator, Unit, and Subgroup values for the
new Indicator you are calculating. When you save the calculated data
values the new Indicator will be saved under these properties.
Change the properties by choosing from the drop down list or type in
new properties under each of the heads. Assign the number of
decimal places for the calculation.
STEP 3
Preview Calculations
In the preview spreadsheet you can view the calculated data. Any
change made in the preview sheet will be reflected in the calculation
results.
STEP 4
Saving the Data Entry Spreadsheet
Click on the Finish button to save the calculations to a new database
in the Data folder.
83
APPENDIX
Menu Bar Options
File Menu
The File menu is available on all the pages. It has the following sub
menu options (Fig. A.1):
Fig. A.1 File menu
Open
You can use this option to open a database. You can open an offline
database (available on the local computer) or an online database
(available on the web).
Database Summary Report
You can use this option to generate a comprehensive summary of the
database.
It is a one-step process and provides you with useful summary
documentation of the database that can be filed for future reference.
The report is generated as MS Excel workbook with worksheets for
various database elements (Fig. A.2).
84
Fig. A.2 Database summary report
•
•
•
•
•
•
•
•
•
•
Summary: Provides the following database information: Name,
Date of creation and template name. It gives a total count for: data
records, Indicator, Unit, Subgroup, I-U-S, Area, Time period,
Source, language, Sector, Goal, Theme, Framework, Institution,
and Convention.
Indicator: Lists all Indicators in the database. Identifies indicators
that are global and have metadata.
Unit: Lists all Units in the database. Identifies Units that are global.
Subgroup: Lists all subgroups. Identifies subgroups that are
global.
I-U-S: Lists all I-U-S.
Time Period: Lists all Time Periods.
Area: Lists all Area Names, Area IDs, shapefile, Area level and
level name. Identifies Areas that are global. Provides the Start
Date and End Date for each shapefile.
Sector: Lists Sectors and associated sub sectors, and linked I-U-S
combinations.
Goal: Lists the Goal tree and I-U-S combinations associated to the
lowest level of each node.
Framework: List of the levels in the Framework and I-U-S
combinations associated at each level.
85
•
•
•
•
•
•
Institution: Lists Institutions in the Framework and I-U-S
combinations associated at each level.
Theme: Lists Themes in the Framework and I-U-S combinations
associated to each level.
Convention: Lists levels in the Convention and I-U-S combinations
associated to each level.
Source: Lists Source tree and I-U-S combinations associated to
the source.
Template Log: Log of action taken on the template with Date and
Time stamp. Identifies the user.
Database Log: Log of actions taken on the database with Date
and Time stamp. Identifies the user.
User Preferences
You can modify the display of CARICOMINFO 1.0 User Preferences
window. Note that there are six tabs in User Preference (Fig. A.3).
Tip
You can either use the
subgroup or the
elements of the
subgroups such as age,
sex, location, etc. This
gives you more options
for cross tabulation.
Fig. A.3 User Preferences
General
Product Path: Displays the path of application root folder. It cannot be
modified.
86
Product Name: Displays product name as it appears in the icon label.
As with the product path, you can only view it without modifying.
Auto-Select Filter Option: Check the box to automatically select the
Filter option. If the box is unchecked, the program will prompt you to
manually specify the filter options every time you use the AutoSelect utility.
Area Tree Sorted by Area ID: Check the box to set Area ID as default
sort option for the area tree.
The interface strings in
DI 5.0 can be viewed in
all he six official
languages of UN:
Arabic, Chinese,
English, French, Russian
and Spanish
Global Color: Check the box to assign a different color to the global
items. Click on the color tab to open the color palette and assign a
different color.
Click OK to apply the changes and exit the properties window.
Click Apply to save the changes and continue with the properties
window.
Click Cancel to discard changes and exit properties window.
Language
In the language tab, you can change the language and style settings
of the interface strings (Fig. A.4).
The interface strings can
be in a language
different from the source
language.
Fig. A.4 Language
87
Click on the Name box to change the language setting for the
interface string. To select a language, choose the language from the
drop-down list.
Click on the Font box to choose the desired font from the dropdown
list.
Click on Style box to choose the desired style from the drop-down list.
Click on Size box to scroll through and apply from available font sizes.
Click on the Source language box to choose the database language
strings. Choose a desired language from the drop-down list.
Indicator
The Indicator tab lets you select the viewing options for Indicator
Classifications. There are seven types in which indicators are
classified.
You can choose only
one of the Indicator
Classifications as default
view setting.
Fig. A.5 Indicator
Notice that there are two sets of icons—radio buttons to the extreme
left and check boxes to the left of the items (Fig. A.5).
88
Click the radio button to the left of the ICs to set it as the default view.
Check boxes to the left of the ICs to display each item. Uncheck to
hide. The classification by “Sector” is the default set by the program
and can not be unchecked.
Check the box to the left of the Show Unit and Subgroups item to
show the Indicator-Uni t-Subgroup grouping. Uncheck it to view only
the Indicator.
Data
The Data tab lets you select the elements and view order in the data
page of CARICOMINFO 1.0 (Fig. A.6).
Fig. A.6 Data
To select, drag and drop elements from the Available pane to the
Selected pane.
Click
to change the order in which you want the elements to
appear in the data entry module.
Check the Data View Alternate Row Color box to view the alternate
rows in a different color. Click on the color tab to change the default
color scheme.
89
Map
The Map tab lets you change the default map colors for the four
default breaks of map wizard (Fig. A.7).
Fig. A.7 Map
Define the first and the last color and click on Smooth button to
graduate the color shades for the middle two colors.
Sound
The Sound tab lets you choose the default sound file that plays when
the CARICOMINFO 1.0 is active (Fig. A.8).
90
Fig. A.8 Sound
Click on the Sound box and choose the desired music files from the
drop-down list. Click to browse for music files from other locations.
Click to enable or disable the background music.
Exit
Click on the exit button to exit CARICOMINFO 1.0. You can also use
the keyboard shortcut mentioned to the right of the exit button.
Help Menu
The help menu has four elements: Content, Tour, Support and About.
Support
Click Support to forward any queries to the online technical support
of DevInfo. The default e-mail program gets activated and a new email message window appears. The default e-mail id of the DevInfo
technical support team appears in the “To” bar.
91
About
Gives you information such as Product Name, Version Name, Logo,
Copyright notice and disclaimer information (Fig. A.9).
Fig. A.9 About CARICOMINFO 1.0
Click System Info to generate a detailed report of the hardware and
software setting of the computer.
92
INDEX
A
Activate Gallery, 71
Add layers, 62, 66
Add raster image, 68
Aggregate Function Pane, 37
Aggregates Functions available, 37
Apply Color in table, 38
B
Buffer button, 67
C
Calculate - Percent, 77
Calculate - Transform Unit, 81
Calculate - User Defined Formula, 82
Calculate - 100 Minus, 78
Calculate - Composite Index, 79
Calculate - Subtotal, 80
Calculate wizard, 77
CARICOMINFO 1.0 Home page, 13
Close slide show, 73
Column Pane, 37
Content Overview, 6
Contents, 3
Continuous, 39
Convention, 20
Copy to slideshow, 73
Create a Map, 50
Create Chart theme, 57
Create color theme, 53
Create Dot Density theme, 56
Create Graphs, 46
Create Hatch theme, 55
Create PowerPoint Presentation, 73
Create Time Series maps, 68
Creating Area series maps, 68
Creating standard reports, 74
Creating Tables, 35
D
Data Filter, 28
Data Grouping Bar, 26
Data Page Navigation Bar, 26
Data page Options, 24
Data parameters, 18
Data Sort, 27
Data View, 25
Database elements, 15
Database Summary Report, 84
Decimal range, 39
Default gallery location, 72
Default map color options, 90
Default report location, 74
Delete gallery presentation, 72
Deleting a Selection, 10
Disclaimer, 58
Discontinuous, 39
Display Label button, 23
Double-click, 10
Drag and drop, 10
E
Enter Table options, 38
Equal count, 39
Equal size, 39
Export, 9
Export report format, 75
F
Feature Panel, 63
Features of CARICOMINFO 1.0, 6
File Menu, 84
93
Filter, 9
Footnote, 38
Formatting options in Map, 58
Formatting options in Table, 42
Framework, 20
Methods of break, 39
Minimum and Maximum range, 39
Missing Data, 53
Most Recent filter option, 28
N
G
Gallery, 71
General User Preferences, 86
Goal, 20
Graph options, 46
Graph wizard, 46
H
Navigation bar, 8
New online connection, 15
O
Offline Database, 15
Online database, 15
Online technical support, 91
Open in file menu, 84
Help Menu, 91
High is good option, 40
P
I
Import report format, 74
Indicator Classification in Table, 41
Indicator Classifications, 20
Indicator viewing options, 88
Information, 9
Inline footnote, 38
Inset button, 67
Installing CARICOMINFO 1.0, 12
Institution, 20
Page Option Bar, 9
Pan button, 23
Pane Header, 9
Point layer, 61
Polygon layer, 61
Presentation Wizards, 34
Preview Graph, 48
Preview map, 59
Preview Map, 50
Preview Table, 44
Product Information, 92
L
Language and style settings, 87
Layer Panel, 61
Legend labels, 40
Legend title, 53
Line layer, 61
R
Raster image, 68
Replace Base Layer, 67
Reports wizard, 74
Row Pane, 37
S
M
Making a Selection, 10
Map pointer button, 63
Map theme options, 51
Map tool bar buttons, 63
Menu bar, 8
Save map, 70
Save Report, 44
Save Table, 45
Saving Graph, 49
Search, 9
Sector, 20
94
Selecting Area by Map, 23
Selecting Area by Name, 22
Selecting Areas, 22
Selecting graph X and Y Axis, 46
Selecting rows and columns, 36
Selecting Time Periods, 21
Setting sound options, 90
Sort, 9
Sort options in Table, 41
Source, 20
Statistics - Count, 30
Statistics - Maximum, 30
Statistics - Mean, 30
Statistics - Minimum, 30
Statistics - Standard Deviation, 30
Status Bar, 9
Suppress Duplicate Headings, 37
System Requirements, 11
W
World Wind, 68
Z
Zoom in button, 23
Zoom out button, 23
Zoom to selected button, 23
T
Table button, 35
Table elements in the available pane, 36
Table wizard, 35
Theme, 20
Theme Panel, 60
Time series bar, 68
Title bar, 8
Toggle View, 9
Tool Bar, 9
U
User Interface, 6
User Preferences, 86
V
View full extent button, 23
View objects in Gallery, 72
Viewing Sources, 31
Viewing Statistics, 30
Viewing Subgroups, 33
Viewing Units, 32
95
96
97