1
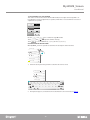
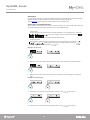
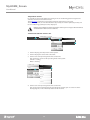
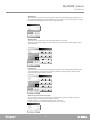
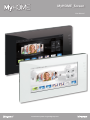
MyHOME_Screen
User Manual
www.homesystems-legrandgroup.com
MyHOME_Screen
User Manual
MyHOME_Screen
User Manual
Contents
Overview of MyHOME_Screen
5
Scrolling
5
Writing
6
Reorganising objects inside a page
7
Pushbuttons and connections
8
Status icons
9
Answering a video door entry call
10
Alarm notification
10
Receiving a message from the switchboard
10
Profiles11
Rooms12
Functions15
Multimedia16
Devices
16
Web browser
17
IP radio
17
Webcam, Weather, Web links, Rss
18
Settings19
Settings > Home
19
Home page skin
19
Change background image
19
Restore background image
19
Quicklinks
20
Settings > General
21
Info
21
Date and time
21
Network
21
Display
21
International21
Password
21
Beep
21
Settings > Profiles
22
Settings > Rooms
22
Settings > Functions
23
Scenarios > Scenario Module
23
Scenarios > MyHOME_Screen scenario
23
Energy
24
Video door entry
24
Settings > Alarm clock
25
Settings > Multimedia
27
3
MyHOME_Screen
User Manual
Add Quicklink
27
Browser
27
Settings > Ringtones
27
Control your My Home system
28
Lighting
28
Automation30
Temperature control
32
Video door entry
40
Sound system
41
Antintrusion43
Messages
44
Energy management
45
Scenarios
50
4
MyHOME_Screen
User Manual
Overview of MyHOME_Screen
1
2
5
3
4
1. Status bar with Status icons.
2. Quick access Pushbuttons.
3. Access to the Rooms, Functions, Settings, Multimedia pages.
4. Quicklinks.
5. Access to Profiles.
Scrolling
Touch and drag left or right to scroll. In addition to using your finger, you can also scroll by
touching the arrows, and .
For some pages, like the web pages, the screen can also be scrolled up or down. When scrolling
using your finger the content of the screen is displayed but no functions are activated.
5
MyHOME_Screen
User Manual
Writing
The screen keyboard appears automatically each time text needs to be entered.
q
w
a
e
r
t
y
u
i
o
s
d
f
g
h
j
k
z
x
c
v
b
n
m
p
l
?123
.
•
Capital letters: touch
•
Activate Capital block: to keep typing in capital letters, touch
•
Numbers, punctuation marks, or symbols: touch
symbols, touch 1/2 .
•
Accents and other alternative characters: touch and hold your finger on a key, and touch to
select an option.
e
è
q
w
a
followed by the letter.
é
ê
ë
€
e
r
t
y
?123
u
. To see other punctuation marks and
i
o
s
d
f
g
h
j
k
z
x
c
v
b
n
m
?123
twice in succession.
p
l
.
•
Hide the keyboard: touch
•
Delete text: touch
.
.
To correct mistakes move the cursor to the desired word using the
and
To change the language of the MyHOME_Screen keyboard see International.
6
arrows.
MyHOME_Screen
User Manual
Reorganising objects inside a page
You can change the position of items as you like by dragging them around the screen.
Touch and hold any item/link until a black area appears, and the icons in vertical sequence at the
side of the link
.
Gate camera
•
To change the name of the item/link touch
•
To change the URL and the name of a link touch
•
To remove the item/link touch
•
To move an item/link touch
(see Writing).
.
.
, and then touch any point in the dark area.
1
2
Gate camera
Gate camera
Gate camera
Gate camera
Gate camera
7
MyHOME_Screen
User Manual
Pushbuttons and connections
Left side
Right side
1
4
5
2
6
7
3
1. Secure Digital memory card connector.
2. USB-miniUSB connector for the connection of MyHOME_Screen to the PC.
3. USB connector for USB PenDrive.
4. Call answering pushbutton.
5. Door lock release pushbutton.
6. Cameras ON and cycling pushbutton.
7. Standby/reactivate pushbutton.
8
MyHOME_Screen
User Manual
Status icons
Icon
Meaning
Alarm clock ON
One or more alarm clocks are enabled. Touch
the icon to modify the alarm clock settings (see
Settings > Alarm clock).
Burglar alarm OFF
The burglar alarm is disabled.
Touch the icon to modify the burglar alarm
settings (see Antintrusion).
Burglar alarm ON
The burglar alarm is enabled. Touch the icon
to modify the burglar alarm settings (see
Antintrusion).
Sound ON
MyHOME_Screen sound is enabled.
MyHOME_Screen sound is disabled.
Sound OFF
1
Multimedia reader ON
A music track is being played. Touch the icon to
display the multimedia player (see Multimedia).
Alarm in memory
A system alarm has occurred. Touch the icon to
view the alarm details (see Antintrusion).
Stop&Go open
The Stop&Go is open. Touch the icon to access the
Stop&Go details page: it is possible to force
rearming if the device allows it. (see SYSTEM
SUPERVISION).
Incoming message (from
the switchboard).
One or more messages have been received from
the switchboard. Touch the icon to read the
messages (see Messages).
Professional studio
function ON
When a video door entry call is received the
associated door lock will open automatically.
Touch the icon to disable the function from the
settings screen Video door entry).
Call exclusion
No sound will be emitted by MyHOME_Screen
on receipt of a call. Touch the icon to disable the
function from the settings screen Video door
entry).
Handsfree function ON
When a video door entry call is received MyHOME_
Screen will answer automatically without the need
to touch any keys.
Touch the icon to disable the function from the
settings screen Video door entry).
Home icon, to return to the
main screen
Temperature measured
inside the zone set by the
software
9
MyHOME_Screen
User Manual
Answering a video door entry call
MyHOME_Screen receives a call from the entrance panel while in standby.
The centre of the display shows the image recorded at the entrance panel.
to answer the call, or press the # pushbutton at the side of MyHOME_Screen (see
Touch
Pushbuttons and connections).
to reject or end the call.
Touch
Touch
to open the door lock, or press the
pushbutton at the side of MyHOME_Screen
(see Pushbuttons and connections).
To switch the staircase light ON (if installed in your system), touch ON .
Use the
and
icons to decrease or increase the volume of the loudspeaker; press the
icon to switch OFF the microphone of MyHOME_Screen, changing the status of
.
Touch Video settings
to display the tools for adjusting the image shown on the display during
the video door entry call:
Video settings
Brightness
55%
Contrast
65%
Colour
40%
Use icons
and
to adjust brightness, contrast and colour.
Touch
to cycle the cameras of the system or press the
Screen (see Pushbuttons and connections).
pushbutton at the side of MyHOME_
Alarm notification
MyHOME_Screen receives an alarm notification while in standby.
The alarm message, with the time, date, type, and zone where the alarm has occurred, appears at
the centre of the display.
More info
Touch
to see the alarm details (see Antintrusion).
Ignore
Touch
to ignore the alarm and display it later.
When an alarm is ignored, the status bar shows the 1 , icon. Touch this icon to see the alarm
details (see Antintrusion).
Receiving a message from the switchboard
MyHOME_Screen receives a message from the switchboard while in standby.
Read
to see the message details (see Messages).
Touch
Ignore
Touch
to ignore the message and display it later.
When a message is ignored, the status bar shows the , icon. Touch this icon to see the message
details (see Messages).
10
MyHOME_Screen
User Manual
Profiles
Use the profiles to make the most of your MyHOME_Screen.
Inside the profile you can recall the most used functions with a simple touch
You can also enter customised notes.
Touch the profile card previously created using the software in the Home page.
1
5
3
2
4
1. Touch to return to the Home page.
2. Touch to customise the profile previously created by the software (see Settings > Profiles).
3. Touch to perform the function in the profile.
4. Touch to add a note to the profile.
5. Touch to customise the profile previously created by the software (see Settings > Profiles
11
MyHOME_Screen
User Manual
Rooms
Using Rooms, simply touch the card of a room to access its functions.
You can recall the functions enabled for the room with a simple touch.
Each card displayed belongs to a room of your home (e.e. living room, bathroom, kitchen, etc...).
Touch Rooms in the Home page.
1
1. Touch the floor where the room is located (if available).
2
2. Touch the card of the room to display.
12
MyHOME_Screen
User Manual
3
6
4
5
3. Touch to return to the room list page.
4. Touch to customise the room you are in (see Settings > Rooms).
5. Touch to return to the room list page.
6. Touch to execute the function in the profile (see Control your My Home system).
13
MyHOME_Screen
User Manual
CUSTOMISATION OF DESCRIPTIONS AND MOVING ITEMS
MyHOME_Screen gives the possibility of customising the descriptions of the functions entered,
and the position of the items inside the page.
1
1. Touch the item that you want to customise for a few seconds.
•
To change the name of the item/link touch
customisation can be entered (see Writing).
•
To move an item/link touch
14
. The keyboard appears, so that the desired
, and then touch any point in the dark area.
MyHOME_Screen
User Manual
Functions
Using Functions, simply touch the system card to access its functions.
Each card displayed belongs to a system of the installation (e.g. automation, lights, temperature
control, etc...).
Touch Functions in the Home page.
2
1
1. Touch the card of a system to access its functions Control your My Home system).
2. Touch to return to the Home page.
15
MyHOME_Screen
User Manual
Multimedia
From the Multimedia page it is possible to access the USB and SD ports. These can be used to
connect devices containing music or images, which can then be played using MyHOME_Screen.
The My Media Server function gives you the possibility of displaying the multimedia contents
found on all the PCs connected to the same network of MyHOME_Screen. Lastly, you can access
Web contents, like Web Radio, Rss, Web Browser, and Webcam.
Devices
Touch Multimedia in the Home page and then touch the card Devices.
Select USB To display and use the content of your USB key.
MyHOME_Screen will be able to play any music, videos and images.
Icons
,
,
,
give you the possibility to filter your USB key, distinguishing between
documents, music, videos, and images.
.
Before disconnecting the USB key touch
PLAYING AN AUDIO FILE
To play an audio file (MyHOME_Screen can only play mp3 files) touch the name of the track.
Freedom by Anthony Hamilton & Elayna Boynton.mp3
02 / 05:21
Touch
to go to the previous track, and
to go to the next track. Hold the finger on these two
icons to fast forward or rewind the track.
/
to pause or play the track.
Touch
Touch
to stop playback of the track; MyHOME_Screen will automatically switch to the
Multimedia page.
Touch
to return to the selection of the files without stopping playback of the track. You can
return at any time to the track being played by touching the icon in the status bar (see Status
icons).
and
to decrease and increase the volume.
Use icons
Touch
to disable the volume; the icon changes status ( ).
PLAYING A VIDEO FILE
To play a video file (MyHOME_Screen can only play mp4 files), touch the name of the video.
05 / 02:20
Touch
to go to the previous video and
to go to the next video.
Touch
/
to pause or play the video.
Touch
to disable the volume; the icon changes status ( ).
Use icons
and
to decrease and increase the volume.
Touch
to return to the selection of the file.
IMAGE PLAYBACK
To open an image (MyHOME_Screen can only open .jpg or .png images), touch the name of the
image.
10 seconds
Touch
to go to the previous image, and
to go to the next image.
Touch
/
to start or pause the image slide show.
The
and
icons can be used to decrease and increase the time each image will be displayed
(minimum 8 seconds, maximum 50 seconds).
Touch
to return to the selection of the file.
16
MyHOME_Screen
User Manual
Web browser
Touch Multimedia in the Home page and then touch the card Web browser.
To display a web page touch the address field (in the title bar), enter the URL, and touch
.
Scroll the web page moving your finger up, down, or sideways.
To reload a web page touch
.
To close a web page touch
.
Touch
and
to go to the previous page, or to the next one.
and then
or
to zoom in or out of the web page; touch
to bring the size back
Touch
to 100%.
IP radio
Touch Multimedia in the Home page and then touch the IP Radio card.
The list of IP Radio channels saved appears touch one to start broadcasting.
RTL 102.5
07 / : :
Touch
to go to the previous radio channel and
to go to the next radio channel.
Touch
/
to mute the radio, or start broadcasting.
Touch
to stop radio broadcasting; MyHOME_Screen will automatically switch to the
Multimedia page.
Touch
to return to the list of IP Radios.
Use icons
and
to decrease and increase the volume.
Touch
to disable the volume; the icon changes status ( ).
17
MyHOME_Screen
User Manual
Webcam, Weather, Web links, Rss
Touch Multimedia in the Home page and then one of the following cards Webcam, Weather, Web
links, Rss.
The functions “Webcam”, “Weather”, “Web links”, and “RSS” give you the possibility of displaying
or listening to Web contents. In order for this application to be enabled, the device must be
connected to a LAN network with ADSL service.
Warning: the help file only explains the “Webcam” function because MyHOME_Screen
manages also the “Weather “, “Web links”, and “Rss” functions in the same way.
2
1
1. Touch a webcam of the list to display it on the Web.
2. Touch to return to the Multimedia page.
18
MyHOME_Screen
User Manual
Settings
Use the Settings menu to access a range of advanced MyHOME_Screen settings and parameters.
Settings > Home
Settings > General
Settings > Profiles
Settings > Rooms
Settings > Functions
Settings > Alarm clock
Settings > Multimedia
Settings > Ringtones
Settings > Home
Home page skin
To change the skin of MyHOME_Screen, touch Settings > Home > Home page skin and select either
the Light or the Dark skin.
Warning: after selecting the desired language do not touch the MyHOME_Screen display
until this has restarted
Change background image
To change the background image of MyHOME_Screen, touch Settings > Home > Change
background image.
You can select the image from Images (the images pre-loaded in MyHOME_Screen will be
suggested), Last Used (the already previously used images will be suggested), USB (if a USB key is
connected to the corresponding port), SD (if a SD card is connected to the corresponding port), or
My MediaServer (if one or more PCs are connected to the LAN network, with file and folder sharing
enabled).
Restore background image
To restore the original MyHOME_Screen background image touch Settings> Home > Restore
background image and then touch Ok to confirm or Cancel to abort.
19
MyHOME_Screen
User Manual
Quicklinks
To add a link to the Home screen (maximum 7) touch Settings > Home > Quicklinks and then Add
Quicklink.
Connections to cameras/entrance panels and scenarios can be selected among the ones available
(the same that you find in the Functions page).
For connections to Web Page, Webcam, Rss, Weather, and Web Radio:
Add Quicklink
Type:
Add new link to a web page:
Web page
2
www.melablog.it
Camera
1
Melablog
Webcam
4
Rss
3
ADD
Select an existing web page link:
Weather
Corriere della sera
Scenario
La Repubblica
Web radio
Gazzetta
1
2
Save changes?
1.Touch Web page
OK
CANCEL
.
2. Enter the URL of the web page.
3. Enter a customised description to be associated to the web page.
4.Touch ADD to add the created link to the list of links.
Add Quicklink
Type:
Add new link to a web page:
Camera
www.melablog.it
Web page
Melablog
Webcam
ADD
Rss
Select an existing web page link:
Weather
5
Melablog
Scenario
Corriere della sera
Web radio
La Repubblica
1
2
6
Save changes?
6
OK
CANCEL
5. Touch the created link to select it (after selection this can also be deleted by touching
6.Touch
OK
to confirm or
CANCEL
).
to abort.
Warning: the procedure to add links to Web Page, Webcam, Rss, Weather, and Web Radio is
the same.
20
MyHOME_Screen
User Manual
Settings > General
Info
To display MyHOME_Screen configuration/address information touch Settings> General > Info.
Date and time
To change the date and the time of MyHOME_Screen touch Settings > General > Date and time.
and
to set the day, the month, and the year;
Use
use
and
to set the hours and the minutes;
after completing the modification, touch Ok to confirm, or Cancel to abort.
Network
To display and edit some MyHOME_Screen network parameters touch Settings > General >
Network.
To connect MyHOME_Screen to the network touch Network status and Connect; to disconnect
touch Disconnect.
Depending on your network parameters, touch IP configuration and select DHCP or Indirizzo IP
Static IP address.
After completing the modifications, touch Ok to confirm, or Cancel to abort.
Warning: after selecting the desired language do not touch the MyHOME_Screen display
until this has restarted
Display
To modify the MyHOME_Screen display parameters touch Settings > General > Display.
and
to decrease or increase the
To change the brightness touch Brightness; use
brightness of the display.
To adapt MyHOME_Screen to your touch, touch Calibration and then the icon until Ok ,
appears, which must then be touched twice.
To clean the display touch Clean, MyHOME_Screen will go in stand-by for 10 seconds. The
countdown will be shown on the display.
Note: The LCD screen has been manufactured using high precision advanced technology. It is
however possible to continually have up to 5 small black and/or luminous points (red, blue, green)
on the LCD screen. This is a normal result of the manufacturing process, and does not indicate
wrong and/or defective operation.
International
To change the MyHOME_Screen and the keyboard language touch Settings > General >
International.
Touch Text language to select the device language; touch Keyboard language to select the
language of the keyboard of the device.
Warning: after selecting the desired language do not touch the MyHOME_Screen display
until this has restarted.
Password
To change the password touch Settings > General > Password.
Touch Change Password a window will appear, for entering the current password (default
1234567), the new password select, and the new password again, to confirm.
After completing the password modification, touch Ok to confirm, or Cancel to abort.
Touch Disable to disable the password request, or Enable to enable it.
Beep
To set the sound mode every time the MyHOME_Screen display is touched, touch Settings >
to enable, or
to disable.
General > Beep and touch
21
MyHOME_Screen
User Manual
Settings > Profiles
To display and customise all the profiles previously created by the software touch Settings >
Profiles.
Touch a profile to customise it according to your needs.
To modify the image of the card touch Change card image.
You can select the image from Images (the images pre-loaded in MyHOME_Screen will be
suggested), Last Used (the already previously used images will be suggested), USB (if a USB key is
connected to the corresponding port), SD (if a SD card is connected to the corresponding port), or
My MediaServer (if one or more PCs are connected to the LAN network, with file and folder sharing
enabled).
To change the background image of the profile, touch Change background image (see Change
background image).
To add a link on the main screen of the profile touch Add Quicklink (see Quicklinks).
To restore the original MyHOME_Screen background image touch Restore background image and
then touch Ok to confirm or Cancel to abort.
Settings > Rooms
To display and customise the rooms of your home touch Settings > Rooms.
Touch the floor the room belongs to (if applicable), and then the room to customise.
To change the card image touch Change card image (see Settings > Profiles).
To change the background image of the room, touch Change background image (see Change
background image).
22
MyHOME_Screen
User Manual
Settings > Functions
Scenarios > Scenario Module
Touch Settings > Functions > Scenarios and then Scenario module > Start programming to access
the scenario modification or creation procedure.
Scenario configuration
If you didn’t cancel the scenario, you will add actions to the
pre-existing scenario. Press OK if you want to start scenario
programming, CANCEL if you wish to abort the operation.
1
Ok
Cancel
1. Touch to start the procedure for the creation of the scenario and then use the controls/
actuators of your system to modify the existing scenario. After operating the controls/
actuators, touch Ok to save the scenario.
To create a new scenario you must first delete the existing one.
Touch Scenario Module > Delete the Scenario followed by Ok o confirm.
To create a new scenario follow the above procedure.
Are you sure to reset the scenario?
2
2.Touch
Ok
Cancel
to confirm or
Ok
Cancel
2
to abort.
To activate the Scenario of the Scenario Module (see SCENARIO MODULE)
Scenarios > MyHOME_Screen scenario
Touch Settings > Functions > Scenarios followed by MyHOME_Screen Scenario to access the
procedure for the creation of MyHOME_Screen scenarios.
MyHOME_Screen Scenario
Activation
Days
M T
Action
W
T
F
S
Device action
ON
1
Ora
2
S
10
:
30
Save changes?
3
OK
CANCEL
3
1. Touch to change the time condition of the scenario, selecting the day or days.
2. Touch to change the time condition of the scenario, selecting the time the event shall occur.
3.Touch
OK
to confirm or
CANCEL
to abort.
To activate and enable the MyHOME_Screen Scenario (see MyHOME_Screen SCENARIO)
23
MyHOME_Screen
User Manual
Energy
Touch Settings> Functions > Energy to customise the energy parameter based on your need.
To set a tariff for each measured item (electricity, gas, etc.), touch Tariffs and then the item; use
and
to decrease or increase the tariff;
touch Ok to confirm or Cancel to abort.
It is possible to enter the monthly consumption goals for each meter. To do this touch
Consumption goals; MyHOME_Screen will notify when these goals have been reached/exceeded.
Select the row where to enter your consumption goal; touch
to enable (when enabled the
) icon is displayed) the goals. Then set the goal for each month, decreasing/increasing using
icons
and
.
Touch Ok to confirm or Cancel to abort.
It is also possible to enter and enable one, or maximum two instantaneous consumption
thresholds for each meter. To do this touch Thresholds, MyHOME_Screen will notify when these
thresholds are exceeded; select the row where to set the threshold.
Threshold 1
Enabled
Threshold 2
Disabled
Threshold 1
0.000 Kw
Threshold 2
0.000 Kw
Touch
to enable (if enabled, the
exceeded. To change the thresholds touch
) icon is displayed) an alarm when the threshold is
.
Threshold 1 (Kw)
00
000
Threshold 2 (Kw)
00
000
Ok
Cancel
Use icons
Touch Ok
and
to decrease and increase the threshold.
to confirm or Cancel to abort.
Video door entry
If the function Handsfree, s enabled, when a video door entry call is received, MyHOME_Screen
answers automatically without the need to touch any keys; touch
to enable the function, or
to disable it.
If the function Professional studio, is enabled, when a video door entry call is received, the door
lock associated is automatically released, without the need to touch any keys; touch
to
to disable it.
enable the function, or
If the function Ringtone exclusion, is enabled, no sound is emitted by MyHOME_Screen when a
video door entry call is received; touch
to enable the function, or
to disable it.
Associate
.
You can associate a Teleloop device to MyHOME_Screen by touching
24
MyHOME_Screen
User Manual
Settings > Alarm clock
To add an alarm clock touch Settings> Alarm clock and then Add alarm clock.
The alarm clock is added to the list. Touch it to change its settings.
Disabled
Repetition
MTWTFSS
Time
00:00
Ringtone
Beep
DELETE
to enable; if enabled the
icon is displayed.
Touch
In Repetition touch
to set/change the alarm clock parameters:
Alarm clock - date and time
Activation
Description
Days
New alarm clock
M
T
W
T
F
S
S
Click to enter the...
3
1
Once
1
Time
09
30
2
4
Save changes?
4
OK
CANCEL
1. Select the days when the alarm clock should go off, or if it should go off only once.
and
2.Use
to set the alarm clock time.
3. Enter a customised description to be associated to the alarm clock.
4.Touch
OK
to confirm or
CANCEL
25
to abort.
MyHOME_Screen
User Manual
In Ringtone touch
to select the type of alarm clock to use:
Alarm signal settings
Signal:
Select a source:
Beep
Sound system
8
Radio
5
Aux
Volume
Touch
6
USB
10%
7
SD
My MediaServer
Save changes?
OK
CANCEL
5.Select Beep To use MyHOME_Screen as alarm clock, or Sound system to switch a sound system
amplifier ON.
6.Use
and
to set the alarm clock volume.
7. Select the source to use for the alarm clock.
to activate the selection of the rooms.
8.Touch
Alarm signal settings
Signal:
Select a source:
Bedroom
Beep
10
9
Sound system
General
Volume
Power amplifier
11
10%
12
Save changes?
9.Use
and
12
OK
CANCEL
to select the room where the alarm clock will go off.
to return to the selection of the sources.
10.Touch
11. Touch to select which amplifier will be activated by the alarm clock.
12.Touch
Touch
DELETE
OK
to confirm or
CANCEL
to abort.
to remove the alarm clock.
26
MyHOME_Screen
User Manual
Settings > Multimedia
Add Quicklink
To customise the web content links (Rss, Rss Weather, Web radio, Webcam, Web Links), that it will
be possible to recall from the multimedia pages, the profiles, and the home page, touch Settings >
Multimedia > Add quicklink followed by the type of link to add/edit(see Quicklinks).
Browser
To customise the browser touch Settings > Multimedia > Browser.
Touch Change Home Page to change the page that will be displayed when the web browser
to save the browser history, or
to disable
opens; touch Enable history and then touch
saving; touch Clear history followed by Ok to delete the browser history, or Cancel to abort.
Settings > Ringtones
To set a dedicated ringtone for each type of call, message, alarm, etc., touch Settings > Ringtones.
Select the option to associate the ringtone to (e.g. Message Ringtone) and then use icons
to select the ringtone to associate among the ones available; use
and
to
and
decrease or increase the ringtone volume.
27
MyHOME_Screen
User Manual
Control your My Home system
Lighting
You can switch a light or a group of lights ON or OFF, adjust their intensity, as well as set the lights
to come on for set times.
Touch Functions in the Home page, and then touch the Lighting card.
SINGLE LIGHT / TIMED LIGHT AT SET TIMES
This control can be used to switch a single light ON or OFF. It also gives the possibility to set the
time the light stays on.
ON
OFF
Timer
Disabled
Use the
Touch
ON
and
and OFF icons to switch the light ON or OFF.
to set the ON time (1, 2, 3, 4, 5, 15 min. /0.5, 30 sec.).
GROUP OF LIGHTS
This control can be used to simultaneously switch ON or OFF a group of lights and dimmers.
ON
Use the
OFF
ON
and
OFF
icons to switch the light ON or OFF.
FIXED TIMED LIGHT
This control can be used to switch a light ON for the time set using the configuration software
(which can be changed directly from MyHOME_Screen).
ON
OFF
Timer
Enabled
00
00’
00”
Use the ON and OFF icons to switch the light ON or OFF.
Touch
to enable the ON time; if enabled, the
icon is displayed.
and
to set hour, minutes and seconds.
Use
STAIR LIGHT
This control can be used to activate the video door entry Stair Light function.
ON
Use the
OFF
ON
and
OFF
icons to switch the stair light ON or OFF.
28
MyHOME_Screen
User Manual
10 LEVEL DIMMER/100 LEVEL DIMMER
This control can be used to switch a dimmer ON or OFF, and to adjust its intensity. With a 10
level dimmer 10 levels of adjustment are possible, while with a 100 level dimmer 100 levels of
adjustments are possible.
ON
OFF
Light intensity
0%
Timer
Disabled
Use the
Touch
Touch
ON
e
and OFF icons to switch the light ON or OFF.
and
to adjust the dimmer intensity.
to set the ON time (1, 2, 3, 4, 5, 15 min. /0.5, 30 sec.).
CUSTOMISATION OF DESCRIPTIONS
With MyHOME_Screen it is possible to customise the descriptions of the functions.
Kitchen light
Living room dimmer
1
Bathroom dimmer
Light group
Dimmer group
Garden light
1. Touch the description that you wish to customise for a few seconds.
Table top light
Living room dimmer
Bathroom dimmer
Light group
Dimmer group
2
q
wLuce giardino
e
r
a
t
y
u
i
o
s
d
f
g
h
j
k
z
x
c
v
b
n
m
?123
p
l
.
2. The keyboard appears, so that the desired customisation can be entered (see Writing).
29
MyHOME_Screen
User Manual
Automation
It is possible to manage in a simple way all the automatisms of your My Home system, like rolling
shutters, shutters, motorized curtains, controlled sockets. watering system, etc.
Touch Functions in the Home page and then touch the Automation card.
OPEN/CLOSE and UP/DOWN CONTROLS
These controls can be used to open and close curtains, shutters, etc. with a simple touch. Based on
the programming of the installer, operation can be in two different ways:
•
normal mode:
the opening and closing movement is performed while the corresponding icon is touched (
/
or
/
), The icon changes status to confirm the movement (
/
or
/
).
When the icon is released, movement will stop automatically.
•
modalità normale:
The opening or closing movement starts when the corresponding icon is touched (
or
/
); during movement the icon changes status, showing the
icon; to stop the movement touch the Stop icon.
Stop
/
;
Examples of safe mode
1
1. While the icon is pressed the automatic device opens; when the finger is removed it stops.
2
2. While the icon is pressed the automatic device moves down; when the finger is removed it
stops.
Examples of normal mode
Stop
3
3
3. Touch the icon to activate the opening of the device; touch
Stop
icon to stop it.
Stop
icon to stop it.
Stop
4
4
4. Touch the icon to activate the opening of the device; touch
30
MyHOME_Screen
User Manual
AUTOMATION GROUP
This control can be used to activate several (2 statuses) automatisms at the same time. For
example, a single touch will switch ON or OFF all the fans inside the house.
ON
OFF
The movement is activated by touching
ON
, and stopped by touching
OFF
.
ON CONTROL
This control works as a pushbutton: the door lock is activated while the icon is pressed, and is
deactivated when the icon is released. If controlling the video door entry system door lock, the
activation time is set during the configuration of the door lock.
to activate the electrical door lock.
Touch
ON/OFF CONTROL
This control can be used to switch and automatism (e.g. fan, watering system, etc.) ON or OFF.
ON
OFF
Touch ON to switch the automatism ON(the status of the icon changes to
to switch it off touch OFF (the status of the icon changes to OFF ).
ON
);
CONTACT
This control provides a synchronised view of the status of a contact connected to the system.
ON
OFF
The active icon shows the status of the contact:
ON
= contact open.
OFF
= contact closed.
OPEN/CLOSE GROUP
This control can be used to activate several (3 statuses) OPEN/CLOSE automatisms at the same
time. For example, a single touch will open or close all the shutters of the home.
ON
OFF
CUSTOMISATION OF DESCRIPTIONS
MyHOME_Screen can be used to customise the descriptions of the functions (see CUSTOMISATION
OF DESCRIPTIONS).
31
MyHOME_Screen
User Manual
Temperature control
It is possible to control and regulate the heating or the air conditioning system using the zone
controls, based on personal current needs.
Touch Functions in the home page and then touch the Temperature control card.
The list of the systems, the non controlled zones (if present), the external probes(if present), and
the air conditioning system (if present) is displayed.
Warning: The management of the temperature control system is only possible if the Remote
Control function is active on the central unit.
TEMPERATURE CONTROL CENTRAL UNIT
CENTRAL UNIT
Central unit
1
Central unit
Weekly programs
2
Central unit
Season
Winter
3
Mode
Weekly
SEASON
Summer
Winter
Next program
3
Winter
Winter 1
1
Ok
Cancel
1. Touch to display your temperature control system.
2. Touch to display the status of the central unit.
3. Touch to select the operating mode of the central unit.
This operation is used to set the operating mode of the system:
Summer = cooling;
Winter = heating.
CENTRAL UNIT
SEASON
Season
Winter
Mode
Weekly
Weekly
4
4
Weekdays
Next program
Holiday
Winter 1
Antifreeze
Ok
Cancel
Manual
Off
Scenarios
4. Touch to select the operating mode of the central unit.
You can select the operating mode of your system: for example, you can select one of the
weekly programs, or set a fixed temperature for all the zones.
32
MyHOME_Screen
User Manual
Weekly Mode
This mode can be used to operate your system in automatic mode, following the program set on
the central unit; depending on your requirements, the programs set in the central unit can change
the temperature during the 24 hours, for each day of the week.
CENTRAL UNIT
Season
Winter
Mode
Weekly
Next program
Winter 1
Ok
Cancel
Weekday Mode
This mode can be used to select a specific daily profile for a set period.
The program is performed until the set date and time, after which the selected weekly program
will be activated.
CENTRAL UNIT
Season
Winter
Until date
Mode
Weekdays
12
Until date
/
01
/ 2013
12/01/2013
Until
Until
12:32
Next program
12
:
32
Winter 1
Ok
Cancel
Holiday Mode
This mode can be used to maintain (during extended absence, for example during holidays), the
system in Antifreeze or Thermal Protection mode, until the set date and time, after which the
selected weekly program will be activated.
CENTRAL UNIT
Season
Winter
Until date
Holiday
Mode
12
Until date
/
01
/ 2013
12/01/2013
Until
Until
12:32
Next program
12
:
32
Winter 1
Ok
Cancel
Antifreeze or Thermal Protection mode
You can decide to have one or more zones, or even the whole system, in antifreeze mode (or
thermal protection mode during the summer months).
In Antifreeze mode, a minimum temperature of 7°C is ensured.
In Thermal Protection, a maximum temperature of 35°C is ensured.
CENTRAL UNIT
Season
Winter
Antifreeze
Mode
Ok
Cancel
33
MyHOME_Screen
User Manual
Manual Mode
This mode can be used to set a constant temperature in all the zones of your system.
CENTRALE
Season
Winter
Manual
Mode
Temperature set
21.5°C
Ok
Cancel
OFF Mode
This mode can be used to switch OFF all the zone of your system.
CENTRAL UNIT
Season
Winter
Mode
Off
Ok
Cancel
Scenario Mode
This mode can be used to select one of the 16 summer scenarios or one of the 16 winter scenarios;
your system will operate automatically following the scenario set.
CENTRAL UNIT
Season
Winter
Scenario
Mode
Next scenario
Winter 1
Ok
Cancel
Timed Mode (4 zone central unit)
This mode can be used to operate the system in manual mode in all the zones for a set time.
CENTRAL UNIT
22.8°C
Season
Winter
Time
:
10
Timed
manual mode
Time
10:30
Temperature set
19.00°C
Ok
Cancel
34
30
MyHOME_Screen
User Manual
ZONES (99 ZONE CENTRAL UNIT)
For each zone, the zone name, the temperature measured, the operating mode, and the status of
the probe (-3, -2, -1, 0, +1, +2, +3) are displayed.
CENTRAL UNIT
Zone 3
20.4° C 21.0° C Auto
ZONE 3
MODE
20.4°C
1
Auto
Mode
Auto
2
Ok
2
Antifreeze
Cancel
Manual
Off
1. Touch to display the details of the zone.
2. Touch to select the operating mode of the zone.
ZONES WITH FAN-COIL FUNCTION (99 ZONE CENTRAL UNIT)
For each zone, the zone name, the temperature measured, the operating mode, the status of the
probe(-3, -2, -1, 0, +1, +2, +3), and the speed of the fan-coil are displayed.
CENTRAL UNIT
Zone 2
22.8° C 23.4° C Auto
ZONE 2
22.8°C
1
Auto
Mode
Fancoil speed
2
Auto
Ok
Cancel
1. Touch to display the details of the zone.
2. Touch to set the speed of the fan-coil.
THERMAL PROBE
The local offset of the probe is the adjustment of the knob of the probe found in each zone of your
temperature control system.
If the probe is in the position (antifreeze/thermal protection) or in the OFF position, no
adjustment will be possible using MyHOME_Screen. In this case, the settings can only be changed
using the probe knob.
ZONES (4 ZONE CENTRAL UNIT)
For each zone, the zone name, the temperature measured, and the status of the probe(-3, -2, -1, 0,
+1, +2, +3) are displayed.
CENTRAL UNIT
Zone 3
21.3° C -2
ZONE 3
1
21.3°C
1. Touch to display the temperature measured.
35
MyHOME_Screen
User Manual
ZONES WITH FAN-COIL FUNCTION (4 ZONE CENTRAL UNIT)
For each zone, the zone name, the temperature measured, the status of the probe(-3, -2, -1, 0, +1,
+2, +3), and the speed of the fan-coil are displayed.
CENTRAL UNIT
Zone 2
21.3° C +2 Auto
ZONE 2
21.3°C
1
Fancoil speed
2
Auto
Ok
Cancel
1. Touch to display the details of the zone.
2. Touch to set the speed of the fan-coil.
EXTERNA PROBES
In case of external radio probes installed in the system, the temperature measured by them can be
displayed.
EXTERNAL PROBES
External probes
External probe
13.6° C
EXTERNAL PROBE
13.6°C
NON CONTROLLED ZONES (4 AND 99 ZONES)
If the system includes probes for the measurement of the temperature only (non controlled zones),
it is possible to display the temperature measured by them.
NON-CONTROLLED PROBES
Non-Controlled Probes
Non-controlled zones
22.8° C
36
Non-controlled zone
22.8°C
MyHOME_Screen
User Manual
BASIC AIR CONDITIONING
Air conditioning in basic mode gives you the possibility of managing the splitters of the
system using commands previously entered by the software. If a temperature probe has been
associated to the splitter, MyHOME_Screen will be able to display the temperature detected in the
corresponding room.
AIR CONDITIONING
Air Conditioning
1
AIR CONDITIONING
Kitchen
20°C
2
Program
Off
Ok
PROGRAM
3
Cancel
4
Off
Cooling
Dehumidification
1. Touch to display your air conditioning system.
2. Touch the splitter to control.
3. Touch to select the program.
4. Select the program to be performed on the splitter.
ADVANCED AIR CONDITIONING
Use the advanced mode to manage the splitter as if you were using its remote control.
AIR CONDITIONING
Air Conditioning
1
Living room
20°C
2
LIVING ROOM
MODE
Program
Mode
Off
Off
3
Heating
Cooling
Fan
Dehumidifier
Automatic
1. Touch to display your air conditioning system.
2. Touch the splitter to control.
3. Touch to select the operating mode of the splitter.
4. Select the splitter mode.
OFF Mode
This mode is used to switch the splitter OFF.
LIVING ROOM
Program
Mode
Off
37
4
MyHOME_Screen
User Manual
Heating Mode
LIVING ROOM
Program
Heating
Mode
Temperature
19.00°C
Fancoil
Auto
Swing
Off
Ok
Cancel
Cooling Mode
LIVING ROOM
Program
Cooling
Mode
Temperature
19.00°C
Fancoil
Auto
Swing
Off
Ok
Cancel
Fan Mode
LIVING ROOM
Program
Fancoil
Mode
Fancoil
Auto
Swing
Off
Ok
Cancel
Dehumidifier Mode
LIVING ROOM
Program
Dehumidifier
Mode
Swing
Off
Ok
Cancel
38
MyHOME_Screen
User Manual
Automatic Mode
LIVING ROOM
Program
Automatic
Mode
Temperature
19.00°C
Fancoil
Auto
Swing
Off
Ok
Cancel
Warning: The control functions depend on the type of splitter installed on the system and
the software configuration.
Group controls
AIR CONDITIONING
Kitchen
Living room
Group of controls
39
MyHOME_Screen
User Manual
Video door entry
Depending on your video door entry system, you can control the door lock release or the staircase
light for each entrance panel, communicate with internal units or with an associated switchboard,
or display the system cameras.
Touch Functions in the Home page and then touch the Video Door Entry.card.
VIDEO CONTROL
This can be used to monitor your home by activating one of the cameras inside the apartment or
in the common areas.
Touch a camera.
The screen shows the image of the selected camera.
Warning: if the audio/video channel is occupied by another user the command is not
performed. Wait for the channel to be free and try again.
If a call is received from the entrance panel, the connection will be interrupted.
For further information on the operation of the corresponding see Answering a video door entry
call.
INTERCOM
This can be used to talk to other video/audio internal units installed in your home, or in other
apartments.
Select the type of call and push to talk
.
MyHOME_Screen calls the associated internal unit.
Warning: if the audio/video channel is occupied by another user the command is not
performed. Wait for the channel to be free and try again.
If a call is received from the entrance panel, the conversation will be interrupted.
Call in progress
Volume
50%
to end the call.
Touch
and
icons to decrease or increase the volume of the loudspeaker; press the
Use the
icon to switch OFF the microphone of MyHOME_Screen, changing the status of
.
40
,
MyHOME_Screen
User Manual
Sound system
You can control and manage your My Home sound system.
Touch Functions in the home page and then touch the Sound system card.
MUSIC SOURCE
You can choose the radio tuner, an external source (Aux), like for example a CD player (controlled
through the Stereo Control, or connected to the RCA input), MyHOME_Screen used as multimedia
source, or an external source (USB or SD), and the Media Server function.
SOURCE
SOURCE CHANGED
Source
Radio Source 1
Radio Source 1
1
Multimedia source
Usb
SD
MediaServer
1. Touch to select the source.
TUNE THE RADIO
MyHOME_Screen gives you the possibility of tuning the radio of your sound system.
SOURCE
SOURCE
Radio Source 1
FM Radio
107.00
radio - DEEJAY
1
1
2
3
4
5
2
1. Touch to manually change the frequency.
2. Touch to switch to another saved frequency.
AMPLIFIER
This control can be used to switch the amplifier ON or OFF, or to adjust the volume.
ROOM 1
AMPLIFIER A
Amplifier A
ON
1
OFF
Volume
50%
2
1. Use the
ON
e
icons to switch the amplifier ON and OFF.
OFF
e
2. Use the
to decrease and increase the volume.
GENERAL
This control can be used to switch all the amplifiers of the system ON or OFF, and to adjust their
volume.
GENERAL
General
Source
Volume
1
ON
and
1. Use the
2. Use the
ON
and
2
OFF
to decrease and increase the volume.
OFF
icons to switch the amplifiers ON and OFF.
41
MyHOME_Screen
User Manual
POWER AMPLIFIER
This control can be used to switch ON or OFF the power amplifier and to manage it.
POWER AMPLIFIER
Power amplifier
ON
1
volume
OFF
50%
2
Settings
1. Use the
ON
e
OFF
e
2. Use the
3
icons to switch the power amplifier ON and OFF.
to decrease and increase the volume of the power amplifier.
3. Touch to open the power amplifier management menu.
SETTINGS
Treble
-2
Bass
+2
4
5
Balance
0
6
Equalizer
rock
7
Loud
Off
8
and
4. To adjust the treble level from -10 to +10 use icons
and
5. To adjust the bass level from -10 to +10 use icons
6. adjust the balance from -10 to +10 use icons
.
and
.
.
7. Touch to select the equaliser curve.
EQUALIZER
Normal
Dance
Pop
Rock
Classical
Techno
Party
Soft
1
2
8. The activation of Loud mode enhances bass and treble frequencies when listening at low
volume. Touch to enable or disable Loud mode.
LOUD
ON
OFF
42
MyHOME_Screen
User Manual
Antintrusion
You can control and manage the status of the burglar alarm system.
Touch Functions in the home page and then touch the Antintrusion card.
System
disabled
1
Alarm Log
1
3
Night
Scenario
2
Zones
entrance
tavern
attic
garage
living roo
kitchen
bedroom
children b
MODIFY THE ZONES
1. ENABLE/DISABLE THE BURGLAR ALARM
To enable the system touch
to disable the system touch
.
In both cases enter your user code for the burglar alarm central unit.
If the wrong code is entered , appears, otherwise the screen will show , If the sound system
is enabled on the burglar alarm central unit, the message, “enabled”/”disabled” will be heard.
indicate the status of the zones; in the examples, zones 1, 2, 4 and 5
The icons entrance / attic
are enabled/included, while zones 3, 6, 7 and 8 are disabled/excluded.
Enable/Disable the zones
With the whole burglar alarm is disabled (
) it is possible to disable or re-enable one or
more zones of the system. This gives you the possibility of customising the operation of the
system following your specific needs.
For example, you can exclude the infrared sensor zones, leaving the perimeter zones
active (entrance door and windows), so that you can move freely around your home whilst
preserving your safety.
This customisation is only possible when the system is disabled, and is performed using the
icons of the individual zones.
MODIFY ZONES
To separate the zones, touch the zones to enable, followed by
; you will be asked
to enter the code. Once the code has been entered, touch
to enable the system. You will
be asked to re-enter the code.
2. SCENARIO
Touch a scenario with a pre-set separation, and then touch
will be asked to enter the code.
to enable the system. You
3. WHAT TYPE OF ALARM HAS OCCURRED?
Touch to display the type of alarm that has occurred. The following information will be
displayed: type of alarm, zone where the alarm has occurred, date and time.
There are four types of alarms: intrusion, tampering, panic, and technical.
REMOVE ALL
to delete all the alarms.
Use
43
MyHOME_Screen
User Manual
Messages
You can receive and display text messages from the switchboard.
Touch Functions in the home page and then touch the Messages card.
The
icon indicates that new messages have been received.
After the message has been opened, the icon changes status to
.
REMOVE ALL
Touch
to delete all messages.
1 Message
From the 15/02/2013 works will start for
the refurbishment of the apartment on the
second floor in front of the lift.
We apologise for any inconvenience that this
may cause.
We remain at your disposal for any problems
you may experience in connection with this
work.
Thank You.
REMOVE ALL
Touch
Touch
to delete the displayed message.
to answer the message from the switchboard.
44
MyHOME_Screen
User Manual
Energy management
This can be used to check the status of energy loads, display energy consumptions/productions,
and monitor the electric system, intervening on Salvavita rearming devices as necessary.
Touch Functions in the home page, and then touch the Energy management card.
SYSTEM SUPERVISION
This can be used to display STOP&GO devices and check that the loads of the My Home system are
working correctly.
Stop And Go
SYSTEM SUPERVISION
System supervision
Stop and Go
Closed
STOP AND GO
1
Auto
Close
1. Touch to disable automatic rearming in case of disconnection of the circuit breaker..
Stop And Go Plus
SYSTEM SUPERVISION
System supervision
Stop and Go Plus
Open
STOP AND GO PLUS
Auto
Close
OPEN
CLOSE
Check
Enabled
1
2
3
1. Touch to disable automatic rearming in case of disconnection of the circuit breaker.
2.Touch
to force the opening of the circuit breaker; touch
Open
3. Touch to disable system check. In this way, by touching Close
circuit breaker closed without the need to perform a test.
Close
to force its closure.
it will be possible to force the
Stop And Go BTest
SYSTEM SUPERVISION
System supervision
Stop and Go BTest
Close
STOP AND GO BTEST
Auto
Close
Test every
3
2
180
Ok
1
Cancel
1. Touch to disable automatic rearming in case of disconnection of the circuit breaker.
2. Use the
3.Touch
e
Ok
to set the frequency of automatic tests (number of days between tests).
to confirm or
Cancel
to abort.
Load Diagnostic
The “Load Diagnostic” function gives the possibility of checking that the loads are working
correctly, by measuring the earth leakage current absorbed by the same.
SYSTEM SUPERVISION
System supervision
Load diagnostic
LOAD DIAGNOSTIC
Washing machine
Ok
Oven
Attention
Microwave
Danger
The icon indicates that the load is working correctly; the icon indicates that the load is working
correctly but the earth leakage current is close to the limits of the standard; the icon indicates
that the earth. leakage current has exceeded the limits of the standard, causing the opening of the
Salvavita
45
MyHOME_Screen
User Manual
CONSUMPTION/PRODUCTION DISPLAY
This can be used to monitor the consumption and the production of energy for: electricity, gas,
water, heating/cooling, hot sanitary water.
This can be used to display the global goals set by the user using
the software, for “Electricity” and “Gas”, in a chart or table format.
Global view
Display the electric power consumed or produced by the system.
Electricity
Water
By connecting a pulse counter to a Water meter with pulse
output, it is possible to display the corresponding consumption/
production on the system.
Gas
By connecting a pulse counter to a Gas meter with pulse output,
it is possible to display the corresponding consumption on the
system.
Hot Water
By connecting a pulse counter to a Hot Water meter, or to the
corresponding pulse output of a heat measurement central unit,
found in the apartment user modules (in case of central heating), it
is possible to display the corresponding system consumption.
Heating/Cooling
By connecting the pulse counter to a Heat meter with pulse output
it is possible to display the calories/frigories measured on the
Heating/Cooling system (in thermal kWh).
Global view
Global view
Value
Line
Consumption 01:2013
Goal
Delta
Electricity line 1
201,00 kWh
239,00 kWh
- 38,00 kWh
Electricity line 2
206,00 kWh
166,00 kWh
+ 40,00 kWh
Electricity line 3
65,69 kWh
205,00 kWh
- 139,31 kWh
Electricity line 4
122,00 kWh
180,00 kWh
- 58,00 kWh
Electricity line 5
240,00 kWh
220,00 kWh
+ 20,00 kWh
€
Unit
Electricity
CONSUMPTION/PRODUCTI...
consumption/production
Electricity line
1
1
1. Touch to display electricity consumption/production information.
Warning: This manual only describe the control of Electricity; MyHOME_Screen manages all
the energy controls in the same way.
46
MyHOME_Screen
User Manual
Electricity line
General
1
Kitchen
Garage
Bathroom
390,552 kWh
110,695 kWh
90,687 kWh
98,514 kWh
Jan 2013
instant consumption
Jan 2013
instant consumption
Jan 2013
instant consumption
Jan 2013
instant consumption
1,125 kW
10 W
0W
210 W
Detailed information
1. Touch a line to display detailed consumption/production information:
General
2
5
Day
Month
Year
€
kWh
Month
01/2013
kWh
Instant
consumption
15,00
12,00
3
1,125 kW
9,00
Month cumulative
consumption
6,00
3,00
0,00
4
1
5
10
15
20
25
390,552 kWh
30
Day
5
2. Touch to toggle between months and days.
3. Indication of the instantaneous consumption.
4. Indication of the total consumption.
5.Touch Day or the green line on the chart to display the graphic information split by days;
When the line is touched, the center of the display shows a window giving the possibility to
select the day to display in chart format.
Select a date
16/01/2013
7
Ok
6
6. Touch to select the date.
7. Touch to confirm.
47
MyHOME_Screen
User Manual
General
Day
Month
Year
€
Day
16/01/2013
kWh
kWh
1,00
Instant
consumption
0,80
1,125 kW
0,60
0,40
Day cumulative
consumption
0,20
16,975 kWh
0.00
6
0
12
18
24
Time
Touch
to display the consumption details in a table format:
General
Day
Month
Year
€
Time
kWh
Time
kWh
Time
kWh
0
1
2
3
4
5
6
7
0,94
8
9
10
11
12
13
14
15
1,05
16
17
18
19
20
21
22
23
0,10
1,65
1,52
0,30
0,40
0,35
0,60
0,63
48
1,32
0,90
0,80
0,89
1,04
1,16
0,38
0,15
0,18
0,39
0,51
0,63
0,69
0,39
kWh
Day
16/01/2013
Instant
consumption
1,125 kW
Day cumulative
consumption
16,975 kWh
MyHOME_Screen
User Manual
LOAD MANAGEMENT (WITH LOAD MANAGEMENT CENTRAL UNIT INSTALLED)
The load management central unit gives the possibility of controlling the power engaged,
to prevent power disconnection by the meter, excluding loads (like oven, washing machine,
microwave, etc.), following the priority level set by the installer.
LOAD MANAGEMENT
Load management
1
1 Oven
Control Enabled
2 Washing machine
Load Forced
OVEN
2
3
Control
Enabled
instant consumption
1,5 kWh
3 Microwave
Load Disconnected
Partial 1
RESET
4 kWh
4
Partial 2
4
RESET
6 kWh
€
kWh
5
The icon indicates that the load is managed by the load management central unit; icon
indicates that the load has been forced and is not managed by the load management central unit;
icon indicates that the load is disconnected.
1. Touch to access the load management function.
2. Touch the load to display.
3. Touch to force the load; touch icons
(default 2 hours and 30 minutes).
and
to decrease or increase the forcing time
Force the load
Time: 02:30
Cancel
Force
4. Touch to reset the consumption meters.
5. Touch to toggle from kWh to cost display, and vice versa.
LOAD MANAGEMENT (WITHOUT LOAD MANAGEMENT CENTRAL UNIT INSTALLED)
If no load management central unit is installed in the system, and advanced actuators are used,
this application gives the possibility of checking the consumption of the loads (e.g. oven, washing
machine, microwave oven, etc.).
LOAD MANAGEMENT
Load management
OVEN
1 Oven
1
2 Washing machine
3 Microwave
2
instant consumption
1,5 kWh
Partial 1
RESET
4 kWh
3
Partial 2
3
RESET
6 kWh
€
kWh
1. Touch to access the load management function.
2. Touch the load to display.
3. Touch to reset the consumption meters.
4. Touch to toggle from kWh to cost display, and vice versa.
49
4
MyHOME_Screen
User Manual
Scenarios
It is possible to enable and modify the scenarios of your My Home system.
Touch Functions in the Home page and then touch the Scenarios card.
SCENARIO OF THE SCENARIO MODULE
SCENARIO MODULE
Scenario Module
module
Activate
To activate a scenario saved in the scenario module touch Scenario module and then Activate to
activate the scenario. If the command is sent successfully, the symbol appears.
To modify a scenario, or to create a new one, touch
(see Scenarios > Scenario module)
PROGRAMMED SCENARIO
PROGRAMMED SCENARIO 1
Programmed
Scenario
Scheduled scenario
START
STOP
This scenario can be used to send a range a controls following one or more actions occurred at a
set time.
It is possible to manage up to 20 of the 300 scenarios configured in the Scenario Programmer.
For this scenario, the four possible actions are:
– Start - Stop AVVIA - ARRESTA .
These are sent to force the start and the stop of the scenario, irrespective of the condition
programmed.
.
– Disable scenario - Enable scenario
These can be used to disable / enable the scenario without executing it.
The scenario will be executed when the programmed conditions occur.
MyHOME_Screen SCENARIO
MyHOME_Screen Scenario
MyHOME_Screen
Advanced scenarioScenario
START
Disabled
This scenario can be used to send a command at a set time, if a certain condition occurs on a
device (e.g. the adjustment level of a dimmer,or the temperature measured by a specific probe).
It is possible to manage up to 20 scenarios.
For this scenario, the two possible actions are:
–Start AVVIA .
The scenario is executed irrespective of the programmed conditions
.
– Enable scenario - Disable scenario
This gives the possibility of enabling/disabling the scenario without executing it.
The scenario will be executed when the programmed conditions occur.
To modify the time condition or the condition of the device of the scenario touch
> MyHOME_Screen scenario)
Example of MyHOME_Screen scenario
The watering system comes on in the garden (action)
at 20.30 (time condition)
50
(see Scenario
MyHOME_Screen
User Manual
51
Legrand SNC
128, av. du Maréchal-de-Lattre-de-Tassigny
87045 Limoges Cedex - France
www.legrand.com
Legrand SNC reserves at any time the right to modify the contents of this booklet and to communicate,
in any form and modality, the changes brought to the same.
BTicino SpA
Viale Borri, 231
21100 Varese
www.bticino.com