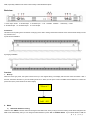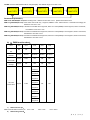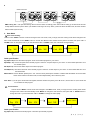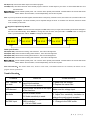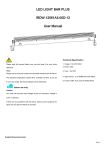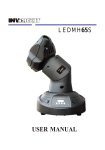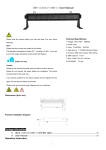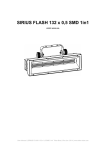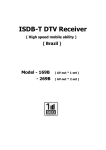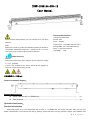
1
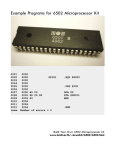
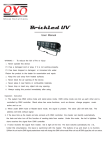
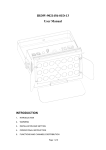
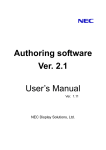
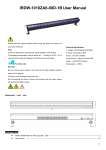
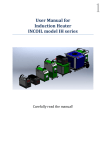
IRDW-12561A4-00D-12
User Manual
Technical Specification:
1.Votage: 220-240V 50HZ
Please read this manual before your use and keep it for your future
2.Power: 23W
3.Fuse:1A/250V
reference.
4.Light Source: ¢10 RGBA LED each 64pcs
Note:
Please use to avoid any caustic and resolvable chemistry for the fixture.
The operation temperature is below 40℃,humidity is 0~95%. If you use
it out of this range, the fixture will be shorten the lifespan.
5.Fuction:DMX, Auto, Sound;Master/Alone
6.Size:L1124*W114*H161mm
7.Net Weight: 5 KG
Indoor use only
Caution:
Please must use the same input voltage as per our instruction. Voltage
in ±10℅ is allowed.
If there is any problems for the fixture, please call the engineer for
repair. Do not open the fixture by yourself.
产品外形尺寸:(单位 mm)
Product installation diagram:
Package information
z
IRDW-12561A3-00D-12 LEDBarLight------------------------------------------------------------------------
z
User manual -----------------------------------------------------------------------------------------------------------1pc
1pc
Operation Instruction:
Product introduction
IRDW-12561A4-00D-12 is a LED Wall washer with 64 each of ¢10 RGBA LED. The function are DMX, Audio and Auto, and
Master / Slave linkable. It can make the color change, dimming, Strobe, Fade effect. It is easy operation, cheaper, easy installation LED
第 12 页
共 28 页
Wash, especially suitable for the wash of Home Party and Entertainment place.
Backview:
1. Power input / FUSE 2. 3P DMX Input 3. 5P DMX Input 4. UP 5.DOWN 6.MENU
9. 3P DMX Output 10. 5P DMX Output
7. Sensitivity 8. MIC
11. Power Output
Installation:
This fixture can be putting in the flat surface or hanging on the wall or ceiling. Please insure that the screw must be fixed closely to avoid
any accident occur.
a) Flat surface installation
b) Hanging installation
Function:
1.
Back Up
When the fixture get power, the system will be back up to the original setting. The display will show the below information. After 2
seconds, the fixture will return to your last working mode. E.G.: When you set up the mode to be DMX and the address is 1 before the
power shut off, the power will show the same display.
*Reset*
DMX comm
Add 001
2. Mode
a)
DMX mode & Address setting:
Hold the button “MENU” until the mode was changed to the DMX mode, loose you finger, then the working mode will be changed to the
DMX mode automatically. Also you can change the DMX address to press “UP” or “DOWN” Button. If you hold the button of “UP” or
第 13 页
共 28 页
“DOWN”, then the DMX address will be changed rapidly. The address range is from 001 to 512.
DMX comm
DMX 1seg
Add XXX
DMX 2seg
Add XXX
DMX 4seg
Add XXX
Add XXX
DMX 8seg
Add XXX
Parameter Explaination:
DMX comm Add XXX(001~512):DMX working mode,address set from 001 to 512,please see the below chat.
DMX 1seg Add XXX(001~512): If the fixture control with only 1 segment, RGBA 4 colors will be match in 4 Channels accordingly, the
address is from 001 to 512
DMX 2seg Add XXX(001~512): If the fixture controlled with 2 segments, there are 4 colors(RGBA) in each segment, total in 8 channels,
the address is from 001 to 512.
DMX 4seg Add XXX(001~512): If the fixture controlled with 4 segments, there are 4 colors(RGBA) in each segment, total in 16 channels,
the address is from 001 to 512.
DMX 8seg Add XXX(001~512): If the fixture controlled with 8 segments, there are 4 colors(RGBA) in each segment, total in 32 channels,
the address is from 001 to 512.
b) 2、DMX function chart:
CH1
0~50 Black
Out
51~100
Dimmer
101~150
Color Flash
161~200Color
Change
CH2
CH3
CH4
CH5
CH6
NA
NA
NA
NA
NA
Flash
All Red
All Green
All Blue
All Ambor
Flash
Color
NA
NA
NA
Speed
NA
NA
NA
NA
NA
NA
0~29
Program 1
30~59
Program2
60~89
Program3
90~119
201~255
Dream Flow
Speed
Fade
Program4
120~149
Program5
150~179
Program6
180~209
Program7
210~255
Program8
c)
DMX connector pin:
Male & Female DMX connector pin:
d)
Pin1 = Gnd
Pin2 = Dmx-
Pin3 = Dmx+
DMX Linking method:
第 14 页
共 28 页
:
DMX Controler
DMX Linking test:Use 3pin DMX linking cable to link the fixture accordingly. Each fixture will be setting up to DMX mode and the
receipt address will set up in the same. (The address code range: 001-512). When you link the fixture at DMX mode, all of the machine
will be worked synchronously.
3. Auto Mode
(I)Auto mode working:
Hold the button “MENU” until the mode was changed to the Auto mode, loose you finger, then the working mode will be changed to the
Auto mode automatically. Press “MENU” button to choose the different code. Please see the picture as below, then press “UP” or
“DOWN” button to change the code. If you hold the button “UP” or “DOWN” button, the code will be changed rapidly.
Aut mode
Prg XX
Aut mode
Spd XX
Aut mode
Aut mode
Stb XX
Fad
XX
Aut mode
Master / Alone
Code specification:
Prg XX(01~09):Choose the internal program. There are 9 internal program for your choice.
Spd XX(01~10): Choose the speed of the internal program. There are 10 speed steps for your choice. 01 is the fastest speed and 10 is
the slowest speed.
Stb XX(00~10): Choose the Strobe steps of the internal program.
Fad XX(00~10): Choose the fade term of the internal program. There are 10 fade steps for your choice. 01 is the fastest fade and 10 is
the slowest fade.
Master/Alone: Choose “Master” please press“UP”. Choose “Alone” please press “DOWN”. In Master state the Master can be sent data
as the master. While in the Alone state, it works independently, will not send any data.
Note: Note: If you set up the strobe and fade together, the flash will be in the priority. If the Stb is not 0, Even Fad is not 0, the fixture will
run the flash not fade program.
(II) Sound Control:
Hold the button “MENU” until the mode was changed to the Audio mode, loose you finger, then the working mode will be
changed to the Audio mode automatically. Press “MENU” to change the code as below, then press “UP” or “DOWN” button to
change the code. If you hold the button “UP” or “DOWN” to change the code rapidly.
Aud mode
Aud mode
Prg XX
Stb XX
Aud mode
Fad
XX
Aud mode
Master / Alone
Code specification:
Prg XX(01~09): Choose the internal program. There are 9pcs internal programs.
第 15 页
共 28 页
Stb XX(01~10): Choose the Strobe steps of the internal program.
Fad XX(01~10): Choose the fade term of the internal program. There are 10 fade steps for your choice. 01 is the fastest fade and 10 is
the slowest fade.
Master/Alone: Choose “Master” please press“UP”. Choose “Alone” please press “DOWN”. In Master state it can sent the data as the
master. While in the Alone state, it works independently, will not send any data.
Note: If you set up the strobe and fade together, the flash will be in the priority. If the Stb is not 0, Even Fad is not 0, the fixture will run the
flash not fade program. The audio sensitivity can be adjusted through the knob. To clockwise turn the knob, the fixture will be
more sensitivity for the audio.
(II)Brightness adjustment by Manual:
Hold the button “MENU” until the mode was changed to the Sel mode, loose you finger, then the working mode will be changed to
the Color mode automatically. Press “MENU” to change the code as below, then press “UP” or “DOWN” button to change the
code. If you hold the button “UP” or “DOWN” to change the code rapidly.
Sel mode
Sel mode
DR XXX
DG XXX
Sel mode
DB XXX
Sel mode
Sel mode
Master / Alone
DA XXX
Code specification:
DR XX(000~255): Red luminance setting, 000 is blackout , 255 is the most brightness.
DG XX(000~255): Green luminance setting,000 is blackout , 255 is the most brightness
DB XX(000~255): Blue luminance setting,000 is blackout , 255 is the most brightness
DA XX(000~255): Amber luminance setting,000 is blackout , 255 is the most brightness
Master/Alone: Choose “Master” please press“UP”. Choose “Alone” please press “DOWN”. In Master state it can sent the data as the
master. While in the Alone state, it works independently, will not send any data.
Auto online function:The fixture under Auto, Audio or color mode, if the Master/Alone be set in Master, the fixture can run
program online synchronous.
Trouble Shooting:
Problems
Check list
Trouble Shooting
1. If your power as same as the
The machine do
1. Make sure the voltage.
input of the machine.
not work.
2. Replace the same fuse.
2. If the fuse was broken.
If your power us same as the input
LED dimmed
Make sure the voltage input.
of the machine.
1. Change to audio mode.
1.If it is in Audio mode.
No Audio
2. Adjust the sensitivity clockwise to
2.If Audio sensitivity is weak.
enlarge the audio signal reception.
1.If the polarity is opposited in the 1.Correct the DMX polarity.
No DMX input
DMX controller.
2.Change to the DMX mode.
2.If it is in DMX mode.
第 16 页
共 28 页