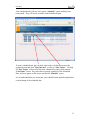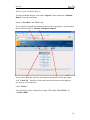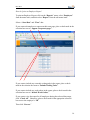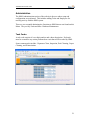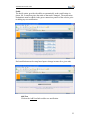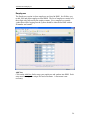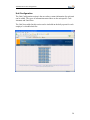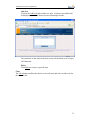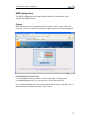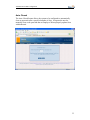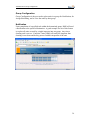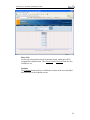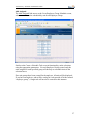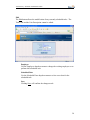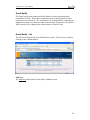
1
USER MANUAL Operations Management System HMS .......................................................................Error! Bookmark not defined. How Do I? ........................................................................................................... 4 New Features ........................................................................................................ 18 HMS Site Documentation ..................................................................................... 20 HMS Home Page .............................................................................................. 20 Administration .................................................................................................. 21 Task Codes .................................................................................................... 21 Employees ..................................................................................................... 26 Unit Configuration ........................................................................................ 28 HMS Configuration ...................................................................................... 32 Colors ............................................................................................................ 32 Auto Closed .................................................................................................. 33 Group Configuration ..................................................................................... 34 Notification ................................................................................................... 34 Assign Scheduling ........................................................................................ 38 View by Units ............................................................................................... 39 Interface Configuration ................................................................................. 40 Task Code Interface ...................................................................................... 40 Occupancy Interface ..................................................................................... 41 Employee Interface ....................................................................................... 43 Task Activity..................................................................................................... 44 Unit Status..................................................................................................... 44 Unit Detail ..................................................................................................... 46 Employee Location ....................................................................................... 49 Task/Work Order Creation ........................................................................... 50 Change Unit Occupancy - Single .................................................................. 52 Change Unit Occupancy - Multiple .............................................................. 53 Schedule Tasks/Work Orders ....................................................................... 54 Guest Notify .................................................................................................. 60 Guest Notify - List ........................................................................................ 60 Guest Notify - Add........................................................................................ 62 Messaging ......................................................................................................... 63 Reports .............................................................................................................. 64 Task Report ................................................................................................... 64 Unit Report.................................................................................................... 65 Unit Notes Report ......................................................................................... 66 Employee Report .......................................................................................... 67 Employee Instruction Card ........................................................................... 68 Employee Team Report ................................................................................ 69 Occupancy Change Report ........................................................................... 70 Occupancy History Report ............................................................................ 71 Work Order Report ....................................................................................... 72 Schedule Report ............................................................................................ 73 Average Calculation Report .......................................................................... 74 2 HMS What is NAVIS HMS? HMS or Operations Management System is NAVIS’ innovative, time-saving product. It is designed to streamline your operation, empower your employees, and improve your bottom line by instantly monitoring all the crucial activities of your day-to-day operations. The first section of this manual is a brief walk-through of common HMS actions, in a step-by-step, “How To” format. Next is a full outline of all the HMS functions. This outline contains a site-map of the website, with details and screen shots of all the functions available for customizing and utilizing the HMS system, as well as all of its available reports. 3 How Do I How Do I? How do I add a new Task Code? To add a new task, click on the “Administration” menu, and select “Task Codes” from the menu items. Click “Add New”. 4 How Do I Click inside of the Task Code Box and type in a new task number. This number should be 2 digits; 01 thru 99 and must be unique, not a number already assigned to an existing task. Then, click inside of the Description box and enter the description of the new task. Next, click inside of the Amount box if you want to assign a specific, nonchanging amount to this task, no matter where the task is performed. Finally, click on the “Save” button to save this new task. 5 How Do I How do I add a new Employee? To add a new employee, click on the “Administration” menu, and select “Employees” from the menu items. Click “Add New”. 6 How Do I Click inside of the Employee ID Box and type in a new employee number. This number needs to be 3 digits 001 thru 999 and must be unique; not a number already assigned to an existing employee. Click inside of the First Name box and type in the new employee’s first name. Click inside of the Last Name box and type in the new employee’s last name. Finally, click on the “Save” button to save this new employee. 7 How Do I How do I delete an Employee? To delete an existing employee, click on the “Administration” menu, and select “Employees” from the menu items. Select the appropriate employee from the list and click “Delete”. 8 How Do I To confirm that you want to delete this employee, click “OK” on the dialogue box. The selected employee will no longer show in the “Employee” screen, or appear in any reports. 9 How Do I How do I schedule Tasks? To schedule a task, click on the “Task Activity” menu and select “Schedule Task/WO” from the menu items. Click “Add New”. 10 How Do I From this screen, select the “Task” you are scheduling from the dropdown menu, and the “Date” you are scheduling the task for. If scheduling a task for a particular employee(s), place a check mark in the appropriate selection box next to employee’s “ID” number. It is not necessary to select an employee to create a scheduled task. Click “Continue”. 11 How Do I From this screen, place a check mark in the appropriate selection boxes next to the unit(s) that you are scheduling this task for. Once you have selected the unit(s), click “Continue”. 12 How Do I Your scheduled tasks will now show on the “Schedule” screen until they have been posted. They will also be available in the Schedule Report. To post a scheduled task, place a check mark in the selection box next to the appropriate task and click “Post Checked”, or click on “Post Todays”. Clicking on “Post Todays” will put all of the tasks scheduled for today’s date onto the “Unit Status” screen. Any tasks that are posted, regardless of the Scheduled Date, will now appear on this screen and not the “Schedule” screen. It is recommended that you do not post your scheduled tasks until the night before or the morning of the scheduled date. 13 How Do I How do I print a Schedule Report? To print a Schedule Report, click on the “Reports” menu, and select “Schedule Report” from the menu items. Select a “Start Date” and “Thru” date. If you want the assigned task amount to show on the report, place a check mark in the selection box next to “Include Anticipated Amount”. If you want to print the report for all employees during the selected date range, click “Check All.” Otherwise click on the selection box next to the employee you want to view a report for. Click “Process.” You will need to select a format for viewing. Click either “Excel (XLS)”, or “Acrobat (PDF)”. 14 How Do I You will then be able to view and print the report. This report will show the Unit, Unit Notes if any, Address, Task, Scheduled Date and Anticipated Amount. It will also show you a total number of tasks, as well as a total dollar amount. 15 How Do I How do I print an Employee Report? To print an Employee Report, click on the “Reports” menu, select “Employees” from the menu items, and then select “Report” from the sub-menu items. Select a “Start Date” and “Thru” date. If you want each employee to appear on their own page, place a check mark in the selection box next to “Appear on separate pages”. If you want to include any currently waiting tasks in the report, place a check mark in the selection box next to “Include Waiting Tasks”. If you want to include any work orders in the report, place a check mark in the selection box next to “Include Work Orders”. If you want to view the report for all employees during the selected date range, click “Check All.” Otherwise, place a check mark in the appropriate selection box next to the employee’s “ID”. Then click “Process.” 16 How Do I You will need to select a format for viewing. Click either “Excel (XLS)”, or “Acrobat (PDF)”. You will then be able to view and print the report. This report will show the Task, Unit, Start Date, End Date, Status and Amount of each task performed during the selected date range. The report will also show a total Amount paid for each employee. An amount is not shown or calculated for any tasks yet not completed. 17 New Features New Features With the release of HMS version 2.0, NAVIS has added some exciting new features that enhance your experience and increase overall functionality. The first and most noticeable change is the new look. HMS has been updated to match the look and feel of the NAVIS website, as well as provide ease of navigation throughout. You will notice that all Menu options are now available in a Tool Bar across the top of the screen. This allows for navigation from screen to screen in a much more efficient and logical manner. Unlike the earlier versions of HMS, where it was necessary to click the back button, Menu navigation is now accessible from every screen within HMS 2.0. The second new feature is the enhanced Tool-Tip data on the Unit Status screen. By holding your mouse pointer over one of the Unit buttons, you may now view the most current task details without having to select the unit and view the Task Status. The types of information shown on the tool tip are: Task performed, Task Status, Occupancy State, and Date & Time of change in Status. If you utilize the Energy Sentinel service, the current Temperature, as well as the Date & Time of last reporting is displayed. Another feature of HMS 2.0 is the addition of an expiration date for the Guest Notify function. This allows you to set a date to have the notification automatically cancel if the “trigger” event was never properly updated from within the unit by an Employee. This will prevent HMS from calling your guests, a week after they have arrived to let them know that…“your vacation rental is now ready for occupancy”. A new addition to the HMS Reports is the Average Calculations Report. This is a statistical analysis report which can be used to evaluate several different sets of data. Such as Time Spent by Employee per Unit per Task. It is especially helpful for those who pay their employees on a “piece rate”. It will provide a dollar per minute breakdown of the data you are used to seeing in the other reports. The Multiple Occupancy Change screen is a new time-saving feature to allow you to change the occupancy of several units at once; unlike earlier versions of HMS, where it was necessary to edit each unit one at a time. 18 New Features Finally a new feature has been added to the Scheduling Set-up. The Assign Scheduling section is used for setting up specific units in an “employee group”, to make the daily/weekly scheduling more efficient by showing only the pre-selected units available for each group. Under the original scheduling option it was necessary to go through the entire unit list, and select those units you wished to assign to an employee. With the Employee Group, you can create a much smaller unit list to make this unit selection process more streamlined. All of the above additions to HMS 2.0 are covered in greater detail in the manual. 19 OMS Home Page HMS Site Documentation HMS Home Page The HMS Units Page is the top level navigation screen for operating the HMS System. All Menus are accessible in a toolbar across the top of the screen, below the NAVIS logo. Hovering your pointer over each Menu header will open a SubMenu for the selected Menu. 20 Administration-Task Codes Administration The HMS Administration section of the website is the area where setup and configuration are performed. This includes adding Tasks and Employees for tracking activity with the HMS system. There are two essential administrative functions to HMS that are not found on this Menu. They are My Units and Misc. Database Maintenance. Task Codes A task code consists of a two-digit number and a short description. Each task must be created for any action performed on a unit that will be tracked by HMS. Some common tasks include: Departure Clean, Inspection, Pool Cleaning, Carpet Cleaning, and Winterization. 21 Administration-Task Codes Add New To add a new task code, click on the Add New link. Task Code The Task Code is a two-digit number assigned to each task. HMS will allow for up to 99 task codes: 01 – 99. Description The Task Description is a short, written description of the tasks your employees will be performing in each unit. (30 character limit) Amount The Task Amount is the default amount paid out to an employee when this task is completed in a unit. Typically this is referred to as a “piece rate” or “piece amount”. (If you do not use “piece rates”, leave blank) 22 Administration-Task Codes Notify The notify option, provides the ability to automatically send a notification via phone, fax, or email any time the status of that task is changed. The notification destinations must be added via the guest connections portion of the website, prior to adding any new notification. Each notification must be setup based upon a change in status for a given task. Add New Click on the Add New link to add a new notification. 23 Administration-Task Codes Task Status The “Task Status” drop-down menu is used to select a status, which will create the trigger to send the notification. Each time a task is associated with a unit it will be in one of the following four status settings: 1Waiting, 2-In Process, 3-Incomplete, and 4-Complete. Typically the status chosen for sending a notification is the “Complete” status. Select Destinations for the notification can be selected by placing a check mark in the appropriate selection box next to the desired destination. Single or multiple destination(s) can be selected at the same time for the same notification. 24 Administration-Task Codes Edit Click the Edit link to change the parameters on existing tasks. Task Code This field cannot be edited as it is the key identifying field for tasks within the task table. Task Description Changes to the task description field will be associated with the corresponding task code number in all future and historical reports. Task Amount It is recommended that the Task Amount field be set when the value of the task is the same for all units. For example, delivering firewood may be set to the same value for all units, but the cost of cleaning will usually vary from unit to unit, and therefore can be set in the Unit Configuration section. Delete The Delete link deletes the task on the corresponding row. Any historical data associated with this task code, will remain in the system for 90 days and be displayed on any applicable reports. However, the description will no longer be displayed. 25 Administration-Employees Employees The Employees section is where employees are listed in HMS. It will allow you to add, edit, and delete employees from HMS. The list of employees consists of a three-digit code followed by the employee name. Every employee or outside vendor that will be logging into the system should be entered into HMS with an ID number and a name. Add New Click on the Add New link to enter your employees and vendors into HMS. Each entry must be assigned a unique ID# and a last name. A first name is not necessary. 26 Administration-Employees There are a maximum of 999 different numbers (001 – 999) which may be used for the Employee ID. The First Name field has a 15 character limit, while the Last Name field has a 30 character limit. Edit The Edit link is used to change the details for the selected employee ID. Similar to task codes, a change to the employee name field will be reflected in all reports future and historical for the selected Employee ID. (For example, if a new employee is assigned an ID# that was used by a former employee, any subsequent reports processed for dates prior to the start date of the new employee, will show the name of the new employee for tasks performed by the former employee.) In order to avoid this situation, it recommended you do not re-use an employee ID for a period of 90 days after the departure of the previous employee. Employee ID The Employee ID field cannot be updated, as it is the unique number used to identify each specific employee or vendor. Delete The Delete link will remove this Employee name and ID. 27 Administration-Unit Configuration Unit Configuration The Unit Configuration section is the area where custom information for each unit can be added. The types of information entered here are the unit-specific Task Amounts and Unit Notes. The Unit Notes added in this section can be included on the daily reports for each employee’s scheduled task list. 28 Administration-Unit Configuration Cost The Cost link opens the Unit Cost page. This is where you will enter the unitspecific task amounts. The costs entered here, will override any amount previously entered in the Task Code section. Edit The Edit tab unlocks the Unit Override Amount for editing. When finished, select Update to save specified amount. Unit Override Amount The Unit Override Amount is the “override” value of a particular task for this specific unit. Any time this task is performed within the unit, the override amount will now be shown instead of the task amount. (This will not append any historical reports, but rather show the changes from that point on.) 29 Administration-Unit Configuration Notes The Notes section is where you can add specific information about the unit or special instructions for your employees. All notes added here can be included on the Employee Notes Report as well as the Schedule Report. For example, you might note specific cleaning products to be used on this home, or special instructions to prepare the home for an owner stay. 30 Administration-Unit Configuration Add New Click on the Add New link to add a new note. Each new note added will be displayed on the Unit Notes screen in chronological order. The text block on the Add a Unit Note screen will facilitate a note of up to 300 characters. Delete Click Delete to remove a specific note. Clear The Clear button confirms the choice to clear all notes and unit override costs for the selected unit. 31 Administration-OMS Configuration HMS Configuration The HMS Configuration section provides the ability to customize the color scheme of the HMS system. Colors HMS allows the user to customize the colors on the “Units” screen. These are used as a visual cue to show the task and occupancy status of each unit displayed. Colored Boxes & Colored Text Use the dropdown menus to select a color for each item. Clicking on the corresponding button will give you a preview of each selected color. It is recommended that you select a color scheme that is easy to read and view, as these selections will show up on the “Units” screen. 32 Administration-OMS Configuration Auto Closed The Auto Closed feature allows the system to be configured to automatically close an open task after a specified number of days. It negates the need to manually close each open task that an Employee did not properly update from within the unit. 33 Administration-Group Configuration Group Configuration Group Configuration is the area used to place units in a group for Notification, for Assign Scheduling, and to View the units by their group. Notification Upon completion of a specified task within the determined group, HMS will send a notification to the specified destination. A good example for use of this feature is to place all units covered by a single inspector into one group. Any time a cleaning task is set to a “Complete” status, HMS will notify the inspector that cleaning is now done and he may proceed with his inspection of the unit. 34 Administration-Group Configuration Add New - Group Click the Add New link add your notification groups. Group Name The “Group Name” field can be filled in with any name that you choose. It is recommended that you chose one that represents the units or the group you are creating. For example; if creating and inspection group for one specific employee, you can use the Inspectors name as the group name. Select Use the Selection Boxes to indicate which units are in the current group. A Check All and Clear All functions are also available. (Any new units added to HMS after a group is made will need to be added to each individual group manually. HMS will not automatically add the unit to the group.) Edit The Edit button navigates to a page that will allow you to add or remove units from a group. View The View button displays the page containing a list of all units in the selected group. 35 Administration-Group Configuration Notify The Notify tab on the Group Configuration page opens the Group Notification page. This is used to set up notifications for a specific group. A notification is triggered when a task is changed to the chosen status. At that time any contacts in the selected group will be notified. (For example, the inspector responsible for inspecting all houses in this group could be selected for notification when the Task Code “Departure Clean” changes to a “Complete” status.) Add New The Add New link is used to add a new group notification. The options that must be selected for each Group Notify are: Task Status, Task Code, and the destination of the contact to be notified. Task Status The Task Status dropdown is used to select the status that will trigger the notification event. 36 Administration-Group Configuration Task Code The Task Code dropdown is used to select the task code that, when placed into the Task Status specified above, will trigger the notification event. Select The Select column contains the selection boxes used to indicate which contact(s) should be notified in the event that the notification criteria are met. Any Additional Contacts may only be added through the Guest Connections - Misc. Database options. Occup Notify The Occup Notify button will open up the “Group Occupancy Notify” screen. This screen is used to add a notification to a specified group upon the change in Occupancy of a specified unit. Add New Click the Add New link to add a new Occupancy Notification. Group Name The Group Name field cannot be edited. To select another group, use the Cancel link to navigate to the previous screen. Occupancy Status The Occupancy Status dropdown menu is used to select the status of occupancy that will trigger the notification. Select Use the Selection Boxes to select the desired destination for the notification. Check All and Clear All functions are also available. 37 Administration-Assign Scheduling Assign Scheduling Assign Scheduling is used to create Employee Groups for faster day-to-day scheduling. If your employees work only in specific units or certain areas, this section will allow you to create a group for quicker and easier setup of the daily scheduled tasks. Add New Click the Add New link to open the “Group Employee Add” screen. Select Use the Selection Boxes in this column to choose an employee for this group. 38 Administration-Assign Scheduling Edit The Edit tab will open a screen to allow you to add or remove units from the selected group. View The View tab will display those units selected for each individual group. Delete The Delete function will completely remove an Employee Group. View by Units This screen displays all of the units in any group or employee group. You can select to view these by Group or Employee. View Groups The View Groups link displays all groups for a specific unit. View Employees The View Employees link displays all Employee Groups that have been assigned to this specific unit for Scheduling. 39 Administration-Interface Configuration Interface Configuration This section of HMS is where you can add the Third Party Interface codes for communication between HMS and your Property Management Software. The types of information updated include changes in task status and occupancy, as well as employee info. These all vary depending on the Property Management Software currently in use. Task Code Interface This screen displays each task and its corresponding Third Party code for sending and receiving task status updates. (Please note: Tasks displayed here are the same as the tasks previously entered on the Task Code screen. Any changes made there will only affect the Interface codes added to this screen.) Edit The Edit link will open up the task for adding and changing the Third Party codes. 40 Administration-Interface Configuration The Edit Task Code Interface screen is used to enter each specific Third Party Code for a specific status. This is a cross reference for HMS which can be configured to send and receive data for all four states: Waiting, In-process, Incomplete, and Complete. Occupancy Interface Similar to Task Code Interface, this screen displays the Third Party Interface codes for changing the Occupancy Status of a unit. Add New Clicking on the Add New link allows you to add the Third Party Code which will update Occupancy status of each unit within HMS. 41 Administration-Interface Configuration Occupancy State Use the Occupancy State dropdown menu to select one of the 2 states of occupancy: Occupied or Vacant. Interface Code The Interface Code field is used to enter a specific code for the Occupancy State. Reply The Reply selection box on the proceeding screen should be checked if you would like to have HMS send the Occupancy Data back to the Property Management Software. (Only one reply per occupancy state can be sent.) Delete The Delete button will remove the Occupancy Interface code. 42 Administration-Interface Configuration Employee Interface This section of HMS is for adding Third Party Interface Codes to update an employee’s information. Edit The Edit link will unlock the selected employee for editing. Update Click Update to save the Entered Code. Cancel Click Cancel to cancel the edit action and remove any data entered. 43 Task Activity - Unit Status Task Activity The Task Activity section provides an effective interface for viewing the current status of all units, as well as the current and historical tasks related to these units. Included in this section is the functionality to create and schedule tasks, view and change unit occupancy, locate employees, and notify guests. A majority of dayto-day work is done from this section of HMS. Unit Status The HMS Units screen displays a clickable box for each unit and its corresponding Unit Description. The last posted task is displayed in each box preceded by the tilde symbol (~) and is color-coded to correspond with the status of that task. The text in each box is also color-coded to correspond with the occupancy of the unit. By holding your mouse pointer over one of the boxes, you will be able to view details of the last performed task, including: occupancy status, a description of the last task performed, the task status, and the date and time of last status update. If the Energy Sentinel service is also utilized, the current temperature, as well as the date and time of reporting, are displayed. This screen will refresh every 60 seconds and show any changes that have occurred. Advanced Search The Advanced Search link opens several search tools on the Units page, and includes a number of parameters that can be used to sort or “narrow-down” the units displayed on the screen. 44 Task Activity - Unit Status All Units The default on the dropdown box in the top corner of this page is All Units; this setting displays all units. Open Task Units When the dropdown box is set to Open Task Units, only units with an unfinished task will be displayed. Unit Description The Unit Description can contain a full or partial Unit Description. All units that contain the character string in this field will be displayed. City-State The City and State fields allow the selection of all units in a given city and/or State. Occupancy The Occupancy field allows the selection of units based on occupancy. Task or Work Order Number The Task or Work Order Number field enables the selection of units with the same open task. Search The Search button performs the specified search. 45 Task Activity - Unit Status Hide Search Hide search closes the Advanced Search tools, keeping any selection that was made using the search function. The search parameters will return upon the 60-second refresh. Unit Detail Clicking on any one of the Unit Buttons will display the Unit Detail page for the selected unit. This will show the Status, Task/Work Order number and description, Employee number, and the Start and End Time of each listed task. These are displayed by Date, starting with the most recently updated task. Edit The Edit link opens up an existing task for editing. Typically, the only time a task needs to be edited is to close open tasks that were not closed properly by the employee performing the task in the unit. 46 Task Activity - Unit Status Unit Description The Unit Description indicates the unit for which the task was assigned. Created From The Created From field displays the source the task originated from. Creation Date The Creation Date field displays the date and time the task was created. Last Updated From The Last Updated From field displays the source the task was last updated from. Last Updated Time The Last Updated Time field displays the date and time the task was last updated. Task Code The Task Code field displays the task performed as well as its description. Status The Status field displays the current status of the posted task. Use the dropdown menu to change the current status of the task. 47 Task Activity - Unit Status Employee The Employee dropdown menu is used to change the employee who performed the task. A change to this field can be useful in situations where a new employee is assigned to a task originally assigned to a different employee, or if it was started by one employee and completed by another. Start Date/Time The Start Date/Time dropdown field can be adjusted. End Date/Time The End Date/Time dropdown field can be adjusted. Amount The amount field can be adjusted. View View shows all the specific details of the selected task. Delete Delete will remove the task and all its details from the Unit. (Note: deleted tasks will no longer be displayed on any subsequent screens or reports once removed.) 48 Task Activity - Employee Location Employee Location The Employee Location provides a list of all employees’ current or last known location as logged by the HMS system. These are listed in chronological order from the newest to the oldest posting as a default setting. To re-sort this data, click on any one of the appropriate column headers. Following is a brief description of the location statements shown on the Employee Location screen: “Currently working…” This states that the Employee is currently in the unit and performing the assigned task. “Last known location was…” This states that the Employee was in this unit and has completed the assigned task. “Last Location Unknown” This statement is given for the instance when an Employee has not logged into or updated a task through HMS in the last 90 days. 49 Task Activity - Task/Work Order Creation Task/Work Order Creation The Task/Work Order Creation page enables the creation of Tasks and Work Orders in the HMS system. These are immediately added to the Units screen. Status The Status dropdown menu allows for the selection of the initial status of the task being created. The options for the status setting are: 1-Waiting, 2In Process, 3-Incomplete, and 4-Complete. (Typically, a task would be created in a “waiting” status, unless the task you are creating has already begun.) Task The Task dropdown menu allows for the selection of the task to be created. (New types of Tasks are created in the Administrative section.) Employee The Employee(s) assigned to the new task are chosen with the selection boxes. The Check All and Clear All functions are also available. 50 Task Activity - Task/Work Order Creation Continue Click the Continue button to confirm the selection of Task, Status, and Employee or Employees for the new task. A second screen comes up to select the Unit(s) for which the task will be created. Select Unit(s) Use the selection boxes next to each Unit Description to choose which unit(s) the new task will be added to. As with the previous screen, the Check All and Clear All functions are available. Continue Click Continue to confirm your selections. This new task will now appear on the Units screen. 51 Task Activity - Change Unit Occupancy Change Unit Occupancy - Single The Occupancy Change screen is used to change the occupancy status of a specific unit. Generally, the guest will use the access number to perform the “Change Unit Occupancy” functional. When a guest does not complete the check-in or check-out procedure, the Change Unit Occupancy feature can be used to set the appropriate status to a unit. In order to keep the Unit Status information accurate, it is recommended that units be updated once daily after the completion of all guest check-ins. Edit Clicking the Edit button will open the unit for changing the Occupancy status. 52 Task Activity - Change Unit Occupancy Change Unit Occupancy - Multiple This screen functions exactly as the previous screen, only it will allow for multiple occupancy changes rather than single. The current Occupancy State is displayed on this screen in red and will stay red until saved. This will help you know what the status was when you entered this screen. Simply use the radio selection buttons to choose those units you wish to change and click on Save. 53 Task Activity - Schedule Tasks/Work Orders Schedule Tasks/Work Orders The Schedule Tasks/Work Orders screen is the where tasks can be scheduled for future dates. All scheduled tasks are displayed on this screen. Any tasks scheduled with the current date or past date are displayed on the table with a pink background. The tasks with future dates are displayed in a blue and white alternating background. The Schedule Task feature enables anyone doing scheduling to save time and create known future tasks in advance. This simplifies the daily procedure to consist of a single-click on the Post Todays link. Add New The Add New link moves to the Create a Schedule Task screen where new tasks can be scheduled. 54 Task Activity - Schedule Tasks/Work Orders Date The Date calendar allows the selection of a date on which the new task will be scheduled. Task The Task dropdown menu provides a list of tasks to be scheduled. Employee Use the selection boxes to choose an employee to perform the new task. There are the Check All and Clear All links to use as well. Continue The Continue button will confirm the task, date, and employee for creation of the new scheduled task. The following screen is where you will enter the unit(s) in which a scheduled task is assigned. 55 Task Activity - Schedule Tasks/Work Orders Select Unit Use the unit selection boxes next to the unit to pick which unit will be assigned this scheduled task. The Check All and Clear All links are also available to use. Continue The Continue button will now confirm the creation of the new scheduled task and add it to the Schedule screen. 56 Task Activity - Schedule Tasks/Work Orders Add Assigned The Add Assigned link moves to the Create Employee Group Schedule screen, where new tasks can be scheduled by unit for an Employee Group. Similar to the Create a Schedule Task screen in functionality, make selections using the appropriate parameters. For each Employee Group created, only the units assigned to each specified group will show up as selectable items in the selection boxes. If no unit groups have been created for the employee, all units will be displayed. If you have an employee who will be working in a unit outside of his/her normal “employee group”, a single task will need to be created for this instance. 57 Task Activity - Schedule Tasks/Work Orders Edit The Edit button allows the modification of any currently scheduled tasks. The Task Code and the Unit Description cannot be edited. Employee Use the Employee dropdown menu to change the existing employee set to perform this scheduled task. Scheduled Date Use the Scheduled Date dropdown menu to select a new date for the scheduled task. Save Clicking Save will confirm the changes made. 58 Task Activity - Schedule Tasks/Work Orders Post Todays The Post Todays link adds all scheduled tasks with the corresponding date to the Unit Status screen. Post Checked The Post Checked link adds all selected scheduled tasks to the Unit Status screen. Delete The Delete link will remove the scheduled task from the Schedule screen, and will no longer appear on any subsequent reports. 59 Task Activity – Guest Notify Guest Notify The Guest Notify menu items provide the ability to contact a guest upon the completion of a task. This feature is commonly used to notify a guest who has requested an early check-in. The “notification” is accomplished by scheduling an automated message to be delivered when a housekeeper or inspector calls into the HMS system to log a change in the current status of a specific task. Guest Notify - List The List screen displays all of the Notifications created. The list can be sorted by clicking on the column headers. Add New The Add New link loads the Guest Notify Addition screen. 60 Task Activity – Guest Notify Guest Name Enter the name of the Guest. Guest Phone Number Enter the destination number the guest would like to receive notification on. Receiving Type From this dropdown menu, select the message delivery type. Unit Description Select the appropriate unit the guests will be checking into, from the dropdown menu. (If you have navigated to Guest Notify from the Unit Detail screen, this field will auto-populate with the appropriate unit description.) Task Code/Work Order Choose the task code or work order from the dropdown menu that will trigger the notification. Status Choose the status of the above task or work order from the dropdown menu to trigger the notification. 61 Task Activity – Guest Notify Message Use the text block here to type the message you wish to deliver to the guest. The text-to-speech engine converts the typed message to a voice, email, or text message. The default message is set to, “Your vacation rental is now ready for occupancy”. Expire Date The Expire Date is used to select a future date for this notification to automatically terminate. This is useful if the housekeeper or inspector fails to update the specific task with the status selected as a trigger for the notification. It will also prevent future delivery of the same message later on, when that same task status is logged into the HMS system from the same unit at a later date. Guest Notify - Add The Add menu goes right to the Guest Notify Addition screen. All the same options as above apply. You can then view these from the Guest Notify – List screen. This Menu item was moved from the Unit Detail screen. If you select “Guest Notify – Add” from the Unit Detail screen, you will be redirected to the Guest Notify Addition Screen with the appropriate Unit Description automatically filled in. 62 Messaging Messaging The messaging feature enables the scheduling of prerecorded messages to be delivered to an employee when he/she logs into the system. When an employee has a pending message in the system, the next time they log into HMS, they will automatically receive their message after entering the appropriate task status update. How to record the Message The text at the top of the screen displays the instructions for creating an employee message: “To leave a message for one of your employees, dial; (your toll-free, Guest Connections Number). Once connected, press * from the menu options. When asked for the phone number you want to deliver to, enter the 3-digit employee ID followed by the # key.” Requested Date - Thru The Requested Date Range indicates the time period for the messages displayed. Status - For a pending message, the status is shown as an Envelope Icon. - For a delivered message, the status is shown as a Mailbox. The delivery date and time are also be displayed in the appropriate column. 63 Reports – Task Report Reports The reporting section of HMS provides some of the most valuable features in the system. All reports can be created in either Excel (XLS) or Adobe Acrobat (PDF). Task Report The task report will show, over a given date range, who has performed a specified task, which unit they did the work in, how long it took them, the current status of the task, and, if applicable, the amount of money to be paid on that task. Task Report for 12/29/2006 thru 12/29/2006 Task Start Date EndDate Status 21 Full Close Employee Unit FLT02 12/29/2006 3:22:32 PM 12/29/2006 3:22:32 PM 4- Complete 0.00 21 Full Close LRK02 12/29/2006 3:09:44 PM 12/29/2006 3:09:44 PM 4- Complete 0.00 21 Full Close FVC06 12/29/2006 2:29:04 PM 12/29/2006 2:29:04 PM 4- Complete 0.00 21 Full Close RGR17 12/29/2006 2:07:30 PM 12/29/2006 2:07:30 PM 4- Complete 0.00 21 Full Close TPF19 12/29/2006 1:52:36 PM 12/29/2006 1:52:36 PM 4- Complete 0.00 21 Full Close TIM11 12/29/2006 1:33:06 PM 12/29/2006 1:33:06 PM 4- Complete 0.00 21 Full Close VRL14 12/29/2006 1:16:04 PM 12/29/2006 1:16:04 PM 4- Complete 0.00 21 Full Close ALT02 12/29/2006 1:06:47 PM 12/29/2006 1:06:47 PM 4- Complete 0.00 21 Full Close ASP15 12/29/2006 1:02:27 PM 12/29/2006 1:02:27 PM 4- Complete 0.00 21 Full Close HAR10 12/29/2006 12:50:43 PM 12/29/2006 12:50:43 PM 4- Complete 0.00 21 Full Close TPF07 12/29/2006 11:55:23 AM 12/29/2006 11:55:23 AM 4- Complete 0.00 21 Full Close PRD04 12/29/2006 11:42:07 AM 12/29/2006 11:42:07 AM 4- Complete 0.00 21 Full Close BGR04 12/29/2006 11:13:49 AM 12/29/2006 11:13:49 AM 4- Complete 0.00 21 Full Close GRO04 12/29/2006 11:06:55 AM 12/29/2006 11:06:55 AM 4- Complete 0.00 21 Full Close LRK12 12/29/2006 10:49:10 AM 12/29/2006 10:49:10 AM 4- Complete 0.00 21 Full Close YEL26 12/29/2006 10:48:23 AM 12/29/2006 10:48:23 AM 4- Complete 0.00 21 Full Close CAM01 12/29/2006 10:40:41 AM 12/29/2006 10:40:41 AM 4- Complete 0.00 21 Full Close MTH07 12/29/2006 10:28:32 AM 12/29/2006 10:28:32 AM 4- Complete 0.00 21 Full Close BAL04 12/29/2006 10:21:10 AM 12/29/2006 10:21:10 AM 4- Complete 0.00 21 Full Close WIC12 12/29/2006 10:12:22 AM 12/29/2006 10:12:22 AM 4- Complete 0.00 21 Full Close PRD05 12/29/2006 9:55:10 AM 0.00 12/29/2006 9:55:10 AM 4- Complete Amount Parameters Date Range Appear on separate pages Include Waiting Tasks Select Task Code(s) 64 Reports – Unit Report Unit Report The Unit report provides a detailed breakdown of all tasks performed on a unit. The detail sorted by unit includes: completed tasks, employees performing the task, and the amount paid. Unit Report for 12/29/2006 thru 12/29/2006 Unit Task Start Date ALT02 Employee 11 Inspection 12/29/2006 4:04:02 PM 12/29/2006 4:07:52 PM 4- Complete EndDate Status 0.00 ALT02 02 Full Clean 12/29/2006 2:08:21 PM 12/29/2006 4:02:17 PM 4- Complete 27.00 ALT02 21 Full Close 12/29/2006 1:06:47 PM 12/29/2006 1:06:47 PM 4- Complete 0.00 ASP15 11 Inspection 12/29/2006 3:53:41 PM 12/29/2006 15:57 4- Complete 0.00 ASP15 02 Full Clean 12/29/2006 11:03:07 AM12/29/2006 12:22:56 PM4- Complete 27.00 ASP15 21 Full Close 12/29/2006 1:02:27 PM 12/29/2006 1:02:27 PM 4- Complete 0.00 BAL03 11 Inspection 12/29/2006 1:26:29 PM 12/29/2006 1:42:50 PM 4- Complete 0.00 BAL03 02 Full Clean 12/29/2006 12:06:08 PM12/29/2006 12:06:08 PM4- Complete 32.40 BAL04 11 Inspection 12/29/2006 11:20:36 AM12/29/2006 11:30:28 AM4- Complete 0.00 BAL04 02 Full Clean 12/29/2006 9:47:30 AM 12/29/2006 11:24:04 AM4- Complete 37.80 Amount Parameters Date Range Appear on separate pages Include Waiting Tasks Include Work Orders Select Task Code(s) 65 Reports – Unit Notes Report Unit Notes Report The Unit Notes report provides a summary of all special instructions or notes associated with each unit. Unit Notes Unit Note Date Laundry: This unit has two Queen beds with extra thick mattresses. The owner has requested that we use King sheets so the mattresses do not buckle. All the beds use standard pillow cases. MAINT: For maintenance issues related to the condo management associationcontact XXX or XXX at (541)598-XXXX. 8/10/2006 2:57:38 PM AHC10 8/10/2006 2:48:47 PM HSK: The white rug goes under the living room coffee table. ALT02 All departments: The owners are frequent guests in this unit. If there are condiments in the refrigerator leave them there. MAINT: Owner does most of the maintenance in this unit. We do not clean the carpets unless owner requests it cleaned. 8/10/2006 3:06:38 PM Laundry bi-fold doors come off the track often. 8/10/2006 3:18:01 PM 8/10/2006 3:03:33 PM ANT09 Do not stack or leave wood next to woodstove or on the floor. Please report laundry room doors if they are off track. Owner requests 6 extra bath towels. ANT18 Make sure the gas fireplace pilot light is on. 8/11/2006 1:48:36 PM Parameters Select Unit(s) 66 Reports – Employee Report Employee Report The Employee Report details all actions performed on the selected units by selected employees for a specified date range. It is sorted by employee, and provides a summary of the total value of the tasks an employee has completed. Employee Report for 12/29/2006 thru 12/29/2006 Employee Task Unit Start Date EndDate Status 02- Full Clean FLT02 12/29/2006 3:05:44 PM 12/29/2006 4:03:57 PM 4- Complete 21.60 02- Full Clean ASP15 12/29/2006 11:03:07 AM 12/29/2006 12:22:56 PM 4- Complete 27.00 02- Full Clean BGR04 12/29/2006 12:52:01 PM 12/29/2006 2:53:13 PM 4- Complete 50.60 02- Full Clean QLN15 12/29/2006 9:21:26 AM 12/29/2006 10:50:53 AM 4- Complete 41.80 02- Full Clean ALT02 12/29/2006 2:08:21 PM 12/29/2006 4:02:17 PM 4- Complete 27.00 02- Full Clean TVC04 12/29/2006 10:43:28 AM 12/29/2006 1:51:12 PM 4- Complete 21.60 11- Inspection PRD04 12/29/2006 4:27:34 PM 12/29/2006 4:27:34 PM 4- Complete 0.00 11- Inspection PRD05 12/29/2006 4:22:06 PM 12/29/2006 4:22:06 PM 4- Complete 0.00 11- Inspection PVCH4 12/29/2006 3:40:40 PM 12/29/2006 3:40:40 PM 4- Complete 0.00 11- Inspection BGL11 12/29/2006 12:54:05 PM 12/29/2006 1:03:03 PM 4- Complete 0.00 11- Inspection LRK12 12/29/2006 12:24:12 PM 12/29/2006 12:43:43 PM 4- Complete 0.00 02- Full Clean CAM01 12/29/2006 2:29:48 PM 12/29/2006 4:01:21 PM 4- Complete 29.00 02- Full Clean WHI05 12/29/2006 11:49:00 AM 12/29/2006 2:19:19 PM 4- Complete 42.50 02- Full Clean RGR17 12/29/2006 9:45:10 AM 12/29/2006 11:33:58 AM 4- Complete 27.00 Amount Parameters Date Range Appear on separate pages Include Waiting Tasks Include Work Orders Select Employee(s) 67 Reports – Employee Instruction Card Employee Instruction Card The Employee Instruction Card provides instructions on how to log into HMS. Parameters Appear on separate pages Instructions Select Employee(s) Select Task Code(s) 68 Reports – Employee Team Report Employee Team Report The Employee Team Report is used to show data on a group of 2 or more employees working on the same task within a specified unit. Team Task/WO by Unit 12/28/2006 Thru 12/29/2006 Unit Task Employee Start Time End Time 12/28/2006 3:45:25 PM 12/28/2006 3:45:47 PM 12/28/2006 3:49:58 PM 12/28/2006 3:50:17 PM Designated Amount: 12/28/2006 3:49:59 PM 12/28/2006 3:50:19 PM 0.00 0.00 0.00 12/28/2006 12:51:25 PM 12/28/2006 2:11:24 PM 12/28/2006 12:51:45 PM 12/28/2006 2:11:44 PM Designated Amount: 12/28/2006 2:11:26 PM 12/28/2006 2:11:45 PM 39.80 39.80 39.80 12/28/2006 11:11:15 AM 12/28/2006 11:11:15 AM 12/28/2006 11:11:34 AM 12/28/2006 11:11:34 AM 12/28/2006 12:43:48 PM 12/28/2006 12:43:48 PM 12/28/2006 12:44:03 PM 12/28/2006 12:44:03 PM Designated Amount: 12/28/2006 12:43:49 PM 12/28/2006 12:43:49 PM 12/28/2006 12:44:04 PM 12/28/2006 12:44:04 PM 20.00 20.00 20.00 20.00 20.00 12/28/2006 3:24:30 PM 12/28/2006 3:24:49 PM 12/28/2006 3:26:57 PM 12/28/2006 3:27:17 PM Designated Amount: 12/28/2006 3:26:59 PM 12/28/2006 3:27:19 PM 0.00 0.00 0.00 12/28/2006 8:05:37 AM 12/28/2006 8:05:57 AM 12/28/2006 9:16:48 AM 12/28/2006 9:17:04 AM Designated Amount: 12/28/2006 9:16:50 AM 12/28/2006 9:17:06 AM 34.40 34.40 34.40 12/29/2006 3:15:40 PM 12/29/2006 3:41:48 PM 12/29/2006 4:14:57 PM 12/29/2006 4:13:58 PM Designated Amount: 12/29/2006 4:14:59 PM 12/29/2006 4:13:59 PM 29.00 29.00 29.00 12/28/2006 3:16:10 PM 12/28/2006 3:17:00 PM 12/28/2006 3:19:10 PM 12/28/2006 3:18:52 PM Designated Amount: 12/28/2006 3:19:12 PM 12/28/2006 3:18:53 PM 0.00 0.00 0.00 CIN03 11- Inspection CRG04 02- Full Clean CUL17 02- Full Clean DIX03 11- Inspection PAR07 02- Full Clean RCC38 02- Full Clean WIT12 11- Inspection Last Updated Amount Parameters By Unit or By Task Select Unit(s) 69 Reports – Occupancy Change Report Occupancy Change Report The Occupancy Change Report provides a summary of all occupancy changes logged thru the system. The report also includes the method that the occupancy status was updated. Occupancy Changed Report for 12/29/06 Unit Description A0901 A1103 ALONG B0105 B0502 B0504 B1101 B1204 BCHBZ BLUEH C0606 C1204 CHATE CR301 D0304 DICE DOLPH E0304 E0501 E0604 F2602 F703W GV216 GV414 H1105 I0403 KW074 L0501 LIFE M0512 Change To Occupied Occupied Occupied Vacant Vacant Occupied Occupied Occupied Vacant Occupied Occupied Occupied Occupied Vacant Occupied Occupied Occupied Occupied Occupied Occupied Vacant Occupied Vacant Occupied Occupied Occupied Vacant Occupied Occupied Occupied Changed Thru Software Software Software Software Software Software Software Software Software Software Software Software Software Software Software Software Phone Software Software Software Software Software Software Software Software Software Software Software Software Software Change Date 12/29/2006 11:54:50 AM 12/29/2006 5:04:06 PM 12/29/2006 3:19:42 PM 12/29/2006 10:04:51 AM 12/29/2006 9:30:14 AM 12/29/2006 9:53:14 AM 12/29/2006 5:03:39 PM 12/29/2006 7:48:51 AM 12/29/2006 8:38:54 AM 12/29/2006 2:25:27 PM 12/29/2006 11:56:00 AM 12/29/2006 11:56:22 AM 12/29/2006 4:34:40 PM 12/29/2006 10:37:44 AM 12/29/2006 4:33:41 PM 12/29/2006 11:16:08 AM 12/29/2006 9:39:27 PM 12/29/2006 10:12:34 AM 12/29/2006 11:57:18 AM 12/29/2006 7:47:56 AM 12/29/2006 12:20:37 PM 12/29/2006 10:49:17 AM 12/29/2006 12:20:13 PM 12/29/2006 3:08:52 PM 12/29/2006 7:48:31 AM 12/29/2006 5:08:11 PM 12/29/2006 12:17:57 PM 12/29/2006 2:01:38 PM 12/29/2006 2:22:15 PM 12/29/2006 4:42:56 PM Parameters Select Occupancy Select Where Changed From Select Date 70 Reports – Occupancy History Report Occupancy History Report The Occupancy History Report provides a summary of all occupancy changes for a given date range. The changes are sorted in alphabetical order by unit. Occupancy History for 12/01/06 thru 12/29/06 Unit Description Change To Changed Thru Change Date Occupied Vacant Occupied Software Software Software 12/27/2006 5:30:32 PM 12/8/2006 11:41:33 AM 12/3/2006 12:57:32 PM Occupied Software 12/28/2006 8:22:03 AM Occupied Software 12/28/2006 3:35:56 PM Occupied Software 12/26/2006 2:45:46 PM Occupied Software 12/26/2006 2:48:39 PM Occupied Software 12/17/2006 7:53:02 AM Occupied Software 12/26/2006 2:49:11 PM A0103 A0104 A0106 A0201 A0204 A0205 A0206 Parameters Select Occupancy Select Where Changed From Select Date Range 71 Reports – Work Order Report Work Order Report The Work Order Report details the amount of time spent at a unit doing any work orders logged into HMS. Work Order Report for 12/01/2006 thru 12/29/2006 Work Order Employee Unit Start Date EndDate Status 002 MTH07 12/20/2006 1:01:29 PM 12/20/2006 1:01:29 PM 4- Complete 013 KHC14 12/23/2006 8:59:07 AM 12/23/2006 8:59:07 AM 4- Complete 013 DIX03 12/15/2006 2:01:52 PM 12/15/2006 2:01:52 PM 4- Complete 017 QLN23 025 YEL26 12/23/2006 10:31:51 AM 12/23/2006 10:31:51 AM 4- Complete 029 PVCH4 12/19/2006 1:16:51 PM 4- Complete 111 RCC12 12/28/2006 12:36:17 PM 12/28/2006 12:36:17 PM 4- Complete 111 LRK11 12/6/2006 2:59:36 PM 12/6/2006 3:10:25 PM 4- Complete 210 PVCK6 12/23/2006 9:36:42 AM 12/23/2006 9:36:42 AM 4- Complete 211 WHI20 12/28/2006 3:34:14 PM 2321 PNB04 12/4/2006 9:29:47 AM Amount 1- Waiting 12/19/2006 1:16:51 PM 2- In Process 12/4/2006 9:29:47 AM 4- Complete Parameters Date Range Appear on separate pages Include Waiting Work Orders 72 Reports – Schedule Report Schedule Report The Schedule Report provides details on tasks scheduled in the future along with any Unit Notes for the assigned units. Parameters Date Range Include Anticipated Amount Select Employee(s) 73 Reports – Average Calculation Report Average Calculation Report The Average Calculation Report is a statistical analysis of the HMS data, shown as an average in dollars per hour. Parameters Unit vs. Employee Appear on Separate Pages Display Start & End Date Include Zero Amounts Include Zero Times Date Range Select Task(s) Select Unit(s) Select Employee(s) 74