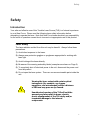
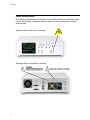
1
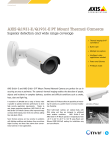
User’s Guide
Model TLB-6600
Swept-Wavelength Tunable Laser
Use of controls or adjustments or performance of procedures other
than those specified herein may result in hazardous radiation
exposure.
Copyright 2005 New Focus, Inc. All rights reserved. New Focus and all other New
Focus product names are trademarks or registered trademarks in the U.S.A. or other
countries. All other trademarks mentioned herein are the property of their respective
companies. Products described in this catalog may be covered by one or more patents
in the U.S.A. and in other countries. Information in this catalog is subject to change
without notice.
Revision 1.1
Contents
Contents
Contents ........................................................................................................................................ i
Safety.............................................................................................................................................1
Introduction .............................................................................................................................1
Laser Safety..........................................................................................................................1
Label Identification ...............................................................................................................2
Warning Labels .....................................................................................................................3
Environmental Concerns .....................................................................................................3
Laser Safety..........................................................................................................................4
Getting Started............................................................................................................................5
Introduction .............................................................................................................................5
Unpacking................................................................................................................................5
Initial Inspection....................................................................................................................5
Contents.................................................................................................................................5
Familiarizing Yourself with the System ...........................................................................6
Front Panel............................................................................................................................6
Rear Panel.............................................................................................................................8
Setting Up the Laser ............................................................................................................9
Connecting Fiber to the Laser ........................................................................................9
Turning the Power On .....................................................................................................9
Turning the Power Off ...................................................................................................10
General Operation....................................................................................................................11
Overview.................................................................................................................................11
What’s Inside .........................................................................................................................11
Logging Into the System ....................................................................................................11
Local Control and Remote Control .................................................................................12
Entering Data and Navigating Locally.............................................................................12
Overview of the Operating Screen ..................................................................................13
Numeric Entry Dialog Screen ...........................................................................................14
Main Menu...........................................................................................................................15
Alternate Displays ..........................................................................................................16
Output Control.................................................................................................................18
Files and Settings ...........................................................................................................20
Source Drive .................................................................................................................20
Copy Files .....................................................................................................................21
Delete Files...................................................................................................................21
i
Contents
Activity Log ...................................................................................................................21
Global Settings ...............................................................................................................22
Display Settings ...........................................................................................................23
Set Time/Date ..............................................................................................................24
Upgrade Firmware.......................................................................................................24
Configure Interfaces ....................................................................................................25
View Firmware Versions .............................................................................................25
Calibrate Touch Pad ...................................................................................................25
Touchpad Enabled/Disabled......................................................................................25
Reboot Instrument.......................................................................................................26
Integrated Options ...................................................................................................................27
6-State Polarization Controller (TLB-6600-PC).................................................................27
Wavelength Reference Option (TLB-6600-WR) and Precision Wavelength Reference
Option (TLB-6600-PWR) .......................................................................................................27
Variable Optical Attenuator Option (TLB-6600-VOA).......................................................29
Remote Operations from a PC..............................................................................................30
SCPI-Like Commands ...........................................................................................................30
Command Responses ...........................................................................................................30
IEEE 488.2 Common Commands .......................................................................................36
List of Commands ..................................................................................................................38
Support .......................................................................................................................................40
Index ............................................................................................................................................41
ii
Safety
Safety
Introduction
Your safe and effective use of this Tunable Laser Source (TLS) is of utmost importance
to us at New Focus. Please read the following laser safety information before
attempting to operate the laser. Note that New Focus bears absolutely no responsibility
for the result of operation caused due to incorrect or inappropriate use of this product.
Laser Safety
The laser radiation emitted from this unit may be harmful. Always follow these
precautions:
1) Avoid direct exposure to the beam.
2) Always wear protective goggles or eyeglasses appropriate for working with
laser light.
3) Avoid looking at the beam directly.
4) Be aware of the warning and safety labels (examples are shown on Page 2).
5) To completely shut off electrical power to the unit, disconnect the power cord
from the product.
6) Do not open the laser system. There are no user-serviceable parts inside the
unit.
Viewing the laser output with certain optical
instruments (for example, eye loupes,
magnifiers, and microscopes) within a distance
of 100 mm may pose an eye hazard.
Unauthorized opening of the TLS will void the
warranty and may result in burns, electric
shock, misalignment of the TLS cavity and/or
irreparable damage to the internal
components.
1
Safety
Label Identification
The following figures show the location of the warning label and certification label
used in this product. Please be aware of them and use caution when working
with the laser.
Aperture label on the front of the laser:
Warning labels on the back of the laser:
2
Safety
Warning Labels
Warning labels are applied to the TLS in locations where specific dangers exist.
Pay careful attention to these labels during handling. Do not remove or tear these
labels. If you have any questions regarding warning labels, please contact us.
Symbols in this manual, on or inside the unit mean:
Laser Hazard
Electrical Hazard
Caution! Hazard
(Refer to accompanying
documentation for more information.)
Environmental Concerns
To maximize the long-term performance and overall testing accuracy of this
instrument, the following environmental safeguards should be considered.
1) Avoid dust and direct sunlight. The optical performance of the unit may be
compromised by long-term exposure to direct sunlight and dust.
2) Avoid excess vibration that might compromise the mechanical integrity of the
unit.
3) Avoid exposing the unit to situations or environments that may result in
contact with corrosive gasses.
4) Do not block fan vents. If unit is racked, make sure it has proper ventilation.
5) The recommended operating temperature is 10-35º C.
6) Allow 30 minutes for full specs for warm-up if instrument is maintained at
room temperature. If unit has been exposed to storage temperature
extremes, allow for an additional hour for each 10º C.
3
Safety
7) Keep original packing material for transport or shipment. If original packing is
not available, call New Focus to have a factory-approved shipping case
delivered to you.
8) It is recommended that the optical connectors be cleaned before every
connection. If optical performance is degraded, it may be improved by
properly cleaning the optical connectors. Periodic inspection of the fiber for
scratching or pits is important for the integrity of the measurements.
Laser Safety
Laser radiation emitted from the TLS or other laser source may be harmful.
Always follow these precautions:
1) Avoid direct exposure to the beam.
2) Always wear protective goggles or eyeglasses appropriate for working with
laser light.
3) Avoid looking at the beam directly.
4) Be aware of the warning and safety labels.
5) To completely shut off electrical power to the unit, disconnect the power cord
from the product.
6) Do not open the laser system. There are no user-serviceable parts inside the
unit.
Unauthorized opening of the TLS will void the
warranty and may result in burns, electric
shock, misalignment of the TLS cavity and/or
irreparable damage to the internal
components.
Contact the CDRH (Center for Devices and Radiological Health) at
http://www.fda.gov/cdrh/ for information on laser types and classifications and the
precautions necessary. OSHA (Occupational Safety & Health Administration)
may also be contacted for more information at http://www.osha.gov/.
4
Getting Started
Getting Started
Introduction
This section outlines the basic steps needed to start using your New Focus TLB-6600
Tunable Laser Source. For more detailed information on how to operate the instrument,
refer to the “General Operation” chapter beginning on Page 11.
Unpacking
Initial Inspection
While unpacking the unit, carefully inspect all shipping materials and
instrumentation for signs of damage. If the TLS appears to have been damaged
during shipping, immediately contact the shipping company to obtain their
insurance and compensation protocols. After a compensatory agreement has
been reached with the shipper, call New Focus in order to obtain the required
RMA number and return shipping address. Retain all packing materials until an
initial equipment test is performed. If there are any problems with setup, the
packing materials will be required to return the unit.
It is recommended the original shipping materials be stored in the event that the
unit needs to be moved or sent back to New Focus for repair or upgrade. If the
unit seems to be malfunctioning for reasons unrelated to shipment, please
contact New Focus at 1 (866) 683-6287 (in the United States) or at +1 408 919
1500. If you have any questions or concerns, please do not hesitate to contact
us.
Contents
Please verify that you received the following components in your shipment. The
exact model and accessory information can be found on your shipping receipt.
1) TLB-6600 Tunable Source
2) AC Power Cord
3) Operations Manual
5
Getting Started
Familiarizing Yourself with the System
Front Panel
The TLB-6600 Tunable Laser Source has two control options: local and remote.
In local mode, the touch-screen and buttons / knob located in the front panel of
the laser provides control of the laser system. In remote mode, you control the
laser over a computer interface (IEEE-488, or Ethernet). When communicating
with the instrument over the remote interface the front panel is updated to
indicate these changes. This communication does not lock out the front panel
interface. For information on using computer control, see the “Remote
Operations from a PC” chapter beginning on Page 27.
Overviews are provided below. For detailed information, refer to the “General
Operation” chapter beginning on Page 11.
Rotary
Knob2
Enter 3
Set
Power 4
Sweep
Setup6
Set ?5
Coherence
Control7
Left and Right
Arrows1
Print/
Save 8
USB Flash
Drive9
Laser
Output10
Initialize
System
Power
On/Off18
Menu16
Touch
Screen17
Sweep
Start/Stop14
Alt.
Views15
dBm/mW11
F1
12
Output Enable
(Laser Power)13
1) Left and Right Arrows: Change the selected digit in the numeric entry
dialog.
2) Selection Knob: Use this knob on the front screen to navigate through
inputs on the screen and to change values in the numeric entry dialog.
3) Enter: Select an option or accept a value.
4) Set Power: Change the current output power value.
5) Set ?: Change to fixed wavelength mode and set the current wavelength.
6
Getting Started
6) Sweep Setup: Change the options for the current sweep settings.
7) Coherence Control: Not applicable to this model.
8) Print/Save: Takes a screen shot of the current display.
9) USB Flash Drive
10) Laser Output: Connector for FC/APC-connectorized fiber. The polarization
is aligned parallel to the key on the FC connector.
11) dBm/mW: Change the output power unit.
12) F1: Not applicable to this model.
13) Output Enable (Laser Power): Turn the laser on and off.
14) Sweep Start/Stop
15) Alt. Views: Not applicable to this model.
16) Menu: Opens the Main Menu.
17) Touch Screen: Use this touch screen to control the laser using an iconbased menu interface.
18) Front Panel Button to Initialize System Power On/Off: Controls AC power
to entire laser system, including the temperature-control circuit. Power is not
supplied to the laser diode until the OUTPUT ENABLE button is activated.
Note
Make sure the laser output is blocked or attached to an optical fiber
and the fiber is connected to an appropriate receptacle on the other
end.
7
Getting Started
Rear Panel
Trigger Out 2
Trigger
Input 13
Master Power
On/Off5
Laser
Modulation
Input 6
GPIB1
Trigger
Input 24
GPIB7
Dual USB
Connector 8
Local
Area
Network 9
AC Power
Input 10
Laser Remote
Safety
Interlock 11
1) GPIB: Used for controlling an external laser or polarization controller.
2) BNC, Trigger Out Connection: TTL compatible; TRIG OUT goes high at the
start of the sweep and goes low at the end of the sweep.
3) Trigger Input 1: Not applicable to this model.
4) Trigger Input 2: Not applicable to this model.
5) Master On/Off Switch: Turns on and off main power to the TLS TLB-6600.
During normal operation the switch is set to the ON position and the front
panel ON/OFF switch is used to turn the instrument on and off. Only turn off
the rear panel master power switch when servicing the instrument.
6) Laser Modulation Input: Not applicable to this model.
7) GPIB: Used to interface to external GPIB enabled computer.
8) Dual USB Connection: For use with an external mouse, keyboard, printer or
mass storage device.
9) Ethernet Connection
10) AC Power Input: 90-265 VAC, 47-63Hz.
11) Laser Remote Safety Interlock: BNC connector. For use with external
safety systems. The laser will not operate if the Interlock circuit is open.
8
Getting Started
Setting Up the Laser
The laser is designed to operate in environments from 15-35º C. It is intended
for indoor use only. If the laser has been in storage at temperatures outside the
range of 15-35º C, allow the laser system at least 4 hours to equalize. Note: Do
not store the laser outside the range of -20 to 70º C.
Connecting Fiber to the Laser
Use only FC/APC-connectorized fiber with the TLB-6600 Tunable Laser
Source. This laser operates with polarization-maintaining (PM) fiber. The
polarization is aligned parallel to the key on the FC connector. The laser
output comes to the front panel through a fiber with an optical isolator of
30 dB, preventing optical feedback into the laser cavity.
Turning the Power On
The TLB-6600 Tunable Laser Source can operate at 100-120V (±10%) Ac
@ 50/60 (±10%) Hz or 200-240v (±10%) AC @ 50/60 (±10%) AC @ 50/60
(±10%) Hz, Pollution degree 2, Installation Category II. The input AC
voltage is selected automatically by the universal AC power module.
1)
Make sure the laser aperture is blocked or attached to an optical fiber
that is connected to an appropriate receptacle. Only use fiber with
FC/APC connectors.
Laser radiation emitted from this unit may be
harmful. Avoid direct exposure to the beam.
2)
Turn on the power by connecting the power cord to the laser power
module and plugging it into a wall outlet.
3)
Initialize the system by pushing the front panel power on/off button.
The system ID will appear on the screen during initialization. For
optimal performance, wait at least 60 minutes after turning on the front
panel power on/off button to initialize system to allow the system to
warm up.
9
Getting Started
Note
It is recommended that you leave the system power on and
turn the laser diode power off when you are not using the
laser.
Once you turn on the power and the system initializes (about 60 seconds),
you can operate the system remotely.
Turning the Power Off
Before turning the system off, you should first turn off power to the laser
diode. See Pages 13-14 for more information about turning off power to
the laser using the touch screen. See the “Remote Operations from a PC”
chapter beginning on page 27 for more information about turning off power
to the laser using the remote computer commands.
10
General Operation
General Operation
Overview
The TLB-6600 Tunable Laser Source is a swept-wavelength tunable laser system. The
laser operates in two modes: Sweep Mode and Fixed Wavelength Mode. Use it in
Fixed Wavelength Mode to operate it at a set wavelength. In Sweep Mode, it is capable
of fast and extremely linear scans between the start and stop wavelengths that you
specify. The system can be operated manually, using the front touch-screen icons, or
remotely using one of the computer interfaces (see the “Remote Operations from a PC”
chapter beginning on Page 27).
What’s Inside
The TLB-6600 Tunable Laser Source is an external-cavity diode laser (ECDL) based on
the Littman/Metcalf design. The laser is designed to provide very accurate and linear
wavelength scans.
The syste m also provides high resolution when stepping between wavelengths. An
ultra-low-noise current source controls the laser’s output power. A temperature-control
circuit actively stabilizes the laser-cavity temperature for optimal performance.
Logging Into the System
When you first power on the laser and the system initializes the warm-up screen
appears with a progress bar, indicating that the system is warming up.
Once the system has warmed up (approximately 60 seconds), the Operating Screen
appears.
11
General Operation
Figure 1: The Operating Screen
Local Control and Remote Control
You are able to control the TLB-6600 Tunable Laser Source either locally or remotely.
Controlling the laser remotely by GPIB or Ethernet interface does not disable the front
panel touch-screen controls.
Entering Data and Navigating Locally
There are four methods for entering data and navigating locally:
1) Touch-screen
2) Selection knob
3) External keyboard
4) External mouse
These methods are described in the following sections. Throughout this chapter,
any steps calling for data entry or navigation can be performed using any one or
any combination of these methods. You are encouraged to try various methods
to determine which will work best and feel most comfortable to you.
12
General Operation
Overview of the Operating Screen
The Operating Screen appears after booting and includes some convenient
shortcuts. In-depth options are available through the Main Menu (see Page 15
for details).
1
1
1
1
2
3
1
1
4
5
h
1
6
7
h
Figure 2: Overview of the Operating Screen
1
1) Minimum and Maximum Supported Wavelengths of the TLS: These are
set at the factory and are not changeable.
2) Start Wavelength (in Continuous Sweep Mode): Change the start
wavelength by touching the number on the screen to open the start
wavelength Numeric Entry Dialog screen (see Page 14 for more information
on the Numeric Entry Dialog Box).
3) Stop Wavelength (in Continuous Sweep Mode): Change the stop
wavelength by touching the number on the screen to open the stop
wavelength Numeric Entry Dialog screen (see Page 14 for more information
on the Numeric Entry Dialog screen).
4) Current Wavelength: Touch the number on the screen to open the fixed
wavelength Numeric Entry Dialog screen (see Page 14 for more information
on the Numeric Entry Dialog screen). Once the desired value has been input,
touch okay on the screen (or press the enter key) to accept the value.
13
General Operation
Accepting the value will cause the instrument’s sweep mode to change to
fixed wavelength.
5) Output Power: Touch the output power number on the screen to open the
output power Numeric Entry Dialog screen (see Page 14 for more information
on the Numeric Entry Dialog screen). Output power supports two unit types:
dBm and milliwatts (mW). To toggle between dBm and mW, press the
dBm/mW key on the front panel (while at the Operating Screen).
6) Sweep Mode: Touch the screen to toggle between the two supported
modes: continuous sweep and fixed wavelength (see Page 16 for more
information on continuous sweep and fixed wavelength modes).
7) Laser Starburst: Touch the laser starburst to turn the laser off and on.
When the starburst is solid, the laser is on.
Numeric Entry Dialog Screen
The Numeric Entry Dialog screen is used for changing numeric values (see
Figure 3). The current value for the specific function is displayed when the dialog
box opens. To change the value which is highlighted in the blue box, use the
selection knob to scroll the value up or down. To move the blue selection box to
a different digit either touch the desired digit or use the left-right arrow keys under
the selection knob. The minimum and maximum supported values for the current
option are displayed in the bottom left of the dialog box. When you have the
value you want, press OK on the touch-screen or press the ENTER key on the
front panel. To abort the operation, touch CANCEL on the screen or press the
MENU key on the front panel.
Figure 3: Numeric Entry Dialog Screen
14
General Operation
Main Menu
Press the MENU key on the front panel and the Main Menu is displayed (see
Figure 4). Toggle the MENU key to alternate between the Main Menu and the
Operating Screen (see Figure 1). This section will outline and explain the
features and functions available under the Main Menu.
Note
The buttons which are “grayed” out indicate that the feature is not
available on this instrument model.
Figure 4: Main Menu
15
General Operation
Alternate Displays
From the Main Menu, touch the ALTERNATE DISPLAYS softkey to bring up
the Alternate Display Setup Menu (see Figure 5).
Figure 5: Alternate Display Setup Menu
Touch the SETUP DISPLAY softkey to open the Tunable Laser Source
Configuration menu (Figure 6). Here you can change sweep mode,
wavelength, sweep rate, number of sweeps, output power, enable
modulation and specify modulation source.
16
General Operation
Figure 6: Alternate Display Setup Menu
17
General Operation
Output Control
From the Main Menu, touch the OUTPUT CONTROL softkey to bring up the
Output Control Menu (Figure 7). (The buttons which are grayed out
indicate that feature is not available.)
Figure 7: Output Control Menu
18
General Operation
Turn the
Open the Tunable
Not
laser on and
Laser Source
applicable
off
Configuration
to this
Menu
model.
(see Figure 6)
Figure 8: Output Control Menu Softkey Functions
19
General Operation
Files and Settings
From the Main Menu, touch the FILES AND SETTINGS softkey to bring up the
Manage Files & Settings Menu (Figure 9). If the softkey is grayed out, the
feature is not available. A pen drive must be inserted in the USB Flash
port to enable the SOURCE DRIVE and the COPY FILES soft keys.
Figure 9: Manage Files & Settings Menu
Source Drive
Touch the SOURCE DRIVE softkey to alternate between HARD DISK and USB F LASH. If
the USB Flash port is empty, the HARD DISK will become the default option.
20
General Operation
Copy Files
COPY FILES is available only when the USB Flash port is occupied. Use it to bring up a
list of available files which may be copied onto the pen drive. Touch the filename once
to select and a second time to copy.
Delete Files
Press the DELETE FILES softkey to bring up a list of files. Touch the filename once to
select and a second time to delete.
Activity Log
Press the ACTIVITY LOG softkey to bring up the Activity Log Options Menu (Figure 10).
The functions and features available under this menu would be accessed only under the
guidance of qualified New Focus personnel.
21
General Operation
Figure 10: Activity Log Options Menu
Global Settings
From the Main Menu, touch the GLOBAL SETTINGS softkey to bring up
GLOBAL SETTINGS – PAGE 1 (Figure 10): DISPLAY SETTINGS, SET
TIME/D ATE, UPGRADE FIRMWARE, and CONFIGURE INTERFACES . Details
follow in the next several pages.
Figure 11: Global Settings -- Page 1
22
General Operation
Touch the MORE GLOBAL SETTINGS softkey to bring up Global Settings –
Page 2 (Figure 12): VIEW FIRMWARE VERSIONS , C ALIBRATE TOUCHPAD,
ENABLE/D ISABLE TOUCHPAD and REBOOT INSTRUMENT. Details follow in the
next several pages.
Figure 12: Global Settings -- Page 2
Display Settings
Options displayed on Page 1 of the Display Settings (Figure 13) allow you to changed
the fixed wavelength, change wa velength precision (number of digits), change graph
gridlines and turn the display status on and off.
Figure 13: Display Settings -- Screen 1
23
General Operation
Options displayed on Page 2 of the Display Settings (Figure 14) allow you to turn the
notifier beeper, the error status icons and the link status icons on and off.
Figure 14: Display Settings -- Screen 2
Set Time/Date
Set the time, date, time format or date format.
Upgrade Firmware
Allows you to perform a firmware upgrade using the World Wide Web, a USB firmware
upgrade, or revert to a previous firmware version. This function must only be accessed
under the guidance of qualified New Focus personnel.
24
General Operation
Configure Interfaces
Displays settings and allows you to configure communications interfaces, including IP
discovery, Ethernet (TCP/IP) terminator, GPIB address, GPIB terminator, GPIB EOI,
and SCPI commands.
View Firmware Versions
Displays current firmware information.
Calibrate Touch Pad
Touch the red “X’s” to calibrate/customize the touch pad.
Touchpad Enabled/Disabled
Once the touchpad is disabled, no touchscreen input will be recognized. Follow
these steps if the touchpad has been disabled and you wish to enable it: 1) Press the
MENU button on the front panel until the Main Menu is displayed ; 2) Use the arrow
buttons or the rotary knob to highlight the GLOBAL SETTINGS option and press the ENTER
key; 3) Use the arrow buttons or the rotary knob to highlight the MORE GLOBAL SETTIGS
option and press the ENTER key; 4) Use the arrow buttons or the rotary knob to highlight
the TOUCHPAD ENABLED /DISABLED option and press ENTER. The touchpad is now
enabled.
25
General Operation
Reboot Instrument
A confirmation screen will appear before rebooting.
26
Integrated Options
Integrated Options
This section describes the operation of integrated options that may or may not have
been purchased with your TLB-6600 laser system. Please note that the TLB-6600 laser
system may be upgraded at the factory to install these options.
6-State Polarization Controller (TLB-6600-PC)
The TLB-6600-PC polarization controller option provides 6 orthogonal states of
polarized light output.
The polarization controller functions may be accessed from the alternate display menu
button on the front panel. If the unit is configured with this option, the alternate display
button will cycle through all of the allowed displays, one of which is the polarization
control page. This page allows the polarization controller to be adjusted to any 1 of the
6 polarization states by simply pressing the appropriate state button.
The SCPI commands for remote operation of the polarization controller option are as
follows:
:CONFig:PSC:STATe?
This query returns the current state of the Polarization Controller.
:CONFig:PSC:STATe?<1-6>
Changes the state of the polarization controller to 1 of the 6 available states.
Wavelength Reference Option (TLB-6600-WR) and
Precision Wavelength Reference Option (TLB-6600-PWR)
The Wavelength Reference Option may be used to correct wavelength inaccuracies in
the Tunable Laser Source (TLS). It can only be used in continuous sweep mode, and
will not work at fixed wavelengths. The wavelength reference card is calibrated across
the entire sweep band of the laser.
The Wavelength Reference Option TLB-6600-WR and Precision Wavelength Reference
Option TLB-6600-PWR operate with the following limits:
27
Integrated Options
Stop – Start >= 2.000 nm
Sweep Speed >= 10nm/sec and =200nm/sec
Max Wavelength trigger permissible error < 200pm
The wavelength reference may be enabled or disabled from the front panel by pressing
the menu button and then accessing the special measurements page and toggling the
? ?measurement & correction soft key either on or off.
The SCPI commands for remote operation of the Wavelength Reference Option and
Precision Wavelength Reference Option are as follows:
:SYSTem:WReference:CONFig?
Queries whether a Wavelength Reference Module is installed.
:SYSTem:WReference:CONFig <Enable|Disable>
Enables/disables use of a Wavelength Reference channel.
:FETCh
Retrieves the data set in Comma Seperated Value (CSV) formate and will return
a file in the form:
1,1510.125,125.43
2,1510.152,127.34
3,1510.174,123.78
.
.
.
where the first number is the reading number, the second number is the
corrected wavelength and the third number is the wavelength error in picometers.
The default wavelength measurement increment is 25pm. To calculate the
measurement time increment, divide the wavelength measurement increment by
the sweep speed then round down to the nearest 10ms. For best results use a
wavelength range/resolution and a sweep speed that are increments of each
other. For instance, to sweep at 100nm/sec using the default wavelength
measurement increment of 25pm, a measurement will occur every 250ms for a
total of 4000 reading during the sweep.
28
Integrated Options
:CONFig:SWEEp:CONTinuous <chanlist> <start> <stop> <rate> <spacing>
<usetrig|immediate> <maxaverage | <num average>> [<filespec>]
To change the measurement resolution, adjust the spacing value in this
command.
:CONFig:SWEEp:CONTinuous?
To view the current sweep configuration, use this command.
Variable Optical Attenuator Option (TLB-6600-VOA)
The variable optical attenuator (VOA) option enables the reduction of output power from
the TLS while maintaining superior noise performance of the TLS, by allowing the TLS
to operate at its optimum current level. Without this option, the laser current is adjusted
to vary the output power of the laser. With this option, a variable optical attenuator is
used to adjust the power. There are two distinct advantages to this method of power
adjustment. First is keeps the maximum signal to noise configuration for the laser, and
second it allows for more dynamic range than direct current adjustment.
If this option is installed it is continually used, and cannot be disabled. The only
indication is additional range in the output power of the laser.
29
Remote Operations from a PC
Remote Operations from a PC
SCPI-Like Commands
SCPI-like commands are used to control the TLS remotely via the Ethernet or GPIB
connections. All commands are in human readable ASCII format and return a human
readable ASCII formatted response, although some measurement data may be in
binary format. Commands are terminated by a user specified termination sequence
(carriage return, line feed ) character(s) and executed one at a time.
Command Responses
All commands return a response. The end of all responses contains a two character
status string. Currently five status strings are defined and have the following meanings:
=>
The command completed successfully
?>
The command was not understood and not executed
!>
The command was understood but failed. Bad parameters could be the cause
~>
A possibly lengthy command (:meas?, :sweep:step? Or :sweep:continuous?) has
begun execution. NOTE: this response is NOT the end of the command, only an
acknowledge that the command was received and understood
<>
The command executed with performance less than specified due to a
configuration conflict
30
Remote Operations from a PC
Device Specific Commands
:ABORt
Abort current sweep or measure operation
:COMMunications?
Get the name of the communication interface that received this
SCPI command.
:CONFig:COMMunications:ENET?
Return the unique 6 byte Ethernet MAC address and the current
IP address in dot notation. Example
:Config:Communications:ENET 00:20:0C:10:79:54 192.168.1.10
:CONFig:COMMunications:GPIB
Set GPIB port parameters
<addrs>
Address
<CR | CRLF | LF | NONE>
message terminator
<EOI>
Enable EOI at end of message
:CONFig:COMMunications:GPIB?
Get GPIB port parameters
:CONFig:COMMunications:LOG
Turn communications logging to the EVENTLOG.CSV file on or
off.
<OFF | ON>
:CONFig:COMMunications:LOG?
Get the communications log setting
:CONFig:COMMunications:TCP
Set Ethernet/TCP port parameters
<IP_addrs | DHCP | BOOTP>
IP_addrs is a standard dot notation address eg. 190.0.33.44
DHCP - Dynamic Host Config Protocol
BOOTP – Bootstrap Protocol
<CR | CRLF | LF | NONE>
message terminator
:CONFig:COMMunications:TCP?
Return Ethernet/TCP port parameters
:CONFig:SWEEp:CONTinuous
(SCPIComm)
<ChanList>
List of channels included in the continuous sweep
<StartWavelen>
Sweep starts at this wavelength
<StopWavelen>
Sweep stops at this wavelength
31
Remote Operations from a PC
<SweepSpeed>
Sweep rate in nMeters/second
<ReadingSpacing>
Reading spacing in nanometers
<USETrig | IMMEdiate>
Start sweep selection
<MAXAverage | <num_avg>
Number of samples to average per reading. MAXAverage means
to calculate numAvg.
numAvg = (SweepTime / SampleTime) / ((StopWavelen StartWavelen) / ReadingSpacing)
[<filespec>]
If file name exists, save data to specified file instead of sending it
out the scpi port. The default extension is either .csv or .bds
depending on the current :config:data:format.
:CONFig:SWEEp:CONTinuous?
Gets the current Sweep Continuous settings
:CONFig:SWEEp:COUNt
Get the number of sweeps to run using :init
<num_sweeps>
0 – continuous sweeps
May enter 0 to 10,000
:CONFig:SWEEp:COUNt?
Get the number of sweeps to run under :init
:CONFig:SWEEp:MODE
Set the Sweep Mode
Some SCPI commands require the sweep mode to be set. The
following commands do NOT set the Sweep Mode, but only
configure specific sweep mode parameters.
:config:sweep:cont ...
:config:sweep:step...
:config:measure ...
<CONTinuous | STEP | TIME>
Step is not supported in the Model TLB-6600
:CONFig:SWEEp:MODE?
Get the current Sweep Mode
:CONFig:SWEEp:RATE
Set the continuous sweep, sweep rate
<sweep_rate>
nm/s
:CONFig:SWEEp:RATE?
Get the sweep reading spacing
This is from the current sweep mode
:CONFig:SWEEp:STARt
Set the start wavelength in the current sweep mode. This
command may only be used in step or continuous sweep modes.
<start_wavelength>
32
Remote Operations from a PC
:CONFig:SWEEp:STARt?
Get the start wavelength in the current sweep mode
:CONFig:SWEEp:STOP
Set the stop wavelength in the current sweep mode. This
command may only be used in step or continuous sweep modes.
<stop_wavelength>
:CONFig:SWEEp:STOP?
Get the stop wavelength in the current sweep mode
:CONFig:SWEEp:TRIGger
Set the trigger mode for continuous or time mode sweeps.
< USETrig | IMMEdiate >
:CONFig:SWEEp:TRIGger?
Get the trigger mode for continuous or time mode sweeps
(Not recommended for users to call this command)
:CONFig:TLS
Set fixed properties of the active TLS
<MinWavelen>
Min Wavelength TLS is capable of generating. Used to error
check TLS sweep limits
<MaxWavelen>
Max Wavelength TLS is capable of generating. Used to error
check TLS sweep limits
<STARt | IN1| NONE>
Trigger In specs (Connects an internal digital input to theTLS
digital output)
STARt – Use the STARt input.
IN1 – Use the IN1 input.
NONE - TLS has no trigger output.
<RISIng | FALLing>
Trigger In Edge specs
RISING - Rising edge occurs when TLS is stable at new
wavelength.
FALLING - Falling edge occurs when TLS is stable at new
wavelength.
<TlsTrigOutTimeToAction>
Not used
<TRIG@Start | NOTRig@Start>
Specifies if TLS generates 1 trigger
<MEAScomp | OUT1| OUT2 | NONE>
Trigger Out specs (Connects an internal digital output to the
instrument output)
MEAScomp – Use the MEAScomp output.
OUT1 – Use the OUT1 output.
OUT2 – Use the OUT2 output.
NONE - TLS has no trigger input.
<RISIng | FALLing>
Trigger Out Edge specs
RISING - Rising edge occurs when sweep completed
FALLING - Falling edge occurs when sweep completed
st
33
Remote Operations from a PC
<TlsTrigInTimeToAction>
Not used
<LINFreq | LINWavlen>
Always LINWavelen
:CONFig:TLS?
Gets properties of TLS
:CONFig:TLS:ACTIve
Set the Active TLS. This applies to all subsequent :config:tls...
commands. Note, the active tls may be modified by
measurement operations or other operations by the instrument
so always set the active tls prior to using :config:tls commands.
< TLSA | TLSB | TLSC >
:CONFig:TLS:ACTIve?
Query which TLS is active.
:CONFig:TLS:CONTrol
Set the Automatic TLS Control Settings.
< NONE | NEWFocus | INTErnal >
Specify the type of TLS.
[< GPIB Address >]
Specify the GPIB Address of the TLS.
:CONFig:TLS:CONTrol?
Query which TLS Control settings.
:CONFig:TLS:OUTPut
Under automatic control, turn the TLS On or Off.
< OFF | ON >
:CONFig:TLS:OUTPut?
Query if the TLS is On or Off.
:CONFig:TLS:POWEr
Set the TLS power setting.
< power >
:CONFig:TLS:POWEr?
Query the TLS power setting.
:CONFig:TLS:RATE?
Query the TLS scan rates (in nm/s). This may return one of the
following formats:
100 - Single scan rate supported.
1-1000 - Scan rates between 1 nm and 1000 nm supported.
0.5,1,2,5,10 - List of scan rates supported.
:CONFig:TLS:UNITs
Set the TLS units.
34
Remote Operations from a PC
< dBm | mW >
:CONFig:TLS:UNITs?
Query the TLS units. Returns "dBm" or "mW".
:CONFig:TLS:WAVElen
Set the TLS output wavelength immediately (not as part of a
sweep or measurement). This command may not work during a
sweep or measurement if the TLS is busy.
<wavelength>
In units of nanometers.
:CONFig:TLS:WAVElen?
Get the current wavelength for the active TLS in units of
nanometers. This command may not work during a sweep or
measurement if the TLS is busy.
:DATE <mm/dd/yy>
Set instrument date
:DATE?
Get instrument date
:INITiate[:IMMEdiate]
Start one sweep using the current sweep configuration. Use
*opc? to poll for sweep status to tell when the sweep is done.
If repeat sweep mode is enabled, this command will start the
repeat sweeps.
:STATus?
Get the most recent status message and how many seconds ago
it occurred.
:SYSTem:MEMOry?
Display installed system memory in MB.
:TIME <hh:mm:ss>
Set system time
:TIME?
Get system time
35
Remote Operations from a PC
IEEE 488.2 Common Commands
*CLS
Clear event status register
*ESE
Writes <value> to the IEEE 488.2 Event Status Enable register
<value>
0 to 255
*ESE?
Returns the IEEE 488.2 Event Status Enable register contents
*ESR?
Returns the IEEE 488.2 Standard Event Status register contents
*GTL
Go to local. Enable local (not supported)
*IDN?
Get id information (model, revision, etc)
<ChanList | TRIGger | <Chassis #>|TLSA |
TLSB | TLSC>
Channel(s)/Trigger or chassis or tunable lasers
No parameter returns id of instrument.
*LLO
Local lock out (not supported)
*OPC
Sets the Operation Complete bit in the IEEE 488.2 Standard
Event Status register
*OPC?
Returns the Operation Complete bit from the IEEE 488.2
Standard Event Status register
*RCL
Recalls data from disk
<filespec | FACTory>
Only the filename need be specified in filespec.
Filename Extensions Supported:
.SST
System State File (default if extension not specified)
.SPC
*RST
36
SplitCal File
Reset the instrument
Remote Operations from a PC
<REBOot>
Option reboot
*SAV
Save data to disk
<filespec>
Only the filename need be specified in filespec. Filename
Extensions Supported:
.SST
System State File (default if extension not specified)
.SPC
SplitCal File
*SRE
Writes <value> to the IEEE 488.2 Standard Request Enable
register
<value>
0 to 255
*SRE?
Returns the IEEE 488.2 Standard Request Enable register
contents
*STB?
Read status register. See SCPI document for extended status.
*TST?
Perform a self test and return results (not supported)
37
Remote Operations from a PC
List of Commands
*cls
*ese <value>
*ese?
*esr?
*gtl
*idn? <chanlist|trigger|<chassis#>|tlsa|tlsb|tlsc>
*llo
*opc
*opc?
*rcl <filespec|factory>
*rst <reboot>
*sav <filespec>
*sre <value>
*sre?
*stb?
*tst?
:abort
:communications?
:config:communications:tcp <ip_addrs|dhcp|bootp> <cr|crlf|lf|none>
:config:communications:tcp?
:config:communications:enet?
:config:communications:gpib <addrs> <cr|crlf|lf|none> <eoi>
:config:communication:gpib?
:config:communication:log <off|on>
:config:communication:log?
:config:conflict? <continuous|step|measure>
:config:sweep:continuous <chanlist> <start> <stop> <rate> <spacing>
<usetrig|immediate> <maxaverage | <num average>> [<filespec>]
:config:sweep:continuous?
:config:sweep:count <num_sweeps>
:config:sweep:count?
:config:sweep:maxaverage < on | off >
:config:sweep:maxaverage?
:config:sweep:mode <continuous|step|time>
:config:sweep:mode?
:config:sweep:rate <sweep_rate>
:config:sweep:rate?
:config:sweep:start <start_wavele ngth>
:config:sweep:start?
:config:sweep:stop <stop_wavelength>
:config:sweep:stop?
:config:sweep:trigger < USETrig | IMMEdiate >
:config:sweep:trigger?
38
Remote Operations from a PC
:config:sweep:wavelen <wavelength>
:config:sweep:wavelen?
:config:tls <minwavelen> <maxwavele n> <start|in1|none> <rising|falling>
<tlstrigouttimetoaction> <trig@start|notrig@start> <meascomp|out1|out2|none>
<rising|falling> <tlstrigintimetoaction> <linfreq|linwavelen>
:config:tls?
:config:tls:active <tlsa | tlsb | tlsc>
:config:tls:active?
:config:tls:control <none | newfocus | internal> [<gpib address>]
:config:tls:control?
:config:tls:output <off | on>
:config:tls:output?
:config:tls:path <high | lows | bhr | blr>
:config:tls:path?
:config:tls:power <dbm>
:config:tls:power?
:config:tls:rate?
:config:tls:source <tlsin | auxa | auxb>
:config:tls:source?
:config:tls:units <dbm|mw>
:config:tls:units?
:config:tls:wavelen <wavelength>
:config:tls:wavelen?
:date <mm/dd/yy>
:date?
:initiate[:immediate]
:initiate:continuous <on|off>
:initiate:continuous?
:sweep:cont?
:system:display <on|off>
:system:display?
:system:memory?
:system:option:itls?
:system:option:itls <on|off> <password>
:time <hh:mm:ss>
:time?
39
Support
Support
For more information contact the Sales Department at New Focus by phone at 1 (866)
683-6287 (in the United States) or at +1 408 919 1500. Contact New Focus by email at
[email protected].
40
Index
Index
AC Power Input, 8
Activity Log, 21
Alt. Views, 7
Alternate Displays, 16
BNC, Trigger Out Connection, 8
Firmware versions, view, 23
fixed wavelength, 6, 13, 14
fixed wavelength, change, 23
Front Panel, 6
Front Panel Button to Initialize
System Power On/Off, 7
Calibrate Touchpad, 23
Coherence Control, 7
Configure Interfaces, 22, 25
Connecting Fiber to the Laser, 9
Copy Files, 21
Current Wavelength, 13
Global Settings, 22, 23
GPIB, 8
GPIB address, 25
GPIB EOI, 25
GPIB terminator, 25
graph gridlines, change, 23
date, 24
date format, 24
dBm/mW, 7, 14
Delete Files, 21
Display Settings, 22, 23, 24
display status, turn on and off,
23
Dual USB Connection, 8
IP discovery, 25
Enter, 6
Entering Data, 12
Environmental Concerns, 3
Ethernet (TCP/IP) terminator,
25
Ethernet Connection, 8
External keyboard, 12
External mouse, 12
F1, 7
Files and Settings, 20
firmware upgrade, USB, 24
firmware upgrade, World Wide
Web, 24
firmware version, revert to
previous version, 24
Laser Modulation Input, 8
Laser Output, 7
Laser Remote Safety Interlock,
8
Laser Safety, 1, 4
laser, turn on and off, 14
Left and Right Arrows, 6
Local Control, 12
Master On/Off Switch, 8
Maximum Wavelength, 13
Menu, 7, 13, 15, 16, 18, 20, 21,
22
Minimum Wavelength, 13
Operating Screen, 11, 13, 14, 15
Output Control, 18
Output Enable (Laser Power), 7
Output Power, 14
Print/Save, 7
Reboot, 23, 26
Remote Control, 12
SCPI, 25, 30, 31, 32, 37
Selection knob, 12
Selection Knob, 6
Set Power, 6
Set Time/Date, 24
Set ?, 6
Setting Up the Laser, 9
setup display softkey, 16
Source Drive, 20
Start Wavelength, 13
Stop Wavelength, 13
Sweep Mode, 14
Sweep Setup, 7
Sweep Start/Stop, 7
time, 24
time format, 24
Time/Date, Set, 22
touch pad, calibrate, 25
Touch Screen, 7
Touchpad, Enable/Disable, 23
touchpad, enabled/disabled, 25
Touch-screen, 12
Turning the Power Off, 10
Turning the Power On, 9
Unpacking, 5
Upgrade Firmware, 22, 24
USB Flash Drive, 7
View Firmware Versions, 25
warning label, 2
wavelength precision, change
number of digits, 23
Rear Panel, 8
41