1
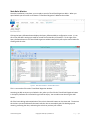
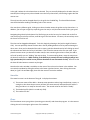
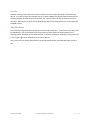
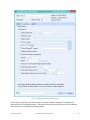
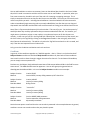
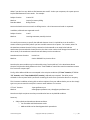
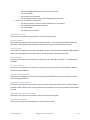
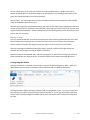
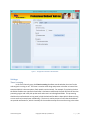
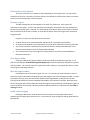
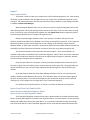
Timed Email Organizer User’s Manual Quick Start Guide .................................................................................................................................... 3 Welcome ................................................................................................................................................. 4 Main Rules Window ................................................................................................................................ 5 Status Bar ........................................................................................................................................ 6 Close ................................................................................................................................................... 6 Save As ................................................................................................................................................ 7 Add/Edit Rules ..................................................................................................................................... 7 Conditions ....................................................................................................................................... 9 Actions .......................................................................................................................................... 12 Delete Rules ...................................................................................................................................... 13 Save All Rules .................................................................................................................................... 13 Move Up/Move Down ....................................................................................................................... 13 Actions Tab ........................................................................................................................................... 14 Backup/Restore ................................................................................................................................. 14 Execute All Rules/Execute Selected Rules .......................................................................................... 15 Test Selected Rules ............................................................................................................................ 15 Execute Actions ............................................................................................................................. 16 Configuring the Add-in .......................................................................................................................... 16 Settings ............................................................................................................................................. 17 Timer is running ............................................................................................................................. 17 Check emails every N minutes ....................................................................................................... 18 Generate a report .......................................................................................................................... 18 Timed Email Organizer Copyright © 2015 Sperry Software Inc. P a g e |1 View Reports Folder ...................................................................................................................... 18 Show the engine window ............................................................................................................... 18 Enable verbose logging .................................................................................................................. 18 Import ............................................................................................................................................... 19 Import Outlook Rules ..................................................................................................................... 19 Import From Delete Stale Emails Add-In......................................................................................... 19 Import From Incoming Mail Organizer Add-In ................................................................................ 19 Import From Sent Items Organizer Add-In...................................................................................... 19 Logon ................................................................................................................................................ 20 Outlook profile .............................................................................................................................. 20 Exchange Mailbox Settings............................................................................................................. 20 Office 365 Mailbox Settings ........................................................................................................... 20 Troubleshooting .................................................................................................................................... 22 Timed Email Organizer Copyright © 2015 Sperry Software Inc. P a g e |2 Quick Start Guide To get started quickly, you’ll probably want to import your existing Outlook rules. To do this, go into Outlook and click on the Sperry Software icon (the red/blue one, not the “Timed Email Organizer” button). Then click on the Import tab, then click on “Import Outlook Rules”. Assuming that there is nothing currently wrong with your rules, a grid will popup that contains all your existing Outlook rules. You can select all of them with the Ctrl-A key, or highlight some of them by selecting with the left mouse button while holding down the Ctrl key. After you’ve made your selection, click on the “Import Rules” button. The add-in will optionally disable your Outlook rules at the same time it imports the rules into Timed Email Organizer rules. It only does this if you say so, but it’s recommended since you’ll otherwise end up with duplicate rules, which is a primary reason for getting duplicate emails. After the rules have been imported, you can close the Outlook rules window, and the Sperry Software Configuration Window. Now you can click on the Timed Email Organizer button to pull up the main grid and see your newly imported rules. Double clicking pulls up any rule for editing. Drag/drop the rules to change the order. Be sure to save the rules using the “Save All Rules” button (which only becomes enabled if you change something). That’s it! Keep in mind that now that the rules have been set up that the rules engine will continue to process the rules, even if you exit Outlook. However in order to do this, the computer must remain on and you must be logged in. Because the add-in will prevent the machine from going to sleep, be careful when closing the lid on laptops. Timed Email Organizer Copyright © 2015 Sperry Software Inc. P a g e |3 Welcome Thank you for choosing the Timed Email Organizer add-in, created by Sperry Software. This add-in eases the chore of staying organized by allowing you to create powerful, flexible rules that Outlook cannot provide (although it duplicates some of that functionality as well, to make it easy to reorder rules, or take them out of Outlook saving you space). It’s perfect for creating rules that move or delete emails based on the age of the email, which means you can: Create an archiving system – move emails out of the Inbox and into a separate folder (or even a separate PST file) after they are 6 months old or older Delete emails from Groupon, Facebook, Twitter and the like that lose value as they age. Who needs yesterday’s traffic reports? If you like to read emails on your phone you can set up a rule that will only move the email after the email has been read Raise the priority of an email if it has not been responded to within two hours One of the first things that should be done is to save a copy of your rules in the case of an error. Using the “Save As” allows you to see and read all the rules, but it cannot be used to restore your rules (other than manually typing them back in). Using the “Backup” button allows you to both see the rules (the rules are written to an XML file which is just a plain text file which can be edited in say, Notepad) and to be able to restore them (using the “Restore” button). To be safe, the add-in will automatically make a backup of your rules once a day, if you open the main window to view the rules. Timed Email Organizer Copyright © 2015 Sperry Software Inc. P a g e |4 Main Rules Window Once the installation is complete, you are ready to use the Timed Email Organizer add-in. When you open Outlook you will notice a new button “Timed Email Organizer” added to the toolbar. Figure 1 - Toolbar on Outlook 2013 Clicking the Sperry Software button displays the Sperry Software Add-ins configuration screen. It is on this screen that basic settings are made to control the functionality of the add-in. To the right of the Sperry Software button is the Timed Email Organizer toolbar button which pulls up the main window for working with the rules: Figure 2 - Main Rules Window - Outlook 2013 Version This is a screenshot of the main Timed Email Organizer window. Assuming you did not import your Outlook rules, when you first click the Timed Email Organizer button in the Sperry Software tab in Outlook the grid will be empty. You can add a new rule using the Add button. All of the basic editing and manipulation of the rules is done with buttons on the Home tab. The Actions tab is where you can find buttons that work with the rules to accomplish goals like backing up and restoring, executing the rules, and testing the rules that you have just created. Timed Email Organizer Copyright © 2015 Sperry Software Inc. P a g e |5 In the grid is where the rules themselves are located. They are normally displayed in the order they are executed, but clicking on any column header sorts the list by that column, and clicking it again does the reverse sort. The only item that can be changed directly in the grid is the Enabled flag. The Save All Rules button must be clicked after enabling or disabling rules in this manner. Like most Sperry Software grids, clicking on a column header causes the grid to sort by that column. In addition, you can type a single key to quickly go to the row (or rule) that starts with the key you typed. Navigating the grid with the keyboard: Ctrl-End brings you to the last row, Ctrl-Home back to the first row, Home to go to the first column, and End to go to the last column. Of course, the arrow keys move the cursor from cell to cell. The rules can be dragged and dropped. To do this, begin by selecting a rule (with a single left mouse click). You can optionally choose to select other rows by holding down the Ctrl key while selecting the other rows. Once you’ve selected all the rules to move, grab the selected rows by left clicking on one of the selected rows while the Ctrl key is held down. Then move the mouse to the row you need. If you place the mouse cursor just above the header row (the one containing the column names) the add-in will scroll up while you are “holding” the rows to drop. To cause scrolling down, move the mouse into the bottom scrollbar area. While scrolling, if the Shift key is pressed, the rows scrolling by will go into high speed mode (this is useful in case you have hundreds or even thousands of rules). Be sure to click the Save All Rules button to commit any changes. Note that the entire window is resizable, so that more of the rules can be shown in the window. You can resize the window by sliding the mouse to the lower right hand corner, then clicking the mouse down (to “grab” the window edge), then slide the mouse to resize the window. Status Bar The status bar area is at the bottom of the grid. It displays three items: 1) The current status of the add-in. Because some operations take a long time (backup, restore, or saving the rules when there are many of them) this status area will indicate what the add-in is doing and when it is ready for the next action. The normal value for this field is “Ready”. 2) The Outlook profile (which is a read only field). 3) The number of rules. Close The Close button saves your grid size (assuming you resized it) and closes the program. It is the same as clicking the red X in the upper right corner of the window. Timed Email Organizer Copyright © 2015 Sperry Software Inc. P a g e |6 Save As The Save As button saves your rules to a file in either plain text, comma delimited or Microsoft Excel format. It is useful to save your Outlook rules in a human readable format to be able to examine them carefully to figure out how you want to architect your rules in order to be able to work at maximum efficiency. Once the file has been saved, depending on which format was selected, it can be opened in Notepad or Excel. Add/Edit Rules The Timed Email Organizer add-in allows you to create and/or edit rules. To add a new rule, simply click the Add button. You will be asked if the rule you want to create applies to incoming emails or to outgoing emails. Although you are presented with a choice of incoming or outgoing, clicking on the red X in the upper right of the window acts like a Cancel button. In any case, once you answer that question you will be presented with a window that looks similar to this: Timed Email Organizer Copyright © 2015 Sperry Software Inc. P a g e |7 Figure 3 - Add/Edit Rule Window on Outlook 2013 The rule name is the next rule in the execution order (but should be changed to something more meaningful) and it is enabled by default. The date the rule was created, the last time it was modified and the last time it was actually used are all shown. Timed Email Organizer Copyright © 2015 Sperry Software Inc. P a g e |8 You can add conditions or actions as necessary (more on that below) but the add-in also has a Folders tab, which is used in connection with the rule to monitor one or more folders. In particular, when you first create a new rule, the add-in asks you if the rule is for incoming or outgoing messages. This is simply a convenience function so that you don’t have to set the folder. That said, you can have the rule monitor any folder you wish – including shared mailboxes. Note that Outlook has to be restarted in order to immediately begin executing rules on a newly added folder, but after that you can drag and drop emails into that folder and the add-in will see those emails as having just arrived and act on them. Note: There is Tag area at the bottom of the rules window. This area is for you. You can keep track of and333 jot down any ancillary information that you want associated with the rule. For instance, you might want to jot down a project or case number, or maybe even have a set of rules that are run monthly…in that case you can fill in the Tag field with “Monthly Run” and at the turn of the month, sort the list of rules by the Tag field (by clicking on the Tag column header in the main grid), select them, then Execute the selected rules. The add-in only writes the Tag field once when the rule is created, and only if the rule was imported from an Outlook rule. Let’s go over the Conditions and Actions each rule can have: Conditions In general, all the conditions together are “AND”ed together – that is, if there is a rule that has the If Subject Contains condition set and the If Body Contains condition set, then both of these conditions must match in order to have the engine trigger the actions for that rule. To simulate an OR condition, you can simply create a separate rule. Furthermore, the Subject, Body and Attachment Name fields accept ANDs and ORs in the field for more exact control. The ANDs and ORs must be uppercase. You can also group using parenthesis to disambiguate the ANDs and ORs. Let’s use the Subject Contains condition as an example: Subject Contains Matches Invoice OR Bill Invoice 28763, January billing statement, Bill’s Used Cars Subject Contains Matches Does Not Match Invoice AND Bill Invoice for January billing Billing Invoice Subject Contains Matches Does Not Match “Invoice for” Invoice for January billing invoice for January billing Subject Contains Matches Does Not Match (Invoice OR Bill) AND statement invoice statement, billing statement My monthly statement Notice that we quotes as well and that the case sensitivity mattered in that example because in general, conditions are not case sensitive unless they are placed in quotes. Timed Email Organizer Copyright © 2015 Sperry Software Inc. P a g e |9 What if you don’t use any ANDs or ORs between two words? Unless you use quotes, the system puts an implied AND between the two words. For example: Subject Contains Matches Does Not Match Invoice bill Invoice for January billing Billing Invoice Notice also how there was no match on Billing Invoice – this is because word order is respected. In addition, wildcards are supported as well: Subject Contains Matches Invoic* invoicing statement, monthly invoices It’s usually not necessary to specify the wildcard character since it’s implied but it can be useful in certain scenarios, particularly where you have variable names with no spaces. For instance, what if in the Attachment Name Contains field you wanted a rule that would act on emails that had text attachments that started with the word invoice, but the invoice number itself changed each month? In other words, if the attachment name format was always Invoice-number.txt: Attachment Name Contains Matches Invoice*.txt invoice-20194455.txt, Invoice-43.txt Note that the same condition can be achieved by using “Invoice AND txt” in the Attachment Name Contains field, but the subtle difference is that “Invoice AND txt” would also match an attachment name like “Invoice for txt parts.pdf”. Finally, while ANDs and ORs are not accepted in the recipient conditions (If “From” Contains, If “To” Or “CC” Contains, and If “Sent On Behalf Of” contains), wildcards are accepted. The ability to use wildcards in the recipient fields is perfect for matching all emails from a particular domain or company. This is because in addition to being able to select recipients from your address books you can also simply type in any text to match the recipient’s name or email address. For instance: If “From” Contains Matches *sperrysoftware.com [email protected], [email protected] Note that multiple recipients are always considered to have an implied OR condition. Summary: Subject, Body and Attachment Name conditions o Can use ANDs and ORs between words o ANDs and ORs can be disambiguated with parenthesis Timed Email Organizer Copyright © 2015 Sperry Software Inc. P a g e | 10 o Has implied ANDs between words so word order matters o Can use wildcards o Are normally case insensitive o Can use quotes to match exact phrases including case sensitivity From, To or CC, and Sent On Behalf Of o Can be a recipient or a name or an email address or a part thereof o Has implied ORs between each recipient o Can use wildcards o Are always case insensitive If Email Is Older Than The rule will only operate on the email if it is of a certain age or older. If Subject Contains The rule will only operate on the email if the subject matches. This field accepts wildcards, ANDs and ORs, which can be grouped with parenthesis and is not case sensitive unless quotes are used. If Body Contains The rule will only operate on the email if the body matches. This field accepts wildcards, ANDs and ORs, which can be grouped with parenthesis and is not case sensitive unless quotes are used. If From Contains The rule will only operate on the email if the From name or email address matches. This field accepts wildcards. If To Or CC Contains The rule will only operate on the email if the email is To (or CC’ed to) name or email address matches. This field accepts wildcards. If Sent On Behalf Of Contains The rule will only operate on the email if the email Sent On Behalf Of name or email address matches. This field accepts wildcards. If Attachment Name Contains The rule will only operate on the email if any of the email attachment names match. This field accepts wildcards, ANDs and ORs, which can be grouped with parenthesis and is not case sensitive unless quotes are used. If Email Has At Least One Attachment The rule will only operate on the email if there is at least one attachment. If Email Is Read/Unread The rule will only operate on the email if it is either read or unread. Timed Email Organizer Copyright © 2015 Sperry Software Inc. P a g e | 11 If Email Has/Has Not Been replied To The rule will only operate on the email if it has or has not been replied to. If Any Item In The Monitored Folders Has Been Modified The rule will only operate on the email if it is has been received or modified in any way since the last time the engine checked. This condition is useful for Exchange public folders or shared mailboxes, if you need to know that something has changed. If Email Flag Status Is Marked The rule will only operate on the email if the flag is set to the particular status (Complete, Clear, or Marked). If Email Flag Due Date Is Over The rule will only operate on the email if the Due Date has gone by. If Email Flag Due Date Is Going To Occur Within The rule will only operate on the email if the Due Date reminder alarm is about to go off. Actions There are several actions to choose from, and they are executed in the order shown in the window, from top to bottom: Change The Category To The rule will change the category to the given one. Clear All Categories The rule will erase any existing categories. Mark Email As Read/Unread The rule will mark the email as read or unread. Note that the add-in’s implementation of marking an email as read will not send back read receipts (unlike Outlook rules, which do send back read receipts). Set Importance To High/Normal/Low The rule will raise or lower the priority of the email. Set Flag Status To Complete/Clear/Marked The rule will set the flag to the indicated status. Set Reminder Date To The rule will set the alarm reminder date to a future date. Copy The Email To The rule will copy the email to whichever folders are selected. Timed Email Organizer Copyright © 2015 Sperry Software Inc. P a g e | 12 Move The Email To The rule will move the email to whichever folder is selected. Delete The Email The rule will delete the email. Note that this is a “soft” delete, and that the email is basically moved to the Deleted Items folder. Permanently Delete The Email The rule will permanently delete the email. This is a “hard” delete, and that the email is not moved to the Deleted Items folder, but rather completely eradicated. Note that it doesn’t make sense to have a rule that Moves the email to a folder AND Deletes the email (or Permanently deletes the email) – you can only either move it or delete it and this is enforced when you save the rule. Delete Rules There are actually two ways to delete rules. One method of deleting rules is to simply select the rule, then click the delete key on the keyboard. A confirmation window will appear, then depending on your answer the rule will be deleted and the server will be updated. A second method involves using the Delete Rules button. You first select one rule (or more rules by holding down the Ctrl key while you click on the rules you no longer want). Then you click the Delete Rules button. A confirmation window will appear (you did make backups, right?) and once confirmed the rules will be deleted. This method has the advantage that you are only asked to confirm once for a number of rules, and the rules are saved just one time; this can be quicker than individually deleting rules. Before making changes to rules, it is advisable to make backups using the Backup button (see below). Save All Rules When editing multiple rules from within the Timed Email Organizer, you can use the Save All Rules button to save all of your changes at once. The button is disabled by default, but will become active when you have made at least one change. If you try to close the Timed Email Organizer window without having saved your changes, you will receive a warning asking if you would like to save before closing. Move Up/Move Down Changing the order of rules processing is simple with these two buttons. Simply select a row, and then click on the button to move it up or down in the execution order. Moving a rule up in the execution order makes the rule run before any of the rules that appear below it. Once the rule order is set, the Save All Rules button needs to be clicked in order to update the grid with the new rule order. Note that it is much simpler to drag and drop the rules from one location to another. To do this, select one or more rows, then while holding down the left mouse button move the cursor to the desired row. Timed Email Organizer Copyright © 2015 Sperry Software Inc. P a g e | 13 Actions Tab Figure 4 - Actions Tab on Outlook 2013 Backup/Restore Making a backup is quick and simple. Click the button and the add-in asks you where to save your rules. The rules are saved in standard XML format meaning they are readable by both humans and computers. This can be convenient so that after you save the file you can edit the rules, make changes then perform a Restore operation with the updated changes. Note that by default, XML files display in a (read only) browser but to edit one, you must right click and select “Edit” from Windows Explorer where it will be brought up in Notepad, so that you can make changes as necessary. To use the Restore button, you must have created at least one backup at some point in the past. By default, one backup copy of your rules is created for you each day you view the rules. The automatic backup is held in your Documents\Sperry Software folder, and has a naming convention of “Rules Backup – {Outlook profile name} – YYYY-MM-DD”, where YYYY is the four digit year, MM is the two digit month, and DD is the two digit day of the month. This automatic backup is only performed once per day so that if the add-in detects that it has already written the file that day, then another is not created until the next day. To be clear, you can always create a backup at any time. Once you click the Restore button, the add-in asks you where the XML file is located. Navigate to it and the add-in will then ask you an important question: Do you want to append or replace your existing rules. If you replace your existing rules, then all your rules will first be deleted then the add-in will Timed Email Organizer Copyright © 2015 Sperry Software Inc. P a g e | 14 restore the rules. Otherwise, the add-in will simply append the newly imported rules to your existing rules. Note that if you aren’t careful, that this may result in some duplicates being created. Execute All Rules/Execute Selected Rules Clicking this button will bring up a new window: Figure 5 - Execute Rules Window on Outlook 2013 The first option is whether to operate only on emails in a certain date range. This can be useful if you are performing archiving operations. The default is off, meaning that all emails in the given folder will be analyzed by the rules engine. Note that the “Run” button must actually be clicked in order to run the rules. The Cancel button will be highlighted once the processing starts to allow you to cancel the operation, however there is no Undo ability so be sure to use the Test Selected Rules (see below) if you’re not sure. At the bottom of the window is the number of rules that have been selected to run. Note that the only difference between Execute Selected Rules and Execute All Rules is that all the rules are selected on your behalf when using the Execute All Rules button. Test Selected Rules One of the most powerful features of the add-in is the ability to execute “What If” scenarios. Using this facility allows you to see which emails will be affected by the various rules that were previously selected. Timed Email Organizer Copyright © 2015 Sperry Software Inc. P a g e | 15 To start, select one or more rules then click the Test Selected Rules button. Decide if you want to operate on emails within a certain date range or not (the default is off, meaning that all emails in the given rules monitored folders list will be considered). Next click Run. The rules engine kicks into gear and finds all of the emails that pertain to the selected rule(s) and tabulates them into the grid. After the rules engine has completed processing, the Status (in the upper right) is updated and the total number of emails found is updated (in the lower left). At this point you can see the emails that the rules engine would have acted upon. Double clicking on any of the resulting emails pulls that email up so that you can see it in its entirety. Execute Actions Let’s say you decide that the list of emails that have been returned looks good and that the rule is well formed. Rather than waiting for the next timer interval to occur, you can simply click the Execute Actions button to have the rules engine process the Actions for that rule on the list of emails. After the rules engine completes executing the actions, the grid is refreshed (by again having the selected rules run) to make sure that all emails are handled. Note that all emails are executed upon, and that selecting one or more before clicking on the Execute Actions button does not affect anything. All emails will have the rule actions executed upon them. Configuring the Add-in Once the installation is complete, you are ready to use the Timed Email Organizer add-in. When you open Outlook you will notice a new button “Sperry Software Add-ins” added to the toolbar. Figure 6 - Toolbar on Outlook 2013 Clicking this button displays the Sperry Software Add-ins configuration screen. It is on this screen that basic settings are made to control the functionality of the add-in. To the right of the Sperry Software button is the Timed Email Organizer toolbar button which pulls up the main window for working with the rules. Timed Email Organizer Copyright © 2015 Sperry Software Inc. P a g e | 16 Figure 7 - Configuration Window on Outlook 2013 Settings Timer is running In the Timer Control group, the Timer is running checkbox controls whether the timer for the rules engine is running or not. This timer is used to come along and process rules after an interval has transpired (which is the next option, Check emails ever N minutes). For example, if you had a rule that the add-in should move a particular email after it has been marked read, the timer will kick off the rules processing engine and it will pick up that email and move it to its designated folder. This processing should not be confused with arriving email, which Outlook notifies add-ins about (which allows arriving or sent emails to be acted upon immediately). The timer is used to process all rules that Outlook does not provide notification for, which is basically all the conditions except for an email arriving in the Inbox. Timed Email Organizer Copyright © 2015 Sperry Software Inc. P a g e | 17 Check emails every N minutes The timer can be set to run slower or faster depending on how important it is to you to have responsive of the rules. Normally, 15 minutes (which is the default) is sufficient but if there is a need to run the rules more frequently it can be lowered. Generate a report The add-in keeps tabs on what happens to an email if it processes it, and it stores this information into a report. If you’re not interested in knowing this information, then the checkbox can be cleared, saving disk space. However, it’s always handy to be able to reference the report to find out how a particular email arrived in a folder, or to be able to find out if the rules engine even acted upon any given email. In general, an entry into the report occurs whenever: An email arrives in any monitored folder and that email is acted upon by the add-in An Import of the Outlook rules (see below) or any of the other Import functions are performed Any time any emails are acted upon by the Execute All Rules, Execute Selected Rules or the Execute Actions button of the Test Selected Rules window Any time the timer of the rules engine fires and an email in any of the monitored folders is found and acted upon View Reports Folder Clicking this button will open an explorer view to the folder that holds the report file. It is in plain text format (called Timed Email Organizer Report.txt) and can be opened by Notepad or any other plain text editor. You can then search for a particular email’s subject, or just peruse the report to make sure things are operating smoothly. Show the engine window Checking this box will show the engine as it runs. It’s necessary to restart Outlook in order to restart the engine and show the window but once that happens, you’ll see the engine window. It can be left up while running, and it will occasionally update as the engine wakes up and process the rules. Clicking the OK button will cause the window to be hidden, until Outlook is restarted. Note that using the X in the upper right of the window will cause the engine to stop processing rules altogether (again at least until Outlook is restarted), and that the Pause and Resume buttons are equivalent to the Timer is running checkbox. Enable verbose logging Clicking this button will cause the add-in to write much more information about what’s happening as the engine processes the rules. It is normally off since the log files that get generated can grow quickly. Timed Email Organizer Copyright © 2015 Sperry Software Inc. P a g e | 18 Import Import Outlook Rules This button is used to import your Outlook rules into Timed Email Organizer rules. After clicking this button, a grid of Outlook rules will appear that is very similar to the Timed Email Organizer’s main rules grid. The code to display the rules has been taken from Sperry Software’s other leading rules addin called the Power Rules Manager. While viewing the Outlook rules, you can select one rule (or many by holding down the Ctrl key while selecting other rules by left clicking with the mouse on each row) or you can select them all using Ctrl-A. Once one or more rules have been selected, click the Import Rules button to begin the process of converting the Outlook rules to Timed Email Organizer rules. Before the process begins however, there is one question: The add-in will want to know whether you want the Outlook rules disabled or not if they are successfully converted. This is important because most times you do not want both sets of rules running, as this would be a major cause of duplicate emails, or other inbox corruption. Note that the add-in will only disable Outlook rules that are successfully converted, and leave the Outlook rule alone if there are any problems along the way. The conversion process is picky about the rules that it imports – since not all Outlook rule conditions and actions are handled by the Timed Email Organizer, a built in filter restricts the conversion to only create Timed Email Organizer rules that can be supported by the engine. In particular, Outlook rules that contain exceptions are not supported. Once the import process is complete, a summary window is displayed and a chance to look at the report is given (since the import process writes a summary to the report file). The grid window can now be closed and you can view your newly imported Timed Email Organizer rules in the main grid window. One handy feature about this Power Rules Manager window is that you can come back and enable or disable multiple Outlook rules at once. Since the add-in does not currently support going in the other direction (that is, from Timed email Organizer rules to Outlook rules) this can be useful for “backing out” of any changes you no longer want in the Timed Email Organizer. FYI: Outlook rules run before add-ins, so if there is a conflict the Outlook rule will go first. Import From Delete Stale Emails Add-In Import From Incoming Mail Organizer Add-In Import From Sent Items Organizer Add-In The Timed Email Organizer is aware of other Sperry Software add-ins including the Delete Stale Emails, Incoming Mail Organizer, and Sent Items Organizer add-ins. Since this add-in is a more powerful, flexible and capable than some of our other add-ins, it is convenient to be able to import the settings from these other add-ins to the Timed Email Organizer format. Note that the Import Rules button will Timed Email Organizer Copyright © 2015 Sperry Software Inc. P a g e | 19 only be enable if the Delete Stale Emails, Incoming Mail Organizer, or Sent Items Organizer add-ins are detected and installed. Logon Outlook profile The Timed Email Organizer must know which mailbox it is going to operate on. This is accomplished using Outlook profiles. You can choose the Outlook profile here, but note that with this version, there is only one set of rules that can be run. Exchange Mailbox Settings If you are in a corporate settings, the User Name and Server Name are used to identify your mailbox. These settings are used with Exchange Server 2010 (and earlier) in an on premise Exchange setting. Office 365 Mailbox Settings Starting with Exchange Server 2013 a different underlying technology can be used to access a mailbox, called hosted Exchange. This includes Office 365. If you would like to use the Timed Email Organizer to access and run rules on your Office365 mailbox, this is where you specify those settings. Timed Email Organizer Copyright © 2015 Sperry Software Inc. P a g e | 20 Timed Email Organizer Copyright © 2015 Sperry Software Inc. P a g e | 21 Troubleshooting Q. I’m having trouble, and need to start over with installing. What can I do? A. Follow these instructions: http://www.sperrysoftware.com/kb/questions/98/I%27m+having+problems%2C+and+I+need+ to+reinstall+my+add-ins+from+a+clean+start.+How+do+I+do+this%3F+ Q. The “Sperry Software Add-ins” button is not visible. A. Run the add-in Reset tool. The add-in reset tool (among others) can be downloaded from http://www.sperrysoftware.com/outlook/tools.asp Q. How can we contact you for more help? A. For help on more in-depth issues, check out our Knowledge Base. Timed Email Organizer Copyright © 2015 Sperry Software Inc. P a g e | 22